1
ADR Series Data Recorders
Configuring a Modem for an ADR
This Tech Note explains how to configure a third-party modem to work with one of Peek’s ADR data recorder
units. These instructions are compatible with the following ADR units:
•
•
•
•
•
•
ADR-1000
ADR-1000 Plus
ADR-2000
ADR-2000 Plus
ADR-3000
ADR-3000 Plus
These instructions do not apply to the ADR-6000 units.
Note Whichever of the ADR units is being used, it should be updated to the newest
version of the ADR firmware. This means version 4.6 for the basic ADR-1000,
2000, and 3000 units, and version 6.12 for the Plus versions.
The TOPS software package includes instructions on how to configure the computer's modem for
communications with an ADR unit, but it does not provide any details on configuring the modem attached to the
ADR unit itself. Customers have a couple of options for these connections: they can either purchase the Peek
Traffic modem specifically designed and hardened for use with an ADR unit out in the elements, or they can
connect the unit via some other kind of modem. Both Peek and non-Peek modems must be configured using a
utility program called the ADR Modem Configurer, which is included on the TOPS Installation CD.
However, if a particular type of modem is not supported within Peek’s ADR Modem Configurer Program, a
new modem configuration file has to be created for proper configuration of the modem. This can be done by
Peek Traffic for a nominal fee, or a user may decide to create the modem file themselves. This document
explains the generic configuration settings for a modem that will enable it to communicate with a Peek ADR.
The configuration process has four steps:
1. The creation of a modem setup file on a PC, using the ADR Modem Configurer utility
2. The temporary connection of the ADR's modem to the PC using a serial cable
3. The configuration of the modem using the utility and a modem settings file
4. The attachment of the newly configured modem to the field ADR unit
Information furnished by Peek Traffic is believed to be accurate and reliable, however Peek
does not warranty the accuracy, completeness, or fitness for use of any of the information
furnished. No license is granted by implication or otherwise under any intellectual property.
Peek Traffic reserves the right to alter any of the Company's products or published technical
data relating thereto at any time without notice.
Copyright © 2012 Peek Traffic Corporation. All rights reserved.
p/n 99-363
Rev 3
Page 1 of 11
1/3/2012
Selecting Modems to Use With TOPS and Your ADRs
For long term reliability, be sure to use environmentally rugged modems in the field (such as Peek’s LPM modem.) A
single configuration may not work for all types of modems. With this in mind, it is recommended that you use the same
modems in the central office (for TOPS) and attached to the ADRs in the field. This should result in the highest
percentage of connection rates over time.
Note If a V.90 (56K) modem is used with the central software and a non-V.90 modem
is used in the field, the V.90 feature may have to be disabled in the central
software modem. This is most often accomplished through an S register in the
modem. If this is done, the central software modem will not be able to connect
to any other field modem using V.90.
It is recommended to configure the ADR's “MODEM INITIALIZATION” setting to “HAYES AT” and the
“INITIALIZE MODEM” setting to “BOOT + DAILY”.
Understanding the TOPS-ADR Connection Process
The following steps describe how the connection process between a central-office software package (such as TOPS or
TDP) and an ADR is supposed to work:
1.
The central-office software commands its attached modem to dial the phone number for the remote ADR.
2.
The remote modem detects the ring and sends the text “RING” to the ADR on the RS232 port. The ADR's modem
cannot answer the call at this point, since the DTR line hasn't been asserted yet.
Note Some modems that go into shutdown do not see the incoming ring unless the
DTR line has been asserted. This results in a Catch-22 situation, as the ADR will
not assert the DTR line until it sees some activity on the RS232 line. The only
way to get around this is to change the “COMMS OPERATION” setting on the
ADR to “ALWAYS ON”. This keeps the ADR com port ON at all times (with
DTR asserted,) but has the side effect of higher power consumption on the ADR.
3.
The ADR is woken up by the activity on the RS232 line (“RING”). It then asserts the DTR line.
4.
The ADR's modem detects the next ring and can now answer the incoming call.
5.
The two modems negotiate and establish a connection.
6.
Communications can then take place between the central software application and the ADR through the modem
connection.
7.
When communications are completed, the central software sends a command to the ADR to hang up.
8.
The ADR de-asserts the DTR line.
9.
The ADR modem loses the DTR line and hangs up.
10. The Carrier Detect signal is dropped between the two modems. The modem connection is now terminated.
Tech Note: Configuring a Modem for an ADR
Copyright © 2012 Peek Traffic Corporation. All rights reserved.
Page 2 of 11
99-363, 3
Installing the Modem Configurer
Before configuring the modem, the ADR Modem Configurer utility will have to be installed. It comes with the TOPS
installation CD, but is not installed as part of TOPS. It includes both the utility itself and a set of preconfigured modem
files, which can be used directly or copied as the source for your own modem file. To install the configurator, follow
these steps:
1.
On a Windows computer, insert the TOPS CD into the CD-ROM drive.
2.
If the autorun feature is active on this PC, the TOPS installation will start on its own. From the main TOPS menu
choose the command to E x p l o r e t h e C D . (If the installation does not start automatically, you can just explore
the CD by opening W i n d o w s E x p l o r e r and browsing to the C D d r i v e .)
3.
Open the A D R M o d e m C o n f i g folder and double-click on the M o d e m C o n f i g . E X E file. This will launch
the Configurer installer.
4.
Follow the steps to install the utility to the default location on your computer. By default, it saves the file to
C:\Program Files\Peek\ADR Modem Config Tool\. It also creates a shortcut to the utility in your Windows Start
menu.
5.
Exit from the TOPS installation screen, if it was started.
6.
If you don't already have a copy of Windows Explorer open, open one. Browse to:
C:\Program Files\Peek\ADR Modem Config Tool\.
In this folder, you will see the utility itself (adr modem configurer.exe), an uninstaller for the utility
(UNWISE.EXE), and a whole passel of modem setup files (*.mdm).
This folder is where you will need to be to perform the remainder of the configuration. You will run the ADR Modem
Configurer from this folder, and this is also where you will select and/or edit a modem file to use with your modem.
Tech Note: Configuring a Modem for an ADR
Copyright © 2012 Peek Traffic Corporation. All rights reserved.
Page 3 of 11
99-363, 3
Choosing/Editing a Modem File
To configure a modem, we'll use the ADR Modem Configurer utility, as installed in the previous section. Many types of
modems are already provided with a modem configuration file. However, if the modem to be configured is not one of
the supported modems, a new modem configuration file will have to be created by editing one of the existing files.
To select a modem configuration file:
1.
Look at the list of modem configuration files that are installed with the utility, as listed on page 9 of this Tech Note.
If you are installing one of those modems, you can simply choose that file in the ADR Modem Configurer Program
and skip the rest of these steps.
2.
If none of the preconfigured files are appropriate for your modem, you'll need to create your own file. First, make a
copy of an existing modem file (e.g. genfld.mdm) and rename it.
Note If a DOS-style filename is used (i.e. it uses the 8.3 name format,) the same
modem file can also be used to configure the modem for use with Peek’s old
TDP software package. TOPS can handle full length filenames, as long as they
end with .mdm.
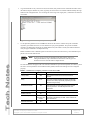
3.
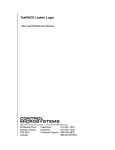
The modem file is an ASCII text file and can be edited in any ASCII text editor. In Windows Explorer, right-click
on the file and choose O p e n W i t h . . .
Figure 1 – Open the selected modem setup file with Notepad
4.
From the list of applications, scroll down and choose N o t e p a d . Unless you have another application on your
computer that also uses the .mdm file extension, you probably should go ahead and select the A l w a y s u s e t h i s
p r o g r a m t o o p e n t h e s e f i l e s checkbox. (That way, the next time you double-click on any .mdm file, it will
automatically open in Notepad.)
Tech Note: Configuring a Modem for an ADR
Copyright © 2012 Peek Traffic Corporation. All rights reserved.
Page 4 of 11
99-363, 3
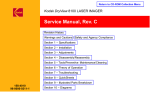
5.
A typical modem file is only a few lines of text (shown below) that provides the text commands that will be sent to
the modem (using the standard 'AT' prefix). Typically, the first two lines are comment fields that identify the target
modem for this configuration file. You can change this text as long as the single quote (') remains the first character
on each line.
Figure 2 – A typical modem setup file open in Notepad
6.
Use the parameter guidelines shown in Table 1 to edit the text file so that it contains the specific commands
required by your modem. However, be aware that these are just general guidelines. The specific commands
required to accomplish each setting may be slightly different for your modem. Consult your modem's manual to
verify the proper command to accomplish each step.
Modem commands can be combined together on the same line, but for the sake of clarity, each command may be
placed on its own line within the file.
Note If you are going to be using the modem with the TDP software, and you are
editing the modem file, keep in mind that the TDP software will only process a
maximum of 10 lines from the modem configuration file.
The order listed here is the proper order. The order that commands are processed is important. (For instance, you do
not want to write the parameters to the modem's memory (&W0) until all of the settings have been configured
properly.)
Table 1 – Guidelines for configuring a modem to work with an ADR
Purpose of the Command
Typical command
Factory Reset
&F0
Notes
This should be issued as the first command to the
modem.
Delay
DLY2
The reset should be followed with a delay of about two
seconds. This delay is specifically required by the ADR
Modem Configurer utility.
Enable Result Codes
Q0
Tells the modem to send textual responses to queries
over the phone line. The ADR expects these code
responses.
Verbose result codes
V1
Disable local echo
E0
Connect at any baud rate
Turn on the verbose version of the result codes.
refer to the
Configure the modem to answer at whatever phone line
manual for the
modem
baud rate is requested by the ADR. Some modems use
the command ‘F0’.
Minimum result codes
X0
Tech Note: Configuring a Modem for an ADR
Copyright © 2012 Peek Traffic Corporation. All rights reserved.
Page 5 of 11
99-363, 3
Purpose of the Command
Typical command
Hang-up on loss of DTR
&D2
Notes
This also has the affect of not allowing the modem to
answer a call unless the DTR line has been asserted by
the ADR. See the Application Note below describing the
process in which a modem connection is established
with the ADR.
Program flow control
refer to the
manual for the
modem
You need to make sure that these flow control settings
are configured:
• disable software flow control
• disable hardware flow control
• and disable modem to modem flow control
(Flow control is not necessary with the ADR, since its
protocol (ACK-NAK) addresses this function.)
Auto-reliable mode
refer to the
connection but will then fall back to a normal connection.
refer to the
The modem’s serial port baud rate remains fixed, it does
Fixed serial port baud
rate
The modem attempts to establish an error-correcting
manual for the
modem
manual for the
modem
Enable data
refer to the
compression
manual for the
modem
Enable auto-retrain
refer to the
not get altered based on the modem connection speed
on the phone line.
If it's available. This is not available on all modems.
If it's available. This is not available on all modems.
manual for the
modem
Auto answer on first ring
S0=1
The modem should attempt to establish a connection as
soon as a RING is detected.
Time to answer
S7=90
Configure the modem to attempt to answer for 90
seconds after the RING is detected.
Save the configuration
&W0
Save the above configuration settings to the modem's
memory. This ensures that the next time the modem is
shut off and turned back on, it will return to the proper
parameters.
7.
Once you have configured the modem setup file to your liking, select F i l e > S a v e to save the changes.
Now that you have a properly configured modem file, continue on to the next section to load the file's configuration into
your modem.
Tech Note: Configuring a Modem for an ADR
Copyright © 2012 Peek Traffic Corporation. All rights reserved.
Page 6 of 11
99-363, 3
Configuring the Modem
To configure the modem , you'll first need to plug the modem into the PC with a serial cable and use the ADR Modem
Configurer utility to select the proper .mdm file. Follow these steps:
1.
Using a serial cable, connect the modem to the PC where the properly configured modem file (.mdm) is stored.
Make sure the modem has power.
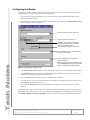
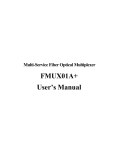
2.
Go to S t a r t menu and open the P r o g r a m s list. Open the P e e k group and launch the A D R M o d e m C o n f i g
T o o l . The utility's window will appear.
select the modem setup file (.mdm) here
enter the serial port used by the PC
Important: This must be set to the same
baud rate that will be used by the ADR to
communicate with the modem
use this button to trigger the configuration
this box displays the text commands that are
being sent to the modem
this box displays the responses that the
modem sends back
Note: To store a log of these messages, make
sure the Debug File On check box is checked
before you press the Reset Modem button.
Figure 3 – ADR Modem Configurer utility
3.
In the M o d e m F i l e S e l e c t i o n field, select the required .mdm file that you selected or edited in the last section.
4.
In the B a u d R a t e field, set the baud rate to the same baud rate the ADR will use to communicate to its modem.
(19200 is the recommended baud rate for most ADR units.)
5.
Select the C o m m P o r t that this PC will use to communicate with the modem.
6.
If you want to store a record of the communications that occur during the configuration (always a good idea), make
sure the D e b u g F i l e O n box is checked.
7.
Press the R e s e t M o d e m button to start the configuration of the modem. It should only take a few seconds to
complete.
The ADR Modem Configurer Program will give an indication of whether the modem was properly configured or not. If
the Debug File option was selected, you can view the details of the configuration by opening the log file. This text file is
named A D R M O D E M C O N F I G U R E R . D B G , and is stored in the same folder as the ADR Modem Configurer.
Tech Note: Configuring a Modem for an ADR
Copyright © 2012 Peek Traffic Corporation. All rights reserved.
Page 7 of 11
99-363, 3
Troubleshooting the Modem Setup
After you've installed the modem on the ADR, you should test the connection between your central software and the
ADR. If you continue to have a problem, you may need to try a different configuration for your modem. Try editing the
modem file and configuring the modem again, and then retest. Once you find a successful set of modem parameters for a
particular brand and model of modem, it should work repeatedly. Once again, this is the best reason to standardize on a
single type of modem for your ADRs.
Some of the following issues may also affect the consistency of your connections:
•
•
•
•
•
•
•
Bad or noisy phone lines
Bad or intermittent lightning protection on the phone line
Dirty contacts on the phone line connections
Non-environmentally rugged modems used in the field
Improper power to the modem
Modem configured at the wrong baud rate (should be configured at the same baud rate as the ADR)
Some old-style analog telephone switches may contribute to noisy phone lines
Tech Note: Configuring a Modem for an ADR
Copyright © 2012 Peek Traffic Corporation. All rights reserved.
Page 8 of 11
99-363, 3
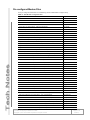
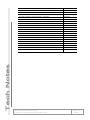
Pre-configured Modem Files
These pre-configured modem files are installed along with the ADR Modem Configurer utility.
Table 2 – ADR Modem Configuration files
Type of Modem
Setup File
3COM 56K
3com56k.mdm
3COM 56K disable V.90
3com56kb.mdm
3COM US Robotics V.90 56K
3com.mdm
Boca Research Modem Pm1440 - (AutoRel)
bocapm14.mdm
CC4144-MIT 14.4 PCMCIA Modem - (MNP10 AutoRel Retrain)
cc4144.mdm
Cellect 14.4 - (Cellular MNP/LAPM only)
cellect.mdm
DF2814 V.34 PCMCIA Modem - (MNP10 AutoRel Retrain)
df2814.mdm
DL3000 (MNP10 Retrain AutoRel AutoAns)
dl3000.mdm
DL3000 (Retrain AutoRel AutoAns)
dl3000b.mdm
FastTalk II Cellular - (Retrain MNP/LAPM only)
fastalk.mdm
General Field Unit - (2400 baud and higher)
genfld.mdm
Hayes SmartModem 1200 baud (Phone=RS232 (DTR / CD are switch set))
hayes12.mdm
Infotel 1414VQP (NoRetrain Phone=Rs232 AutoRel)
infotel.mdm
Megahertz PCMCIA Modem
mhpc2.mdm
MegaHertz USR PCMCIA Modem XJ4288 - (AutoRel Retrain)
xj4288.mdm
Microcom DeskPorte FAST EP28.8 - (MNP10 AutoRel Retrain)
dpep288.mdm
MicroComm (MNP10 Retrain AutoAns)
mnp10dce.mdm
MicroComm DeskPorte 14.4 - (MNP10 High Speed Error Correcting with Fax)
dp144m10.mdm
MicroComm DeskPorte 14.4S - (AutoReliable Retrain LAPM only)
dp144sc.mdm
MicroComm DeskPorte 14.4S - (AutoReliable Retrain)
dp144sb.mdm
MicroComm DeskPorte 14.4S - (AutoReliable Retrain)
dp144sd.mdm
MicroComm DeskPorte 14.4S - (MNP10 Retrain Cellular)
dp144s.mdm
MicroComm DeskPorte ES 28.8 - (AutoReliable Retrain Cellular)
es288c.mdm
MicroComm DeskPorte ES 28.8 - (AutoReliable Retrain)
dp288b.mdm
MicroComm DeskPorte ES 28.8 - (AutoReliable Retrain)
es288.mdm
MicroComm DeskPorte ES 28.8 - (AutoReliable Retrain)
es288b.mdm
MicroComm DeskPorte ES 28.8 - (MNP10 Retrain Cellular)
dp288.mdm
MicroComm DeskPorte ES 28.8 - adr6000 (AutoReliable Retrain Cellular)
Es288d.mdm
MicroComm DeskPorte ES14.4 - (MNP10 Retrain AutoRel)
dpes144.mdm
MicroComm DeskPorte ES14.4 (NoRetrain Phone=Rs232 AutoRel)
dp2uds.mdm
MicroComm modem (MNP10 AutoRel Retrain)
microcom.mdm
MicroComm modem for V.42 modems (ie. Twincom) No Error correction
microv42.mdm
MicroComm TravelPorte 14.4 - (Auto Retrain)
mctp_144.mdm
MicroComm TravelPorte FAST - (Auto Retrain)
mctpf.mdm
MicroComm TravelPorte FAST - (Cellular Field Retrain)
mctpf2.mdm
MultiTech Modem - (AutoRel Retrain)
mt1432.mdm
Peek Traffic LPM14 Low Power Modem - 14.4k - (AutoRel Retrain)
lpm14pc.mdm
Peek Traffic LPM14 RevF Low Power Modem - 14.4k - (AutoRel Retrain)
lpm14pcb.mdm
Peek Traffic LPM14 RevF Low Power Modem - 14.4k - (AutoRel Retrain)
lpm14pcc.mdm
Peek Traffic LPM14 RevF Low Power Modem - 14.4k - ADR6000 (AutoRel Retrain)
lpm14pcd-Idris.mdm
Peek LPM14 RevF Low Power Modem - 14.4k - ADR6000 (AutoRel Retrain)
lpm14pce-Idris.mdm
Peek LPM14 RevF Low Power Modem - 14.4k - ADR6000 (AutoRel Retrain)
lpm14pcf-Idris.mdm
Peek LPM336 Low Power Modem - 33.6k - (AutoRel Retrain)
lpm336b.mdm
Peek LPM336 Low Power Modem - 33.6k - (AutoRel Retrain)
lpm336pc.mdm
Tech Note: Configuring a Modem for an ADR
Copyright © 2012 Peek Traffic Corporation. All rights reserved.
Page 9 of 11
99-363, 3
Type of Modem
Setup File
Practical Peripheral PM14400FX - 14.4k
ppm14400.mdm
Practical Peripheral PM2400SA / Hayes 2400 (Phone=RS232)
ppm.mdm
QBlazer Plus
qbl-plus.mdm
Racal-Datacom ALM3226 V.32bis Cellular Modem - (Auto Retrain)
alm3226.mdm
Simple Tech. PCMCIA Modem - 28.8k - (MNP10 AutoRel Retrain)
simple28.mdm
Starcom 1442F-1 - 14.4k
starcom3.mdm
Starcom 3342E-208-2 - 33.4k
starcom4.mdm
Starcom 3342E-208-2 - 33.4k for ADR-6000
starcom5.mdm
Starcom 3342E-208-2 - 33.4k for ADR-6000
starcom4-Idris.mdm
Toshiba Internal Modem - V.90/K56Flex
v90k56fl.mdm
Twincom (Retrain AutoRel)
twincom.mdm
Twincom to DL-3000
twin2dl.mdm
Twincom UDS (AutoRel NoRetrain Phone=RS232)
twinuds.mdm
US Robotics 9600 FaxModem
usr9600.mdm
US Robotics Sportster (AutoRel)
usrsport.mdm
US Robotics Sportster (AutoRel) UK variant 1
usr-uk.mdm
US Robotics Sportster (AutoRel) UK variant 2
usruk&b1.mdm
US Robotics Sportster 33.6 Faxmodem
usr336.mdm
Viva - 14.4k - (AutoRel Retrain)
viva144.mdm
Zypcom Z32b-PX (Retrain)
z32b-px.mdm
Tech Note: Configuring a Modem for an ADR
Copyright © 2012 Peek Traffic Corporation. All rights reserved.
Page 10 of 11
99-363, 3
Additional Guidance
The following additional resources are available for all customers should they have the need for extra guidance
concerning the ADR Series Data Recorders and their operation with communications hardware.
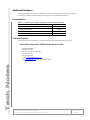
Documentation
Table 3 — Additional documentation available for TOPS and related hardware
Document
Part Number
TOPS Installation Manual
81-896
TOPS Operating Manual
81-897
TOPS v3.6 Release Notes
99-291
ADR Technical Manual
81-921
Technical Support
This contact information will connect you with the technical support staff of Peek Traffic Corporation:
Peek Traffic Corporation - ADR Customer Service Center
2906 Corporate Way
Palmetto, FL 34221
toll free in the U.S.: (800) 245-7660
tel: (941) 845-1200
fax: (941) 845-1504
email: [email protected]
web: www.peektraffic.com and click on the Support tab
Tech Note: Configuring a Modem for an ADR
Copyright © 2012 Peek Traffic Corporation. All rights reserved.
Page 11 of 11
99-363, 3