1
owner's
manual
MODEL NO
13.177895
Serial
Number
Model and serial
numbers may be
found on the back of
the unit.You should
record both model and
serial numbers in a
safe place for future
use.
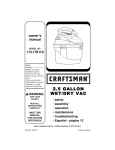
1 1 GALLON
WET/DRY VAC
&WARNING:
FOR YOUR
SAFETY,
READ ALL
INSTRUCTIONS
CAREFULLY
SAVE THIS
MANUAL
FOR FUTURE
REFERENCE
•
•
•
•
•
•
safety
assembly
operating
maintenance
repair parts
Espahol - pagina 19
Sears, Roebuck and Co., Hoffman Estates,
Part No. SP6699
IL 60179 U,S.A.
Printed in Mexico
•
Craftsman
One Year
Full Warranty
_!
If this Craftsman product fails due to a defect in material or workmanship
within one year from the date of purchase, return it to any Sears store,
Sears Service Center, or other Craftsman outlet in the United States for
free repair (or replacement if repair proves impossible).
This warranty applies for only 90 days from the date of purchase if this
product is ever used for commercial or rental purposes.
This warranty does not include bags or filters, which are expendable
parts that can wear out from normal use within the warranty period.
This warranty gives you specific legal rights, and you may also have other
rights, which vary, from state to state.
i=.,
Sears, Roebuck and Co., Hoffman Estates, IL 60179
..a
IMPORTANT SAFETY INSTRUCTIONS
Safety is a combination of using common
sense, staying alert, and knowing how
your wet/dry vacuum cleaner CVac")
works.
Safety Signal Words
DANGER: Indicates a hazardous
situation which, if not avoided, will result
in death or serious injury.
WARNING:
Indicates a hazardous
situation which, if not avoided, could
result in death or serious injury.
_, CAUTION: Indicates a hazardous
situation which, if not avoided, could
result in minor or moderate injury.
When using your Vac, always follow basic
safety precautions including the following:
A WARNING
-To reduce the risk of fire, electric
shock, or injury:
• Read and understand this manual and
all labels on the Vac before operating.
• Use only as described in this manual.
• Do not leave Vac running while
unattended - you may fail to notice
important signs indicating abnormal
operation such as loss of suction,
debris/liquid exiting exhaust, or
abnormal motor noises. Immediately
stop using Vac if you notice these
signs.
• Sparks inside the motor can ignite
flammable vapors or dust. To reduce
the risk of fire or explosion, do not use
near combustible liquids, gases, or
dusts, such as gasoline or other fuels,
lighter fluid, cleaners, oil-based paints,
natural gas, coal dust, magnesium
dust, grain dust, aluminum dust, or gun
powder.
• Do not vacuum anything that is burning
or smoking, such as cigarettes,
matches, or hot ashes.
• Do not vacuum drywall dust, cold
fireplace ash, or other fine dusts with
standard filter. These may pass through
the filter and be exhausted back into
the air. Use a fine dust filter instead.
• To reduce the risk of inhaling toxic
vapors, do not vacuum or use near
toxic or hazardous materials.
• To reduce the risk of electric shock, do
not expose to rain or allow liquid to
enter motor compartment. Store
indoors.
• Do not allow to be used as a toy. Close
attention is necessary when used by or
near children.
• Do not use with a torn filter or without
the filter installed except when
vacuuming liquids as described in this
manual. Dry debris ingested by the
impeller may damage the motor or be
exhausted into the air.
• WARNING: The power cord on this
product contains lead, a chemical
known in the state of California to
cause birth defects or other
reproductive harm. Wash hands after
handling.
• Do not leave Vac when plugged in.
Unplug from outlet when not in use and
before servicing.
• Turn off Vac before unplugging.
• To reduce the risk of injury from
accidental starting, unplug power cord
before changing or cleaning filter.
• Do not unplug by pulling on cord. To
unplug, grasp the plug, not the cord.
• Do not use with damaged cord, plug or
other parts. If your Vac is not working
as it should, has missing parts, has
been dropped, damaged, left outdoors,
•
•
•
•
•
•
•
•
•
•
•
•
ordropped
intowater,
callcustomer
service.
Donotpullorcarrybycord,usecord
ashandle,
closea dooroncord,orpull
cordaround
sharpedgesorcorners.
DonotrunVacovercord.Keepcord
awayfromheated
surfaces.
Donothandle
plug,switch,
ortheVac
withwethands.
Donotputanyobjectintoventilation
openings.
Donotvacuum
withany
ventilation
openings
blocked;
keepfree
ofdust,lint,hairoranything
thatmay
reduce
airflow.
Keephair,looseclothing,
fingers,
and
allpartsofbodyawayfromopenings
andmoving
parts.
Toreduce
theriskoffalls,useextra
carewhencleaning
onstairs.
Toreduce
theriskofbackinjuryor
falls,donotliftaVacthatisheavy
with
liquidordebris.
Partially
emptytheVac
byscooping
debrisordraining
liquidto
makeitcomfortable
tolift.
Toreduce
theriskofpersonal
injuryor
damage
toVac,useonlyCraftsman
recommended
accessories.
Whenusingasa blower:
Directairdischarge
onlyatworkarea.
Donotdirectairatbystanders.
Keepchildren
awaywhenblowing.
Donotuseblower
foranyjobexcept
blowing
dirtanddebris.
Donotuseasasprayer.
Wearsafety
eyewear.
Toreduce
theriskofeyeinjury,
wear
safetyeyewear.
Theoperation
ofany
utilityVacorblower
canresultin
foreign
objects
beingblownintothe
eyes,whichcanresultinsevere
eye
damage.
Toreduce
theriskofbeingstruckby,or
pulleddownby,a rolling
Vac,lockthe
wheels
whenusingonanyuneven
or
sloped
surface.
ThisVacisdouble-insulated,
eliminating
theneedforaseparate
grounding
system.
Useonlyidentical
replacement
parts.Readthe
instructions
forServicing
DoubleInsulated
Wet/Dry
Vacs.
Useonlyextension
cordsthatarerated
foroutdoor
use.Extension
cordsin
poorcondition
ortoosmallinwiresize
canposefireandshockhazards.
To
reduce
theriskofthesehazards,
be
surethecordisingoodcondition
and
thatliquiddoesnotcontact
the
connection.
Donotuseanextension
cordwithconductors
smaller
than16
gauge(AWG)
insize.Toreduce
power
loss,usea 14gaugeextension
cordif
25to50ft.longand12gauge
for50ft.
orlonger.
_1,CAUTION:
• Toreduce
theriskofhearing
damage,
wearearprotectors
whenusingfor
extended
hoursorina noisyarea.
• Fordustyoperations,
weardustmask.
• Staticshocks
arecommon
whenthe
relative
humidity
oftheairislow.
Vacuuming
finedebriswithyourVac
candeposit
staticcharge
onthehose
orVac.Toreduce
thefrequency
of
staticshocks
inyourhomeorwhen
usingthisVac,addmoisture
totheair
witha humidifier.
Observe
thefollowing
warnings
that
appear
onthemotorhousing
ofyourVac:
_]
OUBLE
INSULATED
GROUNDING
NOTREQUIRED,
WHEN
SERVICING
USEONLY
IDENTICAL
REPLACEMENT
PARTS.
_1=
WARNING:
For your own safety,
read and understand owner's
manual. Do not run unattended.
Do not pick up hot ashes, coals,
toxic, flammable or other hazardous
materials, Do not use around
explosive liquids or vapors.
electric shock - do not expose to
_ WARNING: To reduce the risk of
rain - store indoors.
fire or other damage, do not use
onboard storage compartments
to
store oily rags or containers with
_1=WARNING:
To reduce
the riskorof
flammable, explosive,
corrosive
toxic materials,
Do WARNING:
not stand or.s!t
on weight
vac. Improper
,A
50 Lb.
limit.
use may cause injury,
electric shock, always install float
_ WARNING: To reduce the risk of
before any wet pick-up operation,
SAVE THIS MANUAL
oducHon
This Wet/Dry Vac is intended for
household use. It may be used for
vacuuming wet or dry media and may be
used as a blower.
Read this owner's manual to familiarize
yourself with the product features and to
understand the specific usage of your
new Vac.
Table of Contents
Section
Important Safety Instructions ........
Introduction ......................
Page
2
4
Unpacking and Checking
Carton Contents .................
5
Removing/Installing/Storing
The Metal Handle ................
6
Replacement Filter Assembly ........
Wet/Dry Vac Assembly .............
Dust Drum Assembly .............
Insert Hose .....................
7
8
8
8
Wheel Assembly ..................
Operation .......................
Vacuuming Dry Materials .........
Vacuuming Liquids ..............
Emptying the Drum .............
Moving the Wet/Dry Vac ..........
9
10
11
11
11
12
Section
Blowing Feature ................
Storage ........................
Hose Storage ..................
Accessory Storage ..............
Cord Wrap ....................
Handle Storage ................
Maintenance ....................
Filter .........................
Cleaning & Disinfecting
the Wet/Dry Vac ..............
Casters & Wheels ...............
Frame & Handles ...............
Repair Parts .....................
Filter Replacement ...............
Page
12
13
13
13
13
13
14
14
15
15
15
16
18
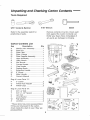
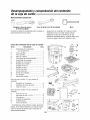
Unpacking and Checking Carton Contents -Tools Required
9/16" Socket & Ratchet
9/16" Wrench
Remove contents of carton. Check each
item against the Carton Contents List.
Notify your Sears Store immediately if
any parts are damaged or missing.
Refer to the assembly sketch for
positioning of parts.
Carton
Key
Contents
List
Description
Qty
A
B*
C*
Wet/Dry Vac Assembly ...........
Filter Nut ......................................
Filter Plate ....................................
1
1
1
D*
E*
F
G
H
I
J
Filter 2-Stage ...............................
Filter Support Assembly ...............
Hose Assembly ............................
Utility Nozzle ................................
Wet Nozzle ...................................
Crevice Nozzle .............................
Claw Nozzle .................................
1
1
1
1
1
1
1
K
L
M
N
O
Dusting Brush ..............................
Extension Handle .........................
8" Wheel .......................................
Metal Handle ................................
Owner's Manual ...........................
1
2
2
1
1
Bag of Loose Parts "A":
P
3" Caster ......................................
Q
R
Mallet
2
Wheel Hub Adapter ..................... 2
Wheel Caps ................................. 2
Bag of Loose Parts "B":
S
3/8" x 4" Bolt .................................
T
3/8" x 1-1/2" Spacer .....................
U
Jam Nut ........................................
V
Lock Washer ................................
W
Flat Washer ..................................
X
Locknut .........................................
* These items may come preassembled.
If they are not present in the carton,
check inside the drum to see if they are
preassembled.
2
2
2
2
6
2
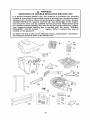
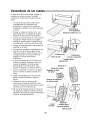
Removing/Instailing/Storing
The Metal Handle
Your metal handle comes packaged in
the dust drum.You must remove the
metal handle from the dust drum and
install the handle in the correct direction,
bent area facing away from the back of
the vac before continuing. (Also remove
the 8" wheel and set aside for
installation).
/
Installing
- /Latch (2)
Handle
Press and hold release buttons while
installing handle into handle receptacles
in drum (See illustration).
NOTE: An audible snap of release
buttons indicates successful engagement
of handle.
Lowering
Handle
for Storage
To store Wet/Dry Vac, press and hold
release buttons while firmly sliding handle
down.
Removing
Pull Down and
Slide Dust Drum
Out of Wet/Dry
Vac Unit
Handle
Press and hold release buttons, as
shown. While firmly pushing in release
buttons, pull handle upwards to remove.
andle
HoEd Release
ons
re s arid
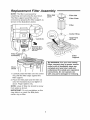
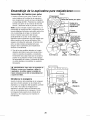
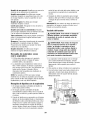
Replacement
Filter Assembly
NOTE: The filter is accessed by
unlatching and removing the dust drum.
The filter support assembly can be
removed by grasping the filter support as
shown in the illustrations below.
..... Center Ring
/
_--Latch (2)
jJ
Open End
of Float
Pull Down and
Slide Dust Drum
Out of Wet/Dry
Vac Unit
Filter
Support
1. Carefully slide the filter over the center
ring until the filter stops against the
filter support.
2. Place the filter plate and the filter nut
onto the threaded stud and tighten it
down. Finger tighten only.
NOTE: Lever of filter nut should be away
from plate as shown.
IMPORTANT: Do not overtighten as this
may deform or crack the filter plate,
center ring or filter.
_. WARNING: For your own safety,
never connect plug to power source
outlet until all assembly steps are
complete and you have read and
understood the safety and operation
instructions.
Do not operate vac
with any parts damaged or missing.
Wet/Dry Vac Assembly
Dust Drum Assembly
/ Slot
1. Slide the dust drum into the front of the
wet/dry vac unit when filter assembly is
complete. Position the dust drum
wheels into the drum area slots and
_um
glide into place.
__
NOTE: When reinstalling the dust drum
and filter support assembly, ensure that
the front of the dust drum is flush with the
0_
lid and motor cover assembly. The dust
drum should fit snugly into place. There
are two pins in the Wet/Dry vac unit that
must fit into the slots in the drum.This
__Dust
Wheel
Wet/Dry
Vac n,t
Drum
Pu Down and
Slide Dust Drum
Ou o Wet/Dry
Vac Unit
i
I
ensures proper alignment. The dust drum
must be installed properly to ensure the
Wet/Dry vac functions correctly.
2. Pull the two latches on the front of the
dust drum up and over the latch
holders and press down firmly until
they snap in place. If the pins from the
lid and motor cover assembly are not
aligned, the latches will not lock.
_1= WARNING: To avoid ingesting
debris or water in the impeller and
damaging vac, never operate
without filter support assembly in
p ace.
Insert
Hose
Insert the push button end of the hose
assembly into the inlet of the vac. The
hose should snap into place. To remove
the hose from the vac, press the release
button in the hose assembly and pull the
hose out of the vac inlet, as shown.
//
Latch
Locked
\ Latch _
"_"/
Holder "_--J
Latch Unlocked
I
I
--- Push
Button
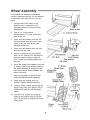
Wheel A ssembly
If any parts are missing or damaged,
contact customer service. Do not attempt
to assemble unit until you have all the
parts.
Pull the dust drum clear o1 the
Wet/Dry Vac. Locate the two 8"
diameter wheels and the two bag
assemblies.
2.
Prop a 2 x 4 wood block
approximately 12" long, under the
rear of the vac.
3
Place one flat washer onto the 3/8"
bolt and install into the hole in rear
panel. Push the bolt all the way
through wheel hub.
4
Place one flat washer and one lock
washer onto the bolt.
6,
Screw on one jam nut and tighten
with a 9/16" wrench.You will need to
hold the head o1 the bolt with the
Back of Vac
x 4 Wood Block
Flat Washe
3/8" Bolt
J Fiat Washer
3/8" Bolt
9/16" socket to securely tighten the
jam nut.
6,
Insert the wheel hub adapter onto the
8" wheel Make sure that the slots on
the wheel adapter fit snugly into the
ribs o1 the wheel. Place adapter and
wheel onto bolt.
7.
Insert one spacer on the bolt and
push through the wheel opening
8
Install one flat washer and one
Iocknut Tighten Iocknut securely.
9,
Jam Nut
Lock Washer
8" Wheel
Wheel Ribs
Wheel Hub
Adapter
Wheel Hub
Adapter Slots
Using a rubber mallet, gently tap the
wheel caps onto each wheel. This is
required on both the left and right
sides.
10 Lock the rear wheels by stepping
down on the wheel locks to secure
unit. Tilt vac back to expose the front
wheel area.
/
Wheel f
Lock
Spacer ..' ..
Flat Washer/
/"
Locknut _'
Wheel Cap
/
/
/
11.Pushthecasteronuntiltheballon
thecasterstemisinserted
alltheway
ontothesocket.
Youwillheartheball
snapintothesocket
andthecaster
willswiveleasilywhenpositioned
correctly.
CasterBall/
Caster Stern j
Operation
_1= WARNING:
To reduce the risk of fire, explosion,
or damage to Vac:
Do not leave Vac running while unattended - you may fail to notice important signs indicating
abnormal operation such as loss of suction, debris/liquid exiting exhaust, or abnormal motor
noises, Immediately stop using Vac if you notice these signs,
Do not leave Vac plugged-in when not in use.
Do not continue running when float has cut off suction.
Do not operate vac in areas with flammable gases, vapors or explosive dust in the air.
Sparks inside the motor can ignite airborne flammables, Flammable gases and vapors
include: lighter fluid, solvent-type cleaners, oil-based paints, gasoline, alcohol, or aerosol
sprays. Flammable dusts include: coal, magnesium, aluminum, grain, or gun powder.
Do not vacuum up explosive dusts, flammable liquids, or hot ashes.
Do not use vac as a sprayer.
_IL WARNING:
To reduce the risk of electric shock or injury:
Do not expose to rain or allow liquid to enter motor compartment,
Store indoors,
Do not handle plug, switch, or vac with wet hands.
Do not service Vac while it is plugged-in. If your Vac is not working as it should, has missing
parts, has been dropped, damaged, left outdoors, or dropped into water, return it to an
independent service center or call customer service.
When using an extension cord, use only outdoor-rated cords that are in good condition.
Do not allow the connection to come into contact with liquid,
Do not vacuum toxic materials to reduce the risk of inhaling the vapors or dust.
outlet, turn the unit on by pushing
switch from position
"0" to position
the
"1".The
symbols used on the switch actuator are
international
"On & Off" symbols. "0" is the
symbol
"ON".
To reduce
the risk of electric
shock,
this
outlet
plug does not fit fully
outlet.
electrician
Do not change
for
only one way. If the
in the outlet,
to install
Familiarize yourself with the accessories
included with the vac. Each accessory may
be used in various ways for vacuuming and
blowing debris. Here is a list of the
accessories and their uses.
reverse
the plug. If it still does not fit, contact
qualified
and "1" is the symbol
0 =°FF I =°"
appliance
has a polarized
plug (one blade
is wider than the other). This plug will fit
in a polarized
for "OFF"
a
the proper
the plug in any way.
After you plug the power cord into the
10
UtilityNozzle
- General
purpose
nozzle
for the vac, unplug the power cord, and
empty the drum. You will know that the
mostvacuuming
applications.
float has risen because vac airflow
WetNozzle-Usedforwetpickupon
ceases and the motor noise will become
smooth
surfaces
topickupliquidanddry
higher in pitch, due to increased motor
thesurface
inonestroke.
speed.
ClawNozzle-Usedforwetordrypickup. 4. After using the vac to pick up liquids,
DustingBrush- Drypickup
ofdustand
allow the filter to dry to reduce the risk of
dirtdebris.
mildew and damage to the filter.
CarNozzle(notprovided)
- Drypickup IMPORTANT: To reduce the risk of
nozzle
forcarinteriors
andmost
damage to the vac do not run motor with
upholstery
cleaning.
float in raised position.
Extension
Handles
- Thesehandles
can
beconnected
together
andprovides
Emptying the Drum
additional
lengthformorereach.
WARNING: To reduce the risk of
injury from accidental starting,
unplug power cord before emptying
the drum.
Hose - Provides transfer of vacuum or
blowing capability to the worksite.
Provides the means of attaching
extension handles and nozzles.
Crevice Tool - Use to pick up debris in
hard to reach locations.
Vacuuming
• ILWARNING: To reduce the risk of
back injury or falls, do not lift a vac
heavy with liquid or debris. Scoop
or drain enough contents out to
make the vac light enough to lift
comfortably.
Dry Materials
1. The filter must always be in correct
position to reduce the risk of leaks and
possible damage to vac.
2. Your Wet/Dry Vac comes with the
17907 Filter installed. When using your
vac to pick up very fine dust, it will be
necessary for you to empty the drum
and clean the filter at more frequent
intervals to maintain peak vac
performance.
1. The vac
for easy
unscrew
opposite
drum.
comes equipped with a drain
emptying of liquids. Simply
the drain cap and lift the
side slightly to empty the
2.Another option is to remove the drum
from the vac.
3. Pull the drum out from the vac by
pulling down and sliding the drum on
the axle support under the drum.
NOTE: A dry filter is necessary to pick up
dry material. If you use your vac to pick
up dust when the filter is wet, the filter will
clog quickly and be very difficult to clean.
Vacuuming Liquids
1.When picking up small arnounts of
liquid the filter may be left in place.
2.When picking up large amounts of
liquid we recommend that the filter be
removed. If the filter is not removed, it
will become saturated and misting may
appear in the exhaust.
3. When the liquid in the drum reaches a
predetermined level, the float
mechanism will rise automatically to cut
oft air-flow. When this happens, turn oft
Dust
Drum
Pull Down and
Slide Dust Drum
Axle
/,
Support--'
11
Vac Unit
/
Drain /
Operation
(continued)
4, Dump the drum contents into the
proper waste disposal container.
5. Replace the drum by reinserting into
the cavity and push until it snaps into
place.
Moving
the Wet/Dry
Vac
To maneuver the vac, the metal handle in
the rear of the unit should be positioned
in the upright position for ease of
movement. Be sure to unlock the back
wheels by pulling up on the wheel locks
before moving the vac.
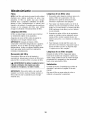
Blowing
_Puil Up to Unlock
Wheel Locks
Feature
Your vac features a blowing port. It can
blow sawdust and other debris. Follow the
steps below to use your vac as a blower.
1. Locate blowing port of your vac.
WARNING: Always wear safety
eyewear complying with ANSI Z87,t
(or in Canada, CSA Z94.3) before
us ng as a b ower,
I
_1_WARNING:To
I
reduce the risk of
injury to bystanders,
keep them
c ear of b ow ng debr s.
,_ CAUTION: Wear a dust mask if
blowing
creates dust which
might
be nha ed.
_1_CAUTION: To reduce the risk of
hearing damage wear ear protectors
when using the vac/blower for
extended hours or when using in a
noisy area.
I
I
I
I
I
I
2. Insert the locking end of the hose
assembly into the blowing port of the
vac. The hose should snap into place.
To remove the hose from the vac, press
the release button in the hose
assembly and pull the hose out of the
vac inlet.
opposite end of hose, then place the
crevice tool on the wand.
4. Turn vac on and you are ready to use
your vac as a blower.
Craftsman recommended accessories are
available at Sears retail stores.
The Sears Blower Nozzle Stock No.
3. (Optional) Attach extension handle to
9-16933 is recommended
debris.
12
for blowing
Storage
Hose Storage
Cord Wrap
When vacuuming is complete, unplug the
cord and wrap it around the cord wrap
area located on the back of the unit.
The hose may be stored by placing in the
top removable tra_ You may also open the
hinged top to access the hose storage.
Hose Storage Tray
Cord
Hinged Top Access
to Hose Storage
Wrap
Area
v
Cleaninc
Cleaning
Supplies
Area -,
Extension
Handle
Storage
Accessory
Storage
Your wet/dry vac accessories may be stored
in the removable lower tray. Cleaning
supplies may be stored in the storage area
on the back of the unit between the wheels.
Handle
Storage
When storing the Wet/Dry Vac, press and
hold release buttons while firmly sliding
handle down.
The extension handles snap into place at
the back of the vac in the extension handle
storage areas.
I
i
.- Handle
Press arid
Hold Release
• Buttons
While Sliding
Handle
Oowriward
Aeeessor_
Storage Tray
13
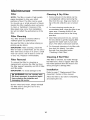
Maintenance
Filter
Cleaning
NOTE: The filter is made of high quality
paper designed to stop very small
particles of dust. The filter can be used
for dry pick up or small amounts of liquid.
Handle the filter carefully when removing
to clean or installing it. Creases in the
filter pleats may occur from installation
but will not affect the performance of the
filter.
1. Some removal of dry debris can be
accomplished without removing the
filter from the vac. Slap your hand on
top of the lid while the vac is turned
off.
2. For best cleaning results due to
accumulated dust, clean the filter in an
open area. Cleaning SHOULD be
done outdoors and not in the living
quarters.
Filter Cleaning
Your filter should be cleaned often to
maintain peak vac performance.
3. After filter removal from vac, remove
the dry debris by gently tapping filter
against the inside wall of your dust
drum. The debris will loosen and fall.
Be sure the filter is dry before storing or
picking up dry debris.
4. For thorough cleaning of dry filter with
fine dust (no debris), run water
through it as described under
"Cleaning A Wet Filter".
IMPORTANT: After cleaning, check the
filter for tears or small holes. Do not use a
filter with holes or tears in it. Even a small
hole can cause a lot of dust to come out
of your vac. Replace it immediately.
Filter
Cleaning
Removal
Filter
Installation
IMPORTANT: To avoid damage to the
damag ng the motor,
A Wet
After filter is removed, run water through
the filter from a hose or spigot. Take care
that water pressure from the hose is not
strong enough to damage filter.
To remove the filter for cleaning or
replacement, unscrew the filter nut from
the filter support assembly and lift off filter
and filter plate.
_, WARNING:
Do not operate with
the float removed, It prevents liquid
from entering the impeller and
A Dry Filter
I
I
blower wheel and motor, always reinstall
the filter before using the vac for dry
material pick-up.
14
Refer to page 7 "Replacement Filter
Assembly" Section of this manual.
Allow the filter to dry before reinstalling
and storing the vac.
Cleaning
and Disinfecting
Casters
the
Wet/Dry Vac
and Wheels
To keep your Wet/Dry Vac looking its
best, clean the outside with a cloth
dampened with warm water and mild
soap.
To clean the drum:
Should your cart squeak or become hard
to roll, you should place two or three
drops of general purpose oil on each
wheel at the axle. If your casters are
noisy, you may put a drop of oil on the
roller shaft to make them quieter.
1. Dump debris out.
Frame
2. Wash drum thoroughly with warm
water and mild soap.
Your metal handle is painted to prevent
rust, however, liquids and corrosive
debris should be wiped off with a soft
cloth should they come in contact with
the handle.
3. Wipe out with dry cloth.
Before prolonged storage or as needed
(i.e.; after waste water pick up) the drum
should be disinfected.
and
Handles
_lk WARNING: To assure product
SAFETY and RELIABILITY, repairs
and adjustments should be
performed by Authorized Sears
Service Centers, always using Sears
replacement parts.
To disinfect the drum:
1. Pour 1 gallon of water and 1 teaspoon
chlorine bleach into the drum.
2. Let solution stand for 20 minutes,
carefully swishing every few minutes,
making sure to wet all inside surfaces
of the drum.
3. Empty drum after 20 minutes. Rinse
with water until bleach smell is gone.
Allow drum to dry completely before
sealing the motor on the drum.
15
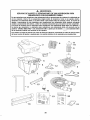
Repair Parts
11 Gallon Wet/Dry Vac
Model Number 113.177895
Always order by Part Number - Not by Key Number
Key
No.
Part No.
Description
1
510013-1
Actuator Assembly
2
832790
Power Head Assembly
3
832119-1
Filter Support Assembly
4
832120
Handle Assembly
5
832113-1
6
832116-1
Dust Drum Assembly
Drum Latch
7
73185
Drain Cap
8
830598
9
17907
8" Wheel (Qty. 1)
Filter- Fine Particle
10
73317
Filter Plate
11
73316
Filter Nut
12
16922
Utility Nozzle
13
16956
Claw Nozzle
14
17817
Wet Nozzle
15
16902
Crevice Tool
16
16901
Dusting Brush
17
831337-9
Hose Assembly
18
17854
Extension, Handle
19
509950
Bag Assembly (Casters)
20
509949
21
SP6699
Bag Assembly (8" Wheel Hardware)
Owner's Manual
t Stock Item - May Be Secured Through The Hardware Department
16
Of Most Sears Retail Stores.
SERVICING
WARNING
OF DOUBLE-INSULATED
WET/DRY
VAC
In a double-insulated Wet/Dry Vac, two systems of insulation are provided
instead of grounding. No grounding means is provided on a double-insulated
appliance, nor should a means for grounding be added. Servicing a doubleinsulated Wet/Dry Vac requires extreme care and knowledge of the system,
and should be done only by qualified service personnel. Replacement parts
for a double-insulated Wet/Dry Vac must be identical to the parts they replace.
Your double-insulated Wet/Dry Vac is marked with the words "DOUBLE
INSULATED" and the symbol _
(square within a square) may also be
marked on the appliance.
To reduce the risk of injury from electrical shock, unplug power cord before
servicing the electrical parts of the Wet/Dry Vac.
5
12
"4
20
\
18
17
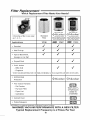
Filter Replacement
Which
Replacement
Filter Meets Your Needs?
FIIter_y_tem
Standard
Filter
Choosing a filter is as easy
as 1,2, 3_,
a rdml
• Sawdust
• Wet Pick-up
• Typical Basement,
Flfi_r
Syg_tem
with
rC_lal proJu_
pnt er¢lon
ar_ mmr0blalproJur_ pFJl_ _on
Figl/_saf]d inhibitsthe grovath
gigllts and inlli_its tile glov&
that can shorten filter life
that can sllorten filter life
bacteria
of inold,rrlilde/,/and
_acteria of mold,rrildev/and
a_ trg07 _ 17912
,/
,/
,/
,/
,/
,/
trst6
,/
,/
,/
Applications
wtt#
,_kMlcroban _,_,M,crobaxl
_
Garage or Car Dirt
•
Drywall Dust
• Cold* Ashes
- BBQ Grill
,/
,/
,/
,/
- Fireplace
* DONOTVACUUM
ANYTHING
THATISBURNING
ORSMOKING,
SUCHASCIGARETTES,
MATCHES
ORHOTASHES.
• Antimicrobial
Protection
•
< _Mlcroban
40kMlcroban
Fine Indoor Particles
- Pet Dander
- Furnace Filter
- Dryer Lint
TRAPS 99.97%
OF PARTICLES
DOWNTO
- Upholstery
.3 MICRONS
• Cement Dust
[_
• Pollen/Allergens
[_
MICROBAN
is a registered
trademark
of Microban
Products
Company
MAXIMIZE VACUUM PERFORMANCE WITH A NEW FILTER
Typical
Replacement
Frequency
18
is 2 Times
Per Year
manual
del usuario
NO. DE MODELO
113.177895
NOmero
de serie
Los nOmerosde modelo
y de serie se pueden
encontrar en el asa,
Usted debe anotar los
nOmerostanto de modelo
como de serie en un lugar
seguro para uso futuro,
,&ADVERTENCIA:
PARASU
SEGURIDAD
LEA DETENIDAMENTE
TODASLAS
INSTRUCCIONES
GUARDEESTE
MANUAL
PARAREFERENCIA
FUTURA
ASPIRADORA PARA
MOJADO/SECO
DE 11 GALONES
•
•
•
•
•
seguridad
ensamblaje
funcionamiento
mantenimiento
piezasde repuesto
J
Sears, Roebuck and Co., Hoffman Estates,
No. de pieza SP6699
IL 60179 U.S.A.
Impreso en M6xico
Garantia completaCraftsmande un aria
Si este prodactoCraftsmanfalla debido a un defectode material o de fabricaciondentrodel plaza
de nn anna partir de la fecha de compra, devuelvaloa cLialqniertienda Sears, Centre de Servicio
Sears u otto puntode venta Craftsmanpare qua sea reparado gmtnitamente(o memplazado si la
repamcionresLiltaimposible).
Estagamntia se aplica solamente darante 90 dias a partir de la fecha de compra, si este producta
se atiliza algnna vez para finescomercialeso de alqailer.
Esta garantia no incluye las balsas ni los filtros, qne son piezas perecedems qae se pueden
desgastarpar caasa del usa normaldentro del periodode garantia.
Estagamntia le confiema nsted derechoslegales especificosy es posibleqae nsted tenga tambi0n
otrosderechosqae variag de nil estadoa otro.
Sears
Roebnck and Co.
Hoffman
IL60179
INSTRUCCIONES
DESEGURIDADIMPORTANTES
Laseguridadesunacombinaci0nde sentidocomdr
pelmanecer
alertay sabelc0mofuncionala
aspiladorapalamojado/seco.
•
•
Palabras de senal de seguridad
PELIGRO:indioauna situaoi0n pnligrosa que, sl
no se evita, Catlsar_la muerte o lesiones graves
ADVERTENCIA:indica una situaci0n peiigrosa
que, si no se evita, podria causar la mnerte o lesiones
graves
•
PRECAUCION:indica una situaci0n peligrosa que,
si no se evita, pudiera causar lesiones leveso
moderadas.
•
Cuandontiiioe la aspiradora para mojado/seco (%
aspiradola"), siga siempre las precaucionesbasicas de
seguridad,inoluyendo las siguientes:
•
A ADVERTENCIA-
•
Para redacir el riesgo de incendio, sacudidas
el_ctricas o lesiones:
•
Leay entienda este manual del usnalio y todas las
etiquetasqne estan colocadas en laaspiradola
antes de utiiizafla.
• Utiiioela aspiradola I]nioamentede la maneraqne
sedescribe en este mannaL
• No deje la aspiradola en marchamientras est6
desatendida.Usted podria no notal seiiaies
importantes que indiqnen un [uncionamiento
anormal, tal como pOrdidade sncci0n, residuos o
liquido qne saien pot el escapeo rnidos anormaies
del motol. Dejede usar la aspiradora
inmediatamentesi observa estas sebales.
• Las chispas que se producen en el interior del
motor pueden incendiarlos vapores infiamabies
o el poivo. Para mdncir el riesgo de incendio o
explosion: No use la aspiradora ceroade liquidos,
gasescombustibles, o poivos expiosivos como
gasolina u otros combustibles, liquido encendedor,
limpiadores, pinturas a basede aceite,gas natural,
poivo de calb0n, poivo de magnesio, poivo de
granos de cereal, polvo de alnminio o p0ivora.
•
•
•
•
•
•
20
No recoja con la aspiladora nada que est6 ardiendo
o hnmeando, como cigarrillos, t0storos o cenizas
calientes.
No recoia con la aspiladora polvo de pared de tipo
seco ni ceniza tria de chimenea o otros polvos tinos
con un tiltro estandai: Estos materiales pneden
pasarpor elflltro y set expulsadosde vueltaal aire.
Utilioeun tiltro para polvo tino en lugar de un tiltro
estandal.
Pala reducir el riesgo de inhalar vapores t0xicos,
no recoja con la aspiradora materia]est0xicos o
peligrosos ni la use cerca de dichos materiales.
Pararedncir el riesgo de descargas elOctricas,no
exponga la aspiladora a la Iluviani deje qne entren
liquidos en el compartimiento del motoL Gnardela
aspiradora en un lugar interiol.
No permita que la aspiradola se ntilioe oomo [in
jnguete. Se necesita prestar maxima atenci0n
cuando sea ntilizadapol niiios o oercade 6stos.
No use la aspiradora con nn tiltro desgaNadoo sin
tenet el tiltro instalado, exceptocuando reoojacon
ella liquidos de la maneraqne se describe en este
mannaL Los residnos secos absorbidos pol el
impnlsor podrian daiiar el motor o ser expulsados
de vuelta al aire.
ADVERTENCIA:El cold0n de energiade este
prodncto contiene plomo, una sustanciaqnimica
que segQnlos oonocimientos del estado de
Californiacansa detectos de nacimiento u otros
daiios a la reprodncoi0n. Lfwese/as manos
despu_sde manejar el producto.
No abandone la aspiradola cnando este encbufada.
DesenchQfelade] tomacorriente cuando no la est6
utilizandoy antes de malizarservicio de revision.
Apague la aspiradola antes de desenchnfarla.
Pala redncil el riesgo de lesiones debidasann
alranque accidental, desenchute e] coid0n de
energiaantes de cambial o limpiar el filtro.
No desenchnte la aspiradola tirando del cord0n.
Paradesenchnfarla, agarre el enchnfe y no el
cordon.
No use la aspiradora con el cordon dailado, el enchnte daiiado n otras piezas daiiadas. Si laaspiradola no funciona como debe,le fa]tan piezas, se ha
•
•
•
•
•
•
•
•
•
•
•
•
caido, ha side dafiada,se ha deiado a la intemperie
o se ha oaido al agua,Namea servicio al oliente.
No tire de la aspiradola usando el cordon ni la Neve
per el cordon, ni use el cordon come asa, ni sierra
una puerta sobre el cordon, nitire del cordon
alrededorde bordes o esquinas afilados. No pase la
aspiladora en mamhasobre el coldOn. Mantenga el
cordon alejado de las superficies saNentes.
No manejeel enshufe, el interruptol o laaspiradora
con las manes mojadas.
No ponga ning_n objeto en las aben:urasde ventilaciOn.No Iecoja nada son la aspiradora ouando
cualquiela de las aben:urasde ventilaciOnest6
bloqueada; mantengadichas aberturas libms de
polvo, pelusa, pelo o cualquier cosa que peeda
reducir el flujo de aire.
Mantenga el pelo, la ropa holgada, los dedos y
todas las partes del ouerpo alejados de las
abertulas y de las piezas mOviles.
Para reducir el riesgo de caidas, tenga cuidado
adicional al limpiar en esoaleras.
Pala reducir el riesgo de lesiones de espaldao
caidas, no levante unaaspiradora que pese touche
debido aque contiene liqeido o residues. Saque
par:e del contenido de la aspiradora o drOnela
pamialmente pala haoer que sea Io sufisientemente
liviana come para poder levantarlaoOmodamente.
Pala redecir el riesgo de lesiones sorporales o
dabos a la aspiradora, utilice Qnicamente
aocesorios resomendados per Craftsman.
CeandoutNisela aspiradola come soplador:
- Diriia la descarga de aim solamente haciael area
de trabajo.
- No dirija el aire hacia las personas que estOn
presentes.
- Mantenga alejados a los nibos durante la
operaoiOnde soplado.
- No utilice el soplador para trabajos que no sean
soplar suciedad y residues.
- No use la aspiradora come rosiador.
- Use protecciOnocular de seguridad.
Pala reducir el riesgode lesionesen los ojos, use
plotecciOnocelal de segeridad.La [riilizaciOnde cualquiel aspiladola utilitariao soplador utilitafio puede
hater quese soplen objetosextraNoshacia los ojos,
Io cual puedecaesardafios graves en los ojos.
Pala reducir el riesgode set golpeado o derribado
pol enaaspiradola que este rodando bloqeeelas
ruedasentoda superficiedesigualo inclinada
Esta aspiradora tiene aislamiento doble, Io cual
eNminala necesidad de un sistema independiente
de conexiOna tier[a. Utilice 0nicamente piezas de
repuesto idOnticas.Lealas instrecciones de servicio
de revision de las aspiradoras para mojado/seco
con aislamiento doble.
Utilice 0nicamente cordones de extension que
tengan capacidadnominal para use a la intempefie.
Los condonesde extension que estOnen malas
condiciones o tengan un tamabo de alambre
demasiado pequeiio puedencrear peligros de
incendio y descargas elOstricas.Para mducir el
riesgo de estos peligros, aseg(ffesede que el
cordon est6 en buenas condiciones y que el liquido
no entre en contaoto con la conexiOn.No utilise un
coldOn de extension qee tenga oondectoms con tin
di_metro menor al calibre 16 (AWG). Para reducir la
pOrdidade potensia, utilise un cordon de extension
de calibre 14 si la Iongitudes de 25 a 50 pies, y de
calibre 12 si la Iongitudes de 50 pies o m_s.
PRECAUCION:
• Para reducir el riesgo de danes a la audiciOn, use
protestores de oidos cuando utilise la aspiradora
durante muchas horas seguidas o cuando la
emplee en en _rea ruidosa.
• Pala opelaciones gee generan polvo, use una
mascara antipolvo.
• Las descargas de estatica soil comunes cuando
la humedad relativadel aire es baja. Si recoge
residues fines con laaspiradora, se puede
depositar calga estatica en la mangeerao en la
asphadora. El meier mmedio pala redecir la
frecuencia de las descargas de estaticaell su casa
o cuando use esta aspiradora es abadir humedad
al aim con tin humidificadol:
Sigalassiguientesadvertencias
queaparecenenla
cajadeImotordelaaspiradola.
F_
ISLAMIENTO
DOBLE.NOSEREQUIERE
CONEXION
A TIERRA.
CUANDOHAGASERVICIODEREVISION
DE
LAASPIRADORA,
UTILICE0NICAMENTE
PIEZASDE
REPUESTO
IDENTICAS.
F_i ADVERTENCIA:
Parasnpropiasegnridad,lea ]
y entiendael manualdeloperador.Notongaen /
marchala aspiradoradesatendida.Norecoja /
cenizascalientes,carboncaliente,materiales /
toxicosni inflamablesni otrosmateriales
/
peligrosos.Nouse la aspiradoraalrededorde /
liquidoso vaporesexplosives.
J
_i ADVERTENCIA:
Parareducirel riesgode
sacudidasel_ctricas,no expongala aspiradoraa
la Iluviay almaceoelaen interiores.
[i._ ADVERTENCIA:
Pararedacirel riesgode
ncendioa otrosdafios,no utiliceloscompartimientosdealmacenamientoa bordopara
almaceoartraposgrasososo recipientes
con
materialesioflamables,explosives,corrosives
o toxicos.
._i ADVERTENCIA:
50 Ib de pesolimite.Noso
pongadepieni sosientesobre la aspiradora.
Elnse incorrecto
paedecaesarlesiooee.
[d._ ADVERTENCIA:
Parareducirel riesgode
escargasel_ctricas,instalesiempreel flotador
antesderealizarcaalqnieroperacion
de
recogidadematerialmojado.
GUARDEESTEMANUAL
21
Introducci6n
Estaaspiradorapara mojado/secoesta dise_ada
parauso dom_sticosolamente,Sepuedeutilizar
pararecogermaterialesmojadoso secosy se
puedeusarcomo soplador,
Leaestemanualdel usuarioparafamiliarizarsecon
lascaracteristicasdel productoy paraentenderla
utilizaci6nespecificade su nuevaaspiradora.
Indice
Se¢¢i6n
P_gina
Secci6n
Instruccionesde seguridadirnportantes.......
20
Introduccidn.............................
22
Desempaquetado
y comprobacidn
del contenidode lacajade cartdn .........
23
Remoci6n,instalacidny almacenamiento
delasa md_lica........................
24
Ensamblajede un filtro de reemplazo.........
25
Ensamblajede laaspiradorapara mojado/seco,26
Ensamblajedeltambor parapolvo ........
26
Introduzcalamanguera .................
26
Ensamblajede las ruedas..................
27
Funcionamiento..........................
28
Recogidade materialessecos
con laaspiradora....................
29
Recogidade liquidos con laaspiradora..... 29
Vaciadodeltambor.....................
29
Pdgina
Trasladode la aspiradorapara mojado/seco.30
Dispositivode soplado ..................
30
AImacenamiento.........................
31
AImacenamiento
de la manguera .........
31
AImacenamiento
de los accesorios........
31
Enrolladordel cord6n ...................
31
Almacenamientodel asa ................
31
Mantenimiento...........................
32
Filtro.................................
32
Limpiezay desinfecci6nde laaspiradora
paramojado/seco....................
33
Ruedecillasy ruedas....................
33
Armaz6ny mangos.....................
33
Piezasde repuesto........................
34
Reemplazodelfiltro .......................
36
22
Desempaquetado
y comprobaci6n
de/contenido
dela cajadecart6n-Herramientas necesarias
Casquilloy Ilavedecarraca
de9/16de pnlgada
Llavedetnercade9/16 depulgada
Consulteel dibujo de ensamblaieparaaveriguarel
posicionamientode las piezas,
Mazo
Saquetodo elcontenido de lacaja de cart6n,
AsegQresede que no falte ning_]narticulo
utiNzandola lista del contenidode lacaja,
Notifique inmediatamentea latienda Searsm_s
cercanasi alguna piezaest_ da_adao falta,
Lista del contenidode la caja de cart6n
Clave
Descripci6n
Cant.
A
Ensamblajede laaspiradora
paramojado/seco..................................
1
B*
Tuercadelfiltro ..........................................
t
C*
Placadelfiltro ............................................
t
D*
Filtrode 2 etapas........................................
1
E*
Ensamblajedelsoportedel tiltro ................1
F
Ensamblajede manguera...........................
1
G
BoquiHade uso general..............................
1
H
Boquillaparamojadn.................................
t
I
Boquillarinconera......................................
1
J
Boquillade garra........................................
1
K
CepiNoparapolvo.......................................
t
L
Asade extensi6n........................................
2
M
Ruedade 8 pulgadas..................................
2
N
Asa metalica...............................................
1
0
Manualdel usuario.....................................
1
Bolsa de piezas sueitas "A" que contiene in
siguiente:
P
Q
R
RuedeciHade 3 pulgadas............................ 2
Adaptador de cnbo de rueda ...................... 2
Tapasde rneda .......................................... 2
ib
J
L
Bolsade piezassueitas"B" quecontienein
siguiente:
S
Purnode 3/8" x 4".......................................
2
T
Sepaladorde 3/8"x 1-1/2".........................
2
U
Contratnerca
...............................................
2
V
Arandelade seguridad................................
2
W
Arandelaplana............................................
6
X
Tuercade fijaci6n.......................................
2
* Esposiblequeeslosarticulosvenganpreensamblados,Si no est_npresentesen lacajade cart6n,
reviseel interiordeltambor paracornprobarsi
esl_n preensamblados,
23
R
:::_ zT
I:
{i'_'s
W
Remoci6n,instalaci6ny almacenamiento
de/asa met /ica
EIasamet_licavieneernpacadaen el tarnborpara
polvo.Usteddeberretirardichaasa metalicadel
tambor parapolvo e instaladaen elsentido
correctQde maneraqueel _readobladasealejede
la partetraserade laaspiradora,antesde continuar,
(Retiretambi_nla ruedade 8 pulgadasy p6egalaa
un lado pararealizarlainstalaci6n.)
Instalaci6n del asa
Optima y mantengaoprimidos los botonesde
liberaci6nmientrasinstala el asa en los
recept_culosparael asa ubicadosen el tambor
(veala ilustraci6n),
....._Pestillo(2)
NOTA:Unchasquidoaudible de los botonesde
liberaci6nindica un acoplamientoexitosodel asa.
Bajada del asa para almacenar
rire del tambor de polvo
hacia ahajo y deslicelo
hacia fuera hasta
retirarlo de la unidad
de la aspiradora para
mojadorseco
la aspiradora
Paraalreacenarla aspiradorapara reojado/seco,
optima y mantengaoprimidoslos botonesde
liberaciOnmientrasdeslizafirmementeel asahacia
abajo,
sa
Oprimay mantenga
__[iolnied°_el_Sh
eraci6n
Remoci6n del asa
Optima y mantengaoprimidos los botonesde
liberaci6n,de la rnaneraquese muestraen la
ilustraci6n,Mientras oprimefirmemente los
botonesde liberaci6n,tire del asa haciaarriba
hastaquitafla,
24
Ensamb/ajede un fi/tro de reemp/azo
NOTA:Paraobtener accesoal filtro, desenganche
el pestillo y retireel tambor para polvo, f_l
ensamblajedel soporte del filtro se puederetirar
agarrandoel soporte del filtro de la maneraque
se reuestraen las ilustracionesque aparecena
continuaci6n.
Palaccade° ._--_-'_-a teerca _
delfiltro
Tuercadelfiltro
" " P acade
tro
Aeillo central
fJ
J
Tiredeltambordepolvo
haciaabao y deslicelo
haca uerahastaretrar o
dela {midadde la
aspiradorapara
mojado/seco
Extremeabierto
Jdel fletader
\
Soporte
delfiltro
ADVERTENCIA:
Para sn propiaseguridad,
mlnca conecteel enchule al tomacorrientede
la fuente deenergiahastaqlte hayacompletado todoslos pasosdeensamblajey haya
leidoy entendidolas instruccionesde
seguridady utilizaci6n. Noutilice la
aspiradorasi alguna desuspiezas est_
danadao falta.
1, DesiicecuidadosamenteeI filtro sobre elaniiIo
central hastaque el fiitro se detengacontra el
soporte deIfiitro.
2, Coloquela piacadel fiitro y latuerca deI fiitro
en el espgrragoroscadoy apriete latuerca.
ApriGteiasoiamentecon los dedos,
NOTA:La paiancade latuerca del filtro debe
estar aiejadade la placa,de la maneraque se
muestraen la ilustraci6n.
IMPORTANTE:
No aprieteexcesivamentela
tuerca,ya que esto podria deformar o agrietar la
placa del filtro, el anillo central o elfiitro.
25
Ensamb/aje de/a aspiradorapara mojado/seco
Ensamblajedel tambor para polvo
Ranura
1, Desliceel tambor parapolvo alinterior de la
partedelanterade la unidadde laaspiradora
paramojado/secocuandose hayacompldado
elensamblajedelfiltro, Posicionelasruedasdel
tambor parapolvo en lasranurasdelareadel
tambory deslicelashastasu posici6ncorrecta,
NOTA:Cuandoreinstaleeltambor parapolvoy el
ensamblajedelsoportedelfiltro, aseg_resede que
la partedelanteradeltambor parapolvo est_ al ras
con elensamblajede la tapay lacubiertadel
motor,El tambor parapolvo debeencajar
perfectamenteen su sitio, En launidadde la
aspiradoraparamojado/secohay dos espigasque
debenencajaren las ranurasdeltambor, Esto
aseguraunaalineaci6nadecuada,El tambor para
polvo sedebeinstalarapropiadamentepara
asegurarque laaspiradorapara mojado/seco
funcionecorrectamente,
'_ueda deltamborparapolvo
_
_)_,---;_
_
_.,_
\ _i ;_-_
__
j
_1/_
[
Unidaddela
aspiradorapara
mojado/seco
, _
parebetpelvo
I L_-
Tiredeltamborpara
deslicelohaciatuera
haS a
!
2, Tirede los dos pestillosubicadosen la parte
delanteradeItambor para polvohaciaarribay
sobrelos soportesde pesfiiIo,y presi6nelos
firmementehaciaabajohastaqueseacopiena
presi6nen la posici6ncorrecta,Si lasespigas
deIensamblajede la tapay lacubiertadelmotor
no esl_n alineadas,los pestiiiosno quedar_n
bioqueados,
_
Pestillo bloqueado
e
a o de
de
pestillo
_
Pestillo desbloqueado
_,A ADVERTENCIA:
Para evitarla ingesti6nde
residuoso aguaen el impulsory dafiar la
aspiradora,no utilice nuncala unidadsin
tener ¢olocadoen susitio el ensamblajedel
sopore de
ro.
Introduzca la manguera
Boton
...... pulsador
Inserteel extremodelensambiajede la manguera
qoetieneelbotGnpulsadoren laentradade la
aspiradora,La mangueradebeacoplarsea presi6n
en su sitio, Paraquitarla manguerade la
aspiradora,optima el bot6n de liberaci6nque
est_en eI ensamblajede la mangueray tire de
la manguerahastasacariade laentradade la
aspiradora,de la maneraquese muestraen
la ilustraci6n.
26
a
unidadde la aspiradora
para mojado/seco
Ensamblajede/as ruedas
Si algunapiezafalta o est_da_ada,p6ngaseen
contactocon servicioal cliente.Nointente
ensamblarla unidadhastaquetengatodaslas
piezas.
1, Tiredel tambor parapolvo hastaretirarlo
completamentede laaspiradorapara
mojado/seco,Localicelasdos ruedasde
8 pulgadasde di_mdro y losdos ensamblajes
de bolsa,
dela aspiradora
Bloquedemaderade2 x4
2. Coloqueun bioquede maderade 2 x 4 de
aproximadamente
12 puigadasde Iongitud
debajode lapartetraserade la aspiradora,
3. CoIoqueunaarandelapianaen el pernode 3/8
de pulgadae instaleeI pernoen elagujero
ubicadoen elpaneltrasero. Empujeel perno
compielramente
a travGsdelcubo de larueda.
Contratgerca
4. Coioqueunaarandelapianay unaarandelade
seguridaden el perno,
5. Enrosqueunacontratuercayapridteiaconuna
Ilavedetuercade9/16 de puigada,Usted
tendr_ quesujetar lacabezadel pernocon el
casquiiIoparaIlavede carracade 9/16de
pulgadaparaapretarfirmementela
contratuerca.
_,randelaplana
Centratllerca
Perne de 3/8"
_randela de segufidad
_ Arandela plane
Perno de 3/8"
6. Inserteel adaptadordecubo de ruedaen la
ruedade 8 pulgadas.AsegOrese
de quelas
ranurasdeladaptadorde ruedaencajen
perfectamenteen las estriasde la rueda.
CoIoqueeladaptadory la ruedaen el perno.
7. Inserteun separadoren el pernoy empujeel
pernoatrav6sde la aberturaubicadaen la
rueda,
Ruedade 8"\
Adaptadordecube
derueda......
8. Instaleunaarandelaplanay unatuercade
fijaci6n, Aprietefirmementelatuercade
fijaci6n,
9. Utilizandoun mazode goma,golpee
suavementelastapasde ruedasobre cada
rueda,Es necesariohaceresto tanto en el lado
izquierdocomoen el lado derecho.
\\
Estriasdela rueda_
Ranurasdel adaptador-decuboderueda
10, Filelas ruedastraseraspisandolos cierresde
lasruedaspara asegurarla unidad,Inclinela
aspiradorahaciaarrasparadejaraldescubierto
el_rea de lasruedasdelanteras.
_
i _f/-r,_._
_l_HeRUeda de 8"
Separador / ,'
Cierre'
Arandelaplane/ /'
derueda Tuercadefijaci6n_ /
/
/
/
Tapederueda_"
27
//
11, Empujela ruedecillahaciadentro hastaquela
bola delvastagode la ruedecillaest6 insertada
completamenteen el receptaculo,Ustedoir_
cOmolabola seacoplaa presiOnen el
receptaculoy la ruedecillagirar9f_cilmente
cuandoest6 posicionadacorrectamente,
Bolad__
V_stagodela ruedecilla
_,_ sZi_,,,/r,/
Ruedecilla
J"
Funcionamiento
,_ ADVERTENCIA:
Pararedacirel riesgodeincendio,explosione dafiosa la aspiradora:
• Nodejelaaspiradoraell mamhamientrasest6desatendida.UstedpodriaIlo notarseiialesimportantes
queindiquenunfuncionamientoanormal,tal homoperdidadesunniOn,residuoso liquido quesalen
pot el escapeo ruidosanormalesdel motor.Dejede usarla aspiradorainmediatamente
si observa
estassefiales.
• Nodejelaaspiradoraenchufadacuandono seest6 utilizando.
• NocontinOeusandola aspiradmacuandoelflotadorhayanortadolasucciOn.
• Noutilicelaasphadoraenareascongasesinflamables,vaporesinflamabieso polvo explosivoen el
aire. Laschispasgeneradasdentrodel motorpuedenincendiarlos materialesinflamablessuspendidos
en elaire.Losgasesinflamablesy losvapomsinflamablesincluyen:liquidoencendedor,limpiadoms
tipo solvente,pinturasa basede aceite,gasolina,alcoholo rociadorestipo aerosol.Los polvos
inflamabiesinnluyen:polvo decarbon,polvode magnesio,polvode aluminio,polvo degranode cereal
o pOlvora.
• Norenojacon laaspiradorapolvosexplosivos,liquidosinflamabiesni cenizascaNentes.
• Nousela aspiradoracomoun rociador.
ADVERTENCIA:Para reducirel riesgo de descargasel_ctricas o lesiones:
• No exponga Jaaspiradola a la Iluvia ni deie que entre IJquJdoen el nompartimiento del motoL Almacene la
aspiradora en un lugar interior.
• No manejeel enchufe, el interruptor o la aspiradora non las manos mojadas.
• No hagaservicio de ajustes y lepalaciones de la aspiradora mientras est6 ennhufada. Si la aspiradora no
esta funcionando como deberia, lefaltan piezas, se ha caido, esta dailada, se ha dejado a la intemperie o
se ha caido al agua, devuOlvalaa un centro de servicio independienteo Ilame a servicio al nliente.
• CuandoutiNce[in cordon de extension, utilice I]nicamente cordones con capanidadnominal para uso a la
intemperie que estOnen buenas condiciones. No deje que la conexiOnentre en nontacto con liquido.
• No renojacon la aspiradora materiales tOxicos, para redunir el riesgo de inhalar los vapores o el polvo.
DespuOsde enchufarel cordonde energiaen el
tomacorriente,enciendala unidadempujandoel
interruptorde laposiciOn'0" a laposiciOn"f", Los
simbolosutilizadosen el accionadordel interruptor
son los simbolosinternacionalesde "encendidoy
apagado'L"0" es elsimbolo de "APAGADO"
y 1"
esel simbolode 'ENCfTNDIDO".
Parareducirel riesgodesacudidaselOctricas,este
aparatoelectrodomOstico
tiene un enchufepolarizado (unahoja es m_sanchaquelaotra), Esteenchufeentrar_en un tomacorrientepolarizadosolamentede unamanera.Si el enchufeno entrapot
completoen el tomacorriente,d61elavuelta.Si
siguesin entrar,pOngaseen contactocon un electricista competentepara instalareltomacorriente
adecuado.NohaganingOntipo decambioen el
enchufe,
28
=APAGADO I =ENCENDIDO
Familiaricesecon los accesoriosquese incluyen
con laaspiradora,Cadaaccesoriopuedeusarsede
diversasmanerasparaaspirary soplarresiduos,A
continuaciOnhayuna listade losaccesoriosy de
sus usos,
Boqailla
deaso general: Boquillaqueseusa en la
subir_eltono del ruidodel motor debidoa que
se producir_un aumentode lavelocidaddel
mismo,
mayoriade lasaplicacionesde aspiraci6n.
Boqaillaparamojado: Se utilizapararecoger
materialesmojadosen superficieslisascon elfin
de recogerliquidosy secarlasuperficieen una
solapasada.
4, Despu_sde utilizar laaspiradorapararecoger
liquidos,deje queelfiltro sesequeparareducir
el riesgode queseforme mohoy el flltro se
dahe,
Boqaillade garra: Seutiiizapararecoger
materialesmojadoso secos,
Cepilloparapone: Recogidaen seco de polvoy
residuosde suciedad,
IMPORTANTE:
Parareducirel riesgode da_osa la
aspiradora,no tenga en marchael motor con el
flotadoren la posici6nelevada.
Boquillaparaauto(nosaministrada):Boquilla
pararecogerrnaterialessecosen interioresde auto
yen la mayoriade limpiezasdetapiceria,
Tabosextensores:Estostubos puedenconectarse
entresiy proporcionanIongitudadicionalpara
tenet rn_salcance,
Vaciado del tambor
_l_ ADVERTENCIA:
Para redacirel riesgode
lesionesdebidasa [inarranqaeaccidental,
desenchaleel cord6n deenergiaantesde
vaciar el tambor.
Manguera:Proporcionatransferenciade capacidad
de aspiraci6no sopladoal lugar detrabajo,
Proporcionalos mediospara acoplarlostubos
extensoresy las boquillas,
Boqaillarinconera:Se utilizapara recoger
residuesen lugaresdificilesde alcanzar,
Recogida de materiales secos
con la aspiradora
1, El flltro debeestarsiempreen la posici6n
correctaparareducirel riesgodefugasy
posiblesda_osa laaspiradora,
2, La aspiradorapara mojado/secoviene conel
figro 17907instalado,AI utilizarla aspiradora
pararecogerpolvo muy fino, ser_necesarioque
ustedvacieel tambory limpieelfigro a
intervalosrn_sfrecuentesparamantenerun
rendimiento6primo,
NOTA:Senecesitaun figro seco pararecoger
materialseco.Si utilizalaaspiradorapara recoger
polvo cuandoelfigro ed_ moiado,dste seaiascar_
r_pidamentey ser_muy dificil limpiaflo,
ADVERTENCIA:
Para redacirel riesgode
que se prodazcanlesionesen la espaldao
caidas, nolevantela aspiradorasi pesa
demasiadodebidoa qae contieneliqaidoo
residues.Saqueo hagasalir ana cantidad
salicientedel contenidopara hacerquela
aspiradoraseasnlicientementelivianacome
para poderlevantarlac6modamente.
1. La aspiradoravieneequipadacon un drenaje
paravaciarlafgcilmentede liquidos,Simplementedesenrosquelatapa deldrenajey levante
ligeramenteel ladoopuestoparavaciarel
tambor,
2, Otraopci6nes retirareltambor de la aspiradora.
3. Tiredeltambor haciafuerahastardirarlo de la
aspiradora,tirandohaciaabajodeltambory
desliz_ndolosobre elsoportedel ejeubicado
debajodeltambor.
Recogida de liquidos con la aspiradora
Tambor
para
1, AI recogerpeque_ascantidadesde liquido se
podr9dejarpuestoelfigro,
2. AI recogergrandescantidadesde liquido
recomendamosquitarel figro, Si no se quitael
figro, _stese saiurar_y podr_aparecernieblaen
elescape.
3. Cuandoel liquido queseencuentreen eltambor
alcanceun nivelpredeterminado,el mecanismo
delflotador subir_automaticamenteparacortar
elfiujo de aire,Cuandoesiosuceda,apaguela
aspiradora,desenchufeel cord6nde energiay
vacieel tambor.Sabr_queelflotador ha subido
porqueelflujo de aim de laaspiradoracesar_y
tolvo hacia aba'o y
esU_elo hacia tllera
Sop
del eje'
29
/
Drenaje/
unidad de la aspiradora
para mojado/seco
Funcionamiento(continuaci6n)
4, Viertaelcontenidodeltarnboren el recipientede
elirninaci6nde residuesapropiado.
5. Coloquede nuevoel tarnborreinsert_ndoloen la
cavidady ernp_jelohastaquese acoplea
presi6nen su sitio.
Traslado de la aspiradora para
mojado/seco
Pararnaniobrarla aspiradora,el asarnet_lica
ubicadaen la partetraserade la unidadse debe
ubicaren posici6nverticalparafacilitarel rnovirniento,Aseg_resede desbloquearlas ruedas
traserastirandohaciaarribade loscierresde las
ruedasantesde moverlaaspiradora.
_Tire
haciaarribadelos
;ierresdelas ruedasparadesbloquearlos
Dispositivo de soplado
La aspiradoracuenta con un orificio de sopiado,
Puedesoplar aserriny otros residuos,Siga los
pasosque se indicana continuaci6npara usar la
aspiradoracomo soplador.
ADVERTENCIA:
Usesiempreprotectores
ocalaresde seguridadqae ctirnplallconla
llormaANSIZ87.1(o ell Callad_,conla llorma
CSAZ94.3) antesdeatilizar la aspiradora¢orno
soplador.
_l, ADVERTENCIA:
Parareda¢irel riesgode
lesiollesa las personasqaeest_llpreselltes,
mallt_llgalasalejadasdelosresidaos
soplados.
_1= ADVERTENCIA:
Use alla m_scaraalltipolvo
si el soplado genera polvo que podria ser
llhaado.
_, PRECAUCION:
Pararedu¢irel riesgode
daflosa la aadi¢i611,
use protectoresde oidos
caalldo titilicela aspiradora/soplador
darallte
rmchas horassegaidaso cualldo la atilice ell
all _rea ruidosa.
1. Localiceel orificio de sopladode laaspiradora,
2. Inserleel extrernodefijaci6n del ensarnblajede
la rnangueraen el orificio de sopladode la
aspiradora,La rnangueradebeacoplarsea
presi6nen su sitio, Paraquitar larnanguerade
laaspiradora,oprirnael bot6n de liberaciOn
ubicadoen elensarnblajede la rnangueray tire
de la rnanguerahastasacarlade laentradade la
aspiradora,
3, (Opcional) Instaleel mangode extensi6nen
el extreme opuestode la mangueray luego
coloque la boquilla rinconeraen eltubo
extensor,
4, Enciendalaaspiradoray estar_lista para
utilizarsecorno soplador.
Los accesoriosrecornendadosCraftsmanest_n
disponibles en lastiendas rninoristas Sears,
La boquilla sopladoraSears No, de existencias
9-16933se recomiendapara soplar residuos.
3O
Almacenamiento
Almacenamiento de la manguera
Enrollador del cord6n
La manguerasepuedeaJmacenar
coIoc;_ndoJa
en
la bandejasuperiorextraible,Ustedtambi6npuede
abrir la partesuperiorembisagradaparaobtener
accesoal areade almacenamientode la manguera,
Cuandose hayacomplei"adolalimpiezacon la
aspiradora,desenchufeel cord6ny enr611elo
alrededordel_readel enrolladordel cord6nquase
encuentraen la partetraserade la unidad,
Baadejadealmaceaamiento
dela maflguera
Areade
almaceaamiento
Anneso
snpefior
embisagradodematefiales
a]areadealmaneaamiento delimpieza
de]a maagnera
Materiales
f
AreadealmaceaamJanto
de
Insmangos
deaxtaasi6a
Almacenamiento
Almacenamiento
del asa
Cuandoalmacenelaaspiradoraparamojado/seco,
oprimay mantengaoprimidoslos botonesde
liberaci6nmientrasdeslizafirmementeel asahacia
abajo,
de Ins accesorios
Los accesoriosde laaspiradoraparamojado/seco
se puedenalmacenaren la bandejainferior
extraible,Los malerialesde limpiezase pueden
almacenarenel _reade almacenamientoubicada
en la partetraserade launidad,entrelasruedas,
Los mangosde extensi6nseacoplana presi6nen
su sitioen laparletraserade la aspiradora,en las
_reasde almacenamientode losmangosde
extensi6n,
"_(
fU _"
/_
Bandeja de
almaceaamient_
de accesnrios
31
_f_
Oprima
y mantenga
i;r!iiedr::i:enSl_i'::tnreSs
destiza .I asa ha.ia
Mantenimiento
Filtro
Limpieza de un filtro seco
NOTA:Estefiltro est_ hechode papelde altacalidad
disenado para detener particulas de polvo muy
pequenas.El filtro se puede usar para recoger
malerial seco o pequenascantidadesde liquido,
Maneje el filtro cuidadosamenteal quitado para
Nmpiadoo alinstalado,Esposibb queseproduzcan
armgas en los pliegues del filtro, pero dichas
armgasno afectar_nelfuncionamientodelfiltro,
1, Se puedenquitar algunos residuossecos sin
quitar el filtro de la aspiradora,D6una
palmadaen la partede arribade latapa
mientras laaspiradoraest_ apagada,
Limpieza del filtro
2. ParaIograrunaNmpieza6primacon elfin de
eliminarel polvo acumuiadoen el fiitro, limpie
elfiltro en un _reaabierta.La limpiezadel filtro
DEBEreaiizarseal airelibre y no enel interior
de unavivienda.
3, Despu6sde quitar el filtro de la aspiradora,
saquelos residuessecos golpeandosuavementeel filtro contra la paredinterior del
tambor para polvo, Los residuosse soltar_ny
El filtro sedebelimpiar a menudopara mantener
un rendimiento6ptimo de laaspiradora,
Aseg_resede secarel filtro antesdeguardarla
aspiradorao de recogerresiduossecos,
caerae,
IMPORTANTE:
Despu6sde limpiarelfiltro,
compruebesi 6sletienedesgarraduraso agujeros
pequenos,Nouse un filtro quetengaagujeroso
desgarraduras,Inclusoun agujeropequenopuede
hacerquesalgatouche polvo de laaspiradora.
C_mbieloinmediatamente,
4, Paralimpiezaa fondo del filtro seco con
polvo fino (sin residuos), haga pasaraguaa
trav6s del filtro tal como se describebajo
"Limpiezade un filtro mojado",
Remoci6n del filtro
Despu6sde quitar elfiltro, hagapasaraguaa
travdsde 61usandounamanguerao desdeuna
espita,Tengacuidadode quela presi6ndel agua
procedentede la manguerano seademasiado
fuertecomo parada_arelfiltro,
Limpieza de un filtro mojado
Paraquitarel filtro con elfin de limpiado o
reemplazado,desenrosquelatuercadelfiltro de la
jauladelfiltro y levanteelfiltro y la placadelfiltro.
ADVERTENCIA:
Noutilicela unidadsi se ha
retiradoel tlotador. Esteimpidequeentre
iqu doene mpusory se danee mo or.
Instalaci6n
Consultela secci6n"Ensamblajede un filtro de
reemplazo"queest_en la p_gina25 de este
manual
IMPORTANTE:
Paraevitardanosa laruedadel
sopladory al motor, vuelvaa instalarsiempm el
filtro antesde usar laaspiradorapara recoger
malerial seco,
Dejequeel filtro sesequeantesde volvera
inslalarloy de guardarlaaspiradora.
32
Limpieza y desinfecci6n de la
Ruedecillas y ruedas
aspiradorapara mojado/seco
Si elcarro rechinao es dificil de hacer rodar,debe
ponerdos o tres gotas de aceitede uso general
en eI eje de cadarueda,Si lasruedecillashacen
ruido, puedeporter unagota de aceiteen el eje del
rodillo para que haganmenos ruido,
Paramantenerel mejor aspectoposiblede la
aspiradorapara mojado/seco,limpie su exterior
con un pasohumedecidocon aguatempladay un
jab6nsuave,
Paralimpiar eltambor:
1, Vaciede residuoseltambor,
Armaz6n y mangos
El mangometalicoest_ pintadoparaimpedir la
formaci6n de herrumbre, Sin embargo,los liquidos y los residuoscorrosivosdebenlimpiarsecon
un pal_osuavesi entranen contactocon el
mango,
2. Lavea fondo eItambor con aguatempladay un
jab6nsuave,
3. Limpieel tambor con un pasoseco.
Antesde un almacenamientoproiongadoo segOn
sea necesario(por ejemplo,si se recogenaguas
residuaies),se debedesinfectareltambor.
ParadesinfectareI tambor:
SEGURIDAD
y CONFIABILIDAD
del prodacto,
las reparacionesy el ajuste debenser
._1=ADVERTENCIA:
realizadospor
Centrosde
Para garantizar
ServicioSears,
la
utilizandosiemprepiezasderepuestoSears.
1, Eche1 gal6n de aguay 1 cucharaditade blanqueadorde cloro en eltambor,
2, Dejeque lasoluci6n reposedurante20 minutos
y agitelacuidadosamentecadapocosminuto._
asegurandoaede toojar todas lassuperficies
interioresdel tambor
3. VacieeI tambor despudsde 20 minutos.EnjuagueIocon aguahastaqueeI olor a blanqueador
desaparezca.Dejequeeltambor sesequecompietamenteantesde sellar el motor sobreel
tambor,
33
Piezasde repuesto
Aspiradora para mojado/seco de 11 galones
Nfimero de modelo 113.177895
Pida siempre por nflmero de pieza --no por nflmero de cJave
No. d_
clave
No. de
pieza
Descripcion
1
510013-1
Ensamblajedel accionador
2
032790
Ensamblajedel cabezal del motor
3
032119-1
Ensamblajedel soporte del fiitro
4
032120
Ensamblajedel asa
5
032113-1
Ensamblajedel tambor para poivo
6
032116-1
Pestiilo de tambor
7
73105
Tapa del drenaje
0
030598
Rueda de 8 pulgadas (cant. 1)
9
17907
Fiitro para particuias finas
10
73317
Piacadel fiitro
11
73316
Tuerca del flitro
12
16922
t Boquiiia utiiitaria
13
16950
14
17817
t Boquiiia de garra
t Boquiiia para mojado
15
16902
t Boquilla rinconera
16
16901
t Cepiilo para poivo
17
031337-9
10
17854
t Ensambiajede manguera
t Asa de extensi6n
19
509950
Ensambiajede bolsa (ruedeciilas)
2O
5O9949
21
SP6699
Ensamblajede bolsa (herrajes para la rueda de 0 puigadas)
Manual del usuario
t Articulodeexistenoias.
Sepuedeobtenera travesdeldepartamento
defeNeteriade lamayoriade
tiendasminoristasSears.
34
i
_.
ADVERTENCIA
SERVICIO DE AJUSTES Y REPARACIONES DE UNA ASPIRADORA PARA
MOJADO/SECO CON AISLAMIENTO DOBLE
Entunaaspiradora
paramojado/seco
conaislamiento
doneseproporcionan
dossistemasdeaislamiento
en
vez deconexiona tierra. Nose proporciona
ninpt_nmediode conexion
a tierraen tin aparatoelectrodomestico
conaislamiento
doble,nisedebeafiadira_ste ninpt_n
mediodeconexion
a tierra.Elserviciode
ajustesy reparaciones
de onaaspiradoraparamojado/seco
conaislamientodone reqoiereextremado
cuidado
y conocimiento
delsistema,y debeserrealizadotinicamente
perpersonal
deserviciocompetente.
Lospiezasderepnestoparala aspiradoraparamojado/secn
conaislamiento
dobledebenserid_nticasa
lospiezasqoereemplazan.
Laaspiradora
paramojado/seco
conaislamiento
done estamarcadaconlos
palabras"DOUBLEINSULATED"
(conaislamiento
doble)y poedequeel simbolo[_ (tincoadrado
dentro
L_J
deuncoadrado)
tambi_nestemarcadoenInsaparatos.
Pararedocirelriesgodelesiones
percausadedescarpas
el_ctricas,
desenchofe
elcordon
deenerpiaantes
dehacerserviciodeajostesy reparaciones
alas piezasel_ctricasdelaaspiradora
paramojado/seco.
12
%
15
"-4
18
35
Reemplazodel filtro
i.Qu6 filtro de reemplazo es adecuado para sus necesidades?
$islem9
Escoger un filtro es tan f_cil
como decir 1, 2, 3,,.
Filtro
est_ndar
de lillto
con
17816
• Aserrin
_"
•
_"
Recogida de material mojado
• Suciedad tipica de s6tano,
_"
de {J#ro con
prtt_mion
conprodu_o
armicro__no
prtt _mion
®nprod
ucoar_imi_obiaro
Coltbateeinhibe
el clecimier_ode Combatee inhibeelc[ecimientode
moho,verdirlybadeuasque p_eder nolo verdii y bacterias
que pueder
aco_rladuraciOrl
de1
filtro
Aplicaciones
$isten_
[email protected]
_ _.microban _
17907
aco_ar
laduraciO_
delfiitm
_
17912
,/
,/
,/
,/
,/
,/
,/
,/
,/
,/
garaje o auto
•
Polvo de pared de tipo seco
• Cenizasfrias*
- Parrilla de barbacoa
- Chimenea
COMeC]GARRILLOS,
FOSFOROS
O CENIZAS
CAL]ENTES.
NORECOJA
CON
LAASP]RADORA
NADA
QUE
ESTE
ARDIENDO
OHUMEAND¢
•
•
Protecci6n
antimicrobiana
_:_.Mlcroban
_ _,Mlcmball
Particulas finas en interiores
- Caspade animales dom6sticos
ATRAPA EL 99.97%
- Filtro de homo
- Pelusa de secadora
DELASPART[CULAS
HASTA
UNTAMANO
TANPEQUEI_O
COMO
o.3MICRONES
- Tapiceria
•
Polvo de cemento
•
Polen/Alergenos
[_
MICROBAN es una marca legistlada de Micmban Products Company
MAXIMICEEL RENDIMIENTODE LAASPIRADORACONUN FILTRONUEVO
La frecuenciatipica de reemplazoes de 2 veces al afio
36
Notes/ Notas
37
Notes/ Notas
38
Notes/ Notas
39
Your Home
For repair - in your home - of all major brand appliances,
lawn and garden equipment, or heating and cooling systems,
no matter who made it, no matter who sold it!
For the replacement parts, accessories and
owner's manuals that you need to do-it-yourself.
For Sears professional installation of home appliances
and items like garage door openers and water heaters.
1-800-4-MY-HOME _
Anytime,dayor night
(1-800-469-4663)
www.sea rs.com
(U.S.A. and Canada)
www.sea rs.ca
Our Home
For repair of carry-in products like vacuums, lawn equipment,
and electronics, call or go on-line for the nearest
Sears Parts and Repair Center.
1-800-488-1222
Anytime, day or night (U.S.A. only)
www.sears.com
To purchase a protection agreement (U.S.A.) or
maintenance agreement (Canada) on a product serviced by Sears:
1-800-827-6655
(U.S.A.)
Para pedir servicio de reparaci6n a
domicilio, y para ordenar piezas:
1-888-SU-HOGAR
s_
(1-888-784-6427)
1-800-361-6665
(Canada)
Au Canada pour service en frangais:
1-800-LE-FOYER
Mc
(1-800-533-6937)
www.sears.ca
@ Sears, Roebuck and Co.
® Registered Trademark / TMTrademark / sMService Mark of Sears, Roebuck and Co.
® Marca Registrada / TMMarca de Fabrica / sMMarca de Servicio de Sears, Roebuck and Co.
_c Marque de commerce / _DMarque dCposCe de Sears, Roebuck and Co.
Part No. SP6699
Form No. SP6699
Printed in Mexico
07/08