1
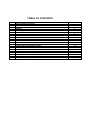
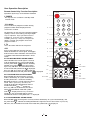
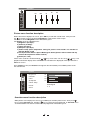
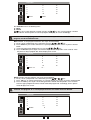
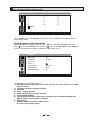
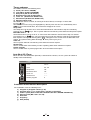
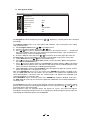
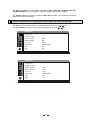
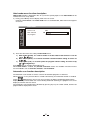
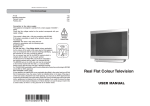
www.denver-electronics.com
DTX-2128 A2/NIC
User Manual
TABLE OF CONTENTS
S/N
TOPIC
General Safety Precautions
Position
Cleaning
Standby
Switching on
Quick Start Guide
User Operation Description
Remote Control Key Function Description
MENU Function Description
Sound Menu Function Description
Equalizer Submenu
Picture Menu Function Description
Overview Menu Function Description
Features Menu Function Description
Child lock Submenu
Timers Submenu
Installation Menu Function Description
Hotel mode Menu Function Description
Automatic scan Function Description
Television Package
Technical Specification
3
4
4
4
4
4
5
5
8
8
9
10
10
12
13
14
14
17
17
18
18
Thank you for purchase of this colour TV set. Please read this instruction carefully. You will
learn how to use TV set and what to do to prolong its service life.
General safety precautions
1. Do not place anything on the television and ensure a minimum distance 10cm around
the apparatus for sufficient ventilation.
2. If your television mains lead or plug becomes damaged or requires replacement,
switch off your television, remove the plug from the socket and call a qualified service
engineer.
3. Always situate your television on a solid and steady surface.
4. Never use a make-shift stand fixed with wood screws.
5. This television is meant to be used in the home in moderate climates (not in tropical
climates). Other use might be dangerous.
6. Do not expose the apparatus to dripping or splashing.
7. Never let anyone, especially children, push small objects into ventilation slots.
8. Route the mains lead where it will not be walked on, crushed, chafed, cut or damaged
in any way.
9. Pull the mains plug out of the wall socket and disconnect the aerial during
thunderstorms.
10. Do not use the television near water, for example near a bath, sink, and pool or in any
damp environment. Do not place objects filled with liquids, such as flower vases, on top of the
television.
Remark: Do not leave the device in stand by mode for a long time.
ٛ
11. If you have spilt liquid into your television, or it fails to operate correctly, switch it off,
ٛ
disconnect the plug and call a qualified service engineer. Never remove the back cover.
12. Ensure that the ventilation is not be impeded by covering the ventilation openings
with items, such as newspapers, table-cloths, curtains etc.
13. Do not place naked flame sources, such as lighted candles on the apparatus.
14. Take attention to the environmental aspects of battery disposal.
Attention: Do not throw Batteries in to litter bin. Please, give it to appropriate station
or shop-assistant.
Notice: Do not keep Batterie under the sun or in the heat. Do not throw it in the fire.
Iٛt might Burst!
Notice: Never take off televisor shell to avoid electric shok! There are no useful parts for
consumer! If it need's repair, let it do the skilled personnel of service of televisors. Do not
cover air vent with any objects.
Your television is in conformity with the safety requirements of standard EN 60065.
Child's an invalid safety.
Keep all packing component parts (plastic bag, box, foam shell and etc.) out of reach of children.
Notice: Do not let child to play with the bag. May Choke!
To protect children and ill people from electric shok, you have to take care of them.
This device is not a toy. Do not let a child to play with it.
Symbols of this instruction.
Important notes are specially marked for your safety. It is necessarily to pay attention to those notes,
to avoid accidents and damage.
Notice: Warning of danger for your health and risk to get injured.
ٛ
A
ٛ ttention: Specify possible danger to televisor or other objects.
ٛ
Remark: Gives You further advice and information.
1
Position
For best results, choose a position where light does not fall directly on the screen and
away from sources of heat. Do not put objects with magnetic field nearby the television or it
could affect the quality of the colours.
Cleaning
Switch off and unplug the television and use only a lightly dampened soft cloth to clean it.
Do not use chemically active substances as these may damage the cabinet finish.
Standby
For convenience your television can be switched to standby with the remote control. To
preserve optimum picture quality (by de-magnetising the picture tube), we advise you to
switch off your television at the on/off switch regularly.
Switching on
1. Remove the battery cover from the remote control unit and install two AA type batteries
according to the diagram inside the battery compartment. Replace the battery cover.
Notice: Danger of explosion if battery is incorrectly replaced. Replace only with the
ٛsame or equivalent type.
2. Connect your aerial to the TV set.
3. Connect your TV to a 230 VAC power socket.
4. Switch on your TV with the power switch on the front panel.
If the screen does not light up, press a button P+ or P- on the front of the television set
or any key such as POWER,
or
, 0, 1, …9 on remote control.
Notes:
1. After switching the television set on by using power button on front panel, the set
switchs to the same mode as it was before switching off by this button. If TV set
was switched off by using the POWER key on remote control, it switches to standby
and the indicator LED on the front panel turns red.
2. After switching television set from standby to operating status, the indicator LED
turns to green from red.
Quick Start Guide
1. Fit the Batteries into the Remote Control according to the diagram in the battery compartment.
2. Plug your main home aerial into the TV set.
3. Plug your TV into the mains and switch ON by pressing the power button on the front panel. If
your TV screen does not light up, press the POWER,
,
key or any digital key on the hand unit
to cancel standby mode.
4. On your remote control press the "OK" key once. The main menu will appear on the screen.
5. On your remote control use the key 18 (P+, P-) to select Installation icon.
6. On your remote control press the
key once to select Installation menu.
7. On your remote control press the
key four times to select Autostore item.
On your remote control press the key Ptwice to run Autostore. Your TV will now automatically
tune and store your local available TV stations. This may take a few minutes.
8. Select your favorite program by using the ,
keys or the digital keys.
9. Set your favorite volume level by using
,
keys.
Remark: If You forget the child lock code or dial it wrongly, press code 4711 on remote
control by pressing digital key to unlock the locked program.
10. You may change code the lock after TV will switch on. Refer to the instruction booklet for further
information about the many other facilities.
Remark: When there is no signal in the aerial socket, the TV screen will appear in blue colour
if the Blue back item is set to On in Features menu.
2
User Operation Description
Remote Control Key Function Description
POWER
Operations by the keys on the Remote Controller
RC-5R-1
1
1 POWER
This key turns the set from the standby mode
into On mode.
2 1-9 digits
Press to select TV programs number directly,
program number will be displayed on the
screen for 3 seconds.
2
For programs 01~99, to get the expecting program
quickly, it can be accessed by pressing 2 digital
keys in sequence. Say if you want to access
program 23 , press key 2 first, and within 2
seconds, press key 3. If key 3 is not pressed
within 2 seconds, the program accessed is
program number 2.
3
1
2
3
4
5
6
7
8
9
TV
0
AV
4
I/II
14
15
5
3 TV
Press the button will view the TV picture.
4 I/II
6
Press to force Mono to Stereo or Stereo to
Mono for NICAM / A2 stereo signal, and toggles
between Dual I and II if NICAM / A2 Dual Sound
is available. More detailed information is listed
below.
7
P
u
16
17
8
4.1 FOR NICAM STEREO SOUND SIGNAL.
When NICAM stereo sound signal is received,
it will be decoded by TV system automatically,
and the yellow OSD “
” indicates decoding
NICAM stereo signal for current sound status.
If press key “I/II” once, the sound will be forced
to mono mode with yellow OSD “
“ displayed.
Press key “I/II” once more, the sound mode will
" displayed.
be back to NICAM stereo with yellow OSD “
4.2 FOR NICAM DUAL SOUND SIGNAL
When NICAM dual sound signal is received,
it will be decoded by TV system automatically,
and the yellow OSD " I "indicates decoding
NICAM dual channel 1 sound signal for current
sound status. If press key “I/II” once, the
sound will be forced to NICAM dual channel
2 mode with yellow OSD " II" displayed.
Press key “I/II” for the third time, the sound
will be forced to MONO mode with yellow
OSD “
“ displayed. Press key “I/II” for the
fourth time, the sound mode will be back to
NICAM dual channel 1 with yellow OSD " I " displayed.
P
PP
OK
9
18
10
NOT USED
TXT
TIME/SUB
19
11
?
20
12
SLEEP
NOT USED
NOT USED
13
4.3 FOR NICAM MONO SOUND SIGNAL
When NICAM mono sound signal is received, it will be decoded by TV system automatically, and
the yellow OSD “ ” indicates decoding NICAM mono signal for current sound status. If press key
“I/II” once, the sound will be forced to mono mode with yellow OSD ”
3
21
22
" displayed.
4.4 FOR A2 STEREO SOUND SIGNAL.
When A 2 stereo sound signal is received, it will be decoded by TV system automatically, and the
yellow OSD “
” indicates decoding A2 stereo signal for current sound status. If press key “I/II”
once, the sound will be forced to mono mode with yellow OSD “
“ displayed. press key “I/II”
once more, the sound mode will be back to A2 stereo with yellow OSD “
" displayed.
4.5 FOR A2 DUAL SOUND SIGNAL
When A2 dual sound signal is received, it will be decoded by TV system automatically, and the
yellow OSD " I " indicates decoding A2 dual channel 1 sound signal for current sound status. If
press key “I/II” once, the sound will be forced to A2 dual channel 2 mode with yellow OSD " II "
displayed. press key “I/II” once more, the sound mode will be back to A2 dual channel 1 with
yellow OSD " I " displayed.
4.6 FOR MONO SOUND SIGNAL
When mono sound signal is received, it will be decoded by TV system automatically, and the
“ indicates decoding mono sound signal for current sound status. Even if press
yellow OSD “
key “I/II” once, nothing changed.
5 RED, GREEN, YELLOW and BLUE keys
In TV mode, press red key to display Sound menu directly, press green key to display Picture
menu directly, press yellow key to display Overview menu directly, press blue key to display
Installation menu directly,
These 4 color keys in teletext mode can quickly enter the pre-captured teletext page according to
indicated information at present teletext page.
6 PP
The TV picture can be adapted to suit the current lighting condition. Press successively to select
the desired setting. There are 5 picture modes such as “Personal, Movie, Sport, Weaksignal,
Game”. Movie, Sport, Weaksignal and Game are preset values of Brightness, Contrast,
Colour and Sharpness, whereas Personal is the last analog setting that the user had set.
7 RECALL
Press it for the first time to view the previous program. Press it for the second time to return the
present program.
8 V+ /VPress the
or
to set the sound level higher or lower, volume bar will be displayed for 3
seconds.
or
to set the sound level higher or lower, volume bar will not be
In teletext mode, Press the
displayed.
9 OK
This menu contains five sub-menus used for selecting various parameters of picture, sound,
overview, feature and Installation.
Press the OK key to display main menu. Press the OK key again, the main menu will
disappear.
It is also used to return from a submenu to main menu.
You can call up a sub-menu and values to set using the arrow keys (18 and 8).
10 TI ME/SUBCODE
Press the button will display time on screen. Press the button once more, the time will disappear.
This key allows the user to enter 4 digits subcodes to show more information when subpage is
available in the current page.
11 TV/TXT
Press the TV/TXT key to change the viewing condition from TV to Teletext mode if TV stations in
your local have teletext broadcasting. Press the TV/TXT key once more, TV picture will display
again.
4
12 CANCEL
This is a toggle function key to display last TV picture from the current teletext page or vice versa.
13 MIX
This is a toggle function key to display TV picture and teletext together or teletext only.
14 AV
Press the button will view the TV and the external video in the following sequence.
TV Æ AV1 (Full Scart) ÆAV2 (AV Scart ) Æ S-Video (optional) Æ RGB Æ TV
Related OSD will display for about 3 seconds.
AV modes
The required outer signal source you can select by pressing the AV key on the remote control
(depending to the model).
AV1, AV2: Selects video and audio inputs on the SCART1 or SCART2 connectors. Used for
direct connection of VCR, satellite receiver, etc.
S-VIDEO: Selects the inputs of sound, picture's sharpness and colour signals in the SCART2 socket.
It is used to connect the video, satellite receiver or other equipment.
Front AV: Using the Front AV connector to connect directly audio- or videotools for example
videocamera.
Please take care that the Scart connector “AV 2” is parallel connected with the “Front ”(side) and can
not use together in the same time to avoid interferences during the operation.
RGB: Selects red, green and blue signal inputs on the SCART1 connector. Used for the direct
connection of game machines and other equipment to get good quality picture.
Notes:
1. For better picture quality your VCR or satellite receiver should be connected to SCART
socket on your TV set.
2. For receiving VCR signal via areal socket a programe with number 99 is recomanded.
15 SOUND EFFECT
You can find a Incred. Mono or Incred. Stereo effect depending on the input signal (mono or stereo).
In “Incred. Mono” mode, sound signal is pre-processed to obtain special sound effects just for mono
sound signal. In “Incred. Stereo” mode, sound signal is pre-processed to obtain special sound effects
just for stereo sound signal.
16 STATUS
Press STATUS to view present program number and name, color standard, sound standard,
preset mode, and etc. Status display OSD will last for 3 seconds.
17 MUTE
Press MUTE key to switch off the sound temporarily. The mute sign will be displayed. Press MUTE
key or
key again to recover the sound from mute mode.
18 P+
/PPress P+ to select programs upward and P- to select programs downwards, program number will
be displayed for 3 sec. When Teletext is active, these keys increase or decrease the current
teletext page.
key can be used as a page up/down key in teletext mode.
19 HOLD
This is a toggle function key which stops the current page acquisition to prevent teletext update.
HOLD can be released by pressing HOLD key or requesting 3 digits page number again.
20 SIZE
This key is to expand character size and display half teletext page. The first SIZE key pressing will
display expanded upper half of teletext page. The second SIZE key pressing will display expanded
lower half of teletext page. The third SIZE key pressing will display normal size teletext page.
5
21 REVEAL
This is a toggle function key to display hidden characters.
22 SLEEP/INDEX
The set will switch off to standby mode if the sleep timer expires. The Sleep timer can be set in
step of 5 minutes with a maximum time up to180 minutes. To disable the sleep function,
repeatedly press the SLEEP key until the set time returns to off. Related OSD will display for about
3 seconds.
Press this key will show the teletext index page.
MENU Function Description
Your television set is controlled by using OK tables such as Sound, Picture, Overview,
Features and Installation. These OK tables appear on the screen after pressing remote
control button OK one or more times. OK button is used to select the different menus. It is
also used to return from a submenu to upper menu. The television set parameters and their values
are arranged in these OK tables. The item line of the OK table with required parameter you
can select by using remote control keys
or , and to change this parameter by using keys
or
. And
can be used to select submenu. The sub-menu tables from the TV screen
disappears after pressing the remote control key OK or about after the last action in these tables.
General Menu Operations.
To minimize the number of keys on remote control, the less frequent used functions are only
accessible via menus. These menus are controlled by using keys such as OK,
,
,
,
and etc.
Sound menu function description
If the OK key is pressed once, we can get main menu as showed picture as below. The default
selected item is Sound menu icon. By pressing
key once to get the first item row “Volume” in
sound menu. The color of selected item will be changed to green from white.
The Sound menu has following items:
a) Volume (63 Steps)
b) Balance (+/-31 Steps)
c) Bass (63 Steps)
d) Treble (63 Steps)
e) AVL (Automatic volume level control function setting. Two modes are available as
On and Off)
f) Loudness (On/Off) (To boost low and high frequencies at low volume status.)
g) Listening mode (Surround Effect) Two modes are available as Normal / Incred.
Mono (Wide Mono) or / Incred. Stereo Wide Stereo)
h) Equalizer (Five bands equalizer setting for sound effect. Adjustment with +/-7 steps
is available for each band.)
i) Preset (Personal / Voice / Music / Theater) (The Voice, Music and Theater modes are
preset with fixed value for Bass, Treble, Loudness and Equalizer. Personal is
6
the last adjustment value of Bass, Treble, Loudness and Equalizer.)
These items can be selected through
/
keys. Item value can be modified by
/
keys. The
graphic and numeric display of the control level of selected item is displayed at the right side of the
sound menu on screen.
Press Red key once, the Sound menu appears also immediately. Press OK key twice to exit
the Sound menu.
Sound
Volume
Balance
Bass
Treble
AVL
Loudness
Listening
Equalizer
5
- 01
31
31
Off
Off
Normal
Sound
Balance
Bass
Treble
AVL
Loudness
Listening
Equalizer
- 01
31
31
Off
Off
Incred. Mono
Personal
Preset
Equalizer submenu
When item “Equalizer” is selected, press
key to enter into Equalizer submenu as showed
below.
There are five audio frequency bands available for adjustment such as 100Hz, 300Hz, 1KHz,
3KHz and 8KHz. /
keys are used to select different band.
/
keys are used to adjust value
of selected item. The color of selected item will become green. Press OK key once to return to
upper sound menu.
7
Equalizer
100
300
1k
3k
8k
Picture menu function description
While sound menu displays on screen, press OK key to exit from sound menu. Then press Pkey
on remote once for the first line Brightness in the picture menu to open.
The color of selected Brightness item will become green.
The Picture menu has following items:
a) Brightness (63 Steps)
b) Contrast (63 Steps)
c) Colour (63 Steps)
d) Sharpness (63 Steps)
e) Colour Temp (Color temperature setting for picture. Three modes are available as
Normal / Warm / Cold)
f) Preset (Personal / Movie / Sport / Weaksignal / Game) (Please refer to above P.P. key
function description for remote control.)
g) Zoom (4:3 / 16:9)
These items could be selected through
/
keys. Item value can be set by
/
keys. The
graphic and numeric display of the control level of selected item is displayed at the right side of the
MENU on screen.
Press Green key once, the Picture menu appears also immediately. Press OK key twice to exit
the Sound menu.
Picture
Brightness
Contrast
Color
Sharpness
Colour Temp
Preset
Zoom
20
31
20
31
Normal
WeakSignal
4:3
Overview menu function description
While picture menu displays on screen, press OK key to exit from picture menu. Then press
key to select Overview icon. And press
key to select current program No. in Overview menu
as showed below. The color of selected current program No. will become green.
8
Overview
1
2
3
4
5
Move
6
7
8
9
10
Delete
11
12
13
14
15
The Overview menu has following items:
a) Move
b) Delete
/ keys are used for program selection listed in row. / keys are used for program selection
listed in column. And the picture of selected program will display on screen accordingly.
Remark: The moving of programs will be much easier if you will set a name for each
program, see the Installation menu.
Move function: it’s for program movement. The steps are listed below.
a) Firstly, select a program No. to be moved by pressing
/ or
/ keys.
b) Press Green key on remote control once. A prompt will appear on screen as picture showed
below.
c) Select expecting target program No. by pressing / or / keys.
d) Press the Green key once again. The movement job will be completed in a few seconds. Then
the picture of target program No. will be displayed on screen.
Overview
1
2
3
4
5
Move 12
6
7
8
9
10
to ...
11
12
13
14
15
Delete function: to delete program. The steps are listed below.
e) Firstly, select a program No. to be deleted by pressing / or
/ keys.
f) Press red key on remote control once. A note will appear on screen as picture showed below.
g) Press the red key once again. The deleting job will be started and completed in a few seconds.
Then the upper program No. will be moved to deleted program No. accordingly, and it’s picture
will be displayed on screen.
Remark: The program "0" is not displayed and also can not be moved or deleted.
Overview
1
2
3
4
5
Delete
6
7
8
9
10
8
9
11
12
13
14
15
Remark: Deleted programs automatically slide to the last of programs (99), and will
be in the Skip feature no longer elected.
Overview
1
2
3
4
5
Delete
6
7
8
9
10
......
11
12
13
14
15
Press Yellow key once, the Overview menu appears also immediately. Press OK key twice to
exit the Sound menu.
Features menu function description
While Overview menu displays on screen, press OK key to exit from Overview menu. Then
press
key to select Features icon. And press
key to select Blue Back item in Features
menu as showed below. The color of selected item will become green.
Features
Blue Back
Language
Child lock
Timers
Teletext lang.
Teletext E/W
Noise Reduction
On
English
---Francais
West
On
The Features menu has following items:
a) Blue Back (On/Off) (To display blue picture on or off on screen when no any TV/AV
signal available.)
b) Language (The menu language selection)
c) Child lock
d) Timers (Setting the time)
e) Teletext lang (Teletext language selection)
f) Teletext E/W (East/West)
g) Noise Reduction (On/Off) (a license free competitive noise reduction algorithm from
NXP to achieves similar channel separation)
h) Output for AV
Selection: Monitor ( Front AV via AV1 output)
TV ( Tuner signal via AV1 output)
10
Child lock submenu
it’s used to lock some TV programs to prevent watching for children.
Child lock
Program nr.
Lock
Child lock
Lock code
88
Off
Off
0000
The Child lock submenu has following items:
a) Program nr. (1-99)
b) Lock (On/Off)
c) Child lock (On/Off)
d) Lock code (4 digital)
The lock function can be enabled or disabled by Child lock item setting in Child lock submenu.
The lock status of particular program is control by lock item in Child lock submenu.
Child lock setting steps are listed as below.
a) Select Child lock item in Features menu.
b) Press
key once. Four pcs of prompt lines will appear.
c) Enter initial passport 0000. The Child lock submenu will appear on screen as showed below.
d) Select program No. to be locked by
/
.
e) Set Lock on by
/
and
/ .
f) Set Child lock on by
/
and
/ .
g) Set new password by
/
and / , if necessary.
h) Press OK key to return to upper Features menu. The Child lock setting is finished. And
the lock prompt words display on screen as showed below for lock program. Both the picture
and sound of the locked program No. can not be available, until enter correct passport.
Enter Lock Code
Channel locked
----
Remark: If the correct password is entered, the Child lock function is disabled at
once for all lock programs. But lock status for every program will keep previous
setting. If you forget your password, you can use code 4711 as the skeleton key.
11
Timers submenu
The Timers submenu has following items:
a) Clock ( Off / 24 hrs / AM/PM)
b) Time (00-23:59/ 00-11:59 AM/PM)
c) Sleep timer (Off / 0-180 minutes)
d) Reminder timer (Off / 0-120 minutes)
e) Timer off (00:00-23:59 / 00:00-11:59)
f) Switch timer (00:00-23:59 / 00:00-11:59)
g) Switch program (1-99)
The Clock item can be set to off, or running in 24 hours format, or running in 12 hours with
by press
key.
The Time item can be set by pressing digital keys directly. Then the time runs automatically. Press
TIME key on remote control once, the current time will appear on screen.
Sleep timer:
The Sleep timer can be set to off, or some time with maximum 180 minutes in step of 5 minutes by
pressing (8 V+,V-,
) keys. The TV system will enter into stand by mode when the sleep timer expires.
Reminder timer:
The Reminder timer can be set to off, or some times with maximum 120 minutes in step of 5 minutes
by pressing (8 V+,V-,
) keys. The TV system will not enter into stand by mode when the Reminder
timer expires. Then a yellow warning label “
" will appear on the screen when the Reminder timer
expires. The yellow warning label will disappear when press any key once.
Timer off:
The TV System will enter into stand by mode when the off timer expires.
Switch timer:
The TV set will switch from stand by mode to operating status when switch timer expires.
Switch program:
The TV set will switch to preset program No. when the switch timer expires.
Auto Shut Off aTimer
When no Front end identification (from RF) is detected for 5 minutes, the TV system will switch to
standby mode automatically.
Timers
Clock
Time
Sleep timer
Reminder timer
Timer off
Switch timer
Switch program
24Hrs
00 : 29
Off
Off
–:–
–:–
0
Installation menu function description
The Installation menu has following items :
a) Program nr. (Program number) (1-99)
b) Program name ( 7 pcs of characters available in maximum)
c) Colour system (Auto / NTSC-443 / NTSC-M / PAL-443 / SECAM / SECAM-L/L’)
d) Sound system (BG / I /DK / L/L’ / M)
e) Auto tune
f) Frequency
g) AFC (On/Off)
12
h) Skip (Active) On/Off
Installation
Program nr.
Program name
Colour system
Sound system
Auto tune
Frequency
AFC
Skip
1
Auto
BG
049.75 MHz
Off
Off
The Program nr can be changed by pressing
accordingly.
/
, digital keys, and the picture will be changed
The Program name can be set as some labels with maximum 7 pcs of characters. The setting
steps are listed below.
a) Select Program name item by
/
in Installation menu.
b) Select the character position by pressing
/
keys.
c) Press
keys to access alphanumeric characters in the sequence A to Z ,+ , -, SPACE and
/
0 to 9. The Program name hence gets tagged to the particular program. 7 pcs of characters in
maximum can be used as one program name.
d) To exit the Program name edit, press
/
several times to the left or right side of the nae
The Auto tune is to scan all available TV programs. The operation steps are list ed as below.
a) Select Auto tune item by
/
keys in Installation menu.
b) Press
key once to enable Auto tune function. A point character “Sure?” will appear on
the right side of Auto tune item.
c) Press
key once again to confirm to run Auto tune. A prompt character “Busy” will appear
on the right side of Auto tune item, and Auto tune will start to scan the available program. It will
take a few minutes depending on available program quantity.
d) When Auto tune is finished, the Installation menu will appear for about 10 seconds, and the
picture of program No. 1 will appear on screen.
Note, when SECAM L/L’ item is set to 1 in service menu, SECAM L/L’ function is enabled. In this
case, the Auto tune will scan two rounds. The first round is for negative PIF modulation and
sound demodulation is selected as FM. The second round is for positive PIF modulation and
sound demodulation is selected as AM.
When SECAM L/L’ item is set to 0 in service menu, SECAM L/L’ function is disabled. In this case,
the Auto tune will scan only one round for negative PIF modulation and sound demodulation is
selected as FM.
The Frequency item can be used to input program frequency by digital keys on remote control
directly. Or just to adjust the tuned program frequency in fine step by pressing
and
keys, to
get perfect picture and sound quality.
After frequency input, the program picture will appear on screen, and sound will appear
accordingly. The program number can be set as expecting one before program frequency input. All
related program information will be save to EEPROM.
13
The Colour system is to select Colour standard as Auto / NTSC-443 / NTSC-M / PAL-443 /
SECAM / SECAM-L/L’. The Standard selected gets tagged to the particular program.
The Sound system is to select RF standard as BG / I /DK / L/L’ / M. The Standard selected gets
tagged to the particular program.
Remark: For Germany use set the colour system "Auto" and sound standard "BG".
The AFC can be set to On or Off for the particular program by pressing
The Skip (Active) is to skip or not the particular program by pressing
Installation
Program nr.
Program name
Colour system
Sound system
Auto tune
Frequency
AFC
Skip
1
Auto
BG
Sure?
049.75 MHz
Off
Off
Installation
Program nr.
Program name
Colour system
Sound system
Auto tune
Frequency
AFC
Skip
2
Auto
Auto
Busy
099.50 MHz
On
Off
14
/
/
keys.
keys.
Hotel mode menu function description
Hotel mode function is designed in this TV system for special purpose. The Hotel mode can be
enabled and set as steps below.
a) Firstly, press OK key once to display main menu on screen.
Input password 1229 to enter Hotel mode menu as showed below, while main menu appears
on screen.
Hotel mode
Hotel mode
Max. Volume
On program
Off
12
1
b) There are three items for setting in Hotel mode menu.
1) Hotel mode (On/Off), it’s used to enable or disable Hotel mode function. It can be
set by
/
keys.
2) Max. volume (00-63), it’s used for maximum volume limitation setting. It can be set
by
/ .
3) On program (1-99), it’s used for power on program number setting. It can be set by
/ and digital keys.
Press MENU key to exit from Hotel mode menu.
When Hotel mode is enabled, only Sound and Picture menus are available. The other menus
are not available such as Overview, Features and Installation.
Automatic scan function description
The Automatic scan function is to have a view of all available programs in short time.
When press P+ / P- key for more than 3 seconds continuously, the Automatic function is enabled.
A logo “
” will display on screen. The next / previous unskipped, unlocked program will be
displayed one by one for about one second. During Automatic scanning, the program name is not
displayed, and the sound is muted.
The Automatic scan function will be disabled by pressing any key on remote control, and the last
program will be displayed on screen.
15
t
Television package
TV set -1pc. Operating instruction -1pc.
Remote control -1pc. Packing box -1pc.
Model:
Power Supply:
CTV 5506 A ST/VT (B)
220-240V, 50Hz
Power consumption:
100W
Antenna input:
75 Ohm
Frequency Range:
VHF-L- E2-S6
VHF-H-S7-S41
UHF-E21-E69
Protection class:
II
19,8 kg
Net weight:
16
Meaning of the “Dustbin” Symbol
Protect our environment: do not dispose of electrical equipment in the domestic
waste.
Please return any electrical equipment that you will no longer use to the collection
points provided for their disposal.
This helps avoid the potential effects of incorrect disposal on the environment and
human health.
This will contribute to the recycling and other forms of reutilisation of electrical and
electronic equipment.
Information concerning where the equipment can be disposed of can be obtained
from your local authority.
In many EU countries the disposal of electrical and electronic equipment in the
domestic waste is prohibited from August 13, 2005 on.
In Germany from March 23, 2006 on.