1
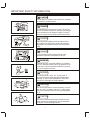
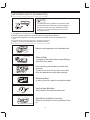
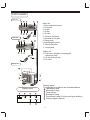
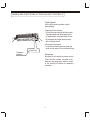
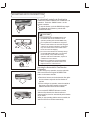
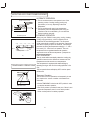
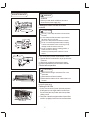
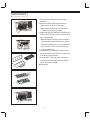
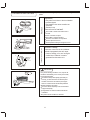
OWNER'S MANUAL
AIR CONDITIONER
ONE-TWIN SPLIT TYPE
Thank you very much for purchasing our air conditioner, please read this owner's
manual carefully before using your air conditioner, save this manual in a safe place
for future reference.
CONTENTS
IMPORTANT SAFETY INFORMATION.............................................................
1
HINTS FOR ECONOMICAL OPERATION.........................................................
2
PARTS NAMES..................................................................................................
3
NAMES AND FUNCTIONS OF INDOOR UNIT CONTROLS............................
4
ADJUSTING AIR FLOW DIRECTION................................................................
5
HOW THE AIR CONDITIONER WORKS...........................................................
6
TEMPORARY OPERATIONS.............................................................................
6
MAINTENANCE..................................................................................................
7
AIR CONDITIONER OPERATIONS AND PERFORMANCE.............................
9
INSTALLATION..................................................................................................
10
TROUBLES AND CAUSES................................................................................
11
TROUBLES AND CAUSES (CONCERNING REMOTE CONTROLLER).........
12
IMPORTANT SAFETY INFORMATION
CAUTION
Do not attempt to install this unit yourself. This unit should
be installed by qualified persons.
Dangerous
DANGER
Do not attempt to service the unit yourself. This unit has
no user serviceable components, opening or removing the
cover will expose you to dangerous voltage. Turning off
the power supply will not prevent potential electric shock.
DANGER
No
Never put hands or objects into the air outlet of indoor
and outdoor units. These units contain a fan running at
high speed. Touching the moving fan will cause serious
injury.
DANGER
To avoid the risk of serious electrical shock, never
sprinkle or spill water or other liquids on the unit.
WARNING
Ventilate the room occasionally while the air conditioner
is in use, especially if there is also a gas appliance in use
in this room. Failure to follow these directions may result
in a loss of oxygen in the room.
WARNING
To prevent electric shock, turn off the power or
disconnect the power supply plug before beginning any
cleaning or other routine maintenance. Follow the
directions for cleaning in the Owner's Manual.
Thinner
WARNING
Do not use liquid cleaners or aerosol cleaners, use a soft
and dry cloth for cleaning the unit. To avoid electric
shock, never attempt to clean the unit by sprinkling water
on it.
CAUTION
Household
Drain
Cleaner
No
Do not use caustic household drain cleaners in the unit.
Drain cleaners can quickly destroy the unit components
(drain pan and heat exchanger coil etc.)
1
IMPORTANT SAFETY INFORMATION
NOTE
For proper performance, operate the unit under the usable
operating temperature and humidity conditions indicated in
this owner's manual. If the unit is operated beyond these
conditions, it may cause malfunctions of the unit or dew
dripping from the unit.
The appliance is not intended for use by children or the disables without supervision.
Children should be supervised to ensure that they do not play with the appliance.
Set moderate temperature, especially when there are children, old men or the disables in the
room.
HINTS FOR ECONOMICAL OPERATION
Gee chilly
Maintain room temperature at a comfortable level.
Control
Clean please
Clean air filter
Pl
e
as
e
cl
os
e
A clogged air filter would reduce cooling efficiency.
Clean it once two weeks.
Never open doors and windows more often than
necessary.
To keep cool or warm air in the room, never open
doors and windows more often than necessary.
Window curtains
In cooling, close the curtains to avoid direct sunlight.
TEMP
CLOCK
MODE
C
SPEED
FAN
SPEED
OFF
ON
TEMP
Use the timer effectively
Set the timer for the desired operation time.
TIMER
Cool and dry air
Get uniform circulation of room air
Air flow adjustment
Adjust air flow direction for even circulation of room
air.
2
PARTS NAMES
Indoor unit
4
3
5
2
6
1
11
Indoor unit
1 Room temperature sensor
2 Front panel
3 Air inlet
4 Air filter
5 Air outlet
6 Vertical air flow louver
7 Horizontal air flow grille
8 Display panel
9 Infrared signal receiver
10 Remote Controller
11 Control panel
7
8 9
10
Indoor unit
4
3
2
5
6
7
1
11
Outdoor unit
12 Drain hose, refrigerant connecting pipe
and electric wiring.
13 Air inlet (side and rear)
14 Air outlet
8 9
12
10
Outdoor unit
Air Out
Abov
e1
A
Above 60cm
13
0cm
ove
Ab
14
v
Abo
0cm
e 10
Abo
v
B
e6
m
0cm
C
Display panel
6
c
4.5
1
2
3
OPERATION
AUTO.
TIMER
ECON.
PRE-DEF
4
Display panel
The operating conditions are indicated below.
1 Operation Lamp
2 Automatic Lamp
3 Timer Lamp
4 Economic Lamp
5 Pre-defrost Lamp (Cooling only type without)
6 Infrared signal receiver
5
3
NAMES AND FUNCTIONS OF INDOOR UNIT CONTROLS
Control panel
Lift the front panel to perform control
panel settings.
.
.
Auto/Cool
Temporary
operation
Opening the front panel
Pull up from two ends of the front panel.
Open the panel and lift the panel up to
an angle where it remains fixed. Do not
lift the panel any further when it stops
with a clicking sound.
Closing the front panel
Lower ends of the front panel, push the
ends on both sides. Close the panel firmly.
Temporary
Normally set this switch to remote control.
If you miss the remote controller or its
batteries are exhausted, set this switch
to the Auto/Cool Position for temporary
operation.
4
ADJUSTING AIR FLOW DIRECTION
To automatically swing the air flow direction
Perform this function while the air conditioner is in
operation. Push the SWING button on the
remote controller.
To stop the function, push the SWING button again.
To change the swing direction, push the AIR
DIRECTION button.
..
CAUTIONS
The AIR DIRECTION and SWING buttons will
be disabled when the air conditioner is not in
operation (including when the ON TIMER is set).
Do not operate the air conditioner for long hours
with the air flow direction set downward during the
cooling or dry operation. Otherwise, condensation
may occur on the surface of the vertical air flow
louver and cause dew dripping.
Do not move the vertical louver manually. Always
use the AIR DIRECTION button. If you move the
louver manually, it may malfunction during
operation. If the louver malfunctions, stop the air
conditioner once and restart it.
When the air conditioner is started immediately
after it was stopped, the vertical air flow louver
might not move for 10 seconds or so.
Hold
Adjusting the Horizontal Air Flow Direction
Preparation:
For the cooling or dry operation, move the vertical air
flow louver downward using the AIR DIRECTION
button on the remote controller.
.
.
Take hold of the lever on the horizontal air flow grilles
and move them to adjust the air flow direction as
required.
For the cooling or dry operation, return the vertical air
flow louver to the original position using the AIR
DIRECTION button on the remote controller.
If your use the AIR DIRECTION button to set the
vertical air flow direction, the direction will move
downward at first, then turn automatically to the direction
as you desire.
When you stop operating with the remote controller, the
vertical air flow louver will shut automatically.
5
HOW THE AIR CONDITIONER WORKS
.
AUTOMATIC OPERATION
Operation suppression zone
Operation starts
¡£
1 C
.
.
¡ £
2 C
1 hours
Set temperature
2 hours
ECONOMIC Operation
Cooling
Fan only
Cooling
Room
temperature
The air conditioner selects and operates in one of the
operating modes of cooling, heating (cooling only
type without) or fan only, depending on the room
temperature.
The air conditioner will control room temperature
automatically round the temperature point set by you.
If the Auto mode is uncomfortable, you can select the
desired conditions manually.
ECONOMIC OPERATION
Fan only
Cooling
Time
Set temperature
When your push ECONO button during cooling, heating
(cooling only type without), or AUTO operation, the air
conditioner will start following operation. The fan speed
will be automatically controlled. In the operation suppression
zone where capacity is kept to the minimum, overcooling is
¡£
prevented by raising the temperature setting by 1 C after 1
¡£
hour and by 2 C after 2 hours of operation. The room
temperature is thus regulated between the operation
suppression zone and the set temperature. (It depends on
the outdoor temperature.)
DRY OPERATION
Dry
The dry mode will automatically select the cooling dry
operation based on the difference between the set
temperature and the actual room temperature.
TEMPORARY OPERATIONS
Indoor unit
The temperature is regulated while dehumidifying by
repeating turning on and off of the cooling operation or fan
only.
The fan speed indicator will display AUTO and low speed
will be used.
Temporary Operation
This function is used to operate the unit temporarily in case
you misplace the remote controller or its batteries are
exhausted.
.
.
AUTO/COOL
TEMPORARY Switch
Set the TEMPORARY switch to the AUTO position in order
to start the automatic operation.
The COOL position is provided for test runs of the unit, and
automatic temperature control is cut off at this position.
Never use the position for ordinary operation.
I cannot find the
remote controller
A temporary
operation
feature
is provided
6
MAINTENANCE
WARNING
WARNING
Before you clean the air conditioner, be sure to
disconnect the power supply plug.
Cleaning the indoor unit and the remote
controller
Use a dry cloth to wipe
Thinner
Select fan only mode
CAUTIONS
Use a dry cloth to wipe the indoor unit and remote
controller.
A cloth dampened with cold water may be used on
the indoor unit if it is very dirty.
Never use a damp cloth on the remote controller.
Do not use a chemically-treated duster for wiping
or leave such materials on the unit for long. It may
damage or fade the surface of the unit.
Do not use benzine, thinner, polishing powder, or
similar solvents for cleaning.
These may cause the plastic surface to crack or
deform.
If you do not plan to use the unit for at least 1 month.
(1) Operate the fan for about half a day to dry the inside
of the unit.
(2) Stop the air conditioner and disconnect power.
(3) Remove the batteries from the remote controller.
Checks before operation
CAUTIONS
Check that the wiring is not broken off or is not
connected.
Check that the air filter is installed.
Check that the outdoor unit air outlet or inlet is not
blocked.
Before you clean the air conditioner be sure to disconnect
the power supply plug.
Cleaning the air filter
1. Pull up from two ends of panel. Open the panel and
lift the panel up to an angle where it remains fixed.
Do not lift the panel any further when it stops with a
clicking sound.
2. Take hold of the left and right handles of the air filter
and lift it up slightly to take it out from the filter holder.
Air Filter Handle
7
MAINTENANCE
3. Take hold of the handles and pull the air filter
downward.
4. Remove the AIR FILTER from the indoor unit.
Clean the AIR FILTER once two weeks.
Clean the AIR FILTER with a vacuum clearer
or water, then dry it up in cool place.
5. Remove the ACTIVE CARBON FILTER/ELECTRO
STATIC FILTER from the indoor unit and take it out
from its support frame.
Clean the filter every month, immerse the filter in
the water with the mild detergent for 20 minutes
and wash it slightly (do not rub), then expose it in
the sun to dry it out for more than 3 hours. (put
the black side face up)
6. Install the filters into their support frames and set
the support frames back in position. The black side
of the filters be at the outsides.
7. Insert the AIR FILTER from the top side into the
unit until it is fixed thoroughly and close the front
panel of the indoor unit tightly.
Optional filter
8
AIR CONDITIONER OPERATIONS AND PERFORMANCE
Three-minute protection feature
A protection feature prevents the air conditioner from being activated for approximately 3 minutes when it is
restarted immediately after operation.
This will protect the machine. (cooling only type without)
Heating characteristics preheating operation
The air conditioner will not deliver warm air immediately after it is started. Warm air flows out after
approximately 5 minutes when the indoor heat exchanger warms up.
Warm air control
When the room temperature reaches the set temperature, the fan speed is automatically reduced to
prevent a cold draft. At this time, the outdoor unit will stop.
Defrosting
If the outdoor unit is frosted during heating operation, defrosting is started automatically (for approximately
5 to 10 minutes) to maintain the heating effect, and the PRE.-DEF. lamp is on.
The fans in both the indoor and outdoor units stop during the defrost operation.
During defrost operation, defrosted water is drained from the bottom plate of the outdoor unit.
Heating capacity
In the heating operation, heat is absorbed from outdoor and released into the room. that is so-called heat
pump system. When the outdoor temperature is too low, you are recommended to use another heating
apparatus in combination with the air conditioner.
Consideration for accumulated snow
Select the position for the outdoor unit where it will not be subject to snow drifts, accumulation of leaves
or other seasonal debris. It is important that the air flow for the outdoor unit is not impeded as this will result in
reducing heating or cooling performance. During the heating mode (cooling only type without) and at sub-zero
temperatures, the water drained off the outdoor unit as a result of the automatic defrost may accumulate and
freeze. It is important that adequate drainage or a soak way is provided.
Power failure
Power failure during operation will stop the unit completely.
The OPERATION lamp on the indoor unit will start flashing when power is restored.
To restart operation, push the ON/OFF button on the remote controller.
Lighting or a car wireless telephone operating nearby may cause the unit to malfunction. Disconnect the unit
with the power and then connect the unit with the power again. Push the ON/OFF button on the remote
controller to restart it.
Air conditioner operating conditions
For proper performance, run the air conditioner under the following temperature conditions:
¡£
Outdoor temperature: 18 to 43 C
¡£
Room temperature: 17 to 32 C
Cooling
operation
CAUTION
Room relative humidity less than 80%. If the air conditioner operates in excess
of this figure, the surface of the air conditioner may attract condensation.
¡£
Outdoor temperature: -7 to 24 C
Heating
operation
Room temperature: 0 to 27 C
Dry
operation
¡£
Outdoor temperature: 11 to 43 C
¡£
Room temperature: 17 to 32 C
If air conditioner is used outside of the above conditions, safety protection features may come into operation.
9
INSTALLATION
Location:
In cooling operation, the air conditioner will dry the room air, so please fix a pipe to drain all
the water away in the air conditioner.
Please let the indoor unit away from the TV set and the radio more than one meter in order to
avoid the picture and noise interference.
Powerful radio transmitters or any other devices radiating high frequency radio waves can
cause the air conditioner to malfunction. Please consult the dealer where you purchased the
air conditioner before installing it.
Don't fix the unit in the dangerous region with combustible gas and volatile matter.
If the air conditioner is operated in an atmosphere containing oils (machine oil), salt near a
coastal area, sulfide gas near a hot spring, etc., such substances may lead to failure of the air
conditioner.
If wrong using, installation, maintenance cause the air conditioner to malfunction, please consult
your dealer.
Be careful with noise or vibrations
Please fix the unit in the stable place to avoid the noise or vibrations.
The noise near the air outlet of the outdoor unit may enter the air exit.
Locate the outdoor unit where noise emitted by it or hot air from its air outlet will cause no
nuisance to your neighbors.
If the air conditioner sounds abnormal during operation, contact the dealer where your
purchased the air conditioner.
Wire
To prevent the voltage, please link the air conditioner with the floor.
The power socket is used as the air conditioner specially.
Don't pull the power wiring hard.
When linking the air conditioner with the floor observe the local rulers.
If necessary, use the power fuse or the circuit, breaker of the corresponding scale ampere.
If you want to change the power wiring, please contact the local dealer where you
purchased the air conditioner..
Relocation
If you move out or if it is desired to relocate the air conditioner, consult your dealer, because
special skills to withdraw Freon, purge air and perform other operations are required.
10
TROUBLES AND CAUSES
Before you ask servicing or repairs, check the following
points.
The unit cannot operate
Recheck
Inoperative
Does not cool or heat well.
The air inlet or outlet of the outdoor unit is
blocked.
Doors or windows are open.
The air filter is clogged with dust.
The louver is not at the correct position.
The fan speed is set to low.
The temperature setting is too high or too low.
Room air is smelly.
These are not failures
Too hot
Smelly
The power fuse is blown or the circuit breaker
has been tripped.
The batteries in the remote controller are
exhausted.
The timer is set.
A bad odor comes from the air conditioner.
Smells impregnated in the wall, carpet,
furniture, clothing, or furs, are coming out.
A white mist of chilled air or water is
generated from the outdoor unit.
CAUTIONS
OPER ATION
The unit cannot operate
If any of the following conditions occur, stop the air
conditioner immediately, set to off the power switch,
and contact the dealer:
The indicator lamps flash rapidly (five times per
second), you disconnect the unit with the power
and then connect the unit with the power again
after two or three minutes but the lamp still flash.
Switch operations are erratic.
The fuse is blown frequently or the circuit breaker
is tripped frequently.
Foreign matter or water has fallen inside the air
conditioner.
Any other unusual condition is observed.
11
TROUBLES AND CAUSES (CONCERNING REMOTE CONTROLLER)
Before you ask for servicing or repairs, check the following points.
Setting Change Is Impossible
Causes
Symptoms
Check whether the MODE
indicated on the display is
"AUTO"
AUTO
The fan speed can not be
changed.
Check whether the MODE
indicated on the display is
"DRY"
DRY
Reason and Disposal
When the automatic mode is
selected, the air conditioner
automatically selects the fan
speed.
When dry operation is selected,
the air conditioner automatically
select the fan speed. The fan
speed can be selected during
"COOL" and "FAN ONLY" and
"HEAT" (cooling only type without)
The Transmission Indicator " ¡ø " Never Comes On
Symptoms
The remote control signal is
not transmitted even when
the ON/OFF button is pushed.
Causes
Check whether the ON
TIMER is indicated on the
display.
Reason and Disposal
The remote control signal is
not transmitted, because the
air conditioner is off.
The Display Never Comes On
Symptoms
The TEMP. indicator does
not come on.
Causes
Check whether the MODE
indicated on the display is
"FAN ONLY".
FAN ONLY
Reason
The temperature cannot be
set during fan only operation.
The Display Goes Off
Symptoms
Causes
The indication on the display
disappears after a lapse of
time.
Check whether the timer
operation has come to an
end when the OFF TIMER
is indicated on the display.
The TIMER indicators go off
after a lapse of certain time.
Check whether the timer
operation is started when
the ON TIMER is indicated
on the display.
Reason
The air conditioner operation
stops since the set time
elapsed.
When the time set to start the
air conditioner is reached, the
air conditioner will automatically
start and the appropriate
indicator will go off.
The Signal Receiving Tone does Not Sound
Symptoms
No receiving tone sounds
from the indoor unit even
when the ON/OFF button is
pushed.
Causes
Check whether the signal
transmitter of the remote
controller is property directed
to the receiver of the indoor
unit when the ON/OFF button
is pushed.
12
Disposal
Direct the signal transmitter
of the remote controller to the
receiver of the indoor unit, and
then rapidly push the ON/
OFF button twice.
CS242-U
2200019824