1
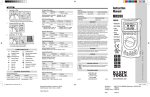
MM200_123456_SP7.book Seite 1 Mittwoch, 30. April 2008 1:17 13
MM
200
Bluetooth Stereo Headset
Instruction Manual
MM200_123456_SP7.book Seite 1 Mittwoch, 30. April 2008 1:17 13
Quick Setup Guide
1
Charging
3h
MM200_123456_SP7.book Seite 2 Mittwoch, 30. April 2008 1:17 13
2a
2b
Pairing
20 cm
2c
2d
MM 200
OK
Keyword
0000
5s
MM200_123456_SP7.book Seite 1 Mittwoch, 30. April 2008 1:17 13
English
MM200_528260.book Seite 1 Freitag, 9. Mai 2008 1:43 13
Contents
Important safety information....................................................................... 4
Delivery includes........................................................................................... 11
Features.......................................................................................................... 12
Operating elements ..................................................................................... 14
Button overview ........................................................................................... 17
LED indications.............................................................................................. 19
Set up.............................................................................................................. 22
Charging the headset battery............................................................ 22
Switching the headset on ................................................................... 24
Establishing Bluetooth connections.................................................. 27
Switching the headset off................................................................... 29
Pairing the headset .............................................................................. 29
Operating ....................................................................................................... 34
Replacing the earpads ......................................................................... 34
Wearing the headset ........................................................................... 35
Listening to music ................................................................................ 37
Calling...................................................................................................... 38
Muting/unmuting the headset’s microphone ................................ 44
Changing the volume ........................................................................... 44
If you are out of the transmission range ......................................... 46
Maintenance and care ................................................................................. 48
Accessories .................................................................................................... 49
Specifications ................................................................................................ 50
Manufacturer declarations ......................................................................... 51
1
MM200_528260.book Seite 2 Freitag, 9. Mai 2008 1:43 13
Thank you for choosing Sennheiser!
We have designed this product to give you reliable operation over
many years. Over 60 years of accumulated expertise in the design and
manufacture of high-quality electro-acoustic equipment have made
Sennheiser a world-leading company in this field.
Please take a few moments to read these instructions carefully, as we
want you to enjoy your new Sennheiser products quickly and to the
fullest.
2
MM200_528260.book Seite 3 Freitag, 9. Mai 2008 1:43 13
3
MM200_528260.book Seite 4 Freitag, 9. Mai 2008 1:43 13
Important safety
information
The MM 200 has been manufactured according
to the accepted rules of safety and current
technology. However, there is still a danger of
damage to equipment if the following general
safety instructions are not complied with.
• Read these instructions.
• Follow these instructions.
• Keep the CD enclosing these instructions in a
location where it is accessible to all users at
all times.
• Always include the warranty booklet and the
CD with this instruction manual when you
pass the MM 200 on to third parties.
Intended use
The MM 200 is an accessory for mobile phones
or any Bluetooth compliant device with a hands
4
MM200_528260.book Seite 5 Freitag, 9. Mai 2008 1:43 13
free profile (HFP), a headset profile (HSP), an
advanced audio distribution profile (A2DP) or
an audio/video remote control profile (AVRCP).
It is intended for wireless communication via
Bluetooth in dry environments.
It is considered improper use when the MM 200
is used
• for any application not named in these
instructions,
• under operating conditions that deviate
from those described in these instructions.
General instructions
Never disassemble or modify components of
the MM 200.
• The built-in rechargeable battery may
present a fire or chemical burn hazard if
mistreated. Therefore, do not disassemble,
heat above 40 °C (104 °F) or incinerate the
rechargeable battery.
5
MM200_528260.book Seite 6 Freitag, 9. Mai 2008 1:43 13
• Sennheiser Communications is not liable for
damages resulting from the loss of
connection due to a run flat battery, an old
battery or exceeding the transmission range.
Before operation
• Use the MM 200 in dry places only and keep
liquids and small electrically conductive
parts away from the MM 200 and its
connecting sockets.
• Do not expose the MM 200 to extreme temperatures. Normal operating temperatures
are 10 °C (50 °F) to 40 °C (104 °F).
• Store the headset in a clean, dust-free
environment.
During charging
• Do not wear the headset when charging.
• Sennheiser Communications is not liable for
damages to USB devices that are not
consistent with the USB specifications.
• The headset must be charged either with a
compatible Sennheiser Communications
power supply (EU: 502310, UK: 502311, US:
502312), the compatible Sennheiser
6
MM200_528260.book Seite 7 Freitag, 9. Mai 2008 1:43 13
Communications car charger unit (502313),
a USB socket of a computer or other
compatible Sennheiser Communications’
charging units.
• Never try to charge batteries other than the
one in the MM 200 headset with the MM 200
power supply or car charger unit.
• Avoid listening at high volume levels for long
periods since this leads to permanent
hearing damage.
During operation
• Observe your country’s regulations for the
use of mobile phones, headsets and hands
free equipment in traffic. Always focus your
attention on driving safely!
• This equipment generates, uses and can
radiate radio frequency energy and, if not
used in accordance with the instructions,
may cause harmful interference to radio
communications. However, there is no
guarantee that interference will not occur in
a particular installation.
7
MM200_528260.book Seite 8 Freitag, 9. Mai 2008 1:43 13
After the usage
period
• Dispose of the built-in batteries according to
local regulations. Do not dispose as
household waste.
Safety instructions for Lithium-Polymer
rechargeable batteries
The MM 200 has a built-in Lithium-Polymer
rechargeable battery. If abused or misused,
rechargeable batteries may leak.
WARNING!
In extreme cases, rechargeable batteries may
even present
• a heat hazard
• a fire hazard
• an explosion hazard
• a smoke and gas hazard
Please
understand
that
Sennheiser
Communications does not accept liability for
damage arising from abuse or misuse.
8
MM200_528260.book Seite 9 Freitag, 9. Mai 2008 1:43 13
Do not heat above 40 °C/104 °F, e.g. do not expose to
sunlight or throw into a fire.
Do not expose to moisture.
Do not short-circuit.
Do not mutilate or dismantle.
Store the units/rechargeable batteries in a cool and dry place
at room temperature (approx. 20 °).
Only charge rechargeable batteries with the appropriate
Sennheiser Communications chargers.
When not using rechargeable batteries for extended periods
of time, charge them regularly (every six months for about
one hour).
9
MM200_US.fm Seite 10 Freitag, 9. Mai 2008 2:33 14
Only charge rechargeable batteries at ambient temperatures
between 10 °C and 40 °C.
Do not charge the rechargeable battery if the unit is
obviously defective.
Return defective units or units with defective rechargeable
batteries to your specialist dealer.
10
MM200_528260.book Seite 11 Freitag, 9. Mai 2008 1:43 13
Delivery includes
1 MM 200 Bluetooth stereo headset with
built-in rechargeable Li-polymer battery
2 ear pads, size S
2 ear pads, size M (already mounted)
2 ear pads, size L
1 clothing clip (not mounted)
1 MM 200 power supply
1 USB charging cable
1 quick setup guide
1 warranty booklet
1 CD with instruction manual
11
MM200_528260.book Seite 12 Freitag, 9. Mai 2008 1:43 13
Features
• A2DP stereo Bluetooth® headset with
excellent sound quality
• Superb stereo sound, with high dynamics
and excellent bass response
• Unobtrusive ear canal phones which effectively block out surrounding noise
• 3 ear pad sizes allow for superior individual
fit and optimal acoustics
• Bluetooth 2.0
– compatible with all Bluetooth 1.1, 1.2 and
2.0 devices that support the hands free
(HFP), headset (HSP), or advanced audio
distribution profile (A2DP)
• Multiple wearing options (lanyard and/or
clothing clip)
• Multiple charging system (charging directly
from USB)
12
MM200_528260.book Seite 13 Freitag, 9. Mai 2008 1:43 13
• 2 simultaneous sources - e.g. MP3 player and
mobile phone
• Mobile phone control
– answer/end/reject
– mic muting
– transfer call*, redial*, voice dial*
(*functions need to be supported by the
mobile phone)
• Long battery life time
– up to 9 hours of music listening
– up to 11 hours of talk time
– up to 300 hours of standby time
13
MM200_528260.book Seite 14 Freitag, 9. Mai 2008 1:43 13
Operating elements
14
MM200_528260.book Seite 15 Freitag, 9. Mai 2008 1:43 13
ear pads
(removable)
ear canal phones
쐋 microphone
Play/Pause button
Next button
volume down button
Prev. button
volume up button
operating unit
socket for power supply
(under strap)
clothing clip
(detachable, on the back side)
LED
lanyard
(removable)
safety clip
15
MM200_528260.book Seite 16 Freitag, 9. Mai 2008 1:43 13
USB plug
USB socket
USB cable
power supply unit
charging plug
16
MM200_528260.book Seite 17 Freitag, 9. Mai 2008 1:43 13
Button overview
Button
to be
pressed
To ...
short
start or pause audio playback,
accept or end a call,
start searching mode
37
37
24
for 2 sec
switch on/off, reject a call,
mute/unmute the microphone
24, 38
42
for 5 sec enter pairing mode
Page
29
short
increase the ring volume or audio volume
by 1 step
42
for 2 sec
increase the ring volume or audio volume
continuously
42
short
reduce the ring volume or audio volume
by 1 step
42
for 2 sec
reduce the ring volume or audio volume
continuously
42
17
MM200_528260.book Seite 18 Freitag, 9. Mai 2008 1:43 13
Button
to be
pressed
To ...
Page
short
skip forward/accept call
37/38
reject a call
for 2 sec redial*, transfer calls between
headset and mobile phone *
for 5 sec enter pairing mode
short
skip backward/accept call
30
37/38
reject a call
transfer calls between
for 2 sec
headset and mobile phone*
voice dial*
38
41
for 5 sec enter pairing mode
30
* this function needs to be supported by the mobile phone
18
38
39, 41
40
MM200_528260.book Seite 19 Freitag, 9. Mai 2008 1:43 13
LED indications
Meaning during operation
LED flashing
0
blue
0
Meaning during operation
1s
2s
and red
pairing mode
3s
6s
once every 3 seconds
0
1s
standby mode
2s
glowing slowly every 4 seconds
0
1s
rapidly (once every second)
audio streaming mode
2s
active call mode
19
MM200_528260.book Seite 20 Freitag, 9. Mai 2008 1:43 13
LED flashing
0
Meaning during operation
1s
2s
several times every second
0
1s
slowly (once every second)
searching mode
2s
idle mode
For a more detailed description of the LED indications, please see
“Switching the headset on” on page 24.
LED colour
Meaning during operation
blue
battery charge status OK
red
low battery
20
MM200_528260.book Seite 21 Freitag, 9. Mai 2008 1:43 13
Meaning during charging
LED colour
0
Meaning during charging
1s
red
0
blue*
2s
charging mode
1s
2s
charging complete
* The LED switches off after 1 hour to save battery power.
21
MM200_528260.book Seite 22 Freitag, 9. Mai 2008 1:43 13
Set up
Charging the headset battery
If you charge the battery for the first time,
allow charging for at least 4 hours without
interruption. Later, 3 hours will suffice to fully
charge the battery.
If you charge the MM 200, it will stop any
operation and go into charging mode.
A fully charged battery provides a playback
time of up to 9 hours or a standby time of up to
300 hours.
When the battery is about to run flat:
• All indications of the LED turn red.
• A low battery alert is heard in the headset.
22
MM200_528260.book Seite 23 Freitag, 9. Mai 2008 1:43 13
There are two ways to charge the headset’s
built-in battery:
1. Via the MM 200 power supply unit 2. Via the USB socket of a computer
왘 Take off the headset and switch it off (see
page 24).
왘 Connect the charging plug to the socket
for power supply .
왘 Connect the USB plug to:
– either a USB socket of a computer
– or the USB socket of the power supply
unit . Connect the power supply to the
mains
During charging, the LED lights up red
continuously. When charging is complete,
the LED turns blue continuously for max.
1 hour. As long as the headset is connected
to a power source, all operating buttons are
blocked.
23
MM200_528260.book Seite 24 Freitag, 9. Mai 2008 1:43 13
Switching the headset on
To switch the headset on:
왘 Press and hold the Play/Pause button for
2 seconds.
A confirmation beep is heard in the headset
and the LED indicates the current
operating mode.
Flashing in blue indicates that the battery
charge status is OK; flashing in red indicates a
low battery (see page 19).
Searching mode
The LED flashes several times every second:
0
1s
2s
The headset is paired to one or several
Bluetooth devices and tries to connect to one of
these devices.
24
MM200_528260.book Seite 25 Freitag, 9. Mai 2008 1:43 13
The LED flashes slowly (once every second):
0
1s
Idle mode
2s
The headset is paired to one or several
Bluetooth devices. However, there is no current
connection because the Bluetooth device is
switched off or out of range.
The LED flashes once every 3 seconds:
0
3s
Standby mode
6s
The headset is paired to one or several
Bluetooth devices. However, there is neither an
audio transmission nor an active call.
The LED is glowing slowly every 4 seconds:
0
1s
Audio streaming
mode
2s
The headset is paired to one or several
Bluetooth devices, a sound file is received via
A2DP and played back or paused.
25
MM200_528260.book Seite 26 Freitag, 9. Mai 2008 1:43 13
Active call mode
The LED flashes once every second:
0
1s
2s
The headset is paired to one or several
Bluetooth devices and there is currently an
active call.
Pairing mode
If you switch on the headset and keep the Play/
Pause button pressed for 5 seconds, the
headset will go into pairing mode (see “Pairing
the headset” on page 29).
The LED flashes alternatingly in red and blue
for up to 60 seconds:
0
1s
2s
The headset is not yet paired to any Bluetooth
device. Pair it as described under “Pairing the
headset” on page 29.
26
MM200_528260.book Seite 27 Freitag, 9. Mai 2008 1:43 13
Establishing Bluetooth connections
If the MM 200 is not yet paired to any device,
see “Pairing the headset” on page 29.
After switch-on, the headset tries to connect to
the Bluetooth device to which it was last
connected. If this device cannot be detected,
the headset will go into idle mode.
If a certain Bluetooth connection cannot be
established, because the corresponding
Bluetooth device is switched off or out of range,
you can manually re-establish the connection
as follows:
왘 Switch off the Bluetooth visibility of all
Bluetooth devices in the vicinity, except for
the Bluetooth device you want to connect to.
27
MM200_528260.book Seite 28 Freitag, 9. Mai 2008 1:43 13
왘 Press the Play/Pause button .
The LED flashes 3 times per second,
indicating that the headset is in searching
mode.
When the headset and the Bluetooth device
detect each other, the connection is
established.
The headset saves up to 8 Bluetooth
connection profiles of Bluetooth devices with
which it has been paired. If you want to reestablish a connection with a device with
which the headset has been paired, the
connection needs to be established from this
device (for details, please see the manual of
the Bluetooth device). Before doing so, please
make sure that the last paired device is
disconnected.
28
MM200_528260.book Seite 29 Freitag, 9. Mai 2008 1:43 13
Switching the headset off
The headset switches off automatically 5
minutes after the last Bluetooth connection is
ended (idle mode).
To manually switch the headset off:
왘 Press and hold the Play/Pause button for
2 seconds.
A confirmation beep is heard in the headset
and the LED flashes red twice, indicating
that the headset is switched off.
Pairing and volume settings are saved
automatically when the headset is switched
off.
Pairing the headset
You can pair the headset to up to 8 devices.
Bluetooth devices supporting:
• the advanced audio distribution profile
(A2DP), e.g. a music mobile phone, a
29
MM200_528260.book Seite 30 Freitag, 9. Mai 2008 1:43 13
portable music player or laptop (Windows
Vista with update as of April 2007 or
Mac OS X Leopard)
• hands free (HFP) or headset (HSP) profile,
e.g. mobile phones
Once you have paired the headset to a
Bluetooth device, the headset automatically
connects to the last paired Bluetooth device
each time this device and the headset detect
each other.
Before pairing to a mobile phone, make sure:
Pairing to a mobile
phone
30
• that the headset’s battery has been charged
as described under “Charging the headset
battery” on page 22,
• that your mobile phone is switched on and
Bluetooth visibility is enabled,
• that the headset is switched off and placed
close to the mobile phone (approx. 20 cm
(7")).
MM200_528260.book Seite 31 Freitag, 9. Mai 2008 1:43 13
To enter pairing mode:
왘 Press the Play/Pause button for 5
seconds.
The LED flashes alternatingly in red and
blue, indicating that the headset is in pairing
mode.
0
1s
2s
If the headset is already switched on and is in
standby or idle mode, you can enter pairing
mode by pressing the Next or Prev. button for
5 seconds.
왘 Once the headset is detected by the mobile
phone, select “MM 200” and connect.
When the Bluetooth connection is
successfully established, the headset is
identified as “MM 200” on the mobile phone
display.
MM 200
OK
Keyword
0000
31
MM200_528260.book Seite 32 Freitag, 9. Mai 2008 1:43 13
왘 When the mobile phone prompts a keyword,
enter 4 zeros (0000).
If pairing was successful, the LED flashes
slowly in blue.
Some mobile phones require an additional step
to connect to the headset. For details, please
refer to the manual of the mobile phone.
Once paired, most mobile phones are able
automatically transfer the audio to the headset
and, in addition, show a headset symbol in their
display.
Pairing is not
successful
If pairing is not successful within 60 seconds,
the headset returns into idle mode.
왘 On the mobile phone, start a search for
Bluetooth devices (see the manual of your
mobile phone) and follow any instructions
displayed on the mobile phone display.
Pairing to other
Bluetooth audio
devices
32
If you wish to pair the headset to other
Bluetooth devices such as portable music
players or laptops, please refer to the manual of
the Bluetooth audio device.
MM200_528260.book Seite 33 Freitag, 9. Mai 2008 1:43 13
The MM 200 can simultaneously be paired to
up to 2 devices, one supporting the HF/HS
profile and one supporting the A2DP, e.g. a
mobile phone and a MP3 player.
Multi-pairing
왘 Pair the MM 200 to one of the devices (see
“Pairing the headset” on page 29). If the
MM 200 is only paired as either a HFP/HSP or
an A2DP device, you can pair it to a
secondary Bluetooth device.
왘 When the headset is in standby mode (i.e. no
active call and no music streaming), press
the Next button or Prev. button for 5
seconds.
The LED flashes alternatingly in red and
blue, indicating that the headset is in pairing
mode and ready to pair the secondary
device.
왘 Follow the steps described under “Pairing to
a mobile phone” on page 30, or the steps
described in the manual of any other device.
33
MM200_528260.book Seite 34 Freitag, 9. Mai 2008 1:43 13
Operating
Replacing the earpads
For reasons of hygiene, the ear pads should be
replaced from time to time. Spare ear pads are
available from your Sennheiser Communications dealer.
왘 Carefully remove the ear pads from the ear
canal phones.
왘 Mount the new ear pads to the ear canal
phones.
The headset comes with ear pads in 3 different
sizes: S, M and L. M size ear pads are already
mounted to the ear canal phones.
34
MM200_528260.book Seite 35 Freitag, 9. Mai 2008 1:43 13
Wearing the headset
Danger of accidents!
The headset can draw off your attention.
왘 Do not wear the headset in an environment
that requires your special attention (e.g. in
traffic or when performing skilled jobs)!
CAUTION!
왘 Put the lanyard around your neck so that
the microphone 쐋 is on your left hand side.
왘 To ensure that the operation buttons always
face outward, you can twist the safety clip
on the lanyard accordingly.
왘 If required, fasten the operating unit to
your clothing with the detachable clothing
clip .
Note on the sound quality:
The perceived sound quality and bass
performance of the ear canal phones depend
largely on the correct fit of the ear canal phones
in the ear.
35
MM200_528260.book Seite 36 Freitag, 9. Mai 2008 1:43 13
For best sound enjoyment, please use the
supplied ear pads of the appropriate size (see
“Replacing the earpads” on page 34).
CAUTION!
Danger of injury!
If inserted too far or without ear pads, the ear
canal phones can injure your ear canals and ear
drums.
왘 Mount the suitable ear pads (S, M or L) to the
ear canal phones (see page 34).
왘 Never insert the ear canal phones without
ear pads!
왘 Always insert and extract the ear canal
phones very carefully and slowly!
왘 Do not insert the ear canal phones too deep
into your ears!
왘 Always keep the ear canal phones dry.
왘 Carefully and slowly insert the ear canal
phones into your ears.
36
MM200_528260.book Seite 37 Freitag, 9. Mai 2008 1:43 13
Listening to music
If your Bluetooth device supports the audio/
video remote control profile (AVRCP), you can
operate the audio player via a remote control.
To ...
Press
start playback
pause playback
skip to the next track in
the playlist/ folder
skip to the previous track
in the playlist/folder
If your Bluetooth device does not support the
audio/video remote control profile (AVRCP):
왘 You have to operate play, pause, stop and
skip via the audio player software of your
Bluetooth device.
37
MM200_528260.book Seite 38 Freitag, 9. Mai 2008 1:43 13
Calling
Provided the headset is switched on, paired
and within the transmission range of a mobile
phone (see page 29), you can accept and make
calls with the MM 200. When you receive a call
while listening to music, the music
automatically pauses and starts playing again
after the call has ended.
Accepting a mobile
phone call
When you receive a call via your mobile phone
you hear a ring tone in the headset.
왘 Press the Play/Pause button or the Next
button or the Prev. button .
A confirmation beep is heard in the headset.
Audio streaming is automatically paused.
왘 Start to talk.
Reject call
38
왘 Press and hold the Play/Pause button or
the Next button or the Prev. button for 2 seconds.
A confirmation beep is heard in the headset.
The ringing stops. Depending on the settings
MM200_528260.book Seite 39 Freitag, 9. Mai 2008 1:43 13
of the mobile phone or Bluetooth device, the
call is either rejected or transferred to a voice
mailbox.
왘 During the call, press the Play/Pause
button . A confirmation beep is heard in
the headset. If any audio streaming was
paused when the call was accepted, it will
automatically resume.
Ending a call
왘 Refer to the manual of your mobile phone for
information on whether your mobile phone
hangs up automatically or you have to hang
up manually.
If you make a call from your mobile phone, any
music playback is paused. A confirmation beep
is heard in the headset.
Making a call
왘 Dial the number on your mobile phone.
Redialling the last number dialled is only
possible with certain mobile phones or
Redialling the last
number dialled
39
MM200_528260.book Seite 40 Freitag, 9. Mai 2008 1:43 13
Bluetooth devices. Please refer to the manual
of your mobile phone or Bluetooth device.
왘 Press the Next button for 2 seconds.
A confirmation beep is heard in the headset.
The last dialled number is redialled.
Voice dialling
The voice dialling function must be supported
by your mobile phone or Bluetooth device,
supporting HFP respectively, and be activated.
왘 Press the Prev. button for 2 seconds. A
confirmation beep is heard in headset.
왘 Say the name of the other party that you
recorded in the phone.
The mobile phone or Bluetooth device
automatically dials the corresponding
number.
If redialling or voice dialling is successful, a
confirmation beep is heard in the headset.
왘 Start to talk.
If redialling or voice dialling has failed (e.g.
because there is no last dialled number stored
40
MM200_528260.book Seite 41 Freitag, 9. Mai 2008 1:43 13
in the phone, the call is rejected by the other
party or the other party cannot be reached), a
confirmation beep is heard in the headset.
왘 To stop dialling during a redialling or voice
dialling attempt, press the Play/Pause
button .
A confirmation beep is heard in the headset.
Then either redialling or voice dialling is
ended.
Stopping redialling
or voice dialling
Transferring an active call from the mobile
phone to the headset*
왘 Refer to the manual of your mobile phone for
information on how to transfer the call audio
from your mobile phone to the headset.
왘 Press and hold either the Next button or
the Prev. button for 2 seconds.
A confirmation beep is heard in the headset.
The call audio is transferred to the mobile
phone.
Transferring an
active call from the
headset to the
mobile phone
*these functions must be supported by the
mobile phone
41
MM200_528260.book Seite 42 Freitag, 9. Mai 2008 1:43 13
Muting/unmuting the headset’s
microphone
To mute the headset’s microphone during a
call:
왘 Press the Play/Pause button for 2
seconds.
A mute indication beep is heard in the headset every 4 seconds while the microphone is
muted.
To unmute the headset’s microphone:
왘 Press the Play/Pause button for 2
seconds
A confirmation beep is heard in the headset.
The microphone works as usual.
Changing the volume
The headset manages 3 different volume
settings independently of each other:
42
MM200_528260.book Seite 43 Freitag, 9. Mai 2008 1:43 13
1. The audio volume can be changed as long as
the headset plays audio.
2. The volume of the other party can be
changed as long as a telephone call lasts.
3. The volume of the headset ring tone can be
changed:
– when the mobile phone rings
– or when audio playback is paused.
After you have changed the headset ring
tone volume, the ring tone is played once in
the set volume.
The volumes can be adjusted in 12 steps. When
the minimum or maximum volume is reached,
an indication tone is heard in the headset.
왘 To increase the volume step-by-step, press
the volume up button .
왘 To reduce the volume step-by-step, press the
volume down button .
왘 To change the volume continuously, press
and hold the respective volume button.
43
MM200_528260.book Seite 44 Freitag, 9. Mai 2008 1:43 13
If you are out of the transmission
range
Phoning and audio streaming is only possible in
the Bluetooth transmission range of the mobile
phone or Bluetooth device, respectively. The
transmission range largely depends on
environmental conditions such as wall
thickness, wall composition etc. With a free line
of sight, the transmission range of most mobile
phones or Bluetooth devices is up to 10 metres.
If the headset leaves the transmission range of
the mobile phone or Bluetooth device:
• The sound quality deteriorates before the
connection finally breaks down.
• Your mobile phone or Bluetooth device
displays the loss of connection.
• Please refer to your mobile phone or
Bluetooth device manual for information on
whether the call is automatically transferred
44
MM200_528260.book Seite 45 Freitag, 9. Mai 2008 1:43 13
to the mobile phone or Bluetooth device or
requires an acknowledgement to do so.
• When there is a loss of connection, an alert
tone is heard in the headset.
• Depending on the connection maintained,
the headset will then go into idle mode (no
connection maintained) or standby mode
(HFP/HSP connection maintained) or
streaming
mode
(A2DP
connection
maintained).
45
MM200_528260.book Seite 46 Freitag, 9. Mai 2008 1:43 13
Maintenance and care
Cleaning the headset
왘 Only clean with a dry cloth. Do not use any
liquids, solvents or cleaning agents.
Storing the headset
If you do not use the headset for extended
periods of time:
왘 Charge the built-in rechargeable battery
every 6 months for about 1 hour.
왘 Store the headset in a clean and dry
environment.
46
MM200_528260.book Seite 47 Freitag, 9. Mai 2008 1:43 13
Accessories
Art. no.
Accessories
502309
USB charging cable
502310
Power supply, EU version
502311
Power supply, UK version
502312
Power supply, US version
502313
Car charging power supply
512816
Spare ear pads L (5 pairs)
512815
Spare ear pads M (5 pairs)
512814
Spare ear pads S (5 pairs)
47
MM200_528260.book Seite 48 Freitag, 9. Mai 2008 1:43 13
Specifications
Specifications
Dimensions
20.5 mm x 64 mm x 18.5 mm (W x H x D)
Weight
28 g without clothing clip
30 g with clothing clip
Power supply
input 100–240 V AC, output 5 V DC, 150 mA
Listen time
9h
Talk time
11 h
Charging time
before first use: 4 hrs
following: 3 hrs
Range
10 m
Speaker type
dynamic, neodymium magnet
Microphone
type
omni-directional electret microphone
48
MM200_528260.book Seite 49 Freitag, 9. Mai 2008 1:43 13
Manufacturer declarations
Warranty regulations
The guarantee period for this Sennheiser Communications product is 24 months
– for the battery 6 months – from the date of purchase. Excluded are accessory
items, rechargeable or disposable batteries that are delivered with the product;
due to their characteristics these products have a shorter service life that is
principally dependent on the individual frequency of use.
The guarantee period starts from the date of original purchase. For this reason,
we recommend that the sales receipt be retained as proof of purchase. Without
this proof (which is checked by the responsible Sennheiser Communications
service partner) you will not be reimbursed for any repairs that are carried out.
Depending on our choice, guarantee service comprises, free of charge, the
removal of material and manufacturing defects through repair or replacement of
either individual parts or the entire device. Inappropriate usage (e.g. operating
faults, mechanical damages, incorrect operating voltage), wear and tear, force
majeure and defects which were known at the time of purchase are excluded from
guarantee claims. The guarantee is void if the product is manipulated by nonauthorised persons or repair stations.
In the case of a claim under the terms of this guarantee, send the device, including
accessories and sales receipt, to the responsible service partner. To minimise the
risk of transport damage, we recommend that the original packaging is used.
Your legal rights against the seller, resulting from the contract of sale, are not
affected by this guarantee. The guarantee can be claimed in all countries outside
the U.S. provided that no national law limits our terms of guarantee.
49
MM200_528260.book Seite 50 Freitag, 9. Mai 2008 1:43 13
CE Declaration of Conformity
This equipment is in compliance with the essential requirements and
other relevant provisions of Directives 1999/5/EC, 89/336/EC or 73/
23/EC.
Before putting the device into operation, please observe the respective countryspecific regulations!
FCC statements
This equipment has been tested and found to comply with the limits for
a Class B digital device, pursuant to Part 15 of the FCC Rules.
These limits are designed to provide reasonable protection against harmful
interference in a residential installation. This equipment generates, uses and can
radiate radio frequency energy and, if not installed and used in accordance with
the instructions, may cause harmful interference to radio communications.
However, there is no guarantee that interference will not occur in a particular
installation. If this equipment does cause harmful interference to radio or
television reception, which can be determined by turning the equipment off and
on, the user is encouraged to try to correct the interference by one or more of the
following measures:
• Reorient or relocate the receiving antenna.
• Increase the separation between the equipment and receiver.
• Connect the equipment into an outlet on a circuit different from that to which
the receiver is connected.
• Consult the dealer or an experienced radio/TV technician for help.
50
MM200_528260.book Seite 51 Freitag, 9. Mai 2008 1:43 13
This device complies with Part 15 of the FCC Rules. Operation is subject to the
following two conditions:
1. this device may not cause harmful interference, and
2. this device must accept any interference received, including interference that
may cause undesired operation.
Changes or modifications not expressly approved by the party responsible for
compliance could void the user's authority to operate the equipment.
This Class B digital apparatus complies with Canadian ICES-003.
Batteries or rechargeable batteries
The supplied batteries or rechargeable batteries can be recycled. Please
dispose of them as special waste or return them to your specialist
dealer. In order to protect the environment, only dispose of exhausted
batteries.
WEEE Declaration
Your Sennheiser Communications product was developed and
manufactured with high quality materials and components which can be
recycled and/or reused. This symbol indicates that electrical and
electronic equipment must be disposed of separately from normal waste
at the end of its operational lifetime.
Please dispose of this product by bringing it to your local collection point or
recycling centre for such equipment. This will help to protect the environment in
which we all live.
51