1
Color Controller
RC-200
OPERATING INSTRUCTIONS
Model number : G528-17
Printed in Japan
UE USA G528-8607
Read this manual carefully before you use this product
and keep it handly for future reference.
For safety, please follow the instructions in this manual.
Introduction
This manual contains detailed instructions on the operation and maintenance of this machine. To get
maximum versatility from this machine all operators should carefully read and follow the instructions in
this manual.
Please read the Safety Information in the “Copy Reference” before using this machine. It contains important information related to USER SAFETY and PREVENTING EQUIPMENT PROBLEMS.
Important
Parts of this manual are subject to change without prior notice. In no event will the company be liable
for direct, indirect, special, incidental, or consequential damages as a result of handling or operating
the machine.
Trademarks
RICOH-SCRIPT2® is a registered trademark of Ricoh Company.
Microsoft® and Windows® are registered trademarks of Microsoft Corporation in the United States and/
or other countries.
Ethernet® is a registered trademark of Xerox Corporation.
Adobe®, PostScript®, Acrobat® and PageMaker® are registered trademarks of Adobe System Incorporated.
AppleTalk, Apple, Macintosh, TrueType, LaserWriter and ColorSync are registered trademarks of Apple Computer, Incorporated.
Other product names used herein are for identification purposes only and might be trademarks of their
respective companies. We disclaim any and all rights in those marks.
Warning:
Use of controls or adjustment or performance of procedures other than those specified in this manual
might result in hazardous radiation exposure.
Notes:
Some illustrations might be slightly different from your machine.
Certain options might not be available in some countries. For details, please contact your local dealer.
Note
The proper names of Windows operating system are as follows:
•
Microsoft® Windows® 95 operating system
•
Microsoft® Windows® 98 operating system
•
Microsoft® Windows NT® Server operating system Version 4.0
•
Microsoft® Windows NT® Workstation operating system Version 4.0
Note to users in the United States of America
Notice:
This equipment has been tested and found to comply with the limits for a Class B digital device, pursuant to Part 15 of the FCC Rules. These limits are designed to provide reasonable protection against
harmful interference in a residential installation. This equipment generates, uses and can radiate radio
frequency energy and, if not installed and used in accordance with the instructions, may cause harmful
interference to radio communications.
However, there is no guarantee that interference will not occur in a particular installation. If this equipment does cause harmful interference to radio or television reception, which can be determined by turning the equipment off and on, the user is encouraged to try to correct the interference by one more of
the following measures:
Reorient or relocate the receiving antenna.
Increase the separation between the equipment and receiver.
Connect the equipment into an outlet on a circuit different from that to which the receiver is
connected.
Consult the dealer or an experienced radio/TV technician for help.
Warning
Changes or modifications not expressly approved by the party responsible for compliance could void
the user's authority to operate the equipment.
Caution (in case of 100BASE-TX environment):
Properly shielded and grounded cables (STP) and connectors must be used for connections to host
computer (and/or peripheral) in order to meet FCC emission limits.
STP with ferrite core must be used for RF interference suppression.
Declaration of Conformity
Product Name: Printer Controller
Model Number: Color Controller RC-200
Responsible party: Ricoh Corporation
Address: 5 Dedrick Place, West Caldwell, NJ 07006
Telephone number: 973-882-2000
This device complies with part 15 of FCC Rules.
Operation is subject to the following two conditions:
1. This device may not cause harmful interference, and
2. this device must accept any interference received,
including interference that may cause undesired operation.
Note to users in Canada
Note:
This Class B digital apparatus complies with Canadian ICES-003.
Remarque concernant les utilisateurs au Canada
Avertissement:
Cet appareil numérique de la classe B est conforme à la norme NMB-003 du Canada.
Copyright © 1999
Manuals for this Machine
There are five manuals that describe the operational procedures separately for
the operation and maintenance of the machine.
This manual, the Printer Reference, contains detailed instructions for using this
machine as a printer.
To ensure safe and efficient operation of the machine, all users should read and
follow the instructions contained in the following manuals.
❖ Operating Instructions that Describes the Copy Functions
Describes the procedures and functions for using this machine as a copier.
❖ Printer Reference Provided as a Paper Manual
Describes the system settings, procedures and functions for using this machine as a printer. (This Manual)
❖ Printer Reference Provided as a PDF File
Describes the procedures and provides necessary information on using this
machine as a printer. The manual is included as a PDF file in the CD-ROM.
❖ RICOH-SCRIPT2 Operating Instructions
Describes the menus and features you can set using the RICOH-SCRIPT2
printer driver. The manual is included as a PDF file in the CD-ROM.
❖ Network Interface Board Operating Instructions
Describes the procedures and provides necessary information on setting up
and using the printer under the network environment. The manual is included as a PDF file in the CD-ROM.
i
How to Read this Manual
Symbols
In this manual, the following symbols are used:
R WARNING:
This symbol indicates a potentially hazardous situation which, if instructions
are not followed, could result in death or serious injury.
R CAUTION:
This symbol indicates a potentially hazardous situation which, if instructions
are not followed, may result in minor or moderate injury or damage to property.
* The statements above are notes for your safety.
Important
If this instruction is not followed, paper might be misfed, originals might be
damaged, or data might be lost. Be sure to read this.
Preparation
This symbol indicates the prior knowledge or preparations required before operating.
Note
This symbol indicates precautions for operation, or actions to take after misoperation.
Limitation
This symbol indicates numerical limits, functions that cannot be used together,
or conditions in which a particular function cannot be used.
Reference
This symbol indicates a reference.
[
]
Keys that appear on the machine's panel display.
Keys and buttons that appear on the computer's display.
{
}
Keys built into the machine's operation panel.
Keys on the computer's keyboard.
ii
TABLE OF CONTENTS
1. Getting Started
Connecting the Machine ...........................................................................
Requirements ................................................................................................
Connecting the Machine Using the Network Interface Board .......................
Connecting the Machine to the Host Using a Parallel Cable ........................
Features of this Machine ..........................................................................
Printer Drivers for this Machine.....................................................................
Software and Utilities Included in the CD-ROM ............................................
Guide to this Machine ...............................................................................
Operation Panel ............................................................................................
1
1
3
4
6
7
7
9
9
2. Configuring the Printer for the Network with the Operation Panel
Configuring the Printer for the Network with the Operation Panel..... 13
3. Installing the Printer Driver and Software
Before Installing ......................................................................................
Auto Run Program...................................................................................
Installing by Auto Run ................................................................................
Installing the IPDL-C Printer Driver .......................................................
Windows 95/98 - Installing the IPDL-C Printer Driver .................................
Windows NT 4.0 - Installing the IPDL-C Printer Driver ...............................
Installing the RICOH-SCRIPT2 Printer Driver .......................................
Windows 95/98 - Installing the RICOH-SCRIPT2 Printer Driver .................
Windows NT 4.0 - Installing the RICOH-SCRIPT2 Printer Driver ...............
Using Adobe PageMaker Version 6.0 or 6.5 in Windows ...........................
Macintosh....................................................................................................
20
21
21
23
23
24
25
25
27
30
31
INDEX........................................................................................................ 36
iii
iv
1. Getting Started
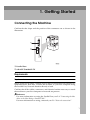
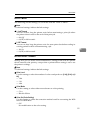
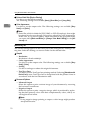
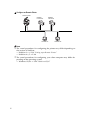
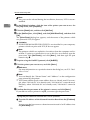
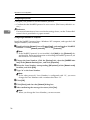
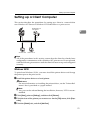
Connecting the Machine
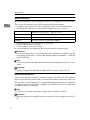
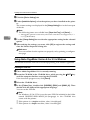
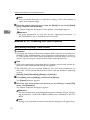
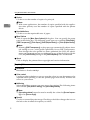
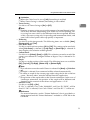
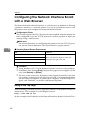
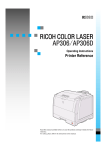
Confirm that the shape and the position of the connectors are as shown in the
illustration.
1. Parallel Port
2. 10BASE-T/100BASE-TX
Requirements
Requirements
Before using this machine, confirm that all the environmental and electrical requirements have been met. Connect the machine to your host computer using
the Parallel Port, Network Interface Board, or both.
Confirm that all the cables, connectors, and electrical outlets necessary to attach
the machine to your host computer or network are present.
Reference
For more information on using the Parallel Port, see P.4 “Connecting the Machine to the Host Using a Parallel Cable”
For more information on using a network, see P.2 “Network connections”
1
Getting Started
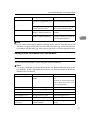
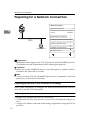
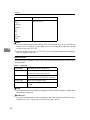
Network connections
The Network Interface Board supports 10BASE-T or 100BASE-TX connections.
You can use the machine in the following network environments:
• Using the appropriate network management software and printer driver.
• Attaching the machine to a networked computer set up as a server.
1
Client
Windows 95, 98, NT 4.0 *1 , Mac OS 7.6~8.6 *2
Driver
IPDL-C, RICOH-SCRIPT2
File Server
NetWare 3.x, NetWare 4.x, NetWare 5
Protocol
IPX/SPX, TCP/IP, AppleTalk, NetBEUI *3
*1
*2
*3
Under Windows NT 4.0, only x86 CPU is supported.
Only RICOH-SCRIPT2 is available.
Under Windows 95/98/NT 4.0 only.
In a mixed network environment, the protocol switches automatically.
Reference
For more information on resolving network connection problems, see the
“Operating Instructions” of Network Interface Board included as a PDF file
in the CD-ROM.
Note
❒ Consult your network administrator before connecting the machine to a network.
Important
❒ Rating voltage of the 10BASE-T/100BASE-TX connector; Max. DC 5V.
Parallel cable requirements
Connect the machine to the host computer using a Parallel Port. This machine
does not provide the parallel cable to connect the machine to the host computer.
The machine's parallel interface is a standard bi-directional interface. It requires
a standard 36-pin parallel cable compliant with IEEE 1284 and a Parallel Port
available on the host computer.
Note
❒ Do not use a parallel cable that is longer than 2.5 meters (8.2 feet).
Important
❒ Rating voltage of the parallel interface connector for the computer; Max. DC
5V.
2
Connecting the Machine
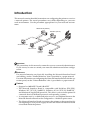
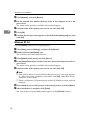
Connecting the Machine Using the Network Interface Board
Connect the machine to the network using the Network Interface Board.
Follow these steps to connect the machine.
1
A Confirm that you have the correct cable.
Note
❒ In a 100BASE-TX environment, be sure to use a properly shielded and
grounded cable (STP) for the connection to your host computer (and/or
HUB) in order to meet FCC and EMC Directive 89/336/EEC emission
guidelines.
B Confirm that the machine is turned off.
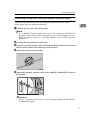
C Loop the network interface cable. The loop should be about 15 cm (6”) from
the end of the cable on the end closest to the printer.
D Attach the ferrite core to the loop.
E Attach the network interface cable to the 10BASE-T/100BASE-TX port on
the printer.
Reference
See P.1 “Connecting the Machine” to be sure of the position of the 10BASET/100BASE-TX port.
3
Getting Started
Note
❒ Confirm that the cable is connected to the 10BASE-T/100BASE-TX port.
Important
❒ Rating voltage of the 10BASE-T/100BASE-TX connector; Max. DC 5V.
1
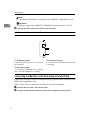
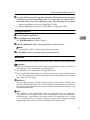
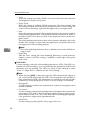
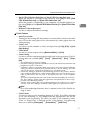
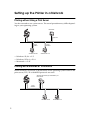
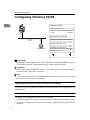
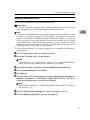
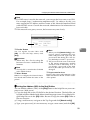
F Connect the other end of the cable to the network.
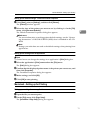
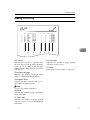
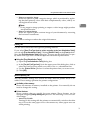
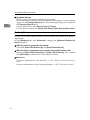
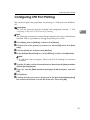
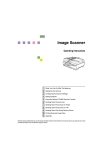
Indicators on the Network Interface Board
1
2
3
1. Indicator (green)
3. Indicator (orange)
Is on while the machine is in a network
environment.
Is on while the Network Interface Board
is working.
2. Indicator (green)
Is on while the 100BASE-TX is working.
Stays off while 10BASE-T is working.
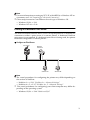
Connecting the Machine to the Host Using a Parallel Cable
Connect the machine to the host computer using a parallel cable compliant with
IEEE 1284 (supplied by you).
Follow these steps to connect the machine to your host computer.
A Confirm that you have the correct cable.
B Confirm that both the machine and the host computer are turned off.
4
Connecting the Machine
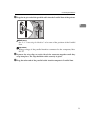
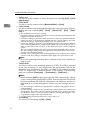
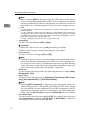
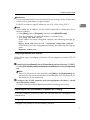
C Plug the 36-pin end of the parallel cable into the Parallel Port of the printer.
1
Reference
See P.1 “Connecting the Machine” to be sure of the position of the Parallel
Port.
Important
❒ Rating voltage of the parallel interface connector for the computer; Max.
DC 5V.
D Squeeze the wire clips on each side of the connector together until they
snap into place. The clips hold the cable securely in place.
E Plug the other end of the parallel cable into the computer's Parallel Port.
5
Getting Started
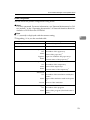
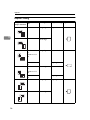
Features of this Machine
This printer is designed especially for office workgroups, both for shared usage
within a network environment, and for one-to-one usage by being connected directly to your computer.
1
❖ Effective Performance with Windows
This printer provides you with rapid and high quality color printing under
the Windows environment.
❖ PostScript Capabilities
Using RICOH-SCRIPT2 provides your printer with PostScript capabilities.
You can use the printer in Windows or Macintosh environments.
❖ Time Saving
You can reduce the amount of time you spend printing.
• Printing Speed *1
Simplex machine
Duplex machine
14 ppm
18 ppm
4 ppm
4 ppm
Monochrome
Full color
*1
A4K, 81/2"× 11"K, maximum printing speed.
❖ Network Connectivity
The printer is network ready with the Network Interface Board.
❖ Easy Handling for Administration
You can set up User Codes for individuals or as a unit of a department. This
allows you to keep records of the printing done for each User Code. You can
also set up a User ID for each print job. To print a job log or a statistics report
shows you color category, result and status of printing per each User Code
and User ID. Viewing the contents of a job log or a statistics report through
the PRINTER MANAGER is available.
Maximum 100 User Code and 64 User ID can be set.
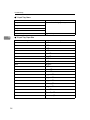
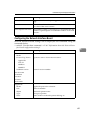
❖ Major Specifications
Maximum Print Quality
Printer Language
600 dpi resolutions
IPDL-C
RICOH-SCRIPT2 *1
Maximum Input Paper Size
Paper Type: A3, 11" × 17"
Bypass Tray: 12" × 18"(DL+)
Standard and Maximum Memory Size
*1
6
Emulations
96MB
Features of this Machine
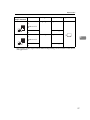
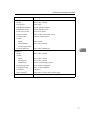
Printer Drivers for this Machine
Printing requires installation of a printer driver for your operating system. The
following drivers are included in the CD-ROM that comes with this machine.
Printer Language
IPDL-C
RPS2 *1
Windows 95 *2
√
√
Windows 98 *3
√
√
Windows NT 4.0 *4
√
√
1
Operating system
Mac OS *5
*1
*2
*3
*4
*5
√
RICOH-SCRIPT2
Microsoft Windows 95 operating system
Microsoft Windows 98 operating system
Microsoft Windows NT Server operating system version 4.0, Microsoft Windows NT
Workstation operating system version 4.0
Required system is 7.6 ~ 8.6.
❖ IPDL-C printer drivers
IPDL-C printer drivers are included in the CD-ROM that comes with this machine. IPDL-C printer drivers allow the computer to communicate with the
printer via a printer language.
⇒ P.23 “Installing the IPDL-C Printer Driver”
⇒ P.24 “Windows NT 4.0 - Installing the IPDL-C Printer Driver”
❖ RICOH-SCRIPT2 Printer Drivers and PPD (PostScript Printer Description) files
RICOH-SCRIPT2 printer drivers and the PPD files are included in the CDROM that comes with this machine. RICOH-SCRIPT2 printer driver allows
the computer to communicate with the printer via a printer language. The
PPD files allow the printer driver to enable printer specific functions.
⇒ P.25 “Windows 95/98 - Installing the RICOH-SCRIPT2 Printer Driver”
⇒ P.27 “Windows NT 4.0 - Installing the RICOH-SCRIPT2 Printer Driver”
⇒ P.31 “Macintosh”
Software and Utilities Included in the CD-ROM
❖ PRINTER MANAGER FOR ADMINISTRATOR
A utility for the system administrator to manage printers on the network.
Reference
For the name of the PRINTER MANAGER FOR ADMINISTRATOR, see
the “Operation Instructions” for the Network Interface Board included as
a PDF file in the CD-ROM.
See the PRINTER MANAGER FOR ADMINISTRATOR Online Help for
details on using the PRINTER MANAGER FOR ADMINISTRATOR.
7
Getting Started
❖ PRINTER MANAGER FOR CLIENT
A utility for users to manage their own print jobs on the network.
Reference
For the name of the PRINTER MANAGER FOR CLIENT, see the “Operation Instructions” for the Network Interface Board included as a PDF file
in the CD-ROM.
1
See the PRINTER MANAGER FOR CLIENT Online Help for details on using the PRINTER MANAGER FOR CLIENT.
❖ Multidirect Print
A utility for printing on a "Peer-to-Peer" network.
Reference
For more information on Multidirect Print, see the “Operating Instructions” for Network Interface Board included as a PDF file in the CD-ROM.
❖ Acrobat Reader
A utility that allows you to read PDF (Portable Document Format) files.
Note
❒ Documentation on using the printer is included in the CD-ROM in PDF
format. For details, see the Readme text in the CD-ROM or “Manuals for this
Machine” in this manual.
8
Guide to this Machine
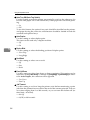
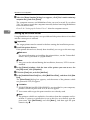
Guide to this Machine
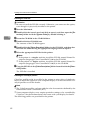
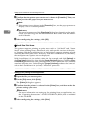
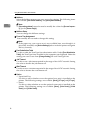
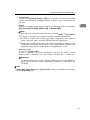
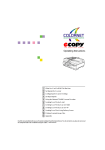
Operation Panel
1
Important
❒ Do not press any operation panel keys while the Data In indicator is flashing
on the operation panel.
1
2 3
4
5
6
7
8
9
10
11
12
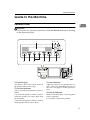
1. Panel Display
3. Error Indicator
The display shows the current status of
the printer and error messages.
Lights up whenever any printer error occurs. A message describing the cause of
the error also appears on the panel display.
2. On Line Indicator
Tells you whether the printer is online or
offline.
Is on while the printer is online (a state in
which the printer can receive data from
the computer).
Is off when the printer is offline (a state in
which printer cannot receive data).
4. Data In Indicator
Blinks while the printer is receiving data
from a computer.
Is on if there is data to be printed.
9
Getting Started
1
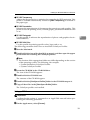
5. {On Line} key
9. {# Enter} key
Press this key to switch the printer between online and offline.
Press this key to execute menu items selected on the panel display.
6. {Reset} key
10. {Media} key
Pressing this key when the printer is offline resets the printer to its power on default settings.
Pressing this key during the online condition cancels the ongoing print job.
Use this key to select a tray, change the
paper size, and to make other settings for
printing.
7. {Escape} key
Press this key to return to the previous
condition on the panel display.
8. {U}{T} keys
Use these keys to increase or decrease
values on the panel display when making
settings.
11. {Menu} key
Press this key to make and check the
printer settings.
12. Power Indicator
Stays on while the power is on. Stays off
when the power is turned off or while the
machine is in the Energy Saver mode.
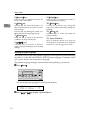
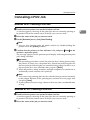
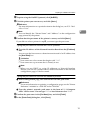
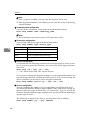
Selecting the printer language
This shows how to select the printer language on the operation panel. Selecting
the IPDL-C or the RICOH-SCRIPT2 (RPS2) printer language is required when
you set the “menu” for each printer language.
The printer language changes automatically when printing is processed.
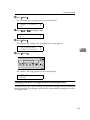
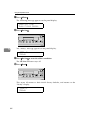
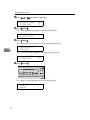
A Press {Menu}.
The following message appears on the panel display.
<Menu>
IPDL-C Menu
j
l
B Press {U} or {T} to display “System Menu”.
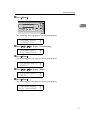
10
Guide to this Machine
C Press {# Enter}.
1
The following message appears on the panel display.
<System Menu>
1.Paper Tray
j
l
D Press {U} or {T} to display “8. PrinterLang.”.
<System Menu>
8.PrinterLang.
j
l
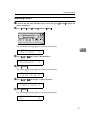
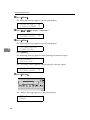
E Press {# Enter}.
The following message appears on the panel display.
<PrinterLang.>
*IPDL-C
j
l
F Press {U} or {T} to display “RPS2”.
<PrinterLang.>
*RPS2
j
l
G Press {# Enter}.
The following message appears on the panel display.
<System Menu>
8.PrinterLang.
j
l
11
Getting Started
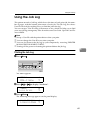
H Press {On Line}.
1
The following message appears on the panel display.
Take Offline
Then Press Reset
I Press {On Line} to enter the offline mode.
The On Line indicator turns off.
J Press {Reset}.
The printer resets and enters the RICOH-SCRIPT2 mode.
12
2. Configuring the Printer for the
Network with the Operation Panel
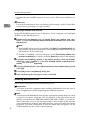
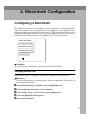
Configuring the Printer for the Network
with the Operation Panel
Configure the printer for the network
using the printer's operation panel.
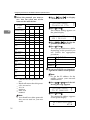
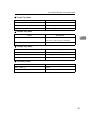
The following table shows the operation panel settings and their default
settings. These are included in the
”System Menu”.
Items
Default
32 IP Address
011.022.033.044
33 Subnet Mask
000.000.000.000
34 Gateway Add
000.000.000.000
(Gateway Address)
35 Access CTL.
000.000.000.000
<Menu>
System Menu
None
Auto Select
(Frame type NetWare)
39 Active PTL.
j
l
000.000.000.000
(Network Boot)
38 Frame NW
<Menu>
IPDL-C Menu
tem Menu”.
(Access Control
Mask)
37 Net Boot
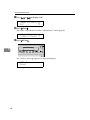
The following message appears on
the panel display.
B Press {U} or {T} to display “Sys-
(Access Control
Address)
36 Access Mask
A Press {Menu}.
All Active
j
l
C Press {# Enter}.
The following message appears on
the panel display.
<System Menu>
1.Paper Tray
j
l
(Active Protocol)
13
Configuring the Printer for the Network with the Operation Panel
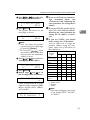
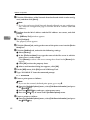
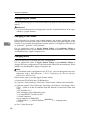
D Select
the protocol you want to
use. You can select one of the
items on the table below.
Menu item on
the panel
display
Active Protocol
TCP *1
NW *2
ET *3
NB *4
'
'
'
'
All Active
(Default Setting)
2
None
TCP/IP Only
'
TCP & NetWare
'
'
'
EtherTalk Only
TCP & EtherTalk
'
NetW & EtherTalk
TCP & NW &
Ether Talk
'
'
'
'
'
'
'
NetBEUI Only
TCP & NetBEUI
TCP & NW &
NB
'
EVFVGVHVJ
'
'
NetWare
IVJ
'
'
TCP & ETK &
NB
NW & ETK &
NB
'
'
'
'
'
'
'
• ' means that this protocol is active.
• Blank cell means that this protocol is not active.
*1
*2
*3
*4
TCP/IP
NetWare
Ether Talk
NetBEUI
Note
❒ You should not select protocols
that are not used on your network.
14
AppleTalk J
NetBEUI
'
j
l
C Press {U} or {T} to display the
protocol you want to use.
D Press {# Enter}.
The actual procedure may differ
depending on the protocol you
use. Follow the appropriate
procedure.
TCP/IP
ETalk & NetBEUI
j
l
B Press {# Enter}.
The current setting appears on
the panel display.
'
'
NetW & NetBEUI
<System Menu>
39.Active PTL.
<Active PTL.>
*All Active
'
NetWare Only
A Press {U} or {T} to display
“39.Active PTL.”.
J
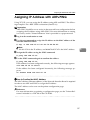
E If you use TCP/IP, you should assign the IP address to the printer.
Note
❒ To get the IP address for the
printer, contact your network
administrator.
A Press {U} or {T} until the following message appears.
<System Menu>
32.IP Address
j
l
B Press {# Enter}.
The current IP address appears
on the panel display.
011.022.033.044
j
jl/#
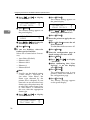
Configuring the Printer for the Network with the Operation Panel
C Press {U} or {T} to set the leftmost digit of the IP address.
111.022.033.044
j
jl/#
D Press {# Enter}.
The pointer (U) moves to the
next digit as shown.
111.022.033.044
j
jl/#
Note
❒ You can return the pointer
(U) to the previous (left) digit
by pressing {Escape}.
❒ If you press {Escape} when
the pointer (U) is on the leftmost position, the selected IP
address is reset.
E Press {U} or {T} to set the second digit of the IP address.
F If you use TCP/IP, you should assign “33.Subnet Mask” and
“34.Gateway Add” following the
same procedure for setting the IP
address.
G If you use TCP/IP, set the “35.Access CTL.” and “36.Access Mask”
following the same procedure for
setting the IP address, if necessary.
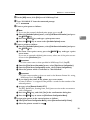
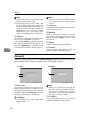
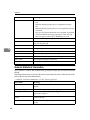
H If
you use TCP/IP, you should
make settings for “37.Net Boot”.
You can select how to assign the
printer's address using the computer. Select one of the items on
the table below.
Menu item on
the panel
display
Available method
AR *1
RA *2
F Press {# Enter}.
G Repeat steps E and F to set
the rest digit of the IP address.
191.168.015.016
j
Check if the pointer (U) is at the
rightmost digit, and press {# Enter} to register the IP address
you selected.
<System Menu>
32.IP Address
j
l
BO *3
DH *4
None
(Default Setting)
'
RARP+TFTP
'
BOOTP
191.022.033.044
j
jl/#
2
'
RARP & BOOTP
'
'
DHCP
ARP+PING
'
ARP & RARP
'
ARP & BOOTP
'
ARP & RARP &
BOOTP
'
*1
*2
*3
*4
'
'
'
'
ARP+PING
RARP+TFTP
BOOTP
DHCP
Note
❒ You must configure your server
to use “RARP+TFTP”, “BOOTP”
or “DHCP”.
15
Configuring the Printer for the Network with the Operation Panel
A Press {U} or {T} to display
“37.Net Boot”.
<System Menu>
37.Net Boot
j
l
B Press {# Enter}.
The current setting appears on
the panel display.
2
<Net Boot>
*None
j
l
C Press {U} or {T} to display the
method you want to use.
D Press {# Enter}.
I If
you use NetWare, select the
frame type for NetWare.
Select one of items below if necessary.
• Auto Select (Default)
• Ethernet 802.3
• Ethernet 802.2
• Ethernet 2
• EthernetSNAP
Note
❒ Usually, use the default setting
(“Auto Select”). However, if
you select “Auto Select”, the
frame type detected by the
printer first is adopted. If your
network can use more than two
frame types, the printer may fail
to select the correct frame type,
if “Auto Select” is selected. In
this case, select the appropriate
frame type.
A Press {U} or {T} to display
“38.Frame NW”.
<System Menu>
38.Frame NW
16
j
l
B Press {# Enter}.
The current setting appears on
the panel display.
<Frame NW>
*Auto Select
j
l
C Press {U} or {T} to display the
frame type you want to use.
D Press {# Enter}.
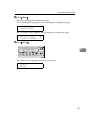
J Reset the printer to apply the settings.
A Press {On Line} to enter the offline condition.
The On Line indicator turns off.
B Press {Reset}.
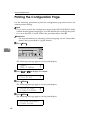
K Print
the configuration page to
check settings you have made.
A Press {Menu}.
B Press {U} or {T} to display
”List Print”.
C After confirming that “Config.Page” is on the display,
press {# Enter}
D Press {# Enter}.
The configuration page is now
printed. Check the contents of
the configuration page.
E Press {On Line}.
The “Ready” message appears
on the panel display.
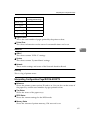
Configuring the Printer for the Network with the Operation Panel
-Address
❖ Subnet Mask
A number used to mathematically
“mask” or hide an IP address on
the network by eliminating those
parts of the address that are alike
for all the machines on the network.
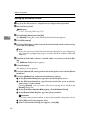
Access Control
Mask
IP Address that
have access
0.
0.
0.
0
xxx.xxx.xxx.xxx
255.
0.
0.
0
192.xxx.xxx.xxx
255.255.
0.
0
192.168.xxx.xxx
255.255.255.
0
192.168. 15.xxx
255.255.255.255
192.168. 15. 16
2
❖ Gateway Address
A gateway is a connection or interchange point that connects two
networks. A gateway address is for
the router or host computer used
as a gateway.
Note
❒ To get the addresses, contact
your network administrator.
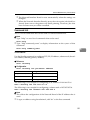
❖ Access Control Address and Access
Control Mask
Access Control Address and Access Control Address are used to
control the IP addresses that have
access to the computer used for
printing, with the IP address. If it is
not necessary for you to control the
access rights, select “0.0.0.0”.
Note
❒ When the Access Control Address settings coincide with the
masked result of the IP address
of the computer, print jobs from
that IP address can be accepted
by the Network Interface Board.
❒ For example, if you assign
192.168.15.16 as the Access Control Address to the Network Interface Board, the combination
of the Access Control Mask and
IP address that can have access
are as follows. (xxx : for any numerical value)
17
Configuring the Printer for the Network with the Operation Panel
2
18
3. Installing the Printer Driver
and Software
All of the procedures in this manual assume that you are familiar with general
Windows procedures and practices. If you are not, see the documentation that
comes with Windows for details.
Some applications require their own specific settings, which may be different
from those provided by the printer driver. Be sure to check the documentation
that comes with your applications for detail.
Considerable hard disk space is required on your computer for printing complex
documents.
19
Installing the Printer Driver and Software
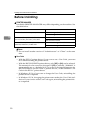
Before Installing
❖ PRINTER MANAGER
Installable PRINTER MANAGER may differ depending on the machine. See
the table below.
Name of machine
Name of PRINTER MANAGER
Ricoh Aficio Color 3006, 4006, 4106
Aficio Manager for Admin
Aficio Manager for Client
3
Gestetner CS206, CS206d, CS206de
Net Vision for Admin
Savin SDC306, SDC306A, SDC306E
Net Vision for Client
Lanier 5706AG, 5706AH, 5806AG,
5806AH, 5806E AG, 5806E AH
Lanier Net Manager for Admin
Lanier Net Manager for Client
Note
❒ Do not install another version of “Administrator” or “Client” at the same
time.
❖ User Code
• With the IPDL-C printer driver, if you want to set a User Code, you must
do it when installing the printer driver.
• With the RICOH-SCRIPT2 printer driver, only [Off] or [On] can be selected.
The numerical value cannot be changed. If [On] is selected, “99999999” is
automatically set as a default. So if you want to distinguish between the
RICOH-SCRIPT2 and the IPDL-C printer drivers, set the different User
Code in the IPDL-C printer driver.
• In Windows 95/98, if you want to change the User Code, reinstalling the
printer driver is required.
• In Windows 95/98, changing the printer name makes the User Code ineffective. If you want to set the User Code again, reinstalling the printer driver is required.
20
Auto Run Program
Auto Run Program
You can install the printer driver and utilities by using the Auto Run program.
Auto Run is available for the following operating systems:
• Windows 95/98
• Windows NT 4.0
If you install the RICOH-SCRIPT2 (RPS2) printer driver, Auto Run is not available.
See P.25 “Installing the RICOH-SCRIPT2 Printer Driver”
3
Important
❒ Before starting this installation, close all documents and applications. In a network environment, confirm that users who are logged on are disconnected.
Be sure to do this when it creates the least interference with other users.
Reference
For more information on the software and utilities included in the CD-ROM,
see P.7 “Software and Utilities Included in the CD-ROM”.
Note
❒ The Auto Run program might not automatically work with certain OS settings. In this case, start "Insttool.EXE" to install the printer driver on the root.
❒ If you want to cancel the Auto Run program, insert the CD-ROM while pressing the {SHIFT} key until your computer finishes accessing the CD-ROM.
❒ Recommended PC requirements.
• Memory: 32MB or more
• CPU: Pentium® 100MHz or more
• Free Hard disk space: 100MB or more
Installing by Auto Run
Follow these steps to install the printer driver and utilities on Windows 95/98/
Windows NT 4.0.
Important
❒ Never have two versions of the same printer driver installed on your system
at the same time. When upgrading to a new version of the printer driver, delete the old version, and then install the new one.
Note
❒ If the "plug and play" function is started by Auto Run, click [Cancel] in the
[New Hardware Found] dialog box or [Device Driver Wizard], and then insert the
CD-ROM. [New Hardware Found] or [Device Driver Wizard] appears depending on
the version of Windows 95/98.
21
Installing the Printer Driver and Software
A Close all applications that are currently running.
B Insert the CD-ROM in the CD-ROM drive.
C Select a language.
Note
❒ The IPDL-C Printer Driver supports English, French, German, Italian or
Dutch. If you have selected any other language, English Printer Driver will
be installed. After installation, you can switch to another language in the
Printer Properties.
3
D Follow the instructions on the screen.
E Restart your computer after installation is complete.
F You should set up the options with the printer driver.
22
Installing the IPDL-C Printer Driver
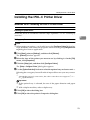
Installing the IPDL-C Printer Driver
Windows 95/98 - Installing the IPDL-C Printer Driver
Installing the printer driver
Install the driver in accordance with the steps explained. ⇒ P.21 “Installing by
Auto Run”
3
Setting up options
Note
❒ When setting up options, you should access the [Configure Printer] dialog box
from Windows. You cannot set up options when accessing the [Configure Printer] dialog box from an application.
A Click [Start], point to [Settings], and then click [Printers].
The [Printers] window appears.
B Select the icon of the printer you want to use by clicking it. On the [File]
menu, click [Properties].
C Click the [Setup] tab, and then click [Configure Printer].
The [Setup - Configure Printer ] dialog box appears.
D Use the [Option Selection] list box to select the optional tray and sorter unit *1 .
Selecting the wrong tray here will make it impossible to use your tray correctly.
*1
Among the optional sorter units, the 3-bin sorter does not support 51/ 2" ×
8 1/ 2"K(HalfLetter).
Important
❒ If the optional tray is selected, be sure of the paper direction and paper
size.
❒ With a duplex machine, select a duplex tray.
E Click [OK] to close the dialog box.
F Click [OK] to close the printer's Properties dialog box.
23
Installing the Printer Driver and Software
Windows NT 4.0 - Installing the IPDL-C Printer Driver
Limitation
❒ Installing a printer driver requires Full Control access permission. Members
of the Administrators, Server Operators, Print Operators, and Power Users
groups have Full Control permission by default. When you install a printer
driver, log on using an account that has Full Control permission.
Installing the printer driver
3
Install the driver in accordance with the steps explained. ⇒ P.21 “Installing by
Auto Run”
Install the printer driver of Windows 95/98 for the alternative driver from the
following folder in the CD-ROM:DRIVERS\IPDL_C\WIN95_98\DISK1
Setting up options
A Click [Start], point to [Settings], and then click [Printers].
The [Printers] window appears.
B Select the icon of the printer you want to use by clicking it. On the [File]
menu, click [Properties] .
C Click the [Configure Printer] tab.
D Use the [Option Selection] list box to select the optional tray and sorter unit *1 .
Selecting the wrong tray here will make it impossible to use your tray correctly.
*1
Among the optional sorter units, the 3-bin sorter does not support 51/ 2" ×
8 1/ 2"K(HalfLetter).
Important
❒ If the optional tray is selected, be sure of the paper direction and paper
size.
❒ With a duplex machine, select a duplex tray.
E Click [OK] to close the printer properties.
24
Installing the RICOH-SCRIPT2 Printer Driver
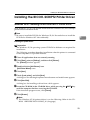
Installing the RICOH-SCRIPT2 Printer Driver
Windows 95/98 - Installing the RICOH-SCRIPT2 Printer Driver
With Windows 95/98, you should install both the Windows 95/98 PostScript
printer driver and the PPD file.
Note
❒ Be sure to install the PPD file for Windows 95/98. Be careful not to install the
PPD file for Windows NT 4.0 accidentally.
3
Installing the printer driver
Preparation
The Windows 95/98 operating system CD-ROM or diskettes are required for
installation.
The following procedure describes installation when the printer is connected
to the computer via a parallel interface.
A Close all applications that are currently running.
B Click [Start], point to [Settings], and then click [Printers].
The [Printers] window appears.
C Double-click the [Add Printers] icon.
[Add Printer Wizard] starts.
D Click [Next].
E Check [Local printer], and click [Next].
A dialog box for selecting the printer manufacturer and model name appears.
F Click [Have Disk].
A dialog box for installing a driver from a disk appears.
G Insert the CD-ROM in the CD-ROM drive, while pressing the {SHIFT} key
until the computer finishes accessing the CD-ROM.
If the Auto Run program starts, click [Cancel].
H Click [Browse].
Note
❒ The Windows 95/98 printer driver is on the following folder in the CDROM: \DRIVERS\RPS2\WIN95_98\(language)
25
Installing the Printer Driver and Software
I Use the [Drives:] list box to select the CD-ROM drive.
J In the [Folders] box, double-click [DRIVERS], [RPS2] *1 and [WIN95_98]. Then
double-click the folder of the appropriate language. Finally, click [OK].
*1
RPS2 is the short name of RICOH-SCRIPT2.
K Click [OK].
L Select the name of the printer whose driver you want to install by clicking
it, and then click [Next].
The port selection dialog box appears.
3
Note
❒ If the printer is a simplex machine, select "Color Controller RC-200".
❒ If the printer is a duplex machine, select "Color Controller RC-200(D)".
M In the [Available ports] box, select the printer port by clicking it, and then
click [Next].
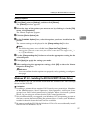
N Change the name of the printer if you want, and then click [Next].
O Select whether or not you want to print a test page, and then click [Finish].
The installer copies the printer driver files from the CD-ROM to your computer's hard disk.
P If you are asked to insert the Windows 95/98 system disk, insert it in the
computer, and then click [OK].
Q If you are asked to provide the location of the required file for Windows 95/
98, do the following:
• Select the folder [WIN95] or [WIN98] in the system disk.
• Navigate to the folder where Windows is installed. Then, select the appropriate folder. The location of the appropriate folder may differ depending
on the version of your operating system. The following are examples:
\WINDOWS\SYSTEM\OPTION\CABS
\WINDOWS\OPTION\CABS
R If you are asked if you want to restart Windows, select [Yes]. If you are not
asked, restart Windows after completing the installation.
S After Windows restarts, set up any options you have installed to the printer.
Reference
⇒ P.27 “Setting up options”
26
Installing the RICOH-SCRIPT2 Printer Driver
Setting up options
A Click [Start], point to [Settings], and then click [Printers].
The [Printers] window appears.
B Select the icon of the printer you want to use by clicking it. On the [File]
menu, click [Properties].
The Printer Properties appears.
C Click the [Device Options] tab.
D In the [Installable Options] box, select the options you have installed on the
3
printer.
The current settings are displayed in the [Change settings for:] list box.
Note
❒ The following items are available here: [Paper feed Tray], [Sorter] *1 .
*1
Among the optional sorter units, the 3-bin sorter does not support 51/2" ×
8 1/2"K(HalfLetter).
E Use the [Change settings for:] list box to select the appropriate setting for the
selected option.
F Click [Apply] to apply the settings you made.
G After configuring the appropriate settings, click [OK] to close the Printer
Properties dialog box.
Reference
You can confirm that the options are properly set by printing a configuration page.
Windows NT 4.0 - Installing the RICOH-SCRIPT2 Printer Driver
With Windows NT 4.0, you should install both the Windows NT 4.0 PostScript
driver and the PPD file.
Limitation
❒ Installing a printer driver requires Full Control access permission. Members
of the Administrators, Server Operators, Print Operators, and Power Users
groups have Full Control permission by default. When you install a printer
driver, log on using an account that has Full Control permission
❒ We recommend that you upgrade your Windows NT 4.0 operating system to
the latest version before installing the printer driver. Contact your Windows
retailer for details about the latest version available.
❒ Be sure to install the PPD file for Windows NT 4.0. Do not accidentally install
the PPD file for Windows 95/98.
27
Installing the Printer Driver and Software
Installing the printer driver
Preparation
The CD-ROM containing the Windows NT Server operating system version
4.0, or the Windows NT Workstation operating system is required for installing the printer driver.
The following procedure describes installation when the printer is connected
to the computer via a parallel interface.
A Close all applications that are currently running.
B Click [Start], point to [Settings], and then click [Printers].
3
The [Printers] window appears.
C Double-click the [Add Printer] icon.
[Add Printer Wizard] starts.
D After confirming that the [My Computer] option is selected, click [Next].
A dialog box for selecting the printer port appears.
E Check the check box of the port you want to use, and then click [Next].
A dialog box for selecting the printer manufacturer and model appears.
F Click [Have Disk].
A dialog box for installing a driver from a disk appears.
G Insert the CD-ROM in the CD-ROM drive, while pressing the {SHIFT} key
until the computer finishes accessing the CD-ROM.
If the Auto Run program starts, click [Cancel].
H Change the drive name in the list box to the name of the CD-ROM drive,
and then click [Browse].
Note
❒ The Windows NT 4.0 printer driver is in the following folder on the CDROM: \DRIVERS\RPS2\NT4\(language).
I In the [Folders] box, double-click [DRIVERS], [RPS2] and [NT4]. Then doubleclick the folder of the appropriate language. Finally, click [Open].
J Click [OK].
A printer model selection dialog box appears.
K Select the name of the printer whose driver you want to install by clicking
it, and then click [Next].
A dialog box for changing the printer name appears.
28
Installing the RICOH-SCRIPT2 Printer Driver
Note
❒ If the printer is a simplex machine, select "Color Controller RC-200".
❒ If the printer is a duplex machine, select "Color Controller RC-200(D)".
L Change the name of the printer if you want, and then click [Next].
M Click [Next].
N In the next dialog box asking if you want to print a test page, select [No] and
then click [Finish].
The installer copies the printer driver files from the CD-ROM to your computer's hard disk.
3
Note
❒ Print a test page after completing installation and restarting Windows.
O If you are asked to insert the Windows NT 4.0 system disk, insert it in the
computer, and then click [OK].
P If you are asked to provide the drive of the system disk, use the drive containing the Windows NT 4.0 system disk.
Q If you are asked to provide the location of the required file, select the ap-
propriate folder. The location of the appropriate folder may differ depending on the version of your operating system. The following is an example:
• folder named [i386] of the Windows NT 4.0 system disk.
After installation is completed, the [Printers] window appears with the icon of
the newly installed printer.
R If you are asked if you want to restart Windows, select [Yes]. If you are not
asked, restart Windows after completing the installation.
S After Windows restarts, set up any options you have installed to the printer.
Reference
⇒ P.29 “Setting up options”
Setting up options
A Click [Start], point to [Settings], and then click [Printers].
The [Printers] window appears.
B Select the icon of the printer you want to use by clicking it. On the [File]
menu, click [Properties].
The Printer Properties appears.
29
Installing the Printer Driver and Software
C Click the [Device Settings] tab.
D Under [Installable Options], select the options you have installed on the printer.
The current settings are displayed in the [Change Setting] box in the lower part
of the tab.
Note
❒ The following items are available here: [Paper feed Tray] and [Sorter] *1 .
*1
3
Among the optional sorter units, the 3-bin sorter does not support 5 1/2" ×
81/ 2"K(HalfLetter).
E Use the [Change Setting] box to select the appropriate setting for the selected
option.
F After making the settings you want, click [OK] to register the settings and
close the Printer Properties dialog box.
Reference
You can confirm that the options are properly set by printing a configuration page.
Using Adobe PageMaker Version 6.0 or 6.5 in Windows
You should install the PPD file for PostScript printing with Adobe PageMaker.
Installing the PPD files
A Close Adobe PageMaker if it is currently running.
B Insert the CD-ROM in the CD-ROM drive, while pressing the {SHIFT} key
until the computer finishes accessing the CD-ROM.
If the Auto Run program start, click [Cancel].
C Select the CD-ROM drive.
D In the [Folders] box, double-click [DRIVERS], [RPS2] and [WIN95_98]. Then
double-click the folder of the appropriate language.
You can see the PPD file.
Note
❒ For Windows 95/98/NT 4.0, use the same PPD file included in the folder
named DRIVERS\RPS2\WIN95_98\(language) in the CD-ROM that
comes with the printer.
❒ If the printer is a simplex machine, select "ricrc202.ppd".
❒ If the printer is a duplex machine, select "ricrc2D2.ppd".
30
Installing the RICOH-SCRIPT2 Printer Driver
E Copy the PPD file into the appropriate folder. The location of the appropri-
ate folder may differ depending on the version of software or how you installed the software on your operating system. The following are examples:
• Adobe PageMaker version 6.0: PM6\RSRC\PPD4
• Adobe PageMaker version 6.5: PM65\RSRC\(language)\PPD4
Selecting the PPD files
A Launch Adobe PageMaker.
B On the [File] menu, click [Print].
3
The [Print Document] dialog box appears.
C From the [Printers] list box, select the printer you want to use.
Note
❒ Confirm that “RPS” is shown after the printer name.
D In the [PPD] list box, select the printer you want to use.
Macintosh
Use the Macintosh LaserWriter 8 driver that comes with your operating system.
Important
❒ See the documentation that comes with your operating system for details on
the functions of the LaserWriter 8 printer driver.
❒ The PPD file is not compatible with QuickDrawGX.
❒ The LaserWriter printer driver for a Macintosh does not come with this printer. Use the appropriate printer driver that comes with the Macintosh operating system you are using.
Reference
This manual describes only the settings specific for this printer. Settings actually may differ depending on the version of the LaserWriter driver you are using. See the documentation that comes with the Macintosh for details on the
LaserWriter functions.
Note
❒ The versions of the LaserWriter driver are separated into two categories.
"LaserWriter 8.3x or earlier" refers to the LaserWriter 8.3x driver and all drivers before that. "LaserWriter 8.4x or later" refers to LaserWriter 8.4x, 8.5x and
8.6x. LaserWriter 8.5x was used to make this manual. The settings may differ
depending on the version of the LaserWriter driver being used.
31
Installing the Printer Driver and Software
Installing the PPD files
Limitation
❒ Be sure to install the PPD file correctly. Otherwise, you cannot use the option,
even though it is physically installed to the printer.
A Start the Macintosh.
B Double-click the icon of your hard disk to open it, and then open the [Extensions] folder inside the [System Folder] by double-clicking it.
C Insert the CD-ROM in the CD-ROM drive.
D Double-click the CD-ROM icon.
3
The contents of the CD-ROM appear.
E Double-click the [Printer Description] folder in the CD-ROM, and then double-click the folder having the appropriate language name to open it.
F Select the appropriate PPD file for the printer.
Note
❒ If the printer is a simplex machine, install the PPD file named Printer Description:(language):Color Controller RC-200 in the CD-ROM.
❒ If ther printer is a duplex machine, install the PPD file named Printer Description:(language):Color Controller RC-200(D) in the CD-ROM.
G Copy the PPD file in the [Printer Descriptions] folder located inside the [Extensions] folder.
The PPD file is installed.
Installing the ColorSync profiles
ColorSync profiles make it possible for the printer to print colors of similar intensity to those that appear on your computer display. You must install the ColorSync profiles to use this feature.
Note
❒ The ColorSync profiles conform with the color characteristics defined by the
International Color Consortium (ICC).
❒ Some computer displays may require particular settings to be controlled by
ColorSync. See the documentation that comes with your display for details.
The following profiles are provided for the printer.
32
Installing the RICOH-SCRIPT2 Printer Driver
❖ RC–200 Transparency
Adjusts the image density to optimize the output for the OHP projection. This
profile is selected automatically whenever [OHP Transparency] is selected as
the paper type.
❖ RC–200 Presentation
Enhances the reproduction of documents that contain text and graphics. This
profile is best for printing charts, colored graphs, presentation materials and
so on.
❖ RC–200 Photograph
Use this profile to enhance the reproduction of photos and graphics that include midtones.
3
❖ RC–200 Solid Color
Use this profile for printing specific colors, logos and so on.
The following procedure shows how to install the ColorSync Profiles.
A Start the Macintosh.
B Double-click the icon of the hard disk to open it, and then open the appropriate folder for installing the ColorSync profiles.
Note
❒ The location of the appropriate folder may differ depending on the version
of the operating system. The following are examples:
• System:Preferences:ColorSync Profiles
• System:ColorSync Profiles
C Insert the CD-ROM in the CD-ROM drive.
The icon of the CD-ROM appears.
D Double-click the CD-ROM icon.
The contents of the CD-ROM appear.
E Double-click the [ColorSyncTM Profiles] folder in the CD-ROM to open it.
F Copy all four files in the [ColorSyncTM Profiles] folder.
The ColorSync profiles are installed.
Setting up PPD file
Preparation
Confirm that the printer is connected to an AppleTalk network before performing the following procedure.
A On the Apple menu, select [Chooser].
33
Installing the Printer Driver and Software
B Click the [LaserWriter 8] icon.
C In the [Select a PostScript Printer] list, select the name of the printer you want
to use by clicking it, and then click [Create].
Note
❒ If your network has multiple zones, click the name of the zone the printer
belongs to in the [AppleTalk Zones] list in the lower left side of the [Chooser]
dialog box.
D Select the name of the printer by clicking it, and then click [Select].
3
Note
❒ Be sure to select the PPD file correctly. Otherwise, you may not use options
because options that you can use depend on the printer.
The PPD file is set up and the LaserWriter 8 icon appears at the left of the
printer name in the list. Next, follow the procedure on P.34 “Setting up options” to make the option settings, or to close the [Chooser] dialog box.
Setting up options
A On the Apple menu, select [Chooser].
B Click the [LaserWriter 8] icon.
C In the [Select a PostScript Printer] list, select the name of the printer you want
to use by clicking it, and then click [Setup].
Note
❒ If your network has multiple zones, click the name of the zone the printer
belongs to in the [AppleTalk Zones] list in the lower left side of the [Chooser]
dialog box.
D Click [Configure].
A list of options appears.
E Select the option you want to set up and the appropriate settings for it.
Note
❒ If the option you want to set up does not appear, the PPD file has not been
set up correctly. Check the name of the PPD file shown in the dialog box.
Reference
For more information on setting up options, see the “Operating Instructions” for RICOH-SCRIPT2 provided as a PDF file which is included in the
CD-ROM.
34
Installing the RICOH-SCRIPT2 Printer Driver
F Click [OK].
The list of options closes.
G Click [OK].
The [Chooser] dialog box appears.
Installing screen fonts
The screen fonts described below can be found in the CD-ROM, in the folder
named [Fonts].
Screen fonts are 10, 12, 14, 18 and 24 point bitmap fonts. Other sizes make characters appear with ragged edges on your computer screen, but they print with
smooth edges.
3
Note
❒ The screen fonts included in the CD-ROM are as follows: AG-Ricoh, HNRicoh, CS-Ricoh, BM-Ricoh, ZC-Ricoh, ZD-Ricoh.
A Start the Macintosh.
B Insert the CD-ROM in the CD-ROM drive.
The CD-ROM icon appears.
C Double-click the CD-ROM icon.
The contents of the CD-ROM appear.
D Copy the fonts you want to install in the [System] folder.
A confirmation dialog box appears.
E Click [OK].
The fonts are installed.
F Restart the Macintosh.
Note
❒ The names of the fonts you have installed appear in the pull-down menu
when you select fonts with applications.
-Screen Fonts
Screen fonts are bitmap fonts, which are formed by grouping dots together. Because of this, screen fonts appear jagged on your computer screen when you enlarge or reduce them. It is recommended that you install as many different sizes
as possible for each font to avoid such jagged appearances. Screen fonts are provided for this printer in 10, 12, 14, 18 and 24 point sizes.
35
INDEX
N
10BASE-T/100BASE-TX, 1
A
Access Control Address, 13, 17
Access Control Mask, 13, 17
Active Protocol, 13
Adobe PaerMaker, 30
PPD, installing, 30
Auto Run, 21
Installing, 21
D
Data In indicator, 9
E
{# Enter} key, 10
Error indicator, 9
{Escape} key, 10
F
Frame type NetWare, 13
G
Gateway Address, 13, 17
Network Boot, 13
Network Connections, 2
Network Interface Boad, 3
O
On Line indicator, 9
{On Line} key, 10
Operation Panel, 9
Options, 23, 24, 27, 29, 34
P
Panel Display, 9
Parallel Cable, 2, 4
Parallel Port, 1
Power indicator, 10
printer driver, 7
PRINTER MANAGER, 20
R
{Reset} key, 10
RICOH-SCRIPT2, 7
Windows 95/98 - Install, 25
Windows NT 4.0 - Install, 27
S
Screen Fonts, 35
Subnet Mask, 13, 17
I
IP Address, 13
IPDL-C, 7
Windows 95/98 - Install, 23
Windows NT 4.0 - Install, 24
L
U
User Code, 20
statistics report, 6
User ID
job log, 6
LaserWriter, 31
M
Macintosh, 31
ColorSync, installing, 32
PPD, installing, 32
PPD, Seting up, 33
{Media} key, 10
{Menu} key, 10
36
UE
USA G528
Color Controller
RC-200
PRINTER REFERENCE
Read this manual carefully before you use this product
and keep it handly for future reference.
For safety, please follow the instructions in this manual.
Introduction
This manual contains detailed instructions on the operation and maintenance of this machine. To get
maximum versatility from this machine all operators should carefully read and follow the instructions in
this manual.
Please read the Safety Information in the “Copy Reference” before using this machine. It contains important information related to USER SAFETY and PREVENTING EQUIPMENT PROBLEMS.
Important
Parts of this manual are subject to change without prior notice. In no event will the company be liable
for direct, indirect, special, incidental, or consequential damages as a result of handling or operating
the machine.
Trademarks
RICOH-SCRIPT2® is a registered trademark of Ricoh Company.
Microsoft® and Windows are registered trademarks of Microsoft Corporation in the United States and/
or other countries.
Ethernet® is a registered trademark of Xerox Corporation.
PostScript® and Acrobat® are registered trademarks of Adobe System Incorporated.
Other product names used herein are for identification purposes only and might be trademarks of their
respective companies. We disclaim any and all rights in those marks.
Warning:
Use of controls or adjustment or performance of procedures other than those specified in this manual
might result in hazardous radiation exposure.
Notes:
Some illustrations might be slightly different from your machine.
Certain options might not be available in some countries. For details, please contact your local dealer.
Note
The proper names of Windows operating system are as follows:
•
Microsoft® Windows® 95 operating system
•
Microsoft® Windows® 98 operating system
•
Microsoft® Windows NT® Server operating system Version 4.0
•
Microsoft® Windows NT® Workstation operating system Version 4.0
Manuals for this Machine
There are five manuals that describe the operational procedures separately for
the operation and maintenance of the machine.
This manual, the Printer Reference, contains detailed instructions for using this
machine as a printer.
To ensure safe and efficient operation of the machine, all users should read and
follow the instructions contained in the following manuals.
❖ Operating Instructions that Describes the Copy Functions
Describes the procedures and functions for using this machine as a copier.
❖ Printer Reference Provided as a Paper Manual
Describes the system settings, procedures and functions for using this machine as a printer.
❖ Printer Reference Provided as a PDF File
Describes the procedures and provides necessary information on using this
machine as a printer. The manual is included as a PDF file in the CD-ROM.
(This Manual)
❖ RICOH-SCRIPT2 Operating Instructions
Describes the menus and features you can set using the RICOH-SCRIPT2
printer driver. The manual is included as a PDF file in the CD-ROM.
❖ Network Interface Board Operating Instructions
Describes the procedures and provides necessary information on setting up
and using the printer under the network environment. The manual is included as a PDF file in the CD-ROM.
i
TABLE OF CONTENTS
1. Uninstalling the Printer Driver and Software
Uninstalling the IPDL-C Printer Driver.....................................................
Windows 95/98 - Uninstalling the IPDL-C Printer Driver..............................
Windows NT 4.0 - Uninstalling the IPDL-C Printer Driver .............................
Uninstalling the RICOH-SCRIPT2 Printer Driver.....................................
Windows 95/98 - Uninstalling the RICOH-SCRIPT2 Printer Driver...............
Windows NT 4.0 - Uninstalling the RICOH-SCRIPT2 Printer Driver .............
Macintosh - Uninstalling the RICOH-SCRIPT2 Printer Driver .......................
1
1
1
2
2
2
3
2. Setting up the Printer Driver and Canceling a Print Job
IPDL-C Accessing the Printer Properties................................................ 5
Windows 95/98 - Accessing the Printer Properties ....................................... 5
Windows NT 4.0 - Accessing the Printer Properties ..................................... 6
RICOH-SCRIPT2 - Setting up for Printing ............................................... 9
Windows 95/98 - Accessing the Printer Properties ....................................... 9
Windows NT 4.0 - Accessing the Printer Properties ................................... 10
Macintosh - Setting up for Printing .............................................................. 11
Canceling a Print Job.............................................................................. 13
Windows 95/98 - Canceling a Print Job ...................................................... 13
Windows NT 4.0 - Canceling a Print Job .................................................... 13
Macintosh - Canceling a Print Job .............................................................. 14
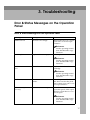
3. Troubleshooting
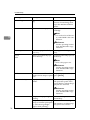
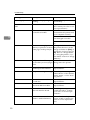
Error & Status Messages on the Operation Panel................................
Error & Status Messages on the Operation Panel ......................................
Getting Printer Information over the Network ..............................................
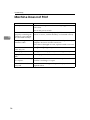
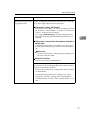
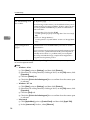
Machine Does not Print...........................................................................
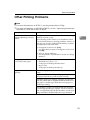
Other Printing Problems .........................................................................
17
17
21
26
29
4. Adjusting the Color Calibration of the Printer
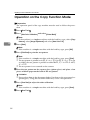
Operation on the Copy Function Mode .................................................
Operation on the Printer Function Mode...............................................
Restoring Previous Color Calibration Settings ....................................
Operation on the Copy Function Mode .......................................................
Operation on the Printer Function Mode .....................................................
34
35
38
38
38
5. Using the Operation Panel
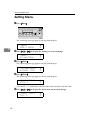
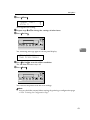
Setting Menu ............................................................................................ 42
ii
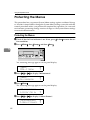
Protecting the Menus ..............................................................................
Protecting the Menus ..................................................................................
Changing the Menu Settings without Removing Protect .............................
Removing Protect........................................................................................
Menu Table...............................................................................................
IPDL-C Menu ..............................................................................................
RICOH-SCRIPT2 Menu ..............................................................................
System Menu ..............................................................................................
Printing the Configuration Page ............................................................
Interpreting the Configuration Page ......................................................
Interpreting the Configuration Page/IPDL-C ...............................................
Interpreting Configuration Page/RICOH-SCRIPT2 .....................................
Resetting Menus......................................................................................
Administering Printing by User Code....................................................
Viewing the Number of Pages Printed for Each User Code........................
Reading the Statistics Report......................................................................
Deleting the User Code Record ..................................................................
Using the Job Log ...................................................................................
Printing the Job Log ....................................................................................
Reading the Job Log ...................................................................................
44
44
45
47
49
51
51
55
58
60
60
61
63
65
65
67
67
69
69
71
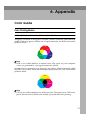
6. Appendix
Color Guide ..............................................................................................
Color Printing Basics ...................................................................................
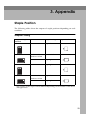
Paper Size and Color Level ....................................................................
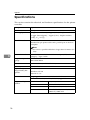
Specifications ..........................................................................................
73
73
75
76
INDEX........................................................................................................ 77
iii
iv
1. Uninstalling the Printer
Driver and Software
Uninstalling the IPDL-C Printer Driver
This section provides basic procedures for uninstalling the IPDL-C printer driver. The actual procedure may differ depending on your operating system.
Follow the procedure below.
Windows 95/98 - Uninstalling the IPDL-C Printer Driver
A Close all applications that are currently running.
B Click [Start], point to [Settings] and click [Printers].
The [Printers] window appears.
C Select the icon of the printer you want to remove by clicking it.
D On the [File] menu, click [Delete].
A confirmation dialog box appears.
E Click [Yes] to delete the printer driver.
Windows NT 4.0 - Uninstalling the IPDL-C Printer Driver
Limitation
❒ Uninstalling a printer driver requires Full Control access permission. Members of the Administrators, Server Operators, Print Operators, and Power Users groups have Full Control permission by default. When you uninstall a
printer driver, log on using an account that has Full Control permission.
A Close all applications that are currently running.
B Click [Start], point to [Settings] and click [Printers].
The [Printers] window appears.
C Select the icon of the printer you want to remove by clicking it.
D On the [File] menu, click [Delete].
A confirmation dialog box appears.
E Click [Yes] to delete the printer driver.
1
Uninstalling the Printer Driver and Software
Uninstalling the RICOH-SCRIPT2 Printer
Driver
1
This section provides basic procedures for uninstalling the RICOH-SCRIPT2
printer driver. The actual procedure may differ depending on your operating
system.
Follow the procedure below.
Windows 95/98 - Uninstalling the RICOH-SCRIPT2 Printer Driver
A Close all applications that are currently running.
B Click [Start] on the taskbar, point to [Settings], and then click [Printers].
The [Printers] window appears.
C Select the icon of the printer you want to remove by clicking it.
D On the [File] menu, click [Delete].
E Click [Yes] to delete the printer driver.
Windows NT 4.0 - Uninstalling the RICOH-SCRIPT2 Printer Driver
Limitation
❒ Uninstalling a printer driver requires Full Control access permission. Members of the Administrators, Server Operators, Print Operators, and Power Users groups have Full Control permission by default. When you uninstall a
printer driver, log on using an account that has Full Control permission.
A Close all applications that are currently running.
B Click [Start] on the taskbar, point to [Settings], and then click [Printers].
The [Printers] window appears.
C Select the icon of the printer you want to remove by clicking it.
D On the [File] menu, click [Delete].
E Click [Yes] to delete the printer driver.
2
Uninstalling the RICOH-SCRIPT2 Printer Driver
Macintosh - Uninstalling the RICOH-SCRIPT2 Printer Driver
This section provides basic procedures for uninstalling the PPD File. The actual
procedure may differ depending on the operating system.
Follow the procedure below.
1
A Drag the “Color Controller RC-200” or “Color Controller RC-200(D)” file
inside [Printer Descriptions] in the [Extensions] folder in [System folder] to
[Trash].
3
Uninstalling the Printer Driver and Software
1
4
2. Setting up the Printer Driver
and Canceling a Print Job
IPDL-C Accessing the Printer Properties
Windows 95/98 - Accessing the Printer Properties
There are two methods you can use to open the Printer Properties.
Making default printer settings
To make the default printer settings, first open the [Printer Properties] dialog box
from the [Printers] window.
Note
❒ With some applications, the printer driver's settings are not used, and the application's own initial default settings are applied.
❒ The following tabs are standard Windows tabs. For more information on
these tabs, see the documentation that comes with the Windows operating
system.
• Windows 95:
[General], [Details] and [Sharing]
• Windows 98:
[General], [Details], [Color Management] and [Sharing]
Note
❒ Profiles set in the [Color Management] tab are not supported.
A Click [Start] on the taskbar, point to [Settings], and then click [Printers].
The [Printers] window appears.
B Select the icon of the printer whose default settings you want to change by
clicking it.
C On the [File] menu, click [Properties].
D Make settings and click [OK].
Making printer settings from an application
To make the printer settings from an application, open the [Printer Properties] dialog box from that application. The following example describes how to make
settings for the WordPad application that comes with Windows 95.
5
Setting up the Printer Driver and Canceling a Print Job
Note
❒ The actual procedure you should follow to open [Printer Properties] may differ
depending on the application. For more information, see the documentation
that comes with the application you are using.
❒ With some applications, the printer driver's settings are not used, and the application's own initial default settings are applied.
❒ Any settings you make in the following procedure are valid for the current
application only.
2
A On the [File] menu, click [Print].
The [Print] dialog box appears.
B Select the printer you want to use from the [Name] list box, and then click
[Properties].
The Printer Properties dialog box appears.
C Make settings, and click [OK].
D Click [OK] to start printing.
Windows NT 4.0 - Accessing the Printer Properties
Making default printer settings - Printer Properties
Limitation
❒ Changing the setting of the printer requires Full Control access permission.
Members of the Administrators, Server Operators, Print Operators, and Power Users groups have Full Control permission by default. When you set up
options, log on using an account that has Full Control permission.
Note
❒ With some applications, the printer driver's settings are not used, and the application's own initial default settings are applied.
❒ The following tabs are standard Windows tabs. For more information on
these tabs, see the documentation that comes with the Windows operating
system.
• [General], [Ports], [Scheduling], [Sharing] and [Security]
A Click [Start] on the taskbar, point to [Settings], and then click [Printers].
The [Printers] window appears.
B Select the icon of the printer you want to use by clicking it.
C On the [File] menu, click [Properties].
The Printer Properties dialogue box appears.
6
IPDL-C Accessing the Printer Properties
D Make settings and click [OK].
Note
❒ The settings you make here are used as the default settings for all applications.
Making default printer settings – Default Document Properties
2
Limitation
❒ Changing the setting of the printer requires Full Control access permission.
Members of the Administrators, Server Operators, Print Operators, and Power Users groups have Full Control permission by default. When you set up
options, log on using an account that has Full Control permission.
A Click [Start] on the taskbar, point to [Settings], and then click [Printers].
The [Printers] window appears.
B Select the icon of the printer you want to use by clicking it.
C On the [File] menu, click [Document Defaults].
The Default Document Properties dialogue box appears.
D Make settings and click [OK].
Note
❒ Settings you make here are used as the default settings for all applications.
Making printer settings from an application
To make the printer settings from an application, open the [Document Properties]
dialog box from that application. The following example describes how to make
settings for the WordPad application that comes with Windows NT 4.0.
Note
❒ The actual procedures you should follow to open the [Document Properties] dialog box may differ depending on the application. For more information, see
the documentation that comes with the application you are using.
❒ With some applications, the printer driver's settings are not used, and the application's own initial default settings are applied.
❒ Any settings you make in the following procedure are valid for the current
application only.
A On the [File] menu, click [Print].
The [Print] dialog box appears.
7
Setting up the Printer Driver and Canceling a Print Job
B Select the printer you want to use from the [Name] list box, and then click
[Properties].
The Document Properties dialog box appears.
C Make settings, and click [OK].
D Click [OK] to start printing.
2
8
RICOH-SCRIPT2 - Setting up for Printing
RICOH-SCRIPT2 - Setting up for Printing
Windows 95/98 - Accessing the Printer Properties
There are two methods you can use to open the Printer Properties dialog box.
2
Making default printer settings
To make the default printer settings for printing from applications, open the
Printer Properties dialog box from the [Printers] window.
Note
❒ The following tabs are standard Windows tabs. For more information on
these tabs, see the documentation that comes with the Windows operating
system.
• Windows 95:
[General], [Details] and [Sharing]
• Windows 98:
[General], [Details], [Color Management] and [Sharing]
Note
❒ Profiles set in the [Color Management] tab are not supported.
A Click [Start], point to [Settings], and then click [Printers].
The [Printers] window appears.
B Select the icon of the printer you want to use by clicking it. On the [File]
menu, click [Properties].
The Printer Properties dialog box appears.
Reference
For more information on making default printer settings, see the “Operating Instructions” of RICOH-SCRIPT2 (RPS2) that is included in this CDROM.
Making printer settings from an application
The contents of the tabs are the default settings made in the Printer Properties
dialog box opened from the [Printers] window. You can make any changes you
want for printing from the application you are currently running. Any settings
you make in these tabs are valid for the current application only.
A Open the application's print menu.
The [Print] dialog box appears.
9
Setting up the Printer Driver and Canceling a Print Job
Note
❒ You can use this dialog box to make basic settings, such as the number of
copies and the print range.
B Select the printer you want to use from the [Name] list box of the [Printer]
group, and then click [Properties].
The Printer Properties dialog box for the printer you selected appears.
2
Reference
For more information on each tab, see the “Operating Instruction” of
RICOH-SCRIPT2 that is included in this CD-ROM.
Windows NT 4.0 - Accessing the Printer Properties
Making default printer settings - Printer Properties
Limitation
❒ Changing the setting of the printer requires Full Control access permission.
Members of the Administrators, Server Operators, Print Operators, and Power Users groups have Full Control permission by default. When you set up
options, log on using an account that has Full Control permission.
Note
❒ With some applications, the printer driver's settings are not used, and the application's own initial default settings are applied.
❒ The following tabs are standard Windows tabs. For more information on
these tabs, see the documentation that comes with the Windows operating
system.
• [General], [Ports], [Scheduling], [Sharing] and [Security]
A Click [Start], point to [Settings], and then click [Printers].
The [Printers] window appears.
B Select the icon of the printer you want to use by clicking it. On the [File]
menu, click [Properties].
The Printer Properties dialog box appears.
Reference
For more information on making default printer settings, see the “Operating Instructions” of RICOH-SCRIPT2 (RPS2) that is included in this CDROM.
Note
❒ Settings you make here are used as the default settings for all applications.
10
RICOH-SCRIPT2 - Setting up for Printing
Making printer default settings - Default Document Properties
A Click [Start], point to [Settings], and then click [Printers].
The [Printers] window appears.
B Select the icon of the printer you want to use by clicking it. On the [File]
menu, click [Document Defaults].
The Default Document Properties dialog box appears.
2
Reference
For more information on making printer default settings, see the “Operating Instructions” of RICOH-SCRIPT2 (RPS2) that is included in this CDROM.
Note
❒ Settings you make here are used as the default settings when printing from
applications.
Making printer settings from an application
Note
❒ General users can change the settings in an application's [Print] dialog box.
A Select the application's [Print] command on the [File] menu.
The [Print] dialog box appears.
B Confirm that the displayed printer name is the printer you want to use, and
then click [Properties].
The Document Properties dialog box appears.
C Make settings, and click [OK].
D Click [OK] to start printing.
Macintosh - Setting up for Printing
Making paper settings from an application
A Open the file you want to print.
B On the [File] menu, click [Page Setup].
The [LaserWriter 8 Page Setup] dialog box appears.
11
Setting up the Printer Driver and Canceling a Print Job
C Confirm that the printer you want to use is shown in [Format for:]. Then, use
[Paper] to select the paper size you want to use.
Note
❒ If the printer is now shown in the [Format for:] box, use the pop-up menu to
display a list of available printers.
Reference
The actual appearance of the [Page Setup] dialog box depends on the application you are using. See the documentation that comes with the Macintosh for details.
2
D After configuring the settings, click [OK].
-Small Size Print Area
This printer supports printing on print areas such as “A4 Small” and “Letter
Small” when printing from a Macintosh, only with specific versions of the driver. Printing with the LaserWriter 8.4x (or later) driver supports printing on both
standard and small print areas. However, with the LaserWriter 8.3x (or earlier),
the small print area options are not displayed.
With LaserWriter 8.3x (or earlier), select A4, for example, and click [Options] in
the [Page Setup] dialog box, then use the [Larger Print Area] option. Checking [Larger Print Area] produces the same printing result as the LaserWriter 8.4x (or later)
standard A4 print area. Unchecking the [Larger Print Area] produces the same result as the LaserWriter 8.4x (or later) “A4 Small” print area.
Setting up for printing from an application
A Open the file you want to print.
B On the [File] menu, click [Print].
The [Printer] dialog box appears.
C Confirm that the printer is selected in the [Printer] box, and then make the
printer settings you want.
Reference
For more information on setting up for printing from an application, see
the “Operating Instructions” of RICOH-SCRIPT2 (RPS2) that is included
in this CD-ROM.
D After configuring the settings, click [Print].
12
Canceling a Print Job
Canceling a Print Job
Windows 95/98 - Canceling a Print Job
A Double-click the printer icon on the Windows taskbar.
2
A window appears, showing all the print jobs that are currently queuing to
be printed. Check the current status of the job you want to cancel.
B Select the name of the job you want to cancel.
C On the [Document] menu, click [Cancel Printing].
Note
❒ You can also open the print job queue window by double-clicking the
printer icon in the [Printer] window.
D Confirm that the printer's on line indicator is lit, and press {Reset} on the
machine's operation panel.
The message appears on the operation panel display indicating that the print
job is being cancelled.
Important
❒ The preceding procedure cancels the print job that is being processed by
the printer. In some cases, the printer may already be processing data for
the next print job following the one currently being output. In such a case,
the next print job is also canceled when you press {Reset}.
❒ When the printer is being shared by multiple computers, be careful not to
accidentally cancel someone else's print job.
Note
❒ You cannot stop printing data that has already been processed internally
by the printer. Because of this, printing may continue for a few pages after
you press {Reset}.
❒ A print job that contains a large volume of data may take considerable time
to stop.
Windows NT 4.0 - Canceling a Print Job
A Double-click the printer icon on the Windows taskbar.
A window appears, showing all the print jobs that are currently queuing to
be printed. Check the current status of the job you want to cancel.
B Select the name of the job you want to cancel.
13
Setting up the Printer Driver and Canceling a Print Job
C On the [Document] menu, click [Cancel Printing].
Note
❒ You can also open the print job queue window by double-clicking the
printer icon in the [Printer] window.
D Confirm that the printer's On Line indicator is lit, and press {Reset} on the
machine's operation panel.
The message appears on the operation panel display indicating that the print
job is being cancelled.
2
Important
❒ The preceding procedure cancels the print job that is being processed by
the printer. In some cases, the printer may already be processing data for
the next print job following the one currently being output. In such a case,
the next print job is also canceled when you press {Reset}.
❒ When the printer is being shared by multiple computers, confirm that you
do not accidentally cancel someone else's print job.
Note
❒ You cannot stop printing data that has already been processed internally
by the printer. Because of this, printing may continue for a few pages after
you press {Reset}.
❒ A print job that contains a large volume of data may take considerable time
to stop.
Macintosh - Canceling a Print Job
A
Double-click the printer's icon on the desk top.
A window appears, showing all the print jobs that are currently queuing to
be printed.
B Check the current status of the job you want to cancel.
C Select the name of the job you want to cancel.
D Click [Pause Button], and then click [Trash Button].
E Press {Reset} on the machine's operation panel.
The message appears on the operation panel display indicating that the print
job is being cancelled.
Important
❒ The preceding procedure cancels the print job that is being processed by
the printer. In some cases, the printer may already be processing data for
the next print job following the one currently being output. In such a case,
the next print job is also canceled when you press {Reset}.
14
Canceling a Print Job
❒ When the printer is being shared by multiple computers, be careful not to
accidentally cancel someone else's print job.
Note
❒ You cannot stop printing data that has already been processed internally
by the printer. Because of this, printing may continue for a few pages after
you press {Reset}.
❒ A print job that contains a large volume of data may take considerable time
to stop.
2
15
Setting up the Printer Driver and Canceling a Print Job
2
16
3. Troubleshooting
Error & Status Messages on the Operation
Panel
Error & Status Messages on the Operation Panel
Message
Description
Comments
Add Fuser Oil
The fuser oil is empty.
Replace the fuser oil. Contact
your sales or service representative.
Reference
See the operating instructions that describes copy
functions.
Add Staples
Stapler is almost empty.
Add staples.
Reference
See the operating instructions that describes copy
functions.
Add Toner
xxx
The indicated toner is empty. Replace the indicated toner
cartridge.
Reference
See the operating instructions that describes copy
functions.
Call Service
There is a malfunction in the
printer.
Turn the power off and on. If
this does not clear the problem, contact your sales or service representative.
Close Door(s)/
Doors or covers are open.
Close doors or covers. The
operation panel of the copier
displays which doors or covers are open.
Cover(s)
Reference
See the operating instructions that describes copy
functions.
17
Troubleshooting
Message
Description
Comments
Initializing
RICOH-SCRIPT2 is initializing.
It is not an error message.
Toner is almost empty.
Replace the indicated toner
cartridge.
Low on: xxx
Process of initializing starts
up in the RICOH-SCRIPT2
mode.
Note
❒ xxx is the color of the toner, and CMYK is the combination.
3
Reference
See the operating instructions that describes copy
functions.
Load Paper
There is no paper in the Bypass Tray.
Load paper in the Bypass
Tray.
Load
There is no indicated paper
size in the tray.
Load the indicated paper size
in the tray.
YYY
Note
❒ YYY is the paper size.
Reference
See the operating instructions that describes copy
functions.
Offline
Printer status is offline. The
To put the printer online,
printer cannot accept or print press {Online}
data.
Clear Misfeed(s)
Paper jam has occurred in the Remove the jammed paper.
printer.
The operation panel of the
copier displays where the paper jam has occurred.
Reference
See the operating instructions that describes copy
functions.
Please wait
The printer is preparing for
printing.
Wait until the printer is
warmed up.
The printer adjusts itself reg- It is not an error message.
ularly to maintain print qual- The printer is working propity. (This message might
erly. Just wait a while.
appear while printing.)
18
Error & Status Messages on the Operation Panel
Message
Description
Comments
Power Off / On
No : XXX-YYYYYYYY
There is communication error Turn the power off and on. If
between the engine and the
this does not clear the probcontroller.
lem, contact your sales or service representative.
Printing ...
Doing print job.
Wait for a while.
Note
❒ This message appears
only in the RICOHSCRIPT2 mode.
Processing
Print data is being processed. Wait for a while.
Ready
The printer is ready for print- It is not an error message.
ing.
The printer is working properly.
Remove Paper
Paper is left in the Duplex
tray.
From Duplex Tray
3
Remove the paper from the
Duplex tray.
Reference
See the operating instructions that describes copy
functions.
Remove Paper
Paper is left in the sorter bin.
From Sorter
Remove the paper from the
sorter bin.
Reference
See the operating instructions that describes copy
functions.
Reset Paper Tray
Correctly
The paper tray is not installed Install the paper tray correctcorrectly.
ly.
Reference
See the operating instructions that describes copy
functions.
Resetting ...
A print job was interrupted
by pressing {Reset}.
Waiting
Printer is waiting for the next Wait for a while.
data to print.
Wait for a while.
The menu is about to be set
on the printer's operation
panel.
19
Troubleshooting
Message
Description
Comments
Warming Up
The printer is preparing for
printing.
Wait until the printer is
warmed up.
Waste Toner is
The waste toner bottle is full. Replace the waste toner bottle. Contact your sales or service representative.
Full
A3:Error
There is too much data for the Check if the interface cable is
I/O buffer to handle.
inserted into the printer and
your computer securely.
3
Check if the interface cable is
not damaged or broken.
Increase the size of I/O buffer.
20
A6:Error
There is not enough printer
Change the Color Level using
memory to print one or more the printer driver to set the
of the pages in the print job. image resolution to [Fast], or
change the Color Level to [1
bit]. Turn on “Image Memory” using the printer's “System Menu” to turn on “Image
Memory”.
AB:Error
The printer is unable to pro- Reduce the amount of data
cess the data you are trying to being sent to the printer.
print.
B1:Error
An error has occurred in the
standard parallel interface.
Contact your sales or service
representative.
B3:Error
The printer setting is wrong.
Reset the printer using
"Menu Reset" of the "Maintenance" menu. ⇒ P.63 “Resetting Menus”
B4:Error
An error has occurred in the
IC card slot.
Contact your sales or service
representative.
B5:Error
An error has occurred in the
RICOH-SCRIPT2 module.
Contact your sales or service
representative.
B7:Error
An error has occurred in the
network interface board.
Turn the printer's power
switch off and on. Contact
your sales or service representative.
85:Error
An error has occurred in the
printer's standard memory.
Turn off and on the printer's
power switch. Contact your
sales or service representative.
Error & Status Messages on the Operation Panel
Message
Description
Comments
86:Error
You may be trying to print
with the wrong printer driver.
Confirm that you are using
the correct printer driver.
You might not be using the
correct interface cable.
Confirm that you are using
the correct interface cable.
91:Error
An error has occurred in the
printer's standard memory.
Turn off and on the power
switch.
94:Error
An error has occurred in the
printer's standard memory.
Turn off and on the power
switch. Contact your sales or
service representative.
3
Note
❒ If you cannot solve the problem by taking above actions, turn the power off
and then on again. If this does not clear the error message, write down the error number and the message, and contact your sales or service representative.
Getting Printer Information over the Network
Printer current status
You can check the printer's status using the telnet command.
❖ telnet
Use status command. For more information, see “Remote Maintenance by telnet (mshell)” in the “Operating Instructions” of Network Interface Board included in the CD-ROM.
Message
Call Service
Description
There is malfunction in the
printer.
Comments
Turn the printer off and then
on.
If this does not clear the problem, contact your sales or service representative.
Close Front Cover
The front cover is open.
Close the front cover.
Close Bank Cover
The bank cover is open.
Close the bank cover.
Close Sorter Cover
The sorter cover is open.
Close the sorter cover.
Close Right Cover
The right cover is open.
Close the right cover.
Close Left Cover
The left cover is open.
Close the left cover.
Duplex Tray: Not Set
Correctly
The duplex tray is not installed correctly.
Install the duplex tray correctly.
21
Troubleshooting
Message
Description
Comments
Energy Save Mode
The printer is in Energy Save
mode.
Wait for a while.
Fuser Oil is Empty
Fuser oil is empty.
Replace the fuser oil . Contact
your sales or service representative.
No Paper
There is no paper of the indi- Load paper of the indicated
cated paper size in the paper paper size into the paper tray
tray being used.
being used.
3
Reference
See the operating instructions that describes copy
functions.
No Staple
There is no staple.
Replace staples.
Reference
See the operating instructions that describes copy
functions.
22
Paper in Duplex Tray
There is paper left in the duplex tray.
Remove the paper from the
duplex tray.
Paper on Sorter Bin
There is paper left in the sort- Remove the paper from the
er bin.
sorter bin.
Paper Tray: Not Set
Correctly
The paper tray is not installed Install the paper tray correctcorrectly.
ly.
Low on XXX Toner
The indicated toner is low or
has run out.
XXX Toner is Empty
The indicated toner is empty. Replace the toner cartridge.
WarmUp
The printer is preparing for
printing.
Waste Toner is Full
The waste toner bottle is full. Replace the waste toner bottle. Contact your sales or service representative.
Replace the toner cartridge.
Wait until the printer is
warmed up.
Error & Status Messages on the Operation Panel
Printer configuration
You can check the printer configuration using telnet.
❖ telnet
Use info command. For more information, see “Remote Maintenance by Telnet (mshell)” in the “Operating Instructions” of Network Interface Board included as a PDF file in the CD-ROM.
Note
❒ “*” (asterisk) is displayed with the current setting.
❒ Regarding *1–*6, see the attached table.
Item
3
Description
Printer System
Version of the printer
Network Board
Version of the network board
Input Tray
No. ID number of the paper tray
Name Name of the paper tray*1
PageSize Paper size loaded in the paper tray*2
Status Current status of the paper tray*3
Output Tray
No. ID number of the output tray
Name Name of the output tray4
Status Current status of the output tray5
Emulation
No. ID number of the emulation used by the
printer
Name Name of the emulation used in the printer*6
Version Version of the emulation
Program
No. ID number of the program
Name Name of the program (The fixed name is
blank.)
23
Troubleshooting
❖ *1 Input Tray: Name
Name
Tray1
Description
Name of installed paper tray
Tray2
Tray3
Tray4
Manual Tray
Bypass Tray
❖ *2 Input Tray: Paper Size
3
Paper Size
24
Description
A3R
A3L
B4R
B4L
A4R
A4L
A4
A4K
B5R
B5 JISL
B5
B5 JISK
A5R
A5L
A5
A5K
B6R
B6 JISL
A6R
A6L
DL+
12"×18"L
DLR
11"×17"L
LGR
81/2"×14"L
F4R
81/2"×13"L
LTR
81/2"×11"L
LT
11"×81/2"K
FLR
81/4"×13"L
FR
8"×13"L
HLR
51/2"×81/2"L
HLT
81/2"×51/2"K
Error & Status Messages on the Operation Panel
❖ *3 Input Tray: Status
Status
Description
Normal
NoTray
There is no paper tray
PaperEnd
There is no paper in the paper tray
❖ *4 Output Tray: Name
Name
Standard
Description
3
Standard Tray
Proof Tray; if the sorter is installed
Bin 1 ~ Bin 20
Sorter
❖ *5 Output Tray: Status
Status
Description
Normal
Normal
PaperExist
There is paper in the output tray
OverFlow
Output tray is full of paper
❖ *6 Emulation: Name
Emulation Name
Description
RWC (IPDL-C)
IPDL-C
RPS (RicohScript2)
RICOH-SCRIPT2
25
Troubleshooting
Machine Does not Print
Possible Cause
Solutions
Is the power on?
Confirm that the power cord is securely plugged into the
wall socket.
Turn on the power switch.
Is the interface cable
Connect the interface cable properly. If there are any conproperly connecting the nectors or screws, confirm that they are fastened securely.
printer to your computer connected securely?
3
Are you using a correct
interface cable?
The type of interface cable you should use depends on your
computer. Be sure to use the correct one.
If the cable is damaged or worn, replace it with a new one.
Does the On Line indicator stay on?
Press {On Line} to light it up.
Is the paper set?
Load paper into the paper tray or on the bypass tray.
Is paper left in the sorter Remove paper from the sorter bin.
bin?
Is the machine working
as a copier?
It may not be able to use the machine as a printer when the
machine is working as a copier.
Does the Error indicator Check the error message on the panel display and take the
stay red?
required action.
26
Machine Does not Print
Possible Cause
Solutions
Is the Data In indicator If not, the data is not being sent to the printer, or the printer
blinking or lit after start- may be resetting the print job because there was a long deing the print job?
lay in receiving the data from the computer.
❖ If the printer is using "I/O Timeout"
Increase the value of the "I/O Timeout" setting of the "IPDL-C Menu" or "RPS2 Menu". Or set the "I/O Timeout"
value to "0" (this is the off setting).
Set a longer [Wait timeout] period accessing the printer
properties when the RICOH-SCRIPT2 printer driver is
selected.
3
❖ If the printer is connected to the computer using the interface cable
Confirm that the printer port settings are correct. For a
parallel port connection, port LPT1 or LPT2 should be
set.
Reference
For more information on the printer port settings, see
the notes after this table.
❖ Network Connection
Contact your network administrator.
If the Data In indicator is blinking or lit.
The printer may be resetting the print job. Take the following steps to correct the situation.
• Increase the "Job Timeout" setting of the "IPDL-C Menu"
or "RPS2 Menu".
• Confirm that the printer driver settings are correct.
• Change the "Transfer" setting of the "System Menu".
• Confirm that the "Parallel" of the "System Menu" is correct.
27
Troubleshooting
Possible Cause
Solutions
Is the Data in indicator
off after blinking or lit
for a while?
It might occur when the printer does not have enough memory to print a page.
The following are the actions you should take when you encounter memory shortage problems. If these actions do not
solve the problem individually, try them in combination
with each other.
A Change the Color Level to [1 bit].
Use the printer property to change the Color Level to [1
bit].
3
B Turn on "Image Memory".
Use the printer's "System Menu" to turn on "Image Memory".
Can you print a test
page (configuration
page)?
If you cannot print a test page, it probably indicates a printer malfunction. You should contact your sales or service
representative.
If you can print a test page but cannot get the printer to print
when you issue a print command from your computer, it
probably means there is a problem with your computer.
Also keep in mind that large, complex data might take a
long time for the printer process.
If you cannot solve the problem by taking the above actions, contact your sales
or service representative.
Note
• Windows 95/98
A
Click [Start], point to [Settings], and then click [Printers].
B Select the icon of the printer by clicking it. Next, on the [File] menu, click
[Properties].
C Click the [Details] tab.
D Check the [Print to the following port] box to confirm that the correct port
is selected.
• Windows NT 4.0
A Click [Start], point to [Settings], and then click [Printers].
B Select the icon of the printer by clicking it. Next, on the [File] menu, click
[Properties].
C Click the [Port] tab.
D Check the [Print to the following port] box to confirm that the correct port
is selected.
• Macintosh
A Click [Apple Menu], point to [Control Panel] and then click [Apple Talk].
B In the [connect via.] list box, select [Ethernet].
28
Other Printing Problems
Other Printing Problems
Note
❒ For more information on IPDL-C, see the printer driver's Help.
❒ For more information on RICOH-SCRIPT2, see the “Operating Instructions”
included as a PDF file in the CD-ROM.
Status
Possible Causes, Descriptions, and Solutions
The Data in indicator will be It might occur when the printer does not have enough
off after blinking or lit for a
memory to print a page.
while.
The following are the actions you should take when
you encounter memory shortage problems. If these actions do not solve the problem individually, try them
in combination with each other.
3
A Change the Color level to [1 bit].
Use the printer property to change the Color Level
to [1 bit].
B Turn on "Image Memory".
Use the printer's "System Menu" to turn on "Image
Memory".
Image is printed on the reverse side of the paper.
The paper in the paper tray is upside down.
• Standard Tray (Tray 1~ 4)
Load paper with the print side down.
• Bypass Tray
Load paper with the print side up.
Paper misfeeds occur frequently.
Check if the paper tray is set correctly. If not, set it correctly.
Paper is not loaded correctly in the paper tray. Remove
the paper from the tray and reload it correctly.
Check the paper type settings. The type of paper set
with the printer driver might be different from the actual paper or media type. Make the correct paper or
media type setting.
You might use paper not supported by this machine.
Use the appropriate type of paper. For more information on supported paper by this machine, see the operating instructions that describes the copy functions.
29
Troubleshooting
Status
It takes too much time to
print the first page.
Possible Causes, Descriptions, and Solutions
The data is so large or complex that it takes time to process it. If the Data In indicator is blinking, the data processing is being done. Just wait until it resumes.
The Energy Saver mode might be enabled. In the Energy Saver mode, it takes time for the machine to warm
up.
It takes too much time to
print.
3
Photographs and other data intensive pages take a
long time for the printer to process, so simply wait
when printing such data.
You can also speed up printing by using the printer
driver to select [1 bit] as the print mode.
The printer takes more time to print documents that
contain a large volume of data. A blinking or lit Data
In indicator means that data is reaching the printer, so
just wait for the data to be processed and printed.
If "Please Wait" appears on the panel display, the printer is now warming up or busy. Wait for a while.
The printer takes more time to print if the "Interleave
Print" is set to on in the copy function. For more information, see the operating instructions that describes
copy functions.
It takes too much time to per- [Color] is selected on the printer driver. Change this setform black and white print- ting to [Black and White] in the [Color Mode].
ing.
Note
Some
applications ignore the color mode setting
❒
made with the printer driver.
Paper is not fed from the de- The printer driver setting is not correct. Change the setsired paper tray.
ting. See the printer driver's Help for further details.
Desired paper size is not
used for the output.
The printer driver setting is not correct. Change the setting. See the printer driver's Help for further details.
Specified paper is not loaded correctly in the paper
tray. Remove the paper from the tray and reload the
specified paper correctly.
Note
❒ If you select Bypass Tray to print with IPDL-C, you
must set the paper size both on the printer driver
and on the operation panel.
❒ If you select Bypass Tray to print with RPS2, you
can set the paper size on the operation panel.
30
Other Printing Problems
Status
Possible Causes, Descriptions, and Solutions
The area on the page that
should be white or free of
toner is a hazy gray.
Check the image density setting.
Image density is too light.
Turning on [Toner Saving] can cause the output to be
blurred and result in very thin lines not printing at all.
With color printing, toner saving can cause abnormal
coloring. Try printing again after turning [Toner Saving]
off. See the printer driver's online help for details about
changing the settings on this tab.
Adjust the Color Calibration.
3
If the message "Add Toner XXX" is on the panel display, replace the toner cartridge for the indicated color.
For more information on replacing the toner cartridge,
see the operating instructions that describes copy functions.
You might be using paper not supported by this printer. Use the appropriate type of paper. For more information of supported paper, see the operating
instructions that informs the copy functions.
Toner is not fused well when The printer is not in the "Thick Paper" or "OHP Transprinting on thick paper or
parency" mode. Select [Thick Paper], [OHP Transparency]
OHP transparencies.
(IPDL-C) or [OHP] (RPS2) in the [Paper Type] box of the
printer driver.
The color of the printout is
different from the color on
the computer's display.
The toner based color system used by the printer is different from the light based color system of the computer screen. ⇒ P.73 “Color Guide”
Turning on the [Toner Saving] can cause color irregularities.
Check the settings of the printer driver's [Color Setting]
tab and restore the default settings.
Adjusting the color calibration.⇒ P.33 “Adjusting the
Color Calibration of the Printer”
31
Troubleshooting
Status
Possible Causes, Descriptions, and Solutions
The printout is different
from the image on the computer screen.
Certain applications or image creation methods produce images that cannot be printed exactly as they appear on the computer screen.
With IPDL-C, checking the [Print as bitmap] item of the
printer driver's [Setup] tab causes the print data to be
converted to image data before it is sent to the printer,
which produces a printout that is closest to what appears on your computer screen.
Note
❒ The setting also causes large-volume print jobs
which take longer to print because of the required
conversion process.
3
Changing the color settings
with the printer driver causes a drastic change in printout color.
Photograph printing looks
rough.
With IPDL-C, do not make radical changes in the settings of the [Color Setting] tab.
Also note that the sample shown by the printer driver
is intended to show what processes are being applied,
not exactly what your printout will look like.
With IPDL-C, select [Fine] on the [Print Quality] tab.
Printing from some applications results in a loss of resolution.
Color documents are printed The printer driver is not set up for color printing. Select
in black and white.
[Color] in the [Color Mode] on the printer driver.
Some applications normally print color text as black
and white.
Fine dot pattern does not
print.
With IPDL-C, select [Photographic] in the [Dithering] list
box.
Solid area, line or text are
shiny or glossy, when created as a mixture of cyan, magenta, yellow.
With IPDL-C, select [K] on the printer driver's [Graphic
Mode] . See the printer driver's online help for details
about changing the settings on this tab.
Black gradation is not natural.
With IPDL-C, select [CMY + K] on the printer driver's
[Graphic Mode].
When printing on OHP
transparencies, a sheet of paper is not placed between
printed OHP transparencies.
The size and direction of the paper loaded in the paper
tray are different from those of the OHP transparency.
Load the same size and direction paper as the OHP
transparency into the paper tray.
The "OHP Slip” setting is set to "Off”. Change the setting with operation panel.
If you cannot solve the problem by taking the above actions, contact your sales
or service representative.
32
4. Adjusting the Color
Calibration of the Printer
To maintain a constant print quality, color calibration is important for color
printers. Color output may change after many prints, after a new toner cartridge
is installed or with changes in temperature and atmospheric conditions.
This section provides instructions on printer color calibration.
Important
❒ In order to do a full color calibration, you have to do the “Auto Color Calibration” in the copy mode at first, then in the printer mode.
❒ Color calibration should be done separately to match the printer driver's settings. You can select among 3 Color Levels *1 from the printer properties.
*1
1 bit, 2 bit, 4 bit (High Quality)
Note
❒ The adjustment of the color calibration affects the output of all of the users
who use the same printer.
❒ Use the same type of paper for each print of the test pattern. An inaccurate
adjustment can occur if the scanned paper type is different from the output
paper type.
33
Adjusting the Color Calibration of the Printer
Operation on the Copy Function Mode
Preparation
The operation panel of the copy machine must be used to follow the procedure.
A Press {User Tools}.
B Press [Auto Color Calibration] and select [Printer Mode].
Note
❒ If the machine is a simplex machine with the hard key type, select [Copy
features], select [Image Adjustment] and select [Auto Color Cal.].
4
C Press [Start].
Note
❒ If the machine is a simplex machine with the hard key type, press [OK].
D Press [Print Start] to print the test pattern.
Note
❒ If the machine is a simplex machine with the hard key type, press [Print].
❒ The test pattern is printed on A4K,11"×81/2"K. If A4K,11"×81/2"K is not
available, the test pattern is printed on either B4L, 81/2"×14''L or A3L,
11''×17''L.
❒ The test pattern is not counted on the counter.
E Place the test pattern on the exposer glass (platen glass) and place a few
pieces of blank paper on the back of the test pattern.
Limitation
❒ Do not place them in the document feeder. Put them on the exposure glass
(platen glass). Using the document feeder may cause a misoperation.
F Press [Scan Start] to adjust the color calibration.
Note
❒ If the machine is a simplex machine with the hard key type, press [Scan].
G Press {User Tools}.
34
Operation on the Printer Function Mode
Operation on the Printer Function Mode
Preparation
The printer operation panel must be used to do the following procedure.
Confirm that a tray for either A4 size paper or not less than 81/2"×11” paper
is selected.
Selecting a paper tray is necessary if one has not yet been selected.
A Press {Menu}.
4
The Menu appears on the panel display.
<Menu>
IPDL-C Menu
j
l
B Press {U} or {T} to display “Maintenance”.
<Menu>
Maintenance
j
l
C Press {# Enter}.
The following message appears on the panel display.
<Maintenance>
1.Color Calib.
j
l
D Press {# Enter}.
The following message appears on the panel display.
<Color Calib.>
1.2 bit
j
l
35
Adjusting the Color Calibration of the Printer
E Press {# Enter}.
The following message appears on the panel display.
<2 bit>
1.Test Pattern
j
l
F Press {# Enter}.
The following message appears and the test pattern begins being printed.
<Test Pattern>
Press # key
G Press {# Enter}
4
The following message appears while the test pattern is being printed.
Printing...
Test Pattern
The following message appears on the panel display after printing the test
pattern.
Set Pattern on
Glass, Press #
H Place the test pattern on the exposure glass (platen glass) and place a few
pieces of blank paper on the back of the test pattern.
Limitation
❒ Do not place them in the document feeder. Put them on the exposure glass
(platen glass). Using the document feeder may cause a misoperation to occur.
I Press {# Enter} to adjust the color calibration.
The following message appears on the panel display during calibration.
Calibrating...
The following message appears after the adjustment of the color calibration
has been completed.
Completed
36
Operation on the Printer Function Mode
The menu [Color Calib.] appears.
<Color Calib.>
1.2 bit
j
l
Note
❒ Adjust the color calibration for both the 1 bit and 4 bit (High Quality)
modes following steps E to I.
J Press {On Line} to return to the “Ready” display.
4
IPDL-C
Ready
37
Adjusting the Color Calibration of the Printer
Restoring Previous Color Calibration
Settings
This machine can store the current and previous color calibration settings. In order to restore the previous setting, you should delete the current one.
Operation on the Copy Function Mode
Preparation
The operation panel of the copy machine must be used to follow the procedure.
4
A Press {User Tools}.
B Press [Auto Color Calibration] and [Printer Mode].
Note
❒ If the machine is a simplex machine with the hard key type, select [Printer
Mode], select [Image Adjustment].
C Press [Prev. Setting].
Note
❒ If the machine is a simplex machine with the hard key type, select [Previous].
Operation on the Printer Function Mode
A Press {Menu}.
The Menu appears on the panel display.
<Menu>
IPDL-C Menu
38
j
l
Restoring Previous Color Calibration Settings
B Press {U} or {T} to display “Maintenance”.
<Menu>
Maintenance
j
l
C Press {# Enter}.
The following message appears on the panel display.
<Maintenance>
1.Color Calib.
j
l
D Press {# Enter}.
4
The following message appears on the panel display.
<Color Calib.>
1.2 bit
j
l
E Press {U} or {T} to display the color level which you want to restore.
<Color Calib.>
2.4 bit
j
l
F Press {# Enter}.
<4 bit>
1.Test Pattern
j
l
G Press {U} or {T} to display “Restore”.
<4 bit>
3.Restore
j
l
H Press {# Enter}.
The following message appears on the panel display.
<Restore>
Press # key
I Press {# Enter} to restore the previous color calibration setting again.
Restored
39
Adjusting the Color Calibration of the Printer
The following message appears on the panel display.
<4 bit>
3.Restore
j
l
J Press {On Line} to return to the “Ready” display.
4
IPDL-C
Ready
40
5. Using the Operation Panel
Though the factory default settings of the printer are suitable for most printing
jobs, the Printer Menu gives you access to a number of settings that control basic
printer operations. Printer Menu settings you make are retained even when you
turn off the printer.
This section provides the following Printer Menu information.
❖ Setting Menus
Describes the basic procedures for changing Printer Menu settings.
❖ Protecting the Menus
Describes how to protect System Menu settings against accidental changes.
❖ Menu Table
A table chart that shows all of the Printer Menu.
Note
❖ {Menu} and {Media} setting priorities
Some of the settings accessed by {Menu} can be accessed by {Media}. Settings made by {Menu} take priority over settings by {Media}.
41
Using the Operation Panel
Setting Menu
A Press {Menu}.
The following message appears on the panel display.
<Menu>
IPDL-C Menu
5
j
l
B Press {U} or {T} to display the setting you want to change.
<Menu>
System Menu
j
l
C Press {# Enter}.
The following message appears on the panel display.
<System Menu>
1.Paper Tray
j
l
D Press {# Enter}.
The following message appears on the panel display.
<Paper Tray>
*Tray 1
j
l
An asterisk “*” is indicated at the left side of the currently selected item.
E Press {U} or {T} to display the menu item you want to change.
<Paper Tray>
Tray 2
42
j
l
Setting Menu
F Press {# Enter}.
<Paper Tray>
*Tray 2
j
l
This registers the setting.
G Repeat steps C to F to change the settings of other items.
H Press {On Line}.
5
The following message appears on the panel display.
Take Offline
Then Press Reset
I Press {On Line} to enter the offline condition.
The On Line indicator stays off.
J Press {Reset}.
This restarts the printer with the new settings.
Note
❒ You can check the current Menu settings by printing a configuration page.
⇒ P.58 “Printing the Configuration Page”
43
Using the Operation Panel
Protecting the Menus
This procedure lets you protect System Menu settings against accidental changes. It makes it impossible to change the System Menu settings you make with the
normal procedure unless you perform the required key operation. In a network
environment, protecting settings restricts changes to the System Menu settings
to network administrators.
Protecting the Menus
A Check if the On Line indicator is on. If not, press {On Line} to enter the online condition.
B Press {# Enter}, then {Escape}, and then {Menu}.
5
The following message appears on the panel display.
<Menu>
IPDL-C Menu
j
l
C Press {U} or {T} to display "Maintenance".
<Menu>
Maintenance
j
l
D Press {# Enter}
The following message appears on the panel display.
<Maintenance>
1.Color Calib
j
l
E Press {U} or {T} to display "3.Menu Protect".
<Maintenance>
3.Menu Protect
44
j
l
Protecting the Menus
F Press {# Enter}.
The following message appears on the panel display.
<Menu Protect>
Off
j
l
G Press {U} or {T} to display “On”.
<Menu Protect>
On
j
l
H Press {# Enter}.
This registers the setting. The “Maintenance” menu appears.
<Maintenance>
3.Menu Protect
j
l
5
I Press {On Line}.
The “Ready” message appears on the panel display.
IPDL-C
Ready
Changing the Menu Settings without Removing Protect
This procedure allows you to change System Menu settings without turning off
menu protection. The changes you make are automatically protected as soon as
you register them.
45
Using the Operation Panel
A Press {Menu}.
The following message appears on the panel display.
<Menu>
IPDL-C Menu
j
l
B Press {U} or {T} to display "System Menu".
5
<Menu>
System Menu
j
l
C Press {# Enter}.
A message that System Menu settings are protected appears.
Menu Protected
Press Escape key
D Press {Media}.
The following message appears on the panel display.
<System Menu>
1.Paper Tray
j
l
E Change the setting following the normal procedure. ⇒ P.42 “Setting Menu”
46
Protecting the Menus
Removing Protect
A Check if the On Line indicator stays on. If not, press {On Line} to enter the
online condition.
B Press {Enter}, then {Escape} and then {Menu}.
The following message appears on the panel display.
<Menu>
IPDL-C Menu
5
j
l
C Press {U} or {T} to display "Maintenance".
<Menu>
Maintenance
j
l
D Press {# Enter}.
The following message appears on the panel display.
<Maintenance> j
1.Color Calib. l
E Press {U} or {T} to display "3.Menu Protect".
<Maintenance> j
3.Menu Protect l
F Press {# Enter}.
The following message appears on the panel display.
<Menu Protect> j
On
l
47
Using the Operation Panel
G Press {U} or {T} to display "Off".
<Menu Protect> j
Off
l
H Press {# Enter}.
This turns off protection and the “Maintenance” menu appears.
<Maintenance> j
3.Menu Protect l
I Press {On Line}.
5
The “Ready” message appears on the panel display.
IPDL-C
Ready
48
Menu Table
Menu Table
IPDL-C Menu
1. Job Timeout
2. I/O Timeout
RPS2 Menu
1. Color Level
2. Color Mode
3. Color Set
4. Color Profile
5. Smoothing
6. Toner Saving
7. Dithering
8. Paper Type
5
9. Auto Tray SW
A. Auto Duplex
*1
B. Duplex Bind *2
C. Collate / Stack *3
D. Face Up / Down *4
E. Job Timeout
F. I/O Timeout
G. Feed timeout
H. Print Error
I. Ktalk Mode
J. Parallel IF1
*1
*2
*3
*4
This menu appears when the machine is a duplex machine.
This menu appears when the machine is a duplex machine and has the optional 10bin or 20-bin sorter installed.
This menu appears when the machine has the optional 10-bin or 20-bin sorter installed.
This menu appears when the machine has the optional 10-bin or 20-bin sorter installed.
49
Using the Operation Panel
System Menu
1. Paper Tray
2. I/O Buffer
3. Transfer
4. Image Memory
5. Parallel
6. Bi-direction
7. OHP Slip
8. PrinterLang. (Printer Language)
9. Language
32. IP Address
33. Subnet Mask
34. Gateway Add (Gateway Address)
5
35. Access CTL. (Access Control)
36. Access Mask
37. Net Boot (Network Boot)
38. Frame NW (Frame Type NW)
39. Active PTL.
Maintenance
1. Color Calib.⇒ P.33
2. Menu Reset⇒ P.63
3. Menu Protect *1 ⇒ P.44
4. Log Protect *2
5. Log Clear *3 ⇒ P.67
List Print
1. Config.Page⇒ P.58
2. Job Log⇒ P.69
3. Statistics⇒ P.65
*1
*2
*3
50
This menu appears when {# Enter}, {Escape} and {Menu} are pressed while the printer is On Line.
This menu appears when {# Enter}, {Escape} and {Menu} are pressed while the printer is On Line.
If “Log Protect” is set to On, “Log Clear” will not appear.
Menu Table
IPDL-C Menu
The following are the settings you can make with the “IPDL-C Menu”.
Note
❒ Italicized settings indicate default settings.
❖ 1. Job Timeout
You can set how long the printer waits before terminating a print job when
the printer doesn't receive the end of that print job.
• 000 Off
• 0 (Off) to 999 seconds
❖ 2. I/O Timeout
You can set how long the printer waits for more print data before ending its
waiting period for data and terminating a job.
• 300 Sec
• 0 (Off) to 999 seconds
5
RICOH-SCRIPT2 Menu
Settings that you can select are described below. Settings made with the printer
driver normally take priority, except when a printer driver setting is set to use
the printer's settings.
Note
❒ Italicized settings indicate default settings.
❖ Color Level
Use this setting to select the number of colors used per dot to [1 bit], [2 bit] or[4
bit].
• 1 bit
• 2 bit
• 4 bit
❖ Color Mode
Use this setting to select either monochrome or color printing.
• Color
• Black & White
❖ Color Set (Color Setting)
Use this setting to select the correction method used for converting the RGB
data to CMYK data.
• Off
No modification to the color setting.
51
Using the Operation Panel
• Vivid
Select this setting to perform CMYK conversion with enhanced saturation
and brightness to print vivid colors.
• Super Vivid
Select this setting to perform CMYK conversion. The colors printed with
this setting are more vivid than those printed with the "Vivid" setting. All
of the colors in the image, especially the lighter ones, are emphasized.
• Fine
Select this setting to perform color matching based on the printer's built-in
color rendering dictionaries, and perform CMYK conversion. It makes it
possible to print colors that are close to the displayed colors on the computer screen.
The color rendering dictionaries refer to the contents selected by the Color
Profile. This setting is useful when the application and printer driver do
not support the color matching features.
Note
❒ The color rendering dictionary that is selected on the Color Profile settings is used.
5
• Super Fine
Like the "Fine" setting, the color rendering dictionary is used, however,
output is more vivid. This setting is enabled to make light colors print
more vivid.
❖ Color Profile
Use this setting to select the color rendering dictionary (CRD). The CRD is referred to for color matching, so you should select the appropriate CRD for the
document you are printing. The CRD you select is also referred to when
“Fine” or “Super Fine” is selected for the “Color Setting”.
Note
❒ When selecting [OHP] as the paper type, the CRD automatically adjusts to
use a color profile specifically for OHP. Even though the color profile has
been optimized for OHP, the adjustments are automatic and are not indicated on any of the dialog boxes. In this case, this setting is not enabled.
• Photograph
Use this setting to enhance the reproduction of photos and graphics that
include midtones.
• Presentation
Use this setting to enhance the reproduction of documents that contain text
and graphics. This CRD is best for printing colored charts, graphs, presentation materials and so on. If you use this CRD for printing photographs,
color gradations might not be reproduced well.
• Solid Color
Use this setting to print specific colors, logos and so on.
52
Menu Table
❖ Smoothing
Use this setting to select whether Smoothing is available or not.
• Off
• Auto
Limitation
❒ When the Color Level is set to [1 bit], Smoothing is enabled.
❒ When Toner Saving is selected, Smoothing is not enabled.
❖ Toner Saving
Use this setting to select whether Toner Saving is available or not.
• Off
• On
Note
❒ Turning on toner saving can cause the output to become blurred and result
in very thin lines not printing at all. In the case of color printing, toner saving can cause colors to be different from those expected. Because of this,
use toner saving only for proofing and intermediate drafts, and turn it off
for final prints when top quality is important.
5
❖ Dithering
Use this setting to select the image mode that is best for the type of data you
are printing.
• Auto
Select this setting to set automatically a mode that is suitable for printing.
• Photographic
Select this setting to print photographs.
• Text
Select this setting to print text.
❖ Paper Type
Use this setting to select the paper type for printing as: Plain Paper, Thick Paper, or OHP Transparency.
• Plain Paper
• OHP
• Thick Paper
Selecting an OHP Transparency as the paper type automatically adjusts internal settings to use a color profile specifically for OHP. Even though the color
profile has been optimized for OHP, the adjustments are automatic and are
not indicated on any of the dialog boxes. In this case, the [Color Profile] setting
is not enabled.
53
Using the Operation Panel
❖ Auto Tray SW (Auto Tray Switch)
Use this setting to make the printer automatically switch to the other tray if it
has the same paper size as the current tray when paper runs out while printing.
• On
• Off
To use this feature, the optional tray unit should be installed on the printer,
and paper having the same size and direction should be loaded in both the
standard and optional trays.
❖ Auto Duplex
Use this setting to select duplex print.
This item can be used only a duplex machine.
• Off
• On
❖ Duplex Bind
Use this setting to select the binding position of duplex prints.
• Short Edge
• Long Edge
5
❖ Sort/Stack
Use this setting to select sort or stack.
• Off
• Sort
• Stack
❖ Face Up/Down
Use this setting to select face-down or face-up printing. This setting can be
used only when [3 bin Sorter] is selected. If [Long Edge] or [Short Edge] is selected in Auto Duplex, this selection will be ignored.
• Face Down
• Face Up
❖ Job Timeout
Use this setting to set how long the printer waits before terminating a print
job when the printer does not receive the end of the current print job. You can
set a time ranging from 1 to 999 seconds, or you can turn this feature off (no
time limit = 0 second).
• 000 Off
• 0 (Off) to 999 seconds
54
Menu Table
❖ I/O Timeout
Use this setting to set how long the printer waits for more print data before
ending its wait period and terminating a job. The job is automatically cancelled if no data is received for the selected time.
• 300 Sec
• 0 (Off) to 999 seconds
❖ Feed timeout
Use this setting to set how long the printer waits for the correct paper size
loaded, when paper runs out while printing. The job is printed with the paper
currently loaded if the correct size is not loaded within the selected time.
• 60 Sec
• 0 (Off) to 999 seconds
❖ Print Errors
Use this setting to select if an error report should be printed from the current
tray when a PostScript error occurs while printing.
• Off
• On
5
❖ Ktalk Mode
This setting is not available.
❖ Parallel IF
Use this setting to select the parallel interface timing. When “System Default”
is selected, the setting in the “System Menu” is used.
• System Default
• ACK Inside
• ACK Outside
System Menu
The following are the settings you can make with the “System Menu”.
Note
❒ Italicized settings indicate default settings.
❖ 1. Paper Tray
You can select the default paper tray whenever you turn on the printer. Only
available trays will be displayed.
• Tray 1
• Tray 2
• Tray 3
• Tray 4
• Bypass
55
Using the Operation Panel
❖ 2. I/O Buffer
You can select the size of the I/O buffer. Normally it is not necessary to
change this setting.
• 16KB
• 32KB
• 64KB
• 128KB
• 256KB
• 512KB
❖ 3. Transfer
You can select the data transfer speed of the parallel interface. If you are having trouble with data transfers, try changing this setting to “Normal”.
• Hi-speed
• Normal
5
❖ 4. Image Memory
This setting controls what the printer does when the printer memory is not
enough to print a certain page.
• Off
• On
❖ 5. Parallel
You can select the parallel interface timing setting. Normally it is not necessary to change this setting.
• ACK Inside
• ACK Outside
• STB Down
❖ 6. Bi-direction
You can select the printer response mode for status fetch requests when the
standard parallel interface is being used. Use the "Standard" setting when you
are experiencing problems while the printer is connected to another manufacturer's print box.
• Original Mode
• Standard
❖ 7. OHP Slip
The OHP Slip is a sheet of paper placed between printed OHP transparencies.
You can set this option to off or on.
• On
• Off
56
Menu Table
❖ 8. PrinterLang.
You can select the printer language that is automatically used when the printer is turned on. Selecting IPDL-C or RPS is required when you set the menu
for each printer language.
• IPDL-C
• RPS (RICOH-SCRIPT2)
❖ 9. Language
You can select the language of the text that appears on the panel display.
• English
• French
• German
• Italian
• Dutch
• Japanese
5
❖ 32. IP Address– 39. Active PTL
You can configure the printer for the network.
Reference
For more information on configuring the printer for the network, see the
“Printer Reference” that is provided as a paper manual.
57
Using the Operation Panel
Printing the Configuration Page
Use the following procedure to print the configuration page which shows the
current printer settings.
Note
❒ If you want to print the configuration page in the RICOH-SCRIPT2 mode,
confirm that the printer language is set to the RPS2 mode. Normally the printer is set to the IPDL-C mode. Follow the procedure below from B.
Reference
For more information on selecting a printer language, see the "Printer Reference" that is provided as a paper manual.
A Press {Menu}.
5
The following message appears on the panel display.
<Menu>
IPDL-C Menu
j
l
B Press {U} or {T} to display "List Print".
<Menu>
List Print
j
l
C Press {# Enter}.
The following message appears on the panel display.
<List Print>
1.Config.Page
j
l
D Press {# Enter}.
The following message appears on the panel display.
<1.Config.Page>
Press # key
58
Printing the Configuration Page
E Press {# Enter}.
This starts printing the configuration page.
The following message appears while printing the configuration page.
Printing...
Config.Page
The “List Print” menu appears after printing the configuration page.
<List Print>
1.Config.Page
j
l
F Press {On Line}.
5
The “Ready” message appears on the panel display.
IPDL-C
Ready
59
Using the Operation Panel
Interpreting the Configuration Page
Interpreting the Configuration Page/IPDL-C
Reference
❖ Firmware Version
This shows the version of the printer firmware.
❖ Total Installed RAM
This is the total amount of memory installed in the printer.
Printer information
5
❖ Tray 1–4, Bypass Tray
This table shows the paper sizes for each tray. Only the available trays are
shown.
Note
Paper Size
60
Indicated on the
Configuration Page
A3L
A3R
B4L
B4R
A4L
A4R
A4K
A4
B5 JISL
B5R
B5 JISK
B5
A5L
A5R
A5K
A5
B6 JISL
B6R
A6L
A6R
12"×18"L
DL+
11"×17"L
DLR
81/2"×14"L
LGR
81/2"×13"L
F4R
81/2"×11"L
LTR
Interpreting the Configuration Page
Paper Size
Indicated on the
Configuration Page
11"×81/2"K
LT
81/4"×13"L
FLR
8"×13"L
FR
51/2"×81/2"L
HLR
81/2"×51/2"K
HLT
❖ Pages Printed
This is the total number of pages printed by the printer to date.
❖ Printer Error
This shows information on the status of consumable items and so on.
5
Status list
❖ IPDL-C
This shows current "IPDL-C" settings.
❖ System
This shows current "System Menu" settings.
❖ Network
These are the settings and status of the Network Interface Board.
Error log
This is a log of printer errors.
Interpreting Configuration Page/RICOH-SCRIPT2
❖ Reference
Shows the printer system version, ID and so on. You can also see the status of
the paper tray and the total number of pages printed to date.
❖ Tray Status
Shows the status of the paper trays.
❖ RPS2 Status
Shows the current settings for the RPS2 mode.
❖ Memory Status
Shows the amount of printer memory, VM area and so on.
61
Using the Operation Panel
❖ Font Status
This is not used for this printer.
❖ Installed Fonts
Shows the fonts installed on the printer.
❖ Interface Status
Shows that the Network Interface Board is installed.
❖ Network & TCP/IP Status
Shows the network and TCP/IP items and their settings.
❖ NetWare Status
Shows the NetWare items and their settings.
❖ NetBEUI Status
Shows the NetBEUI items and their settings.
❖ AppleTalk Status
Shows the AppleTalk items and their settings.
5
62
Resetting Menus
Resetting Menus
Use the following reset procedure to return the settings of all menus to their initial default settings.
A Turn on the power switch.
B Press {Menu}.
The following message appears on the panel display.
<Menu>
IPDL-C Menu
5
j
l
C Press {U} or {T} to display "Maintenance".
<menu>
Maintenance
j
l
D Press {# Enter}.
The following message appears on the panel display.
<Maintenance> j
1.Color Calib. l
E Press {U} or {T} to display "2.Menu Reset".
<Maintenance>
2.Menu Reset
j
l
F Press {# Enter}.
The following message appears on the panel display.
<Menu Reset>
Press # Key
63
Using the Operation Panel
G Press {# Enter}.
The following message appears on the panel display.
Take Offline
Then Press Reset
H Press {On Line}.
The “Ready” message appears on the panel display.
5
IPDL-C
Ready
I Press {On Line} to enter the offline condition.
The On Line indicator stays off.
J Press {Reset}.
This resets all menus to their initial factory defaults, and returns to the
“Ready” display.
IPDL-C
Ready
64
Administering Printing by User Code
Administering Printing by User Code
This printer keeps a record of the number of pages printed for each User Code
set in the printer driver. Using an 8 digit code allows you to keep a record of the
number of prints made by each user code for 3 types of printing. You can monitor, black and white, 3 or 4 colors and other print jobs. *1 You can view the contents of a statistics report through the PRINTER MANAGER for ADMIN.
You can also set the same User Code within a department in the office. Up to 100
User Codes are available.
*1
Other means black and an additional color, or two colors neither of which is black.
• With Windows 95/98, you can set the User Code during driver installation.
• With Windows NT 4.0, you can set the User Code from the Printer Properties
after installing the printer driver.
• With RICOH-SCRIPT2, you can only select whether or not to use the fixed
User Code.
5
Important
❒ With Windows 95/98, changing the User Code can only be done after reinstalling the printer driver.
❒ With Windows 95/98, if the printer name is changed after installing the printer driver, the User Code will be cancelled.
Viewing the Number of Pages Printed for Each User Code
The following procedure shows how to print the list of User Codes and the number of pages printed for each User Code.
A Press {Menu}.
The Menu appears.
<Menu>
IPDL-C Menu
j
l
B Press {U} or {T} to display “List Print”.
<Menu>
List Print
j
l
65
Using the Operation Panel
C Press {# Enter}.
The following message appears on the panel display.
<List Print>
1.Config.Page
j
l
D Press {U} or {T} to display “3.Statistics”.
<List Print>
3.Statistics
j
l
E Press {# Enter}.
The following message appears on the panel display.
<3.Statistics>
Press # key
5
Press {# Enter}.
The following message appears while printing the statistics report.
Printing...
Statistics
The “List Print” menu appears after printing the statistics report.
<List Print>
3.Statistics
j
l
F Press {On Line}.
The “Ready” message appears on the panel display.
IPDL-C
Ready
66
Administering Printing by User Code
Reading the Statistics Report
5
1. User Code
3. Two Color
Shows a list of User Codes. However, if
User Codes have not been configured,
“other” appears.
With RICOH-SCRIPT2, User Code is
fixed to “99999999”.
Indicates the number of pages printed
with two colors or less (excluding Black
and White).
2. Black
4. Full Color
Indicates the number of pages printed
with three or four colors.
Indicates the number of pages printed in
black and white.
Deleting the User Code Record
The following procedure shows how to delete the User Code record.
A Press {Menu}.
67
Using the Operation Panel
The Menu appears.
<Menu>
IPDL-C Menu
j
l
B Press {U} or {T} to display “Maintenance”.
<Menu>
Maintenance
j
l
C Press {# Enter}.
The following message appears on the panel display.
<Maintenance> j
1.Color Calib. l
D Press {U} or {T} to display “Log Clear”.
5
<Maintenance>
3.Log Clear
j
l
E Press {# Enter}.
The following message appears on the panel display.
<Log Clear>
Press # key
F Press {# Enter} to delete the User Code record.
G Press {On Line}.
The “Ready” message appears on the panel display.
IPDL-C
Ready
68
Using the Job Log
Using the Job Log
This printer records a Job Log which shows the time of each print job, the number of pages, and the current print status of each job. The Job Log also shows
User ID for each job, making it easy to find the job in the log.
You can set up a User ID using 8 characters or less, which can help you to find
your own job log among many who share the same User Code. Up to 64 User IDs
are available.
Note
❒ Set up a User ID with the printer driver when you print.
❒ You can change the User ID every time you print.
❒ You can also browse the job log on your computer by accessing PRINTER
MANAGER FOR ADMIN/CLIENT.
❒ Turning off the power or resetting the printer deletes the job log.
5
Printing the Job Log
A Press {Menu}.
The Menu appears.
<Menu>
IPDL-C Menu
j
l
B Press {U} or {T} to display “List Print”.
<Menu>
List print
j
l
C Press {# Enter}.
The following message appears on the panel display.
<List Print>
1.Config.Page
j
l
69
Using the Operation Panel
D Press {U} or {T} to display “Job Log”.
<List Print>
2.Job Log
j
l
E Press {# Enter}.
The following message appears on the panel display.
<2.Job Log>
Press # Key
F Press {# Enter}.
The following message appears while printing the job log.
Printing...
Job Log
5
The “Print List” menu appears after printing the job log.
<List Print>
2.Job Log
j
l
G Press {On Line}.
The “Ready” message appears on the panel display.
IPDL-C
Ready
70
Using the Job Log
Reading the Job Log
5
1. User ID
6. Full Color
Indicates the User ID. “?” appears when
the User ID is not set up. If the “Statistics
Code” is set to [On] in the RICOHSCRIPT2 mode, the fixed User ID of RPS2
will appear.
Indicates the number of pages printed
with three or four colors.
7. Status
Indicates the current status of each job.
2. Printer Language
Indicates the printer Language, either
IPDL-C or RICOH-SCRIPT2 (RPS2).
3. Request Time
Indicates the time when the job was requested by the printer driver.
Note
❒ It is not available with RPS2.
4. Black
Indicates the number of pages printed in
black and white.
5. Two Color
Indicates the number of pages printed
with two colors or less (excluding Black
and White).
71
Using the Operation Panel
5
72
6. Appendix
Color Guide
Color Printing Basics
Additive (Emitted) and Subtractive (Reflected) Color Models
All light is a mixture of red, green, and blue, which is normally called the RGB
model. When red, green, and blue are of equal intensities, the RGB color model
produces white.
red
green
blue
Note
❒ RGB is also called additive or emitted color. The colors on your computer
screen are produced by varying the intensities of RGB.
Printed color is a mixture of cyan, magenta, and yellow, which is normally called
the CMY color model. When mixed in equal proportions the CMY color model
produces black.
yellow
cyan
magenta
Note
❒ CMY is also called subtractive or reflective color. The printer uses CMY toner
plus K (black) toner (CMYK color model) to provide full color printing.
73
Appendix
The colors of the RGB color model can be mixed to produce the cyan, magenta,
and yellow of the CMY color model and vice versa. Two colors of one model are
mixed to produce the color of the other model (mixing blue and green produces
cyan, for example). The remaining color is the compliment of the color produced
(red in this example). Complimentary colors are: red and cyan, green and magenta, blue and yellow.
red
yellow
green
magenta
blue
cyan
Printed Color
The printer produces full-color output using four toner colors: cyan, magenta,
yellow, and black. These four colors make up the CMYK color model.
6
Note
❒ Mixing CMY in equal proportions should hypothetically produce pure black,
but imperfections in the ink cause an equal measure of these colors to produce
a muddy or dark brown. Black toner is added to the color model in order to
make it possible to produce pure black.
74
Paper Size and Color Level
Paper Size and Color Level
The following table shows the correspondence between the color level selected
in the printer driver and the available paper size to be printed.
Paper Size
1 bit
2 bit
4 bit
12"×18"
√
A3, 11"×17"
√
√
B4, 81/2"×14"
√
√
A4, 81/2"×11" or smaller
√
√
√
• √ means the printing can be accomplished with both black and white and color modes.
• Blank cell means the printing may not be completed, if the document contains
a large volume of data.
6
75
Appendix
Specifications
This section contains the electrical and hardware specifications for the printer
controller.
Component
Specification
Resolution
600 dpi
Printing Speed
14 ppm (Monochrome) / 4 ppm (Color) : Simplex machine
18 ppm (Monochrome) / 4 ppm (Color) : Duplex machine
(A4K, 81/2"×11"K)
Parallel Interface
IEEE1284B
Standard 36–pin printer cable and a parallel port on the host
computer
Note
❒ Do not use a parallel cable that is longer than 2.5 meters (8.2
feet).
Network Interface
6
10BASE-T/100BASE-TX shielded twisted-pair (STP) cable and
category / Type 5 cable
Page description lan- IPDL-C
guage
RICOH-SCRIPT2
Fonts
39 Roman fonts (RICOH-SCRIPT2)
Memory
Standard and Maximum : 96 MB
Operation System
Supported by this
printer
Windows 95/98
Network
Topology : Ethernet 10BASE-T/100BASE-TX
Windows NT 4.0
MacOS 7.6~8.6
Protocol : IPX/SPX, NetBEUI, TCP/IP, AppleTalk
Supported Copier
Models
76
Ricoh Aficio Color
3006, 4006, 4106
Gestetner
CS206, CS206d, CS206de
Savin
SDC306, SDC306A, SDC306E
Lanier
5706AG, 5706AH, 5806AG, 5806AH
5806E AG, 5806E AH
INDEX
B
Bi-direction, 56
C
CMY, 73
CMY color model, 73
Color Models, 73
E
Error Messages, 17
F
Firmware Version, 60
R
RGB, 73
RGB color model, 73
S
small size print area, 12
Status Messages, 17
System, 61
T
Total Installed RAM, 60
Transfer, 56
Troubleshooting, 17
U
I
Image Memory, 56
I/O Buffer, 56
I/O Timeout, 51
IPDL-C, 61
J
Job Log, 69
Job Timeout, 51
M
Machine Does not Print, 26
Macintosh
canceling a job, 14
User Code, 65
Statistics Report, 67
User ID, 69
W
Windows 95/98
Canceling a Print Job, 13
printer properties, PostScript, 9
Windows NT 4.0
canceling a job, 13
document defaults, IPDL-C, 7
document defaults, PostScript, 11
printer properties, PostScript, 10
N
Network, 61
O
OHP Slip, 56
P
Pages Printed, 61
Paper Tray, 55
Parallel, 56
Printer Error, 61
PrinterLang., 57
Printing Problems, 29
77
78
UE
USA G528
Note to users in the United States of America
Notice:
This equipment has been tested and found to comply with the limits for a Class B digital device, pursuant to Part 15 of the FCC Rules. These limits are designed to provide reasonable protection against
harmful interference in a residential installation. This equipment generates, uses and can radiate radio
frequency energy and, if not installed and used in accordance with the instructions, may cause harmful
interference to radio communications.
However, there is no guarantee that interference will not occur in a particular installation. If this equipment does cause harmful interference to radio or television reception, which can be determined by turning the equipment off and on, the user is encouraged to try to correct the interference by one more of
the following measures:
Reorient or relocate the receiving antenna.
Increase the separation between the equipment and receiver.
Connect the equipment into an outlet on a circuit different from that to which the receiver is
connected.
Consult the dealer or an experienced radio/TV technician for help.
Warning
Changes or modifications not expressly approved by the party responsible for compliance could void
the user's authority to operate the equipment.
Caution (in case of 100BASE-TX environment):
Properly shielded and grounded cables (STP) and connectors must be used for connections to host
computer (and/or peripheral) in order to meet FCC emission limits.
STP with ferrite core must be used for RF interference suppression.
Declaration of Conformity
Product Name: Printer Controller
Model Number: Color Controller RC-200
Responsible party: Ricoh Corporation
Address: 5 Dedrick Place, West Caldwell, NJ 07006
Telephone number: 973-882-2000
This device complies with part 15 of FCC Rules.
Operation is subject to the following two conditions:
1. This device may not cause harmful interference, and
2. this device must accept any interference received,
including interference that may cause undesired operation.
Note to users in Canada
Note:
This Class B digital apparatus complies with Canadian ICES-003.
Remarque concernant les utilisateurs au Canada
Avertissement:
Cet appareil numérique de la classe B est conforme à la norme NMB-003 du Canada.
Copyright © 1999
Model number : G528-17
UE USA G528-8637
RICOH-SCRIPT2
OPERATING INSTRUCTIONS
Read this manual carefully before you use this product and keep it handy for future
reference.
For safety, please follow the instructions in this manual.
Introduction
Please read the Safety Information in the “Operating Instructions” that comes with the printer before
using this machine. It contains important information related to USER SAFETY and PREVENTING
EQUIPMENT PROBLEMS.
Important
Parts of this manual are subject to change without prior notice. In no event will the company be liable
for direct, indirect, special, incidental, or consequential damages as a result of handling or operating
the machine.
Trademarks
RICOH-SCRIPT2® is a registered trademark of Ricoh Company.
Microsoft®, Windows® and MS-DOS® are registered trademarks of Microsoft Corporation in the United
States and/or other countries.
Adobe®and PostScript® are registered trademarks of Adobe System Incorporated.
AppleTalk, Apple, Macintosh, TrueType, LaserWriter and ColorSync are registered trademarks of Apple Computer, Incorporated.
Other product names used herein are for identification purposes only and might be trademarks of their
respective companies. We disclaim any and all rights in those marks.
Note
The proper names of Windows operating system are as follows:
•
Microsoft® Windows® 95 operating system
•
Microsoft® Windows® 98 operating system
•
Microsoft® Windows NT® Server operating system Version 4.0
•
Microsoft® Windows NT® Workstation operating system Version 4.0
How to Read this Manual
Symbols
In this manual, the following symbols are used:
R WARNING:
This symbol indicates a potentially hazardous situation which, if instructions
are not followed, could result in death or serious injury.
R CAUTION:
This symbol indicates a potentially hazardous situation which, if instructions
are not followed, may result in minor or moderate injury or damage to property.
* The statements above are notes for your safety.
Important
If this instruction is not followed, paper might be misfed, originals might be
damaged, or data might be lost. Be sure to read this.
Preparation
This symbol indicates the prior knowledge or preparations required before operating.
Note
This symbol indicates precautions for operation, or actions to take after misoperation.
Limitation
This symbol indicates numerical limits, functions that cannot be used together,
or conditions in which a particular function cannot be used.
Reference
This symbol indicates a reference.
[
]
Keys that appear on the machine's panel display.
Keys and buttons that appear on the computer's display.
{
}
Keys built into the machine's operation panel.
Keys on the computer's keyboard.
i
TABLE OF CONTENTS
1. Using RICOH-SCRIPT2 with Windows
Using RICOH-SCRIPT2 with Windows 95/98........................................... 1
Printer Properties Tabs and Their Settings ................................................... 1
Using RICOH-SCRIPT2 with Windows NT 4.0......................................... 7
Printer Properties Tabs and Their Settings ................................................... 7
Default Document Properties Tabs and Their Settings ................................. 9
Windows Network Environment............................................................. 14
Windows Headers.................................................................................... 15
Sending Header Data.................................................................................. 15
2. Using RICOH-SCRIPT2 with a Macintosh
Using RICOH-SCRIPT2 with a Macintosh..............................................
Option Setup Dialog ....................................................................................
Setting up for Printing.............................................................................
Setting up for Print Options .........................................................................
17
17
18
18
3. Appendix
Staple Position......................................................................................... 25
Simplex Printing .......................................................................................... 25
Duplex Printing............................................................................................ 26
Printer Memory and VM Area ................................................................. 28
Precautions for RICOH-SCRIPT2 ........................................................... 29
Differences between RICOH-SCRIPT2 and “PostScript Language Reference
Manual, Second Edition” ............................................................................. 29
Other Precautions ....................................................................................... 29
INDEX........................................................................................................ 30
ii
1. Using RICOH-SCRIPT2 with
Windows
Using RICOH-SCRIPT2 with Windows 95/98
For operation under Windows 95/98, you should install both the Windows 95/
98 PostScript printer driver and the PPD file.
Note
❒ Be sure to install the PPD file for Windows 95/98. Do not install the PPD file
for Windows NT 4.0 accidentally.
Printer Properties Tabs and Their Settings
This section describes the Printer Properties tabs and the settings that are specific for this printer. The [General], [Details], [Sharing], and [Color Management] tabs
are standard Windows tabs.
Reference
See the documentation that comes with your Windows operating system for
details.
[Paper] Tab
❖ Paper size
Use this to select the size of paper you want to use.
❖ Layout
Use this to select the layout which can combine the original document.
❖ Orientation
Use this to select [Portrait], [Landscape] or [Rotated].
Note
❒ [Rotated] becomes effective only when [Landscape] is selected.
❖ Paper source
Use this to select the paper tray you want to use. Available choices here are:
[AutoSelect Tray], [Bypass Tray], [Tray 1], [Tray 2], [Tray 3] or [Tray 4].
Note
❒ If the paper tray you want to use is not available here, even though it is
physically installed, use the [Device Options] tab to make the printer recognize the tray correctly.
1
Using RICOH-SCRIPT2 with Windows
❖ Copies
Use this to set the number of copies of a print job.
Note
❒ With some applications, the number of copies specified with the application takes priority over the number of copies specified with the printer
driver.
1
❖ Unprintable Area
Use this to set the unprintable area of paper.
❖ More Options
Click to open the [More Paper Options] dialog box. You can specify the paper
type in this dialog box. The following paper types are available: [Plain Paper],
[OHP Transparency], [Thick Paper], [Plain (Duplex Backs)] or [Thick (Duplex Backs)].
Note
❒ Selecting [OHP Transparency] as the paper type automatically adjusts internal settings to use a color profile specifically for an OHP Transparency.
Even though the color profile has been optimized for OHP, the adjustments are automatic and are not indicated on any of the dialog box. In this
case, the [Color Profile] setting on the [Device Options] tab is not enabled.
❖ About
Click to display the printer driver copyright and version information.
[Graphics] Tab
❖ Resolution
Resolution is fixed at 600 dpi.
❖ Color control
Use this to select whether or not you want the colors in your documents to be
adjusted before printing so that the printed page more closely matches the
colors on your screen.
❖ Halftoning
Select the halftone pattern you want to use for printing. The following items
are available: [Use printer's setting] and [Use settings below].
Note
❒ [Use settings below] cannot be used to modify the values for [Screen frequency] or for [Screen angle].
❖ Special
Use this to control the print image. Checking a check box changes the icon on
the left so that it reflects the option you select.
2
Using RICOH-SCRIPT2 with Windows 95/98
• Print as a negative image
Select this option to print a negative image, which is produced by replacing the three primary colors with their complementary colors, and by reversing black and white.
1
Note
❒ Using negative image printing to output a color image might produce
unexpected results.
• Print as a mirror image
Select this option to print a mirror image of your document by reversing
the horizontal coordinates.
❖ Scaling
Use this to enlarge or reduce the original document.
[Fonts] Tab
Use this tab to select the TrueType font printing method.
If you select [Send TrueType fonts to printer according to the font Substitution Table],
you can edit [Font Substitution Table]. Clicking [Edit the Table] on the [Fonts] tab displays the [Font Substitution Table] dialog box. You can use this dialog box to specify which TrueType fonts should be replaced with built-in printer fonts.
❖ Using the [Font Substitution Table]
A Open the [Font Substitution Table] dialog box.
B In the [For this TrueType font:] list in the upper part of the dialog box, click to
select the TrueType font which you want to use as a substitution font.
C Use the [Printer font for:] list box to select the printer font you want to use.
D Click [OK].
[Device Options] Tab
This tab includes settings that should be made after the printer driver is installed. These settings optimize the printer configuration.
❖ Available printer memory
Shows the amount of memory installed on the printer. You normally do not
need to change this setting.
❖ Printer features
Shows settings that are specific for your printer. These features can be
changed using the [Change settings for:] list box. The following is a list of available settings.
• Auto Tray Switch
Turning on this setting tells the printer to automatically switch to the other
tray if it has the same paper size as the current tray when paper runs out
while printing.
3
Using RICOH-SCRIPT2 with Windows
• Color Level
Use this to set the number of colors used per dot to [1 bit], [2 bit] or [4 bit
(High Quality)].
• Color Mode
Use this to set the output color to [Black and White] or [Color].
• Color Setting
Use this to set the correction method used for the color conversion. The following items are available: [Off] *1 , [Vivid] *2 , [Super Vivid] *3 , [Fine] *4 , [Super
Fine] *5 .
1
*1
*2
*3
*4
*5
No modification to the color setting.
Select this setting to perform CMYK conversion with enhanced saturation and
brightness to print vivid colors.
Select this setting to perform CMYK conversion. The colors printed with this
setting are more vivid than those printed with the ”Vivid” setting. All of the
colors in the image, especially the lighter ones, are emphasized.
Select this setting to perform color matching based on the printer's built-in
color rendering dictionaries, and perform CMYK conversion. It makes it possible to print colors that are close to the displayed colors on the computer
screen.
The color rendering dictionaries refer to the contents selected by the Color Profile. This setting is useful when the application and printer driver do not support the color matching features.
Like the “Fine” setting, the color rendering dictionary is used, however, output
is more vivid. This setting is enabled to make light colors print more vivid.
Note
❒ The color rendering dictionary that is selected on the Color Profile settings is used.
• Color Profile
Use this to select a color rendering dictionary (CRD). The CRD is referred
to for color matching, so you should select the appropriate CRD for the
document you are printing. The CRD you select is also referred to when
“Fine” or “Super Fine” is selected for the “Color Setting”. The following
items are available: [Photograph] *1 , [Presentation] *2 , [Solid Color] *3 .
Note
❒ When selecting [OHP] as the paper type, the CRD automatically adjusts
to use a color profile specifically for OHP. Even though the color profile
has been optimized for OHP, the adjustments are automatic and are not
indicated on any of the dialog boxes. In this case, this setting is not enabled.
*1
*2
*3
Use this setting to enhance the reproduction of photos and graphics that include midtones.
Use this setting to enhance the reproduction of documents that contain text
and graphics. This CRD is best for printing colored charts, graphs, presentation materials and so on. If you use this CRD for printing photographs, color
or gradations might not be reproduced well.
Use this setting to print specific colors, logos and so on.
• Smoothing
Use this to set Smoothing to [Off] or [Auto].
4
Using RICOH-SCRIPT2 with Windows 95/98
Limitation
❒ When the Color Level is set to [1 bit], Smoothing is enabled.
❒ When Toner Saving is selected, Smoothing is not enabled.
• Toner Saving
Use this to set Toner Saving to [On] or [Off].
•
•
•
•
1
Note
❒ Turning on toner saving can cause the output to become blurred and result in very thin lines not printing at all. In the case of color printing, toner saving can cause colors to be different from those expected. Because
of this, use toner saving only for proofing and intermediate drafts, and
turn it off for final prints when top quality is important.
Dithering
Use this to set the image mode. The following items are available: [Auto],
[Photographic] and [Text].
Face-down Print
Use this to set Face-down print to [On] or [Off]. This setting can be used only
when [3-bin Sorter] is selected. If [Long Edge] or [Short Edge] is selected in
Auto Duplex, this selection will be ignored.
Collate/Stack
Use this to set [Collate], [Stack] or [Off]. This selection cannot be used if the
sorter is not selected in Configure Printer or Bypass Tray is selected in Paper Tray.
Staple
Use this to set the position of the staple. The following items are available:
[Off], [Top Left], [Top Right], [Bottom Left] or [Bottom Right].
Note
❒ This selection cannot be used if Sorter is selected for [None] or [3-bin Sorter].
❒ If Staple is selected, Sort command will be selected automatically.
❒ In order to staple in the correct page order using the 10–bin or 20–bin
sorter, “Reverse order” must be selected from the application.
❒ The position of the staple refers to the Portrait orientation. In the case of
Landscape orientation, the position of the staple will be different and
depends on the rotation of the driver and application.⇒ P.25
• Statistics Code
Use this to set [Off] or [On].
If “On” is selected, User Code “99999999” and User ID “RPS2” will be
fixed. If “Off” is selected, User Code “Other” and User ID “?” will be set.
Reference
For more information, see the “Printer Reference” that is provided as a
paper manual and the “Printer Reference” included as a PDF file in the
CD-ROM.
5
Using RICOH-SCRIPT2 with Windows
❖ [Installable Options]
This box shows the options installed in the printer.
When selecting an option inside the upper list of this group, its current setting
appears in the [Change setting for:] box. The following settings are available in
the [Change settings for:] box.
For the optional tray unit: [None], [2 Trays], [3 Trays].
For the optional sorter unit: [None], [3-bin Sorter], [10-bin Sorter], [20-bin Sorter].
1
[PostScript] Tab
Use this tab to set the output format of the PostScript files and the data processing method.
On the [PostScript] tab, click [Advanced] to display the [Advanced PostScript Options] dialog box.
❖ When the printer is connected to the network.
Clear both [Send CTRL+D before job] and [Send CTRL+D after job].
❖ When the printer is connected to your computer via a parallel interface cable.
Select both [Send CTRL+D before job] and [Send CTRL+D after job]. Also, confirm
that [ASCII data] is selected. If it is not selected, select it.
Reference
For more information on the network. ⇒ P.14 “Windows Network Environment”
For more information on the PostScript headers. ⇒ P.15 “Windows Headers”
6
Using RICOH-SCRIPT2 with Windows NT 4.0
Using RICOH-SCRIPT2 with Windows NT 4.0
For operation under Windows NT 4.0, you should install both the Windows NT
4.0 PostScript printer driver and the PPD file.
1
Limitation
❒ Installing a printer driver requires Full Control access permission. Members
of the Administrators, Server Operators, Print Operators, and Power Users
groups have Full Control permission by default. When you install a printer
driver, log on under Full Control permission.
❒ We recommend that you upgrade your Windows NT 4.0 operating system to
the latest version before installing the printer driver. Contact your Windows
retailer for details about the latest version available.
❒ Be sure to install the PPD file for Windows NT 4.0. Do not accidentally install
the PPD file for Windows 95/98.
Printer Properties Tabs and Their Settings
This section describes the settings of the tabs that are specific for this printer.
Limitation
❒ Changing the setting of the printer requires Full Control access permission.
Members of the Administrators, Server Operators, Print Operators, and Power Users groups have Full Control permission by default. When you set up
options, log on using an account that has Full Control permission.
Reference
The [General], [Port], [Scheduling], [Sharing], and [Security] tabs are Windows
NT 4.0 standard tabs. See the documentation that comes with your Windows
operating system for details.
[Device Settings] Tab
The current setting appears in the lower part of the dialog box when you click a
setting item. Select the setting you want to use for the selected item.
❖ Available PostScript Memory
Shows the amount of memory installed on the printer. You normally do not
need to change this setting.
Note
❒ You can change this setting by changing the memory setting in [Installable
Options].
7
Using RICOH-SCRIPT2 with Windows
❖ Halftone
Select the halftone pattern you want to use for printing. The following items
are available: [Use Printer Halftone] and [Use System Halftone].
Note
❒ [Use settings below] cannot be used to modify the values for [Screen frequency ] or for [Screen angle].
1
❖ Halftone Setup
You can change the halftone settings.
❖ Form to Tray Assignment
You normally do not need to change this setting.
Note
❒ If the paper tray you want to use is not available here, even though it is
physically installed, use [Device Settings] tab to make the printer recognize
the tray correctly.
❖ Font Substitution Table
Use this to edit the TrueType font substitution table. Under [Font Substitution
Table], the TrueType fonts installed on the computer are displayed. Select the
setting you want to use from [Change Setting] for each TrueType font.
❖ Job Timeout
Use this to set a job timeout period in the range of 0 to 32767 seconds. Setting
the value to 0 turns the job timeout off.
❖ Wait Timeout
Use this to set a wait timeout period in the range of 0 to 32767 seconds. Setting
the value to 0 turns the wait timeout off.
❖ Option
• Paper feed Tray
Use this to select whether or not the optional tray unit is installed on the
printer. The following settings are available: [None], [2 Trays] and [3 Trays].
• Sorter
Use this to select whether or not the optional sorter unit is installed on the
printer. The following settings are available: [None], [3-bin Sorter], [10-bin
Sorter] and [20-bin Sorter].
8
Using RICOH-SCRIPT2 with Windows NT 4.0
Default Document Properties Tabs and Their Settings
Limitation
❒ Changing the setting of the printer requires Full Control access permission.
Members of the Administrators, Server Operators, Print Operators, and Power Users groups have Full Control permission by default. When you set up
options, log on using an account that has Full Control permission.
1
❒ General users can change the settings in an application's [Print] dialog box.
[Page Setup] Tab
❖ Page Size
Shows the currently selected paper size. You can use the list box to select another paper size if you want.
Note
❒ All paper sizes that can be used with Windows NT 4.0 are displayed, however, only the paper sizes supported by the printer can be selected.
Supported Paper
A3, A4, A5, A6, Hagaki, B4(JIS), B5(JIS), B6(JIS), Legal, Letter, HalfLetter, 8×13,
8.25×13, 8.5×13, 11×17, 12×18
❖ Paper Source
Use this to select the tray from which you want paper to be fed for printing.
The following items are available: [Automatically Select], [Bypass Tray], [Tray 1],
[Tray 2], [Tray 3] or [Tray 4].
Note
❒ If you cannot select an option tray even though it is physically installed on
the printer, use [Installable Options] on the [Device Settings] tab to correctly
set up the option.
❖ Copy Count
Use this to set the number of copies of a print job.
Important
❒ With some applications, the number of copies specified with the application takes priority over the number of copies specified with the printer
driver.
❖ Orientation
Use this to select how the document is positioned on the page. The following
settings are available: [Portrait], [Landscape] and [Rotated].
9
Using RICOH-SCRIPT2 with Windows
❖ Print on Both Side [Duplex Printing]
Use this to set the duplex printing.
The following settings are available: [None], [Short Side] and [Long Side].
❖ Color Appearance
Use this to set the output color. The following settings are available: [Gray
Scale] and [Color].
1
Note
❒ Some files which include the JPEG, BMP or PSD (Photoshop) data might
be printed in color even though Grayscale is selected in Color Appearance.
In this case, if you want to print a whole document in the grayscale mode,
you must select [Black and White] in [Change 'Color Mode' Setting] in the [Advanced] tab.
[Advanced] Tab
The current setting appears in the lower part of the dialog box by clicking a setting item. Select the setting you want to make for the selected item.
❖ Graphic
• Resolution
Resolution is fixed to 600 dpi.
• Color Appearance
Use this to set the output color. The following settings are available: [Gray
Scale], [Color].
• Scaling
Use this to enlarge or reduce the original document.
• TrueType Font
Use this to set the TrueType font printing method. Selecting [Substitute with
Device Font] causes TrueType fonts to be replaced with the printer's fonts in
accordance with the font substitution table.
❖ Document Options
• Mirrored Output
Select this option to print a mirror image of your document by reversing
the horizontal coordinates.
• Negative Output
Select this option to print a negative image, which is produced by replacing the three primary colors with their complementary colors, and by reversing black and white.
Note
❒ Using negative image printing to output a color image might produce
unexpected results.
10
Using RICOH-SCRIPT2 with Windows NT 4.0
• Send CTRL-D Before Each Job and Send CTRL-D After Each Job
When the printer is connected to the network, select [No] for both [Send
CTRL-D Before Each Job] and [Send CTRL-D After Each Job]
When the printer is connected to your computer via parallel interface cable, select [Yes] both for [Send CTRL-D Before Each Job] and [Send CTRL-D After
Each Job].
• Halftone Color Adjustment
Use this to adjust the halftone settings.
1
❖ Printer Features
• Auto Tray Switch
Turning on this setting tells the printer to automatically switch to the other
tray if it has the same paper size as the current tray when paper runs out
while printing.
• Color Level
Use this to set the number of colors used per dot to [1 bit], [2 bit] or [4 bit
(High Quality)].
• Color Mode
Use this to set the output color to [Black and White] or [Color].
• Color Setting
Use this to set the correction method used for the color conversion. The following items are available: [Off] *1 , [Vivid] *2 , [Super Vivid] *3 , [Fine] *4 , [Super
Fine] *5 .
*1
*2
*3
*4
*5
No modification to the color setting.
Select this setting to perform CMYK conversion with enhanced saturation and
brightness to print vivid colors.
Select this setting to perform CMYK conversion. The colors printed with this
setting are more vivid than those printed with the ”Vivid” setting. All of the
colors in the image, especially the lighter ones, are emphasized.
Select this setting to perform color matching based on the printer's built-in
color rendering dictionaries, and perform CMYK conversion. It makes it possible to print colors that are close to the displayed colors on the computer
screen.
The color rendering dictionaries refer to the contents selected by the Color Profile. This setting is useful when the application and printer driver do not support the color matching features.
Like the “Fine” setting, the color rendering dictionary is used, however, output
is more vivid. This setting is enabled to make light colors print more vivid.
Note
❒ The color rendering dictionary that is selected on the Color Profile settings is used.
• Color Profile
Use this to select a color rendering dictionary (CRD). The CRD is referred
to for color matching, so you should select the appropriate CRD for the
document you are printing. The CRD you select is also referred to when
“Fine” or “Super Fine” is selected for the “Color Setting”. The following
items are available: [Photograph] *1 , [Presentation] *2 , [Solid Color] *3 .
11
Using RICOH-SCRIPT2 with Windows
Note
❒ When selecting [OHP] as the paper type, the CRD automatically adjusts
to use a color profile specifically for OHP. Even though the color profile
has been optimized for OHP, the adjustments are automatic and are not
indicated on any of the dialog boxes. In this case, this setting is not enabled.
*1
Use this setting to enhance the reproduction of photos and graphics that include midtones.
*2 Use this setting to enhance the reproduction of documents that contain text
and graphics. This CRD is best for printing colored charts, graphs, presentation materials and etc. If you use this CRD for printing photographs, color or
gradations might not be reproduced well.
*3
Use this setting to print specific colors, logos and so on.
• Smoothing
Use this to set smoothing to [Off] or [Auto].
1
Limitation
❒ When the Color Level is set to [1 bit], Smoothing is enabled.
❒ When Toner Saving is selected, Smoothing is not enabled.
• Toner Saving
Use this to set Toner Saving to [On] or [Off].
Note
❒ Turning on toner saving can cause the output to become blurred and result in very thin lines not printing at all. In the case of color printing, toner saving can cause colors to be different from those expected. Because
of this, use toner saving only for proofing and intermediate drafts, and
turn it off for final prints when top quality is important.
• Dithering
Use this to select the image mode. The following items are available: [Auto],
[Photographic], [Text].
• Paper Type
Use this to select the paper type as [Plain Paper], [Thick Paper], [OHP Transparency], [Plain (Duplex Backs)] or [Thick (Duplex Backs)].
Note
❒ Selecting [OHP Transparency] as the paper type automatically adjusts internal settings to use a color profile specifically for OHP. Even though
the color profile has been optimized for an OHP transparency, the adjustments are automatic and are not indicated on any of the dialog box.
In this case, the [Color Profile] setting on the [Advanced] tab is not enabled.
• Face-down Print
Use this to set Face-down print to [On] or [Off]. This setting can be used only
when [3-bin Sorter] is selected. If [Long Edge] or [Short Edge] is selected in
Auto Duplex, this selection will be ignored.
12
Using RICOH-SCRIPT2 with Windows NT 4.0
• Collate/Stack
Use this to set [Collate], [Stack] or [Off]. This selection cannot be used if the
sorter is not selected in Configure Printer or Bypass Tray is selected in Paper Tray.
• Staple
Use this to set the position of the staple. The following items are available:
[Off], [Top Left], [Top Right], [Bottom Left] or [Bottom Right].
1
Note
❒ This selection cannot be used if Sorter is selected [None] or [3-bin Sorter].
❒ If Staple is selected, Sort command will be selected automatically.
❒ In order to staple in the correct page order using the 10–bin or 20–bin
sorter, “Reverse order” must be selected from the application.
❒ The position of the staple refers to the Portrait orientation. In the case of
Landscape orientation, the position of the staple will be different and
depends on the rotation of the driver and application.⇒ P.25
• Statistics Code
Use this to set [Off] or [On].
If “On” is selected, User Code “99999999” and User ID “RPS2” will be
fixed. If “Off” is selected, User Code “Other” and User ID “?” will be set.
Reference
For more information, see the “Printer Reference” that is provided as a
paper manual and the “Printer Reference” included as a PDF file in the
CD-ROM.
Note
❒ [Paper Size], [Paper Source] and [Copy Count] settings are linked to the settings
on the [Page Setup] tab.
13
Using RICOH-SCRIPT2 with Windows
Windows Network Environment
PostScript data sent to the printer is processed by an interpreter. The interpreter
translates programs written in the ASCII code line-by-line into a form that can
be recognized by the printer.
When the printer is connected to the computer via a parallel interface cable,
PostScript data is processed in units called “jobs”, and each job should have an
EOF (End Of File = Ctrl+D) to indicate the end of the data to the printer. The
printer continues to perform processing with the interpreter until receiving the
EOF.
When the printer is connected to a network, because the network protocol controls the transferred data of jobs, the EOF is not required. Be sure to turn off the
EOF.
1
❖ Windows 95/98
Open the [PostScript] tab of the Printer Properties. Click [Advanced]. Uncheck
both [Send CTRL+D after job] and [Send CTRL+D before job].
❖ Windows NT 4.0
Open the [Advanced] tab of the Default Document Properties. Under [PostScript Options], select [No] for both [Send CTRL-D After Each Job] and [Send CTRLD Before Each Job].
14
Windows Headers
Windows Headers
Headers are appended to the print data, and contain RICOH-SCRIPT2 commands required for proper printing. The default setting appends the headers to
the data automatically for each print job, so you can print without worrying
about the header data. You can configure how header data is sent to the printer
with Windows 95/98.
1
Important
❒ Changing header settings should be performed by system administrators
who are familiar with the functions of PostScript.
Sending Header Data
There are two methods for sending header data.
❖ Send header data for each print job (default)
Use this setting when printing data to a file and when printing to a shared network printer. Select [Download header with each print job] in the [PostScript] tab
to enable this method.
❖ Send header to printer only once
This setting causes the header data to be stored in the printer memory, so jobs
sent after the header data has already been sent are printed more quickly.
Select [Assume header is downloaded and retained] in the [PostScript] tab to enable
this method. To use this setting, you should send the header data to the printer in advance, so click [Send Header Now].
Note
❒ Header data in the printer memory is cleared whenever the printer power
is turned off, the printer is reset, or you switch to another type of the printer language. Printing without header data results in an error, so be careful
when sending header data individually.
Note
❒ When the header data is sent to the printer, a message to inform you that the
header has been sent is printed.
❒ If you send a print job to the printer without the header, a message to inform
you to send the header is printed. In this case, select [Assume header is downloaded and retained] or [Send Header Now] to send the header data to the printer.
If the header has already been stored in the printer memory, a message is
printed informing you that it has been stored.
15
Using RICOH-SCRIPT2 with Windows
1
16
2. Using RICOH-SCRIPT2 with a
Macintosh
Using RICOH-SCRIPT2 with a Macintosh
You can use the LaserWriter printer driver that comes with your Macintosh
when printing from a Macintosh. However, if you use the LaserWriter driver
alone, you lose some printer functions. The lost printer functions can be added
by installing the PPD file.
Option Setup Dialog
Note
❒ Be sure to configure the options correctly. Otherwise, you cannot use the option, even though it is physically installed to the printer.
❖ Paper feed Tray
Use this to select whether or not the optional tray unit is installed on the printer. The following settings are available: [None], [2 Trays] and [3 Trays].
❖ Sorter
Use this to select whether or not the optional sorter unit is installed on the
printer. The following settings are available: [None], [3-bin Sorter] *1 , [10-bin
Sorter] and [20-bin Sorter].
*1
Among the optional sorter units, the 3–bin sorter does not support 51/2'' × 81/2''
K (HalfLetter).
17
Using RICOH-SCRIPT2 with a Macintosh
Setting up for Printing
Setting up for Print Options
LaserWriter 8.3x or earlier
2
With the LaserWriter 8.3x or earlier driver, clicking [Options] on the [Printer] dialog box displays the settings specific for this printer.
Note
❒ Selecting [Printer's Default] means selecting the items set with the printer's operation panel.
Reference
For more information on the LaserWriter 8.3x or earlier, see the documentation that comes with your Macintosh.
❖ Clicking [Option] on the [Printer] dialog box shows the following items:
• Auto Tray Switching
Turning on this setting tells the printer to automatically switch to the other
tray when it has the same size of paper as the current tray when paper runs
out while printing.
• Color Level
Use this to set the number of colors used per dot to [1 bit], [2 bit] or [4 bit
(High Quality)].
• Color Mode
Use this to set the output color to [Color] or [Black and White].
• Color Setting
Use this to set the correction method used for the color conversion. The following items are available: [Off] *1 , [Vivid] *2 , [Super Vivid] *3 , [Fine] *4 , [Super
Fine] *5 .
*1
*2
*3
*4
*5
18
No modification to the color setting.
Select this setting to perform CMYK conversion with enhanced saturation and
brightness to print vivid colors.
Select this setting to perform CMYK conversion. The colors printed with this
setting are more vivid than those printed with the ”Vivid” setting. All of the
colors in the image, especially the lighter ones, are emphasized.
Select this setting to perform color matching based on the printer's built-in
color rendering dictionaries, and perform CMYK conversion. It makes it possible to print colors that are close to the displayed colors on the computer
screen.
The color rendering dictionaries refer to the contents selected by the Color Profile. This setting is useful when the application and printer driver do not support the color matching features.
Like the “Fine” setting, the color rendering dictionary is used, however, output
is more vivid. This setting is enabled to make light colors print more vivid.
Setting up for Printing
Note
❒ The color rendering dictionary that is selected on the Color Profile settings is used.
• Color Profile
Use this to select a color rendering dictionary (CRD). The CRD is referred
to for color matching, so you should select the appropriate CRD for the
document you are printing. The CRD you select is also referred to when
“Fine” or “Super Fine” is selected for the “Color Setting”. The following
items are available: [Photograph] *1 , [Presentation] *2 , [Solid Color] *3 .
2
Note
❒ When selecting [OHP] as the paper type, the CRD automatically adjusts
to use a color profile specifically for OHP. Even though the color profile
has been optimized for OHP, the adjustments are automatic and are not
indicated on any of the dialog boxes. In this case, this setting is not enabled.
*1
Use this setting to enhance the reproduction of photos and graphics that include midtones.
*2
Use this setting to enhance the reproduction of documents that contain text
and graphics. This CRD is best for printing colored charts, graphs, presentation materials and etc. If you use this CRD for printing photographs, color or
gradations might not be reproduced well.
*3 Use this setting to print specific colors, logos and so on.
• Smoothing
Use this to set smoothing to [Off] or [Auto].
Limitation
❒ When the Color Level is set to [1 bit], Smoothing is enabled.
❒ When Toner Saving is selected, Smoothing is not enabled.
• Toner Saving
Use this to set Toner Saving [On] or [Off].
Note
❒ Turning on toner saving can cause the output to become blurred and result in very thin lines not printing at all. In the case of color printing, toner saving can cause colors to be different from those expected. Because
of this, use toner saving only for proofing and intermediate drafts, and
turn it off for final prints when top quality is important.
• Dithering
Use this to select the image mode. The following items are available: [Auto],
[Photographic] and[Text].
• Paper Type
Use this to select the paper type. The following items are available: [Plain
Paper], [Thick Paper], [OHP Transparency], [Plain (Duplex Backs)] and [Thick (Duplex Backs)].
19
Using RICOH-SCRIPT2 with a Macintosh
Note
❒ Selecting [OHP Transparency] as the paper type automatically adjusts internal settings to use a color profile specifically for OHP. Even though
the color profile has been optimized for OHP, the adjustments are automatic and are not indicated on any of the dialog boxes. In this case, the
[Color Profile] setting on [Option] is not enabled.
• Face-down Print
Use this to set Face-down print to [On] or [Off]. This setting can be used only
when [3-bin Sorter] is selected. If [Long Edge] or [Short Edge] is selected in
Auto Duplex, this selection will be ignored.
• Collate/Stack
Use this to set [Collate], [Stack] or [Off]. This selection cannot be used if the
sorter is not selected in Configure Printer or Bypass Tray is selected in Paper Tray.
• Staple
Use this to set the position of the staple. The following items are available:
[Off], [Top Left], [Top Right], [Bottom Left] or [Bottom Right].
2
Note
❒ This selection cannot be used if Sorter is selected for [None] or [3-bin Sorter].
❒ If Staple is selected, Sort command will be selected automatically.
❒ In order to staple in the correct page order using the 10–bin or 20–bin
sorter, “Reverse order” must be selected from the application.
❒ The position of the staple refers to the Portrait orientation. In the case of
Landscape orientation, the position of the staple will be different and
depends on the rotation of the driver and application.⇒ P.25
• Statistics Code
Use this to set [Off] or [On].
If “On” is selected, User Code “99999999” and User ID “RPS2” will be
fixed. If “Off” is selected, User Code “Other” and User ID “?” will be set.
Reference
For more information, see the “Printer Reference” that is provided as a
paper manual and the “Printer Reference” included as a PDF file in the
CD-ROM.
LaserWriter 8.4x or later
The following describes the settings specific for this printer using LaserWriter
8.4x or later.
Reference
For more information on LaserWriter 8.4x or later, see the documentation that
comes with your Macintosh.
20
Setting up for Printing
❖ Selecting [Color Matching] in the [Printer] dialog box shows the following items:
• Print Color
You can specify the method and the color conversion settings for printing.
The following items are available.
• [Black and White]
Select this for monochrome printing.
• [Color/GrayScale]
If you select this item, the color profile you select in the [Color Profile] of
the [Printer Specific Options] becomes effective.
• [ColorSync Color Matching]
If you select [ColorSync Color Matching], [Printer Profile] becomes active in
the same dialog box. Select the ColorSync profile specific for your printer. Your Macintosh converts the print data from RGB to CMYK data,
and sends it to the printer.
• [PostScript Color Matching].
If you select [PostScript Color Matching], [Printer Profile] becomes active in
the same dialog box. Select the ColorSync profile specific for your printer. Your Macintosh prepares the color rendering dictionary (CRD)
based on the selected profile and attaches the CRD to the print data. The
print data is sent to the printer with the CRD. The printer converts the
print data from RGB to CMYK based on the attached the CRD.
2
Note
❒ The CRD is referred to for color matching, so you should select the
appropriate CRD for the document you are printing. The CRD you
select is also referred to when “Fine” or “Super Fine” is selected for
the “Color Setting”.
❖ Selecting [Error Handling] in the [Printer] dialog box shows the following item:
• If there is a PostScript error
You can select [No special report], [Summarize on screen] or [Print detailed report].
• If the cassette is out of paper
You can use this setting to select auto tray switching, which tells the printer
to automatically switch to the other tray if it has the same paper size as the
current tray when paper runs out while printing.
❖ Selecting [Printer Specific Option] in the [Printer] dialog box shows the following
items:
• Color Level
Use this to set the number of colors used per dot to [1 bit], [2 bit] or [4 bit
(High Quality)].
• Color Mode
Use this to set the output color to [Color] or [Black and White].
21
Using RICOH-SCRIPT2 with a Macintosh
• Color Setting
Use this to set the correction method used for the color conversion. The following items are available: [Off] *1 , [Vivid] *2 , [Super Vivid] *3 , [Fine] *4 , [Super
Fine] *5 .
*1
*2
*3
2
*4
*5
No modification to the color setting.
Select this setting to perform CMYK conversion with enhanced saturation and
brightness to print vivid colors.
Select this setting to perform CMYK conversion. The colors printed with this
setting are more vivid than those printed with the ”Vivid” setting. All of the
colors in the image, especially the lighter ones, are emphasized.
Select this setting to perform color matching based on the printer's built-in
color rendering dictionaries, and perform CMYK conversion. It makes it possible to print colors that are close to the displayed colors on the computer
screen.
The color rendering dictionaries refer to the contents selected by the Color Profile. This setting is useful when the application and printer driver do not support the color matching features.
Like the “Fine” setting, the color rendering dictionary is used, however, output
is more vivid. This setting is enabled to make light colors print more vivid.
Note
❒ The color rendering dictionary that is selected on the Color Profile settings is used.
• Color Profile
Use this to select a color rendering dictionary (CRD). The CRD is referred
to for color matching, so you should select the appropriate CRD for the
document you are printing. The CRD you select is also referred to when
“Fine” or “Super Fine” is selected for the “Color Setting”. The following
items are available: [Photograph] *1 , [Presentation] *2 , [Solid Color] *3 .
Note
❒ When selecting [OHP] as the paper type, the CRD automatically adjusts
to use a color profile specifically for OHP. Even though the color profile
has been optimized for OHP, the adjustments are automatic and are not
indicated on any of the dialog boxes. In this case, this setting is not enabled.
*1
Use this setting to enhance the reproduction of photos and graphics that include midtones.
*2 Use this setting to enhance the reproduction of documents that contain text
and graphics. This CRD is best for printing colored charts, graphs, presentation materials and so on. If you use this CRD for printing photographs, color
or gradations might not be reproduced well.
*3
Use this setting to print specific colors, logos and so on.
• Smoothing
Use this to set Smoothing to [Off] or [Auto].
Limitation
❒ When the Color Level is set to [1 bit], Smoothing is enabled.
❒ When Toner Saving is selected, Smoothing is not enabled.
• Toner Saving
Use this to set Toner Saving to [On] or [Off].
22
Setting up for Printing
Note
❒ Turning on toner saving can cause the output to become blurred and result in very thin lines not printing at all. In the case of color printing, toner saving can cause colors to be different from those expected. Because
of this, use toner saving only for proofing and intermediate drafts, and
turn it off for final prints when top quality is important.
• Dithering
Use this to select the image mode. The following items are available: [Auto],
[Photographic] and [Text].
2
Note
❒ When you use the printer that does not support [Auto], the default setting is [Photographic].
• Paper Type
Use this to select the paper type. The following items are available: [Plain
Paper], [Thick Paper], [OHP Transparency], [Plain (Duplex Backs)] or [Thick (Duplex Backs)].
Note
❒ Selecting [OHP Transparency] as the paper type automatically adjusts internal settings to use a color profile specifically for OHP. Even though
the color profile has been optimized for OHP, the adjustments are automatic and are not indicated on any of the dialog box. In this case, the
[Color Profile] setting on [Printer Specific Option] is not enabled.
• Face-down Print
Use this to set Face-down print to [On] or [Off]. This setting can be used only
when [3-bin Sorter] is selected. If [Long Edge] or [Short Edge] is selected in
Auto Duplex, this selection will be ignored.
• Collate/Stack
Use this to set [Collate], [Stack] or [Off]. This selection cannot be used if the
sorter is not selected in Configure Printer or Bypass Tray is selected in Paper Tray.
Note
❒ You must set [Collate ] to [Off] in any other tabs except [Printer Specific Options].
• Staple
Use this to set the position of the staple. The following items are available:
[Off], [Top Left], [Top Right], [Bottom Left] or [Bottom Right].
Note
❒ This selection cannot be used if Sorter is selected for [None] or [3-bin Sorter].
❒ If Staple is selected, Sort command will be selected automatically.
❒ In order to staple in the correct page order using the 10–bin or 20–bin
sorter, “Reverse order” must be selected from the application.
23
Using RICOH-SCRIPT2 with a Macintosh
❒ The position of staple refers to the Portrait orientation. In the case of
Landscape orientation, the position of the staple will be different and
depends on the rotation of the driver and application.⇒ P.25
• Statistics Code
Use this to set [Off] or [On].
If “On” is selected, User Code “99999999” and User ID “RPS2” will be
fixed. If “Off” is selected, User Code “Other” and User ID “?” will be set.
2
Reference
For more information, see the “Printer Reference” that is provided as a
paper manual and the “Printer Reference” included as a PDF file in the
CD-ROM.
24
3. Appendix
Staple Position
The following tables show the outputs of staple positions depending on each
condition.
Simplex Printing
Output of Staple
Position
OS *1
Staple Setting
Paper Feed
Top Left
Windows 95/98
Bottom Left
Windows NT 4.0
Mac OS 7.1 ~ 8.6
Top Right
Top Right
Windows 95/98
Top Left
Windows NT 4.0
Mac OS 7.1 ~ 8.6
*1
Top Right
The position of the staple will be different depending on the rotation of the driver
and application.
25
Appendix
Duplex Printing
Output of
OS *1
Staple Position
Binding
Staple Setting
Long edge
Top Left
2
3
3
2
Short edge
3
Long edge
Bottom Left
2
Windows 95/
98
Windows NT
4.0
3
Mac OS 7.6 ~
8.6
Windows 95/
98
Top Right
Short Edge
2
Windows NT
4.0
3
Mac OS 7.6 ~
8.6
Top Right
2
Long edge
3
Short edge
2
3
26
Bottom Left
Top Right
Paper Feed
Staple Position
Output of
OS *1
Staple Position
Windows 95/
98
Long edge
Top Left
2
Mac OS 7.6 ~
8.6
2
Windows 95/
98
*1
Staple Setting
Paper Feed
Windows NT
4.0
3
3
Binding
Bottom Right
Short edge
Top Left
3
Windows NT
4.0
Mac OS 7.6 ~
8.6
Bottom Right
The position of the staple will be different depending on the rotation of the driver
and application.
27
Appendix
Printer Memory and VM Area
The following table shows the relationship between the printer memory capacity and the VM (virtual memory) capacity.
Printer Memory
96MB
VM (virtual memory) Capacity
Approximately 9.9MB
Note
❒ The “VM” of the PostScript printer is the memory area outside of the page
memory and program area. If the data sent from the computer is very complex, printing may not be possible because of insufficient printer memory.
This is called a “VM error”.
3
❒ In some cases, printing is impossible even though a VM error has not occurred.
28
Precautions for RICOH-SCRIPT2
Precautions for RICOH-SCRIPT2
Differences between RICOH-SCRIPT2 and “PostScript Language
Reference Manual, Second Edition”
The differences between RICOH-SCRIPT2 and PostScript Level 2 as defined in
the “PostScript Language Reference Manual, Second Edition” by Adobe Systems Incorporated are described below.
• RICOH-SCRIPT2 does not support the “user path cache” function, therefore
the print processing speed may be reduced when this function is called by
any PostScript program. This function originated in Display PostScript, and
it is not used by most printer drivers.
• RICOH-SCRIPT2 does not support “automatic garbage collection”. Instead, a
similar routine is implemented by the printer drivers with the “save/restore”
operators. Not having this function does not create any problems.
3
Other Precautions
• Because of the differences in image, graphics, and clipping rules, the printing
results produced by any single draw operator might be out of place by one
dot.
• The memory area used for downloading fonts will not be free. A VM error
might occur when downloading fonts with insufficient VM memory. In this
case, the print job may be canceled. However, this printer will restart RICOHSCRIPT2 automatically.
• Lasertalk version 1.3 is not supported.
• Built-in font metric data may be different from the PostScript fonts.
• Type 1 fonts conform to the Adobe Type 1 font format (1.1) standard. However, some Type 1 fonts with outline transposition (self-interference) may not
print correctly.
• When printing text without using “font hint data” downloaded from the application, enlarged or reduced fonts may print incorrectly.
• When using the PostScript printer driver with Windows applications, the
printed result might not match the preview on the computer screen.
29
INDEX
A
About, 2
Advanced PostScript Options, 6
Advanced tab, 10
Auto Tray Switch, 3, 11
Available PostScript Memory, 7
Available printer memory, 3
C
Color Appearance, 10
Color Mode, 4, 11
Color Profile, 4, 11, 19, 22
Color Setting, 4, 11, 18, 22
Copies, 2
Copy Count, 9
D
Device Options tab, 3
Device Settings tab, 7
Dithering, 5, 12
Document Options, 10
E
EOF, 14
F
Fonts tab, 3
Font Substitution Table, 3, 8
Form to Tray Assignment, 8
G
Graphic, 10
Graphics tab, 2
H
Halftone Color Adjustment, 11
Halftone Setup, 8
header, 15
I
Installable options, 6
30
J
Job Timeout, 8
L
LaserWriter, 18, 20
LaserWriter 8.3x or earlier, 18
LaserWriter 8.4x or later, 20
M
Mirrored Output, 10
More Options, 2
N
Negative Output, 10
O
Option
Sorter, 8
Tray, 8
Option Setup Dialog, 17
P
Page Setup tab, 9
Page Size, 9
Paper size, 1
Paper Source, 9
Paper tab, 1
Paper Type, 12
PostScript tab, 6
Print as a mirror image, 3
Print as a negative image, 3
Printer Features, 11
Printer features, 3
R
Resolution, 2, 10
S
Send CTRL-D After Each Job, 11
Send CTRL-D Before Each Job, 11
Special, 2
Statistics Code
User Code,User ID, 5, 13, 20, 24
T
Toner Saving, 5, 12
TrueType Font, 10
V
VM area, 28
W
Wait Timeout, 8
Windows 95/98
Device Options tab, 3
Fonts tab, 3
Graphics tab, 2
Paper tab, 1
PostScript tab, 6
Windows NT 4.0
Advanced tab, 10
Device Settings tab, 7
Page Setup tab, 9
31
32
EE
GB
UE
USA G528
Note to users in the United States of America
Notice:
This equipment has been tested and found to comply with the limits for a Class B digital device, pursuant to Part 15 of the FCC Rules. These limits are designed to provide reasonable protection against
harmful interference in a residential installation. This equipment generates, uses and can radiate radio
frequency energy and, if not installed and used in accordance with the instructions, may cause harmful
interference to radio communications.
However, there is no guarantee that interference will not occur in a particular installation. If this equipment does cause harmful interference to radio or television reception, which can be determined by turning the equipment off and on, the user is encouraged to try to correct the interference by one more of
the following measures:
Reorient or relocate the receiving antenna.
Increase the separation between the equipment and receiver.
Connect the equipment into an outlet on a circuit different from that to which the receiver is
connected.
Consult the dealer or an experienced radio/TV technician for help.
Warning
Changes or modifications not expressly approved by the party responsible for compliance could void
the user's authority to operate the equipment.
Caution (in case of 100BASE-TX environment):
Properly shielded and grounded cables (STP) and connectors must be used for connections to host
computer (and/or peripheral) in order to meet FCC emission limits.
STP with ferrite core must be used for RF interference suppression.
Declaration of Conformity
Product Name: Printer Controller
Model Number: Color Controller RC-200
Responsible party: Ricoh Corporation
Address: 5 Dedrick Place, West Caldwell, NJ 07006
Telephone number: 973-882-2000
This device complies with part 15 of FCC Rules.
Operation is subject to the following two conditions:
1. This device may not cause harmful interference, and
2. this device must accept any interference received,
including interference that may cause undesired operation.
Note to users in Canada
Note:
This Class B digital apparatus complies with Canadian ICES-003.
Remarque concernant les utilisateurs au Canada
Avertissement:
Cet appareil numérique de la classe B est conforme à la norme NMB-003 du Canada.
Declaration of Conformity
“The Product complies with the requirements of the EMC Directive 89/336/EEC and the Low Voltage
Directive 73/23/EEC.”
Caution (in case of 100BaseTX environment):
Properly shielded and grounded cables (STP) and connectors must be used for connections to host
computer (and/or peripheral) in order to meet EMC Directive 89/336/EEC emission limits.
Copyright © 1999
RICOH-SCRIPT2 Type305 (Option) OPERATING INSTRUCTIONS
UE USA G528-8650
EE GB
Network Interface Board
OPERATING INSTRUCTIONS
Read this manual carefully before you use this product and keep it handy for future
reference.
For safety, please follow the instructions in this manual.
Introduction
To get maximum versatility from this machine all operators should carefully read and follow the instructions in this manual. Please keep this manual in a handy place near the machine.
Please read the Safety Information in the “Printer Reference” before using this machine. It contains important information related to USER SAFETY and PREVENTING EQUIPMENT PROBLEMS.
Important
Parts of this manual are subject to change without prior notice. In no event will the company be liable
for direct, indirect, special, incidental, or consequential damages as a result of handling or operating
the machine.
Note
The names of the applications do not appear in the following pages. Confirm which applications you
will be using before reading this manual.
Descriptions in this manual
Application
PRINTER MANAGER FOR ADMINISTRATOR
Aficio Manager for Admin
Net Vision for Admin
infotec NetPrint Manager for Admin
Lanier Net Manager for Admin
PRINTER MANAGER FOR CLIENT
Aficio Manager for Client
Net Vision for Client
infotec NetPrint Manager for Client
Lanier Net Manager for Client
Software Versions Conventions Used in this Manual
•
NetWare 3.x means NetWare 3.11, 3.12 and 3.2.
•
NetWare 4.x means NetWare 4.1, 4.11 and IntranetWare.
Trademarks
Apple, AppleTalk, EtherTalk, LaserWriter and Macintosh are registered trademarks of Apple Computer,
Incorporated.
Ethernet is a registered trademark of Xerox Corporation.
Microsoft, Windows and Windows NT are registered trademarks of Microsoft Corporation in the United
States and/or other countries.
Netscape and Netscape Navigator are registered trademarks of Netscape Communications Corporation.
Novell, NetWare, Client32 and NDS are registered trademarks of Novell, Inc.
PostScript is a registered trademark of Adobe Systems, Incorporated.
Sun is a registered trademark of Sun Microsystems, Inc.
SunOS is a registered trademark of Sun Microsystems, Inc.
Solaris is a registered trademark of Sun Microsystems, Inc. in the United States and other countries.
Other product names used herein are for identification purposes only and might be trademarks of their
respective companies. We disclaim any and all rights in those marks.
Note
The proper names of the Windows operating systems are as follows:
•
•
Microsoft Windows 95 operating system
Microsoft Windows 98 operating system
•
Microsoft Windows for Workgroups operating system Version 3.11
•
•
Microsoft Windows NT Server operating system Version 4.0
Microsoft Windows NT Workstation operating system Version 4.0
TABLE OF CONTENTS
Introduction................................................................................................
Setting up the Printer in a Network..........................................................
Printing without Using a Print Server ............................................................
Printing with a Windows NT Print Server ......................................................
Printing as a NetWare Print Server ...............................................................
1
2
2
2
3
1. Windows 95/98 Configuration
Configuring Windows 95/98 ..................................................................... 6
Preparing to Use the TCP/IP Protocol for Printing ........................................ 6
Preparing to Use the NetBEUI Protocol for Printing...................................... 7
Installing Multidirect Print .............................................................................. 8
Setting up the Printer Driver.......................................................................... 9
Uninstalling Multidirect Print ........................................................................ 11
2. Windows NT 4.0 Configuration
Preparing for a Network Connection .....................................................
Preparing to Use the TCP/IP Protocol for Printing ......................................
Preparing to Use the NetBEUI Protocol for Printing....................................
Installing Multidirect Print ............................................................................
Setting up the Printer Driver........................................................................
Uninstalling Multidirect Print ........................................................................
Setting up a Client Computer .................................................................
Windows 95/98............................................................................................
Windows NT 4.0..........................................................................................
Configuring LPR Port Printing ...............................................................
14
14
15
17
18
20
21
21
22
23
3. NetWare Configuration
Installing NIB Setup Tool ........................................................................
Installing the PRINTER MANAGER FOR ADMINISTRATOR.....................
Running NIB Setup Tool .............................................................................
Quick Setup Using the NIB Setup Tool Wizard.....................................
NetWare 3.x - Advanced Settings ..........................................................
Setting up as Print Server ...........................................................................
Setting up as Remote Printer ......................................................................
NetWare 4.x, 5 - Advanced Settings ......................................................
Setting up as Print Server ...........................................................................
Setting up as Remote Printer ......................................................................
Setting up a Client Computer .................................................................
Windows 95/98............................................................................................
Windows NT 4.0..........................................................................................
26
26
27
28
31
31
34
37
38
40
44
44
45
ii
4. Macintosh Configuration
Configuring a Macintosh ........................................................................
Changing to EtherTalk ................................................................................
Configuring the Printer ................................................................................
Changing Printer Name...............................................................................
Changing Zone............................................................................................
47
47
48
48
48
5. Appendix
Multidirect Print ....................................................................................... 51
[Select Printer]............................................................................................... 51
[Network] ...................................................................................................... 52
Configuring the Network Interface Board with a Web Browser .......... 54
Going to the Top Page ................................................................................ 54
Assigning IP Address with ARP+PING.................................................. 57
Remote Maintenance by Telnet (mshell) ............................................... 58
Operation Flow............................................................................................ 58
Command List ............................................................................................. 59
SNMP ........................................................................................................ 66
Understanding the Displayed Information ............................................ 67
Print Job Information ................................................................................... 67
Print Log Information................................................................................... 67
Network Statistical Information.................................................................... 68
Configuring the Network Interface Board .................................................... 69
Message List ............................................................................................ 72
System Log Information .............................................................................. 72
Precautions .............................................................................................. 77
Connecting a Dial up Router to a Network .................................................. 77
When Printing PostScript from Windows .................................................... 78
When Printing it with NetWare .................................................................... 78
When Using DHCP ..................................................................................... 79
When Using NIB Setup Tool ....................................................................... 80
Specifications .......................................................................................... 81
INDEX........................................................................................................ 82
iii
Introduction
This manual contains detailed instructions on configuring the printer to use it as
a network printer. The actual procedures may differ depending on your network environment. Use the procedure appropriate for your network environment.
Windows NT (Server)
NetWare (Server)
Windows 95 / 98
Windows NT
NetWare
(Client)
Macintosh
Important
❒ The procedures in this manual assume that you are a network administrator.
If you are not, be sure to consult your network administrator before configuration.
Reference
For more information on physically installing the Network Interface Board
and cabling, see the "Printer Reference" that is provided as a paper manual.
For more information on configuring the Network Interface Board with the operation panel, see the "Printer Reference" that is provided as a paper manual.
❖ Features
• Support for 100BASE-TX and 10BASE-T
• The Network Interface Board is compatible with NetWare (IPX/SPX),
Windows NT (TCP/IP, NetBEUI), Windows 95/98 (TCP/IP, NetBEUI) ,
and Macintosh (AppleTalk) protocols. This allows you to use the printer in
a network that uses different protocols and operating systems.
• A computer used as a dedicated print server is not required because the
Network Interface Board can be configured as a NetWare print server.
• The Network Interface Board can connect the printer to the network without requiring its own power supply because the Network Interface Board
is installed inside the printer.
1
Setting up the Printer in a Network
Printing without Using a Print Server
You do not need to use a print server. The actual procedure may differ depending on your operating system.
Macintosh
AppleTalk
TCP/IP
NetBEUI
Windows 95 / 98
TCP/IP
NetBEUI
Windows NT 4.0
• Windows 95/98 ⇒ P.5
• Windows NT 4.0 ⇒ P.14
• Macintosh ⇒ P.47
Printing with a Windows NT Print Server
When Windows NT Server or Workstation is the operating system used on the
print server, TCP/IP or NetBEUI protocols are used.
Windows NT Server (or Workstation) 4.0
Print Server
TCP/IP
NetBEUI
Windows 95 / 98
2
Windows NT 4.0
Note
❒ For more information on setting up TCP/IP or NetBEUI in a Windows NT environment, see P.14 “Preparing for a Network Connection”.
❒ Client setup instructions are different for each type of Windows OS.
• Windows 95/98 ⇒ P.21
• Windows NT 4.0 ⇒ P.22
Printing as a NetWare Print Server
The Network Interface Board allows you to set up the printer in a NetWare environment as either a print server or a remote printer. A dedicated NetWare
print server is not required. If a dedicated print server is being used, the printer
should be configured as a remote printer.
❖ Configure as Print Server
Print Server
NetWare
File Server
Windows 95
Windows 98
Note
❒ The actual procedures for configuring the printer may differ depending on
the version of NetWare.
• NetWare 3.x ⇒ P.31 “NetWare 3.x - Advanced Settings”
• NetWare 4.x, 5 ⇒ P.37 “NetWare 4.x, 5 - Advanced Settings”
❒ The actual procedures for configuring your client computer may differ depending on the operating system.
• Windows 95/98 ⇒ P.44 “Windows 95/98”
3
❖ Configure as Remote Printer
Remote Printer
NetWare
Print Server
Windows 95
NetWare
File Server
Windows 98
Note
❒ The actual procedures for configuring the printer may differ depending on
the version of NetWare.
• NetWare 3.x ⇒ P.34 “Setting up as Remote Printer”
• NetWare 4.x, 5 ⇒ P.40
❒ The actual procedures for configuring your client computer may differ depending on the operating system.
• Windows 95/98 ⇒ P.44 “Windows 95/98”
4
1. Windows 95/98
Configuration
You can use the printer as a network printer with Windows 95/98 using Multidirect Print, and the TCP/IP or NetBEUI protocols. This chapter explains how to
configure your printer and Windows.
5
Windows 95/98 Configuration
Configuring Windows 95/98
1
Basic Procedure
Selecting the protocol
TCP/IP
NetBEUI
Assigning the IP address
TCP/IP
NetBEUI
Configuring Windows environment
Installing Multidirect Print
Installing the printer driver
Windows 95/98
Changing the port
Preparation
Multidirect Print supports the TCP/IP protocol and the NetBEUI protocol.
Consult the network administrator before selecting the protocol.
Limitation
❒ When you use the NetBEUI protocol, you cannot print to a printer which is
located on the other side of a router.
Note
❒ You can use both TCP/IP and NetBEUI protocols in a computer. To use both
protocols, you must first install them.
Preparing to Use the TCP/IP Protocol for Printing
To use the TCP/IP protocol to print, the network must be configured as described below.
Configuring the printer
Configure your printer to use the TCP/IP protocol.
• Confirm that the TCP/IP protocol is set to active. (The default setting is active.)
• Assign an IP address and make other settings required for using the TCP/IP
protocol.
6
Configuring Windows 95/98
Reference
For more information on how to make the above settings, see the "Printer Reference" that is provided as a paper manual.
If DHCP is used to assign IP addresses, see P.79 “When Using DHCP”.
1
Note
❒ After setting the IP address, use the PING command to confirm that it has
been set correctly.
A
B
Click [Start], point to [Programs], and then click [MS-DOS Prompt].
Type the following. (Example IP address is 192.168.15.16)
C:> ping 192.168.15.16
If the address has been configured correctly, the following message appears.
Reply from 192.168.15.16 : bytes=32 time<10ms TTL=32
If the address has been configured incorrectly, the following message appears.
Request timed out.
Configuring a Windows 95/98 computer
Follow these steps to configure a Windows 95/98 computer to use the TCP/IP
protocol.
A Double-click the [Network] icon of [Control Panel], and confirm that “TCP/IP”
is in the [The following network components are installed] box of the [Configuration]
tab.
Note
❒ If the TCP/IP protocol is not installed, click [Add] in the [Configuration] tab,
and install it. For more information on installing the TCP/IP protocol, see
the Windows 95/98 online help.
B Configure the TCP/IP protocols with the appropriate IP address, subnet
mask and other settings.
Confirm with the network administrator that the settings are correct.
Preparing to Use the NetBEUI Protocol for Printing
To use the NetBEUI protocol to print, the network must be configured as described below.
Configuring the printer
Configure your printer to use the NetBEUI protocol.
7
Windows 95/98 Configuration
• Confirm that the NetBEUI protocol is set to active. (The factory default is active.)
Reference
For more information on how to make the above settings, see the "Printer Reference" that is provided as a paper manual.
1
Configuring a Windows 95/98 computer
Install the NetBEUI protocol into a Windows 95/98 computer, and configure
NetBEUI as the default protocol.
A Double-click the [Network] icon in [Control Panel], and confirm that “NetBEUI” is in the [The following network components are installed:] box in the [Configuration] tab.
Note
❒ If the NetBEUI protocol is not installed, click [Add] in the [Configuration] tab,
and install it. For more information on installing the NetBEUI protocol, see
the Windows 95/98 online help.
❒ If there is “NetBEUI ->Dial-Up Adaptor” in the [The following network components are installed:] box, select it and click [Remove] to remove the binding.
B Configure the NetBEUI protocol as the default protocol. Click the [Configuration] tab, select “NetBEUI” in the [The following network components are installed:] box, and click [Properties].
C Click the [Advanced] tab, select [Set this protocol to be the default protocol], and
click [OK].
D Click [OK] to close the [Network] dialog box.
E After confirming the message to restart, click [Yes].
Installing Multidirect Print
Follow these instructions to install Multidirect Print.
Preparation
You must restart the computer after installing Multidirect Print. Be sure to
close all applications before beginning the installation process.
8
Note
❒ You must install Multidirect Print and the appropriate printer driver in order
to print. If you print, using the TCP/IP protocol, to be able to browse the
printer via the network, PRINTER MANAGER FOR CLIENT (⇒see the inside of the front cover of this manual) needs to be installed. If the installer
starts automatically with the Auto Run program, you can install both of these
programs. For more information on how to install these programs, see the
"Printer Reference" that comes with the printer.
Configuring Windows 95/98
A Close all the applications that are currently running.
B Insert the CD-ROM in the CD-ROM drive.
Note
❒ If the installer starts automatically, you can use it to install Multidirect
Print, and set up the printer driver, and then go to step F.
1
C Open [Control Panel], and double click the [Add/Remove Programs] icon.
D In the [Install/Uninstall] tab, click [Install].
E Click [Next >].
F Type the name of the CD-ROM drive in the [Command line for installation pro-
gram] box, followed by “\NETWORK\MDP\DISK1\SETUP” (do not include the quotation marks), and then click [Finish].
Note
❒ An example would be “D:\NETWORK\MDP\DISK1\SETUP” when the
drive letter is “D”.
G From the [Choose Setup Language] list, select the language you use.
H After the [Welcome] dialog box appears, click [Next >].
I After the [Setup Complete] dialog box appears, click [Yes, I want to restart my
computer now.], and click [Finish].
The computer restarts, and Multidirect Print can now be used. If you select
“No”, be sure to restart the computer manually before launching Multidirect
Print for the first time.
Go to P.9 “Setting up the Printer Driver” after the computer restarts.
Setting up the Printer Driver
Using Multidirect Print to print is not possible until the printer driver is installed
and the correct port selected.
Preparation
The target printer must be turned on before starting the installation process.
A Install the printer drivers.
If the printer drivers have already been installed, you can go to the next step.
Reference
For more information on installing the printer drivers, see the "Printer Reference" that is provided as a paper manual.
9
Windows 95/98 Configuration
Note
❒ Any port can be selected during the installation, however, LPT1 is recommended.
B In the [Printers] window, click the icon of the printer you want to use. On
1
the [File] menu, click [Properties].
C Click the [Details] tab, and then click [Add Port].
D In the [Add Port] box, click [Other], and click [Multi Direct Print], and then click
[OK].
The [Select Printer] dialog box appears, and the names of the printers which
can print with TCP/IP appear.
Limitation
❒ If PRINTER MANAGER FOR CLIENT is not installed in your computer,
printers which can print with TCP/IP do not appear.
Note
❒ The printers which have replied to a broadcast from the computer are listed here. To print to a printer that is not on this list, or to directly type the
port name, click [New Printer], and click [Next >], and then type the port
name in step G.
E To print using the NetBEUI protocol, click [NetBEUI].
F Click the printer you want to use, and click [Next >].
Reference
For more information on a particular item in the dialog box, see P.51 “Multidirect Print”.
Note
❒ You can identify the “Printer Name” and “Address” on the configuration
page printed by the printer.
❒ You cannot add the partly same address that was already used. For example, when “192.168.0.2” was already used, “192.168.0.2xx” cannot be used.
Similarly, when “192.168.0.20” was already used, “192.168.0.2” cannot be
used.
G Confirm that the port name of the printer is correct, and click [Next >].
If you did not select a printer in step F, you must type the port name.
Typing the port name for use with the TCP/IP protocol
A Type the IP address of the Network Interface Board into the [IP address]
box.
You can type the host name or a domain name instead of an IP address into
the [Host Name] box.
10
Configuring Windows 95/98
Limitation
❒ You cannot use a host name that begins with “%%”.
❒ You cannot use the port name that is already in use.
1
Note
❒ When you use DHCP to assign IP addresses to Network Interface
Boards, you can use a printer name (Current Hostname on the network
configuration page) as the host name.
Typing the port name for use with the NetBEUI protocol
A Print a configuration page, and confirm the Network path name.
Reference
For more information on printing a configuration page, see the "Printer
Reference" included as a PDF file in the CD-ROM.
B Type the printer's network path name in the form of “%%Computer
name \Share name”. Do not type “\\” as head characters but “%%”.
H Confirm the port name in the [Port Name] box, and click [Finish].
I Confirm that the port name is displayed in the [Print to the following port] box,
and click [OK].
Configuration is complete.
When you print, the printing procedure is no different. When you select the
printer configured here, the computer automatically uses Multidirect Print.
Uninstalling Multidirect Print
A Open [Control Panel], and double-click the [Add/Remove Programs] icon.
B With the [Install/Uninstall] tab, click [Multi Direct Print], and click [Add/Remove].
C After a confirmation message appears, click [Yes].
UninstallShield removes all of the components of Multidirect Print.
D When the uninstallation is complete, restart the computer.
11
Windows 95/98 Configuration
1
12
2. Windows NT 4.0
Configuration
You can use the printer as a network printer with Windows NT 4.0 using Multidirect Print, and the TCP/IP or NetBEUI protocols. This chapter explains how to
configure the printer and Windows NT.
13
Windows NT 4.0 Configuration
Preparing for a Network Connection
Basic Procedure
Selecting the protocol
2
TCP/IP
NetBEUI
Assigning the IP address
TCP/IP
NetBEUI
Configuring Windows environment
Installing Multidirect Print
Installing the printer driver
Windows NT 4.0
Changing the port
Preparation
Multidirect Print supports the TCP/IP protocol and the NetBEUI protocol.
Consult the network administrator before selecting the protocol.
Limitation
❒ When you use the NetBEUI protocol, you cannot print to a printer which is
located on the other side of a router.
Note
❒ You can use both TCP/IP and NetBEUI protocols, in a computer. To use both
protocols, you must first install them.
Preparing to Use the TCP/IP Protocol for Printing
Follow these instructions to configure the Network Interface Board and Windows NT to use the TCP/IP protocol.
Configuring the printer
Configure your printer to use the TCP/IP protocol.
• Confirm that the TCP/IP protocol is set to active. (The default setting is active.)
• Assign an IP address and make other settings required for using the TCP/IP
protocol.
14
Preparing for a Network Connection
Reference
For more information on how to make the above settings, see the "Printer Reference" that is provided as a paper manual.
If DHCP is used to assign IP addresses, see P.79 “When Using DHCP”.
Note
❒ After setting the IP address, use the PING command to confirm that it has
been set correctly.
A
B
2
Click [Start], point to [Programs], and then click [Command Prompt].
Type the following. (Example IP address is 192.168.15.16)
C:> ping 192.168.15.16
If the address has been configured correctly, the following message appears.
Reply from 192.168.15.16 : bytes=32 time<10ms TTL=32
If the address has been configured incorrectly, the following message appears.
Request timed out.
Configuring a Windows NT computer
Follow these steps to configure Windows NT to use the TCP/IP protocol.
A Double-click the [Network] icon of [Control Panel], and confirm that “TCP/IP
Protocol” is in the [Network protocols] box in the [Protocols] tab.
Note
❒ If the TCP/IP protocol is not installed, click [Add] in the [Protocols] tab, and
install it. For more information on installing the TCP/IP protocol, see the
Windows NT online help.
B Configure the TCP/IP protocols with the appropriate IP address, subnet
mask and other settings.
Confirm with the network administrator that the settings are correct.
C Click the [Services] tab, and confirm that the “Microsoft TCP/IP Printing” is
installed.
If “Microsoft TCP/IP Printing” is not installed, click [Add] in the [Services] tab,
and install it. For more information on installing and configuring network
services, see the Windows NT online help.
Preparing to Use the NetBEUI Protocol for Printing
Follow these instructions to configure the Network Interface Board and Windows NT to use the NetBEUI protocol.
15
Windows NT 4.0 Configuration
Configuring the printer
Configure your printer to use the NetBEUI protocol.
• Confirm that the NetBEUI protocol is set to active. (The factory default is active.)
Reference
For more information on how to make the settings above, see the "Printer Reference" that is provided as a paper manual.
2
Configuring a Windows NT computer
Install the NetBEUI protocol into a Windows NT computer, and type the LAN
adapter number (Lana Number).
A Double-click the [Network] icon of [Control Panel], and confirm that “NetBEUI
Protocol” is in the [Network protocols] box in the [Protocols] tab.
Note
❒ If the NetBEUI protocol is not installed, click [Add] in the [Protocols] tab,
and install it. For more information on installing the NetBEUI protocol, see
the Windows NT online help.
B Change the Lana Number. Click the [Services] tab, select the [NetBIOS interface] in the [Network Services] box , and click [Properties].
C Select the Lana Number corresponding [Nbf protocol] of the [Network route]
headline, and click [Edit].
D Type “0” as the Lana Number.
Note
❒ If the other protocol's Lana Number is configured with “0”, you must
change the Lana Number with a number other than “0”.
E Click [OK].
F Click [Close], and close the [Network] dialog box.
G After confirming the message for restart, click [Yes].
Note
❒ When you change the Lana Number, you must restart.
16
Preparing for a Network Connection
Installing Multidirect Print
Follow these instructions to install Multidirect Print.
Preparation
You must restart the computer after installing Multidirect Print. Be sure to
close all applications before beginning the installation process.
2
Note
❒ You must install Multidirect Print and the appropriate printer driver in order
to print. If you print, using the TCP/IP protocol, to be able to browse the
printer via the network, PRINTER MANAGER FOR CLIENT (⇒see the inside of the front cover of this manual) needs to be installed. If the installer
starts automatically with the Auto Run program, you can install both of these
programs. For more information on how to install these programs, see the
"Printer Reference" that comes with the printer.
❒ To install this software, you must be logged on as a member of the Administrators group.
A Close all applications that are currently running.
B Insert the CD-ROM in the CD-ROM drive.
Note
❒ If the installer starts automatically, you can use it to install Multidirect
Print, and set up the printer driver, and then go to step F.
C Open [Control Panel], and double-click the [Add/Remove Programs] icon.
D In the [Install/Uninstall] tab, click [Install].
E Click [Next >].
F Type the name of the CD-ROM drive in the [Command line for installation program] box, followed by “:\NETWORK\MDP\DISK1\SETUP” (do not include the quotation marks), and then click [Finish].
Note
❒ An example would be “D:\NETWORK\MDP\DISK1\SETUP” when the
drive letter is “D”.
G From the [Choose Setup Language] list, select the language you use.
H After the [Welcome] dialog box appears, click [Next >].
17
Windows NT 4.0 Configuration
I After the [Setup Complete] dialog box appears, click [Yes, I want to restart my
computer now.], and click [Finish].
The computer restarts, and Multidirect Print can now be used. If you select
“No”, be sure to restart the computer manually before launching Multidirect
Print for the first time.
Go to P.18 “Setting up the Printer Driver” after the computer restarts.
2
Setting up the Printer Driver
Using Multidirect Print to print is not possible until the printer driver is installed
and the correct port is selected.
Preparation
The target printer must be turned on before starting the installation process.
A Install the printer drivers.
If the printer drivers have already been installed, you can go to the next step.
Reference
For more information on installing the printer driver, see the "Printer Reference" that is provided as a paper manual.
Note
❒ Any port can be selected during the installation, however, LPT1 is recommended.
B In the [Printers] window, click the icon of the printer you want to use. On
the [File] menu, click [Properties].
C Click the [Ports] tab, and click [Add Port].
D In the [Available Printer Ports] box, click [Multi Direct Print] , and then click [New
Port].
The [Select Printer] dialog box appears, and the names of the printers which
can print with TCP/IP appear.
Limitation
❒ If PRINTER MANAGER FOR CLIENT is not installed in your computer,
printers which can print with TCP/IP do not appear.
❒ You cannot add to type the port name that was already used.
Note
❒ The printers which have replied to a broadcast from the computer are listed here. To print to a printer that is not on this list, or to directly type the
port name, click [New Printer], and click [Next >], and then type the port
name in step G.
18
Preparing for a Network Connection
E To print using the NetBEUI protocol, click [NetBEUI].
F Click the printer you want to use, and click [Next >].
Reference
For more information on a particular item in the dialog box, see P.51 “Multidirect Print”.
2
Note
❒ You can identify the “Printer Name” and “Address” on the configuration
page printed by the printer.
G Confirm that the port name of the printer is correct, and click [Next >].
If you did not select a printer in step F, you must type the port name.
Typing the port name for use with the TCP/IP protocol
A Type the IP address of the Network Interface Board into the [IP address]
box.
You can type the host name or a domain name instead of an IP address into
the [Host Name] box.
Limitation
❒ You cannot use a host name that begins with “%%”.
❒ You cannot use a port name that is already in use.
Note
❒ When you use DHCP to assign IP addresses to Network Interface
Boards, you can use a printer name (Current Hostname on the network
configuration page) as the host name.
Typing the port name for use with the NetBEUI protocol
A Print a configuration page, and confirm the Network path name.
Reference
For more information on printing a configuration page, see the "Printer
Reference" included as a PDF file in the CD-ROM.
B Type the printer's network path name in the form of “%%Computer
name \Share name”. Do not type “\\” as head characters but “%%”.
H Confirm the port name in the [Port Name] box, and click [Finish].
I In the [Printer Ports] dialog box, click [Close].
19
Windows NT 4.0 Configuration
J Confirm that the port name appears in the [Print to the following port(s)] box
and that it is selected. And then click [OK].
Configuration is complete.
When you print, the printing procedure is no different. When you select the
printer configured here, the computer automatically uses Multidirect Print.
2
Uninstalling Multidirect Print
A Open [Control Panel], and double-click the [Add/Remove Programs] icon.
B In the [Install/Uninstall] tab, click [Multi Direct Print], and click [Add/Remove].
C After a confirmation message appears, click [Yes].
UninstallShield removes all of the components of Multidirect Print.
D When the uninstallation is complete, restart the computer.
20
Setting up a Client Computer
Setting up a Client Computer
This section describes the procedures for setting up a client in a network that
uses Windows NT Server or Windows NT Workstation as a print server.
Windows NT 4.0
Print Server
2
Windows 95/98
Windows NT 4.0
Note
❒ All of the procedures in this section assume that the client has already been
configured to communicate with a Windows NT print server. Do not proceed
with the following instructions until the client has been set up and configured
correctly.
Windows 95/98
To print from Windows 95/98, you must install the printer driver and change
the printer port to the print server.
A Install the printer driver as a local printer.
Reference
For more information on installing the printer driver, see the "Printer Reference" that is provided as a paper manual.
Note
❒ Any port can be selected during the installation, however, LPT1 is recommended.
B Click [Start], point to [Settings], and then click [Printers].
C Click the icon of the printer you want to use. On the [File] menu, click [Properties].
D Click the [Details] tab, and click [Add Port].
21
Windows NT 4.0 Configuration
E Click [Network], and click [Browse].
F On the network tree, double-click the name of the computer used as the
print server.
The names of the printers attached to the network appear.
G Click the name of the printer you want to use, and click [OK].
H Click [OK].
I Confirm that the port name appears in the [Print to the following port] box, and
2
click [OK].
Windows NT 4.0
Use the [Printers] window to set up the printer.
A Click [Start], point to [Settings], and then click [Printers].
B Double-click the [Add Printer] icon.
This launches the Add Printer Wizard.
C Click [Network printer server], and click [Next >].
D In the [Shared Printers] box, double-click the name of the computer used as a
print server.
The names of the printers attached to the network appear.
E Click the name of the printer you want to use, and click [OK].
Note
❒ If the printer driver is not installed in the print server, a message appears.
If a driver has been installed on the client, click [OK], and follow the instructions on the screen.
❒ There is a Windows NT printer driver in the CD-ROM that comes with the
machine.
F Select whether you use this printer as the default printer, and click [Next >].
G After installation is complete, click [Finish].
The icon of the newly installed printer appears in the [Printers] window.
22
Configuring LPR Port Printing
Configuring LPR Port Printing
This section explains the procedure for printing to a LPR port from Windows
NT.
Preparation
The TCP/IP protocols must be installed and configured correctly. ⇒ P.14
“Preparing to Use the TCP/IP Protocol for Printing”
2
Note
❒ The following instructions assume that the printer drivers have already been
installed. This is a procedure to change the printer port to LPR.
A Click [Start], point to [Settings], and then click [Printers].
B Click the icon of the printer you want to use. On the [File] menu, click [Properties].
C Click the [Ports] tab, and then click [Add Port].
D In the [Available Printer Ports] box, click [LPR Port], and then click [New Port].
Note
❒ If “LPR Port” does not appear, “Microsoft TCP/IP Printing” has not been
installed.
E Type the IP address of the Network Interface Board into the [Name or address
of server providing lpd] box.
F Type “lp” into the [Name of printer or print queue on that server] box, and click
[OK].
G Click [Close].
H Confirm that the port name is displayed in the [print to the following port(s)]
box and the check mark is inside the check box. Then click [OK].
23
Windows NT 4.0 Configuration
2
24
3. NetWare Configuration
This chapter describes how to configure the printer to use it as a print server or
a remote printer in a NetWare environment.
Note
❒ NetWare must be set to active using the operation panel of the printer. For
more information on how to set it, see the "Printer Reference" included as a
PDF file in the CD-ROM.
25
NetWare Configuration
Installing NIB Setup Tool
A utility called NIB Setup Tool is provided to configure your printer to work in
a NetWare environment. Installing the PRINTER MANAGER FOR ADMINISTRATOR (⇒see the inside of the front cover of this manual) installs NIB Setup
Tool on the computer. This section describes how to install the PRINTER MANAGER FOR ADMINISTRATOR, and how to run NIB Setup Tool.
Limitation
❒ NetWare 3.x, 4.x or 5 must be functional to run NIB Setup Tool.
❒ NIB Setup Tool is supported to work with the following operating systems.
• Microsoft Windows 95/98
• Microsoft Windows NT 4.0
3
Installing the PRINTER MANAGER FOR ADMINISTRATOR
Follow these steps to install the PRINTER MANAGER FOR ADMINISTRATOR.
Preparation
You should install the PRINTER MANAGER FOR ADMINISTRATOR on
your computer. If you install the PRINTER MANAGER FOR ADMINISTRATOR from a file server or run it via the network, the PRINTER MANAGER
FOR ADMINISTRATOR might not work correctly.
Be sure to close all applications before starting the installation procedure.
A Close all the applications that are currently running.
B Insert the CD-ROM in the CD-ROM drive.
If the setup menu starts automatically, follow the instructions on the screen.
Otherwise, go to step C.
C Open [Control Panel] and double-click the [Add/Remove Programs] icon.
D In the [Install/Uninstall] tab, click [Install].
E Click [Next >].
F In the [command line for installation program] box, type the name of the CD-ROM
drive followed by “:\NETWORK\PRINTMAN\XXXADMIN\DISK1\SETUP” (do not include the quotation marks) and then click [Finish].
Note
❒ An example would be “D:\\NETWORK\PRINTMAN\XXXADMIN\DISK1\
SETUP” when the CD-ROM drive name is “D”.
G From the [Choose Setup Language] list, select the language you use.
26
Installing NIB Setup Tool
H In the [Welcome] dialog box, click [Next >].
I The Software License Agreement appears.
After reading through all of the contents by clicking [PageDown], click [Yes] to
agree with the License Agreement.
J Select a folder to install it in, and then click [Next >].
To change the displayed folder, click [Browse] to select another one.
The installation program starts.
After the confirmation dialog box appears, the installation is complete.
3
Running NIB Setup Tool
A Click [Start], point to [Programs], and then click [NIB Setup Tool] in the [PRINTER MANAGER FOR ADMINISTRATOR] program folder.
27
NetWare Configuration
Quick Setup Using the NIB Setup Tool
Wizard
Using NIB Setup Tool, you can easily set up a NetWare printing environment.
Reference
For more information on setting up NIB Setup Tool, see P.26 “Installing NIB
Setup Tool”.
You can select [Wizard] or [Property Sheet] as an installation method.
When you configure the Network Interface Board for the first time, use the Wizard method.
If you want to use the Property Sheet method, see P.31 “NetWare 3.x - Advanced
Settings” and P.37 “NetWare 4.x, 5 - Advanced Settings”.
3
Note
❒ This section assumes that NetWare is functional and that the necessary environment for the NetWare Print Services is available.
❒ If you configure the Network Interface Board in a NetWare environment using NIB Setup Tool, you should install the client software released from Novell in the following cases.
• Windows 95/98 in NDS mode
• Windows NT 4.0 in NDS mode
• Windows NT 4.0 in Bindery mode
A Log in to the Netware file server or the NDS tree as an Admin or Admin
equivalent.
B Run NIB Setup Tool.
Reference
⇒ P.27 “Running NIB Setup Tool”
C Click [Wizard] and click [OK].
The [Network board list] dialog box of the Network Interface Board appears.
D Click [IPX protocol].
E Click the IPX address of the Network Interface Board you are configuring,
and click [Next >].
Note
❒ If you do not know which Network Interface Board you are configuring,
see a network configuration page to confirm the MAC address (Network
address).
28
Quick Setup Using the NIB Setup Tool Wizard
F Confirm that the MAC address and IPX address are correct, and click [Finish].
G Type the print server name into the [Device Name] box, and click [Next >].
The factory default is RDP_ followed by the 6 digit serial number. We recommend that you change it to something that is easier to remember or something
based on the structure of your network.
H In the dialog box for selecting a network environment, click to select [NetWare] and clear [TCP/IP].
I Click [Next >].
3
A dialog box for configuring the NetWare environment appears.
J Select [Bindery] when printing under the Bindery mode, or select [NDS]
when printing under the NDS mode.
When you are using NetWare version 4.x, you should select [NDS].
Note
❒ When configuring the NDS mode, if [NDS] cannot be selected, you need to
check the version of the client software released from Novell. It is recommended that you install the latest version of the client software released
from Novell.
K If you selected [Bindery], type into the [File Server Name:] box the name of the
file server in which a print server is to be created.
Clicking [Browse], you can select a file server among those listed in the
[Browse] dialog box.
L If you selected [NDS], type into the [Tree:] box the name of the NDS tree in
which the print server is created, and type the context into the [Context:] box.
Clicking [Browse], you can select a NDS tree and a NDS context among those
listed in the [Browse] dialog boxes.
As a context, object names are typed from a lower object and divided by a period. For example, if you want to create a print server into NET under DS,
type “NET.DS”.
M Click [Next >].
29
NetWare Configuration
N Type the name of the printer into the [Printer Name] box, and the name of the
print queue into the [Print Queue Name] box.
The default for the Printer Name is “Print Server Name” followed by “_1”
and that the default for the Print Queue Name is “Print Server Name” followed by “_Q” ( quotation marks are not included). You can change them, if
necessary.
O If you have selected the NDS mode, type the volume of the print queue into
the [Queue Volume] box.
Clicking [Browse], you can select one of those shown in the [Browse] dialog
box.
3
P Click [Next >].
A dialog box to confirm the printing environment appears.
Q After confirming the environment, click [Next >].
If you want to change the settings, click [< Back] and make the settings again.
Clicking [Next >], NIB Setup Tool automatically creates the Print Server, the
Printer and the Print Queue in the NetWare network.
R After a confirmation dialog box appears, select [Quit] and click [Finish] to
exit NIB Setup Tool.
30
NetWare 3.x - Advanced Settings
NetWare 3.x - Advanced Settings
The actual procedures for configuring the printer may differ depending on
whether the Network Interface Board is configured as a print server or as a remote printer. This section describes how to configure it in the NetWare 3.x environment.
Basic Procedure
Installing NIB Setup Tool
Print Server
3
Remote Printer
Configuring the Network Interface Board
Configuring the NetWare
Turning the power
off and on
Starting the print server
Preparation
The following procedures use the Property Sheet method in configuring the
Network Interface Board. When you configure the Network Interface Board
as a NetWare print server for the first time, we recommend that you use the
Wizard method. ⇒ P.28 “Quick Setup Using the NIB Setup Tool Wizard”
Note
❒ This section assumes that NetWare is functional and that the necessary environment for the NetWare Print Service is available.
Setting up as Print Server
A Log in to the file server as a Supervisor or a Supervisor equivalent.
B Run NIB Setup Tool.
Reference
⇒ P.27 “Running NIB Setup Tool”
C Click [Property Sheet] and click [OK].
The [Browse] dialog box of the Network Interface Board appears.
D Click [IPX protocol].
31
NetWare Configuration
E Click the IPX address of the Network Interface Board which is to be configured, and then click [Next >].
Note
❒ If you do not know which Network Interface Board you are configuring,
see a network configuration page to confirm the MAC address (Network
Address).
F Confirm that the MAC address and the IPX address are correct, and click
[Finish].
The [NIB Setup Tool] window appears.
3
G Click [Configure].
The property sheet appears.
H Click the [General] tab, and type the name of the print server into the [Device
Name] box.
I Click the [NetWare] tab, and make the following settings.
A Select [Bindery].
B In the [File Server Name:] box, type the name of the file server in which a
print server is to be created.
Click [Browse] to select a file server among those listed in the [Browse] dialog box.
C Click [OK] to close the property sheet.
D After a confirmation dialog box appears, click [OK].
J On the [NIB] menu, click [Exit] to exit NIB Setup Tool.
K Type “PCONSOLE” from the command prompt.
F:> PCONSOLE
L Create a print queue as follows.
Note
❒ If you use the currently defined print queue, go to step M.
A From the [Available Options] menu, select [Print Queue Information] and press
the {ENTER} key.
B Press the {INSERT} key and type a print queue name.
C Press the {ESC} key to return to the [Available Options] menu.
M Create a printer as follows.
A From the [Available Options] menu, select [Print Server Information] and press
the {ENTER} key.
32
NetWare 3.x - Advanced Settings
B To create a new print server, press the {INSERT} key and type a print
server name.
If you use the currently defined print server, select one of the print servers
shown in the [Print Server] list.
Important
❒ Use the same name as that specified in NIB Setup Tool. ( Step H)
C From the [Print Server Information] menu, select [Print Server Configuration].
D From the [Print Server Configuration] menu, select [Printer Configuration].
E Select the printer which is indicated as “Not Installed”.
F If you change the name of the printer, type a new name.
3
A name "Printer x" is assigned to the printer. “x” stands for the number of
the selected printer.
G As Type, select [Remote Other/Unkown].
The IRQ, Buffer size, Starting form and Queue service modes are automatically configured.
H Press the {ESC} key, and click [Yes] in the confirmation dialog box.
I Press the {ESC} key to return to the [Print Server Configuration] menu.
N Assign print queues to the created printer as follows.
A From the [Print Server Configuration] menu, select [Queues Serviced By Printer].
B Select the printer created in step M.
C Press the {INSERT} key to select a queue serviced by the printer.
Note
❒ You can select more than one queue at a time.
D Follow the instructions on the screen to make other necessary settings.
When you have finished the previous steps, confirm that the queues are assigned.
O Press the {ESC} key until “Exit?” appears, and select [Yes] to exit PCONSOLE.
P Turn the printer power off and on.
Note
❒ To confirm that the printer is configured correctly, type the following from
the command prompt.
F:> USERLIST
❒ If the printer works as configured, the name of the print server appears as
an attached user.
33
NetWare Configuration
Setting up as Remote Printer
A Log in to the file server as a Supervisor or a Supervisor equivalent.
B Run NIB Setup Tool.
Reference
⇒ P.27 “Running NIB Setup Tool”
C Click [Property Sheet] and click [OK].
3
The [Browse] dialog box of the Network Interface Board appears.
D Click [IPX protocol].
E Click the IPX address of the Network Interface Board which is to be configured, and click [Next >].
Note
❒ If you do not know which Network Interface Board you are configuring,
see a network configuration page to confirm the MAC address (Network
Address).
F Confirm that the MAC address and IPX address are correct, and click [Finish].
The [NIB Setup Tool] window appears.
G Click [Configure].
The property sheet appears.
H Click the [General] tab, and type the name of the print server into the [Device
Name] box.
I Click the [NetWare] tab, and make the following settings.
A In the [Print Server Name] box, type the name of the print server.
B In the [File Server Name] box, type the name of the file server in which a
print server is to be created.
Clicking [Browse], you can select a file server among those listed in the
[Browse] dialog box.
C In the [Print Server Operation Mode] group, click [As Remote Printer].
D In the [Remote Printer No.] box, type the printer number.
Important
❒ Use the same printer number as that to be created in the printer server.
E Click [OK] to close the property sheet.
F After a confirmation dialog box appears, click [OK].
34
NetWare 3.x - Advanced Settings
J On the [NIB] menu, click [Exit] to exit NIB Setup Tool.
K Type “PCONSOLE” from the command prompt.
F:> PCONSOLE
L Create a print queue as follows.
Note
❒ If you use the currently defined print queue, go to step L.
A From the [Available Options] menu, select [Print Queue Information] and press
the {ENTER} key.
B Press the {INSERT} key and type a print queue name.
C Press the {ESC} key to return to the [Available Options] menu.
3
M Create a printer as follows.
A From the [Available Options] menu, select [Print Server Information] and press
the {ENTER} key.
B To create a new print server, press the {INSERT} key and type a print
server name.
If you use an currently defined print server, select one of the print servers
shown in the [Print Server] list.
Important
❒ Use the same name as that specified in NIB Setup Tool. (Step H)
C From the [Print Server Information] menu, select [Print Server Configuration].
D From the [Print Server Configuration] menu, select [Printer Configuration].
E Select the printer which is indicated as “Not Installed”.
Important
❒ Use the same number as that was used as the Remote Printer No. using
NIB Setup Tool. (Step I-D)
F If you change the name of the printer, type a new name.
A name "Printer x" is assigned to the printer. x stands for the number of the
selected printer.
G As type, select [Remote Parallel, LPT1].
The IRQ, Buffer size, Starting form, and Queue service mode are automatically configured.
H Press the {ESC} key, and click [Yes] in the confirmation dialog box.
I Press the {ESC} key to return to [Print Server Configuration Menu].
N Assign print queues to the created printer as follows.
A From [Print Server Configuration Menu], select [Queues Serviced By Printer].
B Select the printer created in step L.
35
NetWare Configuration
C Press the {INSERT} key to select a queue serviced by the printer.
Note
❒ You can select more than one queue at a time.
D Follow the instructions on the screen to make other necessary settings.
When you have finished the previous steps, confirm that the queues are assigned.
O Press the {ESC} key until “Exit?” appears, and select [Yes] to exit PCONSOLE.
P Start the print server by typing the following from the console of the Net-
3
Ware Server.
If it is running, restart it after exiting it.
❖ To exit
CAREE: unload pserver
❖ To start
CAREE: load pserver print_server_name
Note
❒ If the printer works as configured, “Waiting for job” appears.
36
NetWare 4.x, 5 - Advanced Settings
NetWare 4.x, 5 - Advanced Settings
The actual procedures for configuring the printer may differ depending on
whether the Network Interface Board is configured as a print server or as a remote printer. This section describes how to configure it in the NetWare 4.x and
5 environment.
❖ To use NetWare 5
• Load the IPX protocol into the file server in advance.
• You cannot use the NDPS (Novell Distributed Print Services) mode.
3
Basic Procedure
Installing NIB Setup Tool
Print Server
Remote Printer
Configuring the Network Interface Board
Configuring the NetWare
Turning the power
off and on
Starting the print server
Preparation
The following procedures use the Property Sheet method in configuring the
Network Interface Board. When you configure the Network Interface Board
as a NetWare print server for the first time, we recommend that you use the
Wizard method. ⇒ P.28 “Quick Setup Using the NIB Setup Tool Wizard”
Note
❒ This section assumes that NetWare is functional and that the necessary environment for the NetWare Print Service is available.
❒ You should install the client software released from Novell on Windows before running NIB Setup Tool for configuring in NDS mode or using Windows
NT 4.0.
37
NetWare Configuration
Setting up as Print Server
Important
❒ You can set up the print server using the NDS or Bindery mode in NetWare
4.x, 5. The following procedure is for setting up the print server using the
NDS mode in NetWare 4.1. When you set up the print server using the Bindery mode, use the NIB Setup Tool Wizard. ⇒ P.28 “Quick Setup Using the NIB
Setup Tool Wizard”.
A Log in to the file server as an Admin or an Admin equivalent.
B Run NIB Setup Tool.
3
Reference
⇒ P.27 “Running NIB Setup Tool”
C Click [Property Sheet] and click [OK].
The [Browse] dialog box of the Network Interface Board appears.
D Click [IPX protocol].
E Select the IPX address of the Network Interface Board which is to be configured by clicking it, and click [Next >].
Note
❒ If you do not know which Network Interface Board you are configuring,
see a network configuration page to confirm the MAC address (Network
Address).
F Confirm that the MAC address and the IPX address are correct, and click
[Finish].
The [NIB Setup Tool] window appears.
G Click [Configure].
The property sheet appears.
H Click the [General] tab and type the name of the print server into the [Device
Name] box.
I Click the [NetWare] tab, and make the following settings.
A Select [NDS].
38
NetWare 4.x, 5 - Advanced Settings
B Type into the [Tree:] box the name of the NDS tree in which the print
server is created, and type the context into the [Context:] box.
Clicking [Browse], you can select a NDS tree and a NDS context among
those listed in the [Browse] dialog box.
As a context, object names are typed from a lower object and divided by a
period. For example, if you want to create a print server into NET under
DS, type "NET.DS".
3
C Click [OK] to close the property sheet.
D After a confirmation dialog box appears, click [OK].
J On the [NIB] menu, click [Exit] to exit NIB Setup Tool.
K From Windows, run NWAdmin.
Reference
For more information on NWAdmin, see the documentation that comes
with NetWare.
L Create a print queue as follows.
A Select the container object the print queue is located in among those in
the directory tree, and click [Create] on the [Object] menu.
B In the [Class of new object] box, click “Print Queue”, and click [OK].
C In the [Print Queue name] box, type the name of the print queue.
D In the [Print Queue Volume] box, click the [Browse] button.
E In the [Available objects] box, click the volume in which the print queue is
created, and click [OK].
F After confirming the settings, click [Create].
M Create a printer as follows.
A Select the container object the printer is located in, and click [Create] on
the [Object] menu.
B In the [Class of new object] box, click “Printer”, and click [OK]. When you
are using NetWare 5, click “Printer (Non NDPS)”.
C In the [Printer name] box, type the name of the printer.
D Click to select [Define additional properties] to check a box, and click [Create].
N Assign print queues to the created printer as follows.
A Click [Assignments], and click [Add] in the [Assignments] group.
39
NetWare Configuration
B In the [Available objects] box, click the queue created in step L, and click
[OK].
C Click [Configuration], and in the [Printer type] box, select [Parallel] using the
drop-down menu, and then click [Communication].
D Click [Manual load] in the [Communication type] group, and click [OK].
E After confirming the settings, click [OK].
O Create a print server as follows.
A Select the context specified using NIB Setup Tool (step I-A) and on the
[Object] menu, click [Create].
B In the [Class of new object] box, click “Print Server”, and click [OK]. When
you are using NetWare 5, click “Print Server (Non NDPS)”.
C In the [Print Server name] box, type the name of the print server.
3
Important
❒ Use the same name as that specified using NIB Setup Tool. (Step H)
D Click to select [Define additional properties], and click [Create].
P Assign the printer to the created print server as follows.
A Click [Assignments], and click [Add] in the [Assignments] group.
B In the [Available objects] box, click to select the printer created in step M,
and click [OK].
C After confirming the settings, click [OK].
Q Turn the printer power off and on.
Note
❒ If the printer works as configured, the name of the print server appears as
an attached user.
Setting up as Remote Printer
A Log in to the file server as Admin or an Admin equivalent.
B Run NIB Setup Tool.
Reference
⇒ P.27 “Running NIB Setup Tool”
C Click [Property Sheet] and click [OK].
The [Browse] dialog box of the Network Interface Board appears.
D Click [IPX protocol].
40
NetWare 4.x, 5 - Advanced Settings
E Select the IPX address of the Network Interface Board which is to be configured by clicking it, and click [Next >].
Note
❒ If you do not know which Network Interface Board you are configuring,
see a network configuration page to confirm the MAC address (Network
Address).
F Confirm that the MAC address and the IPX address are correct, and click
[Finish].
The [NIB Setup Tool] window appears.
3
G Click [Configure].
The property sheet appears.
H Click the [General] tab, and type the name of the print server into the [Device
Name] box.
I Click the [NetWare] tab, and make the following settings.
A In the [Print Server Name] box, type the name of the print server.
B In the [File Server Name] box, type the name of the file server in which a
print server is to be created.
Clicking [Browse], you can select a file server among those listed in the
[Browse] dialog box.
C In the [NDS Context] box, type the context in which the print server is to
be created.
Clicking [Browse], you can select a context among those listed in the
[Browse] dialog box.
As a context, object names are typed from a lower level object and divided
by a period. For example, if you want to create a print server into NET under DS, type “NET.DS”.
D In the [Print Server Operation Mode] group, click [As Remote Printer].
E In the [Remote Printer No.] box, type the number of the printer.
Important
❒ Use the same number as that of the printer to be created in the print
server.
F Click [OK] to close the property sheet.
G After the confirmation dialog box appears, click [OK].
41
NetWare Configuration
J On the [NIB] menu, click [Exit] to exit NIB Setup Tool.
K From Windows, run NW Admin.
Reference
For more information on NWAdmin, see the documentation that comes
with NetWare.
L Create a print queue as follows.
A Select the container object the print queue is located in among those in
the directory tree, and click [Create] on the [Object] menu.
B In the [Class of new object] box, click to select “Print Queue”, and click
[OK].
C In the [Print Queue name] box, type the name of the print queue.
D In the [Print Queue Volume] box, click the Browse button.
E In the [Available objects] box, click to select the volume in which the print
queue is created, and click [OK].
F After confirming the settings, click [Create].
3
M Create a printer as follows.
A Select the container object the printer is located in, and click [Create] in
the [Object] menu.
B In the [Class of new object] box, click to select “Printer”, and click [OK].
When you are using the NetWare 5, click “Printer (Non NDPS)”.
C In the [Printer name] box, type the name of the printer.
D Click [Define additional properties] to check a box, and click [Create].
N Assign print queues to the created printer as follows.
A Click [Assignments], and click [Add] in the [Assignments] group.
B In the [Available objects] box, click the queue created in step K, and click
[OK].
C Click [Configuration], and in the [Printer type] box, select [Parallel] using the
drop-down menu, and then click [Communication].
D Click [Manual load] in the [Communication type] group, and click [OK].
E After confirming the settings, click [OK].
O Create a print server as follows.
A Select the context specified using NIB Setup Tool (Step H), and on the
[Object] menu, click [Create].
B In the [Class of new object] box, click “Print Server”, and click [OK]. When
you are using the NetWare 5, click “Print Server (Non NDPS)”.
C In the [Print Server name] box, type the name of the print server.
42
NetWare 4.x, 5 - Advanced Settings
Important
❒ Use the same name as that specified using NIB Setup Tool. (Step H)
D Click to select [Define additional properties], and click [Create].
P Assign the printer to the created print server as follows.
A Click [Assignments], and click [Add] in the [Assignments] group.
B In the [Available objects] box, click the queue created in step L, and click
[OK].
C In the [Printers] group, click the printer assigned in step B, and click
[Printer Number].
D Type the printer number and click [OK].
3
Important
❒ Use the same number as that specified as Remote Printer No. using NIB
Setup Tool. (Step H-E)
E After confirming the settings, click [OK].
Q Start the print server by typing as follows from the console of the NetWare
Server.
If it is running, restart it after exiting it.
❖ To exit
CAREE: unload pserver
❖ To start
CAREE: load pserver print_server_name
43
NetWare Configuration
Setting up a Client Computer
This section describes how to set up a client computer when you use a NetWare
print server.
Note
❒ This section assumes that the client has NetWare client applications installed
and is correctly configured to communicate with a NetWare print server. If
not, install necessary applications before starting the set up procedure.
3
Windows 95/98
Follow these steps to set up a Windows 95/98 client.
Preparation
Log in to the NetWare file server before starting the following procedure.
A Install the printer driver of the printer you want to use as “Local printer”.
Reference
For more information on installing the printer driver, see the "Printer Reference" that comes with the printer.
Note
❒ Any port can be selected during the installation, however, LPT1 is recommended.
B Click [Start], point to [Settings], and then click [Printers].
C In the [Printers] window, click the icon of the printer you want to use.
D On the [File] menu, click [Properties].
E Click the [Details] tab, and click [Add Port].
F Click [Network] and click [Browse].
G On the network tree, double-click the name of the file server.
The queues appear.
H Click the queue you want to print, and click [OK].
I Click [OK].
In the [Print to the following port] box, a network path to the printer appears.
J Click [OK] to close the printer property, and again, open it.
K Click the [Printer Settings] tab.
44
Setting up a Client Computer
L Clear the [Form feed] and the [Enable banner] check boxes.
Note
❒ You should not select these check boxes because they should be specified
using the printer driver. If they are checked, the printer might not print
correctly.
When using the PostScript printer driver
Follow these steps to set up for the PostScript printer driver.
A Click the [PostScript] tab.
B Click [Advanced].
C Remove the check marks from the [Send CTRL+D before job] and the [Send
CTRL+D after job] check boxes.
3
M Click [OK] to close the property.
Windows NT 4.0
Follow these steps to set up a Windows NT 4.0 client.
Preparation
Log in to the NetWare file server before starting the following procedure.
A Double-click the [Network Neighborhood] icon on the desktop and navigate to
the queue you want to use, and then double-click it.
The [Printers] dialog box appears.
B Click [No].
C Close all the applications that are currently running.
D Insert the CD-ROM in the CD-ROM drive.
If the setup menu starts automatically, you can proceed to the next step. If not,
see the "Printer Reference" that is provided as a paper manual.
E The [Printer Installation] dialog box appears.
F From the [Port] list, select the queue you selected in step A, and click [Next >].
G Follow the instructions on the screen to finish the installation of the printer
driver.
45
NetWare Configuration
3
46
4. Macintosh Configuration
Configuring a Macintosh
This chapter explains how to configure a network printer in a Macintosh EtherTalk environment. The actual procedures to configure a network printer may
differ depending on the version of the Mac OS. This chapter describes how to
configure your printer for Mac OS 8. If you use a different version, see the manual that comes with your version of the Mac OS for more information.
Basic Procedure
Changing to EtherTalk
Configuring the printer
Changing printer name
Changing zone
Limitation
❒ To print from a Macintosh, you must use RICOH-SCRIPT2.
Changing to EtherTalk
Follow these steps to configure a Macintosh computer to use EtherTalk.
Reference
For more information on installing the software required for EtherTalk, see
the Macintosh manuals.
A Open [Control Panels], and double-click the [AppleTalk] icon.
B From the [Connect via:] menu, select “Ethernet”.
C If you change zones, select a name from the [zone] menu.
D Close the [AppleTalk] control panels.
E Restart the Macintosh.
47
Macintosh Configuration
Configuring the Printer
Use the operation panel to activate the EtherTalk protocol (The default setting is
active).
Reference
For more information on configuration, see the "Printer Reference" that is provided as a paper manual.
Changing Printer Name
If the network has several same model printers, the names will be the same.
Printers that have the same name will have their names changed slightly in the
Chooser. For example, three printers named “printer” will appear in the chooser
as “printer0”, “printer1” and “printer2”.
Use an application such as Apple Printer Utility or LaserWriter Utility to
change printer names in the Macintosh EtherTalk environment. These utilities
are distributed by Apple Computer, Inc.
4
Changing Zone
It may be necessary to change the zone configuration.
Use an application such as Apple Printer Utility or LaserWriter Utility to
change the zone configuration in the Macintosh EtherTalk environment. These
utilities are distributed by Apple Computer, Inc.
Note
❒ If your Macintosh is configured to use TCP/IP, you can change the zone configuration with a Web browser. ⇒ P.54 “Configuring the Network Interface
Board with a Web Browser”
Follow these steps to use the Apple Printer Utility.
A Insert the CD-ROM in the CD-ROM drive.
B Copy the “Zone Name.ps” file in the “Zone Name” folder to the hard disk.
C Open the copied “Zone Name.ps” file using a text editor, and change “NewZone” , which is in the second line from the bottom, to the name of the new
zone.
%!PS-Adobe2.0 %%
Title: Changing Zone (EtherNet only)
%%CreationDate: Tue Dec 16 1997
%%EndComments
true 0 startjob not {ERROR}if
(%EtherTalk%) << /EtherTalkZone (NewZone) >> setdevparams
%%EOF
D Save “Zone Name.ps”.
48
Configuring a Macintosh
E
F
Run the Apple Printer Utility, and select the printer for which the new zone
name is to be used.
Select [Send PostScript File] in the [Utilities] menu, and send “Zone Name.ps” to
the printer.
4
49
Macintosh Configuration
4
50
5. Appendix
Multidirect Print
Multidirect Print is a Windows program that allows you to print on a Peer-toPeer network. This program allows you to print directly to a network printer,
even if there is no print server.
OS
Protocol Stack
Microsoft Windows 95/98
The Microsoft version of TCP/IP that comes with
Windows.
Microsoft Windows NT 4.0
The Microsoft version of NetBEUI that comes with
Windows.
Note
❒ If the printer is in the middle of warming up or printing, an error message
might appear for a short time after you request a print job. You can change
how long the printer should wait to display the message by clicking [Port Settings] in the [Details] tab on Windows 95/98, and [Configure Port] in the [Ports]
tab on Windows NT 4.0.
[Select Printer]
A list of available printers appears on this screen. This example is for the English
version.
1
2
3
6
4
5
1. Printer Name
The contents of this list are different for
the TCP/IP and NetBEUI protocols.
If you select [TCP/IP], the printer name of
the Network Interface Board appears. If
you select [NetBEUI], the computer name
of the Network Interface Board appears.
51
Appendix
Note
❒ The printer name can be found on the
printer configuration page.
❒ The printer name is set to “RNP” and
the last 6 digits of the MAC address of
the Network Interface Board. For example, a board with a MAC address of
00:00:74:62:5C:65, would be named
RNP625C65. You can change this
name to something more convenient.
2. Address
The contents of this list are different for
the TCP/IP and NetBEUI protocols.
If you select [TCP/IP], the printer name of
the Network Interface Board appears. If
you select [NetBEUI], the computer name
of the Network Interface Board appears.
5
Note
❒ The form of the Network path name is
“%% computer name \ name of printer type”.
3. Comment
Comments that are registered on the Network Interface Board.
4. [Refresh]
Click to refresh the contents of the display. When refreshing, the name of this
button changes to [Stop]. Click it to stop
the refresh.
5. [About]
Version and copyright information.
6. Protocol
Select to display the printers which can
print using the selected protocol.
[Network]
When you select a printer with the [Select Printer] dialog box, the port name is entered automatically. These examples are for the English version.
❖ TCP/IP
❖ NetBEUI
1
2
3
1. Host name
If you print using the TCP/IP protocol, to
select a printer using a host name or a domain name, type the name here. Type the
IP address into the [IP address] box when
selecting a printer by an IP address.
Limitation
❒ You cannot use a host name that
begins with “%%”.
52
Note
❒ When you use DHCP to assign IP addresses to Network Interface Boards,
you can use a printer name (Current
Hostname on the network configuration page) as the host name.
2. IP address
If you print using the TCP/IP protocol,
type the IP address of the printer.
Multidirect Print
3. Printer name
Type the printer's Network path name in
form of “%%Computer name \Share
name”. Do not type “\\” as head characters but “%%”.
5
53
Appendix
Configuring the Network Interface Board
with a Web Browser
The Network Interface Board functions as a Web server in addition to allowing
a printer to function as a network printer. You can use a Web browser to view
the printer status and configure the Network Interface Board.
❖ Configuring the Printer
This facility requires the TCP/IP protocol to be installed. After the printer has
been configured to use the TCP/IP protocol, it will be possible to adjust the
settings using a web browser.
Reference
For more information on configuring the printer to use the TCP/IP protocol, see the "Printer Reference" that is provided as a paper manual.
❖ Operating System Browser Requirements
5
OS
Browser
Microsoft Windows 95/98
Microsoft Windows NT 3.51/4.0
Microsoft Internet Explorer 3.02/4.0
Mac OS 7.6 ∼ 8.6
Netscape Navigator 3.0/4.0
Solaris 2.5 ∼ 2.6
Limitation
❒ Using Windows NT 3.51 with Internet Explorer 3.02 may cause problems.
❒ Sometimes after clicking [Back] , the previous page may not appear. In this
case, click [Refresh] or [Reload] .
❒ The text on the screen may disappear or be aligned incorrectly if the font
size settings of the browser are set to be too large. It is recommended that
you use a font size equal to or smaller than “10 point” with Netscape Navigator, and “Medium” or smaller with Internet Explorer.
Going to the Top Page
After launching your Web browser, type the IP address of the printer. See the example below. This example is for the English version.
http://192.168.15.16/
(In this example, the IP address of the Network Interface Board is 192.168.15.16.)
54
Configuring the Network Interface Board with a Web Browser
Note
❒ If a DNS server is used in the network, you can type the host name as an URL.
For example, http://webmonitor.netprinter.com/. In order to do this, you
must register the IP address and host name of the Network Interface Board
with the DNS server. Consult the network administrator for information on
how to do this.
❒ If the network uses proxy servers, the browser may run slowly.
1
2
3
1. Header Button
You can register favorite URLs with
[URL]. To view the help section, click
[Help].
Important
❒ There may be a fee in using the
browser to access a website on the
internet.
Note
❒ The help file is stored in the CD-ROM
in the HTML format.
2. Menu Button
Buttons to configure the Network Interface Board and confirm the status of the
printer.
5
Note
❒ When you click [Network Config], a dialog box appears requesting the user
name and password. Type only the
password in this dialog box. The factory default password is “password”.
❒ The password is the same as that used
in the remote maintenance (mshell)
and that used in NIB Setup Tool. If
you change a password on the Web
browser, the other passwords are also
changed.
3. Representation Area
Displays the name and comments of the
Network Interface Board and the status
of the printer.
-Linking the Address (URL) to the [Help] Button
You can link the address (URL) of the [Help] button to the help files on your computer or on a Web server.
A Copy the help file on the CD-ROM to the desired location. The help files are
located in folders labeled with abbreviated language names. For example, English help files are in the [EN] folder. Be sure to copy the entire [EN] folder to
the new location.
B Using a web browser, navigate to the Top Page and click [Network config].
C Type your password, (it is not necessary to type a user name) and click [OK].
55
Appendix
D
E
5
56
Type the path to the help file in the [Help URL] box.
If you copied the help file to "C:\HELP\EN", then type "file://C:/HELP/".
For example, if you copied the file to a web server, the address (URL) that will
be linked to the help files is "http://a.b.c.d/HELP/EN/index.html", type "http://a.b.c.d/HELP/".
Click [Apply].
When a warning message appears, select to continue configuring.
Assigning IP Address with ARP+PING
Assigning IP Address with ARP+PING
Using TCP/IP, you can assign the IP address using ARP and PING. The following example is for a BSD UNIX workstation (SunOS 4.x).
Preparation
ARP+PING should be set to active in the network boot configuration before
assigning the IP address using ARP+PING. For more information on setting
it to active, see the "Printer Reference" that is provided as a paper manual.
A Log in to the workstation as root.
B Use the arp command to assign the IP address to the MAC address of the
Network Interface Board.
# arp -s 192.168.15.16 00:00:74:62:5C:65
Note
❒ 192.168.15.16 is the IP address, and 00:00:74:62:5C:65 is the MAC address.
5
C Assign the IP address using the PING command.
# ping 192.168.15.16
D Use the PING command again to confirm the address.
# ping 192.168.15.16
If the address has been configured correctly, the following message appears.
192.168.15.16 is alive
If the address has been configured incorrectly, the following message appears.
no answer from 192.168.15.16
-How to Confirm the MAC Address
The MAC address (Ethernet address) of the Network Interface Board is required
in order to use ARP and PING to assign the IP address.
The MAC address can be seen on the printer configuration page.
Reference
For more information on printing a configuration page, see the "Printer Reference" included as a PDF file in the CD-ROM.
57
Appendix
Remote Maintenance by Telnet (mshell)
You can view the printer status and configure the network interface board using
telnet.
Note
❒ You should use a password so that only the network administrator, or a person having network administrator privileges, can use remote maintenance
(mshell).
Operation Flow
The following is a sample procedure using telnet.
Limitation
❒ Only one person at a time can log on to do remote maintenance.
5
A Using the IP address or host name of the printer, start telnet.
% telnet IP_address
Note
❒ In order to use the host name instead of the IP address, you must write it
to the /etc/hosts file.
B Type the password.
Note
❒ The factory default is “password”.
C Type a command.
Reference
For more information on telnet commands, see P.59 “Command List”.
D Finish telnet.
msh> logout
When the configuration is revised, a confirmation message requests whether
or not the changes should be saved.
E Type “yes” to save the changes and press the {ENTER} key.
If you do not want to save the changes, type “no”and press the {ENTER} key.
If you want to make additional changes, type “return” at the command line,
and press the {ENTER} key.
Note
❒ If the “Can not write NVRAM information” message appears, the changes
are not saved. Repeat the steps above.
58
Remote Maintenance by Telnet (mshell)
❒ The Network Interface Board is reset automatically when the settings are
changed.
❒ When the Network Interface Board is reset, the active print job which has
already been sent to the printer will finish printing. However, jobs that
have not been sent yet will be cancelled.
Command List
This is a list of commands that can be used via remote maintenance.
Note
❒ Type “help” to see a list of commands that can be used.
msh> help
❒ Type “help command_name” to display information on the syntax of that
command.
msh> help command_name
5
TCP/IP address
Use the ifconfig command to configure TCP/IP (IP address, subnet mask, broadcast address, default gateway address).
❖ Reference
msh> ifconfig
❖ Configuration
msh> ifconfig le0 parameter address
Parameter
Configuration Item
(no parameter)
IP address
netmask
subnet mask
gateway
default gateway address
The following is an example for configuring an IP address of 192.168.15.16.
msh> ifconfig le0 192.168.15.16
The following is an example for configuring a subnet mask of 255.255.255.0.
msh> ifconfig le0 netmask 255.255.255.0
Note
❒ This affects the configuration of the Network Board of the IP address that is
used.
❒ To type an address using hexadecimal, add “0x” to the first command.
59
Appendix
-Address
❖ Subnet Mask
A number used to mathematically “mask” or hide the IP address on the network by eliminating those parts of the address that are alike for all the machines on the network.
❖ Default Gateway Address
A gateway is a connection or interchange point that connects two networks.
A gateway address is for the router or host computer used as a gateway.
Note
❒ To get the addresses above, contact your network administrator.
Access control
5
Use the access command to view and configure access control.
❖ Reference
msh> access
❖ Configuration
msh> access parameter address
Parameter
Configuration Method
control
Access Control Address
mask
Access Control Mask
Note
❒ The Access Control Address and the Access Control Mask are used to limit
access to the computer used for printing by denying access to users based on
their IP address. If it is not necessary to limit access, set the Access Control
Mask to “0.0.0.0”.
❒ When the Access Control Address matches the masked result of the IP address of the computer attempting to print, print jobs from that IP address can
be accepted by the Network Interface Board.
❒ For example, if you assign 192.168.15.16 as the Access Control Address to the
Network Interface Board, the combination of the Access Control Mask and
the IP addresses that can be printed are as follows. The XXX is a variable that
means any number from 1 to 255 is acceptable.
60
Remote Maintenance by Telnet (mshell)
Access Control Mask
IP Addresses that can
Access the Printer
0.
0.
0.
0
XXX.XXX.XXX.XXX
255.
0.
0.
0
192.XXX.XXX.XXX
255.255.
0.
0
192.168.XXX.XXX
255.255.255.
0
192.168. 15.XXX
255.255.255.255
192.168. 15. 16
Network boot
Use the set command to configure a network boot.
msh> set parameter {on | off}
“On” means active and “Off” means inactive.
Parameter
Configuration Method
ping
ARP+PING
tftp
RARP+TFTP
bootp
BOOTP
dhcp
DHCP
5
Note
❒ When you use RARP+TFTP, BOOTP or DHCP, the server also needs to be
configured.
❒ DHCP takes precedence over all other settings.
Protocol
Use the set command to allow/prevent remote access for each protocol.
msh> set protocol {up | down}
61
Appendix
Protocol
appletalk
tcpip
“Up” means active. “Down”
means inactive.
netware
netbeui
lpr
ftp
rsh
diprint
web
Note
❒ If you prohibit remote access using TCP/IP and then log out, you cannot use
remote access. If this was a mistake, you can use the printer operation panel
to allow access by TCP/IP.
5
❒ When you prevent access via TCP/IP, you are also prevented from using lpr,
ftp, rsh, diprint, and web.
Status of printer
The following commands can be used to get information about the current status
of the printer.
msh> command
Command
Information that is Displayed
status
Status of printer.
Information about the print job.
info
Information about the paper tray, output
tray, emulation and program of printer.
prnlog [ID]
Lists the last 10 print jobs.
netstat
Information on the Network Interface
Board.
Note
❒ More information on the print job appears when the ID number is added after
the prnlog command.
Reference
For more information on the meaning of the data returned with these commands, see P.69 “Configuring the Network Interface Board”.
62
Remote Maintenance by Telnet (mshell)
Information about the Network Interface Board configuration settings
Use the show command to display the Network Interface Board configuration
settings.
msh> show [-p]
Note
❒ Add “-p” to the show command to have the information displayed on one
screen at a time.
Reference
For more information on the meaning of the data returned with this command, see P.69 “Configuring the Network Interface Board”.
System log information
Use the syslog command to display information stored in the printer's system
log.
msh> syslog
5
Reference
For more information on the displayed information, see P.72 “System Log Information”.
SNMP
Use the snmp command to display and edit SNMP configuration settings such
as the community name.
Note
❒ You can configure from No. 1 to 10 SNMP settings.
❒ The default settings for No. 1 and 2 are as follows.
Number
1
2
community name
public
admin
IP address
0.0.0.0
0.0.0.0
access type
read-only
read-write
trap off
trap off
❖ Display
Shows the SNMP information and available protocols.
msh> snmp ?
msh> snmp [-p] [registered_number]
63
Appendix
Note
❒ If the -p option is added, you can view the displays one by one.
❒ If the registered number is not added, you can view the status of all the registered numbers.
❖ Community name configuration
You can set the community name of the Network Interface Board.
msh> snmp number name community_name
Note
❒ The community name must consist of 15 characters or less.
❖ Access type configuration
You can select the access type from those listed below.
msh> snmp number type access_type
5
Access Type
Type of Access Which is Permitted
read
Read only access is permitted.
write
Read and write access is permitted.
trap
User is notified of trap messages.
no
All access is denied.
❖ Protocol configuration
You should use the following command to set the protocols to active or inactive. If you set a protocol to inactive, you cannot use all the registered numbers for it.
msh> snmp {ip | ipx} {on | off}
• “On” means active and “Off” means inactive
If you want to change the protocol settings for each registered number, use
the following command. Confirm that the protocol set to inactive using the
above command, are not set to active using this command.
msh> snmp number active {ip | ipx} {on | off}
❖ Access configuration
You can configure the address of a host depending on the protocols used.
The Network Interface Board accepts requests only from hosts having addresses with access types of “read-only” or “read-write”. Type “0” to have the
Network Interface Board accept requests from any host without requiring a
specific type of access.
The following example shows how to set the protocol for an address.
msh> snmp number {ip | ipx} address
64
Remote Maintenance by Telnet (mshell)
Note
❒ When using the TCP/IP protocol, type ip followed by a space and then the
IP address.
❒ When using the IPX/SPX protocol, type ipx followed by a space, the IPX
address followed by a decimal and then the MAC address of the Network
Interface Board.
The following is an example of how to configure registration number 3 with
the IP address 192.168.15.16.
msh> snmp 3 ip 192.168.15.16
The following is an example of how to configure registration number 3 with
the IPX address 7390A448, and the MAC address 00:00:74:62:5C:65.
msh> snmp 3 ipx 7390A448.000074625C65
Changing the password
Use the passwd command to change the remote maintenance password.
5
Important
❒ Be sure not to forget or lose the password.
Note
❒ The default factory password is “password”.
A Type “passwd”.
msh> passwd
B Type the current password.
Old password:
C Type the new password.
New password:
Note
❒ The password must consist of 3 to 8 alphanumeric characters and symbols.
Upper and lower case characters are considered unique. For example, R is
different from r.
❒ The password is the same as that used in the configuration of the Network
Interface Board using a Web browser and that used in NIB Setup Tool. If
you change a password on the mshell, the other passwords are also
changed.
D Type the new password again.
Retype new password:
65
Appendix
SNMP
The Network Interface Board functions as a SNMP (Simple Network Management Protocol) agent using the UDP and IPX protocols. Using the SNMP manager you can get information on the printer.
The factory default community names are “public” and “admin”. You can get
MIB information using these community names.
Reference
For more information on configuring the community name, see P.63 “SNMP”
in “Remote Maintenance by Telnet (mshell)”.
Limitation
❒ The supported MIBs may differ depending on your printer.
❖ Supported MIBs
• MIB-II
• PrinterMIB
• HostResourceMIB
• RicohPrivateMIB
5
66
Understanding the Displayed Information
Understanding the Displayed Information
This section describes how to read the displayed information on the status of the
Network Interface Board.
Print Job Information
The status of the print job can be viewed using the following commands.
• mshell : Use the status command. ⇒ P.62 “Status of printer”
Item Name
Meaning
ID
Number of the print request.
Source
The name of the host requesting the print job.
Process
The type of print command.
Status
Status of print job.
5
• Active
Printing or preparing to print.
• Waiting
Waiting to be transferred to the printer.
Time
The time when the print request was received.
Print Log Information
This is a record of jobs that have been printed up to now. The most recent ten
records appear.
This record appears with the following commands.
• mshell : Use the prnlog command. ⇒ P.62 “Status of printer”
Item Name
Meaning
ID
Printing request number.
Source
The user name, workstation name or address of the host
that sent the print job.
Process
The type of print command used.
Bytes
The size of the file in bytes.
67
Appendix
Item Name
Meaning
Result
Communication result.
• OK
Indicates that the print job was completed correctly.
• NG
Indicates that the print job was not completed normally.
• Canceled
rcp, rsh or lpr print commands were stopped. A problem
occurred with the printing application. This message
does not appear when ftp or RPRINTER is used.
5
Time
The time when the print request was received.
User Code
The user name, workstation name or address of the host
that sent the print job.
Address
IP address.
Process
The type of print command used.
Print Start Time
The time the print process was started.
Print End Time
The time the print process was completed.
Open Count
The number of print processes that the application made.
Eof Count
The reception number of file unit.
Data Size
The number of bytes of received data.
Network Statistical Information
This section is about the information provided about the Network Interface
Board.
Detailed information on the words used to describe the status of the Network Interface Board are described below.
• mshell : Use info command. ⇒ P.62 “Status of printer”
68
Item Name
Meaning
System elapsed time
The time that has passed since the network interface board
started.
Total printing time
The total time spent in processing the print data.
Total open count
The total number of open (printing process) count that the
application requires.
Current connection
count
The number of jobs currently connected with the Network
Interface Board.
Total connection count
The total number of print jobs sent to the Network Interface
Board.
Understanding the Displayed Information
Item Name
Meaning
Print error count
The number of times the printing process sent an error message.
Access error count
The number of times the connection was refused because of
the value of the access control.
Print request full count
The number of times a connection was refused because the
number of print requests exceeded the number of allowed
sessions.
Configuring the Network Interface Board
Network Interface Board settings can be displayed and confirmed using the
commands below.
• mshell : Use the show command. ⇒ P.63 “Information about the Network Interface Board configuration settings”
Item Name
5
Meaning
Common
Mode
Protocol Up/Down
Up means active. Down means inactive.
AppleTalk
TCP/IP
NetWare
NetBEUI
NVRAM version
Internal version number.
Device name
Comment
Location
Contact
Soft switch
AppleTalk
Mode
AppleTalk protocol in selection.
Net
Network number.
Object
Macintosh printer name.
Type
The type of printer.
Zone
Name of the zone that the printer belongs to.
69
Appendix
Item Name
Meaning
TCP/IP
Mode
Up means active. Down means inactive.
ftp
lpr
rsh
diprint
web
telnet
download
EncapType
Frame type.
Network boot
Network boot.
Filter
Internal parameter.
Max DSTs
5
Address
IP address.
Netmask
Subnet mask.
Broadcast
Broadcast address.
Gateway
Default gateway address.
AccessCtrl
Access control address.
AccessMask
Access control mask.
Time server
Home page URL
URL of homepage.
Home page link name URL name of homepage.
70
Help page URL
URL of help page.
SNMP protocol
Protocol used with SNMP.
Understanding the Displayed Information
Item Name
Meaning
NetWare
Mode
(This value is fixed)
EncapType
Frame type.
RPRINTER number
Remote printer number.
RPRINTER name
Remote printer name.
Print server name
Print server name.
Fileservername
Name of the connect file server.
Context name
Context of print server.
Switch
Mode
Active mode.
NDS/Bindery
(This value is fixed)
Packet negotiation
Print job timeout
Time of the job timeout.
5
NetBEUI
Mode
(This value is fixed)
Switch
Mode
(This value is fixed)
Direct print
(This value is fixed)
Notification
Notices of finishing to print.
Workgroup name
Name of the workgroup.
Computer name
Name of the computer.
Comment
Comment.
Share name[1]
Share name. (name of the printer type)
Shell mode
Mode of the remote maintenance tool.
71
Appendix
Message List
This is a list of messages recorded to the printer's system log. The system log can
be viewed using the syslog command.
System Log Information
You can use the following methods to view the system log.
• mshell : Use the syslog command. ⇒ P.63 “System log information”
Message when the Network Interface Board starts or restarts
5
72
RICOH Network Interface Board
Ver.x.x.x
The version number of the Network Interface Board.
PRINTER SYSTEM “system name”
Ver.x.x.x
The system name and version of the printer.
Attach FileServer=“file server name”
The printer is attached to “file server
name” as the nearest server.
Current Interface Speed:xxxMbps
The speed of the network (10 Mbps or 100
Mbps).
Current IPX address
The current IPX address.
Frametype=“frame type name”
The "frame type name" is configured to be
used on NetWare.
NetBEUI Computer Name=“computer
name”
The NetBEUI Computer Name is defined
as "computer name".
Start httpd
The Web server has been started.
Start npmpd for IPX
The npmpd for the IPX protocol has been
started.
Start npmpd for TCP/IP
The npmpd for the TCP/IP protocol has
been started.
Start smbd direct print mode(NetBEUI)
You can print from a client on the Windows network via the print server.
Start snmpd Ver.2.0
The SNMP agent of the displayed version
has been started.
Vendor= , Country= , Lang=
The vendor, the country code and the language.
Message List
NetWare (When the Network Interface Board is started)
❖ When working as a print server
Access to NetWare server “file server
name” denied. Either there is no account
for this print server on the NetWare server
or the password was incorrect.
Cannot log in to the file server. Confirm
that the print server is registered on the
file server. If a password has been configured for the print server, delete it.
Attach to print queue “print queue name” Attached to the print queue.
File server is empty
The file server is not registered. Register
your file server using the utility.
Log in to the file server “file server name” Logged in to the file server with NDS or
(“NDS|BINDERY”)
BINDERY mode.
Open log file “file name”
The selected log file has been opened.
Printer “printer name” has no queue
The print queue is not assigned to the
printer. Using NWAdmin, assign the
print queue to the printer, and then restart
it.
Print queue “print queue name” cannot
be serviced by printer 0, “print server
name”
Print services are not available for the
print queue. Confirm that the volume of
the print queue exists on the selected file
server.
The print server received error “error
number” during attempt to log in to the
network. Access to the network was denied. Verify that the print server name
and password are correct.
Cannot log in to the file server. The print
server is not registered or the password
has been set. Register the print server
without setting a password.
5
❖ When working as a remote printer
Cannot create service connection
Cannot establish a connection with the file
server. Your request may exceed the maximum number of connections that the file
server can deal with at a time.
Cannot find the printer (“print server
name”/”printer number”)
The printer having the number displayed
on the print server does not exist. Confirm
the number of the printer registered to the
print server.
Establish a connection with the print serv- A connection with the print server has
er, “print server name”
been established.
73
Appendix
No local target for “print server name”
Cannot get routing information on the file
server. If a different frame type is configured from that used on the network, you
should select "Auto Select" as a frame
type.
Required file server (“file server name”)
not found
Cannot find the required file server.
Required print server (“print server
name”) not found
Cannot find the print server. Confirm the
name of the print server.
Unable to attach to print server (“print
server name”)
Cannot connect to the print server. The
print server refuses a connection for some
reason. Confirm the configuration of the
print server.
NetBEUI (When the Network Interface Board is started)
5
Back to default name (<Computer name>) The same Computer name is detected on
the network. As unable to add computer
name to the suffix, the computer name
changed to the default name. Configure a
new computer name that is unique.
Print session full
Cannot accept the print session.
Required computer name (<Computer
name>) is duplicated name
The same Computer name is detected on
the network. The start job determines the
computer name by adding the computer
name to the suffix (0,1....). Configure a
new computer name that is unique.
TCP/IP
❖ When the address is configured
Invalid gateway address
The Gateway address is not correct for the
selected IP address.
❖ When using lpr
74
filter data error
Some data cannot be handled by the filter
option. Confirm the file code and the settings of the filter option.
lost connection
The connection was cut by a counterpart.
Check the printer to which you requested
to print.
Message List
print requests full
Cannot accept the print request (max. 5 requests). Confirm the status of the printer
with mshell, and print it again after the
number of print requests becomes less
than 5.
printer permission denied
Cannot get a permission to use the printer. Confirm the access rights with the access control address and the access control
mask.
printer refuse
Something is wrong with the printer.
Confirm the status of the printer.
At the beginning of the message, the IP address of the client is displayed within parentheses.
❖ When using SNMP
Exit snmpd
The agent is complete. Reset the printer
or turn the printer off and on.
recvfrom:packet discarded,length(Reception packet length)> (Packet size),from
addr <Address of partner point>
The received packet was ignored since
the length of the packet exceeds the limit.
Confirm whether the administration station sent a packet whose length was longer than 1025 bytes.
session <Community name appointed>
not defined
The community name of the received
packet is not defined. Confirm that the
community name of the administration
station is the same as that of the printer.
snmpin:Bad use of session <community
Name> from <Address>
The community name of the received
packet is not the same as that of the administration station. Confirm the community name of the printer.
5
snmpin:error in snmpdecipher,code (<Er- An error occurred on the received packet.
ror No.>)
Check if the number of the objects sent
from the administration station is more
than 31 and if there are wrong MIB requests.
snmpin:error in snmpservsend,code (<Er- Cannot send a response packet. Normalror No.>)
ly, this message is followed by the messages below *1 *2.
snmpin:pkt too large,code (<Error number>)*1
The response packet to the request is too
big to send. Reduce the number of the objects per request.
75
Appendix
snmpin:error in sending too large request
back,code (<Error number>),giving up*2
The packet notifying the error is too big to
send. Reduce the number of the objects
per request.
snmpin:received bad version
The version of the received packet is invalid. Confirm that the version of the administration station is version-1(0).
Error numbers in the messages are codes for internal use.
5
76
Precautions
Precautions
Please pay attention to the following when using a network interface board.
When configuration is necessary, follow the appropriate procedures below.
Connecting a Dial up Router to a Network
When the NetWare file server and the printer are on the opposite side of a router,
packets are continuously sent back and forth, possibly causing communications
charges to increase. Because the packet transmission is a specification of NetWare, you need to change the configuration of the router. If the network you are
using does not allow you to configure the router, configure the printer.
Configuring the router
Filter the packets so that they do not pass over the dial up router.
5
Note
❒ The MAC address of the printer doing the filtering is printed on the printer
configuration page. For more information on printing a configuration page,
see the "Printer Reference" that comes with the printer.
❒ For more information on configuring the printer if the router cannot be configured, see the instructions below.
Configuring the printer with NetWare
A Following the setup method in this manual, configure the file server.
B Set the frame type for a NetWare environment.
Reference
For more information on selecting a frame type, see the "Printer Reference"
that is provided as a paper manual.
Configuring the printer without NetWare
A While not printing, the Network Interface Board sends packets on the network. Set NetWare to inactive.
Reference
For more information on selecting a protocol, see the "Printer Reference"
that is provided as a paper manual.
77
Appendix
When Printing PostScript from Windows
When printing PostScript from Windows, see the “Printer Reference” that comes
with your machine, and configure it to use the Network Interface Board with the
printer driver.
When Printing it with NetWare
Configuring the form feed
You should not configure the form feed on NetWare. You do not need to configure on NetWare in order to control a new page with the printer driver of Windows. If this setting is configured, the printer might not print properly. If you do
not want to use the form feed, configure it according to the OS you are using as
follows.
• With Windows 95/98, clear the [Form feed] check box with the [Printer Settings]
tab in the printer properties dialog box.
5
Configuring the banner page
Do not configure a banner page on NetWare.
If you do not want to add a banner page, configure it according to the OS you
are using as follows.
• With Windows 95/98, clear the [Form feed] check box with the [Printer Settings]
tab in the printer properties dialog box.
• With Windows NT 4.0, click [Start], point to [Setting] , point to [Control Panel]
and click it. Select [Network] and select [Novell Client Configuration for Windows
NT] in the [Service] tab and click [Properties]. The [Novell Client Configuration] box
appears. Clear the [Enable banner] check box in the [Default Capture] tab in [Novell Client Configuration].
Printing after resetting the printer
After resetting the remote printer, it will be cut off from the print server for about
30-40 seconds before connecting again. Due to the NetWare specification, print
jobs may be accepted, but they will not be printed during this interval.
When using the printer as a remote printer, wait about 2 minutes after resetting
the printer before attempting to print.
78
Precautions
When Using DHCP
Note the following points when using DHCP (Dynamic Host Configuration Protocol).
Supported systems
Windows NT Server 4.0 can be configured as a DHCP server.
Configuring the printer with a reserved IP address
To always assign the same IP address, configure a reserved IP address using the
DHCP server.
Note
❒ When multiple DHCP servers are used, reserve the same address with each
DHCP server. The Network Interface Board needs to receive information
from the DHCP server that it contacts.
5
Follow these steps to configure the printer with a reserved IP address.
A Start the DHCP manager.
B Select the scope that will be used, and on the [Scope] menu, click [Reservation].
C Type the IP address into [IP Address].
D Type the MAC address of the Network Interface Board into [Unique Identifier].
Note
❒ Do not use hyphens to separate the numbers.
❒ If you do not know the MAC address, it can be found on the configuration
page printed by the printer.
E Type a name and comment into the [Client Name] box and the [Client Comment]
box.
Note
❒ For more information on client names, see P.80 “Additional information”.
F Click [Add].
An IP address is reserved.
G Click [Close] to close the dialog box.
79
Appendix
Additional information
• When you click [Active Lease] on the [Scope] menu of DHCP manager, a list of
client leases appears. When the reserved IP address is not active, the name of
the reservation is the name entered in the Client Name field of the Add Reserved Clients dialog box. When the reserved IP address becomes active, the
client name changes to the printer name configured by the Network Interface
Board. Only the first 13 letters of the printer name appear here. When you use
the printer with Multidirect Print, use the host name of the printer as the [Client Properties] Client Properties dialog box.
• When the DHCP server does not assign an IP address, the Network Interface
Board uses 11.22.33.44 as a temporary IP address. You can confirm the printer's IP address on the network configuration page.
• Because 11.22.33.44 is a special IP address, you cannot print using this address.
• When using the DHCP relay agent in a network environment that uses a dial
up router to connect to the Network Interface Board, an increase in communication fees can occur.
5
When Using NIB Setup Tool
If the Network Interface Board cannot browse using the TCP/IP protocol, confirm that the TCP/IP environment is correctly configured in your computer.
80
Specifications
Specifications
LAN interface
100BASE-TX, 10BASE-T
Frame type
EthernetII, IEEE802.2, IEEE802.3, SNAP
Protocol
• TCP/IP
Windows 95
Windows 98
Windows NT 4.0
• IPX/SPX
NetWare 3.11, 3.12, 3.2, 4.1, 4.11, 5, IntranetWare
• NetBEUI
Windows 95
Windows 98
Windows NT 4.0
• AppleTalk
Mac OS 7.6 ∼ 8.6
SNMP
5
MIB-II, PrinterMIB, HostResourceMIB, RicohPrivateMIB
81
INDEX
A
access control address, 60
access control mask, 60
ARP+PING, 57, 61
B
BOOTP, 61
C
client computer, setup
Windows 95/98, 21
Windows NT 4.0, 22
community name, 64
configuration
LPR port printing, Windows NT 4.0,
23
Macintosh, 47
NetWare, 25
NetWare 3.x, 31
NetWare 4.x, 5, 37
Web browser, 54
Windows 95/98, 5
Windows NT 4.0, 13
D
default gateway address, 60
DHCP, 61, 79
dial up router, precautions, 77
E
EtherTalk, 47
I
information
Network Interface Board configuration, 63, 69
Network Statistics, 68
print job, 67
print log, 67
system log, 63, 72
install, 26
Multidirect Print, Windows 95/98, 8
Multidirect Print, Windows NT 4.0,
17
IP address, 57, 59
82
L
LPR port Printing, Windows NT 4.0, 23
M
MAC address, 57
Macintosh, configuration, 47
message, 72
MIB, 66
Multidirect Print, 51
Multidirect Print, install
Windows 95/98, 8
Windows NT 4.0, 17
N
NetWare 3.x, configuration, 31
NetWare 4.x, 5, configuration, 37
NetWare, configuration, 25
network boot, 61
NIB Setup Tool, 28
install, 26
precautions, 80
P
password, 55, 65
precautions, 77
R
RARP+TFTP, 61
Remote Maintenance by Telnet (mshell),
58
remote printer, setup
NetWare 3.x, 34
NetWare 4.x, 5, 40
S
setup
client computer, Windows 95/98, 21
client computer, Windows NT 4.0, 22
printer driver, Windows 95/98, 9
printer driver, Windows NT 4.0, 18
SNMP, 63, 66
specifications, 81
status of printer, 62
subnet mask, 60
U
uninstall
Multidirect Print, Windows 95/98, 11
Multidirect Print, Windows NT 4.0,
20
W
Web browser, 54
Windows 95/98, configuration, 5
Windows NT 4.0, configuration, 13
Z
Zone, 48
83
84
EE
GB
UE
USA G528
Note to users in the United States of America
Notice:
This equipment has been tested and found to comply with the limits for a Class B digital device, pursuant to Part 15 of the FCC Rules. These limits are designed to provide reasonable protection against
harmful interference in a residential installation. This equipment generates, uses and can radiate radio
frequency energy and, if not installed and used in accordance with the instructions, may cause harmful
interference to radio communications.
However, there is no guarantee that interference will not occur in a particular installation. If this equipment does cause harmful interference to radio or television reception, which can be determined by turning the equipment off and on, the user is encouraged to try to correct the interference by one more of
the following measures:
Reorient or relocate the receiving antenna.
Increase the separation between the equipment and receiver.
Connect the equipment into an outlet on a circuit different from that to which the receiver is
connected.
Consult the dealer or an experienced radio/TV technician for help.
Warning
Changes or modifications not expressly approved by the party responsible for compliance could void
the user's authority to operate the equipment.
Caution (in case of 100BASE-TX environment):
Properly shielded and grounded cables (STP) and connectors must be used for connections to host
computer (and/or peripheral) in order to meet FCC emission limits.
STP with ferrite core must be used for RF interference suppression.
Declaration of Conformity
Product Name: Printer Controller
Model Number: Color Controller RC-200
Responsible party: Ricoh Corporation
Address: 5 Dedrick Place, West Caldwell, NJ 07006
Telephone number: 973-882-2000
This device complies with part 15 of FCC Rules.
Operation is subject to the following two conditions:
1. This device may not cause harmful interference, and
2. this device must accept any interference received,
including interference that may cause undesired operation.
Note to users in Canada
Note:
This Class B digital apparatus complies with Canadian ICES-003.
Remarque concernant les utilisateurs au Canada
Avertissement:
Cet appareil numérique de la classe B est conforme à la norme NMB-003 du Canada.
Declaration of Conformity
“The Product complies with the requirements of the EMC Directive 89/336/EEC and the Low Voltage
Directive 73/23/EEC.”
Warning
Changes or modifications not expressly approved by the party responsible for compliance could void
the user's authority to operate the equipment.
Copyright © 1999
Network Interface Board 185
OPERATING INSTRUCTIONS
EE GB
UE USA G528-8640