1
Installation
24-Inch
Built-in
Dishwasher
For use with models: EDW24S, MDW24S
Part No. 101586
Rev. C
Instructions
Important Safety Instructions ..........................................
Important Information About Safety Instructions ..............
Safety Symbols and Labels .............................................
General Safety Precautions .............................................
Installation Specifications ................................................
Product Dimensions .........................................................
Preparing the Location .....................................................
Power Supply Requirements ...........................................
Plumbing Requirements ...................................................
1
1
1
2
3
3
4
4
5
Installation Instructions ....................................................
Verify the Package Contents ............................................
Electrical Connection .......................................................
Plumbing Connections .....................................................
Prepare Drain Cutout .......................................................
Preparing the Dishwasher for Installation ........................
Positioning the Unit in the Cabinet .................................
Verifying Proper Operation ..............................................
Securing the Dishwasher to the Cabinet and Counter ..
Installation the Toe Kick .................................................
Adjusting the Stainless Steel Trim Plates ......................
6
6
7
8
8
8
10
11
12
13
13
Important:
•
Installer: In the interest of safety and to minimize problems, read these installation instructions completely and
carefully before you begin the installation process. Leave these installation instructions with the customer.
•
Customer: Keep these installation instructions for future reference and the local electrical inspector's use. If you have
questions or problems with installation, contact your Dacor ® dealer or the Dacor Customer Service Team.
If You Need Help...
Product Data Label Location
If you have questions or problems with installation, contact
your Dacor dealer or the Dacor Customer Service Team.
For repairs to Dacor appliances under warranty call the
Dacor Distinctive Service line. Whenever you call, have the
model and serial number of the appliance ready. The model
and serial number are printed on the product data label.
The product data label is located on the side of the
dishwasher's door. Open the door to expose it.
Dacor Distinctive Service (repairs under warranty only)
Phone: (877) 337-3226 (U.S.A. and Canada)
Monday -- Friday 6:00 A.M.to 4:00 P.M.Pacific Time
Dacor Customer Service
Phone: (800) 793-0093 (U.S.A. and Canada)
Monday -- Friday 6:00 A.M.to 5:00 P.M.Pacific Time
Web site: www.Dacor.com
All specifications
are subject to change without notice. Dacor assumes no liability for changes to specifications.
© 2007 Dacor, all rights reserved.
Important Information About
Safety Instructions
Safety Symbols and Labels
The Important Safety Instructions and warnings
in this manual are not meant to cover all possible
problems and conditions that can occur. Use common
sense and caution when installing, maintaining or
operating this or any other appliance.
•
Always contact the Dacor Customer Service Team
about problems and conditions that you don't
understand.
[_ DANGER
Immediate hazard s that WILL resu t n severe person a
injury or death ...........................
I
[_ WARNING
Hazards 0r Unsafe practices that COULD result in severe
personal injury or death.
I
[_ CAUTION
Hazards 0r Unsafe practices that COULD resUlt in min0r
personal injury or property damage:
I
[_] DANGER
To avoid the possibility of explosion 0r firel do not store or use c0mbustible, flammable or explosive Vapors
(such as gasoline)inside or in the vicinity of this or any 0ther appliance. DOnot store flammable or explosive materials
in adjacent cabinets or areas.
[_
WARNING
Failure to follow the Warnings and Cautions in these instructions may result in personal injury or death.
[_
WARNING
A qualified technician must complete the installation Of this built'in appliance. The owner is responsible to make sure
the dishwasher is properly installed: Improper connection of the electrical wiring may create an electric shock or fire
hazard and may result in damage to the dishwasher's electrical system: Do not use the dishwasher until it is completely
installed:
READ AND SAVE THESE INSTRUCTIONS
_mCD_
1
General Safety Precautions
To reduce the risk of fire, electric shock, serious injury or death when using your appliance, follow basic safety
precautions, including the following:
WARNING
,
Many surfaces within the dishwasher achieve high
temperatures. Do not touch interior surfaces or items
inside the dishwasher during or immediately after
use. Exercise caution when opening the door. Let
hot air and steam escape before looking or reaching
inside.
D0 notinstall or operate this dishwasher if it ha s
been damaged, dropped; has damaged electrical
conduit or wires or is not Working properly: If the
PrOduCt
•
WARNING
is damaged when received, immediately
contact the dea!e[ 0[ bui!der.
Use this dishwasher only for its intended PUrpose
as outlined in the use and care manual. It is not
•
During loading, insert all sharp or pointed objects
with the handles up. Locate these items where they
will not damage the door seal or cause personal
injury.
•
Under certain conditions hydrogen gas may be
produced in a hot water system that has not been
used for two weeks or more. Hydrogen gas is
explosive. If the hot water system has not been used
for a period of time, turn on all hot water faucets and
let the water flow for several rain utes to release any
accumulated hydrogen gas. Do not smoke or use an
open flame during this process.
•
To prevent household mold and mildew damage,
periodically check the hot water supply line and drain
hoses for leaks.
•
If the dishwasher outlet is connected to a garbage
disposal, make sure the disposal is completely empty
before running the dishwasher.
•
To avoid damage to the racks, do not let sharp edges
come into contact with them.
•
This appliance is designed for installation by more
than one person. To avoid personal injury, do not
attempt to move or lift the dishwasher without
assistance.
•
To prevent personal injury and damage to the unit
due to it tipping over, do not push down on the door
anytime it is open. To reduce the chance of tipping,
attach the anti-tip brackets to the cabinet before
operation.
•
The customer should not install, repair or replace
any part of the dishwasher unless specifically
recommended in the literature accompanying it.
A qualified service technician should perform all
other service. Contact the nearest Dacor authorized
service representative for examination, repair or
adjustment.
•
Do not over torque the leveling legs. Doing so
will distort the dishwasher chassis leading to door
alignment problems and possible water damage.
intended for c0mmercia! usel Read the use and care
manual comPletely before ope(atio n:
,
:
!
Keep all packaging materials away fr0 m ch!ldren
Plastic bags can cause suffocatic
To avoid e!ectfiC sh0ck: thiS dishwasher mUst be
installed and grounded by a qualified instal!er in
a completely enclosed cabinet according tO these
installation instructionsl
AI! installati0n W0[kl plUmbing connections and
electrical
wiring mus t be performed in accordance
•
•
wi!b allapplicable codes and standard s
Install or locate this appliance 0nly in accordance
with these insta!!a!ion instructions !
The insta!ler must show the cust0mer the location
of the fuse box or circuit breaker panel so that the
customer knows Where and how t0 turn the power
off.
Before installing o r servicing the dishwasher, switch
Power off at the fuse box orcircuit breaker pane!
and lock the electrical panel door to prevent power
from being sWitched On accidentallyl When the cirCuit
breaker panel cannot be 10cked;securely fasten
a prominent warning device _ such as a tag, tothe
•
'
Donot tamper with the controls.
D0 not leave children al0ne or Unattended in the
area where the dishwasher is in use. Do not let
children
Never alloW anyone: inClUding children, to sit or
stand 0n any part of the dishwasher. Stepping or
s tting on any part of it may result in tipping damage
and seri0us injuryl
,
Store al detergents and rinse aids out of the reach
of childrenl
!
'i
2
play with this appliance:
,
D0 n0t operate the dishwasher Without the d00r
completely closed and the toe kick panel in place,
prevent child entrapmenti always remove the
door from an old dishwasher when removing it from
service.
_mC_
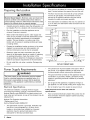
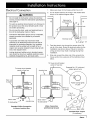
Product Dimensions
Product tolerances: +1/16" (+1.6 mm),-0,
unless otherwise stated
_
23 7/8" (606 mm)
adjustible to 24 1/4" (616 mm)------_
I
I
H
14 5/8"
(371 mm) -_
From rear to
junction box
3 1/4" (83 mm)
from side to
4" (102 mm)
from side to
water inlet
junction box
12"
(305 mm) --_
From rear to e
water
inlet/
Handle style varies with model number.
H
[_ WARNING
Electric Shock Hazard: Observe all governing codes
and ordinances during planning and installation, including
all plumbing and electrical work. All electrical and
plumbing work should be performed by qualified persons.
Failure to follow this warning could result in death or
serious injury. Contact your local building department for
further information.
/
34"
(864 mm)
to
35"
(889 mm)
m
Door in lowered position
21" (533 mm)
22 7/8" (581 mm)-_
46" (1168mm)
-_
=
_mCD_
3
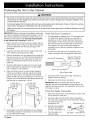
If the unit is to be placed in a corner, there must be at
least 2 inches between the opened door and the wall.
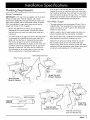
Preparing the Location
The floor must be solid, level and all cut-out surfaces
must be at right angles. The dishwasher must be
secured to the adjacent cabinets using the anti-tip
brackets for safety and proper operation.
WARNING
Electric Shock Hazard, Electrical, water and drain lines
must be confined to the shaded areas shown below to
prevent damage Failure to f011owthese instructi0ns Could
result in fire, electric shock or property damage.
.....
•
Carefully check the location where the dishwasher is to
be installed. Put it in a location with convenient access.
•
Plan the installation so that the appliance can be
removed if service is required.
If the dishwasher is installed at the end of a cabinet run
or in an island, the dishwasher sides and back must be
fully enclosed.
Make certain that electrical power, water supply and
drain can be provided to meet the dishwashers power
supply and plumbing requirements in the selected
location. The best location is on either side of the
kitchen sink for access to existing plumbing and ease
in loading dishes.
•
Prepare the installation location as shown in the cutout
diagram to ensure proper and safe operation. All
minimum dimensions must be met or exceeded.
•
Electrical, water and drain connections are not the
same for all dishwasher brands or models. If replacing
an existing dishwasher, check the location of the
existing utilities to determine if changes are required to
meet the connection requirements of this dishwasher.
•
©
Electrical,
water, and
drain lines
must be
confined to
shaded area
©
Water
Wirinc
//6"/
1 1/2",} //II
Do not install this unit under a cooktop. Damage may
24"
CUT-OUT FRONT VIEW
OOCUr.
The junction box must be located to the right or left of
the cut-out, in an adjacent cabinet, so that power can
be disconnected without removing the dishwasher.
Power Supply Requirements
WARNING
The power supply for the dishwasher must be installed
only by a licensed electrician as specified below, It is
the owner's resPonsibilitY to ensure that the electrical
connection of this appliance is performed
a licensed
electrician:
The ground terminal (or lead) on the appliance must be
connected to a grounded, metallic, permanent wiring
system or grounding conductor installed by a licensed
electrician.
•
Do not ground the appliance or appliance wiring to a
gas pipeline or to the neutral (white) power supply wire.
Electrical Specifications
•
Do not install a fuse in the neutral or ground circuit.
The electrical installation, including minimum supply
wire size and grounding, must be Jn accordance with the
National Electric code ANSI/NFPA (or latest revision) and
local codes and ordinances. A copy of this standard may be
obtained from:
If the electrical service does not meet the
specifications:
National Fire Protection Association
1 Batterymarch Park
Quincy, Massachusetts 02269-9101
The dishwasher requires a grounded, dedicated 120
Vac 60 Hz. circuit protected by a 15 Amp. circuit
breaker or time delay fuse installed by a licensed
electrician. See the product data label on the
dishwasher for the total connected load.
4
_mC_
•
Have a licensed electrician prepare the junction box for
final connection inside the adjacent cabinet according
to the specifications.
If an air gap is not required, the drain hose must be
installed to an inlet or waste tee above the drain trap in
the household plumbing. If you connect to a sink drain,
entry will need to be above the trap. Use a "Y" branch
tailpiece and connector kit (not include) for this method.
It includes all needed fittings and instructions.
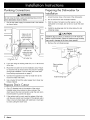
Plumbing Requirements
Drain Connection
IMPORTANT: A 72" drain hose is supplied with the product.
Should a longer drain hose be required, use a hose
approved for detergents and high temperature water. The
drain hose supplied with the dishwasher meets an AHAM
DW-1 test standard. Longer drain hoses should not be
longer than a total of 10 ft. in length.
Hot Water Supply
Review the different ways shown to connects the
dishwasher to the drain system. Choose the method
that best suits your need and meets local codes and
ordinances.
You must install an air gap in the drain if the drain hose
is connected to household plumbing lower than 20 in.
(50.8 cm) from the floor or if required by local codes.
Plan for the air gap in the sink or countertop area
adjacent to the dishwasher. A section of drain hose (not
provided) needs to be installed from the air gap to the
disposal or waste tee. The drain hose is routed from
the dishwasher to an air gap inlet as shown. Air gap
kits are available from a plumbing supply store.
•
The water pressure must be between 20 and 120 p.s.J.
(138-827 kPa). The household hot water heater must
supply a minimum of 120 °F water to the dishwasher
location for best results.
•
Install a valve for the hot water supply line where it is
easily accessible after the dishwasher is installed.
•
Be sure the water inlet is protected from freezing. If the
valve freezes and ruptures, flooding may occur.
Determine the amount of tubing needed to connect
the hot water supply to the unit's water inlet valve.
Copper tubing must have a minimum of 3/8" OD. Highpressure and high-temperature rated plastic tubing with
a minimum inner diameter of 1/4" may be used.
Dishwasher drain hose
Entry must be above trap
Y branch
tailpiece
Single Sink with
Y Branch Tailpiece
Dual Sink with
Y Branch Tailpiece
Dishwasher drain hose
Larger end hose fits
disposer inlet fitting
Cut for 5/8" connection,
I!5_
3/4"
(t
J
[
1" '_
Single Sink
with Air Gap
/
Cut for 3/4" connection
j
End of Drain Hose
Drain air gap
Dual Sink with
Disposer Connection
"'Alternate drain through
floor into seperate trap
I_mCD_
5
Verify the Package Contents
Materials required
•
Cut the shipping carton open and use it as a pad
beneath the dishwasher until the legs are installed.
With the assistance of at least one person, place the
unit to the side of the cabinet opening.
•
90 ° elbow (3/8" NPT external thread on one end,
opposite end sized to fit water supply)
•
3 conductor wire (see electrical specifications)
Remove all of the packing materials from inside and
outside of the unit. DO NOT allow any of the shipping
materials, loose screws or plastic to remain inside.
•
3 wire nuts to fit wire mentioned above. Additional wire
nuts may be required for connection to house wiring.
•
Air gap for drain hose (if required, see page 5)
Unpack the parts box and verify that all of the parts
listed have been provided. If any item is missing or
damaged, please contact the dealer immediately. Do
not install a damaged or incomplete appliance.
•
Hose clamp (depends on installation type)
•
Shut-off valve (if not already installed)
•
Thread seal tape, pipe seal tape or joint compound
•
Water inlet line 3/8" minimum copper or 1/2" minimum
plastic (plastic must be tested for temperature and
pressure). A new ferule and compression nut may also
be required.
•
•
Parts included
with the dishwasher:
for installation
(not provided):
IMPORTANT: Do not use old parts.
•
2-piece toe kick with sound insulation
•
Cabinet mounting screws (2)
•
Color-matched toe kick screws (2)
•
UL/CSA approved strain relief for electrical connection
•
Countertop mounting screws (2)
•
Y-branch tailpiece (if required, see page 5)
•
Junction box cover and cover screw
•
Leveling legs (2)
Make sure you have everything necessary for proper
installation before proceeding.
•
Spanner wrench for leveling legs
Tools required
for installation:
•
3/8", 5/16" and 1/4" nut drivers
•
Bucket
•
Carpenter's square
•
Crescent wrench
•
Drill and appropriate bits (new installations)
•
Hole saw set (new installations'
•
Level
•
Phillips and fiat blade screwdrivers
•
Safety glasses
•
Tape measure
•
Tubing cutter
•
Wire strippers
6
_mC_
IMPORTANT: Each home installation differs. You may need
parts in addition to those listed on this page to complete
the installation.
Electrical Connection
WARNING
•
•
Make sure power to the house junction box is off.
2.
Cut an access hole for the wiring in the shaded area
shown in the cabinet diagram below.
---kl
Do not install the dishwasher unless the electrical
service provided meets the dishwasher specifications
(see page 4).
O
To avoid an electrical shock hazard, turn off power to
the junction box at the circuit breaker panel or fuse
box before proceeding.
•
Do not cross the drain, water and electrical lines in
front of the dishwasher motor or frame.
•
Connect the dishwasher ground wire to a separate,
properly grounded wire installed by a licensed
electrician.
o
A grounded cold water pipe must have metal
continuity to an electrical ground and must not be
interrupted by insulating materials. Any insulating
materials must be jumped with a length of No. 4
copper wire securely damped to bare metal at both
ends. See diagram below.
•
1.
Safe area for
routing electrical
wirinc
©
Cut access hole
Electrical wiring
"_
,
Joining aluminum building wire to stranded copper
wire should be done by a qualified electrician using
materials recognized by UL and local codes.
,
6"XX_-__"_X{
1 1/2"
Feed the electric wire through the access hole. Pull
out all of the slack. Route the electrical cable into the
installation area shown above. Failure to route the
wiring as shown may result in damage during final
installation.
Strip and connect the other end of the wiring to the
house junction box using one of the methods shown
below.
To house circuit breaker
panel or fuse box
To house circuit breaker
panel or fuse box
Junction box
Separate No. 10 (minimum)
copper ground wire
Wire nut,
3 pla_,
GREEN
"Wire nut,
3 places
Meter
No. 4
copper wire
Strain relief
To dishwasher
\
Junction box
Standard 3-Wire Connection
to House Junction Box
Strain relief
To dishwasher ,'_'
3-Wire Connection
with External Ground
ps
-- Bare metal
Insulated Pipe Jumper
(if necessary)
I_mCDtt,
7
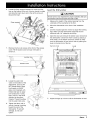
Plumbing Connections
Preparing the Dishwasher for
Installation
DO notcrossthedrain,
Water and electrical
linesin front
IOfthe
WARNING
dishwashermotor or framel
1.
Uncoil the drain hose in the back of the dishwasher.
2.
Do not remove the rear insulation blanket.
I. Cut the hotwater supplylineaccess holeinthe cabinet 3.
as shown below.
4.
Options for hot
water line and
drain line access
hole location
©
Install the leveling legs into the holes below the red
(shipping) plugs.
CAUTION
Remove the red shipping plugs.
Safe area for
routing hot water
supply line and
drain line
Hot water line
2.
If you are using an existing water line, cut 1" off the end
of the line.
3.
Route the hot water line to the installation area. Failure
to route the line as shown above may result in damage
during final installation. The hot water line must meet
the plumbing requirements on page 5.
4.
Connect the opposite end of the hot water line to the
house hot water inlet valve.
5.
Use a bucket to flush the water supply line to clear any
foreign material.
Prepare
Drain Cutout
1.
Cut a 2" diameter hole in the section of the cutout
(shaded) area shown above to allow routing of the
drain hose to the drain connection under the sink when
the dishwasher is pushed into place.
2.
If the cabinet wall is wood, sand the edges of the hole
until they are smooth and rounded. If the cabinet wall is
metal, cover all sharp edges with electrical or duct tape
to avoid cutting the drain hose.
8
_mC_
,,
Install the !egs as shown, a minimum of 1-1!4 from th e J
bottom of t he brackets, Failure tO install the legs correctly
may result in damage to the door when opened: .......
5.
Cut access
hole
With the help of at least one other person, lay the
dishwasher on its back. Do not kink or crush the drain
hose.
Rear insulation
blanket
Install leveling legs j
I
,
Locate the foam support between the motor and the
liner on the bottom of the unit. Use two hands to rotate
and slide the foam down and to the left to remove it.
Discard the foam.
Level the Dishwasher
CAUTION
A level Unit is very imp0rtant for proper operati0n: Be sure
to level the unit front to back and side to side. ...............
,
Foam support
,
,
4.
Measure the height of the cabinet opening from the
underside of the countertop to the floor.
Move the dishwasher to the front of the installation
area.
Use the included spanner wrench to adjust the leveling
legs. Make sure the dishwasher height fits into the
enclosure with 1/4" clearance at the top.
Open the door and remove the bottom rack. Check that
the dishwasher is level from front to back by placing a
level inside, on the bottom of the tub. Check to make
sure the dishwasher is level side to side by placing the
level on the top front of the tub.
Top front of tub
7.
Level
Remove the four (4) screws at the front of the access
cover. Tilt the access cover and pull it forward to
remove it.
Junction box
Access cover
,
,
Locate the water inlet
valve on the bottom of the
dishwasher. It has a 3/8"
NPT female fitting. Wrap
the threads on the 90 °
elbow (not included) with
thread seal tape or apply
joint compound. If using
tape, wrap it in the same
direction as the elbow
threads. Thread the elbow
into the water inlet valve.
\
\
®@@®®
5.
@@®11@
Adjust the legs up or down until the dishwasher is level.
Tighten the elbow with a
wrench, leaving it pointing
toward the rear of the
dishwasher. To prevent
damage, do not over
tighten.
I_mCD_
9
Positioning the Unit in the Cabinet
WARNING
•
Be careful not to pinch the wiring, hot water line and drain hose as you push the dishwasher into place. An electric
shock hazard or water damage may result from pinched wires or hoses. Damage due to improper installation is not
covered under the warranty.
°
Do not push against the front panel with your knees while positioning the dishwasher. Failure to follow this warning
could result in damage to the dishwasher and will void the warranty.
•
Make sure the power to the house junction box is off and the hot water supply valve is off before sliding the unit into
the cabinet.
IMPORTANT: Before continuing the installation, make sure
you have an adequate mounting surface beneath or on the
sides of the countertop and cabinets to attach the anti-tip
brackets and side panels. See Securing the Dishwasher
to the Cabinet and Countertop on page 12.
Finish the Drain Connection
,
Before sliding the unit into the cut-out, position the hot
water line and house wiring on the floor of the opening
to avoid interference with the base and legs of the
dishwasher.
,
Insert the drain hose into the drain access hole made
,
in the cabinet wall during previous steps.
drain system. The type of hose used should be
consistent with the type and diameter installed on the
dishwasher.
2.
Slide the dishwasher into the opening a few inches at a
time. As you push it in, pull the drain hose through the
cabinet wall under the sink. Also check to make sure
there is no interference with the house wiring or the
water line.
,
Open and close the door to insure proper operation.
If there is any binding or rubbing, adjust the leveling
legs. If the door rubs on the right side of the cabinet,
extend the left rear leg by unscrewing it 1/4 of a turn. If
the door rubs on the left side of the cabinet, extend the
right rear leg by unscrewing it 1/4 turn.
,
If door rubs
on right side,I
adjust left |
I
I
If door rubs
on left side,
adjust right
rear leg
X0
/
Cut for 3/4" connection
_
End of Drain Hose
3.
Secure the drain hose to the air gap, waste tee or
disposer with hose clamps.
4.
Make sure the drain hose is not kinked.
IMPORTANT: When connecting the drain line to the
disposer, check to be sure that the knockout plug on the
disposer has been removed. The dishwasher will not drain
if the plug is in place.
Finish the Water Connection
,
rear leg
Larger end hose fits
disposer inlet fitting
".,o,,i
\
,,
1.
I
Cut the end of the drain hose if necessary for the
proper connection size and application. See below.
Cut for 5/8" connection \
Check the dishwasher to make sure it is level. Verify
that the dishwasher is adjusted to the correct height
and is centered in the enclosure.
,
The dishwasher is supplied with a 72" long drain hose.
If a longer drain hose is required, you may add an
extension up to 48" of length. Maximum total drain
hose length is 10 feet. The hose must not restrict the
flow from the drain of the dishwasher to the house's
,_
Make sure that there are no sharp bends or kinks in the
line to restrict the water flow.
Insert the water line into the 90 ° elbow connected to
the water inlet on the bottom of the dishwasher. Always
use a new ferrule and
compression nut.
6.
Check again to see if the dishwasher is level. Repeat
the leveling procedures if necessary. To prevent leaks,
do not over-torque the legs.
10 c_acar
3.
Slide the ferrule against
the elbow and secure
with the compression nut.
4.
Turn the water on to
check for leaks.
90 ° elbow
Hot water line
Finish the Electrical Connection
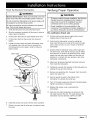
Verifying Proper Operation
WARNING
WARNING
Electric Shock Hazard - Make sure electrical power has
been turned off at the circuit breaker panel or fuse box.
To ensure a safe and proper installati0n the following
cheCklist should be completed by the nsta!ler t0
ensure that no part of the installation has been
oVerlooked and the unit is working properly
Do not connect the dishwasher to the power supply until
the appliance is permanently grounded.
All wiring connections must be enclosed in the junction
box. This unit has copper lead wires.
,Proper
installation is the responsibility of the
homeowner. The importance of proper installation of
your Dacor dishwasher cannot be overemphasizedl
1.
Verify that the power is turned off at the source.
2.
Strip the necessary insulation off the wires in order to
make a good connection.
Pre-verification
3.
Fit the strain relief onto the outer sheath of the wire.
[]
Fit the strain relief into the junction box hole and
tighten.
Confirm that the main power supply (at the circuit
breaker panel or fuse box) is off.
[]
Verify that the dishwasher is level by pulling the
lower rack half way out. Let go of the rack and make
sure it does not roll in or out. If it does, re-level the
dishwasher.
[]
Double check the electrical wiring, water supply line
and drain hose. Verify that all wiring is secure. Make
sure there are no kinks in the electrical wiring, water
supply line and drain hose. Make sure they are not
pinched or in contact with door springs or any other
dishwasher components.
[]
Make sure all packing materials have been removed
from inside the dishwasher.
[]
Familiarize yourself with operation of the dishwasher by
reading the use and care manual.
[]
Remove any protective film, if present, from the control
panel, door panel, etc.
[]
Add two quarts of water to the bottom of the
dishwasher to lubricate the pump seal.
[]
Turn on the water supply and check for plumbing leaks.
Tighten connections if necessary.
[]
Replace the access cover (underneath the
dishwasher).
[]
Verify the hot water temperature by turning on the
hot water faucet at the sink. The water going to the
dishwasher must be between 120°F and 150°F.
,
,
Locate the white, black and green dishwasher wires
with stripped ends. Use wire nuts to connect the
incoming ground wire to green, white to white and
black to black.
Strain relief
Ground
Check List
Continued...
6.
Install the junction box cover with the screw provided.
7.
Check to be sure that the wires are not pinched under
the cover.
ctacor
11
Verifying Proper Operation, Cont.
Wet Test Check List
[]
Turn on the main power supply.
[]
Program the dishwasher to run a normal wash. See the
use and care manual for specific operating instructions.
[]
Close the door completely.
[]
Operate the machine through at least one fill and pump
out and check the following items:
0
Make sure the water completely covers the filter.
0
Make sure all water is pumped out during the pump
phase of the cycle.
0
Check connections for leaks.
Securing the Dishwasher to the
Cabinet and Countertop
[_
To maintain position and alignment, Dacor recommends
that the dishwasher be secured to the countertop. In
cases where it is not possible to anchor to the countertop
(for example, when the dishwasher is installed beneath
a granite counter), the appliance may be anchored to
adjacent cabinets.
Anti-tip Brackets
12 c_acar
properly:
Verify that power is supplied to the dishwasher.
•
Check all plumbing connections.
•
Repeat the verification test.
If the appliance still does not work, contact Dacor
Distinctive Service at (877) 337-3226. Do not attempt
to repair the appliance yourself. If you need service, be
sure to have the model and serial numbers available
when you call. See the inside cover for location.
Dacor is not responsible for the cost of correcting problems
caused by a faulty installation.
Attaching
the Unit to the Countertop
1.
Determine if the dishwasher can be attached to the
countertop. Check at a depth of 2.5" under the counter
to ensure sufficient mounting support exists. If sufficient
mounting support does not exist, attach the unit to
adjacent cabinets. See facing page.
2.
If sufficient support exists to attach to the countertop,
drill pilot holes into the underside of the countertop for
the provided mounting screws.
3.
Secure the anti-tip brackets to the countertop using the
provided screws as shown.
support exists ................
Attach the Anti-Tip Brackets:
fails to operate
•
CAUTION
Make sure to anChor at leas t _0of the antiitip braCkets,
one on each side of the dishwasher. Make sure sufficient
countertop/cabinet
If the dishwasher
Attaching
,
the Unit to the Adjacent
Cabinets
Remove the (2) plastic plugs on each side of the inside
of the dishwasher frame.
2.
Drill pilot holes into the adjacent cabinets for the
provided mounting screws.
3.
Secure the anti-tip brackets on both sides to the
cabinets using the provided screws as shown.
4.
Replace the plastic plugs.
Adjusting the Stainless Steel Trim
Plates
Your Dacor dishwasher has been equipped with adjustable
stainless steel side trim plates. Each side can be adjusted
independently to create a clean, integrated look with your
cabinets.
To Adjust the Side Trim Strips
2 places
1.
Open the door to the fully open position.
2.
Loosen, but do not remove, the screws []
top and side trim plates.
3.
Adjust the side trim plates []
4.
Retighten the screws.
holding the
to cover the opening gap.
/
Installing the Toe Kick
1.
Loosen the depth adjustment screw on each side as
shown.
2.
Slide the bracket out to the proper depth and retighten
the screws.
3.
Attach the supplied toe kick to the brackets with the
provided color matched screws.
Adjust bracket to
desired toe kick
depth
)
\
\
Adjustment screws
/
,r
,/
Adjust to
touch floor
_ta_or
13
4#
The Life of the Kitchen?
Dacor
• 1440 Bridge Gate Drive, Diamond Bar, CA 91765
• Tel: (800) 793-0093
• FAX: (626) 403-3130
• www.Dacor.com