1
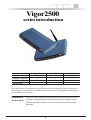
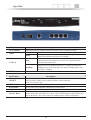
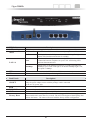
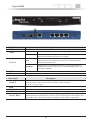
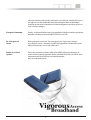
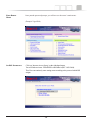
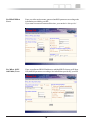
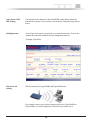
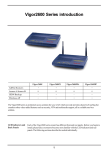
DRAYTEK
VIGOR
2500
SERIES
1
Vigor2500
series introduction
ADSL Routers
Annex A / Annex B
ISDN Backup
Wireless AP
Vigpr2500
Vigpr2500We
*
*
*
*/*
*/*
*/*
~
~
~
~
*
*
Vigpr2500Wt
The Vigor2500 series is an Internet access solution for your LAN which not only provides shared
web surfing but countless other value-added features such as security, VPN and multimedia support,
all in a reliable one-box solution.
LED Indicators
and Back Panels
Each of the Vigor2500 series router has different front and rear panels. Before
you begin to install, please take a moment to become more familiar with the
LED indicators and rear panels. The following sections describe the models
individually.
2
Vigor2500
LED Indicators
Descriptions
ACT(Activity)
Blink when power is supplied to the router and the router is running normally.
LINE
ON when the ADSL network is correctly setup
ADSL
LAN 1-4
DATA
Blinking indicates the DSL protocols start handshaking.The light will
remain still when data transmission is available.
Link
Local Area Network port status. A steady LED indicates a
connection between computers on your LAN. A flickering LED
indicates data transmission.
Speed status of the Ethernet connection. A steady LED indicates
100Mbps speed. If the Link light is on and the 100Mbps light is off,
the speed is 10Mbps.
VPN connection status. A steady LED indicates VPN connection is up.
100Mbps
VPN
Back Panels
ON/OFF
PWR
P1,P2,P3,P4
ADSL
Factory Reset
Descriptions
ON / turn on power. OFF / switch off the power.
Only the power adapter comes with the package can be connected
to the AC 9V power jack.
To connect Vigor 2500 to an electrical outlet.
These switch ports should be connected to your local PCs.
To connect the ADSL cable to your telephone jack.
The restore default settings: While the router is running (ACT LED blinking), press the
button and hold for more than five seconds. The ACT LED begins to blink rapidly, then
release the button . The router will restart with the factory default configuration.
3
Vigor2500We
LED Indicators
Descriptions
ACT(Activity)
Blink when power is supplied to the router and the router is running normally.
ON when the ADSL network is correctly setup
LINE
ADSL
LAN 1-4
VPN
WL
Back Panels
ON/OFF
PWR
P1,P2,P3,P4
ADSL
Factory Reset
DATA
Blinking indicates the DSL protocols start handshaking.The light will
remain still when data transmission is available.
Link
Local Area Network port status. A steady LED indicates a
connection between computers on your LAN. A flickering LED
indicates data transmission.
Speed status of the Ethernet connection. A steady LED indicates
100Mbps
100Mbps speed. If the Link light is on and the 100Mbps light is off,
the speed is 10Mbps.
VPN connection status. A steady LED indicates VPN connection is up.
ON when the wireless LAN is ready.A flickering LED indicates data transmission.
Descriptions
ON / turn on power. OFF / switch off the power.
Only the power adapter comes with the package can be connected
to the AC 9V power jack.
To connect Vigor 2500We to an electrical outlet.
These switch ports should be connected to your local PCs.
To connect the ADSL cable to your telephone jack.
The restore default settings: While the router is running (ACT LED blinking), press the
button and hold for more than five seconds. The ACT LED begins to blink rapidly, then
release the button . The router will restart with the factory default configuration.
4
Vigor2500Wt
LED Indicators
Descriptions
ACT(Activity)
Blink when power is supplied to the router and the router is running normally.
ON when the ADSL network is correctly setup
LINE
ADSL
LAN 1-4
VPN
WL
Back Panels
ON/OFF
PWR
P1,P2,P3,P4
ADSL
Factory Reset
DATA
Blinking indicates the DSL protocols start handshaking.The light will
remain still when data transmission is available.
Link
Local Area Network port status. A steady LED indicates a
connection between computers on your LAN. A flickering LED
indicates data transmission.
Speed status of the Ethernet connection. A steady LED indicates
100Mbps
100Mbps speed. If the Link light is on and the 100Mbps light is off,
the speed is 10Mbps.
VPN connection status. A steady LED indicates VPN connection is up.
ON when the wireless LAN is ready.A flickering LED indicates data transmission.
Descriptions
ON / turn on power. OFF / switch off the power.
Only the power adapter comes with the package can be connected
to the AC 9V power jack.
To connect Vigor 2500Wt to an electrical outlet.
These switch ports should be connected to your local PCs.
To connect the ADSL cable to your telephone jack.
The restore default settings: While the router is running (ACT LED blinking), press the
button and hold for more than five seconds. The ACT LED begins to blink rapidly, then
release the button . The router will restart with the factory default configuration.
5
Copyright
Declarations
Copyright © 2003 All rights reserved. This publication contains information that is
protected by copyright. No part may be reproduced, transmitted, transcribed, stored
in a retrieval system, or translated into any language without written permission from
the copyright holders.
Trademarks
The following trademarks are used in this document:
. Microsoft is a registered trademark of Microsoft Corp.
. Windows,Windows 95, 98, Me, NT, 2000, XP and Explorer are trademarks of
Microsoft Corp.
. Apple and Mac OS are registered trademarks of Apple Computer Inc.
Other products may be trademarks or registered trademarks of their respective
manufacturers.
Safety Instructions
Warranty
. Read the installation guide thoroughly before you set up the router.
. The router is a complicated electronic unit that may be repaired only be authorized
and qualified personnel. Do not try to open or repair the router yourself.
. Do not place the router in a damp or humid place, e.g. a bathroom.
. The router should be used in a sheltered area, within a temperature range of +5 to +40
Celsius.
. Do not expose the router to direct sunlight or other heat sources. The housing and
electronic components may be damaged by direct sunlight or heat sources.
. Keep the package out of reach of children.
. When you want to dispose of the router, please follow local regulations on
conservation of the environment.
We warrant to the original end user (purchaser) that the router wil be free from any
defects in workmanship or materials for a period of three (3) years from the date of
purchase from the dealer. Please keep your purchase receipt in a safe place as it
serves as proof of date of purchase. During the warranty period, and upon proof of
purchase, should the product have indications of failure due to faulty workmanship
and/or materials, we will, at our discretion, repair or replace the defective products
or components, without charge for either parts or labor, to whatever extent we
deem necessary tore-store the product to proper operating condition. Any
replacement will consist of a new or re-manufactured functionally equivalent product
of equal value, and will be offered solely at our discretion. This warranty will not
apply if the product is modified, misused, tampered with, damaged by an act of God,
or subjected to abnormal working conditions. The warranty does not cover the
bundled or licensed software of other vendors. Defects which do not significantly
6
affect the usability of the product will not be covered by the warranty.We reserve
the right to revise the manual and online documentation and to make changes
from time to time in the contents hereof without obligation to notify any person of
such revision or changes.
European Community
Hereby, we declare that the router is in compliance with the essential requirements
and other relevant provisions of R&TTE Directive 99/5/EC.
Be A Registered
Owner
Web registration is preferred. You can register your Vigor router via http://
www.draytek.com.tw . Alternatively, fill in the registration card and mail it to the
address found on the reverse side of the card.
Firmware & Tools
Updates
Due to the continuous evolution of DrayTek ADSL & Router technology, all
routers will be regularly upgraded. Please consult the DrayTek web site for more
information on newest firmware, tools and documents.
http://www.draytek.com.tw
7
Vigor2500
Series Quick Start Guide
Aim of this
chapter
Delivery check
Quickly connect your router to the Internet
Check your router package for the following items :
The Router
1 printed Quick Start Guide with warranty/ registration card
1 CD includes detailed User Manual in electronic form, released firmware and
utilities
1 AC/DC power supply adapter (black)
1 Ethernet LAN cable (blue) for connection to a computer or hub
1 ADSL line cable (RJ-11 or RJ-45, black)
1 external antenna for Vigor2500We/Wt
Identify your variant
Your router package should contain all these items. If any item is
missing or damaged, contact your dealer or our Customer Service
Department immediately.
The Vigor2500 series all contain Annex A/Annex B models,
please check if the package is suitble for your using.
You can get the information from bottom of Vigor2500
series router.
Annex A : connecting to an analog POTS line
Annex B : connecting to a digital ISDN line
8
What you
need from ISP
DSL line
Depending on the variant Vigor2500 series you purchased, the following DSL
service must be available at your local premisses:
ADSL/POTS : ADSL service must be enabled on your POTS telephone line.
ADSL/ISDN : ADSL service must be enabled on your ISDN telephone line.
DSL Parameters
It should provide at least the following information from ISP :
1. The VPI/VCI of the virtual channel to use on the DSL line
2. Protocol : PPPoE, PPPoA or MPoA (RFC1483/2684)
3. Encapsulation Method : LLC/SNAP or VCMUX
4. Modulation Method : T1.413, G.lite, G.DMT
(Vgior2500 series provides multimode which can automatically detect)
9
Example:
VPI/VCI = 0/33
Protocol = PPPoA
Encapsulation Method = VCMUX
Modulation Method = G.DMT
Username/Password
Only for PPPoE/PPPoA mode users
Fixed IP Address/ Subnet Mask/ Gateway IP Address
Only for MPoA mode users. Some ISP will use DHCP method to provide IP
address for MPoA mode users, then users do not need to know the fixed IP
address.
If you do not know these information in detail, please contact your ISP to get
these informations.
What you need
in your side
Local networking
To use the Ethernet port(s) you need at least:
One PC with an Ethernet Card installed.
TCP/IP protocol suite
For TCP/IP, your PC can set either static IP or DHCP to ask IP from router. The
default gateway of router is 192.168.1.1. If static IP is chosen, you can set
192.168.1.x for your PC.
A Web browser
10
You must wire
Ethernet port (between router and PC), DSL port and Power port as below:
Vigor2500
Vigor2500We/Wt
11
Install ‘ Router
Tools ‘
This tool which provides ‘Quick StartWizard’, ‘Firmware Upgrade Program ’
and ‘Syslog Monitor’ client is in the attached CD. It supportsWindows, Mac OS
8/9 and Mac OS X.
Turn on your router
Once all previous steps are completed, turn on your router. After Power is on,
the ‘ACT’ LED and corresponding LAN port LED will light.
If the LEDs do not light normally, please refer to section A, ‘Trouble Shooting’,
for furthur information.
Connect to
Router
If the PC is set to obtain IP address automatically (recommended), you can
useWindows winipcfg.exe or ipconfig.exe to check if it has obtained an IP address
from the router. If not, please reboot PC and ensure that it has obtained an IP address
from the router.
Then you can use “Quick Start Wizard” to confige router or connect to router via
Web browser directly. The default IP of router is 192.168.1.1.
Password
The default password is null. You can press ‘OK’ to skip it.
12
Enter Router
Menu
Once past the password prompt, you will now see the router’s main menu:
(Example: Vigor2500)
Set DSL Parameters
Click on ‘Internet Access Setup’ on the right-hand menu.
You will find two items : PPPoE/PPPoA and MPoA (RFC 1483/2684).
Then You can continuely enter setting menu according to the protocol which ISP
assigns.
13
For PPPoE/PPPoA
Users
Enter your allocated username, password and DSL parameters according to the
information provided by your ISP.
If you want to connect to Internet all the time, you can check ‘Always On’.
For MPoA (RFC
1483/2684) Users
Enter your allocated WAN IP address(or enabling DHCP client to get IP from
ISP) and DSL parameters according to the information provided by your ISP.
14
Auto detect ATM/
DSL Setting
You can also use this function to detect ATM/ DSL setting. Please follow the
instructions to operate. If your country is not in the list, it may take longer time to
detect.
Surfing Internet
Once all previous steps are completed, you can surf Internet now. You can also
monitor the connection condition via router management function.
(Example: Vigor2500)
Wireless LAN
Setting
Wireless setting is for Vigor2500We and Vigor2500Wt only.
If you want to connect your wireless supported devices to Vigor2500We or
Vigor2500Wt, you need configure the router before you start to use it.
15
Wireless LAN
Interface
The Vigor2500We and Vigor2500Wt are equipped with a wireless LAN interface
compliant with the 11 Mbps IEEE 802.11b protocol. The speed of Vigor2500Wt can up
to 22 Mbps. The features of wireless LAN capability enable high mobility of several
simultaneous users accessing all LAN facilities just like on a wired LAN as well as Internet
and WAN access.
The Frequency Domain is set as Europe and the MAC address will show as above. Click
General Settings, you could configure the SSID and wireless channel.
Scheduler: You can set wireless device to work at some time interval only. These are 4
internals you can choose: schedule1, schedule2, schedule3, and schedule4. The default
setting is always working. You can set the schedule under Advanced Setup >> Call
Schedule Setup. (Please refer to detail manual on the attached CD)
16
SSID(Service Set Identification): You should set the SSID same as your note book wireless
card to allow the client PCs to access the network via the wireless LAN interface. The
default SSID is "default".
Channel: To select a wireless channel for Vigor2500We / Vigor2500Wt. The default channel
is 6.
Hide SSID: To check it to hide SSID when the wireless clients sniffing radio.
WEP Security of
Wireless LAN
Interface
WEP Encryption:
To improve the security and privacy of your wireless data packets the WEP encryption
feature can be used. The WEP encrypts each frame transmited from the radio using one of
the keys entered from this panel. WEP encryption can be enabled by selecting 64 bits or
128 bits from pull down menu. These are 4 key sets can be entered and only one key can
be selected. The key can be entered by ASCII or Hexadecimal.
Disable: Turns off the WEP encryption mechanism.
WEP 64 Bit: For 64bits WEP key, either 5 ASCII characters or 10 hexadecimal digitals
leading by 0x can be entered. For example, ABCDE or 0x4142434445.
WEP 128 Bit: For 128bits 13 ASCII characters or 26 hexadecimal digits leading by 0x can
be entered. For exmaple, ABCDEFGHIJKLM or 0x4142434445464748494A4B4C4D.
17
Access Control of
Wireless LAN
Interface
For additional security of wireless access, the Access Control allows your to restrict the
network access rights by the wireless LAN MAC address of client. Only the valid MAC
address which has been configured can allow to access the wireless LAN interface.
Enable Acces Control: To check the Enable Access Control to enable the MAC Address
access control feature.
MAC Address: To type the specific MAC Address which could be added on, removed
from or edited from the access list above.
ADD: To add a MAC address on the list.
Remove: To remove the selected MAC address on the list.
Edit: To edit the selected MAC address on the list.
Cancel: To cancel the MAC address access control setup.
Clean All: To clean all of configured MAC address on the list.
OK: To save the access control list.
18
Trouble Shooting for
Can not get on to the Internet
Check if the
hardware is OK?
Check if the power and LAN line are connected correctly. After power is on,
the ‘ ACT ‘ LED will blink once a second, and the correspondent LAN port
will light.
Can you ping the
router from your
PC?
19
The default gateway IP of router is 192.168.1.1.
Please check if you can ping router correctly.
For Windows
For Mac(Terminal)
If not, please check the IP address of your PC. We suggest you set ‘ get IP
automatically ‘
20
For Win98/ Me user
1. Enter “Control Panel” and double
click “Network”.
2. Choose “TCP/IP of LAN device” and press “
Properties”.
3. Choose “Obtain an IP address automatically”
21
For Win2000 user
1. Enter “Control Panel” and double click
“Network and Dial-up Connections”.
4. Select ‘Obtain an IP address automatically’
2. Right click “Local Area Connection” and
choose “Properties”.
3. Choose “TCP/IP” and press “Properties”.
22
For XP user
1. Enter “Control Panel” and double click
“Network Connections”.
4. Select “Obtain an IP address automatically”
2. Right click LAN icon and choose
“Properties”.
3. Choose “TCP/IP” and press “Properties”.
23
For Mac OS9.x user
Control Panel —> TCP/IP
System Preferences —> Network
For Mac OSX user
24
Are DSL/ ISP
settings Ok?
Connect to router Web Configurator.
(Example: Vigor2500)
Check if the setting of DSL is ok. (For MPoA users, please refer to the MPoA
explanation on page 24 )
—> VPI/VCI/Modulation mode:
T1.413, G.Lite, G.DMT, Mu ti-mode
25
—>Encapsulation mode: VCMUX or LLC/SNAP
For PPPoE/PPPoA user, please check if user name/ password provided by
ISP are correct or not.
26
For MPoA (RFC1483/2684) mode users, please check if the WAN IP/ Gateway/ Namemask is set or ISP requires you to use DHCP client to get WAN IP.
Check DSL Status
You can know the DSL status via status monitor.
(Example: Vigor2500)
Report to people
who concerned if
still can not work
If the router setting is OK and your PC on the LAN can also talk to router
successfully, there may be wrong settings on DSL (eg. VPI, VCI, modulation
etc...) when there is still no ADSL Internet connection. Please contact local
ISP representatives to help you for configuration. If the router does not work
correctly, please contact your dealer for help. For any further questions, please
write email to [email protected].
www.simet.com.tr
27