1
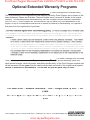
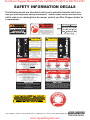
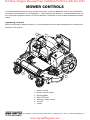
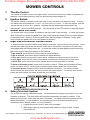
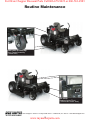
For Dixie Chopper Discount Parts Call 606-678-9623 or 606-561-4983
Model #
____________________
Engine Model # ____________________
Serial #
____________________
Engine Serial #
____________________
Date Purchased ____________________
Engine Spec. #
____________________
XCaliber Owner’s Manual
700110
January 2007
www.mymowerparts.com
For Dixie Chopper Discount Parts Call 606-678-9623 or 606-561-4983
About This Manual
AUTHORIZED DEALER
This owner’s manual is considered a permanent part of the mower. It must be available to all of the
operators and/or person(s) servicing the mower. Should the mower be resold, this manual must remain
with the mower.
All information, illustrations, and specifications contained in this manual were in effect at the time of
publication. Dixie Chopper reserves the right to change, modify, and/or discontinue specifications and/
or design without notice. If there is a change that has been made to your mower which is not shown
or reflected in this manual, please see your authorized Dixie Chopper Mower dealer before operating
and/or servicing the equipment.
Congratulations on the purchase of your new Dixie Chopper commercial mower. We at Dixie Chopper are confident that this mower will provide you with years of excellent performance, durability, and
trouble free service when operated and maintained as directed in this manual.
Should you ever have any questions regarding the operation, maintenance, or safety of your mower,
please contact your authorized Dixie Chopper Mower dealer who has been specially trained on operation and service of Dixie Chopper Mowers.
A space has been provided on the cover and below to record information about your new Dixie Chopper
Mower. Please take time to record such information for future reference, especially when you contact
an authorized Dixie Chopper Mower dealer with questions.
Date Purchased:
___________________________________________
Model Number:
___________________________________________
Serial Number:
___________________________________________
Purchased From:
___________________________________________
Dixie Chopper • 6302 E. County Road 100 N. • Coatesville, IN • 46121 • www.dixiechopper.com
II
www.mymowerparts.com
For Dixie Chopper Discount Parts Call 606-678-9623 or 606-561-4983
TABLE OF CONTENTS
Warranty Policies
Optional Extended Warranty Programs
Safety Information
General Safety Precautions
Safety Information Decals
Mower Controls
Operating the Mower
Mower Deck Adjustment
Routine Maintenance
Dixie Chopper • 6302 E. County Road 100 N. • Coatesville, IN • 46121 • www.dixiechopper.com
1
www.mymowerparts.com
2
3
4
5
7
8
10
12
13
For Dixie Chopper Discount Parts Call 606-678-9623 or 606-561-4983
Warranty Policies
There are no understandings, agreements, representations, or warranties expressed
ressed or implied (including but not
limited to any regarding the merchantability or fitness for a particular purpose), not specified herein, regarding the
equipment which is the subject of this warranty.
Owner/Operator Knowledge Responsibility
Responsibility
As a condition of the Dixie Chopper warranty, the owner and operator(s) are fully responsible for having read, and
reasonably understood the proper operation and care of the Dixie Chopper Mower before attempting to operate the
mower.
Through the terms and conditions contained herein, Magic Circle Corporation and Dixie Chopper warrants that it will
adjust, repair, or replace any factory original part used in the manufacturing of a Dixie Chopper complete unit, found
to be defective in material or workmanship.
Complete Unit
Complet
The warranty period is limited to two years from the date of retail purchase on behalf of the original owner of a Dixie
Chopper Mower. This warranty will provide the cost of repair or replacement ( at the discretion of Dixie Chopper) of
the defective part, including labor. This warranty applies in like form to the original retail purchaser of a Dixie Chopper Mower used commercially, or for income producing purposes. Additionally, Dixie Chopper will provide to the
original purchaser beyond the initial 2 year warranty as stated above, replacement of any main frame, front fork and
castor bearings, steering levers and linkages due to breakage, or any stainless steel body due to rust, for the useful
life period of the machine. This additional “lifetime warranty” covers stated parts only...no labor.
Deck Spindle Assembly
Parts and labor for the replacement of the complete deck spindle assembly (deck hub, deck spindle bearings, deck
hub spacer, and blade spindle shaft), of the Dixie Chopper Mower will be warranted for three years from the retail
purchase date on behalf of the original owner against defects in materials or workmanship.
Hydro-Drive-Train
Hydro-drive components (pumps, wheel motors, and T-box), of the Dixie Chopper Mower will warranted for two
years from the retail purchase date on behalf of the original owner against defects in materials or workmanship.
Generac Engine
The Generac engine used on the Dixie Chopper Mower is warranted for period of three years from the retail purchase date on behalf of the original owner against defects in materials or workmanship. Labor required for engine
warranty will be covered by Dixie Chopper for the first two years and at the unit owners expense during the third
year.
Tires,, Blades, and Belts
Tires, blades, clutch shoes, and belts are considered to be consumable wear items, and are therefore warranted for
an initial period of 90 days against materials or workmanship defects, not for wear or abuse.
Replacement Parts (Customer proof of purchase required)
Dixie Chopper replacement parts are warranted for 90 days against defects in materials & workmanship. (Hydro
pumps and motors must be dealer installed). Coverage is for parts replacement only...no labor, and does not pertain
to improper installation or abuse.
Battery Warranty
Dixie Chopper original equipment batteries are warranted against OEM factory defects in materials or workmanship
(“discharged only and abuse” are not covered). If battery failure occurs within six months of mowers original retail
purchase date, purchase of battery will be reimbursed ($30-$50 depending on model). Battery failures occurring
beyond six months but less than one year from original retail purchase date will be reimbursed at 50% of the cost of
the standard replacement battery.
Transportation for Warranty Repairs
A Dixie Chopper Mower (including any defective part(s) requiring warranty repair, must be returned to an authorized
Dixie Chopper Service Dealer within the warranty period. The expense of transporting the unit to and from the
dealer for warranty work will be the responsibility of the mower owner.
Limitation
imitation of Warranty
The Product Registration/Dealer Delivery Certification must be mailed to Dixie Chopper within three days of the
original retail purchase date to enable accurate validation of the warranty period provided. Proof of purchase may
be required ( invoice & copy of product registration) from the unit owner to substantiate any warranty claim.. All
warranty work must be performed by an authorized Dixie Chopper Servicing Dealer, using only Dixie Chopper OEM
parts.
This warranty covers only Dixie Chopper Mower complete units that are registered with the factory when purchased
new, properly maintained, and operated under conditions considered normal for commercial turf equipment.
Dixie Chopper • 6302 E. County Road 100 N. • Coatesville, IN • 46121 • www.dixiechopper.com
2
www.mymowerparts.com
For Dixie Chopper Discount Parts Call 606-678-9623 or 606-561-4983
Optional Extended Warranty Programs
5 Year Extended Generac-Engine Warranty ($895) (5 Year Coverage from Purchase Date)
This is an extension of the original three year warranty issued by Dixie Chopper and is subject to the
same limitations. Please see Guardian Generac Engine owner’s manual for details of the original
warranty. This warranty will be administered by the Dixie Chopper Service/Warranty Department
(800-307-2667). Dixie Chopper will, at its discretion, pay for (parts only), the replacement of the
engine, or any of its components that fail due to defects in material or workmanship, for a period of
five years from the original date of purchase.
Five-Year Extended Hydro-Drive-Train Warranty ($599)* (5-Years Coverage from Purchase Date)
Dixie Chopper offers a three-year extended parts warranty covering hydro-drive-train components.
Purchasing the three-year extended parts warranty provides to the original purchaser from date of
purchase...
2 years Parts & Labor, plus an additional 3-years Parts Only warranty coverage. This means
for 5 years, if hydro-drive-train components (wheel motors, pumps & pulleys, T box & pulley,
hydro hoses, fittings, gaskets, drive linkages, bushings, wheel hubs, or wheel rims), as part
of the machine, require replacement due to a defect in materials or workmanship, Dixie Choper
will cover the cost of needed replacement part(s) is included. During the first 2 years of warranty coverage, labor for the necessary replacement of the part(s) is included. During years
3 through 5, labor for the necessary replacement of the part(s) will be the responsibility of the
machine owner.
Five Year Extended Deck Spindle Asm. Warranty($199)*
Warranty($199) (5-Years Coverage from Purchase
Date) This five year extended warranty covering the complete deck spindle assembly (deck hub,
deck spindle bearings, deck hub spacer, and blade-spindle shaft), of the Dixie Chopper complete unit
will be warranted for five years from the retail purchase date on behalf of the original owner against
defects in materials or workmanship. The 4th and 5th year are parts only, no labor.
Dixie Chopper will replace all or part of the assembly at its discretion.
Purchase all three Extended Warranties at time of original retail purchase for
$1495
Purchase Hydro and Spindle Warranties at time of original retail purchase for
$798
Dixie Chopper • 6302 E. County Road 100 N. • Coatesville, IN • 46121 • www.dixiechopper.com
3
www.mymowerparts.com
For Dixie Chopper Discount Parts Call 606-678-9623 or 606-561-4983
SAFETY INFORMATION
Read This Manual Carefully And Thoroughly Before Operating The Mower!
1.
2.
3.
Training
Carefully and thoroughly read the owner’s manual. Allow adequate time to fully understand the
controls and operation of the equipment.
Never allow anyone to operate the mower that has not read and fully understood the owner’s
manual.
Do not carry passengers. Avoid mowing while people, especially children and pets are nearby,
since rotating blades can throw rocks and other items with enough force to cause serious injury.
Operator:
Before Use of Equipment
Wear protective clothing while mowing. Long trousers and safety glasses will help reduce the risk
of injury from thrown objects. It is recommended that steel toe shoes with aggressive soles or some
other type of substantial footwear be worn to help protect your feet and maintain traction on slopes or
uneven ground. Always wear hearing protection.
Mowing Area:
Thoroughly inspect the area where the equipment is to be used. Look for items such as stones,
sticks, wire and other foreign objects. When struck by the mower, these and other objects may become projectiles that could lead to serious injury and/or death.
Mower:
For your safety and the long life of your mower, always inspect the mower before each use. Before
inspection, make sure it is on a flat and level surface, the blades are disengaged, the ignition switch
off with the key removed, and the spark plug wire is off of the spark plugs.
General Condition:
• Walk around the mower looking for any fluid spills or leaks on or underneath the mower. Remove any and all excessive debris, dirt, and/or fluids.
• Look for signs of damage or excessive wear. Check the tightness of all nuts, bolts, pins, and
screws. Tighten any that may be loose and replace any that may have been lost during use.
• Be sure the safety interlock seat switch is operating properly so that the engine can not be
started unless the operator is in the seat with the blades disengaged.
• Check the mower blades for any damage or abnormal wear and replace in sets so that they
are balanced.
• Check the tire pressure on all four tires.
• Check all belts for proper wear and correct tension.
• Check engine oil and air filters as recommended in the engine manufacturers’ operators
manual.
Dixie Chopper • 6302 E. County Road 100 N. • Coatesville, IN • 46121 • www.dixiechopper.com
4
www.mymowerparts.com
For Dixie Chopper Discount Parts Call 606-678-9623 or 606-561-4983
GENERAL SAFETY PRECAUTIONS
1.
2.
3.
4.
5.
6.
7.
8.
9.
10.
11.
12.
13.
14.
15.
16.
17.
18.
19.
20.
21.
22.
23.
24.
25.
26.
27.
28.
Never allow individuals who have not read this Operator Manual to operate the mower.
Never allow children to operate mower. This mower is intended for adult use only.
Never operate the mower when barefoot or when wearing open sandals.
Thouroughly clear the work area of objects (wire, stones, sticks, bones, etc.) which may damage the mower or cause personal injury to the operator, bystanders, or other property.
Before attempting to start the engine, engage parking brake, disengage the deck and all at
tachment clutches and position the steering levers into the neutral lock position.
Give complete, undivided attention to the job at hand.
Whenever the deck is engaged, NEVER direct the discharge of material toward bystanders nor
allow anyone near the mower while in operation.
Whenever possible, avoid operating the mower in wet grass.
Mow only in well lit areas.
Use EXTREME CAUTION when mowing and/or turning on hill sides.
Reduce speed and exercise EXTREME CAUTION on slopes to prevent tipping over or loss of
control.
Never operate mower on slopes exceeding 15 degrees.
To avoid tipping over, avoid sudden motion when mowing uphill.
When mowing downhill, loss of traction may occur. Weight transfer to the front wheels may
cause drive wheels to slip and result in loss of control. To help re-gain control, increase
ground speed and gradually turn left or right followed by a decrease in ground speed to regain
directional control.
Do not mow slopes when grass is wet.
Be especially cautious when changing direction on slopes.
Stay alert for holes, rocks and roots in the terrain, which may cause the mower to upset.
Keep away from drop-offs.
Do not operate the mower near any body of water, (lakes, ponds, riverbanks, etc.).
When backing up, make sure the area behind you is clear. Dixie Chopper’s zero turning radius
nearly eliminates the need for backing up. Simply turn the mower around within its own dimension and proceed forward.
Disengage power to attachments, set parking brake, and stop engine before leaving the operator position.
Disengage power to attachments, set parking brake, and stop engine before making any adjustments.
Disengage power to deck and other attachemnts when the mower is being transported or not
in use.
Take all possible precautions when leaving mower unattended; such as disengaging deck,
engaging parking brake, lowerning attachments, placing steering levers into the neutral lock
position, stopping the engine, and removing the key.
Never operate the mower with defective guards, shields, or covers. Always have safety
shields, guards, switches, and other devices in place and in proper working condition.
Place OCDC in the down or operating position when discharge is toward road, street, or
property.
Keep hands, feet and clothing away from rotating parts anytime the mower engine is running.
Do not mow with damaged or worn blades. Make sure blades are properly balanced.
Dixie Chopper • 6302 E. County Road 100 N. • Coatesville, IN • 46121 • www.dixiechopper.com
5
www.mymowerparts.com
For Dixie Chopper Discount Parts Call 606-678-9623 or 606-561-4983
GENERAL SAFETY PRECAUTIONS
29.
30.
31.
32.
33.
Stop the engine, set parking brake, and remove the key:
• After striking a foreign object. Inspect the mower for damage and make any repairs
before starting and operating the mower.
• Before making any adjustments or repairs.
• Before unclogging discharge chute.
• Before refueling.
• Before exiting the mower.
Do not change the engine governor settings or overspeed the engine.
Uses care when pulling loads or using heavy equipment.
• Use only approved drawbar hitch points.
• Limit loads to those you can safely control
• Do not turn sharply.
• Use care when backing.
• Use extreme caution on slopes.
• Loads should not be pulled down slopes. Load may exceed braking capabilities of the
mower causing serious injury or death.
Use caution when near or crossing driveways, parking lots, roads, and sidewalks.
Always run engine at idle for at least one minute (five minutes maximum) for each hour of previous running, before shutting down engine.
Dixie Chopper • 6302 E. County Road 100 N. • Coatesville, IN • 46121 • www.dixiechopper.com
6
www.mymowerparts.com
For Dixie Chopper Discount Parts Call 606-678-9623 or 606-561-4983
SAFETY INFORMATION DECALS
The following decals are intended to alert you to potential hazards and to provide you with important safety information. Should these decals become difficult to read or are missing from the mower, contact you Dixe Chopper dealer for
a replacement.
30229
DANGER
PELIGRO
KEEP HANDS 7 FEET AWAY.
DO NOT OPERATE MOWER UNLESS GUARD
OR GRASS CATCHER IS ATTACHED.
MANTENGA ALEJADOS MANOS Y PIES.
NO OPERE EL CORTACESPED A MENOS
QUE LA PROTECCION O CAPTACION DE
HIERBA ESTE COLOCADA.
800048
DANGER
Shut off engine before refueling.
Shut off engine before refueling.
Never fill fuel tank indoors or when engine is hot.
Never fill fuel tank indoors or when engine is hot.
Wipe up all spilled fuel before starting engine.
Wipe up all spilled fuel before starting engine.
Do not smoke while refueling.
Do not smoke while refueling.
PRECAUCION
PRECAUCION
Cierre El Motor Antes De Volver A Cargar
El Tanque.
Nunca Llene El Tanque De Combustible En
Interiores O Cuando El Motor Este Caliente.
Limpie Todo Combustible Derramado Antes De
Encender El Motor.
No Fume Al Cargar Combustible.
Cierre El Motor Antes De Volver A Cargar
El Tanque.
Nunca Llene El Tanque De Combustible En
Interiores O Cuando El Motor Este Caliente.
Limpie Todo Combustible Derramado Antes De
Encender El Motor.
No Fume Al Cargar Combustible.
TO AVOID INJURY, READ
OWNER’S MANUAL
Never mow near people
Never carry passengers
Never use when under influence of drugs or alcohol
Set parking brake & remove key if leaving machine
Avoid blade unless blade & engine are stopped
Use safely; machine is not a toy
Avoid slippery or steep areas
Look behind machine before backing
Keep safety devices in place and working
Remove potential thrown objects
Know location and function of controls
PELIGRO
CAUTION
LEA EL MANUAL DEL
USUARIO PARA EVITAR
LESIONES.
Nunca corte el cesped cerca de personas
No llevar pasajeros en ninguna circunstancia
No utilice el cortacesped bajo la influencia de drogas o alcohol
Coloque el freno de estacionamiento y retire la llave si abandona la maquina
Evite el contacto con las cuchillas a menos que el motor y las cuchillas esten detenidas
Sea prudente, la maquina no es un juguete
Mire detras de la maquina al retroceder
Mantenga los dispositivos de seguridad en su lugar y funcionando
Evite areas resbaladizas o empinadas
Retire objetos que la maquina pueda lanzar
Aprenda el funcionamiento y ubicacion de los controles
NOTICE
For best performance, minimum engine RPM should be 3750 under no load.
Continuous operation below 3500 RPM will result in engine over-heating and
an unacceptable quality cut. RPM may be reduced for trimming and/or other
light load duties.
If the engine cannot maintain 3500 RPM, under a load, operator should reduce
ground speed, consult manual, and/or contact your dealer for any questions
or necessary adjustments.
DANGER
NEVER MOW
SIDE HILL
OVER 5
800047
CAUTION
TO AVOID INJURY, READ
OWNER’S MANUAL
NEVER MOW
UP HILL
OVER 10
NEVER MOW
SLOPE
OVER 15
STOP BLADE & BACK SLOWLY IF MACHINE STOPS GOING UPHILL
PELIGRO
NUNCA CORTE EL
CESPED LATERALMENTE
CON UNA INCLINACION
MAYOR A 5
LEA EL MANUAL DEL
USUARIO PARA EVITAR
LESIONES.
NUNCA CORTE CESPED
CUESTA ARRIBA CON
UNA INCLINACION
MAYOR A 10
NUNCA CORTE CESPED
EN PENDIENTES CON
UNA INCLINACION
MAYOR A 15
DETENGA LA CUCHILLA Y RETROCEDA LENTAMENTE SI LA MAQUINA DEJA DE IR CUESTA ARRIBA
NOTICE
WARRANTY TO BE USED ONLY TO COVER CORRECTION OF
MANUFACTURING DEFECTS. IT WILL NOT BE USED TO COVER
LACK OF MAINTENANCE, OPERATOR MIS-USE, NORMAL WEAR,
ACCIDENTS, CUSTOMER DIS-SATISFACTION OR TRANSPORTATION CHARGES TO AND FROM THE SERVICING DEALER.
DANGER
Dixie Chopper • 6302 E. County Road 100 N. • Coatesville, IN • 46121 • www.dixiechopper.com
7
www.mymowerparts.com
For Dixie Chopper Discount Parts Call 606-678-9623 or 606-561-4983
MOWER CONTROLS
It is recommended that before you operate the mower, you allow adequate time to fully understand
the controls and operation of the equipment. When reading this manual, it is recommended that you
do so with the equipment nearby for quick orientation, reference of controls and maintenance adjustments.
Operating Controls
Before continuing to read the manual, it is recommended that you take adequate time to identify the
controls of the mower.
1 6
5
7
2
4
3
1.
2.
3.
4.
5.
6.
7.
Ignition Switch
Electric Clutch Switch
Parking Brake
Deck Lift Pedal
Steering Control Levers
Throttle
Choke
Dixie Chopper • 6302 E. County Road 100 N. • Coatesville, IN • 46121 • www.dixiechopper.com
8
www.mymowerparts.com
For Dixie Chopper Discount Parts Call 606-678-9623 or 606-561-4983
MOWER CONTROLS
1.
Throttle Control
The throttle is located on top of the right fender. Move the throttle fully forward to operate the
machine. Move the throttle fully back for idle before shutting engine off.
2.
Ignition Switch
3.
Mower Deck Lift Pedal
4.
Right And Left Motion Control Levers
The ignition switch is located on the right side of the front panel, just below the seat. The ignition switch has three positions: (1) OFF, (2) RUN, and (3) START. To start the engine, turn the
key all the way to the START position. Release the key when engine starts and it will
automatically return to the RUN position. Turn the switch to the OFF position to stop the engine.
The mower deck foot lift pedal is located on the right side of the floor pan. To lower the mower
deck, first push up on the foot pedal lock, then, push down and rotate foot to move the bottom
of the pedal down. Remove foot from pedal when desired height is obtained. Lastly, push
down on the foot pedal lock to lock the pedal into position.
To enter the seat, move the levers all the way left and right, into the neutral lock position. Enter
the seat and start engine with the control levers still in the neutral lock position, mower deck
disengaged and the parking brake set. To move the mower, release parking brake and move
the control levers toward the center of the machine.
To go forward, push control levers forward an equal distance.
T
To go in reverse, pull control levers rearward an equal distance.
To turn left, move the right control lever farther forward from neutral than the left lever.
To turn right, move the left control lever farther forward from neutral than the right lever.
To pivot turn, move one control lever forward and the other lever back of neutral.
To stop or decrease speed, move control levers to neutral. When going forward pull back
gently on control levers. When going in reverse push forward gently on control levers.
To increase speed, increase control lever’s distance from neutral. The farther forward
control levers are from neutral, the faster mower will travel forward. The farther back control
levers are from neutral, the faster mower will go in reverse.
5.
Safety Interlock System
The mower has safety interlock switches. The switches are actuated by the presence of the
operator in the seat. The seat switch will stop the engine when the seat is vacated. If the
machine will not start, check that the seat is occupied. The safety interlock system must be
tested periodically. To test operation, the following functions must be performed by an
authorized Dixie Chopper Dealer, for your protection:
1. Engine should NOT start if seat is not occupied.
2. With engine running, test operate seat switch by rising off seat. Engine
should shut off.
Dixie Chopper • 6302 E. County Road 100 N. • Coatesville, IN • 46121 • www.dixiechopper.com
9
www.mymowerparts.com
For Dixie Chopper Discount Parts Call 606-678-9623 or 606-561-4983
OPERATING THE MOWER
Starting The Engine:
DANGER: DO NOT OPERATE THE ENGINE IN A CONFINED SPACE WHERE DANGEROUS CARBON MONOXIDE FUMES CAN COLLECT. CARBON MONOXIDE IS ODORLESS,
TASTELESS, COLORLESS, AND CAN BE FATAL.
CAUTION: BEFORE STARTING THE ENGINE, BECOME FAMILIAR WITH ALL CONTROLS. READ THIS OPERATOR’S MANUAL THOROUGHLY. ALWAYS CHECK ENGINE
OIL LEVEL BEFORE STARTING THE ENGINE.
To start the engine, occupy the seat. Move throttle control lever halfway to operate position. Pull
choke control all the way out to cold position. Turn ignition key to start position to engage the starter.
When engine starts, release key. Switch is spring-loaded and will return to the run position automatically. If the engine fails to start after 10 seconds
secon of continuous
uous cranking, turn the key to the OFF
position and allow the starter motor to cool. Check for the cause of hard starting; consult the troubleshooting
ting list. Once the engine has started, slowly return the choke control to its normal position. If
the engine stalls at low speeds, or hesitates during acceleration, choke should be applied as necessary until engine reaches normal operating temperature.
Stopping The Engine:
1. Always stop the engine while on flat level ground. Never stop engine on slopes.
2. Move the throttle lever to the idle position.
3. Turn ignition key to the OFF position. (Allow one minute of idle for each hour of running...
maximum of five minutes).
4. Remove key before exiting mower. (Note: In case of an emergency, engine may be
stopped by turning the ignition key to the OFF position.)
Moving Mower With Stalled Engine
If it becomes necessary to move the mower when the engine is inoperative, the hydraulic pumps
are equipped with bypass valves. Before moving the unit, turn 11/16” jam nut and 5/16” nut counter
clockwise one or two turns or until it releases. Always make certain the two bypass valves are returned to their operating position before starting the engine.
Throttle Control:
Throttle control regulates the speed of the engine as measured in RPM. This control should not be
used to regulate the ground speed. The engine has been designed with a special governor that limits
engine RPM.
Always operate mower at full throttle when mowing. Ensure engine operation between 3600 RPM
and a maximum of 3750 RPM as it provides necessary airflow through the engine cowling to prevent
overheating as well as maintaining blade speed for a satisfactory quality of cut. If engine RPM goes
below 3500 when under load slow ground speed until engine maintains RPM as listed above. If at
any time the engine does not operate consistently between the set parameters; contact your authorized Dixie Chopper dealer.
Dixie Chopper • 6302 E. County Road 100 N. • Coatesville, IN • 46121 • www.dixiechopper.com
10
www.mymowerparts.com
For Dixie Chopper Discount Parts Call 606-678-9623 or 606-561-4983
OPERATING THE MOWER
Operation Of The Mower With Mower Deck
Keep all shields and mower deck discharge chute, or OCDC, in place. Never attempt to clear discharge areas or mower deck blades without disengaging mower deck, setting parking brake, shutting
off engine, and removing ignition key.
For best operation on average lawns, operate engine at 3600-3750 rpm; control ground speed with
motion control levers. Average lawns usually cut at a height between two and three inches (5-7.6 cm)
Tall grass and weeds should be cut with the mower in its highest position, making a second pass cutting to height desired. Always keep mower deck blades sharp and balanced.
Mowing Speed
The mower is designed to operate most efficiently at maximum blade speed (engine 3600-3750 rpm)
The speed of the mower should allow the mower deck blades to maintain this maximum speed while
mowing across turf. Slow the mower for cutting tall grass, grass that is heavy with moisture, or when
moving uphill. If ground speed is too fast, or blade speed is too slow, mowing will be uneven because
mower blades will not be able to lift grass into cutting position as mower passes over the ground.
Mowing Height
The best cutting height for you lawn has probably been established from previous experience. The
first time you mow, set the mower to cut a little higher than you have in the past. This will help you
determine the best approach to uneven areas, to be sure a wider cut does not result in scalping the
high spots. In general, recommended cutting height is two to three inches (5-7.6 cm).
Very tall grass can be cut without difficulty by using a little care. Set mower in its highest cutting position and enter area slowly. If necessary, take a cut one half width of mower. overlapping previously
cut area on each pass. Then, with mower set to desired height, make a finish cut over entire area.
OCDC (Operator Controlled Discharge Chute) Operation
This mower may be equipped with an Operator Controlled Discharge Chute. This discharge chute
has a variable adjustment from full open to full closed.
In the full closed position it will serve to keep some of the clipping material under the mower deck
for a longer period of time, in order to enhance the mulching capabilities, as well as functioning as a
discharge safety shield. This discharge chute should ALWAYS BE OPERATED IN THE DOWN POSITION WHEN MOWING, WHILE PEOPLE AR PRESENT IN THE IMMEDIATE VICINITY.
OCDC Controls
1. Handle - Used to raise and lower discharge
chute.
2. Slotted Adjustment - Used to adjust position of
upper screen. May also be used
to hold upper screen between
full
open or full closed. To adjust OCDC
screen, move handle to raise or lower
screen to desired position.
3. Upper Screen with optional bolt-on lower screen
on some models.
2
1
3
SAFE OPERATION OF THIS MOWER IS THE SOLE RESPONSIBILITY OF THE OPERATOR!
BE AWARE OF SURROUNDINGS AT ALL TIMES!
Dixie Chopper • 6302 E. County Road 100 N. • Coatesville, IN • 46121 • www.dixiechopper.com
11
www.mymowerparts.com
For Dixie Chopper Discount Parts Call 606-678-9623 or 606-561-4983
MOWER DECK ADJUSTMENTS
This mower uses 4 chains to raise and lower the deck at a constant level.
LEVEL MOWER DECK
Before making any adjustments to the mower
deck, tire size, style, and pressure must be
checked.
Measure from the ground to the top of the frame
rails at the rear of the mower. Adjust the rear
tire pressure to achieve the same height side-toside.
Measure from the ground to the bottom of the
frame rails at the front of the mower. Adjust the
front tire pressure to achieve the same height
side-to-side.
Change the pitch of the deck by
adjusting the two rear chains.
Change the height of the deck by
adjusting the two front chains.
Side-to-side leveling of the mower deck is accomplished by lowering the mower deck and adjusting the threaded eyebolts at the front of the deck. Park mower on a level sur
surface and place a level
across the front of the mower deck or position the mower blade tips side-to side. Adjust the eyebolts,
so that the mower deck is level or the distance between the right and left blade tip ends and the surface of the ground is the same.
Dixie Chopper • 6302 E. County Road 100 N. • Coatesville, IN • 46121 • www.dixiechopper.com
12
www.mymowerparts.com
For Dixie Chopper Discount Parts Call 606-678-9623 or 606-561-4983
Routine Maintenance
SERVICE AT INTERVALS
INDICATED
WEEKLY OR MONTHLY OR ANNUALLY OR
100 HOURS
500 HOURS
1000 HOURS
Verify safety interlock system
Visually inspect unit for loose
hardware and/or damaged parts (2)
Visually inspect tires
sealleaks
compromise
Check fuel level and for
Check Engine to Deck Belt Tension
Check blades for wear and fitment
Check OCDC in Lowest Position
(1) (4)
Check oil level, engine
(3)
Check oil level, hydraulic
Clean Donaldson Air Filter End Cap
(4)
Clean Engine Air Filter
Check Engine to Transmission Belt
(4)
Change Engine Oil Filter
Lube Deck Spindle Assemblies
Lube Deck Engaging Swing Arm
Lube Scissor Linkage Pivot
Lube Deck Engaging Rod
Lube Front Wheel Bearings
Lube Deck Idler Arm Pivot
Lube Steering Lever Blocks
Replace Donaldson Air Filter Element
(3) (5)
Change Hydraulic Filters
(5)
Change Amsoil Filter
(3) (5)
Change Hydraulic Drive Oil
(1) (4) (5)
Change Engine Oil
Lube Front Caster Bearings
(4)
Clean/Replace Spark Plugs
Check Steering for Creep in Neutral
Check Front and Rear Tires for Wear
Remove Belts and Check Spindle
Bearings, Idlers, and Pulleys
Daily
Daily
Daily
Daily
Daily
Daily
Daily
Daily or every 4 hours
Daily or every 4 hours
X
X
X
X
X
X
X
X
X
X
X
X
X
X
X
X
X
X
X
X
X
NOTES:
1. Initial oil change is after 5 hours of operation. Thereafter, change oil after every 100 hours of operation. Change more often under dusty or dirty
conditions and during hot weather periods.
2. Torque initially and after first 2 hours of operation.
3. Perform initial hydraulic filter change after 50 hours of operation.
4. Change engine oil filter per the engine manufacturer’s recommendations. Refer to Engine Owner’s Manual for recommendations and other
maintenance items.
5. Service more often under dusty or dirty conditions.
Dixie Chopper • 6302 E. County Road 100 N. • Coatesville, IN • 46121 • www.dixiechopper.com
13
www.mymowerparts.com
For Dixie Chopper Discount Parts Call 606-678-9623 or 606-561-4983
Routine Maintenance
Verify Safety Interlock System
With parking brake on, steering levers in the neutral lock position, and deck blades disengaged,
start mower while sitting in the seat. When engine starts, lift up off the seat. The engine should shut
down. If engine continues to run, see an authorized Dixie Chopper dealer to service the safety interlock system.
Visually Inspect Unit for Loose Hardware and/or Damaged Parts
Walk around mower to visually inspect and tighten, if necessary, all hardware. Refer to Part Manual
for proper torque specifications. Pay particular attention to wheel axle nuts, lug nuts, and blade bolts.
Visually inspect tires
Front tire pressure is 12-18 psi. Rear tire pressure is 5-7psi.
Engine to Deck Belt Tension
The deck belt tension and the engine to deck belt tension are regulated by the deck engaging rod
adjustment. Please refer to the Part Manual for location. Proper adjustment is accomplished by
tightening or loosing the nut so that the spring measurement is approximately 3”. See image below
for reference.
3.000
3.000
Dixie Chopper • 6302 E. County Road 100 N. • Coatesville, IN • 46121 • www.dixiechopper.com
14
www.mymowerparts.com
For Dixie Chopper Discount Parts Call 606-678-9623 or 606-561-4983
Routine Maintenance
1000 hours or Annually
Front Caster Assembly
(1 each side)
500 hours
Steering Lever Pivot
(1 each side Under Seat)
Dixie Chopper • 6302 E. County Road 100 N. • Coatesville, IN • 46121 • www.dixiechopper.com
15
www.mymowerparts.com
For Dixie Chopper Discount Parts Call 606-678-9623 or 606-561-4983
Routine Maintenance
100 hours
Idler Pivot Arm
Deck Hub Assemblies (3)
Deck Engaging Swing Arm
Scissor Linkage Pivot
Deck Engaging Rod
100 hours
Front Wheel Bearing
(1 each side)
Dixie Chopper • 6302 E. County Road 100 N. • Coatesville, IN • 46121 • www.dixiechopper.com
16
www.mymowerparts.com
For Dixie Chopper Discount Parts Call 606-678-9623 or 606-561-4983
Notes
www.mymowerparts.com
For Dixie Chopper Discount Parts Call 606-678-9623 or 606-561-4983
6302 E. County Road 100 North
Coatesville, IN. 46121
Phone 1-765-CHOPPER
www.dixiechopper.com
Dixie Chopper, Magic Circle, and the Magic Circle Atom Logo are all trademarks of Magic Circle Corporation
and may not be reproduced without permission.
Printed In USA
Specifications and instructions subject to change without notice.
Print Date 7/06
www.mymowerparts.com