1
UIP1868P
OWNER'S
MANUAL
Contents
WELCOME/FEATURES
TERMINOLOGY
CONTROLS & FUNCTIONS
GETTING STARTED
Setting up the Phone
Expanding Your Phone
Registering Expansion Handsets
Installing the Beltclip
Headset Installation
Display and Icons
Soft Key Function
Main Menu Options
Setting Menu Options
BASICS
Using Your Phone
Call Waiting
Placing a Call on Hold
Redialing a Call
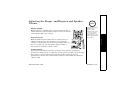
Adjusting the Ringer, and Earpiece and Speaker Volume
Muting the Ringer
Muting the Microphone
Traveling Out of Range
Privacy Mode
Conferencing
Find Handset
Using One Touch Voice Mail Access
PHONEBOOK
2 CALLER ID
Caller ID and CIDCW
4
MULTI-HANDSET
FEATURES
5
Multi-Handset Features
7
Using DirectLink Mode
7
14
15
17
17
18
19
20
21
Using the Room/Baby Monitor
Using the Intercom
TROUBLESHOOTING
48
48
52
52
52
54
55
58
Troubleshooting
58
ADDITIONAL INFORMATION
Note on Power Sources
General Information
Liquid Damage
65
65
67
68
30 PRECAUTIONS & WARRANTY
30 I.C. NOTICE
32
32 INDEX
69
70
71
33
34
35
36
36
37
37
38
39
40
Setting up the Phonebook
40
Viewing the Phonebook
44
Making Calls Using the Phonebook
45
Speed Dialing
45
Editing or Erasing a Stored Name, Phone Number, Distinctive
Ring and Speed Dial
46
Copying Phonebook Entries
47
[1]
www.uniden.com
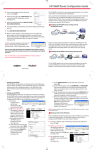
Welcome
With the UIP1868P voice-over-Internet Protocol (VoIP) telephone, Packet8 VoIP service
and your broadband connection, you can access the Internet and make phone calls
simultaneously. The UIP1868P connects directly to your broadband modem. It separates
voice signals from data signals and sends voice traffic to its cordless handsets and data
traffic to your computer.
If you a have a local switch or router supporting a LAN, the UIP1868P will pass all
Ethernet traffic through to your LAN.
Note: Illustrations in this manual are used for explanation purposes.
Some illustrations in this manual may differ from the actual unit.
Features
www.uniden.com
5.8GHz Digital Expandable
Corded/Cordless Telephone System
Dual Keypad and LCD Screen at Base
Ten Multi-Handset Expandability
Hands-Free Duplex Speakerphone in the Handset and Base
Caller ID/Call Waiting Deluxe (Subscribe through Service provider)
100 Programmable Memory Locations in the Base and Each Cordless Handset
Intercom/Call Transfer Between Handsets or Handset and Base
20 Distinctive Ring Options (Ten Ringer Tones and Ten Melody Ringers)
Mute and Hold Features
Do Not Disturb (DND) Feature
DirectLink™ Mode
Room/Baby Monitoring
Battery Level Indicator
Clock Display
Animation Displays
WELCOME/FEATURES [2]
WELCOME/FEATURES
•
•
•
•
•
•
•
•
•
•
•
•
•
•
•
•
This series features AutoTalk ™ and AutoStandby ™. AutoTalk allows you to answer a call by just removing
the handset from the cradle so you don't have to waste time pushing buttons. AutoStandby allows you to
hang up by simply returning the handset to the cradle.
To protect you against mis-billed calls that might result from your phone being activated by other
equipment, this series has Random Code ™ digital security, which automatically selects one of more than
10,000,000 digital security codes for the handset and base.
Digital Spread Spectrum Technology uses a wider frequency band than standard digital transmissions. The
result is a more secure conversation with the clarity of digital sound, extended range, and minimal
interference from other cordless phones.
IntegriSound™ Built in sound quality which provides life-like conversations.
With DirectLink™ mode, you can use two or more handsets as radio tranceivers (walkie-talkies).
Be sure to visit our web site: www.uniden.com
Uniden® is a registered trademark of Uniden America Corporation.
AutoTalk, AutoStandby, DirectLink, IntegriSound and Random Code are trademarks of Uniden America.
If you have a disability and need customer service assistance or if you have any questions about how
Uniden's products can accommodate persons with disabilities, please call the accessibility voice/TTY
line:1-800-874-9314
A representative is available to talk to you M-F, 8:00 am to 5:00 pm, CST. After hours, you can leave us a
message, and we will call you back. Information is also available on our website, www.uniden.com, under
the "Accessibility" link.
[3] WELCOME/FEATURES
www.uniden.com
WELCOME/FEATURES
Accessibility
Terminology
•Standby Mode - The handset maybe sitting or off the cradle, but is NOT in use. talk/flash or speaker has not been
pressed. The corded base handset is on the base and speaker on the base has not been pressed.
No dial tone is present.
•Talk Mode The handset is off the cradle and talk/flash or speaker has been pressed, or pick up the corded
base handset and speaker on the base is pressed and enabling a dial tone.
•VoIP Voice over Internet Protocol, a method of sending voice signals over broadband Internet
connections.
•Station The main base or any registered handset.
TERMINOLOGY [4]
TERMINOLOGY
www.uniden.com
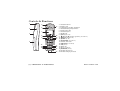
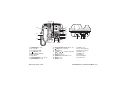
Controls & Functions
1
5
6
13
2
7
3
8
9
14
15
16
4
10
11
12
17
18
19
20
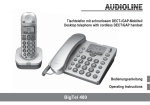
1. Handset Antenna
2. Beltclip Hole
3. Speakerphone Speaker and Ringer
4. Handset Battery Compartment
5. New Message LED
6. Handset Earpiece
7. LCD Display
8. soft Keys (P. 19)
9.
/vol / (volume up/down) (P. 34 & 21)
10. */tone/< (P. 51 & 41)
11.speaker (P. 30)
12.intcom/hold (P. 55 & 32)
13.Headset Jack Cover
14.talk/flash (P. 30 & 32)
15.end (P. 32)
16.cid (P. 49)
17.#/> (P. 51 & 41)
18.phonebook (P. 40)
19.Handset Microphone
20.Handset Charging Contacts
CONTROLS &
FUNCTIONS
[5] CONTROLS & FUNCTIONS
www.uniden.com
21 22 23 24
32
25
33
34
35
36
37
38
26
27
41
28 29 30
www.uniden.com
40
43 44 45
39
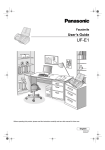
30. do not disturb /DND LED (P. 35)
31. /tone/< (P. 51 & 41)
32. LCD Display
33. /vol /
(volume up/down)
(P. 34 & 21)
34. soft Keys (P. 19)
35. speaker/speaker LED (P. 31)
36. flash (P. 32)
37. mute (P. 36)
38. exit (P. 21)
39. mic (microphone)
40. #/> (P. 51 & 41)
41. VoIP1 port
42. WAN port
43. LAN port
44. Reset Switch
45. Power port
CONTROLS & FUNCTIONS [6]
CONTROLS &
FUNCTIONS
21. phonebook (P. 40)
22. In use LED
23. New Message LED
24. call id (P. 49)
25. Corded Base Handset
26. Base Speaker
27. Curl Cord
28. intercom/hold (P. 55 & 32)
29. find handset (P. 38)
31
42
Safety Recommendations
To ensure general safety, follow these guidelines:
• Do not open or disassemble this product.
• Do not expose the product to moisture.
• Do not perform any action that creates a potential hazard to people or makes the
equipment unsafe.
• Ultimate disposal of this product should be handled according to all national laws and
regulations.
• Do not touch the wires on the cable ports or the wires of cables connected to a port as
hazardous voltage may be present on these wires when the equipment is powered on.
• The plug-socket combination must be accessible at all times because it serves as the power
disconnect.
• To avoid electric shock, do not connect the UIP1868P to any RJ-11 telephone wall jacks.
Use caution when connecting cables. This could damage the UIP1868P or the telephone
wiring in the building.
• Do not work on the system or connect or disconnect cables if lightning or thunder are
present in your area.
• Do not cover or block the air vents on the top or bottom surface of the UIP1868P.
Overheating can cause permanent damage to the unit.
• Read the instructions completely before connecting the system to its power source.
[7] GETTING STARTED
www.uniden.com
G E T T I N G S TA RT E D
Setting up the Phone
UP747BH CH08 GetStart.fm Page 8 Friday, June 17, 2005 9:49 AM
Packet8 services do not include traditional 911 emergency dialing. Packet8 offers
Enhanced 911 service (an FCC standard developed for emergency calling from
wireless phones) at an additional monthly fee. A subscription to Packet8's Enhanced
911 service is required for emergency calling. Packet8's Enhanced 911 optional
service is not available in all areas.
Before You Start!
Visit the Packet8 activation website http://activate.packet8.net/ and enter the
MAC address ID found on the bottom of your UIP1868P. After you activate the
UIP1868P, you will receive an email containing a 10-digit activation code. You will
need this activation code in Step 3.
STEP 1: Check Your Equipment
Check your broadband setup and the other equipment you will need:
• A broadband modem and a broadband Internet connection
• A computer with an Ethernet port (or a local Ethernet switch or router)
• One CAT-5 Ethernet cable
• The Packet8 10-digit activation code that was emailed to you when you created your
account. (If you don't have this email, go to www.packet8.net and enter the email address
and password used to create the account in the account sign in at the top of the screen.)
• If you want to use a backup phone along with the UIP1868P, you will need a standard
telephone cable (RJ-11).
www.uniden.com
note
If you ordered your
UIP1868P directly from
Packet8, it will already
be activated for you.
Your 10-digit activation
code was in the
confirmation email you
received when your
UIP1868P shipped. (If
you don’t have this
email, go to
www.packet8.net and
enter the email address
and password used to
create the account in
the account sign in
page.)
GETTING STARTED [8]
GETTING STARTED
911 Service Notice
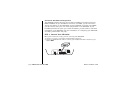
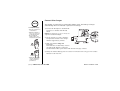
STEP 2: Connect Your UIP1868P
Once your account is set up, you can connect your UIP1868P.
1) Use the coil cord to connect the corded handset to the base.
2) Use the included Ethernet cable to connect your broadband modem to the RJ-45 port
labeled WAN.
[9] GETTING STARTED
www.uniden.com
G E T T I N G S TA RT E D
Check Your Broadband Configuration
The UIP1868P supports the two most common broadband connection protocols:
DHCP and PPPoE. If your broadband connection uses DHCP, you do not need to
change any settings on the UIP1868P. If your broadband connection uses PPPoE,
you will need to enter your user name and password in the UIP1868P. If your
broadband provider has given you a static IP address, you will need to enter that
information in the UIP1868P. For more information on configuring your UIP1868P
visit http://www.uniden.com/voip.
4) OPTIONAL: If you have a second phone you want to use for line 1, connect it to VoIP1.
note
•You can also connect a
wireless access point
to the LAN port, if
desired.
•VoIP1 is not a separate
line. Any phone
connected to VoIP1
will share VoIP line 1
with all the UIP1868P's
cordless handsets.
CAUTION
Do not connect the UIP1868P to a regular telephone wall jack.
www.uniden.com
GETTING STARTED [10]
GETTING STARTED
3) Use another Ethernet cable to connect your PC to the RJ-45 port labeled LAN. If you use
a switch or router for a local network, connect it to the LAN port instead.
CAUTION
To avoid risk of fire or electrical hazard,
use ONLY the included AC adapter!
All the LEDs will flash several times, and
the PWR LED will remain on. If the
UIP1868P was properly recognized by
Packet8's network, the CA LED will remain
on. Test your connection by making a call
with the corded handset and browsing to a web page from your PC. If you have any
difficulty, see the Troubleshooting section.
Step 3 Activate your Packet8 Service
Once you have connected your UIP1868P, you can activate your Packet8 service
• You will need your 10-digit activation code that was sent to you by email when your
Packet8 order shipped. (You can also obtain your activation code at www.packet8.net by
signing in at your account page.)
• Pick up your telephone handset and dial the Activation Service number 012-0001.
• Follow the voice instructions and enter your 10-digit activation code.
• When you enter a valid code, your account will be activated and your Packet8 phone
number will be emailed to you. This Packet8 phone number can also be found in your
account details page after signing in at www.packet8.net.
[11] GETTING STARTED
www.uniden.com
G E T T I N G S TA RT E D
5) Use the included AC abapter to connect the POWER port to a 120 Vac continuous power
outlet.
1) Press down on the handset battery case cover (use the
finger indention for a better grip) and slide the cover
downward to remove.
2) Plug the battery pack connector (red & black wires) into
the jack inside the battery compartment. (The connector
notches fit into the grooves of the jack only one way.)
Match the wire colors to the polarity label in the battery
compartment, connect the battery and listen for a click to
insure connection.
note
•Use only the Uniden
(BT-446) rechargeable
battery pack supplied
with your cordless
telephone.
•Replacement battery
packs are also available
through the Uniden
Parts Department.
3) Make sure you have a good connection by slightly pulling
on the battery wires. If the connection is secure, the
battery jack will remain in place.
4) Place the battery case cover back on the handset and slide
it upwards until it clicks into place.
www.uniden.com
GETTING STARTED [12]
GETTING STARTED
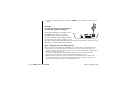
Install the rechargeable battery pack into the handset
note
For maximum range:
•Keep the antenna free
of obstruction.
•When the handset is
not in use place it in
an upright position.
•Do not hold the
handset where you
would block the signal.
Correct
The handset is powered by a rechargeable battery pack. The battery recharges
automatically when the handset is placed in the charger.
1) Connect the AC adapter to the DC IN 9V
jack and to a standard 120V AC wall
outlet.
Caution: To avoid risk or fire or shock, use
only the included AC adapter.
2) Set the charger on a desk or tabletop,
and place the handset in the charger
with the keypad facing forward.
3) Make sure that the charge LED
illuminates.
If the LED does not illuminate, check to
see that the AC adapter is plugged in
and the handset makes good contact with the base charging contacts.
4) Charge the handset battery pack for at least 15-20 hours before using your new cordless
handset for the first time.
Incorrect
•Metal and reinforced
concrete may affect
cordless telephone
performance.
[13] GETTING STARTED
www.uniden.com
G E T T I N G S TA RT E D
Connect the charger
G E T T I N G S TA RT E D
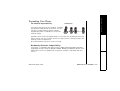
Expanding Your Phone
Ten Handset Expandability
10 Handsets
Your phone supports up to ten handsets, including
any handsets supplied with your phone. You can
now place a fully-featured cordless handset
anywhere AC power is available to connect the
handset charger.
Handsets can be used in DirectLink Mode or on an intercom call without interfering
with incoming calls. It is possible to have a 4-way conference among the base, two
handsets, and one outside line.
All of the handsets ring when a call is received.
Backwards/Forwards Compatibility
Your phone is compatible with other Uniden 5.8GHz Digital Expandable Handsets.
Compatible models include the TCX805, ELX500, TCX400, and TCX440. (Please check
www.uniden.com for an updated list of expansion handsets compatible with this
series.)
www.uniden.com
GETTING STARTED [14]
note
If a handset has ever
been registered to a
different base, you
must de-register the
handset before you
can register it to the
new base (see page
16.)
Handsets supplied with the phone are registered to the
2NCEGJCPFUGV
base by the factory. When charged, pre-registered
QPOCKPDCUG
handsets display a handset ID number. Handsets that have V Q T G I K U V G T
/76'
%9&:
not been registered display Place handset on main base to
r e gi s te r. When you register an extra handset to the base, the handset ID will be
assigned.
Before the expansion handset is registered, the battery pack MUST be charged for
15-20 hours.
To register expansion handsets, follow the steps below:
1) Make sure the main base is in standby mode.
2) On the base, press the MENU soft key, and then select HS Registration.
3) On the handset, press and hold # for two seconds. To cancel registration, press
the CANCEL soft key on the base.
4) While the handset is registering, H a nd s et R e gi s te r in g will appear in the Handset
LCD. When Re gi s tr a ti o n C om pl e te is displayed, the handset has been registered
to the base. If Re g is t ra t io n F ai l ed appears, please try these steps again.
[15] GETTING STARTED
www.uniden.com
G E T T I N G S TA RT E D
Registering Expansion Handsets
You can deregister the handset's ID from the main base unit or the base ID from the
handset. You will usually only deregister the handset if you want to change the
base you use it with, if you are having a problem with your phone, or if you need to
change the digital security code. The digital security code is an identification code
used to connect the handset and the base unit. Normally, setting the code is not
necessary. In the rare situation that you suspect another cordless telephone is
using the same security code, you can change the code by de-registering and reregistering all handsets.
1) On the handset, press the MENU soft key. Select
>GIKUVGT*5!
Deregister HS in the menu and press the OK soft key. ; G U
0Q
D e re g is t er H S ? appears.
$#%&'.'6'
12) Press
volume up/down to select Y es and then the
OK soft key.
When de-registration is complete you will hear a confirmation tone, and
D e re g is t ra ti o n C om p le te appears.
3) After de-registering the handset, you must re-register the handset before you
can use it.
www.uniden.com
GETTING STARTED [16]
G E T T I N G S TA RT E D
De-register the Handset
To attach the beltclip
Insert the beltclip into the holes on each side of the handset.
Press down until it clicks.
To remove the beltclip
Pull either side of the beltclip to release the tabs from the
holes.
Headset Installation
Your cordless handset may be used with an optional headset.
To use this feature, insert the headset plug into the headset
jack. Your phone is ready for hands-free conversations.
(Headsets may be purchased by calling the Uniden Parts
Department or visiting the web site. See back cover page.)
[17] GETTING STARTED
www.uniden.com
G E T T I N G S TA RT E D
Installing the Beltclip
Example of the standby mode display
• Handset
Ringer off icon (when the ringer is off)/ day of the week and time / battery icon
Handset ID and Banner
Number of new Caller ID calls received (If there are no new Caller ID messages,
the Handset ID appears here.)
570#
*CPFUGV
0GY%+&
4'&+#.
/'07
•Base
Day of the week and time
envelope icon
Number of new Caller ID calls received
*
Ringer Volume Level
*
This icon changes depending on ringer volume level (High, low and off)
ICON
Appears During
DESCRIPTION
Battery icons indicate the handset battery status. This icon changes depending on
Standby/Talk
the battery status (empty, low, medium and full).
Standby
Talk
The Mute icon appears when you mute the handset or base.
Talk
The Speaker icon appears when the handset speaker phone is used (handset only).
Talk
The Privacy icon appears when the Privacy Mode is turned on.
Standby
www.uniden.com
The Ringer off icon indicates that ringer is turned off.
When a new message is received, an envelope icon is displayed on the LCD screen
(base only).
GETTING STARTED [18]
G E T T I N G S TA RT E D
Display and Icons
Soft Key Function
"Soft" keys are keys that change function during the operation of the phone. There are three soft keys on
the base and three soft keys on each handset. Soft keys allow you to:
- Access the main menu
- Redial one of the last three numbers dialed
Note: The soft keys will not appear while the handset is charging.
The function of each soft key is determined by the icon that appears directly above it. For example, when
the handset is in standby mode, pressing soft key 1 will redial the last number. When the handset is in
talk mode, pressing soft key 1 will mute the microphone.
Complete information on the features controlled by the soft keys can be found under each feature.
In standby mode
Handset
570#
*CPFUGV
0GY%+&
4'&+#.
/'07
Soft key 1
Soft key 2
Base
570#
0GY%+&
4'&+#.
Soft key 3
Soft key 2
Soft key 3
Handset
Base (base speaker phone)
6CNM
522JQPG
/76'
24+8#%;
[19] GETTING STARTED
4'&+#.
(Corded base handset)
6CNM
24+8#%;
4'&+#.
24+8#%;
www.uniden.com
G E T T I N G S TA RT E D
In talk mode
Soft key 1
/'07
UP747BH CH11 SettingUp.fm Page 20 Friday, June 17, 2005 9:49 AM
Your phone has eight main menu options: DirectLink Mode, Room/Baby Monitor,
Handset Setup, Base Setup, Global Setup, Deregister HS and HS Registration.
You can change Room/Baby Monitor, and Global Setup settings from the base or
from any handset. DirectLink Mode, Handset Setup, and Deregister HS are only
available from a handset. Base Setup and HS Registration are only available from
the base.
Default Settings
The default settings set from the factory match the features that most people use.
You may not need to change them. However, there are a number of options you
must set and entries you must make in memory to take full advantage of all the
phone features. The table below lists the default settings.
Function
Edit Voice Mail
Ringer Tones
Distinctive Ring
Auto Talk
Anykey Answer
Banner
Language (LCD)
www.uniden.com
Handset
Base
None
Flicker
-
On
-
Off
-
Off
-
“ “
English
Function
Contrast
Key Touch Tone
Animation Screen
Day & Time
CIDCW
Area Code
Voice Mail Tone/Dial Mode
Handset
Base
level 5
On
-
On
-
SUN 12:00 AM
CW on/CWDX off
None
Set for use with Packet8
services. Do not change
these settings.
GETTING STARTED [20]
G E T T I N G S TA RT E D
Main Menu Options
Using the interface
Below are some tips for using the software interface on your phone.
• Press the MENU soft key to access the main menu.
• Use
volume up/down to scroll through options.
• Press the OK soft key to make a selection.
• Press the BACK soft key to return to the previous
screen.
• Press end on the handset or exit on the base to exit
the menu.
• If you do not press a key within 30 seconds, the phone
will time out and exit the menu mode. When setting
Day and Time, the time-out period is extended to two
minutes.
[21] GETTING STARTED
•Handset
&KTGEV.KPM/QFG
4QQO/QPKVQT
*CPFUGV5GVWR
$#%-
$#%-
1-
•Base
4QQO/QPKVQT
$CUG5GVWR
)NQDCN5GVWR
$#%-
$#%-
1-
www.uniden.com
G E T T I N G S TA RT E D
Setting Menu Options
The following submenu options must be set separately for each handset and the
base.
note
If you set the ringer to
off, no ringer or
melody will sound.
Selecting a Ringer Tone (Handset only)
Ringer tone lets you choose from ten ringer tones or ten melodies:
- Ringers (Flicker, Clatter, Soft Alert, Wake Up, Light Bug, Beep Boop, Tone Board,
Chip Chop, Party Clap, Reminder)
- Melodies (Beethoven's Symphony #9 [Beethoven9], For Elise [Elise], We Wish You A Merry
Christmas [Merry- Xmas], Home Sweet Home [Hm Swt Hm], Lorri Song #6 [Lorri Song],
When the Irish Eyes Are Smiling [Irish Eyes], Aura Lee, Let Me Call You Sweet Heart
[Sweetheart], Star Spangled Banner [Star Spngl], Old MacDonald [Old MacDld])
You must set a separate ringer tone on each handset.
1) Press the MENU soft key. Select the Handset Setup
menu, and then the Ringer Tones submenu.
2) Press
volume up/down to move the pointer. You
will hear the ringer or melody as you scroll through
the options.
3) Press the OK soft key. You will hear a confirmation
tone.
www.uniden.com
4KPIGT6QPGU
(NKEMGT
%NCVVGT
$#%-
&'.'6'
1-
GETTING STARTED [22]
G E T T I N G S TA RT E D
Handset Setup / Base Setup
Distinctive Ringer allows you to assign a designated ring tone to a stored
phonebook number. When a call is received and the Caller ID information matches
the information in one of the phonebook memory locations, the phone uses the
distinctive ring assigned to that particular caller. You can assign distinctive rings
to multiple phonebook memory locations. Switching the setting to Distinctive Off
disables distinctive ringing: all incoming calls will have a normal ring tone.
Switching to Distinctive On activates all programmed distinctive ring memory
locations.
1) Press the MENU soft key. Select the Handset Setup
menu, and then the Distinctive Ring submenu.
2) Press
volume up/down to select O n or O ff .
3) Press the OK soft key. You will hear a confirmation
tone.
&KUVKPEVKXG4KPI
1P
1HH
$#%-
&'.'6'
1-
Setting AutoTalk (Handset Only)
Autotalk allows you to answer the phone simply by removing the handset from the
cradle. You do not have to press any buttons to answer the call.
1) Press the MENU soft key. Select the Handset Setup
menu, and then the AutoTalk submenu.
2) Press
volume up/down to select O n or O ff .
3) Press the OK soft key. You will hear a confirmation
tone.
[23] GETTING STARTED
#WVQ6CNM
1P
1HH
$#%-
&'.'6'
1-
www.uniden.com
G E T T I N G S TA RT E D
Distinctive Ringer Setup (Handset only)
Anykey Answer allows you to answer the phone by pressing any number key,
*/tone/<, or #/> on the handset.
1) Press the MENU soft key. Select the Handset Setup
menu, and then the Anykey Answer submenu.
2) Press
volume up/down to select O n or O ff .
3) Press the OK soft key. You will hear a confirmation tone.
#P[MG[#PUYGT
1P
1HH
$#%-
&'.'6'
1-
Setting the True Banner (Handset only)
True Banner lets you customize the name your handset displays. The name will be
displayed on the LCD screen during Standby Mode, Intercom, Intercom Hold, Room
Monitor and Copy Phonebook operation. The banner name will be displayed on the
receiving handset as well.
1) Press the MENU soft key. Select the Handset Setup
menu, and then the Banner submenu.
2) Use the number keypad (0-9), */tone/<, #/>, or the
DELETE soft key to enter or edit the name.
3) Press the OK soft key. You will hear a confirmation
tone.
www.uniden.com
$CPPGT
/
AQ
AO
A
AU
A2
AJ
AQ
AP
AG
A
$#%-
&'.'6'
1-
GETTING STARTED [24]
G E T T I N G S TA RT E D
Setting Anykey Answer (Handset only)
G E T T I N G S TA RT E D
Selecting a Language
You can change the language the menu display will use. Choose from English,
French, or Spanish.
1) Press the MENU soft key. Select the Handset Setup
.CPIWCIG
menu or the Base Setup menu, and then the Language ' P I N K U J
submenu.
(TCP㩟CKU
$#%2) Press
volume up/down to choose "English,"
"Français" (French), or "Español" (Spanish).
3) Press the OK soft key. You will hear a confirmation tone.
1-
Adjusting the LCD Contrast
Contrast adjusts the handset LCD brightness. Choose one of the ten levels for
optimum viewing.
1) Press the MENU soft key. Select the Handset Setup
%QPVTCUV
menu or the Base Setup menu, and then the Contrast submenu.
12) Press
volume up/down to adjust the contrast of the $ # % LCD (ten levels.)
3) Press the OK soft key. You will hear a confirmation tone.
[25] GETTING STARTED
www.uniden.com
Key Touch Tone is the tone your keypad makes when keys are pressed. You can turn
this tone on or off.
1) Press the MENU soft key. Select the Handset Setup
-G[6QWEJ6QPG
menu, and then the Key Touch Tone submenu.
1P
1HH
2) Press
volume up/down to select O n or O ff .
$#%&'.'6'
13) Press the OK soft key. You will hear a confirmation
tone.
Setting the Animation Screen (Handset Only)
The Animation Screen displays animation on the handset
LCD. The animations will be displayed on the LCD screen
during a call, ringer volume setting, paging operation,
when you hang up and so on.
1) Press the MENU soft key. Select the Handset Setup
menu, and then the Animation Screen submenu.
2) Press
volume up/down to select O n or O ff .
3) Press the OK soft key. You will hear a confirmation
tone.
www.uniden.com
4KPIGT8QNWOG
4'&+#.
/'07
#PKOCVKQP5ETGGP
1P
1HH
$#%-
&'.'6'
1-
GETTING STARTED [26]
G E T T I N G S TA RT E D
Setting the Key Touch Tone (Handset only)
Turning on the phone
9GNEQOG
2NGCUG9CKV
Hanging up the phone
'PF
4'&+#.
Making a Call
6CNM
/76'
Confirmation (Done!)
&QPG
/'07
Find / Paging Handset
Deleting (Deleted!)
2CIKPI
&GNGVGF
24+8#%;
Also, the animation display changes depending on the ringer volume setting.
4KPIGT8QNWOG
4KPIGT8QNWOG
4KPIGT8QNWOG
?
4'&+#.
/'07
Out of Range
1WV1H4CPIG
4'&+#.
[27] GETTING STARTED
/'07
4'&+#.
/'07
Unavailable
7PCXCKNCDNG
4'&+#.
4'&+#.
/'07
Low Battery
.QY$CVVGT[
/'07
www.uniden.com
G E T T I N G S TA RT E D
The handsets have a variety of animation displays. Below are examples of the
animation screens and what they mean:
If you change one of the global settings, you change that setting for all registered
handsets and the base. Only one handset or the base can change global settings at
a time.
Setting Day and Time
note
•The Dial Mode setting
is pre-configured to
support VoIP. Do not
change this setting.
Day & Time sets the day and time of your display.
1) With the phone in Standby mode, press the MENU soft & C [ 6 K O G
key. Select the Global Setup menu, and then select
/10#/
=?
Day & Time.
$#%5#8'
2) Press
volume up/down to select the day of the
week, and then the → soft key.
3) Press
volume up/down to set hour, and then press the → soft key.
4) Press
volume up/down to set minute, and then press the → soft key.
5) Press
volume up/down to choose A M or P M , and then press the SAVE soft key.
You will hear a confirmation tone.
www.uniden.com
•If no key is pressed for
two minutes, the
phone will exit menu
mode.
GETTING STARTED [28]
G E T T I N G S TA RT E D
Global Setup
note
CIDCW sets the Caller ID on Call Waiting (CIDCW) displays the name and number of
an incoming call while you are on the line.
•Call Waiting Deluxe
(CWDX) may not be
supported by your
phone service provider.
1) With the phone in Standby mode, press the MENU soft % + & % 9
key. Select the Global Setup menu, and then the
%91P%9&:1P
%91P%9&:1HH
CIDCW submenu.
$#%&'.'6'
12) Press
volume up/down to select CW O n /C WD X On , CW
O n /C WD X O ff , or C W O f f /C W DX Of f , and then press the OK soft key. You will hear a
confirmation tone.
•If the area code has
already been stored in
memory, the stored
area code will be
displayed. To change
it, use the DELETE soft
key and number keys
to enter the new area
code.
Setting the Area Code
If you enter a 3-digit area code number in the "Area Code" option, your local area
code does not appear in the Caller ID message. For calls received from outside your
local area code, you will see a full 10-digit number.
1) With the phone in Standby mode, press the MENU soft # T G C % Q F G
key. Select the Global Setup menu, and then the Area 㨫 A A
Code submenu.
$#%&'.'6'
2) Press the number keypad (0-9) to enter a 3-digit area
code.
3) Press the OK soft key. You will hear a confirmation tone.
[29] GETTING STARTED
1-
www.uniden.com
G E T T I N G S TA RT E D
Setting CIDCW (Caller ID on Call Waiting)
Using Your Phone
note
Calling with Packet8 service
• To call anywhere in the world, dial: country code + area code + number. For example, the
country code for the U.S. and Canada is "1." To call anywhere within the US or Canada,
dial: 1 + area code + number
• Anyone can call you at your Packet8 phone number.
Making and Receiving Calls
Making a call
•The handset
microphone is located
at the bottom of the
handset. Position
yourself as near to the
handset as possible
and speak clearly.
P
appears in the display, which
From the Handset Speakerphone
1) Remove the handset from the cradle.
2) Press speaker.
3) Listen for the dial tone.
4) Dial the number.
5) When the other party answers, talk into the microphone.
www.uniden.com
BASICS [30]
BASICS
From the handset
1) Remove the handset from the cradle.
2) Press talk/flash.
3) Listen for the dial tone.
4) Dial the number.
OR
1) Remove the handset from the cradle.
2) Dial the number.
If pause is required, press the PAUSE soft key.
represents a pause
3) Press talk/flash.
•If the line is in use by
another station,
"L i ne I n U s e "
appears in the display
of all other stations.
note
•To set "Autotalk", see
page 23 or to set
"Anykey Answer" see
page 24.
•The base microphone is
located under the
base. Position yourself
as near to the base as
possible.
From the base
1) Pick up the corded handset, or press speaker.
2) Listen for the dial tone.
3) Dial the number.
OR
1) Dial the number.
If pause is required, press the PAUSE soft key.
2) Pick up the corded handset, or press speaker.
Receiving a call
OR
If the handset is off the cradle, press talk/flash. (If AnyKey answer is turned on,
you can also press any key.)
From the base
Press speaker or pick up the corded handset.
[31] BASICS
www.uniden.com
BASICS
From the handset
1) Remove the handset from the cradle. (If AutoTalk is on, the phone will
automatically answer the call when you pick it up.)
2) Press talk/flash.
Hanging Up
From the handset or handset speakerphone, press end. (If AutoStandby is turned
on, you can just return the handset to the cradle.)
From the base, press speaker or return the corded handset to the base.
Switching to the Speakerphone During a Call
On the handset or base to switch a normal call to the speakerphone, press speaker.
To switch from a speakerphone call to a normall call, press speaker again.
Call Waiting
BASICS
If a call waiting tone sounds while you are on a call,
press talk/flash on the handset or flash on the base
to accept the waiting call. There is a short pause, and
then you will hear the new caller. To return to the
original caller, press talk/flash on the handset or
flash on the base again.
Placing a Call on Hold
1) During a call, press intcom/hold on the handset or
intercom/hold on the base. The call will be put on
hold.
*QNFVQVTCPUHGT
*CPFUGV
*CPFUGV
$#%-
&'.'6'
1-
If you leave a call on hold for more than ten seconds, the
display screen will read, Li n e O n H ol d .
www.uniden.com
BASICS [32]
note
•You can place a call on
hold for five minutes.
When five minutes has
passed, the call is
disconnected, and the
phone returns to
standby mode.
•If the number exceeds
32 digits, only the first
32 digits are retained
in redial memory.
•If the redial memory is
empty, you will hear a
beep.
•Redial numbers stored
in the handset and the
base are independent
from each other.
[33] BASICS
Redialing a Call
The last three phone numbers dialed can be quickly
redialed from the handset or base.
4GFKCN
$#%-
1) With the phone in standby mode, press the REDIAL soft
key.
2) Press
volume up/down. Each press of
volume
up/down will display one of the last three number
redialed.
3) Press talk/flash or speaker on the handset (or pick up
the corded base handset, or press speaker on the base).
The selected number is dialed.
4) To hang up, press end (or return the corded base
handset to the base, or press speaker on the base).
/vol/ or
&'.'6'
5614'
/vol/
4GFKCN
$#%/vol/ or
&'.'6'
5614'
/vol/
4GFKCN
$#%-
&'.'6'
5614'
For the base, you can also redial the last number dialed with the phone in talk
mode. Press the REDIAL soft key.
www.uniden.com
BASICS
•While a call is on hold,
CIDCW can not be
received.
2) To return to the call, pick up the corded handset or press talk/flash on a
handset. To talk to the caller on a speakerphone, press speaker on the base or on
a handset.
Adjusting the Ringer, and Earpiece and Speaker
Volume
Ringer volume
With the phone in standby mode, press the volume up key or
volume down key on the handset or base to select one of three
ringer volumes (Off, Low, or High).
If you press the volume
up key when the
earpiece is at the
maximum volume level,
an error tone sounds.
The error tone also
sounds if you press the
volume down key at the
lowest volume.
BASICS
Earpiece Volume
Both the handset and the base offer six volume levels. To
adjust the volume, press the volume up (to increase the
volume) or volume down (to decrease the volume) while you
are on a normal call. The new volume setting remains in
effect after the telephone call has ended.
note
Speaker Volume
The handset speakerphone provides six volume levels; the base speakerhone
provides ten volume levels. To adjust the volume, press the volume up (to increase
the volume) or volume down (to decrease the volume) while you are on a
speakerphone call. The new volume setting remains in effect after the telephone
call has ended.
www.uniden.com
BASICS [34]
Muting the Ringer
note
Do Not Disturb (DND)
The do not disturb feature (DND) allows you to mute the ringer, the base, and any
registered handsets at the same time. With the phone in standby mode, press and
hold do not disturb on the base. You will hear a confirmation tone, and the DND
LED illuminates. To cancel the DND feature, press do not disturb again. You can
also mute the ringer tone while the phone is ringing by pressing do not disturb on
the base.
[35] BASICS
Temporarily Muting the Ringer
To mute the ringer tone temporarily on a single station, press the MUTE soft key on
that station while the phone is ringing. The mute will last for the current incoming
call only. The ringer tone will return to the previous setting on the next incoming
call.
www.uniden.com
BASICS
You cannot mute a
handset's ringer while
the handset is on the
cradle.
Muting the Microphone
You can temporarily mute the microphone so that the caller cannot hear you.
On the handset
During a call, press the MUTE soft key to mute the
microphone.
M u te On and
appear in the display. To cancel muting,
press the MUTE soft key again. M u te Of f appears.
6CNMߦ
/WVG1P
/76'
24+8#%;
BASICS
On the base
During a call, press mute to mute the base microphone.
M u te On and
appear in the display. To cancel muting, press mute again or press
speaker. Mu t e Of f appears.
Traveling Out of Range
During a call, as you begin to move your handset too far from your base, noise may
increase. If you pass the range limits of the base, you will hear a beep and see Ou t
o f R a ng e on the display, and then the handset returns to standby mode.
www.uniden.com
BASICS [36]
Privacy Mode
Privacy Mode prevents interruption from other stations during a call.
From the handset
While you're on a call, press the PRIVACY soft key. P r iv ac y M o de On and
appear
in the display. The phone will exit Privacy Mode automatically when you hange up.
To exit Privacy Mode and stay on the call, press the PRIVACY soft key again when
the P ri v ac y M o de is on. Pr i va cy Mo d e O ff appears.
Conferencing
3-Way Conferencing
•Outside line + Handset + Base (or Handset)
4-Way Conferencing
•Outside line + Handset + Handset + Base
Joining a Conference Call
You can easily join a call already in progress.
[37] BASICS
www.uniden.com
BASICS
If you have more than one handset, up to four people can participate in a
conference call.
From the base
1) Press speaker or pick up the corded handset to join the conference call.
2) To hang up, press speaker or return the corded handset to the base. The
handset(s) will still be connected to the call.
note
From a second handset
1) Press talk/flash or speaker to join the call.
2) To hang up, press end or return the handset to the
cradle. The other station will still be connected to
the call.
To locate a handset, press find handset on the base when the phone is in standby
mode. All registered handsets beep for 60 seconds, and Pa g in g appears on the
handset display. To cancel paging, press any key on the handset or find handset on
the base.
www.uniden.com
If the battery pack is
completely drained, the
handset will not beep
when paged.
BASICS [38]
BASICS
Find Handset
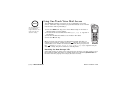
Using One Touch Voice Mail Access
note
The Voice Mail tone is
pre-programmed to
support Packet8's voice
mail service. Do not
alter this setting.
The UIP1868P provides one-touch access to Packet8's voice mail
service. follow the steps below to program the Packet8 access number
into the base and any handset(s):
When you have new messages, the New Message LED will flash. To
retrieve your messages, simply press the
soft key. If you have not
entered the access number or it has been deleted, when you press the
the
soft key, N o N u mb e r S to re d T o s t or e n um b er pr e ss [ M EN U ] appears and you
will hear a beep. The phone returns to standby mode.
Resetting the New Message LED
If the LED remains on after you’ve retrieved your messages, you may need to reset
the indicators. With the phone in standby mode, press and hold find handset on
the base until the paging sound stops (about 5 seconds).
[39] PHONEBOOK
www.uniden.com
PHONEBOOK
1) Press the MENU soft key, then choose Base Setup on the base or
Handset Setup on any handset.
2) Scroll down and select Edit Voice Mail. E d it V _ ma i l No . appears in
the display.
3) Enter the Packet8 VoiceMail access number: 012-0555.
4) Press the OK soft key.
Setting up the Phonebook
You can store names and numbers in your phone’s phonebook, search for names
alphabetically, and dial phonebook entries with just a few key presses. Phonebook
memory is stored independently in the base and handsets. You can store up to 100
numbers in the base and up to 100 numbers in each handset.
The phone uses the same memory to store phonebook entries and Caller ID
messages. If the shared memory is already full, the phone will not store a
phonebook entry. You will have to delete some of the Caller ID messages before you
can store a new phonebook entry.
The memory locations in the handset are not limited to phone numbers. You can
also store a group of numbers (up to 20 digits) that you need to enter once your
call connects.
note
When the memory is
full, you will hear a
beep and Memory
Full appears. You
will have to delete
some Caller ID
messages before you
can store new
phonebook entries.
Storing and Editing Phone Numbers, Names, Distinctive Rings and
Speed Dial
www.uniden.com
PHONEBOOK [40]
PHONEBOOK
1) When the phone is in standby mode, press phonebook. The 2 J Q P G D Q Q M following items appear:
5GCTEJ=#<㨲㨱?
(1st line) The number of the phonebook locations used
5VQTG=5614'?
$#%%12;
5614'
(2nd line) How to search (press the number keypad,
volume up/down)
(3rd line) How to store (press the STORE soft key)
(4th line) The BACK and COPY, and STORE soft keys.
2) Press the STORE soft key. S t or e /E di t N a me appears.
5VQTG'FKV0COG
3) Enter the name (up to 16 characters) by using the
7PKFGP%QTR㨫
number keypad. If a name is not required, go to step
$#%&'.'6'
14. <No Name> will be used as the name.
Refer to the letters on the
number keys to select the
desired characters. With
each press of a number key
(0-9), the displayed
character appears in the
following order:Upper case
letters first, lower case
letters next and finally the
number corresponding to
the key.
Number of times key is pressed
For example, to enter
Movies:
1)Press 6 once, and then press #/> to move the cursor to the right.
2)Press 6 six times.
3)Press 8 six times.
4)Press 4 six times.
5)Press 3 five times.
6)Press 7 eight times.
[41] PHONEBOOK
www.uniden.com
PHONEBOOK
If you make a mistake while entering a name
Use */tone/< or #/> to move the cursor to the incorrect character.
Press the DELETE soft key to erase the wrong character, and then enter the correct
character. To delete all characters press and hold the DELETE soft key.
4) Press the OK soft key to store the name;
S t or e /E d it N o . appears.
5VQTG'FKV0Q
㨫
15) Use the number keypad, */tone/<, or #/> to enter the &'.'6' 2#75'
phone number (up to 20 digits).
If you make an error, use the DELETE soft key to erase the incorrect digits. When
you are finished, press the OK soft key to store the number.
6) If you store the phonebook location in the handset,
D i st i nc t iv e R in g appears. Use
volume up/down to
select a Distinctive Ring tone and then press the OK
soft key.
If you don't want a distinctive ring for this entry,
choose "No Selectn".
7) S p ee d D i al appears. Use
volume up/down to select
a Speed dial number (10 number: SPD1-SPD0).
If you don't want a speed dial number for this entry,
choose "No Selectn".
8) Press the OK soft key. You will hear a confirmation
tone, and D on e ! appears in the display.
&KUVKPEVKXG4KPI
0Q5GNGEVP
(NKEMGT
$#%-
1-
&'.'6'
5RGGF&KCN
0Q5GNGEVP
52&'ORV[
$#%-
&'.'6'
note
To insert a twosecond pause in the
dialing sequence,
press the PAUSE soft
key. If you need the
phone to pause for
more than two
seconds before
sending the next
digits, press the
PAUSE key more than
once. Each pause
counts as one digit.
1-
/QXKGU
$GGVJQXGP52&
$#%-
&'.'6'
'&+6
PHONEBOOK
www.uniden.com
PHONEBOOK [42]
note
If the Caller ID
message was received
as a private/unknown
number, or the
message does not
have the number, you
cannot store the
message in the
Phonebook. If it was
received as private/
unknown name, the
message will be
stored as <No Name>.
Storing Caller ID messages in the Phonebook
Phone numbers and names in the Caller ID list can be stored in the phonebook
easily.
1) When the phone is in standby mode, select the Caller ID message to be stored
(see “Viewing the Caller ID List” on page 49). Then press the STORE soft key.
S t or e/ Ed i t N am e appears. If the Caller ID message is already stored in memory,
you will hear a beep and Th is da t a i s a lr ea d y s to r ed ! ! appears. The number
will not be stored.
2) To complete the setting, follow the steps 3-8 in “Storing and Editing Phone
Numbers, Names, Distinctive Rings and Speed Dial” on page 40.
Storing a Redial Record (Handset only)
1) With the phone in standby mode, press the REDIAL soft key.
2) Use
volume up/down to select the number to be stored.
3) Press STORE. St o re /E d it Na m e appears.
4) To complete the setting, follow the steps 3-8 in “Storing and Editing Phone
Numbers, Names, Distinctive Rings and Speed Dial” on page 40.
PHONEBOOK
[43] PHONEBOOK
www.uniden.com
Viewing the Phonebook
1) Press phonebook. If you open the phonebook during a
call, the COPY and STORE soft key will not appear.
2) Press
volume up/down to scroll through the
phonebook entries. Phonebook entries appear in
alphabetical order (from first to last when you press
to first when you press
volume up).
2JQPGDQQM
5GCTEJ=#<㨲㨱?
5VQTG=5614'?
$#%-
%12;
5614'
volume down, from last
You can also use the letters on the number keys to select the first letter of the
desired name. Press a number key (2-9 and 0) once for the first letter, twice for
the second letter, and so on. The first location that begins with the letter you
entered appears.
For example, to search for an entry starting with "M," press 6 once. Press
volume up/down until the phonebook entry is displayed.
3) To finish the viewing operation:
From the Handset-press end (or the BACK soft key during a call).
From the Base- press exit or the BACK soft key.
PHONEBOOK
www.uniden.com
PHONEBOOK [44]
Making Calls Using the Phonebook
From Standby Mode
1) When the phone is in standby mode, select the
phonebook location to dial (see "Viewing the
Phonebook" on page 44).
2) Press talk/flash or speaker on the handset (or press
speaker on the base or pick up the corded handset).
3) To hang up press end on the handset (or press speaker
corded handset to the base).
/QXKGU
$GGVJQXGP52&
$#%-
&'.'6'
'&+6
on the base or return the
From Talk Mode
1) Press talk/flash or speaker on the handset (or press speaker or pick up the
corded handset from the base).
2) Select the phonebook location to dial (see “Viewing the Phonebook” on
page 44).
3) Press the DIAL soft key.
4) To hang up press end on the handset (or press speaker on the base or return the
corded handset to the base).
Speed Dialing
[45] PHONEBOOK
www.uniden.com
PHONEBOOK
You can program up to ten speed dial numbers in the base and up to ten speed
dial numbers in each handset. You can assign any entry in your phonebook to a
speed dial number (see page 42). To use a speed dial number, when the phone is in
standby mode, press and hold the number key (0-9) you assigned to the phonebook
entry. When the phone number appears, press talk/flash or speaker on the handset
or speaker on the base. The number stored in the speed dial is dialed.
Editing or Erasing a Stored Name, Phone
Number, Distinctive Ring and Speed Dial
1) When the phone is in standby mode, press
2JQPGDQQM
phonebook.
5GCTEJ=#<㨲㨱?
5VQTG=5614'?
2) Use
volume up/down or the number keypad to
$#%%12;
5614'
select the desired phonebook entry (see "Viewing the
Phonebook" on page 44).
3) To edit entry, press the EDIT soft key. To delete the
5VQTG'FKV0COG
entry, press the DELETE soft key.
7PKFGP%QTR㨫
4) If you are deleting the entry, press
volume up/
$#%&'.'6'
1down to select Y e s , and then press the OK soft key.
you will hear a confirmation tone, and De l et e d! appears in the display.
If you are editing the entry, follow the steps 3 to 8 under “Storing and Editing
Phone Numbers, Names, Distinctive Rings and Speed Dial” on page 40 to
complete the editing operation.
PHONEBOOK
www.uniden.com
PHONEBOOK [46]
UP747BH CH13 MemDial.fm Page 47 Friday, June 17, 2005 11:12 AM
Copying Phonebook Entries
note
If the selected handset
is out of range or data
transfer is canceled,
Unavailable appears in
the display. Phonebook
locations will not be
transferred.
Copy Phonebook allows you to transfer stored phonebook entries from one station
to another without having to manually re-enter names and numbers. You can
transfer one memory (phonebook entry) at a time, or all memory at once.
1) When the phone is in standby mode, press phonebook.
2) Press the COPY soft key.
3) Press
volume up/down to select the station you
want to transfer to and then press the OK soft key.
6QYJKEJWPKV!
*CPFUGV
*CPFUGV
$#%-
4) Press
volume up/down to select One Memory or
and then press the OK soft key.
All
M e mo ri e s:
&'.'6'
%QR[2JQPGDQQM
1PG/GOQT[
#NN/GOQTKGUZZZ
$#%&'.'6'
If you select All Memory, Are you sure? appears on the
display screen.
Press
volume up/down to select Y es , and then press the OK soft key.
If you select One Memory, select the phonebook entry
you want to export and then press the COPY soft key.
1-
1-
6QUGNGEV
RJQPGDQQM
R T G U U = # < 㨲 㨱?
$#%-
%QR[KPI
*CPFUGV
%#0%'.
[47] PHONEBOOK
www.uniden.com
PHONEBOOK
5) Copying and name of the receiving station appear in the
display. When the transfer is completed Done! appears on
the display.
When the telephone rings, the Caller ID feature displays the caller’s name, phone
number, date and time of call. With CIDCW (Caller ID on Call Waiting), you can see
the Caller ID information of incoming calls even when you are on the phone.
Additionally, you can dial a number stored in the Caller ID list or save data to your
Phonebook locations.
Important:
Each station can store up to 100 Caller ID records. Each station uses the same
memory locations to store phonebook entries and Caller ID records. If the shared
memory is already full, each time a Caller ID message is received, the phone
overwrites the oldest Caller ID message to store the new message.
The date and time received
Caller's name
Caller's phone number
2/
,CPG5OKVJ
$#%-
&'.'6'
5614'
When the Caller ID message is received, the display shows the caller's phone number
along with the date and time. The incoming call information is stored in the Caller
ID record. If the Caller ID service includes the caller's name, the name will appear in
the display (up to 15 characters).
www.uniden.com
note
•If you answer a call
before the Caller ID
message is received
(for example, before
the second ring), the
Caller ID message will
not appear.
•When the call is
received via a service
provider that does not
offer Caller ID service,
the caller’s phone
number and name does
not appear. (This
includes some
international calls.)
•When the call is via a
private branch
exchange (PBX), the
caller's phone number
and name may not
appear.
CALLER ID [48]
CALLER ID
Caller ID and CIDCW
The number of calls from
the same Caller ID
appears next to the
received time. Once you
view the new message,
the number will be
cleared and disappear.
CALLER ID
note
You may receive any one of the following messages:
When a private name is received; Pr i va te Na m e
When a private number is received; P ri v at e N u mb er
When a unknown name is received; Un kn o wn Na m e
When a unknown number is received; U nk n ow n N u mb er
When invalid data is received; I n co m pl et e D a ta
Data errors appear as "❚."
Viewing the Caller ID List
1) Press cid (or call id).
The summary screen appears. The screen shows the
%CNNGT+&
number of new messages and total messages.
0GY
2) To view the Caller ID messages in historical order, use 6 Q V C N $#%&'.'6'
volume down to scroll through the messages
starting with the most recent message, or
volume
up to scroll through the messages starting with the oldest message.
To jump to Caller ID messages beginning with a particular letter, press the number
key that corresponds to the letter you want to jump to.
[49] CALLER ID
www.uniden.com
note
3) To exit the Caller ID list, press the BACK soft key (on the base, you can also
press the exit key).
Deleting Information from the Caller ID List
1) When the phone is in standby mode, find the Caller ID & G N G V G % C N N G T + &
information you want to delete. (see "Viewing the
;GU
0Q
Caller ID List" on page 49).
$#%$#%12) Press the DELETE soft key. D e le t e C al le r I D appears.
3) Press
volume up/down to select Y es, and then press the OK soft key.
4) You will hear a confirmation tone.
Once the Caller ID data
has been deleted, the
information cannot be
retrieved.
Deleting all Caller ID names/numbers
1) When the phone is in standby mode, press cid (or call
id).
2) Press the DELETE soft key. D e le t e A ll ? appears.
%CNNGT+&
0GY
6QVCN
$#%-
3) Press
volume up/down to choose Y e s .
4) Press the OK soft key. You will hear a confirmation tone.
&GNGVG#NN!
;GU
0Q
$#%-
www.uniden.com
&'.'6'
$#%-
1-
CALLER ID [50]
CALLER ID
Once you view the Caller ID list alphabetically, you cannot switch back to
historical order unless you exit and re-enter the operation.
note
•When a long distance
call has been set, "1"
appears in the display.
•You cannot make a call
from the Caller ID list
if your phone is
connected to a private
branch exchange
(PBX).
Standby mode
1) When the phone is in standby mode, select the
2/
Caller ID message (see "Viewing the Caller ID List"
,CPG5OKVJ
on page 49).
$#%&'.'6'
5614'
2) To have the phone dial a "1" before the displayed
Caller ID number, press */tone/<. To have the
phone dial the stored area code before the displayed Caller ID number,
press #/>.
3) Press talk/flash or speaker on the handset or speaker on the base or pick up the
corded handset. The displayed phone number dials automatically.
Talk mode
1) Press talk/flash or speaker on the handset or speaker on the base or pick up the
corded handset.
2) Select the Caller ID message you want to dial (see "Viewing the Caller ID List" on
page 49).
3) Press the DIAL soft key. The displayed phone number will be dialed.
[51] CALLER ID
www.uniden.com
CALLER ID
Calling a Party from the Caller ID List
Multi-Handset Features
note
The features in this section require a
minimum of two handsets to operate. To
add additional handsets to your system, see
“Expanding Your Phone” on page 14.
•Handsets can be in
Direct Link mode while
other handsets are in
use.
In DirectLink Mode, a pair of handsets can
function as two-way radios. You can have up to five pairs of handsets in DirectLink
Mode at a time. DirectLink Mode does not interfere with the main base's ability to
make or receive telephone calls. You must set both handsets to DirectLink Mode to
make a directlink call.
•While a pair of
handsets are in
DirectLink mode, they
cannot be used to
make or receive calls.
Other handsets can
still make and receive
calls.
To use this feature, you must enter the handsets into DirectLink mode first.
1) Press the MENU soft key and select DirectLink Mode
menu. T o en t er Di re c tL i nk mo de pr e ss [ E NT E R] appears.
2) Press the ENTER soft key to enter DirectLink mode. You
will hear a confirmation tone, and Di re c tL i nk Mo de
C o mp l et e appears.
3) To return to normal mode, press the CANCEL soft key
and then the OK soft key, or return the handset to the
cradle.
www.uniden.com
6QGPVGT
&KTGEV.KPMOQFG
RTGUU='06'4?
$#%-
$#%-
'06'4
MULTI-HANDSET FEATURES [52]
MULTI-HANDSET FEATURES
Using DirectLink Mode
UP747BH CH18 Expanding.fm Page 53 Friday, June 17, 2005 9:48 AM
DirectLink call
1) When the phone is in DirectLink standby mode, press
the DirecLink soft key (example of DirectLink from
handset #1).
570#
*CPFUGV
&KTGEV.KPM/QFG
2) Select the handset to DirectLink with by pressing the
number keys (0-9). Your handset will then page the
other handset.
6Q&KTGEV.KPM
CJCPFUGV
RTGUU=?
%#0%'.
&KTGEV.KPM
&KTGEV.KPM
*CPFUGV
'0&
4) When you finish your conversation, press end or the
END soft key on either handset. To cancel DIrectLink mode and return to
standby, return the handset to the cradle, or press the CANCEL soft key and then
OK soft key.
[53] MULTI-HANDSET FEATURES
www.uniden.com
MULTI-HANDSET FEATURES
$#%-
3) On the receiving handset, press talk/flash, the
ANSWER soft key, or if Any Key Answer is on, press any
number key, */tone/<, or #/>.
Using the Room/Baby Monitor
note
•This feature only works
when the handset(s) is
within the range of the
base.
Monitor using
handset or
base unit
•If the party is out of
range, Unavailable
appears in the display,
and the operation will
be canceled.
Using Room/Baby Monitor
1) Press the MENU soft key and select
Room Monitor menu. T o Ro o m Mo ni t or
appears.
2) Select the handset or base you want to monitor by using
volume up/down.
3) Press the OK soft key.
4QQO/QPKVQT
R o om M on i to r appears, and you hear sounds in the room 㨬 㨭 * C P F U G V where the handset or the base is installed.
'0&
4) To turn off the Room Monitor, press the END soft key,
or end.
www.uniden.com
•While a handset is
monitoring or being
monitored, it cannot
make or receive calls.
Other handsets can
still make and receive
calls.
MULTI-HANDSET FEATURES [54]
MULTI-HANDSET FEATURES
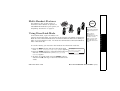
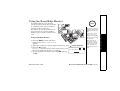
This feature allows you to monitor
sounds in another room. Place the base
or a handset in the room you wish to
monitor; it will function as a
microphone. A second handset can be
set to function as a remote speaker,
allowing you to monitor sounds in the
room.
Using the Intercom
You can use the intercom to talk to another station without using the phone line.
Making an Intercom Page
• You
The
• You
• You
• The
press the CANCEL soft key
called station is busy or out of range
receive an outside call or intercom page while selecting the other station
do not select a station within thirty seconds
called station does not answer within one minute
Answering an Intercom Page
When the intercom page tone sounds, the display will show the ID of the station
that is paging.
[55] MULTI-HANDSET FEATURES
www.uniden.com
MULTI-HANDSET FEATURES
From a handset
1) With the phone in standby mode, press intcom/hold.
2) Use /vol/∧ or /vol/∨ to select the station you
6QKPVGTEQO
want to page, and then press the OK soft key. If you
*CPFUGV
*CPFUGV
select Al l , all other handsets and the base will be
$#%&'.'6'
1paged. An intercom tone sounds.
From the base
1) With the phone in standby mode, press intercom/hold on the base.
2) Use /vol/∧ or /vol/∨ to select the station you want to page, and then press
the OK soft key. If you select A l l , all other handsets will be paged. An intercom
tone sounds.
If any of the following things occurs, the intercom operation will be canceled and
the phone will return to standby:
From a handset
1) Pick up the handset from the cradle. (If AutoTalk is enabled, the handset will
automatically answer when you pick it up.)
2) Press talk/flash, intcom/hold, or the ANSWER soft key.
From the base
Pick up the corded base handset. To answer with the base speakerphone, press
intercom/hold, speaker, or the ANSWER soft key.
Transferring a Call
You can transfer a call between two stations.
www.uniden.com
MULTI-HANDSET FEATURES [56]
MULTI-HANDSET FEATURES
From a handset
1) During a call, press intcom/hold on the handset. The call will be put on hold.
2) Use /vol/ or /vol/ to select the station you * Q N F V Q V T C P U H G T
want to transfer the call to, and then press the OK soft * C P F U G V key. If you select Al l , all other stations will be paged. * C P F U G V $#%&'.'6'
1To cancel the transfer, press talk/flash, the CANCEL
soft key or speaker.
MULTI-HANDSET FEATURES
Hanging up an intercom page
-- From the Handset: press the END soft key or return the handset to the cradle.
-- From the Base: press the END soft key or return the corded handset to the base.
note
Answering a Call Transfer Page
When the page tone sounds, the display will show the ID of the station that is
transferring the call.
To answer a page from a handset
1) Pick up the handset from the cradle. (If AutoTalk is enabled, the handset
automatically answers when you pick it up.)
2) Press talk/flash, intcom/hold, or the ANSWER soft key.
To answer a page from the base
Pick up the corded base handset. To answer with the base speakerphone, press
intcom/hold, speaker, or the ANSWER soft key.
Accepting the call transfer
After answering the page, if you want to accept the call and speak to the outside
caller, press talk/flash on the receiving handset or speaker on the base.
[57] MULTI-HANDSET FEATURES
www.uniden.com
MULTI-HANDSET FEATURES
When you accept the
transferred call, the
transferring station will
be disconnected. The
transferring station can
rejoin the call by
pressing talk/flash on
a handset or speaker on
the base.
From the base
1) During a call, press intercom/hold on the base. The CALL will be put on hold.
2) Use
volume up/down to select the handset you want to transfer the call to,
and then press the OK soft key. If you select A ll , all handsets will be paged. To
cancel the transfer, press intercom/hold, speaker or the CANCEL soft key.
Troubleshooting
If your phone is not performing to your expectations, please try these simple steps first. If these steps
do not solve your problem, please call our Customer Service Hotline at 1-800-297-1023. (Mon - Fri 7 am
to 7 pm, Sat/Sun 9 am to 5 pm, CST. The Customer Service Hotline is closed on holidays.)
Getting Help
If you have trouble connecting to your VoIP Service
Contact Packet8 customer service at 1-888-898-8733 or visit www.packet8.net/support.
If you can questions about using your VoIP service features.
Contact Packet8 customer service at 1-888-898-8733 or visit www.packet8.net/support.
If you have questions on how to use your phone, add extra handsets, program the phonebook, etc.
Contact Uniden customer service at 800-554-7331, Monday-Friday, 8 am to 5 pm, CST, or visit the Uniden
website at www.uniden.com for documentation, FAQs, and troubleshooting tips.
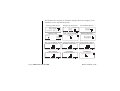
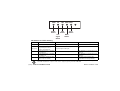
Installation Troubleshooting
If you're having trouble with your UIP1868P, the LEDs on the front panel can help identify the problem.
Figure 1 shows the location of the LEDs, and Table 1 lists the states of the LEDs and what they mean.
www.uniden.com
TROUBLESHOOTING [58]
TROUBLESHOOTING
Understanding the LED Indicators
CA
Power
Status
LAN
WAN VolP1
Line 1
Status
LAN
Status
Call
Agent
Status
TROUBLESHOOTING
PWR
WAN
Status
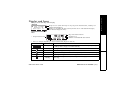
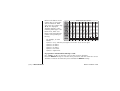
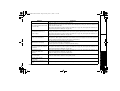
LED Statuses and Their Meaning
LED
On
PWR (power) The UIP1868P has power.
The UIP1868P is signed on &
CA
recognized by the service
(call agent)
provider's SIP Call Agent.
The UIP1868P detects a valid link
LAN
on its LAN port.
The UIP1868P detects a valid link
WAN
on its WAN port.
The telephone connected to this
VoIP1
port is in use or off hook.
Off
Blinking
The UIP1868P has no power.
NA
The UIP1868P is either not signed on or not
recognized by the Call Agent.
NA
The UIP1868P is receiving data on its
LAN port.
The UIP1868P is receiving data on its
The UIP1868P cannot detect a valid link.
WAN port.
Fast: There is an incoming call.
The connected phone is on hook (not in use).
Slow: There is a message waiting.
The UIP1868P cannot detect a valid link.
While the UIP1868P is downloading a firmware update or a new configuration file from your service provider,
the LEDs will blink in sequence from left to right, beginning with the PWR LED.
[59] TROUBLESHOOTING
www.uniden.com
Resetting the UIP1868P
There are two ways to reset the UIP1868P: a power cycle restarts the unit, and a hard reset restores the
unit to factory defaults.
Power Cycle
Simply unplug the telephone UIP1868P and plug it in again. This restarts the UIP1868P and reloads the
configuration file.
Hard Reset
A hard reset restores the UIP1868P to factory defaults. All configuration changes will be lost.
A: Unplug the UIP1868P's AC adapter.
B: Insert a pin or bent-out paper clip into the RESET hole on the rear of the UIP1868P and push the reset
button.
C: While holding the reset button pushed in, reconnect the UIP1868P's AC adapter.
D: Hold the reset button for ten seconds and then release it. This sets the UIP1868P main base back to
factory defaults.
TROUBLESHOOTING [60]
TROUBLESHOOTING
www.uniden.com
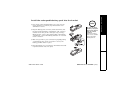
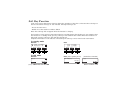
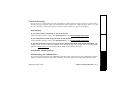
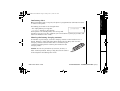
Broadband
modem
Internet
UIP1868P
Computer
Local switch
or router
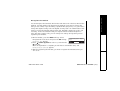
FIRST
LAST
If a local area reset does not restore connectivity, see Common Issues below.
Logging into the UIP1868P
If you need to configure the UIP1868P's router features or check settings while troubleshooting, you can
log into the UIP1868P directly from your web browser.
A: Make sure your computer is directly connected to the UIP1868P's LAN port.
B: Open an Internet Explorer browser window.
C: In the address line of the browser, type 192.168.15.1 and press ENTER.
[61] TROUBLESHOOTING
www.uniden.com
TROUBLESHOOTING
Local Area Reset
Many problems can be solved by resetting all the local network equipment. To perform a local area reset,
first power down all your local equipment: your modem, UIP1868P, switch or router, and computer. Then,
restore power to the devices one at a time, starting with the one directly connected to the Internet and
working your way down:
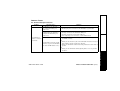
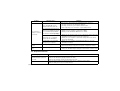
Common Issues
For Terminal Adapter Features
Scenario
Your UIP1868P is
unable to connect to
the Internet.
Check to see if...
Then try...
The PWR LED on the UIP1868P is
off, or the power LED on your
modem is off.
1) Checking the power connection to the UIP1868P, or your modem.
The WAN LED on the UIP1868P is
off and/or the LAN LED on your
modem is off.
Making sure the cable between the UIP1868P and your modem is
1) Securely connected to the UIP1868P's WAN port.
2) Securely connected to your modem's LAN port
3) Free of any frays, loose connectors, or other visible defects
1) Making sure the UIP1868P is configured for DHCP or PPPoE (if your ISP
uses DHCP or PPPoE).
OR
1) Making sure the first three parts of the UIP1868P's IP address match you
The UIP1868P doesn't have a valid
ISP's IP address and the fourth part is different
IP address. (Login to the UIP1868P
2) Making sure UIP1868P's subnet mask exactly matches the subnet mask of
and check the WAN Status screen.)
you ISP.
OR
1) Making sure the UIP1868P's default gateway address is set to your ISP's
IP address.
TROUBLESHOOTING [62]
TROUBLESHOOTING
www.uniden.com
Check to see if...
Then try...
Making sure the cable between the UIP1868P and your computer is
The LAN LED on the UIP1868P is off
1) Securely connected to the UIP1868P's LAN port.
and/or the LINK LED on your
2) Securely connected to your computer's Ethernet card
computer's Ethernet card is off.
3) Free of any frays, loose connectors, or other visible defects
Your computer doesn't have an IP
address. (In most Windows systems, 1) Making sure your computer is configured for DHCP.
Your computer is
2) Making sure the UIP1868P's DHCP Server is enabled.
open a command prompt window
unable to connect to
and enter the command ipconfig.)
the Internet.
1) Making sure the first three parts of your computer's IP address match the
Your computer's IP address and
UIP1868P's IP address and the fourth part is different
subnet mask are on a different
2) Making sure your computer's subnet mask exactly matches the subnet
network than the UIP1868P's.
mask of the UIP1868P.
The UIP1868P is not the default
gateway for your computer.
1) Making sure your computer's default gateway address is set to the
UIP1868P's IP address.
Your UIP1868P
corded
The CA (call agent) LED is off.
1) Resetting the UIP1868P.
2) Contacting Packt8 to verify the necessary SIP configuration settings.
handset has no dial
tone.
The CA (call agent) LED is on.
1) Plugging a standard analog phone into the UIP1868P's VoIP1 port. If this
works, your UIP1868P may be damaged. Contact Uniden customer service.
For Telephone Features
Symptom
Suggestion
The charge LED won't illuminate • Make sure the AC adapter is plugged into the charger and wall outlet.
• Make sure the handset is properly seated in the cradle.
when the handset is placed in
• Make sure the charging contacts on the handset are clean.
the cradle.
The audio sounds weak.
• Move the handset and/or base away from metal objects or appliances and try again.
• Make sure that you are not too far from the base.
[63] TROUBLESHOOTING
www.uniden.com
TROUBLESHOOTING
Scenario
UP747BH CH20 Trouble.fm Page 64 Friday, June 17, 2005 11:13 AM
Symptom
Suggestion
• Make sure that you are not too far from the base.
• Make sure the line is not in use. If an outside call is already using a line, you cannot use that line to
The cordless handset can't make
make another outside call.
or receive calls.
• De-register the handset (see “De-register the Handset” on page 16) and register the handset (see
“Registering Expansion Handsets” on page 15).
The handset doesn't ring or
receive a page.
• Make sure that you are not too far from the base.
• Charge the batteries in the handset for 15-20 hours by placing the handset on the charging cradle.
• De-register the handset (see “De-register the Handset” on page 16) and register the handset (see
“Registering Expansion Handsets” on page 15).
Severe noise interference.
• Keep the handset away from microwave ovens, computers, remote control toys, wireless
microphones, alarm systems, intercoms, room monitors, fluorescent lights, and electrical appliances.
• Move to another location or turn off the source of interference.
Caller ID does not display.
• The handset was picked up before the second ring.
• The call was placed through a switchboard.
• Contact your service provider to verify the Caller ID settings.
• Charge the battery pack for 15-20 hours.
You cannot register the handset
• De-register the handset (see “De-register the Handset” on page 16) and register the handset (see
at the base.
“Registering Expansion Handsets” on page 15).
• De-register the handset (see “De-register the Handset” on page 16) and register the handset (see
“Registering Expansion Handsets” on page 15).
• Make sure that you have registered all handsets.
An extra handset can't join
the conversation.
• Make sure there are not two handsets already using the conference feature.
• Make sure that another station is not in privacy mode.
The base can't join the
conversation
• Make sure that another station is not in privacy mode.
Room Monitor feature does not
work.
• Make sure to place the handset(s) within the range of the base.
www.uniden.com
TROUBLESHOOTING [64]
TROUBLESHOOTING
The handset doesn't
communicate with other
handsets.
Note on Power Sources
Battery replacement and handling
When the operating time becomes short, even after a battery is recharged, please
replace the battery. With normal usage, your battery should last about one year.
Please contact your place of purchase or the Uniden Parts Department for a
replacement battery.
Warning
To avoid the risk of personal injury or property damage from fire or electrical shock,
only use the Uniden battery model and Uniden adapter model specifically
designated for this product.
Caution
•
•
•
•
Use only the specified Uniden battery pack (BT-446).
Do not remove the batteries from the handset to charge them.
Never throw the battery into a fire, disassemble them, or heat them.
Do not remove or damage the battery casing.
www.uniden.com
ADDITIONAL
INF ORM ATI ON
[65] ADDITIONAL INFORMATION
UP747BH CH19 AddInfo.fm Page 66 Friday, June 17, 2005 9:47 AM
When the battery pack is very low, the phone is programmed to eliminate functions
in order to save power.
The battery pack needs to be charged when:
- The empty battery icon appears.
.QY$CVVGT[
- L ow Ba t te ry appears in the display.
If the phone is in standby mode, none of keys will
operate. If you are on a call, complete your conversation as quickly as possible, and
return the handset to the cradle.
Cleaning the battery charging contacts
To maintain a good charge, clean the charging contacts on the handset once a
month. Dampen a cloth with plain water. Gently rub the damp cloth over the
charging contacts until all visible dirt is removed. Dry the
contacts thoroughly before returning the handset to the
charging cradle.
Caution: Do not use paint thinner, benzene, alcohol, or
other chemical products. Doing so may discolor the surface
of the telephone and damage the finish.
www.uniden.com
contacts
ADDITIONAL INFORMATION [66]
ADDITIONAL
INF ORM ATI ON
Low battery alert
General Information
The phone complies with FCC Parts 15 Operating temperature:
0 °C to +50 °C (+32 °F to +122 °F)
AC Adapter Information
AC Adapter part number: AD-1002 for the base
Input Voltage: 120 AC 60Hz
Output Voltage: 9, 12V DC 350, 1000mA
AD-0005 for the charger
120V AC 60Hz
9V DC 210mA
Battery Information
Battery part number: BT-446
Capacity: 800mAh, 3.6V
• To avoid damage to the phone use only Uniden AD-1002 and BT-446, and AD-0005 with
your phone.
• If the handset is left off of the base, the actual Talk mode duration will be reduced
respective to the amount of time the handset is off the base.
Recharge your phone on a regular basis by returning the handset to the charger
after each phone call. When the operating time becomes short even after the
battery is recharged, please replace the battery. With normal usage, the battery
should last about one year.
Specifications, features, and availability of optional accessories are all subject to
change without prior notice.
[67] ADDITIONAL INFORMATION
www.uniden.com
ADDITIONAL
INF ORM ATI ON
A replacement Uniden adapter or battery may be purchased by contacting the
Uniden Parts Department (see back page).
Moisture and liquid can damage your cordless phone. In case of accidental submersion, please read the following steps.
Case
Action
If the handset or base is exposed to
moisture or liquid, but it only affects the Wipe off the liquid, and use as normal.
exterior plastic housing.
If moisture or liquid has entered the
plastic-housing (i.e. liquid can be heard
in the phone or liquid has entered the
handset battery compartment or vent
openings on the base).
www.uniden.com
Handset:
1)Remove the battery cover and leave it off for ventilation.
2)Remove the battery pack by disconnecting.
3)Leave the battery cover off and the battery pack disconnected for at least 3 days.
4)Once the handset is completely dry, reconnect the battery pack and the battery cover.
5)Recharge the handset's battery pack for 20 hours before using again.
Base:
1)Disconnect the AC adapter from the base unit, cutting off electrical power.
2)Disconnect the telephone cord from the base unit.
3)Let dry for at least 3 days.
IMPORTANT: You must unplug the telephone line while recharging the battery pack to
avoid charge interruption.
CAUTION:
DO NOT use a microwave oven to speed up the drying process. This will cause permanent
damage to the handset, base and the microwave oven.
After following these steps, if your cordless telephone does not work, please contact
Customer Service (see back page).
ADDITIONAL INFORMATION [68]
ADDITIONAL
INFO RM ATI ON
Liquid Damage
Precautions!
Before you read anything else, please observe the following:
Warning!
Uniden America Corporation DOES NOT represent this unit to be
waterproof. To reduce the risk of fire, electrical shock, or damage to the
unit, DO NOT expose this unit to rain or moisture.
Rechargeable Nickel-Metal-Hydride Battery Warning
• This equipment contains a rechargeable Nickel-Metal-Hydride battery.
• Nickel is a chemical known to state of California to cause cancer.
• The rechargeable Nickel-Metal-Hydride battery contained in this
equipment may explode if disposed of in a fire.
• Do not short-circuit the battery.
• Do not charge the rechargeable Nickel-Metal-Hydride battery used in
this equipment in any charger other than the one designed to charge
this battery as specified in the owner's manual. Using another charger
may damage the battery or cause the battery to explode.
The exclamation point within an equilateral triangle is
intended to alert the user to the presence of important
operating and maintenance (servicing) instructions in the
literature accompanying the appliance.
Uniden works to reduce lead content in our PVC coated cords in our
products and accessories.
Warning!
The cords on this product and/or accessories contain lead, a chemical
known to the State of California to cause birth defects or other
reproductive harm. Wash hands after handling.
One Year Limited Warranty
When using your telephone equipment, basic safety precautions should
always be followed to reduce the risk of fire, electric shock and injury to
persons, including the following:
1. Do not use this product near water, for example, near a bathtub, wash
bowl, kitchen sink or laundry tub, in a wet basement or near a
swimming pool.
2. Avoid using a telephone (other than a cordless type) during an
electrical storm. There may be a remote risk of electric shock from
lightning.
3. Do not use the telephone to report a gas leak in the vicinity of the
leak.
4. Use only the power cord and batteries indicated in this manual. Do
not dispose of batteries in a fire. They may explode. Check with local
codes for possible special disposal instructions.
Important: Evidence of original purchase is required for warranty service.
WARRANTOR: UNIDEN AMERICA CORPORATION ("Uniden") ELEMENTS OF
WARRANTY: Uniden warrants, for one year, to the original retail owner,
this Uniden Product to be free from defects in materials and
craftsmanship with only the limitations or exclusions set out below.
SAVE THESE INSTRUCTIONS
CAUTION: Risk of explosion if battery is replaced by an incorrect type.
Dispose of used batteries according to the instructions.
The FCC Wants You To Know
Should you experience trouble with this equipment, please contact
Uniden customer service at 800-297-1023.
Changes or modifications to this product not expressly approved by
Uniden, or operation of this product in any way other than as detailed by
the owner's manual, could void your authority to operate this product.
This device complies with part 15 of the FCC rules. Operation is subject
to the following two conditions: (1) This device may not cause harmful
interference, and (2) This device must accept any interference received,
including interference that may cause undesired operation. Privacy of
communications may not be ensured when using this phone. To insure
the safety of users, the FCC has established criteria for the amount of
radio frequency energy various products may produce depending on their
intended usage. This product has been tested and found to comply with
the FCC's exposure criteria. For body worn operation, the FCC RF exposure
guidelines were also met when used with the Uniden accessories supplied
or designed for this product. Use of other accessories may not ensure
compliance with FCC RF exposure guidelines and should be avoided.
WARRANTY DURATION: This warranty to the original user shall terminate
and be of no further effect 12 months after the date of original retail
sale. The warranty is invalid if the Product is
(A) damaged or not maintained as reasonable or necessary, (B) modified,
altered, or used as part of any conversion kits, subassemblies, or any
configurations not sold by Uniden, (C) improperly installed, (D) serviced
or repaired by someone other than an authorized Uniden service center
for a defect or malfunction covered by this warranty, (E) used in any
conjunction with equipment or parts or as part of any system not
manufactured by Uniden, or (F) installed or programmed by anyone other
than as detailed by the owner's manual for this product.
STATEMENT OF REMEDY: In the event that the product does not conform
to this warranty at any time while this warranty is in effect, warrantor
will either, at its option, repair or replace the defective unit and return it
to you without charge for parts, service, or any other cost (except
shipping and handling) incurred by warrantor or its representatives in
connection with the performance of this warranty. Warrantor, at its
option, may replace the unit with a new or refurbished unit. THE LIMITED
WARRANTY SET FORTH ABOVE IS THE SOLE AND ENTIRE WARRANTY
PERTAINING TO THE PRODUCT AND IS IN LIEU OF AND EXCLUDES ALL
OTHER WARRANTIES OF ANY NATURE WHATSOEVER, WHETHER EXPRESS,
IMPLIED OR ARISING BY OPERATION OF LAW, INCLUDING, BUT NOT
LIMITED TO ANY IMPLIED WARRANTIES OF MERCHANTABILITY OR FITNESS
FOR A PARTICULAR PURPOSE. THIS WARRANTY DOES NOT COVER OR
PROVIDE FOR THE REIMBURSEMENT OR PAYMENT OF INCIDENTAL OR
CONSEQUENTIAL DAMAGES. Some states do not allow this exclusion or
limitation of incidental or consequential damages so the above limitation
or exclusion may not apply to you.
LEGAL REMEDIES: This warranty gives you specific legal rights, and you
may also have other rights which vary from state to state. This warranty
is void outside the United States of America and Canada.
PROCEDURE FOR OBTAINING PERFORMANCE OF WARRANTY: If, after
following the instructions in the owner's manual you are certain that the
Product is defective, pack the Product carefully (preferably in its original
packaging). Disconnect the battery from the Product and separately
secure the battery in its own separate packaging within the shipping
carton. The Product should include all parts and accessories originally
packaged with the Product. Include evidence of original purchase and a
note describing the defect that has caused you to return it. The Product
should be shipped freight prepaid, by traceable means, to warrantor at:
Uniden America Service
4700 Amon Carter Blvd.
Fort Worth, TX 76155
[69] PRECAUTIONS & WARRANTY
www.uniden.com
PRECAUTIONS &
WA R R A N T Y
Rechargeable Nickel-Metal-Hydride
Batteries Must Be Recycled or
Disposed of Properly
Important Safety Instructions
I.C. Notice
RADIO EQUIPMENT
The term "IC:" before the radio certification number only signifies that Industry Canada technical specifications were
met.
Operation is subject to the following two conditions: (1) this device may not cause interference, and (2) this device
must accept any interference, including interference that may cause undesired operation of the device. "Privacy of
communications may not be ensured when using this telephone".
I.C. NOTICE
www.uniden.com
I.C. NOTICE [70]
Index
A
Animation screen . . . . . . . . . . . .
Anykey Answer . . . . . . . . . . . . . .
Area Code . . . . . . . . . . . . . . . . .
AutoTalk . . . . . . . . . . . . . . . . . .
B
Banner . . . . . . . . . . . . . . . . . . .
Battery
Preparing . . . . . . . . . . . . . . . .
Replacement and handling . . . .
Beltclip . . . . . . . . . . . . . . . . . .
C
Call transfer feature . . . . . . . . . .
Caller ID
Caller ID services . . . . . . . . . .
Calling . . . . . . . . . . . . . . . . .
CIDCW . . . . . . . . . . . . . . . . . .
Deleting . . . . . . . . . . . . . . . .
Setting . . . . . . . . . . . . . . . . .
Storing . . . . . . . . . . . . . . . . .
Viewing . . . . . . . . . . . . . . . . .
Clock . . . . . . . . . . . . . . . . . . . .
Conferencing . . . . . . . . . . . . . . .
Contrast . . . . . . . . . . . . . . . . . .
Copying phonebook . . . . . . . . . .
D
De-register the handset . . . . . . . .
Distinctive ringer . . . . . . . . . . . .
E
Earpiece volume . . . . . . . . . . . . .
[71] INDEX
26
24
29
23
24
12
65
17
56
48
51
48
50
29
43
49
28
37
25
47
16
23
34
G
General information . . . . . . . . . . . 67
H
Headset installation . . . . . . . . . . 17
Hold . . . . . . . . . . . . . . . . . . . . . 32
I
I.C. notice . . . . . . . . . . . . . . . . . 70
Intercom . . . . . . . . . . . . . . . . . . 55
K
Key touch tone . . . . . . . . . . . . . . 26
L
Language . . . . . . . . . . . . . . . . . . 25
Liquid damage . . . . . . . . . . . . . . 68
M
Making a call . . . . . . . . . . . . . . . 30
Mute . . . . . . . . . . . . . . . . . . . . . 36
P
Phonebook
Making calls . . . . . . . . . . . . . . 45
Viewing . . . . . . . . . . . . . . . . . 44
Precautions . . . . . . . . . . . . . . . . 69
Privacy Mode . . . . . . . . . . . . . . . 37
R
Receiving a call . . . . . . . . . . . . . 31
Redialing a call . . . . . . . . . . . . . . 33
Ringer
Adjusting . . . . . . . . . . . . . . . . 34
Do not disturb . . . . . . . . . . . . . 35
Mute . . . . . . . . . . . . . . . . . . . 35
Tone . . . . . . . . . . . . . . . . . . . 22
Room/baby monitor . . . . . . . . . . 54
S
Setting up
Handset . . . . . . . . . . . . . . 12, 22
Menu options . . . . . . . . . . . . . .21
Soft Key . . . . . . . . . . . . . . . . . . .19
Speed dialing . . . . . . . . . . . . . . .45
T
Transfering a call . . . . . . . . . . . . .56
V
Voice Mail Access . . . . . . . . . . . . .39
W
Warranty . . . . . . . . . . . . . . . . . .69
www.uniden.com
UP747BH CH10 Flowchart.fm Page 72 Friday, June 17, 2005 9:46 AM
Main Menu Flow Chart
•From standby mode
•Base
570#
4'&+#.
∨
4QQO/QPKVQT
$CUG5GVWR
)NQDCN5GVWR
MENU
0GY%+&
/'07
$#%-
$#%-
1-
∨
4QQO/QPKVQT
$CUG5GVWR
)NQDCN5GVWR
$#%-
$#%-
1-
•Handset
570#
*CPFUGV
0GY%+&
4'&+#.
MENU
/'07
&KTGEV.KPM/QFG
4QQO/QPKVQT
*CPFUGV5GVWR
$#%-
$#%-
∨
1-
&KTGEV.KPM/QFG
4QQO/QPKVQT
*CPFUGV5GVWR
$#%-
$#%-
OK
6QGPVGT
&KTGEV.KPMOQFG
RTGUU='06'4?
$#%-
$#%-
'06'4
Enter
570#
*CPFUGV
&KTGEV.KPM/QFG
%#0%'.
&KTGEV.KPM
1-
&KTGEV.KPM/QFG
4QQO/QPKVQT
*CPFUGV5GVWR
$#%-
OK
∧
or
∨
6Q4QQO/QPKVQT
*CPFUGV
*CPFUGV
*CPFUGV
*CPFUGV
*CPFUGV
*CPFUGV
*CPFUGV
*CPFUGV
*CPFUGV
$CUG
$#%-
$#%-
1-
$#%-
∨
1-
OK
∧
or
∨
OK
*#0&5'65'672
'FKV8QKEG/CKN
4KPIGT6QPGU
&KUVKPEVKXG4KPI
#WVQ6CNM
#P[MG[#PUYGT
$CPPGT
.CPIWCIG
%QPVTCUV
-G[6QWEJ6QPG
# P K O C V K$#%QP5ETGGP
$#%-
∧
or
∨
$#5'5'672
'FKV8QKEG/CKN
.CPIWCIG
%QPVTCUV
$#%-
$#%-
1-
OK
1-
MAIN MENU FLOW CHART [72]
M AI N M EN U F LO W CH ART
www.uniden.com
∨
UP747BH CH10 Flowchart.fm Page 73 Friday, June 17, 2005 9:46 AM
•Base
∨
∨
4QQO/QPKVQT
$CUG5GVWR
)NQDCN5GVWR
$#%-
$#%-
$CUG5GVWR
)NQDCN5GVWR
*54GIKUVTCVKQP
$#%-
1-
$#%-
1-
•Handset
∨
4QQO/QPKVQT
*CPFUGV5GVWR
)NQDCN5GVWR
$#%-
$#%-
∨
*CPFUGV5GVWR
)NQDCN5GVWR
>GIKUVGT*5
$#%-
1-
$#%-
∧
or
∨
).1$#.5'672
&C[6KOG
%+&%9
#TGC%QFG
&KCN/QFG
8 Q K E G /$#%CKN6QPG
$#%-
1-
OK
∧
or
∨
OK
>GIKUVGT*5!
;GU
0Q
$#%-
$#%-
1-
1PJCPFUGV
RTGUUJQNF
MG[HQTUGE
%#0%'.
OK
1-
>GIKUVTCVKQP
%QORNGVG
$#%-
$#%-
1-
2NCEGJCPFUGV
QPOCKPDCUG
VQTGIKUVGT
4'&+#.
[73] MAIN MENU FLOW CHART
/'07
www.uniden.com
M AI N M E N U F LO W CH A RT
OK
At Uniden, we'll take care of you!
Thank you for purchasing a Uniden product. If you have any questions or problems,
please do not return this product to the place of purchase.
If you have trouble connecting to your VoIP Service
Contact Packet8 customer service at 1-888-898-8733 or visit www.packet8.net/support.
If you can questions about using your VoIP service features.
Contact Packet8 customer service at 1-888-898-8733 or visit www.packet8.net/support.
If you have questions on how to use your phone, add extra handsets, program the phonebook, etc.
Contact Uniden customer service at 800-554-7331, Monday-Friday, 8 am to 5 pm, CST, or visit the Uniden
website at www.uniden.com for documentation, FAQs, and troubleshooting tips.
Need a Part?
To order headsets, additional handsets, replacement batteries or other accessories, visit
our website at www.uniden.com or call 1-800-554-3988, Mon-Fri, 8 a.m. to 5 p.m. CST.
Help for our Special Needs Customers
If you need special assistance due to a disability or have questions on the accessibility
features of this product, please call 1-800-874-9314 (voice or TTY)
May be covered under one or more of the following U.S. patents:
4,797,916 5,381,460 5,426,690 5,434,905 5,491,745 5,533,010
5,574,727 5,581,598 5,650,790 5,660,269 5,661,780 5,663,981
5,671,248 5,696,471 5,717,312 5,732,355 5,754,407 5,758,289
5,768,345 5,787,356 5,794,152 5,801,466 5,825,161 5,864,619
5,893,034 5,912,968 5,915,227 5,929,598 5,930,720 5,960,358
5,987,330 6,044,281 6,070,082 6,125,277 6,253,088 6,618,015
6,671,315 6,714,630 6,782,098 6,788,920 6,788,953
Other patents pending.
UP747EH_04.eps
R
IE
S,
M
@
FO OR E
CO
S
N
.
LI EN
ES
CC ON ID
A O
N
.U
G
W
W
W
R E G I S T E R O N L I N E T O D AY !
T H A N K Y O U F O R B U Y I N G A U N I D E N P R O D U C T.
©2005 Uniden America Corporation, Fort Worth, Texas. Contains additional foreign articles. Custom manufactured in China.