1
Facsimile
User’s Guide
UF-E1
Before operating this product, please read the instructions carefully and save this manual for future use.
English
DZSD001253-2
T01012-2071
PRINTING HELP
Printing Help
Printing Help
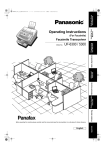
Press [HELP] to print a guide showing how to operate this apparatus. It is useful when the user’s guide is
not available.
1
2
HELP
HELP GUIDE ?
DATE & TIME ?
to select the items (see below) to print.
3
START
* PRINTING *
Items that can be printed by HELP function.
●
Set User Parameters
•••••••••••••••••••••••••••••••••••••••••••••••••••
DATE & TIME ?
LOGO ?
TELEPHONE NO. ?
2
●
Register Speed Dialling Numbers • • • • • • • • • • • • • • • • • • • • • • • • • • • • • • • • • • • SPEED DIAL NO. ?
●
Sending and Receiving Documents
●
Selecting Functions
●
Managing Outgoing Messages (OGM)
●
••••••••••••••••••••••••••••••••
••••••••••••••••••••••••••••••••••••••••••••••••••••••
XMT & RCV ?
SELECT FUNC. ?
••••••••••••••••••••••••••••
HOW TO SET OGM ?
Remote Control Code Table
••••••••••••••••••••••••••••••••••••••••••
RMT CONTROLCODE?
●
Set Up Internet Parameters
•••••••••••••••••••••••••••••••••••••••••••
INTERNET SETTING
●
Register E-mail Address
•••••••••••••••••••••••••••••••••••••••••••••••
REGIST.ADDR.LIST
●
Sending and Receiving Fax via E-Mail
••••••••••••••••••••••••••••
RECEIVING E-MAIL
Contents
PRINTING HELP
Q Printing Help ..................................................................................................
Printing Help..............................................................................................
2
2
GETTING TO KNOW YOUR APPARATUS
Q Safety Information ..........................................................................................
Q Main Apparatus and Accessories/Supplies ....................................................
Supplies ....................................................................................................
Q External View .................................................................................................
Q Control Panel..................................................................................................
6
9
9
10
11
INSTALLING YOUR APPARATUS
Q Connecting the Telephone Line Cord, and Power Cord,
Q
Q
Q
Q
Q
Q
Q
Printer Interface Cable ...................................................................................
Installing the Ink Cartridge .............................................................................
Replacing the Ink Cartridge............................................................................
Installing/Replacing Recording Paper ............................................................
Adjusting Volume ...........................................................................................
Ringer Volume ..........................................................................................
Speakerphone Volume..............................................................................
Handset Volume........................................................................................
User Parameters ............................................................................................
Setting the Date and Time ........................................................................
Setting Your NAME ...................................................................................
Entering Characters ..................................................................................
Setting Your ID Number (FAX Telephone Number) ..................................
Managing Outgoing Messages (OGM)...........................................................
To Record TAM OGM ...............................................................................
To Playback TAM OGM ............................................................................
To Erase TAM OGM .................................................................................
To Record F/T First OGM .........................................................................
To Record F/T Last OGM..........................................................................
To Playback F/T First OGM ......................................................................
To Playback F/T Last OGM.......................................................................
To Erase F/T First OGM............................................................................
To Erase F/T Last OGM ............................................................................
Speed Dialling Numbers.................................................................................
Registering an Abbreviated Dialling Number ............................................
Registering Directory Dialling Number ......................................................
Changing Speed Dialling Numbers ...........................................................
Erasing Speed Dialling Numbers ..............................................................
12
13
15
16
17
17
17
17
18
18
19
20
21
22
22
23
23
24
24
25
25
26
26
27
27
28
29
30
3
BASIC FEATURES
Q Telephone ...................................................................................................... 31
Q
Q
Q
Q
Q
Q
Directory Search Dialling ..........................................................................
Direct Dialling............................................................................................
Abbreviated Dialling ..................................................................................
Manual Number Dialling............................................................................
Loading Documents .......................................................................................
Documents You Can Send .......................................................................
How to Load Documents...........................................................................
Setting Contrast, Resolution and Halftone................................................
Sending Documents.......................................................................................
Multi-station Transmission (Broadcasting)................................................
Receiving Documents ....................................................................................
MANUAL RCV Mode (Factory Setting).....................................................
FAX/TEL Auto Switching Mode.................................................................
Change Setting back to TEL Mode ...........................................................
Receiving in the FAX/TEL Mode...............................................................
Setting Silent Reception for the FAX/TEL, FAX/TAM, FAX Mode ............
Setting the Ring Counter to Answer a Call ...............................................
Setting the Ring Counter for FAX/TEL Mode............................................
FAX/TAM Mode ........................................................................................
FAX Mode .................................................................................................
Receiving Documents Using a Colour Cartridge ......................................
Distinctive Ring Detector (DRD) ...............................................................
Digital Telephone Answering System ............................................................
Setting the TAM (Before you leave home or office) ..................................
Resetting the TAM (After you have returned home or to the office) .........
Buttons Used to Activate Functions for Messages ...................................
Erase all ICMs...........................................................................................
Erase one ICM at a Time ..........................................................................
Making Copies ...............................................................................................
Enlargement Copy ....................................................................................
Printer Mode ..................................................................................................
31
32
32
32
34
34
35
35
36
37
38
40
41
41
42
42
43
43
44
44
45
46
48
48
48
49
49
49
50
51
52
ADVANCED FEATURES
Q Timer Controlled Communications................................................................. 53
Deferred Transmission..............................................................................
53
Remote Reception ....................................................................................
Setting TAM from Remote Station ............................................................
Memo/2Way Recording .................................................................................
About Memo/2Way Recording ..................................................................
Voice Message Transfer ................................................................................
Setting the Voice Message Transfer.........................................................
Operation of Voice Message Transfer ......................................................
Remote Function............................................................................................
About Remote Function ............................................................................
Registering the Remote Control Password...............................................
Caller ID .........................................................................................................
Caller ID List .............................................................................................
Blacklist.....................................................................................................
Changing the Caller’s Telephone Number in Blacklist..............................
Erasing the Telephone Number in Blacklist ..............................................
Selecting Caller Type................................................................................
55
55
56
56
57
57
57
58
58
59
60
60
63
64
65
66
Q Remote Reception/Setting TAM from Remote Station .................................. 55
Q
Q
Q
Q
4
INTERNET COMMUNICATION
Q INTERNET COMMUNICATION ..................................................................... 67
Q
Q
Q
Internet Overview (Fax via Internet) ..........................................................
Internet Overview (Message via Internet) .................................................
Printable Characters (ISO-8859-1) ...........................................................
Sending/Receiving Documents via Internet ...................................................
Sending Documents ..................................................................................
Multi-station Transmission ........................................................................
Receiving Documents ...............................................................................
i-FAX Error Messages ...............................................................................
Programming Internet Parameters .................................................................
Configuring Network Connection ..............................................................
Entering Characters ..................................................................................
Registering Mail Setting ............................................................................
Registering Directory Search ....................................................................
Editing Directory Search ...........................................................................
Registering ABBR .....................................................................................
Editing ABBR ............................................................................................
Registering Sender Name and Subject .....................................................
Receive Setting .........................................................................................
E-mail Address History...................................................................................
Registering E-mail Address.......................................................................
Deleting E-mail Address............................................................................
67
68
68
69
69
70
71
72
73
73
74
75
76
76
77
77
78
79
80
80
80
PROGRAMMING YOUR APPARATUS
Q Programming Your Apparatus........................................................................ 81
Setting Fax Parameters ............................................................................
81
LIST AND JOURNAL
Q Lists and Journal ............................................................................................ 85
Journal and Lists .......................................................................................
Communication Journal (COMM. JOURNAL) ...........................................
Power Failure Report ................................................................................
85
85
85
MAINTENANCE AND TROUBLESHOOTING
Q Maintenance................................................................................................... 86
Cleaning the Document Scanning Area ....................................................
86
Information Codes .....................................................................................
Clearing Recording Paper Jam .................................................................
Cleaning the Print Head ............................................................................
Cleaning the Ink Cartridge Contact ...........................................................
Removing Dried Ink from the Nozzle of the Ink Cartridge .........................
Cleaning the Ink Spillage Recess .............................................................
Clearing a Document Jam.........................................................................
Adjusting the Automatic Document Feeder (ADF) ....................................
Checking the Telephone Line ...................................................................
89
93
94
94
95
95
96
96
97
Q Troubleshooting.............................................................................................. 87
APPENDIX
Q
Q
Q
Q
Specifications ................................................................................................. 98
Paper Specifications....................................................................................... 100
Glossary ......................................................................................................... 101
Index............................................................................................................... 104
5
GETTING TO KNOW YOUR APPARATUS
Safety Information
denotes a potential hazard that could result in serious injury or death.
!
WARNING
●
THE APPARATUS SHOULD NOT BE EXPOSED TO RAIN OR ANY MOIST ENVIRONMENT TO
PREVENT FIRE OR SHOCK.
●
THE APPARATUS MUST BE PROPERLY GROUNDED TO MINIMIZE DAMAGES AND SHOCK.
●
THE APPARATUS CONTAINS HAZARDOUS RADIATION. IF YOU DO NOT FOLLOW THESE
INSTRUCTIONS STRICTLY SPECIFIED HEREIN, YOU MAY EXPOSE YOURSELF TO HAZARDOUS
RADIATION.
●
THE SOCKET SHOULD BE FOUND WITHIN CLOSE PROXIMITY TO THE APPARATUS.
●
THE APPARATUS SHOULD BE INSTALLED IN A SPACIOUS OR WELL-VENTILATED ROOM SO AS
TO MINIMIZE THE AMOUNT OF OZONE IN THE AIR. AS OZONE IS HEAVIER THAN AIR, IT IS
RECOMMENDED THAT AIR AT FLOOR LEVEL BE VENTILATED.
●
THE POWER SUPPLY CORD SHOULD BE CONNECTED TO ORDINARY AC OUTLET PRIOR TO
TELEPHONE LINE CORD WHEN INSTALLING FOR USE.
●
THE TELEPHONE LINE CORD SHOULD BE UNPLUGGED BEFORE DISCONNECTING POWER
SUPPLY CORD FROM AC OUTLET WHEN DISASSEMBLING FOR FUTURE USE.
!
CAUTION
denotes hazards that could result in minor injury or damage to the apparatus.
1. When you know that a thunderstorm is coming, we recommend that you:
1) Unplug the telephone line cord from the phone jack.
2) Turn off the power and unplug the power supply cord from AC outlet.
2. The apparatus may not necessarily provide an effective transfer of a call to or from a telephone
connected to the same line.
3. The operation of the apparatus on the same line as telephone or other equipment with audible warning
devices or automatic ring detectors will give rise to bell tinkle or noise and may cause false tripping of the
ring detector. Should such problem occur, it is not necessary to contact telecom (telephone company)
faults service.
●
Do not install the apparatus near any heating or air-conditioning apparatus.
●
Do not expose to direct sunlight.
●
Do not block the ventilation openings.
●
Do not place heavy objects, or spill liquids on the apparatus.
●
Install the apparatus on a flat surface. Leave at least 10cm of space between the apparatus and other
objects.
IMPORTANT NOTICE
The telephone may not operate under power failure condition. Please ensure that a separate telephone, not
dependent on local power, is available for emergency use.
Notice to Users in European Union(EU)
Declaration of Conformity (DoC) :
"Hereby we, Matsushita Graphic Communication Systems, Inc. / Panasonic Testing Centre (Europe)
GmbH (PTC), declare that this product, Model UF-E1-YG is in compliance with the essential
requirements and other relevant provisions of the Directive 1999/5/EC"
Hint:
If you want to get a copy of the original DoC of our products which relates to the R&TTE,
please contact our web address: http://doc.panasonic-tc.de
Network Compatibility :
This product, Model UF-E1-YG, is designed as to work with an analogue Public Swithched Telephone
Network (PSTN) in each country.
6
GETTING TO
KNOW YOUR
APPARATUS
Safety Information
!
WARNING
THE HANDSET RECEIVER MAY PICK UP SMALL FERRO-MAGNETIC OBJECTS
SUCH AS PINS AND STAPLES.
Notice to Users in New Zealand
The grant of a Telepermit for any item of terminal equipment only indicates that Telecom has accepted that
the item complies with minimum conditions for connection to its network. It does not mean endorsement of
the apparatus by Telecom nor does it provide any sort of warranty. Above all, it does not assure that any
item will work correctly in respect to another item of Telepermitted equipment of a different make or model,
nor does it imply that any apparatus is compatible with all of Telecom’s network services.
The apparatus is not capable, under all operating conditions, of correct operation at a higher speed for
which it is designed. Telecom will accept no responsibility should difficulties arise in such circumstances.
IMPORTANT NOTICE
During power failure, the telephone may not function. Please use a separate telephone, not dependent on
local power, for emergency use.
This apparatus, should not be used if it creates a nuisance to other Telecom customers under certain
circumstances.
Immediately disconnect the apparatus should it become physically damaged and arrange for its disposal or
repair.
Disconnect the telecom connection before disconnecting the power connection prior to relocating the
equipment, and reconnect the power first.
This apparatus may not necessarily provide an effective transfer of a call to or from a telephone connected
to the same line.
This apparatus, when connected on the same line to a telephone or other equipment with audible warning
devices or automatic ring detectors, might trigger bell tinkle or noise and may cause false tripping of the ring
detector. Should such problems occur, it is not necessary to contact telecom faults service.
If the supply cord of this apparatus is damaged, it must be replaced with the special cord supplied by an
authorized Panasonic Service Center.
This apparatus is not set up to make automatic calls to the Telecom ‘111’ Emergency Service.
Any users using this apparatus for recording Telephone conversations must comply to New Zealand law.
This requires that at least one party in the conversation to be aware of the recording. In addition, the
Principles enumerated in the Privacy Act 1993 shall be complied in respect to the nature of the personal
information collected, the purpose for its collection, how it is to be used and what is to be disclosed to any
other party.
WARNING NOTICE:
No emergency call such as ‘111’ or other call can be made from this apparatus during power failure.
"This notice has been included at the request of NZ Telecom as a condition of compliance with Telecom PTC
requirements."
7
Safety Information
NUMBER DISPLAY FORMAT
For all local and national incoming calls your display will show the area code (e.g. 9 for Auckland) or the
cellular prefix (e.g. 25 for Telecom Cellular) followed by the caller’s telephone number. An Auckland caller’s
number will be displayed as 9+++++++ on the LCD display and on the "CALL SELECTION". The seven X’s
respresent the seven digits of the caller’s telephone number. A call from a 7-digit Telecom Cellular number
will be displayed as 25+++++++. A call from a 6-digit Telecom Cellular number will be displayed as
25++++++. For incoming international calls your display may only show the digits ‘0000’.
For business users on a Centrex line, your display will also show the Centrex extension numbers in the
shorter extension number format used within your company.
TO RETURN A CALL
From the "CALL SELECTION" print-out, select the telephone number which you wish to call.
If you recognize the telephone number as a local, non-cellular number then you can simply dial the 7-digit
telephone number without the area code.
In other cases diall a "0" first and then dial all the digits, including the area code which is the left-most digit.
CUSTOMERS USING TELECOM’S TOLL SERVICES
For Home use or use on a digit exchange business line, using Telecom’s toll services, it is always easier to
dial a "0" before dialing the full telephone number as appeared on the "CALL SELECTION" print-out. This
avoids having to decide whether the call is from your local calling area. If the call is a local number, you will
not incur a toll charge.
For use on a Centrex line using Telecom’s toll services, simply dial the number displayed if it is from one
"10" then the full telephone number which appear on the "CALL SELECTION" print-out.
CUSTOMERS USING ANOTHER COMPANY’S TOLL SERVICES
Many customers use another company’s toll services and have their line set up so that their chosen carrier’s
access code is automatically inserted by the Telecom exchange. An example is CLEAR’s "CLEARDirect"
050 digit insertion service. If you use this service, your local calls will also be passed to the other carrier
should you dial the "0" and the area code. A toll charge may be incurred. Check with the carrier concerned.
If you recognize the telephone number as a local non-cellular number then you should dial the 7-digit
telephone number without the area code and without the "0" prefix. This will avoid incurring a toll charge for
a local call.
8
GETTING TO
KNOW YOUR
APPARATUS
Main Apparatus and Accessories/Supplies
Unpack the carton and check that you have all the accessories illustrated.
Handset
Telephone Line Cord
Power Cord
Curl Cord
Apparatus
CD-ROM
User’s Guide and
Quick Reference Guide
Dust Protector Cover
(See page 16)
Ink Cartridge (Black)
Cartridge Holder
Printer Driver Software and
Quick Start Guide
Registration Form and
Internet Setup Guide
Roset
(It may not be supplied depending
on countries.)
Supplies
Black Ink Cartridge
Order No.: PC-20BK
Colour Ink Cartridge
Order No.: PC-20CL
(See note1)
NOTE
1. The Colour Ink Cartridge required for your apparatus is sold separately. Please purchase it
from the place where you bought the apparatus or an office supplies store before proceeding
with installation.
9
External View
Front View
Recording Paper Tray
Document Guides
Recording Paper Guide
Handset
Recording Paper Stacker
Document Exit
Rear View
Printer Interface Connection
10
Pull out when copying
or receiving.
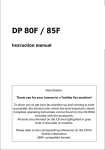
1. ALARM
The indicator lights up when trouble occurs.
2. MEMORY
Lights when memory is used.
3. LCD Display
Displays date and time, or the current
operation.
4. CALLS
Displays the number of calls in the OUT
(unattended) and MEMO modes.
5. PRINTER
Used to serve as a printer.
6. HELP
Used to print a simple operating guide.
7. RESOLUTION
Used to set Standard, Fine, Super-Fine and
Halftone. (See page 35)
8. CONTRAST
Used to set Normal, Darker or Lighter. (See
page 35)
9. CLEAR
Used to erase inputs.
10. DIRECTORY SEARCH
Used to search for a station name.
11. VOL. (VOLUME)
Used to adjust monitor volume, Ringer
Volume, Melody Volume and Message
Volume.
12. FUNCTION/EDIT
Used to start or select a function. The function
is explained in greater detail in this manual.
13. REPLAY
Used to replay any stored messages.
GETTING TO
KNOW YOUR
APPARATUS
Control Panel
14. OUT/2WAY REC
Used to set when the user is not around to
attend to calls or record a telephone
conversation.
15. REDIAL/PAUSE
Used to set a pause when entering a
telephone number or redialling the last dialled
number.
16. HOLD
Used to pause an interval during a
conversation.
17. SPEAKERPHONE
Used for hands-free conversation or to enter a
space when registering a telephone number.
18. Dial keypad
Used for registering telephone numbers and
entering characters for station name. Used to
activate ICMs (incoming message) functions.
19. TONE button
Used to temporarily change Dialling Mode
from Pulse to Tone.
20. INTERNET
Used to dail up to ISP to retrieve e-mails and
Faxes.
21. ABBR
Used to speed-dial a telephone number or email address.
22. FLASH
Used to access some features of your PBX.
23. COPY/SET
Used to make photocopies (See page 50) and
set operations.
24. START
Used to start operations.
25. STOP
Used to cancel operations or return to
standby.
11
INSTALLING YOUR APPARATUS
Connecting the Telephone Line Cord, and
Power Cord, Printer Interface Cable
4
Connect the printer interface cable. (It is not supplied.)
Printer Interface Cable
It is recommended to use a high quality IEEE 1284
Bi-Directional Parallel Cable no longer than 6 feet.
1
2
Connect the handset cord.
Connect the power cord.
(See note 4)
3
Connect the telephone line cord.
(See note1)
(See note2)
(See note3)(See note4)
NOTE
12
1. Your apparatus uses little power and you should keep it "ON" at all times.
2. This apparatus must be properly earthed through an ordinary 3 prong AC outlet. If 3 prong AC
outlet is not provided, it is required to be earthed to the terminal on the rear of the apparatus.
3. This apparatus cannot function during a power failure.
4. The line connecting method, the types of the telephone line cord and power supply cord vary
from country to country.
Installing the Ink Cartridge
1. Open the Panel Cover until it is secured.
1
2. Lift up the Cartridge Cover until it is locked.
3. Wait until the Ink Cartridge Station is moved to
installing position.
2
2
5
4. Take out the Ink Cartridge from its plastic
packaging.
5. Remove the tape on the Ink Cartridge.
3
6. Tilt the coloured side of the Ink Cartridge toward
you with the contact points (gold-plated) facing
inwards and slide the Ink Cartridge into the Ink
Cartridge Cradle.
Continued on the next page.
!
CAUTION
Make sure that the old and new Ink Cartridges are out of reach from the children as
the ink may be harmful to them.
(See note1)
NOTE
1. Ink Cartridge Station will be returned if no action is taken in about 3 minutes. To make move
Ink Cartridge Station to install position, repeat procedure 1 and 2.
13
INSTALLING
YOUR
APPARATUS
1
Installing the Ink Cartridge
4
7. Confirm that the Ink Cartridge is positioned as
illustrated.
5
8. Press the outer end of the Ink Cartridge as
illustrated until you hear a click.
6
9. Close the Cartridge Cover.
10. Close the Panel Cover.
11. Press [0] for new Ink Cartridge.
10
9
!
CAUTION
(See note1)
NOTE
14
Make sure not to touch the Print Head on the Ink Cartridge or the sharp edges around
it during unpacking and installing the cartridge.
(See note2)
1. You may purchase the required ink cartridge (Order No.: PC-20BK (Black), PC-20CL (Colour))
for your apparatus from the place where you bought the apparatus or an offfice supplies store.
2. If initial print or copy tests are missing dots or lines, repeat steps 3 to 5.
Continue to print or copy until they are of satisfactory quality.
Replacing the Ink Cartridge
1
, you need to replace the Ink
INSTALLING
YOUR
APPARATUS
When the apparatus shows NO INK
015 or INK LEVEL LOW
Cartridge. Use the following procedure to replace.
1. Open the Panel Cover until it is secured.
1
2. Lift up the Cartridge Cover until it is locked.
2
2
3. Press the outer end of the Ink Cartridge until it is
released from the catch and remove it from cradle.
4. Take the cartridge out.
4
5. Install the new Ink Cartridge. (See page 13. Follow
the instructions from step 2.)
3
3
6. Close the Cartridge Cover.
7. Close the Panel Cover.
7
6
(See note1)
Press [0] for new Ink Cartridge or [1] for used Ink Cartridge to return to standby.
Maintaining Print Quality: Keep the ink cartridge in the cradle at all times. Removing the cartridge will
expose it to air, causing the ink to evaporate, and degrade the print quality.
Keep the ink cartridge in its “home” position when the UF-E1 is not being used.
Leaving it out of position will cause the ink to evaporate quickly.
Storing Ink Cartridge:
The following instructions will help you when storing unused ink cartridge.
- Keep the ink cartridge in its sealed container until you are ready to use it.
- Store the ink cartridge container at room temperature.
- Check the expire date on the cartridge package and use before that date.
- Install the ink cartridge in the cradle immediately after opening the
sealed container.
NOTE
1. If your apparatus detects Out-of-ink even though the Ink Cartridge still has enough ink, remove
the Ink Cartridge and clean the Print Head on the Ink Cartridge by referring to pages 94 and
95. Then, re-install the Ink Cartridge and make a few copies to confirm whether the Ink
Cartridge has recovered.
15
Installing/Replacing Recording Paper
You can place up to a maximum of 100 sheets of recording paper based on paper specifications. (See page
100 for details.)
1
1. Pull the Recording Paper Tray Extender.
2
2. Place the recording paper FACE UP on the Paper
Tray until the leading edge placed into the
apparatus stops and make sure that the leading
edge is straightened.
3. Adjust the Paper Guide to the width of the recording
paper. (See note 2)
3
4. Place the Dust Protector Cover on the Paper Tray.
(See note 1)
(See note1)(See note2)(See note3)
1. To avoid any paper feed problem , the Dust Protector Cover must be installed after placing the
recording paper.
2. The paper should not be over the tab.
3. If "CHECK PAPER 010" is displayed, set the paper and press [STOP]. Received documents
will be printed.
16
You can adjust the ringer volume, speakerphone volume and handset volume on your apparatus. The builtin speaker enables you to hear the dialling tone, dialling signals, and busy tone. The ringer will sound when
your apparatus receives a call.
Ringer Volume
Q
4 levels (0, 1, 2 or 3) can be set.
(See notes 1 and 3)
Handset
use [ ] and [ ] to adjust during standby mode.
RINGER VOLUME =2
Speakerphone Volume
VOL.
SPEAKERPHONE
Q
4 levels (1, 2, 3 or 4) can be set.
SPEAKERPHONE
and
(use [ ] and [ ] to adjust.)
MONITOR VOLUME=2
SPEAKERPHONE
to return to standby.
Handset Volume
Q
4 levels (1, 2, 3 or 4) can be set.
Lift up the handset.
When you are calling,
use [ ] and [ ] to adjust.
RECEIVER VOL = 2
(See note1) (See note2) (See note3)
NOTE
1. When "SILENT RCV" in BASIC SETTING is set to "ON", the apparatus will not trigger ringing
sound. (See pages 81 and 82)
2. You can also adjust the volume of the key touch tone in BASIC SETTING ("KEY VOLUME").
(See pages 81 and 82)
3. If you select volume "0", the display will show the following message when a call comes in.
PICKUP TELEPHONE
17
INSTALLING
YOUR
APPARATUS
Adjusting Volume
User Parameters
Setting the Date and Time
You can set to display Date and Time on your
apparatus.
1
GHI
FUNCTION/
EDIT
BASIC SETTING ?
2
COPY/SET COPY/SET
00-00-’00 00:00
FUNCTION/
EDIT
COPY/SET
STOP
3
Enter Date, Month, Year and Time.
E. g. :20, May 2001 15:30
JKL
ABC
2
0
0
5
[0] must be
inserted if it
is one digit.
0
@
@
JKL
DEF
1
1
5
3
0
24 hours
Lower digits of Year.
20-05-’01 15:30
If you make a mistake, use the [ ] and [ ]
to move the cursor to edit.
4
COPY/SET
STOP
(See note1)
(See note2)
(See note3)
NOTE
18
1. To cancel operation press [STOP] button.
2. The accuracy of the clock will be approximately ±60 seconds a month.
3. If a power failure occurs, a built-in battery will back up this information up to 8 minutes when
it is fully charged.
User Parameters
When you send a document, your NAME can appear as a header on the top of the copy printed at the other
station.
The NAME helps to identify you to someone who receives your documents.
1
2
3
GHI
FUNCTION/
EDIT
COPY/SET
A BC
BASIC SETTING ?
COPY/SET
NAME:■
Enter your NAME (max. 25 characters and digits) by using the
keypad. (See page 20)
E. g. :PANASONIC
NAME:PANASONIC
If you make a mistake, use [ ] and [ ] to move the cursor to
edit.
If more that 11 characters are entered, the characters on the
left will be scrolled off from the display.
4
COPY/SET
STOP
19
INSTALLING
YOUR
APPARATUS
Setting Your NAME
User Parameters
Entering Characters
Enter characters using each button (
following table.
@.
to
). Select the desired characters according to the
Character Table
Character String
Character String
Buttons Number of times buttons pressed Buttons Number of times buttons pressed
1 2 3 4 5 6 7 8 9
1 2 3 4 5 6 7 8 9
@.
1
ABC
A
B
C
DEF
D
E
GHI
G
JKL
MNO
R
PQ S
P
Q
R
S
2
TUV
T
U
V
8
F
3
XYZ
W
W
X
Y
Z
9
H
I
4
.
-
/
(
)
J
K
L
5
M
N
O
6
#
Buttons
Use
7
•
&
=
0
Special use of buttons
SPEAKERPHONE
Enter a SPACE.
Move the cursor to the right or left.
CLEAR
Delete entered character.
How to Enter Characters
Select the desired characters in the above table and press [COPY/SET]. This enters the selected characters.
E. g. :Entering "PANASONIC"
R
PQ S
P
ABC
MNO
A
MNO
N
ABC
R
PQ S
R
PQ S
MNO
MNO
MNO
MNO
MNO
GHI
GHI
GHI
I
ABC
ABC
ABC
C
COPY/SET
20
A
R
PQ S
R
PQ S
S
O
N
User Parameters
When sending or receiving, your ID number will appear on the remote apparatus LCD display and their ID
Number will appear on your LCD display. (See note 2)
You should use your facsimile telephone number as your ID number up to 20 digits long.
1
2
3
GHI
BASIC SETTING ?
FUNCTION/
EDIT
COPY/SET
DEF
COPY/SET
TEL:■
Enter your ID (max. 20 digits) by using the Dial keypad and
[SPEAKERPHONE] for a space.
SPEAKERPHONE
E. g. :
ABC
@.
SPEAKERPHONE
JKL
JKL
JKL
@.
ABC
@.
ABC
TEL:01 555 1212■
If you make a mistake, press [CLEAR] to erase the number
then re-enter the correct number. If more than 11 digits are
entered, the characters on the left will be scrolled off from
the display.
4
COPY/SET
STOP
(See note1)(See note2)
NOTE
1. You may use [#] to enter a "+" character at the beginning of the ID number to indicate the
following digit(s) for your country code.
E. g. :+1 201 555 1212 +1 for U.S.A. country code.
+81 3 111 2345
+81 for Japan country code.
2. Character ID function may be available depending on the other party. If it is available, first 16
characters from your registered name are used.
21
INSTALLING
YOUR
APPARATUS
Setting Your ID Number (FAX Telephone Number)
Managing Outgoing Messages (OGM)
The apparatus has 2 receiving modes. One is OUT MODE (When you are out) and the other is IN MODE
(When you are at home). In OUT MODE, you can record a greeting message (TAM OGM) to answer a call
before recording incoming message. The greeting message takes up to a 30-second recording which is
played to the caller before the apparatus records the message.
To Record TAM OGM
1
MNO
COPY/SET
FUNCTION/
EDIT
TAM OGM ?
2
@.
COPY/SET
TAM OGM (Max. 30 sec.)
REC TAM OGM ?
Microphone
FUNCTION/
EDIT
STOP
Keypad COPY/SET
3
COPY/SET
START
PRESS START
4
START
After a beep tone is heard, start recording via
the microphone (approx. 20 cm away and
speak towards MIC on the Control Panel).
5
STOP
to end recording. The OGM is played.
Sample of greeting messages
TAM OGM: Hello I am unable to answer your call right now. Please leave your message after the beep.
To send a fax, please start your apparatus now.
(See note1)
(See note2)
NOTE
22
1. Press [STOP] anytime to end OGM.
2. To change an OGM, you must delete the old OGM first and then record a new one.
Managing Outgoing Messages (OGM)
1
MNO
COPY/SET
FUNCTION/
EDIT
To Erase TAM OGM
1
MNO
@.
COPY/SET
EDIT
TAM OGM ?
2
A BC
@.
COPY/SET
PLAY TAM OGM ?
3
DEF
ERASE TAM OGM ?
3
COPY/SET
COPY/SET
FUNCTION/
TAM OGM ?
2
INSTALLING
YOUR
APPARATUS
To Playback TAM OGM
COPY/SET
PLAYBACK OGM
START TO ERASE
Your apparatus plays the recorded OGM.
(See note 2)
Your apparatus plays the recorded OGM.
(See note 2)
4
START
Your apparatus erases the recorded OGM.
(See note 3)
(See note1)
NOTE
(See note2)
(See note3)
1. Press [STOP] anytime to end OGM.
2. When the apparatus beeps 3 times and the display shows "NOT RECORDED", it means that
OGM is not recorded.
3. To change an OGM, you must erase the old OGM first and then record a new one.
23
Managing Outgoing Messages (OGM)
In IN MODE (When you are at home), you can record 2 outgoing messages in FAX/TEL auto-switching
mode: The "F/T FIRST OGM" is a message (max. 4 sec.) played to the caller while the apparatus is
activating the internal bell. The "F/T LAST OGM" is a final message (max. 8 sec.) played to the caller before
the apparatus enters the fax mode.
To Record F/T First OGM
1
MNO
COPY/SET
FUNCTION/
EDIT
To Record F/T Last OGM
1
MNO
EDIT
TAM OGM ?
2
A BC
COPY/SET
F/T FIRST OGM (Max. 4 sec.)
TAM OGM ?
2
DEF
COPY/SET
F/T LAST OGM (Max. 8 sec.)
REC F/T FIRST ?
3
REC F/T LAST ?
3
COPY/SET
COPY/SET
PRESS START
4
PRESS START
4
START
After a beep tone is heard, start recording via
the microphone (approx. 20 cm away and
speak towards MIC on the Control Panel).
5
to end recording.
The OGM is played.
START
After a beep tone is heard, start recording via
the microphone (approx. 20 cm away and
speak towards MIC on the Control Panel).
5
STOP
COPY/SET
FUNCTION/
STOP
to end recording.
The OGM is played.
Sample of greeting messages
F/T(Fax/Tel) First OGM: Please hold while your call is being transferred.
F/T(Fax/Tel) Last OGM:
(See note1)
NOTE
24
Sorry, there is no one here to answer your call. To send a fax please start your
apparatus now.
(See note2)
1. Press [STOP] anytime to end OGM.
2. To change an OGM, you must delete the old OGM first and then record a new one.
Managing Outgoing Messages (OGM)
To Playback F/T Last OGM
1
1
MNO
COPY/SET
FUNCTION/
EDIT
MNO
A BC
COPY/SET
EDIT
TAM OGM ?
2
A BC
DEF
COPY/SET
PLAY F/T FIRST ?
3
COPY/SET
PLAYBACK OGM
PLAYBACK OGM
Your apparatus play the recorded OGM.
(See note 2)
Your apparatus play the recorded OGM.
(See note 2)
(See note1)
NOTE
A BC
PLAY F/T LAST ?
3
COPY/SET
COPY/SET
FUNCTION/
TAM OGM ?
2
INSTALLING
YOUR
APPARATUS
To Playback F/T First OGM
(See note2)
(See note3)
1. Press [STOP] anytime to end OGM.
2. When the apparatus beeps 3 times and the display shows "NOT RECORDED", it means that
OGM is not recorded.
3. To change an OGM, you must erase the old OGM first and then record a new one.
25
Managing Outgoing Messages (OGM)
To Erase F/T First OGM
1
MNO
COPY/SET
FUNCTION/
EDIT
To Erase F/T Last OGM
1
MNO
EDIT
TAM OGM ?
2
A BC
COPY/SET
TAM OGM ?
2
DEF
DEF
COPY/SET
ERASE F/T FIRST?
3
COPY/SET
START TO ERASE
START TO ERASE
Your apparatus plays the recorded OGM.
(See note 2)
4
Your apparatus erases the recorded OGM.
(See note 3)
(See note1)
NOTE
26
Your apparatus plays the recorded OGM.
(See note 2)
4
START
(See note2)
DEF
ERASE F/T LAST ?
3
COPY/SET
COPY/SET
FUNCTION/
START
Your apparatus erases the recorded OGM.
(See note 3)
(See note3)
1. Press [STOP] anytime to end OGM.
2. When the apparatus beeps 3 times and the display shows "NOT RECORDED", it means that
OGM is not recorded.
3. To change an OGM, you must erase the old OGM first and then record a new one.
Speed Dialling Numbers
To store a telephone number into ABBR Auto-Dialler, follow these steps below:
1
2
3
4
J KL
SPEED DIAL NOS.?
FUNCTION/
EDIT
COPY/SET COPY/SET
ABBR. NO.
= ■
Enter an ABBR Dialling Number (0 to 9).
E. g. :
@.
STATION NAME
Enter the station name using the dial keypad (max. 15 characters).
(See page 20)
NAME:PANASONIC
E. g. :PANASONIC
5
6
COPY/SET
TELEPHONE NO
Enter the telephone number.
(up to 36 digits including pauses and spaces)
E. g. :
7
PAUSE
TEL:9-555 1234■
SPEAKERPHONE
REDIAL/
XYZ
W
JKL
JKL
JKL
@.
ABC
DEF
GHI
COPY/SET
ABBR. NO.
To register another number, repeat steps 3 to 7.
To return to standby, press [STOP].
= ■
(See note1) (See note2)
NOTE
1. If you require a special access number to get to an outside line, enter it first and then press
[REDIAL/PAUSE]. A hyphen "-" is displayed for pause.
2. Use [SPEAKERPHONE] to enter a space between the numbers to make it easier to read.
27
INSTALLING
YOUR
APPARATUS
Registering an Abbreviated Dialling Number
Speed Dialling Numbers
Registering Directory Dialling Number
1
2
3
4
J KL
SPEED DIAL NOS.?
FUNCTION/
EDIT
COPY/SET
A BC
DIRECTORY DIAL ?
COPY/SET
STATION NAME
(Up to 120 stations can be registered.)
Enter the Station name using the dial keypad. (Max. 15 characters)
(See page 20)
NAME:MATSUSHITA
E. g. :MATSUSHITA
5
6
COPY/SET
TELEPHONE NO
Enter the telephone number.
(up to 36 digits including pauses and spaces)
E. g. :
7
PAUSE
TEL:9-555 1234■
SPEAKERPHONE
REDIAL/
XYZ
W
JKL
JKL
JKL
@.
ABC
DEF
GHI
COPY/SET
STATION NAME
To register another number, repeat steps 4 to 7.
To return to standby, press [STOP].
(See note1) (See note2)
NOTE
28
1. If you require a special access number to get to an outside line, enter it first and then press
[REDIAL/PAUSE]. A hyphen "-" is displayed for pause.
2. Use [SPEAKERPHONE] to enter a space between the numbers to make it easier to read.
Speed Dialling Numbers
INSTALLING
YOUR
APPARATUS
Changing Speed Dialling Numbers
If you need to change any of the speed dialling numbers, follow the steps below:
Q
ABBR. Dialling Number
1
Q
1
ABBR
ABBR. NO.
2
DIRECTORY Dialling Number
DIRECTORY
SEARCH
= ■
Enter the ABBR dialling numbers you want
to change.
MATSUSHITA
2
E. g. :
Select the station to be changed.
PANASONIC
3
PANASONIC
3
COPY/SET
FUNCTION/
EDIT
COPY/SET
FUNCTION/
EDIT
NAME:PANASONIC
4
NAME:PANASONIC
4
to move the cursor to the incorrect character.
Press [CLEAR] to delete then enter the new
character.
5
COPY/SET
to move the cursor to the incorrect character.
Press [CLEAR] to delete then enter the new
character.
5
COPY/SET
TEL:9-555 1234
6
TEL:9-555 1234
6
to move the cursor to the incorrect number.
Press [CLEAR] to delete then enter the new
number.
7
COPY/SET
7
To correct another ABBR dialling number,
repeat steps 1 to 6.
(See note1)
NOTE
to move the cursor to the incorrect number.
Press [CLEAR] to delete then enter the new
number.
COPY/SET
To correct another telephone number, repeat
steps 1 to 6.
(See note2)
1. Use [SPEAKERHONE] to enter a space between the numbers you set. Each space is counted
as a digit and you can enter up to 36 digits per entry.
2. If a deferred transmission has been set, the speed dialling number cannot be changed or
erased until the transmission has finished or is cancelled (See page 53).
29
Speed Dialling Numbers
Erasing Speed Dialling Numbers
To erase the setting of dialling number.
Q
ABBR. Dialling Number
1
Q
1
ABBR
ABBR. NO.
2
DIRECTORY Dialling Number
DIRECTORY
SEARCH
= ■
Enter the ABBR dialling numbers you want
to change.
MATSUSHITA
2
E. g. :
Select the station to be deleted.
PANASONIC
3
PANASONIC
3
FUNCTION/
EDIT
FUNCTION/
EDIT
EDIT ?
4
EDIT ?
4
DELETE ?
5
DELETE ?
5
COPY/SET
COPY/SET
START TO DELETE
6
30
START
START TO DELETE
6
START
BASIC FEATURES
Telephone
Directory Search Dialling
Please register telephone number and
station name before use. (See pages 27 and
28)
2
DIRECTORY
SEARCH
BASIC FEATURES
1
DIRECTORY SEARCH
MATSUSHITA
Handset
Keypad
VOL.
3
PANASONIC
4
Q
Lift up the handset.
The apparatus starts to dial the telephone
number.
Quick Search Function
1. After operation of step 2, select the initial character of the destination name by each button (
@.
to
).
Initial Character
Buttons
Initial Character
Buttons
@.
JKL 5
Press
Press
ABC
MNO 6
Press
DEF 3
Press
DEF
PQRS 7
Press
R
PQ S
GHI 4
Press
TUV 8
Press
TUV
1
Press
ABC 2
GHI
.
JKL
MNO
Initial Character
.
Buttons
WXYZ 9
Press
Other
Press
XYZ
W
Press
#
Press
2. Press [ ] or [ ] to search for the other party’s name.
31
Telephone
Direct Dialling
To dial a telephone number manually, using the keypad, follow the steps below.
1
2
3
ENTER TEL NO.
Lift up the handset.
Dial by using the following methods.
●
Enter a telephone number from the keypad.
●
Abbreviated Dialling (See below)
●
Directory Search Dialling (See page 31)
When the other party answers, begin your conversation.
Abbreviated Dialling
Abbreviated Dialling is a speedy way to dial a frequently dialled telephone number by preprogramming the
telephone number into built-in auto-dialler with a 1-digit abbreviated code. To program an abbreviated
dialling number, see page 27.
1
ABBR
and enter a 1-digit code.
E. g. :
ABBR
@.
MATSUSHITA
The display will show the registered name.
2
Lift up the handset or press [SPEAKERPHONE].
The full number (e.g. 9-555 1234) will be dialled.
9-555 1234■
Manual Number Dialling
1
Enter the telephone number.
E. g. :
JKL
JKL
JKL
@.
ABC
DEF
GHI
5551234
2
3
32
Lift up the handset or press [SPEAKERPHONE].
Begin your conversation.
Telephone
Q
Duration Display
The timer will start counting after 10 seconds from the time you have dialled out as displayed
00:00’20”
HOLD
HOLD
BASIC FEATURES
Q
1. Press [HOLD] to pause during a conversation.
Melody will be played to the caller.
2. Press [HOLD] again to resume conversation.
Q
To redial the last number
REDIAL/
PAUSE
1. Press [SPEAKERPHONE] or lift up the handset.
2. Press [REDIAL/PAUSE] button.
3. The apparatus starts to dial the last dialled telephone number.
Q
SPEAKERPHONE
1. Press [SPEAKERPHONE].
SPEAKERPHONE
2. Talk with the other party.
3. Press [SPEAKERPHONE] again after you finished talking.
33
Loading Documents
Documents You Can Send
The apparatus can send any document printed on A4 size paper.
Document Thickness
Document Size
(Minimum Size)
(Maximum Size)
Effective Scanning Area
210 mm
105 mm
Y = 5 mm
297 mm
148 mm
(Direction)
210 mm
Single sheet;
0.06 mm (45 g/m2) to
0.15 mm (112 g/m2)
Multiple sheets;
0.06 mm (45 g/m2) to
0.10 mm (80 g/m2)
(Direction)
Q
Y
X = 2.5 mm
X
Note : Letters on X and Y area will not be
printed on the received copy.
And content of original
document is erased where
a header and total page are
positioned.
Documents You Cannot Send
You must never try to send documents that are
●
Wet
●
Too thin (e.g., airmail paper, pages from some magazines, etc.)
●
Coated (e.g., glossy paper, etc.)
●
Covered with wet ink or paste
●
Creased, curled or folded
●
Chemically processed (e.g., pressure-sensitive paper, carbon-coated paper, etc.) or made of cloth or
metal
Remove clips, staples or other similar fastening objects.
You are advised to make a photocopy of the above documents before transmission.
34
Loading Documents
FAC
E
1
Set documents FACE DOWN and make sure
bottom sheet enters the apparatus first.
- A maximum of 20 pages at a time.
2
3
Adjust the document guides to the width of
the documents.
DOW
N
Change the RESOLUTION and CONTRAST
if needed (See below).
Setting Contrast, Resolution and Halftone
The transmission settings, CONTRAST, RESOLUTION and HALFTONE can be changed temporarily before
or after you have placed the document on the ADF.
Once the document is sent, your apparatus will automatically revert to default setting. (See pages 81 and
84)
Q
CONTRAST
Q
Your apparatus is preset to NORMAL contrast. To
transmit a faint-printed document, please change
contrast setting to DARKER and vice versa a
dark-printed document, please set to LIGHTER.
Press [CONTRAST] repeatedly to select.
RESOLUTION and HALFTONE
Your apparatus is preset to STANDARD
resolution. Use Fine or Super Fine for detailed
documents and Halftone when sending
photographs or illustrations with grey tones. Press
[RESOLUTION] repeatedly to select.
:NORMAL
:STANDARD
:DARKER
:FINE
:LIGTHER
:S-FINE
:HALFTONE
(See note1)
NOTE
(See note2)
1. To permanently change the Contrast position and Resolution position, please change FAX
SETTING. (See pages 81 and 84)
2. Setting of the Resolution cannot be changed when making copies.
35
BASIC FEATURES
How to Load Documents
Sending Documents
FAC
E
DOW
N
1
2
Set document(s) FACE DOWN on the ADF
and adjust the Document Guides.
Enter the telephone number.
E. g. :
JKL
JKL
JKL
@.
ABC
DEF
GHI
Following dialling methods can also be
used.
3
Q
●
Direct Dialling (See page 32)
●
Abbreviated Dialling (See page 32)
●
Directory Search Dialling (See page 31)
START
To redial the last number
REDIAL/
PAUSE
1. Set document(s) FACE DOWN on the ADF and adjust the Document Guides.
2. Press [REDIAL/PAUSE] button.
3. The apparatus starts to dial the last dialled telephone number.
Q
Automatic Redialling
If the line is busy, your apparatus will redial the number up to 2 times at 3 minute interval. During that time, a
message will appear as shown on the right. If the line is still busy after the last try, a message "REDIAL
OVER" will appear as shown on the right and your apparatus will print a COMM. Journal depending on the
FAX SETTING. (See pages 81 and 84)
5551234
WAITING TO DIAL
REDIAL OVER
(See note1)
NOTE
36
(See note2)
630
(See note3) (See note4) (See note5)
1. To stop the transmission, press [STOP].
2. If you need a special access number to get to an outside line, dial it first then press [REDIAL/
PAUSE] to enter a pause (represented by a "-") before dialling the full number.
E. g. : 9 [REDIAL/PAUSE] 555 1234
3. When you hear the voice of the other party through the speakerphone after step 3, lift up the
handset and tell the other party to prepare to receive a document. After you hear a beep, press
[START] and replace the handset.
4. While a document is kept in the memory waiting for the transmission, you cannot send another
document until the memory transmission is completed.
5. The number of redials will depend on the countries settings.
Sending Documents
Multi-station Transmission (Broadcasting)
Multi-station Transmission enables the sender to transmit the same document to multiple stations without
having to load document for every transmission. This can be done simply by storing the document into
memory and selecting the intended stations one at a time. (Max. 50 stations)
BASIC FEATURES
1
DOCUMENT SET
Set document(s) FACE DOWN on the ADF and
adjust the Document Guides.
2
Dial by any combination of the following methods.
(See notes 1 and 3)
●
Abbreviated Dialling (See page 32)
●
Directory Search Dialling (See page 31)
E. g. :
ABBR
@.
COPY/SET
ABBR
ABC
COPY/SET
COPY/SET
(When entering a station for Abbreviated Dialling or
Directory Search Dialling, press [COPY/SET] after each
station is entered.)
3
(Station name)
ENTER STATION(S)
START
* STORING *
The document is stored into memory and then the
apparatus starts to dial the telephone number for each
station in sequence.
9-555 1234■
(See note1) (See note2)(See note3)
NOTE
1. You can review the stations you have entered in step 2 before storing your document into
memory by pressing [ ] or [ ]. Press [CLEAR] to clear an entered station shown on the
display, if necessary.
2. To stop the transmission, press [STOP].
3. It is not possible to set stations with E-Mail addresses.
37
Receiving Documents
Q
Incoming Process
This apparatus provides 4 types of reception modes. Select a mode to suit your specific requirements.
When You are at Home. (IN MODE)
Your Usage
If you receive mainly telephone calls,
set your apparatus to "MANUAL RCV"
mode.
When A Call Is Received
MANUAL RCV Mode
When you receive a fax call,
START
to receive documents.
When a telephone call is received,
the apparatus will ring.
If you receive both voice and fax calls,
set your apparatus to "FAX/TEL" mode.
FAX/TEL Mode
When you receive a fax call,
the apparatus automatically
receives documents.
When a telephone call is received,
When You are OUT. (OUT MODE)
the apparatus will ring.
If you receive both voice and fax calls,
set your apparatus to "FAX/TAM"
mode.
FAX/TAM Mode
When you receive a fax call,
the apparatus automatically
receives documents.
When a telephone call is received,
the message is recorded.
If you receive mainly fax calls,
set your apparatus to "FAX" mode.
FAX Mode
When you receive a fax call,
the apparatus automatically
receives documents.
When a telephone call is received,
the apparatus will ring once.
38
Receiving Documents
Required Setting
OUT/2WAY REC button
COPY/SET
VOL.
BASIC FEATURES
Set the "RCV MODE (IN)" to the "MANUAL RCV".
COPY/SET
FUNCTION
EDIT
[ :RCV MODE (IN) ?]
COPY/SET STOP
VOL.
[ :MANUAL RCV]
OUT/
2WAY REC
Lamp : OFF
Set the "RCV MODE (IN)" to the "FAX/TEL".
COPY/SET
VOL.
COPY/SET
FUNCTION
EDIT
[ :RCV MODE (IN) ?]
COPY/SET STOP
VOL.
[ :FAX/TEL]
Set the "RCV MODE (OUT)" to the "FAX/TAM".
COPY/SET
VOL.
COPY/SET
FUNCTION
EDIT
[ :RCV MODE (OUT) ?]
COPY/SET STOP
VOL.
[ :FAX/TAM]
OUT/
2WAY REC
Set the "RCV MODE (OUT)" to the "FAX".
COPY/SET
VOL.
Lamp : ON
COPY/SET
FUNCTION
EDIT
[ :RCV MODE (OUT) ?]
COPY/SET STOP
VOL.
[ :FAX]
39
Receiving Documents
This section explains the 4 types of reception modes in which you can set your apparatus. (See page 38)
MANUAL RCV Mode
This mode allows you to speak to the other party before receiving a document.
1
The apparatus starts to ring.
PICKUP TELEPHONE
2
Lift up the handset and ask the other party
to send the document.
Handset
* TELEPHONE *
START
3
START
Reception starts. (See note 1)
ON LINE * RCV *
4
Replace the handset. (See note 2)
Q
Friendly Reception
This function enables automatic fax reception even when the handset is lifted. (See notes 3, 4 and 5)
Lift up the handset when it rings.
Reception starts automatically.
Reception ends.
-Replace the handset.
(See note1) (See note2) (See note3)
(See note4) (See note5)
Note:
A black square mark will be printed on the top right corner of the received paper for the apparatus to
check the print quality. It is possible to change to not print this mark by the setting of #07 in the FAX
SETTING. (See pages 81 and 84)
NOTE
40
1. If a document is placed in your apparatus when you press [START], your apparatus will switch
to fax transmission. To receive faxes, remove the doument and press [START].
2. An incoming call will be cut off when you replace the handset before pressing [START].
3. To use this function, set "FRIENDLY RCV" to "ON". (See pages 81 and 84)
4. Sometimes friendly reception is not possible if you hear noise over the handset. When this
happens, press [START] to start reception.
5. Your apparatus will not automatically switch to reception if 30 seconds has elapsed without
receiving fax tone after lifting up the handset.
Receiving Documents
FAX/TEL Auto Switching Mode
In this mode, your apparatus automatically receives the documents when it detects a fax signal and
continues to ring when it detects a telephone call. (See note)
If it is a fax call.
If it is a telephone call.
1
2
1
2
Your apparatus begins to receive the
documents.
It will answer the call with one ring. (See
notes 1 and 2)
It rings about 12 times.
(See notes 2 and 4)
F/T FIRST OGM is played to the other
party. Finally, F/T LAST OGM is played to
the other party.
(See note 3)
Change Setting back to TEL Mode
1
2
3
GHI
FUNCTION/
BASIC SETTING ?
EDIT
COPY/SET
GHI
RCV MODE (IN) ?
COPY/SET
:MANUAL RCV
4
5
:FAX/TEL
COPY/SET
STOP
20-MAY 15:30
(See note1) (See note2)
NOTE
(See note3)(See note4)
1. Setting "RING COUNTER" is valid when the "SILENT RCV" is set to "OFF". (See pages 81
and 82)
2. Set the number of rings that the apparatus will alert for a telephone call. (See pages 81 and 82)
3. When First OGM or Last OGM is not recorded, the apparatus will send simulated Ring Back
Tone. (See page 24)
4. If the apparatus can not detect the engaged tone, it might be changed to FAX mode.
41
BASIC FEATURES
It will answer the call with one ring. (See
notes 1 and 2)
Receiving Documents
Receiving in the FAX/TEL Mode
Incoming Call
The apparatus will answer the call with one ring.
Incoming call will be distinguished between a voice call and fax call by detecting the fax calling tone.
Note : The number of rings can be changed. (See "Setting the Ring Counter" on the next page.)
Fax Call
The apparatus will receive a document
with one ring.
Note : To change the number of rings,
setting of "SILENT RCV" must
be changed. (See below)
Voice Call
The apparatus will ring 12 times.
While ringing, the other party will hear F/T First OGM and
simulated ring back tone.
Note :The number of rings can be changed. (See "Setting
the Ring Counter for FAX/TEL mode" on the next
page.)
You don’t answer.
You answer the call by
lifting up the handset.
F/T Last OGM will be heard by the other party.
Then, the apparatus switches to the FAX mode.
Setting Silent Reception for the FAX/TEL, FAX/TAM, FAX Mode
You can set your apparatus to receive documents without ringing.
1
2
3
4
42
GHI
FUNCTION/
EDIT
COPY/SET
BASIC SETTING ?
MNO
SILENT RCV ?
COPY/SET
:ON
COPY/SET
STOP
Receiving Documents
Setting the Ring Counter to Answer a Call
1
3
BASIC SETTING ?
EDIT
COPY/SET
R
PQ S
RING COUNTER ?
BASIC FEATURES
2
GHI
FUNCTION/
COPY/SET
4
RING COUNTER
:1
1 to 9 is available to select. (See note 1)
5
COPY/SET
STOP
Setting the Ring Counter for FAX/TEL Mode
1
2
3
GHI
FUNCTION/
BASIC SETTING ?
EDIT
COPY/SET
T UV
F/T RING CNT. ?
COPY/SET
:12
3, 6, 9 or 12 is available to select.
4
COPY/SET
STOP
(See note1)
NOTE
1. Ring Counter varies depending on countries.
43
Receiving Documents
FAX/TAM Mode
In this mode, your apparatus automatically receives the documents if it is a fax call. If it is a telephone call,
the apparatus will play the greeting message and record ICM.
If it is a fax call.
If it is a telephone call.
1
2
1
2
3
It will answer the call with one ring.
(See notes 1 and 3)
Reception starts.
It will answer the call with one ring.
(See notes 1 and 3)
TAM OGM is played.
When a telephone call is received, the
message is recorded (max. 30 seconds).
(See notes 2, 4 and 5)
FAX Mode
In this mode, the apparatus only receives fax calls.
If it is a fax call.
If it is a telephone call.
1
2
1
2
It will answer the call with one ring.
(See notes 1 and 3)
Reception starts.
(See note1)
NOTE
44
It will answer the call with one ring.
(See notes 1 and 3)
The apparatus will not ring after one ring.
(See note2) (See note3)(See note4)(See note5)
1. Setting "RING COUNTER" is valid when the "SILENT RCV" is set to "OFF". (See pages 81
and 82)
2. The recording message time can be changed. (See pages 81 and 83)
3. Set the number of rings that the apparatus will alert for a telephone call. (See pages 81 and 82)
4. If the incoming message is noisy, the recording time might be less than Max. of 15 minutes.
5. If the apparatus can not detect the engaged tone, it might be changed to FAX mode.
Receiving Documents
Receiving Documents Using a Colour Cartridge
This apparatus cannot print out received documents if a colour cartridge is installed. To print out, please
replace it with a black cartridge. It is not our recommendation but should you wish to print out received
documents using a colour cartridge, please follow the procedure below. Please note that the printing
process may be longer than when using a black cartridge and the printing quality may not be as high.
Documents are received automatically.
Incoming call will not be answered while the display is showing
"PRINT 1:YES 0:NO".
If "0" is entered, the apparatus shows "INSTL BLK CARTRG"
to advise replacing the cartridge.
COLOR CARTRG SET
DOCUMENT RCVD
PRINT 1:YES 0:NO
2
3
@.
to print out. (See note 1)
* PRINTING *
@.
to confirm. (See note 2)
PRINT 1:OK 0:NG
or
if print quality is not good.
4
Repeat operation from step 2 to step 3 until all received
documents are printed out.
(See note1)(See note2)(See note3)
NOTE
1. Press [STOP] to cancel printing operation.
2. Documents will be deleted from memory after printout.
3. If setting "OUT OF INK MARK" in the FAX SETTING is set to "OFF", received document will
be printed out automatically without any operation even if empty Colour Cartridge was
installed. This may result in the printing of a blank page.
45
BASIC FEATURES
1
Receiving Documents
Distinctive Ring Detector (DRD)
This function is only effective for Hong Kong (DUPLEX), Singapore (DISTINCTIVE RINGING) and
New Zealand (FAX ABILITY).
Your apparatus has a special feature in conjunction with an optional service provided by many local
telephone companies. It can distinguish up to 2 telephone numbers with a corresponding ring pattern
identifying each number. "DRD" provides you with multiple telephone numbers: one number for your fax and
another for your business or personal use.
To set or cancel the function, follow the procedure on the next page.
The following table shows a typical example with 2 telephone numbers on a single telephone line.
Telephone No.
Usage
Distinctive Ring Sound
Ring Pattern
555 - 2222
Fax
Riiing....................Riiing....................
Single Ring
555 - 1111
Business
Ring...Ring...........Ring...Ring...........
Double Ring
The following illustration shows a typical set-up in your apparatus to detect the double ring pattern.
Distinctive Ring Service
At Your Location
Business/Personal
Ring..Ring..........Ring..Ring
A person recognises the call by
the ringtone of the telephone.
Dialling "555-1111"
Fax
Riiing...............Riiing
The apparatus identifies the
fax call by the single ringtone and
answers automatically.
Dialling "555-2222"
(See note1)
NOTE
46
1. "Riiing" means a long ringing sound and "Ring" means a short ringing sound.
Receiving Documents
To set or cancel DRD
1
2
3
GHI
FUNCTION/
BASIC SETTING ?
EDIT
COPY/SET
GHI
DEF
DRD ?
:OFF
COPY/SET
or
to select “ON” to set DRD or “OFF” to cancel DRD.
:ON
4
COPY/SET
20-MAY 15:30
To return to standby, press [STOP].
●
Request the following Ringtones from your local telephone company.
Hong Kong
Singapore
New Zealand
DUPLEX RINGING
DISTINCTIVE RINGING
FAX ABILITY
Single Ring
Double Ring
Fax
TEL or TAM
Single Ring
Double Ring
Fax
TEL or TAM
Fax Ringer
Primary Ringer
Fax
TEL or TAM
47
BASIC FEATURES
Q
Digital Telephone Answering System
Setting the TAM (Before you leave home or office)
1
OUT/
2WAY REC
to turn ON the OUT/2WAY REC lamp.
2
The apparatus plays the OGM.
PLAYBACK OGM
Resetting the TAM (After you have returned home or to the office)
1
2
The [OUT/2WAY REC] button will blink when a new ICM is recorded.
OUT/
2WAY REC
01 SUN 15:00 05
Your apparatus plays the new ICM(s).
The display shows the recorded time for each ICM.
3
Current ICM
Total ICM
START
to delete ICM.
START TO ERASE
or
STOP
to return to standby.
(See note1) (See note2) (See note3) (See note4) (See note5)
(See note6)(See note7)
NOTE
48
1. When the apparatus displays "MEMORY FULL 870", please erase ICM.
2. When you want to receive a call while playing the ICM, press [STOP]. The display will show
"PICKUP TELEPHONE". Lift up the handset to talk.
3. To cancel ICM playback midway, press [STOP].
4. If nothing is done while playing an ICM for 5 seconds, the message will be kept in the memory.
You can play back the ICM anytime by following the steps on page 49.
5. The recording time for ICM can be changed. (See pages 81 and 83)
6. If the incoming message is noisy, the recording time might be less than Max. of 15 minutes.
7. If the apparatus can not detect the engaged tone, it might be changed to FAX mode.
Digital Telephone Answering System
Buttons Used to Activate Functions for Messages
Use buttons to activate the following functions.
Play from the first ICM.
@.
Play the previous ICM.
DEF
Play the next ICM.
SLOW
PQRS
FAST
XYZ
W
BASIC FEATURES
REPLAY
Play the ICM slowly.
Play the ICM quickly.
ERASE
Erase the current ICM.
Erase all ICMs
1
@.
FUNCTION/
EDIT
ERASE MESSAGE ?
repeatedly until your request is displayed.
2
3
COPY/SET
START TO ERASE
START
Erase one ICM at a Time
You can choose to erase an ICM one at a time.
1
2
Select the ICM to be erased.
01 TUE 14:23
05
while playing the ICM.
3
To erase next ICM, continue from step 2. To quit, press [STOP].
49
Making Copies
This function provides single or multiple photocopies. When copying, you can select the Contrast,
Resolution and Halftone (See page 35).
1
FAC
E
DOW
1 Adjust the Document Guides.
2 Place the documents FACE DOWN
N
2
1
Load the documents on the ADF.
(max. 20 pages).
1
2
COPY/SET
NO. OF COPY = 01
Keypad
3
COPY/SET
START
Enter the number of copies.
E. g. :
XYZ
W
(max. 99)
NO. OF COPY = 09
4
START
The apparatus stores the document, then
prints out the copies.
* STORING *
* COPY *
(See note1)
NOTE
50
1. It is not available to select Standard resolution for making copies.
01/09
Making Copies
Enlargement Copy
Q
Enlargement Copy
This function allows you to enlarge an A5-sized document to an A4-sized photocopy.
BASIC FEATURES
Enlarged copy A4
Original A5
1
2
Set document(s) FACE DOWN on the ADF and adjust the
Document Guides.
COPY/SET
NO. OF COPY = 01
3
4
DOCUMENT SET
ENLARGE COPY ?
START
The apparatus stores the document, then prints out the
copies.
* STORING *
(See note1)
NOTE
1. It is not possible to make multiple copies by Enlargement Copy.
51
Printer Mode
You can use this apparatus as a printer. To prepare to use, follow the procedure below. For colour printing,
please purchase Colour Ink Cartridge from the place where you bought the apparatus or an office supplies
store.
1
2
3
4
5
6
7
Turn "OFF" the power on the PC and unplug the apparatus.
Remove the Parallel Port Cap from the apparatus.
Connect the 36-pin Centronics male end of the cable to the Parallel Port on the fax apparatus.
Connect the DB-25 male end of the cable to the Parallel Port on your PC.
Turn "ON" the power on the PC and plug in the apparatus, and select the old cartridge or a new
one.
PRINTER
PRINTER MODE
to switch the apparatus to the Printer Mode.
Install Printer Driver Software to your PC while referring to its Quick Start Guide.
(See note1)
NOTE
52
■
When you replaced Black Ink Cartridge with
Colour Ink Cartridge, please keep the replaced
Ink Cartridge in the Cartridge Holder as
illustrated.
■
Press the holding tab to remove the Ink
Cartridge.
(See note2)
1. When you switched the apparatus to the Printer Mode, documents will not be received. (The
apparatus rings for incoming calls.) To receive documents, press [PRINTER] to switch it back
to serve as a fax.
2. Printer Mode will be switched to fax if no action was taken by the PC for 10 minutes.
ADVANCED FEATURES
Timer Controlled Communications
Deferred Transmission
You can set a time (one timer) to send a document to one or multiple stations (max. 50 stations) within the
day.
1
DOCUMENT SET
Set document(s) FACE DOWN on the ADF and adjust the
Document Guides.
2
4
SET ?
EDIT
COPY/SET
TIME =
ADVANCED
FEATURES
3
COPY/SET
FUNCTION/
■ :
Enter the desired start time using the dial keypad.
(Use a 4-digit, 24-hour clock.)
E. g. :
ABC
DEF
DEF
(11:30 p.m.)
COPY/SET
ENTER STATION(S)
5
Enter the telephone number. (Manual Dialling)
E. g. :
@.
ABC
DEF
GHI
JKL
MNO
R
PQ S
TUV
XYZ
W
123456789
Also, documents can be transmitted by any of the following
combinations except Manual Dialling:
(Deferred Multi-station Transmission)
●
Directory Search Dialling (See page 31)
●
Abbreviated Dialling (See page 32)
E. g. :
6
COPY/SET
ABBR
@.
* STORING *
START
20-MAY 15:30
DEFER.XMT 23:30
(See note1)
NOTE
(See note2) (See note3)
1. If you make a mistake in step 4, press [CLEAR] then re-enter the correct time.
2. To cancel the Deferred Communication setting, see page 54.
3. You cannot register or change a telephone number for Abbreviated dialling and Directory
dialling when deferred multi-station transmission is set.
53
Timer Controlled Communications
Q
Confirm Deferred Transmission
1
2
3
4
FUNCTION/
EDIT
COPY/SET
DEFERRED XMT ?
A BC
CONFIRM ?
COPY/SET
TIME =
23:30
COPY/SET
(See note 1)
(station name)
5
Q
STOP
Cancel Deferred Transmission
1
2
3
4
FUNCTION/
EDIT
COPY/SET
DEFERRED XMT ?
DEF
CANCEL ?
COPY/SET
START TO CANCEL
START
DELETED
(See note1)
NOTE
54
1. If you set more than one destination, press [ ] or [ ] to confirm.
Remote Reception/
Setting TAM from Remote Station
Remote Reception
If you have an extension telephone connected to the same line, when a fax call is received via extension
telephone, the documents can still be received if you follow the steps below.
1
2
Answer a call on an extension telephone. If you hear beep
"Pi,Pi,", the other party wishes to send you a fax,
3
Replace the handset. Fax reception starts.
Setting TAM from Remote Station
If you forget to set your apparatus to activate TAM, you can set it remotely. You must preset "REMOTE
PASSWORD" in TAM SETTING (See page 83), "IN/OUT REMOTE SET" to "ON" in TAM SETTING (See
page 83) and "RCV MODE (OUT)" to "FAX/TAM" in BASIC SETTING (See page 82) in advance.
When "MANUAL RCV" at "RCV MODE (IN)" is set:
1
2
Call your apparatus from a remote location.
Your apparatus will answer after 15 rings.
3
When "FAX/TEL" at "RCV MODE (IN)" is set:
1
2
Call your apparatus from a remote location.
Your apparatus answers.
When you hear the greeting message or ring
back tone,
3
and after you hear a long beep, dial the
Remote Password and [#] button within 10
seconds. (You must use Tone dialling.)
E. g. :
4
@.
ABC
DEF
and after you hear a long beep, dial the
Remote Password and [#] button within 10
seconds. (You must use Tone dialling.)
GHI
Replace the handset.
E. g. :
4
@.
ABC
DEF
GHI
Replace the handset.
(See note1) (See note2) (See note3)
NOTE
1. Remote reception is not possible when a call is currently made from your apparatus.
2. When system setting "REMOTE RCV" is set to "OFF", remote reception is not possible. (See
pages 81 and 84)
3. Remote reception may not be possible when dialling tones are heard at that instant the buttons
are pressed.
55
ADVANCED
FEATURES
within 30 seconds after lifting up the handset.
Memo/2Way Recording
About Memo/2Way Recording
If you are going out and you want to leave a private message for someone, you can record it in your
apparatus. It can then be played back directly or remotely, the same as any other incoming messages.
Q
Recording a Memo Message
1
2
3
FUNCTION/
XYZ
W
EDIT
MEMO RECORDING ?
COPY/SET
PRESS START
START
* RECORDING * 03
Speak towards MIC on the Control Panel from a distance
of approximately 20 cm.
4
Q
STOP
to stop the recording.
2-way Conversation Recording
While you are speaking with someone on the telephone, you can record your conversation for a later
reference. It can be played back directly or remotely. (See note 4)
1
2
During your conversation
3
4
Continue your conversation.
OUT/
2WAY REC
* RECORDING * 03
to start the recording.
RECORDED
STOP
to stop the recording.
(See note1) (See note2) (See note3)(See note4)
NOTE
56
1. Memo Message: A message can be recorded through the built-in microphone.
2. 2-way Recording: Conversation over the telephone can be recorded for a later reference.
3. A warning tone (pu..pu..) may be heard while the conversation is recorded. This may be due
to the regulation of the government.
4. While you are talking over the speakerphone, 2-way Recording is not available.
Voice Message Transfer
This function provides the ability to transfer ICMs to a remote telephone while you are out. After an ICM is
recorded, the apparatus will call to the telephone to which you have assigned. You can listen to the ICM
after entering the Remote Password on a touch tone telephone. Remote Password must be set in TAM
SETTING in advance (See page 59).
Setting the Voice Message Transfer
1
3
4
5
6
TAM SETTING ?
EDIT
COPY/SET
A BC
ICM TRANSFER ?
:ON
COPY/SET
ADVANCED
FEATURES
2
T UV
FUNCTION/
COPY/SET
TEL:■
Enter the telephone number (max. 36 digits).
TEL:123456789■
COPY/SET
STOP
Operation of Voice Message Transfer
1
2
3
After a message is recorded, your apparatus starts to dial the assigned telephone number.
When you answer the call, you will hear a series of tone “Pi,Pi,Pi,”.
and dial the Remote Password within 10 seconds. (You must use Tone dialling.)
E. g. :
4
5
@.
ABC
DEF
GHI
You will hear the message.
Replace the handset after listening to the message.
(See note1) (See note2)
NOTE
1. The telephone line will be disconnected if you enter the wrong password 3 times in
succession.Your apparatus will redial 2 times automatically if the line is busy.
2. If you use mobile telephone, this function may not work correctly due to line quality.
57
Remote Function
About Remote Function
You can make calls from remote location to play back or erase messages. To use this function, you must
use tone dialling.
The remote control password is required for remote control operations. Make sure the password is already
registered. (See page 59)
Also, make sure that your apparatus is set to either "FAX/TEL" or "FAX/TAM" modes. (See pages 42 and 44)
1.
Make the call from an outside telephone.
2.
While you are hearing the OGM,
3.
4.
Enter the remote control password (4 digits).
5.
6.
Enter the remote control code within 10 seconds for desired operation.
(See table below)
7.
End the call.
(See note1) (See note2) (See note3) (See note4)
Remote Function Table
Remote Control Code
NOTE
58
Operation Item
1
Play back the previous message.
2#
Play back messages.
3
Play back next message.
6#
Erase all messages.
1. When playing back messages, press [#] before ending the call.
2. The call will be cut off if the remote control password is not entered within 10 seconds at step 4.
3. To cancel the current remote control operation or if some trouble occurs, press [#]. Resume
operation from step 6.
4. If you use mobile telephone, this function may not work correctly due to line quality.
Remote Function
Registering the Remote Control Password
The remote control password must be registered before carrying out remote control operation.
1
3
4
5
TAM SETTING ?
EDIT
COPY/SET
REMOTE PASSWORD?
COPY/SET
:■
Enter the remote control password (4 digits).
:5678
E. g. :
JKL
COPY/SET
STOP
MNO
R
PQ S
TUV
20-MAY 15:30
(See note1)
NOTE
1. To quit registration, press [STOP].
59
ADVANCED
FEATURES
2
T UV
FUNCTION/
Caller ID
This function may only be available in certain countries, such as Singapore, Hong Kong, Indonesia, New
Zealand. To check availability of this function, please contact the sales personnel to whom you purchased
from or local Panasonic sales company.
In order to use this function, you must apply this service at your local telephone company.
You can confirm caller’s telephone number on the display before taking a call. This function allows you to
screen your calls. To enable this function, you need to change Caller ID setting in the BASIC SETTING in
advance. (See pages 81 and 82) When the apparatus receives a call, the LCD display will show the Caller’s
telephone number as shown below.
1234567890123
(See note page 61)
Caller ID List
You can confirm caller’s information on the display and either erase or register it to fax directory or Black
List, or dial to displayed station.
Q
Dialling to displayed station
1
@.
Q
Deleting all caller’s information
1
@.
FUNCTION/
EDIT
@.
EDIT
CALLS LIST ?
2
COPY/SET
CALLED HISTORY ?
3
COPY/SET
*1)123456789
@.
FUNCTION/
CALLS LIST ?
2
3
4
COPY/SET
CALLED HISTORY ?
COPY/SET
*1)123456789
(2)MGCS
(See note 1 page 61)
4
5
(2)MGCS
(See note 2 page 61)
5
EDIT
REGISTER ?
6
DELETE ?
SPEAKERPHONE
or
The apparatus starts to dial.
7
8
60
FUNCTION/
COPY/SET
START TO DELETE
START
DELETED
Caller ID
Registering displayed station to Fax
Directory
1
@.
Q
Registering displayed station to Black List
1
@.
FUNCTION/
EDIT
@.
EDIT
CALLS LIST ?
2
CALLS LIST ?
2
COPY/SET
COPY/SET
CALLED HISTORY ?
3
CALLED HISTORY ?
3
COPY/SET
COPY/SET
*1)123456789
4
*1)123456789
4
FUNCTION/
EDIT
FUNCTION/
EDIT
REGISTER ?
5
@.
FUNCTION/
ADVANCED
FEATURES
Q
REGISTER ?
5
COPY/SET
STATION NAME
BLACK LIST REG.?
6
Enter station name. (See page 20)
6
COPY/SET
NO. =
7
7
COPY/SET
Enter Blacklist number (2 digits (01 to 10))
and then press [COPY/SET].
PANASONIC
8
■
(02)123456789
COPY/SET
to confirm telephone number.
8
COPY/SET
STOP
123456789
9
COPY/SET
(See note1)
NOTE
STOP
(See note2)(See note3)
1. " " mark in the display indicates displayed station has not been confirmed.
2. If the Caller ID number matches with the registered telephone number in the ABBR dialling
directory or Directory Search dialling directory, the registered Station Name is displayed. If not,
the Caller ID number is displayed.
3. The LCD can display the reason why the telephone number is not displayed (i.e. "NUMBER
WITHHELD" or "NO. UNAVAILABLE", etc.).
61
Caller ID
Q
Deleting a displayed station
1
2
3
@.
FUNCTION/
EDIT
CALLED HISTORY ?
COPY/SET
*1)123456789
FUNCTION/
EDIT
5
7
62
CALLS LIST ?
COPY/SET
4
6
@.
(2)MGCS
DELETE ?
COPY/SET
START TO DELETE
START
STOP
Caller ID
Blacklist
By registering telephone number of unwanted call into Blacklist, the apparatus will not ring if the Caller ID
number matches with Blacklist.
To register the Caller’s telephone number into Blacklist (After Communication)
You can manually register the Caller’s telephone number into Blacklist with the following method.
1
GHI
FUNCTION/
EDIT
BASIC SETTING ?
COPY/SET
@.
J KL
BLACK LIST REG.?
3
COPY/SET
NO. =
4
■
Enter the Blacklist number with 2 digits (01 to 10).
NO. = 02
(02)TELEPHONE NO
5
6
Enter the telephone number (up to 20 digits).
E. g. :
XYZ
W
JKL
JKL
JKL
@.
ABC
DEF
GHI
JKL
MNO
R
PQ S
TUV
COPY/SET
To record another number, repeat steps 4 to 6.
To return to standby, press [STOP].
63
ADVANCED
FEATURES
2
Caller ID
Changing the Caller’s Telephone Number in Blacklist
If you need to change any of the Caller’s telephone number in the Blacklist, follow the steps below:
To change the Caller’s telephone number in the Blacklist
1
2
3
4
GHI
FUNCTION/
BASIC SETTING ?
EDIT
COPY/SET
@.
J KL
BLACK LIST REG.?
COPY/SET
NO. =
■
Enter the Blacklist number.
(02)55512345678
ABC
E. g. :
(01 to 10)
5
to move the cursor to the incorrect number and press [CLEAR].
6
7
Then enter a new telephone number. (See notes 1 and 2)
E. g. :
(02)65512345678
MNO
COPY/SET
To change another number, repeat steps 4 to 7.
To return to standby, press [STOP].
(See note1) (See note2)
NOTE
64
1. If you require a special access number to get to an outside line, enter it first and then press
[REDIAL/PAUSE]. A hyphen "-" is displayed for pause.
2. Use [SPEAKERPHONE] to enter a space between the numbers to make it easier to read.
Caller ID
Erasing the Telephone Number in Blacklist
If you need to erase any of the telephone number in the Blacklist, follow the steps below:
To erase the Caller’s telephone number in the Blacklist
1
3
4
5
6
BASIC SETTING ?
EDIT
COPY/SET
@.
J KL
BLACK LIST REG.?
COPY/SET
NO. =
■
Enter the Blacklist number.
ADVANCED
FEATURES
2
GHI
FUNCTION/
(02)12345678
E. g. :
ABC
(01 to 10)
CLEAR
repeatedly to delete all numbers.
(02)
COPY/SET
To erase another number, repeat steps 4 to 6.
To return to standby, press [STOP].
65
Caller ID
Selecting Caller Type
You can pre-set the registered station in the directory of ABBR dialling and Directory Search dialling as a
voice call (TEL) station or a fax call (FAX) station.
If the Caller ID number matches with registered ABBR dialling number or the Directory Search dialling
number, the pre-set caller type (Voice Call or Fax Call) is distinguished and documents are received without
ringing if it is a fax call, or with ringing if it is a voice call.
1
2
3
4
5
GHI
FUNCTION/
EDIT
COPY/SET
@.
MNO
CALLER TYPE ?
COPY/SET
SELECT TEL NO.
Select required station from ABBR dialling numbers or
Directory Search dialling numbers.
If the station name has not been registered to the selected
station, telephone number will be displayed in stead.
PANASONIC
COPY/SET
:TEL
6
7
BASIC SETTING ?
:FAX
COPY/SET
STOP
(See note1) (See note2) (See note3)
NOTE
66
1. To quit setting midway, press [STOP].
2. When you choose "TEL" setting, it rings 5 times and receives documents by current receiving
setting.
3. When you choose "FAX" setting, it receives documents without ringing regardless of current
receiving setting.
INTERNET COMMUNICATION
INTERNET COMMUNICATION
This apparatus offers the user an Internet function which provides a cheaper mode of communication to
send or receive a document. With this enhanced feature, the user could easily interface with either another
fax apparatus or a personal computer for communication.
To utilise this function, the user has to, first of all, subscribe to an Internet Service Provider (ISP) which will
register and provide the user with the following:
1. User Name or User ID
Preferred login name for connection and POP server
2. Password
Given password for connection and POP server
3. ISP Telephone Number
Connect to ISP
4. E-mail Address
Username@ XXXXX.XX.XX
Domain Name
5. SMTP Server Name
Given SMTP Server Name
6. POP3 Server Name
Given POP3 Server Name
7. DNS Number
Given Primary and Secondary DNS number
The above information is pre-requisite in registering the Internet Function in this apparatus (See pages 73 to
75). The configuration must be established before any Internet communication.
INTERNET
COMMUNICATION
Internet Overview (Fax via Internet)
Internet
UF-E1 can only read files transmitted in TIFF (Tagged Image File Format), which is primarily a graphic file.
Once the apparatus receives TIFF file, it will be stored into memory and printed out automatically when
reception completes. However, you can view this document in the personal computer. To do this, the user
has to download a viewer software from the website via a personal computer and convert the documents.
The address of the website is
http://www.panasonic.co.jp/mgcs/download/uf-e1
All i-FAX apparatus accept and recognise only TIFF documents. Any documents other than TIFF type, for
instance, BMP, IPG, GIF, TXT, DOC, XLS, etc., are received, an error message will be printed out to alert the
recipient. (See page 72). In this situation, the recipient has to inform the sender to convert his documents to
TIFF format before transmission. The converter software can be downloaded from the following website:
http://www.panasonic.co.jp/mgcs/download/uf-e1
(See note1) (See note2)
NOTE
1. When you convert documents created by MS-WORD etc., do not select 400 × 400 dpi
resolution. UF-E1 cannot receive documents in 400 x 400 dpi resolution.
2. UF-E1 does not accept document files (TIFF files) created in 400 × 400 dpi resolution or A3
size.
67
INTERNET COMMUNICATION
Internet Overview (Message via Internet)
Internet
Electronic mails or e-mails can be received by the apparatus, transmitted via a personal computer or e-mailenabled fax apparatus. This apparatus only supports ISO-8859-1 characters (see below). All i-FAX
apparatus accept and recognise only TIFF documents. Any documents other than TIFF type, for instance,
BMP, IPG, GIF, TXT, DOC, XLS, etc., are received, an error message will be printed out to alert the
recipient. (See page 72). In this situation, the recipient has to inform the sender to convert his documents to
TIFF format before transmission. The converter software can be downloaded from the following website:
http://www.panasonic.co.jp/mgcs/download/uf-e1
Printable Characters (ISO-8859-1)
ISO 8859-1 character set
!
“
#
$
%
&
‘
(
)
*
+
,
-
.
/
0
1
2
3
4
5
6
7
8
9
:
;
<
=
>
?
@
A
B
C
D
E
F
G
H
I
J
K
L
M
N
O
P
Q
R
S
T
U
V
W
X
Y
Z
[
\
]
^
_
‘
a
b
c
d
e
f
g
h
i
j
k
l
m
n
o
p
q
r
s
t
u
v
w
x
y
z
{
|
}
~
¡
¢
£
¤
¥
¦
§
¨
©
ª
«
¬
-
®
¯
º
±
²
³
´
µ
¶
·
¸
¹
º
»
¼
½
¾
¿
À
Á
Â
Ã
Ä
Å
Æ
Ç
È
É
Ê
Ë
Ì
Í
Î
Ï
Ð
Ñ
Ò
Ó
Ô
Õ
Ö
×
Ø
Ù
Ú
Û
Ü
Ý
Þ
ß
à
á
â
ã
ä
å
æ
ç
è
é
ê
ë
ì
í
î
ï
ð
ñ
ò
ó
ô
õ
ö
ø
ù
ú
û
ü
ý
þ
ÿ
Note that the characters tabulated are acceptable and recognised by this apparatus. Any other characters
cannot be detected and therefore will not be printed legibly by this apparatus.
68
Sending/Receiving Documents via Internet
Sending Documents
FAC
E
1
DOW
Set the document(s) FACE DOWN on the
ADF and adjust the Document Guides.
N
DOCUMENT SET
2
INTERNET
ENTER STATION(S)
3
(See note 3)
PANASONIC
or
@.
MGCS
(You need to register E-Mail address in
advance. See pages 76 and 77.)
4
START
The apparatus starts to dial the ISP
telephone number.
Q
Automatic Redialling
If the line is busy, your apparatus will redial the number up to 2 times at 3 minute interval. During that time, a
message will appear as shown on the right. If the line is still busy after the last try, a message "REDIAL
OVER" will appear as shown on the right and your apparatus will print a COMM. Journal depending on the
FAX SETTING. (See pages 81 and 84)
5551234
WAITING TO DIAL
REDIAL OVER
630
(See note1)(See note2)(See note3)
NOTE
1. To stop the transmission, press [STOP].
2. If the transmission cannot be completed for any reason, the e-mail may be returned
undelivered, otherwise no reply will be printed.
3. E-Mail address can be entered directly from the dial keypad at step 3 for transmission.
69
INTERNET
COMMUNICATION
ABBR
Sending/Receiving Documents via Internet
Multi-station Transmission enables the sender to transmit the same document to multiple stations without
having to load document for every transmission. This can be done simply by storing the document into
memory and selecting the intended stations one at a time. (Max. 50 stations)
Multi-station Transmission
FAC
E
1
DOW
Set the document(s) FACE DOWN on the
ADF and adjust the Document Guides.
N
DOCUMENT SET
2
INTERNET
ENTER STATION(S)
3
Select required stations by any combination
of the following methods. (See note 2)
●
Abbreviated Dialling
●
Directory Search Dialling
E. g. :
ABBR
R
PQ S
COPY/SET
COPY/SET
PANASONIC
ENTER STATION(S)
(When entering a station for Abbreviated
Dialling or Directory Search Dialling, press
[COPY/SET] after each station is entered.)
4
START
* STORING *
The document is stored into memory and
then the apparatus starts to dial the ISP
telephone number.
(See note1)(See note2)(See note3) (See note4)
NOTE
70
1. To stop the transmission, press [STOP].
2. It is not possible to set E-Mail addresses with fax stations.
3. If the transmission cannot be completed for any reason, the e-mail may be returned
undelivered, otherwise no reply will be printed.
4. You can review the stations you have entered in step 3 before storing your document into
memory by pressing [ ] or [ ]. Press [CLEAR] to clear an entered station shown on the
display, if necessary.
Sending/Receiving Documents via Internet
You can dial out manually to Internet Service Provider to check if electronic mails or fax documents have
been stored in your e-mail account.
Receiving Documents
1
INTERNET
MAIL CHECK ?
2
3
The apparatus will dial to Internet Service
Provider and receive messages or
documents automatically.
If the apparatus fails to receive message or
documents, an error message will be
printed. (See page 72)
Auto-Dialling Function
You can preset timings (max. 10 times) to dial out to ISP to receive e-mails automatically by the apparatus.
Follow the procedure below.
1
@.
7
A BC
FUNCTION/
EDIT
COPY/SET
TIME =
i-FAX SETTING ?
2
3
4
COPY/SET
J KL
RCV SETTING ?
Enter required time to dial ISP.
E. g. :23:30
TIME =
23:30
TIME =
Q :
COPY/SET
PRINT TEXT ?
AUTO-POP DIAL ?
5
6
8
Q :
COPY/SET
:OFF
9
10
COPY/SET
STOP
to return to standby or go to step 8 to
enter next schedule.
20-MAY 15:30
:ON
AUTOPOP DIAL SET
(See note1) (See note2) (See note3)
NOTE
1. Electronic mails will be received into memory and printed out only when the conditions apply.
(See page 79)
2. It may take due time for the apparatus to identify whether the attached file is in TIFF format
depending on its file size. If it is not in TIFF format, the apparatus will print an error message.
3. If you stop receiving documents, you may not be able to receive it for a while due to ISP’s
recovery time.
71
INTERNET
COMMUNICATION
Q
START
Sending/Receiving Documents via Internet
i-FAX Error Messages
There are various situations that could result in the printing of error message journals in this apparatus. This
happens when the apparatus detects incompatibility of characters, wrong file formats and memory overflow.
The following conditions are to be noted.
Printed Warning Messages
Description
Advice
[The attached files cannot be E-mails with unrecognized file
printed out by I-FAX. The attached format, e.g. Word, Excel etc.
files have been deleted from server, i-FAX only recognizes TIFF files.
please contact sender, if necessary.
This email has an attached file
which is not supported by Internet
FAX. Inform originator to re-send
the attachment in the TIFF-file
format. TIFF-F Converter (Windows
Printer Driver) can be downloaded
from the following URL address:
http://www.panasonic.co.jp/mgcs/
download/uf-e1]
Message receives when "DEL POP
ERR MSG" is turned "ON". The
attached files are deleted from
server. Inform sender to convert files
to TIFF format and transmit again
(See page 67). Another alternative is
to ask sender to transmit again and
retrieve them using a personal
computer.
[The attached files cannot be
printed out by I-FAX. This email
has an attached file which is not
supported by Internet FAX. Inform
originator to re-send the attachment
in the TIFF-file format. TIFF-F
Converter (Windows Printer Driver)
can be downloaded from the
following URL address: http://
www.panasonic.co.jp/mgcs/
download/uf-e1]
Message receives when "DEL POP
ERR MSG" is turned "OFF". The
attached files are stored in server.
Retrieve them using a personal
computer.
[All attached files cannot be printed
out due to memory overflow.
As the attached files have been
deleted from server, please contact
sender if necessary]
Memory Overflow
(The apparatus started to receive
with space in memory and then
memory overflow occurred.)
Message receives when "DEL POP
ERR MSG" is turned "ON". The
attached files have been deleted
from server.
[All attached files cannot be printed
out due to memory overflow]
Message receives when "DEL POP
ERR MSG" is turned "OFF". The
attached files are stored in server.
Retrieve them using a personal
computer.
[I-FAX does not have full capacity
to receive the rest of files. Please
delete ICM or print out documents
stored in memory]
Delete ICM or print out the
Memory Overflow
(The apparatus started to receive documents stored in memory and try
it again.
without space in memory and
then memory overflow occurred)
[Unrecognized character types Message with unrecognized
received, cannot print out correctly] characters
(characters other than ISO88591 type)
[Deleted E-mail text]
Occurs when "PRINT TEXT" is
turned "OFF".
(See note1)
NOTE
72
1. Setting for "DEL POP ERR MSG" and "PRINT TEXT" can be changed in the RECEIVE
SETTING. (See page 79)
Programming Internet Parameters
Configuring Network Connection
1
@.
10
A BC
FUNCTION/
EDIT
Enter the password. (Max. 20 digits per
entry using US-ASCII) (See notes 1 and 2)
i-FAX SETTING ?
E. g. :abcd
COPY/SET
PASSWORD=abcd
2 times
11
12
CONNECTION ?
3
4
5
COPY/SET
ISP TEL NO. ?
COPY/SET
Enter Primary DNS number.
(See notes 3 and 4)
■
Enter ISP telephone number. (Max. 36
digits) (See notes 1 and 2)
E. g. :202 224 128 006
202.224.128.006
E. g. :
R
PQ S
TUV
XYZ
W
MNO
JKL
GHI
MNO
789 6546■
COPY/SET
USER ID ?
13
14
COPY/SET
SECONDARY DNS ?
COPY/SET
Enter Secondary DNS number.
(See notes 3 and 4)
COPY/SET
E. g. :202 224 128 050
Enter the User ID. (Max. 40 digits per
entry using US-ASCII)
(See page 74) (See notes 1 and 2)
E. g. :[email protected]
[email protected]
9
PRIMARY DNS ?
COPY/SET
SPEAKERPHONE
6
7
8
COPY/SET
INTERNET
COMMUNICATION
2
COPY/SET
COPY/SET
PASSWORD ?
202.224.128.050
15
16
COPY/SET
ISP TEL NO. ?
CONNECTION ?
17
MAIL SETTING ?
to continue registration, refer to page 75,
step 4, or press [STOP] to return to
standby.
(See note1) (See note2)
NOTE
(See note3)(See note4)
1. To correct entered data, move the cursor to required character and press [CLEAR]. Enter
correct number or character.
2. To delete entered data, press [CLEAR] repeatedly until all characters are deleted.
3. If Primary and Secondary DNS numbers are not required, press [COPY/SET].
4. To correct entered data, move the cursor to required position and overwrite 3-digit number.
73
Programming Internet Parameters
Entering Characters
Enter characters using each button (
table.
@.
to
). Select the characters according to the following
Character Inputs for E-mail Address, User ID, server name, subject, etc.
Character String
Buttons
Number of times buttons pressed
1
@.
2
3
@ .
4
5
6
7
8
9
_
$
%
&
=
~
S
7
Z
9
#
/
ABC
a
b
c
A
B
C
2
DEF
d
e
f
D
E
F
3
GHI
g
h
i
G
H
I
4
JKL
j
k
l
J
K
L
5
MNO
m
n
o
M
N
O
6
R
PQ S
p
q
r
s
P
Q
R
TUV
t
u
v
T
U
V
8
XYZ
W
w
x
y
z
W
X
Y
(
)
,
\
;
:
SPEAKERPHONE
10 11 12 13 14 15 16 17 18 19 20 21 22
^
1
+
[
]
space
E. g. :jack.S
JKL
:j
ABC
:a
ABC
:c
ABC
JKL
JKL
:k
@.
@.
:.
R
PQ S
R
PQ S
COPY/SET
74
ABC
R
PQ S
R
PQ S
R
PQ S
R
PQ S
R
PQ S
R
PQ S
: S (HINT:
R
PQ S
: S)
”
’
?
!
|
<
>
{
}
0
Programming Internet Parameters
Registering Mail Setting
1
@.
A BC
FUNCTION/
EDIT
9
Enter password. (Max. 20 digits per entry
using US-ASCII) (See note)
E. g. :1234
PASSWORD=1234
i-FAX SETTING ?
2 times
COPY/SET
E-MAIL ADDRESS ?
CONNECTION ?
3
MAIL SETTING ?
4
COPY/SET
Enter your e-mail address. (Max. 60 digits
per entry using US-ASCII) (See page 74)
(See note)
[email protected]
COPY/SET
■
6
COPY/SET
E. g. :[email protected]
USER ID ?
5
11
12
Enter POP User Name. (Max. 40 digits per
entry using US-ASCII) (See page 74) (See
note)
13
14
15
COPY/SET
SMTP SERVER ?
COPY/SET
■
Enter server name. (Max. 60 digits per
entry using US-ASCII) (See page 74) (See
note)
E. g. :japan.jp
E. g. :JACK SMITH
japan.jp
JACK SMITH
7
COPY/SET
PASSWORD ?
8
COPY/SET
16
17
18
PASSWORD=■
COPY/SET
POP3 SERVER ?
COPY/SET
■
Enter POP3 server name. (Max. 60 digits
per entry using US-ASCII) (See page 74)
(See note)
E. g. :japan.jp
japan.jp
19
COPY/SET
STOP
(See note1) (See note2)
NOTE
1. To correct entered data, move the cursor to required character and press [CLEAR]. Enter
correct number or character.
2. To delete entered data, press [CLEAR] repeatedly until all characters are deleted.
75
INTERNET
COMMUNICATION
2
10
COPY/SET
Programming Internet Parameters
E-mail addresses, once registered, will be stored in memory and can be viewed via [DIRECTORY
SEARCH] button. [DIRECTORY SEARCH] can contain 120 registrations of telephone numbers or fax
numbers and e-mail addresses in all.
Registering Directory Search
1
@.
Editing Directory Search
1
A BC
FUNCTION/
EDIT
@.
A BC
FUNCTION/
EDIT
i-FAX SETTING ?
2
COPY/SET
A BC
DIRECT. SEARCH ?
3
COPY/SET
NEW EMAIL ADD ?
4
COPY/SET
i-FAX SETTING ?
2
3
4
5
STATION NAME
5
NAME:JOHN WILLS
6
COPY/SET
E-MAIL ADDRESS
7
Enter the e-mail address. (See page 74)
E. g. :[email protected]
[email protected]
8
A BC
COPY/SET
NEW EMAIL ADD ?
A BC
CONFIRM ?
COPY/SET
JOHN WILLS
Scroll down the station name and select the
one you want to edit.
Enter the name of person or company.
E. g. :JOHN WILLS
COPY/SET
6
7
8
9
EDIT ?
FUNCTION/
EDIT
COPY/SET
NAME:JOHN WILLS
Enter correct station name. (See page 74)
E. g. :JOHN SMITH
NAME:JOHN SMITH
COPY/SET
Edit the e-mail address.
COPY/SET
E. g. :[email protected]
[email protected]
NEW EMAIL ADD ?
Enter new e-mail address and repeat from
step 4, otherwise continue the step below.
9
10
NEW EMAIL ADD ?
STOP
Repeat from step 3 if you want to edit
another e-mail address.
11
76
COPY/SET
STOP
Programming Internet Parameters
You can register up to 10 E-Mail addresses into ABBR E-Mail Address separately with ABBR dialling of
telephone number or fax number.
Registering ABBR
@.
1
A BC
FUNCTION/
EDIT
@.
EDIT
i-FAX SETTING ?
2
COPY/SET
i-FAX SETTING ?
2
DEF
COPY/SET
DEF
ABBR. ADDRESS ?
3
ABBR. NO.
4
5
ABBR. ADDRESS ?
3
COPY/SET
COPY/SET
= ■
Enter numeric number from 0 to 9.
STATION NAME
Enter the name of person or company. (Max.
15 digits per entry using US-ASCII)
(See page 74)
ABBR. NO.
4
5
Enter numeric number from 0 to 9 to edit.
Enter correct station name. (Max. 15 digits
per entry using US-ASCII) (See page 74)
NAME:MR SMITH
NAME:MS JANE
6
COPY/SET
COPY/SET
[email protected]
E-MAIL ADDRESS
7
Enter the e-mail address. (Max. 60 digits per
entry using US-ASCII) (See page 74)
7
Enter correct address. (Max. 60 digits per
entry using US-ASCII) (See page 74)
E. g. :[email protected]
E. g. :[email protected]
[email protected]
[email protected]
8
COPY/SET
8
9
COPY/SET
To add new entry, repeat from step 4,
otherwise, continue the step below.
To add new entry, repeat from step 4,
otherwise, continue the step below.
STOP
= ■
E. g. :MR SMITH
E. g. :MS JANE
6
A BC
FUNCTION/
9
STOP
77
INTERNET
COMMUNICATION
1
Editing ABBR
Programming Internet Parameters
You can register a Sender Name and a Subject of your E-mail in the apparatus. They will appear either on
the screen or printout when the other party receives your E-mail (fax document).
Registering Sender Name and Subject
1
@.
A BC
FUNCTION/
EDIT
i-FAX SETTING ?
2
COPY/SET
GHI
USER INFO ?
3
COPY/SET
SENDER NAME ?
4
COPY/SET
and enter sender name. (See page 74) (See notes 1 and 2)
E. g. :Panasonic
Panasonic
5
COPY/SET
SUBJECT ?
6
COPY/SET
Enter the title or subject of message. (See page 74)
(See notes 1 and 2)
E. g. :ACE Sales
ACE Sales
7
COPY/SET
STOP
(See note1) (See note2)
NOTE
78
1. To correct entered data, move the cursor to required character and press [CLEAR]. Enter
correct number or character.
2. To delete entered data, press [CLEAR] repeatedly until all characters are deleted.
Programming Internet Parameters
Receive Setting
1
@.
A BC
FUNCTION/
EDIT
i-FAX SETTING ?
2
COPY/SET
J KL
RCV SETTING ?
3
COPY/SET
PRINT TEXT ?
4
COPY/SET
:OFF
INTERNET
COMMUNICATION
5
:ON
6
COPY/SET
AUTO-POP DIAL ?
To set another parameter, repeat operation from
step 4, or to return to standby, press [STOP].
RECEIVE SETTING
Selection
PRINT TEXT
AUTO-POP DIAL
DEL POP ERR MSG
(See note 1)
AUTO MAIL RCV
Setting
Description
Page
ON
Select to print out e-mail text.
71
OFF
Select not to print out e-mail text.
71
ON
Select to dial out automatically to ISP server to retrieve
e-mails. (max. 10 times)
71
OFF
Select not to dial out automatically to ISP server.
71
ON
Select to delete all e-mails and attached files from ISP
server once the apparatus has received it.
72
OFF
Select to keep all e-mails and attached files in ISP
server when the apparatus had an error to receive it.
72
ON
Select to receive e-mails automatically after transmitted
documents.
69,
70
OFF
Select not to receive e-mails automatically after
transmitted documents.
69,
70
(See note1)
NOTE
1. After you changed setting of "DEL POP ERR MSG" from "OFF" to "ON", the apparatus may
print out all e-mails kept in ISP server after it received.
79
E-mail Address History
Registering E-mail Address
1
@.
Deleting E-mail Address
1
A BC
FUNCTION/
EDIT
@.
EDIT
i-FAX SETTING ?
i-FAX SETTING ?
2
COPY/SET
2
MNO
COPY/SET
MNO
MAIL ADD. HIST ?
MAIL ADD. HIST ?
3
3
COPY/SET
COPY/SET
( 1)smith@panaso
( 1)smith@panaso
4
4
Scroll down to the desired e-mail address.
Scroll down to the desired e-mail address.
5
5
FUNCTION/
EDIT
REGISTER ?
6
A BC
FUNCTION/
FUNCTION/
EDIT
6
COPY/SET
Scroll down to select function.
STATION NAME
7
Enter station name for selected e-mail
address. (Max. 15 digits per entry using USASCII)
DELETE ?
7
COPY/SET
E. g. :SMITH
START TO DELETE
NAME:SMITH
8
COPY/SET
8
START
DELETED
smith@panasonic
9
80
COPY/SET
STOP
9
STOP
PROGRAMMING YOUR APPARATUS
Programming Your Apparatus
Your facsimile apparatus has a variety of adjustable Fax Parameter Settings. These parameter settings,
listed in the Parameter Table (See pages 82 to 84), are preset for you and do not need to be changed. If you
want to make a change, read the table carefully. Some parameters, such as the Resolution, can be
temporarily changed by a simple key operation just before a transmission is made. When the transmission
ends however, these parameters return to their preset values (Home position). Parameters can be changed
by the procedure described below.
Setting Fax Parameters
1
GHI
FUNCTION/
EDIT
BASIC SETTING ?
or
or
R
PQ S
FUNCTION/
FAX SETTING ?
EDIT
or
or
T UV
FUNCTION/
EDIT
2
3
TAM SETTING ?
COPY/SET
DATE & TIME ?
SILENT RCV ?
repeatedly until your request is displayed.
4
5
COPY/SET
:OFF
:ON
"ON" or "OFF" is available to select.
6
COPY/SET
RING COUNTER ?
To set another parameter, repeat operation from step 3, or to
return to standby, press [STOP].
(See note1)
NOTE
1. To print a Fax Parameter List, see page 85.
81
PROGRAMMING
YOUR
APPARATUS
E. g. :Choose "SILENT RCV" in the BASIC SETTING.
Programming Your Apparatus
Q
Fax Parameter Table
Underlined selections in the Selection column are factory settings.
BASIC SETTING
No.
Parameter
01 DATE & TIME
02 SETTING NAME
(NAME)
03 FAX TEL NO.
(TEL NO.)
04 RCV MODE (IN)
08
09
10
12
13
14
15
16
17
19
Set the Telephone mode or Fax/Tel Auto Switching
mode.
Set the Fax mode or FAX/TAM mode.
41
Select whether or not the apparatus will receive
documents without ringing.
Set the number of initial rings before the apparatus
RING COUNTER
1-9
answers. This function will not be valid unless the
"SILENT RCV" is set to "OFF".
F/T RING CNT
3, 6, 9, 12
Set the number or rings that the apparatus will alert the
(F/T RING COUNTER)
caller when set to the Fax/Tel Auto Switching mode.
KEY VOLUME
OFF / SOFT / LOUD Select the volume of the button tone.
DAYLIGHT TIME
ON / OFF
Select whether or not the apparatus adjusts the built(See note 1)
in clock for Daylight Savings Time automatically. The
built-in clock will advance 1 hour at 2:00 am on the
third Sunday in March and fall back 1 hour at 2:00
am on the first Sunday in October.
HOLD MUSIC
ON / OFF
Select whether or not the apparatus will play Hold
Music while the line is being put on hold.
DRD
ON / OFF
Select whether or not the apparatus checks for a
distinctive ring pattern.
(Distinctive Ring
Detector) (See note 2)
Select whether or not the apparatus displays Caller
CALLER ID
ON / OFF
ID.
(See note 3)
BLACK LIST REG.
-Register the telephone number to be listed in the
(See note 3)
Black List.
CALLER TYPE
Select "TEL" or
Select "TEL" (Telephone call) or "FAX" (Fax call) for
(See note 3)
"FAX" for registered each registered station to identify incoming call.
stations.
Selecting the type of line connected.
TEL LINE TYPE
PBX / PSTN
(See note 4)
Selecting the dialling mode
DIALLING METHOD TONE
(See note 4)
PULSE 10PPS
42
MANUAL RCV
FAX/TEL
FAX
FAX/TAM
ON / OFF
(See note1) (See note2) (See note3)
NOTE
82
Page
18
19
21
06 SILENT RCV
--
Description
Set the current Date & Time.
Set your name or company name.
Set your fax telephone number or ID number.
05 RCV MODE (OUT)
07
Selection
---
44
43
43
---
-46
60
63
66
-11
(See note4) (See note5) (See note6)
1. This parameter supports an optional telephone service "DAYLIGHT TIME" provided in New
Zealand.
2. This parameter supports an optional telephone service "Distinctive Ring Service" provided in
Hong Kong, Singapore and New Zealand only.
3. This parameter supports an optional telephone service "Caller ID" provided in New Zealand,
Hong Kong and Singapore.
4. The contents of Fax Parameter may differ depending on each country’s regulation or
specification.
5. Factory setting may differ depending on each country’s regulation or specification.
6. Depending on the PBX conditions when the fax apparatus is called, the number of rings can
differ from the setting.
Programming Your Apparatus
TAM SETTING
No.
Parameter
Selection
Description
Page
01 REMOTE
PASSWORD
(----)
Set a 4-digit password for Remote Control
operation.
59
02 ICM TRANSFER
(MESSAGE
TRANSFER)
ON / OFF
Select whether or not the apparatus calls the preprogrammed location after an incoming voice
message is recorded in the built-in TAM.
57
03 ICM REC. TIME
(MESSAGE
RECORDING TIME)
30, 60,
(sec.)
180 Set the recording time for each incoming message.
44
04 IN/OUT RMT SET
(IN/OUT REMOTE
SET)
ON / OFF
Select whether or not the apparatus accepts the IN/
OUT mode to be changed using the Remote
Control operation.
58
05 CALL SCREENING
ON / OFF
Select whether or not you can monitor the incoming
call through the speaker while it is being recorded
and answer it if you wish by simply lifting up the
handset.
--
90,
PROGRAMMING
YOUR
APPARATUS
(See note1) (See note2)
NOTE
1. The contents of Fax Parameter may differ depending on each country’s regulation or
specification.
2. Factory setting may differ depending on each country’s regulation or specification.
83
Programming Your Apparatus
FAX SETTING
No.
Parameter
Selection
Description
Page
01 MEMORY TX
ON / OFF
Select whether or not the apparatus stores the
documents first and transmits them from document
memory.
--
02 SILENT DETECT
(SILENT
DETECTION)
ON / OFF
Select Silent Detection in Fax/TAM mode.
--
03 RESOLUTION
(RESOLUTION
HOME POSITION)
STANDARD
FINE
S-FINE
HALFTONE
Select required home position for your document.
35
04 CONTRAST
(CONTRAST HOME
POSITION)
NORMAL
DARKER
LIGHTER
Set the home position of [CONTRAST] button on
the panel.
35
05 ECO INK RCV
ON / OFF
Set to save ink for printing.
--
06 REDUCTION RCV
ON / OFF
Select whether or not the apparatus reduce
received document to 93% reduction.
--
07 OUT OF INK MARK
ON / OFF
Select whether or not the appartus prints ink mark
on the document.
If it is set to "OFF", the apparatus cannot detect the
print quality. It may print a blank page even though
there is enough ink in the Ink Cartridge.
--
08 COMM. JOURNAL
INC
OFF
ALWAYS
Select the print condition for the COMM. Journal.
• INC:
Print only when the transmission has
failed.
• OFF:
Do not print.
• ALWAYS: Print after each transmission.
85
09 PRINT JOURNAL
AUTOMATIC
MANUAL
Select whether or not the apparatus prints the
journal automatically after each 32 transactions.
85
11 DIRECT RCV
ON / OFF
Select whether or not the apparatus receives
document directly, not stored it into memory.
--
13 FRIENDLY RCV
ON / OFF
Select whether or not the apparatus continues to
monitor a fax signal when a call is answered using
the fax handset.
40
14 REMOTE RCV
ON / OFF
Select whether the apparatus accepts the remote
reception command to switch into fax reception
mode.
55
15 OVERSEAS COMM. ON / OFF
Select whether or not the apparatus uses the
overseas setting to improve communications.
--
16 DIAGNOSTIC
Select whether or not the apparatus accepts
remote service diagnostic from the service centre.
Please ask your Panasonic Authorised Dealer for
details.
--
ON / OFF
(See note1) (See note2)
NOTE
84
1. The contents of Fax Parameter may differ depending on each country’s regulation or
specification.
2. Factory setting may differ depending on each country’s regulation or specification.
LIST AND JOURNAL
Lists and Journal
Journal and Lists
To help you maintain records of Lists and Journal, this facsimile apparatus is equipped to print the following
Lists and Journal.
The “Journal” is a record of the last 32 transactions (a transaction is recorded each time you send or receive
a document). It is printed out automatically after every 32 transactions, and also can be printed manually by
the following procedure:
Q
To print a List:
1
2
DEF
FUNCTION/
EDIT
LIST PRINT ?
COPY/SET
for Transaction Journal or
for Fax Parameter List or
for Speed Dialling Number List or
for Caller ID List or (See note 1)
for Blacklist or (See note 1)
for i-Fax Parameter List or
for E-Mail Address List
3
START
* PRINTING *
Communication Journal (COMM. JOURNAL)
The Communication Journal (COMM. JOURNAL) allows you to verify whether the transmission was
successful. You may select the print status (Off/Always/Inc.) in the FAX SETTING ("COMM. JOURNAL").
(See pages 81 and 84)
Power Failure Report
If a power failure occurs, this apparatus will not function. If fax documents are stored in memory, they will be
lost. When power is restored, a power failure report will be printed out stating which files in memory have
been erased.
Sample Power Failure Report
POWER FAILURE REPORT
05 MAY-01 15:30
PANASONIC 81 123 456
POWER FAILURE HAS OCCURED
PLEASE RE-PROGRAM DEFERRED TX
(See note1)(See note2)
NOTE
1. Blacklist and Caller ID List are printed depending on countries.
2. MEMORY COMM. JOURNAL will be printed if it is a multi-station transmission and deferred
transmission.
85
LISTS
AND
JOURNAL
Power Failure Report
MAINTENANCE AND TROUBLESHOOTING
Maintenance
Cleaning the Document Scanning Area
If the receiving party reports that the received documents were black or contained black lines, try to make a
copy on your apparatus to verify. If the copy is black or has black lines, the document scanning area is
probably dirty and must be cleaned.
Q
To clean the scanning area
1
1. Open the Panel Cover until it is secured.
1
2. Press the tabs on each side of the Feed Roller
inwards and lift it up.
2
2
2
3. Open the white plastic protector and hold it.
3
5. Press the tabs on each side of the Feed Roller and
hold it down until it is secured.
4. Wipe the Scanning Area gently with a soft cloth. Be
sure to use a clean cloth as the Scanning Area is
easily scratched.
6. Close the Panel Cover.
5
6
5
86
Troubleshooting
If You Have Any of These Problems
Making a call
No dial tone.
CAUSE/ACTION
Page
• Check the telephone line.
• Check the connection of power supply
plug.
• Check the telephone cable provided.
12, 97
12,
17, 63,
97
Ringing tone
No ringing tone.
• Check the telephone line.
• Check the volume of the ringing tone.
• Check if the telephone number of the
caller is registered in the blacklist.
Telephone
Answering
Machine
Cannot activate
"OUT" mode.
• Check if memory is full.
• Delete messages.
• Print out documents.
49
Switch to reception
mode during
message recording.
• Make sure that silence during recording is
not prolonged more than the 6-sec. limit.
• The voice of the caller is too soft and
detected as no sound.
--
Voice messages
received without talking.
Caller hangs up the phone without talking.
Transmission stops.
Check if the telephone line cord is
disconnected.
--
Cannot transmit
overseas.
Check the telephone line cord.
• Try transmission by adding "-".
• Set "OVERSEAS COMM." to "ON".
--
Cannot print at
receiving end.
Check if the documents are placed
correctly for transmission.
--
Alarm is heard after
transmission.
• No recording paper at receiving end.
• Press [STOP] button.
--
Transmitting
--
MAINTENACE
AND
TROUBLESHOOTING
SYMPTOMS
87
Troubleshooting
SYMPTOMS
CAUSE/ACTION
• Check if the reception mode is set at
"MANUAL RCV".
• Check if recording paper is run out and
memory is full.
• Install recording paper.
• Delete messages.
• Print out documents.
--
A black square mark
appears on the top
right corner of the
recorded paper.
• It is printed for checking the print
quality.
• You can change to not print it by the
setting of #07 in the FAX SETTING.
84
Blank paper
Remove the tape on the Ink Cartridge
when you replace the Ink Cartridge with
a new one.
--
Recording paper
Cannot be printed.
Check if the paper is recommended for
use.
--
Printing
Faint
• Check if the paper is recommended for
use.
• Check if the Ink Cartridge is
recommended for use.
• Check if the documents are written
faintly.
• Check with the transceiver.
• Ensure documents are distinctly
written.
• Adjust "Scanning Contrast".
--
Delay in printing.
Trouble in faxing or telephone line is not
working.
--
The apparatus does
not operate at all.
• When you encounter malfunctioning,
please disconnect the power supply
plug and connect it once again.
• The operation should be normalised.
• However, should the malfunctioning
persist, please follow the procedure
below (it initialises the operation).
--
Receiving
Malfunction
No reception
with ringing.
OUT/
2WAY REC
START
Press the 3 buttons simultaneously.
88
Page
Troubleshooting
Information Codes
When something unusual occurs, the display may show one of the Information Codes below. These will help
you identify and correct the problem.
001/002
003/004
010
014
015
Meaning
• Remove jammed paper.
• Press [STOP] to clear the
alarm.
93
No recording paper or paper
misfed.
• Load the paper.
• Press [STOP] to clear the
alarm.
16
Ink Cartridge is not installed.
Install the Ink Cartridge.
Out of ink.
Replace the Ink Cartridge.
Ink Cartridge Cradle cannot move.
• Paper jam may have
occurred.
• Remove jammed paper.
• Ink Cartridge has not been
properly installed.
• Re-install Ink Cartridge.
060
300 316
13
15
93
• Reload the document
properly.
• Remove document jam.
35, 96
Document misfeeding.
Document is jammed.
Document length exceeds 1 meter.
• Reload the document
properly.
• Remove document jam.
• Make a copy to fit in
correct size.
34, 35,
96
Document length is too short.
Make a copy to fit in correct
size.
Panel Cover is open.
Close the Panel Cover.
Printer engine failure.
Contact your local Panasonic
Dealer for service.
Document misfeeding.
030
032
Page
Recording paper jam.
016
031
Action
34
MAINTENACE
AND
TROUBLESHOOTING
Info. Code
--
--
89
Troubleshooting
Info. Code
Meaning
400
During initial handshake, receiving
station did not respond or
communication error occurred.
• Check with the other party.
• Reload the document and
send again.
Remote station required a
Receiving Password to receive the
document.
Check the remote station.
401
During initial handshake,
communication error occurred.
Reload the document and
send again.
--
No confirmation from the receiving
station for the previous page sent.
Wait a few minutes and send
again.
--
Remote side confirmation of
previous page sent.
Wait a few minutes and send
again.
--
No data from the transmitting side.
Check with the other party.
416/417
418/419
Received data has too many
errors.
Check with the other party.
420/421
Apparatus goes to receiving mode,
but receives no command from the
transmitting side.
• Remote side misdial.
• Check with the other party.
During initial handshake, received
the disconnect command from the
transmitting side.
Check with the other party.
428
430/434
Communication error occurred
while receiving.
Check with the other party.
436/490
Received data has too many
errors.
Check with the other party.
Telephone line is disconnected.
Wait a few minutes and send
again.
Communication error occured
while receiving.
Check with the other aprty.
404/405
407
408/409
412
450
492/493
494
90
Action
Page
--
--
--
--
--
--
--
--
--
--
Troubleshooting
495
540/541
542
543/544
Meaning
Action
Telephone line disconnected.
Check with the other party.
Communication error occurred
while transmitting.
• Reload the document and
send again.
• Check with the other party.
Page
--
--
Telelphone line is disconnected.
Check with the other party.
Communication error occurred
while receiving.
Check with the other party.
No document was on the ADF.
Reload the document and
send again.
Redial was not successful due to a
busy line or no response from the
called station.
Reload the document and
send again.
Incorrect destination e-mail
address.
Check the registered e-mail
address.
--
Cannot logon to the designated
DNS Server, SMTP Server or POP
Server.
• Check the DNS Server IP
Address.
• Check the SMTP Server
Name.
• Check the POP Server
Name.
--
717
Incomplete SMTP protocol
transmission. SMTP Server’s hard
disk may be full.
• Check the SMTP Server
Name.
• SMTP Server is defective.
--
719
Received data via Internet is in a
format that is not supported.
Ask the originator to re-send
with supported file attachment
format: In a TIFF format.
--
720
Cannot connect to the POP Server.
POP server is down.
• Check the POP Server
Name.
• Contact with your ISP
company.
--
721
Cannot connect to the POP Server.
(User Name or Password error)
Check the POP User Name
and Password.
--
550
552/553
554
623
630/633
712
716
--
--
--
--
MAINTENACE
AND
TROUBLESHOOTING
Info. Code
91
Troubleshooting
Info. Code
Meaning
Action
Page
725
DNS Server connection timed out.
DNS Server is down.
Check the DNS Server IP
Address.
--
Received an error response from
the DNS Server.
• Check the POP Server
Name.
• Check the SMTP Server
Name.
• Check the DNS Server IP
Address.
--
• Check the ISP TEL No.
• Try to connect again.
• Connect with your ISP
company to compare
modem capability.
--
Poor quality of telephone line.
Try to connect again.
--
Certification error for connection.
• Check the connection,
User ID and Password.
• Check the ISP TEL No.
--
Connection error.
• Try to connect again.
• Change ISP
--
Memory overflow occurred while
storing documents into memory for
transmission or reception.
• Transmit documents
without storing into
memory.
• Print out received
document.
• Erase incoming message
after played back.
--
726
Connection error
770-772
782
780/781
784-787
795
796
870
At 12 p.m. every day, the roller will rotate to make smooth contact between the Roller and the Scanning
Glass. So, this is not an apparatus fault even if a rotating sound is heard.
If you wish to change the roller rotation time, follow the operation described below.
1
2
3
HELP
@.
12:00
TIME =
15:00
J KL
(See note 2)
START
(See note1)
NOTE
92
TIME =
(See note 1)
(See note2)
1. It is also possible to change the time in an Off-Hook state. In this case, reject tone "Pi Pi Pi"
will be heard when [HELP] is pressed.
2. It is not possible to set the minute setting.
Troubleshooting
Clearing Recording Paper Jam
If the recording paper becomes jammed in the apparatus, the ALARM lamp will light up and the alarm will
sound.
1
1. Open the Panel Cover.
1
2. Lift up the Cartridge Cover from the right corner.
2
3. Remove jammed paper.
!
3
CAUTION
While removing the jammed
paper, do take care not to touch
the cable that is attached to the
cartridge holder.
4. Close the Cartridge Cover.
5. Close the Panel Cover.
MAINTENACE
AND
TROUBLESHOOTING
2
93
Troubleshooting
Cleaning the Print Head
If the printed document has dots or lines missing, check the Ink Cartridge.
Q To clean the Print Head
1
2
R
PQ S
MNO
CLEAN CARTRIDGE?
FUNCTION/
EDIT
COPY/SET
* CLEANING *
The apparatus starts to clean the Print Head.
Cleaning the Ink Cartridge Contact
If the received document has dots or lines missing, check the Ink Cartridge.
Q To clean the Ink Cartridge.
1
1. Open the Panel Cover.
Ink Cartridge
Contact
2. Open the Cartridge Cover.
3. Remove the Ink Cartridge from the Ink Cartridge
Cradle. Clean the Ink Cartridge with a swab
moistened only with water.
DO NOT clean the "Nozzle" of the Ink Cartridge.
Nozzle
Ink Cartridge Cradle
4. Gently clean the contact on the Ink Cartridge Cradle
with a swab moistened only with water.
5. Re-install the Ink Cartridge and re-evaluate the print
quality.
94
Troubleshooting
Removing Dried Ink from the Nozzle of the Ink Cartridge
If the Ink Cartridge is exposed to air for an extended period of time, a layer of dried ink will form as crust on
the nozzle of the Ink Cartridge. If this occurs, follow the steps below to remove the dried ink from the nozzle
of the Ink Cartridge.
Business Card or
Rigid Paper
1. Hold the Ink Cartridge over a waste bag so that the nozzle
of the Ink Cartridge is pointed toward the waste bag.
2. Gently scrape the dried ink with the edge of a business
card or other rigid paper stock so that the dried ink falls into
the waste bag.
DO NOT use a swab to remove dried ink from the Ink
Cartridge.
Dried Ink
Cleaning the Ink Spillage Recess
To prevent spillage, always clean the Ink Spillage Recess of excess ink before moving the apparatus.
Q To clean the Ink Spillage Recess
Ink Spillage Recess
1. Open the Panel Cover.
2. Open the Cartridge Cover.
3. Remove the Ink Cartridge.
MAINTENACE
AND
TROUBLESHOOTING
4. Inspect the Ink Spillage Recess for excess ink. If
necessary, clean up the excess ink with a swab or a paper
towel.
(See note1)
NOTE
1. It is recommended to make a copy on the apparatus at least once a week to prevent ink from
drying on the nozzle of the Ink Cartridge.
95
Troubleshooting
Clearing a Document Jam
If the document gets jammed in the apparatus, the ALARM lamp will light up and the alarm will sound.
1
1. Open the Panel Cover.
2
3. Close the Panel Cover.
2. Remove jammed paper.
Adjusting the Automatic Document Feeder (ADF)
If document misfeeding occurs frequently, we suggest you adjust the ADF.
Q To adjust ADF
Open the ADF Door and slide the Pressure Adjusting Lever to
the desired position depending on the condition.
Position
96
Condition
1
To prevent feed trouble
2
Standard position
3
To prevent multiple feed trouble
Troubleshooting
Checking the Telephone Line
When you do not hear a dial tone through the telephone connected to the apparatus or when the telephone
does not ring (Not automatic reception).
2
Plug a different regular telephone into the same
telephone jack.
3
Check for dial tone through the handset. If there is still
no dial tone, report it to your local telephone company.
or
Call from another telephone to this number. If the
telephone does not ring, report it to your local telephone
company.
MAINTENACE
AND
TROUBLESHOOTING
1
Unplug the Telephone Line Cord from the telephone
jack that was supplied by the telephone company.
97
APPENDIX
Specifications
Compatibility
ITU-T Group 3
Scanning Method
CIS type image sensor
Document Size
Max.: 210 mm x 297 mm
Min.: 148 mm x 105 mm
Document Thickness
Single sheet
: 0.06 mm (45 g/m2) to 0.15 mm (112 g/m2)
Multiple sheets : 0.06 mm (45 g/m2) to 0.10 mm (80 g/m2)
ADF Capacity
(Automatic Document Feeder)
Built-in, up to 20 sheets
Effective Scanning Width
205 mm
Recording Method
Thermal Inkjet
Recording Paper
Plain paper
Recording Paper Size
A4
Printer Speed
Monochrome: 3.5 ppm (Based on ITU-T Image No.1)
Effective Recording Size
A4 : 203 mm x 274 mm
Print Margin
3 mm
A4 size
20 mm
A4 : 3.5 mm
3.5 mm
Horizontal : 8 pels/mm
Resolution (Conforms to ITU-T) Vertical : Standard
: 3.85 lines/mm
Fine
: 7.7 lines/mm
Super Fine : 15.4 lines/mm
(FAX)
Coding Scheme
MH, MR (Conforms to ITU-T)
Modem Type
ITU-T V.34, V.29, V.27 ter, V.21 and V.17
Modem Speed
33600, 31200, 28800, 26400, 24000, 21600, 19200, 16800, 14400,
12000, 9600, 7200, 4800, 2400 and 300 bps
(DATA)
98
Coding Scheme
None
Modem Type
ITU-T V.34, V.32bis, V.32, V.22bis, V.22
Modem Speed
33600, 31200, 28800, 26400, 24000, 21600, 19200, 16800, 14400,
12000, 9600, 7200, 4800, 2400, and 1200 bps
Error Correction
ITU-T V.42
Internet FAX Protocol
TCP/IP, PPP, SMTP, POP3
Abbreviated
Dialling Memory Capacity
10 stations
Each station can be registered with up to 36 digits for each telephone
number (including pauses and spaces) and up to 15 characters for each
station name.
Specifications
Image Memory Capacity
Approx. 60 pages or 15 min.
(Based on ITU-T Test Chart No.1 using Standard Resolution)
Power Supply
200 - 240 VAC, 50 - 60 Hz, Single Phase
Power Consumption
Standby
Transmission
Reception
Copy
Max.
Dimensions
386 mm (W) x 290 mm (D) x 211 mm (H) (excluding projections)
Weight
Approx. 4.3 kg (excluding recording paper)
Operating Environment
Tx: Temperature
Relative Humidity
Rx: Temperature
Relative Humidity
Atmospheric Pressure
2500 m
Cartridge Specification
940 pages (Mono, ECO Mode), 470 pages (Mono, Normal Mode)
340 pages (Colour, ECO Mode), 170 pages (Colour, Normal Mode)
: Approx. 1.4 W
: Approx. 13 W
: Approx. 8 W
: Approx. 13 W
: Approx. 30 W
: 5 to 35°C
: 15 to 70%
: 15 to 35°C
: 20 to 80%
99
APPENDIX
ITU-T Image No.1
Paper Specifications
In general, most plain bond papers will produce excellent results. Most photocopy papers will also work very
well. There are many "name" and "generic" brands of paper available. Before purchasing large quantity, we
recommend that you test various samples until you obtain the results you are looking for.
The following table summarizes the major specifications to consider when selecting white or coloured paper.
Paper Type
Plain Bond Paper/
Recycle Paper
Size
Letter, A4
Weight
64 to 90 g/m2
Paper Tray
Capacity
70 sheets
Note
Max. 100 sheets under condition
of 20 to 30°C, 50 to 60% RH, 70
to 75 g/m2
Coated Paper
Letter, A4
Transparency
Letter, A4
64 to 90 g/m2
--
70 sheets
Formulated for ink jet printing.
10 sheets
Thickness : 0.0039 to 0.0051 in.
(0.10 to 0.13 mm)
Formulated for ink jet printing
(See note1) (See note2)
NOTE
100
1. It is possible that the paper meets the specifications listed above and still does not print well
because of the variations in the manufacturing. Therefore, we recommend that you test
thoroughly before purchasing large quantity.
2. Poor quality paper may reduce print quality and cause paper jams and other problems. If you
encounter such problems, switch to a higher grade of paper.
ABBR. No.
(Abbreviated Number)
The ability to store full telephone numbers into the dialler and then utilise a
short series of keystrokes to speed-dial that number in the future.
ADF
(Automatic Document
Feeder)
The mechanism that delivers a stack of document pages to the scanner one
page at a time.
Automatic Reception
The mode that allows you to receive fax documents without user intervention.
BPS
(Bits Per Second)
The amount of data that is transmitted over the telephone line. Your
apparatus can start at 9600 BPS and automatically steps down to 7200, 4800,
2400 BPS depending on the telephone line condition and the receiving
apparatus capabilities.
Character ID
A programmed proprietary code name that allows up to 16 alphanumeric
characters identifying your facsimile apparatus.
Character buttons
The buttons that are used to enter letters and symbols for various
programming functions.
Coding Scheme
The data compression method used by facsimile apparatus. Your apparatus
utilises Modified Huffman (MH) coding schemes.
CONTRAST
Signifies the scanning sensitivity in terms of lightness and darkness of your
original transmitting pages.
COMM. JOURNAL
Refers to the Communication Journal.
Deferred Transmission
The ability to send documents to other stations/destinations at a later time.
Dial Keypad
Used for registering telephone numbers and entering characters for station
name. Used to activate ICMs (incoming message) functions.
Direct Dialling
The method of dialling where you enter the entire telephone number through
the keypad.
Domain Name
A unique name that identifies an Internet site. Domain Names always have 2
or more parts, separated by dots. The part on the left is the most specific, and
the part on the right is the most general.
DNS (Domain Name
Server)
The purpose of the DNS is to store records containing domain information,
such as Fully Qualified Domain Names (FQDN) and translate them to TCP/IP
addresses.
DTMF
(Dual Tone MultiFrequency)
Dialling method that sends a different set of frequencies for each digit of the
telephone keypad. Commonly refers to touch tone dialling.
E-mail Address
The address for sending and receiving data by e-mail. It consists of User
name, Sub-domain name and Domain name.
Fax Parameter List
The list that contains the home Fax Parameters setting that you have
programmed into your apparatus.
Fax/Tel Auto Switch
This feature allows you to use a single telephone line for both fax and voice so
that you can save the cost of installing a second telephone line. When the
apparatus answers an incoming call, it will automatically distinguish whether
the caller is a fax or voice. If it is a fax call, the apparatus will start receiving
the document automatically. If it is a voice call, the apparatus will ring through
the built-in speaker for your attention.
FUNCTION/EDIT
The control panel button that will be utilised to begin an operation or
configuration of a feature.
G3 Mode (Group 3)
Refers to the standards and transmission capabilities of the current
generation of facsimile apparatus.
101
APPENDIX
Glossary
Glossary
Halftone
A scanning technique to distinguish levels of grey from black and white. Your
apparatus can detect up to 64 levels of grey in halftone mode.
Header
A row of information that is transmitted by the sending apparatus and printed
on the top of each page by the receiving apparatus. This identifies the
transmitting apparatus and information about the transmission, such as time
and date.
Header Print
The header will appear at the top of each page received and show the
sender’s ID, date and time, and page number.
Help Function
When operation guidance is needed, detailed operating instructions can be
printed by pressing the [HELP] button.
ID
A programmable address of up to 20 digits identifying your apparatus.
ISP
(Internet Service Provider)
An institution that provides access to the Internet in some form, usually for
money.
IP Address
A unique number used to identify equipment or host computers on the
Internet.
Information Code
A code that is internally generated by your Fax, stating a specific operational
error, apparatus failure or telephone line failure.
ITU-T
International Telecommunication Union - Telecommunication. This
organisation has presently developed 4 groups of industry standards that
insure facsimile compatibility.
ITU-T Test Chart No.1
An industry standard document that allows comparisons of the transmission
speeds and capabilities of facsimile apparatus.
Journal
A report that is printed by your apparatus listing the last 32 transmitting and
receiving transactions.
LCD
Liquid Crystal Display. The display area of your apparatus.
Line Holding
You can hold the line by pressing the [HOLD] button on your control panel.
While the line is on hold, the other party will hear hold music. To resume
conversation, lift up the handset.
Manual Reception
A mode that requires operator intervention to receive an incoming document.
Modem
A device that converts signals from your fax apparatus into signals that can be
transmitted over telephone lines.
NAME
Your programmed company name or your name up to 25 alphanumeric
characters.
Off-hook dialling
The direct dialling of a telephone number with the handset out of the cradle or
"off the hook".
On-hook dialling
The direct dialling of a telephone number with the handset in the cradle or "on
the hook".
PSTN
Public Switched Telephone Network. Network of interconnected switching
equipment and transmission facilities.
POP (Post Office Protocol) POP refers to the way e-mail software such as Eudora gets e-mail from a mail
server. You must always have a POP account that you tell your e-mail
software to use to retrieve your mail.
PPP (Point to Point
Protocol)
102
This is the main protocol used for the dial-up communication to connect
personal computer with another personal computer through telephone
network.
Remote Reception
A function that allows you to activate your fax apparatus to receive from an
extension telephone. You may transfer an incoming call to your fax apparatus
from an extension telephone by pressing the [ ] button twice on a touch tone
telephone, or dial "99" on a rotary telephone.
Resolution
Relates to the number of dots scanned or printed per certain square. The
quality of the image increases as the number of dots per certain square
increases.
Super Fine Resolution
Super Fine Resolution which is twice as precise as Fine resolution will offer
the reproduction of document with high copy quality.
SMTP (Simple Mail
Transfer Protocol)
This is the main communication protocol used to send and receive e-mail on
the Internet.
TAM
A Telephone Answering Machine (TAM) which allows the caller to leave a
message.
TIFF Converter
The TIFF Converter converts the document into the format that allows the
Internet FAX to receive and print as a mail. The converter also allows the
document to be registered (called "TIFF file creation" function) as a file.
TIFF Image Viewer
An application software to view the contents of TIFF-F File. Some TIFF Image
Viewers may not display the data properly.
TIFF-F (Tagged Image File
Format)
An image file format for attachments of graphic data for smooth transmission
between different units. The coding method of this format supports the same
coding as Modified Huffman (MH) and multiple-page image data.
103
APPENDIX
Glossary
Index
A
R
Abbreviated Dialling .............................................32
Adjusting the Automatic Document Feeder
(ADF) ...................................................................96
Adjusting Volume .................................................17
Blacklist................................................................63
Remote Function ................................................. 58
Remote Function Table ....................................... 58
Remote Reception ............................................... 55
Removing Dried Ink from the Nozzle of
the Ink Cartridge .................................................. 95
Replacing the Ink Cartridge ................................. 15
RESOLUTION and HALFTONE .......................... 35
C
S
Character Table ...................................................20
Cleaning the Document Scanning Area...............86
Cleaning the Ink Spillage Recess ........................95
Cleaning the Ink Cartridge Contact......................94
Clearing a Document Jam ...................................96
Clearing Recording Paper Jam............................93
Communication Journal (COMM. JOURNAL)......85
CONTRAST .........................................................35
Control Panel .......................................................11
Setting Fax Parameters ....................................... 81
Setting the Date and Time ................................... 18
Setting Your ID Number ...................................... 21
Setting Your NAME ............................................. 19
Speed Dialling Numbers ...................................... 27
B
D
Deferred Transmission.........................................53
Digital Telephone Answering System ..................48
Distinctive Ring Detector (DRD) ..........................46
Document Misfeeding ..........................................96
E
Enlargement Copy ...............................................51
F
FAX Mode ............................................................44
Fax Parameter Table ...........................................82
FAX/TAM Mode ...................................................44
FAX/TEL Auto Switching Mode............................41
I
Information Codes................................................89
Installing the Ink Cartridge ...................................13
Installing/Replacing Recording Paper..................16
M
Making Copies .....................................................50
MANUAL RCV mode ...........................................40
Memo/2Way Recording .......................................56
Multi-station Transmission ...................................37
P
Printer Interface Cable .........................................12
Printing Help ..........................................................2
104
T
Telephone Line Cord ........................................... 12
To Playback ................................................... 23, 25
To Print a List ...................................................... 85
To Record ...................................................... 22, 24
Troubleshooting ................................................... 87
V
Voice Message Transfer...................................... 57
Matsushita Electric Industrial Co., Ltd.
Web Site : http://www.panasonic.co.jp/global/
©2001
Printed in Singapore
DZSD001253-2
T01012-2071