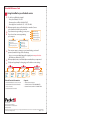
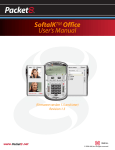
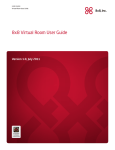
1
fold UIP1868P Router Configuration Guide In the menu bar down the left side of the screen, select WAN. The UIP1868P can function as your primary gateway/router or as a device client within an existing network configuration. In the top menu bar, select WAN Settings. This will open the WAN Configuration screen. (See Figure #7) If you currently have broadband access and a gateway/router installed at your location, you may add the UIP1868P as a device client to your network. (See “A” below.) If you currently have broadband internet access and do not have a router, you may install your UIP1868P as the primary router to your network. (See “B” below.) Select the radio button labeled SPECIFY FIXED WAN CONFIGURATION. A Installing the UIP1868P with an existing network configuration/router Figure #7 Enter the IP Address, Subnet Mask, and Gateway Address provided by your ISP. Computer Broadband modem Click SAVE WAN CONFIGURATION. Local router Internet When the utility displays a window telling you it must reboot the phone, make sure your broadband modem is connected to your phone's WAN port, then click OK. When the phone finishes rebooting, it will ask your broadband modem to assign an IP address. (See Figure #8) NOTE: For detailed installation with a Static IP address, please refer to the UIP1868P User Interface Guide – WAN Configuration section. UIP1868P Plug one end of the enclosed Ethernet cable into the WAN port on the back of the UIP1868P. Plug the other end of the Ethernet cable into your router/gateway which is connected to your broadband modem. The UIP1868P will automatically obtain an IP address from your existing router. Figure #8 You are now ready to activate your Packet8 account. (Please refer to the Uniden Quick Start Guide instructions for activating your Packet8 account.) B Installing the UIP1868P as your primary gateway/router Broadband modem You can download a copy of the UIP1868P User Interface Guide at http://www.packet8.net/support/faqs/ Computer UIP1868P Internet Local switch or router The UIP1868P supports the two most common broadband connection protocols: DHCP (most common connection type found with Cable Modem) and PPPoE (most DSL providers use this connection type). UPZZ76747EZ(0) 1 Setting up with DHCP The UIP1868P is configured for use with Dynamic Host Configuration Protocol (DHCP) by default. If your broadband connection uses DHCP, simply connect your broadband modem to the WAN port of the phone and then connect the phone’s power cord to an AC power outlet. f ) Under ENABLE PPPOE, click the drop-down arrow and select YES. g) Under Authentication, enter the USERNAME and PASSWORD that were provided by your ISP. Username and password are often case-sensitive, so be sure to enter upper and lower case letters correctly. h) Under Settings, select the radio button labeled KEEPALIVE. This configures the phone to maintain the PPPoE connection even when your computer is idle or turned off. i) When the utility displays a window telling you it must reboot the phone, make sure your broadband modem is connected to your phone's WAN port, then click OK. When the phone finishes rebooting, it will ask your broadband modem to assign an IP Figure #4 address. (See Figure #4) 2 Setting up with PPPoE If your broadband connection uses PPPoE, you will need to configure the UIP1868P built-in router by inputting the user name and password provided by your Internet Service Provider. Follow the steps below to configure the UIP1868P to use a PPPoE-based connection. a) Connect a computer with a web browser Figure #1 directly to the LAN port of your UIP1868P. b) Type http://192.168.15.1 (the default IP address of your UIP1868P) into the address bar of your web browser. Then press the Enter key. (See Figure #1) c) You should now see your Figure #2 UIP1868P’s System Information Screen. (See Figure #2) d) In the menu bar down the left side of the screen, select WAN. e) In the menu bar on the top of the screen, select PPPoE. This opens the WAN PPPoE Configuration screen. (See Figure #3) NOTE: For detailed installation with PPPoE, please refer to UIP1868P User Interface Guide – Setting up with PPPoE section. C Setting up with a Static IP Address If your broadband provider has given you a static IP address, you will need to enter that information in the UIP1868P. Follow the steps below to configure the UIP1868P for use with a Static IP address. Connect a computer with a web browser directly to the LAN port of your UIP1868P. Type http://192.168.15.1. (the default IP address of your UIP1868P) into the address bar of your web browser. Then press the Enter key. (See Figure #5) You should now see your UIP1868P’s System Information Screen. (See Figure #6) Figure #3 fold Figure #5 Figure #6 fold UIP1868P Router Configuration Guide In the menu bar down the left side of the screen, select WAN. The UIP1868P can function as your primary gateway/router or as a device client within an existing network configuration. In the top menu bar, select WAN Settings. This will open the WAN Configuration screen. (See Figure #7) If you currently have broadband access and a gateway/router installed at your location, you may add the UIP1868P as a device client to your network. (See “A” below.) If you currently have broadband internet access and do not have a router, you may install your UIP1868P as the primary router to your network. (See “B” below.) Select the radio button labeled SPECIFY FIXED WAN CONFIGURATION. A Installing the UIP1868P with an existing network configuration/router Figure #7 Enter the IP Address, Subnet Mask, and Gateway Address provided by your ISP. Computer Broadband modem Click SAVE WAN CONFIGURATION. Local router Internet When the utility displays a window telling you it must reboot the phone, make sure your broadband modem is connected to your phone's WAN port, then click OK. When the phone finishes rebooting, it will ask your broadband modem to assign an IP address. (See Figure #8) NOTE: For detailed installation with a Static IP address, please refer to the UIP1868P User Interface Guide – WAN Configuration section. UIP1868P Plug one end of the enclosed Ethernet cable into the WAN port on the back of the UIP1868P. Plug the other end of the Ethernet cable into your router/gateway which is connected to your broadband modem. The UIP1868P will automatically obtain an IP address from your existing router. Figure #8 You are now ready to activate your Packet8 account. (Please refer to the Uniden Quick Start Guide instructions for activating your Packet8 account.) B Installing the UIP1868P as your primary gateway/router Broadband modem You can download a copy of the UIP1868P User Interface Guide at http://www.packet8.net/support/faqs/ Computer UIP1868P Internet Local switch or router The UIP1868P supports the two most common broadband connection protocols: DHCP (most common connection type found with Cable Modem) and PPPoE (most DSL providers use this connection type). UPZZ76747EZ(0) 1 Setting up with DHCP The UIP1868P is configured for use with Dynamic Host Configuration Protocol (DHCP) by default. If your broadband connection uses DHCP, simply connect your broadband modem to the WAN port of the phone and then connect the phone’s power cord to an AC power outlet. f ) Under ENABLE PPPOE, click the drop-down arrow and select YES. g) Under Authentication, enter the USERNAME and PASSWORD that were provided by your ISP. Username and password are often case-sensitive, so be sure to enter upper and lower case letters correctly. h) Under Settings, select the radio button labeled KEEPALIVE. This configures the phone to maintain the PPPoE connection even when your computer is idle or turned off. i) When the utility displays a window telling you it must reboot the phone, make sure your broadband modem is connected to your phone's WAN port, then click OK. When the phone finishes rebooting, it will ask your broadband modem to assign an IP Figure #4 address. (See Figure #4) 2 Setting up with PPPoE If your broadband connection uses PPPoE, you will need to configure the UIP1868P built-in router by inputting the user name and password provided by your Internet Service Provider. Follow the steps below to configure the UIP1868P to use a PPPoE-based connection. a) Connect a computer with a web browser Figure #1 directly to the LAN port of your UIP1868P. b) Type http://192.168.15.1 (the default IP address of your UIP1868P) into the address bar of your web browser. Then press the Enter key. (See Figure #1) c) You should now see your Figure #2 UIP1868P’s System Information Screen. (See Figure #2) d) In the menu bar down the left side of the screen, select WAN. e) In the menu bar on the top of the screen, select PPPoE. This opens the WAN PPPoE Configuration screen. (See Figure #3) NOTE: For detailed installation with PPPoE, please refer to UIP1868P User Interface Guide – Setting up with PPPoE section. C Setting up with a Static IP Address If your broadband provider has given you a static IP address, you will need to enter that information in the UIP1868P. Follow the steps below to configure the UIP1868P for use with a Static IP address. Connect a computer with a web browser directly to the LAN port of your UIP1868P. Type http://192.168.15.1. (the default IP address of your UIP1868P) into the address bar of your web browser. Then press the Enter key. (See Figure #5) You should now see your UIP1868P’s System Information Screen. (See Figure #6) Figure #3 fold Figure #5 Figure #6 fold UIP1868P Router Configuration Guide In the menu bar down the left side of the screen, select WAN. The UIP1868P can function as your primary gateway/router or as a device client within an existing network configuration. In the top menu bar, select WAN Settings. This will open the WAN Configuration screen. (See Figure #7) If you currently have broadband access and a gateway/router installed at your location, you may add the UIP1868P as a device client to your network. (See “A” below.) If you currently have broadband internet access and do not have a router, you may install your UIP1868P as the primary router to your network. (See “B” below.) Select the radio button labeled SPECIFY FIXED WAN CONFIGURATION. A Installing the UIP1868P with an existing network configuration/router Figure #7 Enter the IP Address, Subnet Mask, and Gateway Address provided by your ISP. Computer Broadband modem Click SAVE WAN CONFIGURATION. Local router Internet When the utility displays a window telling you it must reboot the phone, make sure your broadband modem is connected to your phone's WAN port, then click OK. When the phone finishes rebooting, it will ask your broadband modem to assign an IP address. (See Figure #8) NOTE: For detailed installation with a Static IP address, please refer to the UIP1868P User Interface Guide – WAN Configuration section. UIP1868P Plug one end of the enclosed Ethernet cable into the WAN port on the back of the UIP1868P. Plug the other end of the Ethernet cable into your router/gateway which is connected to your broadband modem. The UIP1868P will automatically obtain an IP address from your existing router. Figure #8 You are now ready to activate your Packet8 account. (Please refer to the Uniden Quick Start Guide instructions for activating your Packet8 account.) B Installing the UIP1868P as your primary gateway/router Broadband modem You can download a copy of the UIP1868P User Interface Guide at http://www.packet8.net/support/faqs/ Computer UIP1868P Internet Local switch or router The UIP1868P supports the two most common broadband connection protocols: DHCP (most common connection type found with Cable Modem) and PPPoE (most DSL providers use this connection type). UPZZ76747EZ(0) 1 Setting up with DHCP The UIP1868P is configured for use with Dynamic Host Configuration Protocol (DHCP) by default. If your broadband connection uses DHCP, simply connect your broadband modem to the WAN port of the phone and then connect the phone’s power cord to an AC power outlet. f ) Under ENABLE PPPOE, click the drop-down arrow and select YES. g) Under Authentication, enter the USERNAME and PASSWORD that were provided by your ISP. Username and password are often case-sensitive, so be sure to enter upper and lower case letters correctly. h) Under Settings, select the radio button labeled KEEPALIVE. This configures the phone to maintain the PPPoE connection even when your computer is idle or turned off. i) When the utility displays a window telling you it must reboot the phone, make sure your broadband modem is connected to your phone's WAN port, then click OK. When the phone finishes rebooting, it will ask your broadband modem to assign an IP Figure #4 address. (See Figure #4) 2 Setting up with PPPoE If your broadband connection uses PPPoE, you will need to configure the UIP1868P built-in router by inputting the user name and password provided by your Internet Service Provider. Follow the steps below to configure the UIP1868P to use a PPPoE-based connection. a) Connect a computer with a web browser Figure #1 directly to the LAN port of your UIP1868P. b) Type http://192.168.15.1 (the default IP address of your UIP1868P) into the address bar of your web browser. Then press the Enter key. (See Figure #1) c) You should now see your Figure #2 UIP1868P’s System Information Screen. (See Figure #2) d) In the menu bar down the left side of the screen, select WAN. e) In the menu bar on the top of the screen, select PPPoE. This opens the WAN PPPoE Configuration screen. (See Figure #3) NOTE: For detailed installation with PPPoE, please refer to UIP1868P User Interface Guide – Setting up with PPPoE section. C Setting up with a Static IP Address If your broadband provider has given you a static IP address, you will need to enter that information in the UIP1868P. Follow the steps below to configure the UIP1868P for use with a Static IP address. Connect a computer with a web browser directly to the LAN port of your UIP1868P. Type http://192.168.15.1. (the default IP address of your UIP1868P) into the address bar of your web browser. Then press the Enter key. (See Figure #5) You should now see your UIP1868P’s System Information Screen. (See Figure #6) Figure #3 fold Figure #5 Figure #6 fold UIP1868P Router Configuration Guide In the menu bar down the left side of the screen, select WAN. The UIP1868P can function as your primary gateway/router or as a device client within an existing network configuration. In the top menu bar, select WAN Settings. This will open the WAN Configuration screen. (See Figure #7) If you currently have broadband access and a gateway/router installed at your location, you may add the UIP1868P as a device client to your network. (See “A” below.) If you currently have broadband internet access and do not have a router, you may install your UIP1868P as the primary router to your network. (See “B” below.) Select the radio button labeled SPECIFY FIXED WAN CONFIGURATION. A Installing the UIP1868P with an existing network configuration/router Figure #7 Enter the IP Address, Subnet Mask, and Gateway Address provided by your ISP. Computer Broadband modem Click SAVE WAN CONFIGURATION. Local router Internet When the utility displays a window telling you it must reboot the phone, make sure your broadband modem is connected to your phone's WAN port, then click OK. When the phone finishes rebooting, it will ask your broadband modem to assign an IP address. (See Figure #8) NOTE: For detailed installation with a Static IP address, please refer to the UIP1868P User Interface Guide – WAN Configuration section. UIP1868P Plug one end of the enclosed Ethernet cable into the WAN port on the back of the UIP1868P. Plug the other end of the Ethernet cable into your router/gateway which is connected to your broadband modem. The UIP1868P will automatically obtain an IP address from your existing router. Figure #8 You are now ready to activate your Packet8 account. (Please refer to the Uniden Quick Start Guide instructions for activating your Packet8 account.) B Installing the UIP1868P as your primary gateway/router Broadband modem You can download a copy of the UIP1868P User Interface Guide at http://www.packet8.net/support/faqs/ Computer UIP1868P Internet Local switch or router The UIP1868P supports the two most common broadband connection protocols: DHCP (most common connection type found with Cable Modem) and PPPoE (most DSL providers use this connection type). UPZZ76747EZ(0) 1 Setting up with DHCP The UIP1868P is configured for use with Dynamic Host Configuration Protocol (DHCP) by default. If your broadband connection uses DHCP, simply connect your broadband modem to the WAN port of the phone and then connect the phone’s power cord to an AC power outlet. f ) Under ENABLE PPPOE, click the drop-down arrow and select YES. g) Under Authentication, enter the USERNAME and PASSWORD that were provided by your ISP. Username and password are often case-sensitive, so be sure to enter upper and lower case letters correctly. h) Under Settings, select the radio button labeled KEEPALIVE. This configures the phone to maintain the PPPoE connection even when your computer is idle or turned off. i) When the utility displays a window telling you it must reboot the phone, make sure your broadband modem is connected to your phone's WAN port, then click OK. When the phone finishes rebooting, it will ask your broadband modem to assign an IP Figure #4 address. (See Figure #4) 2 Setting up with PPPoE If your broadband connection uses PPPoE, you will need to configure the UIP1868P built-in router by inputting the user name and password provided by your Internet Service Provider. Follow the steps below to configure the UIP1868P to use a PPPoE-based connection. a) Connect a computer with a web browser Figure #1 directly to the LAN port of your UIP1868P. b) Type http://192.168.15.1 (the default IP address of your UIP1868P) into the address bar of your web browser. Then press the Enter key. (See Figure #1) c) You should now see your Figure #2 UIP1868P’s System Information Screen. (See Figure #2) d) In the menu bar down the left side of the screen, select WAN. e) In the menu bar on the top of the screen, select PPPoE. This opens the WAN PPPoE Configuration screen. (See Figure #3) NOTE: For detailed installation with PPPoE, please refer to UIP1868P User Interface Guide – Setting up with PPPoE section. C Setting up with a Static IP Address If your broadband provider has given you a static IP address, you will need to enter that information in the UIP1868P. Follow the steps below to configure the UIP1868P for use with a Static IP address. Connect a computer with a web browser directly to the LAN port of your UIP1868P. Type http://192.168.15.1. (the default IP address of your UIP1868P) into the address bar of your web browser. Then press the Enter key. (See Figure #5) You should now see your UIP1868P’s System Information Screen. (See Figure #6) Figure #3 fold Figure #5 Figure #6 Packet8 Broadband Phone Service Reference Card Calling with Packet8 service— just like using your home or cell telephone To call anywhere in the world, dial: country code + area code + number. Example: the country code for the U.S. and Canada is “1.” Dial: 1+area code+number. Anyone can call you at your Packet8 phone number. Using the Features of your Packet8 service Advanced Call Features: these features are activated with the [Flash] key on your phone (or going on-hook for half second then going off-hook): • Caller ID: automatic when presented. • Call Waiting: a beep is heard when there is an incoming call. Answer the incoming call by pressing the [Flash] key. • Line-alternate/Hold: press the [Flash] key to put the current line on hold. • 3-way Conferencing: during a call, press [Flash], call third party, then press [Flash] to conference. Press [Flash] again to drop the last person added. • *69 Call Return: press *69 and stay on the line to automatically ring the last number that called your number. • *70 Call Waiting Disable: to disable call waiting on a per-call basis, enter *70 before dialing. You can disable call waiting and send new callers to voicemail, or present a busy tone if voicemail is disabled while you are on a phone call. • *77 Anonymous Call Rejection (ACR): a feature that rejects incoming calls from anonymous callers. It will automatically stop all incoming calls from callers who have their numbers blocked.To de-activate ACR, press *87. • *78 Do Not Disturb: automatically send your calls directly to your voice messaging box without ringing your phone.You will hear a stutter tone on your phone to indicate the feature is turned on.To de-activate, press *79. • Call Forwarding: you can forward your phone to ring somewhere else. Go to your account details page after signing in at www.packet8.net or call from your Packet8 phone: 012-0005. Communication for the Broadband Generation www.packet8.net VoiceMail Reference Card Using VoiceMail on your Packet8 service To check your Packet8 voicemail: • From your Packet8: 012-0555 • From any phone, toll-free:1.888.898.7887 • From any phone outside the U.S.: 1.650.353.4400 When prompted, enter your Packet8 phone number (1+area code+number) and then your password 1 Next message If you have a message waiting, you can press: 2 Replay message If you do not have a message waiting, 3 Delete message you can press: 1 Voicemail Preferences 8 Listen to Saved Message 1 Hear greeting 1 Next message 2 Delete and re-record greeting 2 Replay message # Put new greeting in service 3 Delete message 4 Save messages and listen to the next 4 Send message as email There are two ways to change your voicemail settings, voicemail password, number of rings, and call settings: • Access your account details page after signing in at www.packet8.net • Call from your Packet8: 012-0005 When prompted, enter your Packet8 phone number, then your password Telephone keypad map for changing your Packet8 account settings: 1 2 3 Voicemail Call Settings Personal Access Password 1 Voicemail Settings 1 On 2 Off 2 Ring Before Voicemail Answers 1 - 9 1 Call Forwarding 2 Int’l Calling 1 On 1 On 2 Off 2 Off 3 Caller ID 1 On 1 Enable Password 2 Re-enter Password 2 Off Packet8 Contact Information: Support: • Automated Activation Service: 012-0001 • Automated IP Address/Phone Number Service: 012-0003 • Packet8 Voicemail: 012-0555 • www.packet8.net/support • Customer Service,toll-free:1.888.898.8733 • Customer Service,outside U.S.:1.408.687.4120 3151 Jay Street Santa Clara, CA U.S.A. 95054 Tel: 408.727.1885 • Fax: 408.980.0432 www.packet8.net Packet8, the Packet8 logo, and the 8x8, Inc. logo are registered trademarks of 8x8, Inc. 8x8, Inc. is a Nasdaq listed company, symbol EGHT. © 2005. 8x8, Inc. All rights reserved. QRC4001 0205 www.packet8.net