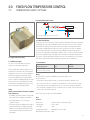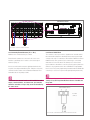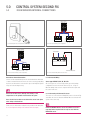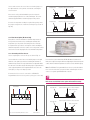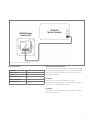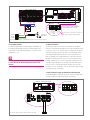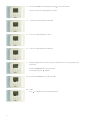
1
rehaU intelligent Ba heating/cooling controlS technical & inStallation manUal www.rehau.co.uk Building Solutions Automotive Industry REHAU Intelligent Floor heating/cooling CONTROLS Index 1.0 . . . . . . Principles of Underfloor Heating/Cooling. . . . . . . . . . . . . . . . . . . 5 1.1 . . . . . . Principle of UFH. . . . . . . . . . . . . . . . . . . . . . . . . . . . . . 5 1.2 . . . . . . Principle of UFC. . . . . . . . . . . . . . . . . . . . . . . . . . . . . . 6 1.3 . . . . . . Fixed Flow Water Temperature (FFT) System. . . . . . . . . . . . . . . . . . . 7 1.4 . . . . . . Zone Control. . . . . . . . . . . . . . . . . . . . . . . . . . . . . . . 8 1.5 . . . . . . Set Back Mode. . . . . . . . . . . . . . . . . . . . . . . . . . . . . . 8 2.0 . . . . . . Fixed Flow Temperature Control . . . . . . . . . . . . . . . . . . . . . . 9 2.1 . . . . . . Required Components for Fixed Flow Temperature Control . . . . . . . . . . . . . 9 2.2 . . 2.2.1 . 2.2.2 . 2.2.3 . 2.2.3a. 2.2.4 . 2.2.5 . 2.2.6 . 2.2.7 . 2.2.8 . . . . . . . . . . . . . . . . . . . . . . . . . . . . . . . . Fixed Temperature Mixing Options . . . Compact Mixer Unit . . . . . . . . . Working Principle . . . . . . . . . Installation. . . . . . . . . . . . . Before the System is Switched On . . . Thermostatic Mixing Valve (TMV) . . . Working Principle. . . . . . . . . . Installation. . . . . . . . . . . . . Required Components for Zone Control . Wiring . . . . . . . . . . . . . . . . . . . . . . . . . . . . . . . . . . . . . . . . . . . . . . . . . . . . . . . . . . . . . . . . . . . . . . . . . . . . . . . . . . . . . . . . . . . . . . . . . . . . . . . . . . . . . . . . . . . . . . . . . . . . . . . . . . . . . . . . . . . . . . . . . . . . . . . . . . . . . . . . . . . . . . . . . . . . . . . . . . . . . . . . . . . . . . . . . . . . . . . . . . . .10 .10 .10 .11 .12 .12 .12 .13 .15 .16 2.3 . 2.3.1 2.3.2 2.3.3 2.3.4 . . . . . . . . . . . . . . . . Temperature Safety Options. . High Limit Sensor (HLS) . . . Working Principle. . . . . . Dew Point Control. . . . . . Installation. . . . . . . . . . . . . . . . . . . . . . . . . . . . . . . . . . . . . . . . . . . . . . . . . . . . . . . . . . . . . . . . . . . . . . . . . . . . . . . . . . . . . . . . . . . . . . . . . . . . . . . .19 .19 .19 .19 .19 . . . . . . . . . . . . . . . . . . . . . . . . . 2.4 . . . . . . 2-Port Zone Valve (ZV) . . . . . . . . . . . . . . . . . . . . . . . . . . .20 2.4.1 . . . . . Working Principle. . . . . . . . . . . . . . . . . . . . . . . . . . . . .20 2.4.2 . . . . . Installation. . . . . . . . . . . . . . . . . . . . . . . . . . . . . . . .21 3.0 . . . . . . REHAU Intelligent Heating/Cooling Control Systems . . . . . . . . . . . . . .22 3.1 . 3.1.1 3.1.2 3.1.3 . . . . . . . . . . . . . . . . . Components Overview. . . . . . . . . . . . . Components Overview Heating. . . . . . . . . . Components Overview Heating/Cooling . . . . . . Components Overview Wireless Sensors/Controllers . . . . . . . . . . . . . . . . . . . . . . . . . . . . . . . . . . . . . . . . . . . . . . . . . . . . . . . . .22 .22 .24 .24 3.2 . . . . . . Working Principle. . . . . . . . . . . . . . . . . . . . . . . . . . . . .26 3.3 . . . . . . Required Components for Zone Control . . . . . . . . . . . . . . . . . . . .27 1 REHAU Intelligent Floor heating/cooling CONTROLS Index 4.0 . . . . . . Control System First Fix. . . . . . . . . . . . . . . . . . . . . . . . . .28 4.1 . . . . . . Components Overview. . . . . . . . . . . . . . . . . . . . . . . . . . .28 4.2 . 4.2.1 4.2.2 4.2.3 . . . . . . . . . . . . . . . . . Positioning the BA Master Controller Room Sensors and Remote Air/Floor Sensors. . Location of Room, Humidity Sensor and Air Sensor . . . . . . . . . . . . . . Positioning the Remote Air Sensor . . . . . . . . . . . . . . . . . . . . Positioning the Floor Sensor. . . . . . . . . . . . . . . . . . . . . . . . . . . . . . .29 .29 .29 .29 5.0 . . . . . . Control System Second Fix . . . . . . . . . . . . . . . . . . . . . . . .30 5.1 . . . . . . REHAU BA Central Control Units . . . . . . . . . . . . . . . . . . . . . . .30 5.2 . 5.2.1 5.2.2 5.2.3 5.2.4 5.2.5 5.2.6 . . . . . . . . . . . . . . . . . . . . . . . . . . . . . Electrical Connection. . . . . . . . . . . . Boiler Connection. . . . . . . . . . . . . Pump Outputs - UFH Pump . . . . . . . . . Connecting REHAU Add On, Extension Modules . Connecting Room Sensors . . . . . . . . . Connecting Thermal Actuators (TH 1 – TH 8) . . External Switch/Timer . . . . . . . . . . . . . . . . . . . . . . . . . . . . . . . . . . . . . . . . . . . . . . . . . . . . . . . . . . . . . . . . . . . . . . . . . . . . . . . . . . . . . . . . . . . . . . . . . . . . . . . . . . . . . . . . . . . . . . . . . . .31 .31 .32 .33 .34 .35 .35 5.3 . . 5.3.1 . 5.3.1a. 5.3.2 . 5.3.3 . . . . . . . . . . . . . . . . . Room Sensors Internal Connections.. . Connect the Wiring . . . . . . . . Connect the Remote Air Sensor . . . Floor Sensor Option (TD Sensor Only) . Connecting the Floor Sensor. . . . . . . . . . . . . . . . . . . . . . . . . . . . . . . . . . . . . . . . . . . . . . . . . . . . . . . . . . . . . . . . . . . . . . . . . . . . . . . . . . . . .36 .36 .36 .37 .37 . . . . . . . . . . . . . . . . . . . . 6.0 . . . . . . Wireless Sensors/Controllers Set Up . . . . . . . . . . . . . . . . . . . .38 6.1 . . . . . . Radio Frequency (RF) . . . . . . . . . . . . . . . . . . . . . . . . . . .38 6.1.1. . . . . . Set Up . . . . . . . . . . . . . . . . . . . . . . . . . . . . . . . . .38 6.1.2. . . . . . Technical Data . . . . . . . . . . . . . . . . . . . . . . . . . . . . . .39 7.0 . . . . . . Setting Up BA Master Controller (Cooling) . . . . . . . . . . . . . . . . . .40 7.1 . . . . . . Offset to Day Temperature . . . . . . . . . . . . . . . . . . . . . . . . .40 7.2 . . . . . . Night Setback Temperature (NSB). . . . . . . . . . . . . . . . . . . . . . .40 7.3 . . . . . . BMS Used for Heating/Cooling Change Over Decision. . . . . . . . . . . . . . .40 7.4 . . . . . . Exceeded Dew Point. . . . . . . . . . . . . . . . . . . . . . . . . . . .40 7.5 . . . . . . Using Dehumidifier . . . . . . . . . . . . . . . . . . . . . . . . . . . .41 7.6 . . . . . . Dew Point Control. . . . . . . . . . . . . . . . . . . . . . . . . . . . .41 7.7 . . . . . . Volt Free Output Signal for Chiller/Reversible Heatpump . . . . . . . . . . . . . .41 8.0 . . . . . . System Start Up and Operating Instructions . . . . . . . . . . . . . . . . .42 8.1 . . . . . . Setting the Sensor Channel Number. . . . . . . . . . . . . . . . . . . . . .42 8.2 . . . . . . REHAU BA Master Controller. . . . . . . . . . . . . . . . . . . . . . . . .43 2 9.0 . . . . . . Commissioning . . . . . . . . . . . . . . . . . . . . . . . . . . . .44 9.1 . . . . . . Pre-commissioning Requirements . . . . . . . . . . . . . . . . . . . . . .44 9.2 . . . . . . The Commissioning Team. . . . . . . . . . . . . . . . . . . . . . . . . .44 10.0. . . . . . CT Set Up Guide. . . . . . . . . . . . . . . . . . . . . . . . . . . . .45 10.1. . . . . . Programmable Room Sensor, Domestic Hot Water, Radiator and Two Stage Controller . .45 11.0. . . . . . Domestic Hot Water (DHW), Radiators and Two Stage Controller. . . . . . . . .54 11.1. . . . . . Domestic Hot Water . . . . . . . . . . . . . . . . . . . . . . . . . . . .54 11.2. . . . . . Radiators . . . . . . . . . . . . . . . . . . . . . . . . . . . . . . . .55 11.3. . . . . . Two Stage Room Temperature Controller. . . . . . . . . . . . . . . . . . . .56 12.0. . . . . . Special Functions . . . . . . . . . . . . . . . . . . . . . . . . . . . .57 12.1. . . . . . Network Multiple Controllers. . . . . . . . . . . . . . . . . . . . . . . . .57 12.2. . . . . . Dip Switches. . . . . . . . . . . . . . . . . . . . . . . . . . . . . . .58 12.3. . . . . . Holiday Override Function. . . . . . . . . . . . . . . . . . . . . . . . . .59 12.4. . . . . . Checking Control System Operation. . . . . . . . . . . . . . . . . . . . . .60 13.0. . . . . . Troubleshooting and Error/Fault Messages. . . . . . . . . . . . . . . . . .61 13.1. . . . . . Troubleshooting. . . . . . . . . . . . . . . . . . . . . . . . . . . . . .61 13.2. . . . . . Error/Fault Messages . . . . . . . . . . . . . . . . . . . . . . . . . . .61 13.3. . . . . . Voltage Measurements. . . . . . . . . . . . . . . . . . . . . . . . . . .61 14.0. . . . . . Resets. . . . . . . . . . . . . . . . . . . . . . . . . . . . . . . . .65 14.1. . . . . . Replacing Faulty Sensor/Controller. . . . . . . . . . . . . . . . . . . . . . .65 15.0. . . . . . Sensor Failure/Actuator and Pump Exercise . . . . . . . . . . . . . . . . .66 15.1. . . . . . Sensors/Controller Failure. . . . . . . . . . . . . . . . . . . . . . . . . .66 15.2. . . . . . Actuator and Pump Exercise. . . . . . . . . . . . . . . . . . . . . . . . .66 16.0. . . . . . Wiring Schematic - Next Generation . . . . . . . . . . . . . . . . . . . .67 3 REHAU Intelligent Floor heating/cooling CONTROLS Index If a floor heating system is added to an existing heating or hot water system, containing mild steel pipes, a strainer must be fitted straight after the branch off. All REHAU control systems must be installed. - By a competent person - In accordance with the latest issue of instructions supplied with each component - According to the current IEE wiring regulations laid out in BS 7671 and National Valid regulations and in compliance with the ordinances stipulated by local power authorities. Diagram/DWG Legend AC AV BPV BV CP CS CT2 OS CYL DHWS EV FM HLS IV LSV Actuator Air Vent Bypass Valve Balancing Valve Circulating Pump Cylinder Sensor Programmable Room Sensor Outside Sensor Cylinder Domestic Hot Water System Expansion Vessel Flow Meter High Temperature Limit Stat Isolating Valve Radiator Lock Shield Valve VT Variable Temperature MOV Motor Operated Mixing Valve RS Room Sensor BC Boiler Controls SP System Pump TA Standard Sensor TDRoom Sensor with identical features of TM, along with floor sensor TIV Thermostatic Inlet Valve TMRoom Sensor with four modes Auto, Day, Night and Frost protection TMV Thermostatic Mixing Valve TP Tamper Resistant Sensor TRV Thermostatic Radiator Valve ZV 2-port Zone Valve REHAU Intelligent Controls Technical Data Power Supply 230V AC +10/-15%, 50 HZ Max load pumps and Thermal actuators 4A + 35VA Boiler relay Volt free signal. Max 4A Main pump (Volt free relay) Volt free signal. Max 4A Secondary pump 230V AC, 50Hz Max. 4A Thermal actuators Max. 10VA on each output Max. 35VA in total Max. 10VA per output. Max. 35VA in total 4 Optional External Switch (Timer) for night setback Open terminals for night set back and closed terminals for day operation Room sensor Bus 2 wire low voltage 5v Application sensor and Limit sensor NTC type ETF-1899A for water temperature Control signal for mixing valve actuator 0-10V DC Power supply for mixing valve actuator 24V AC. Max 6VA 1.0 Principles of Underfloor Heating/Cooling 1.1 Principle of UFH Thermal Comfort REHAU underfloor heating system operates on the basis of low surface temperatures and even temperature distribution across the whole floor with comfortable radiant energy. In contrast to other heating systems the radiative equilibrium between occupants and the surfaces in a room is established and an optimum level of comfort is achieved. Environmentally friendly Due to the high heat output, even at low flow temperatures, the REHAU sub-surface heating systems are ideal for use in combination with gas condensing boilers, ground source heat pumps or thermal solar power systems. Energy-saving Due to the REHAU underfloor heating systems’ high proportion of radiant energy, comfort conditions can be achieved with lower room temperatures typically 1ºC to 2ºC. This facilitates a typical annual energy savings of 6% to 12%. Good for allergy sufferers Through the REHAU underfloor heating systems’ low proportion of convective energy only a minimal thermal vortex is formed. Dust circulation and the carbonising of dust are thus a thing of the past. This protects the airways - not just those of allergy sufferers. Visually attractive rooms without radiators The REHAU underfloor heating / cooling systems - Allow the user to be free with their interior design -G ives the architect the planning freedom - Totally eliminates risk of injury and burning from surface mounted heat emitters. Hence totally suitable for nurseries, schools, hospitals, clinics etc. 42, - L ower maintenance costs. Operative Temperature according to CIBSE* Winter Summer In living spaces and lounges 22-23ºC 23-25ºC In bathrooms 20-22ºC 23-25ºC * CIBSE Guide A, Environmental Design Red - warm uncomfortable Yellow - still comfortable Orange - comfortable Blue - cold uncomfortable 4& Room air temperatures according to BS EN 12831 - In living spaces and lounges: 20ºC 1. Thermal comfort, dependent on the room air temperature TRL and the temperature of the surfaces enclosing the room TF Surface temperatures Maximum permissible floor surface temperatures are to be observed for the surface as a surface in direct contact with people for medical and physiological reasons: - Occupied zone 29ºC Exemplary temperature profiles in heated rooms - In bathrooms: 24ºC. - Peripheral zone 35ºC (generally situated along in the floor near large glazed areas). # 2. Radiator heating # 4. Sub-surface heating # 3. Ideal heat distribution 5 1.0 Principles of Underfloor Heating/Cooling 1.2 Principle of UFC Advantages of a Underfloor Cooling System - High level of comfort - Preserves resources Classic air conditioning systems Traditional air conditioning systems overcome the cooling loads that occur by changing the air, with the following negative effects: -D raughts - Unrestricted interior design. -H igh room air speeds - Draughts do not occur - Low investment costs - Low annual costs Thermal comfort The thermal comfort for one person in a room is determined by: - The person’s activity - The person’s clothes - Air temperature - Air speed - Air humidity - Surface temperatures. The heat output of the human body occurs via main three mechanisms: - Radiation - Evaporation - Convection. The human body experiences the greatest level of well being if it can regulate at least 50% of its heat output through radiation. With the REHAU underfloor cooling system the energy exchange between people and cooling surface occurs across large areas and predominantly through radiation and thus provides the optimum conditions for a comfortable room atmosphere. - Cold supply air temperatures - High sound level. Radiation Min 50% Evaporation <30% 32ºC Convection <10% 20ºC 20ºC Heat distribution <2-5% 3. The human being’s heat balance This can often result in uncomfortable air conditions for the user, also referred to as sick building syndrome. Economic disadvantages of traditional air conditioning units: -H igh investment costs -H igh annual running costs. Cooling capacity The standard cooling capacity of the REHAU underfloor cooling system is 50W/m2 in accordance with DIN 4715-1. The performance estimation was carried out with: - RAUFIX system 0.5m/s 4%-0 4. Air temperatures and air speeds with pipe underfloor cooling Influencing factors on the cooling capacity The sub-surface cooling system’s maximum achievable output is dependent upon: - floor covering - pipe spacing - Distance between pipes 10cm - pipe dimensions - RAUTHERM S 16 x 1.5mm - floor construction - Coolant temperature 10K - heat gains - Temperature spread 2K. - system Under practical conditions, with - surface temperature of 19-20ºC However, each of the factors affects the cooling capacity to a different degree. - room temperature of 26ºC values of 35-40 W/m2 can be obtained. The floor covering and pipe spacing have a substantial impact on the output of the cooling system. It is recommended that only stone, tile or slate type floor or other low resistivity floor coverings are used to maximise the cooling output 6 1.0 Principles of CONTROLLING FLOOR HEATING SYSTEMS (FH) 1.3 Fixed Flow water temperature (FFT) System A conventional boiler system including radiators and domestic hot water (DHWS) provides water with a flow temperature in the region of 80ºC. Water is pumped by a Main (system) pump to the hot water cylinder and to the radiators, where it loses temperature and on the return, the water temperature normally stays at around 69ºC. Current standards and regulations for floor heating state that the surface temperature of a floor must not exceed 29ºC (in perimeter zones and bathrooms 35ºC). In a traditional underfloor circuit the flow and return water is mixed via a mixing valve to achieve a flow temp of between 32ºC-55ºC. This is achieved by mixing the boiler flow with cooler water from the return of the floor heating circuits. Once flow set point is achieved the mixing valve closes to the boiler to stop excess temperature rise. A constant temperature system regulates the amount of warm water being added from the main system boiler to the water circulating within the circuits, to maintain the flow temperature in the circuits at a pre-set level. This constant temperature is mechanically pre-set at a thermostatic mixing valve (TMV). Commonly there are two main systems in use: -Fixed Flow Temperature (FFT) system For larger commercial applications, a traditional system using a 3-Port thermostatic mixing valve is recommended. It is not possible to influence the mixed water temperature remotely by a building management system (BMS). For domestic and smaller commercial applications requiring a constant temperature system, REHAU offers a small and compact mixing unit called the compact mixer unit. It is supplied pre-assembled and is ideal for installations where space is limited. -Variable Flow Temperature (VFT) system (also known as weather compensated system). 7 1.0 Principles of CONTROLLING FLOOR HEATING SYSTEMS (FH) 1.4 ZONE CONTROL Master Controller ZV IV IV UFH - Flow TMV HLS CP IV AC AC AC AC UFH - Manifold UFH - Return RT RT RT RT 5. Individual zone control with FH The REHAU INTELLIGENT zone control system is a simple electronic control system that has been specifically designed to give optimum and accurate control of Floor Heating systems. Heating/Cooling circuits are connected to a central manifold. Each circuit will have a thermoelectric actuator (AC) on the manifold operating the return valve for the circuit. In heating mode: The heat output in each room is controlled by a room sensor (RS), which continuously compares the required room temperature with the actual room temperature. If the room temperature is too low/high, it will signal the actuator (AC) to open the return valve of the circuit and allow warm/ cold water to flow through it. (As shown in Fig. 5). Zone controls give control over local/room temperature by adjusting the amount of water circulating within individual circuits/ zones. Adjustments are made dependent upon: - Continuous temperature readings from each room sensor (RS) - The end user settings such as room temperature set point and programmed night set-back periods on the timer 8 In cooling mode: The cooling output in each room is controlled by a room sensor (RS), which continuously compares the required room temperature with the actual room temperature. If the room temperature is too high, it will signal the actuator (AC) to open the return valve of the circuit and allow cool water to flow through it. 1.5 Set Back Mode A floor heating system switches into set-back mode instead of switching off completely. This means when you leave the house or at night, the system allows the internal temperature to drop to a lower level. Depending on the installed system components, this reduced temperature level can be set for each room individually or for a group of rooms. The pre-set temperature for this mode should be carefully selected, because if the temperature is set too low the system will require a large initial input of energy coupled with a long response time to raise the temperature again. The set back mode enables the system to respond quickly and efficiently when heat is required. It can also make it possible to use a smaller boiler compared to a conventional heating system. 2.0 Fixed FLOW temperature control 2.1 required components for fixed FLOW temperature control Authorised Specialists Installation, commissioning, maintenance and repairs of all electrical control components shall only be carried out by trained, competent and qualified specialists in accordance with the national, valid regulations (Health & Safety, Wiring Regulations, etc) and in compliance with the ordinances stipulated by the local power authorities. This table should help you in identifying which components you need dependent on your choice of flow temperature control. More details on each control option and how they are installed and electrically wired are given in the subsequent sections. Sources of Danger Before opening any component always ensure the system is switched OFF at the main heating system isolation switch. To clean the components use a dry towel only. Never clean the unit with water or other solvents (e.g. spirit, acetone). Never touch any live component with wet hands. Designated Application All equipment explained in the following sections is intended for mixing flow and return water to a suitable mixed water temperature for use with wet floor heating. Modifications or changes to this equipment are only permitted with the manufacturer’s approval. The manufacturer does not accept liability for damages arising from misusing the equipment. Constant Temperature Component REHAU Art. No. Compact Mixer Unit Thermostatic Mixing Valve Configuration Compact Mixer Unit 237092 1x No ½" Balancing Valve (BV) + ½" TIV (for outputs up to 12kW) 237102 1x¹ No ¾" Balancing Valve (BV) + ¾" TIV (for outputs up to 18kW) 245130 1x¹ No Bypass Valve Not supplied 1x 1x Male iron to copper adapters Not supplied No No Circulating Pump with 2x isolating valves Not supplied No 1x Manifold Isolating Valves Incl. with Manifold Not used 2x High Temperature Limit Stat 225125 Included 1x 2-Port Zone Valve (22mm) for outputs up to 12kW 230426 1x² 1x² 2-Port Zone Valve (28mm) for outputs 12kW to 18kW 230427 1x² 1x² 1) Only one balancing valves required, size depending on output 2) Only one zone valve required, size depending on output 9 2.0 fixed FLOW temperature control 2.2 Fixed temperature mixing options 2.2.1 Compact Mixer Unit -Only for domestic/light commercial applications -For outputs up to 12kW use 1/2" valve set (not to be used to size primary pipes) -For outputs between 12 - 18kW use 3/4" valve set (not to be used to size primary pipes) -The circulating pump only circulates the warm water through the circuits. A separate main system pump is needed to supply the manifolds with hot water from the boiler. 6. Compact Mixer Unit Temperature Guage UFH Manifold (not included in compact mixer) High Temperature Limit Stat HLS Inline HLS Temperature Probe Air Vent Balancing Valve BV ca.39 L (see table below) 160 “or æ” System Return 16 Compact Mixer Connector Block UFH Flow Header UFH Pump 210 ±2 2.2.2 Working Principle The compact mixer regulates the main system flow from the boiler directly into the manifold. It mixes the high temperature water from the main system flow (usually required temperature + 70°C), with the cooler water from the FH return of the circuits to ensure the right temperature. The thermostatic inlet valve (TIV) allows small amounts from the main system flow to enter the return header, where it mixes with the return water from the circuits. The circulating pump (CP) maintains an uninterrupted flow of water from the return header up into the flow header and back into the floor circuits as long as there is a demand signal present from any of the room sensors. Additional space of 160mm required to access inline temperature probe for thermostatic inlet valve System Flow UFH Return Header “or æ” 80 Thermostatic Inlet Valve TIV Inline Temperature Probe of TIV 41 Tee Connector with Drain Valve 55 ca.65 ca.105 Manifold Ports Approximate Length L in mm 10 4 5 6 7 8 9 10 11 12 437 492 547 602 657 712 767 822 877 932 987 7. Compact Mixer Unit fitted to the right side of the manifold with FH flow header on top, FH return header on bottom High Temperature Limit Stat HLS Temperature Guage UFH Manifold (not included in compact mixer) Inline HLS Temperature Probe Air Vent Balancing Valve BV L (see table below) 160 ca 39 16 Compact Mixer Connector Block System Return UFH Flow Header UFH Pump Additional space of 160mm required to access inline temperature probe for thermostatic inlet valve ca 65 ca. 105 System Flow UFH Return Header Inline Temperature Prove of TIV 41 The unit also features a high temperature limit stat (HLS) which is explained later in the section on Temperature Safety Options. 3 210 ±2 The temperature of this mixed flow is measured by the in-line temperature probe, which feeds back to the thermostatic head on the (TIV). The thermostatic head of the thermostatic inlet valve (TIV) is set to achieve the required design flow temperature. Once the required design flow temperature is detected by the in-line temperature probe it closes the thermostatic inlet valve (TIV), No further main system flow is allowed into the return header, until the measured temperature falls below the design flow temperature. 2 55 Tee Connector with Drain Valve Manifold Ports Approximate Length L in mm 2 3 4 5 6 7 “or æ” 80 8 9 10 Thermostatic Inlet Valve TIV 11 12 437 492 547 602 657 712 767 822 877 932 987 8. Compact Mixer Unit fitted to the left side of the manifold with FH flow header on top, FH return header on bottom CT2/HW Junction Box CMU HWS CT2/R CT2/HW SV ZV HLS AV BPV SV PV CS RS TMV LSV TRV BA Controller CT2/R Compact Mixer Unit Hot Water Supply Radiator Controller Domestic Hot Water Controller Safety Valve Zone Valve High temperature Limit Thermostat Air Vent By pass Valve Safety Valve Pressure Vessel Cylinder Sensor Room Sensor Thermostatic Mixing Valve Lock Shield Valve Thermostatic Radiator Valve HWS Hot Water Sensor Hot Water Cylinder AV Radiator TRV LSV RS Manifold Flow Header HLS CMU ZV Manifold Return Header ZV PV SV CP Boiler BPV 9. Hydraulic layout of REHAU Compact Mixer Unit with ‘S’ plan Integration 2.2.3 Installation Required Components Qty Supplied by REHAU REHAU Compact Mixer Unit 1x Yes REHAU Valve Set 1x Yes Fitting -The compact mixer comes pre-assembled, ready to fit onto the right hand side of the REHAU manifold. It can be integrated into an existing radiator system via an 'S' plan type control system. (As shown in Fig. 9) Due to the inability of a 3-Port mid position valve to isolate both system ports i.e. DHW & Radiators, it is recommended that this type of valve is not used with the Floor Heating system. - If a module needs to be mounted onto the left side of the manifold: -the pump inlet / outlet connections must be loosened first - rotate the pump 180ºC - connections tightened again -temperature gauge and opposite blanking plug unscrewed -gauge and plug swapped over and screwed into tee adapter. -The compact mixer is screwed onto the manifold flow/return headers. Care should be taken that all connections are securely tightened -Balancing valve (BV) and thermostatic inlet valve (TIV) are screwed onto the opposite ends of the manifold headers. (Balancing valve (BV) to the FH flow header and thermostatic inlet valve (TIV) to the FH return header) -The probe of the thermostatic inlet valve (TIV) should be carefully inserted into the sleeve in the tee-connector underneath the circulating pump (CP) (return header). The thermostatic inlet valve (TIV) must be fitted onto the system flow pipework from the boiler, not onto the return pipework to the boiler. 11 2.0 fixed FLOW temperature control 2.2 Fixed temperature mixing options 2.2.3a Before the system is switched on, the following settings have to be carried out: -Balancing valve (BV) set to fully open as per recommendations on the instruction leaflet supplied with the compact mixer - Thermostatic inlet valve (TIV) set to design flow temperature 2.2.4 Thermostatic Mixing Valve (TMV) -Suitable for all applications, below 30Kw. Above this weather compensation is recommended - Use the correct size of mixing valve (according to required heat output: 15kW / 20kW or 30kW) - High limit stat (HLS) set 15ºC above design flow temperature (function explained in the section 2.2.1 Temperature Safety Options) -The compact mixer must be in position on the manifold before the electrical connections can be made -The circulating pump only circulates the warm water through the circuits. A separate main system pump is needed to supply the mixing valve with hot water from the boiler. - The pump live (brown) connects to the ‘L’ terminal of the secondary pump connection inside the control centre 2.2.5 Working Principle The boiler temperature main system flow enters the thermostatic mixing valve at 70ºC+ and is mixed with the cooler return water from the circuits as required. - The neutral wire (blue) connects to the ‘N’ terminal of the secondary pump connection inside the control centre - The earth wire (green & yellow) connects to the ‘E’ terminal next to the boiler connection inside the control centre. (See Fig. 12, see page 16). If the system is wired correctly, the pump should only run if there is a demand signal, i.e. a room sensor (RS) activates an actuator (AC). Circulating Pump Make Grundfoss 25-60 130 (May Vary) Overall dimensions 140mm x 95mm x 130mm (H x W x L)* Voltage 230v High Temperature Limit Sensor Make Oreg TT 90 Overall dimensions 90mm x 40mm x 60mm (H x W x L)* Temperature range +20°C to +90°C Wiring 1.6m, 3 core flex (0.75mm²) Balancing Valve Type Up-and-over ½" or ¾" Female-male Overall dimensions 60mm x 40mm (H x L)* Material Brass MS 63 (Body) Thermostatic Inlet Valve Material Brass MS 63 (Body) Temperature range +20°C to +50°C (different range on request) System pressure 10 bar Differential pressure 1 bar (for system differential pressures greater than this, install pressure reducing valves prior to the thermostatic valve) Temperature Gauge Temperature Range * Dimensions are approximates only 12 0°C to +80°C A circulating pump (CP) circulates water at the required design flow temperature through the circuits via the manifold flow header every time there is a demand signal from one of the room sensors. On the return from the circuits water is taken as required, and mixed with the main system flow. The remaining water is then routed back to the boiler. A wax capsule inside the thermostatic mixing valve (TMV) expands and contracts with a temperature increase or decrease of the mixed water inside the valve. The pre-set design flow temperature on the valve is mechanically transformed into a pre-stop for the valve position. This means, that no more water from the main system flow can enter the circuits, once the correct flow temperature is reached. A so called ‘closed’ circuit or loop is created between the thermostatic mixing valve (TMV), the circulating pump (CP) and the manifold with its floor heating circuits. If the flow temperature falls below the design flow temperature, the thermostatic mixing valve (TMV) allows additional water from the main system to flow into the circuit. The amount of water added is dependent on the temperature decrease, in certain cases the thermostatic mixing valve (TMV) can fully open the main system flow port and fully close the return flow port. This will result in a quick response from the FH system to sudden increases in heat demand. To improve the response time even further it is recommended to fit a differential bypass valve (BPV) as close to the thermostatic mixing valve (TMV) as possible. This can reduce the time it takes for the hot water from the boiler to reach the mixing valve. 2.2.6 Installation Required Components Qty Supplied by REHAU Correct sized 3-Port Thermostatic Mixing Valve (TMV) 1x Yes Circulating Pump (CP) Isolating Valve of correct size (IV) 1x 4x No 2x (with manifolds) Bypass Valve (BPV) 1x No Fitting (always read and follow instructions supplied with components) -Identify on the valve the correct inlets for flow and return water as well as the outlet for the mixed water Wiring -The pump live (brown) should be wired into terminal (1) of the Honeywell high temperature limit sensor (HLS) via terminal (L1) of connector block. Article No. 225125 - Connect the boiler flow from the 2-Port zone valve into the inlet for hot water (identified with an “H” usually on the valve body) using the compression ring connections -The pump neutral (blue) wire is to be connected to terminal ‘N’ terminal of the secondary pump connection inside the control centre - Connect the collective return from the floor heating to the inlet for cold water usually (identified with a “C” on the valve body) using the compression ring connections -The earth wire (green & yellow) connects to the ‘E’ terminal next to the main pump connection inside the control centre. - Connect the outlet for the mixed water usually (identified with “MIX” or arrow on the valve body) to the flow inlet side of the circulating pump (CP) via the isolating valve (IV) - Fit the circulating pump (CP) using isolation valves on both ports of the pump making sure the pump inlet is connected to the mixed outlet of the TMV and the pump outlet to the flow header of the floor heating manifold. CT2/ HW Junction Box HWS CT2/R CT2/HW SV ZV HLS AV TS CP BPV SV PV CS RS TMV LSV TRV Hot Water Supply Radiator Controller Domestic Hot Water Controller Safety Valve Zone Valve High temperature Limit Thermostat Air Vent Temperature semsor (Flow) Circulating Pump By pass Valve Safety Valve Pressure Vessel Cylinder Sensor Room Sensor Thermostatic Mixing Valve Lock Shield Valve Thermostatic Radiator Valve BA Master Controller CT2/ R HWS Hot Water Sensor Hot Water Cylinder AV TRV Radiator LSV CP HLS TS RS Manifold Flow Header ZV Manifold Return Header ZV TMV PV SV CP Boiler BPV 10. Constant Flow Water Temperature system with ‘S’ plan Integration 13 2.0 FIXED flow temperature control 2.2 fixed temperature mixing options Data Thermostatic Mixing Valves (Fixed Flow 3-Port) For up to 15kW: Dimensions : 130mm x 95mm x 43mm (H x W x D) Outlet temperature setting : 35ºC to 65ºC Hot water supply : max 90ºC Temperature stability 9 nominal : ± 3ºC Flow @ 3 bar : approximately 65 l/min Body : Cast gunmetal, nickel plated Internal brass components : DZR brass Fittings : 22mm compression DZR brass For up to 20kW: Dimensions : 130mm x 95mm x 43mm (H x W x D) Outlet temperature setting : 30ºC to 60ºC Hot water supply : max 85ºC Temperature stability 9 nominal : ± 2ºC Flow @ 3 bar : approximately 65 l/min Body : Cast gunmetal, nickel plated Internal brass components : DZR brass Fittings : 22mm compression DZR brass For up to 30kW: Dimensions : 146mm x 139mm x 57mm (H x W x D) Outlet temperature setting : ambient to 60ºC Hot water supply : max 85ºC Temperature stability 9 nominal : ± 3ºC Flow @ 3 bar : approximately 100 l/min Body : Cast gunmetal, nickel plated Internal brass components : DZR brass Fittings : 28mm compression DZR brass Differential Bypass Valve (straight) Dimensions : 90mm x 176mm x 52mm (H x W x D) Opening pressure settings : 0.1 bar to 0.5 bar Max operating pressure : 10 bar Max operating temperature : max 120ºC Body : DZR brass Connections : 22mm compression 14 2.2.7 Required Components for Zone Control Masters/ Add On modules Quantity Components REHAU Art. No. Heating Heating/Cooling REHAU BA 202236-001 No Yes BA Cooling Kit 202233-001 No Yes Add On, Module 225115-002 Up to 8 zones: 0x Up to 14 zones: 1x Components REHAU Art. No. Constant Flow Temperature REHAU CT2 (Programmable Room Sensor) 225108-002 Minimum:1x (same time setting in all zones) Maximum:14x (different time setting in all zones) REHAU TP (Tamper resistant sensor) 225109-001 REHAU TA (Standard Sensor) 225106-001 Up to 8 zones: maximum of 7x Up to 14 zones: maximum of 13x REHAU TD (Comfort plus sensor, includes floor sensor) 225116-001 REHAU TM (Comfort sensor) 225107-002 REHAU HS (Humidity sensor) 229435-001 No Actuators 241293-002 Minimum:1x per controlled circuit Maximum:12x per manifold / controller Switch fused spur Not supplied 1x Net Extension kit 202239-001 If the distance between the master and the Add On Module exceeds 0.3m, then net extension kit is required. This includes 2 connector blocks each with 2 small cables with RJ45 connectors Components REHAU Art. No. Constant Flow Temperature REHAU RF CT2-RH 202246-001 Minimum:1x (same time setting in all zones) Maximum:14x (different time setting in all zones) REHAU RF TP 202253-001 REHAU RF TA 202251-001 Up to 8 zones: maximum of 7x Up to 14 zones: maximum of 13x REHAU RF TD 202245-001 REHAU RF TM 202254-001 REHAU RC 202244-001 Wired Sensors/Controllers Wireless Sensors/Controllers Minimum: 1x Maximum: 5x Communication distance: Up to 30m inside building and 100m line of sight 15 2.0 FIXED flow temperature control 2.2 fixed temperature mixing options 2.2.8 Wiring BA Controller UNIT NUMBER (1-9) 2 5 4 3 2 4 9 8 7 6 1 9 5 0 1 0 F E 3 STRING NUMBER (1-F) D C B A 8 7 6 DIP SWITCH ON OFF 1 230VAC C2 L L N 2 N L THERMAL ACTUATORS 3 4 L N L N N 6 N L 7 N L 8 N L N DISPLAY SUPPLY SENSOR L 5 L X-Relay SEC. PUMP VOLT FREE 230VAC L N L N 6 N L 7 N L 8 N L N EXT. SWITCH I O N THERMOSTAT BUS + + + + MIXING VALVE 0 - 10V Y X MIXING VALVE 24V AC THERMOSTAT BUS APP SENSOR T C1 5 L T BOILER B1 B2 N 3 4 N L N L N THERMAL ACTUATORS + T L BOILER B1 B2 L T SUPPLY 230VAC SUPPLY 230VAC L N 2 N T 1 L 1 2 3 4 5 6 7 8 LINK L1 L2 N 2 L N 1 C L N High Limit Temperature Stat (HLS) 11. Electrical Connections of Secondary Pump Via High Limit Temperature Sensor BA Controller (Main Control) UNIT NUMBER (1-9) 2 5 4 3 2 4 9 8 7 6 1 9 5 0 1 0 F E 3 STRING NUMBER (1-F) D C B A 8 7 6 DIP SWITCH ON OFF SEC. PUMP 230VAC L N 1 L 2 N L THERMAL ACTUATORS 3 4 L N L N N 6 N L 7 N L 8 N L N DISPLAY SUPPLY SENSOR L 5 L 7 6 N L N L 8 N L N EXT. SWITCH I O N THERMOSTAT BUS + + + + MIXING VALVE 0 - 10V Y X MIXING VALVE 24V AC THERMOSTAT BUS APP SENSOR T X-RELAY C1 C2 5 L T BOILER B1 B2 N 3 4 N L N L N THERMAL ACTUATORS + T L L T SUPPLY 230VAC 2 N T 1 L 1 2 3 4 5 6 7 8 LINK BOILER B1 B2 X-Relay SEC. PUMP VOLT FREE 230VAC L N L N High Limit Temperature Stat (HLS) SUPPLY 230VAC L N L UFH Circulation Pump Compact mixer connection block 12. Compact Mixer Wiring 16 Compact Mixer Wiring to the BA Controller L N Blue Green & Yellow N Brown Zone Valve wiring connections for Volt Free boiler Switching Zone Valve wiring connections for 230v boiler Switching BA Controller (Main Control) RJ45 NETWORK BUS Switch Live To Boiler BOILER B1 B2 SUPPLY 230VAC L N Grey wire should taken to the connector of the volt free supply and connected X-RELAY SEC. PUMP VOLT FREE 230VAC L N L N N SUPPLY 230VAC L N Switch Live To Boiler BOILER B1 B2 X-RELAY SEC. PUMP VOLT FREE 230VAC L N L N NETWORK BUS ADD-ON MODULE WIRELESS RECEIVER L1 L2 N L1 L2 Wires to Pump and Zone Valve SUPPLY 230VAC L N SL PL SL PL Wires to Pump and Zone Valve N N L L Wires to HLS BOILER B1 B2 X-Relay SEC. PUMP VOLT FREE 230VAC L N L N Wires to HLS N L1 L2 N L1 L2 See Insets for Zone Valve / Boiler wiring options SL PL The wiring instructions supplied within the control equipment should be used for correct wiring. The above wiring diagram is for guidance only and should not be used as a definitive wiring diagram 2 L N 1 High Limit Temperature Sensor (HLS) L N L N SL PL C 2 Port Zone Valve 13. Electrical Connections from zone valve to boiler Via High Limit Temperature Sensor BA Controller (Main Control) UNIT NUMBER (1-9) 2 5 4 3 2 4 9 8 7 6 1 9 5 0 1 0 F E 3 STRING NUMBER (1-F) D C B A 8 7 6 DIP SWITCHES DIP SWITCH ON SEC. PUMP 230VAC L 1 N L 2 N L N THERMAL ACTUATORS 3 4 L N L N 5 L 6 N L 7 N L 8 N L N DISPLAY SUPPLY SENSOR L 5 L 7 6 N L N L 8 N L N EXT. SWITCH I O N THERMOSTAT BUS + + + + MIXING VALVE 0 - 10V Y X OFF + Ensure that DIP 5 is turned on and DIP 6 is turned off to enable the function of high limit zone valve LINK SUPPLY 230VAC L N L N E BOILER B1 B2 X-RELAY C1 C2 1 2 3 4 5 6 7 8 MIXING VALVE 24V AC THERMOSTAT BUS APP SENSOR T X-RELAY C1 C2 3 4 L N L N THERMAL ACTUATORS T BOILER B1 B2 N N ON T L L T SUPPLY 230VAC 2 N T 1 L 1 2 3 4 5 6 7 8 X - RELAY OFF APP SENSOR SEC. PUMP 230VAC L N FLOW WATER TEMPERATURE SENSOR TO BE STRAPPED ON THE PIPE WORK (FLOW) AFTER THE ZONE VALVE BROWN L BLUE GREEN/YELLOW N ZONE VALVE E The wiring instructions supplied within the control equipment should be used for correct wiring. The above wiring diagram is for guidance only and should not be used as a definitive wiring diagram 14. Connecting for separate high limitation to the BA Master Controller 17 2.0 FIXED flow temperature control 2.2 fixed temperature mixing options BA Master Controller (Main Control) 2 5 4 3 2 4 1 9 8 7 6 3 5 0 9 1 0 F E D C B A 8 7 6 DIP SWITCH ON OFF UFH PUMP 230VAC L 1 N L 2 N L N THERMAL ACTUATORS 3 4 L N L N 5 L 6 N L 7 N L 8 N L N DISPLAY L 5 L 7 6 N L N L 8 N L N EXT. SWITCH I O MIXING VALVE 0 - 10V THERMOSTAT BUS SUPPLY SENSOR N + + + + Y + EXT. SWITCH I O Link SUPPLY 230VAC L BOILER B1 B2 N X-Relay VOLT FREE L N SEC. PUMP 230VAC L N L N 230V Output signal to control secondary pump for UFH system N L 230V Boiler output signal BOILER B1 B2 Potential free boiler output signal Remote start terminal of boiler 15. Intergrating BMS with REHAU Intelligent Controls 18 X MIXING VALVE 24V AC THERMOSTAT BUS APP SENSOR T X-RELAY C1 C2 3 4 L N L N THERMAL ACTUATORS T BOILER B1 B2 N N T L L T SUPPLY 230VAC 2 N T 1 L 1 2 3 4 5 6 7 8 Connection from BMS timed output or external time switch The connections are volt free. Do not apply a voltage to the EXT SWITCH as this will damage the unit. 2.0 Fixed Flow temperature control 2.3 Temperature safety options Recommended Position for HLS ZV IV IV TMV HLS CP IV UFH - Flow AC UFH - Manifold UFH - Return 16. Recommended Position of HLS (3-Port) valve 2.3.1 High Limit Sensor (HLS) 2.3.2 Working Principle The sensor of the high limit sensor (HLS) monitors the mixed flow temperature. This is a safety device, which should be set to a temperature of 15ºC above the max. design flow temperature. In the case of a system malfunction and the max. design flow temperature being exceeded, the high limit sensor (HLS) switches off the secondary circulating pump (CP), and cuts the power to the zone valve. With the zone valve closed and the circulating pump stopped, no hot water can enter the floor heating circuits. Fitting (Always read and follow instructions supplied with components) -If a REHAU compact mixer unit is used, the high limit sensor (HLS) is already pre-assembled -Check high limit is set for 15°C above required set point -For all other systems the high limit sensor (HLS) must be fitted after the circulating pump (CP) and before the manifold flow header. It should also be fitted at least 0.3m to 0.5m after the mixing valve. 2.3.3 Dew Point Control The dew point control of the system is performed by the BA Master Controller coupled with the Humidity sensors positioned within the index rooms (refer section 4.2). The controller will calculate the dew point temperature based on the index room temperature and the % of relative humidity within the IVindex room.IV If the system has more than one humidity UFH - Flow HLS TS ZV sensor installed within the control system then the BA Master Controller willUFHoperate to - Manifold CP AC IV the worst case temperature and humidity conditions. If the coolUFHwater temperature flowing - Return MOV into the floor heating/cooling circuit approaches the dew point temperature (safety factor of 2°C), the controller will signal the actuators present on the manifold to close the return valve of the circuits and there by preventing the formation of any condensation. 2.3.4 Installation Required Components Qty Supplied by REHAU High Limit Sensor (strap-on or phial pocket/well) 1x Yes Wiring No wiring work is required if a REHAU Compact Mixer Unit is used. All other Systems: -The pump live (brown) wire should be connected to terminal (1) within the HLS - The 2-Port zone valve live (brown) wire should also be connected to this terminal - The live (Brown) wire to the high limit sensor is connected to terminal (C) within the HLS and must be supplied from the ‘L’ terminal of the sec pump connection inside the control centre. (As shown in Fig. 13) Note: Please refer to page 16 for wiring diagram. Data Strap on: Dimensions : 92mm x 48mm x 77mm (H x W x D) Setting range : 25ºC to 95ºC Switch type : SPDT Switching Differential : Adjustable from 4K to 10K Max Ambient Temperature : 70ºC 19 2.0 FIxEd Flow tEMPERAtURE contRol 2.4 2-PoRt ZonE vAlvE (Zv) 2.4.1 Working Principle The 2-Port zone valve (ZV) has a dual function: - To separate the floor heating system hydraulically from other systems supplied by the same heat source, such as the domestic hot water system (DHWS) or radiators - Close down the flow of hot water from the boiler in case of a boiler malfunctioning. The 2-Port zone valve (ZV) makes it possible to integrate the floor heating with the other systems by employing the 'S- Plan’ configuration, which is well established in the heating industry. Only when there is a demand signal from any of the room sensors will the zone valve be open and allow warm water to enter the floor heating circuits. In combination with the high limit sensor, the valve provides additional safety in case the water supply temperature exceeds a pre-set limit. If the high limit sensor cuts the power to the zone valve motor, the in-built spring closes the valve and creates a hydraulic barrier. This means the boiler pump or any other pump can no longer inject water into the floor heating system. Data Size : 22mm or 28mm Overall Dimensions : 120mm x 60mm x 95mm (H x W x L)* Voltage Rating : 230V AC, 50Hz Switch Rating : 2.2A Switch Type : Single Pole Single Throw (SPST) 22mm Single Pole Double Throw (SPDT) 28mm Power Consumption : 6W Timings (Nominal) : Temperature Range : ON : 12 seconds: under power OFF: 6 seconds: under spring return Ambient +50ºC maximum Flow Temperature : +5ºC to +88ºC Max Pressure : 0.55 bar differential for close off 8.6 bar static Auxiliary Switch : 2.2A at 220/240V AC at 50Hz Flow Direction : As per Arrow on valve body Electrical Connections : 1m Flying lead (heat resisting cable) * dimensions are approximates only 20 2.0 Fixed Flow temperature control 2.4 2-port Zone valve (ZV) 2.4.2 Installation Required Components Qty Supplied by REHAU 2-Port Zone Valve of correct size 1x Yes Compact Mixer Unit BV Fitting (always read and follow instructions supplied with components) -The valve should be installed without blocking any vent or cold feed when closed HLS UFH - Flow CP AC ZV -For recommended positions refer to CPFig. 17. IV HLS TS AC UFH - Manifold UFH - Return MOV UFH - Return ZV -Positioning the zone valve (ZV) at an angle is possible, but it must 4 Port Mixing Valve not be mounted so that the powerhead is below the horizontal level IV IV of the pipework UFH - Flow TIV UFH - Manifold If fitted in a confined space, sufficient ventilation must be available to keep the valve within its ambient temperature range. Also access must be provided to remove the powerhead if necessary. 3 Port Mixing Valve ZV TMV IV IV HLS CP IV UFH - Flow AC UFH - Manifold UFH - Return 17. Two locations of zone valve: Compact mixer, 3-Port mixing valve 21 3.0 REHAU IntEllIgEnt HEAtIng/coolIng contRol SYStEM 3.1 coMPonEntS ovERvIEw 3.1.1 Components Overview Heating Component Article number REHAU BA, Master Controller 225113-002 (24V) Constant Temperature The REHAU BA Master Controller is suitable for connecting up to 8 zones of multiple sensors and 24V actuators. In addition it provides outputs for the FH secondary pump, main pump and boiler demand signal. 225115-002 (24V) The Add On Module provides another 6 zone connections. A maximum of 1 extension modules can be used with the BA to increase the zones up to a total of 14 zones. 225108-002 (5V) The 24/7 clock combined with the 4-event timer enables the end user to customise his heating system according to his requirements with an adjustment range from +5ºC to +35ºC. The control sensor is also able to set the set point temperature for multiple other sensors (except another control sensor). 225109-001 (5V) This room sensor is the ideal solution for public areas where unauthorised adjustments are to be prevented. 225106-001 (5V) This room sensor offers local temperature adjustment of ±4ºC from the current set point of zone temperature. 225107-002 (5V) This room sensor offers identical features to the REHAU TA sensor. In addition it has a slide switch to enable the end user to manually switch the zone into one of 4 modes: Auto, Day, Night and Frost Protection. 225116-001 (5V) This room sensor has identical features to the REHAU TM sensor. In addition it comes including a floor sensor with 3m cable which can be used to prevent the floor surface temperature to either drop below a pre-set minimum or rise above a pre-set maximum temperature. 241293-002 (24V) The actuator allows individual control of circuits by opening and closing the corresponding isolating valve on the manifold. Add On, Module REHAU CT2, Programmable Room Sensor REHAU TP, Tamper Resistant Sensor REHAU TA, Standard Sensor REHAU TM, Comfort Sensor REHAU TD, Sensor with floor sensor Actuator 22 Component Article number REHAU Remote Air Sensor 228007-001 (5V) Remote air sensor works only in conjunction with a TM thermostat. (Also available in Brass/Aluminium, please contact sales office 225385-001 The seperate floor sensor works only in conjunction with a CT2 Programmable Room Sensor or TD sensor. 202239-001 (5V) If the distance between the master and the Add On Module exceeds 0.3m, then net extension kit is required. This includes 2 connector blocks each with 2 small cables with RJ 45 connectors. 202234-001 (5V) This 24/7 clock combined with the 4-event timer enables the user to customize his domestic hot water according to his requirements. It is provided with a remote flow temperature sensor which is strapped on to the domestic hot water supply pipe from the cylinder (within 150mm of top of cylinder) 202226-001 (5V) This wireless 24/7 clock combined with the 4-event timer enables the user to customize his room temperature according to his requirements. This wireless room controller provides two stage control of a designated area or room which may be part of an underfloor heating system. These units are used where a secondary heat source is employed to boost the temperature within the area if the conventional heating system is not powerful enough 202243-001 (5V) This 24/7 clock combined with the 4-event timer enables the user to control the temperature of a circuit or Zone of Radiators that are hydraulically independent from an underfloor heating system. For more information refer to section 11.2, see page 55. 211786-001 As the thermal actuator outputs on the Master Controller and Add On Module are 24 volt ac, there is sometimes a need to convert these to be able to switch 240 volt i.e. for connecting a zone valve, dehumidifier etc. A Relay module R-24- SP can be used on thermal actuator output TH 1 to 8 on Master Controller, TH 9 to 14 on the Add On Module. The relay is designed to operate a switching current of up to 2Amp and is fitted with green indicator lamp to signify operation. 225125-002 Over temperature thermal cut-out device with auto reset. REHAU Seperate Floor Sensor Net Extension kit REHAU CT2 / HW, Hot Water Controller REHAU CT2 / 2 Two Stage Controller REHAU CT2 / R Radiator Controller 24V Relay High Limit Sensor 23 3.0 REHAU IntEllIgEnt HEAtIng/coolIng contRol SYStEM 3.1 coMPonEntS ovERvIEw 3.1.2 Additional Components Overview Heating/Cooling Component Article number BA Cooling Kit 202233-001 (5V) The BA Cooling Kit contains a humidity sensor, WLAC switch and a flow temperature sensor. This kit when integrated into the system helps prevent the flow of water temperature below the dew point ( in cooling mode) and there by prevent condensation. 3.1.3 Components Overview Wireless Sensors/Controllers Component Article number REHAU RC, Wireless Receiver 202244-001 (5V) The wireless receiver is required to receive signals from wireless sensors/controllers. Max distance between the Master/Add On Module and receiver is 3m. Communication distance of up to 30m inside building and 100m outside building. REHAU RF CT2, Programmable Room Sensor 202246-001 (5V) The wireless 24/7 clock combined with the 4-event timer enables the end user to customise his heating system according to his requirements with an adjustment range from +5ºC to +40ºC. The control thermostat is also able to set the set point temperature for multiple other thermostats (except another control sensor). Not used if cooling is to be utilised. 202253-001 (5V) This wireless room sensor is the ideal solution for public areas where unauthorised adjustments are to be prevented. 202251-001 (5V) This wireless room sensor offers local temperature adjustment of ± 4ºC from the current set point of zone temperature. 202254-001 (5V) This wireless room sensor offers identical features to the REHAU TA thermostat. In addition it has a slide switch to enable the end user to manually switch the zone into one of 4 modes: Auto, Day, Night and Frost Protection. 202245-001 (5V) This room thermostat has identical features to the REHAU TM thermostat. In addition it comes including a 3m long sensor which can be used to prevent the floor surface temperature to either drop below a pre-set minimum or rise above a pre-set maximum temperature. 202235-001 (5V) This wireless 24/7 clock combined with the 4-event timer enables the user to customize his domestic hot water according to his requirements. It is provided with a remote flow temperature sensor which is strapped on to the domestic hot water supply pipe from the cylinder (within 150mm of top of cylinder). REHAU RF TP, Tamper Resistant Sensor REHAU RF TA, Standard Sensor REHAU RF TM, Comfort Sensor REHAU RF TD, Floor Limit Sensor REHAU RF CT2 / HW, Hot Water Controller 24 Component Article number REHAU RF CT2 / R, Radiator Controller 202249-001 (5V) This wireless 24/7 clock combined with the 4-event timer enables the user to control the temperature of a circuit or Zone of Radiators that are hydraulically independent from an underfloor heating system. For more information refer to section 11.2, see page 55. 202229-001 (5V) This wireless 24/7 clock combined with the 4-event timer enables the user to customize his room temperature according to his requirements. This wireless room controller provides two stage control of a designated area or room which may be part of an underfloor heating system. These units are used where a secondary heat source is employed to boost the temperature within the area if the conventional heating system is not powerful enough. REHAU RF CT2 / 2, Two Stage Controller 25 3.0 wIRElESS SEnSoRS/contRollERS 3.2 woRkIng PRIncIPlE Traditional ON/OFF control 20.5ºC Advanced PI- control OFF 20.0ºC 19.5ºC HEAT 100% ON The graph above left shows the ‘hunting’ temperature profile of a room with a traditional sensor. PI- control gives a more stable and accurate room temperature - for higher comfort levels. The graph above right shows the stabilising effect of the PI controller, improving comfort and saving energy. 18. Pi-Control of room temperature This sophisticated electronic control system was designed specifically for floor heating applications in the residential and light commercial sectors. The room sensors are designed to control the indoor comfort temperature with a high level of accuracy. The sensors communicate with the REHAU BA controller using a bus protocol, which reduces the wiring of the components to a minimum whilst the range of sensor types allows greater flexibility in control system layout and can meet the requirement of most projects. 0.25mm2 Two-core cable is recommended for connecting the system in either star or series (daisy chain) configurations. Standard installation cable (1mm² twin) can be used if required. The low voltage (5v) bus system makes it possible to install the room sensors in almost every environment whilst always providing maximum safety. The temperature requirements of each heated zone on the system is communicated to the controller unit of the system, i.e. to the REHAU BA for fixed flow water temperature. The master control units will then control the operation of circuit actuators, main system pump, secondary pump and the boiler switching. The integration of the system into the ‘S’ plan control configuration is also possible. 26 Proportional Integral Control Sensor The REHAU controller utilises PI Control, this is designed to cover a broad range of specifications. The system uses self learning capabilities to continue optimisation throughout its operation. After approximately 3 – 10 days, depending on the number of operations, the system should reach optimal output levels for given conditions. Advantages of this form of control are that, after a short period, the controls determine the optimum time to open the actuators, allowing the room to reach the set temperature with minimum overshoot. This gives high comfort levels while ensuring minimum wasted energy. ‘Hunting’ behaviour, a characteristic associated with traditional sensors, causes the on-off cycling of the boiler when searching for the set temperature; this can result in excessive wear and tear on components. REHAU PI control eliminates the ‘hunting’ behaviour and can help to increase the cycle life of all system components. Considering the graph above we see that the desired set point temperature is set at 20°C by 8am. As the REHAU intelligent master uses a software algorithm to control the time to warm up, this varies the required start up point by learning from its previous sensor history and only switching on at the last possible moment to allow the room to reach set point at the desired time. The result is a significant energy saving that is achieved as indicated in blue on the graph above. 3.3 Required Components for Zone Control This table should help you identifying which components you need dependent on your choice of zone temperature control. More details on each control option and how they are installed and electrically wired are given in the subsequent sections. Potential energy savings Internal Temperature °C Optimum Start Control REHAU CT2 Programmable Room Sensor, Radiator and Two stage controllers have an advanced time clock that learns how quickly a building reaches desired temperature i.e. set point by constantly measuring the temperature in the zone. This subsequently brings on the heating at the optimum time prior to building occupancy. This typically results in the heating being switched on later on mild days normally resulting in a 10% energy improvement. 20°C 18°C Clock set for 6am 12°C Optimised start 8°C 04 05 06 07 08 09 10 Time during the day 18a. Graph showing an example of optimised start Maximum Manifold Size = 12-Port. Wired Sensors/Controllers Components REHAU Art. No. Constant Flow Temperature REHAU CT2 (Programmable Room Sensor) 225108-002 Minimum:1x (same time setting in all zones) Maximum:14x (different time setting in all zones) REHAU TP (Tamper resistant sensor) 225109-001 REHAU TA (Standard Sensor) 225106-001 Up to 8 zones: maximum of 7x Up to 14 zones: maximum of 13x REHAU TD (Comfort plus sensor, includes floor sensor) 225116-001 REHAU TM (Comfort sensor) 225107-002 REHAU HS (Humidity sensor) 229435-001 No Actuators 241293-002 Minimum:1x per controlled circuit Maximum:12x per manifold / controller Switch fused spur Not supplied 1x Net Extension kit 202239-001 If the distance between the master and the Add On Module exceeds 0.3m, then net extension kit is required. This includes 2 connector blocks with 2 small cables with RJ 45 connectors Components REHAU Art. No. Constant Flow Temperature REHAU RF CT2 Programmable Room Sensor 202246-001 Minimum:1x (same time setting in all zones) Maximum:14x (different time setting in all zones) REHAU RF TP 202253-001 REHAU RF TA 202251-001 Up to 8 zones: maximum of 7x Up to 14 zones: maximum of 13x REHAU RF TD 202245-001 REHAU RF TM 202254-001 REHAU RC 202244-001 Wireless Sensors/Controllers Minimum: 1x Maximum: 5x NOTE:- Communication distance: Up to 30m inside building and 100m line of sight 27 4.0 Control System First Fix 4.1 Components Overview All REHAU control systems must be installed: - By a competent person The cable termination length at the sensor position should be long enough to allow for connection to the sensor i.e.150mm. This should then be coiled and positioned within an electrical back box. Both Flush and surface electrical back boxes can be used. - In accordance with all local electrical regulations and the current IEE wiring regulations set out in BS 7671 - In accordance with the latest issue of the instructions supplied with each component. First fix involves the installation of all the electrical cables to the position of the control components and routing them back to the REHAU BA control unit position. Any of the layouts shown below or a mixture of both systems can be used. The following cables sizes are required from the component position within the building, back to the REHAU BA controller position. First fix work should be carried out whilst the building is under construction and before the plasterwork has started. ADD ON MODULE MASTER 4 2 10 6 5 1 7 3 ADD ON MODULE MASTER 1 6 5 9 7 2 3 8 SENSORS CONNECTED IN STAR 11 4 8 9 10 SENSORS CONNECTED IN BUS MODE (DAISY CHAIN) 19. Star & Series cable layouts Main heating system switch fuse spur to main control unit: 1mm2 2 cores & earth Control unit position to zone valve 1mm2 2 core & earth Control unit to FH circulating pump Or to the connector block if using a compact mixer unit 1mm2 2 core & earth Wiring to main system boiler controls 1mm2 2 core & earth Room sensor (daisy chain or Star)* 0.25mm2 2 core Control unit to actuator (if more than 1m away) 1mm 2 core 2 *It is recommended that different coloured cables are used for the 5v bus connection of the sensors and the BA controller, Care must be taken to ensure correct wiring connection between sensors & controller terminals if wires of the same colour are used 28 - It is very important that the cables terminating at the control unit should have a minimum length of 600mm and ensure that they are clearly identified so at the second fix stage it is clear what the cable does Specific Specification of REHAU Intelligent Controls 1. Maximum cable length from controller to actuator 40m 2. The maximum system cable length using the series layout is 300m 3. The maximum cable length between sensors/controllers is 100m 4. The maximum cable length from a sensor to the REHAU BA in star configuration is 100m 5. Maximum cable length from BA to Add On Module 100m 6. Maximum distance of flow temperature sensor to controller 50m 7. Maximum number of actuators that can be connected to the Master Controller/Add On Module 14/8 8. Maximum number of actuators on each output on Master Controller 4 9. Maximum distance between the Master/Add On Module and Receiver 3m 4.0 Control System First Fix 4.2 Positioning the BA Master controller Room Sensors and Remote Air / floor Sensors 4.2.1 Location of Room, Humidity Sensor and Air Sensor The requirement for the correct positioning room sensors cannot be overstated. Care must be taken to ensure the sensors are located; 1. In a position with good air circulation at the ambient temperature preferably on an internal wall at a height of 1.6 metres from floor level. 2. The sensor must not be positioned in draughts, above a heat source or where the temperature will be influenced by localised heat gains from direct sunlight, water pipes or appliances. 3. If fixed to a studded wall the cable exit holes should be sealed to avoid draughts. 4. The sensor must be mounted to a vibration free surface. Humidity sensor should not be positioned where short term high humidity is possible e.g. kitchen, bathrooms etc. 4.2.2 Positioning the Remote Air Sensor The remote air sensor is supplied fitted into a standard electrical switch blanking plate (White, Brass or Stainless Steel). If required, the sensor can be removed from the supplied mounting and fitted into any surface. Required cable size is same, 0.5mm2 from the remote air sensor to TM sensor position. Unlike the REHAU TD floor sensor the remote air sensor is only fitted when required and can only be used with the REHAU TM sensor 4.2.3 Positioning the Floor Sensor The floor sensor should be positioned where it can detect the true temperature of the floor and always be within the heated area of the controlled room. To Controller For easy replacement of the sensor it is recommended that the sensor be placed within a screed/concrete but level with the surface. The sensor can be placed within + a+ 10mm copper sleeve (not supplied) to aid the removal of the sensor. This position will also give a true reflection of the floor surface temperature. 10 Cu Tube Floor Sensor 20. Positioning of room sensor Location of the REHAU BA Master Controller/Add On Module The REHAU BA unit should be installed in a suitable location leaving room to work on the controller. The area should also be clean, dry location mounted on solid vibration free structure within 0.8 metre above the floor heating manifold. The REHAU BA Master Controller can be located within REHAU manifold cabinets. max. 450 mm THERMOSTAT Timber Floor Screed 21. Positioning of floor sensor 29 5.0 Control System Second Fix 5.1 REHAU BA Central Control Unit BA WLM. Hydronic Master Buttons for navigating Enter ( ) 1 2 3 4 5 6 7 8 Red: Zone 1 to 8 indicating heating is on Green: Boiler enable signal is activated Green: Secondary UFH is running Green: Main boiler (primary) pump is running (if installed) Green: Power supply connected, Red: Night setback is running, Red flashing: Indicates error The REHAU BA control unit can operate 8 heating zones, each of which may have a number of floor heating circuit actuators connected. (See section 5.2.5 connecting the thermal actuators) Each zone / room has a designated output within the controllers (TH 1 – TH 8). If more zones are required then a REHAU Add On extension module has to be provided. Each REHAU BA control unit can facilitate the connection of 1, REHAU Add On extension module’s making the maximum number of zones 14. The setting of the zones is referred to later in the document within the section: System Operation and Zoning. 30 Fixing the REHAU BA Unit Removing the 6 screws on the face of the unit will allow access to the three fixing holes provided. Fix the controller to the building structure using suitable fixing screws do not damage the unit housing. Do not over tighten the fixing screws. If necessary 10mm spacers (not provided) can be used to allow cables to pass through the cable access panels at the rear of the unit. Alternatively surface cables can be run into the terminals using either the cable release in the cover or by pressing out the cable entries in the lower part of the cover. 5.0 Control System Second Fix 5.2 Electrical Connection Ensure that the electrical installation is carried out in accordance with the local wiring regulations and the IEE wiring regulations as set out in BS 7671. 5.2 Electrical Connection The 230v AC mains supply The cable from the main system, switch fuse spur should be connected via a local isolation switch to the mains terminal block within the REHAU BA control unit marked L, N, E (As shown in Fig. 22). MAINS SUPPLY FROM 3 AMP FUSED ISOLATOR 22. Main wiring connection terminals 23. Connection of a mains 230v supply and Volt free connection to the boiler 5.2.1 Boiler Connection The REHAU BA control unit has a volt free relay, which may be used to switch a boiler or to open a motorised valve. Connecting the Boiler requiring Volt Free (potential free) Switching (Floor Heating Only) To control the switching of a boiler with dedicated terminals for remote switching e.g. room sensor, connect these terminals to B1 & B2 on the control unit. Terminals B1 & B2 are volt free (As shown in Fig. 23). Connecting the Boiler Requiring 230v AC Connection (Floor Heating only) To control the switching of a boiler or motorised valve requiring mains voltage, make a link from the L (230v) mains input terminal to the terminal marked BOILER – B1. Connect the boiler switched live to the terminal marked BOILER – B2. Connect the boiler neutral wire to the terminal marked N in the controller and earth wire to the terminal marked E in the controller. (As shown in Fig. 23). Connecting the Boiler requiring ‘S’ Plan Integration The integration of the FH system controls into an ‘S’ plan configuration requires the end switch from the zone valve (Orange wire) to be connected to the boiler terminal B1 with the Live (Brown) wire connected to the secondary pump terminal. The permanent live (Grey) wire connects to the main live terminal with the neutral wire (Blue) connecting to the main neutral terminal and earth to the E terminal within the controller (As shown in Fig. 13, see page 17). Boiler relay will energise 60 seconds after the start of main pump. On the REHAU BA Master Controller, the boiler demand will stop if there is no demand from a room sensor. 31 5.0 contRol SYStEM SEcond FIx 5.2 ElEctRIcAl connEctIon 5.2.2 Pump Outputs - UFH Pump The master has an output for the underfloor circulating pump (secondary pump). The output will be energised with a delay of 180 sec after the demand from the room sensor. The delay is to allow time for the thermal actuator to open. SUPPLY 230VAC L N BOILER B1 B2 X-RELAY C1 C2 SEC. PUMP UFH 230VAC L N The 230v AC pump can be connected directly to terminals L and N under the heading “Sec. UFH Pump”. Connect the pump E (Earth) terminal to E (earth) on the master. The maximum pump load must not exceed 4 amps, 230v at start up. There is an overrun period of 1 minute after the demand for heat from the room sensor disappears. 24. UFH pump output on BA Master Controller UFH PUMP Delay times: Secondary UHF pump 3 min. X-output: (configured as main pump) 3 min 10 sec. DIP - 5 DIP - 6 Main Pump Off Off RESERVED RESERVED XX- -RELAY RELAY DEHUMIDIFIER DEHUMIDIFIER BOILER BOILERTEST TEST 66 77 88 DIP Switch 4 turned to 'ON' on the master controller to start DIP Switch 4 turned to 'ON' on the master controller to start initial heat up sequence in accordance with BS EN 1264 initial heat up sequence in accordance with BS EN 1264 DIP Switches on the master controller DIP Switches on the master controller To control SENSOR SENSORCHECK CHECK INITIAL INITIALHEAT HEATUP UP SEQUENCE SEQUENCE INSTALL INSTALLMODE MODE RESERVED RESERVED XX- -RELAY RELAY DEHUMIDIFIER DEHUMIDIFIER BOILER BOILERTEST TEST SENSOR SENSORCHECK CHECK INITIAL INITIALHEAT HEATUP UP SEQUENCE SEQUENCE INSTALL INSTALLMODE MODE X relay Output DIP DIP SWITCHES SWITCHES DIP SWITCHES SWITCHES DIP ON BA controller has a relay whichON can be utilized for a number of different ON ON purposes. The relay is a volt free output and is positioned on the PCBOFF OFF OFF OFF 1 2 3 4 5 6 7 8 1 2 3 4 5 4 5relay 1 2 of 3 the 6 7is8determined by the 1 2 3 4 5 as shown on the drawing. The function setting of the DIP-switches. The functions that the relay can perform, and the appropriate DIP-switch settings, are as follows: DIP switches XtheRELAY RELAY Output (located on X master controller) Output ON ON Where a boiler primary pump is required to be switched on from the master, the X relay output can be used for this purpose. This relay will be activated 10 seconds after the UFH circulating pump has started XX- -RELAY RELAY OFF OFF 1 2 3 4 5 6 7 8 1 2 3 4 5 6 7 8 Description High limit zone valve On Off ON ON XX- -RELAY RELAY OFF OFF 11 22 33 44 55 66 77 88 On On ON ON OFF OFF 1 2 3 4 5 6 7 8 1 2 3 4 5 6 7 8 XX- -RELAY RELAY Cooling device or module alternative 32 This function is used where an additional protection is required to prevent boiler water entering the underfloor system. When the system is off or when the supply water exceeds 65°C. An additional flow water temperature sensor (ETF-1899A) and a zone valve are connected (Fig. 14) The relay output can be used to provide a volt free signal to a heat pump or to a K-MOD switching module where a chiller is utilized to provide the cooling water. The relay output is always on in cooling mode and off in heating mode. (Refer to Fig. 38a, see page 41) 230V output from X-relay The X relay output is volt free as shown in fig.26 If the relay is required to be used as an L & N switch, connect a link wire from mains live to C1, connect the device live to C2, and the device neutral to mains Neutral. 5.2.3 Connecting REHAU Add On, Extension Modules The addition of REHAU Add On Extension modules (max 1 Add On module) will increase the zoning potential from 8 to 14 zones. RJ 45 Connection SUPPLY 230VAC L N BOILER B1 B2 X-RELAY C1 C2 SEC. PUMP UFH 230VAC L N BA Master Controller RJ 45 Connection Add On Module NET EXTENSION KIT (Required if Add On Module is more than 0.3m apart from the Master Controller) 25. Connecting extension modules 26. X - Output on the BA controller X - Output X - Output on the FS/FS-C controller The Pump relays will energise after a delay when any room sensor calls for heat, this is to give time for SEC. the circuit PUMP UFH SUPPLY actuators to open. The delay times are: 230VAC 230VAC X-RELAY BOILER L N B1 B2 C1 C2 Secondary FH 180 seconds pump Main pump 190 seconds L The addition of REHAU Add On Extension module will increase the zoning potential from 8 to 14 zones. The Master Controller is connected to the extension module using an RJ 45 connector cable (this is included with every Add On Module). If the distance between the master and the Add On Module exceeds 0.5m, then net extension kit is required (Art. No: 202239) and use a 4 core cable 0.25mm2. N UFH PUMP UFH PUMP OUTPUT ON FS/FS-C controller 33 5.0 Control System Second Fix 5.2 Electrical Connection 5.2.4 Connecting Room Sensors REHAU INTELLIGENT room sensors operate on a 5v common bus system. Both the REHAU BA Master Controller has four sets of identical terminals, which can be used for the connection of the sensors. Any sensor can be connected to any of these terminals. Remember to connect + to + and I to I . Master Controller SENSOR BUS T SENSOR BUS T + + T + T + - The maximum system cable length using a daisy chain layout is 300 mtr, with a maximum cable length between sensors of 100 mtr. - The maximum distance a sensor can be from the REHAU BA Master Controller is 100 mtr. when connected in star configuration. (Refer to Fig.27) Sensor to T T T T Connect + to + and 27. Connecting Room Sensors T + + Sensor T + + Only REHAU INTELLIGENT wire room sensors can be connected to the control system. Only Sensors compatible and supplied by REHAU Ltd. can be connected to the system. Under no circumstances should any other type/manufacture of 230v or 24v room sensors be connected to the system. Connection of such equipment will irreparably damage the controllers & equipment. Such actions will void all warranties. 34 BA Master Controller N L N L N L N L UNIT NUMBER (1-9) STRING NUMBER (1-F) N 0 4 L 9 THERMAL ACTUATORS 24V 5 N 9 8 7 6 L 5 4 3 2 N 1 L 2 N 1 0 F E L 3 OUT PUT 1 Out put 2 Out put 3 Out put 4 Out put 5 Out put 6 Out put 7 Out put 8 D C B A 8 7 6 DIP SWITCH ON OFF X-RELAY C1 C2 SEC. PUMP 230VAC L N 1 L 2 N L N THERMAL ACTUATORS 3 4 L N L N 5 L 6 N L 7 N L 8 N L N DISPLAY SUPPLY SENSOR L 5 L 6 N L 7 N L 8 N L N EXT. SWITCH I O N THERMOSTAT BUS + + + + MIXING VALVE 0 - 10V Y X MIXING VALVE 24V AC THERMOSTAT BUS APP SENSOR T BOILER B1 B2 3 4 L N L N THERMAL ACTUATORS T N N + T L L T SUPPLY 230VAC 2 N T 1 L 1 2 3 4 5 6 7 8 LINK THERMAL ACTUATORS 24V OUT PUT 1 Out put 2 Out put 3 Out put 4 Out put 5 Out put 6 Out put 7 Out put 8 L N ZONE 1 L N L N L N L N L N L N L N ZONE 4 28. Actuator connection to Master Controller 5.2.5 Connecting Thermal Actuators (TH 1 – TH 8) Maximum 14 x 24 Volt actuators per controller. Ensure that the actuators are connected to the correct zone. Actuators controlled by zone 1 must be connected to output terminal 1 (TH 1) etc. Connect one wire from the actuator to right hand terminal on the respective zone output terminal block (TH 1-TH 6) then connect the other wire from the actuator to the left hand terminal block. These terminal blocks are not polarity sensitive. A maximum of 4 actuator heads can be installed into each output, 2 terminal blocks, 14 actuator max. per controller within the controller as long as they are to be controlled by the same sensor. 5.2.6 External Switch/Timer The controllers can accept a volt free signal from an external switch / timer which will facilitate the switching between day mode and night set back mode only. For setback the switch will be in OPEN circuit and CLOSED for day- time operation. Each controller type comes fitted with a link across the Ext switch. This link has to be removed and replaced with the switch/timer connection all other system parameters will have to be programmed into either a REHAU CT2 Programmable Room Sensor. No system programming is available with the REHAU BA controller. (See section 8.1 System Start Up & Operating Instructions). Connection of the external switch/timer will override the settings of any CT2 Programmable Room Sensors installed onto the system. TIMER. EXTERNAL SWITCH VOLT FREE CONTACTS 29. Connection of external switch/ timer located on the Master Collection 35 5.0 Control System Second Fix 5.3 Room Sensors internal connections Master Controller SENSOR BUS + T T + SENSOR BUS T T T T Sensor Connect + to + and T 30. Removing the front cover (all sensor variants) + + Sensor to T T + + + T + 32.Sensor internal wiring, Star configuration Master Controller SENSOR BUS + To Controller T T + SENSOR BUS + T T + + + + + Sensor T to TM Room Sensor T T T T Connect + to + and T + + Sensor 31.Sensor internal wiring, Serial configuration Remote air sensor 32a. Sensor internal wiring with remote air sensor Room Sensor Internal Connections Sensors can be mounted directly onto the electrical back box either flush or surface mounted. Remove the front cover of the sensor by gently lifting the front cover. Remove the sensor fascia to expose the fixing holes (Refer to Fig. 31 for Connecting Sensors). 5.3.1 Connect the Wiring Care must be taken not to damage the circuitry or the components on the printed circuit board at this point. 5.3.1a Connecting the Remote Air Sensor The sensor is connected to the REHAU TM sensor as shown in Fig. 32a. When the sensor is fitted the REHAU TM sensor function will operate in the same way. Care should also be taken not to deform the sensor back plate when fixing to the back box. Fix the sensor to the back box using the holes provided on the back plate Do not over tighten the fixing screws and deform the back plate. 36 Sensor types REHAU TP, CT2, TA, TM & TD All sensor types are connected dependent upon which wiring configuration used on the first fix, Refer to Fig. 31, or Fig. 32 . When the wiring of the sensor is complete refit the fascia plate and the sensor front cover. Unlike the REHAU TD floor sensor the remote air sensor is only fitted when required and can only be used with the REHAU TM sensor Sensors with a remote air sensor have a mechanical jumper on the right hand side of the printed circuit board controlling the sensor function. Temperature dial Jumper in position for remote air sensor Mode selection switch If the sensor is to be positioned within the space then leave the mechanical jumper parked on one of the terminal pins. The sensor should be supplied with the mechanical jumper in this position. If remote air temperature reading is required then gently remove the jumper and position it on both the terminal pins (as shown in Fig 32b). Temperature dial Jumper in position for remote air sensor Mode selection switch 32b. Positioning jumper (side view of TM sensor) 5.3.2 Floor Sensor Option (TD Sensor Only) Being able to control the minimum or maximum temperatures of floors provides two functions. By controlling the maximum floor temperature you can prevent over heating of the floor. This may be required where special floor coverings are used. Controlling the minimum temperature of the floor surface can create greater comfort levels for the end user keeping the floor at a minimum temperature. 5.3.3 Connecting the Floor Sensor Sensors requiring floor sensors wire up as shown in Fig. 33. Sensors with a floor sensor have a mechanical jumper on the right hand side of the printed circuit board controlling the minimum or maximum temperature. The temperature limits are adjustable within the sub menu of the BA controller. If heating only is required then this can be adjusted within the CT2 Programmable Room Sensor sub menu (HiLo) see Fig. 34 for Jumper position. If connected to a system fitted with a REHAU BA Master Controller these limits can be adjusted using the BA menu. Adjusting the limits this way will control either the min/max temperatures for all floor sensors within the group. Note: The REHAU CT2 Programmable Room Sensor can be fitted with a floor sensor. However this is an optional extra, and will require the floor sensor as a separate part REHAU Art No. 225385. If however, the floor sensor is connected to a REHAU CT2 Programmable Room Sensor as part of a group (see section 10). Where REHAU TD sensors are installed within the system. The floor limit sensor must be fitted or the system will not work correctly. To Controller Temperature dial Jumper in position for max. floor surface temperature Mode selection switch + + Temperature dial Jumper in position for min. floor surface temperature Mode selection switch TD ROOM SENSOR 33. Sensor internal wiring with floor sensor Floor Sensor 34. Positioning jumper (side view of TD sensor) 37 6.0 wIRElESS SEnSoRS/contRollERS SEt UP 6.1 RAdIo FREqUEncY (RF) REHAU wireless sensors can be used in conjunction with wired sensors. When using wireless sensors, a receiver unit has to be connected to the main controller. The sensors/controllers are powered by standard AAA batteries and an alarm signal indicates when these are running low. A frequency band of 868 MHz is used in order to maximise communication stability. 6.1.1 Set up Where wireless Room sensors/controllers are being used, it is necessary for the BA Master Controller to confirm that the Room Sensors/Controllers are communicating correctly. To achieve this: 1. On master, switch on DIP-3 to activate Sensor Check: Sensor Jumper Sensor check mode button Channel selector RF CT2 Programmable Room Sensor/Controller ON OFF 1 2 3 4 5 6 7 8 DIP Switch 3 turned to ‘ON’ on the Master Controller to enable ‘Sensor Check’ 2. All wireless Room sensors/controllers now have to be initialized (to ensure controllers/sensors are communicating with the main controller) ON a) Room Sensors (RF TA, RF TD, RF TM, RF TP) are initialized by pressing the internal ON learning mode button until a beep is heard. OFF 1 2 3 4 5 6 7 8 (See Fig. 35) OFF b) Room controllers (RF1 CT2, 4 5 6 RF7CT2/R, 2 RF 3 CT2/HW, 8 RF CT2/2) by pressing the pin hole button with the clock symbol until a beep is heard. (See Fig. 35) 3. Switch off DIP-3 to de-activate Sensor Check. ON OFF 1 2 3 4 5 6 7 8 DIP Switch 3 turned to ‘OFF’ on the Master Controller to disable ‘Sensor Check’ 38 Sensor check mode button 35. Wireless Room Sensor / Controller REHAU Wireless Receiver (RC) REHAU BA Master Controller 36. Connection of Master And Wireless Receiver 6.1.2 Technical Data Supply Voltage 24 V from Master Distance to master Max 3 m Enclosure IP 21 Ambient temperature range 0 to 40°C Communication Frequency 868 MHz Communication distance Up to 30m inside building and 100m line of sight Connection of master and receiver The receiver is connected to the master or the add on module using the included cable. Max distance between the master/add on module and receiver is 3m. Up to 5 receivers can be connected, either in a daisy chain or in parallel. Positioning Do not place the receiver inside a metal box. In case of communication problems it may be necessary to move the location of the receiver, or to add an additional receiver. Configuring Connect the receiver to the master, and the system will reconfigure itself for wireless operation. 39 7.0 Setting up BA Master controller (Cooling) The REHAU BA Master Controller is an independent floor heating / cooling control system. It requires manual switching of the system from heating to cooling and back to heating using a WLAC switch or a volt free signal from the BMS. Thus, being able to give an output demand signal to boiler, chiller or a reversible heat pump. Default settings on the BA master (Cooling) Day temperature 24°C Night temperature 26°C Off Temperature (Frost protection) 5°C Minimum flow water temperature 2°C (above dew point) Floor Limit temperature, high 27°C Floor Limit temperature, low 17°C WLAC SWITCH Slider switch set to heating position (In this situation BMS has priority) REHAU + + WLAC + + T T Factory settings Connected to sensor BUS T T Description Volt free signal from the BMS; When BMS relay is closed, the system switches into cooling; when relay is opened the system switches to heating Connected to sensor BUS 37. Wiring of BMS for Heating/Cooling change over decision The controller is supplied with pre programmed settings. The adjustment of these parameters is not possible on the BA Master Controller 7.1 Offset to Day Temperature This provides the daytime cooling offset temperature (factory set to 3°C). This function prevents the need to adjust the temperature settings on the sensors from winter to summer temperatures. This allows all the connected sensors within the controller to have a positive offset temperature to the set day temperature set within the controller e.g. If the Controller has heating day temperature set point is 21°C then in cooling mode the controlled cooling temperature within the space will be 24°C (21+ 3). 7.2 Night Setback Temperature (NSB) The cooling setback function will operate at whatever NSB temperature set within the master controller above the room set-point temperature when in cooling mode. The factory set NSB temperature is 2°C. 40 7.3 BMS Used for Heating/ Cooling Change Over Decision If a BMS system in being used for the heating/cooling decision, the volt free BMS signal should be connected to the REHAU WLAC switch, but the slider switch on the right side of the WLAC must be set to the heating position (in this situation the BMS signal has priority and we recommend that the slider toggle be removed to avoid incorrect overriding) (Refer to Fig. 37). 7.4 Exceeded Dew Point The controller calculates the dew point temperature based on room temperature and relative humidity. If the water temperature flowing into the underfloor heating/cooling circuits is lower than the dew point temperature plus 2°C safety factor, the controller signals the actuators to close, there by preventing the formation of any condensation. BA Master Controller STRING NUMBER (1-F) UNIT NUMBER (1-9) 5 4 3 2 Out put 8 L N 5 8 7 6 DIP SWITCH ON OFF 1 L 2 N L N 3 4 L N L N THERMAL ACTUATORS 5 L 6 N L 7 N L 8 N L N DISPLAY 1 2 3 4 5 6 7 8 SUPPLY SENSOR L N MIXING VALVE 0 - 10V THERMOSTAT BUS + T Out put 7 L N + T Out put 6 L N 4 9 8 7 6 1 Out put 2 Out put 3 Out put 4 Out put 5 L N L N L N L N THERMAL ACTUATORS 24V 2 9 OUT PUT 1 L N 3 0 1 0 F E D C B A Y NETWORK BUS X NETWORK BUS X-RELAY C1 C2 SEC. PUMP 230VAC L 1 N L 2 N L N THERMAL ACTUATORS 3 4 L N L N 5 L 7 6 N L N L 8 N L N EXT. SWITCH I O MIXING VALVE 24V AC THERMOSTAT BUS APP SENSOR + T BOILER B1 B2 N + T L + T SUPPLY 230VAC OUT PUT 1 L N Out put 2 L N THERMAL ACTUATORS 24V Out put 3 Out put 4 Out put 5 L N L N L N Out put 6 L N Out put 7 L N ADD-ON MODULE WIRELESS RECEIVER LINK Out put 8 L N DIP SWITCHES OFF Connection to Dehumidifier RESERVED X - RELAY DEHUMIDIFIER L N L Blue N 230V AC Mains Supply Brown BOILER TEST 1 2 3 4 5 6 7 8 12 nc SENSOR CHECK INITIAL HEAT UP SEQUENCE 24 V RELAY 11 14 no ON A2 INSTALL MODE A1 DIP Switch 7 turned to 'ON' on the master controller to enable dehumidifier when humidity exceeds a set point Only Output 1 on the Master Controller can be used for switching the Dehumidifier Green/ Yellow 38. Typical Wiring Schematic for Dehumidifier requiring 230V signal using a 24V Relay 7.5 Using Dehumidifier If cooling is being limited due to high humidity a dehumidifier can be enabled by the BA Master Controller. The dehumidifier can be connected via a relay using output number 1 on the master and setting DIP-7 to “on”. 7.6 Dew Point Control The dew point control of the system is performed by the BA Master Controller coupled with the Humidity Sensors positioned within the index rooms (refer section 4.2.1, on page 29). The controller will calculate the dew point temperature based on the index room temperature and the % of relative humidity within the index room. If the system has more than one humidity sensor installed within the control system then the BA Master Controller will operate to the worst case temperature and humidity conditions. If the cool water temperature flowing into the floor heating/cooling circuit approaches the dew point temperature (safety factor of 2°C), the controller will signal the actuators present on the manifold to close the return valve of the circuits and there by preventing the formation of any condensation. The output from the controller is 24Vac. Channel number 1 cannot be used for Room temperature control in this situation 7.7 Volt Free Output Signal for Chiller/Reversible Heatpump The REHAU BA Master Controller will provide a volt free output signal to enable a chiller/reversible heat pump via the X-Relay. BA Master Controller (Main Control) STRING NUMBER (1-F) UNIT NUMBER (1-9) ON 1 2 3 4 5 6 7 8 MIXING VALVE 0 - 10V ON OFF SUPPLY 230VAC L N 38a. Volt Free Output Signal for Chiller/ Reversible Heat Pump BOILER B1 B2 X-RELAY C1 C2 SEC. PUMP UFH 230VAC L N 1 2 3 4 5 6 7 8 X - RELAY OFF X - Output 41 8.0 System Start Up and Operating Instructions 8.1 Setting the Sensor Channel Number Set the channel selector within the various sensors so that it corresponds with the thermal actuator output that it must activate. Each sensor on the system is to be allocated a channel number. Under the front cover of all sensors a selector can be accessed. (As shown in Fig. 40). The number of its output (its CH channel) can be set with a screwdriver The channel selection on all sensors can be carried out without the sensor being supplied with power. However when the power is on the sensors will need to be given control designation (see section 8.0) and a HARD RESET must be carried out to the REHAU BA controller to enable all sensors to be recognised. A sensor set to CH 1 will activate the thermal actuators connected to output TH1 within the controller. This will control the actuators connected to that zone. For channel numbers 10 to 14, use the letter designation A to E. 10 = A, 11= B, 12 = C etc. 39. REHAU CT2 Programmable Room Sensor front cover layout A) Display B) Down adjustment C) OK - Accept D) Up adjustment E) Reset to factory settings F) Pin button for clock adjustment Up to 13 slave sensors can be controlled by one REHAU CT2 Programmable Room Sensor. The REHAU BA control unit can only accept 8 heated zone inputs (see fig. 40 for channel number allocation). If additional heated zones are necessary, an REHAU Add On Module must be utilised. For Channel 0 see section 12.3, page 59 40. Channel allocation setting Number of zones BA Controller Add On Modules Up to 8 Zones 1 0 9 to 14 Zones 1 1 0 % MASTER Add On MODULE 9 9 A 10 TH2 B 11 TH3 C 12 4 TH4 D 13 5 TH5 E 14 6 TH6 7 TH7 8 TH8 1 TH1 2 3 41. Controller number designation Within the sensors when used with REHAU Add On Module which can control 6 extra head zones 42 8.0 System Start Up and Operating Instructions 8.2 REHAU BA Master Controller The BA Master Controller comes with pre-set temperatures, these pre-set values are fixed so the REHAU BA Master Controller should always be used in conjunction with at least one REHAU CT2 Programmable Room Sensor. However if a REHAU CT2 Clock sensor is fitted to the system it will override the fixed and the programmed parameter set in the REHAU BA Master Controller. Default Settings The BA Master Controller has the following default temperature settings: Description Factory settings Day temperature 21°C Night temperature 18°C Off Temperature (Frost protection) 5°C Floor Limit temperature, high 27°C Floor Limit temperature, low 17°C BA Master Controller controls only temperature settings and there is no time control. If a REHAU CT2 Clock Thermostat is NOT fitted on the system an external time clock will be required to control the time switching of the system. The REHAU BA Master Controller can accept a volt free signal from an external switch (timer) which will facilitate the switching between day mode and night set back mode. For setback the switch will be in OPEN circuit and CLOSED for day- time operation. Each controller type comes fitted with a link across the TIME terminal. This link has to be removed and replaced with the switch/timer connection. 43 9.0 Commissioning The definition of commissioning, according to CIBSE (Chartered Institution of Building Services Engineers) is the advancement of an installation from static completion to working order to specified requirements. The commissioning of a system is essential to obtain the design operating parameters of the UFH system as set out by the system designer. Co-operation between all parties involved with the design and installation of the FH and control system is essential. 9.2 The Commissioning Team Normally Consists of: -FH installer -FH control system installer / electrician -Boiler and main system controls installer / electrician -M & E contractor -Commissioning engineer. Sufficient time and resources has to be allowed for the full commissioning process of the installation to be completed. 9.1 Pre-commissioning Requirements - Balance the flow rate through the circuit valves on the manifold - Confirm with the installer that the boiler commissioning has been carried out as instructed in the boiler manufacturer’s installation and servicing instructions - Confirm correct operation of the system controls including the sequencing of the pumps and boiler. For fixed flow water temperature control (REHAU BA Master Controller) follow the steps in the Underfloor Heating Systems - Installation Guide 890.605E section Initial system warm up. This details the start up temperature to the FH. Flow headers and the duration of these temperatures as set out in BS EN 1264 Pt.4. 44 10.0 ct SEt UP gUIdE 10.1 CT2 CT2 / 2 PRogRAMMABlE RooM SEnSoR, doMEStIc Hot wAtER, RAdIAtoR And two StAgE contRollER Programmable Room Sensor, CT2 / R Radiator Controller, CT2 / HW Two Stage Controller Domestic Hot Water Controller This user guide applies for all the controllers mentioned above, with certain instructions only for specific controllers. A: B: C: Display Adjustment down OK - accept D: E: R F: Adjustment up Reset to factory setting Pin button adjust of clock 42. REHAU CT2 Programmable Room Sensor/Controller front cover layout The REHAU CT2 Programmable Room Sensor Controller has 3 main buttons to navigate: UP 1 2 3 4 5 6 7 , DOWN and ENTER (circled). 0:00 G: H: I: Automatic mode Manual mode Time and Temperature J: Day Number 1 2 34567 K: ". 1234567 ". ". 1234567 4-event symbol Wake Night ". 1234567 Out Home 43. REHAU CT2 Programmable Room Sensor/Controller 45 1. 1 2 3 4 5 6 7 1 2 3 4 5 6 7 The time will have to be set as soon as the CT2 Programmable Room Sensor is switched on for the first time, the hour digits start to flash. :00 1.1a To change the hours on the clock, use the default) and then press . and to select the correct hour (24 hour clock is I I:00 1.1b Then the minutes will start to flash, adjust as above and press 1 2 3 4 5 6 7 2 3 4 5 6 7 to confirm. I I:23 1.2 The day of the week then has to be set. Number 1 on the top left of the screen will flash, select the correct day by using the up and down arrows. 1 is Monday, 2 is Tuesday....6 is Saturday, 7 is Sunday. Press to confirm. 1.3 This shows the channel numbers for the following zones:- I I:23 To set which channels the CT2 Programmable Room Sensor controls, press zone CH 1. 46 1.4 Use the UP and DOWN arrows to either select ON. 1.5 or OFF. Press to confirm, then the next channel will appear. to select the first 1.6 Repeat for each channel as desired. To leave this menu, either go through all 14 channels and press ESC (below) or don’t press any buttons for 10 seconds and it will revert to main screen. 1.7 To quit a sub-menu at any time, navigate the menus until you reach ESC and press . N.B. Steps 1 - 3 are a requirement to enable the correct operation of the control system. Steps 4 - 8 are optional. 1.8 The date and time are now set. 2 I I:23 N.B. Time has to be manually changed between BST and GMT. to change the default time settings. 2. The default time events are shown below, if you do not wish to change them, proceed to step 3. If you do wish to change them, follow step 2. 44. Event-clock mode DAY 1-5 TIME TEMPERATURE Day Out In Night 06:00 08:00 16:00 22:30 21°C 15°C 22°C 18°C DAY 6-7 TIME TEMPERATURE Day Night 08:00 23:00 22°C 15°C 4 Event Sequence High limit temperature Low limit temperature Scale 4.5.2 50°C (DHW) 30°C (DHW) 50°C (DHW) 30°C (DHW) 50°C (DHW) 30°C (DHW) 29°C (CT2 Programmable Room Sensor only) 17°C (CT2 Programmable Room Sensor only) 24hr/°C N.B. All event times must be in the same 24hr period. REHAU recommend a 2 hour warm up / cool down time for your underfloor heating, e.g. to be warm at 7am, start the first event, DAY, at 5am. 4-event clock mode/ automatic mode: In automatic mode, the clock function symbol ( ) and one of the 4-event symbols ( indicated. Comfort mode: 5 secs. ) will be Temporary override To temporarily override any temperature in the 4-event schedule program, press the UP ( ) button once, to show the temperature in the display, and press UP ( ) or DOWN ( ) again to increase or decrease the temperature. The display will flash for 5 seconds, and will then revert to the time. The override will operate until the next programmed event when the sensor will resume the automatic programme. Cancel comfort mode To cancel the temporary override, press the OK ( ) button twice. Manual mode: 5 secs. Permanent override During holidays, the scheduled 4-event program can be overridden. Press the OK ( ) button, and then the UP ( ) or DOWN ( ) button until the override temperature is set. The set temperature will remain in the display and the unit will now operate to this temperature permanently. Cancel comfort mode To cancel the permanent override state press the OK ( ) button once, and the unit will resume automatic function. 47 1 2 3 4 5 2.1a Hold the button for 3 seconds. This screen will be displayed. This shows the start time of the first event, DAY, which is the first time the heating comes on. If this is to be changed, use the UP and DOWN arrows like when setting the time. If it is not to be changed, press 1 2 3 4 5 twice to move on. 2.1b This is the temperature for the DAY event. to continue. Adjust if required as above. If not press N.B. If no buttons are pressed for a while, the CT2 Programmable Sensor/Controller will revert back to the main 1 2 3 4 5 1 2 3 4 5 1 2 3 4 5 1 2 3 4 5 1 2 3 4 5 1 2 3 4 5 48 screen and you will have to start again. 2.2a The time the second event starts - OUT. Adjust if required as above. If not press twice to continue. 2.2b This is the temperature of second event - OUT. Adjust if required as above. If not press 2.3a The time the third event starts - IN. to continue. Adjust if required as above. If not press twice to continue. 2.4b The temperature for the third event - IN. Adjust if required as above. If not, press to continue. 2.5a The time for fourth event to start - NIGHT. Adjust if required as above. If not press twice to continue. 2.5b The temperature for fourth event - NIGHT. Adjust if required as above. If not, press to continue. 2.6a Days 6 and 7 (Saturday and Sunday) only have 2 events - DAY and NIGHT. This screen shows the start time of day event. 6 7 Adjust if required as above. If not press twice to continue. 2.6b The temperature for DAY event at weekend. Adjust if required as above. If not, press to continue. 6 7 2.7a The time which the NIGHT event starts at weekend. twice to continue. Adjust if required as above. If not press 6 7 1 2 3 4 5 2.7b The temperature for the NIGHT event. Adjust if required as above. If not, press to continue. 2.8 Once the settings are completed, the CT2 Programmable Room Sensor/Controller returns to the standard screen, showing time, day and current event. 3. temporary override (to change current temperature temporarily) 2 Press the UP button once, the temperature then flashes. Adjust to desired temperature with UP and DOWN buttons. The display then flashes for 5 seconds and then reverts back to main screen. To cancel, press twice. 3.1 Permanent override (e.g. occupants go on holiday) Press on main screen. Use UP and DOWN buttons until desired temperature reached. Press to confirm. The display will remain on the override temperature until it is cancelled. To cancel, press once. 49 4. changing event sequence over different days (if required) Hold UP and DOWN buttons to reach sub-menus. Scroll through and press on Pro. The 5 possible sequences below can be scrolled through and selected by 4.1a 4 events on 5 days, 2 events on 2 days (default). 1 2 3 4 5 4.1b 4 events on 6 days, 2 events on 1 day. 1 2 3 4 5 4.1c 4 events for 7 days. 1 2 3 4 5 6 7 4.1d 2 events for 7 days. 1 2 3 4 5 6 7 4.1e 2 events for 5 days, 1 event for 2 days. 1 2 3 4 5 5. Setting Floor Sensors (only available on ct2 Programmable Room Sensor) Hold UP and DOWN buttons to reach sub-menus. Scroll through and press on on HiLi. 50 . 5.1 Adjust maximum floor sensor temperature with UP and DOWN buttons, press to confirm. N.B. Only a maximum OR minimum floor sensor can be fitted to each CT2 Programmable Room Sensor, not both. 5.2 Select LoLi if minimum floor sensor fitted. 5.3 Adjust minimum floor sensor temperature as above. 6. to See current Sensor Info Hold UP and DOWN buttons to reach sub-menus. Scroll through and press on InFo. 6.1 The first screen shows the software version. 6.2 Press DOWN to show current room temperature. Press DOWN again to show floor temperature (if floor sensor fitted). Press to return to main screen. 1 1 N.B. No values can be changed in InFo. 7. changing the Scale from °c to °F and 12-24hr Hold UP and DOWN buttons to reach sub-menus. on SCAL. Scroll through and press This allows you to change the clock and the temperature units. 51 7.1 Press UP and DOWN to scroll through options and to select desired scale. The first is 24 hour clock and temperature in celsius. 1 2 3 4 5 6 7 AdAP 7.2 24 hour clock and temperature in fahrenheit. 7.3 12 hour clock and temperature in celsius. 7.4 12 hour clock and temperature in fahrenheit. 8. Turning on Adaptive function ensures that the room will reach the correct temperature at the desired time. Hold UP and DOWN buttons to reach sub-menus. Scroll through and press on ADAP. 8.1a Use the UP and DOWN arrows to either select ON. 8.1b or OFF. Press 52 to confirm, then the next channel will appear. Below only required for CT2 / 2 Controller (Two Stage Controller) 9. 1 2 3 4 5 6 7 To change advanced settings on the two stage controller Advanced settings on two stage controller. Using these settings, the secondary heat source could be turned on if the room does not reach the correct temperature in the desired time. An example would be to bring the second stage if temperature has not reached 2°C of the set point within 30 minutes Hold UP and DOWN buttons to reach sub-menus. Scroll through and press on 2 ST 9.2a Use the UP and DOWN arrows to either select ON. 9.2b or OFF. Press 1 2 3 4 5 6 7 1 2 3 4 5 6 7 1 2 3 4 5 6 7 1 2 3 4 5 6 7 to confirm, then the next channel will appear. 9.3 ‘LEAP’ will start to flash on the screen, press to confirm. 9.4 Use the UP and DOWN arrows to set the temperature between 0 to 10°C, press 9.5 ‘EINE’ will start to flash on the screen, press 9.6 Use the UP and DOWN arrows to set the time between 0 to 2hrs, press LEAP to confirm. 2.0C to accept. EINE to confirm. I:00 53 11.0 Domestic Hot water (DHW), Radiators and Two stage controller 11.1 Domestic Hot water (DHW) HWS Hot Water Supply CT2/HW CT2/HW Domestic Hot Water Controller SV Safety Valve HWS ZV Zone Valve Hot Water Sensor HWS Hot Water Supply HLS High temperature Limit Thermostat CT2/HW Hot Water CT2/HW Domestic HotAV Water Controller Air Vent Cylinder AV SV Safety Valve TS Temperature semsor (Flow) HWS ZV Zone Valve CP Hot Water Sensor Circulating Pump HLS High temperature BPV Limit Thermostat By pass Valve Hot Water AV Air Vent SV Safety Valve Cylinder AV TS Temperature PV semsor (Flow) Pressure Vessel CP Circulating Pump CS Cylinder Sensor BPV By pass ValveRS Junction Box Room Sensor SV Safety Valve TMV PV Thermostatic Mixing Valve CP PV Pressure Vessel ZV CP CS Cylinder Sensor ZV Junction Box RS Room Sensor Boiler TMV PV TMV Thermostatic Mixing Valve CP BA Master Controller BA Master Controller RS CP HLS TS Manifold Flow Header RS ZV HLS CP TS Manifold Return Header Manifold Flow Header ZV TMV Manifold Return Header BPV CP Boiler BPV 45. Constant Flow Water Temperature system with ‘S’ plan Integration Constant Flow Water Temperature system with 'S' plan Integration Working Principle Installation The REHAU CT2/HW is provided with a remote flow temperature sensor A 2-port zone valve is installed on the primary supply from boiler Constant Flow Water Temperature system with 'S' plan Integration which is strapped on to the domestic hot water supply pipe from the to storage cylinder, and this is wired to a 24V Relay, which is cylinder (within 150mm of top of cylinder). The temperature of the hot controlled by the output of the REHAU BA controller. The channel water is controlled by REHAU CT2/HW, which continuously compares the output number is set in the REHAU CT2/HW controller. required water temperature with actual water temperature measured by the flow temperature sensor. If the water temperature is too low, it will Master Controller signal the zone valve (wired via a 24V Relay into the Master Controller) to open and start the boiler there by allowing hot water to flow through the primary coil. Master Controller RJ45 NETWORK BUS NETWORK BUS ADD-ON MODULE WIRELESS RECEIVER Programming The programmable function allows for two timed periods per day when the water temperature is generated up to the level set within the controller. Outside of these periods a second temperature can be set, as a back up, below which the stored hot water is not allowed to fall, outside of the timed periods. The actual temperature being measured by the sensor is displayed in the controller’s “info” menu. RJ45 NETWORK BUS NETWORK BUS N L ADD-ON N MODULE L N L N DISPLAY L MIXING VALVE Out put 1 Out put 2 Out put 3 Out put 4 Out put 5 Out put 6 Out THERMAL put 7 OutACTUATORS put 8 24V EXT. SUPPLY L N L N L N L N L N OutLput 1N OutLput 2N OutLput 3N Out put 4DISPLAY Out put 8 0 - 10V SWITCH Out put 5SENSOR Out put 6SENSOR Out put 7BUS L N L N L A1 A2 11 THERMAL ACTUATORS 24V 54 I O 14 no 12 nc L N L N L N L 14 no N L 24 V RELAY EXT. 12 nc N SWITCH I O APP SENSOR SENSOR BUS + NOT USED LINK N L Grey REMOTE SENSOR FOR HOT WATER CYLINDER ZONE VALVE ON DHW CIRCUIT + + Y X MIXING VALVE 24V AC + REHAU CT2/ HW Controller MIXING VALVE 24V AC Orange Brown 24 V RELAY Blue Green/ Yellow NOT USED + SENSOR BUS APP SENSOR + REMOTE SENSOR FOR REHAU CT2/CYLINDER HW HOT WATER Controller + REHAU + + Channel Selector Set to Output 5 L N L Brown Blue employed, so Green/ Yellow X EARTH N 230V AC Mains Supply L EARTH N 230Vallowed AC Back up water temperature not to Mains fall below the set temperatureSupply *This may be reduced to a lower setting if solar generation of hot water is that best use is made of the “free” energy produced by the solar heating **For altering the default settings please refer to Section 10, on page 45 N A1 A2 11 N L 30ºC N Y + REHAU + + T T Hot water generation L T 50ºC* N + L T Description N L L N N +L MIXING VALVE 0 - 10V SENSOR BUS T Default Settings** N L N LINK Out put 1 Out put 2 Out put 3 Out put 4 Out put 5 Out put 6 Out put 7 Out put 8 L N T N T L THERMAL ACTUATORS 24V SUPPLY SENSOR WIRELESS RECEIVER T T L T N L N L N THERMAL ACTUATORS 24V T L T N T L T Out put 1 Out put 2 Out put 3 Out put 4 Out put 5 Out put 6 Out put 7 Out put 8 46.Orange Wiring Schematic for REHAU CT2/HW HotChannel WaterSelector Controller and 24V Zone Valve Grey ZONE VALVE ON DHW CIRCUIT Set to Output 5 11.0 Domestic Hot water (DHW), Radiators and Two stage controller 11.2 Radiators CT2/R SV ZV AV TS CP BPV SV PV CS RS TMV LSV TRV Radiator Controller Safety Valve Zone Valve Air Vent Temperature Sensor (Flow) Circulating Pump By pass Valve Safety Valve Pressure Vessel Cylinder Sensor Room Sensor Thermostatic Mixing Valve Lock Shield Valve Thermostatic Radiator Valve BA Master Controller CT2/R Radiator TRV CT2/R Radiator Controller SV Safety Valve ZV Zone Valve SV PV CS SV RS CP TS HLS BA Master C Manifold Flow header CT2/R AV Air Vent TS Temperature Sensor (Flow) Junction Box CP Circulating Pump BPV By pass Valve ZV PV LSV ZV Manifold Return header TRV Radiator LSV TMV Safety Valve CP HLS Cylinder Sensor Boiler RS TMV Room Sensor Thermostatic Mixing Valve LSV BPV ZV Junction Box Manifold ZV Lock Shield Valve Thermostatic Radiator Valve 47. Hydraulic Schematic for REHAU CT2/R Radiator Zone ControllerTRV TMV PV SV CP Boiler Working Principle Like traditional control of radiator circuit, REHAU CT2/R controls the temperature of a circuit or Zone of Radiators that are hydraulically independent from an underfloor heating system. The REHAU CT2/R continually compares the required room temperature with the actual room temperature, if the temperature is too low, it will signal the zone valve (wired via a 24V Relay into the Master Controller) controlling the radiators to open and start the boiler, thereby allowing hot water to flow through the circuit. BPV Default Settings* Description 21ºC* Occupied - Zone temperature 17ºC Setback - Zone temperature * For altering the default settings please refer to Section 10, on page 45. Installation A 2-port zone valve is installed on the primary supply from boiler to the radiators and this is wired to 24V Relay, which is controlled Master Controller by the channel output of the REHAU BA controller. That channel output number is then set in the REHAU CT2/R controller. Programming The default programmable function allows for two timed periods per day when the temperature of the zone is required level and allowed to fall to Master Controller a lower level outside these periods. The actual zone temperature being SENSOR BUS measured by the sensor is displayed in the unit’s “info” menu. RJ45 NETWORK BUS NETWORK BUS ADD-ON MODULE WIRELESS RECEIVER L N L N L N L N L N L N L N DISPLAY THERMAL ACTUATORS 24V MIXING VALVE 0 - 10V SUPPLY SENSOR L N + + T N Y T Out put 1 Out put 2 Out put 3 Out put 4 Out put 5 Out put 6 Out put 7 Out put 8 L RJ45 X NETWORK BUS NETWORK BUS ADD-ON MODULE WIRELESS RECEIVER N L N L EXT. SWITCH I O N L N L N L N + L + N L N L N L N L N SUPPLY SENSOR L EXT. SWITCH I O N MIXING VALVE 0 - 10V SENSOR BUS + + + + Y X MIXING VALVE 24V AC SENSOR BUS APP SENSOR LINK + REHAU CT2/R Controller Channel Selector Output 5 A1 Set A2 to 11 L EARTH N L THERMAL ACTUATORS 24V REHAU Out put 1 Out put 2 Out put 3 Out put 4 Out put 5 Out put 6 Out put 7 Out put 8 Grey N L 230V AC If the whole heating system is served by radiators, and no underfloor ZONE VALVE ON RADIATOR CIRCUIT Mains Supply heating is used, then standard REHAU CT2 sensor should be used, Brown which will start the secondary pump, for circulation around the system. Blue N DISPLAY REHAU CT2/R Controller LINK If thermostatic radiator valves are employed, these can be used for A1 A2 24 V RELAY individual room control, and the REHAU CT2/R can be 11 used as a timing 230V ACused for maximum 14 12 device with the high temperature setting limiting and no nc NOT USED Mains the low temperature setting for frostSupply protection. Orange Brown Blue Green/ Yellow MIXING VALVE 24V AC Out put SENSOR 1 Out put BUS 2 Out put 3 Out put 4 Out put 5 Out put 6 Out put 7 Out put 8 APP L N + L N + L N +L N L N L N L N L N SENSOR THERMAL ACTUATORS 24V 14 no 24 V RELAY REHAU + + 12 nc NOT USED Orange L L EARTH N N T T L T T N T L T N T L T N T L T N T THERMAL ACTUATORS 24V Out put 1 Out put 2 Out put 3 Out put 4 Out put 5 Out put 6 Out put 7 Out put 8 T The control of multiple rooms is possible, contact REHAU sales office. L TS Manifol CP Pressure Vessel Channel Selector Set to Output 5 Grey Green/ Yellow ZONE VALVE ON RADIATOR CIRCUIT 48. Wiring Schematic for REHAU CT2/R Radiator Zone Controller 55 11.0 Domestic Hot water (DHW), Radiators and Two stage controller 11.3 TWO Stage room temperature controller Master Controller 0 DIP SWITCH ON OFF 1 2 3 4 5 6 7 8 RJ45 NETWORK BUS N L 3 N 4 L N L N THERMAL ACTUATORS 5 L 6 N L 7 N L 8 N L N DISPLAY L MIXING VALVE 0 - 10V THERMOSTAT BUS SUPPLY SENSOR N + T L 2 + T 1 Y X NETWORK BUS C1 C2 1 230VAC L N L 2 N L N THERMAL ACTUATORS 3 4 L N L N 5 L 7 6 N L N L 8 N L N EXT. SWITCH I O + + ADD-ON MODULE MIXING VALVE 24V AC THERMOSTAT BUS APP SENSOR T BOILER B1 B2 N T L + T SUPPLY 230VAC WIRELESS RECEIVER L N L N L N L N L N L N THERMAL ACTUATORS 24V L THERMAL ACTUATORS 24V Out put 1 Out put 2 Out put 3 Out put 4 Out put 5 Out put 6 Out put 7 Out put 8 L N L N L STAGE 1 A2 11 L L N L N L N EXT. SWITCH I O LINK MIXING VALVE 0 - 10V SENSOR BUS + + SENSOR BUS APP SENSOR + + Y X MIXING VALVE 24V AC + REHAU CT2/ 2 Controller Channel Selector Set to '2' 24 V RELAY REHAU 12 nc 11 14 no + + 24 V RELAY CT2/ 2 12 nc L NOT USED ZONE VALVE ON RADIATOR CIRCUIT Orange Grey A2 EARTH N L Blue N N 230V AC Mains Supply Brown L STAGE 2 A1 14 no N N T T A1 N SUPPLY DISPLAY SENSOR T N T L T N T L T Out put 1 Out put 2 Out put 3 Out put 4 Out put 5 Out put 6 Out put 7 Out put 8 ELECTRIC HEATING ELEMENTS Output for second stage control is always adjacent to stage one control output Green/ Yellow 49. Wiring Schematic for REHAU CT2/2 Two STAGE Room Temperature Controller Working Principle REHAU CT2/2 provides two stage control of a designated area or room which may be part of an underfloor heating system. These units are used where a secondary heat source is employed to boost the temperature within the area if the conventional heating system is not powerful enough. For example, a conservatory, which features a considerable glass area, can benefit by the switching of an additional heat source i.e. electric radiators on very cold days when the normal system cannot achieve the required temperature level. A further application is where a heat pump is used to create the normal system hot water, but on very cold days this may not be sufficient to achieve the required temperature. The second stage can be used to enable a back up boiler or immersion heater. When a timed event occurs to raise the room temperature a function within the controller allows the normal heating system to initially try to achieve the temperature. If after a period of time (x) it has not warmed the space to within (y) degrees of the required level, the second output is enabled. Once the temperature has been achieved, the second stage switches off, but if the temperature should then fall to below (y) degrees of that required, the second stage is re-started after a similar delay period. Within the advanced menu section of the controller, the ‘y’ 56 setting can be adjusted by the client or installer from 0ºC to 10ºC, and the ‘x’ setting can be adjusted from 0-2 hours, so an example would be to bring on the 2nd stage if the temperature has not reached within 2ºC (y) of the set point after (x) 30 minutes. Programming 4 event time and temperature programming is similar to that of standard CT2 Programmable Room Sensor. In addition it also includes programming for second stage. An “optimum start” facility (adaptive function) can also be enabled when the unit will calculate the ON time, to achieve the required temperature by the start of the programmed period. (Refer to section 10, on page 45) Installation The Two Stage Controller is installed as part of the BA controller and set to a channel number, e.g. Channel 3. The normal heating valve is connected to output 3. Output 4 on the Master Controller becomes the second stage output, and must not be used for any other function. The electrical capacity of the output is 2 amps, so if electric elements are being used, a relay or contractor should be employed. 12.0 Special Functions 12.1 Networking multiple controllers Up to 15 Strings CP BPV IV MP ZV CP ZV Circulating Pump By Pass Valve Isolating Valve Main Pump Zone Valve Network Master Submaster Slave Up to 9 Masters String 2 IV IV BA 2,1 ZV CP IV BA 2,2 String 1 IV Up to 9 Masters BA 1,1 BA 1,2 BA 1,3 Add On Module MP Hot Water Centrally Mixed by Third Party BA 2,3 BPV BA 0,0 Master 1 Master 2 Add On Module Signal to Switch the Boiler Network Master can control up to 14 heated zones 50. Hydraulic Schematic for Networking of Multiple Controllers In larger buildings with more than 14 zones where multiple manifolds are utilised, it is possible to use multiple masters to create a single network. One master must be defined as the “network controlling master” by setting both dials to zero (see table below). Using more than one secondary pump 1. If more than one secondary pump is used, a separate string should be created for each pump (see Fig. 50). On the first string all left hand dials in the slaves must be set to 1, and the right hand dial should be set in sequence from 1 to 9. On the second string of masters/ slaves all left hand dials should be set to 2 and the right hand dials again should be set in sequence from 1 to 9. This numbering can be continued for up to 15 strings. 2. All main controllers are interconnected using special cable via the RJ 45 socket 1 or 2. Master and Slave Left dial set to Right dial set to Network Controlling Master 0 0 String 1 Submaster 1 1 String 1 Slave 1 2 to 9 String 2 Submaster 2 1 String 2 Slave 2 2 to 9 Up to String 15 Submaster 1 to F 1 Left Dial Right Dial 3. RJ 45 connection of string 1 to string 2 etc., can be achieved via string 1 slave to string 2 submaster or string 1 slave to string 2 slave as shown in Fig.50. 4. An BA Master Controller can be used as the “network controlling master” for central mixing control of supply water and boiler switching. 57 12.0 Special Functions 12.2 Dip Switches Function Description DIP switches (located on the master controller) 1 Turn on to activate install mode Increase temperature on sensor in room 1, this would activate actuator on output 1 and will open after 1-3 minutes, UFH pump to turn on and mixing valve to open; Turn off to deactivate ON OFF 1 2 3 4 5 6 7 8 INSTALL MODE DIP Switch This closes the boiler start relay contacts for 1 minute; Turn off to deactivate ON DIP Switches on the master controller DIP Switches on the master controller 6 Off Off Where a boiler primary pump is required to be switched on from the master, the X relay output can be used for this purpose. This relay will be activated 10 seconds after the UFH circulating pump has started. ON ON OFF OFF 1 2 3 4 5 6 7 8 1 2 3 4 5 6 7 8 On High limit zone valve This function is used where an additional protection is required to prevent boiler water entering the underfloor system. When the system is off or when the supply water exceeds 65°C. An additional flow water temperature sensor (ETF-1899A) and a zone valve are connected (Fig. 14, see page 17) Cooling device or module alternative The relay output can be used to provide a volt free signal to a heat pump or to a K-MOD switching module where a chiller is utilized to provide the cooling water. The relay output is always on in cooling mode and off in heating mode Turn on for Dehumidifier If a dehumidifier is being used it can be connected via a relay using number 1 output on the master and setting DIP-7 to “on”, the output given is 24V ac. Hence Channel 1 cannot be used for room temperature control ON ON OFF OFF 11 22 33 44 55 66 77 88 ON ON OFF OFF 1 2 3 4 5 6 7 8 1 2 3 4 5 6 7 8 XX- -RELAY RELAY On Off XX- -RELAY RELAY On ON OFF 1 2 3 4 5 6 7 8 DEHUMIDIFIER 7 58 RESERVED RESERVED XX- -RELAY RELAY DIP Switch 4 turned to 'ON' on the master controller to DIP Switch 4 turned to 'ON' on the master controller to initial heat up sequence in accordance with BS EN 12 initial heat up sequence in accordance with BS EN 12 X RELAY RELAY Output Output X Main Pump DEHUMIDIFIER DEHUMIDIFIER 1 2 3 4 5 6 7 8 BOILER BOILERTEST TEST OFF OFF 11 22 33 44 55 66 77 88 XX- -RELAY RELAY 5 DIP DIP SWITCHES SWITCHES SENSOR SENSORCHECK CHECK INITIAL INITIALHEAT HEATUP UP SEQUENCE SEQUENCE OFF ON ON SENSOR CHECK XX- -RELAY RELAY DEHUMIDIFIER DEHUMIDIFIER BOILER BOILERTEST TEST room sensor is present on that channel. Turn off to deactivate SENSOR SENSORCHECK CHECK INITIAL INITIALHEAT HEATUP UP SEQUENCE SEQUENCE Turn on to activate learn mode OFF OFF 11 22 33 44 55 66 77 88 Power light start blinking; each red channel light on master should now be lit if a ON INSTALL INSTALLMODE MODE 3 DIP SWITCHES SWITCHES DIP INSTALL INSTALLMODE MODE ON ON 1 2 3 4 5 6 7 8 INSTALL MODE OFF BOILER TEST Turn on to close boiler relay RESERVED RESERVED 1& 2 12.0 Special Functions 12.3 Holiday OVERRIDE Function Dependent upon the control system configuration it is possible to override all the automatic functions of the control system with a single function. This action can be used for holiday periods (e.g. to set the whole system into a frost protection mode), or to temporarily override all the temperature control of the system. Below are set out two options. Option 1 CT2 Programmable Room Sensor set to Channel 0 can be used for REHAU CT2 clock sensors controlling a group of slave sensors but do not control actuators. The position of these sensors should be somewhere central or convenient within the building Setting this sensor to Channel 0 will control the time and temperature for the connected group of sensors but the REHAU CT2 clock sensor itself will not control an output. Option 2 Permanent Override If the system if fitted with REHAU CT2 Programmable Room Sensor the scheduled 4-event program can be overridden (refer to permanent override on page 47). 59 12.0 SPEcIAl FUnctIonS 12.4 cHEckIng contRol SYStEM oPERAtIon After setting the channels, it is possible to check the entire control system. Area circled shows the DIP switches on the Master Controller System check procedure 1. Sensor check: a. Switch on DIP-3 to activate sensor check - power light starts blinking. b. Each red channel light on the Master Controller should now be lit if a Room Sensor is present on that channel. c. Switch off DIP-3 to de-activate sensor check - power light stops blinking. DIP Switch 3 turned to ‘ON’ on the Master Controller to enable ‘Sensor Check’ 2. Install mode: a. Turn all adjustable temperature settings on the Room Sensors to minimum. b. Switch on DIP-1 on the Master Controller to activate install mode (Install mode will be active for 2 hours). c. Turn the temperature setting on the adjustable Room Sensor in room 1 to maximum. The red channel 1 light should be lit and the actuator on output number 1 will be activated. d. After 3 mins 10 secs UFH pump and mixing valve output will operate. e. Repeat step 2c on all rooms. Note 1: Install mode will only be active for 2hrs, after this it returns to normal control if left on. Note 2: If the Room Sensor is of a wireless type, a delay of up to 5 minutes may occur before the channel light becomes illuminated. Note 3: If DIP-5 and DIP-6 are off this enables main pump after 10 secs. DIP Switch 1 turned to ‘ON’ on the Master Controller to enable ‘Install Mode’ 3. Boiler test: a. Switch on DIP-1 & 2. This closes the boiler start relay contacts for 1 minute. DIP Switch 1 & 2 turned to ‘ON’ on the Master Controller to enable ‘Boiler Test’ 4. To end all tests: a. Switch off DIP-1 to deactivate sensor check. b. Switch off DIP-2 to deactivate boiler test. c. Set all Room Sensor dials to centre position i.e. zero. d. Room Controllers recommended to 21˚C. e. Set all override switches to automatic position (clock symbol). 5. The system is now operating automatically. 60 13.0 TroubleShooting and Error/Fault Messages 13.1 Troubleshooting Problem Possible cause & Solution Channel light is not coming on (When in Sensor Check (DIP3) Mode) Make sure the power light is blinking. If not then put DIP-3 to ON position. 2-wire bus may be incorrectly connected. Voltage at each Room Sensor should not be lower than 4.0V (check for + & - continuity and short circuits). For Wireless Room Sensors, please check that the batteries have been inserted correctly. Have the Wireless Controllers/ Sensors been initialised. For Wireless Room Sensor check that the REHAU RC (receiver) is correctly connected. For channel 9-14, is the Add On Module correctly connected to the Master Controller. Make sure the Room Sensor in that room is set to the correct channel number. The channel selector on the Room Sensor may be slightly out of position, try rotating and set it again. (When in Install mode (DIP1), when the CT2 Programmable Room Sensor is activated (set to maximum)) Master is not in install mode - after 2 hours the master automatically de-activates install mode - please reset the DIP-1. The actuator on the manifold has not opened after 3 minutes. Check the red channel light is illuminated. Make sure the Room Sensor in that room is set to the correct channel number (two Room Sensors could be crossed over). The actuator for the room is not connected to the correct output on the Master Controller. Bad electrical connection between actuator and terminals. Actuator may be faulty or manually locked. UFH Pump not starting in install mode Bad electrical connection between pump and terminals. Install mode is not activated. Pump may be faulty. Output relay for Main pump, Cooling, High limit valve or other attached device, not starting in install mode Incorrect connection to device (output relay has volt free contacts, see BA Master Controller wiring diagram for correct connection). Bad electrical connection between terminals and attached device. Install mode is not activated. Attached device may be faulty. Boiler does not fire (LED lit) Incorrect connection to device (output relay has volt free contacts, see BA Master Controller wiring diagram for correct connection). Bad electrical connection between terminals and attached device. Install mode is not activated. Attached device may be faulty. (LED not lit) Timing sequence delay is activated BA Master Controller only - mixing valve not open above 20%. No heat demand from Room Sensors. Master Controller is in cooling mode. 61 13.0 TroubleShooting and Error/Fault Messages 13.1 Troubleshooting Problem Possible cause & Solution Mixing valve does not operate correctly (When in install mode) Incorrect connection, see master wiring diagram for correct connection. Valve/actuator assembly is incorrect. Actuator is faulty. Check what happens if sensor and/or outdoor module is missing. (Valve cycles between open and closed in normal operating mode) Valve may be oversized. Supply Limit sensor may be subject to heat migration. Upstream water temperature is excessively high (these problems may be corrected by changing PI settings – please refer to the REHAU Intelligent BA Heating/Cooling Controls, Technical and Installation Manual). Room is too cold. (After running for at least 48 hours) The Room Sensor is placed in a position that does not represent the general temperature in the room. E.g. mounted on external wall or near an extraneous heat source. If the room is controlled by a CT2 Programmable Room Sensor, check that the time and temperatures are set correctly. If the Room Sensor has got an override switch (TM or TD), the switch may be set in the “off” or “night” position. For rooms with floor sensors, the maximum floor limit setting could be preventing the room reaching the desired temperature. Insufficient heating capacity of the system. Bad insulation creating large heat loss. Room is too hot (After running for at least 48 hours) This could be caused by draughts within the wall cavities. The Room Sensor is placed in a position that does not represent the general temperature in the room. If the room is controlled by a CT2 Programmable Room Sensor, check that the time and temperatures are set correctly. If the Room Sensor has got an override switch (TM or TD), the switch may be set in the “day” position. For rooms with floor sensors, the minimum floor limit setting could be increasing the room temperature above the desired setting. Solar gain or extraneous heat source. 62 13.0 TroubleShooting and Error/Fault Messages 13.2 Error/Fault Messages During normal operation the green power LED will be ON when the Master Controller is energised. The red output Channel LED’s (1 to 8 on the Master Controller, and 9 to 14 on the Add On Module) will indicate if the channel output relay is ON/OFF. An error / fault message is shown by flashing the green power LED or one of the 8 red output Channel LED’s. From the number of flashes on any one LED, the problem can be diagnosed, and identified from the following: The error number will be indicated by the number of flashes, with a pause of less than a 1/2 second between the flashes. The indication will be followed by a pause of 2 seconds, following which the sequence will be repeated. Flashing Power LED (green) Flashes Description Corrective action 1 Flash One or more Room Sensors, Room Controllers, WLH, WLAC that are set to channel 0 or channel 15 are no longer sending data to the Master Controller. The fault is corrected by replacing the Room Sensor. The Master Controller will need to be HARD RESET (see below). If the Room Sensor is of the WIRELESS type, the error/fault message could be an indication that the power has failed, and that the internal battery of the Room Sensor needs to be replaced. 2 Flashes One or more Room Sensors have been set to a channel number which does not exist in the system. For example, the message will occur if the units are set to channels 9-14 and the required Add On Module are not found in the system. The error is corrected by setting the channel number of the Room Sensor to a channel that does exist within the installed Master Controller/Add On Module. 3 Flashes Application sensor defect. The fault is corrected by changing the temperature sensor. If the sensor has been removed deliberately to change the operation of the system, follow the HARD RESET instruction below. 4 Flashes The Outdoor Compensation Module (OC) is defective. The fault is corrected by changing the Outdoor Compensation Module. If the module has been removed deliberately to change the operation of the system, follow the HARD RESET instruction below. 5 Flashes The external Supply Limit Sensor (type ETF-1899A) is defective. The fault is corrected by changing the temperature sensor. If the sensor has been removed deliberately to change the operation of the system, follow the HARD RESET instruction below. 6 Flashes Internal overheating. The Master Controller has its own internal safety temperature protection system. The problem is corrected by improving the ventilation around the Master Controller module. 7 Flashes Defective internal overheat sensor. The Master Controller will control as normal, however the protection against internal over heating is no longer active. The fault can only be corrected by replacing the Master Controller module. 8 Flashes The communication to the Add On Module has been lost. The fault is corrected by re-establishing the connection to the Add On Module or by changing the Add On Module if it is defective - or if it has been deliberately removed, with a HARD RESET. 9 Flashes Indicates total number of input units exceeded. Please refer to factory or your local service engineer. 10 Flashes No connection to wireless receiver REHAU RC. 11 Flashes Step 2 on 2-step controller REHAU CT2/2 is used by another Room Sensor/ Controller. Only one error/fault condition can be shown at a time. If more than one error occurs, they will be prioritised in the sequence of flashes. 63 13.0 TroubleShooting and Error/Fault Messages 13.2 Error/Fault Messages Flashing output LED (red): The appropriate output channel LED can flash, indicating that the Room Sensor or Controller on that channel has a fault/error. The failure code can also be seen in the service menu (submenu 2a). Flashes Description Corrective action 1 Flash The Master Controller has lost communication to the Room Sensor. The fault is corrected by re-establishing the connection to the Room Sensor and the fault condition will be automatically reset once correct communication is resumed. If the Room Sensor is defective and has to be changed, or if it has been deliberately removed, it is necessary to make a HARD RESET. If the Room Sensor is of the WIRELESS type, the error/fault message could be an indication that the power has failed, and that the internal battery of the Room Sensor needs to be replaced. 2 Flashes The internal sensor in the CT2 Programmable Room Sensor/Controller is defective. The fault can only be corrected by replacing the Room Sensor/Controller. Remember to make a HARD RESET after installing the new Room Sensor/ Controller. 3 Flashes The limit sensor on the CT2 Programmable Room Sensor/Controller is defective. Replace the faulty sensor. Reset is NOT required. 4 Flashes Defective REHAU CT2 Programmable Room Sensors/Controllers. If a CT2 Programmable Room Controller operating a group of Room Sensors becomes defective, the remaining Room Sensors will continue control within the maximum and minimum limits programmed into the Master Controller. 5 Flashes Two or more CT2 Programmable Room Sensors/Controllers are trying to control this output. Check “AREA” setting on the CT2 Programmable Room Sensor. 13.3 Voltage Measurements The following information should be useful to electrical installers who, with a multi meter, can measure voltages on the terminals of the Master Controller Modules and Room Sensors. Please check these measurements first, in the event of an apparent malfunction. Voltage measured across Value Description Sensor Bus (measured at any point within the Bus) 4.69v to 4.99v dc Indicates a good bus Less than 4.69v dc Indicates that one sensor may have polarity reversed Above 4.99v Theoretically impossible External switch (measured across the terminals) 11.5 to 12v dc Supply water sensor (measured across two terminals) 5.0v dc Mixing valve actuator 25v to 27v ac between + and - Drive signal (the master shows the output in the “spanner” section of the display menu, this can be checked at the actuator terminals, across the blue and black cables). 0v to 10v dc 64 Good Functionality 14.0 ResetS BA WLM. Hydronic Master 1 2 3 4 5 6 7 8 There are two different reset actions that can be used on the BA Master Controller: Resets To Enable Function Hard Reset* (used if there is a faulty sensor) Press the “ ” button on the BA Master Controller for 5 seconds; a HARD RESET will be initiated (indicated by all the red output LED’s (1-8) rapid lighting in sequence). a) This reset will remove any Room Sensor unit with a defective input sensor, or a defective Add On Module from the system. b) The fault message will be reset, but the defective items will no longer participate in the system. Once a defective unit is replaced, the new unit will automatically be recognised by the BA Master Controller and become part of the system. c) This reset would erase the identity of the defective component from the Master Controller memory. Factory Reset (restores factory defaults) Press the “ ” button on the BA Master Controller for 15 seconds; a total factory reset will be initiated. This is indicated through flashes of channel LED’s 1,3, 5 and 7 alternating with channel LED’s 2, 4, 6 and 8 (while the “ ” button is pressed). a) This reset will put all programmed temperature settings back to the factory defaults. b) It will also remove all Room Sensors/Controllers from the master memory, and reset the system to accept only those Room Sensors/ Controllers that are functioning correctly. * Hard resets do not alter the temperature settings already programmed into the BA Master Controller. 14.1 Replacing Faulty Sensor/ Controller 1. Identify the sensor/controller to be changed by the blinking output LED. 2. Switch OFF power to the master. 6. On wireless sensor/controller now press the button on the sensor/ controller. On hardwired sensor/controller go to step. 3. Change the sensor/controller. Ensuring the correct channel address. 7. Check that the corresponding output LED has changed from blinking to permanently ON. 4. Switch ON power to the master. 8. Reset the DIP-3 to OFF. 5. Set the master into sensor check mode and set DIP-3 to ON. For any other changes in the system use the CT Quick Set Up Guide (see section 10, on page 45) and start the install sequence from the beginning. 65 15.0 Sensor failure/actuator and pump exercise 15.1 Sensors/Controller Failure If a Room sensor/controller is defective or if the communication to the unit is interrupted, an alarm will be triggered. Depending on the system configuration the control will continue in one of the following ways. - If there are several units on the same channel which have a room sensor (which is still intact), the control will continue as before, however without contribution from the defective unit - If no valid room sensor/controller is found, the system will run at constantly 20% ON The emergency program is only valid for channels with heat control. Channels with cooling control will always run at 100% OFF in connection with a defective room sensor. 15.2 Actuator and Pump Exercise If no automatic ON/OFF sequence of pumps occur over a 72 hour period, an exercise of these components will take place. The actuators will be activated for 3 minutes. The pumps will be started for 10 seconds during that period and there will be no firing of the boiler. 66 16.0 Wiring Schematic - Next Generation REHAU BA controller with ADD On module CT2 PROGRAMMABLE ROOM SENSOR COMFORT PLUS SENSOR LIMITFLOOR SENSOR STANDARD SENSOR UP TO 14 CHANNELS + + REHAU CT CHANNEL 1 T T A CHANNEL 2 + + TD - CHANNEL 14 - + + T T + + REHAU TA T T REHAU 4 Core cable minimum 0.25 mm² UNIT NUMBER (1-9) 5 4 3 2 L N DISPLAY SUPPLY SENSOR L N 5 DISPLAY LEARN MODE BOILER TEST 8 N NETWORK BUS SENSOR BUS + + 1 L SEC. PUMP 230VAC N L B 1 N L N THERMAL ACTUATORS 2 3 4 L N L N L N 5 L 6 N L 7 N Orange & Grey wires not required; make electrically safe L 8 N L N EXT. SWITCH I O SENSOR BUS APP SENSOR + + ACTUATOR 1 & 2 ACTUATOR 3 & 4 ACTUATOR 5 ACTUATOR 6 ACTUATOR 7 ACTUATOR 8 LINK MANIFOLD G01 D ADD-ON MODULE SUPPLY 230VAC L Balancing Valve (BV) Thermostatic Inlet Valve (TIV) 4 5 SEC. PUMP 230VAC L 1 N L 5 L 6 N L SENSOR BUS N + + N THERMAL ACTUATORS 2 3 4 L N L N L N MASTER MODULE SENSOR BUS 5 L 6 N L + + N WIRELESS RECEIVER MANIFOLD G02 1 FLOW Actuators Compact Mixer Unit (CMU) 2 Core cable minimum 0.25 mm² PORT No MOTORIZED VALVE AT MANIFOLD High Limit Sensor HEATED ZONE 1-01 HEATED ZONE 1-01a HEATED ZONE 1-02 HEATED ZONE 1-03 HEATED ZONE 1-04 Zone Valve (ZV) 3 3 4 N L N L N THERMAL ACTUATORS RJ45 X-RELAY 0 0 N RETURN LIMIT SENSOR N SWITCH N SWITCH FLOW 2 L Orange & Grey wires not required; make electrically safe L L 1 BOILER 0 0 WIRELESS RECEIVER PORT No MOTORIZED VALVE AT MANIFOLD 2 N G 3 2 4 5 HEATED ZONE 2-01 HEATED ZONE 2-01a HEATED ZONE 3-02 HEATED ZONE 3-03 HEATED ZONE 3-04 X-RELAY C1 C2 T BOILER B1 B2 T SUPPLY 230VAC RETURN E NETWORK BUS ACTUATOR 9 ACTUATOR 10 ACTUATOR 11 ACTUATOR 12 ACTUATOR 11 L COMMISSIONING MODE X - RELAY INSTALL MODE 7 N OFF OFF ON RJ 45 LINK L ADD ON MODULE DIP - 6 T L OFF ON OFF T 6 N T 5 L DIP - 5 T 3 4 N L N L N THERMAL ACTUATORS COOLING DEVICE/MODULE T L 7 6 X-RELAY OUTPUT FUNCTION BOILER PUMP HIGH LIMIT ZONE VALVE 1 2 3 4 5 6 7 8 T 2 N F 4 9 8 7 6 1 9 1 8 DIP SWITCH ON OFF C L 2 0 1 0 F E D C B A BA Controller (Main Control) 3 STRING NUMBER (1-F) The schematic shown explains the typical/basic wiring principle of the REHAU Intelligent controls. The number of Room Sensors can differ for each project. RJ 45 2 N L 3 4 N L N L N THERMAL ACTUATORS 5 6 L N 7 L N L 8 N L N DISPLAY L CHANNEL 1 L BOILER B1 B2 X-RELAY C1 C2 N SEC. PUMP 230VAC L 230 V Switch Live to Boiler 1 L 2 N L THERMAL ACTUATORS 3 4 L N L N N 5 6 L N L 7 N L L EXT. SWITCH I O N ZONE SECONDARY PUMP VALVE ADD-ON MODULE 3. Secondary pump connection must be routed back to the secondary pump terminals within the BA controller if only 1 manifold secondary pump is connected to the system. This is required to allow the pump to run should any actuator connected to the Add On Modules be called to open. WIRELESS RECEIVER E 4. 4 core cable with a cross sectional area of 0.25mm² must be used to connect the Add On Modules to the BA Master Controller. 4 5 9 8 7 6 5 4 3 2 8 7 SUPPLY 230VAC 6 L DIP SWITCH BOILER PUMP HIGH LIMIT ZONE VALVE COOLING DEVICE/MODULE OFF ON ON DIP - 6 OFF OFF ON Mains RESERVED DEHUMIDIFIER X - RELAY BOILER TEST INSTALL MODE 1 2 3 4 5 6 7 8 DIP - 5 BOILER 0 0 X-RELAY 0 0 N X-RELAY OUTPUT FUNCTION ON SENSOR CHECK F 1 3 OFF TURN ON DIP - 3 TO ACTIVATE SENSOR CHECK Power light blinks quickly, each red channel light on master should now be lit if a room sensor is present on that channel. Switch off to deactivate 9 D C B A OFF DIP ON + 2. All wiring and earthing to be in accordance with BS 7671:2002. UNIT NUMBER (1-9) 2 STRING NUMBER (1-F) TURN ON DIP 7 FOR DEHUMIDIFIER (COOLING ONLY) If a dehumidifier is being used it can be connected via a relay using number 1 output on the master and setting DIP-7 to "on", the output given is 24Vac. Hence Channel 1 cannot be used for room temperature control 0 DIP ON 2 OFF TURN ON DIP 1 & 2 TO ACTIVATE BOILER TEST This closes the boiler start relay for 1 min + D 1 0 F E 1 OFF DIP ON 7 OFF APP SENSOR SENSOR BUS C TURN ON DIP 1 TO ACTIVATE INSTALL MODE Increase temperature on sensor in room 1, this would activate actuator on output 1 and will open after 1-3 mins, UFH pump to turn on and mixing valve to open SENSOR BUS LINK DIP SWITCH DIP ON 1. Earth wiring not shown for drawing clarity 3 B NOTES NETWORK BUS 8 N ACTUATORS A + Limit Sensor N Orange & Grey wires not required; make electrically safe MAINS SENSOR BUS + T SUPPLY 230VAC N NETWORK BUS T T T + + SUPPLY SENSOR T 1 L T LINK SEC. PUMP 230VAC L Orange & Grey wires not required; make electrically safe ZONE VALVE N SECONDARY PUMP 5. 2 core cable with a minimum cross sectional area of 0.25mm² must be used for the thermostatic bus. 6. All sensors connected to the bus must terminate at the BA Master Controller not at the Add On Modules. The above wiring schematic is for guidance only and should not be used as definitive wiring diagram. G 67 Our verbal and written application engineering advice is based upon experience and the best of our knowledge. However it is to be regarded as non-binding information. Working conditions and use under conditions for which the product was not intended and over which we have no influence exclude any claim resulting from our information. We recommend that a suitable check is made as to whether the REHAU product is suitable for the envisaged purpose. Application, use and processing of the products is carried out beyond the scope of our control and are therefore carried out exclusively at your own responsibility. If liability should still apply, then this is restricted, in the case of all damage, the value of the goods supplied by us and used by you. Our warranty applies to the consistent quality of our products as per our specification and in accordance with our general terms and conditions of delivery and payment. This document is protected by copyright. All rights based on this are reserved. No part of this publication may be translated, reproduced or transmitted in any form or by any similar means, electronic or mechanical, photocopying, recording or otherwise, or stored in a data retrieval system. UK & IRELAND SALES OFFICES London REHAU Ltd The Building Centre 26 Store Street London WC1E 7BT Slough Units 5 J & K Langley Business Centre Station Road Langley Slough SL3 8DS Birmingham Tameside Drive Holford Way Witton Birmingham B6 7AY Manchester Brinell Drive Irlam Manchester M44 5BL Glasgow Phoenix House Phoenix Crescent Strathclyde Business Park Bellshill, North Lanarkshire ML4 3NJ Dublin 9 St. Johns Court Business Park Swords Road Santry Dublin 9 Tel: (0207) 580 6155 Fax: (0207) 307 8595 Tel: (01753) 588500 Fax: (01753) 588501 Tel: (0121) 344 2300 Fax: (0121) 344 2301 Tel: (0161) 777 7400 Fax: (0161) 777 7401 Tel: (01698) 503700 Fax: (01698) 503701 Tel: 00353 (0)1 8165020 Fax: 00353 (0)1 8165021 www.rehau.co.uk 864.602EN/268/E&T/06.08