1
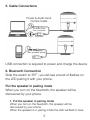
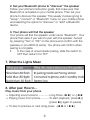
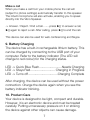
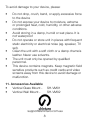
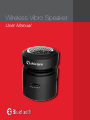
Wireless Vibro Speaker
User Manual
Contents
1. Introduction.................................................................. 1
2. Battery Precautions...................................................... 2
3. Getting Started............................................................. 3
4. Installation.................................................................... 4
5. Cable Connections....................................................... 5
6. Bluetooth Connection................................................... 6
7. What the Lights Mean................................................... 6
8. Playing Music or Making Calls...................................... 7
9. Battery Charging.......................................................... 7
10. Product Care.............................................................. 7
11. Available Accessories................................................. 8
Warranty
In the unlikely event that your product fails to work during
the 12 month warranty period, please return it to your
place of purchase or contact Shintaro Support via email
at [email protected] for further advice.
Specifications
Vibro Speaker 10W
Power Output: 10W
Frequency Range: 40Hz - 20KHz
Power Supply: Built-in Lithium Battery / USB Cable
Impedance: Satellite 4ohms + Subwoofer 2ohms
Size: 55mm x 70mm
Weight: 273g
1. Introduction
Thank you for purchasing the Shintaro Wireless Portable
Vibro Speaker - a small portable music player, speaker
and amplifier. You can turn any solid surface into a
speaker by simply placing this device on the surface.
1
2. Battery Precautions
The device can be powered by a built-in, rechargeable
lithium battery. Please charge the battery for at least 8
hours before your first use of the device.
•
•
•
•
•
•
•
•
If the device is not used for a long period of time,
the battery may lose its charge. Please recharge the
battery
Rechargeable batteries are only to be charged
under adult supervision
Use only the supplied USB cable to recharge the
battery. Improper charging may damage the battery
or device
Do not attempt to open the rechargeable battery or
battery pack. There are no serviceable parts inside
Should the battery leak, the device may become
damaged. Clean the battery compartment immediately, avoiding contact with skin
Keep batteries out of reach of children. If swallowed,
consult a physician immediately
Leaving a battery in hot or cold places, will reduce
the capacity and lifetime of the battery. Always try to
keep the battery between 15C and 25C. A device
with a hot or cold battery may not work temporarily,
even when the battery is fully charged.
Do not dispose of batteries in a fire as they may
explode. Batteries may also explode if damaged.
Dispose of batteries according to local regulations.
Do not dispose as household waste.
2
3. Getting Started
General Controls
LED Light
Microphone
USB Port
On/Off/BT Switch
Volume Up
Next
Play/Pause/Call Controls
Previous
Volume Down
3
Package Contents
Portable Vibro Speaker
USB Cable
Wall Mount Adaptor
Manual
4. Installation
Rubber Stand
Remove the protective tape
at the bottom of the device to
reveal the rubber stand.
Note: 1. Don’t throw away the
protective tape, please stick it on
when using a mounting socket or
when not in use.
2. Use a wet finger to clean any
dust off the pad.
Flat and Hard Surface
4
5. Cable Connections
Power & Audio Input
Combo Cable
for audio input
from computer
for power
for audio input
from portable device
USB connection is required to power and charge the device
6. Bluetooth Connection
Slide the switch to “BT”, you will see a burst of flashes on
the LED pairing it with your phone.
Put the speaker in pairing mode
When you turn on the bluetooth, the speaker will be
discovered by your phone.
1. Put the speaker in pairing mode
When you turn on the bluetooth, the speaker will be
discovered by your phone.
When the speaker is in pairing mode the LED will flash in blue.
5
2. Set your Bluetooth phone to “discover” the speaker
Follow your phone’s instruction guide, first make sure that
Bluetooth is activated on your mobile phone. Then set your
phone to discover the speaker. This usually involves going to
“setup”, “connect” or “Bluetooth” menu on your mobile phone
and selecting the option to “discover” or “add” a Bluetooth
device.
3. Your phone will find the speaker
Your phone will find the speaker under name “Bluetooth”. Your
phone then asks if you want to pair with the speaker. Accept
by pressing “Yes” or “OK” on the phone and confirm with the
passkey or pin=0000 (4 zeros). You phone will confirm when
pairing is complete.
•
In the case of unsuccessful pairing, slide the switch to
OFF then restart it to “BT”
7. What the Lights Mean
8. After pair, How to...
Play music from your phone
-> Adjusting sound volume:.............. Long Press +►►| or -|◄◄
-> Playing music from phone............ To start playback, press ►||
(press ►|| again to pause)
-> To skip to previous or next song press -|◄◄ or +►►|
6
Make a call
When you make a call from your mobile phone the call will
(subject to phone settings) automatically transfer to this speaker.
The inbuilt microphone will also activate, enabling you to speak
directly into the Vibro Speaker.
-> Answer / Reject / End a Call..........press ►|| to answer a call,
►|| again to reject a call. After calling, press ►|| to end the call.
This device can also be used for web conferencing and Skype.
9. Battery Charging
The device has a built-in rechargeable lithium battery. This
can be charged by connecting to the USB port of your
computer. Refer to the battery indicator (The LED will
change to red colour) for the charging status.
LED -> Quick Blue Flash...........................Needs Charging
LED -> Stays Red............................. Charging in Progress
LED -> Turns off..................................Charging Complete
After charging, the device can be used without the power
connection. Charge the device again when you see the
battery indicator blinking.
10. Product Care
Your device is designed to be light, compact and durable.
However, it is an electronic device and must be treated
carefully. Putting unnecessary pressure on it or striking
the device against other objects can cause damage.
7
To avoid damage to your device, please:
•
•
•
•
•
•
•
Do not drop, crush, bend, or apply excessive force
to the device
Do not expose your device to moisture, extreme
or prolonged heat, cold, humidity, or other adverse
conditions.
Avoid storing in a damp, humid or wet place. It is
not waterproof
Do not operate or store unit in places with frequent
static electricity or electrical noise (eg. speaker, TV
set).
Clean the unit with a soft cloth or a damp chamois
leather. Never use solvents.
The unit must only be opened by qualified
personnel.
This device contains magnets. Keep magnetic field
sensitive products such as credit cards and video
screens away from this device to avoid damage or
malfunction.
11. Accessories Available
• Vertical Glass Mount -
• Vertical Wall Mount - SH-VM01
SH-VM02
[email protected]
8
Notes
.........................................................................................
.........................................................................................
.........................................................................................
.........................................................................................
.........................................................................................
.........................................................................................
.........................................................................................
.........................................................................................
.........................................................................................
.........................................................................................
.........................................................................................
.........................................................................................
.........................................................................................
.........................................................................................
.........................................................................................
.........................................................................................
.........................................................................................
.........................................................................................
.........................................................................................
.........................................................................................
.........................................................................................
.........................................................................................
.........................................................................................
.........................................................................................
.........................................................................................
.........................................................................................
.........................................................................................
.........................................................................................
9