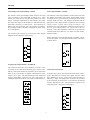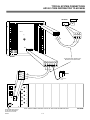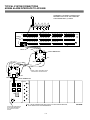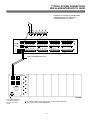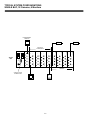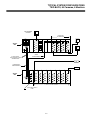
1
AD1650B MicroPower EP
Video Matrix
Switching System
Installation Instructions
This manual describes the installation procedures for the American Dynamics model AD1650B MicroPower EP Video Matrix
Switching Systems. The AD1650B is a CCTV surveillance control system having multiple video inputs, multiple video outputs,
and multiple control stations. The AD1650B is capable of controlling a maximum of 128 video input sources such as cameras
and a maximum of 16 video outputs such as monitors and video tape recorders. AD1650B Systems are supplied in completely
configured switching Bays. Only the necessary bay interconnections, the video input and output connections, and any optional
accessory connections need be made prior to operation.
Setup programming and operating instructions for the AD1650B are provided in the System Programming manual, OP1650BSP.
The software/firmware furnished with this equipment is confidential to and is copyrighted by AMERICAN DYNAMICS. It is
not to be copied or disclosed in any manner without the express written consent of AMERICAN DYNAMICS. The
software/firmware is furnished to the purchaser under a license for use on a single system.
Note: Information furnished by AMERICAN DYNAMICS is believed to be accurate and reliable. However, no responsibility is
assumed by AMERICAN DYNAMICS for its use; nor for any infringements of other rights of third parties which may result
from its use. No license is granted by implications or otherwise under any patent or patent rights of AMERICAN DYNAMICS.
Copyright 1995 by American Dynamics. All rights reserved.
AMERICAN
DYNAMICS
The installation of this product should be made by qualified
service personnel and should conform to all local codes.
CAUTION
RISK OF ELECTRIC SHOCK
DO NOT OPEN
The lightning flash with arrowhead
symbol, within an equilateral
triangle, is intended to alert the
user to the presence of uninsulated
"dangerous voltage" within the
product's enclosure that may be of
sufficient magnitude to constitute a
risk of electric shock to persons.
!
CAUTION: TO REDUCE THE RISK OF ELECTRIC SHOCK,
DO NOT REMOVE COVERS (OR BACK) .
NO USER-SERVICEABLE PARTS INSIDE.
REFER SERVICING TO QUALIFIED SERVICE PERSONNEL
WARNING
To reduce the risk of fire or shock hazard, do
not expose this product to rain or moisture.
Warning: This product generates, uses, and can
radiate radio frequency energy and if not
installed and used in accordance with the
instructions manual, may cause interference to
radio communications. It has been tested and
found to comply with the limits for a Class A
computing device pursuant to Part 15 of FCC
Rules, which are designed to provide reasonable
protection against such interference when
operated in a commercial environment.
Operation of this product in a residential area is
likely to cause interference in which case the
user at his own expense will be required to take
whatever measures may be required to correct
the interference.
!
The exclamation point within an
equilateral triangle is intended to
alert the user to the presence of
important operating and maintenance
(servicing) instructions in the
literature accompanying the product.
UNPACKING AND INSPECTION
Unpack carefully. This is an electronic product and should
be handled as such. Compare the items received with the
packing list with your order.
Be sure to save:
1. The shipping cartons and insert pieces. They are the
safest material in which to make future shipments of
the product.
2. The IMPORTANT SAFEGUARDS sheet.
3. These Installation and Operating Instructions.
)
MAINTENANCE
User maintenance of this unit is limited to external cleaning
and inspection. For specific recommendations refer to the
IMPORTANT SAFEGUARDS sheet packaged with this product.
INSTALLATION AND SERVICE
If you require information during installation of this
product or if service seems necessary, contact the
American Dynamics Repair and Service Department at
(800) 442-2225. You must obtain a Return Authorization
Number and shipping instructions before returning any
product for service.
Do not attempt to service this product yourself. Opening or
removing covers may expose you to dangerous voltages or
other hazards. Refer all servicing to qualified personnel.
QA301C
CONTENTS
Page
SYSTEM DESCRIPTION................................................................................ 1
MODULE DESCRIPTIONS ............................................................................ 2
SETUP
Central Processing Module...................................................................... 1-2
Video Input Module................................................................................. 1-2
Video Output Module .............................................................................. 1-2
Power Supply Module ............................................................................. 1-3
INSTALLATION
Installation ............................................................................................... 2-2
Connections ............................................................................................. 2-2
Power and Data Interconnections ...................................................... 2-2
Video Connections............................................................................. 2-2
Control Code Connections................................................................. 2-3
System Control Connections ............................................................. 2-4
SYSTEM CONFIGURATIONS
Single Bay Systems ................................................................................ 3-3
Two Bays, 64 Camera, 8 Monitor Systems ............................................. 3-4
Three Bays, 128 Camera, 8 Monitor Systems ......................................... 3-5
Two Bays, 24 Camera, 16 Monitor Systems ........................................... 3-7
Four Bays, 64 Camera, 16 Monitor Systems........................................... 3-8
Six Bays, 128 Camera, 16 Monitor Systems ......................................... 3-10
OPERATION
Powering Up ............................................................................................ 4-2
Keyboard Control .................................................................................... 4-3
System Programming .............................................................................. 4-3
TYPICAL SYSTEM CONNECTIONS
AD1672 Keyboard to AD1650B ...................................................... C-2
AD1676 Keyboard to AD1650B ...................................................... C-3
AD2078 Keyboard to AD1650B ...................................................... C-4
AD1691 Code Distributor to AD1650B ........................................... C-5
AD2096 Alarm Interface to AD1650B..................................... C-6, C-7
AD1650B System Configurations
Single Bay, 32 Camera, 8 Monitor ................................................... C-8
Two Bay, 64 Camera, 8 Monitor ...................................................... C-9
Three Bay, 128 Camera, 8 Monitor ................................................ C-10
Two Bay, 24 Camera, 16 Monitor................................................... C-11
Four Bay, 64 Camera, 16 Monitor .................................................. C-12
Six Bay, 128 Camera, 16 Monitor ................................................. C-13
INDEX
SPECIFICATIONS .......................................................................... Back Cover
AD1650B
SYSTEM DESCRIPTION
SYSTEM DESCRIPTION
System Keyboards
The AD1650B MicroPower EP Matrix Switching System is a
CCTV control system with multiple video inputs, multiple
video outputs, and multiple control stations. The AD1650B is
capable of controlling a maximum of 128 video input sources
such as cameras, a maximum of 16 video outputs such as
monitors, and a maximum of 24 keyboards.
Eight 2-wire keyboard ports are provided on the rear panel of
the Central Processing Module. Two types of keyboards are
available for connection to these keyboard ports:
AD1678C - A full-function system operation and
programming keyboard with pushbutton lens control and
vector solving joystick for pan/tilt movement.
AD1650B Systems are supplied in completely configured
switching bays. Only the necessary bay interconnections, the
video input and output connections, and any optional accessory
connections need be made prior to operation. The AD1650B
System, as delivered, is a complete system with all inputs
terminated in 75 ohms. Each bay is packed in a separate
shipping carton, labeled with the AD1650B bay assembly
number on the outside and on the serial number tag. It is
important to note the bay part number for installation.
AD1672A - An operator two-monitor keyboard with
pushbutton lens control and joystick for pan/tilt movement.
Four RS-232 ports are provided on the rear panel of the Power
Supply Module for connection of the following keyboards:
AD2078 - A full-function system operation and
programming keyboard with pushbutton lens control and
vector solving joystick for pan/tilt movement.
AD1677 - An operator desktop or rack mounted model with
pushbutton lens and pan/tilt control.
Sections of this manual are organized specific to the size of the
system to be installed. Systems fit in the following categories:
one bay, two bay, three bay, four bay, and six bay. The bay
number on each serial number tag is important, since this
number defines the location of the bay for hook-up.
AD1676B - An operator five-monitor keyboard with
pushbutton lens control and joystick for pan/tilt movement.
These ports may be expanded using an AD1981 Port Expander
to provide a total of 16 RS-232 ports.
System Modules
An AD1650B System consists of one or more switching bays
with one Central Processing Module, one or more Power
Supply Modules, the desired Video Input Modules (VIM) and
Video Output Modules (VOM), and appropriate rear panels.
The AD5400 or AD5500 Excalibur Graphical System Manager
can be used as a control interface, from a personal computer
(PC) connected to any RS-232 port. The Excalibur system
provides the same capabilities as an AD2078 keyboard, via a
user-friendly graphical interface.
The following pages describe the different modules available
for AD1650B switching bays. These include:
Switching System Accessories
Power Supply Module, AD1603N
The following American Dynamics products may be connected
to the AD1650B System for additional video control
capabilities. For specific information on each unit, refer to the
respective data sheets for these accessories, or call American
Dynamics Applications Department for assistance.
Power Panel
Central Processing Module, AD1661B
Central Processing Module, AD1663B, with Data Panel
Terminating Video Input Module, AD1611
• AD1640 and AD1680 Series Receivers
Looping Video Input Module, AD1609CM
• AD1680MG Manchester Generator
Video Output Module, AD1626
• AD1683 Control Code/PSK Modem
Video Output Module, no Text, AD1626NA
• AD1691 Code Distributor
Video Interconnect Panel
• AD1981 Port Expander
• AD1983 Code Converter
All AD1650B switching bays are shipped with the required
modules installed in the bays. Only the necessary video and
data interconnections to the bays and modules must be made
(see Connections, Section 2).
• AD2031/AD2032/AD2033 Followers/Responders
• AD2083 Code Translators
• AD1696/AD2096 Alarm Interface Units
1
MODULE DESCRIPTIONS
AD1650B
SYSTEM MODULE DESCRIPTIONS
Central Processing Module - AD1661B
Power Supply Module - AD1603N
The AD1661B Central Processing Module (CPM) controls the
switching bays for the AD1650B system and provides the onscreen programming menus for setup of the system (see
System Programming Manual, OP1650BSPB). The AD1661
CPM rear panel provides eight 2-wire keyboard input ports and
a programming monitor video output BNC connector, labeled
PROG MON, as shown below.
The AD1603N Power Supply Module (PSM) converts the
input AC power to the necessary DC voltages which are
supplied to all the modules in the AD1650B bay. In multiple
bay systems, the AD1603N PSM also provides power to bays
that do not have a Power Supply Module.
Power Panels
In bays which have an AD1603N PSM, the rear Power Panel,
shown below, provides four 8-pin modular RS-232 ports,
labeled 1 through 4, for connection of RS-232 devices such as
Keyboards, Alarm Interface Units, Port Expanders, computers,
etc. The rear panel also provides a 12-pin interface connector,
labeled J1 OUT, for connection of Control Code to codecontrolled accessories, such as Code Distributors, Receivers,
etc. The J1 OUT connector also distributes power to bays
which do not have an AD1603N PSM.
K
E
Y
B
R
D
PGM MON
1
2
3
4
5
6
7
8
RS-232
1
2
3
4
CPM with Data Interconnect Panel - AD1663B
For multiple bay systems, the AD1663B Central Processing
Module (CPM) controls the switching bays for the AD1650B
system and provides the programming menus for setup of the
system. A Data Interconnect Panel is provided with the
AD1663B CPM to distribute data and control signals to other
bays in the system. Three 8-pin modular RS-232 output ports,
labeled J2, J3, and J4, are provided on the Data Interconnect
Panel for output of these signals.
J1
OUT
In multiple bay systems, certain bays do not have an AD1603N
PSM. For these bays, a rear Power Panel is provided for
receipt of power and data signals from the AD1603N PSM in
the bays with the PSM. This Power Panel, shown below,
provides a 12-pin connector, labeled J1 OUT, for connection
of Control Code and power signals from the PSM.
The AD1663B CPM is the same as the AD1661B CPM, above,
with the addition of this panel. This module provides all
keyboard input ports, the PROG MON BNC, and the RS-232
ports, as illustrated below.
PGM MON
K
E
Y
B
R
D
J2
D
A
T
A
1
2
3
J3
4
5
J1
OUT
6
7
8
2
J4
O
U
T
P
U
T
AD1650B
MODULE DESCRIPTIONS
Terminating Video Input Module - AD1611
Video Output Module - AD1626
The AD1611 Video Input Module (VIM) performs the actual
video switching in the AD1650B switching bays. Each
module can switch any one of eight video inputs to any video
output, or multiple combinations of video outputs, up to eight.
The eight video inputs to the module are connected at the rear
panel BNC connectors, as shown below. The connectors are
labeled with the appropriate video input number assigned by
the switching system: 1 through 8, 9 through 16, and so on up
to 121 through 128.
The AD1626 Video Output Module (VOM) creates titles that
are added to the monitor video output. Each module controls
the output for two system monitors, as labeled at the top of the
AD1626 VOM rear panel. The modules are labeled with the
appropriate video output number assigned by the switching
system: 1 and 2, 3 and 4, and so on up to 15 and 16. The
module has two video output BNC connectors on the bottom of
the rear panel, labeled OUT, for connection to the two
monitors. Four video input BNC connectors are provided for
switched inputs from other bays, two inputs for each monitor,
labeled A and B.
The switched video outputs are routed to the Video Output
Modules and the VIP panel within the bay.
Model AD1626NA Video Output Module is available with no
text on the outputs. The rear panel of both models is the same,
as shown below.
C
A
M
E
R
A
1
MONITOR
2
4
1
A
A
5
B
B
8
O
U
T
O
U
T
Looping Video Input Module - AD1609CM
The AD1609CM Video Input Module performs video
switching in the AD1650B switching bay, similar to the
AD1611 VIM. Each module can switch any one of eight video
inputs to any video output, or multiple combinations of video
outputs, up to eight. The AD1609CM provides additional
looping output BNC connectors for each video input, for
routing the unswitched camera video inputs to additional bays.
Video Interconnect Panel
In multiple bay systems, the Video Interconnect Panel (VIP) is
used to distribute the switched video signals from the Video
Input Modules in one bay to the Video Output Modules in
other bays. Eight video output BNC connectors are provided
on the rear panel, as shown below. The connectors are labeled
with the appropriate video output number assigned by the
switching system: 1 through 8 or 9 through 16.
1
V
I
P
1
3
5
7
8
2
4
6
8
3
SETUP
This section of the manual describes the module setup procedures for the
AD1650B System. All AD1650B systems are factory configured for
proper operation. However, it may be necessary to change or adjust the
factory setups to certain modules for unique or changing user
requirements. Certain of these module setup procedures should be made
prior to installation and connection of the AD1650B (Section 2). The
Video Output Module Display Control and Power Supply Module Vertical
Phase Adjustment procedures can be done only after the system is
connected and powered up.
Central Processing Module - Video Type Selection . . . . . . . 1-2
Video Input Module . . . . . . . . . . . . . . . . . . . . . . . . . . . . . . . 1-2
Video Output Module - Display Control . . . . . . . . . . . . . . . 1-2
Video Output Module - Monitor Selection . . . . . . . . . . . . . . 1-2
Power Supply Module . . . . . . . . . . . . . . . . . . . . . . . . . . . . . 1-3
Power Supply Module - Vertical Phase Adjustment . . . . . . 1-3
Power Supply Module - Fuse Replacement . . . . . . . . . . . . . 1-3
SETUP
AD1650B
SETUP
Video Output Module - Monitor Selection
!
CAUTION - Due to the presence of noninsulated components with hazardous
voltages, the following internal adjustments
should be performed by qualified service
personnel only.
The AD1626 VOMs are properly configured at the factory. In
the event a module setup must be changed, the module must be
configured before installation and connection of video outputs.
This is done with the AD1626 VOM removed from the bay.
Eight 2-pin jumpers and one 8-position DIP switch are
provided, on the module PCB, to configure the AD1626 VOM
monitor selection (see Figure 1-1).
Central Processing Module - Video Type Selection
A DIP switch, labeled S2, on the AD1661B and AD1663B
Central Processing Module PCB is factory set for the type of
video signal. Switch position 7 of S2 is set to OFF for NTSC
video and ON for PAL video.
Set (insert) two jumpers plugs, only, to select two monitors
to be used for this VOM: 1 and 2, 3 and 4, 5 and 6, or 7 and
8. The jumpers are near the back of the AD1626 module
PCB (end with gold edge connectors). The PCB labeling
indicates the jumper positions for each monitor, ordered as:
1, 3, 5, 7, 2, 4, 6, and 8.
Video Input Module
Set the module PCB DIP switch to the same monitor pair as
selected in the jumpers. The DIP switch is located near the
front edge of the PCB, behind the display controls. The DIP
switch positions for each monitor are shown in the table
below. Only two switches positions are set to “ON” to
identify the monitors selected for this VOM.
The AD1611 and AD1609CM Video Input Modules are
configured at the factory and have no user switch settings.
Video Output Module - Display Control
The AD1626 Video Output Module (VOM) has three controls
for each monitor display output: brightness, vertical position
and horizontal position (see Figure 1-1, below). These are at
the front of the AD1626 PCB and are adjusted with the module
plugged into the bay, the front panel of the bay removed, and
power applied to the bay. The top three controls are for the
even-numbered monitor (2, 4, etc.), and the bottom three
controls are for the odd-numbered monitor (1, 3, etc.). The
function of each control is marked on the board.
To adjust the vertical or horizontal position of a monitor
display, set the test switch, labeled S2, to the TEST position
(forward). This switch is located under U37 on the board.
Using a screwdriver, turn the potentiometers to the desired
placement of the display. To lock these positions, return the
test switch back to the NORM position. The brightness control
can be set at any time.
OFF ON
V E R T BRIGHT
HORIZ
DIP Switch Position
1
5
2
6
3
7
4
8
Note: The DIP switch position labels do not indicate the
selected monitor. For example, for monitors 1 and 2, the
jumpers are set to 1 and 2, and the DIP switch position 1
and position 5 are set to “ON”.
S2
TEST
NORM
1
3
5
U43
7
2
4
U46
U47
V E R T BRIGHT
ODD
MONITOR
Jumper Position
1
2
3
4
5
6
7
8
U37
12 34 5678
HORIZ
EVEN
MONITOR
Monitor
1 and/or 9
2 and/or 10
3 and/or 11
4 and/or 12
5 and/or 13
6 and/or 14
7 and/or 15
8 and/or 16
Figure 1-1 - AD1626 Video Output Module PCB Layout
1-2
6
8
AD1650B
SETUP
Power Supply Module
Power Supply Module - Fuse replacement
The AD1603N Power Supply Module converts the input AC
power to the necessary DC voltages which are supplied to all
the modules in the AD1650B bay. The AD1603N PSM also
includes the Control Code circuitry which supplies code to the
remote Receivers and other Control Code accessories.
The Power Supply Module contains four fuses for the input
AC power to the AD1603N and the output DC power from the
AD1603N to the AD1650B modules. The fuses may be
checked with the power switch turned OFF. These may be
replaced in the field by qualified personnel only.
The system on/off switch and power pilot light are located on
the front of the Power Supply Module (see Figure 1-2, below).
The AC power line fuse, F1, is located in a screw-top fuse
holder near the line cord on the rear of the power supply case
(see Figure 1-2). If this fuse needs replacement, use the
following type fuse, according to the supply voltage:
Power Supply Module - Vertical Phase Adjustment
A vertical phase control is provided on the AD1603N Power
Supply Module for adjustment of the phase of the vertical
interval pulse with respect to the AC line. Proper adjustment
of this control provides roll-free video switching, provided that
all cameras are properly phased together. This control is set at
the factory for proper operation.
AD1650B
ADE1650B, ADK1650B
(120VAC)
(230VAC)
In addition, three DC output power fuses are mounted on the
surface of the AD1603N PCB (see Figure 1-2). These may be
replaced with the following size fuses:
If field adjustment is required, this control is adjusted with the
AD1603N PSM plugged into the bay, the front panel of the
bay removed, and power applied to the bay. Insert a
screwdriver into the hole located on the top front of the PSM
(see Figure 1-2) and turn the control until roll-free switching is
obtained. (Video inputs must be line-locked and on the same
phase of the AC power source for roll-free vertical switching.)
F2 (+18VDC) - 1A, 250V
F3 (+9VDC) - 2A, 250V
F4 (-18VDC) - 3/10A, 250V
Vertical Phase
Adjustment
F3
F2
Power
Indicator
3/8A Slo Blo
3/16A T
Power Supply
F4
F1
Power
Switch
Power Cord
Figure 1-2 - AD1603N Power Supply Module PCB Layout
1-3
SYSTEM INSTALLATION
This section of the manual describes the system installation and
connection procedures for the AD1650B System. AD1650B Systems are
supplied in completely configured switching bays. Only the necessary
bay interconnections, the video input and output connections, and any
optional accessory connections need be made prior to operation.
Installation . . . . . . . . . . . . . . . . . . . . . . . . . . . . . . . . . . . . . . 2-2
Mounting . . . . . . . . . . . . . . . . . . . . . . . . . . . . . . . . . . . . 2-2
Power Sources . . . . . . . . . . . . . . . . . . . . . . . . . . . . . . . . 2-2
Connections . . . . . . . . . . . . . . . . . . . . . . . . . . . . . . . . . . . . . 2-2
Power and Data Interconnections . . . . . . . . . . . . . . . . . . 2-2
Video Connections . . . . . . . . . . . . . . . . . . . . . . . . . . . . . 2-2
Control Code Connections . . . . . . . . . . . . . . . . . . . . . . . 2-3
System Control Connections . . . . . . . . . . . . . . . . . . . . . 2-4
SYSTEM INSTALLATION
AD1650B
INSTALLATION
CONNECTIONS
This installation should be made by qualified service personnel
and should conform to all local codes. Safeguards must be
taken to avoid unintentional operation by employees and
maintenance personnel working about the premises, by falling
objects, by customers, by building vibration, and by similar
causes.
Mounting
AD1650B systems are normally supplied for standard 19-inch
rack mounting and have a rack height of 5 1/4 inches. These
models have an “R” suffix to the model number (e.g.,
AD1650BR32-8). Single bay systems which are available for
desktop use have a “D” suffix to the model number (e.g.,
AD1650BD32-8). The system layout is designed for ease of
installation and minimum interconnecting cable length.
In multiple bay configurations, carefully identify the various
bays before mounting. The video inputs should be located
near the top of the racks while the video outputs should be
located near the bottom, as illustrated in the Typical System
Configurations section at the end of this manual.
When the system configuration requires more than one rack,
the AD1650B bays should be mounted in side-by-side racks as
illustrated in the Typical System Configurations.
Note: Internal jumper switch settings on the
modules should be made before system connections
are started (see SETUP, Section 2).
All AD1650B system connections are made on the rear panels
of the bays or modules. Be certain that all connections are
completed properly before applying power.
Each installation should be made in a planned and orderly
manner. Confirm the operation of each piece of equipment as
early as possible during the installation procedure. It is much
easier to remove a few temporary terminations or connections
after a confirmation check than it is to disconnect and re-wire a
large number of “permanent” connections.
To facilitate maintenance and service problems, mark all input
and output cables.
Power and Data Interconnections
Inter-bay power and data cables are supplied as required for
each configuration. Depending on the functions of the bay, the
power panels supplied with each bay have different
configurations and connector jack designations. See the
descriptions of Power and Data Interconnections in each of the
System Configuration descriptions, Section 3.
For proper ventilation and ease of service, allow at least 3 feet
(1 meter) from the rear of the racks to any wall.
Note
When using interbay power and data cables,
connect ground (black lead wire with lug) to
each bay with a screw.
Power Sources
Models with an “AD” prefix to the model number
(AD1650BD8-2, AD1650BR96-8, etc.,) are configured for use
with a 120VAC, 50/60Hz primary power source. Models with
an “ADE” or “ADK” prefix (ADE1650BD8-2, AD1650BR968, etc.,) are configured for a 230VAC, 50Hz primary power
source. All models are supplied with pendant 3-wire cords and
plugs for mating to the primary source outlet.
DO NOT PHYSICALLY CONNECT
EQUIPMENT TO THE POWER SOURCE
UNTIL READY TO “POWER UP”
Read the section on POWERING UP (Section 4) before
applying power to any units.
Video Connections
All video connections should be made using a high-grade, 75ohm, RG-59U video cable (Belden 8241 or equivalent) with
BNC connectors. All video outputs must be terminated in 75
ohms at the last unit on the run. Intermediate units must be set
to Hi-Z. Outputs which are improperly terminated will not
display the system-generated alphanumerics and the resulting
pictures will be of poor quality.
Inter-bay power, data, and video connections for several
different AD1650B System Configurations are described in
Section 3 of this manual. Illustrations of these configurations
and system bay interconnections are shown in the Typical
System Connections, pages C-8 through C-13.
2-2
AD1650B
SYSTEM INSTALLATION
Control Code Connections
*
The Control Code for Receivers, Code Followers/Responders,
Code Distributors, Code Translators, and other code-controlled
accessories is provided by Control Code Outputs in either the
AD1651B, AD1653B, or AD1655 bay. Accessories associated
with video inputs 1 through 64 are controlled by the Control
Code Output from AD1651B or AD1653B bays. Accessories
associated with video inputs 65 through 128 are controlled by
the Control Code Output from the AD1655 bay.
Receiver
Receiver
Receiver
W
W
W
B
J1 JACK
PIN NO.
1
4
7
LEAD
COLOR
White
Black
Shield
EQUIPMENT
TERMINAL
W
B
S
B
S
B
S
* 120-Ohm Termination
W
Control Code emanates from J1, a 12-pin connector, on the
back panels of the AD1603N Power Supply Modules of the
appropriate bays. A mating plug, with leads, is supplied.
Pinouts for the color-coded leads on this connector and the
corresponding equipment terminal identifications are:
S
B
S
AD1650B
Figure 2-1 - Control Code “Daisy Chain” Connections
* 120-Ohm Termination
*
Receiver
S
B
W
Connections are made by connecting the appropriate signal
wires from the J1 plug to the unit’s B/W/S terminals.
• Connect the Black Code wire to the terminal marked B.
• Connect the White Code wire to the terminal marked W.
• Connect the cable Shield to the terminal marked S.
*
Receiver
Control Code Lines must be 18-AWG, shielded, two-wire,
twisted pair, Belden 8760 or equivalent (for plenum use
Belden 88760 or equivalent). Control Code Lines are NEC
Class 2, low voltage circuits. Where local codes permit,
installation in conduit is not required. Avoid installation near
high voltage circuits or other potential interference sources.
A maximum of three code-controlled units may be “Daisy
Chained” on one Control Code Line as shown in Figure 2-1.
The maximum code line length is 5000 feet (1500m). A 120ohm termination must be provided at the last piece of
equipment on each Code line.
If additional equipment are required with a Control Code
Output or if longer distances are involved, Code Distribution
Units must be used as shown in Figure 2-2. Each AD1691
Code Distribution Unit provides 64 Control Code outputs from
a single Control Code input. A 120-ohm termination must be
provided at the last equipment on each code output line.
For connection of code-controlled accessories (receivers,
followers/responders, translators, code distribution units) refer
to the installation manual included with each device.
Refer to the Typical System Connections, page C-5, at the end
of this manual, for illustration of Control Code connections.
2-3
*
Receiver
Other
Receivers
S
B
W
S
B
W
W
B S W B S W
B S
Code Distribution Unit
W B S
W B S
AD1650B
Figure 2-2 - Use of Code Distribution Unit
SYSTEM INSTALLATION
AD1650B
PIN 4
PIN 5
System Control Connections
TWO-WIRE KEYBOARDS
Eight 2-wire keyboard ports are provided on the rear panel of
the AD1661B or AD1663B CPM (see rear panel illustrations
on page 2). The port number labels on the rear panel, 1 - 8,
correspond to the monitor number controlled via that port.
Two AD keyboards are available for connection to these ports:
The AD1672A is a 2-monitor keyboard. This keyboard has
two connection cables and may be connected to any two of
the ports to control the corresponding numbered monitors.
If the connection distance exceeds seven feet, an 8-pin
Junction Box (HP0047, Figure 2-3) is provided for RS-232
connections. The Junction Box is connected to an AD1650B
RS-232 port with the supplied JJ0007 cable, and is wired to the
RS-232 device using 18-AWG shielded 3-wire cable (Belden
8770 or equivalent). The maximum cable length between an
RS-232 device and the Junction Box is 1000 feet. The pin
definitions for the Junction Box are provided in Table 2-1.
PIN 7
PIN 1
PIN 8
Interface
Signal
No Connection
Shield
No Connection
Receive Data
Transmit Data
No Connection
Ground
No Connection
RS-232 KEYBOARDS AND CONTROL UNITS
RS-232 devices can be connected directly to the AD1650B
RS-232 ports using the supplied JJ0007 cables if the
connection distance between the AD1650B and the RS-232
device is seven feet or less.
PIN 2
Table 2-1 - Junction Box Terminal Definition
See the Typical System Connections, page C-2, for illustration
of 2-wire keyboard connection.
AD1676B, AD1677, and AD2078 Keyboards, AD2096 Alarm
Interface Units, AD1981 Port Expanders, and other RS-232
compatible devices such as computers, modems, etc. are
connected to any of the four RS-232 Ports. Connection, to any
of the RS-232 ports, is by an 8-pin modular plug. The
AD1650B is supplied with four modular wall-mount junction
boxes (HP0047, Figure 2-3)and four modular cables (JJ0007)
for connections to these ports.
PIN 6
Figure 2-3 - HP0047 Junction Box
The AD1678C is a full system keyboard. It may be
connected to any 2-wire port to control all eight monitors.
Four modular RS-232 ports are provided on the rear panel of
the AD1603N Power Supply Module in the AD1651B or
AD1653B bay (see rear panel illustrations on page 2). These
ports are used for control connections to the CPM of that bay.
The four ports may be expanded, using the AD1981 Port
Expanders, to provide a maximum of 16 keyboard ports for
control connections to the AD1650B system.
PIN 3
Box
Pin
1
2
3
4
5
6
7
8
Box
Color
Blue
Orange
Black
Red
Green
Yellow
Brown
Gray
RS-232
Code
Shield
RCD
XMIT
GND
-
For proper RS-232 connections, ascertain the DTE (Data
Terminal Equipment) or DCE (Data Control Equipment) pin
configuration of each connected RS-232 device. All American
Dynamics equipment, including the AD1650B, are configured
as DTE devices. Consult the installation manual of the RS-232
device for its pin and signal definitions.
The connections for DTE-to-DTE communications between an
RS-232 device and the AD1650B Junction Box are:
- Connect the XMIT pin of the RS-232 device to RCD (pin
4) of the AD1650B Junction Box,
- Connect the RCD pin of the RS-232 device to XMIT (pin
5) of the AD1650B Junction Box,
- Connect the Ground of the RS-232 device to GND (pin
7) of the AD1650B Junction Box.
Make RS-232 cable shield connections only at the connectors
(Junction Box) attached to the AD1650B bay.
For distances of over 1000 feet, a link using asynchronous line
drivers, short-haul modems, or dial-up modems is required.
RS-232 cables with mating connectors are required between
the AD1650B and the modem at one end of the link and
between the modem and the RS-232 device at the other end.
See the Typical System Connections at the end of this manual,
pages C-3, C-4, C-6, and C-7, for illustrations of RS-232
device connections.
2-4
SYSTEM CONFIGURATIONS
The following section of this manual provides interconnection
information for typical configurations of the AD1650B system. These are
organized according to the size and capabilities of systems.
System Configurations . . . . . . . . . . . . . . . . . . . . . . . . . . . . . 3-2
Single Bay systems . . . . . . . . . . . . . . . . . . . . . . . . . . . . . . . . 3-3
Two Bay systems . . . . . . . . . . . . . . . . . . . . . . . . . . . . . . . . . 3-4
Three Bay systems . . . . . . . . . . . . . . . . . . . . . . . . . . . . . . . . 3-5
Two Bay systems . . . . . . . . . . . . . . . . . . . . . . . . . . . . . . . . . 3-7
Four Bay systems . . . . . . . . . . . . . . . . . . . . . . . . . . . . . . . . . 3-8
Six Bay systems . . . . . . . . . . . . . . . . . . . . . . . . . . . . . . . . . 3-10
SYSTEM CONFIGURATIONS
AD1650B
SYSTEM CONFIGURATIONS
The following section of this manual provides interconnection
information for typical configurations of the AD1650B system.
These are organized according to the size and capabilities of
systems, as follows:
The descriptions in the following pages include the following
subsections of connection instructions, as applicable to each
configuration.
Power/Data Interconnections
1. Single Bay systems
page 3-3
- up to 56 x 2, 48 x 4, 40 x 6, or 32 x 8
(Cameras x Monitors)
2. Two Bay systems
- up to 64 Cameras and 8 Monitors
page 3-4
3. Three Bay systems
- up to 128 Cameras and 8 Monitors
page 3-5
4. Two Bay systems
- up to 24 Cameras and 16 Monitors
page 3-7
5. Four Bay systems
- up to 64 Cameras and 16 Monitors
page 3-8
6. Six Bay systems
- up to 128 Cameras and 16 Monitors
page 3-10
Bays that do not contain a power supply are provided power
via the Power/Data Interconnections described in each section.
All bays in the multi-bay configurations receive control
information from the AD1653B bay via either the Power/Data
Interconnections (for bays with no power supply) or separate
Data Interconnections (for bays with power supply modules).
Note
When using interbay power and data cables,
connect ground (black lead wire with lug) to
each bay with a screw.
Control Code Connections
Illustrations of these configurations and bay interconnections
are shown in the Typical System Connections at the end of this
manual, pages C-8 through C-13.
The instructions in the following pages and the Typical System
Connection illustrations show the modules and connections for
the maximum number of Cameras and Monitors of each
configuration. Smaller switching system matrices, such as
those ordered with future expansion in mind, may have fewer
modules installed than illustrated.
These system configurations include varied combinations of
AD1650B bays, with different mixtures of modules for power,
processor control, Video Input, and Video Output. The
different types of bays used in these configurations are:
AD1651B - CPU bay for Single Bay systems
In each configuration, Control Code for camera receivers and
other code-controlled units is provided either directly from the
J1 connector on the Power Panel of the appropriate bay, or
from flying leads on the Power/Data Interconnections. These
are identified, as appropriate to each configuration, in the
following pages. See page 2-3 for Control Code connections
to code-controlled accessories.
Video Interconnections
In most multiple-bay configurations, camera inputs switched
by the Video Input Modules are routed to the appropriate
Video Output Modules in other bays from the Video
Interconnect Panel (VIP) in the input bay. The required Video
Interconnections are identified in each configuration in the
following pages.
Video Input and Output Connections
AD1653B - CPU bay for Multiple Bay systems
AD1654 - Bay for Input Modules, Terminated
AD1655 - Bay for Input Modules, Terminated, with power
All (Camera) video input and (Monitor) video output
connections for each type of video module are identified in
each of the following configurations.
AD1656 - Bay for Input Modules, Looping
AD1657 - Bay for Output Modules, with power
AD1658 - Bay for Input Modules, Looping, with power
Note: In the following configuration descriptions,
references to “left” or “right” apply to the Bays as
viewed from the REAR.
3-2
AD1650B
SYSTEM CONFIGURATIONS
SINGLE BAY SYSTEMS
Video Input Connections
Single bay systems can consist of 56 cameras and 2 monitors,
48 cameras and 4 monitors, 40 cameras and 6 monitors, or 32
cameras and 8 monitors. A complete system is supplied in one
AD1651B bay.
Installed modules include:
One AD1603N Power Supply Module (PSM),
One AD1661B Central Processing Module (CPM),
Each AD1611 VIM includes eight terminated BNC’s on the
back panel for video input connections. The system assigns
the video input connected to the top BNC on the right-most
AD1611 VIM as input video number 1, and the video input
connected to the top BNC on the next AD1611 VIM to the left
as input video number 9, etc., up to video input number 56 on
the bottom BNC of the last (seventh) AD1611 VIM on the left.
Video Output Connections
One to seven AD1611 Video Input Modules (VIMs),
One to four AD1626 Video Output Modules (VOMs).
For illustration of a typical single bay system, see Page C-8 of
the Typical System Connections.
IDENTIFY THESE MODULES CAREFULLY
BEFORE PROCEEDING.
Power/Data Interconnections
Single bay systems require no power interconnections. All
power to the bay and to all modules in the bay is supplied from
the AD1603N PSM within the bay.
Each AD1626 VOM has two BNC’s on the bottom of the back
panel (labeled OUT) for video output connections. The system
assigns the upper right OUT BNC, on the right-most AD1626
VOM, as video output number 1, and the lower left OUT BNC
on this VOM as video output number 2. The upper right OUT
BNC on the next AD1626 VOM to the left is assigned as video
output number 3, etc., up to video output number 8 for four
VOMs.
The four top-most BNC’s on each VOM, labeled A and B, are
not used in single bay configurations.
Control Code Connections
Control Code for all camera receivers in a system is provided
from the J1 OUT connector on the AD1603N PSM Power
Panel.
3-3
SYSTEM CONFIGURATIONS
AD1650B
TWO BAY SYSTEMS, 64 CAMERAS x 8 MONITORS
Video Interconnections
Systems for a maximum of 64 cameras and 8 monitors are
supplied in two bays. The AD1653B bay contains a power
supply, processor, and monitor modules for monitors 1 through
8. The AD1654 bay contains the the camera modules for
cameras 1 through 64.
These systems are supplied in two bays configured as shown
below:
Modules/Panels
AD1603N PSM, Power Panel
Power Panel
AD1663B CPM, Data Panel
AD1611 VIM
AD1626 VOM
VIP Panel
AD1653B AD1654
Bay
Bay
1
1
1
1-8
1-4
1
For illustration of a typical two bay system with 64 cameras
and 8 monitors, see Page C-9 of the Typical System
Connections.
CAREFULLY IDENTIFY ALL BAYS, MODULES, AND
PANELS BEFORE PROCEEDING.
Power/Data Interconnections
A Power/Data Interconnection cable is supplied to provide
both operating power and control signals to the AD1654 bay
from the AD1653B bay. Connect the cable between connector
J1 on the AD1603N PSM Power Panel in the AD1653B bay
and connector J1 on the Power Panel in the AD1654 bay.
The camera video outputs from the AD1654 bay are provided
through eight BNC connectors, labeled 1, 3, 5, 7, and 2, 4, 6, 8,
on the VIP Panel.
Each AD1626 VOM in the AD1653B bay has two pairs of
input BNC connectors located on the upper portion of its back
panel for video interconnections from the VIP Panel. From the
rear, the input BNC for system monitor 1 is located at the
right-most VOM position, labeled MONITOR 1 A, and system
monitor 2 is the next position to the left, labeled MONITOR 2
A. System monitor 3 is on the next VOM panel to the left,
labeled MONITOR 3 A and system monitor 4 is labeled
MONITOR 4 A, and so on to system monitor 8 on the fourth
VOM panel. The “B” MONITOR BNC connectors are not
used in systems with 64 cameras or less.
AD1654 to AD1653B - Connect the top BNC on the AD1654
bay VIP Panel, labeled 1, to the top input BNC of the
AD1653B bay VOM panel for system monitor 1, labeled
MONITOR 1 A. Connect the BNC labeled 2 on the AD1654
bay VIP panel, to the top input BNC of the AD1653B bay
VOM panel for system monitor 2, labeled 2 A. Continue in
this manner until all eight connections of the AD1654 bay VIP
panel are connected to all eight “A” monitor input BNC’s of
the AD1653B bay VOM panels. If there are less than eight
monitors in the system, leave the remaining BNC’s on the VIP
panel unterminated.
DO NOT TERMINATE THE VIP PANELS.
Video Input Connections
Control Code Connections
Control Code for all 64 cameras is provided from flying leads
on the supplied Power/Data Interconnection cable, above.
Each AD1611 VIM in the AD1654 bay has eight terminated
BNC’s on the back panel for video input connections. The
system assigns the video input connected to the top BNC on
the right-most AD1611 VIM as input number 1. The video
input connected to the top BNC on the next AD1611 VIM to
the left is assigned as input number 9, etc., up to video input
number 64 on the bottom BNC of the last AD1611 VIM.
Video Output Connections
Each AD1626 VOM in the AD1653B bay has two BNC’s on
the bottom of its back panel (labeled OUT) for video output
connections. The system assigns the upper right OUT BNC on
the right-most AD1626 VOM as video output number 1, and
the lower left OUT BNC on this VOM as video output number
2. The upper-right OUT BNC on the next AD1626 VOM to
the left is assigned as video output number 3, etc., up to video
output number 8 on the fourth VOM.
3-4
AD1650B
SYSTEM CONFIGURATIONS
THREE BAY SYSTEMS, 128 CAMERAS x 8 MONITORS
Video Interconnections
Systems for a maximum of 128 cameras and 8 monitors are
supplied in three bays. The AD1653B bay contains a power
supply, a processor, and monitor modules for monitors 1
through 8. The AD1654 bay contains the camera modules for
cameras 1 through 64. The AD1655 bay contains a power
supply and camera modules for cameras 65 through 128.
These systems are supplied in three bays configured as shown
below:
Modules/Panels
AD1603N PSM, Power Panel
Power Panel
AD1663B CPM, Data Panel
AD1611 VIM
AD1626 VOM
VIP Panel
AD1653B AD1654 AD1655
Bay
Bay
Bay
1
1
1
1
8
1-8
1-4
1
1
For illustration of a typical Three Bay system with 128
cameras and 8 monitors, see Page C-10 of the Typical System
Connections.
CAREFULLY IDENTIFY ALL BAYS, MODULES, AND
PANELS BEFORE PROCEEDING.
Power/Data Interconnections
A Power/Data Interconnection cable is supplied to provide
both operating power and control signals to the AD1654 bay
from the AD1653B bay. Connect the cable between connector
J1 on the AD1603N PSM Power Panel in the AD1653B bay
and connector J1 on the Power Panel in the AD1654 bay.
A separate Data Interconnect cable is supplied to provide
control data to the AD1655 bay. Connect this Data cable
between connector J2 on the Data Panel in the AD1653B bay
and connector J2 on the Power Panel in the AD1655 bay.
Control Code Connections
Control Code for cameras 1-64 is provided from flying leads
on the Power/Data cable from connector J1 on the AD1653B
bay. Control Code for cameras 65-128 is provided from
connector J1 on the Power Panel in the AD1655 bay.
The camera video outputs from the VIP Panels on the AD1654
(cameras 1 to 64) and AD1655 (cameras 65 to 128) bays are
provided through eight BNC’s, labeled 1, 3, 5, 7, and 2, 4, 6, 8.
Each AD1626 VOM in the AD1653B bay has two pairs of
input BNC’s located on the upper portion of its back panel for
video interconnections from the VIP panels. Outputs from the
AD1654 bay connect to the AD1653B bay “A” MONITOR
BNC’s. Outputs from the AD1655 bay connect to the
AD1653B bay “B” BNC’s.
From the rear of the AD1653B bay, the input BNC for system
monitor 1 is located at the right-most VOM position in the bay,
labeled MONITOR 1 A and 1 B, and system monitor 2 is
labeled MONITOR 2 A and 2 B. System monitor 3 is on the
next VOM panel to the left, labeled MONITOR 3 A and 3 B,
and system monitor 4 is labeled MONITOR 4 A and 4 B, and
so on to system monitor 8 on the fourth VOM panel.
AD1654 to AD1653B - Connect the top BNC on the AD1654
bay VIP Panel, labeled 1, to the top input BNC of the
AD1653B bay VOM panel for system monitor 1, labeled
MONITOR 1 A. Connect the BNC labeled 2 on the AD1654
bay VIP panel, to the top input BNC of the AD1653B bay
VOM panel for system monitor 2, labeled 2 A. Continue in
this manner until all eight connections of the AD1654 bay VIP
panel are connected to all eight “A” monitor inputs of the
AD1653B bay VOM panels. If there are less than eight
monitors in the system, leave the remaining BNC’s on the VIP
panel unterminated.
DO NOT TERMINATE THE VIP PANELS.
AD1655 to AD1653B - Connect the top BNC on the AD1655
bay VIP Panel, labeled 1, to the second input BNC of the
AD1653B bay VOM panel for system monitor 1, labeled
MONITOR 1 B. Connect the BNC labeled 2 on the AD1655
bay VIP panel, to the second input BNC of the AD1653B bay
VOM panel for system monitor 2, labeled 2 B. Continue in
this manner until all eight connections of the AD1655 bay VIP
panel are connected to all eight “B” monitor inputs of the
AD1653B bay VOM panels. If there are less than eight
monitors in the system, leave the remaining BNC’s on the VIP
panel unterminated.
DO NOT TERMINATE VIP PANELS.
(Continue on the next page for Video Input and Output
Connections for this configuration.)
3-5
SYSTEM CONFIGURATIONS
AD1650B
THREE BAY SYSTEMS, 128 CAMERAS x 8 MONITORS
(Continued from prior page)
Video Input Connections
Each AD1611 VIM in the AD1654 and AD1655 bays includes
eight terminated BNC’s for video input connections. The
system assigns the video input connected to the top BNC on
the right-most AD1626 VIM in the AD1654 bay as input
number 1. The video input connected to the top BNC on the
next VIM to the left is assigned as input number 9 etc., up to
video input number 64. In the AD1655 bay, the system
assigns the video input connected to the top BNC on the rightmost VIM as input number 65. The video input connected to
the top BNC on the next VIM to the left is assigned as input
number 73 etc., up to number 128.
Video Output Connections
Each AD1626 VOM in the AD1653B bay has two BNC’s on
the bottom of its back panel (labeled OUT) for video output
connections. The system assigns the upper right OUT BNC on
the right-most VOM as output number 1, and the lower left
OUT BNC of this VOM as output number 2. The upper right
OUT BNC on the next VOM to the left is assigned as output
number 3, etc., up to output number 8.
3-6
AD1650B
SYSTEM CONFIGURATIONS
TWO BAY SYSTEMS, 24 CAMERAS x 16 MONITORS
Video Input Connections
Systems for a maximum of 24 cameras and 16 monitors are
supplied in two bays. The AD1653B bay contains a power
supply, a processor, camera modules for cameras 1 through 24,
and monitor modules for monitors 1 through 8. The AD1657
bay contains a power supply, camera modules for cameras 1
through 24, and monitor modules for monitors 9 through 16.
These systems are supplied in two bays configured as shown
below:
Modules/Panels
AD1603N PSM, Power Panel
AD1663B CPM, Data Panel
AD1611 VIM
AD1609CM VIM
AD1626 VOM
AD1653B AD1657
Bay
Bay
1
1
1
1-3
1-3
4
1-4
Each AD1609CM in the AD1657 bay has eight pairs of
looping BNC’s on the back panel for video input connections.
Video inputs are connected to one BNC of each pair and
looped to the corresponding terminated video input in the
AD1611 VIM in the AD1653B bay.
The system assigns the video input connected to the top BNC
pair on the right-most AD1609CM as input number 1, the
video input connected to the top BNC pair on the next
AD1609CM to the left as input number 9, and the video input
connected to the top BNC pair on the third AD1609CM as
input number 17, up to video input 24 on the bottom BNC pair
of the third AD1609CM.
Video Output Connections
For illustration of a typical Two Bay system with 24 cameras
and 16 monitors, see Page C-11 of the Typical System
Connections.
IDENTIFY ALL BAYS, MODULES, AND PANELS
CAREFULLY BEFORE PROCEEDING.
Power/Data Interconnections
Each bay contains an AD1603N Power Supply Module, thus
no power interconnection is required.
A Data Interconnect cable is supplied to provide control data to
the AD1657 bay. Connect this cable between connector J3 on
the Data Panel in the AD1653B bay and connector J3 on the
Power Panel in the AD1657 bay.
Control Code Connections
Control Code for all cameras in this configuration is provided
from connector J1 on the Power Panel in the AD1653B bay.
Each AD1626 VOM in the AD1653B and AD1657 bays has
two BNC’s on the bottom of the back panel (labeled OUT) for
video output connections.
In the AD1653B bay, the system assigns the video output
connected to the upper right OUT BNC on the right-most
AD1626 VOM as video output number 1, and the video output
from the lower left OUT BNC of this VOM as video output
number 2. The video output connected to the upper right OUT
BNC on the next AD1626 VOM to the left is assigned as
output number 3, etc., up to video output number 8 on the
fourth VOM in this bay.
In the AD1657 bay, the system assigns the video output
connected to the upper right OUT BNC on the right-most
AD1626 VOM as output number 9, and the video output from
the lower left OUT BNC of this VOM as output number 10.
The video output connected to the upper right OUT BNC on
the next AD1626 VOM to the left is assigned as output number
11, etc., up to video output number 16 on the fourth VOM in
this bay.
The four top-most BNC’s on each VOM, labeled A and B, are
not used in this configuration.
3-7
SYSTEM CONFIGURATIONS
AD1650B
FOUR BAY SYSTEMS, 64 CAMERAS x 16 MONITORS
Video Interconnections
Systems for a maximum of 64 cameras and 16 monitors are
supplied in four bays. The AD1653B bay contains a power
supply, processor, and monitor modules for monitors 1 - 8.
The AD1657 bay contains a power supply and monitor
modules for monitors 9 - 16. The AD1654 bay contains
camera modules for cameras 1 - 64 for monitors 1 - 8. The
AD1656 bay contains camera modules for cameras 1 - 64 for
monitors 9 - 16.
These systems are supplied in four bays configured as shown
below:
AD1653BAD1657AD1654 AD1656
Modules/Panels
Bay
Bay
Bay
Bay
AD1603N PSM, Pwr Pnl 1
1
Power Panel
1
1
AD1663B CPM, Data Pnl 1
AD1609CM VIM
1-8
AD1611 VIM
1-8
AD1626 VOM
4
1-4
VIP Panel
1
1
The camera video outputs from the VIP Panels on the AD1654
and AD1656 bays are provided through eight BNC’s, labeled
1, 3, 5, 7, and 2, 4, 6, 8.
Each AD1626 VOM in the AD1653B and AD1657 bays has
two pairs of input BNC’s located on the upper portion of its
back panel, for video interconnections from the VIP panels.
Outputs from the VIP Panels in the AD1654 and AD1656 bays
connect to the AD1653B and AD1657 bays “A” MONITOR
BNC’s. The “B” MONITOR BNC connectors are not used in
systems with 64 cameras or less.
From the rear of the AD1653B bay, the input BNC for system
monitor 1 is located at the right-most VOM position, labeled
MONITOR 1 A, and system monitor 2 is labeled MONITOR 2
A. System monitor 3 is on the next panel to the left, labeled
MONITOR 3A, and system monitor 4 is labeled MONITOR 4
A, and so on to system monitor 8.
For illustration of a typical Four Bay system with 64 cameras
and 16 monitors, see Page C-12 of the Typical System
Connections.
IDENTIFY ALL BAYS, MODULES, AND PANELS
CAREFULLY BEFORE PROCEEDING.
Power/Data Interconnections
Two Power/Data Interconnection cables are supplied. Connect
one cable between connector J1 on the AD1653B Power Panel
and connector J1 on the AD1654 Power Panel. Connect the
second cable between connector J1 on the AD1657 Power
Panel and connector J1 on the AD1656 Power Panel.
One Data Interconnect cable is supplied. Connect the Data
cable between connector J3 on the Data Panel in the AD1653B
bay and connector J3 on the Power Panel in the AD1657 bay.
Control Code Connections
Control Code for all 64 cameras is provided from flying leads
on either of the two Power/Data Interconnection cables, above.
In the AD1657 bay, the input BNC for system monitor 9 is
located at the right-most VOM position, labeled MONITOR 9
A, system monitor 10 is labeled MONITOR 10 A. System
monitor 11 is on the next panel to the left, labeled MONITOR
11 A, system monitor 12 is labeled MONITOR 12 A, and so
on to system monitor 16.
AD1654 to AD1653B - Connect the top BNC on the AD1654
bay VIP Panel, labeled 1, to the top input BNC of the
AD1653B bay VOM panel for system monitor 1, labeled
MONITOR 1 A. Connect the BNC labeled 2 on the AD1654
bay VIP panel, to the top input BNC of the AD1653B bay
VOM panel for system monitor 2, labeled 2 A. Continue in
this manner until all eight connections of the AD1654 bay VIP
panel are connected to all eight “A” monitor inputs of the
AD1653B bay VOM panels.
DO NOT TERMINATE THE VIP PANELS.
AD1656 to AD1657 - Connect the top BNC on the AD1656
bay VIP Panel, labeled 1, to the top input BNC of the AD1657
bay VOM panel for system monitor 9, labeled MONITOR 9 A.
Connect the BNC labeled 2 on the AD1656 bay VIP panel, to
the top input BNC of the AD1657 bay VOM panel for system
monitor 10, labeled 10 A. Continue in this manner until all
eight connections of the AD1657 bay VIP panel are connected
to all eight “A” monitor inputs of the AD1657 bay VOM
panels. If there are less than 16 monitors in the system, leave
the remaining VIP panel BNC’s unterminated.
DO NOT TERMINATE THE VIP PANELS.
3-8
AD1650B
SYSTEM CONFIGURATIONS
Video Input Connections
Each AD1609CM in the AD1656 bay has eight pairs of
looping BNC’s on the back panel for video input connections.
Video inputs are connected to one BNC of each pair and
looped to the corresponding terminated video input in an
AD1611 VIM in the AD1654 bay. The system assigns the
video input connected to the top BNC pair on the right-most
AD1609CM as input number 1, the video input connected to
the top BNC pair on the next AD1609CM to the left as input
number 9, etc., up to video input number 64 on the bottom
BNC pair of the last AD1609CM.
Video Output Connections
Each AD1626 VOM in the AD1653B and AD1657 bays has
two BNC’s on the bottom of the back panel for video output
connections. In the AD1653B bay, the system assigns the
upper right OUT BNC on the right-most AD1626 VOM as
output number 1, and the OUT BNC to the left as output
number 2. The upper right OUT BNC on the next AD1626
VOM to the left is assigned the number 3, etc., up to video
output number 8 on the fourth VOM in this bay.
In the AD1657 bay, the system assigns the upper right OUT
BNC on the right-most VOM as number 9, and the BNC to the
left as 10. The upper right BNC on the next VOM to the left is
assigned as number 11, etc., up to video output number 16.
3-9
SYSTEM CONFIGURATIONS
AD1650B
SIX BAY SYSTEMS, 128 CAMERAS x 16 MONITORS
Control Code Connections
Systems for a maximum of 128 cameras and 16 monitors are
supplied in six bays. The AD1653B bay contains a power
supply, processor, and monitor modules for monitors 1 through
8; the AD1657 bay contains a power supply and monitor
modules for monitors 9 through 16. The AD1654 bay contains
camera modules for cameras 1 through 64, for monitors 1
through 8; the AD1656 bay contains camera modules for
cameras 1 through 64, for monitors 9 through 16. The
AD1655 bay contains camera modules for cameras 65 through
128, for monitors 1 through 8; the AD1658 bay contains
camera modules for cameras 65 through 128, for monitors 9
through 16.
These systems are supplied in six bays configured as below:
Modules/Panels
AD1603N PSM, Power Panel
Power Panel
AD1663B CPM, Data Panel
AD1611 VIM
AD1626 VOM
VIP Panel
AD1653B AD1654 AD1655
Bay
Bay
Bay
1
1
1
1
8
1-8
1-4
1
1
Modules/Panels
AD1603N PSM, Power Panel
Power Panel
AD1609 VIM
AD1626 VOM
VIP Panel
AD1657 AD1656 AD1658
Bay
Bay
Bay
1
1
1
8
1-8
1-4
1
1
For illustration of a typical Six Bay system with 128 cameras
and 16 monitors, see Typical System Connections, page C-13.
IDENTIFY ALL BAYS, MODULES, AND PANELS
CAREFULLY BEFORE PROCEEDING.
Power/Data Interconnections
Two Power/Data Interconnect cables are supplied. Connect
one cable between connector J1 on the AD1603N PSM Power
Panel in the AD1653B bay and connector J1 on the Power
Panel in the AD1654 bay. The second Power/Data cable is
connected between connector J1 on the AD1603N PSM Panel
in the AD1657 bay and J1 on the AD1656 bay Power Panel.
Control Code for cameras 1-64 is provided from flying leads
on the Power/Data cables, from either the AD1653B bay or the
AD1657 bay (the same code is available from both bays).
Control Code for cameras 65-128 is provided from connector
J1 on the Power Panel in either the AD1655 bay or the
AD1658 bay (the same code is available from both bays).
Video Interconnections
The eight video output BNC’s from the VIP Panels on the
AD1654 and AD1656 bays are for cameras 1 to 64 and the
eight output BNC’s on the VIP Panels on the AD1655 and
AD1658 bays are for cameras 65 to 128.
Each AD1626 VOM in the AD1653B and AD1657 bays has
two pairs of input BNC’s located on the upper portion of its
back panel, for video interconnections from the VIP panels.
Outputs from the VIP Panels in the AD1654 and AD1656 bays
connect to the AD1653B and AD1657 bays “A” MONITOR
BNC’s. Outputs from the VIP Panels in the AD1655 and
AD1658 bays connect to the AD1653B and AD1657 bays “B”
MONITOR BNC’s.
From the rear of the AD1653B bay, the input BNC for system
monitor 1 is located at the right-most VOM position in the bay,
labeled MONITOR 1 A and 1 B, and system monitor 2 is
labeled MONITOR 2 A and 2 B. System monitor 3 is on the
next panel to the left, labeled MONITOR 3A and 3 B, and
system monitor 4 is labeled MONITOR 4 A, and so on to
system monitor 8.
In the AD1657 bay, the input BNC for system monitor 9 is
located at the right-most VOM position in the bay, labeled
MONITOR 9 A and MONITOR 9 B, system monitor 10 is
labeled MONITOR 10 A and 10 B. System monitor 11 is on
the next panel to the left, labeled MONITOR 11 A and 11 B,
system monitor 12 is labeled MONITOR 12 A and 12 B, and
so on to system monitor 16.
(Continue the Video Interconnections on the next page.)
Three Data Interconnect cables are supplied. Connect one
Data cable between connector J2 on the Data Panel in the
AD1653B bay and J2 on the Power Panel in the AD1655 bay.
Connect the next Data cable between connector J3 on the Data
Panel in the AD1653B bay and J3 on the Power Panel in the
AD1657 bay. Connect the remaining Data cable between
connector J4 on the Data Panel in the AD1653B bay and J4 on
the Power Panel in the AD1658 bay.
3-10
AD1650B
SYSTEM CONFIGURATIONS
Video Interconnections (continued)
Video Input Connections
AD1654 to AD1653B - Connect the top BNC on the AD1654
bay VIP Panel, labeled 1, to the top input BNC of the
AD1653B bay VOM panel for system monitor 1, labeled
MONITOR 1 A. Connect the BNC labeled 2 on the AD1654
bay VIP panel, to the top input BNC of the AD1653B bay
VOM panel for system monitor 2, labeled 2 A. Continue in
this manner until all eight connections of the AD1654 bay VIP
panel are connected to all eight “A” monitor inputs of the
AD1653B bay VOM panels.
Each AD1609CM in the AD1656 and AD1658 bays has eight
pairs of looping BNC’s on the back panel for video input
connections. Video inputs are connected to one BNC of each
pair and looped to the corresponding terminated video input in
an AD1611 VIM in the AD1654 and AD1655 bays.
DO NOT TERMINATE THE VIP PANELS.
AD1656 to AD1657 - Connect the top BNC on the AD1656
bay VIP Panel, labeled 1, to the top input BNC of the AD1657
bay VOM panel for system monitor 9, labeled MONITOR 9 A.
Connect the BNC labeled 2 on the AD1656 bay VIP panel, to
the top input BNC of the AD1657 bay VOM panel for system
monitor 10, labeled 10 A. Continue in this manner until all
eight connections of the AD1657 bay VIP panel are connected
to all eight “A” monitor inputs of the AD1657 bay VOM
panels. If there are less than 16 monitors in the system, leave
the remaining BNC’s on the VIP panel unterminated.
In the AD1656 bay, the system assigns the video input
connected to the top BNC pair on the right-most AD1609CM
as input number 1, the video input connected to the top BNC
pair on the next AD1609CM to the left as input number 9, etc.,
up to video input number 64 on the bottom BNC pair of the
last AD1609CM in the bay. The looping inputs from each
AD1609CM in the AD1656 bay are connected to the
corresponding AD1611 VIM input BNC’s in the AD1654 bay.
In the AD1658 bay, the system assigns the video input
connected to the top BNC pair on the right-most AD1609CM
as input number 65, the video input connected to the top BNC
pair on the next AD1609CM to the left as input number 73,
etc., up to video input number 128 on the bottom BNC pair of
the last AD1609CM in this bay. The looping inputs from each
AD1609CM in the AD1658 bay are connected to the
corresponding AD1611 VIM input BNC’s in the AD1655 bay.
DO NOT TERMINATE THE VIP PANELS.
AD1655 to AD1653B - Connect the top BNC on the AD1655
bay VIP Panel, labeled 1, to the second input BNC of the
AD1653B bay VOM panel for system monitor 1, labeled
MONITOR 1 B. Connect the BNC labeled 2 on the AD1655
bay VIP panel, to the second input BNC of the AD1653B bay
VOM panel for system monitor 2, labeled 2 B. Continue in
this manner until all eight connections of the AD1655 bay VIP
panel are connected to all eight “B” monitor inputs of the
AD1653B bay VOM panels.
DO NOT TERMINATE THE VIP PANELS.
AD1658 to AD1657 - Connect the top BNC of the AD1658
bay VIP Panel, labeled 1, to the second input BNC of the
AD1657 bay VOM panel for system monitor 9, labeled
MONITOR 9 B. Connect the BNC labeled 2 of the AD1658
bay VIP panel, to the second input BNC of the AD1657 bay
VOM panel for system monitor 10, labeled 10 B. Continue in
this manner until all eight connections of the AD1658 bay VIP
panel are connected to all eight “B” monitor inputs of the
AD1657 bay VOM panels. If there are less than 16 monitors
in the system, leave the remaining BNC’s on the VIP panel
unterminated.
Video Output Connections
Each AD1626 VOM in the AD1653B and AD1657 bays has
two BNC’s on the bottom of the back panel for video output
connections.
In the AD1653B bay, the system assigns the video output
connected to the upper right OUT BNC on the right-most
AD1626 VOM as output number 1, and the OUT BNC to the
left on this VOM as output number 2. The video output
connected to the upper right OUT BNC on the next AD1626
VOM to the left is assigned as output number 3, etc., up to
video output number 8 on the fourth VOM in this bay.
In the AD1657 bay, the system assigns the video output
connected to the upper right OUT BNC on the right-most
AD1626 VOM as output number 9, and the OUT BNC to the
left as number 10. The video output connected to the upper
right OUT BNC on the next AD1626 VOM to the left is
assigned as output number 11, etc., up to video output number
16 on the fourth VOM in this bay.
DO NOT TERMINATE THE VIP PANELS.
3-11
OPERATION
The following section of this manual describes the powering up and basic
operation of the AD1650B system. The complete system setup
programming and operating instructions for the AD1650B are provided in
the System Programming manual, OP1650BSP.
Powering Up . . . . . . . . . . . . . . . . . . . . . . . . . . . . . . . . . . . . . 4-2
Powering the AD1650 bays . . . . . . . . . . . . . . . . . . . . . . 4-2
Operating Indication . . . . . . . . . . . . . . . . . . . . . . . . . . . . 4-2
CPM Reset . . . . . . . . . . . . . . . . . . . . . . . . . . . . . . . . . . . 4-2
Keyboard Control . . . . . . . . . . . . . . . . . . . . . . . . . . . . . . . . 4-3
Video Selection . . . . . . . . . . . . . . . . . . . . . . . . . . . . . . . 4-3
Camera Control . . . . . . . . . . . . . . . . . . . . . . . . . . . . . . . 4-3
System Programming . . . . . . . . . . . . . . . . . . . . . . . . . . . . . 4-3
OPERATION
AD1650B
POWERING UP
A complete AD1650B system may be brought on-line after:
Ribbon Cable to DATA OUTPUT PANEL
for multiple bay interconnect
(1663B CPM models only)
• All modules and bays have been installed and connected.
• One or more cameras have been connected for video input.
• One or more monitors have been connected for viewing
video output.
Ribbon Cable from POWER SUPPLY
for RS-232 Inputs
• All video cables have been properly terminated.
• A Keyboard has been connected for system control.
BLINKING LED
Power is connected and applied to the AD1650B system one
bay at a time, in the following order:
1. AD1658 bay, if present
RESET BUTTON
2. AD1657 bay, if present
3. AD1655 bay, if present
Figure 4-2 - Central Processing Module Front Panel
4. AD1651B or AD1653B bay, whichever is present.
(AD1654 and AD1656 bays are powered by other bays in the
system.)
Powering the AD1650B bays
Power is supplied to each AD1650B bay which contains an
AD1603N Power Supply Module, via a power cord and plug.
Connect the power cord to the required voltage source:
AD1650B - 120VAC, 50/60 Hz
ADE1650B, ADK1650B - 230 VAC, 50 Hz
Each AD1650B bay which contains an AD1603N PSM is
powered on by the toggle switch located on the bottom right of
the front panel (see Figure 4-1, below). When power is turned
on, a red indicator, next to the power switch, is illuminated.
Any bay which does not contain an AD1603N PSM, such as an
AD1654 or AD1656 bay, is powered by the bay that it is
connected to (by the Power/Data Interconnection).
Operating Indication
Following power on to the bay containing the AD1661B or
AD1663B Central Processing Module (CPM), proper
operation can be visually verified when the front panel is
removed from the bay. An LED/RESET indicator located on
the front of the CPM module, shown in Figure 4-2, is the
operating indicator. When power is applied, this LED blinks at
the rate of once per second to indicate proper CPM operation.
If the LED does not blink properly, try a Reset (below).
CPM Reset
If proper operation is not indicated, the CPM may be reset
while the front panel of the AD1650B bay is open. To reset
the CPM, press the LED/RESET button on the front of the
module (see Figure 4-2).
If the CPM still does not indicate proper operation, contact
American Dynamics Technical Support Center for assistance.
MICROPOWER CONTROL SYSTEM
Figure 4-1 - AD1650B Bay Front Panel (bays with an AD1603N PSM)
4-2
ON
OFF
AD1650B
OPERATION
KEYBOARD CONTROL
Camera Control
The following instructions are for verifying basic operation of
the system. For complete setup and programming of the
AD1650B, refer to the AD1650B System Programming
Manual, OP1650BSPB.
Cameras at sites equipped with AD1640 or AD1680 Series
Receivers can be controlled by keyboard commands. The
following camera control actions are performed on the
“Called” camera.
All system setup and control functions are accessible through
keyboards connected to the system. As a security feature,
AD2078 keyboards have a keyswitch for restricting the setup
programming functions. Refer to the keyboard installation and
operation manual for these restrictions.
CAMERA PAN AND TILT
Hold the keyboard joystick in the direction you wish to
move the camera. The camera continues to move until the
joystick is centered.
The following operations are available for system test or
operation prior to system setup or programming:
LENS IRIS, FOCUS, ZOOM
Press and Hold the lens function button designating the
desired action. The function continues to change as long as
the button is depressed. Release the button when the desired
effect has been obtained.
• Calling a monitor to a keyboard
• Calling a camera to a monitor
• Controlling the pan/tilt, lens, and auxiliaries at a camera site
equipped with a Receiver
AUXILIARIES
Momentary or Latching action of auxiliaries depends on the
options installed in the Receiver at the site being controlled.
To activate an auxiliary function:
Video Selection
Video control functions are accessed from a keyboard by first
placing one of the monitors of the system under the control of
the keyboard (“Calling” a monitor to a keyboard) and then
“Calling” cameras in the system to that monitor.
1. Enter the auxiliary number on the keyboard.
2. Press the AUX ON button to activate the auxiliary.
3. Release the AUX ON button:
To “CALL” a MONITOR to a keyboard:
If auxiliary action stops the auxiliary is momentary.
1. Press the CLEAR button to clear the ENTER display.
If auxiliary action continues the auxiliary is latching.
2. Enter the number of the desired monitor.
4. Press the AUX OFF button to deactivate a latching
auxiliary.
3. Press the MON (Monitor) button on the keyboard. The
number of the MONITOR NOW UNDER CONTROL is
displayed in the MONITOR display.
Note: The current state of latching functions such as locks
or gates is not discernible from the keyboard. If critical,
operator feedback should be provided via the monitor or
some other device.
To “CALL” a CAMERA to the monitor under control:
1. Press the CLEAR button to clear the ENTER display.
2. Enter the number of the desired camera. (A video
source must be connected to this input.)
3. Press the CAM (Camera) button on the keyboard. The
number of the CAMERA ON THE MONITOR UNDER
CONTROL is displayed in the CAMERA display.
SYSTEM PROGRAMMING
For full system programming procedures refer to the AD1650B
System Programming Manual, OP1650BSPB.
The on-screen display position and its brightness for the called
monitor are adjusted by the horizontal position, vertical
position, and brightness controls on the AD1626 Video Output
Module. See Setup of the AD1626 Video Output Module,
Section 2.
4-3
IF YOU ENCOUNTER ANY PROBLEMS
OPERATING THIS UNIT, OR NEED ASSISTANCE,
CALL OUR TECHNICAL SUPPORT CENTER:
within the United States: 1-800-442-2225
outside the United States: (914) 624-7640
TYPICAL SYSTEM CONNECTIONS
Typical System Connections
AD1672 Keyboard to AD1650B . . . . . . . . . . . . . . . . . . . . . C-2
AD1676 Keyboard to AD1650B . . . . . . . . . . . . . . . . . . . . . C-3
AD2078 Keyboard to AD1650B . . . . . . . . . . . . . . . . . . . . . C-4
AD1691 Code Distributor to AD1650B . . . . . . . . . . . . . . . C-5
AD2096 Alarm Interface to AD1650B . . . . . . . . . . . . C-6, C-7
AD1650B System Configurations
Single Bay, 32 Camera, 8 Monitor . . . . . . . . . . . . . . . . . . . C-8
Two Bay, 64 Camera, 8 Monitor . . . . . . . . . . . . . . . . . . . . . C-9
Three Bay, 128 Camera, 8 Monitor . . . . . . . . . . . . . . . . . . C-10
Two Bay, 24 Camera, 16 Monitor . . . . . . . . . . . . . . . . . . . C-11
Four Bay, 64 Camera, 16 Monitor . . . . . . . . . . . . . . . . . . . C-12
Six Bay, 128 Camera, 16 Monitor . . . . . . . . . . . . . . . . . . C-13
TYPICAL SYSTEM CONNECTIONS
AD1672 KEYBOARD TO AD1650B
Ð LENS Ð
Ð AUX Ð
Ð CAMERA SELECT Ð
PGM
Ð AIM Ð
AD1672
MONITOR SELECT SWITCH
KEYBOARD CABLE NUMBER 2
KEYBOARD CABLE NUMBER 1
RS-232
PGM MON
1
2
3
4
K
E
Y
B
R
D
1
2
3
4
J1
OUT
5
6
7
8
AD1650B
Connect the cable ground
on the cable assembly to
one of the four corner
screws.
CAMERA AND/OR MONITOR MODULES
(See TYPICAL CONFIGURATIONS, pages C-8 - C-13)
NOTE: THESE CONNECTIONS, ILLUSTRATING CONTROL OF MONITORS 1 AND 2, ARE TYPICAL OF ONE KEYBOARD.
ANY TWO MONITORS CAN BE CONTROLLED BY ONE AD1672 KEYBOARD.
MULTIPLE AD1672 KEYBOARDS CAN BE CONNECTED TO AD1650B PORTS TO CONTROL ADDITIONAL MONITORS.
C-2
TYPICAL SYSTEM CONNECTIONS
AD1676 KEYBOARD TO AD1650B
4
AD1676
3-WIRE, 18 AWG, SHIELDED CABLE,
BELDEN 8770 OR EQUIVALENT
RCD
XMIT
4
5
3
4
6
5
3
HP0047
6
HP0047
2
7
1
8
2
1
GND
7
8
TP8059
JJ0007
JJ0007
RS-232
PGM MON
1
2
3
4
7.5 VOLTS AC
1.5 AMP
K
E
Y
B
R
D
1
2
3
J1
OUT
4
5
6
7
8
AD1650B
Connect the cable ground
on the cable assembly to
one of the four corner
screws.
NOTE : THESE CONNECTIONS ARE TYPICAL OF ONE KEYBOARD.
EACH RS232 PORT IS PROGRAMMABLE.
C-3
TYPICAL SYSTEM CONNECTIONS
AD2078 KEYBOARD TO AD1650B
AD2078
3-WIRE, 18 AWG, SHIELDED CABLE,
TO HP0082 TERMINAL BLOCK (J1 SIDE)
JUMPER WIRES SUPPLIED WITH KEYBOARD,
REMOVE FOR CONNECTIONS OVER 7 FT
TO XMIT,
PIN 5
TO GND,
PIN 7
RCD
JJ0007
XMIT
5
4
5
3
6
GND
7
4
4
3
6
TP8082 or
TP8083 Wall
Transformer
TO RCD,
PIN 4
2
7
1
8
8
2
6
HP0047
1
J1
5
3
HP0082
TERMINAL
BLOCK
2
7
1
8
J2
JJ0007
TO RS232
PORT
JJ0007
CONNECTIONS BETWEEN UNITS THAT ARE
LESS THAN SEVEN FEET (7') APART
RS-232
PGM MON
1
2
3
4
CONNECTIONS BETWEEN UNITS THAT ARE
GREATER THAN SEVEN FEET (7') APART
K
E
Y
B
R
D
1
2
3
J1
OUT
4
5
6
7
8
AD1650B
Connect the cable ground
on the cable assembly to
one of the four corner
screws.
NOTE : THESE CONNECTIONS ARE TYPICAL OF ONE KEYBOARD.
EACH RS232 PORT IS PROGRAMMABLE.
C-4
TYPICAL SYSTEM CONNECTIONS
AD1691 CODE DISTRIBUTOR TO AD1650B
RECEIVER
CODE LED
W BS
B
S
W
J1
AD1691
18 AWG SHIELDED TWISTED PAIR ,
BELDEN 8760 OR EQUIVALENT
S W B AC AC
W
B
S
TP8002
12 VOLTS AC
10 VA
RS-232
MON
1
2
K
E
Y
B
R
D
1
2
3
3
J1
OUT
4
5
6
7
8
Connect the cable ground
on the cable assembly to
one of the four corner
screws.
NOTE: THESE CONNECTIONS ARE TYPICAL OF ONE CODE DISTRIBUTION UNIT
C-5
AD1650B
TYPICAL SYSTEM CONNECTIONS
AD2096 ALARM INTERFACE TO AD1650B
DRAWING ILLUSTRATES CONNECTIONS
BETWEEN UNITS THAT ARE GREATER
THAN SEVEN FEET (7') APART
1
A
2
A
3
4
A
5
A
SELECT
7
A
8
6
A
9 10 11 12
13 14 15 16 17 18
19 20 21 22 23 24
ON
OFF
PRGM
ABCDEFGH
POWER
25 26 27 28 29 30
31 32 33 34 35 36
37 38 39 40 41 42
49 50 51 52 53 54
55 56 57 58 59 60
61 62 63 64
43 44 45 46 47 48
ON
OFF
ALARM
ABCDEFGH
C
O
M
MW
N N C
O C M
INPUT OUTPUT
AD2096
GND
JJOOO7
8
HP0047 TERMINAL BOX
1
2
7
6
3
5
4
RCD
XMIT
RCD
XMIT
4
5
6
3
2
7
1
8
3-WIRE, 18 AWG, SHIELDED CABLE,
BELDEN 8770 OR EQUIVALENT
GND
JJOOO7
HP0047 TERMINAL BOX
RS-232
PGM MON
1
2
K
E
Y
B
R
D
1
2
3
4
3
4
J1
OUT
5
6
7
8
Connect the cable ground
on the cable assembly to
one of the four corner
screws.
NOTE : THESE CONNECTIONS ARE TYPICAL OF ONE ALARM INTERFACE,
EACH RS232 PORT IS PROGRAMMABLE.
C-6
AD1650B
TYPICAL SYSTEM CONNECTIONS
2096 ALARM INTERFACE TO 1650B
DRAWING ILLUSTRATES CONNECTIONS
BETWEEN UNITS THAT ARE LESS
THAN SEVEN FEET (7') APART
1
A
2
A
SELECT
3
4
A
A
7
8
5
A
6
A
9 10 11 12
13 14 15 16 17 18
19 20 21 22 23 24
ON
OFF
ALARM
PRGM
ABCDEFGH
POWER
25 26 27 28 29 30
31 32 33 34 35 36
37 38 39 40 41 42
49 50 51 52 53 54
55 56 57 58 59 60
61 62 63 64
43 44 45 46 47 48
ON
OFF
ABCDEFGH
C
O
M
MW
N N C
O C M
INPUT OUTPUT
AD2096
JJ0007 - FOR CONNECTIONS UP TO 7'
RS-232
PGM MON
1
2
K
E
Y
B
R
D
1
2
3
4
3
4
J1
OUT
5
6
7
8
AD1650B
Connect the cable ground
on the cable assembly to
one of the four corner
screws.
NOTE : THESE CONNECTIONS ARE TYPICAL OF ONE ALARM INTERFACE,
EACH RS232 PORT IS PROGRAMMABLE.
C-7
TYPICAL SYSTEM CONFIGURATIONS
SINGLE BAY, 32 Cameras, 8 Monitors
PROGRAMMING
MONITOR
32
1
8 OUTPUTS
TO MONITORS
RS-232
PGM MON
AD1651
BAY
1
2
3
4
J1
OUT
K
E
Y
B
R
D
MONITOR
MONITOR
8
6
7
MONITOR
5
4
MONITOR
3
2
1
1
A
A
A
A
2
A
A
A
A
3
B
B
B
B
4
B
B
B
B
5
6
O
U
T
O
U
T
7
8
O
U
T
O
U
T
O
U
T
O
U
T
O
U
T
O
U
T
C
A
M
E
R
A
C
A
M
E
R
A
C
A
M
E
R
A
C
A
M
E
R
A
2
5
1
7
9
1
2
8
2
0
1
2
4
2
9
2
1
1
3
5
3
2
2
4
1
6
8
32 INPUTS FROM
CAMERAS
CONTROL CODE
CONNECTIONS
8
1
C-8
TYPICAL SYSTEM CONFIGURATIONS
TWO BAYS, 64 Cameras, 8 Monitors
PROGRAMMING
MONITOR
8 OUTPUTS
TO MONITORS
RS-232
PGM MON
1
2
K
E
Y
B
R
D
MONITOR
8
J2
1
AD1653
BAY
3
2
4
D
A
T
A
3
4
J1
OUT
J3
5
6
7
J4
O
U
T
P
U
T
MONITOR
7
6
MONITOR
5
4
MONITOR
3
2
1
1
A
A
A
A
A
A
A
A
B
B
B
B
B
B
O
U
T
O
U
T
O
U
T
O
U
T
O
U
T
O
U
T
B
B
8
8
O
U
T
O
U
T
VIDEO
INTERCONNECT
FLYING LEADS,
FOR CONTROL CODE
CONNECTIONS
64
POWER/DATA
INTERCONNECT
1
AD1654
BAY
V
I
P
C
A
M
E
R
A
C
A
M
E
R
A
C
A
M
E
R
A
C
A
M
E
R
A
C
A
M
E
R
A
C
A
M
E
R
A
C
A
M
E
R
A
C
A
M
E
R
A
1
5
7
4
9
4
1
3
3
2
5
1
7
9
1
7
6
0
5
2
4
4
3
6
2
8
2
0
1
2
4
2
6
1
5
3
4
5
3
7
2
9
2
1
1
3
5
6
4
5
6
4
8
4
0
3
2
2
4
1
6
8
3
5
J1
OUT
4
6
8
64 INPUTS FROM CAMERAS
VIDEO INTERCONNECT
PANEL
C-9
TYPICAL SYSTEM CONFIGURATIONS
THREE BAYS, 128 Cameras, 8 Monitors
128
VIDEO INTERCONNECT
PANEL
65
V
I
P
AD1655
BAY
1
C
A
M
E
R
A
1
1
3
C
A
M
E
R
A
1
0
5
C
A
M
E
R
A
C
A
M
E
R
A
C
A
M
E
R
A
C
A
M
E
R
A
C
A
M
E
R
A
9
7
8
9
8
1
7
3
6
5
1
2
4
1
2
5
1
1
6
1
1
7
1
0
8
1
0
9
1
0
0
1
0
1
9
2
8
4
7
6
6
8
9
3
8
5
7
7
6
9
1
2
8
1
2
0
1
1
2
1
0
4
9
6
8
8
8
0
7
2
3
4
CONTROL CODE
CONNECTIONS,
CAMERAS 65-128
C
A
M
E
R
A
1
2
1
5
7
J1
OUT
2
4
6
8
64 INPUTS FROM CAMERAS
VIDEO
INTERCONNECT
DATA
INTERCONNECT
TO AD1655 BAY
DATA INTERCONNECT
PANEL
PROGRAMMING
MONITOR
8 OUTPUTS
TO MONITORS
RS-232
1
PGM MON
2
K
E
Y
B
R
D
MONITOR
8
J2
1
AD1653
BAY
2
4
3
3
4
J1
OUT
J3
5
6
7
J4
D
A
T
A
O
U
T
P
U
T
8
MONITOR
7
6
MONITOR
5
4
MONITOR
3
2
1
A
A
A
A
A
A
A
A
B
B
B
B
B
B
B
B
O
U
T
O
U
T
O
U
T
O
U
T
O
U
T
O
U
T
O
U
T
O
U
T
1
8
VIDEO
INTERCONNECT
FLYING LEADS,
FOR CONTROL CODE
CONNECTIONS,
CAMERAS 1-64
64
POWER/DATA
INTERCONNECT
TO AD1654 BAY
1
AD1654
BAY
V
I
P
C
A
M
E
R
A
C
A
M
E
R
A
C
A
M
E
R
A
C
A
M
E
R
A
C
A
M
E
R
A
C
A
M
E
R
A
C
A
M
E
R
A
C
A
M
E
R
A
1
5
7
4
9
4
1
3
3
2
5
1
7
9
1
7
6
0
5
2
4
4
3
6
2
8
2
0
1
2
4
2
6
1
5
3
4
5
3
7
2
9
2
1
1
3
5
6
4
5
6
4
8
4
0
3
2
2
4
1
6
8
3
5
J1
OUT
4
6
8
64 INPUTS FROM CAMERAS
VIDEO INTERCONNECT
PANEL
C-10
TYPICAL SYSTEM CONFIGURATIONS
TWO BAYS, 24 Cameras, 16 Monitors
PROGRAMMING
MONITOR
24 LOOPING
INPUTS FROM
AD1657 BAY
8 OUTPUTS
TO MONITORS
RS-232
1
2
PGM MON
K
E
Y
B
R
D
MONITOR
8
J2
D
A
T
A
1
AD1653
BAY
3
4
2
3
O
U
T
P
U
T
J3
4
J1
OUT
5
6
CONTROL CODE
CONNECTIONS
J4
MONITOR
7
6
8
4
MONITOR
3
2
1
A
A
A
A
A
A
A
A
B
B
B
B
B
B
B
B
O
U
T
O
U
T
7
MONITOR
5
O
U
T
O
U
T
O
U
T
O
U
T
8
C
A
M
E
R
A
C
A
M
E
R
A
C
A
M
E
R
A
1
7
9
1
2
0
1
2
4
2
1
1
3
5
2
4
1
6
8
O
U
T
O
U
T
1
DATA
INTERCONNECT
TO AD1657 BAY
LOOPED VIDEO
INPUTS
8 OUTPUTS
TO MONITORS
MONITOR
16
AD1657
BAY
4
MONITOR
15
14
MONITOR
MONITOR
13
12
11
10
1
7
9
A
A
A
A
A
A
A
A
B
B
B
B
B
B
B
B
O
U
T
O
U
T
O
U
T
O
U
T
O
U
T
O
U
T
O
U
T
O
U
T
9
1
1
J1
OUT
2
4
1
6
24 INPUTS FROM
CAMERAS
16
9
C-11
8
24
TYPICAL SYSTEM CONFIGURATIONS
FOUR BAYS, 64 Cameras, 16 Monitors
PROGRAMMING
MONITOR
8 OUTPUTS TO
MONITORS 1-8
RS-232
1
PGM MON
2
K
E
Y
B
R
D
MONITOR
8
J2
1
AD1653
BAY
2
3
4
3
J3
4
J1
OUT
5
6
J4
D
A
T
A
O
U
T
P
U
T
6
MONITOR
5
4
MONITOR
3
2
1
1
A
A
A
A
A
A
A
A
B
B
B
B
B
B
B
B
O
U
T
O
U
T
O
U
T
O
U
T
O
U
T
O
U
T
O
U
T
O
U
T
8
7
8
FLYING LEADS,
FOR CONTROL CODE
CONNECTIONS
MONITOR
7
VIDEO
INTERCONNECT
POWER/DATA
INTERCONNECT
64 LOOPING INPUTS
FROM AD1656 BAY
AD1654
BAY
V
I
P
C
A
M
E
R
A
C
A
M
E
R
A
C
A
M
E
R
A
C
A
M
E
R
A
C
A
M
E
R
A
C
A
M
E
R
A
C
A
M
E
R
A
C
A
M
E
R
A
1
5
7
4
9
4
1
3
3
2
5
1
7
9
1
7
6
0
5
2
4
4
3
6
2
8
2
0
1
2
4
2
6
1
5
3
4
5
3
7
2
9
2
1
1
3
5
6
4
5
6
4
8
4
0
3
2
2
4
1
6
8
3
5
J1
OUT
4
6
8
DATA
INTERCONNECT
8 OUTPUTS TO
MONITORS 9-16
MONITOR
16
AD1657
BAY
J1
OUT
MONITOR
15
14
MONITOR
13
12
MONITOR
11
10
9
9
A
A
A
A
A
A
A
A
B
B
B
B
B
B
B
B
O
U
T
O
U
T
O
U
T
O
U
T
O
U
T
O
U
T
O
U
T
O
U
T
16
VIDEO
INTERCONNECT
FLYING LEADS,
FOR CONTROL CODE
CONNECTIONS
LOOPED VIDEO INPUTS
POWER/DATA
INTERCONNECT
V
I
P
5
7
4
9
4
1
3
3
2
5
1
7
9
1
1
9
AD1656
BAY
11
13
J1
OUT
15
10
12
14
16
6
4
5
6
4
8
4
0
3
2
64 INPUTS FROM CAMERAS
C-12
2
4
1
6
8
64
4
3
AD1654
BAY
J1
OUT
FLYING LEADS
CONTROL CODE,
CAMERAS 1-64
AD1653
BAY
2
1
J1
OUT
RS-232
AD1655
BAY
J1
OUT
4
8
6
4
2
7
5
3
1
V
I
P
1
2
8
1
2
4
1
2
5
C
A
M
E
R
A
1
2
1
8
7
6
5
4
3
2
1
K
E
Y
B
R
D
J4
J3
J2
O
U
T
P
U
T
D
A
T
A
1
2
0
1
1
6
1
1
7
C
A
M
E
R
A
1
1
3
3
3
O
U
T
O
U
T
B
A
C
A
M
E
R
A
1
7
C
A
M
E
R
A
2
5
9
C
A
M
E
R
A
LOOPED VIDEO INPUTS
O
U
T
O
U
T
B
B
A
2
1
1
MONITOR
4
3
MONITOR
1
C
A
M
E
R
A
O
U
T
O
U
T
B
B
A
A
J1
OUT
FLYING LEADS:
CONTROL CODE
FOR CAMERAS 1-64
AD1657
BAY
J1
OUT
4
9
16
14
12
10
15
13
11
9
V
I
P
2
0
2
1
2
8
2
9
1
3
1
2
5
4
10
15
8
6
4
5
6
4
8
3
2
64 LOOPING
INPUTS
FROM AD1656 BAY
4
0
2
4
1
6
8
AD1656
BAY
16
14
3
7
3
6
12
4
5
4
4
6
5
3
6
1
2
1
2
8
1
1
3
5
7
64
6
4
4
9
5
6
1
2
0
VIDEO INTERCONNECT
4
5
2
6
0
7
1
2
1
128
POWER/DATA
INTERCONNECT
CONTROL CODE
CONNECTION FOR
CAMERAS 65-128
AD1658
BAY
J1
OUT
4
V
I
P
13
4
1
C
A
M
E
R
A
O
U
T
O
U
T
B
B
A
A
B
A
5
A
6
MONITOR
7
2
6
9
6
8
6
5
C
A
M
E
R
A
11
4
9
5
7
C
A
M
E
R
A
7
DATA INTERCONNECTS
8
8
MONITOR
8
0
7
7
7
6
7
3
C
A
M
E
R
A
8 OUTPUTS TO
MONITORS 1-8
8
8
8
5
8
4
8
1
C
A
M
E
R
A
5
C
A
M
E
R
A
C
A
M
E
R
A
9
6
64 LOOPING
INPUTS
FROM AD1658 BAY
1
0
4
9
3
9
2
8
9
9
7
1
0
0
1
0
1
C
A
M
E
R
A
C
A
M
E
R
A
VIDEO INTERCONNECT
1
1
2
1
0
8
1
0
9
C
A
M
E
R
A
1
0
5
LOOPED VIDEO INPUTS
1
0
4
8
9
4
1
9
6
8
1
4
0
2
5
15
3
2
O
U
T
O
U
T
B
1
7
2
4
O
U
T
O
U
T
B
B
A
A
B
A
13
A
14
MONITOR
64 INPUTS FROM CAMERAS
4
8
3
3
16
16
MONITOR
8
8
7
3
8
0
9
12
11
MONITOR
1
6
O
U
T
O
U
T
B
B
A
A
8 OUTPUTS TO
MONITORS 9-16
64 INPUTS FROM CAMERAS
1
1
2
9
7
VIDEO INTERCONNECT
1
0
5
1
6
5
10
8
O
U
T
O
U
T
B
B
A
A
1
9
9
MONITOR
7
2
65
TYPICAL SYSTEM CONFIGURATIONS - SIX BAYS, 128 Cameras, 16 Monitors
3
1
V
I
P
VIDEO INTERCONNECT
POWER/DATA
INTERCONNECT
PGM MON
DATA INTERCONNECT
CONTROL CODE
CONNECTION FOR
CAMERAS 65-128
C-13
INDEX
INDEX
AD1650B
Accessories . . . . . . . . . . . . . . . . . . . . . . . . . . . . . . . . . . . . . 1
AD1603N PSM, Power Supply Module . . . . . . . . . . . . . . . 2
AD1609CM, Video Input Module . . . . . . . . . . . . . . . . . . . 3
AD1611, Video Input Module . . . . . . . . . . . . . . . . . . . . . . 3
AD1626, Video Output Module . . . . . . . . . . . . . . . . . . . . . 3
AD1626NA, Video Output Module . . . . . . . . . . . . . . . . . . 3
AD1661 CPM, Central Processing Module . . . . . . . . . . . . 2
AD1663 CPM, Central Processing Module . . . . . . . . . . . . 2
Power and Data Interconnection
Installation . . . . . . . . . . . . . . . . . . . . . . . . . . . . . . . . 2-2
Four Bays, 64 Camera, 16 Monitor Systems . . . . . . 3-8
Single Bay Systems . . . . . . . . . . . . . . . . . . . . . . . . . 3-3
Six Bays, 128 Camera, 16 Monitor Systems . . . . . 3-10
Three Bays, 128 Camera, 8 Monitor Systems . . . . . 3-5
Two Bays, 64 Camera, 8 Monitor Systems . . . . . . . 3-4
Two Bays, 24 Camera, 16 Monitor Systems . . . . . . 3-7
Power
On/Off switch . . . . . . . . . . . . . . . . . . . . . . . . . . 1-3, 4-2
Sources . . . . . . . . . . . . . . . . . . . . . . . . . . . . . . . . . . . 2-2
Power Panels . . . . . . . . . . . . . . . . . . . . . . . . . . . . . . . . . . . . 2
Power Supply Module - AD1603N PSM
Description . . . . . . . . . . . . . . . . . . . . . . . . . . . . . . . . . . 2
Setup . . . . . . . . . . . . . . . . . . . . . . . . . . . . . . . . . . . . . 1-3
Powering Up
CPM Reset . . . . . . . . . . . . . . . . . . . . . . . . . . . . . . . . 4-2
Operating Indicator . . . . . . . . . . . . . . . . . . . . . . . . . . 4-2
Powering the switching bays . . . . . . . . . . . . . . . . . . 4-2
Central Processing Module - AD1661 CPM, AD1663 CPM
Description . . . . . . . . . . . . . . . . . . . . . . . . . . . . . . . . . . 2
Setup . . . . . . . . . . . . . . . . . . . . . . . . . . . . . . . . . . . . . 1-2
CONNECTIONS . . . . . . . . . . . . . . . . . . . . . . . . . . . . . . . 2-2
Control Code Connections . . . . . . . . . . . . . . . . . . . . 2-3
Power and Data Interconnection . . . . . . . . . . . . . . . . 2-2
System Control Connections . . . . . . . . . . . . . . . . . . 2-4
Two-wire keyboards . . . . . . . . . . . . . . . . . . . . . 2-4
RS-232 keyboards and devices . . . . . . . . . . . . . 2-4
Video Connections . . . . . . . . . . . . . . . . . . . . . . . . . . 2-2
Control Code Connections
Installation . . . . . . . . . . . . . . . . . . . . . . . . . . . . . . . . 2-3
Four Bays, 64 Camera, 16 Monitor Systems . . . . . . 3-8
Single Bay Systems . . . . . . . . . . . . . . . . . . . . . . . . . 3-3
Six Bays, 128 Camera, 16 Monitor Systems . . . . . 3-10
Three Bays, 128 Camera, 8 Monitor Systems . . . . . 3-5
Two Bays, 64 Camera, 8 Monitor Systems . . . . . . . 3-4
Two Bays, 24 Camera, 16 Monitor Systems . . . . . . 3-7
Reset, CPM Reset . . . . . . . . . . . . . . . . . . . . . . . . . . . . . . 4-2
RS-232 Connections . . . . . . . . . . . . . . . . . . . . . . . . . . . . 2-4
SETUP
Central Processing Module . . . . . . . . . . . . . . . . . . . . 1-2
Video Input Module . . . . . . . . . . . . . . . . . . . . . . . . . 1-2
Video Output Module . . . . . . . . . . . . . . . . . . . . . . . . 1-2
Power Supply Module . . . . . . . . . . . . . . . . . . . . . . . 1-3
Single Bay Systems . . . . . . . . . . . . . . . . . . . . . . . . . . . . . 3-3
Six Bays, 128 Camera, 16 Monitor Systems . . . . . . . . . 3-10
System Accessories . . . . . . . . . . . . . . . . . . . . . . . . . . . . . . . 1
SYSTEM CONFIGURATIONS
Four Bays, 64 Camera, 16 Monitor Systems . . . . . . 3-8
Single Bay Systems . . . . . . . . . . . . . . . . . . . . . . . . . 3-3
Six Bays, 128 Camera, 16 Monitor Systems . . . . . 3-10
Three Bays, 128 Camera, 8 Monitor Systems . . . . . 3-5
Two Bays, 64 Camera, 8 Monitor Systems . . . . . . . 3-4
Two Bays, 24 Camera, 16 Monitor Systems . . . . . . 3-7
System Control Connections . . . . . . . . . . . . . . . . . . . . . . 2-4
Two-wire keyboards . . . . . . . . . . . . . . . . . . . . . . . . . 2-4
RS-232 keyboards and devices . . . . . . . . . . . . . . . . . 2-4
SYSTEM DESCRIPTION . . . . . . . . . . . . . . . . . . . . . . . . . 1
System Keyboards . . . . . . . . . . . . . . . . . . . . . . . . . . . . . . . . 1
System Modules . . . . . . . . . . . . . . . . . . . . . . . . . . . . . . . . . 1
SYSTEM MODULE DESCRIPTIONS . . . . . . . . . . . . . . . 2
Central Processing Module . . . . . . . . . . . . . . . . . . . . . 2
Data Interconnect Panel . . . . . . . . . . . . . . . . . . . . . . . . 2
Power Panels . . . . . . . . . . . . . . . . . . . . . . . . . . . . . . . . 2
Power Supply Module . . . . . . . . . . . . . . . . . . . . . . . . . 2
Video Input Module . . . . . . . . . . . . . . . . . . . . . . . . . . . 3
Video Interconnect Panel . . . . . . . . . . . . . . . . . . . . . . . 3
Video Output Module . . . . . . . . . . . . . . . . . . . . . . . . . 3
SYSTEM PROGRAMMING . . . . . . . . . . . . . . . . . . . . . 4-3
Data Interconnect Panel . . . . . . . . . . . . . . . . . . . . . . . . . . . 2
Data Interconnection - see Power and Data Interconnection
Display Control, Video Output Module . . . . . . . . . . . . . 1-2
Four Bays, 64 Camera, 16 Monitor Systems . . . . . . . . . . 3-8
Fuse Replacement, Power Supply Module . . . . . . . . . . . 1-3
INSTALLATION
Connections . . . . . . . . . . . . . . . . . . . . . . . . . . . . . . . 2-2
Installation . . . . . . . . . . . . . . . . . . . . . . . . . . . . . . . . 2-2
Keyboards . . . . . . . . . . . . . . . . . . . . . . . . . . . . . . . . . . . . . . 1
Keyboard Control . . . . . . . . . . . . . . . . . . . . . . . . . . . . . . 4-3
Camera Control . . . . . . . . . . . . . . . . . . . . . . . . . . . . . 4-3
Video Selection . . . . . . . . . . . . . . . . . . . . . . . . . . . . . 4-3
MODULE DESCRIPTIONS . . . . . . . . . . . . . . . . . . . . . . . 2
Monitor Selection, Video Output Module . . . . . . . . . . . . 1-2
Mounting . . . . . . . . . . . . . . . . . . . . . . . . . . . . . . . . . . . . . 2-2
OPERATION
Keyboard Control . . . . . . . . . . . . . . . . . . . . . . . . . . . 4-3
Powering Up . . . . . . . . . . . . . . . . . . . . . . . . . . . . . . . 4-2
System Programming . . . . . . . . . . . . . . . . . . . . . . . . 4-3
I-2
AD1650B
INDEX
Three Bays, 128 Camera, 8 Monitor Systems . . . . . . . . . 3-5
Two Bays, 64 Camera, 8 Monitor Systems . . . . . . . . . . . 3-4
Two Bays, 24 Camera, 16 Monitor Systems . . . . . . . . . . 3-7
TYPICAL SYSTEM CONNECTIONS . . . . . . . . . . . . . C-1
Vertical Phase Adjustment, Power Supply Module . . . . . 1-3
Video Input Connections
Installation . . . . . . . . . . . . . . . . . . . . . . . . . . . . . . . . 2-2
Four Bays, 64 Camera, 16 Monitor Systems . . . . . . 3-9
Single Bay Systems . . . . . . . . . . . . . . . . . . . . . . . . . 3-3
Six Bays, 128 Camera, 16 Monitor Systems . . . . . 3-11
Three Bays, 128 Camera, 8 Monitor Systems . . . . . 3-6
Two Bays, 64 Camera, 8 Monitor Systems . . . . . . . 3-4
Two Bays, 24 Camera, 16 Monitor Systems . . . . . . 3-7
Video Input Module - AD1611, AD1609CM
Description . . . . . . . . . . . . . . . . . . . . . . . . . . . . . . . . . . 3
Setup . . . . . . . . . . . . . . . . . . . . . . . . . . . . . . . . . . . . . 1-2
Video Interconnect Panel . . . . . . . . . . . . . . . . . . . . . . . . . . 3
Video Interconnections
Four Bays, 64 Camera, 16 Monitor Systems . . . . . . 3-8
Six Bays, 128 Camera, 16 Monitor Systems . . . . . 3-10
Three Bays, 128 Camera, 8 Monitor Systems . . . . . 3-5
Two Bays, 64 Camera, 8 Monitor Systems . . . . . . . 3-4
Video Output Connections
Installation . . . . . . . . . . . . . . . . . . . . . . . . . . . . . . . . 2-2
Four Bays, 64 Camera, 16 Monitor Systems . . . . . . 3-9
Single Bay Systems . . . . . . . . . . . . . . . . . . . . . . . . . 3-3
Six Bays, 128 Camera, 16 Monitor Systems . . . . . 3-11
Three Bays, 128 Camera, 8 Monitor Systems . . . . . 3-6
Two Bays, 64 Camera, 8 Monitor Systems . . . . . . . 3-4
Two Bays, 24 Camera, 16 Monitor Systems . . . . . . 3-7
Video Output Module - AD1626, AD1626NA
Description . . . . . . . . . . . . . . . . . . . . . . . . . . . . . . . . . . 3
Setup . . . . . . . . . . . . . . . . . . . . . . . . . . . . . . . . . . . . . 1-2
Video Type Selection, Video Output Module . . . . . . . . . 1-2
I-3
Declaration of Conformity
Manufacturer:
Sensormatic
CCTV Systems Division
Manufacturer’s Address:
Sensormatic
CCTV Systems Division
10 Corporate Drive
Orangeburg, New York 10962 USA
Sensormatic Electronics Corporation
American Dynamics Business Unit
State Rd. 110 Km 5.8
Poblado San Antonio
Aguadilla P. R. 00690
Declares, that the product(s) listed below:
Name/Type:
Model Numbers:
Micropower EP Video Matrix Switching System
ADE1650B All Versions
ADK1650B All Versions
Name/Type:
Model Numbers:
Bays
ADE1651B, ADK1651B
ADE1653B, ADK1653B
ADE1654, ADK1654
ADE1655, ADK1655
ADE1656, ADK1656
ADE1657, ADK1657
ADE1658, ADK1658
all models may be followed by “D” for desktop or
“R” for rackmount
Name/Type:
Model Numbers:
Modules
ADE1603N, ADK1603N (Power Supply)
AD1661B, AD1663 (CPM)
AD1611 (VIM)
AD1626 (VOM)
AD1626NA (VOM, no text)
AD1609CM (LVIM)
comply with the Generic Standards EN55022 , EN50081-1, EN50082-1 in accordance with the
following International Standards:
1. IEC 801-2 (1991), 4 kV CD, 8 kV AD
2. IEC 801-3 (1984) 3V/m
3. IEC 801-4 (1988) 1 kV Power lines, 0.5 kV Signal lines
4. EN55022 (1988) Class B
Additional information:
These products herein, comply with the requirements of the EMC Directive 89/336/EEC. The equipment
was tested in a typical configuration.
Orangeburg, NY, USA,
31 January 1996
Dennis Dodrill, Manager
Quality Assurance and Technical Services
This representative has the technical documentation and the declaration of conformity on file.
SPECIFICATIONS
Supply Voltage:
AD1650B: 120VAC, 50/60 Hz
ADE1650B: 230V
, 50 Hz
ADK1650B: 230V
, 50 Hz
Power per Bay: 35 watts max.
Mounting: Free standing or Rack mount
Size per Bay: Desktop - 5.5" H x 14" D x 17" W (140 x 356 x 432 mm)
Rack-mount - 5.25" H x 14" D x 19" W (13 x 356 x 483 mm)
Weight per Bay: 35 lbs (16 Kg)
An American Dynamics Product
Designed and built by
Sensormatic CCTV Systems Division
One Blue Hill Plaza
Pearl River, New York, 10965
(914) 624-7600
Technical Support Center: 800-442-2225
FAX: (914) 624-7685
8000-0869-01
June 1996
OP1650BG
Printed in USA