1
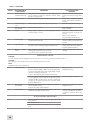
table 3-1. continued
Seq No.
Location Item to
Check/Service
PROCEDURE
Not Fully Mission
Capable If
6
Battery Adapter/
Compartment/ Cap
Verify that the battery adapter is present. Inspect for corrosion, moisture, corroded or defective contacts. Verify
that the o-ring is present.
Adapter is missing, contacts damaged or corroded, or o-ring is missing.
7
Function Switch
Check the switch for operation (without a battery).
Switch has no definite stopping
points. Switch knob is broken or
missing.
8
Pivotal Focusing
Lens
Check to make sure pivotal focusing lens is present.
Pivotal focusing lens is missing.
9
Gain Control Knob
(for SiriusM)
Check knob for operation.
Knob inoperative.
Knob is missing.
10
Lenses
Inspect optical surfaces for dirt, fingerprint residue,
scratches, chips, or cracks.
Scratches or chips hinder vision
with Sirius turned on. Cracks are
present.
Photoreceiver damaged.
Pivotal focusing lens damaged.
11
Focusing Ring
Rotate the focusing ring to ensure free movement (range
is approximately 1/3 turn).
Ring gets stuck or adversely affects
the user’s ability to properly focus
the unit.
12
Eyepiece Ring
Rotate the eyepiece ring to make sure the eyepiece is not
too tight or too loose. Range is approximately ½ turn.
Ring gets stuck, is too loose, or adversely affects the user’s ability to
properly adjust the diopter.
13
Optional
ment
Inspect optional items for dirt, or corrosion, damage, and
missing parts. Check for proper operation.
If necessary, clean as detailed in Part 4.4.2.
Equipment is damaged or parts are
missing.
Equip-
OPERATIONAL CHECKS
CAUTION:
Do not activate the Sirius in daylight unless the lens cap is on, or you are operating under dark conditions.
CAUTION:
Do not forget to open the photoreceiver after finishing operational checks.
NOTE:
Daylight checks are described below.
14
Function Switch
Install the battery. Verify that the photoreceiver is open.
Turn the switch from OFF to ON. Look for the green glow
in eyepiece (it should appear after a slight delay), and wait
about 10 s for image to disappear.
Look for a flashing red light in eyepiece viewing area.
Image is present.
Red light is flashing.
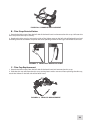
Close the photoreceiver by placing the pivotal focusing
lens in rightmost position. Pull out the IR and turn the
switch from ON to the IR position. Look for a permanent
red glow in the eyepiece viewing area. Turn the switch
from IR to ON position.
Permanent red glow is absent
15
Gain Control
(for SiriusM)
Rotate the gain control knob to verify that it adjusts the
screen’s brightness level.
Inspect for a broken or missing knob.
Knob does not adjust the screen’s
brightness level.
16
Viewed Image
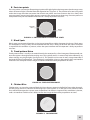
Inspect for any operational defects (refer to Part 4.3.1:
Identification of Operational Defects).
Shading, edge glow, flashing, flickering, and intermittent operation,
or excessive cosmetic defects are
found.
AFTER CHECKING PROCEDURES
17
Turn the unit OFF. Verify that the green glow fades from
the eyepieces.
Remove the battery.
Return the unit and all accessories to the soft carrying
case.
28