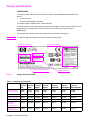
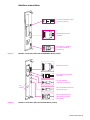
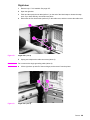
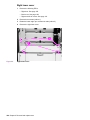
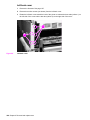
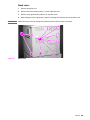
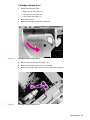
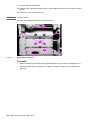
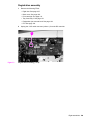
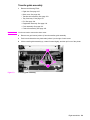
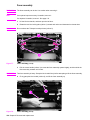
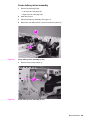
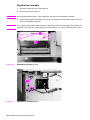
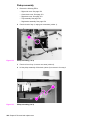
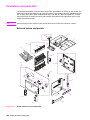
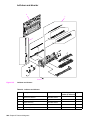
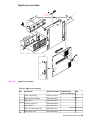
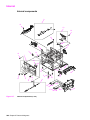
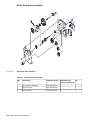
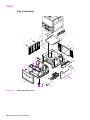
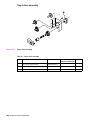
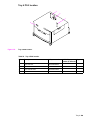
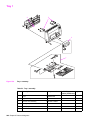
1
HP LaserJet 9000/9040/9050
Service Manual
HP LaserJet 9000, 9040, and 9050 Series printers
Service_____________________
Copyright and License
Trademark Credits
© 2005 Copyright Hewlett-Packard
Development Company, LP
Adobe® and PostScript® are trademarks of
Adobe Systems Incorporated.
Reproduction, adaptation or translation
without prior written permission is prohibited,
except as allowed under the copyright laws.
MS-DOS® is a U.S. registered trademark of
Microsoft Corporation.
Part number: Q3721-90963
Edition 1, 4/2005
The information contained herein is subject to
change without notice.
The only warranties for HP products and
services are set forth in the express warranty
statements accompanying such products and
services. Nothing herein should be construed
as constituting an additional warranty. HP
shall not be liable for technical or editorial
errors or omissions contained herein.
ENERGY STAR® is a U.S. registered service
mark of the United States Environmental
Protection Agency.
Table of contents
Table of contents
List of tables
List of figures
1 Product information
Product features of the HP LaserJet 9000 Series printers . . . . . . . . . . . . . . . . . . 2
Product features of the HP LaserJet 9040/9050 Series printers . . . . . . . . . . . . . . 4
Product specifications . . . . . . . . . . . . . . . . . . . . . . . . . . . . . . . . . . . . . . . . . . . . . . 6
Product overview. . . . . . . . . . . . . . . . . . . . . . . . . . . . . . . . . . . . . . . . . . . . . . . . . 10
External view of the printer and accessories . . . . . . . . . . . . . . . . . . . . . . . . 10
Interface connections . . . . . . . . . . . . . . . . . . . . . . . . . . . . . . . . . . . . . . . . . . 11
Optional accessories. . . . . . . . . . . . . . . . . . . . . . . . . . . . . . . . . . . . . . . . . . . 12
Regulatory information . . . . . . . . . . . . . . . . . . . . . . . . . . . . . . . . . . . . . . . . . . . . 13
Regulatory requirements. . . . . . . . . . . . . . . . . . . . . . . . . . . . . . . . . . . . . . . . 13
FCC regulations . . . . . . . . . . . . . . . . . . . . . . . . . . . . . . . . . . . . . . . . . . . . . . 13
Declaration of conformity . . . . . . . . . . . . . . . . . . . . . . . . . . . . . . . . . . . . . . . 13
Environmental product stewardship program . . . . . . . . . . . . . . . . . . . . . . . . 13
Service approach . . . . . . . . . . . . . . . . . . . . . . . . . . . . . . . . . . . . . . . . . . . . . . . . 14
Parts and supplies . . . . . . . . . . . . . . . . . . . . . . . . . . . . . . . . . . . . . . . . . . . . 14
Warranty . . . . . . . . . . . . . . . . . . . . . . . . . . . . . . . . . . . . . . . . . . . . . . . . . . . . 14
Limited warranty for print-cartridge life
. . . . . . . . . . . . . . . . . . . . . . . . . . 14
2 Product requirements
Site requirements . . . . . . . . . . . . . . . . . . . . . . . . . . . . . . . . . . . . . . . . . . . . . . . . 16
Operating environment . . . . . . . . . . . . . . . . . . . . . . . . . . . . . . . . . . . . . . . . 16
Space requirements . . . . . . . . . . . . . . . . . . . . . . . . . . . . . . . . . . . . . . . . . . . 17
Media specifications . . . . . . . . . . . . . . . . . . . . . . . . . . . . . . . . . . . . . . . . . . . . . . 19
Guidelines for selecting print media . . . . . . . . . . . . . . . . . . . . . . . . . . . . . . . 19
Special media specifications. . . . . . . . . . . . . . . . . . . . . . . . . . . . . . . . . . . . . 19
Storing print media . . . . . . . . . . . . . . . . . . . . . . . . . . . . . . . . . . . . . . . . . . 22
Media input/output options . . . . . . . . . . . . . . . . . . . . . . . . . . . . . . . . . . . . . . . . . 25
Trays, bins, and paper handling . . . . . . . . . . . . . . . . . . . . . . . . . . . . . . . . . . 25
Supported sizes of paper for input and output . . . . . . . . . . . . . . . . . . . . . . . 26
3 Product configuration
Using the control panel . . . . . . . . . . . . . . . . . . . . . . . . . . . . . . . . . . . . . . . . . . . 30
Control-panel buttons . . . . . . . . . . . . . . . . . . . . . . . . . . . . . . . . . . . . . . . . . . 31
Numeric keypad commands . . . . . . . . . . . . . . . . . . . . . . . . . . . . . . . . . . . . 32
Settings and defaults. . . . . . . . . . . . . . . . . . . . . . . . . . . . . . . . . . . . . . . . . . . . . . 33
Setting the display language. . . . . . . . . . . . . . . . . . . . . . . . . . . . . . . . . . . . . 33
Setting the tray registration . . . . . . . . . . . . . . . . . . . . . . . . . . . . . . . . . . . . . 33
Printer driver information. . . . . . . . . . . . . . . . . . . . . . . . . . . . . . . . . . . . . . . . 36
Control-panel menus . . . . . . . . . . . . . . . . . . . . . . . . . . . . . . . . . . . . . . . . . . . . . . 37
Using a menu map . . . . . . . . . . . . . . . . . . . . . . . . . . . . . . . . . . . . . . . . . . . . 37
iii
Retrieve job menu . . . . . . . . . . . . . . . . . . . . . . . . . . . . . . . . . . . . . . . . . . . . . . .
Information menu . . . . . . . . . . . . . . . . . . . . . . . . . . . . . . . . . . . . . . . . . . . . . . . .
Paper-handling menu . . . . . . . . . . . . . . . . . . . . . . . . . . . . . . . . . . . . . . . . . . . . .
Configure device menu. . . . . . . . . . . . . . . . . . . . . . . . . . . . . . . . . . . . . . . . . . . .
Printing submenu . . . . . . . . . . . . . . . . . . . . . . . . . . . . . . . . . . . . . . . . . . . . .
Print-quality submenu . . . . . . . . . . . . . . . . . . . . . . . . . . . . . . . . . . . . . . . . .
System setup submenu . . . . . . . . . . . . . . . . . . . . . . . . . . . . . . . . . . . . . . . .
I/O submenu. . . . . . . . . . . . . . . . . . . . . . . . . . . . . . . . . . . . . . . . . . . . . . . . .
Resets submenu . . . . . . . . . . . . . . . . . . . . . . . . . . . . . . . . . . . . . . . . . . . . .
Diagnostics menu . . . . . . . . . . . . . . . . . . . . . . . . . . . . . . . . . . . . . . . . . . . . . . . .
Service menu . . . . . . . . . . . . . . . . . . . . . . . . . . . . . . . . . . . . . . . . . . . . . . . . . . .
Remote firmware upgrade (RFU) . . . . . . . . . . . . . . . . . . . . . . . . . . . . . . . . . . .
Upgrading firmware to a single printer . . . . . . . . . . . . . . . . . . . . . . . . . . . . .
38
38
39
41
41
44
46
48
53
54
54
55
55
4 Product maintenance
Preventative maintenance . . . . . . . . . . . . . . . . . . . . . . . . . . . . . . . . . . . . . . . . .
Preventive maintenance kit contents . . . . . . . . . . . . . . . . . . . . . . . . . . . . . .
Cleaning the printer and accessories . . . . . . . . . . . . . . . . . . . . . . . . . . . . . . . . .
General cleaning . . . . . . . . . . . . . . . . . . . . . . . . . . . . . . . . . . . . . . . . . . . . .
Internal cleaning. . . . . . . . . . . . . . . . . . . . . . . . . . . . . . . . . . . . . . . . . . . . . .
Fuser cleaning . . . . . . . . . . . . . . . . . . . . . . . . . . . . . . . . . . . . . . . . . . . . . . .
Print cartridge information . . . . . . . . . . . . . . . . . . . . . . . . . . . . . . . . . . . . . . . . .
Storage. . . . . . . . . . . . . . . . . . . . . . . . . . . . . . . . . . . . . . . . . . . . . . . . . . . . .
Handling instructions . . . . . . . . . . . . . . . . . . . . . . . . . . . . . . . . . . . . . . . . . .
Refilled print cartridges . . . . . . . . . . . . . . . . . . . . . . . . . . . . . . . . . . . . . . . .
Print-cartridge weights . . . . . . . . . . . . . . . . . . . . . . . . . . . . . . . . . . . . . . . . .
Print-cartridge life expectancy . . . . . . . . . . . . . . . . . . . . . . . . . . . . . . . . . . .
Saving toner by using EconoMode . . . . . . . . . . . . . . . . . . . . . . . . . . . . . . .
60
60
61
61
62
65
67
67
67
68
68
68
68
5 Theory of operation
Basic operation. . . . . . . . . . . . . . . . . . . . . . . . . . . . . . . . . . . . . . . . . . . . . . . . . .
Sequence of operation . . . . . . . . . . . . . . . . . . . . . . . . . . . . . . . . . . . . . . . . .
Power-on sequence . . . . . . . . . . . . . . . . . . . . . . . . . . . . . . . . . . . . . . . . . .
Timing chart . . . . . . . . . . . . . . . . . . . . . . . . . . . . . . . . . . . . . . . . . . . . . . . . .
Engine control system . . . . . . . . . . . . . . . . . . . . . . . . . . . . . . . . . . . . . . . . . . . .
DC controller PCA . . . . . . . . . . . . . . . . . . . . . . . . . . . . . . . . . . . . . . . . . . . .
DC controller operations . . . . . . . . . . . . . . . . . . . . . . . . . . . . . . . . . . . . . . .
High-voltage power supply circuit . . . . . . . . . . . . . . . . . . . . . . . . . . . . . . . .
Low-voltage power supply unit. . . . . . . . . . . . . . . . . . . . . . . . . . . . . . . . . . .
Formatter system . . . . . . . . . . . . . . . . . . . . . . . . . . . . . . . . . . . . . . . . . . . . . . . .
Formatter hardware . . . . . . . . . . . . . . . . . . . . . . . . . . . . . . . . . . . . . . . . . . .
Laser/scanner system . . . . . . . . . . . . . . . . . . . . . . . . . . . . . . . . . . . . . . . . . . . .
Image formation system . . . . . . . . . . . . . . . . . . . . . . . . . . . . . . . . . . . . . . . . . .
The eight processes of image formation . . . . . . . . . . . . . . . . . . . . . . . . . . .
Print cartridge. . . . . . . . . . . . . . . . . . . . . . . . . . . . . . . . . . . . . . . . . . . . . . . .
Pickup and feed system . . . . . . . . . . . . . . . . . . . . . . . . . . . . . . . . . . . . . . . . . . .
Media-size detection . . . . . . . . . . . . . . . . . . . . . . . . . . . . . . . . . . . . . . . . . .
Media-level detection . . . . . . . . . . . . . . . . . . . . . . . . . . . . . . . . . . . . . . . . . .
Multifeed prevention. . . . . . . . . . . . . . . . . . . . . . . . . . . . . . . . . . . . . . . . . . .
Overhead-transparency detection . . . . . . . . . . . . . . . . . . . . . . . . . . . . . . . .
Fuser-wrapping-jam detection . . . . . . . . . . . . . . . . . . . . . . . . . . . . . . . . . . .
Jam detection . . . . . . . . . . . . . . . . . . . . . . . . . . . . . . . . . . . . . . . . . . . . . . .
Tray 1 . . . . . . . . . . . . . . . . . . . . . . . . . . . . . . . . . . . . . . . . . . . . . . . . . . . . . . . . .
Tray 1 driver PCA. . . . . . . . . . . . . . . . . . . . . . . . . . . . . . . . . . . . . . . . . . . . .
Power supply . . . . . . . . . . . . . . . . . . . . . . . . . . . . . . . . . . . . . . . . . . . . . . . .
Sequence of operation . . . . . . . . . . . . . . . . . . . . . . . . . . . . . . . . . . . . . . . . .
Pickup and feed . . . . . . . . . . . . . . . . . . . . . . . . . . . . . . . . . . . . . . . . . . . . . .
Jam detection . . . . . . . . . . . . . . . . . . . . . . . . . . . . . . . . . . . . . . . . . . . . . . .
iv
Table of contents
70
71
73
74
75
76
77
78
80
81
81
83
84
84
85
87
87
87
87
87
87
88
93
93
93
93
94
94
Tray 4 . . . . . . . . . . . . . . . . . . . . . . . . . . . . . . . . . . . . . . . . . . . . . . . . . . . . . . . . . 95
Tray 4 driver PCA . . . . . . . . . . . . . . . . . . . . . . . . . . . . . . . . . . . . . . . . . . . . . 95
Power supply . . . . . . . . . . . . . . . . . . . . . . . . . . . . . . . . . . . . . . . . . . . . . . . . 95
Sequence of operation . . . . . . . . . . . . . . . . . . . . . . . . . . . . . . . . . . . . . . . . . 95
Pickup and feed . . . . . . . . . . . . . . . . . . . . . . . . . . . . . . . . . . . . . . . . . . . . . . 96
Media-level and media-size detection. . . . . . . . . . . . . . . . . . . . . . . . . . . . . . 96
Jam detection . . . . . . . . . . . . . . . . . . . . . . . . . . . . . . . . . . . . . . . . . . . . . . . . 96
6 Removal and replacement
Introduction . . . . . . . . . . . . . . . . . . . . . . . . . . . . . . . . . . . . . . . . . . . . . . . . . . . . . 99
Removal and replacement strategy . . . . . . . . . . . . . . . . . . . . . . . . . . . . . . . 99
Repair notices . . . . . . . . . . . . . . . . . . . . . . . . . . . . . . . . . . . . . . . . . . . . . . . . 99
Electrostatic discharge (ESD) . . . . . . . . . . . . . . . . . . . . . . . . . . . . . . . . . . . . 99
Required tools. . . . . . . . . . . . . . . . . . . . . . . . . . . . . . . . . . . . . . . . . . . . . . . . 99
Orientation of the printer (with tray 4) . . . . . . . . . . . . . . . . . . . . . . . . . . . . . 100
Covers . . . . . . . . . . . . . . . . . . . . . . . . . . . . . . . . . . . . . . . . . . . . . . . . . . . . . . . . 101
Right top cover . . . . . . . . . . . . . . . . . . . . . . . . . . . . . . . . . . . . . . . . . . . . . . 101
Left top cover . . . . . . . . . . . . . . . . . . . . . . . . . . . . . . . . . . . . . . . . . . . . . . . 103
Front cover . . . . . . . . . . . . . . . . . . . . . . . . . . . . . . . . . . . . . . . . . . . . . . . . . 104
Right door . . . . . . . . . . . . . . . . . . . . . . . . . . . . . . . . . . . . . . . . . . . . . . . . . . 105
Right lower cover . . . . . . . . . . . . . . . . . . . . . . . . . . . . . . . . . . . . . . . . . . . . 106
Left door and diverter . . . . . . . . . . . . . . . . . . . . . . . . . . . . . . . . . . . . . . . . . 107
Left back cover . . . . . . . . . . . . . . . . . . . . . . . . . . . . . . . . . . . . . . . . . . . . . . 108
Back cover . . . . . . . . . . . . . . . . . . . . . . . . . . . . . . . . . . . . . . . . . . . . . . . . . 109
Right and left rail covers . . . . . . . . . . . . . . . . . . . . . . . . . . . . . . . . . . . . . . . 110
Top assemblies . . . . . . . . . . . . . . . . . . . . . . . . . . . . . . . . . . . . . . . . . . . . . . . . . 111
Control panel. . . . . . . . . . . . . . . . . . . . . . . . . . . . . . . . . . . . . . . . . . . . . . . . 111
Laser/scanner assembly . . . . . . . . . . . . . . . . . . . . . . . . . . . . . . . . . . . . . . . 112
Delivery assembly . . . . . . . . . . . . . . . . . . . . . . . . . . . . . . . . . . . . . . . . . . . 113
Delivery-fan assembly. . . . . . . . . . . . . . . . . . . . . . . . . . . . . . . . . . . . . . . . . 114
Delivery-assembly fans and face-down-bin fan (fans 3, 6, and 4) . . . . . . . 115
Delivery motor. . . . . . . . . . . . . . . . . . . . . . . . . . . . . . . . . . . . . . . . . . . . . . . 116
Cartridge release lever . . . . . . . . . . . . . . . . . . . . . . . . . . . . . . . . . . . . . . . . 117
Front assemblies . . . . . . . . . . . . . . . . . . . . . . . . . . . . . . . . . . . . . . . . . . . . . . . . 119
Print cartridge . . . . . . . . . . . . . . . . . . . . . . . . . . . . . . . . . . . . . . . . . . . . . . . 119
Transfer-roller assembly . . . . . . . . . . . . . . . . . . . . . . . . . . . . . . . . . . . . . . . 120
Tray 2 and tray 3 (interchangeable) . . . . . . . . . . . . . . . . . . . . . . . . . . . . . . 121
Rollers (pickup, feed, or separation) . . . . . . . . . . . . . . . . . . . . . . . . . . . . . . 122
Fuser-jam-removal knob . . . . . . . . . . . . . . . . . . . . . . . . . . . . . . . . . . . . . . . 123
Registration-jam-removal knob . . . . . . . . . . . . . . . . . . . . . . . . . . . . . . . . . . 124
Right assemblies . . . . . . . . . . . . . . . . . . . . . . . . . . . . . . . . . . . . . . . . . . . . . . . . 125
Tray 1 . . . . . . . . . . . . . . . . . . . . . . . . . . . . . . . . . . . . . . . . . . . . . . . . . . . . . 125
Paper-input unit (PIU) . . . . . . . . . . . . . . . . . . . . . . . . . . . . . . . . . . . . . . . . . 126
Registration assembly. . . . . . . . . . . . . . . . . . . . . . . . . . . . . . . . . . . . . . . . . 129
Transfer-guide assembly . . . . . . . . . . . . . . . . . . . . . . . . . . . . . . . . . . . . . . 131
Left assemblies . . . . . . . . . . . . . . . . . . . . . . . . . . . . . . . . . . . . . . . . . . . . . . . . . 133
Duplexer . . . . . . . . . . . . . . . . . . . . . . . . . . . . . . . . . . . . . . . . . . . . . . . . . . . 133
Fuser assembly. . . . . . . . . . . . . . . . . . . . . . . . . . . . . . . . . . . . . . . . . . . . . . 134
Back assemblies . . . . . . . . . . . . . . . . . . . . . . . . . . . . . . . . . . . . . . . . . . . . . . . . 135
Formatter . . . . . . . . . . . . . . . . . . . . . . . . . . . . . . . . . . . . . . . . . . . . . . . . . . 135
Low-voltage power supply . . . . . . . . . . . . . . . . . . . . . . . . . . . . . . . . . . . . . 136
High-voltage power supply . . . . . . . . . . . . . . . . . . . . . . . . . . . . . . . . . . . . . 137
DC controller . . . . . . . . . . . . . . . . . . . . . . . . . . . . . . . . . . . . . . . . . . . . . . . . 138
Toner-sensor contact assembly . . . . . . . . . . . . . . . . . . . . . . . . . . . . . . . . . 140
Drum motor . . . . . . . . . . . . . . . . . . . . . . . . . . . . . . . . . . . . . . . . . . . . . . . . . 141
Feed-drive assembly . . . . . . . . . . . . . . . . . . . . . . . . . . . . . . . . . . . . . . . . . 142
Power-supply fan (fan 1). . . . . . . . . . . . . . . . . . . . . . . . . . . . . . . . . . . . . . . 143
Cartridge fan (fan 5) . . . . . . . . . . . . . . . . . . . . . . . . . . . . . . . . . . . . . . . . . . 144
v
Controller fan (fan 2) . . . . . . . . . . . . . . . . . . . . . . . . . . . . . . . . . . . . . . . . .
Jetlink connector . . . . . . . . . . . . . . . . . . . . . . . . . . . . . . . . . . . . . . . . . . . .
Fuser-connector holder assembly . . . . . . . . . . . . . . . . . . . . . . . . . . . . . . .
Fuser delivery-drive assembly . . . . . . . . . . . . . . . . . . . . . . . . . . . . . . . . . .
Tray 4 . . . . . . . . . . . . . . . . . . . . . . . . . . . . . . . . . . . . . . . . . . . . . . . . . . . . . . . .
Orientation . . . . . . . . . . . . . . . . . . . . . . . . . . . . . . . . . . . . . . . . . . . . . . . . .
Left side cover . . . . . . . . . . . . . . . . . . . . . . . . . . . . . . . . . . . . . . . . . . . . . .
Right side cover . . . . . . . . . . . . . . . . . . . . . . . . . . . . . . . . . . . . . . . . . . . .
Back covers . . . . . . . . . . . . . . . . . . . . . . . . . . . . . . . . . . . . . . . . . . . . . . . .
Tray 4 . . . . . . . . . . . . . . . . . . . . . . . . . . . . . . . . . . . . . . . . . . . . . . . . . . . . .
Rollers (pickup, feed, and separation) . . . . . . . . . . . . . . . . . . . . . . . . . . .
Registration assembly . . . . . . . . . . . . . . . . . . . . . . . . . . . . . . . . . . . . . . . .
Drive motor. . . . . . . . . . . . . . . . . . . . . . . . . . . . . . . . . . . . . . . . . . . . . . . . .
Drive assembly. . . . . . . . . . . . . . . . . . . . . . . . . . . . . . . . . . . . . . . . . . . . . .
Controller board . . . . . . . . . . . . . . . . . . . . . . . . . . . . . . . . . . . . . . . . . . . . .
Paper-size detection switch PCA . . . . . . . . . . . . . . . . . . . . . . . . . . . . . . .
Power supply . . . . . . . . . . . . . . . . . . . . . . . . . . . . . . . . . . . . . . . . . . . . . . .
Pickup assembly . . . . . . . . . . . . . . . . . . . . . . . . . . . . . . . . . . . . . . . . . . . .
Paper-connecting unit . . . . . . . . . . . . . . . . . . . . . . . . . . . . . . . . . . . . . . . .
145
146
147
149
151
151
151
152
153
154
155
156
157
158
159
160
161
162
163
7 Troubleshooting
Troubleshooting process . . . . . . . . . . . . . . . . . . . . . . . . . . . . . . . . . . . . . . . . .
Basic troubleshooting process flow . . . . . . . . . . . . . . . . . . . . . . . . . . . . . .
Preliminary operating checks . . . . . . . . . . . . . . . . . . . . . . . . . . . . . . . . . .
General troubleshooting information . . . . . . . . . . . . . . . . . . . . . . . . . . . . . . . .
Abnormal noises are evident, such as grinding or
chattering when the main motor is turned on. . . . . . . . . . . . . . . . . . . . . . .
Media does not feed from tray x when printing from a software
program; the paper-path test is successful . . . . . . . . . . . . . . . . . . . . . . . .
Media does not print from tray 4 . . . . . . . . . . . . . . . . . . . . . . . . . . . . . . . .
The printer stops printing and hangs on certain jobs . . . . . . . . . . . . . . . . .
Envelopes are wrinkling . . . . . . . . . . . . . . . . . . . . . . . . . . . . . . . . . . . . . . .
Fusing is poor. . . . . . . . . . . . . . . . . . . . . . . . . . . . . . . . . . . . . . . . . . . . . . .
The printer feeds from an incorrect tray when different media
is selected for the first page of the job . . . . . . . . . . . . . . . . . . . . . . . . . . . .
Power-on . . . . . . . . . . . . . . . . . . . . . . . . . . . . . . . . . . . . . . . . . . . . . . . . . . . . .
Troubleshooting by using control-panel messages . . . . . . . . . . . . . . . . . . . . .
Event log page . . . . . . . . . . . . . . . . . . . . . . . . . . . . . . . . . . . . . . . . . . . . .
Control-panel messages. . . . . . . . . . . . . . . . . . . . . . . . . . . . . . . . . . . . . . . . . .
Control-panel and event-log message format . . . . . . . . . . . . . . . . . . . . . .
Printer-message tables . . . . . . . . . . . . . . . . . . . . . . . . . . . . . . . . . . . . . . .
Alphabetical error messages . . . . . . . . . . . . . . . . . . . . . . . . . . . . . . . . . . .
Numerical error messages . . . . . . . . . . . . . . . . . . . . . . . . . . . . . . . . . . . .
User- and service-level diagnostics . . . . . . . . . . . . . . . . . . . . . . . . . . . . . . . . .
Paper-path test. . . . . . . . . . . . . . . . . . . . . . . . . . . . . . . . . . . . . . . . . . . . . .
Service test . . . . . . . . . . . . . . . . . . . . . . . . . . . . . . . . . . . . . . . . . . . . . . . .
Service-level diagnostics . . . . . . . . . . . . . . . . . . . . . . . . . . . . . . . . . . . . . . . . .
Engine test . . . . . . . . . . . . . . . . . . . . . . . . . . . . . . . . . . . . . . . . . . . . . . . .
Service menu . . . . . . . . . . . . . . . . . . . . . . . . . . . . . . . . . . . . . . . . . . . . . . .
Diagnostics flowchart . . . . . . . . . . . . . . . . . . . . . . . . . . . . . . . . . . . . . . . . .
Other diagnostics for the HP LaserJet 9000, 9000mfp, and 9000Lmfp . . . . . .
Cold reset. . . . . . . . . . . . . . . . . . . . . . . . . . . . . . . . . . . . . . . . . . . . . . . . . .
Other diagnostics for the HP LaserJet 9040/9050, 9040mfp, and 9050mfp. . .
Cold reset. . . . . . . . . . . . . . . . . . . . . . . . . . . . . . . . . . . . . . . . . . . . . . . . . .
Tray 4 diagnostics . . . . . . . . . . . . . . . . . . . . . . . . . . . . . . . . . . . . . . . . . . . . . .
Diagnostics label . . . . . . . . . . . . . . . . . . . . . . . . . . . . . . . . . . . . . . . . . . . .
Motor test . . . . . . . . . . . . . . . . . . . . . . . . . . . . . . . . . . . . . . . . . . . . . . . . . .
Standalone running test . . . . . . . . . . . . . . . . . . . . . . . . . . . . . . . . . . . . . . .
vi
Table of contents
167
168
170
171
171
171
171
171
172
172
172
174
175
175
178
179
179
180
188
213
213
213
215
215
215
216
217
217
219
219
221
221
221
222
Sensor test . . . . . . . . . . . . . . . . . . . . . . . . . . . . . . . . . . . . . . . . . . . . . . . . . 222
Light-pattern interpretation . . . . . . . . . . . . . . . . . . . . . . . . . . . . . . . . . . . . . 223
Jam troubleshooting . . . . . . . . . . . . . . . . . . . . . . . . . . . . . . . . . . . . . . . . . . . . . 224
Jams . . . . . . . . . . . . . . . . . . . . . . . . . . . . . . . . . . . . . . . . . . . . . . . . . . . . . . 225
Customer print job. . . . . . . . . . . . . . . . . . . . . . . . . . . . . . . . . . . . . . . . . . . . 225
Clearing jams . . . . . . . . . . . . . . . . . . . . . . . . . . . . . . . . . . . . . . . . . . . . . . . 225
Evaluate the information pages. . . . . . . . . . . . . . . . . . . . . . . . . . . . . . . . . . . . . 226
Configuration page . . . . . . . . . . . . . . . . . . . . . . . . . . . . . . . . . . . . . . . . . . 226
Jetdirect page . . . . . . . . . . . . . . . . . . . . . . . . . . . . . . . . . . . . . . . . . . . . . . 229
Supplies status page . . . . . . . . . . . . . . . . . . . . . . . . . . . . . . . . . . . . . . . . . 230
Usage page . . . . . . . . . . . . . . . . . . . . . . . . . . . . . . . . . . . . . . . . . . . . . . . 231
File directory page . . . . . . . . . . . . . . . . . . . . . . . . . . . . . . . . . . . . . . . . . . . 232
Image-formation troubleshooting . . . . . . . . . . . . . . . . . . . . . . . . . . . . . . . . . . . 233
Check the print cartridge. . . . . . . . . . . . . . . . . . . . . . . . . . . . . . . . . . . . . . . 234
EconoMode. . . . . . . . . . . . . . . . . . . . . . . . . . . . . . . . . . . . . . . . . . . . . . . . . 234
Skew . . . . . . . . . . . . . . . . . . . . . . . . . . . . . . . . . . . . . . . . . . . . . . . . . . . . . . 234
Image-defect tables . . . . . . . . . . . . . . . . . . . . . . . . . . . . . . . . . . . . . . . . . . 235
Repeating defect ruler . . . . . . . . . . . . . . . . . . . . . . . . . . . . . . . . . . . . . . . . 243
Media troubleshooting . . . . . . . . . . . . . . . . . . . . . . . . . . . . . . . . . . . . . . . . . . . . 244
Determine the problem source: media or printer . . . . . . . . . . . . . . . . . . . . 244
Isolate a paper path . . . . . . . . . . . . . . . . . . . . . . . . . . . . . . . . . . . . . . . . . . 244
Isolate a media brand . . . . . . . . . . . . . . . . . . . . . . . . . . . . . . . . . . . . . . . . . 245
Isolate a media type . . . . . . . . . . . . . . . . . . . . . . . . . . . . . . . . . . . . . . . . . . 245
Communication troubleshooting . . . . . . . . . . . . . . . . . . . . . . . . . . . . . . . . . . . . 246
Communications check. . . . . . . . . . . . . . . . . . . . . . . . . . . . . . . . . . . . . . . . 246
Jetdirect configuration . . . . . . . . . . . . . . . . . . . . . . . . . . . . . . . . . . . . . . . . 246
Embedded LAN troubleshooting
(HP LaserJet 9040n/9050n, HP LaserJet 9040dn/9050dn,
HP LaserJet 9050mfp, and HP LaserJet 9040mfp only). . . . . . . . . . . . . . . 247
Wiring diagrams . . . . . . . . . . . . . . . . . . . . . . . . . . . . . . . . . . . . . . . . . . . . . . . . 251
8 Parts and diagrams
Introduction . . . . . . . . . . . . . . . . . . . . . . . . . . . . . . . . . . . . . . . . . . . . . . . . . . . . 256
Ordering parts . . . . . . . . . . . . . . . . . . . . . . . . . . . . . . . . . . . . . . . . . . . . . . . 256
Consumables, supplies, accessories, FRUs, and documentation . . . . . . . 257
Common hardware . . . . . . . . . . . . . . . . . . . . . . . . . . . . . . . . . . . . . . . . . . . 261
Illustrations and parts lists . . . . . . . . . . . . . . . . . . . . . . . . . . . . . . . . . . . . . . . . . 262
External covers and panels. . . . . . . . . . . . . . . . . . . . . . . . . . . . . . . . . . . . . 262
Left door and diverter . . . . . . . . . . . . . . . . . . . . . . . . . . . . . . . . . . . . . . . . . 264
Right cover assembly . . . . . . . . . . . . . . . . . . . . . . . . . . . . . . . . . . . . . . . . . 265
Internal . . . . . . . . . . . . . . . . . . . . . . . . . . . . . . . . . . . . . . . . . . . . . . . . . . . . . . . 266
Internal components . . . . . . . . . . . . . . . . . . . . . . . . . . . . . . . . . . . . . . . . . . 266
Drum feed drive assembly . . . . . . . . . . . . . . . . . . . . . . . . . . . . . . . . . . . . . 274
Fuser delivery drive assembly . . . . . . . . . . . . . . . . . . . . . . . . . . . . . . . . . . 275
Cartridge lifter assembly . . . . . . . . . . . . . . . . . . . . . . . . . . . . . . . . . . . . . . 276
500-sheet trays (tray 2 and tray 3) . . . . . . . . . . . . . . . . . . . . . . . . . . . . . . . 277
Paper input unit. . . . . . . . . . . . . . . . . . . . . . . . . . . . . . . . . . . . . . . . . . . . . . 278
Registration assembly. . . . . . . . . . . . . . . . . . . . . . . . . . . . . . . . . . . . . . . . . 279
Transfer roller assembly . . . . . . . . . . . . . . . . . . . . . . . . . . . . . . . . . . . . . . . 280
Delivery assembly . . . . . . . . . . . . . . . . . . . . . . . . . . . . . . . . . . . . . . . . . . . 281
PCA assembly location . . . . . . . . . . . . . . . . . . . . . . . . . . . . . . . . . . . . . . . 283
Tray 4 . . . . . . . . . . . . . . . . . . . . . . . . . . . . . . . . . . . . . . . . . . . . . . . . . . . . . . . . 284
Tray 4 main body . . . . . . . . . . . . . . . . . . . . . . . . . . . . . . . . . . . . . . . . . . . . 284
Tray 4 drive assembly. . . . . . . . . . . . . . . . . . . . . . . . . . . . . . . . . . . . . . . . . 288
Tray 4 PCA location . . . . . . . . . . . . . . . . . . . . . . . . . . . . . . . . . . . . . . . . . . 289
Tray 1 . . . . . . . . . . . . . . . . . . . . . . . . . . . . . . . . . . . . . . . . . . . . . . . . . . . . . . . . 290
Alphabetical parts list . . . . . . . . . . . . . . . . . . . . . . . . . . . . . . . . . . . . . . . . . . . . 291
Numerical parts list . . . . . . . . . . . . . . . . . . . . . . . . . . . . . . . . . . . . . . . . . . . . . . 296
vii
Index
viii
Table of contents
List of tables
Table 1. Features of the HP LaserJet 9000 Series printers . . . . . . . . . . . . . . . . . 2
Table 2. Features of the HP LaserJet 9040/9050 Series printers . . . . . . . . . . . . 4
Table 3. Configuration comparison . . . . . . . . . . . . . . . . . . . . . . . . . . . . . . . . . . . 6
Table 4. Physical specifications . . . . . . . . . . . . . . . . . . . . . . . . . . . . . . . . . . . . . 7
Table 5. Electrical specifications (HP LaserJet 9000) . . . . . . . . . . . . . . . . . . . . . 7
Table 6. Electrical specifications (HP LaserJet 9040) . . . . . . . . . . . . . . . . . . . . . 8
Table 7. Electrical specifications (HP LaserJet 9050) . . . . . . . . . . . . . . . . . . . . . 8
Table 8. Environmental specifications
. . . . . . . . . . . . . . . . . . . . . . . . . . . . . . .8
Table 9. Acoustical specifications . . . . . . . . . . . . . . . . . . . . . . . . . . . . . . . . . . . . 9
Table 10. Paper weight equivalence . . . . . . . . . . . . . . . . . . . . . . . . . . . . . . . . . 23
Table 11. Control-panel button functions . . . . . . . . . . . . . . . . . . . . . . . . . . . . . . 31
Table 12. Printer state and numeric key effect . . . . . . . . . . . . . . . . . . . . . . . . . . 32
Table 13. Storing print cartridges . . . . . . . . . . . . . . . . . . . . . . . . . . . . . . . . . . . 67
Table 14. Normal sequence of operation . . . . . . . . . . . . . . . . . . . . . . . . . . . . . . 71
Table 15. Failure sequence of operation . . . . . . . . . . . . . . . . . . . . . . . . . . . . . . 73
Table 16. Pickup-and-feed system sensors and switches . . . . . . . . . . . . . . . . . 90
Table 17. Pickup-and-feed system motors and solenoids . . . . . . . . . . . . . . . . . 92
Table 18. Primary steps for troubleshooting . . . . . . . . . . . . . . . . . . . . . . . . . . . 167
Table 19. Power-on defects or a blank display . . . . . . . . . . . . . . . . . . . . . . . . 174
Table 20. Alphabetic error messages . . . . . . . . . . . . . . . . . . . . . . . . . . . . . . . . 180
Table 21. Numeric error messages . . . . . . . . . . . . . . . . . . . . . . . . . . . . . . . . . 188
Table 22. Service test abnormality codes . . . . . . . . . . . . . . . . . . . . . . . . . . . . 213
Table 23. Service menu . . . . . . . . . . . . . . . . . . . . . . . . . . . . . . . . . . . . . . . . . . 215
Table 24. DIP switch settings . . . . . . . . . . . . . . . . . . . . . . . . . . . . . . . . . . . . . 223
Table 25. Tray 4 light-pattern interpretation . . . . . . . . . . . . . . . . . . . . . . . . . . . 223
Table 26. General jam troubleshooting questions . . . . . . . . . . . . . . . . . . . . . . 224
Table 27. Printer devices troubleshooting . . . . . . . . . . . . . . . . . . . . . . . . . . . . 228
Table 28. Image-quality checks . . . . . . . . . . . . . . . . . . . . . . . . . . . . . . . . . . . . 233
Table 29. Image defects . . . . . . . . . . . . . . . . . . . . . . . . . . . . . . . . . . . . . . . . . . 236
Table 30. Consumables, supplies, accessories, FRUs, and documentation . 257
Table 31. Hardware table . . . . . . . . . . . . . . . . . . . . . . . . . . . . . . . . . . . . . . . . . 261
Table 32. Common torque values . . . . . . . . . . . . . . . . . . . . . . . . . . . . . . . . . . 261
Table 33. Printer external covers and panels . . . . . . . . . . . . . . . . . . . . . . . . . 263
Table 34. Left door and diverter . . . . . . . . . . . . . . . . . . . . . . . . . . . . . . . . . . . 264
Table 35. Right cover assembly . . . . . . . . . . . . . . . . . . . . . . . . . . . . . . . . . . . 265
Table 36. Internal components (1 of 4) . . . . . . . . . . . . . . . . . . . . . . . . . . . . . . 267
Table 37. Internal components (2 of 4) . . . . . . . . . . . . . . . . . . . . . . . . . . . . . . 269
Table 38. Internal components (3 of 4) . . . . . . . . . . . . . . . . . . . . . . . . . . . . . . 271
Table 39. Internal components (4 of 4) . . . . . . . . . . . . . . . . . . . . . . . . . . . . . . 273
Table 40. Drum feed drive assembly . . . . . . . . . . . . . . . . . . . . . . . . . . . . . . . . 274
Table 41. Fuser delivery drive assembly . . . . . . . . . . . . . . . . . . . . . . . . . . . . . 275
Table 42. Cartridge lifter assembly . . . . . . . . . . . . . . . . . . . . . . . . . . . . . . . . . . 276
Table 43. 500-sheet trays (tray 2 and tray 3) . . . . . . . . . . . . . . . . . . . . . . . . . . 277
Table 44. Paper input unit . . . . . . . . . . . . . . . . . . . . . . . . . . . . . . . . . . . . . . . . 278
Table 45. Registration assembly . . . . . . . . . . . . . . . . . . . . . . . . . . . . . . . . . . . 279
Table 46. Transfer roller assembly . . . . . . . . . . . . . . . . . . . . . . . . . . . . . . . . . . 280
Table 47. Delivery assembly . . . . . . . . . . . . . . . . . . . . . . . . . . . . . . . . . . . . . . 282
Table 48. PCA location . . . . . . . . . . . . . . . . . . . . . . . . . . . . . . . . . . . . . . . . . . . 283
Table 49. Tray 4 main body (1 of 2) . . . . . . . . . . . . . . . . . . . . . . . . . . . . . . . . . 285
ix
Table 50. Tray 4 main body (2 of 2) . . . . . . . . . . . . . . . . . . . . . . . . . . . . . . . .
Table 51. Tray 4 drive assembly . . . . . . . . . . . . . . . . . . . . . . . . . . . . . . . . . . .
Table 52. Tray 4 PCA location . . . . . . . . . . . . . . . . . . . . . . . . . . . . . . . . . . . . .
Table 53. Tray 1 assembly . . . . . . . . . . . . . . . . . . . . . . . . . . . . . . . . . . . . . . .
Table 54. Alphabetical parts list . . . . . . . . . . . . . . . . . . . . . . . . . . . . . . . . . . . .
Table 55. Numerical parts list . . . . . . . . . . . . . . . . . . . . . . . . . . . . . . . . . . . . .
x
List of tables
287
288
289
290
291
296
List of figures
Figure 1. Sample identification label . . . . . . . . . . . . . . . . . . . . . . . . . . . . . . . . . . 6
Figure 2. External view of the printer and accessories . . . . . . . . . . . . . . . . . . . . 10
Figure 3. Interface connections (HP LaserJet 9040/9050 Series printer) . . . . . 11
Figure 4. Interface connections (HP LaserJet 9000 Series printer) . . . . . . . . . . 11
Figure 5. Optional accessories . . . . . . . . . . . . . . . . . . . . . . . . . . . . . . . . . . . . . 12
Figure 6. Space requirements for the base model . . . . . . . . . . . . . . . . . . . . . . . 17
Figure 7. Space requirements with a finishing device
(3,000-sheet stapler/stacker shown) and tray 4 installed . . . . . . . . . . . . . . . 18
Figure 8. Sample seams . . . . . . . . . . . . . . . . . . . . . . . . . . . . . . . . . . . . . . . . . . 20
Figure 9. Adhesive labels . . . . . . . . . . . . . . . . . . . . . . . . . . . . . . . . . . . . . . . . . . 21
Figure 10. Media trays, bins, and paper handling . . . . . . . . . . . . . . . . . . . . . . . 25
Figure 11. Control-panel layout . . . . . . . . . . . . . . . . . . . . . . . . . . . . . . . . . . . . . 30
Figure 12. Registration page (1 of 2) . . . . . . . . . . . . . . . . . . . . . . . . . . . . . . . . . 34
Figure 13. Registration page (2 of 2) . . . . . . . . . . . . . . . . . . . . . . . . . . . . . . . . . 35
Figure 14. Turn off the printer and remove the power cords . . . . . . . . . . . . . . . 62
Figure 15. Remove the print cartridge . . . . . . . . . . . . . . . . . . . . . . . . . . . . . . . . 62
Figure 16. Wipe any residue . . . . . . . . . . . . . . . . . . . . . . . . . . . . . . . . . . . . . . . 63
Figure 17. Replace the print cartridge . . . . . . . . . . . . . . . . . . . . . . . . . . . . . . . . 63
Figure 18. Lock the print cartridge . . . . . . . . . . . . . . . . . . . . . . . . . . . . . . . . . . . 63
Figure 19. Close the front cover . . . . . . . . . . . . . . . . . . . . . . . . . . . . . . . . . . . . . 64
Figure 20. Sample cleaning page . . . . . . . . . . . . . . . . . . . . . . . . . . . . . . . . . . . . 65
Figure 21. Printer systems . . . . . . . . . . . . . . . . . . . . . . . . . . . . . . . . . . . . . . . . . 70
Figure 22. Sequence-of-operation block diagram . . . . . . . . . . . . . . . . . . . . . . . 71
Figure 23. Timing chart block diagram . . . . . . . . . . . . . . . . . . . . . . . . . . . . . . . . 74
Figure 24. Engine-control-system block diagram . . . . . . . . . . . . . . . . . . . . . . . . 75
Figure 25. DC controller PCA block diagram . . . . . . . . . . . . . . . . . . . . . . . . . . . 76
Figure 26. High-voltage power supply block diagram . . . . . . . . . . . . . . . . . . . . 78
Figure 27. Power-supply-block diagram . . . . . . . . . . . . . . . . . . . . . . . . . . . . . . . 80
Figure 28. Laser/scanner system . . . . . . . . . . . . . . . . . . . . . . . . . . . . . . . . . . . . 83
Figure 29. Image formation . . . . . . . . . . . . . . . . . . . . . . . . . . . . . . . . . . . . . . . . 84
Figure 30. Print cartridge . . . . . . . . . . . . . . . . . . . . . . . . . . . . . . . . . . . . . . . . . . 85
Figure 31. Pickup-and-feed system sensors and switches . . . . . . . . . . . . . . . . 89
Figure 32. Pickup-and-feed system motors and solenoids . . . . . . . . . . . . . . . . 91
Figure 33. Tray 1 block diagram . . . . . . . . . . . . . . . . . . . . . . . . . . . . . . . . . . . . . 93
Figure 34. Tray 4 block diagram . . . . . . . . . . . . . . . . . . . . . . . . . . . . . . . . . . . . . 95
Figure 35. View of front and right side . . . . . . . . . . . . . . . . . . . . . . . . . . . . . . . 100
Figure 36. View of back and left side . . . . . . . . . . . . . . . . . . . . . . . . . . . . . . . . 100
Figure 37. Right top cover (1 of 2) . . . . . . . . . . . . . . . . . . . . . . . . . . . . . . . . . . 101
Figure 38. Right top cover (2 of 2) . . . . . . . . . . . . . . . . . . . . . . . . . . . . . . . . . . 102
Figure 39. Left top cover . . . . . . . . . . . . . . . . . . . . . . . . . . . . . . . . . . . . . . . . . 103
Figure 40. Front cover (1 of 2) . . . . . . . . . . . . . . . . . . . . . . . . . . . . . . . . . . . . . 104
Figure 41. Front cover (2 of 2) . . . . . . . . . . . . . . . . . . . . . . . . . . . . . . . . . . . . . 104
Figure 42. Right door (1 of 2) . . . . . . . . . . . . . . . . . . . . . . . . . . . . . . . . . . . . . . 105
Figure 43. Right door (2 of 2) . . . . . . . . . . . . . . . . . . . . . . . . . . . . . . . . . . . . . . 105
Figure 44. Right lower cover . . . . . . . . . . . . . . . . . . . . . . . . . . . . . . . . . . . . . . 106
Figure 45. Left door . . . . . . . . . . . . . . . . . . . . . . . . . . . . . . . . . . . . . . . . . . . . . 107
Figure 46. Left back cover . . . . . . . . . . . . . . . . . . . . . . . . . . . . . . . . . . . . . . . . 108
Figure 47. Back cover . . . . . . . . . . . . . . . . . . . . . . . . . . . . . . . . . . . . . . . . . . . 109
Figure 48. Rail covers . . . . . . . . . . . . . . . . . . . . . . . . . . . . . . . . . . . . . . . . . . . 110
xi
Figure 49. Control panel . . . . . . . . . . . . . . . . . . . . . . . . . . . . . . . . . . . . . . . . .
Figure 50. Laser/scanner assembly . . . . . . . . . . . . . . . . . . . . . . . . . . . . . . . .
Figure 51. Delivery assembly . . . . . . . . . . . . . . . . . . . . . . . . . . . . . . . . . . . . .
Figure 52. Delivery-fan assembly . . . . . . . . . . . . . . . . . . . . . . . . . . . . . . . . . .
Figure 53. Delivery-assembly fans and face-down-bin fan (1 of 2) . . . . . . . . .
Figure 54. Delivery-assembly fans and face-down-bin fan (2 of 2) . . . . . . . . .
Figure 55. Delivery motor . . . . . . . . . . . . . . . . . . . . . . . . . . . . . . . . . . . . . . . .
Figure 56. Cartridge release lever (1 of 3) . . . . . . . . . . . . . . . . . . . . . . . . . . . .
Figure 57. Cartridge release lever (2 of 3) . . . . . . . . . . . . . . . . . . . . . . . . . . . .
Figure 58. Cartridge release lever (3 of 3) . . . . . . . . . . . . . . . . . . . . . . . . . . . .
Figure 59. Print cartridge . . . . . . . . . . . . . . . . . . . . . . . . . . . . . . . . . . . . . . . . .
Figure 60. Transfer-roller assembly . . . . . . . . . . . . . . . . . . . . . . . . . . . . . . . . .
Figure 61. Tray 2 or tray 3 . . . . . . . . . . . . . . . . . . . . . . . . . . . . . . . . . . . . . . . .
Figure 62. Rollers (pickup, feed, or separation) . . . . . . . . . . . . . . . . . . . . . . .
Figure 63. Fuser-jam-removal knob . . . . . . . . . . . . . . . . . . . . . . . . . . . . . . . .
Figure 64. Registration-jam-removal knob . . . . . . . . . . . . . . . . . . . . . . . . . . .
Figure 65. Tray 1 . . . . . . . . . . . . . . . . . . . . . . . . . . . . . . . . . . . . . . . . . . . . . . .
Figure 66. Paper-input unit (1 of 5) . . . . . . . . . . . . . . . . . . . . . . . . . . . . . . . . .
Figure 67. Paper-input unit (2 of 5) . . . . . . . . . . . . . . . . . . . . . . . . . . . . . . . . .
Figure 68. Paper-input unit (3 of 5) . . . . . . . . . . . . . . . . . . . . . . . . . . . . . . . . .
Figure 69. Paper-input unit (4 of 5) . . . . . . . . . . . . . . . . . . . . . . . . . . . . . . . . .
Figure 70. Paper-input unit (5 of 5) . . . . . . . . . . . . . . . . . . . . . . . . . . . . . . . . .
Figure 71. Registration assembly (1 of 2) . . . . . . . . . . . . . . . . . . . . . . . . . . . .
Figure 72. Registration assembly (2 of 2) . . . . . . . . . . . . . . . . . . . . . . . . . . . .
Figure 73. Transfer-guide assembly . . . . . . . . . . . . . . . . . . . . . . . . . . . . . . . .
Figure 74. Reinstalling the transfer-guide assembly . . . . . . . . . . . . . . . . . . . .
Figure 75. Duplexer (1 of 2) . . . . . . . . . . . . . . . . . . . . . . . . . . . . . . . . . . . . . . .
Figure 76. Duplexer (2 of 2) . . . . . . . . . . . . . . . . . . . . . . . . . . . . . . . . . . . . . . .
Figure 77. Fuser assembly (1 of 2) . . . . . . . . . . . . . . . . . . . . . . . . . . . . . . . . .
Figure 78. Fuser assembly (2 of 2) . . . . . . . . . . . . . . . . . . . . . . . . . . . . . . . . .
Figure 79. Formatter (HP LaserJet 9000 shown) . . . . . . . . . . . . . . . . . . . . . .
Figure 80. Low-voltage power supply (1 of 2) . . . . . . . . . . . . . . . . . . . . . . . . .
Figure 81. Low-voltage power supply (2 of 2) . . . . . . . . . . . . . . . . . . . . . . . . .
Figure 82. High-voltage power supply (1 of 2) . . . . . . . . . . . . . . . . . . . . . . . . .
Figure 83. High-voltage power supply (2 of 2) . . . . . . . . . . . . . . . . . . . . . . . . .
Figure 84. DC controller (1 of 2) . . . . . . . . . . . . . . . . . . . . . . . . . . . . . . . . . . .
Figure 85. DC controller (2 of 2) . . . . . . . . . . . . . . . . . . . . . . . . . . . . . . . . . . .
Figure 86. Toner-sensor contact assembly . . . . . . . . . . . . . . . . . . . . . . . . . . .
Figure 87. Reinstalling the toner-sensor contact assembly . . . . . . . . . . . . . . .
Figure 88. Drum motor . . . . . . . . . . . . . . . . . . . . . . . . . . . . . . . . . . . . . . . . . .
Figure 89. Feed-drive assembly . . . . . . . . . . . . . . . . . . . . . . . . . . . . . . . . . . .
Figure 90. Power-supply fan . . . . . . . . . . . . . . . . . . . . . . . . . . . . . . . . . . . . . .
Figure 91. Cartridge fan (1 of 2) . . . . . . . . . . . . . . . . . . . . . . . . . . . . . . . . . . .
Figure 92. Cartridge fan (2 of 2) . . . . . . . . . . . . . . . . . . . . . . . . . . . . . . . . . . .
Figure 93. Controller fan . . . . . . . . . . . . . . . . . . . . . . . . . . . . . . . . . . . . . . . . .
Figure 94. Jetlink connector . . . . . . . . . . . . . . . . . . . . . . . . . . . . . . . . . . . . . .
Figure 95. Fuser-connector holder assembly (1 of 3) . . . . . . . . . . . . . . . . . . .
Figure 96. Fuser-connector holder assembly (2 of 3) . . . . . . . . . . . . . . . . . . .
Figure 97. Fuser-connector holder assembly (3 of 3) . . . . . . . . . . . . . . . . . . .
Figure 98. Fuser delivery-drive assembly (1 of 3) . . . . . . . . . . . . . . . . . . . . . .
Figure 99. Fuser delivery-drive assembly (2 of 3) . . . . . . . . . . . . . . . . . . . . . .
Figure 100. Fuser delivery-drive assembly (3 of 3) . . . . . . . . . . . . . . . . . . . . .
Figure 101. Left side cover . . . . . . . . . . . . . . . . . . . . . . . . . . . . . . . . . . . . . . .
Figure 102. Right side cover . . . . . . . . . . . . . . . . . . . . . . . . . . . . . . . . . . . . . .
Figure 103. Back covers . . . . . . . . . . . . . . . . . . . . . . . . . . . . . . . . . . . . . . . . .
Figure 104. Tray 4 . . . . . . . . . . . . . . . . . . . . . . . . . . . . . . . . . . . . . . . . . . . . . .
Figure 105. Rollers . . . . . . . . . . . . . . . . . . . . . . . . . . . . . . . . . . . . . . . . . . . . .
Figure 106. Registration assembly (1 of 2) . . . . . . . . . . . . . . . . . . . . . . . . . . .
Figure 107. Registration assembly (2 of 2) . . . . . . . . . . . . . . . . . . . . . . . . . . .
xii
List of figures
111
112
113
114
115
115
116
117
117
118
119
120
121
122
123
124
125
126
126
127
127
128
129
130
131
132
133
133
134
134
135
136
136
137
137
138
139
140
140
141
142
143
144
144
145
146
147
147
148
149
149
150
151
152
153
154
155
156
156
Figure 108. Drive motor . . . . . . . . . . . . . . . . . . . . . . . . . . . . . . . . . . . . . . . . . . 157
Figure 109. Drive assembly . . . . . . . . . . . . . . . . . . . . . . . . . . . . . . . . . . . . . . . 158
Figure 110. Controller board (1 of 2) . . . . . . . . . . . . . . . . . . . . . . . . . . . . . . . . 159
Figure 111. Controller board (2 of 2) . . . . . . . . . . . . . . . . . . . . . . . . . . . . . . . . 159
Figure 112. Paper-size switch PCA (1 of 2) . . . . . . . . . . . . . . . . . . . . . . . . . . . 160
Figure 113. Paper-size switch PCA (2 of 2) . . . . . . . . . . . . . . . . . . . . . . . . . . . 160
Figure 114. Power supply . . . . . . . . . . . . . . . . . . . . . . . . . . . . . . . . . . . . . . . . . 161
Figure 115. Pickup assembly (1 of 2) . . . . . . . . . . . . . . . . . . . . . . . . . . . . . . . . 162
Figure 116. Pickup assembly (2 of 2) . . . . . . . . . . . . . . . . . . . . . . . . . . . . . . . . 162
Figure 117. Paper-connecting unit . . . . . . . . . . . . . . . . . . . . . . . . . . . . . . . . . . 163
Figure 118. Basic troubleshooting process flow (1 of 2) . . . . . . . . . . . . . . . . . 168
Figure 119. Basic troubleshooting process flow (2 of 2) . . . . . . . . . . . . . . . . . 169
Figure 120. Sample event log (HP LaserJet 9000 series printer page shown) 176
Figure 121. Example of events . . . . . . . . . . . . . . . . . . . . . . . . . . . . . . . . . . . . . 177
Figure 122. Diagnostics flowchart . . . . . . . . . . . . . . . . . . . . . . . . . . . . . . . . . . 216
Figure 123. Tray 4 label . . . . . . . . . . . . . . . . . . . . . . . . . . . . . . . . . . . . . . . . . . 221
Figure 124. Sample configuration page . . . . . . . . . . . . . . . . . . . . . . . . . . . . . . 227
Figure 125. Sample Jetdirect configuration page . . . . . . . . . . . . . . . . . . . . . . . 229
Figure 126. Sample supplies status page . . . . . . . . . . . . . . . . . . . . . . . . . . . . 230
Figure 127. Sample usage page . . . . . . . . . . . . . . . . . . . . . . . . . . . . . . . . . . . 231
Figure 128. Sample file directory page . . . . . . . . . . . . . . . . . . . . . . . . . . . . . . . 232
Figure 129. Image defect examples . . . . . . . . . . . . . . . . . . . . . . . . . . . . . . . . . 235
Figure 130. Repeating defect ruler . . . . . . . . . . . . . . . . . . . . . . . . . . . . . . . . . . 243
Figure 131. Printer wiring diagram (HP LaserJet 9000 series printer) . . . . . . . 251
Figure 132. Printer wiring diagram (HP LaserJet 9040/9050 series printer) . . 252
Figure 133. Tray 4 wiring diagram . . . . . . . . . . . . . . . . . . . . . . . . . . . . . . . . . . 253
Figure 134. Printer external covers and panels . . . . . . . . . . . . . . . . . . . . . . . . 262
Figure 135. Left door and diverter . . . . . . . . . . . . . . . . . . . . . . . . . . . . . . . . . . 264
Figure 136. Right cover assembly . . . . . . . . . . . . . . . . . . . . . . . . . . . . . . . . . . 265
Figure 137. Internal components (1 of 4) . . . . . . . . . . . . . . . . . . . . . . . . . . . . . 266
Figure 138. Internal components (2 of 4) . . . . . . . . . . . . . . . . . . . . . . . . . . . . . 268
Figure 139. Internal components (3 of 4) . . . . . . . . . . . . . . . . . . . . . . . . . . . . . 270
Figure 140. Internal components (4 of 4) . . . . . . . . . . . . . . . . . . . . . . . . . . . . . 272
Figure 141. Drum feed drive assembly . . . . . . . . . . . . . . . . . . . . . . . . . . . . . . 274
Figure 142. Fuser delivery drive assembly . . . . . . . . . . . . . . . . . . . . . . . . . . . . 275
Figure 143. Cartridge lifter assembly . . . . . . . . . . . . . . . . . . . . . . . . . . . . . . . . 276
Figure 144. 500-sheet trays (tray 2 and tray 3) . . . . . . . . . . . . . . . . . . . . . . . . 277
Figure 145. Paper input unit . . . . . . . . . . . . . . . . . . . . . . . . . . . . . . . . . . . . . . . 278
Figure 146. Registration assembly . . . . . . . . . . . . . . . . . . . . . . . . . . . . . . . . . . 279
Figure 147. Transfer roller assembly . . . . . . . . . . . . . . . . . . . . . . . . . . . . . . . . 280
Figure 148. Delivery assembly . . . . . . . . . . . . . . . . . . . . . . . . . . . . . . . . . . . . . 281
Figure 149. PCA assembly location . . . . . . . . . . . . . . . . . . . . . . . . . . . . . . . . . 283
Figure 150. Tray 4 main body (1 of 2) . . . . . . . . . . . . . . . . . . . . . . . . . . . . . . . 284
Figure 151. Tray 4 main body (2 of 2) . . . . . . . . . . . . . . . . . . . . . . . . . . . . . . . 286
Figure 152. Tray 4 drive assembly . . . . . . . . . . . . . . . . . . . . . . . . . . . . . . . . . . 288
Figure 153. Tray 4 PCA location . . . . . . . . . . . . . . . . . . . . . . . . . . . . . . . . . . . 289
Figure 154. Tray 1 assembly . . . . . . . . . . . . . . . . . . . . . . . . . . . . . . . . . . . . . . 290
xiii
xiv
List of figures
1
Product information
Chapter contents
Product features of the HP LaserJet 9000 Series printers . . . . . . . . . . . . . . . . . . . . . . . . . . . . . . . 2
Product features of the HP LaserJet 9040/9050 Series printers . . . . . . . . . . . . . . . . . . . . . . . . . . . 4
Product specifications . . . . . . . . . . . . . . . . . . . . . . . . . . . . . . . . . . . . . . . . . . . . . . . . . . . . . . . . . . . 6
Product overview . . . . . . . . . . . . . . . . . . . . . . . . . . . . . . . . . . . . . . . . . . . . . . . . . . . . . . . . . . . . . . 10
External view of the printer and accessories . . . . . . . . . . . . . . . . . . . . . . . . . . . . . . . . . . . . . 10
Interface connections . . . . . . . . . . . . . . . . . . . . . . . . . . . . . . . . . . . . . . . . . . . . . . . . . . . . . . . 11
Optional accessories . . . . . . . . . . . . . . . . . . . . . . . . . . . . . . . . . . . . . . . . . . . . . . . . . . . . . . . 12
Regulatory information . . . . . . . . . . . . . . . . . . . . . . . . . . . . . . . . . . . . . . . . . . . . . . . . . . . . . . . . . 13
Regulatory requirements . . . . . . . . . . . . . . . . . . . . . . . . . . . . . . . . . . . . . . . . . . . . . . . . . . . . 13
FCC regulations . . . . . . . . . . . . . . . . . . . . . . . . . . . . . . . . . . . . . . . . . . . . . . . . . . . . . . . . . . . 13
Declaration of conformity . . . . . . . . . . . . . . . . . . . . . . . . . . . . . . . . . . . . . . . . . . . . . . . . . . . . 13
Environmental product stewardship program . . . . . . . . . . . . . . . . . . . . . . . . . . . . . . . . . . . . . 13
Service approach . . . . . . . . . . . . . . . . . . . . . . . . . . . . . . . . . . . . . . . . . . . . . . . . . . . . . . . . . . . . . 14
Parts and supplies . . . . . . . . . . . . . . . . . . . . . . . . . . . . . . . . . . . . . . . . . . . . . . . . . . . . . . . . . 14
Warranty . . . . . . . . . . . . . . . . . . . . . . . . . . . . . . . . . . . . . . . . . . . . . . . . . . . . . . . . . . . . . . . . . 14
Limited warranty for print-cartridge life . . . . . . . . . . . . . . . . . . . . . . . . . . . . . . . . . . . . . . . . . . 14
Limited warranty for print-cartridge life . . . . . . . . . . . . . . . . . . . . . . . . . . . . . . . . . . . . . . . . . . 14
Chapter contents 1
Product features of the HP LaserJet 9000 Series printers
HP LaserJet 9000 printer (C8519A)
The HP LaserJet 9000 printer comes standard with 64 MB RAM, wide-format
printing, and two 500-sheet trays (tray 2 and tray 3).
HP LaserJet 9000n printer (C8520A)
The HP LaserJet 9000n printer comes standard with 64 MB RAM, wide-format
printing, two 500-sheet trays (tray 2 and tray 3), a 100-sheet multipurpose tray
(optional tray 1), and an embedded HP Jetdirect print server.
HP LaserJet 9000dn printer (C8521A)
The HP LaserJet 9000dn printer comes standard with 64 MB RAM, wide-format
printing, two 500-sheet trays (tray 2 and tray 3), a 100-sheet multipurpose tray
(optional tray 1), an embedded HP Jetdirect print server, and an optional duplex
printing accessory (duplexer) for printing on both sides of paper.
HP LaserJet 9000hns printer (C8522A)
The HP LaserJet 9000hns printer contains the HP LaserJet 9000dn with a 2,000sheet feeder (optional tray 4) and an optional 3,000-sheet stapler/stacker, an
optional 3,000-sheet stacker, or an optional multifunction finisher.
Table 1. Features of the HP LaserJet 9000 Series printers
Speed
z
z
z
Resolution
z
z
z
Toner
z
z
50 pages per minute (ppm) for letter-size print media and A4-size media.
First page out in less than 8 seconds.
Transmit Once, Raster Image Processing (RIP) Once technology.
600 dots per inch (dpi) with Resolution Enhancement technology (REt).
HP FastRes 1200 (1200-dpi-like quality at up to 50 ppm letter and A4).
Up to 256 levels of gray.
HP UltraPrecise print cartridge. The capacity is rated at an average
30,000 pages with 5% coverage.
EconoMode capability.
PCL printer
language and fonts
z
Fast printing performance, built-in Intellifont and TrueType scaling
technologies, built-in HP-GL/2 vector graphics, and advanced imaging
capabilities are benefits of the printer control language (PCL) 6 printer
language. PCL 6 also includes 80 scalable TrueType fonts and one
bitmapped Line Printer Font.
PS language
z
PostScript® 3 (PS) emulation.
Automatic language
switching
z
The printer automatically determines and switches to the appropriate
language for the print job.
Enhanced memory
and memory expansion
z
The HP LaserJet 9000 Series printers come with 64 MB of memory and
can be expanded to 384 MB.
2 Chapter 1 Product information
Table 1. Features of the HP LaserJet 9000 Series printers (continued)
Expandability
All models accept the following accessories:
Optional tray 1, a 100-sheet or 10-envelope multipurpose tray for
automatic and manual feeding of envelopes, labels, transparencies,
custom-sized media from 98 x 191 mm (3.8 x 7.5 inches) to
312 x 470 mm (12.3 x 18.5 in), and heavy paper.
z Optional tray 4, a 2,000-sheet feeder that supports letter, legal, B4, A4,
11 x 17 inches, A3, executive, B5, and custom 182 x 210 mm
(7.2 x 8.3 inches) to 297 x 431.8 mm (11.7 x 17 inches) print media.
z Optional duplexer.
z Optional 3,000-sheet stapler/stacker, 3,000-sheet stacker, or
multifunction finisher.
z Enhanced input/output (EIO) cards.
z Dual inline memory module (DIMM) slots for adding memory and fonts.
z Hard disk for RIP Once capability, job retention features, and font
storage.
z
Wireless printing
z
The printer supports wireless printing with the installation of a Fast
InfraRed Connect pod.
Interface connection
z
Bidirectional ECP type-C parallel port (IEEE-1284 compliant).
Three EIO slots for hard-disk-accessory or print-server installation.
Wireless Fast InfraRed port (IrDA compliant).
Foreign interface connector.
HP Jet-Link connector.
z
z
z
z
Networking
Duty cycle
z
z
Three EIO slots for hard-disk-accessory or print-server installation.
An HP 610N Jetdirect print server is included with HP LaserJet 9000n,
9000dn, and 9000hns.
z
300,000 images per month.
Product features of the HP LaserJet 9000 Series printers 3
Product features of the HP LaserJet 9040/9050 Series printers
HP LaserJet 9040/9050 printer
The HP LaserJet 9040/9050 printer (product number Q7697A/Q3721A) comes
standard with 64 MB RAM, wide-format printing, and two 500-sheet trays (tray 2
and tray 3).
HP LaserJet 9040n/9050n printer
The HP LaserJet 9040n/9050n printer (product number Q7698A/Q3722A) comes
standard with 128 MB RAM, wide-format printing, two 500-sheet trays (tray 2 and
tray 3), a 100-sheet multipurpose tray (tray 1), and an embedded HP Jetdirect print
server.
HP LaserJet 9040dn/9050dn printer
The HP LaserJet 9040dn/9050dn printer (product number Q7699A/Q3723A)
comes standard with 128 MB RAM, wide-format printing, two 500-sheet trays
(tray 2 and tray 3), a 100-sheet multipurpose tray (tray 1), an embedded HP
Jetdirect print server, and a duplex printing accessory (duplexer) for printing on
both sides of paper.
Table 2. Features of the HP LaserJet 9040/9050 Series printers
Speed
z
z
z
Resolution
z
z
z
Toner
z
z
40 pages per minute (ppm) (HP LaserJet 9040 series printer) or 50 ppm
(HP LaserJet 9050 series printer) on letter or ISO A4 paper.
First page out in less than 8 seconds.
Transmit Once, RIP Once technology.
600 dpi with REt.
FastRes 1200 provides 1200 dpi quality at full speed.
Up to 256 levels of gray.
HP UltraPrecise print cartridge. The capacity is rated at an average
30,000 pages with 5% coverage.
EconoMode capability.
PCL printer
language and fonts
z
Fast printing performance, built-in Intellifont and TrueType scaling
technologies, built-in HP-GL/2 vector graphics, and advanced imaging
capabilities are benefits of the printer control language (PCL) 6 printer
language. PCL 6 also includes 80 scalable TrueType fonts and one
bitmapped Line Printer Font.
PS language
z
PostScript 3 (PS) emulation.
Automatic language
switching
z
The printer automatically determines and switches to the appropriate
language for the print job.
Enhanced memory
and memory expansion
z
The HP LaserJet 9040/9050 Series printers come with 64 or 128 MB of
memory and can be expanded to 512 MB.
4 Chapter 1 Product information
Table 2. Features of the HP LaserJet 9040/9050 Series printers (continued)
Expandability
All models accept the following accessories:
Optional tray 1, a 100-sheet or 10-envelope multipurpose tray for
automatic and manual feeding of envelopes, labels, transparencies,
custom-sized media from 98 x 191 mm (3.8 x 7.5 inches) to
312 x 470 mm (12.3 x 18.5 inches), and 64 to 216 g/m² (17- to 58-lb
bond).
z Optional tray 4, a 2,000-sheet feeder that supports letter, legal, B4, A4,
11 x 17 inches, A3, executive, B5, and custom 76 x 127 mm
(3 x 5 inches) to 297 x 431 mm (11.7 x 17 inches) print media.
z Optional duplexer.
z Optional 3,000-sheet stapler/stacker, 3,000-sheet stacker, multifunction
finisher, or 8-bin mailbox.
z EIO cards.
z DIMM slots for adding memory.
z Hard disk for RIP Once capability, job retention features, and font
storage.
z Compact Flash slots for printer firmware forms or fonts.
z
Wireless printing
z
The printer supports wireless printing with the installation of a Fast
InfraRed Connect pod.
Interface connection
z
Bidirectional ECP type-B parallel port (IEEE-1284 compliant).
Two EIO slots for accessory installation.
HP Jet-Link connector.
z
z
Networking
Duty cycle
z
z
Two EIO slots for hard-disk-accessory or print server installation.
A Jetdirect print server is included with HP LaserJet 9040n/9050n and
9040dn/9050dn.
z
300,000 images per month.
Product features of the HP LaserJet 9040/9050 Series printers 5
Product specifications
Identification
The model number and printer serial number are listed on an identification label located in two
places:
z
on the rear cover
z
on the chassis behind the right door
The model number is alphanumeric, such as C4270A.
The serial number contains information about the country/region of origin and the revision level, the
production code, and production number of the printer. An example of a serial number is
USBB123456.
The top label also contains power-rating and regulatory information. See figure 1.
Note
The power-rating and regulatory information varies by country/region.
Electrical information
Regional certification
Model and serial number
Figure 1.
Manufacture date
Sample identification label
Table 3. Configuration comparison
HP
HP
HP
LaserJet LaserJet LaserJet
9000
9000n
9000dn
HP
LaserJet
9000hns
HP
LaserJet
9040/9050
HP
HP
LaserJet
LaserJet
9040n/9050n 9040dn/9050dn
Standard memory
Maximum memory
64 MB
384 MB
64 MB
384 MB
64 MB
384 MB
64 MB
384 MB
64 MB
512 MB
128 MB
512 MB
128 MB
512 MB
PS emulation
Standard
Standard
Standard
Standard
Standard
Standard
Standard
Jetdirect print server Optional
Standard
Standard
Standard
Optional
Standard
Standard
Optional duplexer
Optional
Optional
Standard
Standard
Optional
Optional
Standard
Optional tray 1,
100-sheet
multipurpose tray
Optional
Standard
Standard
Standard
Optional
Standard
Standard
Optional tray 4,
2,000-sheet feeder
Optional
Optional
Optional
Standard
Optional
Optional
Optional
6 Chapter 1 Product information
Table 3. Configuration comparison
HP
HP
HP
LaserJet LaserJet LaserJet
9000
9000n
9000dn
HP
LaserJet
9000hns
HP
LaserJet
9040/9050
HP
HP
LaserJet
LaserJet
9040n/9050n 9040dn/9050dn
Optional
Optional
Optional
Optional
Optional
Optional
Optional
Optional 3,000Optional
sheet stapler/stacker
Optional
Optional
Standard
Optional
Optional
Optional
Optional
Optional
multifunction finisher
Optional
Optional
Optional
Optional
Optional
Optional
Optional 8-bin
mailbox
N/A
N/A
N/A
N/A
Optional
Optional
Optional
Optional hard disk
Optional
Optional
Optional
Optional
Optional
Optional
Optional
Optional 3,000sheet stacker
Table 4. Physical specifications
HP LaserJet
9000, 9040, and 9050
HP LaserJet
9000n/9000dn,
9040n/9040dn, and
9050n/9050dn
HP LaserJet
9000hns
Height
600 mm (23.6 inches)
600 mm (23.6 inches)
1,036.4 mm (40.8 inches)
Width
990.8 mm (39.0 inches)
1,115.8 mm (44.4 inches) 1,788.2 mm (70.4 inches)
Depth
1,001 mm (42.7 inches)
1,001 mm (42.7 inches)
1,001 mm (42.7 inches)
Weight
(without print cartridge)
63.5 kg (140 lb)
9000n/9040n/9050n:
69.4 kg (153 lb)
9000dn/9040dn/9050dn:
76.2 kg (168 lb)
76.2 kg (168 lb)
Table 5. Electrical specifications (HP LaserJet 9000)
Volts
Frequency Amperes (A)
Watts (W) (typical)
Thermal units per hour
(BTu/hr)
100-127 Vac 50/60 Hz
± 10%
± 2 Hz
Minimum
recommended current
capacity =
15 A dedicated circuit
printing = 1,040 W
standby = 265 W
PowerSave 1 = 40 W
PowerSave 2 = 25 W
off = 0 W
printing = 3,550.36 BTU/hr
standby = 904.71 BTU/hr
PowerSave 1 = 136.56 BTU/hr
PowerSave 2 = 85.35 BTU/hr
off = 0 BTU/hr
220-240 Vac 50/60 Hz
± 10%
± 2 Hz
Minimum
recommended current
capacity =
6.5 A dedicated circuit
printing = 995 W
standby = 265 W
PowerSave 1 = 40 W
PowerSave 2 = 25 W
off = 0.2 W
printing = 3,396.93 BTU/hr
standby = 904.71 BTU/hr
PowerSave 1 = 136.56 BTU/hr
PowerSave 2 = 85.35 BTU/hr
off = 0.69 BTU/hr
Product specifications 7
Table 6. Electrical specifications (HP LaserJet 9040)
Volts
Frequency Ampres
Watts (W) (typical)
Thermal units per hour
(BTu/hr)
100-127 Vac ± 50/60 Hz
10%
± 2 Hz
Minimum
recommended current
capacity =
12 A dedicated circuit
printing = 900 W
standby = 200W
PowerSave 1 = 158 W
PowerSave 2 = 21 W
off = 0.5 W
printing = 3,550.36 BTu/hr
standby = 904.71 BTu/hr
PowerSave 1 = 136.56 BTu/hr
PowerSave 2 = 85.35 BTu/hr
off = 0 BTu/hr
220-240 Vac ± 50/60 Hz
10%
± 2 Hz
Minimum
recommended current
capacity =
5.3 A dedicated circuit
printing = 900 W
standby = 200 W
PowerSave 1 = 40 W
PowerSave 2 = 21 W
off = 0.5 W
printing = 3,396.93 BTu/hr
standby = 904.71 BTu/hr
PowerSave 1 = 136.56 BTu/hr
PowerSave 2 = 85.35 BTu/hr
off = 0.69 BTu/hr
Table 7. Electrical specifications (HP LaserJet 9050)
Volts
Frequency Ampres
Watts (W) (typical)
Thermal units per hour
(BTu/hr)
100-127 Vac ± 50/60 Hz
10%
± 2 Hz
Minimum
recommended current
capacity =
12 A dedicated circuit
printing = 1,000 W
standby = 200 W
PowerSave 1 = 158 W
PowerSave 2 = 21 W
off = 0.5 W
printing = 3,550.36 BTu/hr
standby = 904.71 BTu/hr
PowerSave 1 = 136.56 BTu/hr
PowerSave 2 = 85.35 BTu/hr
off = 0 BTu/hr
220-240 Vac ± 50/60 Hz
10%
± 2 Hz
Minimum
recommended current
capacity =
6.5 A dedicated circuit
printing = 1,000 W
standby = 200 W
PowerSave 1 = 40 W
PowerSave 2 = 21 W
off = 0.5 W
printing = 3,396.93 BTu/hr
standby = 904.71 BTu/hr
PowerSave 1 = 136.56 BTu/hr
PowerSave 2 = 85.35 BTu/hr
off = 0.69 BTu/hr
Note
Electrical specifications might change. See www.hp.com/go/lj9000 or www.hp.com/go/lj9050_lj9040
for the current information.
WARNING!
Power requirements are based on the country/region where the printer is sold. Do not convert operating
voltages. This can damage the printer and void the product warranty.
Table 8. Environmental specifications
Operating temperature
10°C to 32.5°C
(50°F to 91°F)
Relative humidity
10% to 80%
Storage temperature
-40ºF to +60ºF
Storage humidity
15% to 90%
8 Chapter 1 Product information
Table 9. Acoustical specifications
Declared per ISO 9296
Sound power level1
HP LaserJet 9050
Sound power level2
HP LaserJet 9040
Sound pressure level3
(Bystander position)
HP LaserJet 9050
Sound pressure level4
(Bystander position)
HP LaserJet 9040
Printing (50 ppm)
LWAd = 7.2 Bels (A) [72 dB(A)]
Ready
LWAd = 5.6 Bels (A) [56 dB(A)]
Printing (40 ppm)
LWAd = 7.0 Bels (A) [dB(A)]
Ready
LWAd = 5.6 Bels (A) [dB(A)]
Printing (50 ppm)
LpAm = 56 dB(A)
Ready
LpAm = 40 dB(A)
Printing (40 ppm)
LpAm = 54 dB(A)
Ready
LpAm = 39 dB(A)
1.Values current as of October 16, 2003. Values subject to change, see www.hp.com/support/
lj9050_lj9040 for current information.
2.Values current as of October 24, 2004. Values subject to change, see www.hp.com/support/
lj9050_lj9040 for current information.
3.Values current as of October 16, 2003. Values subject to change, see www.hp.com/support/
lj9050_lj9040 for current information.
4.Values current as of October 24, 2004. Values subject to change, see www.hp.com/support/
lj9050_lj9040 for current information.
Product specifications 9
Product overview
External view of the printer and accessories
Face-up bin
Optional 3,000-sheet
stapler/stacker, 3,000sheet stacker, 8-bin
mailbox, or
multifunction finisher
Front door
Standard output bin
(face-down bin)
Optional
tray 1
Right door
Duplexer (inside
the printer)
Left door
(behind the
output
Tray 2
Tray 3
Optional tray 4
Figure 2.
External view of the printer and accessories
10 Chapter 1 Product information
Ver tical
transfer door
Interface connections
Local area network (LAN)
connector (RJ-45)
Parallel B connector
(Parallel)
HP Jet-Link connector
(for paper-handling
accessory)
Figure 3.
Interface connections (HP LaserJet 9040/9050 Series printer)
Parallel connector
HP Jetdirect print server
(optional)
Foreign interface
connector (not used)
I/O
slots
HP Fast InfraRed Connect
(optional IR pod)
HP Jet-Link connector
(optional accessories
connection)
Figure 4.
Interface connections (HP LaserJet 9000 Series printer)
Product overview 11
Optional accessories
Multifunction finisher
3,000-sheet stapler/stacker
3,000-sheet stacker
Tray 1
Duplex printing
accessory
(duplexer)
8-bin mailbox
(HP LaserJet
9040/9050 Series
printer only)
Figure 5.
Optional accessories
12 Chapter 1 Product information
Tray 4
HP Fast InfraRed
Connect (HP LaserJet
9000 Series printer only
Regulatory information
Regulatory requirements
For regulatory information and requirements, please see the HP LaserJet 9000 Start Guide or the
HP LaserJet 9040/9050 Start Guide.
FCC regulations
For FCC regulations, please see the HP LaserJet 9000 Start Guide or the HP LaserJet 9040/9050
Start Guide.
Declaration of conformity
For declaration of conformity information, please see the HP LaserJet 9000 Start Guide or the HP
LaserJet 9040/9050 Start Guide.
Environmental product stewardship program
For environmental product stewardship program information, please see the HP LaserJet 9000 Use
Guide or the HP LaserJet 9040/9050 Use Guide.
Regulatory information 13
Service approach
Repair of the printer normally begins with a three-step process:
z
isolate the problem to the major system (the host computer, the network and/or server, or the
printer system)
z
determine whether the problem is located in one of the paper-handling devices or in the printer
engine
z
troubleshoot the problem using the procedures in chapter 7
When a faulty part is located, repair is usually accomplished by assembly-level replacement of field
replaceable units (FRUs). Some mechanical assemblies can be repaired at the subassembly level.
Hewlett-Packard does not support replacement of components on the printed circuit assemblies.
Parts and supplies
The following information helps you locate parts and assistance.
Ordering information
"Ordering parts" in chapter 8 of this manual contains FRUS and replacement part numbers.
Replacement parts can be ordered from the HP Customer Services and Support Organization
(HPS).
"Consumables, supplies, accessories, FRUs, and documentation" in chapter 8 of this manual
contains information about accessories that are specifically designed for this printer. Order
accessories from HPS.
Phone listings
z
HPS (for U.S.)
(800) 752-0900
z
HPS (for Canada)
(800) 387-3867
z
HPS (for Europe)
(49 7031) 142253
Exchange program
Hewlett-Packard offers remanufactured assemblies for some parts. These are identified in
"Illustrations and parts lists" in chapter 8, and can be ordered through HPS.
Consumables
The printer has two consumables: the print cartridge and the preventive maintenance kit. The
stapler/stacker and the 8-bin mailbox have one consumable: the staple cartridge. These are
identified in "Illustrations and parts lists" in chapter 8, and can be ordered through HPS.
Warranty
For warranty information and requirements, please see the HP LaserJet 9000 Start Guide or the HP
LaserJet 9040/9050 Start Guide.
Limited warranty for print-cartridge life
For print-cartridge warranty information, please see the HP LaserJet 9000 Start Guide or the HP
LaserJet 9040/9050 Start Guide.
14 Chapter 1 Product information
2
Product requirements
Chapter contents
Site requirements . . . . . . . . . . . . . . . . . . . . . . . . . . . . . . . . . . . . . . . . . . . . . . . . . . . . . . . . . . . . . 16
Operating environment . . . . . . . . . . . . . . . . . . . . . . . . . . . . . . . . . . . . . . . . . . . . . . . . . . . . . . 16
Space requirements . . . . . . . . . . . . . . . . . . . . . . . . . . . . . . . . . . . . . . . . . . . . . . . . . . . . . . . . 17
Media specifications . . . . . . . . . . . . . . . . . . . . . . . . . . . . . . . . . . . . . . . . . . . . . . . . . . . . . . . . . . . 19
Guidelines for selecting print media . . . . . . . . . . . . . . . . . . . . . . . . . . . . . . . . . . . . . . . . . . . . 19
Special media specifications. . . . . . . . . . . . . . . . . . . . . . . . . . . . . . . . . . . . . . . . . . . . . . . . . . 19
Storing print media . . . . . . . . . . . . . . . . . . . . . . . . . . . . . . . . . . . . . . . . . . . . . . . . . . . . . . . . . 22
Media input/output options . . . . . . . . . . . . . . . . . . . . . . . . . . . . . . . . . . . . . . . . . . . . . . . . . . . . . . 25
Trays, bins, and paper handling . . . . . . . . . . . . . . . . . . . . . . . . . . . . . . . . . . . . . . . . . . . . . . . 25
Chapter contents 15
Site requirements
Operating environment
The electrical and environmental specifications must be maintained to ensure the proper operation of
this printer. See "Product specifications" in chapter 1. Consider the following points before installing
the printer:
z
Install in a well-ventilated, dust-free area.
z
Install on a level, flat surface that can support the printer size and weight. Make sure that all four
printer feet are level. Do not install on carpet or on other soft surfaces.
z
Make sure that an adequate power-supply circuitry is available. See "Product specifications" in
chapter 1.
z
Install where temperature and humidity are stable, and where no abrupt changes occur (away
from water sources, humidifiers, air conditioners, refrigerators, or other major appliances). See
"Product specifications" in chapter 1.
z
Install away from direct sunlight, areas that experience vibration, open flames, ultrasonic heaters,
ammonia fumes, or magnets and devices that emit a magnetic field. If the printer is placed near
a window, make sure that the window has a curtain or blind to block direct sunlight.
z
Maintain enough space around the printer for proper access and ventilation. See "Space
requirements" on page 17.
16 Chapter 2 Product requirements
Space requirements
638 mm (25.1 inches)
353 mm
(13.9 inches)
638 mm (25.1 inches)
633 mm (24.9 inches)
353 mm
(13.9 inches)
368 mm
(17.8 inches)
600 mm (23.6 inches)
Figure 6.
Space requirements for the base model
Site requirements 17
2,591 mm (102 inches)
1,001 mm (39.4 inches)
2,591 mm (102 inches)
1,036 mm (40.8 inches)
Figure 7.
Space requirements with a finishing device (3,000-sheet stapler/stacker shown) and tray 4
installed
18 Chapter 2 Product requirements
Media specifications
Use the following information to help the user select and use print media.
Note
Before purchasing large quantities of print media, make sure that it meets the requirements that are
specified in this service manual and in the HP LaserJet Printer Family Print Media Guide. See "Media
input/output options" on page 25. Always test print media before buying large quantities.
Note
Hewlett-Packard neither warrants nor recommends the use of a particular brand of paper or print media.
Media properties are subject to manufacturing changes, and HP has no control over such changes.
Although testing media helps to characterize the manufacturer’s performance and process quality, the
customer assumes all responsibility for the quality and performance of media.
Guidelines for selecting print media
For best results, use conventional 75-g/m2 (20-lb) paper. Make sure that the paper is of good quality,
and free of cuts, nicks, tears, spots, loose particles, dust, wrinkles, voids, and curled or bent edges.
Note
Some print media might meet all of the guidelines in this manual and still not produce satisfactory
results. This might be the result of improper handling, unacceptable temperature and humidity levels,
or other variables over which HP has no control.
If you are unsure what type of paper you are loading (such as bond or recycled), check the label on
the package of paper.
For information about measuring caliper, see "Media input/output options" on page 25.
Hint
Do not purchase more media than can be easily used in a short time (about 3 months). Media that is
stored for long periods experiences heat and moisture extremes that can be damaging. Planning is
important to prevent damage to a large supply of media.
Special media specifications
The following sections describe specifications for special media that can be used in these printers.
Envelope specifications
Successful printing on envelopes depends upon the quality of the envelopes. Envelope fold lines can
vary considerably, not only between manufacturers, but also within a box from the same
manufacturer. When selecting envelopes, consider the following components:
z
Construction—Prior to printing, envelopes should lie flat with less than 10 mm (0.39 inch) curl,
and have well-constructed seams.
z
Condition—Envelopes should not be wrinkled, nicked, or otherwise damaged.
z
Temperature—Envelopes should be compatible with the heat and pressure produced by the
printer.
Media specifications 19
Figure 8.
Sample seams
Note
Print envelopes from tray 1 only. Send envelopes straight through the printer, entering at tray 1 and
exiting from the face-up bin.
Note
For the best print quality, position margins no closer than 15 mm (0.6 inch) from the edges of the
envelope. Avoid printing over the area where the envelope seams meet.
Envelopes that have adhesive strips or flaps
Check to make sure that envelopes that have peel-off adhesive strips, or more than one flap that
folds over to seal, use adhesives that are compatible with the heat and pressure in the printer. The
extra flaps and strips might cause wrinkling, creasing, or jams, and can even damage the fuser.
Label specifications
CAUTION
To avoid damaging the printer, use only labels that are recommended for laser printers. Never print on
the same sheet of labels more than once and never print on a partial sheet of labels.
When selecting labels, consider the quality of each component:
Note
z
Adhesives—The adhesive material should be stable at 190°C (374°F), which is the printer
fusing temperature.
z
Arrangement—Do not use labels that have exposed backing between them. Labels can peel off
sheets with spaces between the labels, causing jams. See figure 9 for acceptable arrangement
schemes.
z
Curl—Prior to printing, labels must lie flat with no more than 10 mm (0.39 inch) of curl in any
direction.
z
Condition—Do not use labels that have wrinkles, bubbles, or other indications of separation.
Print labels from tray 1 only. Send labels straight through the printer, entering at tray 1 and exiting from
the face-up bin.
20 Chapter 2 Product requirements
Figure 9.
Adhesive labels
Transparency specifications
To avoid damaging the printer, use only transparencies that are recommended for use in laser
printers.
z
Construction—Prior to printing, transparencies should lie flat with less than 10 mm (0.39 inch)
curl.
z
Condition—Transparencies should not be wrinkled, nicked, or otherwise damaged.
z
Temperature—Transparencies should be stable at 190°C (374°F), which is the printer fusing
temperature.
Note
If problems occur while printing transparencies, use tray 1. Send transparencies straight through the
printer, entering at tray 1 and exiting from the face-up bin.
CAUTION
Transparencies that are used in the printer must be able to withstand 190°C (374°F), the printer fusing
temperature.
Preprinted forms and special letterhead
Many preprinted forms and special letterhead papers perform well in HP LaserJet printers. However,
these papers undergo processes that alter their original characteristics, and care must be taken to
ensure that they conform to HP specifications. All special papers should be wrapped in moistureproof wrapping when they are purchased from the paper converter or printing house.
Forms and letterhead must be printed with inks that conform to the following specifications:
Note
z
Only use ink that is heat-resistant, and that will not melt, scorch, or release hazardous emissions
when subjected to 200°C (392°F) for 0.1 second.
z
Inks must have resistance to silicon oils, and must not be affected by resin components in toner.
z
Inks must not be flammable.
z
Inks must not “offset” (transfer from the printed paper onto the printer, contaminating internal
printer components). The principle cause of offset is ink that is not fully dried or that cannot
withstand the printer fusing temperature.
Do not use low-temperature inks (the kind that is used in thermography).
Media specifications 21
Embossed media
Embossed media is not recommended for use in HP LaserJet printers. Media is embossed by
stamping an image into the media by compressing the media fibers together at approximately 200°C
(392°F), and sometimes by applying a thin metal foil to the surface. The printer fusing process can
loosen the foil, and loose foil can interfere with the mechanical and electronic operation of the printer.
Embossed paper, with or without foil, can also cause multifeed jams. Multiple embossed print media
sheets tend to stick to one another.
Media that contains cutouts or perforations
Avoid media that contains cutouts or perforations for these reasons:
z
Cut fibers absorb more moisture and can increase waviness and media curl. This decreases the
print quality near the cutout or perforated area.
z
Cutting knives leave a sharp edge on the cutout or perforation. If the sharp edge is facing the
print cartridge drum during printing, it can scratch the drum surface.
z
If printing occurs over a cutout hole, the transfer roller is contaminated with unused toner,
creating light streaks on the paper.
Chemically treated media
Coatings such as lacquers, polymers, laminations, or other chemicals protect the paper, but can
cause problems in the fuser and transfer areas of HP LaserJet printers. The surface resistivity and
moisture content can be greatly altered, resulting in print-quality problems. Hard surface coatings
increase wear on the rollers and media guides. All chemically treated media must meet HP
specifications for fusing compatibility.
Synthetic media
Synthetic media (those manufactured from man-made fibers) do not perform as well as bond media
in any printer, especially HP LaserJet printers. All synthetic media must meet HP specifications,
especially for caliper and fusing compatibility.
Coated media
Do not use coated media. Most coated media does not meet the specifications for fusing
compatibility and other specifications for HP LaserJet printers.
Other special media
z
Odd sizes: check minimum and maximum supported sizes in chapter 2.
z
Carbonless media: carbonless media (NCR) is not supported by HP LaserJet printers.
z
Recycled media: choose recycled media that meets Hewlett-Packard specifications. Note that
recycled media might not be as bright as indicated in the specifications. HP recommends that
recycled media contain no more than 5% groundwood. See "Paper weight equivalence table" on
page 23.
Storing print media
Ideally, the printing and media storage environment should be at or near room temperature, and
should not be too dry or too humid. Remember that paper is hygroscopic; it absorbs and loses
moisture rapidly.
Heat works with humidity to damage paper. Heat causes the moisture in paper to evaporate, while
cold causes it to condense on the sheets. Heating systems and air conditioners remove most of the
humidity from a room. As a package is opened and used the paper is used, it loses moisture, causing
22 Chapter 2 Product requirements
streaks and smudging. Humid weather or water coolers can cause the humidity in a room to
increase. As a package of paper is opened and used, it absorbs any excess moisture, causing light
print and dropouts. Also, as paper loses and gains moisture, it can distort. This can cause jams.
Therefore, print-media storage and handling are as important as the paper-making process itself.
Media storage environmental conditions directly affect the feed operation.
Customers should not purchase more media than can easily be used in a short time (about three
months). Media that is stored for long periods might experience heat and moisture extremes, which
can cause damage. Planning is important to prevent damage to a large supply of media.
Unopened paper in sealed packages can remain stable for several months before use. Opened
packages of paper have more potential for environmental damage, especially if they are not wrapped
with a moisture-proof barrier.
The media storage environment should be properly maintained to ensure optimum printer
performance. The required condition is 20°C to 24°C (68°F to 75°F), with a relative humidity of 45%
to 55%. The following guidelines should be helpful when evaluating the paper-storage environment:
z
Paper should be stored at or near room temperature.
z
The air should not be too dry or too humid (because of the hygroscopic properties of paper).
z
The best way to store an opened package of paper is to rewrap it tightly in its moisture-proof
wrapping. If the printer environment is subject to extremes, unwrap only the amount of paper to
be used during the day's operation to prevent unwanted moisture changes.
Envelope storage
Proper storage of envelopes contributes to good print quality. Envelopes should be stored flat. If air is
trapped in an envelope, and creates an air bubble, then the envelope might wrinkle during printing.
Paper weight equivalence table
Use this table to determine approximate equivalent points in weight specifications other than U.S.
bond weight. For example, to determine the equivalent of 20-lb U.S. bond-weight paper in U.S. coverweight paper, locate the bond weight (in row 3, second column) and scan across the row to the cover
weight (in the fourth column). The equivalent is 28 lb. Shaded areas indicate a standard weight for
that grade.
Table 10. Paper weight equivalence
U.S. bond
weight (lb)
U.S. text/
book
weight (lb)
U.S. cover
weight (lb)
U.S. bristol U.S. index
weight (lb) weight (lb)
U.S. tag
weight (lb)
Europe
metric
weight
(g/m2)
Japan
metric
weight
(g/m2)
17
43
24
29
35
39
64
64
20
50
28
34
42
46
75
75
21
54
30
36
44
49
80
80
22
56
31
38
46
51
81
81
24
60
33
41
50
55
90
90
27
68
37
45
55
61
100
100
28
70
39
49
58
65
105
105
32
80
44
55
67
74
120
120
34
86
47
58
71
79
128
128
36
90
50
62
75
83
135
135
0.18
39
100
55
67
82
91
148
148
0.19
42
107
58
72
87
97
157
157
0.20
43
110
60
74
90
100
163
163
U.S. postcard
thickness
(mm)
Media specifications 23
Table 10. Paper weight equivalence
Note
U.S. postcard
thickness
(mm)
U.S. bond
weight (lb)
U.S. text/
book
weight (lb)
U.S. cover
weight (lb)
U.S. bristol U.S. index
weight (lb) weight (lb)
U.S. tag
weight (lb)
Europe
metric
weight
(g/m2)
Japan
metric
weight
(g/m2)
0.23
47
119
65
80
97
108
176
176
53
134
74
90
110
122
199
199
54
137
75
93
113
125
203
203
58
146
80
98
120
133
216
216
65
165
90
111
135
150
244
244
66
169
92
114
138
154
250
250
67
171
94
115
140
155
253
253
70
178
98
120
146
162
264
264
72
183
100
123
150
166
271
271
The U.S. postcard measurements are approximate. Use for reference only.
24 Chapter 2 Product requirements
Media input/output options
Trays, bins, and paper handling
The base-model printer comes with two built-in 500-sheet trays (tray 2 and tray 3). Tray 1 and tray 4
can be added to the printer. Special media (envelopes, labels) should only be loaded into tray 1. The
printer comes with face-up and face-down bins, and a 3,000-sheet stapler/stacker, 3,000-sheet
stacker, or multifunction finisher, or 8-bin mailbox for the HP LaserJet 9040/9050 Series printers, can
be installed.
Face-up bin
3,000-sheet stapler/
stacker, 3,000-sheet
stacker, multifunction
finisher, or 8-bin
mailbox
Standard output bin
(Face-down bin)
Tray 1
Tray 2
Tray 3
Tray 4
Figure 10.
Media trays, bins, and paper handling
CAUTION
Using print media that does not meet HP specifications might cause problems for the printer, requiring
repair. Such repair is not covered by the Hewlett-Packard warranty or service agreements.
The HP LaserJet 9000 Series printers and HP LaserJet 9040/9050 Series printers accept a variety
of media, such as cut-sheet paper (including up to 100% recycled fiber-content paper), envelopes,
labels, transparencies, and custom-size paper. Properties such as weight, composition, grain, and
moisture content are important factors affecting printer performance and output quality. Media that
does not meet the guidelines outlined in this manual and in the print media guide can cause the
following problems:
z
poor print quality
z
increased jams
z
premature wear on the printer, requiring repair
Media input/output options 25
Supported sizes of paper for input and output
Note
For more information on an optional HP output device, see the user guide that came with the product.
Tray or Bin
Capacity
Paper
Weight
Optional tray 1
Up to
100 sheets
Standard detectable sizes:
Letter, Legal, Executive, ISO A3, ISO
A4, ISO A5, 11 x 17, JIS B5, JIS B4,
JPostD,
Custom sizes:
Minimum: 98 x 191 mm
(3.9 x 7.5 inches)
Maximum: 312 x 470 mm
(12.3 x 18.4 inches)
64 to 216 g/m2
(17- to 58-lb bond)
Two-sided printing: 64
to 199 g/m2 (1-7 to 53lb bond)
Up to
10 envelopes
Envelope sizes:
Commercial #10, C5, DL, Monarch,
B5
Maximum
stack height for
transparencies:
10 mm
(0.4 inch)
Transparencies:
0.12 to 0.13 mm thick (4.7 to 5.5 mils
thick)
Note
Print on envelopes, transparencies,
and labels from optional tray 1 only.
2
Trays 2 and 3
Up to
500 sheets
Standard detectable sizes:
Letter, Letter-R, Legal, Executive, ISO
A3, ISO A4-R, ISO A5, JIS B4, JIS
B5, 11 x 17
Custom sizes:
Minimum: 148 x 210 mm
(5.8 x 8.3 inches)
Maximum: 297 x 431 mm
(11.7 x 17 inches)
64 to 199 g/m (17- to
53-lb bond)
Optional tray 4
Up to
2,000 sheets
Standard detectable sizes:
Letter, Legal, Executive, ISO A3, ISO
A4, 11 x 17, JIS B4, JIS B5
Standard undetectable sizes:
8K, 16K, JIS Executive, 8.5 x 13
(215 x 330 mm)
Custom sizes:
Minimum: 182 x 210 mm
(7.2 x 8.3 inches)
Maximum: 297 x 431 mm
(11.7 x 17 inches)
64 to 199 g/m2 (17- to
53-lb bond)
Standard top
bin
Up to 500
sheets
Standard sizes:
Letter, Legal, Executive, ISO A3, ISO
A4, ISO A5, 11 x 17, JIS B5, JIS B4,
JPostD, Monarch, 8K, 16K
Custom sizes
Custom types: Transparencies
64 to 199 g/m2 (17- to
53-lb bond)
Up to 50
transparencies
26 Chapter 2 Product requirements
Tray or Bin
Capacity
Paper
Weight
Left output bin
Up to 100
sheets
Standard sizes:
Letter, Legal, Executive, ISO A3, ISO
A4, ISO A5, 11 x 17, JIS B5, JIS B4,
JPostD, Monarch, 8K, 16K
Custom sizes
Custom types: Envelopes, labels
64 to 216 g/m2 (17- to
58-lb bond)
Standard detectable sizes:
Letter, Letter-R, Legal, Executive, ISO
A3, ISO A4, ISO A4-R, 11 x 17,
JIS B4, JIS B5
Standard undetectable sizes:
8K, 16K
Custom sizes
Custom types: Duplexing is not
supported for envelopes, labels, or
transparencies.
64 to 199 g/m2 (17- to
53-lb bond)
Standard sizes for lower bin:
Letter, Legal, Executive, ISO A3, ISO
A4, ISO A5, 11 x 17, JIS B5, JIS B4,
8K, 16K
64 to 199 g/m2 (17- to
53-lb bond) in lower bin
Up to 10
transparencies
Duplex printing
accessory
Optional
3,000-sheet
stacker
Up to
3,000 sheets of
Letter or A4
Up to
1,500 sheets of
A3 or 11 x 17
Optional
3,000-sheet
stacker/stapler
Up to
3,000 sheets of
Letter or A4
Up to
1,500 sheets of
A3 or 11 x 17
Up to 50
sheets stapled
Standard sizes for upper bin:
Letter, Legal, Executive, ISO A3, ISO
A4, ISO A5, 11 x 17, JIS B5, JIS B4,
JPostD, Monarch, 8K, 16K
Custom sizes
Custom types: Envelopes, labels,
transparencies, heavy paper
Standard sizes for lower bin:
Letter, Legal, Executive, ISO A3, ISO
A4, ISO A5, 11 x 17, JIS B5, JIS B4,
8K, 16K
Standard sizes for upper bin:
Letter, Legal, Executive, ISO A3, ISO
A4, ISO A5, 11 x 17, JIS B5, JIS B4,
JPostD, Monarch, 8K, 16K
Custom sizes
Custom types: Envelopes, labels,
transparencies, heavy paper
64 to 216 g/m2 (17- to
58-lb bond) in upper
bin
64 to 199 g/m2 (17 to
53 lb bond) in lower bin
64 to 216 g/m2 (17- to
58-lb bond) in upper
bin
Media input/output options 27
Tray or Bin
Capacity
Paper
Weight
Optional
multifunction
finisher
Up to 1,000
sheets of
stacked 20 lb
bond for Letter
and A4 (up to
50 sheets
stapled), and
500 sheets of
stacked 20-lb
bond for A3
and 11 x 17
(up to 25
sheets stapled)
Standard sizes:
Letter, Legal, Executive, ISO A3, ISO
A4, ISO A5, JIS B4, JIS B5, 11 x 17
Custom sizes:
Minimum: 98 x 191 mm
(3.9 x 7.5 inches)
Maximum: 312 x 470 mm
(12.3 x 18.5 inches)
Custom types: Envelopes, labels,
transparencies, heavy paper
64 to 199 g/m2 (17- to
53-lb bond) in lower
booklet bin
64 to 216 g/m2 (17- to
58-lb bond) in upper
bin
Standard sizes for upper bin
Letter, Legal, Executive, ISO A3, ISO
A4, ISO A5, JIS B4, JIS B5, 11 x 17
Custom sizes
Minimum: 148 x 210 mm
(5.8 x 8.3 inches)
Maximum: 297 x 432 mm
(11.7 x 17 inches)
Standard sizes for 8 mailbox bins
Letter, Legal, Executive, ISO A3, ISO
A4, ISO A5, JIS B4, JIS B5, 11 x 17
Custom sizes
Minimum: 148 x 210 mm
(5.8 x 8.3 inches)
Maximum: 297 x 432 mm
(11.7 x 17 inches)
60 to 135 g/m2 (16- to
36-lb bond) in
8 mailbox bins
Up to 40
booklets of 5
sheets,
stacked; or 20
booklets of 10,
sheets stacked
Optional 8-bin
mailbox
(HP LaserJet
9040/9050
Series printers
only)
28 Chapter 2 Product requirements
Up to 250
sheets of A4 or
Letter in each
output bin
64 to 216 g/m2 (18- to
58-lb bond) in upper
bin
3
Product configuration
Chapter contents
Using the control panel . . . . . . . . . . . . . . . . . . . . . . . . . . . . . . . . . . . . . . . . . . . . . . . . . . . . . . . . . 30
Control-panel buttons . . . . . . . . . . . . . . . . . . . . . . . . . . . . . . . . . . . . . . . . . . . . . . . . . . . . . . . 31
Numeric keypad commands . . . . . . . . . . . . . . . . . . . . . . . . . . . . . . . . . . . . . . . . . . . . . . . . . . 32
Settings and defaults . . . . . . . . . . . . . . . . . . . . . . . . . . . . . . . . . . . . . . . . . . . . . . . . . . . . . . . . . . . 33
Setting the display language. . . . . . . . . . . . . . . . . . . . . . . . . . . . . . . . . . . . . . . . . . . . . . . . . . 33
Setting the tray registration . . . . . . . . . . . . . . . . . . . . . . . . . . . . . . . . . . . . . . . . . . . . . . . . . . . 33
Printer driver information. . . . . . . . . . . . . . . . . . . . . . . . . . . . . . . . . . . . . . . . . . . . . . . . . . . . . 36
Control-panel menus. . . . . . . . . . . . . . . . . . . . . . . . . . . . . . . . . . . . . . . . . . . . . . . . . . . . . . . . 37
Control-panel menus . . . . . . . . . . . . . . . . . . . . . . . . . . . . . . . . . . . . . . . . . . . . . . . . . . . . . . . . . . . 37
Using a menu map . . . . . . . . . . . . . . . . . . . . . . . . . . . . . . . . . . . . . . . . . . . . . . . . . . . . . . . . . 37
Retrieve job menu . . . . . . . . . . . . . . . . . . . . . . . . . . . . . . . . . . . . . . . . . . . . . . . . . . . . . . . . . . 38
Information menu . . . . . . . . . . . . . . . . . . . . . . . . . . . . . . . . . . . . . . . . . . . . . . . . . . . . . . . . . . 38
Paper-handling menu . . . . . . . . . . . . . . . . . . . . . . . . . . . . . . . . . . . . . . . . . . . . . . . . . . . . . . . 39
System setup submenu . . . . . . . . . . . . . . . . . . . . . . . . . . . . . . . . . . . . . . . . . . . . . . . . . . . . . 46
I/O submenu . . . . . . . . . . . . . . . . . . . . . . . . . . . . . . . . . . . . . . . . . . . . . . . . . . . . . . . . . . . . . . 48
Resets submenu . . . . . . . . . . . . . . . . . . . . . . . . . . . . . . . . . . . . . . . . . . . . . . . . . . . . . . . . . . . 53
Diagnostics menu . . . . . . . . . . . . . . . . . . . . . . . . . . . . . . . . . . . . . . . . . . . . . . . . . . . . . . . . . . . . . 54
Service menu . . . . . . . . . . . . . . . . . . . . . . . . . . . . . . . . . . . . . . . . . . . . . . . . . . . . . . . . . . . . . . . . 54
Remote firmware upgrade (RFU) . . . . . . . . . . . . . . . . . . . . . . . . . . . . . . . . . . . . . . . . . . . . . . . . . 55
Upgrading firmware to a single printer . . . . . . . . . . . . . . . . . . . . . . . . . . . . . . . . . . . . . . . . . . 55
HP Web Jetadmin 6.1 for a single printer . . . . . . . . . . . . . . . . . . . . . . . . . . . . . . . . . . . . . . . . 57
Chapter contents 29
Using the control panel
The control panel includes three LED indicator lights, four navigation buttons, a help button,
a message-clear button, a pause/resume button (9000 Series) or a menu button (9040/9050 Series),
a cancel-job button (9000 Series) or a stop button (9040/9050 Series), a numeric keypad, and a
graphical display that can show up to four lines of text.
The control panel graphical display provides both status and error messages by using distinct text
and codes.
GRAPHICAL DISPLAY
BACK
UP
SELECT
NUMERIC KEYPAD
PAUSE/RESUME
(FOR 9000 SERIES)
MENU
(FOR 9040/9050
SERIES)
CANCEL JOB
(FOR 9000 SERIES)
STOP
(FOR 9040/9050
SERIES)
READY
Figure 11.
Control-panel layout
30 Chapter 3 Product configuration
DATA
ATTENTION
HELP
DOWN
CLEAR
Control-panel buttons
Table 11. Control-panel button functions
Button
Function
z
Backs up one step from a selection or a 10-key entry.
z
Navigates to the previous item in the list.
z
z
Saves the selected value for that item. An asterisk ( * ) appears next to the
selection, indicating that it is the new default. Default settings remain when the
printer is switched off or is reset (unless you reset all factory defaults from the
Resets menu).
Prints one of the printer information pages from the control panel.
(CLEAR)
z
Returns a numeric entry to its previous value.
(DOWN ARROW)
z
Navigates to the next item in the list.
(H ELP )
z
Provides help on about the message that appears on the control-panel display.
C ANCEL J OB
z
Cancels the current print job. The time it takes to cancel depends on the size of
the print job. Press the button only once.
z
Opens the STOP menu which contains the following options:
(B ACK
(U P
ARROW )
ARROW )
(S ELECT )
- OR STOP
P AUSE /R ESUME
z
•
Cancel the current print job.
•
Pause the printer.
•
Resume printing if the printer was paused.
z
Returns to the ready or busy state from menus or online help.
Toggles between pause and resume.
z
Opens or exits the menus.
z
Specifies numeric values.
-ORMENU
N UMERIC
Note
KEYPAD
The HP LaserJet 9000 and the HP LaserJet 9040/9050 Series printers are similar products. The
behavior or feature is common in both printers unless noted otherwise.
Using the control panel 31
Numeric keypad commands
The numeric keypad is used to specify numeric values. The numeric keypad provides a shortcut key
to items in the menus if the device is in an idle state. Pressing the numbers that correspond with the
position of the menu item opens that menu. For example, to print a configuration page, the customer
can press 22. The first 2 represents the Information menu, which is the second menu. The second 2
represents the Print configuration page command, which is the second item in the Informationmenu list.
The menus change dynamically. The Configure device menu has flexible menus that can be used to
configure accessories depending on what accessories are available, so the number sequence might
not be the same for all devices. Pressing a number should correspond to the same sequence that is
used when navigating to that item in the list and pressing
.
The exception to this approach is when the display contains a list of values. In this case, typing the
number moves to that item in the list but does not select the item. This is the same for continuous
values that can be specified by using the numeric keypad. For example, to specify the number of
copies, the customer presses the appropriate number and then presses
.
The following table outlines what happens in certain printer states when a button on the numeric
keypad is pressed.
Table 12. Printer state and numeric key effect
PowerSave
Idle/pause
Exit the
PowerSave
mode.
Open a menu. No effect.
Each menu
has an
assigned
number.
32 Chapter 3 Product configuration
Continuable Data
error
No effect.
Processing In menus
job
No effect.
In online
information
Specify the
No effect.
numeric value.
Settings and defaults
The printer bases most printing decisions on temporary settings or on factory (permanent) defaults.
Note
Settings that you send from software programs override default settings.
Temporary settings are the values that are set through a software program for the current print job.
Temporary settings remain in effect until the current print job is finished.
Control-panel defaults are the values that are specified by selecting a control-panel item and
pressing
. An asterisk ( * ) next to the item name indicates that it is now the default. The printer
retains default settings even when power is turned off.
Factory defaults are preset at the factory and are the permanent default values for each menu item.
Setting the display language
Method 1
1
Press
to open the menus.
2
Press
or
to scroll to CONFIGURE DEVICE, and then press
3
Press
or
to scroll to SYSTEM SETUP, and then press
4
Press
or
to scroll to LANGUAGE, and then press
5
Press
or
to scroll to the appropriate language, and then press
.
.
.
.
Method 2
Note
1
Press and hold
2
Hold
until all three LED indicator lights are illuminated at the same time.
3
Press
or
while turning on the printer.
to scroll to the desired language, and then press
.
For Japanese, Turkish, Czech, Russian, Hungarian, and Polish, the language selection changes the
default symbol set for the specific language. For all other languages, the default symbol set is PC-8.
Setting the tray registration
1
Press
to open the menus.
2
Press
or
to scroll to CONFIGURE DEVICE, and then press
3
Press
or
to scroll to PRINT QUALITY, and then press
4
Press
or
to scroll to SET REGISTRATION, and then press
.
.
.
You can select a tray by specifying a SOURCE. The default SOURCE is tray 2. If you want to set the
registration for tray 2, go to step 7. Otherwise, proceed to the next step.
5
Press
6
Press
or
to select a tray, and then press
display returns to the SET REGISTRATION menu.
7
Press
8
Follow the instructions on the printed page.
or
or
to scroll to SOURCE, and then press
.
. After selecting a tray, the control-panel
to scroll to PRINT TEST PAGE, and then press
.
Settings and defaults 33
Figure 12.
Registration page (1 of 2)
34 Chapter 3 Product configuration
Figure 13.
Registration page (2 of 2)
Settings and defaults 35
Printer driver information
When you change a setting from the printer control panel, the new setting becomes the default value.
You can override any control-panel setting from the printer driver and through most software
programs.
36 Chapter 3 Product configuration
Control-panel menus
Press
or
to cycle through the control-panel menus. Each menu is described in a separate
table in this section. Menu items appear only if their associated option is installed, or their functions
are activated.
All menus and their associated items are available when the printer is online. In menu mode, if no
buttons are pressed for approximately 30 seconds, the system automatically returns to the top level
and displays either an existing error or one of the following messages:
Note
z
READY, if the printer is online
z
OFFLINE, if the printer is offline
Items appear only when the associated optional accessory is installed or the associated function is
activated. Printer-driver and software commands override the printer control-panel settings.
From the control panel, you can print a menu map that shows the current printer configuration.
Additional menu items can appear on the control panel, depending on the optional accessories that
are currently installed in the printer. The following is a list of menus that are available from the control
panel, and where to find information about each menu.
z
"Retrieve job menu" on page 38
z
"Information menu" on page 38
z
"Paper-handling menu" on page 39
z
"System setup submenu" on page 46
Using a menu map
To see the current settings for the menus and items that are available on the control panel, print a
control-panel menu map. Values that appear with an ( * ) next to them are the currently selected
values for a setting. Many of these values can be overridden from the print driver or a software
program. You might want to store the menu map near the printer for reference.
The contents of the menu map varies, depending on the optional accessories that are installed in the
printer.
Select an item from the menu map
1
Press
2
Press
or
to scroll to the required menu, and then press
3
Press
or
to scroll to the page desired, and then press
to open the menus.
.
.
Control-panel menus 37
Retrieve job menu
Note
If no private, stored, quick copy, or proof and hold jobs are stored on the printer hard disk or in RAM,
the message NO STORED JOB appears when the menu is selected.
1
A list of user names appears.
2
Select a user name, and a list of jobs that are stored for that user appears.
3
Select a job name, and print or delete that job. If a job requires a PIN before it can be printed or
deleted,
appears next to the PRINT or DELETE command and a PIN must be typed. If a job
requires a PIN to delete,
appears next to the DELETE command and a PIN must be provided.
4
If you select PRINT, the printer prompts you to specify the number of copies to print (1 to 32,000).
Information menu
To print an information page, scroll to the information page that you want and press
.
.
Item
Explanation
PRINT MENU MAP
Generates a menu map that shows the layout and current settings of the
control-menu items.
The printer will back up one screen to SET FRONT TO BACK when the page is
completed.
PRINT
CONFIGURATION
Generates a page detailing the current configuration of the printer.
The printer will return to the online READY state when the page is completed.
PRINT SUPPLIES
STATUS PAGE
Generates a page that shows the number of pages remaining for each supply in
the printer.
The printer will return to the online READY state when the page is completed.
PRINT USAGE PAGE
Generates a page that contains information that could be used for cost
accounting. This item is only available if a hard disk is installed.
The printer will return to the online READY state when the page is completed.
PRINT
FILE DIRECTORY
Generates a directory page containing information for all installed mass-storage
devices.
The printer will return to the online READY state when the page is completed.
PRINT PCL
FONT LIST
Generates a typeface list of all PCL fonts that are available on the printer.
The printer will return to the online READY state when the page is completed.
PRINT PS
FONT LIST
Generates a typeface list of all PS fonts that are available on the printer.
The printer will return to the online READY state when the page is completed.
38 Chapter 3 Product configuration
Paper-handling menu
When paper-handling settings are correctly configured through the control panel, you can print by
selecting the type and size of paper from the printer driver or software program.
Some items in this menu (such as duplex and manual feed) are available from specific software
programs, or from the printer driver (if the appropriate driver is installed). Printer-driver and softwareprogram settings override control-panel settings.
Item
Values
Explanation
TRAY 1=FIRST
FIRST
(HP LaserJet 9000
only)
FIRST: The user can specify if media in the tray should
be used.
CASSETTE
CASSETTE: If set to CASSETTE, the tray must be configured
with a size and type, but it then functions like all of the
other trays.
TRAY <N>
SIZE=LETTER
ANY SIZE
LETTER
LETTER-ROTATED
LEGAL
A4
A4-ROTATED
EXECUTIVE
EXECUTIVE(JIS)
A3
A5
B4(JIS)
B5(JIS)
8K
16K
8.5 X 13
11 X 17
CUSTOM
ANY CUSTOM
The user can set the paper size for trays 2 and 3 and for
optional tray 4 (if installed) when the custom switch is in
the CUSTOM position. The size is detected if the switch is
in the STANDARD position. Substitute the tray number for
<N>.
TRAY <N>
TYPE=PLAIN
ANY TYPE
PLAIN
PREPRINTED
LETTERHEAD
TRANSPARENCY
PREPUNCHED
LABELS
BOND
RECYCLED
COLOR
CARDSTOCK>163
ROUGH 90-105 G/M2
ENVELOPE *
The user can specify the type of media that is loaded in
each tray. Substitute the tray number for <N>.
*ENVELOPE appears for tray 1 only.
Paper-handling menu 39
Item
Values
Explanation
FUSER MODES
List of print-media
types
Configure the fuser mode that is associated with each
media type. The default value for each paper type is
AUTO.
The fuser mode can only be changed from this menu
option on the control panel.
AUTO: Utilizes the optimum mode for that media type.
NORMAL: Normal temperature; prints at 50 pages per
minute (ppm).
LOW: Low temperature; prints at 50 ppm.
HIGH1: Raises the temperature, prints at 50 ppm.
HIGH2: Raises the temperature; prints at 32 ppm.
SPECIAL: Use this mode to print at normal speeds with a
40-second delay added to the beginning of the next job.
After each 400 pages are printed, the first page of that
job is printed at a slower speed in order to clean the
fuser. No defects should be noticeable on the printed
page. This is not a preferred setting.
(HP LaserJet 9000
only)
CAUTION
If you change the fuser mode to HIGH1 or HIGH2, be sure
to change it back to the default when you are done
printing. Setting a paper type to HIGH1 or HIGH2 might
shorten the life of some consumables, such as the fuser,
and might cause other failures or jams.
40 Chapter 3 Product configuration
Configure device menu
This menu contains all of the administrative functions.
Printing submenu
Some items in this menu are available from a software program, or from the printer driver (if the
appropriate driver is installed). Printer-driver and software-program settings override control-panel
settings.
Item
Values
Explanation
COPIES=1
1 to 32,000
Set the default number of copies by selecting any number
from 1 to 32,000. Use the numeric keypad to select the
number of copies.
Note
It is best to set the number of copies from the printer driver
or software program. (Driver and software settings
override control-panel settings.)
DEFAULT PAPER
SIZE=
LETTER
LETTER
LEGAL
A4
EXECUTIVE
11X17
A3
B4(JIS)
B5(JIS)
CUSTOM
A5
LETTER ROTATED
STATEMENT
8.5X13
12X18
A4 ROTATED
RA3
EXECUTIVE(JIS)
DPOSTCARDS(JIS)
8K
16k
ENVELOPE #10
ENVELOPE MONARCH
ENVELOPE C5
ENVELOPE DL
ENVELOPE B5
Set the default image size for paper and envelopes. (The
item name will change from paper to envelope as you
scroll through the available sizes.)
DEFAULT CUSTOM
PAPER SIZE
UNIT OF MEASURE
X DIMENSION
Y DIMENSION
Allows the user to set a custom paper size for any of the
installed trays. Substitute the tray number for <N>. This
menu only appears when the custom switch in the
selected tray is in the custom size position. The user
selects the X and Y dimensions of the custom paper size
by using the ruler labels in the trays.
PAPER
DESTINATION=
STANDARD OUTPUT
STANDARD OUTPUT
LEFT OUTPUT BIN
STANDARD TOP BIN
Allows the user to configure the output bin destination.
Only the installed bins appear on the menu.
Configure device menu 41
Item
Values
Explanation
DUPLEX=OFF
OFF
ON
This item appears only when an optional duplex printing
accessory is installed. Set the value to ON to print on both
sides (duplex) or OFF to print on one side (simplex) of a
sheet of paper.
For more information, see the HP support flyer or go to
www.hp.com/support/lj9050_lj9040 or
www.hp.com/support/lj9000.
DUPLEX
BINDING=LONG
EDGE
LONG EDGE
SHORT EDGE
Allows the user to change the binding edge for duplex
printing. The menu item appears when a duplex printing
accessory is installed in the printer and DUPLEX=ON.
OVERRIDE A4/
LETTER=
NO
YES
NO
This command is used to print on letter-size media when
an A4 job is sent, but no A4-size media is loaded in the
printer (or to print on A4-size media when a letter job is
sent, but no letter media is loaded in the printer).
MANUAL FEED=OFF
OFF
ON
Use this item to set the printer to feed the paper manually
from optional tray 1, rather than automatically from a tray.
When MANUAL FEED=ON and optional tray 1 is empty, the
printer goes offline when it receives a print job. The
message MANUALLY FEED [PAPER SIZE] appears on the
control-panel display.
EDGE TO EDGE
OVERRIDE=NO
NO
YES
Turn the edge-to-edge mode on or off for all print jobs. This
mode can be overridden inside a print job by using an
edge-to-edge PJL variable.
COURIER
FONT=REGULAR
REGULAR
DARK
Select the version of Courier font to use:
REGULAR: The internal Courier font that is available on the
HP LaserJet 4 Series printers.
DARK: The internal Courier font that is available on the
HP LaserJet III Series printers.
Both fonts are not available at the same time.
WIDE A4=NO
YES
NO
The Wide A4 setting changes the number of characters
that can be printed on a single line of A4 media.
YES: Up to 80 10-pitch characters can be printed on one
line.
NO: Up to 78 10-pitch characters can be printed on one
line.
PRINT PS
ERRORS=OFF
ON
OFF
Select ON to print the PS error page when PS errors occur.
PRINT PDF
ERRORS= OFF
OFF
ON
Select ON to print the PDF error page when PDF errors
occur.
PCL submenu
Items in the PCL submenu affect PCL tasks.
42 Chapter 3 Product configuration
Item
Values
Explanation
FORM LENGTH=60
5 to 128
Sets vertical spacing from 5 to 128 lines for the default
paper size. Specify the value by using the numeric keypad.
ORIENTATION=
PORTRAIT
PORTRAIT
LANDSCAPE
Allows the user to select the default page orientation.
Note
It is best to set the page orientation from the printer driver
or software program. (Driver and software settings override
control-panel settings.)
FONT
SOURCE=INTERNAL
INTERNAL
CARD SLOT X
INTERNAL: Internal fonts.
SLOT 1, 2, or 3: Fonts that are stored in one of the three
DIMM slots.
FONT NUMBER=0
0-999
The printer assigns a number to each font and lists the
numbers on the PCL Font List. The font number appears in
the Font # column of the printout.
FONT PITCH=10.00
0.44 to 99.99
Using the numeric keypad or
and
, specify a value.
This item might not appear, depending on the font that you
selected.
SYMBOL SET=PC-8
Variety of
available symbol
sets
Select any one of several available symbol sets from the
printer control panel. A symbol set is a unique grouping of
all of the characters in a font. PC-8 or PC-850 is
recommended for line-draw characters.
APPEND CR TO
LF=NO
YES
NO
Select YES to append a carriage return to each line feed
that is encountered in backward-compatible PCL jobs
(pure text, no job control). Some environments, such as
UNIX®, indicate a new line by using only the line-feed
control code. This option allows the user to append the
required carriage return to each line feed.
SUPRESS BLANK
PAGES=NO
NO
YES
When set to YES, form feeds are ignored if the page is
blank.
Configure device menu 43
Print-quality submenu
Some items in this menu can be set with a software program, or from the driver (if the appropriate
driver is installed). Driver and software settings override control-panel settings.
Item
Values
Explanation
SET
REGISTRATION
PRINT TEST
PAGE
Shift the margin alignment to center the image on the page from
top to bottom, and from left to right. You can also align the image
on the front with the image printed on the back.
SOURCE=TRAY 2
ADJUST TRAY
<X>
FUSER MODES
(HP LaserJet
9040/9050
only)
List of media
types
Configure the fuser mode that is associated with each print-media
type.
The fuser mode can only be changed from this menu option on the
control panel. The default value for each paper type is AUTO.
AUTO: Utilizes the optimum mode for that media type.
NORMAL: Normal temperature; prints at 40/50 pages per minute
(ppm).
LOW: Low temperature; prints at 40/50 ppm.
HIGH1: Raises the temperature; prints at 40/50 ppm.
HIGH2: Raises the temperature; prints at 32 ppm.
SPECIAL: Use this mode to print at normal speeds with a 40second delay added to the beginning of the next job. After each
400 pages are printed, the first page of that job is printed at a
slower speed in order to clean the fuser. No defects should be
noticeable on the printed page. This is not a preferred setting.
CAUTION
If you change the fuser mode to HIGH1 or HIGH2, be sure to change
it back to the default when you are done printing. Setting a paper
type to HIGH1 or HIGH2 might shorten the life of some
consumables, such as the fuser, and might cause other failures or
jams.
RESOLUTION=
FASTRES 1200
300
600
FASTRES 1200
Select the resolution from the following values:
300: Produces draft print quality at maximum printer speed.
300 dpi (dots per inch) is recommended for some bitmapped fonts
and graphics, and for compatibility with the HP LaserJet III family
of printers.
600: Produces high print quality at maximum product speed.
FASTRES 1200: Produces optimum print quality (comparable to
1200 dpi) at maximum product speed.
Note
It is best to change the resolution from the driver or software
program. (Driver and software settings override control-panel
settings.)
44 Chapter 3 Product configuration
Item
Values
Explanation
RET=MEDIUM
OFF
LIGHT
MEDIUM
DARK
Use the printer Resolution Enhancement technology (REt) setting
to produce print that contains smooth angles, curves, and edges.
All print resolutions, including FastRes 1200, benefit from REt.
Note
It is best to change the REt setting from the driver or software
program. (Driver and software settings override control-panel
settings.)
ECONOMODE
ON
OFF
When set to “on”, the printer prints by using a reduced amount of
toner per page; however, the print quality of the page is drastically
reduced.
TONER
DENSITY=3
1 to 5
Lighten or darken the print on the page by changing the tonerdensity setting. The settings range from 1 (light) to 5 (dark), but the
default setting of 3 usually produces the best results.
Note
It is best to change the toner density from the driver or software
program. (Driver and software settings override control-panel
settings.)
SMALL PAPER
MODE=NORMAL
NORMAL
SLOW
When printing on narrow media, this setting slows down the printer
which stabilizes the fuser temperature to minimize wrinkles.
CREATE
CLEANING PAGE
No value to
select
to print a cleaning page (for cleaning excess toner from
Press
the paper path.
In order for the cleaning page to work correctly, print the page on
copier-grade paper (not bond or rough paper). Follow the
instructions on the cleaning page. The progress bar shows the
time remaining before the process is complete.
PROCESS
CLEANING PAGE
No value to
select
This item appears only after a cleaning page has been generated.
Press
to process the cleaning page. The progress bar
shows the time remaining before the process is complete.
Configure device menu 45
System setup submenu
Items in this menu affect the printer function. Configure the printer according to your printing needs.
Item
Values
Explanation
DATE/TIME
DATE
DATE FORMAT
TIME
TIME FORMAT
Sets the date and time for the printer. The Real Time Clock is
set to Greenwich Mean Time (GMT).
JOB STORAGE
LIMIT=32
1 to 100
Specifies the number of jobs that can be stored on the printer
hard-disk accessory.
JOB HELD
TIMEOUT=
OFF
OFF
1 HOUR
4 HOURS
1 DAY
1 WEEK
Sets the length of time that quick copy, proof and hold,
private, and stored jobs are kept before being automatically
deleted from the queue.
SHOW ADDRESS=OFF
AUTO
OFF
Sets whether or not the printer IP address appears with the
Ready message. If this value is “on,” the address of the EIO
card in slot 1 is shown.
USE REQUESTED
TRAY
MANUAL FEED
PROMPT
PS DEFER
MEDIA
Specifies the behavior of the tray by indicating which tray the
printer should print from.
USE REQUESTED TRAY sets the tray that the printer should
print from for specified jobs. The values for this menu item
are EXCLUSIVELY (default) and FIRST.
MANUAL FEED PROMPT determines whether or not the product
prompts the user when a job does not match a requested
configured tray. The values for this menu item are ALWAYS
(default) or UNLESS LOADED.
PS DEFER MEDIA sets whether the paper-handling model is
based on PostScript rules or HP rules. The values for this
menu item are ENABLED (default) and DISABLED.
1 MINUTE
15 MINUTES
30 MINUTES
60 MINUTES
90 MINUTES
2 HOURS
4 HOURS
Set how long the printer remains idle before it enters Sleep
mode.
The Sleep mode minimizes the amount of power that the
printer consumes when it is idle and reduces wear on the
printer electronic components.
When you send a print job, press a control-panel button,
open a paper tray, or open the top cover, the printer
automatically exits Sleep mode.
(HP LaserJet
9040/9050 only)
(HP LaserJet
9040/9050 only)
TRAY BEHAVIOR
(HP LaserJet
9040/9050 only)
SLEEP DELAY=90
MINUTES
POWERSAVE TIME=1
HOUR
(HP LaserJet 9000
only)
Note
Sleep turns off the backlight on the display, but the display is
still readable.
WAKE TIME
SUBMENU
(HP LaserJet
9040/9050 only)
46 Chapter 3 Product configuration
SETTING WAKE
TIME
Sets the time that the printer automatically comes out of
Sleep mode. This feature can be set for a different time for
each day of the week.
Item
Values
Explanation
PERSONALITY=AUTO
AUTO
PCL
PS
PDF
XHTML
MIME
Select the default printer language (personality). Possible
values are determined by which valid languages are installed
in the printer.
Normally, you should not change the printer language (the
default is AUTO). If you change it to a specific printer
language, the printer does not automatically switch from one
language to another unless specific software commands are
sent to the printer.
CLEARABLE
WARNINGS=
JOB
ON
JOB
Set the amount of time that a clearable warning appears on
the printer control panel.
ON: Warning messages appear on the control panel until
is pressed.
JOB: Warning messages appear on the control panel until the
end of the job from which they were generated.
AUTO CONTINUE=ON
ON
OFF
Determine how the printer reacts to errors.
ON: If an error prevents printing, the message appears, and
the printer goes offline for 10 seconds before returning
online.
OFF: If an error prevents printing, the message remains on
the display and the printer does not print until
is pressed.
Note
To stop printing when an installed optional stapler accessory
is out of staples, set AUTO CONTINUE=OFF on the control-panel
System setup menu.
CARTRIDGE LOW=
CONTINUE
CONTINUE
STOP
Determine how the printer functions when toner is low. The
CARTRIDGE LOW message first appears when the print
cartridge is almost out of toner. (About 2,400 pages can still
be printed at 5% coverage.)
CONTINUE: The printer continues to print while the CARTRIDGE
LOW message appears.
STOP: The printer goes offline and wait for attention.
CARTRIDGE OUT=
CONTINUE
STOP
CONTINUE
Determine how the printer functions when toner is out.
AUTO
ON
OFF
Determine how the printer functions when a jam occurs.
AUTO: The printer automatically selects the best mode for
printer jam recovery (usually ON). This is the default setting.
ON: The printer automatically reprints pages after a jam is
cleared.
OFF: The printer does not reprint pages following a jam.
Printing performance might be increased with this setting.
(HP LaserJet
9040/9050 only)
JAM RECOVERY=
AUTO
Configure device menu 47
Item
Values
Explanation
RAM DISK=AUTO
AUTO
(HP LaserJet 9000
only)
OFF
This item determines how the RAM disk is configured. This
item appears only if no optional hard disk is installed and the
printer has at least 8 MB of memory.
OFF: The RAM disk is disabled.
Note
If the setting is changed from OFF to AUTO, the printer
automatically reinitializes after it comes out of an idle period.
List of
available
languages
LANGUAGE=ENGLISH
Sets the language that is used on the control panel.
I/O submenu
Items in the I/O (input/output) menu affect the communication between the printer and the computer.
I/O timeout submenu
Item
Values
Explanation
I/O TIMEOUT=15
5 to 300
Select the I/O timeout period in seconds. (I/O timeout refers to the
time, measured in seconds, that the printer waits before ending a
print job.)
Use this setting to adjust timeout for best performance. If data
from other ports appears in the middle of your print job, increase
the timeout value.
Parallel input submenu
Item
Values
Explanation
HIGH SPEED=YES
YES
NO
The printer accepts the faster parallel communications that are
used for connections with newer computers.
ADVANCED
FUNCTIONS=ON
ON
OFF
Turn the bidirectional parallel communication on or off. The default
is set for a bidirectional parallel port (IEEE-1284).
This setting allows the printer to send status readback messages
to the computer. (Turning the parallel advanced functions on might
slow language switching.)
48 Chapter 3 Product configuration
EIO X Jetdirect submenu
The EIO (enhanced input/output) submenu appears only when an EIO device is installed in an EIO
slot on the printer (such as an HP Jetdirect print server). The items in the menu depend on the
particular accessory product that is installed. If the printer contains an HP Jetdirect print server EIO
card, you can configure basic networking parameters by using the EIO menu. These and other
parameters can also be configured through HP Web Jetadmin or other network configuration tools
(such as by using Telnet or browsing the embedded Web server).
For more information about the EIO submenu, see the documentation that came with the EIO
Jetdirect card.
Configure device menu 49
Embedded Jetdirect submenu (HP LaserJet 9040n/9050n and 9040dn/9050dn
only)
Item
Options
Values
Explanation
TCP/IP
ENABLE
ON
Enable the TCP/IP protocol.
Disable the TCP/IP protocol.
OFF
HOST NAME
CONFIG
METHOD
An alphanumeric string, up to 32 characters, that
identifies the device. This name is listed on the
Jetdirect configuration page. The default host name
is NPIxxxxxx, where xxxxxx is the last six digits of
the LAN hardware (MAC) address.
BOOTP
Use BootP (Bootstrap Protocol) for automatic
configuration from a BootP server.
DHCP
Use DHCP (Dynamic Host Configuration Protocol)
for automatic configuration from a DHCP server. If
selected and a DHCP lease exists, DHCP
RELEASE and DHCP RENEW menus will be
available to set DHCP lease options.
AUTO IP
Use automatic link-local IP addressing. An address
in the form 169.254.x.x will be automatically
assigned.
MANUAL
Use the MANUAL SETTINGS menu to configure
TCP/IP parameters.
The current DHCP lease along with the leased IP
address are released.
DHCP
RELEASE
DHCP RENEW
MANUAL
SETTINGS
50 Chapter 3 Product configuration
NO
(default)
The print server does not request to renew the
DHCP lease.
YES
The print server requests to renew the current
DHCP lease.
IP ADDRESS
The unique IP address of the printer.
SUBNET
MASK
The subnet mask for the printer.
SYSLOG
SERVER
The IP address of the syslog server that receives
and logs syslog messages.
DEFAULT
GATEWAY
The IP address of the gateway or router used for
communications with other networks.
IDLE
TIMEOUT
The time period, in seconds, after which an idle
TCP print data connection is closed (default is 270
seconds).
Item
Options
Values
Explanation
TCP/IP
DEFAULT IP
AUTO IP
A link-local IP address of 169.254.x.x is set.
LEGACY
The address 192.0.0.192 is set, consistent with
older Jetdirect products.
Specify the IP address (n.n.n.n) of the Primary
Domain Name System (DNS) Server.
PRIMARY
DNS
SECONDARY
DNS
IPX/SPX
.
Specify the IP address (n.n.n.n) of the Secondary
Domain Name System (DNS) Server.
PROXY
SERVER
Specify the proxy server to be used by embedded
applications in your printer. A proxy server is
typically used by network clients for Internet
access. It caches Web pages, and provides a
degree of Internet security, for those clients.
To specify a proxy server, type its IP address or
fully-qualified domain name. The name can be up
to 64 characters.
For some networks, you might need to contact your
Independent Service Provider (ISP) for the proxy
server address.
PROXY PORT
Type the port number that the proxy server uses for
client support. The port number identifies the port
that is reserved for proxy activity on your network,
and can be a value from 0 to 65,535.
ENABLE
ON
OFF
Enable the IPX/SPX protocol.
Disable the IPX/SPX protocol.
FRAME TYPE
AUTO
Select the frame type setting for your network.
AUTO (default) automatically sets and limits the
frame type to the first one detected.
EN_8023
EN_II
EN_8022
EN_SNAP
These EN values are frame-type selections for
Ethernet networks.
ON
OFF
Enable or disable the AppleTalk protocol.
APPLETALK
ENABLE
DLC/LLC
ENABLE
Enable or disable the DLC/LLC protocol.
SECURE WEB
HTTPS
REQUIRED
For secure, encrypted communications, only
HTTPS access is accepted. The print server
appears as a secure site.
HTTPS
OPTIONAL
Access is permitted to either HTTP or HTTPS.
Configure device menu 51
Item
Options
Values
Explanation
DIAGNOSTICS
LOOPBACK
TEST
YES
NO
CAUTION
This test will erase your TCP/IP configuration.
YES the loopback test will be initiated.
NO the loopback test will not be initiated.
PING TEST
DEST IP
Specify the IP address of the remote host. A valid
IP address must be specified.
PACKET
SIZE
Specify the size of each packet, in bytes, to be sent
to the remote host. The minimum is 64 (default) and
the maximum is 2,048.
TIMEOUT
Specify the length of time, in seconds, to wait for a
response from the remote host. The default is 1
and the maximum is 100.
COUNT
Specify the number of ping test packets to send for
this test. Select a value from 1 to 100. To configure
the test to run continuously, select 0.
PRINT
RESULTS
If the ping test was not set for continuous operation,
you can choose to print the test results. Select YES
to print results or NO.
EXECUTE
Specify whether to initiate the ping test. Select YES
to initiate the test or NO.
PACKETS
SENT
Determines the number of packets (0-65,535) that
have been sent to the remote host since the most
recent test was initiated or completed.
PACKETS
RECEIVED
Shows the number of packets (0-65,535) that have
been received from the remote host since the most
recent test was initiated or completed.
PERCENT
LOST
Shows the percent of ping test packets that were
sent with no response from the remote host since
the most recent test was initiated or completed.
RTT MIN
Shows the minimum detected round-trip-time
(RTT), from 0 to 4096 milliseconds, for packet
transmission and response.
RTT MAX
Shows the maximum detected RTT, from 0 to 4096
milliseconds, for packet transmission and response.
PING
RESULTS
RTT AVE
PING IN
PROGRESS
Shows the average detected RTT, from 0 to 4,096
milliseconds, for packet transmission and response.
Shows whether or not a ping test is in progress. YES
indicates a test in progress and NO indicates that a
test completed or was not run.
Updates the ping test data with current results.
REFRESH
52 Chapter 3 Product configuration
Item
Options
Values
Explanation
RESET SECURITY
NO
YES
NO
YES
Specifies wether the current security settings on
the print server will be saved or reset to factory
defaults.
NO (default): The current security settings are
maintained.
YES: The security settings are reset to factory
defaults.
LINK SPEED
AUTO
The print server automatically configures itself to
match the network link speed and communication
mode. If it fails, 100TX HALF is set.
10T HALF
10 Mbps, half-duplex operation
10T FULL
10 Mbps, full-duplex operation
100TX HALF
100 Mbps, half-duplex operation
100TX FULL
100 Mbps, full-duplex operation
Resets submenu
Note
Use this menu with caution. You can lose buffered page data or printer configuration settings when
you select these items. Reset the product only under the following circumstances:
z
You want to restore the printer default settings.
z
Communication between the product and computer has been interrupted.
z
You are having problems with a port.
The items in the Resets submenu clear all memory in the printer, while RESET clears only the current
job.
Configure device menu 53
Diagnostics menu
Administrators can use this menu to troubleshoot jam and print-quality issues.
Item
Values
Explanation
PRINT EVENT
LOG
Generates a localized LIFO (last in, first out) list of the 50 most
recent entries in the error log. The printed event log shows error
number, page count, error code, and description or personality.
SHOW EVENT LOG
Allows the user to scroll through the contents of the event log from
the printer control panel, and shows the 50 most recent events.
Use
and
to scroll through the event log contents.
PAPER PATH
TEST
PRINT TEST
PAGE
Generates a test page that is useful for testing the paper-handling
features of the printer.
SOURCE=TRAY 2
Specifies if paper from all of the trays or from a specific tray is
used when the test is performed.
DESTINATION=
STANDARD
OUTPUT
Specifies which paper paths are tested.
DUPLEX=OFF
Specifies if the duplexer is included when the test is performed.
COPIES=1
Specifies how many sheets of paper from the specified source are
sent when the test is performed.
SENSORS=OFF
Specifies if sensor information appears as the paper moves
through the path or if only the status of the device is appears
during the paper path test.
SERVICE TEST
The engine tests access portions of the printer internal
diagnostics that occur when the printer is turned on. These
diagnostics are available as tools to help isolate problems that the
firmware does not report. See "Service test" on page 213 for more
information.
Service menu
The Service menu is locked. A service technician must type a PIN to open the menu. See "Service
menu" on page 215 for more information.
54 Chapter 3 Product configuration
Remote firmware upgrade (RFU)
The process for upgrading printer firmware remotely involves three steps:
Note
1
Determine the current level of firmware installed on the printer.
2
Go to the www.hp.com/go/lj9000_firmware, www.hp.com/go/lj9040_firmware, or
www.hp.com/go/lj9050_firmware Web site and download the latest firmware.
3
Download the new firmware to the printer.
In some instances, an upgrade might require about 10 minutes to complete.
Upgrading firmware to a single printer
You can send an .RFU upgrade to a printer at any time; the printer waits for all input/output channels
to become idle before turning power off and back on.
Note
If the firmware upgrade involves a change in the format of NVRAM, the NVRAM settings are lost and
must be set again by the customer.
The elapsed time for an upgrade depends on the I/O transfer time, in addition to the time that it takes
for the printer to reinitialize. The I/O transfer time depends on several things, including the speed of
the computer that is sending the upgrade and the I/O method (FIR, parallel, or network). The reinitialization time depends on the specific hardware configuration of the printer, such as the number
of EIO devices that are installed, the presence of external paper-handling devices, and the amount of
memory that is installed. Finally, any print jobs that are ahead of the .RFU job in the queue print
before the .RFU upgrade processes.
Note
The printer automatically restarts after processing the upgrade.
Windows systems
If the printer is shared on the network, then the following command can be issued from a command
prompt:
copy /b FILENAME \\SHARENAME\PRINTERNAME
where FILENAMEis the name of the .RFU, SHARENAME is the name of the computer from which
the printer is being shared, and PRINTERNAME is the printer share name.
If the printer is connected locally, then the .RFU can be sent directly to the printer with a COPY
command from a command prompt or MS-DOS window:
copy /b FILENAME PORTNAME
where FILENAME is the name of the .RFU, and PORTNAME is the name of the appropriate printer
port (such as LPT 1).
The following setting on the control panel might help if a timeout message appears on the computer
during an upgrade.
To change the timeout on the control panel
1
Press the Menu tab.
2
Press CONFIGURE DEVICE.
3
Press I/O.
4
Press I/O TIMEOUT.
5
Specify 300 seconds as the value.
Remote firmware upgrade (RFU) 55
6
Press OK.
7
Press EXIT.
The following command can be set on the computer to address a timeout message that appears on
the computer screen during an upgrade. From a command prompt or MS-DOS window, type the
command and press the enter key:
Mode lpt1:,,p
If the printer is attached to a parallel port other than LPT1, substitute the correct LPT port number in
the mode command. After this command is set, the file can be copied to the printer with the
previously mentioned copy command.
Note
You can also send the file through a FIR port.
FTP
If the HP LaserJet printer uses a direct network connection, file transfer protocol (FTP) can be used
to update the HP LaserJet firmware following these steps:
1
See the TCP/IP address on the EIO X Jetdirect page (is the second page of the configuration
page printout).
Note
See "Evaluate the information pages" on page 226 to print a configuration page.
Note
Before connecting to the printer, make sure that the printer is not in Powersave mode. Make sure that
any error messages are cleared from the control panel.
2
Open a MS- DOS command window on the computer.
3
Type FTP <TCP/IP PRINTER ADDRESS> (for example, if the TCP/IP address is 192.168.0.90,
type FTP 192.168.0.90.
4
Press ENTER on the computer keyboard.
5
When prompted for the user name and the password, press ENTER for each.
6
Type BIN at the >prompt.
7
Press ENTER.
8
Type:put <path> where <path> is the location where the .RFU was downloaded from the Web.
For example, type: PUT C:\LJ9000\lj9000FW.RFU, C:\LJ9040\lj9040FW.RFU,
or PUT C:\LJ9050\lj9050FW.RFU and then press enter.
9
When the download process starts and the firmware is updated on the printer, type BYE at the
command prompt, and then press ENTER to exit the FTP session.
HP Web Jetadmin 7.5/7.6 for single or multiple printers
1
Download the appropriate firmware upgrade file from www.hp.com to a folder on the computer
that is running HP Web Jetadmin.
2
Start Web Jetadmin 7.x.
3
From the navigation section on the screen, select Device management from the drop-down
menu. This selection is located at the upper-left of the window.
4
Click the Tools folder, and then select Printer Firmware Update from the Multiple Firmware
Update folder.
5
Click Update a firmware image file.
6
Click Browse and locate the correct firmware image.
7
Click Upload to place the firmware image file on the server.
56 Chapter 3 Product configuration
8
Verify that the information that appears in All Available Images.
9
Click Return to Device Firmware Update.
10 Select the printer(s) to be upgraded.
11 Click Update Firmware Now to start the upgrade immediately, or enter an appropriate date and
time, and then click Schedule Update for Later to perform the upgrade at another time.
Note
Do not turn the printer off during the upgrade. When the upgrade is complete, the printer automatically
reboots.
Note
The status of the firmware upgrade can be monitored by selecting View Printer Update Status in the
navigation section on the screen.
HP Web Jetadmin 6.1 for a single printer
This procedure requires that Web Jetadmin version 6.1 be installed. Complete the following steps to
upgrade a single printer through Web Jetadmin after downloading the .RFU file from the HP Web
site.
1
Start HP Web Jetadmin 6.1.
2
Type the IP address or IP hostname of the printer in the Quick Device Find field, and then click
Go. The printer Status window appears.
3
Click the right arrow on the toolbar to see the Update button.
4
Click Update.
5
When prompted for the type of update to perform, click Update Printers, and then click
Continue.
6
Under Upload new firmware image:, click Browse to locate the .RFU file you that downloaded
from the www.hp.com/go/lj9000_firmware, www.hp.com/go/lj9040_firmware, or the www.hp.com/
go/lj9050_firmware Web site.
7
Click Upload to move the .RFU from your hard drive to the HP Web Jetadmin server.
8
Refresh the browser.
9
Select the .RFU from the Select new firmware version: drop-down menu.
10 Click Update Firmware. HP Web Jetadmin sends the selected .RFU to the printer.
Also, HP Web Jetadmin 6.1 can be used to perform multiple or unattended installations:
Note
In some instances, an upgrade might require about 10 minutes to complete.
1
Start HP Web Jetadmin.
2
Create a device group. The following is a simple way to do this:
a. Click Devices on the Choose: drop-down menu.
b. Click Device Model from the Filter: drop-down menu.
c. Type iy9000lw or iy9050lw in the Criteria (Optional): field.
d. Click Go.
3
In the Device List, select the printers that you want to include in the group, and then click Create
Group.
4
When prompted, type a name for the new device group, and then click OK.
5
Click Update.
Remote firmware upgrade (RFU) 57
6
When prompted for the type of update to perform, click Update Printers, and then click
Continue.
7
From the list of HP Devices, select the printers to be upgraded, or click Select All.
8
Click Update to install the new printer firmware.
58 Chapter 3 Product configuration
4
Product maintenance
Chapter contents
Preventative maintenance . . . . . . . . . . . . . . . . . . . . . . . . . . . . . . . . . . . . . . . . . . . . . . . . . . . . . . . 60
Preventive maintenance kit contents . . . . . . . . . . . . . . . . . . . . . . . . . . . . . . . . . . . . . . . . . . . 60
Cleaning the printer and accessories . . . . . . . . . . . . . . . . . . . . . . . . . . . . . . . . . . . . . . . . . . . . . . 61
General cleaning. . . . . . . . . . . . . . . . . . . . . . . . . . . . . . . . . . . . . . . . . . . . . . . . . . . . . . . . . . . 61
Internal cleaning . . . . . . . . . . . . . . . . . . . . . . . . . . . . . . . . . . . . . . . . . . . . . . . . . . . . . . . . . . . 62
Fuser cleaning . . . . . . . . . . . . . . . . . . . . . . . . . . . . . . . . . . . . . . . . . . . . . . . . . . . . . . . . . . . . 65
Print cartridge information . . . . . . . . . . . . . . . . . . . . . . . . . . . . . . . . . . . . . . . . . . . . . . . . . . . . . . . 67
Storage . . . . . . . . . . . . . . . . . . . . . . . . . . . . . . . . . . . . . . . . . . . . . . . . . . . . . . . . . . . . . . . . . . 67
Handling instructions . . . . . . . . . . . . . . . . . . . . . . . . . . . . . . . . . . . . . . . . . . . . . . . . . . . . . . . 67
Refilled print cartridges . . . . . . . . . . . . . . . . . . . . . . . . . . . . . . . . . . . . . . . . . . . . . . . . . . . . . . 68
Print-cartridge weights . . . . . . . . . . . . . . . . . . . . . . . . . . . . . . . . . . . . . . . . . . . . . . . . . . . . . . 68
Print-cartridge life expectancy . . . . . . . . . . . . . . . . . . . . . . . . . . . . . . . . . . . . . . . . . . . . . . . . 68
Saving toner by using EconoMode . . . . . . . . . . . . . . . . . . . . . . . . . . . . . . . . . . . . . . . . . . . . . 68
Chapter contents 59
Preventative maintenance
To ensure optimum print quality, the printer prompts customers to perform printer maintenance every
350,000 pages. When the PERFORM PRINTER MAINTENANCE message appears on the control panel,
the customer needs to purchase and install a preventive maintenance kit. After a new maintenance
kit is installed, press and hold
until all three LEDs are solid. Press
, and then press
to
reset the maintenance counter.
Note
The preventive maintenance kit is a consumable, and is not covered under warranty.
For more information about installing a preventive maintenance kit, see the installation guide that
accompanies it.
Preventive maintenance kit contents
The preventive maintenance kit, P/N C9152A (110 V) or C9153A (220 V), should be replaced after
each 350,000 pages of use. The following parts are included in the preventive maintenance kit:
z
Fuser assembly (1 assembly)
z
Transfer roller assembly (1 assembly)
z
Feed rollers (tray 2 and tray 3) (4 rollers)
z
Pickup rollers (tray 2 and tray 3) (2 rollers)
z
Tray 4 rollers (3 rollers)
Variables such as media, environment, and usage can cause premature wear of these parts. See
"Media specifications" in chapter 2 or the HP LaserJet Printer Family Print Media Guide for
information about suitable media, environment, and usage conditions.
60 Chapter 4 Product maintenance
Cleaning the printer and accessories
To maintain superior print quality and performance, use the following procedures to clean the printer
and the paper-handling accessories thoroughly every time you change the print cartridge or
whenever print-quality problems occur.
General cleaning
WARNING!
In order to avoid shock hazard, turn the printer and the paper-handling accessories off and unplug all
of the power cords before you begin these steps.
CAUTION
Do not use ammonia-based cleaners on or around the products. While cleaning the printer, be careful
not to touch the transfer roller (located underneath the print cartridge). Skin oils on the roller can cause
print-quality problems.
To prevent damage, do not expose the print cartridge to direct light. Place a piece of paper over the
print cartridge to shield it while it is out of the printer.
z
Clean the outside of the products with a water-dampened cloth.
z
Clean the inside of the products with a dry, lint-free cloth.
Cleaning spilled toner
Defective print cartridges can develop leaks. After a jam has occurred, some toner might remain on
the rollers and guides inside the printer. The pages that print immediately after the jam can pick up
this toner.
Note
To clean skin and clothing of toner spills, remove as much toner as possible with a dry tissue, and then
wash with cold water. Hot water causes toner to set permanently into clothing.
Vacuum specifications
Do not use a conventional vacuum to vacuum the printer or any spilled toner. The toner particles that
are used in this product might be too fine for effective vacuuming and could result in damage to the
conventional vacuum cleaner.
A vacuum cleaner that is specifically designed for cleaning toner can be used if it is capable of
filtering fine particles (5 microns in diameter).
Dispose of waste toner in accordance with local requirements. Do not discharge toner particles in
drains.
First aid measures
z
Ingestion—If toner is ingested, rinse your mouth thoroughly with water and drink several
glasses of water. If irritation occurs, consult a physician.
z
Inhalation—If toner particles are inhaled, move to fresh air immediately. If irritation occurs,
consult a physician.
z
Eye contact—If toner comes in contact with the eyes, immediately flush them with plenty of
water for at least 15 minutes. If irritation occurs, consult a physician.
z
Skin contact—If toner spills on skin, remove as much toner as possible by using a dry tissue
(more than one might be needed), and then wash the affected area of the skin with cold water. If
irritation occurs, consult a physician.
Cleaning the printer and accessories 61
Internal cleaning
During the printing process, paper, toner, and dust particles can accumulate inside the printer and
the paper-handling accessories. Over time, this buildup can cause print-quality problems such as
toner specks or smearing. Internal cleaning can assist in correcting and preventing these types of
problems.
CAUTION
Before you begin these steps, turn the printer off and unplug all of the power cords to avoid shock
hazard.
1
Turn the printer off and unplug all of the power cords.
Figure 14.
Turn off the printer and remove the power cords
CAUTION
To prevent damage to the print cartridge, use two hands when removing it from the printer.
2
Open the front cover, turn the green lever counterclockwise to the unlocked position, and then
slide the print cartridge out of the printer.
Figure 15.
Remove the print cartridge
CAUTION
To prevent damage, do not expose the print cartridge to light. Place a piece of paper over the print
cartridge to shield it while it is out of the printer.
62 Chapter 4 Product maintenance
3
Figure 16.
Wipe any residue
4
Figure 17.
Replace the print cartridge.
Replace the print cartridge
5
Figure 18.
Using a dry, lint-free cloth, wipe any residue from the paper-path area, the registration roller, and
the print cartridge cavity.
Press the button on the green lever, and then turn the lever clockwise to the locked position.
Lock the print cartridge
Cleaning the printer and accessories 63
6
Figure 19.
Close the front cover. Plug in all of the power cords, and then turn on the printer.
Close the front cover
64 Chapter 4 Product maintenance
Fuser cleaning
To complete internal cleaning, create and process a cleaning page.
Create a cleaning page
Generating a cleaning page cleans the excess toner off the pressure roller in the fuser. The page
contains instructions that walk the customer through the process of inserting the page in a tray. If
tray 1 is installed, the instructions indicate that the page should be placed face-down in tray 1. If
tray 1 is not installed, the instructions indicate that the page be placed face-up in tray 2. The
customer is then instructed to select the PROCESS CLEANING PAGE on the control panel. A sample
cleaning page is shown below. While the cleaning page is printing, the display shows CREATING
CLEANING PAGE.
Note
For best results, use copier-grade paper with a smooth surface and a weight of 64 to 90 g/m2
(17 to 24 lb). Do not use bond or rough paper.
Create/print a cleaning page
Figure 20.
1
Press
2
Press
or
to scroll to CONFIGURE DEVICE, and then press
3
Press
or
to scroll to PRINT QUALITY, and then press
4
Press
or
to scroll to CREATE CLEANING PAGE, and then press
5
A cleaning page prints.
to open the menus.
.
.
.
Sample cleaning page
Cleaning the printer and accessories 65
Process a cleaning page
Follow the instructions on the cleaning page to complete the cleaning process.
PROCESS CLEANING PAGE is only visible to the customer after a cleaning page is generated by using
the CREATE CLEANING PAGE menu. When the customer generates the page and places it face-down
in tray 1, or face-up in tray 2, the customer is instructed to select this menu item to complete the
cleaning process. The device must check to make sure that letter or A4 paper is loaded so that the
long edge feeds first. When the customer completes these steps, this menu item is not visible until
another cleaning page is created. While the cleaning page is being processed, CLEANING appears on
the display panel.
Note
When toner is cleaned from inside the printer, shiny black spots appear on the black strip. If white spots
appear on the black strip, print another cleaning page.
Note
To ensure good print quality with certain types of paper, use the cleaning page every time the print
cartridge is replaced. If the cleaning page is frequently needed, try a different type of paper for print jobs.
66 Chapter 4 Product maintenance
Print cartridge information
Print cartridges contain components that are sensitive to light, temperature, and humidity. Make sure
that the customer follows the recommendations in this section to ensure the highest quality and
longest life of the print cartridge.
Storage
The print cartridge (C8543X) should not be removed from its package until installation.
If cartridges are stored, the storage environment should meet the conditions listed in the following
table.
Table 13. Storing print cartridges
Category
Temperature
Humidity
Storage
-20°C to 40°C
(-4°F to 104°F)
10% to 90% RH
If the print cartridge must be removed from the printer, always store the cartridge in a situation that
meets the following criteria:
z
Note
CAUTION
Inside the protective bag in which it was originally packaged
If original package is not available, cover the top opening of the print cartridge with paper.
z
In a dark cabinet, away from direct sunlight
z
With the correct side up and with the cartridge in a horizontal position (not standing on end)
z
At a temperature listed in the preceding table
z
Away from ammonia or other organic-solvent fumes
Never ship the printer with a print cartridge installed. Excessive vibration during shipping can cause
toner to leak, contaminating the printer.
Never expose the print cartridge to direct sunlight, or to room light. Bright light and direct sunlight can
permanently damage a print cartridge.
Handling instructions
z
Do not touch the surface of the photosensitive drum in the cartridge. Protect the drum from light
and contamination.
z
Do not expose the cartridge to unnecessary vibrations or shock.
z
Do not expose the photosensitive drum to strong light. Blurred areas on the page might indicate
that the drum has been exposed to light for too long. This causes permanent damage to the
photosensitive drum. If this occurs, replace the cartridge.
z
Never manually rotate the drum, especially in the reverse direction. Manual rotation can cause
internal damage and toner spills.
Print cartridge information 67
Refilled print cartridges
HP policy about non-HP print cartridges
Hewlett-Packard Company cannot recommend using new, refilled, or remanufactured, non-HP print
cartridges. Because they are not HP products, HP cannot influence their design or control their
quality.
While Hewlett-Packard Company does not prohibit the use of refilled print cartridges during the
warranty period or while the printer is under a maintenance contract, we do not recommend their use
for the following reasons:
z
Hewlett-Packard has no ability to ensure that a refilled print cartridge functions at the high level
or reliability of a new HP print cartridge. Hewlett-Packard also cannot predict the long-term effect
of the various toner formulations found in refilled cartridges.
z
Hewlett-Packard has no control over the print quality of a refilled print cartridge. The print quality
of HP print cartridges influences customer perception of the printer.
z
Repairs resulting from the use of refilled print cartridges are not be covered under the HP
warranty or maintenance contract.
z
Smart cartridge features (cartridge out/low) are not available.
Print-cartridge weights
The approximate weight of a print cartridge when full and empty is as follows:
z
Full: 4,220 grams (9.28 lb)
z
Empty: 2,700 grams (5.94 lb)
Print-cartridge life expectancy
The life of the print cartridge depends on the amount of toner used in each print job. When printing
text at 5% coverage, an HP LaserJet 9000/9040/9050 print cartridge lasts an average of 30,000
images. This life expectancy is estimated with the default print density setting, and EconoMode off
(default settings).
Saving toner by using EconoMode
HP LaserJet 9000/9040/9050 print cartridge usage can be extended by using the printer EconoMode
feature. EconoMode can be turned on or off through the driver or through HP LaserJet device
configuration.
Note
z
Some software programs might refer to EconoMode as “draft mode.”
z
EconoMode is only available if a genuine HP print cartridge is installed.
HP does not recommend full-time use of EconoMode. If EconoMode is used full-time when the average
toner coverage is significantly less than 5%, it is possible that the toner supply will outlast the
mechanical parts in the print cartridge. If print quality begins to degrade under these circumstances,
you will need to install a new print cartridge even if there is toner supply remaining in the cartridge.
68 Chapter 4 Product maintenance
5
Theory of operation
Chapter contents
Basic operation . . . . . . . . . . . . . . . . . . . . . . . . . . . . . . . . . . . . . . . . . . . . . . . . . . . . . . . . . . . . . . . 70
Sequence of operation . . . . . . . . . . . . . . . . . . . . . . . . . . . . . . . . . . . . . . . . . . . . . . . . . . . . . . 71
Power-on sequence . . . . . . . . . . . . . . . . . . . . . . . . . . . . . . . . . . . . . . . . . . . . . . . . . . . . . . . . 73
Timing chart . . . . . . . . . . . . . . . . . . . . . . . . . . . . . . . . . . . . . . . . . . . . . . . . . . . . . . . . . . . . . . 74
Engine control system . . . . . . . . . . . . . . . . . . . . . . . . . . . . . . . . . . . . . . . . . . . . . . . . . . . . . . . . . . 75
DC controller PCA. . . . . . . . . . . . . . . . . . . . . . . . . . . . . . . . . . . . . . . . . . . . . . . . . . . . . . . . . . 76
DC controller operations . . . . . . . . . . . . . . . . . . . . . . . . . . . . . . . . . . . . . . . . . . . . . . . . . . . . . 77
High-voltage power supply circuit . . . . . . . . . . . . . . . . . . . . . . . . . . . . . . . . . . . . . . . . . . . . . . 78
Low-voltage power supply unit . . . . . . . . . . . . . . . . . . . . . . . . . . . . . . . . . . . . . . . . . . . . . . . . 80
Formatter system . . . . . . . . . . . . . . . . . . . . . . . . . . . . . . . . . . . . . . . . . . . . . . . . . . . . . . . . . . . . . 81
Formatter hardware . . . . . . . . . . . . . . . . . . . . . . . . . . . . . . . . . . . . . . . . . . . . . . . . . . . . . . . . 81
Laser/scanner system . . . . . . . . . . . . . . . . . . . . . . . . . . . . . . . . . . . . . . . . . . . . . . . . . . . . . . . . . . 83
Image formation system . . . . . . . . . . . . . . . . . . . . . . . . . . . . . . . . . . . . . . . . . . . . . . . . . . . . . . . . 84
The eight processes of image formation. . . . . . . . . . . . . . . . . . . . . . . . . . . . . . . . . . . . . . . . . 84
Print cartridge . . . . . . . . . . . . . . . . . . . . . . . . . . . . . . . . . . . . . . . . . . . . . . . . . . . . . . . . . . . . . 85
Pickup and feed system . . . . . . . . . . . . . . . . . . . . . . . . . . . . . . . . . . . . . . . . . . . . . . . . . . . . . . . . 87
Media-size detection . . . . . . . . . . . . . . . . . . . . . . . . . . . . . . . . . . . . . . . . . . . . . . . . . . . . . . . . 87
Media-level detection . . . . . . . . . . . . . . . . . . . . . . . . . . . . . . . . . . . . . . . . . . . . . . . . . . . . . . . 87
Multifeed prevention . . . . . . . . . . . . . . . . . . . . . . . . . . . . . . . . . . . . . . . . . . . . . . . . . . . . . . . . 87
Overhead-transparency detection. . . . . . . . . . . . . . . . . . . . . . . . . . . . . . . . . . . . . . . . . . . . . . 87
Fuser-wrapping-jam detection . . . . . . . . . . . . . . . . . . . . . . . . . . . . . . . . . . . . . . . . . . . . . . . . 87
Jam detection . . . . . . . . . . . . . . . . . . . . . . . . . . . . . . . . . . . . . . . . . . . . . . . . . . . . . . . . . . . . . 88
Tray 1. . . . . . . . . . . . . . . . . . . . . . . . . . . . . . . . . . . . . . . . . . . . . . . . . . . . . . . . . . . . . . . . . . . . . . . 93
Tray 1 driver PCA . . . . . . . . . . . . . . . . . . . . . . . . . . . . . . . . . . . . . . . . . . . . . . . . . . . . . . . . . . 93
Power supply. . . . . . . . . . . . . . . . . . . . . . . . . . . . . . . . . . . . . . . . . . . . . . . . . . . . . . . . . . . . . . 93
Sequence of operation . . . . . . . . . . . . . . . . . . . . . . . . . . . . . . . . . . . . . . . . . . . . . . . . . . . . . . 93
Pickup and feed . . . . . . . . . . . . . . . . . . . . . . . . . . . . . . . . . . . . . . . . . . . . . . . . . . . . . . . . . . . 94
Jam detection . . . . . . . . . . . . . . . . . . . . . . . . . . . . . . . . . . . . . . . . . . . . . . . . . . . . . . . . . . . . . 94
Tray 4. . . . . . . . . . . . . . . . . . . . . . . . . . . . . . . . . . . . . . . . . . . . . . . . . . . . . . . . . . . . . . . . . . . . . . . 95
Tray 4 driver PCA . . . . . . . . . . . . . . . . . . . . . . . . . . . . . . . . . . . . . . . . . . . . . . . . . . . . . . . . . . 95
Power supply. . . . . . . . . . . . . . . . . . . . . . . . . . . . . . . . . . . . . . . . . . . . . . . . . . . . . . . . . . . . . . 95
Sequence of operation . . . . . . . . . . . . . . . . . . . . . . . . . . . . . . . . . . . . . . . . . . . . . . . . . . . . . . 95
Pickup and feed . . . . . . . . . . . . . . . . . . . . . . . . . . . . . . . . . . . . . . . . . . . . . . . . . . . . . . . . . . . 96
Media-level and media-size detection. . . . . . . . . . . . . . . . . . . . . . . . . . . . . . . . . . . . . . . . . . . 96
Jam detection . . . . . . . . . . . . . . . . . . . . . . . . . . . . . . . . . . . . . . . . . . . . . . . . . . . . . . . . . . . . . 96
Chapter contents 69
Basic operation
This chapter provides information about the following systems:
z
Engine control
z
Formatter
z
Laser/scanner
z
Image formation
z
Pickup and feed
Relationships among the five systems are represented in figure 21.
Figure 21.
Printer systems
70 Chapter 5 Theory of operation
Sequence of operation
The engine control system controls operational sequences. Table 14 describes the sequences.
Figure 22.
Sequence-of-operation block diagram
Table 14. Normal sequence of operation
State
Period
WAIT
From the time the power is
switched on until the surface
temperature of the fuser and
pressure rollers reach their
WAIT target value (four minutes
or less)
Operation
z
z
z
z
z
z
z
z
z
z
z
z
STBY
From the end of the WAIT
(standby) period to the input of a print
reservation command from the
formatter
-orFrom the end of the LSTR
period until either a print
reservation command is input
from the formatter or until power
is switched off
z
z
z
z
Power on: CPU and ASIC initialize
Fan rotation (fans 1 through 6 for 30 seconds, duplexer fan for
3 seconds)
Formatter interface communication starts
Fuser heaters turn on
Cartridge check
Cartridge-memory check for toner level
Optional interface communication (duplexer, tray 1, tray 4,
paper handling)
Cassette checks (lifting and loading status)
Jam check (auto flush/eject)
Fuser-wrapping-jam detect
Door open/sleep check
Fuser-roller temperature control and delivery motor
Fuser control (fuser roller temperature—180°C [356°F]/
pressure roller 140°C [285°F])
Print reservation command (awaits INTR sequence)
Fan-motor drive control (fans 1 through 5 half-speed rotation;
fan 6 is off)
If the standby state lasts five minutes or more, the fuser/
delivery motor is rotated for about 0.08 second to prevent the
pressure roller from becoming deformed.
Basic operation 71
Table 14. Normal sequence of operation (continued)
State
Period
Operation
INTR
(initial
rotation)
z
From the input of a printreservation command from the z
formatter until the laser/scanner z
enters a ready state
z
z
z
z
z
z
z
z
PRINT
From the input of a print
command until the primary dc
bias is turned off
z
z
z
z
z
z
z
z
z
LSTR
(last
rotation)
From the time the primary
z
charging roller is turned off until z
each of the motors stops
z
z
z
z
z
scanner-motor rotation
fuser/delivery-motor rotation
drum-motor rotation
high-voltage control (negative bias to transfer roller)
receives print command
fan-motors 1 through 6 full-speed rotation
pickup operation starts
high-voltage control bias applied to primary charging roller,
developing roller, and transfer roller)
fuser control (fuser roller to 190°C [374 °F], pressure roller
180°C [356°F])
initial rotation final check (high-voltage, scanner motor, pickup
operation complete)
jam/door open/failure/sleep check
fuser/delivery, drum, scanner, and fan-motor rotations
fuser control (print temperature—fuser 190°C [374°F])
engine-to-formatter output signal
formatter-to-engine input signal
paper-feed control
image control
high-voltage control (toner level-output separation bias and
pressure roller bias)
next-pickup control (calculates, from media size, the speed to
send media through)
jam/door open/failure
fuser/delivery, drum, scanner, and fan motor rotations
high-voltage control completion
fuser control (print to standby temperature—180°C [356°F])
fan motor control (fan 1 through 6 full-speed rotation)
fuser/delivery, drum, and scanner motor stop (writes in
cartridge memory)
jam/door open/failure check
ready for next pickup
Table 15. Failure sequence of operation
State
Period
Operation
JAM
From the time the power is
z
switched on until the end of the z
LSTR period
z
z
DOOR
OPEN
From the time the power is
z
switched on until the end of the z
LSTR period
z
FAILURE From the time the power is
z
switched on until the end of the z
LSTR period
72 Chapter 5 Theory of operation
sensor check
drive stop (scanner motor, high-voltage, fuser control, and
fuser/delivery motor stop)
status setting (jam status set)
door open check
drive stop
status setting
door close (wait sequence)
drive stop
status setting (set)
Table 15. Failure sequence of operation (continued)
State
Period
Operation
SLEEP
From the time the power is
z
switched on until the end of the
LSTR period
z
z
drive stop (scanner motor, high-voltage control, fuser control,
fuser/delivery motor, 24 V stop, 3.3 V sets PowerSave mode,
fan motor stop)
status setting
door-open check
Power-on sequence
The sequence from the time the power is turned on until the printer enters the standby state is as
follows:
1
The power is turned on.
2
The CPU and the ASIC are initialized.
3
Video interface communication begins (formatter).
4
All of the fans are turned on.
5
The printer flushes any residual paper from the paper path.
6
A cartridge-presence check occurs.
7
A cartridge-memory check occurs.
8
Any installed accessories are initialized.
9
The fuser and pressure-roller heaters are turned on.
10 The pickup-roller motor and the cassette-lifter motors are turned on.
11 The pickup-roller motor and the cassette-lifter motors are turned off.
12 The fuser motor, drum motor, and transfer negative bias are turned on.
13 The pressure bias and the jam detection lever drive solenoid (SL501) are turned on.
14 The developing ac bias is turned on (toner-level detection).
15 The fuser reaches its target temperature.
16 The fuser motor, drum motor, transfer negative bias, pressure bias, and SL501 are turned off.
17 Standby is initialized.
Basic operation 73
Timing chart
Figure 23.
Timing chart block diagram
74 Chapter 5 Theory of operation
Engine control system
The engine control system coordinates the laser/scanner, image formation, and pickup and feed
systems according to the instructions it receives from the formatter. The engine control system
consists of the DC controller PCA, the high-voltage power supply circuit, and the low-voltage power
supply unit.
Figure 24 shows a block diagram of the engine control system.
Figure 24.
Engine-control-system block diagram
Engine control system 75
DC controller PCA
The DC controller circuit controls operational sequences of the printer.
Figure 25.
DC controller PCA block diagram
76 Chapter 5 Theory of operation
DC controller operations
z
The CPU (IC201) on the DC controller PCA controls the following printer operations:
• Sequence of the printer
• Communications with the formatter
• High-voltage power supply circuit
• Rotation of the pickup motor, lifter motor, pickup roller motor, and fan motor 6
• Communication with the duplexer and tray 1, if installed
• Fuser heater control circuit and fuser heater safety circuit
z
The ASIC (IC202) on the DC controller PCA controls the following printer operations, according
to instructions from the CPU:
• laser/scanner
• rotation of fuser/delivery motor and drum motor
• sensors and switches
• clutches and solenoids
• rotation of fan motors 1 through 5
z
The reset IC (IC203) monitors +3.3 V and resets the CPU and ASIC at power on.
z
The EEPROM (IC204) stores backup data.
z
The pickup motor driver IC (IC205) drives the pickup motor.
z
The pickup roller up-and-down motor driver IC (IC206) drives the pickup roller up-and-down
motor.
z
The lifter motor driver IC (IC207) drives the lifter motor.
z
The fan motor control circuit turns fans on and off.
Engine control system 77
High-voltage power supply circuit
The high-voltage power supply circuit applies a high-voltage bias to the primary charging roller, the
developing cylinder, the pre-transfer upper guide, the transfer charging roller, the separation static
charge eliminator, and the pressure roller through the ASIC (IC 202), according to instructions it
receives from the CPU (IC201) on the DC controller PCA. The high-voltage power supply circuit also
detects the toner level.
Figure 26.
High-voltage power supply block diagram
78 Chapter 5 Theory of operation
Each of the bias generation circuits has a specific purpose:
z
Primary charging bias generation. Applies bias to the primary charging roller to spread a
uniform, negative charge on the photosensitive drum.
z
Developing bias generation. Controls the amount of toner transferred onto latent images
formed on the photosensitive drum.
z
Pre-transfer upper guide bias generation. Prevents toner on the photosensitive drum from
adhering to the pre-transfer upper guide.
z
Transfer bias generation. Each of the three types of transfer bias (cleaning bias, between-page
bias, and print bias) is applied to the transfer charging roller at specified intervals.
z
Cleaning bias. Cleans the transfer charging roller by moving toner to the photosensitive drum.
z
Between-page bias. Prevents residual toner on the photosensitive drum from adhering to the
transfer charging roller between pages of a multi-page print job.
z
Print bias. Transfers toner from the photosensitive drum to the print media.
z
Separation static charge eliminating bias. Stabilizes media delivery.
z
Pressure roller bias generation. Prevents toner from adhering to the fuser roller.
z
Toner level detection. Monitors toner level through two antennae (plate antenna and flat
antenna) in the print cartridge.
Engine control system 79
Low-voltage power supply unit
The low-voltage power supply unit consists of the fuser control circuit and the low-voltage powersupply circuit.
Figure 27.
Power-supply-block diagram
Fuser control circuit
Three heaters heat the fuser roller and pressure roller. The main heater (H1) heats the center of the
fuser roller, the sub-heater (H2) heats both ends of the fuser roller, and the lower heater (H3) heats
the pressure roller.
Two thermistors monitor the surface temperature of the rollers. The upper thermistor (TH1) monitors
the fuser roller surface temperature and the lower thermistor (TH2) monitors the pressure roller
surface temperature.
Two thermal switches guard against overheating the three heaters by turning off power to the heaters
when the temperature rises abnormally.
The printer is designed to prevent flicker. Lights attached to the same ac power source as the printer
can flicker as a result of high-frequency noise. To control flicker, the printer gradually increases and
decreases power to the heaters when they are turned on and off.
Low-voltage power-supply circuit
The low-voltage power-supply circuit converts ac voltage from the power source to dc voltage when
the printer is turned on. The ac power is converted as follows:
z
+24 Vdc for motors, solenoids, clutches, and the high-voltage power supply circuit
z
+5 Vdc for the laser/scanner PCA, the beam detect PCA, and the formatter
z
+3.3 Vdc for the formatter, sensors, and the ICs on the DC controller PCA
80 Chapter 5 Theory of operation
Formatter system
The formatter and DC controller exchange signals that allow the DC controller to begin the initial
rotation period (INTR), turn on the registration roller drive clutch, and feed media into the printer.
When media is positioned for printing, the formatter sends information through the DC controller to
the laser/scanner, which then turns the laser diodes on and off. Laser beams that the laser diodes
emit are reflected by the laser/scanner mirror, scanning across the photosensitive drum to form a
latent image on the drum.
The formatter system is responsible for the following:
z
Receiving and processing data from the various printer interfaces
z
Monitoring control panel input and relaying printer status information (through the control panel
and the I/O)
z
Developing and coordinating data placement and timing with the print engine
z
Storing font information and macros
z
Communicating with the host computer
The formatter receives data from the I/O and converts it into a dot image. The formatter then sends a
print signal to the engine controller assembly. The engine controller assembly synchronizes the
image-formation system with the paper-feed system, and signals the formatter to send the printimage data. The formatter sends the print-image data (dots) in the form of a video signal, and the
printing process begins.
Formatter hardware
The formatter system includes the following components:
z
ROM—Stores the dot patterns of internal character sets (fonts), in addition to storing
microprocessor control programs.
z
RAM—Stores printing and font information received from the host system, and can also serve to
temporarily store a full page of print-image data before the data is sent to the print engine.
Increasing the RAM increases graphic intense printing operations, but it will not increase the
I/O buffer space or cause the printer to print more pages per minute.
z
NVRAM—Stores information about the I/O and print environment configuration. The printer
keeps the contents of NVRAM when the power is turned off or disconnected. (As in other HP
LaserJet printers, downloaded fonts and macros are saved in conventional RAM and are lost
when power is turned off.)
z
Interfaces
• Parallel interface (HP LaserJet 9040/9050 only)—Receives incoming data through its IEEE1284 B interface connector. The IEEE-1284 B interface provides high-speed, two-way
communication between the printer and the host, letting the customer change printer settings
and monitor printer status from the host computer.
• Parallel interface (HP LaserJet 9000 only)—Receives incoming data through its IEEE1284 C interface connector. The IEEE-1284 C interface provides high-speed, two-way
communication between the printer and the host, letting the customer change printer settings
and monitor printer status from the host computer.
• EIO—Supports a wide range of print servers and other add-on devices through PCI-based
EIO slots. HP Jetdirect EIO cards provide high-speed communication for network printing over
Ethernet, Ethernet and LocalTalk, Token Ring, or Fast Ethernet networks.
z
Flash memory card (HP LaserJet 9040/9050 only)—The formatter has three flash memory card
slots. One slot is dedicated to printer firmware. The printer supports Type 1 and Type 2 flash
memory. Unlike standard printer memory, flash memory cards can be used to permanently store
downloaded fonts, macros, and forms even when the printer is turned off.
Formatter system 81
Note
A flash memory card that is designed for use with a digital camera should not be inserted into the
printer. The printer does not support photo printing directly from a flash memory card. If you install a
camera-type flash memory card, a message asking if you want to reformat the flash memory card
appears on the control-panel display. If you choose to reformat the card, all data on the card will be lost.
z
Real Time Clock (HP LaserJet 9040/9050 only)—The user sets the date and time when the
printer is turned on for the first time. This date and time is used for the Wake-up time feature. A
battery supplies power when the printer is turned off.
z
HP Jetdirect Fast Ethernet embedded print server (HP LaserJet 9040/9050 only)—The
HP LaserJet 9040n/9050n and the HP LaserJet 9040dn/9050dn printers include an HP Jetdirect
Fast Ethernet embedded print server on the formatter. This functions like other Jetdirect EIO
products.
82 Chapter 5 Theory of operation
Laser/scanner system
The laser/scanner unit of the HP LaserJet 9000 series printer and the HP LaserJet 9040/9050 series
printer contains two laser diodes in its laser unit. The printer employs the “twin-beam method,” which
scans two lines simultaneously.
Based on signals it receives from the DC controller and the formatter, the laser/scanner PCA causes
the two laser diodes to emit laser beams. The beams strike a six-sided mirror that rotates at a
constant speed. The beams reflect off the mirror, pass through a focusing lens and a reflective mirror,
and focus on the photosensitive drum.
The scanning mirror rotating at a constant speed allows the laser beams to scan across the drum at
a constant speed. Finally, a latent image is formed on the drum surface by constant-speed rotation of
the photosensitive drum and constant-speed scanning of the laser beams.
Figure 28.
Laser/scanner system
Laser/scanner system 83
Image formation system
The image formation system consists of the cartridge, transfer charging roller, and fuser.
When a print command is sent from the formatter, the engine controller drives the main motor to
rotate the photosensitive drum, primary charging roller, developing cylinder, transfer charging roller,
and pressure roller.
The primary charging roller applies a uniform negative charge to the photosensitive drum surface.
Laser beams, modulated by the signals from the formatter, focus on the photosensitive drum surface
to form a latent image on the photosensitive drum.
Toner on the developing cylinder develops the latent image formed on the photosensitive drum into a
visible image, which is transferred onto media by the transfer charging roller. The toner transferred is
changed to a permanent image by heat and pressure in the fuser. The cleaning blade scrapes
residual toner from the photosensitive drum, and the primary charging roller applies a uniform
negative charge to the photosensitive drum surface in preparation for the next latent image.
Figure 29.
Image formation
The eight processes of image formation
1
Conditioning (primary charging)—Consists of the application of a uniform negative charge to
the surface of the drum with the primary charging roller located in the print cartridge. The primary
charging roller is made of conductive rubber. An ac bias is applied to the roller to erase any
residual charges from any previous image. A negative dc bias is applied by the charging roller to
create a uniform negative potential on the drum surface.
2
Writing (laser beam exposure)—Two laser diodes project laser beams onto a rotating scanning
mirror. As the mirror rotates, the beams reflect off the mirror, first through a set of focusing
lenses, then off a mirror, and finally through a slot in the top of the print cartridge, and onto the
photosensitive drum. The twin beams sweep the drum from left to right, discharging the negative
potential wherever the beams strike the surface. This creates a latent electrostatic image, which
later is developed into a visible image.
3
Developing—At this stage of the process, the latent electrostatic image is present on the drum.
The toner particles obtain a negative surface charge by rubbing against the developing cylinder
which is connected to a negative dc supply. The negatively charged toner is attracted to the
discharged (exposed, grounded) areas of the drum, and is repelled from the negatively charged
(unexposed) areas.
4
Pre-transfer—Applies bias to prevent toner on the photosensitive drum from adhering to the
pre-transfer upper guide.
84 Chapter 5 Theory of operation
5
Transfer—During the transfer process, the toner image on the drum surface is transferred to the
paper. The transfer charging roller applies a positive charge to the back of the paper and causes
the negatively charged toner on the drum surface to be attracted to the paper. After separation,
the drum is cleaned and conditioned for the next image.
6
Separation—During the separating process, the paper separates from the drum. To stabilize the
feed system and to prevent dropouts on the printed image at low temperature and humidity, the
charge on the back of the paper is reduced by the static charge eliminator.
7
Fusing—During the fusing process, the toner is fused to the paper by heat and pressure to
produce a permanent image. The paper passes between a heated fuser element and a soft
pressure roller. This melts the toner and presses it into the paper.
8
Drum cleaning—The cleaning blade is in contact with the surface of the drum at all times. As
the drum rotates during printing, excess toner is scraped off and stored in the waste toner
receptacle.
Print cartridge
Cartridge
Laser beams
Toner reservoirs
Primary charging roller
Cartridge
memory
Waste toner reservoir
Blade
Developing cylinder
Cleaner blade
Flat antenna
Plate antenna
Photosensitive drum roller
Pre-transfer guide
Transfer charging roller
Static charge eliminator
Figure 30.
Print cartridge
Cartridge design
The design of the print cartridge incorporates dramatic changes in the toner hopper geometry and
stirrer design. The cartridge contains three main interconnecting toner reservoir areas, each with a
cylindrical shape. A cylindrically shaped hopper effectively eliminates the packing and accumulation
of toner in areas where it will not reach the development area. Another key improvement was realized
in the design of the toner stirrer, where stirrers rotating within each of the hopper cylinders unpack
the toner, allowing it to be displaced easily into the cartridge development area.
No-shake toner
Shaking is not required at installation or at the end of cartridge life because the geometry of the
hopper and stirrer design automatically redistributes and unpacks the toner. The overall design of the
“no-shake” system is so efficient that when fading occurs for the first time, it is a sure indication that
the cartridge is out of toner. Shaking the cartridge will not produce more toner for printing.
Image formation system 85
Cartridge memory
The print cartridge comes with built-in RAM. The printer detects the cartridge condition by reading
and writing to this memory. The read/write of the memory is performed by the memory controller after
receiving instructions from the DC controller through the antenna unit.
The DC controller instructs the memory controller PCA to perform read/write at the following timing:
z
Read
• When the power is turned on
• When the door cover is closed
• When the DC controller receives a command from the formatter
z
Write
• When a print operation is complete
• When the DC controller receives a command from the formatter
The DC controller also detects cartridge memory failures. If the DC controller fails in a read/write
attempt two times, it reports the failure to the formatter as a cartridge memory abnormality.
Toner seal
This print cartridge incorporates an automatic toner-seal roll-up. When a new print cartridge is
installed, the DC controller detects a new cartridge and sends a signal to the drum motor to roll up
the toner seal.
When a print cartridge is inserted, the power is turned on, or the door cover is closed, the DC
controller monitors the toner seal opening detection signal and verifies whether or not the cartridge is
new. If the cartridge is new, an open signal from the DC controller is sent to the drum motor. This
reverses the drum motor rotation, which rolls up the toner seal. After a short period of time, the DC
controller turns off the open signal, completing the roll up sequence.
The DC controller also monitors the printer for presence of a print cartridge. When a cartridge is
inserted, the same signal that instructs the cartridge to roll up the seal is used as a detection signal.
Toner-level detection
The print cartridge has built-in toner-level detection. The DC controller monitors the toner level using
feedback signals received from two antennae (plate and flat) in the cartridge.
When the power is turned on, a door cover is closed, or a print operation is performed, the DC
controller sets the developing bias signal, the developing ac bias circuit sends a signal to the toner
level circuit 1 and the developing cylinder. This causes the plate antenna to feedback the output
value to the toner level circuit 1. The toner level circuit 1 compares the two signals and sends the
results to the DC controller as the toner level detection signal. At the same time, the DC controller
turns on the frequency output signal to output the reference frequency to the flat antenna. This
causes the flat antenna to feedback the output value to the toner level circuit 2. The toner level
circuit 2 compares the two signals and sends the results to the DC controller as the toner level
detection signal, toner level accuracy to within 1% from 0 to 100%, then reports the result to the
formatter.
86 Chapter 5 Theory of operation
Pickup and feed system
The pickup and feed system is divided into two blocks: pickup/feed and fuser/delivery. This printer
contains two standard pickup sources (tray 2 and tray 3) and two delivery sources (face-up and facedown bins.)
The pickup unit picks up single sheets from tray 2 or tray 3. The feed unit transports each sheet to the
fuser unit.
When the printer is turned on, the stack of print media is lifted by the lifter to where the paper pickup
is enabled. When the DC controller receives a print command, the pickup roller starts rotating. This
lowers the pickup roller to the paper surface. A sheet of paper is fed to the feed rollers and the preregistration roller. The pre-registration roller corrects the skew.
After a short period of time, the sheet is transferred to the photosensitive drum. The image on the
drum is transferred onto the sheet, which is then transported to the fuser.
Media-size detection
Because the printer can contain custom-size media in all trays, the printer has a custom/standard
switch and two size-detection switches. The DC controller reads information from the two size
detection switches in the trays to determine media width and length. If the switches are set to the
custom size setting, the “X” and “Y” dimensions must be set in the control panel. The width-detection
switches also sense the presence of trays: if all of the width-detection switches are off, the DC
controller assumes that a tray is missing.
Media-level detection
The lifter that lifts the paper detects the media level in the trays. The lifter contains a lifter blocking
plate. This plate shuts off two sensors in each tray, allowing the lifter position to be detected. This
detected position determines the media level.
Media level is based on approximate number of sheets in the tray. Depending on the lifter position,
the sensors determine paper levels as full (200 or more sheets), high (100 to 200 sheets), middle (50
to 100 sheets), or low (less than 50 sheets).
Multifeed prevention
The printer utilizes the separation roller method for its multiple-feed-prevention mechanism. This
method drives the feed rollers and separation roller in the reverse direction from each other. The
separation roller contains a torque limiter. When a multifeed occurs, the torque limiter allows the top
sheet to feed into the printer, but returns the additional sheet to the tray.
Overhead-transparency detection
The overhead transparency sensor emits light through the media path and reads light that is
reflected back from a prism. When plain paper passes through the media path, no light is reflected
back, but when a transparency passes through the media path, the sensor can read the reflected
light, indicating the presence of a transparency.
Fuser-wrapping-jam detection
The printer contains a mechanism to detect wrapping jams in the fuser. The DC controller sends
signals to the pressure roller bias generation circuit. The circuit applies the same bias values to the
pressure roller and to the wrapping-jam-detection circuit. The jam-detection lever solenoid monitors
the pressure roller bias through contact with the pressure roller. The wrapping-jam-detection circuit
compares the monitored value to the applied value for differences in the values. When they differ, the
circuit determines that a wrapping jam occurred, and signals the DC controller to stop the printer.
Pickup and feed system 87
Jam detection
The printer detects jams according to the following conditions:
z
Pickup 1 delay jam. Media does not reach the tray 2 feed sensor A (PS1402) or the tray 3 feed
sensor A (PS1404) within 3.2 seconds after pickup begins.
z
Pickup 2 delay jam.
• Media does not reach the tray 2 feed sensor B (PS1401) or the tray 3 feed sensor B (PS1403)
within 3.0 seconds after the tray 2 feed sensor A (PS1402) or the tray 3 feed sensor A
(PS1404) detects the leading edge of the media.
• Media does not reach the registration paper sensor (PS2) within 4.0 seconds after the tray 2
feed sensor B (PS1401) detected the leading edge of the media, or within 4.5 seconds after
the tray 3 feed sensor B (PS1403) detected the leading edge of the media.
z
Fuser delivery 1 delay jam. The leading edge of the media does not reach the fuser delivery
sensor (PS502) within 1.4 seconds after the /VSYNC signal.
z
Fuser delivery 2 delay jam. The leading edge of the media does not reach the fuser jam sensor
(PS501) within 1.6 seconds after the /VSYNC signal.
z
Fuser delivery stationary jam. The trailing edge of the media does not clear the fuser delivery
sensor (PS502) within a specified time (3.4 seconds for A3 media, 2.5 seconds for A4 media)
after the /VSYNC signal.
z
Face-down delivery delay jam. The leading edge of the media does not reach the face-down
bin delivery sensor (PS1451) within 2.4 seconds after the /VSYNC signal.
z
Face-down delivery stationary jam. The leading edge of the media does not clear the facedown bin delivery sensor (PS1451) within a specified time (4.3 seconds for A3 media, 3.4
seconds for A4 media) after the /VSYNC signal.
z
Door open jam. The following sensors can detect media when the door is opened or closed:
• Registration paper sensor (PS2)
• Fuser delivery sensor (PS501)
• Fuser jam sensor (PS502)
• Tray 2 feed sensor B (PS1401)
• Tray 2 feed sensor A (PS1402)
• Tray 3 feed sensor B (PS1403)
• Tray 3 feed sensor A (PS1404)
• Face-down bin delivery sensor (PS1451)
z
Residual jam. The following conditions determine a residual jam:
• The fuser delivery sensor (PS502) and the fuser jam sensor (PS501) detect media when the
printer is turned on.
• Three minutes have passed since a jam that should contain an automatic delivery command
was cleared, but the CPU on the DC controller PCA did not receive the automatic delivery
command.
• A jam was cleared, jammed media was automatically delivered, the printer is on, and the fuser
roller reached its target temperature, but at least one of the following sensors detects media:
• Registration paper sensor (PS2)
• Fuser delivery sensor (PS501)
• Fuser jam sensor (PS502)
• Tray 2 feed sensor B (PS1401)
• Tray 3 feed sensor B (PS1403)
• Face-down bin delivery sensor (PS1451)
88 Chapter 5 Theory of operation
Figure 31.
Pickup-and-feed system sensors and switches
Pickup and feed system 89
Table 16. Pickup-and-feed system sensors and switches
Sensor/switch
Description
PS1
Overhead transparency sensor
PS2
Registration paper sensor
PS501
Fuser delivery sensor
PS502
Fuser jam sensor
PS1401
Tray 2 feed sensor B
PS1402
Tray 2 feed sensor A
PS1403
Tray 3 feed sensor B
PS1404
Tray 3 feed sensor A
PS1405
Tray 2 media-level sensor 1
PS1406
Tray 2 media-level sensor 2
PS1407
Tray 3 media-level sensor 1
PS1408
Tray 3 media-level sensor 2
PS1409
Tray 2 media-surface sensor
PS1410
Tray 2 empty sensor
PS1411
Tray 3 media-surface sensor
PS1412
Tray 3 empty sensor
PS1413
Pickup shaft home-position sensor
PS1451
Face-down bin delivery sensor
PS1452
Face-down bin full sensor
SW2
Tray 2 media-length detection switch
SW3
Tray 3 media-length detection switch
SW4
Tray 2 media-width detection switch
SW5
Tray 3 media-width detection switch
90 Chapter 5 Theory of operation
Figure 32.
Pickup-and-feed system motors and solenoids
Pickup and feed system 91
Table 17. Pickup-and-feed system motors and solenoids
Motor/solenoid
Description
DCM1
Fuser/delivery motor
DCM2
Main/drum motor
SMT1
Pickup roller up and down motor
SMT2
Lifter motor
SMT3
Pickup motor
SL1
Face-up solenoid
SL501
Jam detection lever drive solenoid
CL1
Registration roller drive clutch
CL2
Pre-registration roller drive clutch
92 Chapter 5 Theory of operation
Tray 1
Tray 1 is a multipurpose tray that picks up and feeds media into the printer.
Tray 1 driver PCA
A driver PCA in the tray holds a four-bit microcomputer (CPU-IC2501) that controls its operational
sequence and serial communications with the DC controller PCA. The CPU drives a motor, solenoid,
and clutch according to commands sent from the DC controller PCA.
Figure 33.
Tray 1 block diagram
Power supply
The power supply is +24 Vdc that is supplied to drive the motor, solenoid, and clutch, and +3.3 Vdc
for the IC and sensors.
Sequence of operation
When tray 1 is installed, the door is closed, or the printer returns from sleep mode, and the paper
path sensor (PS2502) does not detect the presence of media, the tray 1 driver PCA rotates the motor
to bring the pickup roller to its initial position. The tray proceeds with the following pickup sequence:
1
Receives a pickup command
2
Turns on the pickup solenoid (SL2501), which brings the pickup roller in contact with the surface
of the media
3
Turns on the feed clutch (CL2501) to rotate the pickup roller and feed roller, picking up the media
4
Feeds the media to the between-page adjustment position, turns off CL2501, and feeds media to
the printer
5
Receives a feed-stop command, stops the motor, and returns to a standby state
Tray 1 93
Pickup and feed
The tray 1 pickup unit picks up media by lowering the pickup roller onto the surface of the media that
is loaded in the tray, and then separating the roller from the media surface the pickup cam lifts the
pickup roller up and down. When the tray 1 pickup unit turns on the pickup solenoid, the stopper
leaves the cam, allowing the cam to rotate. This shifts the pickup roller up and down. After
completing one rotation, the cam contacts the stopper and is held in so the pickup roller is brought to
its initial position.
Tray 1 utilizes the separation roller method for its multiple-feed-prevention mechanism. This method
drives the feed rollers and separation roller in the reverse direction from each other. The separation
roller contains a torque limiter. When a multifeed occurs, the torque limiter allows the top sheet to
feed into the printer, but returns the additional sheet to the tray.
Jam detection
The tray 1 paper path sensor (PS2502) determines whether or not media is transported correctly to
the printer. If the paper path sensor does not detect the leading edge of media within the specified
length of time after turning on the pickup solenoid, the CPU stops the pickup operation and notifies
the DC controller of a jam occurrence.
The CPU in tray 1 detects the following jams:
z
Pickup retry. If the paper path sensor does not detect the leading edge of media 1 second after
turning on the pickup solenoid, the CPU stops the motor once, and then restarts it. The CPU
turns on the pickup solenoid 0.7 seconds after the start of the second motor rotation.
z
Pickup delay jam. The paper path sensor (PS2502) does not detect the leading edge of media
within 3 seconds of turning on the pickup solenoid.
z
Residual jam. There is power to tray 1, the top cover is closed (or when the tray returns from
sleep mode), and the paper path sensor (PS2502) detects media.
94 Chapter 5 Theory of operation
Tray 4
Tray 4 is a 2,000-sheet feeder that picks up and feeds media into the printer.
Tray 4 driver PCA
A driver PCA in tray 4 holds a 16-bit microcomputer (IC1) that controls the tray 4 operational
sequence and serial communications with the formatter. The driver PCA drives the motors and clutch
according to commands that the formatter sends.
Figure 34.
Tray 4 block diagram
Power supply
Tray 4 employs a remote switch method for the power supply unit. The formatter sends a power-on
signal to the power supply unit through the driver PCA. When the signal is received, the power supply
unit supplies +24 Vdc and +5 Vdc to the driver PCA. +24V is then supplied to the lifter, feed, and
pickup motors to drive them. The +5 V is supplied to the sensors and also to the ICs on the driver
PCA.
The power unit utilizes a standalone switch so that tray 4 can be powered on without turning on the
printer. This switch is used for standalone diagnostics. See "Tray 4 diagnostics" in chapter 7.
Sequence of operation
When tray 4 is loaded with media and closed, the paper deck starts lifting the stack to the pickup
position. When the formatter instructs tray 4 to deliver media, the drive rollers pick up a sheet and
feed it to the registration assembly. The tray 4 registration assembly adjusts the skew and transports
the sheet to the printer.
Tray 4 95
Pickup and feed
The formatter sends a signal to the driver PCA to start driving the pickup and feed motors. Rotated
by the rollers, the pickup roller picks up a sheet, the separation roller removes any excessive sheets,
and the feed roller transports the sheet to the registration roller unit.
After the media enters the registration roller unit, the registration roller corrects the skew and the
second feed roller feeds the media to the printer.
When the media reaches the merge-point in the printer, the driver PCA checks for a merge-point
permission command sent from the formatter. If the signal is detected, tray 4 continues feeding to the
printer. If the signal is not detected, tray 4 stops feeding until the signal is received.
Media-level and media-size detection
The paper level is detected by the paper-level sensors (PS21 to 23) on the paper-level sensor PCA.
The combination of these sensors determines the level of the print media loaded in tray 4.
The paper size is detected by the paper size detection switches (SW11 to 15) on the paper size
detection switch PCA. The combination of these switches determines the paper size.
Tray 4 sends the size and level information to the printer formatter.
Jam detection
Tray 4 determines a jam by monitoring the presence of media in the sensor areas at specific times
that are stored in the CPU. If the CPU determines a jam under the following conditions, the tray stops
feeding operations and notifies the formatter.
z
Residual jam. The registration paper sensor (PS11) or jam sensor (PS103) detects media
during the warm-up period.
z
Pickup delay jam. The between page sensor (PS12) does not detect media after receiving a
print command or the PS12 sensor detects media, but the registration paper sensor (PS11) does
not.
z
Pickup stationary jam. The edge does not clear the registration paper sensor (PS11) after the
between-page sensor (PS12) detects the trailing edge of the media.
z
Feed delay jam. The jam sensor (PS103) does not detect media after the start of the registration
rollers.
z
Feed stationary jam. The trailing edge of the media does not pass through the jam sensor
(PS103) after the registration rollers are turned off.
96 Chapter 5 Theory of operation
6
Removal and replacement
Chapter contents
Introduction . . . . . . . . . . . . . . . . . . . . . . . . . . . . . . . . . . . . . . . . . . . . . . . . . . . . . . . . . . . . . . . . . . 99
Removal and replacement strategy . . . . . . . . . . . . . . . . . . . . . . . . . . . . . . . . . . . . . . . . . . . . 99
Repair notices . . . . . . . . . . . . . . . . . . . . . . . . . . . . . . . . . . . . . . . . . . . . . . . . . . . . . . . . . . . . . 99
Electrostatic discharge (ESD) . . . . . . . . . . . . . . . . . . . . . . . . . . . . . . . . . . . . . . . . . . . . . . . . . 99
Required tools. . . . . . . . . . . . . . . . . . . . . . . . . . . . . . . . . . . . . . . . . . . . . . . . . . . . . . . . . . . . . 99
Orientation of the printer (with tray 4) . . . . . . . . . . . . . . . . . . . . . . . . . . . . . . . . . . . . . . . . . . 100
Covers . . . . . . . . . . . . . . . . . . . . . . . . . . . . . . . . . . . . . . . . . . . . . . . . . . . . . . . . . . . . . . . . . . . . . 101
Right top cover . . . . . . . . . . . . . . . . . . . . . . . . . . . . . . . . . . . . . . . . . . . . . . . . . . . . . . . . . . . 101
Left top cover . . . . . . . . . . . . . . . . . . . . . . . . . . . . . . . . . . . . . . . . . . . . . . . . . . . . . . . . . . . . 103
Front cover . . . . . . . . . . . . . . . . . . . . . . . . . . . . . . . . . . . . . . . . . . . . . . . . . . . . . . . . . . . . . . 104
Right door . . . . . . . . . . . . . . . . . . . . . . . . . . . . . . . . . . . . . . . . . . . . . . . . . . . . . . . . . . . . . . . 105
Right lower cover . . . . . . . . . . . . . . . . . . . . . . . . . . . . . . . . . . . . . . . . . . . . . . . . . . . . . . . . . 106
Left door and diverter . . . . . . . . . . . . . . . . . . . . . . . . . . . . . . . . . . . . . . . . . . . . . . . . . . . . . . 107
Left back cover . . . . . . . . . . . . . . . . . . . . . . . . . . . . . . . . . . . . . . . . . . . . . . . . . . . . . . . . . . . 108
Back cover . . . . . . . . . . . . . . . . . . . . . . . . . . . . . . . . . . . . . . . . . . . . . . . . . . . . . . . . . . . . . . 109
Right and left rail covers . . . . . . . . . . . . . . . . . . . . . . . . . . . . . . . . . . . . . . . . . . . . . . . . . . . . 110
Top assemblies . . . . . . . . . . . . . . . . . . . . . . . . . . . . . . . . . . . . . . . . . . . . . . . . . . . . . . . . . . . . . . 111
Control panel. . . . . . . . . . . . . . . . . . . . . . . . . . . . . . . . . . . . . . . . . . . . . . . . . . . . . . . . . . . . . 111
Laser/scanner assembly . . . . . . . . . . . . . . . . . . . . . . . . . . . . . . . . . . . . . . . . . . . . . . . . . . . . 112
Delivery assembly. . . . . . . . . . . . . . . . . . . . . . . . . . . . . . . . . . . . . . . . . . . . . . . . . . . . . . . . . 113
Delivery-fan assembly. . . . . . . . . . . . . . . . . . . . . . . . . . . . . . . . . . . . . . . . . . . . . . . . . . . . . . 114
Delivery-assembly fans and face-down-bin fan (fans 3, 6, and 4) . . . . . . . . . . . . . . . . . . . . 115
Delivery motor. . . . . . . . . . . . . . . . . . . . . . . . . . . . . . . . . . . . . . . . . . . . . . . . . . . . . . . . . . . . 116
Cartridge release lever . . . . . . . . . . . . . . . . . . . . . . . . . . . . . . . . . . . . . . . . . . . . . . . . . . . . . 117
Front assemblies . . . . . . . . . . . . . . . . . . . . . . . . . . . . . . . . . . . . . . . . . . . . . . . . . . . . . . . . . . . . . 119
Print cartridge . . . . . . . . . . . . . . . . . . . . . . . . . . . . . . . . . . . . . . . . . . . . . . . . . . . . . . . . . . . . 119
Transfer-roller assembly . . . . . . . . . . . . . . . . . . . . . . . . . . . . . . . . . . . . . . . . . . . . . . . . . . . . 120
Tray 2 and tray 3 (interchangeable). . . . . . . . . . . . . . . . . . . . . . . . . . . . . . . . . . . . . . . . . . . . 121
Rollers (pickup, feed, or separation) . . . . . . . . . . . . . . . . . . . . . . . . . . . . . . . . . . . . . . . . . . . 122
Fuser-jam-removal knob . . . . . . . . . . . . . . . . . . . . . . . . . . . . . . . . . . . . . . . . . . . . . . . . . . . . 123
Registration-jam-removal knob . . . . . . . . . . . . . . . . . . . . . . . . . . . . . . . . . . . . . . . . . . . . . . . 124
Right assemblies . . . . . . . . . . . . . . . . . . . . . . . . . . . . . . . . . . . . . . . . . . . . . . . . . . . . . . . . . . . . . 125
Tray 1 . . . . . . . . . . . . . . . . . . . . . . . . . . . . . . . . . . . . . . . . . . . . . . . . . . . . . . . . . . . . . . . . . . 125
Paper-input unit (PIU) . . . . . . . . . . . . . . . . . . . . . . . . . . . . . . . . . . . . . . . . . . . . . . . . . . . . . . 126
Registration assembly. . . . . . . . . . . . . . . . . . . . . . . . . . . . . . . . . . . . . . . . . . . . . . . . . . . . . . 129
Transfer-guide assembly . . . . . . . . . . . . . . . . . . . . . . . . . . . . . . . . . . . . . . . . . . . . . . . . . . . . 131
Left assemblies . . . . . . . . . . . . . . . . . . . . . . . . . . . . . . . . . . . . . . . . . . . . . . . . . . . . . . . . . . . . . . 133
Duplexer . . . . . . . . . . . . . . . . . . . . . . . . . . . . . . . . . . . . . . . . . . . . . . . . . . . . . . . . . . . . . . . . 133
Fuser assembly. . . . . . . . . . . . . . . . . . . . . . . . . . . . . . . . . . . . . . . . . . . . . . . . . . . . . . . . . . . 134
Back assemblies . . . . . . . . . . . . . . . . . . . . . . . . . . . . . . . . . . . . . . . . . . . . . . . . . . . . . . . . . . . . . 135
Formatter . . . . . . . . . . . . . . . . . . . . . . . . . . . . . . . . . . . . . . . . . . . . . . . . . . . . . . . . . . . . . . . 135
Low-voltage power supply. . . . . . . . . . . . . . . . . . . . . . . . . . . . . . . . . . . . . . . . . . . . . . . . . . . 136
High-voltage power supply . . . . . . . . . . . . . . . . . . . . . . . . . . . . . . . . . . . . . . . . . . . . . . . . . . 137
Chapter contents 97
DC controller . . . . . . . . . . . . . . . . . . . . . . . . . . . . . . . . . . . . . . . . . . . . . . . . . . . . . . . . . . . .
Toner-sensor contact assembly . . . . . . . . . . . . . . . . . . . . . . . . . . . . . . . . . . . . . . . . . . . . . .
Drum motor . . . . . . . . . . . . . . . . . . . . . . . . . . . . . . . . . . . . . . . . . . . . . . . . . . . . . . . . . . . . .
Drum motor . . . . . . . . . . . . . . . . . . . . . . . . . . . . . . . . . . . . . . . . . . . . . . . . . . . . . . . . . . . . .
Feed-drive assembly . . . . . . . . . . . . . . . . . . . . . . . . . . . . . . . . . . . . . . . . . . . . . . . . . . . . . .
Power-supply fan (fan 1) . . . . . . . . . . . . . . . . . . . . . . . . . . . . . . . . . . . . . . . . . . . . . . . . . . .
Cartridge fan (fan 5) . . . . . . . . . . . . . . . . . . . . . . . . . . . . . . . . . . . . . . . . . . . . . . . . . . . . . . .
Controller fan (fan 2) . . . . . . . . . . . . . . . . . . . . . . . . . . . . . . . . . . . . . . . . . . . . . . . . . . . . . .
Jetlink connector . . . . . . . . . . . . . . . . . . . . . . . . . . . . . . . . . . . . . . . . . . . . . . . . . . . . . . . . .
Fuser-connector holder assembly . . . . . . . . . . . . . . . . . . . . . . . . . . . . . . . . . . . . . . . . . . . .
Fuser delivery-drive assembly . . . . . . . . . . . . . . . . . . . . . . . . . . . . . . . . . . . . . . . . . . . . . . .
Tray 4 . . . . . . . . . . . . . . . . . . . . . . . . . . . . . . . . . . . . . . . . . . . . . . . . . . . . . . . . . . . . . . . . . . . . .
Orientation . . . . . . . . . . . . . . . . . . . . . . . . . . . . . . . . . . . . . . . . . . . . . . . . . . . . . . . . . . . . . .
Left side cover . . . . . . . . . . . . . . . . . . . . . . . . . . . . . . . . . . . . . . . . . . . . . . . . . . . . . . . . . . .
Right side cover . . . . . . . . . . . . . . . . . . . . . . . . . . . . . . . . . . . . . . . . . . . . . . . . . . . . . . . . . .
Back covers . . . . . . . . . . . . . . . . . . . . . . . . . . . . . . . . . . . . . . . . . . . . . . . . . . . . . . . . . . . . .
Tray 4 . . . . . . . . . . . . . . . . . . . . . . . . . . . . . . . . . . . . . . . . . . . . . . . . . . . . . . . . . . . . . . . . . .
Rollers (pickup, feed, and separation) . . . . . . . . . . . . . . . . . . . . . . . . . . . . . . . . . . . . . . . . .
Registration assembly . . . . . . . . . . . . . . . . . . . . . . . . . . . . . . . . . . . . . . . . . . . . . . . . . . . . .
Drive motor. . . . . . . . . . . . . . . . . . . . . . . . . . . . . . . . . . . . . . . . . . . . . . . . . . . . . . . . . . . . . .
Drive assembly. . . . . . . . . . . . . . . . . . . . . . . . . . . . . . . . . . . . . . . . . . . . . . . . . . . . . . . . . . .
Controller board . . . . . . . . . . . . . . . . . . . . . . . . . . . . . . . . . . . . . . . . . . . . . . . . . . . . . . . . . .
Paper-size detection switch PCA . . . . . . . . . . . . . . . . . . . . . . . . . . . . . . . . . . . . . . . . . . . . .
Power supply . . . . . . . . . . . . . . . . . . . . . . . . . . . . . . . . . . . . . . . . . . . . . . . . . . . . . . . . . . . .
Pickup assembly . . . . . . . . . . . . . . . . . . . . . . . . . . . . . . . . . . . . . . . . . . . . . . . . . . . . . . . . .
Paper-connecting unit . . . . . . . . . . . . . . . . . . . . . . . . . . . . . . . . . . . . . . . . . . . . . . . . . . . . .
98 Chapter 6 Removal and replacement
138
140
141
141
142
143
144
145
146
147
149
151
151
151
152
153
154
155
156
157
158
159
160
161
162
163
Introduction
Removal and replacement strategy
This chapter documents removal and replacement of field replaceable units (FRUs) only.
Replace parts in the reverse order of their removal. Directions for difficult or critical replacement
procedures are included.
Repair notices
WARNING!
The printer can have sharp sheet metal edges. Use caution when working on the printer.
CAUTION
Always remove the print cartridge before removing or replacing assemblies and parts (see page 119).
IMPORTANT: Put the print cartridge in its original print-cartridge bag, or, if the bag is not available,
cover the print cartridge with a piece of paper. Light can damage the print cartridge.
To install a self-tapping screw, first turn it counterclockwise to align it with the existing thread pattern,
then carefully turn it clockwise to tighten. Do not overtighten the screw. If a self-tapping screw-hole
becomes stripped, repair the screw-hole or replace the affected assembly.
Note
Note the lengths, diameters, and locations of screws. Be sure to return each screw to its original location
during reassembly.
Incorrectly routed or loose wire harnesses can interfere with other internal components and can be
damaged or broken. Frayed or pinched harness wires can be difficult to locate. When replacing wire
harnesses, always use the provided wire loops, lance points, or wire-harness guides.
Electrostatic discharge (ESD)
CAUTION
The printer contains parts that are sensitive to electrostatic discharge (ESD). Always service the printer
at an ESD-protected workstation, or use an ESD mat.
Watch for the ESD symbol (shown at left) to identify the parts that are sensitive to ESD. Protect these
parts by using an ESD wrist strap and protective ESD pouches.
Required tools
The following tools are needed to service the printer:
CAUTION
z
#2 Phillips screwdriver with magnetic tip
z
T-10 TORX screwdriver
z
T-20 TORX screwdriver
z
Small, flatblade screwdriver
z
Small needle-nose pliers
z
ESD mat
z
Penlight
A pozidrive screwdriver will damage screw-heads on the printer. Use a #2 Phillips screwdriver.
If you have a multi-speed screwdriver, use a torque limiter.
Introduction 99
Orientation of the printer (with tray 4)
The printer is shown with tray 4 and tray 1.
Front and right side orientation
Front
Right
Figure 35.
View of front and right side
Back and left side orientation
Back
Left
Figure 36.
View of back and left side
100 Chapter 6 Removal and replacement
Covers
The following covers can be removed from the printer:
z
Right top cover
z
Left door and diverter
z
Left top cover
z
Left back cover
z
Front cover
z
Back cover
z
Right door
z
Rail cover
z
Right lower cover
Right top cover
1
Remove the control panel. See page 111.
2
Remove tray 1 if it is installed. See page 125.
3
Open the right door.
4
Release the door stop (callout 1).
1
Figure 37.
Right top cover (1 of 2)
Covers 101
5
Remove three silver screws (callout 2).
6
Gently lift the right edge to release the tabs, and then lift the right top cover to the right.
2
Figure 38.
Right top cover (2 of 2)
To reinstall
If the left top cover was removed (page 103), you must replace it before replacing the right top cover.
102 Chapter 6 Removal and replacement
Left top cover
1
Remove the control panel. See page 111.
2
Remove the right top cover. See page 101.
3
Remove two silver screws (callout 1).
4
Lift the left top cover up, and then pull it toward the right side of the printer to release two locating
tabs (on the underside of the cover, at the left edge).
1
2
2
Figure 39.
Left top cover
To reinstall
z
Be sure to feed the control-panel cable up and through the hole (callout 2) in the left top cover.
z
Insert the three locating tabs (on the underside of the cover, at the left edge) into the locating
holes on the top of the printer.
Covers 103
Front cover
1
Remove two small, plastic retaining pins (callout 1).
2
Pinch and release two tabs (below the retaining cups, callout 2) on the end of each black
retaining strap to release the strap ends.
1
2
Figure 40.
Front cover (1 of 2)
3
Note
Remove the front cover from the hinges (callout 3) by pulling up on the hinge tabs that are
located below the front cover.
To gain access to the tabs, the front cover needs to be lifted away from the printer.
3
Figure 41.
Front cover (2 of 2)
104 Chapter 6 Removal and replacement
Right door
1
Remove tray 1 if it is installed. See page 125.
2
Open the right door.
3
Pinch and then push the two tabs (callout 1) on the end of the black strap to release the strap
ends. If you have difficulty, use needle-nose pliers.
4
Disconnect the four locator tabs (callout 2) on the cable cover, and then remove the cable cover.
1
2
2
Figure 42.
Right door (1 of 2)
5
Note
Unplug two multiple-wire cable connectors (callout 3).
Do not remove the single grounding cable (callout 4).
6
Lift the right door up and off of the two hinges, and remove it from the printer.
2
3
Figure 43.
2
4
Right door (2 of 2)
Covers 105
Right lower cover
1
Remove the following FRUs:
• Right door. See page 105.
• Back cover. See page 109.
• Right and left rail covers. See page 110.
2
Remove three screws (callout 1).
3
Rotate the lower edge up to release two tabs (callout 2).
4
Remove the right lower cover.
2
2
1
Figure 44.
Right lower cover
106 Chapter 6 Removal and replacement
Left door and diverter
Note
If the 3,000-sheet stacker, 3,000-sheet stapler/stacker, or multifunction finisher is installed, move it
away from the printer to gain access to the left door and diverter.
1
CAUTION
Open the left door.
Make sure that you do not drop the pins (callout 1) that are on the end of each spring-loaded rod.
2
Grasp the two spring-loaded rods (callout 2), push them in toward the printer, and then pull them
down and away from the printer.
3
Lift the left side of the door to a 45° angle and remove the left hinge (callout 3).
4
Slide the door toward the left and out of the right hinge (callout 4).
2
4
2
3
2
2
1
Figure 45.
Left door
Covers 107
Left back cover
1
Remove the formatter. See page 135.
2
Remove three silver screws (not shown) from the left back cover.
3
Rotate the left back cover toward the back of the printer to release the three tabs (callout 1) on
the left side of the cover and the two tabs (callout 2) on the right side of the cover.
2
1
2
Figure 46.
Left back cover
108 Chapter 6 Removal and replacement
Back cover
CAUTION
1
Remove the power cord.
2
Remove two silver screws (callout 1) on the right back cover.
3
Remove seven gold screws (callout 2) on the back cover.
4
While facing the back of the printer, rotate the left edge out and then remove the back cover.
Make sure that you do not damage the plastic that surrounds the power connection.
2
1
2
Figure 47.
Back cover
Covers 109
Right and left rail covers
1
Remove trays 2 and 3. See page 121.
2
Remove two silver screws (callout 1) from the right rail cover.
3
Lift the upper tab (callout 2) to release it, and push the lower tab (callout 3) toward the right to
release it.
4
Remove the right rail cover.
5
Remove the screw from the bottom left cover, and then remove the left rail cover.
1
2
2
3
2
Figure 48.
Rail covers
110 Chapter 6 Removal and replacement
Top assemblies
Gain access to the following assemblies from the top of the printer:
z
Control panel
z
Laser/scanner assembly
z
Delivery assembly
z
Delivery-fan assembly
z
Delivery-assembly fans and
face-down-bin fan
z
Delivery motor
z
Cartridge release lever
Control panel
1
Open the front cover.
2
Release the two tabs (callout 1) on the underside of the control panel by pulling them toward the
front of the printer.
3
Tilt the front of the control panel up.
4
Unplug the cable connector on the underside of the control panel, and remove the control panel
from the printer.
1
Figure 49.
Control panel
Top assemblies 111
Laser/scanner assembly
1
Remove the following FRUs:
• Control panel. See page 111.
• Right top cover. See page 101.
2
Unplug three cable connectors (callout 1).
3
Remove four long, gold screws (callout 2).
4
Lift the laser/scanner out of the printer.
1
2
2
Figure 50.
Laser/scanner assembly
112 Chapter 6 Removal and replacement
Delivery assembly
1
Remove the following FRUs:
• Right top cover. See page 101.
• Left top cover. See page 103.
• Left back cover. See page 108.
• Control panel. See page 111.
2
Open the left door.
3
Face the top of the printer from the left side.
4
Unplug one cable connector (callout 1).
5
Remove four gold screws (callout 2) and two silver screws (callout 3).
6
Lift out the delivery assembly.
2
1
2
3
2
Figure 51.
Delivery assembly
Top assemblies 113
Delivery-fan assembly
CAUTION
1
Remove the delivery assembly. See page 113.
2
Gently remove the two sensor flags (callout 1) from the holders.
3
Unplug three cable connectors (callout 2).
Make sure that you remove and replace the cable connectors carefully.
4
Remove one silver screw (callout 3).
5
Grasp the middle fan, lift the right side of the metal casing, and then slide the metal casing to the
left to release the tab (callout 4).
6
Slide the fan assembly to the right, and gently separate the two parts.
2
1
2
3
2
4
2
Figure 52.
Delivery-fan assembly
To reinstall
Make sure to install the sensor flags with the correct sides facing up.
114 Chapter 6 Removal and replacement
Delivery-assembly fans and face-down-bin fan (fans 3, 6, and 4)
1
Remove the fan assembly. See page 114.
2
Carefully unwind the fan cables from the cable guides (callout 1).
2
1
Figure 53.
Delivery-assembly fans and face-down-bin fan (1 of 2)
3
Remove six gold screws (callout 2).
4
Remove the three fans:
• Fan 3: delivery-assembly back fan (callout 3)
• Fan 6: face-down-bin fan (callout 4)
• Fan 4: delivery-assembly front fan (callout 5)
2
2
3
Figure 54.
2
4
2
5
Delivery-assembly fans and face-down-bin fan (2 of 2)
To reinstall
Make sure to replace each fan in the correct airflow position.
Top assemblies 115
Delivery motor
1
Remove the following FRUs:
• Right top cover. See page 101.
• Left top cover. See page 103.
• Control panel. See page 111.
• Delivery assembly. See page 113.
WARNING!
The PCA board is fragile. To prevent damage, hold the PCA board when you remove or plug in the
connector.
2
Hold the PCA board, and unplug one cable connector (callout 1).
3
Remove four screws (callout 2).
2
1
2
Figure 55.
Delivery motor
116 Chapter 6 Removal and replacement
Cartridge release lever
1
Remove the following FRUs:
• Right top cover. See page 101.
• Left top cover. See page 103.
• Control panel. See page 111.
Figure 56.
2
Open the front cover.
3
Rotate the cartridge release lever downward.
Cartridge release lever (1 of 3)
4
Remove the print cartridge. See page 119.
5
Rotate the cartridge release lever to a 45° angle.
6
Face the top of the printer, and remove two long screws (callout 2).
2
Figure 57.
Cartridge release lever (2 of 3)
Top assemblies 117
7
Figure 58.
Rotate the cartridge release lever to the vertical, unlocked position.
Cartridge release lever (3 of 3)
8
Face the front of the printer, and slide the cartridge release handle away from the front of the
printer.
118 Chapter 6 Removal and replacement
Front assemblies
Gain access to the following assemblies from the front of the printer:
z
Print cartridge
z
Transfer-roller assembly
z
Tray 2 and tray 3
z
Rollers (pickup, feed, and
separation)
z
Fuser-jam-removal knob
z
Registration-jam-removal
knob
Print cartridge
WARNING!
To prevent damage, do not expose the print cartridge to light. Put it in its print cartridge bag, or, if the
bag is not available, cover the print cartridge with a piece of paper.
1
Open the front cover of the printer.
2
Rotate the cartridge release lever (callout 1) downward.
3
Grasp the front handle (callout 2) with one hand, and pull the print cartridge out of the printer
until the top handle (callout 3) is visible.
4
Grasp the top handle with your other hand, and continue pulling the print cartridge until it is out of
the printer.
1
2
2
Figure 59.
3
2
Print cartridge
To reinstall
z
Make sure that the transfer roller assembly (page 120) is installed before you reinstall the print
cartridge.
z
Align the print cartridge with the print cartridge guides, and make sure that you insert it
completely.
z
Press and hold the white button (on the green lever), and rotate the green lever clockwise until it
locks into place.
Front assemblies 119
Transfer-roller assembly
CAUTION
Do not touch the black transfer roller. Skin oils can damage the roller.
1
Open the front cover.
2
Unlock the print cartridge by rotating the large, green lever (callout 1) downward.
3
Press the blue tab (callout 2), and slowly pull the transfer roller assembly out of the printer.
4
Lift the assembly upward to release the catch on the underside, and remove the assembly from
the printer.
2
1
2
Figure 60.
Transfer-roller assembly
To reinstall
z
Make sure that the transfer roller is completely inserted and latched.
120 Chapter 6 Removal and replacement
Tray 2 and tray 3 (interchangeable)
Figure 61.
1
Slide the tray open until it stops.
2
Grasp the sides of the tray.
3
Lift the tray up and remove it.
Tray 2 or tray 3
Front assemblies 121
Rollers (pickup, feed, or separation)
CAUTION
Do not remove the torque limiter from behind the separation roller. If the black spacer comes off, return
it to the shaft, metal-edge first.
1
Remove tray 2 or tray 3. See page 121.
2
Locate the appropriate roller on the upper-right side of the tray cavity. The pickup roller (callout 1)
is a type 1 roller. The feed roller (callout 2) and the separation roller (callout 3) are type 2 rollers.
3
Pinch the tab on the end of each roller to release it.
4
Slide the roller off of the shaft.
2
1
2
2
3
Figure 62.
Rollers (pickup, feed, or separation)
122 Chapter 6 Removal and replacement
Fuser-jam-removal knob
CAUTION
Make sure not to drop any of the internal parts from the fuser-jam-removal knob, and pay careful
attention to the original location of the parts.
1
Open the front cover.
2
Release the tab (callout 1) with a small flatblade screwdriver.
3
Slowly remove the knob and internal parts (spring, pin, and bushing).
2
1
Figure 63.
Fuser-jam-removal knob
To reinstall
Reinstall any dropped parts in the following order: pin, spring (spring-side facing in), bushing, knob.
Front assemblies 123
Registration-jam-removal knob
1
Open the front cover.
2
Hold the registration-jam-removal knob firmly, and remove the silver screw inside the knob
(callout 1).
3
Pull the knob off of the printer.
2
1
Figure 64.
Registration-jam-removal knob
To reinstall
Make sure that you align the knob with the notch on the post.
124 Chapter 6 Removal and replacement
Right assemblies
Gain access to the following assemblies from the right side of the printer:
z
Multipurpose tray (tray 1)
z
Paper-input unit (PIU)
z
Registration assembly
z
Transfer-guide assembly
Tray 1
1
Unlock two locking pins (one shown, callout 1) at the bottom of tray 1.
2
Gently pull the bottom of the tray away from the printer.
3
Open the right door, and lift tray 1 off of the door.
2
1
Figure 65.
Tray 1
Right assemblies 125
Paper-input unit (PIU)
1
Remove the following FRUs:
• Right door. See page 105.
• Back cover. See page 109.
• Right rail cover. See page 110.
• Tray 2 and tray 3. See page 121.
2
Remove four gold screws (callout 1), two from each rail.
3
Pull the rails out from the front of the printer.
2
1
Figure 66.
Paper-input unit (1 of 5)
4
Face the right side of the printer.
5
If tray 4 is installed, remove the paper-connecting unit by sliding two levers (callout 2) toward the
center of the unit.
2
Figure 67.
Paper-input unit (2 of 5)
126 Chapter 6 Removal and replacement
6
Remove three screws (callout 3) from the right lower cover.
7
Rotate the lower edge up to release two tabs (callout 4).
8
Remove the right lower cover.
4
2
3
2
Figure 68.
Paper-input unit (3 of 5)
9
Face the back of the printer.
10 Remove the J-220 and J-221 cable connectors (callout 5) from the DC controller, and carefully
unwind the cables from the cable guides (callout 6).
2
5
2
6
Figure 69.
Paper-input unit (4 of 5)
Right assemblies 127
11 Face the right side of the printer.
12 Push the green registration handle (callout 7) down slightly, and then pull it out to gain access to
the PIU.
13 Remove four silver screws (callout 8).
CAUTION
The PIU is heavy.
14 Grasp the PIU handle (callout 9), and lift the PIU out.
2
7
8
2
2
9
Figure 70.
Paper-input unit (5 of 5)
To reinstall
z
Make sure that the green handle on the registration assembly is up before reinstalling the PIU.
z
Reinstall the right lower cover (figure 68 on page 127) before the right rail cover (figure 48 on
page 110).
128 Chapter 6 Removal and replacement
Registration assembly
1
Remove the following FRUs:
• Right door. See page 105.
• Back cover. See page 109.
• Print cartridge. See page 119.
• Tray 2 and tray 3. See page 121.
• Registration-jam-removal knob. See page 124.
• PIU. See page 126.
2
Unplug the J-215 cable connector (callout 1) from the DC controller.
2
1
Figure 71.
Registration assembly (1 of 2)
Right assemblies 129
3
Remove two gold screws (callout 2) from the registration assembly.
4
Lift the registration assembly up slightly, and then rotate it downward until you can pull it from the
chassis.
2
Figure 72.
Registration assembly (2 of 2)
To reinstall
WARNING!
Make sure not to scrape the top of the registration assembly against the chassis. Small, black, plastic
pieces on top of the registration assembly can be damaged easily.
130 Chapter 6 Removal and replacement
Transfer-guide assembly
1
Remove the following FRUs:
• Right door. See page 105.
• Back cover. See page 109.
• Transfer-roller assembly. See page 120.
• Tray 2 and tray 3. See page 121.
• PIU. See page 126.
• Registration assembly. See page 129.
• Fuser assembly. See page 134.
• Feed-drive assembly. See page 142.
Note
You do not need to remove the drum motor.
2
Remove two gold screws (callout 1) from the transfer-guide assembly.
3
Push in and release the two plastic tabs (callout 2) to the right of each screw.
4
Lift the transfer-guide assembly up, rotate it forward slightly, and then pull it out of the printer.
2
1
2
Figure 73.
Transfer-guide assembly
Right assemblies 131
To reinstall
CAUTION
1
Face the right side of the printer, and reinsert the pin (callout 1) in the back, left corner.
2
Rotate the transfer guide assembly upward, and slide the three back tabs (callout 2) into place.
You must confirm that the tabs are securely in place before proceeding. Face the left side of the printer,
and check the tabs.
2
1
2
Figure 74.
Reinstalling the transfer-guide assembly
132 Chapter 6 Removal and replacement
Left assemblies
Note
If the 3,000-sheet stacker, 3,000-sheet stapler/stacker, multifunction finisher, or 8-bin mailbox is
installed, move it away from the printer before beginning repairs to the left side of the printer.
Gain access to the following assemblies from the left side of the printer:
z
Duplexer
z
Fuser assembly
Duplexer
1
Lift the left door handle, and then open the left door.
2
Push the green tab (callout 1) downward. This releases the duplexer and moves it forward
slightly.
3
Pull the center handle (callout 2), and slide the duplexer from the printer until it locks.
2
1
2
Figure 75.
Figure 76.
Duplexer (1 of 2)
4
Grasp the two handles that are on the sides of the duplexer.
5
Lift the duplexer up (to release two underside catches) and remove it.
Duplexer (2 of 2)
Left assemblies 133
Fuser assembly
WARNING!
The fuser assembly can be hot. Use caution when removing it.
Note
If an optional output accessory is installed, remove it.
If a duplexer is installed, remove it. See page 133.
Note
1
Lift the left door handle, and then open the left door.
2
Rotate the two blue locking tabs (callout 1) toward each other and downward to release them.
Do not release the T-shaped envelope levers (callout 2).
2
1
2
Figure 77.
Fuser assembly (1 of 2)
3
WARNING!
Pull the center handle (callout 3) to rotate the fuser assembly upward slightly, and then slide the
fuser assembly outward until it locks.
The fuser assembly is heavy. Grasp the blue handle firmly before attempting to lift the fuser assembly.
4
Firmly grasp the blue handle (callout 4), and lift the fuser assembly up.
2
3
Figure 78.
Fuser assembly (2 of 2)
134 Chapter 6 Removal and replacement
4
2
Back assemblies
Gain access to the following assemblies from the back of the printer:
z
Formatter
z
Cartridge memory PCA
z
Low-voltage power supply
(LVPS)
z
Drum motor
z
Feed-drive assembly
z
High-voltage power supply
(HVPS)
z
Power-supply fan (fan 1)
z
DC controller
z
Cartridge fan (fan 5)
z
Toner-sensor contact
assembly
z
Controller fan (fan 2)
Formatter
WARNING!
The formatter has sharp edges.
1
Turn the printer off.
2
Disconnect all cables from the formatter.
3
Loosen the two thumb screws (callout 1).
4
Grasp the thumb screws, and slide the formatter out of the printer.
5
Place the formatter on an ESD mat.
1
2
Figure 79.
Formatter (HP LaserJet 9000 shown)
Back assemblies 135
Low-voltage power supply
1
Remove the back cover. See page 109.
2
Remove the large cable connector (callout 1) from the DC controller.
3
Unroute the cable from the cable guides (callout 2).
1
2
2
Figure 80.
Low-voltage power supply (1 of 2)
4
Unplug one standard cable connector (callout 3) from the low-voltage power supply.
5
Unplug one molex cable connector (callout 4) by pulling and releasing the tab on the side of the
connector.
6
Unplug two molex cable connectors (callout 5) by pressing and releasing the tabs on the side of
the connectors.
7
Remove four gold screws (callout 6).
8
Remove the low-voltage power supply.
2
4
2
3
2
6
Figure 81.
Low-voltage power supply (2 of 2)
136 Chapter 6 Removal and replacement
5
2
High-voltage power supply
1
WARNING!
Remove the back cover. See page 109.
The flat ribbon cable is fragile. Do not bend or fold it.
2
Remove the flat ribbon cable connector (callout 1) from the DC controller.
3
Unplug the low-voltage power-supply cable connector (callout 2) from the DC controller, and
unroute the cable from the cable guides (callout 3).
2
1
2
2
3
Figure 82.
High-voltage power supply (1 of 2)
4
Remove three silver screws (callout 4).
5
Push the black locking tab (callout 5) away from the high-voltage power supply, and remove the
high-voltage power supply.
2
4
2
5
Figure 83.
High-voltage power supply (2 of 2)
Back assemblies 137
DC controller
CAUTION
The DC controller is sensitive to electrostatic discharge (ESD). Always perform service work at an
ESD-protected workstation, or use an ESD mat. For further precautions, see page 99.
1
Remove the following FRUs:
• Back cover. See page 109.
• Formatter. See page 135.
• High-voltage power supply. See page 137.
CAUTION
Use caution when removing cable connectors J-215, J-219, and J-213. Do not bend or break the
component that is adjacent to these cable connectors.
2
Remove 17 cable connectors (callout 1).
1
2
Figure 84.
DC controller (1 of 2)
138 Chapter 6 Removal and replacement
3
Remove four gold screws (callout 2).
4
Release the small tab (callout 3), and rotate the top edge of the DC controller away from the
printer.
5
Remove the DC controller from the two metal holders (callout 4).
2
3
2
3
4
2
Figure 85.
DC controller (2 of 2)
Back assemblies 139
Toner-sensor contact assembly
1
Remove the following FRUs:
• Back cover. See page 109.
• High-voltage power supply. See page 137.
• DC controller. See page 138.
2
Remove two screws (callout 1).
3
Remove the toner-sensor contact assembly.
2
1
Figure 86.
Toner-sensor contact assembly
To reinstall
Make sure that the top tab (callout 2) is on the outside of the chassis.
2
Figure 87.
Reinstalling the toner-sensor contact assembly
140 Chapter 6 Removal and replacement
Drum motor
1
Remove the back cover. See page 109.
2
Remove the HVPS. See page 137.
3
Unplug one cable connector (callout 1).
4
Remove four gold screws (callout 2).
5
Pull the drum motor away from the printer.
1
2
2
Figure 88.
Drum motor
Back assemblies 141
Feed-drive assembly
1
Remove the following FRUs:
• Back cover. See page 109.
• High-voltage power supply. See page 137.
• DC controller. See page 138.
2
Disconnect the drum motor.
3
Open the front cover.
4
Press the white button on the cartridge release lever (callout 1, page 119), and then rotate the
lever clockwise until it locks into place.
5
Face the back of the printer.
6
Pinch the two black tabs (callout 2) together with needle-nose pliers to release the activation
lever (callout 3).
7
Remove three gold screws (callout 4).
8
Remove the feed-drive assembly.
2
2
4
Figure 89.
Feed-drive assembly
To reinstall
Note
Be sure to reconnect the activation lever.
142 Chapter 6 Removal and replacement
2
3
Power-supply fan (fan 1)
1
Remove the back cover. See page 109.
2
Unplug the fan cable connector (callout 1), and carefully unwind the fan cables from the cable
guides (callout 2).
3
Slide the power supply fan (callout 3) out of the printer.
2
1
2
2
3
Figure 90.
Power-supply fan
Back assemblies 143
Cartridge fan (fan 5)
1
Remove the back cover. See page 109.
2
Remove the J-216 cable connector (callout 1) from the DC controller.
2
1
Figure 91.
Cartridge fan (1 of 2)
3
Remove tray 1 if it is installed. See page 125.
4
Open the right door.
5
Release the strap by pinching and then pushing the two tabs (page 105, callout 1) on the end of
the black strap.
6
Remove two silver screws (callout 2) from the cartridge fan.
7
Locate the two arrow-marked tabs (callout 3), and then press the arrow-marked area in the
direction that the arrow indicates.
8
Slide the cartridge fan to the right to remove it.
2
3
2
Figure 92.
Cartridge fan (2 of 2)
To reinstall
Slide the tabs into the printer before you snap the fan into place.
144 Chapter 6 Removal and replacement
Controller fan (fan 2)
1
Remove the back cover. See page 109.
2
Locate the controller fan below the formatter.
3
Unplug the fan cable connector (callout 1), and carefully unwind the fan cables from the cable
guides (callout 2).
4
Release two black tabs (callout 3).
5
Slide the controller fan (callout 4) out of the printer.
2
1
2
3
2
2
4
Figure 93.
Controller fan
Back assemblies 145
Jetlink connector
1
Remove the back cover. See page 109.
2
Disconnect two cables (callout 1) that are connected to the Jetlink connector (behind the white
ground connector).
3
Remove two screws (callout 2).
4
Remove the Jetlink connector.
2
1
Figure 94.
Jetlink connector
146 Chapter 6 Removal and replacement
Fuser-connector holder assembly
1
Remove the following FRUs:
• Formatter. See page 135.
• Back cover. See page 109.
• Left top cover. See page 103.
• Right top cover. See page 105.
• Low-voltage power supply. See page 136.
• High-voltage power supply. See page 137.
• Feed-drive assembly. See page 142.
• Duplexer (if installed). See page 133.
• Fuser assembly. See page 134.
2
Remove two ground screws (callout 1) and three additional screws (callout 2).
2
1
Figure 95.
Fuser-connector holder assembly (1 of 3)
3
Remove four screws (callout 3) and then remove the formatter cage (callout 4).
3
4
Figure 96.
Fuser-connector holder assembly (2 of 3)
Back assemblies 147
4
Remove one screw (callout 5) and one cable connector (callout 6), and then pull the fuserconnector holder assembly toward you.
6
5
Figure 97.
Fuser-connector holder assembly (3 of 3)
148 Chapter 6 Removal and replacement
Fuser delivery-drive assembly
1
Remove the following FRUs:
• Left top cover. See page 103.
• Right top cover. See page 105.
2
Open the left door.
3
Remove the delivery assembly. See page 113.
4
Disconnect one cable (callout 1) and one connector (callout 2).
1
2
Figure 98.
Fuser delivery-drive assembly (1 of 3)
5
Remove three screws (callout 3).
3
Figure 99.
Fuser delivery-drive assembly (2 of 3)
Back assemblies 149
6
From the left side of the printer, lift the back of the fuser delivery drive assembly to disengage the
top tabs (callout 4).
4
Figure 100.
Fuser delivery-drive assembly (3 of 3)
7
Pull the fuser delivery-drive assembly toward you to disengage the front tab, rotate the assembly
to the left, and then lift it away from the chassis.
To reinstall
Make sure that the green handle is in the locked position.
150 Chapter 6 Removal and replacement
Tray 4
The following covers and assemblies can be removed from tray 4:
z
Left side cover
z
Drive assembly
z
Right side cover
z
Controller board
z
Back covers
z
z
Tray assembly
Paper-size detection switch
PCB
z
Tray 4 rollers (pickup, feed,
and separation)
z
Power supply
z
Pickup assembly
z
Registration assembly
z
Paper connecting unit
z
Drive motor
Orientation
See "Orientation of the printer (with tray 4)" on page 100.
Left side cover
1
Remove two screws (callout 1) from the left side cover.
2
Pull the top edge of the cover outward.
3
Lift the left side cover up and outward to remove it from tray 4.
2
1
2
Figure 101.
Left side cover
To reinstall
Make sure that the hook (callout 2) on the inside of the cover connects correctly.
Tray 4 151
Right side cover
1
Remove two screws (callout 1) from the right side cover.
2
Pull the top edge of the cover outward.
3
Lift the right side cover up and out to remove it from tray 4.
1
2
2
Figure 102.
Right side cover
To reinstall
Make sure that the hook (callout 2) on the inside of the cover connects correctly.
152 Chapter 6 Removal and replacement
Back covers
Center back cover
1
Remove four screws (callout 1) from the center back cover.
2
Remove the center back cover.
Right back cover
Note
1
Remove the center back cover.
2
Slide the right back cover (callout 2) toward the center to release an interior tab.
3
Lift the right back cover straight up to release a second interior tab.
Be sure to keep the right back cover vertically aligned with tray 4. Otherwise, the second interior tab
will not release.
4
Pull the right back cover out to remove it.
Left back cover
Note
1
Remove the center back cover.
2
Slide the left back cover (callout 3) toward the center to release an interior tab.
3
Lift the left back cover straight up to release a second interior tab.
Be sure to keep the left back cover vertically aligned with tray 4. Otherwise, the second interior tab will
not release.
4
Pull the left back cover out to remove it.
2
1
2
Figure 103.
2
3
Back covers
Tray 4 153
Tray 4
CAUTION
Tray 4 is heavy and can be damaged if dropped. Use both hands when removing tray 4.
1
Open tray 4 (the tray assembly), and remove all of the paper.
2
Pull the tray assembly out until it stops.
3
Press the release button (callout 1) on the right side of the tray and the release button (not
shown) on the left side of the tray.
4
Continue to press the two release buttons while pulling the tray assembly out of the chassis.
2
1
Figure 104.
Tray 4
154 Chapter 6 Removal and replacement
Rollers (pickup, feed, and separation)
Note
1
Remove tray 4. See page 154.
2
Locate the appropriate roller on the upper right side of the tray cavity. The pickup roller
(callout 1), feed roller (callout 2), and separation roller (callout 3) are all type 2 rollers.
To gain access to the separation roller, slide the blue roller shield toward the back of tray 4 (as shown
in figure 105).
3
Pinch the tab on the end of each roller to release it.
4
Slide the roller off of the shaft.
2
1
2
2
3
Figure 105.
Rollers
To reinstall
z
You do not need to slide the blue shield back over the separation roller. It will reset automatically.
z
Make sure that each roller is locked in place by attempting to remove it without first pinching the
tab.
Tray 4 155
Registration assembly
CAUTION
1
Remove the right side cover. See page 152.
2
Remove four screws (callout 1).
Use care when following step 3. Three cables are connected to the registration assembly.
3
Note
Gently lift the registration assembly off of tray 4, and unplug three connectors (callout 2) from the
rear of the registration assembly.
If you cannot reach the three cable connectors, remove the center back cover (page 153), remove the
right back cover (page 153), and unplug the connectors (figure 107, callout 3) from the back of tray 4.
2
1
2
Figure 106.
Registration assembly (1 of 2)
2
3
Figure 107.
Registration assembly (2 of 2)
156 Chapter 6 Removal and replacement
Drive motor
1
Remove the center back cover. See page 153.
2
Unplug the cable connector (callout 1) from the controller board.
3
Carefully unwind the cable from the cable guides (callout 2).
4
Remove two screws (callout 3).
5
Remove the drive motor from tray 4.
1
2
2
2
3
Figure 108.
Drive motor
Tray 4 157
Drive assembly
1
Remove the center back cover. See page 153.
2
Unplug the cable connector (callout 1) from the controller board.
3
Carefully unwind the cable from the cable guides (callout 2).
4
Remove two screws (callout 3).
5
Remove the drive assembly from tray 4.
1
2
2
2
3
Figure 109.
Drive assembly
158 Chapter 6 Removal and replacement
Controller board
1
Remove the following FRUs:
• Center back cover. See page 153.
• Left back cover. See page 153.
2
Unplug eleven connectors (callout 1).
2
1
Figure 110.
Controller board (1 of 2)
3
Remove two screws (callout 2).
4
Release two holding pins (callout 3).
5
Remove the controller board from tray 4.
2
2
3
Figure 111.
Controller board (2 of 2)
Tray 4 159
Paper-size detection switch PCA
1
Remove the center back cover. See page 153.
2
Remove one screw (callout 1) to remove the leaf spring (callout 2).
2
1
2
Figure 112.
Paper-size switch PCA (1 of 2)
3
Release four tabs (callout 3), and remove the PCA from the casing.
4
Unplug the cable connector (callout 4).
2
4
2
3
Figure 113.
Paper-size switch PCA (2 of 2)
To reinstall
Open tray 4 slightly so that it does not put pressure on the casing.
160 Chapter 6 Removal and replacement
Power supply
1
Remove the following FRUs:
• Center back cover. See page 153.
• Left back cover. See page 153.
2
Unplug one connector (callout 1).
3
Remove two screws (callout 2).
4
Slide the power supply to the left to remove it.
2
1
2
3
Figure 114.
Power supply
Tray 4 161
Pickup assembly
1
Remove the following FRUs:
• Right side cover. See page 152.
• Center back cover. See page 153.
• Right back cover. See page 153.
• Tray assembly. See page 154.
• Registration assembly. See page 156.
2
From the back of tray 4, unplug two connectors (callout 1).
2
1
Figure 115.
Pickup assembly (1 of 2)
3
From the front of tray 4, remove one screw (callout 2).
4
Lift the pickup assembly off the hook (callout 3) to remove it from tray 4.
2
2
3
Figure 116.
Pickup assembly (2 of 2)
162 Chapter 6 Removal and replacement
Paper-connecting unit
1
Release the two levers (callout 1) by pulling them toward the center of the paper connecting unit.
2
Lift the paper connecting unit straight up and remove it.
1
2
Figure 117.
Paper-connecting unit
Tray 4 163
164 Chapter 6 Removal and replacement
7
Troubleshooting
Chapter contents
Troubleshooting process . . . . . . . . . . . . . . . . . . . . . . . . . . . . . . . . . . . . . . . . . . . . . . . . . . . . . . . 167
Basic troubleshooting process flow. . . . . . . . . . . . . . . . . . . . . . . . . . . . . . . . . . . . . . . . . . . . 168
Preliminary operating checks . . . . . . . . . . . . . . . . . . . . . . . . . . . . . . . . . . . . . . . . . . . . . . . . 170
General troubleshooting information . . . . . . . . . . . . . . . . . . . . . . . . . . . . . . . . . . . . . . . . . . . . . . 171
Power-on . . . . . . . . . . . . . . . . . . . . . . . . . . . . . . . . . . . . . . . . . . . . . . . . . . . . . . . . . . . . . . . . . . . 174
Troubleshooting by using control-panel messages . . . . . . . . . . . . . . . . . . . . . . . . . . . . . . . . . . . 175
Event log page . . . . . . . . . . . . . . . . . . . . . . . . . . . . . . . . . . . . . . . . . . . . . . . . . . . . . . . . . . . 175
Control-panel messages . . . . . . . . . . . . . . . . . . . . . . . . . . . . . . . . . . . . . . . . . . . . . . . . . . . . . . . 178
Control-panel and event-log message format . . . . . . . . . . . . . . . . . . . . . . . . . . . . . . . . . . . . 179
Printer-message tables . . . . . . . . . . . . . . . . . . . . . . . . . . . . . . . . . . . . . . . . . . . . . . . . . . . . . 179
Alphabetical error messages . . . . . . . . . . . . . . . . . . . . . . . . . . . . . . . . . . . . . . . . . . . . . . . . 180
Numerical error messages . . . . . . . . . . . . . . . . . . . . . . . . . . . . . . . . . . . . . . . . . . . . . . . . . . 188
User- and service-level diagnostics. . . . . . . . . . . . . . . . . . . . . . . . . . . . . . . . . . . . . . . . . . . . . . . 213
Paper-path test . . . . . . . . . . . . . . . . . . . . . . . . . . . . . . . . . . . . . . . . . . . . . . . . . . . . . . . . . . . 213
Service test . . . . . . . . . . . . . . . . . . . . . . . . . . . . . . . . . . . . . . . . . . . . . . . . . . . . . . . . . . . . . . 213
Service-level diagnostics . . . . . . . . . . . . . . . . . . . . . . . . . . . . . . . . . . . . . . . . . . . . . . . . . . . . . . . 215
Engine test . . . . . . . . . . . . . . . . . . . . . . . . . . . . . . . . . . . . . . . . . . . . . . . . . . . . . . . . . . . . . . 215
Service menu . . . . . . . . . . . . . . . . . . . . . . . . . . . . . . . . . . . . . . . . . . . . . . . . . . . . . . . . . . . . 215
Diagnostics flowchart . . . . . . . . . . . . . . . . . . . . . . . . . . . . . . . . . . . . . . . . . . . . . . . . . . . . . . 216
Other diagnostics for the HP LaserJet 9000, 9000mfp, and 9000Lmfp. . . . . . . . . . . . . . . . . . . . 217
Cold reset . . . . . . . . . . . . . . . . . . . . . . . . . . . . . . . . . . . . . . . . . . . . . . . . . . . . . . . . . . . . . . . 217
Other diagnostics for the HP LaserJet 9040/9050, 9040mfp, and 9050mfp . . . . . . . . . . . . . . . . 219
Cold reset . . . . . . . . . . . . . . . . . . . . . . . . . . . . . . . . . . . . . . . . . . . . . . . . . . . . . . . . . . . . . . . 219
Tray 4 diagnostics . . . . . . . . . . . . . . . . . . . . . . . . . . . . . . . . . . . . . . . . . . . . . . . . . . . . . . . . . . . . 221
Diagnostics label. . . . . . . . . . . . . . . . . . . . . . . . . . . . . . . . . . . . . . . . . . . . . . . . . . . . . . . . . . 221
Motor test . . . . . . . . . . . . . . . . . . . . . . . . . . . . . . . . . . . . . . . . . . . . . . . . . . . . . . . . . . . . . . . 221
Standalone running test . . . . . . . . . . . . . . . . . . . . . . . . . . . . . . . . . . . . . . . . . . . . . . . . . . . . 222
Sensor test . . . . . . . . . . . . . . . . . . . . . . . . . . . . . . . . . . . . . . . . . . . . . . . . . . . . . . . . . . . . . . 222
Light-pattern interpretation . . . . . . . . . . . . . . . . . . . . . . . . . . . . . . . . . . . . . . . . . . . . . . . . . . 223
Jam troubleshooting . . . . . . . . . . . . . . . . . . . . . . . . . . . . . . . . . . . . . . . . . . . . . . . . . . . . . . . . . . 224
Jams . . . . . . . . . . . . . . . . . . . . . . . . . . . . . . . . . . . . . . . . . . . . . . . . . . . . . . . . . . . . . . . . . . . 225
Customer print job . . . . . . . . . . . . . . . . . . . . . . . . . . . . . . . . . . . . . . . . . . . . . . . . . . . . . . . . 225
Clearing jams . . . . . . . . . . . . . . . . . . . . . . . . . . . . . . . . . . . . . . . . . . . . . . . . . . . . . . . . . . . . 225
Evaluate the information pages . . . . . . . . . . . . . . . . . . . . . . . . . . . . . . . . . . . . . . . . . . . . . . . . . . 226
Configuration page . . . . . . . . . . . . . . . . . . . . . . . . . . . . . . . . . . . . . . . . . . . . . . . . . . . . . . . . 226
Jetdirect page . . . . . . . . . . . . . . . . . . . . . . . . . . . . . . . . . . . . . . . . . . . . . . . . . . . . . . . . . . . . 229
Supplies status page. . . . . . . . . . . . . . . . . . . . . . . . . . . . . . . . . . . . . . . . . . . . . . . . . . . . . . . 230
Usage page. . . . . . . . . . . . . . . . . . . . . . . . . . . . . . . . . . . . . . . . . . . . . . . . . . . . . . . . . . . . . . 231
File directory page . . . . . . . . . . . . . . . . . . . . . . . . . . . . . . . . . . . . . . . . . . . . . . . . . . . . . . . . 232
Image-formation troubleshooting. . . . . . . . . . . . . . . . . . . . . . . . . . . . . . . . . . . . . . . . . . . . . . . . . 233
Check the print cartridge. . . . . . . . . . . . . . . . . . . . . . . . . . . . . . . . . . . . . . . . . . . . . . . . . . . . 234
Image-defect tables. . . . . . . . . . . . . . . . . . . . . . . . . . . . . . . . . . . . . . . . . . . . . . . . . . . . . . . . 235
Chapter contents 165
Repeating defect ruler . . . . . . . . . . . . . . . . . . . . . . . . . . . . . . . . . . . . . . . . . . . . . . . . . . . . . 243
Media troubleshooting . . . . . . . . . . . . . . . . . . . . . . . . . . . . . . . . . . . . . . . . . . . . . . . . . . . . . . . . 244
Determine the problem source: media or printer . . . . . . . . . . . . . . . . . . . . . . . . . . . . . . . . . 244
Isolate a paper path . . . . . . . . . . . . . . . . . . . . . . . . . . . . . . . . . . . . . . . . . . . . . . . . . . . . . . . 244
Isolate a media brand. . . . . . . . . . . . . . . . . . . . . . . . . . . . . . . . . . . . . . . . . . . . . . . . . . . . . . 245
Isolate a media type . . . . . . . . . . . . . . . . . . . . . . . . . . . . . . . . . . . . . . . . . . . . . . . . . . . . . . . 245
Communication troubleshooting . . . . . . . . . . . . . . . . . . . . . . . . . . . . . . . . . . . . . . . . . . . . . . . . . 246
Communications check . . . . . . . . . . . . . . . . . . . . . . . . . . . . . . . . . . . . . . . . . . . . . . . . . . . . 246
Jetdirect configuration . . . . . . . . . . . . . . . . . . . . . . . . . . . . . . . . . . . . . . . . . . . . . . . . . . . . . 246
Embedded LAN troubleshooting (HP LaserJet 9040n/9050n, HP LaserJet 9040dn/9050dn,
HP LaserJet 9050mfp, and HP LaserJet 9040mfp only) . . . . . . . . . . . . . . . . . . . . . . . . 247
Wiring diagrams . . . . . . . . . . . . . . . . . . . . . . . . . . . . . . . . . . . . . . . . . . . . . . . . . . . . . . . . . . . . . 251
166 Chapter 7 Troubleshooting
Troubleshooting process
The troubleshooting process is a systematic approach that addresses the primary problems first, and
then other problems, to discover the causes for printer malfunctions and errors. The "Basic
troubleshooting process flow" on page 168 illustrates the primary steps for troubleshooting the
printing system. Each heading depicts a primary troubleshooting step. A “yes” answer to the
questions allows troubleshooting to proceed to the next primary step.
A “no” answer indicates that additional testing and correction is needed. Proceed to the referenced
location in the chapter and follow the directions there. After completing the additional testing and
correcting the problem, proceed to the next primary step.
Note
It is important to always follow this process in sequence. Failure to do so can result in increased repair
time, difficulty, and expense.
This list describes the basic questions to answer and the corresponding troubleshooting sections to
help quickly define the problem(s).
Table 18. Primary steps for troubleshooting
"Power-on" on page 174
Does the printer perform the initialization and power-on sequence?
This section contains the procedures for correcting power-supply problems.
"Printer-message tables" on
page 179
Does the control panel indicate an error condition?
This section contains the procedures for clearing control-panel messages.
"Paper-path test" on page 213
Is it possible to perform a paper-path test?
This section contains information about troubleshooting paper-path and
print-media problems.
"Evaluate the information pages" Is there information in the event log?
on page 226
This section contains the procedures for printing the information pages and
evaluating and correcting printer configuration.
"Image-formation
troubleshooting" on page 233
Does the print quality meet customer expectations?
This section contains print-cartridge checks, information about EconoMode,
image-defect examples, and the repeating-defect ruler.
"Media troubleshooting" on page Is the media being used acceptable for this printer?
244
This section contains information about how to determine print-media
problems and correct them.
"Communication
troubleshooting" on page 246
Can the customer print from the host system successfully?
This section describes how to determine whether the printer is
communicating correctly with the host system.
Troubleshooting process 167
Basic troubleshooting process flow
Figure 118.
Basic troubleshooting process flow (1 of 2)
168 Chapter 7 Troubleshooting
Figure 119.
Basic troubleshooting process flow (2 of 2)
Troubleshooting process 169
Preliminary operating checks
Make sure that the following conditions are met before troubleshooting a specific printer problem:
Note
z
The printer is plugged in, and the specified power is being delivered.
z
The selected tray contains media that is correctly loaded and adjusted.
z
The print cartridge is installed correctly.
z
The printer receives maintenance on a regular basis.
z
Any I/O devices are installed correctly.
z
The customer is using acceptable media
z
The printer is positioned on a solid, level surface.
z
The line voltage does not vary more than 10% from the nominal rated value that is specified on
the power-rating label.
z
The operating environment for the printer is within the temperature and humidity specifications.
z
The printer is never exposed to ammonia fumes.
z
The printer is not exposed to direct sunlight.
z
Non-HP components (such as refilled print cartridges, font DIMMs, and memory DIMMs) are
removed from the printer.
Sudden changes in printer environment can cause image defects and media-handling problems.
Always make sure that the printer is not exposed to direct sunlight or to heating or cooling vents. Allow
time for the printer and media to acclimate whenever changing environments (for example, moving
from a cold environment to a warm one). Acclimation can take anywhere from 3 to 24 hours depending
on the ambient conditions.
170 Chapter 7 Troubleshooting
General troubleshooting information
The following lists symptoms and typical solutions to miscellaneous problems.
Abnormal noises are evident, such as grinding or chattering when
the main motor is turned on
In the print cartridge area:
z
If the print cartridge is new, automatic seal roll-up will cause noise until seal removal is complete.
z
If it is not new, replace the print cartridge.
In the fuser area:
z
Reseat the fuser.
z
Remove and reinstall the fuser.
In tray 2 or 3:
z
Verify that the media is loaded correctly with acceptable media.
If installed, from tray 4:
z
Verify that the media is loaded correctly with acceptable media.
z
Replace the tray 4 paper path connection unit (PPCU).
z
Replace the tray 4 main-drive assembly.
Media does not feed from tray x when printing from a software
program; the paper-path test is successful
Verify that the correct media size is loaded:
z
All trays: check from the control panel.
z
Tray 2, 3, or 4: remove and reseat the paper guides in the correct position in the tray that fails.
z
Verify the custom-size-switch setting.
Media does not print from tray 4
z
Make sure that power is being supplied to tray 4.
z
Print a configuration page (make sure that tray 4 is listed in the paper-handling options section).
z
Run a paper-path test from tray 4 (if the test is successful, the paper-size-detection switches
might have failed or an incorrect size might be specified in the software program).
z
Verify the custom-size-switch setting.
The printer stops printing and hangs on certain jobs
z
Remove any non-HP memory DIMMs and retry the print job.
z
Resend the print job.
z
Send a print job from a different software program.
General troubleshooting information 171
Envelopes are wrinkling
z
Verify that the input tray is tray 1.
z
Verify that the output destination is the face-up bin.
z
Place the fuser levers in the up position and retry printing the envelopes.
z
Try different envelopes (make sure that the envelopes are within specifications; see the HP
LaserJet Printer Family Print Media Guide).
Fusing is poor
z
Make sure that the fuser levers are in the down position for cut-sheet media.
z
Make sure that all packing spacers are removed from inside of the printer.
z
Try different media (make sure that the media is within specifications; see the HP LaserJet
Printer Family Print Media Guide).
z
Make sure that the correct fusing mode for the media is set at the control panel.
z
Make sure that the ac power does not fluctuate out of range during the print cycle.
The printer feeds from an incorrect tray when different media is
selected for the first page of the job
z
Determine whether the problem is a hardware or a software issue (run a paper-path test from
each paper tray to eliminate the hardware; see "Paper-path test" on page 213).
z
If the paper-path test fails, troubleshoot the error message.
z
Make sure that the most current printer driver is installed (click the Print Quality tab on the
printer driver, and then click About).
z
Verify the custom-size-switch setting.
z
If the paper-path test works, the problem might be a software- or customer-related issue. Make
sure to define the media types that are loaded in each paper tray. This can be done from HP Web
Jetadmin if an HP Jetdirect print server is installed, or from the control panel. Use the
appropriate procedure from the following choices.
From HP Web Jetadmin:
1
Click the Trays tab.
2
Select the correct media type for each tray that is listed.
3
Click OK to save your changes, and exit HP Web Jetadmin.
From the control panel:
Tray 1
1
Press
2
Use
or
to scroll to PAPER HANDLING, and then press
3
Use
or
to scroll to TRAY 1 SIZE, and then press
4
Use
or
to scroll to the size of media that is loaded, and then press
5
Press PAUSE/RESUME or MENU to exit the menu.
to open the menus.
172 Chapter 7 Troubleshooting
.
.
.
Tray 2, tray 3, and tray 4
Note
Standard sizes are automatically detected in these trays.
Use these steps to set the size for custom media in tray 2, tray 3, and tray 4:
1
Press
2
Use
or
to scroll to PAPER HANDLING, and then press
3
Use
.
or
to scroll to TRAY X SIZE, where X is the tray that you are setting, and then press
4
Use
or
to scroll to CUSTOM, and then press
5
Use
or
to select the unit of measure (MILLIMETERS or INCHES), and then press
6
Use the keypad or the
or
to specify the X (front to back) dimension, and then press
7
Use the keypad or the
or
to specify the Y (left to right) dimension, and then press
8
Press PAUSE/RESUME or MENU to exit the menu.
to open the menus.
.
.
.
.
.
General troubleshooting information 173
Power-on
The printer control panel should be functional as soon as possible in the troubleshooting process so
that the printer diagnostics can assist in locating printing errors.
Table 19. Power-on defects or a blank display
Problem
Action
Is ac power available at the
printer power receptacle?
Make sure that power is available. See "Electrical specifications
(HP LaserJet 9000)" in Chapter 1.
Is the printer on/off switch set to Push the switch to the on position.
on?
Are the printer fans on?
Press PAUSE/RESUME or MENU to put the printer in the ready state.
Note
The fan operation is significant, because all fans are controlled by the printer
DC controller PCA. Fans 1 through 6 operate at full speed for 30 seconds
during the WAIT period. Fans 1 through 5 slow to half-speed, and fan 6 stops
during the STBY period and when the printer is in PowerSave mode. Make
sure that the printer is not in PowerSave mode.
Operational fans indicate that the following conditions are being met:
NO
YES
1
The ac power is present in the printer.
2
The DC power supply is functional (both 24 Vdc and 5 Vdc are
generated).
3
The DC controller PCA microprocessor is functional.
If the fans are not working, turn off the printer and remove the printer
formatter PCA. Disconnect all of the printer paper-handling options. Then,
turn on the printer and check the fans again. If the fans are still not working,
perform the following steps:
1
Make sure that all of the fans are connected to the DC controller PCA.
2
Perform an engine test.
If the fans are working, but the printer control panel is blank, print an engine
test. See "Service-level diagnostics" on page 215. If the engine test is
successful, perform the following steps:
1
Reseat or replace the cable from the control panel that is connected to
the DC controller PCA.
2
Replace the control-panel assembly.
3
Make sure that the latest firmware is installed.
4
Replace the printer formatter PCA.
If the engine test is not successful, make sure that no media is in the paper
path. Retry the engine test. If the engine test is still unsuccessful, perform the
following steps:
174 Chapter 7 Troubleshooting
1
Make sure that the latest firmware is installed.
2
Replace the DC controller PCA.
Troubleshooting by using control-panel messages
The control panel should show the message READY, PAUSED, or POWERSAVE ON. For information about
error messages that appear, see the event log. If the display is blank, see "Power-on" on page 174.
Event log page
Use the event log to diagnose and troubleshoot printer errors and intermittent failures. You can either
print the event log or view it on the control panel (select PRINT EVENT LOG or SHOW EVENT LOG).
The event log is a last in-first out (LIFO) ordered listing of the last 50 entries. The printed event log is
printed in four columns that show the event number, page count, error code, and description or
personality.
The description or personality provides detail about the error messages. The information is more
useful for troubleshooting.
The following items should be logged in the event log:
z
Critical errors
z
Jams
z
Sensors sensing out-of-range conditions
z
Deleted jobs
z
Unexpected media size
z
Complex page
z
Buffer overflow
z
NVRAM changes
z
Any diagnostics tests
Print the event log
The printer internal event log stores the 50 most recent events, and can be printed at any time. Use
these steps to print the event log:
1
Press
2
Use
or
to scroll to CONFIGURE DEVICE, and then press
3
Use
or
to scroll to DIAGNOSTICS, and then press
4
Use
or
to scroll to PRINT EVENT LOG, and then press
5
The event log prints. The control panel shows the message PRINTING EVENT LOG.
to open the menus.
.
.
.
Interpret the event log
Each individual entry in the log is called an “error,” while all errors that occur at the same page count
are called an “event.” See "Printer-message tables" on page 179 for each error in an event to better
understand the event. Events usually conclude with a time-out or no response from the device (error
66.XY in the event log). Turn the printer off, and then turn the printer on.
Use the event log tables in this section to associate errors in the event log with the control-panel error
message. Follow the recommended action listed in the event log table starting on page 179 for each
error or event.
Troubleshooting by using control-panel messages 175
1
Check the event log for specific error trends in the last 10,000 printed pages.
2
Ask the customer for any observed error trends (for example, if jams tend to occur in a specific
area of the printer).
3
Record any specific error trends.
4
See "Printer-message tables" on page 179” and follow the recommended action.
Sample event log
A
Figure 120.
Sample event log (HP LaserJet 9000 series printer page shown)
176 Chapter 7 Troubleshooting
View the event log
Use the event log to scroll through the contents of the event log from the control panel. The 50 most
recent events appear, with the most recent appearing first. Use
or
to scroll through the eventlog contents. If the event log is empty, the control panel shows the message EVENT LOG IS EMPTY.
Follow these steps to view the event log:
1
Press
2
Use
or
to scroll to CONFIGURE DEVICE, and then press
3
Use
or
to scroll to DIAGNOSTICS, and then press
4
Use
or
to scroll to SHOW EVENT LOG, and then press
5
The event log appears.
to open the menus.
Error number
13.3 PAPER JAM
CHECK RIGHT DOOR
Appears on control-panel display
.
.
Page count
.
Error code
50 0000006 XX.XX.XX
Appears in the event log
Figure 121.
Example of events
Hint
Whenever a 13.XX appears on the control panel, clear the jammed media from the printer, press PAUSE/
RESUME or MENU to stop printing, and print the event log. If you cannot print the event log, you can still
view it on the control panel.
Troubleshooting by using control-panel messages 177
Control-panel messages
Make sure to read the exact text of the control-panel message, including the error-message number
and the text, in order to locate the error message in the tables. This control panel stores enhanced
information.
Messages that appear on the control panel provide six categories of information. Each message
category is assigned a priority. If more than one condition occurs at the same time, the highest
priority message appears. When it is cleared, the next priority message appears, and so on. The
following are the messages and their priorities:
z
Status messages—Status messages communicate the current state of the printer to the
operator. Whenever the printer is ready and online, the printer status message READY appears
unless warning messages are pending. When the printer is performing a task, such as a reset or
a test, the associated printer-status message appears. When the task is complete, the message
returns to READY or PAUSED, depending on the current state of the printer.
z
Warning messages—Warning messages are messages that are important enough that the
customer must acknowledge them, but not serious enough to cause the printer to stop the
printing process. They are usually transient in nature but they can affect the output, so a record
of their occurrence is important. Warnings generally alternate with the READY (or PAUSED) status
message and remain on the control panel until the customer presses
. Warnings appear in
most-recent order (LIFO) with duplicates removed.
z
Error messages—Error messages communicate to the customer that some action must be
performed, such as adding media or clearing a jam. Some errors are considered autocontinuable, because the error message appears on the control panel for 10 seconds, and then
the printer clears the message and continues normal operation. Pressing a control-panel button
during the 10-second period cancels the auto-continue feature and indicates the function of the
button that was pressed. Unlike status and warning messages, error messages stop the printing
process. The customer has to either fix the problem or give the printer a different command. If
the customer can continue past some error conditions without actually fixing the problem, then
the customer should be able to perform the task by pressing
. If only one option is available
when the customer presses
, printing should continue by applying the option shown. If more
than one option is available when the customer presses
, the options are listed with the most
logical option listed first and highlighted.
z
Critical error messages—Critical error messages communicate printer failures to the customer.
Generally, turning power off and then on is required in order for the printer to resume normal
operation. If the critical error persists, the printer might require service and the customer must
request a service call. Critical errors are not auto-continuable.
z
Output device warning messages—These messages are similar to the warning messages that
were described previously, except that they relate to the output device. By default only, the
message appears if the output device does not provide any additional help. The prompt at the
bottom of the control panel does not appear.
z
Output device error messages—These messages are similar to the error messages that are
described previously, except that they relate to the output device. By default only, the message
appears if the output device does not provide any additional help. The prompt at the bottom of
the control panel does not appear.
178 Chapter 7 Troubleshooting
Control-panel and event-log message format
The control-panel messages are in the following format:
z
13.XY.ZZ JAM INSIDE DUPLEXER
z
WAITING FOR TRAY XX TO LIFT
z
40 EIO X BAD TRANSMISSION
The event-log messages are in the following format:
Note
z
3 13.xy.zz 0 JAM INSIDE DUPLEXER
z
2 00.00.00 0 WAITING FOR TRAY XX TO LIFT
z
1 40.00.00 0 EIO X BAD TRANSMISSION
Print a configuration page to identify the input or output device that is configured. Notice that the error
format only identifies the Jetlink device number and the device type; it does not identify the input or
output device.
Printer-message tables
Printer messages appear on the printer control-panel display to relay the normal status of the printer
(such as PROCESSING JOB), or an error condition (such as CLOSE RIGHT DOOR) that needs attention.
"Alphabetical error messages" on page 180 and "Numerical error messages" on page 188 list
messages that require attention, or that might raise questions. Messages are listed in alphabetical.
Not all messages are listed, because some (such as READY) are self-explanatory.
Note
Some printer messages are affected by the AUTO CONTINUE and CLEARABLE WARNINGS settings on the
Configure Device menu, on the System Setup submenu, or on the printer control panel (see "System
setup submenu" on page 46).
Control-panel messages 179
Alphabetical error messages
Table 20. Alphabetic error messages
Message
[FS] DEVICE
FAILURE
To enter menus
press
alternates with
READY
To enter menus
press
[FS] FILE
OPERATION FAILED
To enter menus
press
Event-log
error
message
Description or explanation
Recommended action
The printer detected a device
failure on the specified device.
[FS] is:
1
Turn off the printer, and then
turn the printer on again.
2
Reseat the specified device.
3
Replace the specified device.
•
DISK
•
FLASH
•
ROM DISK
•
RAM DISK
A PJL file system command
attempted to perform an illogical
operation.
[FS] is:
alternates with
•
DISK
READY
To enter menus
press
•
FLASH
•
ROM DISK
•
RAM DISK
[FS] FILE
SYSTEM IS FULL
To enter menus
press
A PJL file-system command could 1
not store something on the file
2
system.
[FS] is:
alternates with
•
DISK
READY
TO enter menus
press
•
FLASH
•
ROM DISK
•
RAM DISK
[FS] IS WRITE
PROTECTED
To enter menus
press
The file-system device is
1
protected, and no new files can be
written to it.
2
[FS] is:
alternates with
•
DISK
READY
To enter menus
press
•
FLASH
•
ROM DISK
•
RAM DISK
<BINNAME> FULL
REMOVE ALL PAPER
FROM BIN
ACCESS DENIED
MENUS LOCKED
Verify the PJL command.
Clear the file system.
Check with the system
administrator.
Remove the file system
protection.
Check with the network
administrator.
1
Empty the specified output
bin.
2
Make sure that the flag moves
smoothly.
3
If the error persists, perform
the service test.
Security mechanism is enabled.
z
Check with the network
administrator.
The printer is canceling a job.
No action is necessary.
The specified output bin is full.
BLOWN LAMP FUSER
BLOWN MOTOR FUSER
CANCELING
180 Chapter 7 Troubleshooting
Table 20. Alphabetic error messages (continued)
Message
Description or explanation
Recommended action
CARTRIDGE FAILURE
For help press
z
1
Remove and reinstall the print
cartridge
alternates with
z
RETURN FOR
REPLACEMENT
For help press
2
Replace the cartridge.
z
3
Replace the toner-sensor
contact assembly.
4
Replace the high-voltage
power supply.
1
To continue press
2
Replace the print cartridge.
3
Replace the toner-sensor
contact assembly.
4
Replace the high-voltage
power supply.
5
Replace the DC controller.
CARTRIDGE LOW-XXXX
PAGES ESTIMATED
For help press
Event-log
error
message
z
alternates with
z
TO CONTINUE
PRESS
z
CARTRIDGE OUT
REPLACE CARTRIDGE
For help press
z
z
alternates with
The print cartridge is
defective.
The toner-sensor contact
assembly is defective.
The high-voltage power
supply is defective.
A low-toner situation occurred
and the cartridge low setting is
set to “stop.”
The XXXX starts at 8% toner
capacity remaining.
When the estimated pages
reaches 0, the message
REPLACE CARTRIDGE appears.
.
The toner in the cartridge
Replace the print cartridge.
reached 0%.
The printer continues printing
until the drum life reaches 0%.
READY
To enter menus
press
CHECK CABLES
The printer cables might be loose. Make sure that the printer cables
are secured tightly.
CHECK COPY CONNECT
CARD
The copy connect card might not
be installed correctly.
Install the copy connect card.
CHECKING PRINTER
The engine is doing an internal
test.
No action is necessary.
CHOSEN PERSONALITY
NOT AVAILABLE
For help press
z
1
Change the font request.
2
Install additional fonts.
alternates with
READY
To enter menus
press
z
The PJL encountered a
request for a personality that
does not exist in the printer.
The job is aborted, and no
pages are printed.
CLEANING
A cleaning page is processing.
No action is necessary.
CLEARING EVENT LOG
An event log is clearing.
No action is necessary.
CLEARING PAPER
FROM PRINTER
Media is detected in the paper
path (the printer will attempt to
eject the media).
1
No action is necessary.
2
If the jam does not clear,
remove the media.
CLOSE FRONT DOOR
For help press
The front door is open.
1
Close the front door.
2
If the error persists, perform a
service test.
Control-panel messages 181
Table 20. Alphabetic error messages (continued)
Message
Description or explanation
Recommended action
The printer has received data.
Press
DELETING
The printer is deleting the stored
job.
No action is necessary.
DETECTABLE SIZE
IN TRAY XX
For help press
Standard-size media is loaded in
tray XX, but the switch is set to
custom.
Set the switch to standard.
DIFFERENT PAPER
SIZES IN JOB
The current job has different
media sizes.
No action is necessary.
DIGITAL SEND
COMMUNICATION
The MFP cannot communicate
with the server.
Check with the system
administrator.
EIO DISK X
NOT FUNCTIONAL
For help press
The hard disk in the EIO slot X is
not working correctly.
1
Reseat the hard disk.
2
Replace the hard disk.
EIO X DISK
INITIALIZING
The EIO hard disk in slot X is
initializing.
No action is necessary.
EIO X DISK
SPINNING UP
The EIO hard disk in slot X is
spinning up its plater.
No action is necessary.
ERROR EXITING
DIGITAL SEND JOB
The digital-send job failed.
Resend the digital-send job.
EXTERNAL DEVICE
INITIALIZING
To enter menus
press
The printer has just been turned
on, or is coming out of the
PowerSave mode.
No action is necessary.
FINISHER ALIGN
ERROR
An alignment error occurred in the The job will not be completed.
output device.
FLASH DISK X
INITIALIZING
A new flash DIMM is installed and 1
is initializing.
2
HARD DISK NOT
INSTALLED
The hard disk is not installed on
the MFP.
Install the hard disk.
INCORRECT PIN
z
Retype the PIN.
DATA RECEIVED
PRESS
TO
CONTINUE
Event-log
error
message
to print the last page.
alternates with
READY
To enter menus
press
alternates with
DETECTABLE SIZE
IN TRAY XX
MOVE SWITCH TO
STANDARD
z
182 Chapter 7 Troubleshooting
The wrong PIN is typed.
This message appears for 2
seconds and then returns to
the previous screen so that
the customer can retype the
PIN.
No action is necessary.
Do not turn the power off
during the initialization.
Table 20. Alphabetic error messages (continued)
Message
INITIALIZING
PERMANENT STORAGE
Event-log
error
message
Description or explanation
Recommended action
z
No action is necessary.
z
The printer has just been
turned on.
Permanent storage is
initializing.
INPUT PAPER PATH
OPEN
The paper-path between the
printer and the external paperhandling input device is open.
Close the input device paper path.
INSTALL CONNECTION
UNIT
For help press
The paper path connection unit
was not installed in the right
access door.
1
Locate and install the paperpath connection unit.
2
Reinstall the paper-path
connection unit.
3
Replace the paper path
connection unit.
INTERNAL DISK NOT
FOUND
The internal disk is not found
INTERNAL DISK NOT
FUNCTIONAL
The internal disk is not functioning Turn off the printer, and then turn
correctly.
the printer on again.
INTERNAL DISK NOT
INITIALIZED
The internal disk has not been
initialized.
LOAD TRAY XX
[TYPE] [SIZE]
For help press
Tray XX is configured for a specific 1
type and size for a job that has
2
been sent, but the tray is empty.
alternates with
Make sure that the internal disk is
installed correctly.
Initialize the disk or check with the
system administrator.
3
TO USE ANOTHER
TRAY PRESS
Insert media into tray XX.
Select a different tray by
pressing
.
Verify the program settings.
LOADING
PROGRAM XX
DO NOT POWER OFF
Programs or fonts are loading into No action is necessary (do not
RAM (the length of the process
turn power off during this
depends on the size of the entity). process).
MANUAL FEED
[TYPE] [SIZE]
For help press
A job is sent to the printer, but the 1
specified media size is not
available.
2
Insert the correct media into
tray 1.
Select a different tray.
alternates with
TO USE ANOTHER
TRAY PRESS
MECHANICAL ERROR
MEMORY FULL
STORED DATA LOST
z
z
MEMORY SETTINGS
CHANGED
No memory is available in the 1
printer.
2
The current job might not print
correctly, and some resources
(downloaded fonts) might be
lost.
The resource-saving or I/O
1
buffering settings had to be
2
changed by the printer (memory is
3
insufficient for the previous
settings).
Simplify the job.
Install additional memory.
Verify the program settings.
Simplify the job.
Install additional memory.
Control-panel messages 183
Table 20. Alphabetic error messages (continued)
Message
MEMORY SHORTAGE
JOB CLEARED
For help press
Event-log
error
message
Description or explanation
The printer ran out of memory (the 1
remainder of the job is canceled).
2
Add a hard disk.
Verify the job and program
settings.
4
Simplify the job.
The printer adaptive data
1
compression had to fit the raster
2
graphics in the available memory.
3
Simplify the job.
READY
To enter menus
press
alternates with
Add additional memory.
3
alternates with
MEMORY SHORTAGE
PAGE SIMPLIFIED
For help press
Recommended action
Add additional memory.
Add a hard disk.
READY
To enter menus
press
NON HP CARTRIDGE
DETECTED
For help press
A non-HP print cartridge is
installed.
No action is necessary.
Note
This message appears for 30
seconds, and then the printer
returns to the READY state.
Note
A cartridge-low/out message does
not appear with non-HP print
cartridges.
OPTIONAL BIN
1 FULL
REMOVE ALL PAPER
FROM BIN
The face-up bin is full. More than
125 pages are in the face-up bin.
OPTIONAL BIN
2 FULL
REMOVE ALL PAPER
FROM BIN
The stapler bin is full. More than Remove all media from the stapler
3,000 sheets of letter or A4 media bin.
are in the stapler bin.
OUTPUT PAPER PATH
OPEN
The paper path between the
printer and the output-device is
open.
PAUSED
PAUSE/RESUME has been pressed. Press PAUSE/RESUME to return the
Printing stopped, but the job might printer to READY.
be received.
To return to ready
press RESUME key
Remove all media from the faceup bin.
Close the output-device paper
path.
PERFORM PRINTER
MAINTENANCE
For help press
The printer reached its prescribed Perform printer maintenance.
printed page threshold of 350,000
pages between maintenance
periods.
PLEASE WAIT
The printer is deleting data so it
can stop receiving I/O.
No action is necessary.
POWERSAVE ON
The printer is in the PowerSave
mode.
No action is necessary.
Note
Press any key on the control panel
to return the device to ready.
184 Chapter 7 Troubleshooting
Table 20. Alphabetic error messages (continued)
Message
Event-log
error
message
Description or explanation
Recommended action
PRINTING
CONFIGURATION
A configuration page is printing.
No action is necessary.
PRINTING
EVENT LOG
An event log is printing.
No action is necessary.
PRINTING
FILE DIRECTORY
A file directory page is printing.
No action is necessary.
PRINTING
FONT LIST
A PCL or PS personality typeface No action is necessary.
list is printing.
PRINTING
MENU MAP
A menu map is printing.
No action is necessary.
PRINTING
PAPER PATH TEST
A paper-path test is printing.
No action is necessary.
PRINTING
REGISTRATION PAGE
A registration page is printing.
No action is necessary.
PRINTING
SUPPLIES STATUS
A supplies-status page is printing. No action is necessary.
PRINTING
USAGE PAGE
A usage page is printing.
PROCESSING
The printer is processing the
No action is necessary.
current job, but has not yet begun
to pick up pages.
PROCESSING
COPY X OF Y
The printer is processing or
printing collated copies (X of Y
indicates copies is processing).
No action is necessary.
PROCESSING
FROM TRAY X
The printer is processing the
current job.
No action is necessary.
READY
To enter menus
press
The printer is ready and online,
waiting for data.
No action is necessary.
RESEND
UPGRADE
The firmware upgrade is not
complete.
Resend the upgrade (do not turn
power off during the upgrade).
RESETTING
FACTORY SETTINGS
z
Reset the configurations.
z
“Restore factory settings” is
selected.
A cold reset has occurred.
No action is necessary.
ROTATE PAPER
IN TRAY XX
For help press
A job requires booklet printing, but 1
none of the trays has letter or A4
2
media loaded in the correct
orientation.
Rotate the media in the tray.
ROTATE PAPER
IN TRAY XX
For help press
Tray XX is loaded with letter or A4
media in the portrait orientation,
but the job that used the tray did
not specify portrait.
1
Verify the program settings.
2
Verify the tray settings.
alternates with
READY
To enter menus
press
Verify the program settings.
Note
To improve performance, rotate
the media.
Control-panel messages 185
Table 20. Alphabetic error messages (continued)
Message
Event-log
error
message
Description or explanation
Recommended action
SCAN CARRIAGE
LOCKED
The scan carriage is locked.
Unlock the scan carriage.
SCAN FAILURE
A scanning job failed.
Turn off the printer, and then turn
the printer on again.
SETTING SAVED
A value is saved.
No action is necessary.
SIZE MISMATCH
TRAY XX = [SIZE]
For help press
The media loaded in the tray is
1
longer or shorter in the feed
2
direction than the size that the tray
is configured for.
STAPLER ALIGN
ERROR
The media in the stapling device is Clean the rollers at the
unaligned (this error message
accumulator.
might appear when different
media sizes are used for the same
print job).
STAPLER JAM
For help press
The stapler is jammed.
Clear the jammed staples.
STAPLER OUT OF
STAPLES
For help press
The stapler is out of staples.
Replace the staple cartridge.
STAPLING
INTERRUPTION
An obstruction in the stapler must Remove the obstruction.
be removed before stapling can
continue.
TOO MANY PAGES IN
JOB TO STAPLE
For help press
The output device received too
many pages to perform the
stapling process.
The pages are ejected without
being finished.
TRAY XX CONTAINS
UNKNOWN MEDIA
The media type in the specified
tray cannot be determined.
1
Verify the tray settings.
2
Make the media settings
more specific.
TRAY XX EMPTY
[TYPE] [SIZE]
To enter menus
press
The specified tray is empty, but the Load additional media into the
current job does not require this
tray.
tray to print correctly.
Verify the tray settings.
Set the tray switch to
standard (if custom-size
media is used, set the X and
Y values in the custom setting
of the control panel).
alternates with
READY
To enter menus
press
TRAY XX OPEN
For help press
alternates with
READY
To enter menus
press
186 Chapter 7 Troubleshooting
The specified tray is open, but the Close the tray.
current job does not require this
tray to print.
Table 20. Alphabetic error messages (continued)
Message
TRAY XX SIZE=
*DETECTED SIZE
For help press
alternates with
Event-log
error
message
Description or explanation
Recommended action
The custom switch is in the
1
“Standard” position, and the
2
customer selects a value from the
3
menu.
TRAY X SIZE=
*DETECTED SIZE
To change, move
switch in tray x
Verify the tray settings.
Verify the program settings.
Set the tray switch to
“Custom,” or do not select a
value from the menu.
TRAY XX
[TYPE] [SIZE]
DETECTED SIZE
The media size in tray XX when the If custom size media is installed,
tray is closed and the custom
change the custom switch to the
switch is not changed.
correct position.
TYPE MISMATCH
TRAY XX= [TYPE]
For help press
The system detects a
transparency in the paper path
coming from tray XX.
1
Reconfigure the tray for
transparencies.
2
If no transparencies are
installed, replace the OHT
sensor (PS1).
UNABLE TO STORE
JOB
A memory, disk, or configuration
problem prevents the job from
being stored.
Check the control panel for
additional messages.
UNSUPPORTED SIZE
IN TRAY XX
A job requires a specified size
1
media that is not supported by the
printer.
2
Reformat the print job to use
a supported size.
The requested media size or type 1
is not available (the printer asks if
it should use another media size
or type instead).
Select a different type, size,
or tray to use. Use
and
to view the available
media in the printer and press
to select the highlighted
tray.
USE [TYPE]
[SIZE] FROM
TRAY N INSTEAD
2
Cancel the job.
Verify the program settings.
WAIT FOR PRINTER
TO REINITIALIZE
A RAM-disk setting changed (the No action is necessary (do not
printer is automatically restarting). turn the power off during
An output-device setting changed initialization).
(the printer is automatically
restarting).
WAITING FOR
TRAY XX TO LIFT
The tray number XX is lifting the
media to the top of the tray for
correct feeding.
No action is necessary.
WARMING UP
The printer was turned on or is
coming out of PowerSave mode.
No action is necessary.
Control-panel messages 187
Numerical error messages
Table 21. Numeric error messages
Control panel
message
Event-log
error
message
Description
Recommended action
13.01.00 JAM IN
TRAY 1
For help press
13.01.00
A page is jammed in the paper
path at the tray 1 feed area.
1
Clear the jam in the indicated
area.
2
Close the door so that the
printer attempts to clear the
paper path.
3
Perform a service test. See
page 213.
4
If the error persists, replace
the paper-input unit.
5
Replace the tray 1 pickup
rollers.
6
Replace tray 1.
1
Clear the jam in the indicated
area.
13.01.00 JAM IN
TRAY X
For help press
13.01.00
A page is jammed in the paper
path at tray X feed area.
•
•
13.01.00 JAM INSIDE 13.01.00
RIGHT DOOR
For help press
188 Chapter 7 Troubleshooting
Tray 2: The media did not 2
reach the tray 2 feed
sensor (PS1402) within the
specified time.
3
Tray 3: The media did not
reach the tray 3 feed
sensor (PS1404) within the
4
specified time.
A page is jammed in the paper
path at the feed area.
Closing the door so that the
printer attempts to clear the
paper path.
Make sure that the pickup
roller is installed in tray 2
and/or tray 3.
Replace the pickup rollers.
5
If the errors persists, replace
the paper-input unit.
1
Clear the jam in the indicated
area.
2
Close the door so that the
printer attempts to clear the
paper path.
3
Perform a service test. See
page 213.
4
If the error persists, replace
the paper input unit.
5
Replace the tray 1 pickup
rollers.
6
Replace tray 1.
Table 21. Numeric error messages (continued)
Control panel
message
Event-log
error
message
Description
13.03.00 JAM IN
TRAY 1
For help press
13.03.00
z
13.03.00 JAM IN
TRAY X
For help press
z
13.03.00
13.03.00 JAM INSIDE 13.03.00
RIGHT DOOR
For help press
13.05.00 JAM INSIDE 13.05.00
FRONT DOOR
For help press
z
z
A page is jammed in the paper 1
path at the tray 1 feed area.
The media did not reach the
2
registration sensor (PS2)
within the specified time.
z
Clear the jam in the indicated
area.
Close the door so that the
printer attempts to clear the
paper path.
3
Perform a service test. See
page 213.
4
If the error persists when
feeding, replace the tray 1
pickup rollers and replace
tray 1.
A page is jammed in the paper 1
path at tray X feed area.
The media did not reach the
2
registration sensor (PS2)
within the specified time.
A page is jammed in the paper
path at the feed area.
z
Recommended action
Clear the jam in the indicated
area.
Close the door so that the
printer attempts to clear the
paper path.
3
Perform a service test. See
page 213.
4
If the error persists when
feeding from tray 2 or tray 3,
replace the paper input unit.
1
Clear the jam in the indicated
area.
2
Close the door so that the
printer attempts to clear the
paper path.
3
Perform a service test. See
page 213.
4
If the error persists, replace
the paper-input unit.
5
Replace the tray 1 pickup
rollers.
6
Replace tray 1.
A page is jammed in the paper 1
path at the fuser area.
The leading edge of the media 2
did not reach the fuser delivery
sensor (PS502) within the
specified time.
3
Clear the jam in the indicated
area.
Close the door so that the
printer attempts to clear the
paper path.
If the error persists, replace
the print cartridge.
4
Replace the transfer roller
assembly.
5
Replace the fuser.
Control-panel messages 189
Table 21. Numeric error messages (continued)
Control panel
message
Event-log
error
message
13.05.00 JAM INSIDE 13.05.00
RIGHT DOOR
For help press
13.06.00 JAM INSIDE 13.06.00
FRONT DOOR
For help press
13.06.00 JAM INSIDE 13.06.00
LEFT DOOR
For help press
13.09.00 JAM INSIDE 13.09.00
FRONT DOOR
For help press
190 Chapter 7 Troubleshooting
Description
z
z
A page is jammed in the paper 1
path at the fuser area.
The leading edge of the media 2
did not reach the fuser delivery
sensor (PS502) within the
specified time.
3
A page is jammed in the paper
path at the fuser area.
A page is jammed in the paper
path at the fuser area.
z
z
Recommended action
Clear the jam in the indicated
area.
Close the door so that the
printer attempts to clear the
paper path.
If the error persists, replace
the print cartridge.
4
Replace the transfer roller
assembly.
5
Replace the fuser.
1
Clear the jam in the indicated
area.
2
Close the door so that the
printer attempts to clear the
paper path.
3
If the error persists, replace
the fuser.
1
Clear the jam in the indicated
area.
2
Close the door so that the
printer attempts to clear the
paper path.
3
If the error persists, replace
the fuser.
A page is jammed in the paper 1
path at the face-down bin.
The leading edge of the media 2
did not reach the face-down
bin delivery sensor (PS1451)
within the specified time.
3
Clear the jam in the indicated
area.
Close the door so that the
printer attempts to clear the
paper path.
Reseat the connections to
the DC controller.
4
Make sure the delivery flags
move smoothly.
5
Perform a service test. See
page 213.
6
If the error persists, replace
the delivery unit.
7
Replace the DC controller.
Table 21. Numeric error messages (continued)
Control panel
message
Event-log
error
message
13.09.00 JAM INSIDE 13.09.00
LEFT DOOR
For help press
13.0A.00 JAM INSIDE 13.0A.00
LEFT DOOR
For help press
Description
z
z
z
z
Recommended action
A page is jammed in the paper 1
path at the face-down bin.
The leading edge of the media 2
did not reach the face-down
bin delivery sensor (PS1451)
within the specified time.
3
13.0A.00
z
z
z
z
5
Perform a service test. See
page 213.
6
If the error persists, replace
the delivery unit.
7
Replace the DC controller.
A page is jammed in the paper 1
path. Access through the left
door.
2
The trailing edge of the media
did not leave the face-down bin
delivery sensor (PS1451)
3
within the specified time.
A page is jammed in the paper 1
path at the face-down bin.
The trailing edge of the media 2
did not leave the face-down bin
delivery sensor (PS1451)
within the specified time.
3
A page is jammed in the paper 1
path at the reversing area.
The leading edge of the media 2
did not reach the reversed
paper sensor (PS2002) in the
duplexer within the specified
3
time.
4
13.10.00 JAM INSIDE 13.10.00
LEFT DOOR
For help press
z
z
Reseat the connections to
the DC controller.
Make sure the delivery flags
move smoothly.
4
13.10.00 JAM INSIDE 13.10.00
DUPLEXER DOOR
For help press
Close the door so that the
printer attempts to clear the
paper path.
4
4
13.0A.00 JAM IN
TOP OUTPUT BIN
For help press
Clear the jam in the indicated
area.
A page is jammed in the paper 1
path at the reversing area.
The leading edge of the media 2
did not reach the reversed
paper sensor (PS2002) in the
duplexer within the specified
3
time.
4
Clear the jam in the indicated
area.
Close the door so that the
printer attempts to clear the
paper path.
If the error persists, replace
the delivery unit.
Replace the diverter.
Clear the jam in the indicated
area.
Close the door so that the
printer attempts to clear the
paper path.
If the error persists, replace
the delivery unit.
Replace the diverter.
Clear the jam in the indicated
area.
Close the door so that the
printer attempts to clear the
paper path.
Reseat the connections to
the DC controller.
If the error persists, replace
the duplexer.
Clear the jam in the indicated
area.
Close the door so that the
printer attempts to clear the
paper path.
Reseat the connections to
the DC controller.
If the error persists, replace
the duplexer.
Control-panel messages 191
Table 21. Numeric error messages (continued)
Control panel
message
Event-log
error
message
13.11.00 JAM INSIDE 13.11.00
DUPLEXER DOOR
For help press
Description
z
z
Recommended action
A page is jammed in the paper 1
path at the reversing area.
The trailing edge of the media 2
did not leave the reversed
paper sensor (PS2002) in the
duplexer within the specified
3
time.
4
13.11.00 JAM INSIDE 13.11.00
LEFT DOOR
For help press
z
z
A page is jammed in the paper 1
path at the reversing area.
The trailing edge of the media 2
did not leave the reversed
paper sensor (PS2002) in the
duplexer within the specified
3
time.
4
13.11.05 JAM IN
INPUT ACCESSORY
For help press
13.11.05
z
13.11.06 PICKUP
STATIONARY JAM
For help press
13.11.06
13.11.07 JAM IN
INPUT ACCESSORY
For help press
13.11.07
192 Chapter 7 Troubleshooting
z
A page is jammed in the paper 1
path at the registration area.
A pickup delay jam has
2
occurred.
A page is jammed in the pickup
area of the input accessory.
z
z
A page is jammed in the right
door area.
A page stopped in the
registration area.
Clear the jam in the indicated
area.
Close the door so that the
printer attempts to clear the
paper path.
Reseat the connections to
the DC controller.
If the error persists, replace
the duplexer.
Clear the jam in the indicated
area.
Close the door so that the
printer attempts to clear the
paper path.
Reseat the connections to
the DC controller.
If the error persists, replace
the duplexer.
Clear the jam in the indicated
area.
Close the door so that the
printer attempts to clear the
paper path.
3
Perform a paper-path test.
See page 213.
4
If the error persists, replace
the paper-pickup assembly.
1
Clear the jam in the indicated
area of the input device.
2
Remove the media from the
right door of the printer
engine.
1
Clear the jam in the indicated
area.
2
Close the door so that the
printer attempts to clear the
paper path.
3
If the error persists, replace
the vertical transfer unit.
Table 21. Numeric error messages (continued)
Control panel
message
Event-log
error
message
Description
13.11.08 JAM IN
INPUT ACCESSORY
For help press
13.11.08
z
13.11.09 JAM IN
INPUT ACCESSORY
For help press
13.11.10 RESIDUAL
JAM IN DELIVERY
AREA
For help press
13.11.0A JAM IN
INPUT DEVICE
For help press
z
13.11.09
z
z
13.11.10
13.11.0A
13.12.00 JAM INSIDE 13.12.00
DUPLEXER DOOR
For help press
A page is jammed in the paper 1
path at the vertical transfer unit
registration area.
2
A paper-delivery delay jam
occurred.
Close the door so that the
printer attempts to clear the
paper path.
Make sure that the vertical
transfer sensor is functional.
4
If the error persists, replace
the vertical transfer sensor.
5
Replace the vertical transfer
unit.
Clear the jam in the indicated
area.
Close the door so that the
printer attempts to clear the
paper path.
3
Replace the paper path
connection unit.
4
Replace the vertical
registration assembly.
5
If the error persists, replace
the diverter.
1
Clear the jam.
2
Turn off the printer, and then
turn the printer on again.
3
Replace the paper path
connection unit.
4
Replace the VRA.
1
Clear the jam in the indicated
area.
2
Turn off the printer, and then
turn the printer on again.
A page is jammed in the paper 1
path at the duplexer.
The leading edge of the media 2
did not reach the duplexer
paper sensor (PS2004) within
the specified time.
3
Clear the jam in the indicated
area.
A page is jammed in the input
device when the power is turned
on.
z
Clear the jam in the indicated
area.
3
A page is jammed in the paper 1
path at the right door area.
A paper-delivery stationary
2
jam occurred.
A page is jammed in the delivery
area when the power is turned on
or when the front door is closed.
z
Recommended action
Close the door so that the
printer attempts to clear the
paper path.
Perform a paper-path test.
See page 213.
4
If the error persists, replace
the fuser.
5
Replace the duplexer.
6
Replace the diverter.
Control-panel messages 193
Table 21. Numeric error messages (continued)
Control panel
message
Event-log
error
message
13.12.00 JAM INSIDE 13.12.00
LEFT DOOR
For help press
13.12.01
JAM IN LEFT
ACCESSORY
For help press
13.12.02
JAM IN LEFT
ACCESSORY
For help press
13.12.03
JAM IN LEFT
ACCESSORY
For help press
13.12.04
JAM IN LEFT
ACCESSORY
For help press
194 Chapter 7 Troubleshooting
13.12.01
Description
z
z
z
z
13.12.02
13.12.03
13.12.04
Recommended action
A page is jammed in the paper 1
path at the duplexer.
The leading edge of the media 2
did not reach the duplexer
paper sensor (PS2004) within
the specified time.
3
Media is present in the flipper
when power is turned on.
An auto-flush operation is not
possible.
Media never reached the flipper
input area.
Media is jammed in the flipper
entry area.
Media is jammed in the flipper
internal area.
Clear the jam in the indicated
area.
Close the door so that the
printer attempts to clear the
paper path.
Perform a paper-path test.
See page 213.
4
If the error persists, replace
the fuser.
5
Replace the duplexer.
6
Replace the diverter.
1
Clear the jam.
2
Turn off the printer, and then
turn the printer on again.
3
Send two pages through for a
paper-path test.
4
Replace the flipper assembly.
1
Clear the jam.
2
Turn off the printer, and then
turn the printer on again.
3
Send two pages through for a
paper-path test.
4
Replace the flipper assembly.
1
Clear the jam.
2
Turn off the printer, and then
turn the printer on again.
3
Send two pages through for a
paper-path test to test the top
face-down bin and the left
face-up bin.
4
Replace the flipper assembly.
1
Clear the jam.
2
Turn off the printer, and then
turn the printer on again.
3
Send two pages through for a
paper-path test.
4
Replace the delivery
assembly.
5
Replace the flipper assembly.
Table 21. Numeric error messages (continued)
Control panel
message
Event-log
error
message
Description
Recommended action
13.12.10
JAM IN LEFT
ACCESSORY
For help press
13.12.0A
Media was present in the paper
path when power was turned on.
1
Clear the jam.
2
Check for mechanical
interference in the flipper and
paper-path rollers.
3
Turn off the printer, and then
turn the printer on again.
4
Send two pages through for a
paper-path test.
5
Replace the paper-path
assembly.
1
Clear the jam.
2
Check for mechanical
interference in the flipper and
paper-path rollers.
3
Turn off the printer, and then
turn the printer on again.
4
Send two pages through for a
paper-path test.
5
Replace the paper-path
assembly.
1
Clear the jam.
2
Check for mechanical
interference in the flipper and
paper-path rollers.
3
Turn off the printer, and then
turn the printer on again.
4
Send two pages through for a
paper-path test.
5
Replace the paper-path
assembly.
13.12.11
JAM IN LEFT
ACCESSORY
For help press
13.12.12
JAM IN LEFT
ACCESSORY
For help press
13.12.13
JAM IN LEFT
ACCESSORY
For help press
13.12.0B
z
z
13.12.0C
13.12.0D
Media stopped while it was
flipping.
Media never reached the
FLEXIT sensor.
Media stopped in the paper path.
z
z
Media stopped in the paper
1
path.
2
Media jammed entering the
accumulator or offset module.
Clear the jam.
Check for mechanical
interference in the flipper and
paper-path rollers.
3
Check for jams at the
accumulator or the offset
module.
4
Turn off the printer, and then
turn the printer on again.
5
Send two pages through for a
paper-path test.
6
Replace the paper-path
assembly.
Control-panel messages 195
Table 21. Numeric error messages (continued)
Control panel
message
Event-log
error
message
Description
Recommended action
13.12.20
JAM IN LEFT
ACCESSORY
For help press
13.12.14
z
1
Clear the jam.
2
Turn off the printer, and then
turn the printer on again.
3
Send two pages through for a
paper-path test.
4
Replace the accumulator
assembly.
1
Clear the jam.
2
Turn off the printer, and then
turn the printer on again.
3
Send two pages through for a
paper-path test.
4
Replace the accumulator
assembly.
1
Clear the jam.
2
Turn off the printer, and then
turn the printer on again.
3
Send two pages through for a
paper-path test.
4
Replace the accumulator
assembly.
1
Clear the jam.
2
Turn off the printer, and then
turn the printer on again.
3
Send two pages through for a
paper-path test.
4
Replace the accumulator
assembly.
1
Clear the jam.
2
Turn off the printer, and then
turn the printer on again.
3
Send two pages through for a
paper-path test.
4
Replace the accumulator
assembly.
1
Clear the jam.
2
Perform a staple-position
calibration.
3
Send a staple job to the
stapler.
4
Turn off the printer, and then
turn the printer on again.
5
Replace the carriage
assembly.
6
Replace the stapler unit.
13.12.21
JAM IN LEFT
ACCESSORY
For help press
13.12.22
JAM IN LEFT
ACCESSORY
For help press
13.12.23
JAM IN LEFT
ACCESSORY
For help press
13.12.24
JAM IN LEFT
ACCESSORY
For help press
13.12.30
JAM IN LEFT
ACCESSORY
For help press
z
13.12.15
13.12.16
Media is jammed in the
accumulator entry area.
The GW sensor never activated.
Note
This jam might be a hardware
malfunction if the failure persists
consistently.
13.12.17
13.12.18
Media is jammed in the
accumulator exit area.
The retainer sensor does not
activate.
Note
This jam might be a hardware
malfunction if the error persists.
13.12.1E
z
z
z
196 Chapter 7 Troubleshooting
Media is present in the
accumulator when the printer
is turned on.
Media is activating the exit
sensor when the printer is
turned on.
The carriage hit the media.
Media is jammed between the
carriage and the stack of paper
in the stapling area.
The carriage motor does not
detect movement; it should be
finding the home position.
Table 21. Numeric error messages (continued)
Control panel
message
Event-log
error
message
Description
Recommended action
13.12.31
JAM IN LEFT
ACCESSORY
For help press
13.12.1F
Media is jammed in the stapler
unit.
1
Clear the jam.
2
Turn off the printer, and then
turn the printer on again.
3
Send a staple job to the
stapler.
4
Replace the stapler unit.
5
Replace the carriage
assembly.
1
Clear the jam.
2
Turn off the printer, and then
turn the printer on again.
3
Send two pages through for a
test job.
4
Replace the offset assembly.
13.12.40
JAM IN LEFT
ACCESSORY
For help press
13.12.41
JAM IN LEFT
ACCESSORY
For help press
13.12.42
JAM IN LEFT
ACCESSORY
For help press
13.12.28
13.12.29
Media is present in the offset
module when power is turned on.
The offset module did not reach its 1
target position.
2
Note
This jam might be a hardware
malfunction if the failure repeats
five consecutive times.
13.12.2A
13.13.00 JAM INSIDE 13.13.00
DUPLEXER DOOR
For help press
13.13.00 JAM INSIDE 13.13.00
LEFT DOOR
For help press
z
z
z
Turn off the printer, and then
turn the printer on again.
3
Send two pages through for a
test job.
4
Replace the offset assembly.
1
Clear the jam.
2
Turn off the printer, and then
turn the printer on again.
3
Send two pages through for a
test job.
4
Replace the offset assembly.
A page is jammed in the paper 1
path at the duplexer.
The trailing edge of the media 2
did not leave the duplexer
paper sensor (PS2004) within
a specified time.
3
Clear the jam in the indicated
area.
A page is jammed in the paper 1
path at the duplexer.
The trailing edge of the media 2
did not leave the duplexer
paper sensor (PS2004) within
a specified time.
3
Clear the jam in the indicated
area.
Media is jammed in the offset
module exit area.
z
Clear the jam.
Close the door so that the
printer attempts to clear the
paper path.
If the error persists, replace
the duplexer.
Close the door so the printer
attempts to clear the paper
path.
If the error persists, replace
the duplexer.
Control-panel messages 197
Table 21. Numeric error messages (continued)
Control panel
message
Event-log
error
message
13.20.00 JAM INSIDE 13.20.00
FRONT DOOR
For help press
Description
z
z
Recommended action
A page is jammed in the paper 1
path.
Media is present in the printer. 2
Note
Media is detected in the paper path
3
when the printer is turned on, or
media is detected after opening
4
and closing any door:
13.20.00 JAM INSIDE 13.20.00
LEFT DOOR
For help press
13.21.00 JAM INSIDE 13.21.00
FRONT DOOR
For help press
198 Chapter 7 Troubleshooting
•
Registration sensor (PS2)
•
Fusing-unit jam sensor
(PS501)
•
Fusing-unit delivery sensor
(PS502)
•
Tray 2 paper-feed sensor
(PS1402)
•
Tray 3 paper-feed sensor
(PS1403)
•
Face-down-bin delivery
sensor (PS1451)
Perform a paper-path test.
See page 213.
Verify correct seating of the
leaf springs under the highvoltage power supply.
Remove the duplexer and
make sure that all of the
media is removed from the
paper path.
6
Verify the correct movement
of the duplexer residualpaper sensor.
7
If the error persists, replace
the fuser.
The duplexer residual paper
sensor (PS2005) detects
media.
z
A page is jammed in the paper 1
path.
Media is present in the printer. 2
A door is open.
Close the door so that the
printer attempts to clear the
paper path.
5
z
z
Clear the jam in the indicated
area.
Clear the jam in the indicated
area.
Close the door so the printer
attempts to clear the paper
path.
3
Perform a paper-path test.
See page 213.
4
Verify the correct seating of
the leaf springs under the
high-voltage power supply.
5
If the error persists, replace
the fuser.
1
Close the door so that the
printer attempts to clear the
paper path.
2
Clear the jam in the indicated
area.
3
Perform a paper-path test.
See page 213.
4
Perform a service test. See
page 213.
5
Verify that the interlock
switches are working
correctly.
6
If the error persists, replace
the front door.
Table 21. Numeric error messages (continued)
Control panel
message
Event-log
error
message
13.21.00 JAM INSIDE 13.21.00
LEFT DOOR
For help press
13.30.00 JAM IN
TRAY 1
For help press
13.30.00 JAM IN
TRAY X
For help press
13.30.00
13.30.00
Description
Recommended action
A door is open.
1
Close the door so that the
printer attempts to clear the
paper path.
2
Clear the jam in the indicated
area.
3
Perform a paper-path test.
See page 213.
4
Perform a service test. See
page 213.
5
Verify that the interlock
switches are working
correctly.
6
If the error persists, replace
the left door.
1
Clear the jam in the indicated
area.
2
Close the door so that the
printer attempts to clear the
paper path.
3
Perform a service test. See
page 213.
4
If the error persists, replace
the paper input unit.
5
Replace the tray 1 pickup
rollers.
6
Replace tray 1.
1
Clear the jam in the indicated
area.
2
Close the door so that the
printer attempts to clear the
paper path.
3
Perform a service test. See
page 213.
4
If the error persists, replace
the paper input unit.
5
Replace the tray X pickup
rollers.
6
Replace tray X.
A page is jammed in the pickup
area of tray 1.
A page is jammed in the pickup
area of tray X.
Control-panel messages 199
Table 21. Numeric error messages (continued)
Control panel
message
Event-log
error
message
13.30.00 JAM INSIDE 13.30.00
RIGHT DOOR
For help press
13.31.00 JAM INSIDE 13.31.00
FRONT DOOR
For help press
13.31.00 JAM INSIDE 13.31.00
LEFT DOOR
For help press
13.32.00 JAM INSIDE 13.32.00
RIGHT DOOR
For help press
13.XX.YZ JAM INSIDE 13.0A.00
TOP OUTPUT BIN
200 Chapter 7 Troubleshooting
Description
Recommended action
A page is jammed in the pickup
area of tray 1.
1
Clear the jam in the indicated
area.
2
Close the door so that the
printer attempts to clear the
paper path.
3
Perform a service test. See
page 213.
4
If the error persists, replace
the paper-input unit.
5
Replace the tray 1 pickup
rollers.
6
Replace tray 1.
z
z
z
z
z
z
A page is jammed in the paper 1
path at the fuser area.
The leading edge of the media 2
reached the fuser delivery
sensor (PS502) within the
specified time, but the trailing
3
edge of the media did not
reach the fuser-jam sensor
(PS501) within the specified
time.
Clear the jam in the indicated
area.
A page is jammed in the paper 1
path at the feed area.
The media did not leave the
2
registration sensor (PS2)
within the specified time.
Clear the jam in the indicated
area.
A delivery stay jam has occurred,
and the media did not clear
PS1451 within the specified time.
Close the door so that the
printer attempts to clear the
paper path.
If the error persists, replace
the fuser.
Close the door so that the
printer attempts to clear the
paper path.
If the error persists, replace
the fuser.
Close the door so that the
printer attempts to clear the
paper path.
3
Replace the registration
assembly.
4
If the error persists, replace
the paper-input unit.
1
Clear the jam in the indicated
area.
2
Close the door so that the
printer attempts to clear the
paper path.
3
Make sure that PS1451 is
functioning correctly.
4
Perform a sensor test.
5
Perform a paper-path test.
Table 21. Numeric error messages (continued)
Control panel
message
Event-log
error
message
Description
Recommended action
13.XX.YZ JAM IN
TRAY N
13.01.00
z
1
Clear the jam in the indicated
area.
2
Close the door so that the
printer attempts to clear the
paper path.
3
Make sure that the indicated
sensor is functioning
correctly.
4
Perform a sensor test.
5
Perform a paper-path test.
A tray 2 pickup jam has
occurred (N = 2) (PS1402).
-or-
13.01.00
z
A tray 3 pickup jam has
occurred (N = 3) (PS1404).
-or-
13.30.00
13.XX.YZ JAM INSIDE 13.05.00
FRONT DOOR
z
z
-or-
13.31.00
13.XX.YZ JAM INSIDE 13.06.00
LEFT DOOR
13.XX.YZ JAM INSIDE 13.09.00
LEFT DOOR
13.XX.YZ JAM INSIDE 13.10.00
LEFT DOOR
z
A tray 1 pickup jam has
occurred (N = 1).
A fuser delivery delay jam has 1
occurred, and the media did
not clear PS501 within the
2
specified time.
A fuser delivery delay jam has
occurred, and the media did
3
not clear PS502 within the
specified time.
A fuser delivery stay jam has
occurred, and the media did not
clear PS501 within the specified
time.
A reversing delay jam has
occurred.
-or-
13.11.00
z
A reversing stay jam has
occurred.
Close the door so that the
printer attempts to clear the
paper path.
Make sure that the PS501
senor flag or the PS502 flag
is functioning correctly.
4
Perform a sensor test.
5
Perform a paper-path test.
1
Clear the jam in the indicated
area.
2
Close the door so that the
printer attempts to clear the
paper path.
3
Make sure that the PS501
senor flag is functioning
correctly.
4
Perform a sensor test.
5
Perform a paper-path test.
A delivery delay jam has occurred, 1
and the media did not clear
PS1451 within the specified time.
2
z
Clear the jam in the indicated
area.
Clear the jam in the indicated
area.
Close the door so that the
printer attempts to clear the
paper path.
3
Make sure that PS1451 is
functioning correctly.
4
Perform a sensor test.
5
Perform a paper-path test.
1
Clear the jam in the indicated
area.
2
Close the door so that the
printer attempts to clear the
paper path.
3
Perform a sensor test.
4
Perform a paper-path test.
Control-panel messages 201
Table 21. Numeric error messages (continued)
Control panel
message
Event-log
error
message
13.XX.YZ JAM INSIDE 13.12.00
DUPLEXER
Description
Recommended action
z
1
Clear the jam in the indicated
area.
2
Close the door so that the
printer attempts to clear the
paper path.
3
Perform a sensor test.
4
Perform a paper-path test.
A duplexing delay jam has
occurred.
-or-
13.13.00
13.XX.YZ JAM INSIDE 13.32.00
RIGHT DORR
z
z
z
14.X
14.X
z
z
21 PAGE TOO COMPLEX 21
For help press
A duplexing stay jam has
occurred.
A media stay jam has occurred 1
in the paper path.
The media did not reach
2
PS1401 or PS1403 after
reaching PS1402 or PS1404.
X = 2 for tray 2
X = 3 for tray 3
Perform a sensor test.
4
Perform a paper-path test.
1
Check the media for
premature wear of the feed
rollers.
2
Clean the feed rollers with a
lightly dampened cloth.
3
Replace the feed rollers.
alternates with
22 EIO X BUFFER
OVERFLOW
To continue
press
202 Chapter 7 Troubleshooting
22
The printer EIO card in slot X
overflowed the I/O buffer during a
busy state.
Close the door so that the
printer attempts to clear the
paper path.
3
The page formatting process is too 1
complex.
21 PAGE TOO COMPLEX
To continue
press
Clear the jam in the indicated
area.
To continue printing, press
(some data will be
lost).
2
Simplify the print job.
3
To print the job without losing
data, set PAGE PROTECT=ON in
the configuration menu. Do
not leave the PAGE
PROTECT=ON or the print
performance will degrade.
The normal setting is PAGE
PROTECT=AUTO.
4
Add memory.
1
To continue printing, press
(some data will be
lost).
2
Turn off the printer, and then
turn the printer on again.
3
Move the EIO card to a
different slot.
4
Replace the EIO card.
Table 21. Numeric error messages (continued)
Control panel
message
Event-log
error
message
Description
Recommended action
22 EMBEDDED I/O
BUFFER OVERLOW
22
The printer embedded I/O buffer
overflowed during a busy state.
1
To continue printing, press
(some data will be
lost).
2
Turn off the printer, and then
turn the printer on again.
3
See "Embedded LAN
troubleshooting (HP LaserJet
9040n/9050n, HP LaserJet
9040dn/9050dn, HP LaserJet
9050mfp, and HP LaserJet
9040mfp only)" on page 247
for more information.
1
To continue printing, press
(some data will be
lost).
alternates with
2
22 PARALLEL I/O
BUFFER OVERFLOW
To continue
press
Turn off the printer, and then
turn the printer on again.
3
Reseat the parallel cable.
4
Replace the parallel cable.
5
Replace the formatter.
22 PARALLEL I/O
BUFFER OVERFLOW
For help press
22 SERIAL I/O
BUFFER OVERFLOW
To continue
press
40 BAD SERIAL
TRANSMISSION
To continue
press
22
22
40
The printer parallel buffer
overflowed during a busy state.
The printer serial buffer overflowed 1
during a busy state.
To continue printing, press
(some data lost).
2
Turn off the printer, and then
turn the printer on again.
3
Reseat the serial cable.
4
Replace the serial cable.
5
Move the EIO card to a
different slot.
6
Replace the EIO card.
A serial data error (parity, framing, 1
or line overrun) occurred while
data was being received.
To continue printing, press
(some data will be
lost).
2
Turn off the printer, and then
turn the printer on again.
3
Reseat the serial cable.
4
Replace the serial cable.
5
Move the EIO card to a
different slot.
6
Replace the EIO card.
Control-panel messages 203
Table 21. Numeric error messages (continued)
Control panel
message
Event-log
error
message
Description
Recommended action
40 EIO X BAD
TRANSMISSION
To continue
press
40
A connection with the EIO card in
slot X has been abnormally
interrupted.
1
To continue printing, press
(some will be lost).
2
Turn off the printer, and then
turn the printer on again.
3
Reseat the serial cable.
4
Replace the serial cable.
5
Move the EIO card to a
different slot.
6
Verify the program settings.
7
Replace the EIO card.
1
To continue printing, press
(some will be lost).
2
Turn off the printer, and then
turn the printer on again.
3
See "Embedded LAN
troubleshooting (HP LaserJet
9040n/9050n, HP LaserJet
9040dn/9050dn, HP LaserJet
9050mfp, and HP LaserJet
9040mfp only)" on page 247
for more information.
40 EMBEDDED I/O BAD 40
TRANSMISSION
41.3 UNEXPECTED
SIZE TRAY XX
For help press
41.3
alternates with
A connection with the embedded
I/O card has been abnormally
interrupted.
Tray XX is loaded with media that is 1
longer or shorter in the feed
direction than the size that is
configured for the tray.
LOAD TRAY XX
[TYPE] [SIZE]
To change size
press
41.5 UNEXPECTED
TYPE TRAY XX
For help press
alternates with
LOAD TRAY XX
[TYPE] [SIZE]
To change type
press
204 Chapter 7 Troubleshooting
41.5
Tray XX is loaded with a media
type (transparencies, envelopes)
that is different from what the tray
is configured to use.
Replace the media with the
correct size or reconfigure
the tray to use the current
size.
2
Press
tray.
3
Verify the position of the
standard/custom switch.
4
Verify the program settings.
1
Replace the media with the
correct size or reconfigure
the tray to use the current
size.
2
Press
tray.
3
Verify the program settings.
to select another
to select another
Table 21. Numeric error messages (continued)
Control panel
message
Event-log
error
message
Description
41.X
PRINTER ERROR
For help press
41.X
A printer error occurred, and X
1
corresponds to the following issue:
alternates with
To continue
press
49.X
PRINTER ERROR
To continue
cycle power
50.X FUSER ERROR
For help press
51.X
PRINTER ERROR
For help press
alternates with
49.X
50.X
51.X
Recommended action
•
1 = Unknown misprint error 2
•
2 = Beam detect error
•
4 = No video sync
A critical firmware error occurred.
A fuser error occurred, and X
corresponds to the following issue:
1 Low fuser temperature
2 Fuser warm up service
3 High fuser temperature
4 Faulty fuser
5 Inconsistent fuser
6 Faulty fuser
To continue printing, press
.
Turn off the printer, and then
turn the printer on to
continue.
3
Resend the print job.
4
Reseat connections to the
laser/scanner and DC
controller.
5
If error persists, replace the
laser/scanner.
6
Replace the upper cable
guide assembly.
7
Replace the DC controller.
1
Turn off the printer, and then
turn the printer on to
continue.
2
Resend the print job.
3
Update the firmware to the
latest version.
1
Turn off the printer, and then
turn the printer on to
continue.
2
Reseat connections to the
fuser and the DC controller.
3
Reseat the fuser.
4
If error persists, replace the
fuser.
5
Replace the upper cableguide assembly.
6
Replace the low-voltage
power supply.
7
Replace the DC controller.
A printer error occurred, and X
1
corresponds to the following issue:
1 Beam detect error
2 Laser error
2
To continue
cycle power
Turn off the printer, and then
turn the printer on to
continue.
Reseat connections to the
laser/scanner and DC
controller.
3
If error persists, replace the
laser/scanner.
4
Replace the upper cableguide assembly.
5
Replace the DC controller.
Control-panel messages 205
Table 21. Numeric error messages (continued)
Control panel
message
Event-log
error
message
Description
52.X
PRINTER ERROR
For help press
52.X
A printer error occurred, and X
1
corresponds to the following issue:
0 Scanner error
1 Scanner startup error
2
2 Scanner rotation error
alternates with
To continue
cycle power
53.XY.ZZ
PRINTER ERROR
For help press
55.X
PRINTER ERROR
For help press
53.XY.ZZ
55.X
alternates with
To continue
press
56.XX
PRINTER ERROR
For help press
alternates with
To continue
cycle power
206 Chapter 7 Troubleshooting
56.X
A DIMM error occurred, and X, Y,
and Z corresponds to the following
issues:
X = DIMM type
0 ROM
1 RAM
Y = Device location
0 On board RAM/ROM
1 DIMM slot 1
2 DIMM slot 2
3 DIMM slot 3
4 DIMM slot 4
ZZ = Error number
1 Unsupported memory
2 Recognized memory
3 Less than minimum memory
4 Exceeds maximum memory
Recommended action
Turn off the printer, and then
turn the printer on to
continue.
Reseat connections to the
laser/scanner and DC
controller.
3
If error persists, replace the
laser/scanner.
4
Replace the upper cableguide assembly.
5
Replace the DC controller.
1
Turn off the printer, and then
turn the printer on to
continue.
2
Reseat the specified DIMM.
3
Move DIMM to a different
slot.
4
If the error persists, replace
the specified DIMM.
5
Replace the formatter.
A temporary printer error occurred. 1
To clear the error, press
.
2
Turn off the printer, and then
turn the printer on again.
3
Make sure that the
maintenance kit is not due for
replacement.
4
Reseat the formatter, DIMMs,
and EIO cards.
5
Perform an engine test. See
page 215.
6
Perform a service test. See
page 213.
7
Replace the DC controller
8
Replace the formatter.
A printer error occurred, and X
1
corresponds to the following issue:
1 Illegal input selection
2 Duplexer was removed while
2
power is on
Turn off the printer, and then
turn the printer on again to
continue.
3
Check the program settings.
4
Turn the printer off and
reinstall the duplexer.
Check the printer
configuration.
Table 21. Numeric error messages (continued)
Control panel
message
Event-log
error
message
Description
Recommended action
57.XX
PRINTER ERROR
For help press
57.X
A printer error occurred, and X
corresponds to the following issue:
1 Cartridge fan error (fan #5)
2 (not used)
3 Power-supply-fan error (fan
#1)
4 Formatter- (controller-) fan
error (fan #2)
5 Delivery-fan (front) error
(fan #4)
6 Face-down tray error
7 Delivery-fan (back) error
(fan #3)
8 Duplexer-fan error
1
Turn off the printer, and then
turn the printer on again to
continue.
2
Reseat connections to the
specified fan and DC
controller.
3
If the error persists, replace
the specified fan.
4
Replace the DC controller.
A printer error occurred.
XX = 04 (power supply)
XX = 03 (CPU)
1
Turn off the printer, and then
turn the printer on again to
continue.
2
Check the printer
configuration.
3
Replace the print cartridge.
4
Replace the toner sensor
contact assembly.
5
Replace the DC controller.
alternates with
To continue
cycle power
58.XX
PRINTER ERROR
For help press
58.X
alternates with
To continue
cycle power
59.X
PRINTER ERROR
For help press
59.X
alternates with
To continue
cycle power
59.X
PRINTER ERROR
For help press
alternates with
To continue
cycle power
59.X
A printer error occurred, and X
1
corresponds to the following issue:
0 Main motor error
1 Main motor startup error
2
2 Main motor rotation error
Turn off the printer, and then
turn the printer on again to
continue.
Reseat connections to the
DC controller.
3
Replace the print cartridge.
4
Perform a service test. See
page 213.
5
Replace the main motor.
6
Replace the DC controller.
A printer error occurred, and X
1
corresponds to the following issue:
3 Abnormal fuser motor start
4 Fuser motor rotation error
Check the cables
connections at the fuser
motor, and reseat them as
necessary.
2
Reseat the fuser.
3
Replace the fuser motor.
4
Replace the fuser assembly.
Control-panel messages 207
Table 21. Numeric error messages (continued)
Control panel
message
Event-log
error
message
Description
Recommended action
60.X
PRINTER ERROR
For help press
60.X
Tray X is lifting the media to the top
of the tray for correct feeding, but
something is preventing the lift
process.
2 Error in tray 2
3 Error in tray 3
1
Open tray X.
2
Check tray X for obstructions.
3
Remove and reseat tray X.
4
Perform a service test. See
page 213.
5
Switch tray X with the other
tray.
6
If the error changes, the tray
might be defective.
7
If the error persists, replace
the paper input unit.
62.X
PRINTER ERROR
To continue
cycle power
64 PRINTER ERROR
For help press
62.X
64
A printer error occurred, and X
1
corresponds to the following issue:
1 memory in DIMM slot 1
2 memory in DIMM slot 2
2
3 memory in DIMM slot 3
3
4 memory in DIMM slot 4
A scan buffer error occurred.
66.11.00
INPUT
DEVICE FAILURE
For help press
208 Chapter 7 Troubleshooting
66.11.00
z
z
A failure in an external input
device occurred.
A lifting operation is not
completed in the correct
amount of time.
Reseat the DIMM.
Move the DIMM to a different
slot.
4
Replace the DIMM.
1
Turn off the printer, and then
turn the printer on to
continue.
2
Update the firmware to the
latest version.
3
Reseat connections to the
laser/scanner and DC
controller.
4
If the error persists, replace
the laser/scanner.
5
Replace the DC controller.
6
Make sure that the side of the
tray is empty.
1
Make sure that the tray on
the left side of the lift deck is
empty.
2
Make sure that the paperpath connection unit is
installed in the right side of
the engine.
3
Check the connections.
4
Turn off the printer, and then
turn the printer on to
continue.
5
Send two pages through for a
paper-path test.
6
Reseat the input device.
7
Replace the input device.
alternates with
To continue
cycle power
Turn off the printer, and then
turn the printer on to
continue.
Table 21. Numeric error messages (continued)
Control panel
message
Event-log
error
message
Description
Recommended action
66.11.01
For help press
66.11.01
The paper path connection unit is
not installed.
Install the paper-path connection
unit.
66.12.20
OUTPUT
DEVICE FAILURE
For help press
66.12.14
z
z
z
The retainer sensor was not
1
activated.
2
The retainer DC motor, located
in the accumulator, is
damaged.
3
The printer cannot finish a
power-on sequence.
4
5
66.12.21
OUTPUT
DEVICE FAILURE
For help press
66.12.21
z
z
z
alternates with
CHECK CABLES AND
CYCLE POWER
66.12.40
OUTPUT
DEVICE FAILURE
For help press
66.12.28
z
z
alternates with
CHECK CABLES AND
CYCLE POWER
66.12.60
OUTPUT
DEVICE FAILURE
For help press
66.12.3C
z
z
alternates with
CHECK CABLES AND
CYCLE POWER
66.12.70
OUTPUT
DEVICE FAILURE
For help press
alternates with
CHECK CABLES AND
CYCLE POWER
66.12.46
z
z
1
The bearing bracket is
damaged.
2
The accumulator-wheel sensor
is damaged.
The printer cannot finish a
3
power-on sequence.
The offset module did not
reach the offset position.
The printer firmware detected
five consecutive jams.
Check the cables.
Turn off the printer, and then
turn the printer on to
continue.
Send two pages through for a
paper-path test.
Replace the accumulator
assembly.
Replace the output device
controller PCA.
Check the cables.
Turn off the printer, and then
turn the printer on to
continue.
Send two pages through for a
paper-path test.
4
Replace the accumulator
assembly.
5
Replace the output device
controller PCA.
1
Check the cables.
2
Turn off the printer, and then
turn the printer on to
continue.
3
Send two pages through for a
paper-path test.
4
Replace the offset assembly.
5
Replace the output device
controller PCA.
An EEPROM error occurred. 1
The EEPROM on the controller 2
PCA is damaged.
Check the cables.
Turn off the printer, and then
turn the printer on to
continue.
3
Send two pages through for a
paper-path test.
4
Replace the output device
controller PCA.
An EEPROM error occurred. 1
The EEPROM on the controller 2
PCA is damaged.
Check the cables.
Turn off the printer, and then
turn the printer on to
continue.
3
Send two pages through for a
paper-path test.
4
Replace the output device
controller PCA.
Control-panel messages 209
Table 21. Numeric error messages (continued)
Control panel
message
Event-log
error
message
67.X
68.X
68.X PERMANENT
STORAGE WRITE FAIL
For help press
Description
Recommended action
The output device is not attached
when the printer is turned on.
1
At power-on, make sure that
the output device is attached
correctly.
2
Make sure that the JetLink
connector is installed
correctly.
z
z
alternates with
68.X PERMANENT
STORAGE WRITE FAIL
To continue
press
68.0 PERMANENT
STORAGE ERROR
For help press
68.0
z
alternates with
To continue
press
68.1 PERMANENT
STORAGE FULL
For help press
alternates with
To continue
press
210 Chapter 7 Troubleshooting
z
68.1
z
z
The printer NVRAM or hard
1
disk is failing to write.
2
Printing can continue but there
might be unexpected
3
responses because an error
occurred in permanent
storage.
4
One or more of the printer
settings that were saved in the
NVRAM or hard disk is invalid
and is reset to the factory
default.
Printing can continue, but
unexpected responses might
occur because an error
occurred in permanent
storage.
The printer NVRAM or hard
disk is full.
Printing can continue, but
unexpected responses might
occur because an error
occurred in permanent
storage.
To clear the error, press
.
Check the printer
configuration.
Turn off the printer, and then
turn the printer on to
continue.
Reseat the hard disk.
5
Reinitialize the hard disk.
6
Replace the hard disk.
1
To clear the error, press
2
Check the printer
configuration.
3
Turn off the printer, and then
turn the printer on to
continue.
4
Print a configuration page.
5
Resend the firmware.
6
Perform a NVRAM
initialization, and re-enter the
configuration information.
7
Replace the formatter.
1
To clear the error, press
2
Check the printer
configuration.
3
Turn off the printer, and then
turn the printer on to
continue.
4
Reseat the hard disk.
5
Reinitialize the hard disk.
6
Replace the hard disk.
.
.
Table 21. Numeric error messages (continued)
Control panel
message
Event-log
error
message
Description
69.X
PRINTER ERROR
To continue
cycle power
69.X
A printer error occurred where X is 1
detailed below.
0 The duplex mechanism failed
1 The duplex side-adjust failed
2
79.XXXX
PRINTER ERROR
To continue
cycle power
79.XXXX
Recommended action
Turn off the printer, and then
turn the printer on to
continue.
Reseat the duplexer (make
sure that the printer is turned
off).
3
Perform a service test. See
page 213.
4
Perform a paper-path test.
See page 213.
5
If the error persists, replace
the duplexer (make sure that
the printer is turned off).
A critical hardware error occurred. 1
Turn off the printer, and then
turn the printer on to
continue.
2
Try printing a job from a
different software program. If
the job prints, go back to the
first program and try printing
a different file. (If the
message only appears with a
certain software program or
print job, contact the software
vendor for assistance.)
3
If the error persists, try the
following:
•
Turn off the printer, and
then turn the printer on
again.
•
Reseat or replace the
interface cable.
•
Remove the DIMMs one
at time, turn the printer off,
and then turn the printer
on again.
•
Try using the parallel
interface.
•
Upgrade to the latest
firmware.
•
Remove the EIO cards
and perform a cold reset.
•
Remove the hard disk,
turn the printer off, and
then turn the printer on
again.
•
If the error persists,
replace the formatter.
Control-panel messages 211
Table 21. Numeric error messages (continued)
Control panel
message
Event-log
error
message
Description
Recommended action
80.XXXX
EIO ERROR
80.XXXX
The EIO accessory card in slot X
encountered a critical error.
1
Turn off the printer, and then
turn the printer on again.
2
Reseat the EIO card.
3
Move the EIO card to a
different slot.
4
If the error persists, replace
the EIO card.
1
Turn off the printer, and then
turn the printer on again.
2
See "Embedded LAN
troubleshooting (HP LaserJet
9040n/9050n, HP LaserJet
9040dn/9050dn, HP LaserJet
9050mfp, and HP LaserJet
9040mfp only)" on page 247
for more information.
1
Turn off the printer, and then
turn the printer on again.
2
If the error persists, replace
the formatter.
A service test has been initialized. z
See Table 22, “Service test
abnormality codes,” on page
213.
80.XXX
80
EMBEDDED JETDIRECT
ERROR
81 SERVICE
For help press
81
88.XXXX
An embedded Jetdirect error
occurred.
A temporary error occurred while
testing the printer.
Note
0000 denotes that the service test
passed.
99 SERVICE
For help press
212 Chapter 7 Troubleshooting
99
A firmware flash-failure occurred.
1
Resend the flash upgrade.
2
Replace the flash DIMM.
User- and service-level diagnostics
The following sections describe diagnostics for the printer.
Paper-path test
The paper-path test can be used to verify that various paper paths are working correctly or to
troubleshoot problems with tray configuration.
To print a paper-path test
1
Press
2
Use
or
to scroll to CONFIGURE DEVICE, and then press
3
Use
or
to scroll to DIAGNOSTICS, and then press
4
Use
or
to scroll to SET PAPER PATH TEST, and then press
5
Use
or
to select the input tray that you want to test, the output bin, the duplex printing
accessory (if available), and the number of copies.
6
Use
to open the menus.
or
.
.
to scroll to PRINT TEST PAGE, and then press
.
to start the paper-path test.
Service test
The service test verifies that the print engine is functioning correctly. This test is very useful for
isolating printer problems. The test can be performed with that paper-handling accessories attached,
but it will not activate any of the accessory motors, switches, or sensors.
To perform a service test
1
Turn off the printer.
2
Make sure that the paper path of the printer is clear of all media, and that the left, front, and right
doors are closed.
3
Open tray 2 and tray 3.
4
Turn on the printer, and when the printer is ready press
5
Use
or
to scroll to CONFIGURE DEVICE, and then press
6
Use
or
to scroll to DIAGNOSTICS, and then press
7
Use
or
to scroll to SERVICE TEST, and then press
. The service test can take up to two
minutes to complete. The message PERFORMING SERVICE TEST appears on the control panel.
8
When the test is complete, the message SERVICE TEST PASSED appears on the control panel, or
up to five sets of four-digit numbers appear on the control panel. If no abnormalities were noted,
(0000 0000 0000 0000 0000) appears. If abnormalities were noted, the four-digit code or codes
appear in parentheses (0101 0111 0132 0000 0000). Write down these codes and match them
to the descriptions and FRUs that are listed in table 21.
9
Close tray 2 and tray 3.
to open the menus.
.
.
Table 22. Service test abnormality codes
Code
Description
FRU
0101
Cassette pickup-rod motor
Paper-input unit
0102
Cassette feed motor
Paper-input unit
0103
Cassette lifter motor
Paper-input unit
User- and service-level diagnostics 213
Table 22. Service test abnormality codes (continued)
Code
Description
FRU
0104
Tray 1 feed motor
Tray 1
0105
Switchback motor
Duplexer
0106
Duplex feed motor
Duplexer
0107
Duplex feed motor 2
Duplexer
0108
Side registration motor
Duplexer
0109
Pre-registration roller clutch
Registration assembly
0110
Registration roller clutch
Registration assembly
0111
Tray 1 feed roller clutch
Tray 1
0112
Coil jam sensor solenoid
Fuser assembly
0113
Face-up flapper solenoid
Delivery assembly
0114
Tray 1 pickup solenoid
Tray 1
0115
Duplex deflector solenoid
Duplexer
0116
Duplex flapper solenoid
Duplexer
0117
Upper cassette paper out solenoid
Paper-input unit
0118
Upper cassette lifter position sensor
Paper-input unit
0119
Upper cassette paper level sensor A
Paper-input unit
0120
Upper cassette paper level sensor B
Paper-input unit
0121
Upper cassette feed sensor A
Paper-input unit
0122
Upper cassette feed sensor B
Paper-input unit
0123
Lower cassette paper out sensor
Paper-input unit
0124
Lower cassette lifter position sensor
Paper-input unit
0125
Lower cassette paper level sensor A
Paper-input unit
0126
Lower cassette paper level sensor B
Paper-input unit
0127
Lower cassette feed sensor A
Paper-input unit
0128
Lower cassette feed sensor B
Paper-input unit
0129
Registration paper sensor
Registration assembly
0130
Pickup rod home position sensor
Paper-input unit
0131
Fusing unit delivery sensor A
Fuser assembly
0132
Fusing unit delivery sensor B
Fuser assembly
0133
Face-down bin delivery sensor
Delivery assembly
0135
Tray feed sensor
Tray 1
0136
Switchback sensor
Duplexer
0137
Duplex feed sensor
Duplexer
0138
Duplexer reaming paper sensor
Duplexer
0139
Face-down bin paper-full sensor
Delivery assembly
0140
Right door sensor
Paper input unit
0141
Duplex feed roller 1 home-position sensor
Duplexer
0142
Side registration guide home-position sensor
Duplexer
0143
OHT sensor
Registration assembly
0144
Coil jam sensor
Fuser assembly
214 Chapter 7 Troubleshooting
Service-level diagnostics
Engine test
The engine test verifies that the print engine is functioning correctly. Because the formatter is
completely bypassed during an engine test, this test is very useful for isolating printer problems. The
engine test prints a full page of horizontal lines across the entire printable area.
Note
Media can be picked up from tray 2 or tray 3 if the formatter is installed. If the formatter is removed,
the tray that you do not want to print from must be open. Also, make sure that the print cartridge is
installed in the printer.
Service menu
The service menu printer commands should be used only by authorized service personnel. The
service menu can only be opened by using the PIN code 00900001 for the HP LaserJet 9000 series
printers, 04904005 for the HP LaserJet 9040 series printers, or 09905004 for the HP LaserJet 9050
series printers. While in the service menu, you can perform the following tasks:
z
Clear the event log
z
Verify and set the page count and serial number (these appear on the configuration page)
z
Change the maintenance intervals
z
Set the cold-reset media size
If a stapler/stacker is installed you can also perform these tasks:
z
Calibrate the staple position
z
Review and edit the serial number of the output device
z
Review and edit the page count of the output device
Table 23. Service menu
Item
Explanation
Clear event log
Clear the event log after maintenance or repairs are complete.
Total page count Reset the total page count.
Maintenance
count
Reset the pages since the last maintenance count.
Maintenance
interval
Change or reset the maintenance interval.
Serial number
Reset the printer serial number.
Cold reset paper Set the cold-reset the media size.
Stapler/stacker
Perform a staple position calibration.
Service-level diagnostics 215
Diagnostics flowchart
Use this flowchart to help identify the cause of high-level printer problems for the HP LaserJet 9000,
HP LaserJet 9000mfp, HP LaserJet 9000Lmfp, HP LaserJet 9040/9050, and HP LaserJet 9040mfp/
9050mfp. These problems are indicated by abnormalities in the printer power-on sequence. The LED
that the flowchart refers to is on the formatter.
Figure 122.
Diagnostics flowchart
216 Chapter 7 Troubleshooting
Other diagnostics for the HP LaserJet 9000, 9000mfp, and 9000Lmfp
Cold reset
Performing a cold reset clears all data from the printer memory and returns all of the default settings
to the factory settings.
CAUTION
Performing a cold reset resets the Jetdirect configuration. To avoid making changes to your network
configuration, remove the HP Jetdirect print server before performing a cold reset.
Note
If possible, print a configuration page and menu map before performing a cold reset. This documents
current settings for later reference.
To perform a cold reset, set the display language, or reset the maintenance kit
Note
1
Turn off the printer.
2
Press and hold
3
Turn on the printer.
4
Continue to hold
button on MFPs).
5
Use
(the 9 button on MFPs) or
(the 3 button on MFPs) to scroll to the appropriate
selection (COLD RESET, SELECT LANGUAGE, or NEW MAINTENANCE KIT).
(the 6 button on MFPs).
until all three control panel lights illuminate, and then release
(the 6
Other functions are available in this menu, but are not applicable.
6
Press
(the 6 button on MFPs).
The printer boot sequence is complete when READY appears on the control-panel display.
To initialize (format) a hard disk
Note
Initializing a hard disk erases all of the data on the installed mass-storage devices.
1
Turn off the printer.
2
Press and hold PAUSE/RESUME (START on MFPs).
3
Turn on the printer.
4
Hold PAUSE/RESUME or START down until all three error lights illuminate.
5
Release the PAUSE/RESUME or START key.
6
Press
7
Press
(the 5 button on MFPs) until INITIALIZE DISKS appears on the control-panel display.
(the 6 button on MFPs).
The printer boot sequence is complete when READY appears on the control-panel display.
Other diagnostics for the HP LaserJet 9000, 9000mfp, and 9000Lmfp 217
To initialize NVRAM or perform a skip disk
Note
Note
The model number, the serial number, the usage data, and the error event log information is retained
when performing a disk initialization.
1
Turn off the printer.
2
Press and hold
3
Turn on the printer.
4
Release
5
Press
6
Press PAUSE/RESUME (START on MFPs).
7
Use
(the 9 button on MFPs) or
(the 3 button on MFPs) to scroll to the appropriate
selection (NVRAM INIT or SKIP DISK).
(the 9 button on MFPs).
(the 9 button on MFPs).
(the 3 button on MFPs).
Other functions are available in this menu, but are not applicable.
8
Press
(the 6 button on MFPs).
The printer boot sequence is complete when READY appears on the control-panel display.
218 Chapter 7 Troubleshooting
Other diagnostics for the HP LaserJet 9040/9050, 9040mfp, and
9050mfp
Cold reset
Performing a cold reset clears all data from the printer memory and returns all of the default settings
to the factory settings.
CAUTION
Performing a cold reset resets the Jetdirect configuration. To avoid making changes to your network
configuration, remove the HP Jetdirect print server before performing a cold reset.
Note
If possible, print a configuration page and menu map before performing a cold reset. This documents
current settings for later reference.
To perform a cold reset, set the display language, reset the maintenance kit,
enable or disable embedded LAN
Note
1
Turn off the printer.
2
Turn on the printer.
3
Wait until the printer begins counting memory.
4
Press and hold
5
Continue to hold
button on MFPs).
6
Use
(the 9 button on MFPs) or
(the 3 button on MFPs) to scroll to the appropriate
selection (COLD RESET, SELECT LANGUAGE, NEW MAINTENANCE KIT, or ENABLE/DISABLE EMBEDDED
LAN).
(the 6 button on MFPs).
until all three control panel lights illuminate, and then release
(the 6
Other functions are available in this menu, but are not applicable.
7
Press
(the 6 button on MFPs).
The printer boot sequence is complete when READY appears on the control-panel display.
To initialize (format) a hard disk
Note
Initializing a hard disk erases all of the data on the installed mass-storage devices.
1
Turn off the printer.
2
Turn on the printer.
3
Wait until the printer begins counting memory.
4
Press and hold MENU (START on MFPs).
5
Hold PAUSE/RESUME or START down until all three error lights illuminate.
6
Release the MENU or START key.
7
Press
8
Press
(the 5 button on MFPs) until INITIALIZE DISKS appears on the control-panel display.
(the 6 button on MFPs).
The printer boot sequence is complete when READY appears on the control-panel display.
Other diagnostics for the HP LaserJet 9040/9050, 9040mfp, and 9050mfp 219
To initialize NVRAM or perform a skip disk
Note
Note
The model number, the serial number, the usage data, and the error event log information is retained
when performing a disk initialization.
1
Turn off the printer.
2
Turn on the printer.
3
Wait until the printer begins counting memory.
4
Press and hold
5
Release
6
Press
7
Press MENU (START on MFPs).
8
Use
(the 9 button on MFPs) or
(the 3 button on MFPs) to scroll to the appropriate
selection (NVRAM INIT or SKIP DISK).
(the 9 button on MFPs) until all three error lights illuminate.
(the 9 button on MFPs).
(the 3 button on MFPs).
Additional functions are available in this menu but they are not applicable.
9
Press
(the 6 button on MFPs).
The printer boot sequence is complete when READY appears on the control-panel display.
Drum-rotation functional check
The photosensitive drum in the print cartridge must rotate in order for the print process to work. The
photosensitive drum receives its drive from the main drive assembly. Use this procedure to test
whether the drum is rotating:
Note
1
Open the front cover.
2
Remove the print cartridge.
3
Mark the cartridge drive gear with a felt-tipped marker. Note the position of the mark.
4
Install the print cartridge, and close the front cover. The start-up sequence should rotate the
drum enough to move the mark.
5
Open the printer, and inspect the gear that was marked in step 3. Verify that the mark moved. If
the mark did not move, inspect the main drive assembly to make sure that it is meshing with the
print cartridge gears. If the drive gears appear functional, and the drum does not move, replace
the print cartridge.
This test is especially important if refilled print cartridges are being used.
High-voltage power-supply check
The high-voltage power-supply PCA provides the necessary voltages for the electrophotographic
processes. Use the following procedures to verify the operation of the high-voltage system.
Print cartridge connection points
Visually inspect the four connection points on the inside, right end of the print cartridge. If they are
dirty or corroded, clean the connections. If they are damaged, replace the print cartridge.
High-voltage contacts
The high-voltage contact springs are mounted on the high-voltage power-supply PCA and protrude
through the print cartridge cavity to contact the print cartridge. Verify that the contacts are not dirty or
corroded and that the spring action is functional. If they are damaged, replace the high-voltage
power-supply PCA.
220 Chapter 7 Troubleshooting
Tray 4 diagnostics
Tray 4 can run standalone diagnostics to test the device motors, functionality, and sensors. You need
one power cord, one #2 Phillips screwdriver, and a small flatblade screwdriver for the DIP switches.
Diagnostics label
The following label is on the inside of the tray 4 back cover.
Figure 123.
Tray 4 label
Motor test
This test verifies that the three motors on tray 4 are functioning correctly.
1
Identify the back cover (opposite from the tray door). Remove the four screws in the back cover.
Remove the back cover.
2
Pull open the tray.
3
Set the DIP switches on the controller PCA to the motor-test mode.
4
To turn the power-supply switch to the diagnostic mode, pull out on the blue handle.
• If the motors are working correctly, you will hear them as they rotate continuously.
• If the motors do not rotate, replace the corresponding FRU: either the paper pickup assembly
or the paper-deck drive assembly.
5
To stop the test, return the power switch to the operational mode (push it in), and reset the DIP
switches on the controller PCA to the off position.
Tray 4 diagnostics 221
Standalone running test
This test verifies that tray 4 is functioning correctly. For this test, use the LED that is located on the
controller PCA on tray 4.
Note
If tray 4 is mounted underneath the printer, jams might occur because the printer will not pick up the
media. To prevent excessive jams during this test, feed only six to eight pages.
1
Make sure that media is in the tray.
2
Set the DIP switches on the controller PCA for the standalone running mode.
3
To set the power-supply switch to diagnostic mode, pull the blue power-supply switch outward.
The motors start. Media should be lifted from the tray.
If the unit does not work correctly, the lower service LED on the controller PCA flashes in a
pattern that indicates the problem. (See table 25 on page 223 for an interpretation of the LED
patterns.)
4
To stop the test, return the power-supply switch to the operational mode, and set the DIP
switches on the controller PCA to the off position (see table 24). Open tray 4, and remove any
media from the paper path.
Sensor test
This test manually activates the sensors on tray 4 to test whether they are working correctly.
1
Set the DIP switches on the controller PCA for the sensor-test mode.
2
For each paper sensor, perform the following actions:
• Pull open the paper tray.
• Remove the metal spring that holds the sensor unit in place (secured by one screw).
• Pull out the sensor unit.
3
To set the power-supply switch to the diagnostic mode, pull the blue power-supply switch
outward.
4
To manually activate each sensor, press it in.
• When you activate the sensor, the bottom service LED on the controller PCA illuminates.
When you release the sensor, the LED turns off.
• If the LED does not come on, a problem exists with the sensor. Replace the corresponding
FRU.
5
To stop the test, return the power-supply switch to the operational mode, and set the DIP
switches on the controller PCA to the off position (see table 24).
222 Chapter 7 Troubleshooting
Table 24. DIP switch settings
Note
DIP switch
Normal
Motor test
Stand-alone
running test
Sensor test
1
Off
On
On
Off
2
Off
On
Off
Off
3
Off
Off
Off
On
4
Off
On
On
On
Make sure that you turn the power supply off and set all the DIP switches to the off position (normal
settings) when you finish the diagnostics, or the unit will not work correctly. Then, replace the back
cover.
Light-pattern interpretation
If tray 4 is working correctly, it picks up media from the tray and feeds it to the printer, and the bottom
service light flashes regularly every 0.5 seconds.
Table 25. Tray 4 light-pattern interpretation
Long
(1 sec.)
Short (0.03
sec.)
Error number and
meaning
Recommended action
3
1
66.11.01
lifter malfunction
Lift the tray by hand to make sure that it lifts smoothly.
Make sure that the paper-size plates are correctly
installed (in the same corresponding slots) and are not
bent. If neither if these is the problem, replace tray 4.
2
1
13.11.11
registration-sensor
delay jam
If the media does not reach the sensor, open the door
and remove the media. Replace the paper pickup
assembly.
2
2
13.11.3B
registration-sensor
station jam/initial jam
Open the door, and remove the media. Check the
sensors, and replace the corresponding FRU.
2
3
13.11.31
jam-sensor delay jam
If the media did not reach the sensor, open the door
and remove the media. Replace the paper pickup
assembly.
2
4
13.11.21
13.11.2B
jam-sensor stationary
jam/initial jam
Open the door and remove the media.
1
1
paper-path door open Close the door.
1
2
tray open
Close the tray.
wrong size of media
loaded
Load the correct size of media, or check the sensors.
no media in tray
Load the media, or check the sensors.
1
Note
3
If the LED does not illuminate, replace the paper-deck PCA or the universal-power-supply assembly.
Tray 4 diagnostics 223
Jam troubleshooting
Jams occur either when media does not reach or does not clear a photosensor along the printer
paper path in a specific amount of time. If a media jam occurs, a 13.xx PAPER JAM message
appears on the printer control panel. The following table lists general questions that you should ask
and topics that you should explore before troubleshooting.
Table 26. General jam troubleshooting questions
Problem
Action
What is the frequency of the
jams (continuous, one jam per
100 pages, one jam per 1,000
pages, or some other interval)?
Verify the frequency of the jam with the customer. Print or view the event log
to determine the jam history. See "Event log page" on page 175.
Do jams only occur when the
media is fed from a particular
input source (tray 1, tray 2, tray
3, or tray 4)?
See "Jams" on page 225 and "Paper-path test" on page 213 to isolate the
problem.
Do jams only occur when media See "Jams" on page 225 and "Paper-path test" on page 213 to isolate the
is delivered to a specific output problem.
bin (for example, the face-down
bin, face-up bin, duplexer,
stapler)?
Do jams occur with a specific
type of media?
Try media that is known to perform well. See the HP LaserJet Printer Family
Print Media Guide.
Where does the leading edge of Attempt to duplicate the problem. See "Paper-path test" on page 213.
the first sheet of media in the
Inspect the paper path and all mechanical assemblies in the path in advance
printer paper path stop when a of the leading jam.
jam occurs? Are any sheets of
media physically damaged or
torn?
Is the customer loading the trays Observe the customer loading the media. See correct paper-handling
correctly?
procedures in the HP LaserJet Printer Family Print Media Guide.
Is the customer overfilling the
trays?
Make sure that the media level is not above the maximum fill marks in the
paper trays. Observe the customer loading media in the trays.
Are the tray guides set correctly? Make sure that the tray 2 and tray 3 paper guides are set correctly both at the
front and rear of the tray. Make sure that the front fence is locked into the
correct position. For tray 4, make sure that all adjustments are set correctly:
front, back, and side at the top and bottom of the tray.
Does the printer need cleaning? Inspect the paper path and paper-path rollers. See "Internal cleaning" on
page 62.
When was the user maintenance From the configuration page, determine the number of pages since the last
performed on the printer?
maintenance. The preventive maintenance kit should be installed every
350,000 images.
Is the custom-size switch set
correctly?
224 Chapter 7 Troubleshooting
Make sure that the switch is set correctly for the media that is selected.
Jams
Jams occur most often when the following conditions exist:
z
Trays are not correctly loaded (the media does not meet the specifications listed in the HP
LaserJet Printer Family Print Media Guide)
z
The media is in poor condition
z
The printer needs cleaning
If a jam occurs, a 13.x PAPER JAM message appears on the control panel. See "Printer-message
tables" on page 179 for detailed descriptions of the 13.x messages and the recommended actions to
resolve the errors.
Customer print job
Ask the customer to send a print job from the problem source(s) to the problem destination(s). Try to
recreate the jam errors by having the customer perform a paper-path test. See "Paper-path test" on
page 213.
When verifying print jobs, make sure that all of the settings are selected according to the customer’s
preference. Keep in mind that program settings take priority over driver settings, which take priority
over the printer control-panel settings. If a single setting is not present in the program, but is set in the
driver, it overrides the control-panel settings.
Note
HP Web Jetadmin can override media types and sizes in certain conditions. See the HP LaserJet 9000
Use Guide or the HP LaserJet 9040/9050 Use Guide for more information.
Clearing jams
Note
Open and close all of the printer covers to clear the jam message. After removing a sheet of media,
you might need to check other areas for the presence of other media.
All portions of a jammed piece of media must be removed, or you might experience repeated jams.
If the jam persists, try the following remedies:
z
If PostScript is installed, use the JAM RECOVERY=ON menu item under the PostScript Menu (the
printer attempts to automatically recover from jams).
z
Perform a form feed from the computer or the printer control panel (a form feed might flush any
media or envelopes that remain in the printer).
z
Make sure you have located and removed all scraps of media from inside the printer.
Clearing repeated jams
1
Check to see that media is correctly loaded in trays and that all width guides are correctly set
(not skewed).
2
Try turning over the stack of media in the tray. If you are using letterhead media, try printing from
a different tray.
3
Do not use previously printed media or torn, worn, or irregular media.
4
Check the media specifications. If media is outside of the recommended specifications, problems
might occur. See the HP LaserJet Printer Family Print Media Guide.
5
The printer might be dirty. See "Internal cleaning" in chapter 4.
Jam troubleshooting 225
Evaluate the information pages
From the printer control panel, print pages that give details about the printer and its current
configuration. The following information pages are available:
z
Configuration page
• If JetDirect card is installed, a Jetdirect page is also generated.
z
File directory page
z
Usage page
z
File directory page
For a complete list of the printer information pages, print a menu map.
To select and print items from the information menu:
1
Press
2
Use
or
to scroll to INFORMATION, and then press
3
Use
or
to scroll to the appropriate information page, and then press
to open the menus.
.
.
Configuration page
Use the configuration page to view current printer settings, to help troubleshoot printer problems, or
to verify installation of accessories, such as memory (DIMMs), input and output paper-handling
devices, and printer languages.
The content of the configuration page varies, depending on the options currently installed in the
printer.
If any of the installed devices are not shown on the configuration page, verify that the Jet-Link cabling
is correctly connected and functional and that DC power is available to the paper-handling devices.
Check and reseat suspect cable connections. If any of the cables are replaced, you must cycle the
power to have the printer recognize the device again.
Configuration page elements
A
Printer information
B
Event log
C
Installed personalities and options
D
Memory
E
Security
F
Paper trays and options
226 Chapter 7 Troubleshooting
A
2
D
E
B
2
E
2
C
2
F
G
Figure 124.
Sample configuration page
Note
If an HP Jetdirect EIO card is installed, an HP Jetdirect configuration page also prints out.
Evaluate the information pages 227
Verify installed options
In the installed personalities and options section on the configuration page, look for options such as
hard disk information, DIMM types (RAM or ROM), and DIMM sizes.
Make sure that the options installed in the printer are reflected in the configuration page. If an
installed device is not shown on the configuration page, see table 27 for recommended actions.
The paper tray and options section of the configuration page identifies two types of paper-handling
devices that communicate or interact with the printer:
z
Engine DC controller-driven devices
• Duplexer
• Tray 1
z
Communication link devices (Jet-Link protocol)
• Input devices: Tray 4
• Output devices: Multifunction finisher, 3,000-sheet stapler/stacker, or 3,000-sheet stacker
While the engine DC controller-driven devices draw power (24 VDC) and control signals from the
engine, the Jet-Link devices have their own power supply and controller board.
The information from the paper handling controller is carried by the Jet-Link cables that connect the
controller board of all the Jet-Link protocol supported devices. The Jet-Link protocol supports up to
64 devices connected to the paper handling. Each device controller has an input or output port that
provides flexible connections in different configurations.
Table 27. Printer devices troubleshooting
Device
Action if installed and undetected
Duplexer
Print a configuration page to verify device installation.
Turn the power off, reseat the duplexer, verify that the connector is not broken, and turn
the printer on.
If the connector is broken or if turning the printer on and off does not work, then replace
the duplex cable and/or duplexer.
Device 1 and 2
Verify that ac power is present.
Verify that the Jet-Link cables are installed correctly.
Remove all Jet-Link connections, and visually inspect for connector damage on the cable
pins and connector ends. Try using a different cable to connect the problem device
directly to the paper handling controller. All Jet-Link cables are wired the same, but are
different lengths.
If a device is not recognized, replace the device controller or defective Jet-Link cable.
228 Chapter 7 Troubleshooting
Jetdirect page
Use the Jetdirect page to view current network settings, to help troubleshoot printer problems, or to
verify network statistics or protocol information.
Jetdirect page elements
A
HP Jetdirect configuration
B
Network statistics
C
Protocol information
A
2
2
B
2
C
Figure 125.
Sample Jetdirect configuration page
Evaluate the information pages 229
Supplies status page
Use the supplies status page to view current printer supply status, to help troubleshoot printer
problems, or to verify printer information.
Supplies status page elements
A
Supplies ordering information
B
Cartridge information
C
Other supplies information
D
Printer information
A
2
B
2
2
C
D
2
Figure 126.
Sample supplies status page
230 Chapter 7 Troubleshooting
Usage page
The usage page is designed to fit into a pay-per-page (PPP) model. A reseller can configure the
usage page with instructions for a customer to send the information back to the reseller in order to
prepare bills.
Print a usage page from the printer control panel (or gain access to the information remotely from HP
Web Jetadmin) to determine how many simplex or duplex pages of each media size are scanned on
the copy module and printed on the printer. Average toner coverage is approximated by counting
pixels. Jams are not counted. The data cannot be reset manually, and values such as total print and
scan impressions, toner coverage, serial number, default language, and default media size are
backed up between the printer NVRAM and hard disk.
Figure 127.
Sample usage page
Evaluate the information pages 231
File directory page
Use the file directory page to view current directory structures, to help troubleshoot printer problems,
or to verify storage capabilities.
File directory page elements
A
Directory information
2
A
Figure 128.
Sample file directory page
232 Chapter 7 Troubleshooting
Image-formation troubleshooting
When working with customers, obtain a print sample before troubleshooting the printer. Ask the
customer to describe the quality expected from the printer. The print sample also helps clarify the
customer’s description of the problem.
Often an image-formation problem is linked to media that is outside the specifications
Hewlett-Packard establishes for optimum printer performance. See "Media troubleshooting" on page
244 for help with persistent image-formation problems.
Table 28. Image-quality checks
Image-quality checks
Action
Does the problem repeat on the Use the "Repeating defect ruler" on page 243.
page?
Is the print cartridge full and is it See "Check the print cartridge" on page 234.
manufactured by HP?
Is the customer using media that See "Trays, bins, and paper handling" in chapter 2.
meets all HP specifications?
Is the print sample similar to
Compare the sample to the tables and perform the actions recommended in
those in the image defect tables? the "Image-defect tables" on page 235.
Is the problem on the print
If a dark and distinct toner image is present on the drum surface, assume
cartridge or the transfer charging that the first four functions of the electrophotographic process are functioning
roller?
(cleaning, conditioning, writing, and developing—See "Image formation
system" in chapter 5), and troubleshoot the failure as a transfer or fusing
problem.
Does the media meet HP
standards?
See "Media troubleshooting" on page 244.
Image-formation troubleshooting 233
Check the print cartridge
Image-formation defects often result from problems with the print cartridge. Use the following list to
verify that the print cartridge is operating correctly.
Perform all of the following checks before replacing the print cartridge.
z
Make sure that the print cartridge contains toner.
• The full print cartridge weight is approximately 4,220 grams (9.28 lb).
• The empty weight is approximately 2,700 grams (5.94 lb).
Note
z
Check the print cartridge to see if it is disassembled or refilled.
z
Make sure that the print cartridge is seated correctly in the printer cavity.
z
Inspect the cartridge for toner leaking through worn seals (manual rotation of the drum can
cause internal damage and toner spills).
The print cartridge is rated for 30,000 images at 5% coverage for two-page jobs. Check the surface of
the photosensitive drum in the cartridge to see if it is damaged or scratched. Touching the drum
contaminates the photosensitive surface and might cause spotting and defects during printing.
z
White areas on the page might indicate that the drum was exposed to light for too long. If white
areas appear, stop the printer and wait a few minutes. This should eliminate most defective
images. If not, the print cartridge might be placed in a dark environment for several days, which
might restore some life to the drum.
EconoMode
EconoMode creates draft-quality printing by reducing the amount of toner on the printed page by up
to 50%. Advise the customer to turn EconoMode on or off, either from the printer driver or a software
program.
Skew
Use the following information to gauge skew specifications.
z
2 mm over 260 mm (simplex and duplex)
z
Leading edge plus or minus 2.5 mm (cut sheet media)
z
Plus or minus 4.5 mm (envelopes)
z
Left margin plus or minus 2.5 mm (cut sheet)
234 Chapter 7 Troubleshooting
Image-defect tables
The printer output quality is subject to customer judgment. This section helps define print-quality
defects and the factors that affect print quality.
The print samples shown illustrate some print-quality defects. Keep copies of print-quality defects
that you encounter in the field, and an explanation of their causes, to use for future reference.
Black page
White page
Blank spots
Wrinkles and creases
Curl or wave
Contamination on back
Distorted image
Dropout
Horizontal black lines
Horizontal smudges
Loose toner
Repeating defects
Toner specks
Vertical black lines
Bubbles
Horizontal white lines
Page skew
Vertical dots
Figure 129.
Gray background
Light, dark, or faded print
Toner smear
Vertical white lines
Repeating image
Misformed character
Image defect examples
Image-formation troubleshooting 235
Table 29. Image defects
Problem
Cause
Solution
Black page
The high-voltage power supply
connections are contaminated.
z
z
The high-voltage power supply is
installed incorrectly.
z
Note If the high-voltage power supply z
was removed and replaced, it might
not be seated correctly.
Defective primary charging roller.
z
The laser drive circuitry is damaged z
on the DC controller board so that the
laser is always on.
White page
Replace the print cartridge.
Replace the laser/scanner assembly and
DC controller board, and the formatter, if
necessary.
z
Replace the print cartridge.
The laser shutter is defective.
z
Check the laser shutter for correct
operation when closing the front door with
the print cartridge installed.
Transfer charging roller voltage does
not exist.
z
Replace the transfer roller assembly if
necessary.
Developing bias does not exist.
z
Clean the high-voltage power supply
contacts.
Replace the high-voltage power supply.
The laser/scanner cable assembly is z
defective.
Replace the laser/scanner cable
assembly.
z
The media does not meet printer
specifications or is stored incorrectly.
Print a few more pages to see if the
problem corrects itself.
Turn over the stack of media in the tray.
Also try rotating the media 180°.
If the media does not meet HP
specifications, replace the media.
z
z
The transfer charging roller is
contaminated of deformed.
Also see "Dropouts" on The print cartridge is defective.
page 238.
236 Chapter 7 Troubleshooting
Remove the high-voltage power supply
and check the connectors and ribbon
cable for damage.
Reseat the high-voltage power supply,
and make sure to fully seat the connectors
and ribbon cable correctly.
The print cartridge is out of toner.
z
Blank spots
Clean the high-voltage power supply
terminals.
Clean the high-voltage springs where they
contact the print cartridge.
z
Replace the transfer charging roller.
z
Replace the print cartridge.
Table 29. Image defects (continued)
Problem
Cause
Solution
Wrinkles or creases
The media does not meet printer
z
specifications or is stored incorrectly.
z
z
The printer operating environment
does not meet specifications.
z
Make sure that the printer operating
environment meets specifications.
The media is loaded incorrectly.
z
Make sure that the media is loaded
correctly, and that the guides fit correctly
against the stack of media.
The media is printing from the wrong z
tray.
Print from a different tray (such as tray 1).
The wrong output bin for the media
type is being used.
z
Print to a different output bin (face-up or
face-down bin).
An obstruction in the paper path
exists.
z
Check the paper path for media debris.
Check for damaged components that
could be creasing the media.
z
The fuser levers are not in the correct z
position.
z
Curl or wave
Print a few more pages to see if the
problem corrects itself.
Turn over the stack of media in the tray.
Also try rotating the media 180°.
If the media does not meet HP
specifications, replace the media.
The media does not meet printer
z
specifications or is stored incorrectly.
z
z
The levers should be in the down position
for all media except envelopes.
The levers should be in the up position for
envelopes.
Print a few more pages to see if the
problem corrects itself.
Turn over the stack of media in the tray.
Also try rotating the media 180°.
If the media does not meet HP
specifications, replace the media.
The printer operating environment
does not meet specifications.
z
Make sure that the printer operating
environment meets specifications.
Also see "Dropouts" on The media is printing to the wrong
output bin.
page 238.
z
Print to a different output bin (face-up or
face-down bin).
The wrong fuser setting is used for
the media type.
z
From the paper-handling menu on the
control panel, change the fuser mode
setting or select another media type from
the printer driver.
Image-formation troubleshooting 237
Table 29. Image defects (continued)
Problem
Cause
Solution
Contamination on back
Contamination inside printer (for
example, tray separation roller, feed
roller, transfer charging roller, fuser,
print cartridge) exists.
z
z
z
z
The media does not meet printer
z
specifications or is stored incorrectly.
z
z
The printer requires a preventive
maintenance kit.
Distorted images
z
The media does not meet printer
z
specifications or is stored incorrectly.
z
z
Dropouts
Print a few more pages to see if the
problem corrects itself.
Turn over the stack of media in the tray.
Also try rotating the media 180°.
If the media does not meet HP
specifications, replace the media.
When the printer reaches 350,000 pages
printed, install the preventive maintenance
kit.
Print a few more pages to see if the
problem corrects itself.
Turn over the stack of media in the tray.
Also try rotating the media 180°.
If the media does not meet HP
specifications, replace the media.
The printer operating environment
does not meet specifications.
z
Make sure the printer operating
environment meets specifications.
Media is not moving through the
paper path correctly.
z
Check all rollers and motors for correct
operation.
Poor connection of cables to the
laser/scanner exists.
z
Reseat the cables connected to the laser/
scanner.
Poor connection of cables to the DC
controller board exists.
z
Reseat the cables connected to the DC
controller PCA.
A defective laser/scanner exists.
z
Replace the laser/scanner.
A defective DC controller PCA.
z
Replace the DC controller PCA.
The media might be too smooth.
z
Check the media type and quality.
The printer operating environment
does not meet specifications.
z
Make sure the printer operating
environment meets specifications.
The toner density setting is incorrect. z
From the configure device menu on the
control panel, adjust the toner density
setting (make sure EconoMode is off).
The fuser setting for the type of media z
is incorrect.
From the paper-handling menu on the
control panel, change the fuser mode
setting or select another media type from
the printer driver.
Also see "Blank spots"
on page 236.
Maintenance is due.
238 Chapter 7 Troubleshooting
Print at least 10 pages to see if the
problem goes away.
Print a cleaning page. See "Create a
cleaning page" in chapter 4.
Identify and clean the contaminated part
according to the "Repeating defect ruler"
on page 243. If contamination cannot be
removed, replace the contaminated part.
Check for toner leaks.
z
When the printer reaches 350,000 pages
printed, install the preventive maintenance
kit.
Table 29. Image defects (continued)
Problem
Cause
Solution
Bubbles
A drum ground path does not exist.
z
z
Check the drum ground spring and
reconnect it, if necessary.
Replace the high-voltage power supply.
Note With no ground path, the drum cannot
discharge. The negative charge on the drum
repels toner and leaves the page with bubble
print.
Gray background
z
The media does not meet printer
specifications or is stored incorrectly.
z
z
The printer operating environment
does not meet specifications.
z
The toner density setting is incorrect. z
Horizontal black lines
From the configure device menu on the
control panel, adjust the toner density
setting (make sure EconoMode is off).
z
Replace the print cartridge.
The print cartridge, laser/scanner
assembly, or DC controller PCA is
defective.
z
See the "Repeating defect ruler" on page
243.
Replace the print cartridge.
Reseat the connectors on the laser/
scanner and DC controller PCA.
Replace the laser/scanner assembly and
the DC controller PCA, if necessary.
z
z
The paper path is contaminated or
damaged.
z
z
z
z
Horizontal white lines
Make sure that the printer operating
environment meets specifications.
The print cartridge is faulty.
z
Horizontal smudges
Print a few more pages to see if the
problem corrects itself.
Turn over the stack of media in the tray.
Also try rotating the media 180°.
If the media does not meet HP
specifications, replace the media.
z
z
z
See the "Repeating defect ruler" on page
243.
Replace the print cartridge.
Check the print cartridge and replace it, if
necessary.
Check the fuser and replace it, if
necessary.
Check the print cartridge and replace it, if
necessary.
Check the fuser and replace it, if
necessary.
Replace the laser/scanner assembly and
the DC controller PCA, if necessary.
Image-formation troubleshooting 239
Table 29. Image defects (continued)
Problem
Cause
Solution
Light print, dark print, or The toner density setting is incorrect. z
fade
The transfer charging roller is
defective.
z
The media does not meet printer
z
specifications or is stored incorrectly.
z
z
Poor contact to the high-voltage
power supply exists.
z
z
z
Also see "Bubbles" on
page 239.
Loose toner
Print a few more pages to see if the
problem corrects itself.
Turn over the stack of media in the tray.
Also try rotating the media 180°.
If the media does not meet HP
specifications, replace the media.
Make sure that the drum ground spring is
connected correctly to the high-voltage
power supply.
Clean the contacts if they are
contaminated. If the problem persists after
cleaning, or if parts are damaged or
deformed, replace them.
Replace the high-voltage power supply, if
necessary.
z
Replace the laser/scanner assembly.
The DC controller PCA is defective.
z
Replace the DC controller PCA.
The laser shutter is defective.
z
Check the laser shutter for correct
operation when installing the print
cartridge.
Contamination in the printer exists.
z
Print a few more pages to see if the
problem corrects itself.
Clean the inside of the printer or use the
printer cleaning page.
The print cartridge is defective.
z
Replace the print cartridge.
The media might be too smooth.
z
Check the media type and quality.
The fuser setting is incorrect for the
media type.
z
From the paper-handling menu on the
control panel, change the fuser mode
setting or select another media type from
the printer driver.
The fuser is defective.
z
Maintenance might be due. Check this by
printing a copy of the supplies status
page. If maintenance is due, order and
install the preventive maintenance kit.
Replace the fuser.
z
240 Chapter 7 Troubleshooting
Replace the transfer charging roller.
The laser/scanner assembly is
defective.
z
Repeating defects
From the configure device menu on the
control panel, adjust the toner density
setting (make sure EconoMode is off).
The envelope levers are set
incorrectly.
z
Make sure that the envelope levers are set
to the specified media.
A roller is contaminated or defective.
z
See the "Repeating defect ruler" on page
243.
Table 29. Image defects (continued)
Problem
Cause
Solution
Page skew
The media does not meet printer
z
specifications or is stored incorrectly.
z
z
The media is not loaded correctly or
trays are not adjusted correctly.
Toner smears
z
Make sure that the registration assembly
is installed correctly.
z
Print a few more pages to see if the
problem corrects itself.
Clean the inside of the printer or use the
printer cleaning page.
Contamination in the printer exists.
The media might be too smooth.
z
Check the media type and quality.
The print cartridge is defective.
z
Replace the print cartridge.
The fuser setting for the media type is z
incorrect.
Contamination in the printer exists.
z
z
z
The media does not meet printer
z
specifications or is stored incorrectly.
z
z
The customer is alternating small and z
standard media (such as envelopes
and letterhead).
Vertical black lines
Make sure that the media is loaded
correctly and that the guides fit correctly
against the stack of media.
The registration assembly is installed z
incorrectly.
z
Toner specks
Print a few more pages to see if the
problem corrects itself.
Turn over the stack of media in the tray.
Also try rotating the media 180°.
If the media does not meet HP
specifications, replace the media.
From the paper-handling menu on the
control panel, change the fuser mode
setting or select another media type from
the printer driver.
Print a few more pages to see if the
problem corrects itself.
Clean the inside of the printer. See
"Internal cleaning" in chapter 4.
Print a cleaning page. See "Create a
cleaning page" in chapter 4.
Print a few more pages to see if the
problem corrects itself.
Turn over the stack of media in the tray.
Also try rotating the media 180°.
If the media does not meet HP
specifications, replace the media.
To alternate small and standard media,
from the paper-handling menu on the
control panel, set SMALL PAPER
SPEED=SLOW.
The print cartridge is defective.
z
Replace the print cartridge.
The fuser entrance guide is
contaminated.
z
Clean the guide.
Scratches on the fuser exist.
z
Replace the fuser.
The fuser film is worn.
z
Set the fuser to a lower temperature
mode.
Replace the fuser.
z
Image-formation troubleshooting 241
Table 29. Image defects (continued)
Problem
Cause
Vertical dots
The static charge eliminator teeth are z
contaminated.
Clean the static charge eliminator.
Poor contact exists between the static z
charge eliminator and the highvoltage power supply.
Clean the contacts, if contaminated. If the
problem persists after cleaning, or parts
are damaged or deformed, replace them.
Vertical white lines
The transfer charging roller is
deformed or deteriorated.
z
Replace the transfer charging roller.
The high-voltage power supply is
defective.
z
Replace the high-voltage power supply.
The print cartridge faulty.
z
Replace the print cartridge.
Contamination in the laser path
exists.
z
z
Clean the laser path (remove the laser/
scanner assembly and clean the lens).
Replace the laser/scanner assembly.
z
Replace the fuser assembly.
The fuser is defective.
Repeating images
Solution
This type of defect might occur when z
using preprinted forms, a large
quantity of narrow media, or a fuser z
mode that is set too high for the
media.
z
z
Misformed characters
242 Chapter 7 Troubleshooting
Print a few more pages and see if the
problem corrects itself.
Make sure that the media type and quality
meet HP specifications.
If you observe that this type of defect
occurs on wide media (such as letter or
A4) just after printing on narrow media
(such as envelopes), you can set SMALL
PAPER SPEED on the paper-handling
menu to SLOW. This slows down printing.
Check your fuser mode.
Maintenance is due.
z
Print a copy of the supplies status page. If
maintenance is due, order and install the
preventive maintenance kit.
The printer operating environment
does not meet specifications.
z
Make sure that the printer operating
environment meets specifications.
Maintenance is due.
z
Print a copy of the supplies status page. If
maintenance is due, order and install the
preventive maintenance kit.
Repeating defect ruler
Repetitive print defects are usually caused by a specific roller in the printer or the print cartridge. Use
the following figure to isolate the cause of repetitive print defects. Align the first occurrence of the
defect with the top of the “ruler” (at the top or bottom of the misprinted page), and measure to the
next occurrence of the defect to determine which roller is causing the defect. When the defect pattern
matches the pattern of the ruler, replace the indicated roller.
Figure 130.
Repeating defect ruler
Image-formation troubleshooting 243
Media troubleshooting
Media defects can cause jams and image defects. If the previously described conditions are
corrected and do not eliminate the printing problem, continue to investigate the media as the source
of the defect.
Problems with media are sometimes difficult to detect. Follow a standard troubleshooting procedure
to help isolate media-related problems. The following are the steps to follow:
z
"Determine the problem source: media or printer" on page 244.
z
"Isolate a paper path" on page 244.
z
"Isolate a media brand" on page 245.
z
"Isolate a media type" on page 245.
z
“Operating environment” in chapter 2.
z
"Paper-path test" on page 213.
Determine the problem source: media or printer
When determining the cause of a printer failure, a distinction must be made between problems that
relate to the printer itself and those that involve media. Often a problem that seems to be related to
the printer is actually a matter of poor print-media selection or handling. To determine whether a
problem is caused by the printer or by the media, try a few simple steps to remedy the situation:
z
Turn the media over in the tray to print on the reverse side.
z
Rotate the sheets 180° (end to end) to feed with a different leading edge.
If the symptoms cease, or change in some way, assume that the problems are caused by the media.
Isolate a paper path
Try using the straightest paper path
Some problems can be avoided by using the straightest available paper path. Usually this means
media feeds from the upper paper tray or tray 1, and exits into the face-up bin. This path is
recommended for envelopes and labels.
Determine if the problem is caused by the duplexing process
Media that has just made a pass through the printer can show increased media curl. Media curl
increases image dropout, and creates pickup and stacking problems. When the second pass is
made, media might not meet the specifications for moisture and curl. Dry media can hold static
charges that affect print quality and stacking of the duplexed page. Media shrinkage resulting from a
second pass through the printer can cause image misalignment on the duplexed page.
Isolate the source of the jam
Define the source of the media that jams.
Determine where media jams occur
Check where media stops when a jam occurs.
244 Chapter 7 Troubleshooting
Determine whether the printer is experiencing misfeeds or multifeed jams
The following are some possible causes of misfeeds or multifeed jams:
z
The media might be too heavy. Check basis weight and measure caliper. See "Media input/
output options" in chapter 2.
z
The media might be too smooth. Check the finish.
z
The media might be too heavy or too light. Check basis weight.
z
The customer might be attempting to print embossed media, pre-printed forms, or perforated
media that does not meet HP specifications. See "Media specifications" in chapter 2.
z
The media might be loaded incorrectly. Turn over the sheets in the media tray to determine if inream curl is causing misfeeds.
z
The customer might be fanning media before loading it into the tray.
z
The customer might be adding media in small amounts. Do not add small amounts of media or
mix types of media in the tray.
z
The printer or media storage environment might be too humid or too dry. See "Storing print
media" in chapter 2.
Isolate a media brand
If the printer jams with only one brand of media:
z
Try switching media brands.
z
If the media ream in use appears to be old, open a fresh ream of the same media and load it
correctly into the printer. If the problem disappears, investigate storage and handling conditions.
Isolate a media type
When jams and other problems occur frequently, it is often because the customer is using a special
media. Customers must only use media that conforms to all Hewlett-Packard specifications, and
should always test media before purchasing large quantities. Media should be tested before storage
to verify quality printing results. Then, if problems occur, storage or handling conditions can isolate
the most likely cause. Some types of media that might cause problems are:
z
Adhesive labels
z
Envelopes
z
Transparencies
z
Preprinted forms and letterhead
z
Embossed media
z
Perforated media
z
Chemically treated media
z
Synthetic media
z
Coated media
z
Other special media
See "Media specifications" in chapter 2 for further information concerning these types of media.
Media troubleshooting 245
Communication troubleshooting
Communications check
Note
Communication problems are normally the customer’s responsibility. Time spent attempting to resolve
these problems might not be covered by the Hewlett-Packard warranty. Refer the customer to the
network administrator for assistance in troubleshooting network problems.
Test message
After the printer is installed, verify communications between the printer and the IBM-compatible
computer. Type the following information at the MS-DOS prompt:
C:\DIR>LPT1 then press ENTER to print to parallel port #1.
The printer should print a directory listing of the C:\ directory.
EIO troubleshooting
The Jetdirect configuration page shown in figure 125 on page 229 contains valuable information
about the current status of the EIO accessories. Before attempting to troubleshoot a network problem
or notifying your network consultant of a problem, always print a configuration page. If an EIO
accessory is installed, the Jetdirect configuration page also prints.
See the HP Jetdirect Network Interface Configuration Guide for detailed explanations of network
issues.
Jetdirect configuration
z
If the EIO Jetdirect print server has successfully turned on and completed its internal
diagnostics, the I/O CARD READY message will appear. If communication is lost, an I/O NOT
READY message appears followed by a two digit error code. Consult the HP Jetdirect Network
Interface Configuration Guide for further details and recommended action.
z
The “Network Statistics” column indicates the status of network activity. Bad packets, framing
errors, un-sendable packets, and collisions should be minimal. If a high percentage (greater than
1%) of these occur, contact the network administrator. All of the statistics are set to zero when
the printer is powered off.
z
A “Novell Status” block should state the Novell printer server name to which the printer is
connected. If the Node Name reads “NPIxxxxxx” (xxxxxx = last six digits of the EIO LAN
address), the EIO card has not been configured for a Novell server. This could indicate that the
card is operating under an IPX protocol other than Novell. Consult with the network administrator
if the Node Name is not present.
z
In the TCP/IP protocol block, the default IP address is “192.0.0.192.” It is acceptable to operate
the printer with this default address. The error message ARP DUPLICATE IP ADDRESS might
appear in this block. This is also an acceptable error code if the TCP/IP protocol is not being
used. Please check with the network administrator to determine the correct IP address for the
printer.
246 Chapter 7 Troubleshooting
Embedded LAN troubleshooting (HP LaserJet 9040n/9050n,
HP LaserJet 9040dn/9050dn, HP LaserJet 9050mfp, and
HP LaserJet 9040mfp only)
Although networking is integrated, the embedded LAN has additional features to assist in
troubleshooting. These include the following features:
z
The ability to turn on and turn off the embedded networking.
z
An internal diagnostic to check the networking hardware.
z
The ability to initiate communication from the printer to other network devices to check
communication paths.
z
The ability to upgrade the embedded LAN separately from the printer firmware.
z
Procedures to upgrade the embedded LAN by installing new printer firmware (through the
parallel port and the networking port).
z
A Save + Restore capability for formatter exchanges.
Error codes
Some embedded LAN error codes are the same as those for an EIO card. In these cases, the
embedded LAN is identified as EIO 4. In other cases, because the embedded LAN is part of the
printer firmware, the LAN error codes are within the 49.X series. See "Numerical error messages" on
page 188 for more information.
If the printer cannot print a configuration page, click the Configure Device menu and then click the
I/O menu. If Embedded Jetdirect Menu does not appear or if the JDI is disabled or is not installed,
do not look at the LEDs on the back of the printer next to the RJ-45 connector (10/100 LEDs). These
LEDs are controlled by hardware and are active regardless of the state of the embedded LAN
(enabled or disabled).
LAN diagnostics
Two diagnostic menus are available on the control-panel display, One of the menus is unique to the
printer diagnostics and the other is unique to the embedded LAN in the I/O submenu. The
diagnostics menu item in the I/O submenu is described as follows.
The following are the embedded LAN diagnostics:
z
Loopback test
z
Ping test
z
Ping-test results
Loopback test
Perform a loopback test to check for hardware errors in the embedded LAN. The loopback test is
designed to operate for a few hours, overnight, or during the weekend. When it is operating, the
printer cannot accept network traffic such as print jobs.
Use the loopback test to help detect printer problems and embedded LAN problems that might be
caused by hardware or basic firmware problem. This is done by eliminating the network as a variable
in the troubleshooting process.
If a loopback test fails, printer and/or embedded LAN updates might be required or the formatter
might need to be replaced.
Note
If the printer fails before you open the Loopback menu, remove the LAN cable, perform a cold reset
on the printer, and then perform a loopback test.
Communication troubleshooting 247
Ping test
Perform a ping test to check for network connectivity.
A ping test is designed to troubleshoot TCP/IP network connectivity issues by taking key parts of the
functionality from the ping utility on Microsoft Windows systems. All Jetdirect products can respond
to ping requests, but the embedded LAN can initiate ping requests. All TCP/IP implementations, such
as ICMP Echo Response, are required to respond to ping requests.
The following are the ping-test parameters:
z
Destination IP address: the IP address that you want to contact
z
Packet size: how many octets of data to send
z
Count: the number of packets to send
z
Timeout: the number of seconds to wait for a response
z
Print results: a printed page of the results
The following are the recommended settings for a ping test:
z
Destination IP address: use the local router and then use the remote nodes
z
Packet Size: 64 bytes and then 1,460
z
Count: 4
z
Timeout: 1 second (more time if using a WAN connection)
z
Print results: yes (to have a record of what succeeded and what failed)
Ping-test results
The following information is available from the pint test:
z
Packets Sent: The total number of ICMP packets that were sent to the remote host during the
test (or during the most recent test)
z
Packets Received: The total number of ICMP packets that were received from the remote host
during the test (or during the most recent test)
z
Percent Lost: The percentage of ICMP packets that were sent but not received from the remote
host during the test (or during the most recent test)
z
RTT Min: The minimum time (in milliseconds) from when an ICMP packet is sent until it is
returned from the remote host
z
RTT Max: The maximum time (in milliseconds) from when an ICMP packet is sent until it is
returned from the remote host
z
RTT Average: The average time (in milliseconds) from when an ICMP packet is sent until it is
returned from the remote host (total time/number of packets).
The View Ping Results menu indicates whether a ping-test is in progress. If a ping test is in
progress, the user has a menu item to “refresh” the ping results. The results are not dynamically
updated in most cases.
Note
HP recommends printing a page with the ping-test results when working on network connectivity
issues.
To enable or disable the embedded LAN
1
Turn off the printer.
2
Turn on the printer.
3
Wait until the printer begins counting memory.
4
Press and hold
5
When all three LEDs are illuminated, release
248 Chapter 7 Troubleshooting
(the 6 button on MFPs).
(the 6 button on MFPs).
6
Note
(the 9 button on MFPs) or
(the 3 button on MFPs) to scroll to the appropriate
Use
selection (COLD RESET, SELECT LANGUAGE, NEW MAINTENANCE KIT, or ENABLE/DISABLE EMBEDDED
LAN).
Other functions are available in this menu, but are not applicable to the LAN.
7
Press
(6 key on MFPs). The printer continues the boot sequence.
Hard-failure troubleshooting for the embedded LAN
If a 49, 79, or 8X error or equivalent occurs, determine if the environment outside of the printer is
causing the problem or if the problem is in the printer.
Note
HP recommends printing a network configuration page to use if you lose the network configuration.
1
Turn off the printer.
2
Remove the network cable.
3
Turn on the printer and disable the embedded LAN. (If the test fails, a hardware problem exists. If
the test succeeds, go to step 4.)
4
Turn off the printer.
5
Turn on the printer and enable the embedded LAN. (If the test fails, go to step 6. If the test
succeeds, go to step 8).
6
Turn off the printer.
7
Turn on the printer and perform a cold reset. (If the test fails, a hardware problem exists. If the
test succeeds, go to step 8.)
8
Click the Embedded Network menu.
9
On the Diagnostics menu, click Loopback Test.
10 On the Loopback Test menu, click Execute. This begins a continuous diagnostic that is only
stopped by using a power-cycle. A failure is reported on a diagnostic page or with an error
message. (If the test fails, a hardware problem exits. If the test succeeds, go to step 11).
11 Turn off the printer.
12 Install the network cable.
13 Turn on the printer.
14 Restore the network configuration (if necessary).
If the test succeeds, the problem has not been diagnosed. If the test fails, the problem might be a
network firmware issue. Perform a standard Jetdirect firmware troubleshooting procedure, and
disable all of the unused network protocols and services.
If the printer fails when the embedded LAN is enabled and the network cable is unplugged, disable
the embedded LAN and upgrade the printer by installing the .RFU file and the parallel port. Sending
the .RFU file by using the printer results in the embedded LAN firmware being reprogrammed.
When enabled, the embedded LAN supports the traditional methods of upgrading a Jetdirect device
(FTP, HTTP, HP Download Manager, and Web Jetadmin). In addition, .RFU upgrades when the
embedded LAN is enabled or disabled.
Communication troubleshooting 249
Connectivity problems
Use the following procedure if the printer and the network configuration page are correct, but the
network printer connectivity is not working.
1
Print a network configuration page.
2
Click Embedded Networking.
3
On the Diagnostics menu, click Loopback Test.
4
On the Loopback Test menu, click Execute. This begins a continuous diagnostic that can only
be stopped by using a power-cycle. A failure is reported on a diagnostic page or with an error
message. (If the test fails, a hardware problem exits. If the test succeeds, go to step 5.)
5
Turn off the printer.
6
Turn on the printer.
7
Reenter the network information.
8
Click Embedded Jetdirect.
9
On the Diagnostics menu, click Ping.
10 Specify the destination IP (the default is 127.0.0.1).
11 Specify the packet size (64 to 2,048, with a default of 64).
12 Specify the timeout (1 to 100 seconds, with a default of 1).
13 Specify the count (0 to 100, with a default of 4).
Note
Use different IP addresses to test the network connectivity. Results are obtained by opening the Ping
Results menu and selecting the individual keys, or by configuring the printer to print the results at the
end of the test. Click the Diagnostics menu and then click the View Ping Results sub-menu for more
information.
Note
The embedded Jetdirect and EIO cards can work together simultaneously (just like two EIO cards in
the same printer). Or, if necessary as a part of troubleshooting, the embedded Jetdirect can be disabled
and an EIO card can be installed.
Save + Restore
CAUTION
Do not replace the formatter, Compact Flash firmware, and/or the DC controller at the same time. The
product will not work if the formatter, Compact Flash firmware, and/or the DC controller are replaced
at the same time. After you replace the formatter, Compact Flash firmware, and/or the DC controller
leave the product in the READY state for at least 10 minutes so that the formatter, Compact Flash
firmware, and/or the DC controller update each other.
Do not perform a cold reset.
WARNING!
The formatter has sharp edges.
250 Chapter 7 Troubleshooting
Wiring diagrams
Figure 131.
Printer wiring diagram (HP LaserJet 9000 series printer)
Wiring diagrams 251
Figure 132.
Printer wiring diagram (HP LaserJet 9040/9050 series printer)
252 Chapter 7 Troubleshooting
Figure 133.
Tray 4 wiring diagram
Wiring diagrams 253
254 Chapter 7 Troubleshooting
8
Parts and diagrams
Chapter contents
Introduction . . . . . . . . . . . . . . . . . . . . . . . . . . . . . . . . . . . . . . . . . . . . . . . . . . . . . . . . . . . . . . . . . 256
Ordering parts. . . . . . . . . . . . . . . . . . . . . . . . . . . . . . . . . . . . . . . . . . . . . . . . . . . . . . . . . . . . 256
Consumables, supplies, accessories, FRUs, and documentation . . . . . . . . . . . . . . . . . . . . 257
Common hardware . . . . . . . . . . . . . . . . . . . . . . . . . . . . . . . . . . . . . . . . . . . . . . . . . . . . . . . . 261
Illustrations and parts lists . . . . . . . . . . . . . . . . . . . . . . . . . . . . . . . . . . . . . . . . . . . . . . . . . . . . . . 262
External covers and panels. . . . . . . . . . . . . . . . . . . . . . . . . . . . . . . . . . . . . . . . . . . . . . . . . . 262
Left door and diverter . . . . . . . . . . . . . . . . . . . . . . . . . . . . . . . . . . . . . . . . . . . . . . . . . . . . . . 264
Right cover assembly . . . . . . . . . . . . . . . . . . . . . . . . . . . . . . . . . . . . . . . . . . . . . . . . . . . . . . 265
Internal . . . . . . . . . . . . . . . . . . . . . . . . . . . . . . . . . . . . . . . . . . . . . . . . . . . . . . . . . . . . . . . . . . . . 266
Internal components . . . . . . . . . . . . . . . . . . . . . . . . . . . . . . . . . . . . . . . . . . . . . . . . . . . . . . . 266
Drum feed drive assembly . . . . . . . . . . . . . . . . . . . . . . . . . . . . . . . . . . . . . . . . . . . . . . . . . . 274
Fuser delivery drive assembly . . . . . . . . . . . . . . . . . . . . . . . . . . . . . . . . . . . . . . . . . . . . . . . 275
Cartridge lifter assembly . . . . . . . . . . . . . . . . . . . . . . . . . . . . . . . . . . . . . . . . . . . . . . . . . . . . 276
500-sheet trays (tray 2 and tray 3) . . . . . . . . . . . . . . . . . . . . . . . . . . . . . . . . . . . . . . . . . . . . 277
Paper input unit. . . . . . . . . . . . . . . . . . . . . . . . . . . . . . . . . . . . . . . . . . . . . . . . . . . . . . . . . . . 278
Registration assembly. . . . . . . . . . . . . . . . . . . . . . . . . . . . . . . . . . . . . . . . . . . . . . . . . . . . . . 279
Transfer roller assembly . . . . . . . . . . . . . . . . . . . . . . . . . . . . . . . . . . . . . . . . . . . . . . . . . . . . 280
Delivery assembly. . . . . . . . . . . . . . . . . . . . . . . . . . . . . . . . . . . . . . . . . . . . . . . . . . . . . . . . . 281
PCA assembly location . . . . . . . . . . . . . . . . . . . . . . . . . . . . . . . . . . . . . . . . . . . . . . . . . . . . . 283
Tray 4. . . . . . . . . . . . . . . . . . . . . . . . . . . . . . . . . . . . . . . . . . . . . . . . . . . . . . . . . . . . . . . . . . . . . . 284
Tray 4 main body. . . . . . . . . . . . . . . . . . . . . . . . . . . . . . . . . . . . . . . . . . . . . . . . . . . . . . . . . . 284
Tray 4 drive assembly . . . . . . . . . . . . . . . . . . . . . . . . . . . . . . . . . . . . . . . . . . . . . . . . . . . . . . 288
Tray 4 PCA location. . . . . . . . . . . . . . . . . . . . . . . . . . . . . . . . . . . . . . . . . . . . . . . . . . . . . . . . 289
Tray 1. . . . . . . . . . . . . . . . . . . . . . . . . . . . . . . . . . . . . . . . . . . . . . . . . . . . . . . . . . . . . . . . . . . . . . 290
Alphabetical parts list . . . . . . . . . . . . . . . . . . . . . . . . . . . . . . . . . . . . . . . . . . . . . . . . . . . . . . . . . 291
Numerical parts list . . . . . . . . . . . . . . . . . . . . . . . . . . . . . . . . . . . . . . . . . . . . . . . . . . . . . . . . . . . 296
Chapter contents 255
Introduction
The figures in this chapter illustrate the major subassemblies in the printer and their component
parts. A table accompanies each exploded-view diagram. Each table lists the item number for the
replaceable part, the associated part number for the item, the quantity, and a description of the part.
Note
When looking for a part number, pay careful attention to the voltage listed in the description column
to make sure that the part number selected is for the correct printer model.
Ordering parts
All standard part numbers listed are stocked and can be ordered from HP’s Customer Services and
Support Organization (CCSO). See "Parts and supplies" in chapter 1.
Consumables and accessories like those listed in table 30 can be ordered from Hewlett-Packard.
See "Parts and supplies" in chapter 1.
256 Chapter 8 Parts and diagrams
Consumables, supplies, accessories, FRUs, and documentation
Table 30. Consumables, supplies, accessories, FRUs, and documentation
Product number
Service
number
Exchange
number
Description
C8519-69009
Print cartridge
Printer
Consumables
C8543X
C8091A
C8085-60541
Staple cartridge (3,000-sheet
stapler/stacker)
C8088B
C8088-60541
Staple cartridge (multifunction
finisher)
Supplies
C9152A
C9152-67904
C9152-69004
PM kit/110 V
C9153A
C9153-67904
C9153-69004
PM kit/220 V
C8519-67901
C8519-69001
Formatter assembly
Q3721-67901
Q3721-69001
Formatter assembly
HP LaserJet 9040/
(Note: Do not replace the
9050 base
formatter and the Compact
Flash firmware at the same time)
Q3722-67901
Q3722-69001
Formatter assembly
HP LaserJet
(Note: Do not replace the
9040n/9050n and
formatter and the Compact
9040dn/9050dn
Flash firmware at the same time)
Q3726-67905
Q3726-69005
Formatter assembly
HP LaserJet
(Note: Do not replace the
9040mfp and
formatter and the Compact
9050mfp
Flash firmware at the same time)
RG5-5750-210CN
C8519-69031
Fuser assembly, 110 V
RG5-5751-210CN
C8519-69032
Fuser assembly, 220 V
FRUs
C7860A
RG5-5681-030CN
HP LaserJet 9000
Paper input unit (PIU)
RG5-5778-120CN
C8519-69028
RG5-7780-000CN
DC controller
HP LaserJet 9000
DC controller
HP LaserJet 9040/
9050
RG5-5728-050CN
C8519-69015
High-voltage power supply
RG5-5730-000CN
C8519-69007
Low-voltage power supply,
110 V
HP LaserJet 9000
RG5-7778-000CN
Low-voltage power supply,
110 V
HP LaserJet 9040/
9050
RG5-5731-000CN
Low-voltage power supply,
220 V
HP LaserJet 9000
RG5-7779-000CN
Low-voltage power supply,
220 V
HP LaserJet 9040/
9050
Q3721-67902
Control panel assembly
HP LaserJet 9040/
9050
Q2635-67912
HP LaserJet 9040/
Firmware Compact Flash
9050
(Note: Do not replace the
formatter and the Compact
Flash firmware at the same time)
RG5-5734-020
Introduction 257
Table 30. Consumables, supplies, accessories, FRUs, and documentation (continued)
Product number
Service
number
Exchange
number
Q2635-67903
RG5-5663-000CN
Description
Printer
Firmware Compact Flash
(Note: Do not replace the
formatter and the Compact
Flash firmware at the same time)
HP LaserJet
9040mfp and
HP LaserJet
9050mfp
Registration assembly
Accessories
Blank 16MB flash DIMM
C9147A
C9147-67908
C7843A
C9147-69019
16 MB flash firmware DIMM
HP LaserJet 9000
C7843-67901
16 MB DIMM
HP LaserJet 9000
C7845A
C7845-67901
32 MB DIMM
HP LaserJet 9000
Q1887A
C7846-67901
64 MB DIMM
HP LaserJet 9000
C9121A
C9121-67901
128 MB DIMM
HP LaserJet 9000
Q3982-67951
32MB DDR DIMM
HP LaserJet 9040/
9050 series only
Q2625-67951
64MB DDR DIMM
HP LaserJet 9040/
9050 series only
Q2626-67951
128MB DDR DIMM
HP LaserJet 9040/
9050 series only
Q2627-67951
256MB DDR DIMM
HP LaserJet 9040/
9050 series only
Q2628A
Q2628-67951
512MB DDR DIMM
HP LaserJet 9040/
9050 series only
C4103A
C4103-67901
HP Fast InfraRed Connect pod
HP LaserJet 9000
C4293A
Font DIMM—simplified Chinese HP LaserJet 9000
C4292A
Font DIMM—traditional Chinese HP LaserJet 9000
J6054B
J6054-61031
J6054-69031
Hard disk
HP LaserJet 9000
J6073A
J6073-61011
J6073-69011
Hard disk
HP LaserJet 9040/
9050
J4169A
J4169-61001
J4169-69001
HP Jetdirect 610N Fast Ethernet
(10/100 Base-TX)
J4135A
J4135-61001
HP Jetdirect Connectivity (USB)
C8568A
C8568-67902
Tray 1
C8531A
C8531-67902
2,000-sheet feeder (tray 4)
RG5-6212-300CN
2,000-sheet feeder (tray 4)
cassette only
RG5-6225-050CN
Vertical transfer assembly
RG5-6228-040CN
Paper deck drive assembly
RG5-6208-150CN
C8531-69013
Paper pickup assembly
C8085A
3,000-sheet stapler/stacker
C8088B
Multifunction finisher
Q8532A
8-bin mailbox
C8532A
258 Chapter 8 Parts and diagrams
C8532-67902
Duplexer
HP LaserJet 9040/
9050 series only
Table 30. Consumables, supplies, accessories, FRUs, and documentation (continued)
Product number
Service
number
Exchange
number
Description
Printer
Q3721-90963
Service manual bundle for the
HP LaserJet 9040mfp and the
HP LaserJet 9050mfp
HP LaserJet
9040mfp,
HP LaserJet
9050mfp, and the
HP LaserJet
9000mfp
5963-7863
HP LaserJet Printer Family Print
Media Guide
5969-6818
HP Jetdirect Print Server
Administrator’s Guide
5969-3412
HP Jetdirect Print Server
Jetadmin Setup Guide
Q5693-90002
Paper Handling Accessories
Service Addendum
C8519-90901
HP LaserJet 9000 Start Guide—
U.S.
C8519-90902
HP LaserJet 9000 Start Guide—
Americas
C8519-90903
HP LaserJet 9000 Start Guide—
West Europe
C8519-90904
HP LaserJet 9000 Start Guide—
North Europe
C8519-90905
HP LaserJet 9000 Start Guide—
East Europe
C8519-90906
HP LaserJet 9000 Start Guide—
Asia
Documentation
URL: www.hp.com/support/lj9000
HP LaserJet 9000 Use Guide
Q3721-90906
HP LaserJet 9040/9050 Use
Guide
Q3721-90934
HP LaserJet 9000 and 9040/
9050 Series printers Service
Guide
C8532-90901
HP Duplexer Install Guide
C8568-90901
HP Tray 1 Install Guide
C8531-90901
HP 2,000-sheet feeder Install
Guide
C8084-90900
HP Stapler/stacker and Stacker
Install Guide
C8088-90903
HP Multifunction Finisher Install
Guide
C8088-90902
HP Multifunction Finisher
Service Guide
C8088-90901
HP Multifunction Finisher Use
Guide
C8519-60102
HP LaserJet 9000 Series Printer
Software
CD-ROM—Americas
Introduction 259
Table 30. Consumables, supplies, accessories, FRUs, and documentation (continued)
Product number
260 Chapter 8 Parts and diagrams
Service
number
Exchange
number
Description
C8519-60104
HP LaserJet 9000 Series Printer
Software
CD-ROM—Europe
C8519-60105
HP LaserJet 9000 Series Printer
Software
CD-ROM—Asia
C8519-60106
HP LaserJet 9000 Series Printer
Service
CD-ROM (English version)
C9152-90901
PM kit installation guide
Printer
Common hardware
Table 31. Hardware table
Example
Description
Sizes
Uses
Screw
M3 by 6 mm
M3 by 8 mm
M4 by 8 mm
M4 by 10 mm
Various
Screw, tapping
M3 by 6 mm
M3 by 8 mm
M3 by 30 mm
M4 by 6 mm
M4 by 12 mm
To hold plastic to metal
(excluding the control panel)
Screw, pan head
M3 by 6 mm
To hold plastic to plastic
Screw, w/washer
M3 by 6 mm
M3 by 8 mm
M3 by 7 mm
M4 by 6 mm
M4 by 12 mm
To hold plastic to metal
(excluding the covers)
E-ring
XD9-0136-000CN
XD9-0134-000CN
To hold gears in place
Table 32. Common torque values
Material
HP recommended torque
value
Plastic to metal
5.5 lb-in
Metal to metal
10 lb-in
PCBA
5.5 lb-in
Plastic to plastic
5.5 lb-in
Introduction 261
Illustrations and parts lists
The following illustrations and parts tables list the field replaceable units (FRUs) for this printer. Two
tables at the end of this chapter list all of the parts shown in this chapter: table 54, “Alphabetical parts
list,” on page 291 lists the parts in alphabetical order, and table 55, “Numerical parts list,” on page
296 lists the parts in numerical order by part number. Both tables list the appropriate figure in this
chapter that shows the part.
Note
Parts that have no item number or part number listed are not FRUs and cannot be ordered.
External covers and panels
2
16
1
14
15
22
11
8
13
12
17
9
18
23
20
21
19
7
17
3
20
4
3
6
5
Figure 134.
Printer external covers and panels
262 Chapter 8 Parts and diagrams
10
Table 33. Printer external covers and panels
Ref
Description
9000 part number
9040/9050 part
Qty
number (if different)
1
Cover, right top
RB2-5659-000CN
1
2
Cover, left top
RB2-5660-000CN
1
3
Cap, right cover
RB2-5675-000CN
2
4
Cover, tray 1 blanking
RB2-5676-000CN
1
5
Cover, right rail
RB2-5682-000CN
1
6
Cover, left rail
RB2-5683-000CN
1
7
Cover, right back
RB2-5684-000CN
1
8
Cover, left back
RB2-5685-000CN
1
9
Cover, left lower
RB2-5687-000CN
1
10
Cover, right lower
RB2-5689-000CN
1
11
Tray, face-up
RB2-5690-000CN
1
12
Back cover assembly
RG5-5701-000CN
1
13
Front cover assembly
RG5-5702-000CN
1
14
Control panel assembly
RG5-5703-060CN
1
15
Left upper cover assembly
RG5-5705-000CN
1
16
Cover, operation panel, 110 V
RB2-5701-000CN
1
16
Cover, operation panel, 220 V
RB2-5703-000CN
1
17
Tape, cover (retaining strap)
RB2-5653-000CN
2
18
Strap, rock block, retaining clip
RB2-5655-000CN
2
19
Pin
RB2-5656-000CN
1
20
Bushing
RB2-5652-000CN
2
21
Latch, roller-action
RB2-5700-000CN
1
22
Cover, left upper
RB2-6491-000CN
1
23
Plate, lock, right side
RB2-5679-000CN
1
Illustrations and parts lists 263
Left door and diverter
4
1
2
3
Figure 135.
Left door and diverter
Table 34. Left door and diverter
Ref
Description
9000 part number
Left door and diverter
RG5-5646-050CN
1
1
Diverter assembly
RG5-5647-050CN
1
2
Damper assembly
RG5-5648-000CN
2
3
Screw, M4 by 10
XA9-1189-000CN
4
Cover, left (left door)
RB2-6007-000CN
264 Chapter 8 Parts and diagrams
9040/9050 part
Qty
number (if different)
1
Right cover assembly
6
3
5
1
2
4
4
Figure 136.
Right cover assembly
Table 35. Right cover assembly
Ref
Description
9000 part number
Right cover assembly
RG5-5737-000CN
1
1
Right cover knob assembly
RG5-5740-000CN
1
2
Cable, tray 1
RG5-5763-000CN
1
3
Grounding cable, tray 1
RG5-5764-000CN
1
4
Screw, M3 by 8
XA9-1200-000CN
5
Tape, cover (restraining strap)
RB2-5653-000CN
6
Screw, M3 by 8, RS
XA9-1276-000CN
9040/9050 part
Qty
number (if different)
1
Illustrations and parts lists 265
Internal
Internal components
9
13
12
14
13
13
13
3
3
13
14
7
20
19
14
1
18
11
13
5
4
14
6
4
2
10
8
14
15
17
16 16
17
Figure 137.
Internal components (1 of 4)
266 Chapter 8 Parts and diagrams
13
16 16
15
Table 36. Internal components (1 of 4)
Ref
Description
9000 part number
9040/9050 part
number (if different)
Qty
1
Guide, pickup
RB2-5522-000CN
1
2
Guide, cartridge
RB2-5526-000CN
1
3
Hinge mount, damper
RB2-5570-020CN
2
4
Hinge arm, front cover
RB2-5654-000CN
2
5
Cover, right door, inside
RB2-5697-000CN
1
6
Knob, registration, jam removal
RB2-5845-000CN
1
7
Front inside cover assembly
RG5-5721-000CN
1
8
Jam clearing assembly, fuser
RG5-5700-000CN
1
9
Lever assembly, cartridge release
RG5-5746-000CN
1
10
Foot, right side
RB1-6421-000CN
2
11
Foot, left side
RB2-5529-000CN
2
12
Guide rail, cartridge
RG5-5718-000CN
1
13
Screw, M3 by 6, RS
XA9-1275-000CN
14
Screw, M3 by 8, RS
XA9-1276-000CN
15
Torque limiter, spacer
RB2-5759-000CN
2
16
Roller, feed/separation
RF5-3338-000CN
4
17
Roller, PICK
RF5-3340-000CN
2
18
Collar
RB2-5547-000CN
1
19
Link, connect
RB2-5528-000CN
1
20
Spring, tension
RS6-2285-000CN
1
Internal 267
7
13
8
10
12
12
11
20
20
19
14
17
15
3
4
2
5
1
6
9
15
Figure 138.
Internal components (2 of 4)
268 Chapter 8 Parts and diagrams
5
6
18
16
Table 37. Internal components (2 of 4)
Ref
Description
9000 part number
9040/9050 part number Qty
(if different)
1
Front fusing mount
RB2-5517-000CN
1
2
Front fusing rail
RB2-5515-000CN
1
3
Back fusing rail
RB2-5516-000CN
1
4
Back fusing mount
RB2-5518-000CN
1
5
Spring, leaf
RB2-5523-000CN
2
6
Screw, M3 by 6
XA9-1275-000CN
7
Fuser connector holder assembly
RG5-5724-020CN
1
8
Fuser power cable
RG5-5771-000CN
1
9
Gear, 21T
RS5-0708-000CN
1
10
Fuser high-voltage cable
RG5-5772-000CN
1
11
Feed guide, transfer
RG5-5651-000CN
1
12
Screw, M3 by 6, RS
XA9-1275-000CN
13
Screw, M3 by 8, RS
XA9-1276-000CN
14
Fuser assembly, 110 V
RG5-5750-170CN
1
14
Fuser assembly, 220 V
RG5-5751-170CN
1
15
Screw, M3 by 8
XA9-1276-000CN
16
Toner contact assembly
RG5-5717-000CN
17
Spring, tension
RS6-2299-000CN
18
Arm, shutter
RB2-5639-000CN
1
19
Shutter, laser
RB2-5640-000CN
1
20
Spring, tension
RS6-2296-000CN
2
1
Internal 269
5
9
8
4
1
11
2
3
12
1
10
2
4
13
2
2
14
2
6
2
2
7
Figure 139.
Internal components (3 of 4)
270 Chapter 8 Parts and diagrams
Table 38. Internal components (3 of 4)
Ref
Description
9000 part number
9040/9050 part
number (if different)
1
Screw, M3 by 6, RS
XA9-1275-000CN
2
Screw, M3 by 8, RS
XA9-1276-000CN
3
Latch mount assembly
RG5-5704-000CN
1
4
End paper sensor assembly
RG5-5699-000CN
2
5
Upper cable guide assembly
RG5-7787-000CN
1
6
Fan, #5, cartridge fan
RH7-5306-000CN
7
Right rail assembly
RG5-5715-000CN
2
8
Cartridge, front pressure assembly
RG5-5709-000CN
1
9
Cartridge, back pressure assembly
RG5-5710-000CN
1
10
Spring, compression
RS6-2302-000CN
11
Laser/scanner assembly
RG5-5826-000CN
1
12
Rod, switch, ON/OFF
RB2-5661-000CN
1
13
Left rail, upper
RG5-5713-000CN
1
14
Left rail, lower
RG5-5714-000CN
1
RG5-5729-000CN
Qty
1
Internal 271
12
7
10
12
13
13
12
4
1
12
8
13
2
11
13
13
13
6
3
5
12
9
Figure 140.
Internal components (4 of 4)
272 Chapter 8 Parts and diagrams
Table 39. Internal components (4 of 4)
Ref
Description
9000 part number
9040/9050 part
Qty
number (if different)
1
Low voltage power supply assembly 110 V RG5-5730-000CN
RG5-7778-000CN
1
1
Low voltage power supply assembly 220 V RG5-5731-000CN
RG5-7779-000CN
1
2
Cable, HVPS flat ribbon
RH2-5445-000CN
1
3
Fan, #1, power supply
RH7-5294-000CN
1
4
Fan, #2, controller
RH7-5295-000CN
RH7-1623-000CN
1
5
Back cable holder assembly
RG5-5725-030CN
RG5-7786-000CN
1
6
Fan connecting cable
RG5-5759-000CN
RG5-7783-000CN
1
7
Inlet assembly (Power SW 10)
RG5-5727-000CN
1
8
High voltage power supply (HVPS)
RG5-5728-050CN
1
9
Connector assembly
RG5-5779-000CN
1
10
Toner sensor contact with memory
(antenna)
RG5-5719-000CN
1
11
Main cable harness assembly
RG5-5722-000CN
1
12
Screw, M3 by 6, RS
XA9-1275-000CN
13
Screw, M3 by 8, RS
XA9-1276-000CN
Internal 273
Drum feed drive assembly
2
1
Figure 141.
Drum feed drive assembly
Table 40. Drum feed drive assembly
Qty
9040/9050 part
number (if different)
Description
9000 part number
Drum feed drive assembly
RG5-5656-060CN
1
1
Main motor (M2)
RH7-5287-000CN
1
2
Screw, M3 by 6
XA9-1275-000CN
Ref
274 Chapter 8 Parts and diagrams
Fuser delivery drive assembly
2
4
1
3
Figure 142.
Fuser delivery drive assembly
Table 41. Fuser delivery drive assembly
Ref
Description
9000 part number
9040/9050 part
Qty
number (if different)
Fuser delivery drive assembly
RG5-5659-000CN
RG5-7789-000CN
1
Screw, M3 by 6, RS
XA9-1275-000CN
2
Lever, switch
RB2-6077-000CN
3
Motor, DC, 24V (M1)
RG5-5288-000CN
4
Microswitch (SW1)
WC4-5171-000CN
1
1
RH7-1622-000CN
1
1
Internal 275
Cartridge lifter assembly
1
2
Figure 143.
Cartridge lifter assembly
Table 42. Cartridge lifter assembly
Ref
Description
9000 part number
Cartridge lifter assembly
RG5-5741-020CN
1
1
Spring, tension
RS6-2298-020CN
1
2
Screw, M3 by 6
XA9-1275-000CN
276 Chapter 8 Parts and diagrams
9040/9050 part
Qty
number (if different)
500-sheet trays (tray 2 and tray 3)
3
1
2
Figure 144.
500-sheet trays (tray 2 and tray 3)
Table 43. 500-sheet trays (tray 2 and tray 3)
Ref
Description
9000 part number
9040/9050 part
number (if different)
Qty
500-sheet trays
RG5-5635-080CN
1
1
Custom/standard switch
RB2-5813-000CN
1
2
Spring, torsion
RB2-5816-000CN
1
3
Screw, W/W, M3 by 29.5
XA9-0668-000CN
Internal 277
Paper input unit
1
2
1
1
1
1
1
1
1
1
Figure 145.
Paper input unit
Table 44. Paper input unit
Description
9000 part number
Paper input unit
RG5-5681-030CN
1
Screw, M3 by 6, RS
XA9-1275-000CN
2
Paper pickup PCA
RG5-5678-000CN
Ref
278 Chapter 8 Parts and diagrams
Qty
9040/9050 part
number (if different)
1
1
Registration assembly
Figure 146.
Registration assembly
Table 45. Registration assembly
Ref
Description
9000 part number
Registration assembly
RG5-5663-000CN
9040/9050 part
Qty
number (if different)
1
Internal 279
Transfer roller assembly
3
2
1
Figure 147.
Transfer roller assembly
Table 46. Transfer roller assembly
Ref
Description
9000 part number
Transfer roller assembly
RG5-5662-000CN
1
1
Holder, transfer
RG5-5653-000CN
1
2
Roller, transfer
RF5-3319-000CN
1
3
Guide, transfer/pre-transfer
RG5-5654-000CN
1
280 Chapter 8 Parts and diagrams
9040/9050 part
Qty
number (if different)
Delivery assembly
9
3
1
6
4
8
7
10
2
5
Figure 148.
Delivery assembly
Internal 281
Table 47. Delivery assembly
Ref
Description
9000 part number
Delivery assembly
RG5-5643-030CN
1
1
Delivery cross member assembly
RG5-5645-000CN
1
2
Delivery PCA
RG5-5649-000CN
1
3
Flag, sensor
RB2-6037-000CN
1
4
Lever, sensor
RB2-6035-000CN
1
5
Screw, M3 by 8
XA9-1276-000CN
1
6
Fan, #3, rear delivery
RH7-5296-000CN
1
7
Fan, #4, front delivery
RH7-5297-000CN
1
8
Fan, #6, face down tray
RH7-5302-000CN
1
9
Lever, sensor
RB2-6036-000CN
1
10
Spring, tension
RB2-6042-000CN
1
282 Chapter 8 Parts and diagrams
9040/9050 part
Qty
number (if different)
PCA assembly location
2
1
3
4
Figure 149.
PCA assembly location
Table 48. PCA location
Ref
Description
9000 part number
9040/9050 part
Qty
number (if different)
1
DC controller PCA
RG5-5778-120CN
RG5-7780-000CN
2
Delivery PCA
RG5-5649-000CN
1
3
Print cartridge memory controller PCA
RG5-6996-000CN
1
4
Paper pickup (PIU) PCA
RG5-5678-000CN
1
1
Internal 283
Tray 4
Tray 4 main body
11
5
8
8
10
4
7
6
9
3
10
16
15
14
8
10
12
1
17
18
Figure 150.
Tray 4 main body (1 of 2)
284 Chapter 8 Parts and diagrams
13
2
8
Table 49. Tray 4 main body (1 of 2)
Ref
Description
9000 part number
9040/9050 part
Qty
number (if different)
1
Cover, front
RB2-7648-040CN
1
2
Cover, right
RB2-7649-000CN
1
3
Cover, right back
RB2-7650-000CN
1
4
Cover, left back
RB2-7651-000CN
1
5
Cover, center
RB2-7652-000CN
1
6
Cover, back
RF5-3644-000CN
1
7
Cover, left
RF5-3645-000CN
1
8
Screw, stepped
RS5-9099-000CN
6
9
Screw, W/W, M4 by 6
XA9-0994-000CN
7
10
Screw, M4 by 6
XB6-7400-000CN
11
Paper path connection unit (PPCU)
RG5-6227-000CN
1
12
Paper input unit (PIU)
RG5-6208-150CN
1
13
Feed/separation rollers
RF5-3338-000CN
3
14
Tray 4 vertical registration assembly (VTU/ RG5-6225-050CN
VRA)
1
15
Tray 4
RG5-6212-300CN
1
16
Lever, standard/custom
RB2-7762-020CN
1
17
Caster
RB2-7709-000CN
2
18
Screw, M4 by 8
XA9-0732-000CN
7
Not
shown
Tray 4-to-engine stabilizing screws
0515-4318
2
Tray 4 285
7
8
9
10
8
8
8
1
3
8
6
8
4
2
3
5
Figure 151.
Tray 4 main body (2 of 2)
286 Chapter 8 Parts and diagrams
Table 50. Tray 4 main body (2 of 2)
Ref
Description
9000 part number
9040/9050 part
Qty
number (if different)
1
Caster, back
RB2-7678-020CN
2
2
Caster, front swivel
RB3-0304-040CN
2
3
Screw, M5 by 12
XA9-0912-000CN
14
4
Switch assembly (SW21)
RG5-6206-020CN
1
5
Paper size sensing assembly
RG5-6207-040CN
1
6
Screw, M4 by 8, RS
XA9-0732-000CN
4
7
Paper volume sensing assembly
RG5-6229-030CN
1
8
Screw, M4 by 6
XA9-0994-000CN
12
9
Power supply
RG5-6250-000CN
1
10
Jet-Link cable holder assembly (see 10a,
10b, and 10c)
10a
Holder
RB2-7662-000CN
10b
Cable assembly
RG5-6240-000CN
10c
Grounding cable
RG5-6249-000CN
Tray 4 287
Tray 4 drive assembly
2
Figure 152.
1
Tray 4 drive assembly
Table 51. Tray 4 drive assembly
Ref
Description
9000 part number
Tray 4 deck drive assembly
RG5-6228-040CN
1
1
Motor
RH7-1481-000CN
1
2
Screw, M3 by 6 with washer
XB2-6300-607CN
2
288 Chapter 8 Parts and diagrams
9040/9050 part
Qty
number (if different)
Tray 4 PCA location
3
2
1
4
Figure 153.
Tray 4 PCA location
Table 52. Tray 4 PCA location
Ref
Description
9000 part number
9040/9050 part
Qty
number (if different)
1
Paper size PCA
RG5-6238-000CN
1
2
Paper volume PCA
RG5-6237-000CN
1
3
Deck controller PCA
RG5-6235-120CN
1
4
LED PCA
RG5-6239-000CN
1
Tray 4 289
Tray 1
5
4
3
2
1
Figure 154.
Tray 1 assembly
Table 53. Tray 1 assembly
Ref
Description
9000 part number
Tray 1
C8568-67902
1
Tray assembly
RG5-5809-000CN
2
Service cover assembly
RG5-5811-040CN
1
3
Roller, pickup
RF5-3403-000CN
1
4
Roller, separation
RF5-3404-000CN
2
5
Cover hooks
RB2-6537-000CN
2
290 Chapter 8 Parts and diagrams
9040/9050 part
Qty
number (if different)
1
Alphabetical parts list
Table 54. Alphabetical parts list
Description
Part number
Figure and page
Arm, front cover
RB2-5654-000CN
Figure 137 on page 266
Arm, shutter
RB2-5639-000CN
Figure 138 on page 268
Back cable holder assembly (HP LaserJet 9040/9050)
RG5-7786-000CN
Figure 140 on page 272
Back cable holder assembly (HP LaserJet 9000)
RG5-5725-030CN
Figure 140 on page 272
Back cover assembly
RG5-5701-000CN
Figure 134 on page 262
Bushing
RB2-5652-000CN
Figure 134 on page 262
Cable, flat
RH2-5445-000CN
Figure 140 on page 272
Cap, left cover
RB2-5675-000CN
Figure 134 on page 262
Cartridge back pressure assembly
RG5-5710-000CN
Figure 139 on page 270
Cartridge front pressure assembly
RG5-5709-000CN
Figure 139 on page 270
Cartridge lifter assembly
RG5-5741-020CN
Figure 143 on page 276
Caster, back
RB2-7678-020CN
Figure 151 on page 286
Caster, front swivel
RB3-0304-040CN
Figure 151 on page 286
Collar
RB2-5547-000CN
Figure 137 on page 266
Connector assembly
RG5-5779-000CN
Figure 140 on page 272
Control lever assembly
RG5-5746-000CN
Figure 137 on page 266
Control panel assembly
RG5-5703-060CN
Figure 134 on page 262
Control panel overlay
RB2-5703-000CN
Figure 134 on page 262
Cover, back
RF5-3644-000CN
Figure 150 on page 284
Cover, back left
RB2-7651-000CN
Figure 150 on page 284
Cover, back right
RB2-7650-000CN
Figure 150 on page 284
Cover, front
RB2-7648-040CN
Figure 150 on page 284
Cover hooks
RB2-6537-000CN
Figure 154 on page 290
Cover, left (left door)
RB2-6007-000CN
Figure 135 on page 264
Cover, left (tray 4)
RF5-3645-000CN
Figure 150 on page 284
Cover, left back
RB2-5685-000CN
Figure 134 on page 262
Cover, left lower
RB2-5687-000CN
Figure 134 on page 262
Cover, left rail
RB2-5683-000CN
Figure 134 on page 262
Cover, left, top
RB2-5660-000CN
Figure 134 on page 262
Cover, left upper
RB2-6491-000CN
Figure 134 on page 262
Cover, multipurpose blanking
RB2-5676-000CN
Figure 134 on page 262
Cover, operation panel, 100 to 127 V
RB2-5701-000CN
Figure 134 on page 262
Cover, right
RB2-5662-000CN
Figure 136 on page 265
Cover, right (tray 4)
RB2-7649-000CN
Figure 150 on page 284
Cover, right back
RB2-5684-000CN
Figure 134 on page 262
Cover, right door
RB2-5697-000CN
Figure 137 on page 266
Alphabetical parts list 291
Table 54. Alphabetical parts list (continued)
Description
Part number
Figure and page
Cover, right lower
RB2-5689-000CN
Figure 134 on page 262
Cover, right rail
RB2-5682-000CN
Figure 134 on page 262
Cover, right top
RB2-5659-000CN
Figure 134 on page 262
Cover, upper
RB2-7652-000CN
Figure 150 on page 284
Damper assembly
RG5-5648-000CN
Figure 135 on page 264
DC controller PCA
RG5-7780-120CN
Figure 149 on page 283
Deck controller PCA
RG5-6235-120CN
Figure 153 on page 289
Delivery cross member assembly
RG5-5645-000CN
Figure 148 on page 281
Delivery feed assembly
RG5-5643-030CN
Figure 148 on page 281
Delivery PCA
RG5-5649-000CN
Figure 148 on page 281
Delivery PCA
RG5-5649-000CN
Figure 149 on page 283
Diverter assembly
RG5-5647-050CN
Figure 135 on page 264
Drum feed drive assembly
RG5-5656-050CN
Figure 141 on page 274
E ring
XD9-0136-000CN
Figure 143 on page 276
E ring
XD9-0134-000CN
Figure 143 on page 276
End paper sensor assembly
RG5-5699-000CN
Figure 139 on page 270
Fan, #1, power supply
RH7-5294-000CN
Figure 140 on page 272
Fan, #2, controller (HP LaserJet 9040/9050)
RH7-1623-000CN
Figure 140 on page 272
Fan, #2, controller (HP LaserJet 9000)
RH7-5295-000CN
Figure 140 on page 272
Fan, #3
RH7-5296-000CN
Figure 148 on page 281
Fan, #4
RH7-5297-000CN
Figure 148 on page 281
Fan, #5 (HP LaserJet 9040/9050)
RH7-5306-000CN
Figure 139 on page 270
Fan, #5 (HP LaserJet 9000)
RG5-5729-000CN
Figure 139 on page 270
Fan, #6
RH7-5302-000CN
Figure 148 on page 281
Fan connecting cable (HP LaserJet 9040/9050)
RG5-7783-000CN
Figure 140 on page 272
Fan connecting cable (HP LaserJet 9000)
RG5-5759-000CN
Figure 140 on page 272
Feed PCA
RG5-5678-000CN
Figure 145 on page 278
Feed PCA
RG5-5678-000CN
Figure 149 on page 283
Flag, sensor
RB2-6037-000CN
Figure 148 on page 281
Foot, left side
RB2-5529-000CN
Figure 137 on page 266
Foot, right side
RB1-6421-000CN
Figure 137 on page 266
Frame, delivery
RB2-6006-000CN
Figure 135 on page 264
Front cover assembly
RG5-5702-000CN
Figure 134 on page 262
Front inside cover assembly
RG5-5721-000CN
Figure 137 on page 266
Fuser assembly 110 V
RG5-5750-170CN
Figure 138 on page 268
Fuser assembly 220 V
RG5-5751-170CN
Figure 138 on page 268
Fuser delivery drive assembly (HP LaserJet 9040/9050)
RG5-7789-000CN
Figure 142 on page 275
Fuser delivery drive assembly (HP LaserJet 9000)
RG5-5659-000CN
Figure 142 on page 275
Fuser high-voltage cable
RG5-5772-000CN
Figure 138 on page 268
Fusing connector holder assembly
RG5-5724-000CN
Figure 138 on page 268
292 Chapter 8 Parts and diagrams
Table 54. Alphabetical parts list (continued)
Description
Part number
Figure and page
Fusing jam clearing assembly
RG5-5700-000CN
Figure 137 on page 266
Fusing power cable
RG5-5771-000CN
Figure 138 on page 268
Gear, 21T
RS5-0708-000CN
Figure 138 on page 268
Guide, cartridge
RB2-5526-000CN
Figure 137 on page 266
Guide, pickup
RB2-5522-000CN
Figure 137 on page 266
Guide rail, cartridge
RG5-5718-000CN
Figure 137 on page 266
Guide, transfer/pre-transfer
RG5-5654-000CN
Figure 147 on page 280
High voltage power supply (HVPS)
RG5-5728-050CN
Figure 140 on page 272
Hinge arm, front cover
RB2-5654-000CN
Figure 137 on page 266
Hinge mount, damper
RB2-5570-020CN
Figure 137 on page 266
Holder, transfer
RG5-5653-000CN
Figure 147 on page 280
Inlet assembly (Power SW10)
RG5-5727-000CN
Figure 140 on page 272
Jet-Link cable assembly
RG5-6240-000CN
Figure 151 on page 286
Jet-Link grounding cable
RG5-6249-000CN
Figure 151 on page 286
Jet-Link holder
RB2-7662-000CN
Figure 151 on page 286
Knob, cassette
RB2-5813-000CN
Figure 144 on page 277
Knob, jam removal
RB2-5845-000CN
Figure 137 on page 266
Label, custom/standard switch
5851-1391
Figure 144 on page 277
Laser/scanner assembly
RG5-5826-000CN
Figure 139 on page 270
Latch mount assembly
RG5-5704-000CN
Figure 139 on page 270
Latch, roller-action
RB2-5700-000CN
Figure 134 on page 262
LED PCA
RG5-6239-000CN
Figure 153 on page 289
Left door and diverter
RG5-5646-050CN
Figure 135 on page 264
Left upper cover assembly
RG5-5705-000CN
Figure 134 on page 262
Lever, custom
RB2-7762-020CN
Figure 150 on page 284
Lever, sensor
RB2-6035-000CN
Figure 148 on page 281
Lever, switch
RB2-6077-000CN
Figure 142 on page 275
Link, connect
RB2-5528-000CN
Figure 137 on page 266
Low voltage power supply assembly 110 V (HP LaserJet
9040/9050)
RG5-7778-000CN
Figure 140 on page 272
Low voltage power supply assembly 110 V (HP LaserJet
9000)
RG5-5730-000CN
Figure 140 on page 272
Low voltage power supply assembly 220 V (HP LaserJet
9040/9050)
RG5-7779-000CN
Figure 140 on page 272
Low voltage power supply assembly 220 V (HP LaserJet
9000)
RG5-5731-000CN
Figure 140 on page 272
Main cable harness holder assembly
RG5-5722-000CN
Figure 140 on page 272
Main motor (M2)
RH7-5287-000CN
Figure 141 on page 274
Microswitch (SW1)
WC4-5171-000CN
Figure 142 on page 275
Motor
RH7-1481-000CN
Figure 152 on page 288
Motor, DC, 24V (M1) (HP LaserJet 9040/9050)
RH7-1622-000CN
Figure 142 on page 275
Alphabetical parts list 293
Table 54. Alphabetical parts list (continued)
Description
Part number
Figure and page
Motor, DC, 24V (M1) (HP LaserJet 9000)
RG5-5288-00CN
Figure 142 on page 275
Mount, back fusing
RB2-5518-000CN
Figure 138 on page 268
Mount, damper
RB2-5570-000CN
Figure 137 on page 266
Mount, front fusing
RB2-5517-000CN
Figure 138 on page 268
Multi-purpose cable
RG5-5763-000CN
Figure 136 on page 265
Multi-purpose grounding cable
RG5-5764-000CN
Figure 136 on page 265
Paper input unit (PIU) (engine)
RG5-5681-030CN
Figure 145 on page 278
Paper input unit (PIU)
RG5-6208-150CN
Figure 150 on page 284
Paper path connection assembly (PPCU)
RG5-6227-000CN
Figure 151 on page 286
Paper size PCA
RG5-6238-000CN
Figure 153 on page 289
Paper-size sensing assembly
RG5-6207-040CN
Figure 151 on page 286
Paper volume PCA
RG5-6237-000CN
Figure 153 on page 289
Paper volume sensing assembly
RG5-6229-030CN
Figure 151 on page 286
Pin, fusing shutter
RB2-5656-000CN
Figure 134 on page 262
Print cartridge memory controller PCA
RG5-6996-000CN
Figure 149 on page 283
Rail, back fusing
RB2-5516-000CN
Figure 138 on page 268
Rail, front fusing
RB2-5515-020CN
Figure 138 on page 268
Registration assembly
RG5-5663-000CN
Figure 146 on page 279
Right cover assembly
RG5-5737-000CN
Figure 136 on page 265
Right cover knob assembly
RG5-5740-000CN
Figure 136 on page 265
Right rail assembly
RG5-5715-000CN
Figure 139 on page 270
Rod, switch
RB2-5661-000CN
Figure 139 on page 270
Roller, feed retard
RF5-3338-000CN
Figure 137 on page 266
Roller, feed retard
RF5-3338-000CN
Figure 151 on page 286
Roller, PIC
RF5-3340-000CN
Figure 137 on page 266
Roller, transfer
RF5-3319-000CN
Figure 147 on page 280
Screw, M3 by 6
XA9-1275-000CN
Figure 138 on page 268
Screw, M3 by 6
XA9-1275-000CN
Figure 141 on page 274
Screw, M3 by 6
XA9-1275-000CN
Figure 143 on page 276
Screw, M3 by 6, RS
XA9-1275-000CN
Figure 137 on page 266
Screw, M3 by 6, RS
XA9-1275-000CN
Figure 138 on page 268
Screw, M3 by 6, RS
XA9-1275-000CN
Figure 139 on page 270
Screw, M3 by 6, RS
XA9-1275-000CN
Figure 140 on page 272
Screw, M3 by 6, RS
XA9-1275-000CN
Figure 142 on page 275
Screw, M3 by 6, RS
XA9-1275-000CN
Figure 145 on page 278
Screw, M3 by 8
XA9-1200-000CN
Figure 136 on page 265
Screw, M3 by 8
XA9-1276-000CN
Figure 138 on page 268
Screw, M3 by 8
XA9-1276-000CN
Figure 148 on page 281
Screw, M3 by 8, RS
XA9-1276-000CN
Figure 136 on page 265
Screw, M3 by 8, RS
XA9-1276-000CN
Figure 137 on page 266
294 Chapter 8 Parts and diagrams
Table 54. Alphabetical parts list (continued)
Description
Part number
Figure and page
Screw, M3 by 8, RS
XA9-1276-000CN
Figure 138 on page 268
Screw, M3 by 8, RS
XA9-1276-000CN
Figure 139 on page 270
Screw, M3 by 8, RS
XA9-1276-000CN
Figure 140 on page 272
Screw, M4 by 6
XA9-0994-000CN
Figure 151 on page 286
Screw, M4 by 10
XA9-1189-000CN
Figure 135 on page 264
Screw, M4 by 8, RS
XA9-0732-000CN
Figure 151 on page 286
Screw, stepped
RS5-9099-000CN
Figure 150 on page 284
Screw, TP, M4 by 6
XB6-7400-000CN
Figure 150 on page 284
Screw, W/W, M3 by 6
XB2-6300-607CN
Figure 152 on page 288
Screw, W/W, M3 by 29.5
XA9-0668-000CN
Figure 144 on page 277
Screw, W/W, M4 by 6
XA-0994-000CN
Figure 150 on page 284
Screw, W/W, M5 by 12
XA9-0912-000CN
Figure 151 on page 286
Service cover assembly
RG5-5811-040CN
Figure 154 on page 290
Shutter, laser
RB2-5640-000CN
Figure 138 on page 268
Spring, compression
RS6-2302-000CN
Figure 139 on page 270
Spring, leaf
RB2-5523-000CN
Figure 138 on page 268
Spring, tension
RS6-2285-000CN
Figure 137 on page 266
Spring, tension
RS6-2296-000CN
Figure 138 on page 268
Spring, tension
RS6-2299-000CN
Figure 138 on page 268
Spring, tension
RS6-2298-020CN
Figure 143 on page 276
Spring, torsion
RB2-5816-000CN
Figure 144 on page 277
Strap, rock block
RB2-5655-000CN
Figure 134 on page 262
Switch assembly (SW21)
RG5-6206-020CN
Figure 151 on page 286
Tape, cover (retaining strap)
RB2-5653-000CN
Figure 134 on page 262
Tape, cover (retaining strap)
RB2-5653-000CN
Figure 136 on page 265
Toner contact assembly
RB2-5717-000CN
Figure 138 on page 268
Toner sensor contact with memory (antenna)
RG5-5719-000CN
Figure 140 on page 272
Torque, limiter
RB2-5759-000CN
Figure 137 on page 266
Transfer guide assembly
RG5-5651-000CN
Figure 138 on page 268
Transfer roller assembly
RG5-5662-000CN
Figure 147 on page 280
Tray 1 assembly
RG5-5809-000CN
Figure 154 on page 290
Tray, face-up
RB2-5690-000CN
Figure 134 on page 262
Tray, 500-sheet
RG5-5635-080CN
Figure 144 on page 277
Tray 4
RG5-6212-300CN
Figure 150 on page 284
Tray 4 deck drive assembly
RG5-6228-040CN
Figure 152 on page 288
Tray 4-to-engine stabilizing screws
0515-4318
Figure 150 on page 284
Tray 4 vertical registration assembly (VTU/VRA)
RG5-6225-050CN
Figure 150 on page 284
Upper cable guide assembly
RG5-7787-000CN
Figure 139 on page 270
Vertical transfer assembly
RG5-6225-000CN
Figure 150 on page 284
Alphabetical parts list 295
Numerical parts list
Table 55. Numerical parts list
Part number
Description
Figure and page
0515-4318
Tray 4-to-engine stabilizing screws
Figure 150 on page 284
5851-1391
Label, custom/standard switch
Figure 144 on page 277
RB1-6421-000CN
Foot, right side
Figure 137 on page 266
RB2-5515-020CN
Rail, front fusing
Figure 138 on page 268
RB2-5516-000CN
Rail, back fusing
Figure 138 on page 268
RB2-5517-000CN
Mount, front fusing
Figure 138 on page 268
RB2-5518-000CN
Mount, back fusing
Figure 138 on page 268
RB2-5522-000CN
Guide, pickup
Figure 137 on page 266
RB2-5523-000CN
Spring, leaf
Figure 138 on page 268
RB2-5526-000CN
Guide, cartridge
Figure 137 on page 266
RB2-5528-000CN
Link, connect
Figure 137 on page 266
RB2-5529-000CN
Foot, left side
Figure 137 on page 266
RB2-5547-000CN
Collar
Figure 137 on page 266
RB2-5570-020CN
Hinge mount, damper
Figure 137 on page 266
RB2-5639-000CN
Arm, shutter
Figure 138 on page 268
RB2-5640-000CN
Shutter, laser
Figure 138 on page 268
RB2-5652-000CN
Bushing
Figure 134 on page 262
RB2-5653-000CN
Tape, cover (retaining strap)
Figure 134 on page 262
RB2-5653-000CN
Tape, cover (retaining strap)
Figure 136 on page 265
RB2-5654-000CN
Arm, front cover
Figure 137 on page 266
RB2-5654-000CN
Hinge arm, front cover
Figure 137 on page 266
RB2-5655-000CN
Strap, rock block
Figure 134 on page 262
RB2-5656-000CN
Pin, fusing shutter
Figure 134 on page 262
RB2-5659-000CN
Cover, right, top
Figure 134 on page 262
RB2-5660-000CN
Cover, left, top
Figure 134 on page 262
RB2-5661-000CN
Rod, switch
Figure 139 on page 270
RB2-5662-000CN
Cover, right
Figure 136 on page 265
RB2-5675-000CN
Cap, left cover
Figure 134 on page 262
RB2-5676-000CN
Cover, multipurpose blanking
Figure 134 on page 262
RB2-5682-000CN
Cover, right rail
Figure 134 on page 262
RB2-5683-000CN
Cover, left rail
Figure 134 on page 262
RB2-5684-000CN
Cover, right back
Figure 134 on page 262
RB2-5685-000CN
Cover, left back
Figure 134 on page 262
RB2-5687-000CN
Cover, left lower
Figure 134 on page 262
RB2-5689-000CN
Cover, right lower
Figure 134 on page 262
RB2-5690-000CN
Tray, face-up
Figure 134 on page 262
296 Chapter 8 Parts and diagrams
Table 55. Numerical parts list (continued)
Part number
Description
Figure and page
RB2-5697-000CN
Cover, right door
Figure 137 on page 266
RB2-5700-000CN
Latch, roller-action
Figure 134 on page 262
RB2-5701-000CN
Cover, operation panel, 100 to 127 V
Figure 134 on page 262
RB2-5703-000CN
Control panel overlay
Figure 134 on page 262
RB2-5717-000CN
Toner contact assembly
Figure 138 on page 268
RB2-5759-000CN
Torque, limiter
Figure 137 on page 266
RB2-5813-000CN
Knob, cassette
Figure 144 on page 277
RB2-5816-000CN
Spring, torsion
Figure 144 on page 277
RB2-5845-000CN
Knob, jam removal
Figure 137 on page 266
RB2-6006-000CN
Frame, delivery
Figure 135 on page 264
RB2-6035-000CN
Lever, sensor
Figure 148 on page 281
RB2-6037-000CN
Flag, sensor
Figure 148 on page 281
RB2-6007-000CN
Cover, left (left door)
Figure 135 on page 264
RB2-6077-000CN
Lever, switch
Figure 142 on page 275
RB2-6491-000CN
Cover, left upper
Figure 134 on page 262
RB2-6537-000CN
Cover hooks
Figure 154 on page 290
RB2-7648-040CN
Cover, front
Figure 150 on page 284
RB2-7649-000CN
Cover, right (tray 4)
Figure 150 on page 284
RB2-7650-000CN
Cover, back right
Figure 150 on page 284
RB2-7651-000CN
Cover, back left
Figure 150 on page 284
RB2-7652-000CN
Cover, upper
Figure 150 on page 284
RB2-7662-000CN
Jet-Link holder
Figure 151 on page 286
RB2-7678-020CN
Caster, back
Figure 151 on page 286
RB2-7762-020CN
Lever, custom
Figure 150 on page 284
RB3-0304-040CN
Caster, front swivel
Figure 151 on page 286
RF5-3319-000CN
Roller, transfer
Figure 147 on page 280
RF5-3338-000CN
Roller, feed retard
Figure 137 on page 266
RF5-3338-000CN
Roller, feed retard
Figure 151 on page 286
RF5-3340-000CN
Roller, PIC
Figure 137 on page 266
RF5-3644-000CN
Cover, back
Figure 150 on page 284
RF5-3645-000CN
Cover, left (tray 4)
Figure 150 on page 284
RG5-5288-000CN
Motor, DC, 24V (M1) (HP LaserJet 9000)
Figure 142 on page 275
RG5-5635-080CN
Tray, 500-sheet
Figure 144 on page 277
RG5-5643-030CN
Delivery feed assembly
Figure 148 on page 281
RG5-5645-000CN
Delivery cross member assembly
Figure 148 on page 281
RG5-5646-050CN
Left door and diverter
Figure 135 on page 264
RG5-5647-050CN
Diverter assembly
Figure 135 on page 264
RG5-5648-000CN
Damper assembly
Figure 135 on page 264
RG5-5649-000CN
Delivery PCA
Figure 148 on page 281
RG5-5649-000CN
Delivery PCA
Figure 149 on page 283
Numerical parts list 297
Table 55. Numerical parts list (continued)
Part number
Description
Figure and page
RG5-5651-000CN
Transfer guide assembly
Figure 138 on page 268
RG5-5653-000CN
Holder, transfer
Figure 147 on page 280
RG5-5654-000CN
Guide, transfer/pre-transfer
Figure 147 on page 280
RG5-5656-050CN
Drum feed drive assembly
Figure 141 on page 274
RG5-5659-000CN
Fuser delivery drive assembly (HP LaserJet 9000)
Figure 142 on page 275
RG5-5662-000CN
Transfer roller assembly
Figure 147 on page 280
RG5-5663-000CN
Registration assembly
Figure 146 on page 279
RG5-5678-000CN
Feed PCA
Figure 145 on page 278
RG5-5678-000CN
Feed PCA
Figure 149 on page 283
RG5-5681-000CN
Paper input unit (PIU), engine
Figure 145 on page 278
RG5-5699-000CN
End paper sensor assembly
Figure 139 on page 270
RG5-5700-000CN
Fusing jam clearing assembly
Figure 137 on page 266
RG5-5701-000CN
Back cover assembly
Figure 134 on page 262
RG5-5702-000CN
Front cover assembly
Figure 134 on page 262
RG5-5703-060CN
Control panel assembly
Figure 134 on page 262
RG5-5704-000CN
Latch mount assembly
Figure 139 on page 270
RG5-5705-000CN
Left upper cover assembly
Figure 134 on page 262
RG5-5709-000CN
Cartridge front pressure assembly
Figure 139 on page 270
RG5-5710-000CN
Cartridge back pressure assembly
Figure 139 on page 270
RG5-5715-000CN
Right rail assembly
Figure 139 on page 270
RG5-5718-000CN
Guide rail, cartridge
Figure 137 on page 266
RG5-5719-000CN
Toner sensor contact with memory (antenna)
Figure 140 on page 272
RG5-5721-000CN
Front inside cover assembly
Figure 137 on page 266
RG5-5722-000CN
Main cable harness holder assembly
Figure 140 on page 272
RG5-5724-000CN
Fusing connector holder assembly
Figure 138 on page 268
RG5-5725-000CN
Back cable holder assembly (HP LaserJet 9000)
Figure 140 on page 272
RG5-5727-000CN
Inlet assembly (Power SW 10)
Figure 140 on page 272
RG5-5728-050CN
High voltage power supply (HVPS)
Figure 140 on page 272
RG5-5730-000CN
Low voltage power supply assembly 110 V (HP LaserJet
9000)
Figure 140 on page 272
RG5-5731-000CN
Low voltage power supply assembly 220 V (HP LaserJet
9040/9050)
Figure 140 on page 272
RG5-5737-000CN
Right cover assembly
Figure 136 on page 265
RG5-5740-000CN
Right cover knob assembly
Figure 136 on page 265
RG5-5741-020CN
Cartridge lifter assembly
Figure 143 on page 276
RG5-5746-000CN
Control lever assembly
Figure 137 on page 266
RG5-5750-170CN
Fuser assembly 110 V
Figure 138 on page 268
RG5-5751-170CN
Fuser assembly 220 V
Figure 138 on page 268
RG5-5759-000CN
Fan connecting cable (HP LaserJet 9040/9050)
Figure 140 on page 272
RG5-5763-000CN
Multi-purpose cable
Figure 136 on page 265
298 Chapter 8 Parts and diagrams
Table 55. Numerical parts list (continued)
Part number
Description
Figure and page
RG5-5764-000CN
Multi-purpose grounding cable
Figure 136 on page 265
RG5-5771-000CN
Fusing power cable
Figure 138 on page 268
RG5-5772-000CN
Fuser high-voltage cable
Figure 138 on page 268
RG5-5779-000CN
Connector assembly
Figure 140 on page 272
RG5-5809-000CN
Tray 1 assembly
Figure 154 on page 290
RG5-5811-040CN
Service cover assembly
Figure 154 on page 290
RG5-5826-000CN
Laser/scanner assembly
Figure 139 on page 270
RG5-6206-020CN
Switch assembly (SW21)
Figure 151 on page 286
RG5-6207-040CN
Paper-size sensing assembly
Figure 151 on page 286
RG5-6208-150CN
Paper input unit (PIU)
Figure 150 on page 284
RG5-6212-300CN
Tray 4
Figure 150 on page 284
RG5-6225-000CN
Vertical transfer assembly
Figure 150 on page 284
RG5-6225-050CN
Tray 4 vertical registration assembly (VTU/VRA)
Figure 150 on page 284
RG5-6227-000CN
Paper path connection assembly (PPCU)
Figure 151 on page 286
RG5-6228-040CN
Tray 4 deck drive assembly
Figure 152 on page 288
RG5-6229-030CN
Paper volume sensing assembly
Figure 151 on page 286
RG5-6235-120CN
Deck controller PCA
Figure 153 on page 289
RG5-6237-000CN
Paper volume PCA
Figure 153 on page 289
RG5-6238-000CN
Paper size PCA
Figure 153 on page 289
RG5-6239-000CN
LED PCA
Figure 153 on page 289
RG5-6240-000CN
Jet-Link cable assembly
Figure 151 on page 286
RG5-6249-000CN
Jet-Link grounding cable
Figure 151 on page 286
RG5-6996-000CN
Print cartridge memory controller PCA
Figure 149 on page 283
RG5-7778-000CN
Low voltage power supply assembly 110 V (HP LaserJet
9040/9050)
Figure 140 on page 272
RG5-7779-000CN
Low voltage power supply assembly 220 V (HP LaserJet
9040/9050)
Figure 140 on page 272
RG5-7780-120CN
DC controller PCA
Figure 149 on page 283
RG5-7783-000CN
Fan connecting cable (HP LaserJet 9040/9050)
Figure 140 on page 272
RG5-7786-000CN
Back cable holder assembly (HP LaserJet 9040/9050)
Figure 140 on page 272
RG5-7787-000CN
Upper cable guide assembly
Figure 139 on page 270
RG5-7789-000CN
Fuser delivery drive assembly (HP LaserJet 9040/9050)
Figure 142 on page 275
RH2-5445-000CN
Cable, flat
Figure 140 on page 272
RH7-1481-000CN
Motor
Figure 152 on page 288
RH7-1622-000CN
Motor, DC, 24V (M1) (HP LaserJet 9040/9050)
Figure 142 on page 275
RH7-1623-000CN
Fan, #2, controller (HP LaserJet 9040/9050)
Figure 140 on page 272
RH7-5287-000CN
Main motor (M2)
Figure 141 on page 274
RH7-5294-000CN
Fan, #1, power supply
Figure 140 on page 272
RH7-5295-000CN
Fan, #2, controller (HP LaserJet 9000)
Figure 140 on page 272
RH7-5296-000CN
Fan, #3, rear delivery
Figure 148 on page 281
Numerical parts list 299
Table 55. Numerical parts list (continued)
Part number
Description
Figure and page
RH7-5297-000CN
Fan, #4, front delivery
Figure 148 on page 281
RH7-5302-000CN
Fan, #6, face down tray
Figure 148 on page 281
RG7-5306-000CN
Fan, #5, cartridge fan
Figure 139 on page 270
RS5-0708-000CN
Gear, 21T
Figure 138 on page 268
RS5-9099-000CN
Screw, stepped
Figure 150 on page 284
RS6-2285-000CN
Spring, tension
Figure 137 on page 266
RS6-2296-000CN
Spring, tension
Figure 138 on page 268
RS6-2298-020CN
Spring, tension
Figure 143 on page 276
RS6-2299-000CN
Spring, tension
Figure 138 on page 268
RS6-2302-000CN
Spring, compression
Figure 139 on page 270
WC4-5171-000CN
Microswitch (SW1)
Figure 142 on page 275
XA9-0668-000CN
Screw, W/W, M3 by 29.5
Figure 144 on page 277
XA9-0732-000CN
Screw, M4 by 8, RS
Figure 151 on page 286
XA9-0912-000CN
Screw, W/W, M5 by 12
Figure 151 on page 286
XA9-0994-000CN
Screw, M4 by 6
Figure 151 on page 286
XA9-1189-000CN
Screw, M4 by 10
Figure 135 on page 264
XA9-1200-000CN
Screw, M3 by 8
Figure 136 on page 265
XA9-1275-000CN
Screw, M3 by 6
Figure 138 on page 268
XA9-1275-000CN
Screw, M3 by 6
Figure 141 on page 274
XA9-1275-000CN
Screw, M3 by 6
Figure 143 on page 276
XA9-1275-000CN
Screw, M3 by 6, RS
Figure 137 on page 266
XA9-1275-000CN
Screw, M3 by 6, RS
Figure 138 on page 268
XA9-1275-000CN
Screw, M3 by 6, RS
Figure 139 on page 270
XA9-1275-000CN
Screw, M3 by 6, RS
Figure 140 on page 272
XA9-1275-000CN
Screw, M3 by 6, RS
Figure 142 on page 275
XA9-1275-000CN
Screw, M3 by 6, RS
Figure 145 on page 278
XA9-1276-000CN
Screw, M3 by 8
Figure 138 on page 268
XA9-1276-000CN
Screw, M3 by 8
Figure 148 on page 281
XA9-1276-000CN
Screw, M3 by 8, RS
Figure 136 on page 265
XA9-1276-000CN
Screw, M3 by 8, RS
Figure 137 on page 266
XA9-1276-000CN
Screw, M3 by 8, RS
Figure 138 on page 268
XA9-1276-000CN
Screw, M3 by 8, RS
Figure 139 on page 270
XA9-1276-000CN
Screw, M3 by 8, RS
Figure 140 on page 272
XB2-6300-607CN
Screw, W/W, M3 by 6
Figure 152 on page 288
XB6-7400-000CN
Screw, TP, M4 by 6
Figure 150 on page 284
XD9-0134-000CN
E ring
Figure 143 on page 276
XD9-0136-000CN
E ring
Figure 143 on page 276
300 Chapter 8 Parts and diagrams
Index
Symbols
B
* (asterisk), next to control panel selections 31
Back arrow, control panel 31
back assemblies, removing 135
back covers, removing
left 108
printer 109
tray 4 153
back of page contamination, troubleshooting 238
back view, diagrams 100
background, gray 239
base memory 6
BD PCB, voltage 80
beams, operations 83, 84
between-page bias 79
bias generation circuits, operations 79
bidirectional communication
operations 81
settings 48
troubleshooting 246
billing, usage page information 231
binding edge, settings 42
bins, output
event log error messages 179
fan, removing 115
full, error messages 180, 184
jam detection operations 88
jams, error messages 191
locating 10
paper sizes supported 26
selecting 41
sensors 88, 90
straight paper path, using 244
black lines, troubleshooting
horizontal 239
vertical 241
black pages, troubleshooting 236
blank pages
suppressing 43
troubleshooting 236
blank spots, troubleshooting 236
blown lamp or motor error message 180
bond paper, weight equivalence table 23
both sides, printing on 42
bubbles, troubleshooting 239
buffer overflow, error messages 202
buttons, control panel 30
Numerics
2,000-sheet input tray. See tray 4
3,000-sheet stacker
communications, troubleshooting 228
Install guide 259
locating 10, 12
models including 7
paper sizes supported 27
3,000-sheet stapler/stacker
communications, troubleshooting 228
error messages 186
Install guide 259
locating 10, 12
models including 7
paper sizes supported 27
space requirements 18
500-sheet trays. See tray 2 or 3
8-bin mailbox
locating 10
models supported 7
paper sizes supported 28
part number 258
A
A4 paper
override settings 42
Wide A4 settings 42
AC voltage operations 80
access denied, menus locked 180
accessories
available 3, 5
diagrams 12
ordering 14
part numbers 257
acclimating printer 170
accounting information 231
address, IP 46
adhesive labels
fuser mode 44
output path 244
specifications 20
alignment, tray registration 44
alphabetical lists
error messages 180
part numbers 291
Appletalk settings 51
applications, changing settings from 33
arrow keys, control panel 31
assemblies
diagrams and part numbers 256
ordering 14
removing and replacing 99
service approach 14
asterisk (*), next to control panel selections 31
Attention light, locating 30
auto continue, settings 47
Index
C
Cancel Job button, control panel 31
capacities
print cartridges 2, 4
trays and bins 3, 5, 26
carbonless media 22
cardstock
fuser mode 44
sizes supported 26
carriage returns, settings 43
cartridge fan, removing 144
cartridge lifter assembly, diagrams and part numbers 276
cartridge release lever, removing 117
Index301
cartridges
capacity 2, 4
checking 234
components, operations 85
EconoMode 45, 68
error messages 181
handling 67
image formation operations 84
level detection operations 79, 86
low 47
noise, troubleshooting 171
non-HP 68
ordering 14
out, settings 47
part numbers 257
refilled 68, 220
removing 62, 119
ROM, memory operations 86
seals, automatic roll-up 86
storing 67
supplies status page information 230
weight 68
CD-ROMs, part numbers 260
center back cover (tray 4), removing 153
characters, troubleshooting
dropouts 238
misformed 242
chemically treated media 22
circuit capacity, specifications 7
cleaning
bias, operations 79
blade, operations 84, 85
page, creating 65
precautions 61
procedures 62
Clear key, control panel 31
clearable warnings, settings 47
clearing jams 225
clearing memory 217, 219
clock, setting 46
clothing, toner on 61
clutches
pickup and feed system 92
tray 1 93
voltage 80
coated media 22
codes, service test errors 214
cold reset 250
cold resets, performing 217, 219
communications
operations 77, 81
settings 48
troubleshooting 246
Compact Flash 250
complex pages, error messages 202
components, internal 266
conditioning process, image formation operations 84
configuration page
HP Jetdirect 229
printing 38
using 226
Configure device menu 41
connectivity, troubleshooting 250
connectors, locating 11
consumables
ordering 14
part numbers 257
contamination, troubleshooting 238
Index302
Index
control panel
blank, troubleshooting 174
Configure device menu 41
configuring trays 172
Diagnostics menu 54
EIO menu 49
error messages, alphabetical list 180
error messages, numerical list 188
event log, displaying 177
I/O menu 48
Information menu 38
keys 30
language, selecting 33, 48, 217, 219
LED indicator lights 30
locating 10
menu map 37
menu map, printing 38
menus, using 37
messages, interpreting 178
numeric keypad 32
operations 81
Paper handling menu 39
Parallel input submenu 48
part numbers 257
PCL menu 42
Print quality menu 44
Printing submenu 41
removing 111
Resets 53
Retrieve job menu 38
Service menu 215
settings 33
System setup submenu 46
controller board (tray 4), removing 159
controller fan, removing 145
copies, number of 41
cost accounting information 231
country of origin 6
counts, page 231
Courier font settings 42
covers
back, removing 109
diagrams 262
front, removing 104
left back, removing 108
left, removing 103
locating 10
part numbers 263
rail, removing 110
right lower, removing 106
right top, removing 101
tray 4, removing 151
CPU
DC controller PCB 77
tray 1 driver PCB 93
tray 4 96
creases, troubleshooting 237
critical error messages 178
CSSO (Customer Services and Support Organization) 14
curl, troubleshooting 237, 244
current capacity, specifications 7
custom media
detectable size message 182
jams, troubleshooting 224
sizes supported 26
tray settings 41
Customer Services and Support Organization (CSSO) 14
cutouts, avoiding media with 22
D
dark pages, troubleshooting 236, 240
dark setting, toner density 45
data communication operations 81
Data light, locating 30
data transmission settings 48
date, setting 46
DC controller
cartridge memory failures, detection 86
diagrams and part numbers 283
formatter operations 81
media-size detection 87
operations 76
part numbers 257
removing 138
tray 1 feeding operations 93
troubleshooting 174
voltage 80
DC voltage, conversion 80
declaration of conformity 13
default settings
restoring 53, 217, 219
selecting 31, 33
defect ruler 243
defect tables 235
delay jams
tray 1 94
tray 2 or 3 88
tray 4 96
delivery assembly
diagrams and part numbers 281
fans, removing 114, 115
removing 113
delivery motor, removing 116
density settings 45
depth, printer
space requirements 17
specifications 7
developing bias generation 79
developing cylinder, operations 84
developing process, image formation operations 84
diagnostics
communications 246
drum rotation 220
engine 174, 215
flowchart 216
high-voltage power supply 220
LAN 247
loopback 247, 249
paper path 213
ping 248
print cartridges 234
service test 213
tray 4 221
troubleshooting, preliminary 170
Diagnostics menu 54
different media for first page, troubleshooting 172
digital camera memory cards 82
DIMMs
error messages 206
installed personalities and options 228
part numbers 258
DIP switches, tray 4 223
directory, file 38, 232
disks. See hard disks
distorted images, troubleshooting 238
diverter, left door 107, 264
DLC/LLC settings 51
documentation, part numbers 259
door open jams 88
DOOR OPEN sequence of operations 73
doors, removing
left 107, 264
right 105
DOS prompt, communications test 246
dots per inch (dpi)
features 2, 4
settings 44
dots, vertical 242
double-sided printing 42
Down arrow, control panel 31
dpi (dots per inch)
features 2, 4
settings 44
draft printing 45, 68
drive assembly (tray 4), removing 158
drive motor (tray 4), removing 157
drivers, changing settings from 36
dropouts, troubleshooting 238
drum
bias generation 79
cleaning process, image formation operations 85
feed drive assembly, diagrams and part numbers 274
ground path, troubleshooting 239
image defects, troubleshooting 234
image formation operations 84
rotation check 220
drum motor (DCM2)
block diagram 92
removing 141
duplexer
communications 77, 228
failure, error messages 211
Install guide 259
jams, error messages 191, 197, 202
locating 10, 12
models including 2, 6
paper sizes supported 27
part number 259
removing 133
settings 42
troubleshooting 244
duty cycle 3, 5
E
EconoMode 45, 68
edge-to-edge printing 42
EEPROM operations 77
EIO cards
critical error messages 212
slots 81
supported 3, 5
EIO menu 49
electrical specifications 7
electrostatic discharge (ESD), precautions for 99
embedded LAN
disabling 248
formatter replacement 250
ping test 248
troubleshooting 247, 249
embossed media, specifications 22
engine control system
block diagram 75
formatter operations 81
engine test
performing 215
troubleshooting 174
Index
Index303
envelopes
default image size, setting 41
fuser lever positioning 237
output path 244
sizes supported 26
specifications 19
storing 23
wrinkled, troubleshooting 172
environmental product stewardship program 13
environmental specifications
acclimating to changes 170
print cartridges, storing 67
printer 8, 16
storing media 22
equivalence table, paper weight 23
e-rings 261
error messages
alphabetical list 180
event log 175
numerical list 188
priority 178
settings 47
ESD (electrostatic discharge), precautions for 99
Ethernet MAC addresses 250
event log
configuration page 226
message format 179
printing 175
using 175
viewing 54, 177
exchange program 14
expansion, memory 6
external paper handling device messages 178
eye contact, toner 61
F
face-down bin
delivery sensor (PS1451) 88, 90
fan, removing 115
full sensor (PS1452) 90
jam detection operations 88
jams, error messages 191
locating 10
face-up bin
locating 10
using 244
face-up solenoid (SL1) 92
factory default settings, restoring 53, 217, 219
faded print, troubleshooting 240
FAILURE sequence of operations 73
fans
cartridge, removing (fan 5) 144
controller, removing (fan 2) 145
delivery, removing 114
error messages 207
face-down bin, removing (fans 3, 6, and 4) 115
operations, troubleshooting 174
power supply, removing (fan 1) 143
Fast InfraRed Connect
locating 11, 12
part number 258
fasteners, types of 261
FastRes 44
FCC regulations 13
features, product 2, 4, 6
feed clutch, tray 1 (CL2501) 93
feed delay jams, tray 4 96
feed-drive assembly, removing 142
Index304
Index
feed rollers
image defects, troubleshooting 238
included in printer maintenance kit 60
removing 122
tray 1 93, 94
tray 4 96, 155
feed sensors, tray 2 or 3 90
feed stationary jams, tray 4 96
feed system
motors, solenoids, and clutches 92
operations 87
sensors and switches 89
tray 1 93
tray 4 95
field replaceable units (FRUs)
part numbers 262
removing and replacing 99
service approach 14
file directory 38, 232
file warning messages 180
firmware
error messages 205
flash failures 212
part numbers 257
upgrading 55
first aid procedures, toner 61
first page out, specifications 2, 4
first page, troubleshooting 172
flash disks, error messages 180, 182
flash memory
cards, digital camera 82
flat ribbon cables 137
flickering, prevention operations 80
flowcharts
diagnostics 216
troubleshooting process 168
focusing lenses, operations 83, 84
font DIMMs, part numbers 258
fonts
Courier settings 42
downloaded, storage operations 81
included 2
lists, printing 38
PCL settings 43
foreign interface connector, locating 11
form lines, settings 43
formatter
bypassing 215
operations 81
removing 135
replacing 250
tray 4 feeding operations 95
voltage 80
forms, preprinted 21
frequent jams, troubleshooting 224, 225
front assemblies, removing 119
front cover
locating 10
removing 104
front door error messages
jams 189, 198
open 181
front view, diagrams 100
FRUs (field replaceable units)
part numbers 262
removing and replacing 99
service approach 14
FTP, remote firmware upgrades 56
fuser
assembly 60
assembly, removing 134
cleaning 65
connector holder assembly, removing 147
contamination, troubleshooting 238
control circuit operations 80
delivery drive assembly, diagrams and part numbers 275
delivery jams 88
delivery sensor (PS502) 88, 90
delivery-drive assembly, removing 149
error messages 205
image defects, troubleshooting 240, 241, 242
image formation operations 85
jam removal knob, removing 123
jam sensor (PS501) 88, 90
levers 237
media compatibility 20
noise, troubleshooting 171
operations 77
part numbers 257
poor adhesion, troubleshooting 172
roller 79, 80
wrapping jam detection operations 87
fuser modes 40, 44
fuser/delivery motor (DCM1) 92
G
gray background, troubleshooting 239
ground path, drum 239
H
hard disks
critical error messages 212
error messages 180, 182
file directory page 232
file directory, printing 38
initializing 217, 219
installed personalities and options 228
job retention 46
models including 7
part numbers 258
skip disk function 218, 220
supported 3, 5
harnesses, replacing 99
heating operations, fuser 80
heavy paper
fuser mode 44
types supported 26
height, printer
space requirements 17
specifications 7
Help key, control panel 31
high-voltage power supply
checking 220
image defects, troubleshooting 236, 240, 242
operations 78
part numbers 257
removing 137
voltage 80
hoppers, printer cartridge 85
horizontal defects, troubleshooting 239
HP Customer Services and Support Organization (CSSO) 14
HP Fast InfraRed Connect
locating 11, 12
part number 258
HP Jetdirect configuration page 229
HP Jetdirect print servers
EIO menu 49
models including 6
networks supported 81
part numbers 258
troubleshooting 246, 250
HP Jet-Link
cabling, troubleshooting 226
connector, locating 11
connector, removing 146
HP LaserJet 9000 Series Printer software CD-ROM 260
HP Web JetAdmin
configuring trays from 172
upgrading firmware with 56, 57
HTTPS settings 51
humidity
environmental specifications, printer 8
storing media 22
storing print cartridges 67
I
I/O buffer overflow, error messages 202
I/O communication operations 81
I/O menu 48
I/O slots, locating 11
image defect tables 235
image formation operations 84
image quality
cleaning page, creating 65
settings 44
troubleshooting 233
image size, setting default 41
Information menu 38
information pages
configuration 226
file directory 232
Jetdirect 229
printing 38, 226
supplies status 230
usage 231
ingestion, toner 61
inhalation, toner 61
inks, preprinted media specifications 21
input trays
capacities 26
configuration page information 228
detectable size error messages 182
feeding, troubleshooting 171, 172
included 2
jams, error messages 188, 199
jams, troubleshooting 224
Jet-Link device error messages 179
media error messages 186, 187
paper path test 213
paper sizes, supported 26
part numbers 259
registration 33, 44
selecting 46, 172
unexpected size, error messages 204
installed personalities and options 228
installing printer 16
Intellifont 2, 4
interfaces
connections, locating 11
operations 81
internal components, diagrams and part numbers 266
INTR (initial rotation) sequence 72
IP address 46, 246
IPX/SPX settings 51
Index
Index305
J
jam detection lever driver solenoid (SL501) 92
jam removal knobs, removing 123
JAM sequence of operations 73
jams
causes of 225
cleaning spilled toner after 61
clearing 225
error messages 188
multifeeds, troubleshooting 245
recovery settings 47
tray 1 detection operations 94
tray 2 or 3 detection operations 88
tray 4 detection operations 96
troubleshooting 224
JetAdmin
configuring trays from 172
upgrading firmware with 56, 57
Jetdirect configuration page 229
Jetdirect print servers
EIO menu 49
models including 6
networks supported 81
part numbers 258
troubleshooting 246, 250
Jet-Link
cabling, troubleshooting 226
connector, locating 11
connector, removing 146
devices, troubleshooting 228
job retention
job storage limit, setting 46
Retrieve job menu 38
timeout settings 46
K
keypad, numeric 32
keys, control panel 30
kits, maintenance
installation guides 260
part numbers 257
replacing 60
knobs, removing 124
L
labels
fuser mode 44
output path 244
specifications 20
lamp error messages 180
LAN
disabling 248
formatter replacement 250
ping test 248
troubleshooting 247, 249
landscape orientation, setting as default 43
language, control panel 33, 48, 217, 219
languages, printer
default, setting 47
error messages 181
included 2, 4
laser shutter, troubleshooting 236
laser/scanner
operations 83
removing 112
voltage 80
LaserJet 9000 Series Printer software CD-ROM 260
latent image formation 84
Index306
Index
leading edge, detection operations
tray 1 94
tray 2 or 3 88
LEDs
control panel 30
flickering, prevention operations 80
tray 4 223
left assemblies, removing 133
left back cover (printer), removing 108
left back cover (tray 4), removing 153
left door
diagrams and part numbers 264
jams, error messages 190, 191, 198
part numbers 264
removing 107
left output bin, paper sizes supported 27
left rail cover, removing 110
left side cover (tray 4), removing 151
left side view, diagrams 100
left top cover, removing 103
lenses, operations 83, 84
letterhead
fuser mode 44
specifications 21
level, media detection operations
tray 2 or 3 87
tray 4 96
level, toner 79, 86
levers, fuser 237
life expectancies, print cartridges 2, 4
lifter motor (SMT2) 92
lifter position, media-level detection operations
tray 2 or 3 87
tray 4 95
light print
setting, toner density 45
troubleshooting 240
line feed settings 43
line spacing settings 43
lines, troubleshooting
horizontal 239
vertical 241
locked menus, control panel 180
long edge binding, settings 42
loopback test 247, 249
loose toner, troubleshooting 240
low print cartridges, settings 47
lower heater (H3), operations 80
low-voltage power supply
operations 80
part numbers 257
removing 136
LSTR (last rotation) sequence 72
M
MAC addresses 250
Macintosh, Appletalk settings 51
macros, downloaded 81
mailbox
locating 10
models supported 7
paper sizes supported 28
part number 258
main heater (H1), operations 80
main motor, operations 84
maintenance kits
installation guide 260
part numbers 257
replacing 60
manual feed
control panel settings 42
error messages 183
manuals, part numbers 259
map, control panel menus 37
map, menu 38
margins, settings 44
media
coated 22
configuring trays 172
default image size, setting 41
detection operations 87, 96
error messages 185, 204
fuser modes 40, 44
level detection operations 87, 96
preprinted 21
selecting 19, 25
sizes, supported 26
small, mode for 45
storing 22
troubleshooting 244
weight equivalence table 23
media-level sensors 90
memory
clearing 217, 219
configuration page information 226
data loss, error message 183
DIMMs, error messages 208
expansion features 6
flash cards 82
formatter system 81
part numbers 258
print cartridges 86
settings changed, error message 183
memory controller PCB assembly, diagrams and part numbers 283
Menu button, control panel 31
menu map, control panel 37
menus, control panel
Configure device 41
Diagnostics 54
EIO 49
I/O 48
Information 38
locked 180
map 37
map, printing 38
numeric keypad, navigating with 32
Paper handling 39
Parallel input 48
PCL 42
Print quality 44
Printing 41
Resets 53
Retrieve job 38
Service 215
System setup 46
using 37
messages
alphabetical list 180
event log codes 175
numerical list 188
settings 47
types of 178
metal, screws for 261
metric weight equivalence table, paper 23
Microsoft Windows, remote firmware upgrades 55
mirrors, operations 83, 84
misfeeds, troubleshooting 245
misformed characters, troubleshooting 242
model number 6
models, printer 2, 4, 6
modes
fuser 40, 44
Sleep 46
moisture
environmental specifications, printer 8
storing media 22
storing print cartridges 67
molex cable connectors, unplugging 136
monthly duty cycle 3, 5
motors
delivery, removing 116
drum 92, 141
error messages 180, 207
main, operations 84
noise, troubleshooting 171
pickup and feed system 92
tray 4 drive, removing 157
tray 4, testing 221
voltage 80
MS-DOS prompt, communications test 246
multifeeds
prevention operations 87
troubleshooting 245
multifunction finisher
documentation 259
locating 10
models including 7
paper sizes supported 28
part number 258
multipurpose tray. See tray 1
N
narrow media settings 45
navigation, control panel
keys 30
menus 37
numeric keypad 32
networking features 3, 5
networks
connectivity, troubleshooting 250
disabling embedded LAN 248
embedded LAN, troubleshooting 247
formatter, replacing 250
Jetdirect configuration page 229
Jetdirect print servers, part numbers 258
ping tests 248
speed settings 53
noise
troubleshooting 171
non-HP cartridges 68, 184
Novell Status information 246
number of copies 41
numeric keypad, control panel 32
numerical lists
error messages 188
part numbers 296
NVRAM
errors 210
initializing 218, 220
operations 81
O
offline message 37
on/off switch, locating 10
Index
Index307
operating environment
acclimating to 170
print cartridges 67
printer, specifications 8, 16
operations
bias generation circuits 79
DC controller 76
engine control system 75
formatter 81
high-voltage power supply circuit 78
image formation 84
laser/scanner system 83
low-voltage power supply 80
pickup and feed system 87
power-on 73
sequences 71
systems overview 70
tray 1 93
tray 4 95
ordering parts 14
orientation
default 43
error messages 185
output bins
event log error messages 179
fan, removing 115
full, error messages 180, 184
jam detection operations 88
jams, error messages 191
locating 10
paper sizes supported 26
selecting 41
sensors 88, 90
straight paper path, using 244
output quality
cleaning page, creating 65
settings 44
specifications 2, 4
troubleshooting 233
overhead transparencies
sensor (PS1) 87, 90
specifications 21
overheating, thermistor operations 80
override A4/letter 42
P
page counts 231
page orientation
default 43
error messages 185
page skew
adjustment operations, tray 4 95
specifications 234
troubleshooting 241
pages per minute (ppm) 2, 4
pages per month 3, 5
pan head screws 261
Index308
Index
paper
coated 22
configuring trays 172
default image size, setting 41
detection operations 87, 96
error messages 185, 204
fuser modes 40, 44
level detection operations 87, 96
preprinted 21
selecting 19, 25
sizes, supported 26
small, mode for 45
storing 22
troubleshooting 244
weight equivalence table 23
paper deck drive assembly, part numbers 258
Paper handling menu 39
paper input unit (PIU)
diagrams and part numbers 278
part numbers 257
reinstalling 128
removing 126
paper jams. See jams
paper path
cleaning 63
straight 244
test, printing 213
test, settings 54
tray 1 sensor (PS2502) 93, 94
paper pickup assembly, part numbers 258
paper-size detection switch PCB (tray 4), removing 160
parallel communication operations 81
parallel connector, locating 11
Parallel input submenu 48
parallel port, supported 3, 5
part numbers
alphabetical list 291
consumables, accessories, and documentation 257
numerical list 296
voltage 256
parts
ordering 14
removing and replacing 99
Pause/Resume key, control panel 31
pay-per-page 231
PCB assemblies, diagrams and part numbers
printer 283
tray 4 289
PCBA, screws for 261
PCI slots 81
PCL font list, printing 38
PCL language, features 2, 4
PCL menu 42
PDF error page 42
perforated media, avoiding 22
Perform Printer Maintenance message 60
periods
image formation 84
operations 71
power-on 73
personalities
default, setting 47
error messages 181
included 2, 4
phases
image formation 84
operations 71
power-on 73
phone numbers, ordering parts 14
photosensitive drum
bias generation 79
cleaning process, image formation operations 85
feed drive assembly, diagrams and part numbers 274
ground path, troubleshooting 239
image defects, troubleshooting 234
image formation operations 84
rotation check 220
physical specifications 7
pickup and feed system
feed-drive assembly, removing 142
motors, solenoids, and clutches 92
operations 87
sensors and switches 89
tray 1 93
tray 4 95
pickup assembly (tray 4), removing 162
pickup delay jams
tray 1 94
tray 2 or 3 88
tray 4 96
pickup feed guide (tray 4), removing 163
pickup motor (SMT3) 92
pickup roller up and down motor (SMT1) 92
pickup rollers
included in printer maintenance kit 60
printer, removing 122
tray 1 93, 94
tray 4 96, 155
pickup shaft home-position sensor (PS1413) 90
pickup solenoid, tray 1 (SL2501) 93, 94
ping tests 248
PINs
error messages 182
Service menu 215
PIU (paper input unit)
diagrams and part numbers 278
part numbers 257
reinstalling 128
removing 126
plastic, screws for 261
portrait orientation
error messages 185
setting as default 43
ports, supported 3, 5
PostScript error pages 42
PostScript font list, printing 38
PostScript Level 3 emulation 2, 6
power
consumption, specifications 7
switch, locating 10
troubleshooting 174
power supplies
fan, removing 143
high-voltage, removing 137
low-voltage 80
low-voltage, removing 136
part numbers 257
tray 1 93
tray 4, operations 95
tray 4, removing 161
power-on sequence 73
PowerSave
energy consumption 7
fan operation during 174
settings 32, 46
ppm (pages per minute) 2, 4
preliminary operating checks, troubleshooting 170
preprinted media specifications 21
preprinted paper, fuser mode 44
prepunched paper, fuser mode 44
pre-registration roller drive clutch (CL2) 92
pressure roller
bias generation 79
cleaning 65
fuser wrapping jam detection operations 87
heating operations 80
image formation operations 84, 85
pre-transfer process, image formation operations 84
pre-transfer upper guide bias generation 79
primary charging roller
bias generation 79
image defects, troubleshooting 236
image formation operations 84
print bias, operations 79
print cartridges
capacity 2, 4
checking 234
components, operations 85
EconoMode 45, 68
error messages 181
fan, removing 144
handling 67
image formation operations 84
level detection operations 79, 86
lifter assembly, diagrams and part numbers 276
low 47
noise, troubleshooting 171
non-HP 68
ordering 14
out, settings 47
part numbers 257
refilled 68, 220
release lever, removing 117
removing 62, 119
ROM, memory operations 86
seals, automatic roll-up 86
storing 67
supplies status page information 230
weight 68
print quality
cleaning page, creating 65
settings 44
troubleshooting 233
Print quality menu 44
PRINT sequence 72
print servers
EIO menu 49
models including 6
networks supported 81
troubleshooting 246, 250
print servers, part numbers 258
printer drivers, changing settings from 36
printer languages
default, setting 47
error messages 181
included 2, 4
printer maintenance kits
installation guide 260
part numbers 257
replacing 60
printer messages
alphabetical list 180
event log codes 175
numerical list 188
types of 178
Printing submenu 41
priorities, messages 178
Index
Index309
private jobs
control panel settings 38
timeout settings 46
production code, locating 6
programs, changing settings from 33
proof and hold jobs
control panel settings 38
timeout settings 46
protocols, network
Jetdirect page information 229
settings 50
troubleshooting 246
PS error pages 42
PS fonts
included 2
list, printing 38
PS Level 3 emulation 6
Q
quality
cleaning page, creating 65
settings 44
specifications 2, 4
troubleshooting 233
QuickCopy jobs
control panel settings 38
timeout settings 46
R
rail covers, removing 110
RAM disk
error messages 180
operations 81
settings 48
RAM, print cartridges 86
Ready light, locating 30
Ready message 37
Real Time Clock operations 82
recovery, jam 47
recycled media, specifications 22
refilled print cartridges 68, 220
registration assembly
diagrams and part numbers 279
image defects, troubleshooting 241
part numbers 258
removing 129
tray 4 95, 156
registration jam removal knob, removing 124
registration paper sensor (PS2) 88, 90
registration roller drive clutch (CL1) 92
registration roller, cleaning 63
registration, tray settings 33, 44
regulatory information 13
relative humidity
specifications, printer 8
storing media 22
storing print cartridges 67
remanufactured assemblies 14
remote firmware upgrade (RFU) 55
removing parts 99
repair process 14
repeating defects, troubleshooting 240, 243
repeating images, troubleshooting 242
repetitive defect ruler 243
replacement intervals
print cartridges 68
printer maintenance kit 60
Index310
Index
replacement parts
ordering 14
removing and replacing 99
replacing
parts 99
printer maintenance kit 60
reports
configuration 226
file directory 232
Jetdirect 229
printing 38, 226
supplies status 230
usage 231
reset, cold 250
Resets menu 53
resets, cold 217, 219
residual jams, detection operations
tray 1 94
tray 2 or 3 88
tray 4 96
resolution
features 2, 4
settings 44
Resolution Enhancement technology (REt) 45
restoring factory default settings 53, 217, 219
REt (Resolution Enhancement technology) 45
Retrieve job menu 38
revision level 6
RFU (remote firmware upgrade) 55
ribbon cables 137
right assemblies, removing 125
right back cover (tray 4), removing 153
right door
assembly, diagrams 265
jams, error messages 188, 200
locating 10
part numbers 265
removing 105
right lower cover, removing 106
right rail cover, removing 110
right side cover (tray 4), removing 152
right side view, diagrams 100
right top cover, removing 101
RIP Once technology 2, 4
rollers
cleaning 61
image defects, troubleshooting 238
included in printer maintenance kit 60
printer, removing 122
repeating defects, troubleshooting 240, 243
tray 1 operations 94
tray 4 operations 96
tray 4, removing 155
ROM
disk, error messages 180
formatter operations 81
rotate paper message 185
rotation check, drum 220
ruler, repeating defects 243
S
Save + Restore 250
scan buffer errors 208
scan error messages 186
scanning mirror, operations 84
screwdrivers, required 99
screws
self-tapping, installing 99
types of 261
seal, toner 86
security
configuration page information 226
settings 53
Web sites, settings 51
Select key, control panel 31
self-tapping screws 99, 261
sensors
pickup and feed system 89
tray 1 93
tray 4 222
voltage 80
separation process, image formation operations 85
separation rollers
image defects, troubleshooting 238
printer, removing 122
tray 1 94
tray 4, operations 96
tray 4, removing 155
separation static charge eliminating bias, operations 79
sequences
image formation 84
operations 71
power-on 73
serial error messages 203
serial number 6
service approach 14
Service menu 215
service tests 213
Set Registration 44
setting up printer 16
settings
control panel, selecting 31
image quality 44
restoring defaults 53, 217, 219
types of 33
shipping printer 67
short edge binding, settings 42
shutter, troubleshooting 236
site requirements 16
size, printer
space requirements 17
specifications 7
sizes, media
configuring trays 172
detection operations 87, 96
envelopes 19
error messages 185, 204
mismatch error message 186
supported 26
sizes, screws 261
skew
adjustment operations, tray 4 95
specifications 234
troubleshooting 241
skin contact, toner 61
skip disk 218, 220
Sleep mode settings 46
SLEEP sequence of operations 73
small paper
mode 45
troubleshooting 241
smears, troubleshooting 241
smudges, horizontal 239
software
HP LaserJet 9000 Series Printer CD-ROM 260
settings 33
solenoids
pickup and feed system 92
tray 1 93, 94
voltage 80
space requirements 17
spare parts, ordering 14
special media
coated 22
embossed 22
envelope specifications 19
fuser lever positioning 237
label specifications 20
loading 25
output path 244
perforated 22
storing 22
transparency specifications 21
specifications
print cartridges, storing 67
printer 7
skew 234
speed 2, 4
specks, troubleshooting 241
speed
data transmission settings 48
network settings 53
printer, specifications 2, 4
resolution settings 44
spilled toner, cleaning 61
stacker
communications, troubleshooting 228
Install guide 259
locating 10, 12
models including 7
paper sizes supported 27
stages
image formation 84
operations 71
power-on 73
standard memory 6
standard top bin, paper sizes supported 26
staple cartridges
ordering 14
part numbers 257
stapler/stacker
communications, troubleshooting 228
error messages 186
Install guide 259
locating 10, 12
models including 7
paper sizes supported 27
space requirements 18
Start guide 259
static charge eliminating bias, operations 79
static eliminator
image defects, troubleshooting 242
operations 85
static, precautions for 99
stationary jams
tray 2 or 3 88
tray 4 96
status messages 47, 178
status, supplies information page
printing 38
using 230
STBY (standby) sequence 71
Stop button, control panel 31
stopped printing, troubleshooting 171
Index
Index311
stored jobs
control panel settings 38
timeout settings 46
storing
envelopes 23
media 22
print cartridges 67
printer 8
straight paper path, using 244
stripped screw holes 99
subassemblies, service approach 14
sub-heater (H2), operations 80
supplies
ordering 14
part numbers 257
supplies status page
printing 38
using 230
surface coatings, media 22
switches
engine test 215
media-length detection (SW2-SW5) 90
paper-size detection (tray 4), removing 160
pickup and feed system 89
tray 4 223
symbol sets 43
synthetic media 22
System setup submenu 46
systems, operations overview 70
T
tapping screws 261
TCP/IP settings 50, 52, 246
telephone numbers, ordering parts 14
temperature
environmental specifications, printer 8
fuser heating operations 80
label specifications 20
print cartridges, storing 67
storing media 22
temporary settings 33
tests
communications 246
diagnostics flowchart 216
drum rotation 220
engine 174, 215
high-voltage power supply 220
LAN 247
loopback 247, 249
paper path 213
ping 248
print cartridge 234
service 213
tray 4 221
troubleshooting, preliminary 170
text, troubleshooting
dropouts 238
misformed 242
thermistors, fuser control circuit 80
time, setting 46
timeout settings
held jobs 46
I/O 48
Sleep mode 46
timing chart, printer operations 74
Index312
Index
toner
bubbles, troubleshooting 239
cleaning spilled 61
coverage, usage page information 231
density settings 45
first aid measures 61
image formation operations 84
level detection operations 79
loose, troubleshooting 240
no-shake cartridge design 85
seal 86
smears, troubleshooting 241
specks, troubleshooting 241
toner-sensor contact assembly, removing 140
tools, required 99
top assemblies, removing 111
top covers
left, removing 103
right, removing 101
torque limiter, operations 87
torque values, screws 261
trailing edge, detection operations
tray 2 or 3 88
tray 4 96
transfer bias generation 79
transfer charging roller
cleaning operations 79
image formation operations 84
operations 85
transfer guide assembly, removing 131
transfer process, image formation operations 85
transfer roller
assembly, removing 120
cleaning 61
contamination, troubleshooting 238
diagrams and part numbers 280
image defects, troubleshooting 236, 240
included in printer maintenance kit 60
Transmit Once technology 2, 4
transparencies
detection sensor (PS1) 87, 90
fuser mode 44
specifications 21
tray 1
See also trays
assembly, diagrams and part numbers 290
communications 77, 228
configuring 172
feeding operations 93
feeding, troubleshooting 171
Install guide 259
jam detection operations 94
jams, error messages 188, 199
loading special media 25
locating 10, 12
models including 6
paper sizes supported 26
part number 258
registration 33
removing 125
tray 2 or 3
See also trays
configuring 173
diagrams and part numbers 277
feeding, troubleshooting 171
guides, adjusting 224
jam detection operations 88
locating 10
media detection operations 87
media-length detection switches 90
noise, troubleshooting 171
paper sizes supported 26
pickup and feed operations 87
registration 33
removing 121
sensors 90
settings 39
tray 4
See also trays
back covers, removing 153
communications, troubleshooting 228
configuring 173
controller board, removing 159
diagnostics 221
drive assembly, diagrams and part numbers 288
drive assembly, removing 158
drive motor, removing 157
feeding operations 95
feeding, troubleshooting 171
guides, adjusting 224
Install guide 259
jam detection operations 96
left side cover, removing 151
lights, interpreting 223
locating 10, 12
main body, diagrams and part numbers 284
models including 6
motors, testing 221
noise, troubleshooting 171
paper sizes supported 26
paper-size detection switch PCB, removing 160
part number 258
PCB, diagrams and part numbers 289
pickup assembly, removing 162
pickup feed guide, removing 163
power supply, operations 95
power supply, removing 161
printing, troubleshooting 171
registration assembly, removing 156
registration settings 33
removing covers and assemblies 151
removing from printer 154
right side cover, removing 152
rollers included in printer maintenance kit 60
rollers, removing 155
sensors, testing 222
settings 39
space requirements 18
stand-alone running test 222
trays
capacities 26
configuration page information 228
detectable size error messages 182
feeding, troubleshooting 171, 172
included 2
jams, error messages 188, 199
jams, troubleshooting 224
Jet-Link device error messages 179
media error messages 186, 187
paper path test 213
paper sizes, supported 26
part numbers 259
registration 33, 44
selecting 46, 172
unexpected size, error messages 204
troubleshooting
about 167
blank pages 236
blurry images 238
bubbles 239
communications 246
connectivity 250
diagnostics flowchart 216
dropouts 238
embedded LAN 247
formatter replacement 250
gray background 239
hard disk 217, 218, 219, 220
horizontal lines 239
HP Jetdirect print servers 246
image quality 233
light print 240
loose toner 240
media 244
misformed characters 242
noise 171
power 174
preliminary operating checks 170
process flow 168
repeating defect ruler 243
repeating defects 240
repeating images 242
skewed pages 241
smeared toner 241
specks, toner 241
tray 4, stand-alone diagnostics 221
vertical lines 241
wiring diagram 251
wrinkled pages 237
TrueType fonts, features 2, 4
two-sided printing 42
types, paper
fuser modes 44
tray settings 39
U
unexpected size, error messages 204
universal serial bus (USB) communication operations 81
UNIX, carriage return settings 43
Up arrow, control panel 31
upgrading firmware 55
usage page 38, 231
USB communication operations 81
Use guide 259
V
vacuuming spilled toner 61
Index
Index313
vertical dots, troubleshooting 242
vertical line spacing settings 43
vertical lines, troubleshooting
black 241
white 242
vertical transfer assembly, part numbers 258
vertical transfer door, locating 10
viewing event log 177
voltage
AC 80
high-voltage power supply check 220
part numbers 256
specifications 7
tray 1 power supply 93
tray 4 power supply 95
variations, allowable 170
W
WAIT sequence 71
wake time, setting 46
warning messages 178
warranty 14
washers, types of 261
washing off toner 61
waste toner, cleaning operations 85
Web JetAdmin
configuring trays from 172
upgrading firmware with 56, 57
Web sites
documentation 259
firmware upgrades 55
security settings 51
weight
envelopes 19
equivalence table, paper 23
paper, supported 26
print cartridges 68
printer 7
white lines, troubleshooting
horizontal 239
vertical 242
white pages, troubleshooting 236
Wide A4 setting 42
wide-format printing 2
width, printer
space requirements 17
specifications 7
Windows, remote firmware upgrades 55
wire harnesses, replacing 99
wireless printing 3
wiring diagrams 251
wrapping jams, detection operations 87
wrinkles, troubleshooting
envelopes 172
pages 237
writing process, image formation operations 84
Index314
Index
© 2005 Hewlett-Packard Development Company, L.P.
www.hp.com
*Q3721-90963*
*Q3721-90963*
Q3721-90963