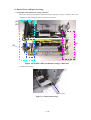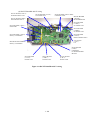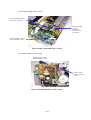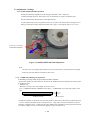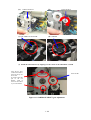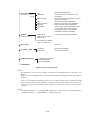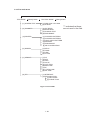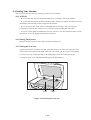
1
PIXMA MP760
SERVICE
MANUAL
Canon
Copyright 2005, Canon U.S.A. This technical publication is the proprietary and confidential information of Canon U.S.A. which
shall be retained for reference purposes by Authorized Service Facilities of Canon U.S.A. Its unauthorized use is prohibited.
PIXMA MP760
SERVICE
MANUAL
REVISION 0
PIXMA MP760
PIXMA MP760
PIXMA MP760
PIXMA MP760
PIXMA MP760
PIXMA MP760
PIXMA MP760
H12-4602
H12-4603
H12-4604
H12-4605
H12-4606
H12-4608
H12-4609
120V USA
230V EMB
230V GB
230V EUM
120V CND
230V AUS
230V AE
HY8-13A4-000
COPYRIGHT 2004 CANON INC. CANON PIXMA MP760 NOV. 2004
Scope
This manual has been issued by Canon Inc., to provide the service technicians of this product with the
information necessary for qualified persons to learn technical theory, installation, maintenance, and repair of
products. The manual covers information applicable in all regions where the product is sold. For this reason, it
may contain information that is not applicable to your region.
Revision
This manual could include technical inaccuracies or typographical errors due to improvements or changes made
to the product. When changes are made to the contents of the manual, Canon will release technical information
when necessary. When substantial changes are made to the contents of the manual, Canon will issue a revised
edition.
The following do not apply if they do not conform to the laws and regulations of the region where the manual or
product is used:
Trademarks
Product and brand names appearing in this manual are registered trademarks or trademarks of the respective
holders.
Copyright
All rights reserved. No parts of this manual may be reproduced in any form or by any means or translated into
another language without the written permission of Canon Inc., except in the case of internal business use.
Copyright © 2004 by Canon Inc.
CANON INC.
Inkjet MFP/FAX Quality Assurance Div.
5-1 Hakusan 7-Chome, Toride-city, Ibaraki 302-8501, Japan
I. MANUAL OUTLINE
This manual consists of the following three parts to provide information necessary to service the PIXMA
MP760:
Part 1: Maintenance
Information on maintenance and troubleshooting of the PIXMA MP760
Part 2: Technical Reference
New technology and technical information such as FAQ's (Frequently Asked Questions) of the PIXMA
MP760
Part 3: Appendix
Block diagrams and pin layouts of the PIXMA MP760
Reference:
This manual does not provide sufficient information for disassembly and reassembly procedures. Refer
to the graphics in the separate Parts Catalog.
II. TABLE OF CONTENTS
Part 1: MAINTENANCE
1-1
1. MAINTENANCE
1–1
1-1. Adjustment, Periodic Maintenance, Periodic Replacement Parts, and Replacement
Consumables by Service Engineer
1-3
1-2. Customer Maintenance
1-3
1-3. Product Life
1-4
1-4. Special Tools
1-5
1-5. Serial Number Location
1-6
2. LIST OF ERROR DISPLAY / INDICATION
1-6
2-1. Users Error Messege
1-9
2-2. New Error Codes and Recovery Methods
1 - 11
2-3. Warnings
1 - 11
2-4. Troubleshooting by Symptom
1 - 16
3. REPAIR
1 - 16
3-1. Notes on Service Part Replacement (and Disassembling / Reassembling)
1 - 19
3-2. Special Notes on Repair Servicing
3-2-1 Flexible Cable and Harness Wiring, Connection
1 - 19
1 - 21
3-3. Adjustment / Settings
1 - 21
3-3-1 Paper Feed Motor Adjustment
1 - 22
3-3-2 Gear Phase Adjustment
1 - 24
3-3-3 Lift Cam Shaft Ass’y Adjustment
1 - 25
3-3-4 Solenoid Cam Spring Location
1 - 25
3-3-5 Carriage Shaft Clip Location
1 - 26
3-3-6 White Sheet Location
1 - 28
3-3-7 Grease Application
1 - 30
3-3-8 Waste Ink Counter Setting
1 - 30
3-4. User Data Flow
1 - 33
3-5. Service Switches
1 - 33
3-5-1 Hardware Switches
1 - 33
3-5-2 Service Data Setting
1 - 34
3-5-3 Service Data Registration / Setting Method
1 - 35
3-5-4 Service Data Flowchart
1 - 39
3-5-5 Explanation of service data
1 - 40
3-5-6 New SSSWs / parameters added to this model
1 - 42
3-5-7 SSSW Default Setting
1 - 60
3-6. Test Mode / Factory Mode
1 - 60
3-6-1 Test Mode / Factory Mode Overview
1 - 61
3-6-2 Test Mode Menu
1 - 62
3-6-3 Factory Mode
1 - 63
3-6-4 Operation Panel Test
1 - 64
3-6-5 Print Test
1 - 66
3-6-6 CD-R Calibration (230V only)
1 - 66
3-6-7 IRDA test
1 - 66
3-7. Upgrading the version of SPCNT Flash ROM
1 - 67
3-8. Verification Items
1 - 67
1 - 69
1 - 69
1 - 69
1 - 69
1 - 70
1 - 70
1 - 71
1 - 72
3-8-1 EEPROM information print
4. Cleaning Your Machine
4-1 Caution
4-2 Cleaning the Exterior
4-3 Cleaning the Scan area
4-4 Cleaning the Interior
4-5 Cleaning the Paper Feed Rollor
4-6 Cleaning the Bottom Plate
5. Transportation
Part 2: TECHNICAL REFERENCE
2-1
1. New Technologies
2-3
2. Cleaning Mode and Amount of Ink Purged
2-5
3. Print Mode
2-9
4. FAQ (Problems Specific to the MP760 and Corrective Actions)
Part 3: APPENDIX
3-1
1. Wiring Diagram
3-2
2. Specification
Part 1
Maintenance
1. MAINTENANCE
1-1
Adjustment, Periodic Maintenance, Periodic
Replacement Consumables by Service Engineer
Replacement
Parts,
and
(1) Adjustment
Approx
Adjustment
Timing
Purpose
Tool
ALL CLEAR
(EEPROM
initialization)
*1
At SPCNTBOARDASS’Y
replacement
To initialize settings other
than the following
-Service/User soft SW
-Various counter
-TYPE Setting
None
To initialize
the settings,
select #8
CLEAR –ALL
in the service
mode
1 min
TYPE settings
(EEPROM
settings)
*1
-At SPCNTBOARDASS’Y
replacement
-At excecutingAll clear
-To set the type
-To set the destination
None
Select #5
TYPE in the
service mode
1 min
time
Power SW
OFF/ON*1
Waste ink
counter resetting
(EEPROM
settings)
At bottom case unit
replacement
At ink absorber INK
ABSORBER
(HY7-2885/2886/2887/28
88/2889/2890/2891/2953)
To reset the waste ink
counter.
Waste ink
counter setting
(EEPROM
initialization)
At SPCNTBOARDASS’Y
replacement
Waste ink counter setting
CD-R sensor /
automatic print
head alignment
sensor correction
(EEPROM
settings)
(230V only)
At SPCNTBOARDASS’Y
replacement
At carriage unit
replacement
To correct the CD-R and
automatic print head
alignment sensor.
1-1
None
1min
Select #7
PRINTER in
the service
mode,
and input “0”
at #5 INK ABS
CAPA.
1 imn
None
Print out the
EEPROM
information,
and select #7
PRINTER in
the service
mode.
Then, register
at #5 INK ABS
CAPA.
1 min
None.
(Correction
performed
through
FACTORY
MODE-[2]PRI
NTER-SHUK
KEN at the
same time as
printing.)
Approx
Adjustment
Timing
Purpose
Tool
Print head
alignment
- At print head
replacement
- At SPCNTBOARDASS’Y
replacement
To ensure accurate dot
placement.
None.(Main
body
buttons)
Computer
(settings via
the printer
driver)
2 min
Paper feed motor
position
adjustment*
At paper feed motor unit
replacement
To adjust the belt tension.
(Position the paper
feed motor so that the belt
is stretched tight.)
2 min
-At carriage unit
replacement
-At chassis' upper gear
replacement
-At LIFT CAM SHAFT
replacement
-To maintain sliding
properties of the carriage,
carriage shaft, and shaft
lift.
-To protect the chassis'
upper gear.
-To LIFT CAM SHAFT
replacement
None
For the
adjustment,
refer to [3-3
Adjustment/Se
ttings
(1) PAPER
FEED
MOTOR
Installation
Adjustment.
-FLOIL
KG-107A
-MOLYKOTE
HP300
*2
Grease
application
time
1 min
Note: DO NOT loosen the red screws on both sides of the main chassis, securing the carriage shaft
positioning.
*1: When SPCNT BOARD ASS’Y isreplaced, be sure to select the settings of [#8CLEAR]-[ALL]
and [#5TYPE] in Service Mode, and turn the
power OFF/ON with the Power button (Software
Power: OFF/ON). DO NOT turn the power OFF/ON by removing and inserting the power code
(Hardware Power: OFF/ON). In this case, data may not be written correctly.
*2: Red screws of paper feed motor
The red screws securing the paper feed motor may be loosened only at replacement of the paper
feed motor unit.
(2) Periodic maintenance
Adjustment
Timing
Purpose
Tool
Approx.
time
None
1-2
(3) Periodic replacement parts
Adjustment
Timing
Purpose
Tool
Approx.
time
None
(4) Replacement consumables
Adjustment
Timing
Purpose
Tool
Approx.
time
None
1-2 Customer Maintenance
Adjustment
Timing
Purpose
Tool
Approx.
time
Print head
alignment
At print head
replacement.
To ensure accurate dot
placement.
None
Main body
buttons
Computer
(automatic
settings
via the printer
driver)
Print head cleaning
When print quality is
not satisfying.
To improve nozzle
conditions.
None
1 min
Main
body
buttons
Computer
(settings via the
printer driver)
Print head deep
cleaning
When print quality is
not satisfying, and not
improved by print head
cleaning.
To improve nozzle
conditions.
None
Computer
(setting via the
printer driver)
.
Ink tank
replacement
When an ink tank
becomes empty.(No ink error)
When paper does not
To clean the paper feed
feed properly.
rollers.
Paper feed roller
cleaning
CD-R print position At CD-R printing, when
adjustment
necessary
To correct CD-R print
position.
Bottom plate
cleaning
To clean the platen ribs.
When the back side of
the paper is smeared
1-3
3min
2min
2min
None
2min
Main
body
buttons
None
2min
Computer
(application
software)
None
Computer
(application
software)
1min
1-3 Product Life
(1) Main body
Specified print volume (a), (b), or the years of use (c), whichever comes first.
(a) Scanning Section: 15,000 pages
(b) Printing Section: 18,000 pages
Bk
Copy
Print
3,420 pages
3,960 pages
1,500 character pattern
-
-
A4, 7.5% duty per color pattern
2,520 pages
2,880 pages
A4, photo, borderless printing
180 pages
360 pages
L, photo, borderless printing
1,080 pages
1,980 pages
Postcard, photo, borderless printing
360 pages
1,260 pages
1,500 character pattern + Post card
Address printing
Color
(c) Years of use
5 years of use
(2) Ink tank
BCI-3eBK:
900 pages
(JEIDA STD patternJ1, plain paper standerd mode)
740 pages
(Black 1,500 character pattern, plain paper / standard mode)
1,300 pages (ISO JIS-SCID No. 5 / plain paper / standard mode)
BCI-6C:
550 pages
(ISO JIS-SCID No. 5 / plain paper / standard mode)
BCI-6M:
430 pages
(ISO JIS-SCID No. 5 / plain paper / standard mode)
BCI-6Y:
360 pages
(ISO JIS-SCID No. 5 / plain paper / standard mode)
BCI-6BK:
2,000 pages (ISO JIS-SCID No. 5 / plain paper / standard mode)
1-4 Special Tools
Name
Tool No.
Application
MOLYKOTE
CK-8012-000
To be applied to the chassis' upper gear, New
HP300
FLOIL KG-107A
Remarks
and to the sliding portion of the shaft lift.
QY9-0057-000
To be applied to the sliding portion of the In common with
carriage and the bearing portion of the other models.
carriage shaft.
1-4
1-5 Serial Number Label Location
On the right side of the backside in the bottom case (close to the rating plate)
Figure1-1 Serial Number Label Location
1-5
2. LIST OF ERROR DISPLAY / INDICATION
User error messages
Look for the applicable error message and execute the appropriate countermeasures.
Error Codes
As for the causes and countermeasures, only the error codes that are newly incorporated in the unit remedies
unique to the product are included in New Error Codes and Recovery Methods. For the causes and
countermeasures of other error codes, refer to the separate G3/G4 Facsimile Error Code List (Rev. 2).
Service error code output
When service data #1 SSSW SW01 Bit0 is set to “1”,
the following service error codes are displayed when
an error occurs.
2-1 User’s error messege
"Print head does not work. Clear foreign object from print head. Turn off and on"
Printing position correction failed
Cause:
Carriage movement prevented by one of the following.
Damaged shaft.
Parts deformed. (Carriage or guide frame)
Insufficient grease.
Solution: Replace the shaft.
Replace the deformed parts.
Apply more grease.
Cause: Bi-directional print displacement correction failed because the carriage motor is
out of step, or some similar reason.
Solution: Replace the carriage motor.
Home position error
Cause1:
Tried to stop the carriage unit that has been moving or to move the carriage unit at a pouse by
force.
Solution1: Do not touch the carriage unit other than cartridge replacement position.
Cause2:
Foreign body in carriage section.
Solution2: Open flatbed ass’y and remove the foreign body.
Cause3:
Loose carriage belt.
Solution3: Replace carriage unit
Cause4:
Carriage motor does not work.
Solution4 (1) Switch power OFF/ON.
(2) Replace carriage motor.
Cause5:
The position of the carriage cannot be detected (due to smears on the carriage
encoder film or SPCNT board failure).
Solution5: (1) Switch power off/on.
(2) Wipe the carriage encoder film with a cloth soaked with alcohol.
(3) Replace the carriage encoder film.
(4) Replace the SPCNT board.
1-6
Note:
This error message means the same as service error codes ##338 and ##340. When this error occurs in
this model, it is not treated as a service error, but as a user error, and the error message is displayed.
“Scanning Unit (Printer Cover) is open.”
Cause:
You opened the scanning unit (printer cover) during an operation.
Solution: Close the scanning unit (printer cover).
Cause:
Damaged scanner open arm ass’y, damaged scanner sensor arm, or SPCNT board ass’y failure.
Solution: Replace the scanner open arm ass’y, replace the scanner sensor arm, or replace the SPCNT board
ass’y.
“The paper is jammed. Clear the paper and press [OK].”
Cause:
The paper is jammed.
Solution: Clear the paper and press [OK].
“Error Turn the machine off and on”
Cause:
The printer’s internal unit has malfunctioned.
Solution: Clear the paper.
Press [OK]
Reattachment the Print head.
Switch power off/on.
Check the service error code and refer to an appropriate solution.
“The machine's memory is full. Delete documents, or print from PC if the data is image.”
Cause:
The machine’s memory is full because you tried to copy a very detailed document.
Solution: Divide the document and copy each part separately.
“Cannot write to memory card. (displayed as [write-protect error]”
Cause:
The memory card inserted in the card slot is write-protected.
Solution: Release the write protection of the memory card.
Cause:
The setting [Memory Card Protect] is set to [ON].
Solution: Set [Memory Card Protect] to [OFF], and connect the USB cable again.
“?” Cannot read from memory card.
Cause:
The question mark [?] indicates that the data
may be a JPEG file containing an image with the
resolution size: 6400 dpi x 6400 dpi or greater. If the data is not in the JPEG format, it is not
included in the number of images.
Solution: Print from the computer.
1-7
“Error during scanning memory card. Pull the card and turn the machine off and on.”
Cause:
Data in the memory card cannot be accessed.
Solution: Check the data in the memory card from a digital camera.
Check the connection between the multi-card board and the SPCNT board.
Replace the Multi Cards Board.
Replace the SPCNT board.
“There is no images in memory card”
Cause:
The image data in the memory card are not in the file formats that are valid in this machine.
Solution: Print from the computer.
1-8
2-2 New Error Codes and Recovery Methods
Those error codes that have been added starting with the product and those error codes for
which remedies unique to the product are offered are shown together with causes and
remedies, where applicable.
##341 Maintenance jet waste ink capacity full
Solution: Replace the waste ink absorber as follows in the error occurs:
(1) Select [7] PRINTER TEST in the service mode and select [5] INK ABS CAPA under the [7], then
input “0”.
(2) Check to make sure that no image exist in memory; then, turn off the power, remove the appropriate
parts, and replace the waste ink absorber.
##342 Cleaning absorption waste ink capacity full
Solution: Replace the waste ink absorber as follows in the error occurs:
(1) Select [7] PRINTER TEST in the service mode and select [5] INK ABS CAPA under the [7], then
input “0”.
(2) Check to make sure that no image exist in memory; then, turn off the power, remove the appropriate
parts, and replace the waste ink absorber.
##343 Ink detection waste ink capacity full
Solution: Replace the waste ink absorber as follows in the error occurs:
(1) Select [7] PRINTER TEST in the service mode and select [5] INK ABS CAPA under the [7], then
input “0”.
(2) Check to make sure that no image exist in memory; then, turn off the power, remove the appropriate
parts, and replace the waste ink absorber.
##352 Printer control EEPROM head information error
Cause: The EEPROM for printer control is faulty.
Solution:
(1) Turn off and then on the power.
(2) Turn off the power, and replace the printhead.
(3) Replace the SPCNT board.
NOTE:
In the presence of ##352, the carriage unit will not move to printhead replacement position even
when the inner cover is opened. Moreover the carriage will not be locked in position even when the
power is turned off. When replacing the printhead, be sure to turn off the power, and draw out the
carriage before replacement.
1-9
##355 Lit-up motor for CD-R print malfunctioned
Cause: In performing a CD-R print, the motor to lift up the carriage shaft is malfunctioned.
Solution:(1) Turn off and then on the power.
(2) Check the connection from the SHEET FEED unit to the SPCNT board ass’y (JPM1).
(3) Replace the SHEET FEED ASS’Y.
(4) Replace the SPCNT board.
##356 ASF cam sensor error
Cause: An error occurs at the ASF cam sensor in the ASF (Auto Sheet Feeder) unit.
Solution: (1) To reboot, press [OK] button or turn off and then on the power.
(2) Replace the SHEET FEED ASS’Y.
##357 ASF paper feed (AP) position error
Cause: An error occurs at the AP positioning in the ASF (Auto Sheet Feeder) unit.
Solution: (1) To reboot, press [OK] button or turn off and then on the power.
(2) Replace the SHEET FEED ASS’Y.
(3) Replace the SPCNT board.
##358 USB Host VBUS overcurrent error
Cause: Overcurrent is applied to the VBUS signal of USB.
Solution: (1) To reboot, press [OK] button or turn off and then on the power.
(2) Replace the SPCNT board.
##359 Paper feed position error
Cause: An error occurs at the paper feed positioning.
Solution: (1) To reboot, press [OK] button or turn off and then on the power.
(2) Replace the SHEET FEED ASS’Y.
(3) Replace the SPCNT board.
##360 Paper feed cam sensor error
Cause: An error occurs at the paper feed cam sensor.
Solution: (1) To reboot, press [OK] button or turn off and then on the power.
(2) Replace the SHEET FEED ASS’Y
(3) Replace the SPCNT board.
##361 Valve sensor error
Cause: An error occurs at the valve sensor in the Purge unit.
Solution: (1) To reboot, press [OK] button or turn off and then on the power.
(2) Replace the SPCNT board.
1 - 10
##362 Motor driver malfunctioned error
Cause: The motor driver is malfunctioned due to heating, etc.
Solution: (1) To reboot, press [OK] button or turn off and then on the power.
(2) Replace the SPCNT board.
2-3 Warnings
Main body (no LCD indications)
Displayed warning
Remarks
None
None
2-4 Troubleshooting by symptom
Symptom
General
errors
Solution
The unit does not power on.
(1) Check the power cord
connection.
(2) Check the connection between
the SPCNT board (JPSU1) and
power supply unit.
(3) Replace the power supply unit.
Nothing is displayed.
(1) Check the connection
between the Operation panel
unit and SPCNT board
(JPANEL1).
(2) Replace the SCANNER
unit.
(3) Replace the SPCNT board.
Part of the Viewer does not
display anything.
(1)If the test mode can be
used, check for faulty dot in
Viewer
(2) Check the connection
between the Operation panel
unit and SPCNT board
(JPNL1).
(3) Replace the SCANNER
UNIT.
(4) Replace the SPCNT board
ass’y.
The keys do not work.
(1) Check the connection
between the SCANNER UNIT
and SPCNT board (JPNL1).
(2) Replace the SCANNER
UNIT.
(3) Replace the SPCNT board.
1 - 11
Remarks
Symptom
The paper is not feed
Printing properly.
problems (The Paper feed motor does
not run.)
Solution
1) Check the connection from
the sheet feed unit to the
SPCNT board assy (JPM1).
(2) Replace the sheet feed unit.
(3) Replace the SPCNT board
ass’y.
The paper is not picked up
from the auto sheet feeder.
(1) Check the foreign matter in
the paper feed section.
(2) Check the connection
SHEET FEED UNIT to the
SPCNT board ass’y (JPM1).
(3) Replace the SHEET FEED
UNIT.
(4) Replace SPCNT board
ass’y.
The carriage motor does not
run.
(1) Check the connection from
the SHEET FEED unit to the
SPCNT board ass’y (JPM1).
(2) Replace the SHEET FEED
unit.
(3) Replace the SPCNT board
ass’y.
Carriage error
(The carriage comes into
contact with the push-on
plates at the left and right
sides, resulting in noise.)
(1) Check if grease adheres to
the carriage encoder film.
(2) Using lint-free paper
impregnated with alcohol,
wipe the carriage encoder film
with care so as not to scratch
the film.
(3) If a lot of grease adheres to
the carriage, replace the
carriage board because grease
might be spread to the sensor
on the carriage board.
(4) Replace the carriage
encoder film.
1 - 12
Remarks
Symptom
Printing
Quality
Error
Solution
• The printer does not at all.
• Printing stops midway.
• Certain colors are not
printed.
(1) Remove the printhead and
re-install it.
(2) Carry out nozzle cleaning
on the printhead five times
with the cleaning operation,
than visually cheek the test
print for non-discharge of ink
from nozzle
. (Fig. 1-2)
(3) Remove and reinstall the
printhead.
(4) Replace the appropriate
ink tank.
(5) Replace the printhead.
(6) Replace the SPCNT board
ass’y.
(7) Replace the purge unit.
Blotches appear
Blank ink appear
(1) Remove and reinstall the
printhead.
(2) Carry out nozzle cleaning
on the printhead five times
with the cleaning operation,
than visually cheek the test
print for non-discharge of ink
from nozzle.Fig.
( 1-2)
(3) Perform print head
refreshing, and print out
Nozzle check pattern.
Visually check the test print
for non-discharge of ink from
nozzle.Fig.
( 1-2)
(4) Replace the appropriate
ink tank.
(5) Replace the printhead.
(6) Check the connection of
the carriage ribbon cable and
the SPCNT board.
(JHD1, JHD2)
(7) Replace the carriage unit.
(8) Replace the SPCNT board.
(9) Replace the purge unit.
1 - 13
Remarks
Symptom
The
Nothing is printed.
Scanning
Image
Is
Abnormal
The image has vertical
stripes.
The halftone image contains
black dots.
Faulty
CD-R
(230V
only)
The CD-R Tray is not
recognized.
Other
(As-received failure)
The display appers in
English.
Solution
(1) Check the connection
between the contact sensor
and SPCNT board (JCCD1).
(2) Replace the SCANNER
unit.
(3) Replace the SPCNT board
ass’y.
(1) Clean the Document glass.
(2) Check the connection
between the contact sensor
and SPCNT board (JCCD1).
(3) Replace the SCANNER
unit.
(4) Replace the SPCNT board
ass’y.
(1) Clean the Document glass.
(2) Check the connection
between the SCANNER unit
and SPCNT board (JCCD1).
(3) Replace the SCANNER
unit.
(4) Replace the SPCNT board
ass’y.
(1) Remove the CD-R Tray,
and place the CD-R Tray
again.
(2) Check the connection
between the CARRIAGE
UNIT and SPCNT board
ASS’Y (JHD1, JHD2).
(3) Replace the CARRIAGE
UNIT.
(4) Replace the SPCNT
BOARD ASS’Y.
Select the settings of
[#8CLEAR]-[ALL] and
[#5TYPE] (Type setting) in
Service Mode, and turn the
power OFF/ON with the
power button (Software
Power: OFF/ON).
1 - 14
Remarks
Missing dots
Unstable printing
Splashed dots
Figure1-2 Defective Pattern (Sample)
1 - 15
3. REPAIR
3-1 Notes on Service Part Replacement (and Disassembling / Reassembling)
Service part
SPCNT BOARD ASS’Y
(HY7-3223)
INK ABSOBER
(HY7-2885/2886/2887/
2888/2889/2890/2891/
2953)
CARRIAGE UNIT
(HY7-2862)
PAPER FEED MOTOR
(HY7-2912)
Notes on replacement*1
- Before removal of the
SPCNT board ass'y, remove
the power cord, and allow for
approx. 1 minute (for
discharge of capacitor's
accumulated charges), to
prevent damages to the
SPCNT board ass'y.
- Before replacement, check
the waste ink amount (by
service test print or EEPROM
information print).
Apply grease to the sliding
portions.
[See 3-3. Adjustment /
Settings, 3-3-7 Grease
application.]
-The red screws securing the
paper feed motor are allowed
to be loosened. (DO NOT
loosen any other red screws.)
1 - 16
Adjustment / settings
After replacement:
1.Clear ALL *2
(Initialize the EEPROM.)
2.TYPE setting *2
Power SW OFF/ON
3. Reset the waste ink counter.
4. Service data setting
5. CD-R sensor calibration
[See 3-6 Test mode 3-6-5 CD-R
Calibration]
Operation check
- EEPROM information
print
- Service test print
-Copy
- Printing via parallel or
USB connection
- Direct printing from a
digital camera
[See 3-6. Service SW, for details
of 1 to 4]
6. Perform the print head
alignment in the user mode.
After replacement:
1. Reset the waste ink counter.
[See 3.3. Adjustment / Settings,
3-3-8 Waste ink counter setting]
- EEPROM information
print
1. CD-R sensor calibration
[See 3-6-5. CD-R Calibration]
-Service test print (Confirm
CD-R and automatic print
head alignment sensor
correction.)
2. Perform the print head
alignment in the user mode.
1. Adjust the paper feed motor.
[See 3-3. Adjustment / Settings,
3-3-1 Paper feed motor
adjustment.]
Service part
LIFT CAM SHAFT
(HY7-2902)
TIMING SLIT STRIP
FILM
(HY7-2863)
TIMING SLIT DISK
FILM
(HY7-3083)
Notes on replacement*1
-Grease application to the
sliding portions
[See 3-3. Adjustment /
Settings, 3-3-7 Grease
application.]
-Upon contact with the film,
wipe the film with ethanol.
- Confirm no grease is on the
film. (Wipe off any grease
thoroughly with ethanol.)
- Do not bend the film
PRINT HEAD
(QY6-0049)
PAPER EXIT TRAY
ASS’Y
(HY7-3220)
LEFT COVER
(HY7-3219)
RIGHT COVER
(HY7-3221)
Adjustment / settings*2
After replacement:
Operation check
-Service test print
1. LIFT CAM SHAFT phase
adjustment
See 3-3. Adjustment / Settings,
3-3-3 LIFT CAM SHAFT.]
After replacement:
1. Perform the print head
alignment in the user mode.
-Service test print
After replacement:
1. Perform the print head
alignment in the user mode.
-Service test print
Align the left side of the tray
with the T-part’ angle of
Solenoid Cam Gear to insert
(after removing the tray, the
angle returns to almost
vertical by the force exerted
by the spring). Then pull the
tray open a little (approx. 30 –
60 degrees) and move it
toward the left side to insert
the other side of the shaft (see
the photo in Figure 1-7).
Align the two claws of the
bottom frame with the claws
of the left cover (see the photo
in Figure 1-8).
Align the three claws of the
bottom frame with the claws
of the right cover (see the
photo in Figure 1-9).
*1: General notes:
- Make sure that the flexible cables and wires in the harness are in the proper position and connected correctly.
[See 3-2. Special Notes on Repair Servicing, 3-3-1 Flexible cable and harness wiring, connection, for details.]
- Do not drop the ferrite core, which may cause damage.
- Protect electrical parts from damage due to static electricity.
- Before removing a unit, after removing the power cord, allow the printer to sit for approx. 1 minute (for capacitor discharging
to protect the logic board ass'y from damages).
- Do not touch the timing slit strip film and timing slit disk film. No grease or abrasion is allowed.
- Protect the units from soiled with ink.
- Protect the housing from scratches.
- Exercise caution with the red screws, as follows:
i. The red screws of the paper feed motor may be loosened only at replacement of the paper feed motor unit (DO NOT
loosen them in other cases).
ii. DO NOT loosen the red screws on both sides of the main chassis, securing the carriage shaft positioning (they are not
adjustable in servicing).
*2: When SPCNT BOARD ASS’Y is replaced, be sure to select the settings of [#8CLEAR]-[ALL] and [#5TYPE] in Service Mode,
and turn the power OFF/ON with the Power button (Software Power: OFF/ON). DO NOT turn the power OFF/ON by removing
and inserting the power code (Hardware Power: OFF/ON). In this case, data may not be written correctly.
1 - 17
To attach the PAPER EXIT TRAY
UNIT, align the tray with the
T-part of the Solenoid Cam Gear
to insert. Then pull the tray open
a little and move it toward the left
side to insert the other side of the
shaft.
Figure1-3 Solenoid Cam Gear
The following photos show the left and the right cover claws.
Figure1-4 LEFT COVER
Align them for assembling.
Figure1-5 RIGHT COVER
1 - 18
3-2 Special Notes on Repair Servicing
3-2-1 Flexible cable and harness wiring, connection
Be careful of wiring of the flexible cables and harness. Improper wiring or connection may cause
breakage of a line, leading to ignition or emission of smoke.
(1)
(2)
(4)
(3)
Figure 1-6 Flexible cable and harness wiring, connection
(1) IRDA board wiring
IRDA board
Figure 1-7 Cable Guide wiring
1 - 19
(2) SPCNT BOARD ASS’Y wiring
SPCNT BOARD (JPSU1) POWER SUPPLY UNIT
SPCNT BOARD (JLCD1)SCANNER UNIT
SPCNT BOARD(JIRD1)
IRDA BOARD ASS’Y
SPCNT BOARD (JHD1/JHD2) CARRIAGE UNIT
SPCNT BOARD
(JPNL1) SCANNER UNIT
SPCNT BOARD
(JLMP1)SCANNER UNIT
SPCNT BOARD (JSOL1) SOLENOID
SPCNT BOARD
(JFBM1)SCANNER UNIT
SPCNT BOARD
(JEXT1) RELEY BOARD ASS’Y
SPCNT BOARD (JCDR1)Memory card BOARD
SCNT BOARD
(JFAU1) FAU
SPCNT BOARD (JDSC1) Memory card BOARD
SPCNT BOARD
(JPM1) CARRIAGE/
LF/AP/PAPER FEED
MOTOR
SPCNT BOARD
(JVLV1) PURGE UNIT
SPCNT BOARD
(JINK1) PLATEN UNIT
SPCNT BOARD
(JMC1) PURGE UNIT
Figure 1-8 SPCNT BOARD ASS’Y wiring
1 - 20
(3) RELAY BOARD ASS’Y wiring
RELAY BOARD (JSNS2) LF Encoder / PE Sensor
RELAY BOARD
(JSNS1) PF Encoder /
PF PE Encoder /
AP Encoder
SPCNT BOARD (JEXT1) RELAY BOARD (JREL)
Figure1-9 RELAY BOARD ASS’Y wiring
(4) POWER SUPPLY UNIT wiring
POWER SUPPLY (CN4) SPCNT BOARD (JPSU1)
REGULATOR POWER SUPPLY
(CN6)
Figure1-10 POWER SUPPLY UNIT wiring
1 - 21
3-3 Adjustment / Settings
3-3-1 PAPER FEED MOTOR Adjustment
Perform the following adjustments when the paper feed motor unit is replaced:
1) When attaching the motor, fasten the screws so that the belt is properly stretched (in the
direction indicated by the blue arrow in the figure below).
2) After replacement, be sure to perform the service test print, and confirm that no strange noise or
faulty print operation (due to dislocation of the belt or gear, or out-of-phase motor, etc.) occurs.
Red screws securing the
PAPER FEED MOTOR
Figure 1-11 PAPER FEED MOTOR Adjustment
Note:
The red screws securing the paper feed motor may be loosened only at replacement of the paper
feed motor unit. DO NOT loosen them in other cases.
3-3-2 CARRIAGE SHAFT gear adjustment
In installing a carriage shaft, the gear phase should be adjusted.
(1) Insert the metallic pin shown below to the hole in the PURGE UNIT (see the photo (a) below) (until
it reaches the end).
[Metallic pin]
- Diameter: 2.0 mm or less, and Length: 20.0 mm or more
(Use “CARRIAGE SHAFT L SPRING: HY7-2867”, or anunbended clip can be used in place of the
pin.)
20.0mm or more
2.0mm or less
(2) With the metallic pin inserted, turn the LIFT GEAR 2 clockwise (in the direction indicated by the
arrow in the photo (b) below) until it reaches the end. (Stop when it cannot turn farther any more.)
Under the conditions above, confirm that the ASF ARM LOCK LEVER is located upward (see Photo
(c)) and the capping section is located at the capping position (see Photo (d)).
1 - 22
(a)
CARRIAGE SHAFT
(c) ASF ARM LOCK LEVER
(b)
LEFT GEAR 2
(d) CAPPING
(3) Install the LEFT GEAR 1 by aligning it on the cutout of the CR SHAFT CAM R.
Align the two parts
so that both surfaces
shown at the top are
horizontal.
Or, adjust so that the
part of the CR
SHAFT CAM R
shown at the bottom
is just at the bottom.
LEFT GEAR 1
Figure 1-12 CARRIAGE SHAFT gear adjustment
1 - 23
3-3-3 Positioning in LIFT CAM SHAFT ASS’Y adjustment
(1) Remove the PRESSURE ROLLER SPRING from the hook of the chassis, and apply it to the gash
of the LIFT CAM SHAFT ASS’Y.
PRESSURE ROLLER SPRING
LIFT CAM SHAFT ASS’Y
Figure 1-13 Positioning in LIFT CAM SHAFT ASS’Y adjustment 1
(2) Turn the gear of the LIFT CAM SHAFT ASS’Y in the direction indicated by the arrow “a” in the
photo (clockwise) until it reaches the end.
(3) Turn the gear of the LIFT CAM SHAFT ASS’Y in the direction indicated by the arrow “b” in the
photo below (counterclockwise) until it reaches the end.
a
b
Figure1-14 Positioning in LIFT CAM SHAFT ASS’Y adjustment 2
1 - 24
3-3-4 SOLENOID CAM location
(1) Install the spring so that the Short end of the spring is at the top and the Long end of the spring is at
the bottom.
SOLENOID
CAM
(The part has a protection against reverse installation.)
Short
SPRING
SOLENOID
Long
Figure 1-15 SOLENOID CAM spring location
3-3-5 CARRIAGE SHAFT CLIP location
(1) Adjust the ellipse area of CARRIAGE SHAFT CLIP and the edge of TIMING SLIT STRIP FILM
Red screws
Ellipse Area of
CARRIAGE SHAFT
CLIP
Figure 1-16 CARRIAGE SHAFT CLIP location
1 - 25
3-3-6 Applying White Sheet
(1) Rib bumps are provided on the right side and the bottom side of the FAU (Film Adapter Unit)
Protective Sheet. (See the photo shown below, the directions when you open the document cover.)
Temporally attach the white sheet to a place inside the rib bumps on the right side (about 1 mm
inside or less).
(2) Attach the whole part of the white sheet, by aligning the edge of the white sheet on the line of rib
bumps on the bottom side of the FAU Protective Sheet. (See the photo shown below, one line
inner from the outmost line.)
Rib
White sheet
FAU Protective Sheet
Rib on the
right
Figure1-17 Applying white Sheet
(3) Confirm the location to apply the white sheet.
For the confirmation, lift up the document cover
just a little, and look into to visually confirm that the edges of the white sheet are not placed on the
scanner top cover (molded part).
OK Example: The edges of the white sheet are not located on the scanner top cover.
White Sheet Corners
Figure1-18 Location confirmation to apply the white sheet (the rear side and the right side) (OK
example)
1 - 26
NG Example: The edges of the white sheet are located on the scanner top cover.
Figure1-19 Location confirmation to apply the white sheet (the rear side and the right side)
(NG example)
1 - 27
3-3-7 Grease application
(2)
(2)
(3)
(4)
(1)
(9)
(10)
(8)
Figure 1-20 Grease application1
1 - 28
(7)
(5)
(6)
Figure 1-21 Grease application2
Part name
Chassis
Where to apply grease / oil
1
2
3
4
LIFT CAM SHAFT
5
6
7
CARRIAGE SHAFT
8
CARRIAGE SHAFT
SPRING L
9
CARRIAGE SHAFT
SPRING R
10
Entire surface the CARRIAGE
SLIDER contacts
CARRIAGE SHAFT sliding portion
CARRIAGE SHAFT CAM L sliding
portion
CARRIAGE SHAFT CAM R sliding
portion
LIFT CAM SHAFT sliding portion
SPRING sliding portion (4 points)
PRESSURE ROLLER ASS’Y sliding
portion (4 points)
CARRAGE and CARRIAGE SHAFT
sliding portion
CARRIAGE SHAFT sliding portion
(over the area more than 2/3 from the
top end of the spring)
CARRIAGE SHAFT sliding portion
(over the area more than 2/3 from the
top end of the spring)
Note: 1 drop = 9 to 18 mg
1 - 29
Grease / oil name
FLOIL KG107A
FLOIL KG107A
MOLYKOTE
HP300
MOLYKOTE
HP300
FLOIL KG107A
FLOIL KG107A
Grease / oil
amount
Chassis
LIFT CAM
SHAFT
FLOIL KG107A
FLOIL KG107A
FLOIL KG107A
FLOIL KG107A
CARRIAGE
SHAFT
CARRIAGE
SHAFT
SPRING L
CARRIAGE
SHAFT
SPRING R
3-3-8
Waste ink counter setting
When the SPCNT board ass'y is replaced, check the amount of the waste ink capacity before the
replacement. After the replacement, register the amount of the waste ink capacity on the new
SPCNT board ass’y that has been replaced.
To check the waste ink capacity, print out the EEPROM information print.
To register the waste ink capacity, select [7] PR
INTER – [5] INK ABS CAPA in the service mode,
and input a value between 0 – 100 (%) with the numeric keys.
3-4 User data flow
[COPY] button
[Menu]
Special Copy
* 2 on 1 Copy
Borderless Copy
Image Repeat
* Auto
Manual
Vertical
Horizontal
Sticker Copy
Fading Correction Copy
Small
* Large
* Photo Scanning Size
4
3
* 2
1
4
3
* 2
1
4" x 6"
5" x 7"
Maintenance/Settings
Maintenance
Nozzle Check
Print Head Cleaning
Head Deep Cleaning
Auto Head Align
Manual Head Align
Roller Cleaning
Bottom Plate Cleaning
Scanner Calibration
Machine Setting
Quiet mode
* OFF
ON
Extension Amount
* Small
Large
Energy Saver Mode
15 minutes
* 1 hour
4 hour
8 hour
Prevent Rubbing
* OFF
ON
Figure 1-22 Use data flow (1/3)
1 - 30
Date Display
YYYY/MM/DD
* MM/DD/YYYY
* DD/MM/YYYY
EUR
USA
Memory Card Protect
* On
OFF
Slide Show
* Fast
Fine
(USA)
* ENGLISH
FRANCAIS
ESPANOL
PORTUGUES
Languages Selection
Auto Feed Switch
* OFF
ON
Two-Sided Copy Setting
* Vertical
Horizontal
[COPY] button
[Paper/Setting] button
Paper Size
Media Type
Quality
Preset Ratio
* Letter
B5
A5
4"×6"
5"×7"
Credit-card-size
* A4
EUR
USA
Plain Paper
Glossy Photo Paper
High Res. Paper
Transparency
* Photo Paper Pro
Photo Plus Glossy
Other Photo Paper
Normal
Fine
Fast
25% MIN
70% A4->A5
86% A4->B5
95% A4->LTR
* 100%
115% B5->A4
141% A5->A4
170% 5×7->LTR
212% 4×6->LTR
400% MAX
Zoom (25~400%)
Fit-to-Page
Figure 1-23 Use data flow (2/3)
1 - 31
(EUROPE)
*ENGLISH
FRANCAIS
ESPANOL
PEUTSCH
ITALIANO
NEZERLANDS
SUOMI
PORTUGUES
NORSK
SVENSKA
DENSK
[FILM]
[Menu]
Color Negative Film
Single-photo Print
Black & White Negative
Multi-photos Print
Color Positive Film
Printing All Photo
35mm Slide
Print all Photos
Printing With Fading Correction
Maintenance/Settings
[FILM]
[Settings]
Paper Size
Media Type
Quality
Border/Borderless
[PHOTO]
[Menu]
Single -image Print
Multi-image Print
Special Photo Print
Special Photo Print
* Sticker Print
Print All Image
Photo Index Print
DPOF Print
Maintenance/Settings
[PHOTO]
[Settings]
Setting 1:Basic
Paper Size
Media Type
Image Quality
Bordered/Borderless Settings
Date Print
Settings 2:Optimizer
POP
Vivid Photo
Noise reduction
Face brightener
Figure 1-24 Use data flow (3/3)
1 - 32
3-5. SERVICE SWITCHES
3-5-1 Hardware Switches
There is no service hardware switch on the Circuit board.
3-5-2 Service Data Setting
Service data can be checked and changed with items on display menus. The effective
SSSWs/ parameters and their default values in this machine are shown in Service menu in
this chapter.
#1 SSSW (Service soft switch settings)
These setting items are for basic fax service functions such as error management, echo
countermeasures, and communication trouble countermeasures.
#2 MENU (MENU switch settings)
These setting items are for functions required during installation, such as NL equalizer
and transmission levels.
#3 NUMERIC Param. (NUMERIC parameter settings)
These setting items are for inputting numeric parameters such as the various conditions
for the FAX/TEL switching function.
#4 NCU (NCU settings)
These setting items are for telephone network control functions such as the selection
signal transmission conditions and the detection conditions, for the control signals sent
from the exchange.
#5 TYPE (TYPE setting)
The type setting makes the service data conform to a specific country communications
standards. There is only one setting item in this block.
#6 GENESIS (UHQ function setting)
These setting items are for scanned image processing such as edge enhancement and error
diffusion processing.
#7 PRINTER (PRINTER function settings)
These setting items are for basic printer service functions such as the reception picture
reduction conditions. Also there is an item for resetting the printer section without
switching the power off-on.
#8 CLEAR (Data initialization mode)
Various data are initialized by selecting one of these setting items. There is a setting item
for checking/inputting the total number of pages printed and total number of pages
scanned by this fax.
#9 ROM (ROM management)
ROM data such as the version number and checksum are displayed.
1 - 33
3-5-3 Service Data Registration / Setting Method
Service data can be registered/set by the following operations:
Standby(Copy Mode)
(1) User data mode selection
Press the Menu key.
(2) Sevice data mode selection
Press the SCAN, COPY, and then SCAN button.
(3) Menu item selection
Select the menu item by pressing the
button.
Press the OK button.
(4) Data registration
Input the data and press the OK button.
Press the Stop/Reset button to return to standby.
Figure 1-25 Service Data Setting Method
1 - 34
3-5-4 Service Data Flowchart
Service Data
#1 SSSW
(Service soft switch setting)
#+No.
Bit
SW01
SW02
7
–
–
6
–
–
5
–
–
4
1
–
3
–
–
2
–
–
1
0
–
0
0
–
Error management
Not used
SW03
SW04
–
–
–
–
–
–
–
–
–
–
–
–
–
–
–
–
Not used
Not used
SW05
–
–
–
–
–
–
–
–
Not used
SW06
SW07
SW08
SW09
–
–
–
–
–
–
–
–
–
–
–
–
0
–
–
–
–
–
–
–
0
–
–
–
0
–
–
–
–
–
–
–
Scan condition settings
Not used
Not used
Not used
SW10
SW11
SW12
SW13
SW14
SW15
SW16
SW17
SW18
SW19
SW20
SW21
SW22
SW23
SW24
SW25
SW26
SW27
SW28
SW29
SW30
–
–
0
–
–
–
–
–
–
–
–
–
–
–
–
–
–
–
–
–
–
–
–
–
–
–
–
–
–
–
–
–
–
–
–
–
–
–
–
–
–
–
–
–
0
–
–
–
–
–
–
–
–
–
–
–
–
–
–
–
–
–
–
–
–
0
–
–
–
–
–
–
–
–
–
–
–
–
–
–
–
–
–
–
–
–
0
–
–
–
–
–
–
–
–
–
–
–
–
–
–
–
–
–
–
–
–
0
–
–
–
–
–
–
–
–
–
–
–
–
–
–
–
–
–
–
–
–
1
–
–
–
–
–
–
–
–
–
–
–
–
–
–
–
–
0
–
–
–
0
–
–
–
–
–
–
–
–
–
–
–
–
–
–
–
–
–
–
Not used
Not used
Page timer settings
Not used
Not used
Not used
Not used
Not used
Not used
Not used
Not used
Not used
Not used
Not used
Not used
Not used
Not used
Not used
Not used
Flash ROM version up
Not used
SW31 to SW50
Not used
SW50
#2 MENU
Not used
#3 NUMERIC Param.
Not used
#4 NCU
Not used
Figure 1-26 Service Data (1/4)
Caution:
The switches marked “-” are not used
. Do not change their settings.
1 - 35
#5 TYPE
CYGNUS-P
(Type setting)
U.S.A.
EUROPE
U. K.
SWEDEN
SWISS
AUSTRIA
DENMARK
NORWAY
HOLLAND
BELGIUM
AUSTRALIA
FINLAND
N. Z.
ITALY
SPAIN
PORTUGAL
IRELAND
HONG KONG
HONG KONG
MALAYSIA
HUNGARY
SAF
KOREA
CHINA
GERMAN
FRANCE
SINGAPORE
CZECH
SLOVENIA
CANADA
JAPAN
RUSSIA
ASIA
POLAND
EUROPE2
STANDARD
Figure 1-27 Service Data (2/4)
Caution:
#5 TYPE (TYPE Setting)
For the machine type settings, select according to the products as follows:
1 - 36
#6 GENESIS (UHQ)
(Genesis function settings)
#7 PRINTER
1.Bit SW
2.SLICE
3.GAMMA
#1 SSSW
(Printer function settings)
6
–
5 4 3
– – –
Not used
2
–
1
–
0
–
Not used
SW06
– –
SW07~20:
SW20
– – –
Not used
1
0
0
Reduction settings
Bit
SW01
7
–
SW02~05:
#2 NUMERIC Param
01: 18 (mm)
02: 0
03: 0
04: 0
05: 5 (mm)
Not used
Not used
Not used
Leading edge margin
Trailing edge margin (Black printing)
Item 06~30:
Not used
30:
#3 PRINT COUNT
XXX/YYY
Print counter check
#4 PRINTER RESET
Yes=(-)
No=(+)
Printer section reset function
#5 INK ABS CAPA
SUCTION
Wasteinkcapacitycheck/entry
#6 CDR ADJUST
[0]: CDR X SET
[1]: CDR Y SET
Figure 1-28 Service Data (3/4)
Caution: #6 GENESIS (UHQ function settings)
Tampering with this setting may cause the scanned image quality to deteriorate.
Do not change these settings.
Memo:
#7 PRINTER (Printer function settings)
1. At #5 INK ABS CAPA, you can check or register the capacity of waste ink ejected during the
cleaning operation. For the waste ink capacity registration, register a value between 0 – 100
(%) with the numeric keys.
The absorption amount of the waste ink absorber is set based upon the amount that the BJ
cartridge has ejected.
The settings of the waste ink capacity are stored in EEPROM of SPCNT BOARD.
When replacing the SPCNT BOARD, check the waste ink capacity before the replacement,
and register the waste ink capacity at the new SPCNT BOARD after the replacement.
2. At #6 CDR ADJUST (CD-R Print writing pos
ition adjustment), you can adjust the writing
position in X and Y directions within the following range.
+/-0.0mm, +/-0.1mm, +/-0.2mm, +/-0
.4mm, +/-0.6mm, +/-0.8mm, +/-1.0mm
You can also perform this adjustment from “CD-LabelPrint” or “Easy-PhotoPrint”.
1 - 37
#8 CLEAR
(Data initialization mode
TEL
USER SW
settings)
SERVICE SW
NCU
SERVICE DATA
REPORT
COUNTER
ALL
#9 ROM
(ROM management)
MAIN:V0.20
040806 0000 FA00
USB :00.00
Dialling data initialization
User data and service data #1 to #3
initialization
User data and service data #1 to #3 and
#6 to #7 initialization
#4 NCU setting data initialization
Data on system dump list initialization
Data on activity report initialization
Total number of pages printed/scanned
All user data, service data, activity
management data, and image data
initialization (except COUNTER)
Version No. and Checksum display
CPU :DD-01-01-QUAD
981111 0000 FFFF
Not used
#10 CS SET
#11 DATE / TIME
SERVICE REPORT
Date and time display
Date and time setting
1.DISPLAY
2.SETTING
1.SERVICE & SYSTEM
2.SERVICE DATA
3.SYSTEM DUNP
TEST MODE
Figure 1-29 Service Data (4/4)
Caution:
If USER SW of #8 CLEAR is selected, communication management data of user data is not
deleted.
However, if TEL or SERVICE SW is selected, the communication management data of user data is
deleted.
If ALL of #8 CLEAR is performed, be sure to set #5 TYPE and turn the power OFF/ON with the
Power button (Software Power: OFF/ON). DO NOT turn the power OFF/ON by removing and
inserting the power code (Hardware Power: OFF/ON). In this case, data may not be written
correctly.
Memo:
The date/time settings at #11 DATE/TIME is equivalent to the settings at [FAX SETTINGS] –
[USER SETTINGS] – [DATE&TIME]. Neither has priority.
1 - 38
3-5-5 Explanation of service data
a) SSSW (Service Soft Switch settings)
The items registered and set by each of these switches comprise 8-bit switches. The figure below shows
t3
Bi
t2
Bi
t1
Bi
t0
Bi
t4
Bi
t5
Bi
t6
Bi
SW01
Bi
t7
which numbers are assigned to which bits. Each bit has a value of either 0 or 1.
0
0
0
0
0
0
0
0
Figure 1-30 Bit Switch Display
See the chart in the service data shown in this Chapter, 5.2.3 Service data setting to see effective
bits and their default values. The meanings (functions) of the bits are not described in this manual
except the new switches added to this model. See the G3 Facsimile Service Data Handbook
(supplied separately) for details of the switches.
Below are examples showing how to read bit switch tables.
Indicates that the
setting is "0".
Indicates that the
setting is "1".
Figures in boldface
are default settings.
Bit
0
1
2
3
4
5
6
7
Function
Service error code
Error dump list
Not used
Not used
##300 series service error code
Not used
Not used
Not used
1
Output
Output
0
Not Output
Not Output
Output
Not Output
Figure 1-31 How to Read Bit Switch Tables
1 - 39
3-5-6 New SSSWs/parameters added to this model
#1 SSSW (service soft switch setting)
SW01 (service soft switch 01: error management)
Bit
Function
1
0
0
Service error code
Output
Not output
1
Error dump list
Output
Not output
2
Not used
3
Not used
4 (New)
##300 series service error code
5
Not used
6
Not used
7
Not used
Output
Not output
[Bit 4]
Even when Bit0 is set to "Not output", you can select whether or not to output ##300 series Service
Error Codes, caused by hardware malfunction.
When "Output" is selected, ##300 series Serv
ice Error Codes are displayed and in reports.
When "Not Output" is selected, no Service Error Codes are displayed.
SW29 Flash ROM version up
Bit
Function
0
Not used
1 (New)
Flash ROM version up
2
Not used
3
Not used
4
Not used
5
Not used
6
Not used
7
Not used
1
0
YES
NO
[Bit 1]
If YES is selected, the version of Update flash ROM can be upgraded.
1 - 40
#7 PRINTER (printer function settings)
2. NUMERIC PARAM.
No.
Function
Selecting range
Default setting
05
Trailing edge margin
0 ~ 9999
5 ( 5 mm)
[Parameter 05]
Sets the print image trailing edge margin.
5. INK ABS CAPA
This switch allows the waste ink capacity stored in the PCNT board to be checked or entered.
[SUCTION]
At #5 INK ABS CAPA, you can check or registerthe capacity of waste ink ejected during the
cleaning operation. For the waste ink capacity registration, register a value between 0 – 100
(%) with the numeric keys.
The absorption amount of the waste ink absorber is set based upon the amount that the BJ
cartridge has ejected.
The settings of the waste ink capacity are stored in EEPROM of SPCNT BOARD.
When replacing the SPCNT BOARD, check the waste ink capacity before the replacement, and
register the waste ink capacity at the new SPCNT BOARD after the replacement.
6.CDR ADJUST
At #6 CDR ADJUST (CD-R Print writing positi
on adjustment), you can adjust the writing
position in X and Y directions within the following range.
+/-0.0mm, +/-0.1mm, +/-0.2mm, +/-0
.4mm, +/-0.6mm, +/-0.8mm, +/-1.0mm
You can also perform this adjustment from “CD-LabelPrint” or “Easy-PhotoPrint”.
1 - 41
3-5-7 SSSW Default Setting
TYPE
U.S.A.
EUROPE
U.K.
SWEDEN
SWISS
AUSTRIA
SW01
00000000
00010000
00010000
00010000
00010000
00010000
SW02
00000000
00000000
00000000
00000000
00000000
00000000
SW03
00000000
00000000
00000000
00000000
00000000
00000000
SW04
10000000
10000000
10000000
10000000
10000010
10000010
SW05
00000000
00000000
00000000
00000000
00000000
00000000
SW06
10010000
10000000
10000000
10000000
10000000
10000000
SW07
00000000
00000000
00000000
00000000
00000000
00000000
SW08
00000000
00000000
00000000
00000000
00000000
00000000
SW09
00000000
00000000
00000000
00000000
00000000
00000000
SW10
00000000
00000000
00000000
00000000
00000000
00000000
SW11
00000000
00000000
00000000
00000000
00000000
00000000
SW12
00000010
00000010
00000010
00000010
00000010
00000010
SW13
00000000
00000000
00000000
00000000
00000000
00000000
SW14
00000000
00000000
00000000
00000000
00000000
00000000
SW15
00000000
00000000
01000000
00000000
00000000
00000000
SW16
00000011
00000011
00000011
00000011
00000011
00000011
SW17
00000000
00000000
00000000
00000000
00000000
00000000
SW18
00000000
00000000
00000000
00000000
00000000
00000000
SW19
00000000
00000000
00000000
00000000
00000000
00000000
SW20
10000000
10000000
10000000
10000000
10000000
10000000
SW21
00000000
00000000
00000000
00000000
00000000
00000000
SW22
00000000
00000000
00000000
00000000
00000000
00000000
SW23
00000000
00000000
00000000
00000000
00000000
00000000
SW24
00000000
00000000
00000000
00000000
00000000
00000000
SW25
00001000
00001000
00001000
00001000
00001000
00001001
SW26
00000000
00000000
00000000
00000000
00000000
00000000
SW27
00000000
00000000
00000000
00000000
00000000
00000000
SW28
00000000
00000000
00000000
00000000
00000000
00000000
SW29
00000000
00000000
00000000
00000000
00000000
00000000
SW30
00000000
00000000
00000000
00000000
00000000
00000000
#1 SSSW
1 - 42
TYPE
U.S.A.
EUROPE
U.K.
SWEDEN
SWISS
AUSTRIA
SW31
00000000
00000000
00000000
00000000
00000000
00000000
SW32
00000000
00000000
00000000
00000000
00000000
00000000
SW33
00000000
00000000
00000000
00000000
00000000
00000000
SW34
00000000
00000000
00000000
00000000
00000000
00000000
SW35
00000000
00000000
00000000
00000000
00000000
00000000
SW36
00000000
00000000
00000000
00000000
00000000
00000000
SW37
00000000
00000000
00000000
00000000
00000000
00000000
SW38
00000000
00000000
00000000
00000000
00000000
00000000
SW39
00000000
00000000
00000000
00000000
00000000
00000000
SW40
00000000
00000000
00000000
00000000
00000000
00000000
SW41
00000000
00000000
00000000
00000000
00000000
00000000
SW42
00000000
00000000
00000000
00000000
00000000
00000000
SW43
00000000
00000000
00000000
00000000
00000000
00000000
SW44
00000000
00000000
00000000
00000000
00000000
00000000
SW45
00000000
00000000
00000000
00000000
00000000
00000000
SW46
00000000
00000000
00000000
00000000
00000000
00000000
SW47
00000000
00000000
00000000
00000000
00000000
00000000
SW48
00000000
00000000
00000000
00000000
00000000
00000000
SW49
00000000
00000000
00000000
00000000
00000000
00000000
SW50
00000000
00000000
00000000
00000000
00000000
00000000
05:
OFF
OFF
OFF
OFF
OFF
OFF
06:
DIAL
DIAL
DIAL
DIAL
DIAL
DIAL
07:
10
10
10
10
10
10
08:
3429
3429
3429
3429
3429
3429
09:
33.6
33.6
33.6
33.6
33.6
33.6
10:
25 Hz
#2 MENU
25 Hz
25 Hz
1 - 43
25 Hz
25 Hz
25 Hz
TYPE
AUSTRALIA FINLAND
DENMARK
NORWAY
HOLLAND
BELGIUM
SW01
00010000
00010000
00010000
00010000
00010000
00010001
SW02
00000000
00000000
00000000
00000000
00000000
00000000
SW03
00000000
00000000
00000000
00000000
00000000
00000000
SW04
10000000
10000010
10000010
10000000
10000000
10000000
SW05
00000000
00000000
00000000
00000000
00000000
00000000
SW06
10000000
10000000
10000000
10000000
10000000
10000000
SW07
00000000
00000000
00000000
00000000
00000000
00000000
SW08
00000000
00000000
00000000
00000000
00000000
00000000
SW09
00000000
00000000
00000000
00000000
00000000
00000000
SW10
00000000
00000000
00000000
00000000
00000000
00000000
SW11
00000000
00000000
00000000
00000000
00000000
00000000
SW12
00000010
00000010
00000010
00000010
00000010
00000010
SW13
00000000
00000000
00000000
00000000
00000000
00000000
SW14
00000000
00000000
00000000
00000000
00000000
00000000
SW15
00000000
00000000
00000000
00000000
00000000
00000000
SW16
00000011
00000011
00000011
00000011
00000011
00000011
SW17
00000000
00000000
00000000
00000000
00000000
00000000
SW18
00000000
00000000
00000000
00000000
00000000
00000000
SW19
00000000
00000000
00000000
00000000
00000000
00000000
SW20
10000000
10000000
10000000
10000000
10000000
10000000
SW21
00000000
00000000
00000000
00000000
00000000
00000000
SW22
00000000
00000000
00000000
00000000
00000000
00000000
SW23
00000000
00000000
00000000
00000000
00000000
00000000
SW24
00000000
00000000
00000000
00000000
00000000
00000000
SW25
00001000
00001000
00001000
00001000
00001000
00001000
SW26
00000000
00000000
00000000
00000000
00000000
00000000
SW27
00000000
00000000
00000000
00000000
00000000
00000000
SW28
00000000
00000000
00000000
00000000
00000000
00000000
SW29
00000000
00000000
00000000
00000000
00000000
00000000
SW30
00000000
00000000
00000000
00000000
00000000
00000000
#1 SSSW
1 - 44
TYPE
DENMARK
NORWAY
HOLLAND
BELGIUM
AUSTRALIA
FINLAND
SW31
00000000
00000000
00000000
00000000
00000000
00000000
SW32
00000000
00000000
00000000
00000000
00000000
00000000
SW33
00000000
00000000
00000000
00000000
00000000
00000000
SW34
00000000
00000000
00000000
00000000
00000000
00000000
SW35
00000000
00000000
00000000
00000000
00000000
00000000
SW36
00000000
00000000
00000000
00000000
00000000
00000000
SW37
00000000
00000000
00000000
00000000
00000000
00000000
SW38
00000000
00000000
00000000
00000000
00000000
00000000
SW39
00000000
00000000
00000000
00000000
00000000
00000000
SW40
00000000
00000000
00000000
00000000
00000000
00000000
SW41
00000000
00000000
00000000
00000000
00000000
00000000
SW42
00000000
00000000
00000000
00000000
00000000
00000000
SW43
00000000
00000000
00000000
00000000
00000000
00000000
SW44
00000000
00000000
00000000
00000000
00000000
00000000
SW45
00000000
00000000
00000000
00000000
00000000
00000000
SW46
00000000
00000000
00000000
00000000
00000000
00000000
SW47
00000000
00000000
00000000
00000000
00000000
00000000
SW48
00000000
00000000
00000000
00000000
00000000
00000000
SW49
00000000
00000000
00000000
00000000
00000000
00000000
SW50
00000000
00000000
00000000
00000000
00000000
00000000
05:
OFF
OFF
OFF
OFF
OFF
OFF
06:
DIAL
DIAL
DIAL
DIAL
DIAL
DIAL
07:
10
10
10
10
10
10
08:
3429
3429
3429
3429
3429
3429
09:
33.6
33.6
33.6
33.6
33.6
33.6
10:
25 Hz
#2 MENU
25 Hz
25 Hz
1 - 45
25 Hz
25 Hz
25 Hz
TYPE
N.Z
ITALY
SPAIN
PORTUGAL
IRELAND
HONG KONG
SW01
00010000
00010000
00010000
00010000
00010000
00010000
SW02
00000000
00000000
00000000
00000000
00000000
00000000
SW03
00000000
00000000
00000000
00000000
00000000
00000000
SW04
10000000
10000010
10000010
10000010
10000000
10000000
SW05
00000000
00000000
00000000
00000000
00000000
00000000
SW06
10000000
10000000
10000000
10000000
10000000
10000000
SW07
00000000
00000000
00000000
00000000
00000000
00000000
SW08
00000000
00000000
00000000
00000000
00000000
00000000
SW09
00000000
00000000
00000000
00000000
00000000
01000000
SW10
00000000
00000000
00000000
00000000
00000000
00000000
SW11
00000000
00000000
00000000
00000000
00000000
00000000
SW12
00000010
00000010
00000010
00000010
00000010
00000010
SW13
00000000
00000000
00000000
00000000
00000000
00000000
SW14
00000000
00000000
00000000
00000000
00000000
00000000
SW15
00000000
00000000
00000000
00000000
00000000
00000000
SW16
00000011
00000011
00000011
00000011
00000011
00000011
SW17
00000000
00000000
00000000
00000000
00000000
00000000
SW18
00000000
00000000
00000000
00000000
00000000
00000000
SW19
00000000
00000000
00000000
00000000
00000000
00000000
SW20
10000000
10000000
10000000
10000000
10000000
10000000
SW21
00000000
00000000
00000000
00000000
00000000
00000000
SW22
00000000
00000000
00000000
00000000
00000000
00000000
SW23
00000000
00000000
00000000
00000000
00000000
00000000
SW24
00000000
00000000
00000000
00000000
00000000
00000000
SW25
00001000
00001000
00001001
00001000
00001000
00001000
SW26
00000000
10000000
00000000
00000000
00000000
00000000
SW27
00000000
00000000
00000000
00000000
00000000
00000000
SW28
00000000
00000000
00000000
00000000
00000000
00000000
SW29
00000000
00000000
00000000
00000000
00000000
00000000
SW30
00000000
00000000
00000000
00000000
00000000
00000000
#1 SSSW
1 - 46
TYPE
N.Z
ITALY
SPAIN
PORTUGAL
SW31
00000000
00000000
00000000
00000000
00000000
00000000
SW32
00000000
00000000
00000000
00000000
00000000
00000000
SW33
00000000
00000000
00000000
00000000
00000000
00000000
SW34
00000000
00000000
00000000
00000000
00000000
00000000
SW35
00000000
00000000
00000000
00000000
00000000
00000000
SW36
00000000
00000000
00000000
00000000
00000000
00000000
SW37
00000000
00000000
00000000
00000000
00000000
00000000
SW38
00000000
00000000
00000000
00000000
00000000
00000000
SW39
00000000
00000000
00000000
00000000
00000000
00000000
SW40
00000000
00000000
00000000
00000000
00000000
00000000
SW41
00000000
00000000
00000000
00000000
00000000
00000000
SW42
00000000
00000000
00000000
00000000
00000000
00000000
SW43
00000000
00000000
00000000
00000000
00000000
00000000
SW44
00000000
00000000
00000000
00000000
00000000
00000000
SW45
00000000
00000000
00000000
00000000
00000000
00000000
SW46
00000000
00000000
00000000
00000000
00000000
00000000
SW47
00000000
00000000
00000000
00000000
00000000
00000000
SW48
00000000
00000000
00000000
00000000
00000000
00000000
SW49
00000000
00000000
00000000
00000000
00000000
00000000
SW50
00000000
00000000
00000000
00000000
00000000
00000000
05:
OFF
OFF
OFF
OFF
OFF
OFF
06:
DIAL
DIAL
DIAL
DIAL
DIAL
DIAL
07:
10
10
10
10
10
10
08:
3429
3429
3429
3429
3429
3429
09:
33.6
33.6
33.6
33.6
33.6
33.6
10:
25 Hz
IRELAND HONG KONG
#2 MENU
25 Hz
25 Hz
1 - 47
25 Hz
25 Hz
25 Hz
TYPE
MALAYSIA
HUNGARY
SAF
KOREA
CHINA
GERMAN
SW01
00010000
00010000
00010000
00010000
00010000
00010000
SW02
00000000
00000000
00000000
00000000
00000000
00000000
SW03
00000000
00000000
00000000
00000000
00000001
00000000
SW04
10000000
10000000
10000000
10000000
10000000
00000010
SW05
00000000
00000000
00000000
00000000
00000000
00000000
SW06
10000000
10000000
10000000
10000000
10000000
10000000
SW07
00000000
00000000
00000000
00000000
00000000
00000000
SW08
00000000
00000000
00000000
00000000
00000000
00000000
SW09
01000000
00000000
01000000
01000000
01000000
00000000
SW10
00000000
00000000
00000000
00000000
00000000
00000000
SW11
00000000
00000000
00000000
00000000
00000000
00000000
SW12
00000010
00000010
00000010
00000010
00000010
00000010
SW13
00000000
00000000
00000000
00000000
00000000
00000000
SW14
00000000
00000000
00000000
00000000
00000000
00000000
SW15
00000000
00000000
00000000
00000000
00000000
00000000
SW16
00000011
00000011
00000011
00000011
00000011
00000011
SW17
00000000
00000000
00000000
00000000
00000000
00000000
SW18
00000000
00000000
00000000
00000000
00000000
00000000
SW19
00000000
00000000
00000000
00000000
00000000
00000000
SW20
10000000
10000000
10000000
10000000
10000000
10000000
SW21
00000000
00000000
00000000
00000000
00000000
00000000
SW22
00000000
00000000
00000000
00000000
00000000
00001000
SW23
00000000
00000000
00000000
00000000
00000000
00000000
SW24
00000000
00000000
00000000
00000000
00000000
00000000
SW25
00001000
00001000
00001000
00001000
00001000
00001101
SW26
00000000
00000000
00000000
00000000
00000000
00010000
SW27
00000000
00000000
00000000
00000000
00000000
00000000
SW28
00000000
00000000
00000000
00000000
00000000
00000000
SW29
00000000
00000000
00000000
00000000
00000000
00000000
SW30
00000000
00000000
00000000
00000000
00000000
00000000
#1 SSSW
1 - 48
TYPE
MALAYSIA
HUNGARY
SAF
KOREA
CHINA
GERMAN
SW31
00000000
00000000
00000000
00000000
00000000
00000000
SW32
00000000
00000000
00000000
00000000
00000000
00000000
SW33
00000000
00000000
00000000
00000000
00000000
00000000
SW34
00000000
00000000
00000000
00000000
00000000
00000000
SW35
00000000
00000000
00000000
00000000
00000000
00000000
SW36
00000000
00000000
00000000
00000000
00000000
00000000
SW37
00000000
00000000
00000000
00000000
00000000
00000000
SW38
00000000
00000000
00000000
00000000
00000000
00000000
SW39
00000000
00000000
00000000
00000000
00000000
00000000
SW40
00000000
00000000
00000000
00000000
00000000
00000000
SW41
00000000
00000000
00000000
00000000
00000000
00000000
SW42
00000000
00000000
00000000
00000000
00000000
00000000
SW43
00000000
00000000
00000000
00000000
00000000
00000000
SW44
00000000
00000000
00000000
00000000
00000000
00000000
SW45
00000000
00000000
00000000
00000000
00000000
00000000
SW46
00000000
00000000
00000000
00000000
00000000
00000000
SW47
00000000
00000000
00000000
00000000
00000000
00000000
SW48
00000000
00000000
00000000
00000000
00000000
00000000
SW49
00000000
00000000
00000000
00000000
00000000
00000000
SW50
00000000
00000000
00000000
00000000
00000000
00000000
05:
OFF
OFF
OFF
OFF
OFF
OFF
06:
DIAL
DIAL
DIAL
DIAL
DIAL
DIAL
07:
10
10
10
11
13
10
08:
3429
3429
3429
3429
3429
3429
09:
33.6
33.6
33.6
33.6
33.6
33.6
10:
25 Hz
#2 MENU
25 Hz
25 Hz
1 - 49
25 Hz
25 Hz
25 Hz
TYPE
FRANCE
SINGAPORE
CZECH
SLOVENIA
CANADA
JAPAN
SW01
00010000
00010000
00010000
00010000
00000000
00010000
SW02
00000000
00000000
00000000
00000000
00000000
00000000
SW03
00000000
00000000
00000000
00000000
00000000
00000000
SW04
00000010
10000000
10000000
10000000
10000000
10000000
SW05
00000000
00000000
00000000
00000000
00000000
00000000
SW06
10000000
10000000
10000000
10000000
10010000
10000000
SW07
00000000
00000000
00000000
00000000
00000000
00000000
SW08
00000000
00000000
00000000
00000000
00000000
00000000
SW09
00000000
01000000
00000000
00000000
00000000
01000000
SW10
00000000
00000000
00000000
00000000
00000000
00000000
SW11
00000000
00000000
00000000
00000000
00000000
00000000
SW12
00000010
00000010
00000010
00000010
00000010
00000010
SW13
00000000
00000000
00000000
00000000
00000000
00000000
SW14
00000000
00000000
00000000
00000000
00000000
00000000
SW15
00000000
00000000
00000000
00000000
00000000
00000000
SW16
00000011
00000011
00000011
00000011
00000011
00000011
SW17
00000000
00000000
00000000
00000000
00000000
00000000
SW18
00000000
00000000
00000000
00000000
00000000
00000000
SW19
00000000
00000000
00000000
00000000
00000000
00000000
SW20
10000000
10000000
10000000
10000000
10000000
10000000
SW21
00000000
00000000
00000000
00000000
00000000
00000000
SW22
00000000
00000000
00000000
00000000
00000000
00000000
SW23
00000000
00000000
00000000
00000000
00000000
00000000
SW24
00000000
00000000
00000000
00000000
00000000
00000000
SW25
00001001
00001000
00001000
00001000
00001000
00000000
SW26
00000000
00000000
00000000
00000000
00000000
00000000
SW27
00000000
00000000
00000000
00000000
00000000
00000000
SW28
00000000
00000000
00000000
00000000
00000000
00000000
SW29
00000000
00000000
00000000
00000000
00000000
00000000
SW30
00000000
00000000
00000000
00000000
00000000
00000000
#1 SSSW
1 - 50
TYPE
FRANCE
SINGAPORE
CZECH
SLOVENIA
CANADA
JAPAN
SW31
00000000
00000000
00000000
00000000
00000000
00000000
SW32
00000000
00000000
00000000
00000000
00000000
00000001
SW33
00000000
00000000
00000000
00000000
00000000
00000000
SW34
00000000
00000000
00000000
00000000
00000000
00000000
SW35
00000000
00000000
00000000
00000000
00000000
00000000
SW36
00000000
00000000
00000000
00000000
00000000
00000000
SW37
00000000
00000000
00000000
00000000
00000000
00000000
SW38
00000000
00000000
00000000
00000000
00000000
00000000
SW39
00000000
00000000
00000000
00000000
00000000
00000000
SW40
00000000
00000000
00000000
00000000
00000000
00000000
SW41
00000000
00000000
00000000
00000000
00000000
00000000
SW42
00000000
00000000
00000000
00000000
00000000
00000000
SW43
00000000
00000000
00000000
00000000
00000000
00000000
SW44
00000000
00000000
00000000
00000000
00000000
00000000
SW45
00000000
00000000
00000000
00000000
00000000
00000000
SW46
00000000
00000000
00000000
00000000
00000000
00000000
SW47
00000000
00000000
00000000
00000000
00000000
00000000
SW48
00000000
00000000
00000000
00000000
00000000
00000000
SW49
00000000
00000000
00000000
00000000
00000000
00000000
SW50
00000000
00000000
00000000
00000000
00000000
00000000
05:
OFF
OFF
OFF
OFF
OFF
OFF
06:
DIAL
DIAL
DIAL
DIAL
DIAL
DIAL
07:
10
10
10
10
10
10
08:
3429
3429
3429
3429
3429
3429
09:
33.6
33.6
33.6
33.6
33.6
33.6
10:
50 Hz
#1 MENU
25 Hz
25 Hz
1 - 51
25 Hz
25 Hz
25 Hz
TYPE
RUSSIA
ASIA
POLAND
EUROPE2
STANDARD
SW01
00010000
00010000
00010000
00010000
00010000
SW02
00000000
00000000
00000000
00000000
00000000
SW03
00000000
00000000
00000000
00000000
00000000
SW04
10000000
10000000
10000000
10000000
10000000
SW05
00000000
00000000
00000000
00000000
00000000
SW06
10000000
10000000
10000000
10000000
10000000
SW07
00000000
00000000
00000000
00000000
00000000
SW08
00000000
00000000
00000000
00000000
00000000
SW09
00000000
00000000
00000000
00000000
00000000
SW10
00000000
00000000
00000000
00000000
00000000
SW11
00000000
00000000
00000000
00000000
00000000
SW12
00000010
00000010
00000010
00000010
00000010
SW13
00000000
00000000
00000000
00000000
00000000
SW14
00000000
00000000
00000000
00000000
00000000
SW15
00000000
00000000
00000000
00000000
00000000
SW16
00000011
00000011
00000011
00000011
00000011
SW17
00000000
00000000
00000000
00000000
00000000
SW18
00000000
00000000
00000000
00000000
00000000
SW19
00000000
00000000
00000000
00000000
00000000
SW20
10000000
10000000
10000000
10000000
10000000
SW21
00000000
00000000
00000000
00000000
00000000
SW22
00000000
00000000
00000000
00000000
00000000
SW23
00000000
00000000
00000000
00000000
00000000
SW24
00000000
00000000
00000000
00000000
00000000
SW25
00001000
00001000
00001000
00001000
00001000
SW26
00000000
00000000
00000000
00000000
00000000
SW27
00000000
00000000
00000000
00000000
00000000
SW28
00000000
00000000
00000000
00000000
00000000
SW29
00000000
00000000
00000000
00000000
00000000
SW30
00000000
00000000
00000000
00000000
00000000
#1 SSSW
1 - 52
TYPE
RUSSIA
ASIA
POLAND
EUROPE2
STANDARD
SW31
00000000
00000000
00000000
00000000
00000000
SW32
00000000
00000000
00000000
00000000
00000000
SW33
00000000
00000000
00000000
00000000
00000000
SW34
00000000
00000000
00000000
00000000
00000000
SW35
00000000
00000000
00000000
00000000
00000000
SW36
00000000
00000000
00000000
00000000
00000000
SW37
00000000
00000000
00000000
00000000
00000000
SW38
00000000
00000000
00000000
00000000
00000000
SW39
00000000
00000000
00000000
00000000
00000000
SW40
00000000
00000000
00000000
00000000
00000000
SW41
00000000
00000000
00000000
00000000
00000000
SW42
00000000
00000000
00000000
00000000
00000000
SW43
00000000
00000000
00000000
00000000
00000000
SW44
00000000
00000000
00000000
00000000
00000000
SW45
00000000
00000000
00000000
00000000
00000000
SW46
00000000
00000000
00000000
00000000
00000000
SW47
00000000
00000000
00000000
00000000
00000000
SW48
00000000
00000000
00000000
00000000
00000000
SW49
00000000
00000000
00000000
00000000
00000000
SW50
00000000
00000000
00000000
00000000
00000000
05:
OFF
OFF
OFF
OFF
OFF
06:
DIAL
DIAL
DIAL
DIAL
DIAL
07:
10
10
10
10
10
08:
3429
3429
3429
3429
3429
09:
33.6
33.6
33.6
33.6
33.6
10:
25 Hz
#1 MENU
25 Hz
25 Hz
1 - 53
25 Hz
25 Hz
TYPE
U.S.A.
EUROPE
U.K.
SWEDEN
SWISS
AUSTRIA
01:
0
0
0
0
0
0
02:
10
10
10
10
10
10
03:
15
15
15
15
15
15
04:
12
12
12
12
12
12
05:
4
4
4
4
4
4
06:
4
4
1
4
4
4
07:
350
350
350
350
350
350
08:
0
0
0
0
0
0
09:
6
6
6
6
6
6
10:
5500
5500
5500
5500
5500
5500
11:
3500
3500
3500
3500
3500
3500
12:
0
0
0
0
0
0
13:
1300
1300
1300
1300
1300
1300
14:
0
0
0
0
0
0
15:
120
120
120
120
120
120
16:
4
2
2
2
2
2
17:
100
100
100
100
100
100
18:
0
0
0
0
0
0
19:
200
400
400
400
400
400
20:
100
100
100
100
100
100
21
0
0
0
0
0
0
22:
200
400
400
400
400
400
23:
44
44
44
44
44
44
24:
20
10
10
10
10
10
25:
60
60
60
60
60
60
26:
44
44
44
44
44
44
27:
0
0
0
0
0
0
#3
NUMERIC
Param
1 - 54
TYPE
DENMARK
NORWAY
HOLLAND
BELGIUM
AUSTRALIA
FINLAND
01:
0
0
0
0
0
0
02:
10
10
10
10
10
10
03:
15
15
15
15
15
15
04:
12
12
12
12
12
12
05:
4
4
4
4
4
4
06:
4
4
4
4
4
4
07:
350
350
350
350
350
350
08:
0
0
0
0
0
0
09:
6
6
6
6
6
6
10:
5500
5500
5500
5500
5500
5500
11:
3500
3500
3500
3500
3500
3500
12:
0
0
0
0
0
0
13:
1300
1300
1300
1300
1300
1300
14:
0
0
0
0
0
0
15:
120
120
120
120
120
120
16:
2
2
2
2
2
2
17:
100
100
100
100
100
100
18:
0
0
0
0
0
0
19:
400
400
400
400
400
400
20:
100
100
100
100
100
100
21
0
0
0
0
0
0
22:
400
400
400
400
400
400
23:
44
44
44
44
44
44
24:
10
10
10
10
10
12
25:
60
60
60
60
60
60
26:
44
44
44
44
44
44
27:
0
0
0
0
0
0
#3
NUMERIC
Param
1 - 55
TYPE
N.Z
ITALY
SPAIN
PORTUGAL
IRELAND
HONG KONG
01:
0
0
0
0
0
0
02:
10
10
10
10
10
10
03:
15
15
15
15
15
15
04:
12
12
12
12
12
12
05:
4
4
15
4
4
4
06:
4
4
3
4
4
1
07:
350
350
350
350
350
350
08:
0
0
0
0
0
0
09:
6
6
6
6
6
6
10:
5500
5500
5500
5500
5500
5500
11:
3500
3500
3500
3500
3500
3500
12:
0
0
0
0
0
0
13:
1300
1300
1300
1300
1300
1300
14:
0
0
0
0
0
0
15:
120
120
120
120
120
120
16:
2
2
2
2
2
2
17:
100
100
100
100
100
100
18:
0
0
0
0
0
0
19:
400
400
400
400
400
400
20:
100
100
100
100
100
100
21
0
0
0
0
0
0
22:
400
400
400
400
400
400
23:
44
44
44
44
44
44
24:
10
10
10
10
10
10
25:
60
60
60
60
60
60
26:
44
44
44
44
44
44
27:
0
0
0
0
0
0
#3
NUMERIC
Param
1 - 56
TYPE
MALAYSIA
HUNGARY
SAF
KOREA
CHINA
GERMAN
01:
0
0
0
0
0
0
02:
10
10
10
10
10
8
03:
15
15
15
15
15
15
04:
12
12
12
12
12
6
05:
4
4
4
4
4
4
06:
4
4
4
4
4
4
07:
350
350
350
350
350
350
08:
0
0
0
0
0
0
09:
6
6
6
6
6
6
10:
5500
5500
5500
5500
4300
9000
11:
3500
3500
3500
3500
3500
3500
12:
0
0
0
0
0
0
13:
1300
1300
1300
1300
1200
1300
14:
0
0
0
0
0
0
15:
120
120
120
120
120
120
16:
2
2
2
2
2
2
17:
100
100
100
100
100
100
18:
0
0
0
0
0
0
19:
400
400
400
400
400
400
20:
100
100
100
100
100
100
21
0
0
0
0
0
0
22:
400
400
400
400
400
400
23:
44
44
44
44
44
44
24:
10
10
10
10
10
10
25:
60
60
60
60
60
60
26:
44
44
44
44
44
44
27:
0
0
0
0
0
0
#3
NUMERIC
Param
1 - 57
TYPE
FRANCE
SINGAPORE
CZECH
SLOVENIA
CANADA
JAPAN
01:
0
0
0
0
0
0
02:
8
10
10
10
10
10
03:
15
15
15
15
15
15
04:
12
12
12
12
12
12
05:
4
4
4
4
4
4
06:
4
4
4
4
4
4
07:
350
350
350
350
350
350
08:
0
0
0
0
0
0
09:
6
6
6
6
6
6
10:
5500
5500
5500
5500
5500
5500
11:
3800
3500
3500
3500
3500
3500
12:
0
0
0
0
0
0
13:
1300
1300
1300
1300
1300
1300
14:
0
0
0
0
0
0
15:
120
120
120
120
120
120
16:
2
2
2
2
4
4
17:
100
100
100
100
100
100
18:
0
0
0
0
0
0
19:
400
400
400
400
200
200
20:
100
100
100
100
100
100
21
0
0
0
0
0
0
22:
400
400
400
400
200
200
23:
44
44
44
44
44
44
24:
10
10
10
10
20
15
25:
60
60
60
60
60
60
26:
44
44
44
44
44
44
27:
0
0
0
0
0
0
#3
NUMERIC
Param
1 - 58
TYPE
RUSSIA
ASIA
POLAND
EUROPE2
STANDARD
01:
0
0
0
0
0
02:
10
10
10
10
10
03:
15
15
15
15
15
04:
12
12
12
12
12
05:
4
4
4
4
4
06:
4
4
4
4
4
07:
350
350
350
350
350
08:
0
0
0
0
0
09:
6
6
6
6
6
10:
5500
5500
5500
5500
5500
11:
3500
3500
3500
3500
3500
12:
0
0
0
0
0
13:
1300
1300
1300
1300
1300
14:
0
0
0
0
0
15:
120
120
120
120
120
16:
2
2
2
2
2
17:
100
100
100
100
100
18:
0
0
0
0
0
19:
400
400
400
400
400
20:
100
100
100
100
100
21
0
0
0
0
0
22:
400
400
400
400
400
23:
44
44
44
44
44
24:
10
10
10
10
10
25:
60
60
60
60
60
26:
44
44
44
44
44
27:
0
0
0
0
0
#3
NUMERIC
Param
1 - 59
3-6 Test Mode / Factory Mode
This machine is equipped with the test mode to check operations of various functions listed below.
To
enter into the test mode, select TEST MODE in the menu items of the service data and press the OK button.
To enter into the FACTORY MODE, press the Menu button after entering into the TEST MODE.
To end the TEST MODE and the FACTORY MODE, press the Stop/Reset button. Then turn the power
OFF/ON with the power button.
3-6-1 Test Mode/FACTORY Mode Overview
Test mode and FACTORY Mode can be executed by following the menu items from the display.
a) PRINT EEPROM (Test mode)
Can confirm EEPROM information in the printer. Select [3] PRINTER - [4] EEPROM from the
test mode menu, and press the OK button. For the details, please refer to [3-8 Confirmation/3-8-6
EEPROM information print].
b) CD-R calibration (Test mode)
Compensates for label recognition in printing a CD-R label.
c) PANEL (FACTORY MODE)
Tests the functions of operation panel.
d) PRINTER SHUKKEN (FACTORY MODE)
Prints test patterns within the print area.
e) IRDA Test (FACTORY MODE)
Tests the functions of IRDA test.
1 - 60
3-6-2 Test mode menu
TEST MODE
[Menu] button
*[1] SYSTEM TEST
FACTORY MODE
[Menu] button
[1] ROM SUM / CPU SUM
[2] SD RAM
*[2] SCANNER
[2] ADF READ
[3] BOOK READ
[4] SHADING TEST
[6] ENDURANCE
[3] PRINTER
*[1] SHUKKEN PATTERN 1
*[2] SHUKKEN PATTERN 2
*[3] CD-R CHECK PATTERN
*[4] EEPROM
*[5] ENDURANCE
[6] CD-R CALIBRATION
*[4] MODEM
[1] RELAY
[2] TONAL
[3] DTMF
[4] G3 FAX
*[7] SENSOR
[1] DS
[2] DES
[3] TRAY
[4] VALUE
[5] CD-R TRAY
[6] MAIN CAM
[7] PE
[8] U-TURN CAM
[9] ASF CAM
*[8] ETC
[1] INTERFACE
[4] EEPROM CLEAR
[1] INK COUNT
[2] PURGE FLAG
Figure 1-32 Test Mode
1 - 61
"*" indicates that these
are not used in the field.
3-6-3 Factory mode menu
"*" indicates that these
are not used in the field.
FACTORY MODE
[1] PANEL
[2] PRINTER
SHUKKEN
*PURGE
*CD-R
*[3] CCD SELF CHECK
*[4] SCAN
*[5] FILM SCAN
*[6] G3 TX
[7] IRDA
*[8] CR GEAR ADJUST
*[9] CD-R (MANUAL)
Figure 1-33 Factory Mode
1 - 62
3-6-4 Operation Panel Tests
If you select test menu in the FACTORY mode, [1] PANE
L is displayed. To select the test menu, press
the OK button. In this test, check that the display, LED lamps, and keys on the control panel are operating
correctly.
(a) Display test
When the Color Start key is pressed from the Panel menu, patterns in black or in color appear in
LCD Viewer. Check whether each patterns is displayed correctly in the LCD Viewer.
(b) LED lamp test
The LED lamp test is selected by pressing the Color Start key after the display test.
When the Color Start key is pressed, all the lamps on the control panel light. Check for any LED that
does not light during the test.
(c) Operation key test
The Operation key test is selected by pressing the Color Start key after the LED lamp test.
In this test, you press the key corresponding to the displayed character to put it out. The table giving
the correspondence between the characters and the keys is below.
Character Operation key Character Operation key
C
COPY button
W ON/OFF
S
SCAN button
E
Search
I
FILM button
G
Trimming
P
PHOTO button
N
under
2
Two-Sided button
R
Right
M
Menu
K
OK button
T
Settings
L
Left button
U
Upper button
C
Color button
S
Stop/Reset button
M Black button
1 - 63
3-6-5 PRINT TEST
Select SHUKKEN of the PRINTER test from the FACTORY MODE menu to print out the print pattern.
The following items can be checked in the print pattern.
<EEPROM information contents>
On the service test print (sample below), confirm the EEPROM information as shown below. (The
information is given in the upper portion of the printout.)
Destination (model name)
ROM Version
USB serial number
Reserve for factory use
Ink absorber waste ink amount(%)
CDR sensor correction value
xxxx
Vx.xx
USB(xxxxxx)
FA=xxxxxx
D=xxx.x
CDR(xxxxxx,xxxxxx)
<Print check items>
On the service test print (sample below), confirm the following items:
Check 1 nozzle check pattern: Inkshall be ejected from all nozzles
Check 2 top of form accuracy: The line shall not extend off the paper.
Check 3 vertical straight lines: The line shall not be broken.
Check 4 halftone: There shall be no remarkable streaks or unevenness.
1 - 64
<Service test print sample>
Check 2 Top of from accuracy
Check 4
Halftone
Check 1
Nozzle check pattern
Check 3
Straight line
Figure 1-34 Service test print
1 - 65
3-6-6 CD-R Calibration
When SPCNT board ass’y, CD-R tray, or a unit or a part of printer (such as Carriage unit, Pump unit)
is replaced, perform the CD-R calibration as follows (registration of CDR sensor compensation value
data).
1. Place A4 plain paper on the Auto Sheet Feeder.
2. From the TEST MODE menu, perform [3] PRINTER - [6] CD-R CALIBRATION to print out a
blank paper.
3. From the TEST MODE menu, perform [3] PRINTER
- [4] EEPROM to print out the information
and check the CDRS (XXX) item.
If a numeric value appears, it means OK. If (000) appears, it
means NG. (Refer to 3-7-7 EEPROM Information Print.)
If it is NG, repeat the procedure of 1. to 3. shown above, or replace the unit.
3-6-7 IRDA TEST
Press the Menu button and select the FACTORY Test from the Test Mode menu.
From the FACTORY Test mode, press the right cursor button or the left cursor button to select [7]
IRDA. In this test, it is confirmed whether an infrared data communication from a cellular phone is
performed correctly.
Perform the infrared data communication and check that “TEST OK” is
displayed on LCD. Data received in this test is not output.
3-7 Upgrading the version of SPCNT flash ROM
To upgrade the version of flash ROM, always down load via USB interface.
<Flash ROM upgrading file>
The flash ROM upgrading file will be distributed in SSIS at the timing of upgrading the version.
<Upgrading Procedure>
The detailed upgrading procedure will be introduced by a Service Information bulletin when the
version is upgraded.
[Prerequisite (reference)]
- Printer to Personal Computer:
Connect via USB cable. (Connect only one printer to the computer.)
- Environment to be used, OS:
Windows 2000/XP
- Printer driver:
Should be installed in advance.
- Main Unit Mode when down loading the upgrading file:
Set “1” at [#1 SSSW]-[SW29]-[Bit 1] of the service data for the flash ROM upgrading
mode.
1 - 66
3-8 Verification Items
3-8-1 EEPROM information print
<How to read EEPROM information print>
[Print sample]
MP770
V0.20 IF(USB1=1 1284=0) D=004.5 ST=2012/12/12-00:30
ER(ER0=1612 ER1=1602) LPT=2012/12/13-02:16
PC(M=000 R=000 T=003 D=004 C=002)
CLT(BK=2012/12/13-02:22 CL=2012/12/13-02:22)
CH=00001 CT(BK1=040 BK2=000 C=109 M=012 Y=113) IS(BK1=0 BK2=2 C=0 M=2 Y=0
P_ON(S=00014) A_REG=1 M_REG=0
UR(A(BKoe)=000 B(Coe)=000 C(Moe)=000 D(SCoe)=000 E(SMoe)=000 F(PBKoe)=000
G(BKbi)=+02 H(CLbi)=000 I(BK-CL)=-01 J(SCLbi)=000 K(C-SC)=000 L(M-SM)=000)
WP=0117 CDIN(LG=000 PB=000) MSD(000)
PAGE(All=00075 PP=00075 HR+MP=00000 PR+SP+SG=00000 GP=00000 PC=00000 EV=00000)
UCPAGE(All=00051 PP=00051 HR+MP=00000 PR+SP+SG=00000 GP=00000 PC=00000
EV=00000)
BPPAGE(All=00107 BSGP=00000 PC=00000)
CDPAGE(All=00000) EDGE=00000 L=00000 CDR=00000
CDRP=(-00144,+00295) CDRS=(028)
Head TempBK=36.0 Head TempC=32.0 Env Temp=30.0 FF(FF FF FF)
HDEEPROM
V0001
SN=0318-A43D
LN(00000 00000 00001 00003 00001 00000 00000)
ID=04
IL=(BK=000 C=+01 M=000 Y=000 C2=000 M2=000 PBK=000)
Printed items:
1. Model name 2. ROM version 3. Connected I/F (USB1/1284) 4. Waste ink amount 5. Installation date
6. Operator call/service call error record 7. Last printing time
8. Purging count (manual/deep cleaning/timer/dot count/ink tank or print head replacement)
9. Cleaning time (BK/CL)
10. Print head replacement count 11. Ink tank replacement count (pigment BK/dye BK/C/M/Y) 12. Ink
status (pigment BK/dye BK/C/M/Y)
13. Power-on count (soft) 14. Automatic print head alignment by user 15. Manual print head alignment
by user
16. User print head alignment values
(Bkoe/Coe/Moe/SCoe/SMoe/PBKoe/BKbi/CLbi/BK-PCBK/SCLbi/C-SC/M-SM)
17. Wiping count 18. Camera Direct Print-supported device connection record 19. Longest period
where printing stops
20. ASF feed pages (total, plain paper, High Resolution Paper & Matte Photo Paper, Photo Paper Pro &
Photo Paper Plus Glossy & Photo Paper Plus Semi-gloss, Glossy Photo Paper, Postcard, Envelope)
21. U-turn cassette feed pages (total, plain paper, High Resolution Paper & Matte Photo Paper, Photo
Paper Pro & Photo Paper Plus Glossy & Photo Paper Plus Semi-gloss, Glossy Photo Paper, postcard,
envelope)
1 - 67
22. Auto duplex print pages (total, Photo Paper Plus Double Sided, postcard)
23. Camera Direct print pages (total) 24. Borderless print pages 25. L & 4x6 print pages
26. Number of CD-Rs printed
27. CD-R print position adjustment 28. CD-R sensor correction value
29. Print head temperature (BK/CL) 30. Inside temperature 31. Line inspection information
HDEEPROM
32. Version
33. Serial number
34. Lot number
35. Print head ID
36. Ink ejection level (BK/C/M/Y/C2/M2/PBK)
1 - 68
4. Cleaning Your Machine
This section describes the necessary cleaning procedures for your machine.
4-1 CAUTION
• Be sure to turn OFF the power and disconnectthe power cord before cleaning the machine.
• If you turn OFF the machine, all the documents stored in memory are deleted. Print all the necessary
documents stored in memory before turning OFF the machine.
• Do not use tissue paper, paper towels, or similar materials for cleaning; they can stick to the
components or generate static charges. Use a soft cloth to avoid scratching the components.
• Never use volatile liquids such asthinners, benzene, acetone, or any other chemical cleaner to clean
the machine; these can damage the machine's components.
4-2 Cleaning The Exterior
Wipe the machine’s exterior with a clean, soft, lint-free damp cloth.
4-3 Cleaning the Scan area
Wipe the Platen Glass (A) and the inner side of the Document Cover (white area) (B) with a clean,
soft, lint-free cloth moistened with water. Then wipe with a clean, soft, dry, lint-free cloth making
sure not to leave any residue, especially on the Platen Glass. If you have trouble getting the
scanning area clean, wipe with diluted mild detergent (for dish washing).
(A)
(B)
Figure 1-35 Cleaning the Scan area
1 - 69
4-4. Cleaning The Interior
Regularly clean the interior of the machine to avoid deterioration in print quality due to parts being
dirtied by ink or paper dust.
Figure 1-36 Cleaning The Interior
4-5 Cleaning the paper feed roller
Follow this procedure:
1. Connect the power cord, and power on the machine.
2. Remove any paper from the Auto Sheet Feeder and Cassette.
3. Select the paper source with [Feed Switch].
4. Press [Menu] repeatedly until <Maintenance/
Settings> appears, then press [OK] twice.
5. Use [Right cursor ] or [Leftrsor
cu ] to select <Roller Cleaning>.
6. Press [OK].
The machine starts cleaning the roller.
7. When cleaning has finished, repeat steps 3 to 6 for a total of two times.
8. Load A4- or letter-size plain paper in the Auto Sheet Feeder or Cassette and repeat steps 3 to 5 an
additional three times.
1 - 70
4-6 Cleaning The Bottom Plate
Follow this procedure:
1. Power on then connect the power cord.
2. Remove any paper from the Auto Sheet Feeder.
3. Prepare a sheet of A4 or Letter size plain paper. Fold it in half along the long edge. Unfold the paper,
then load it in the paper support with the outside edge of the fold facing down.
4. Press [Menu] repeatedly until <Maintenance/
Settings> appears, then press [OK] twice.
5. Use [Right cursor ] or [Leftrsor
cu ] to select <Bottom Cleaning>.
6. Press [OK].
The paper is fed and output.
MEMO:
If this component is still dirty after performing the operation described above, use a clean cotton
bud to remove ink stain, paper powder, and dust around the platen (A).
Figure 1-37 Cleaning the Platen
1 - 71
5. TRANSPORTATION
This section describes the procedures for transporting the printer for returning after repair, etc.
(1) Keep the print head and ink tanks installed in the carriage. [See NOTE (1) on the next page.]
(2) Turn off the printer to securely lock the carriage in the home position. (When the printer is turned
off, the carriage is automatically locked in place.) [See NOTE (2) on the next page.]
(3) To further secure the carriage to prevent movement from the home position during transportation,
make and use a fixing tool in the following procedures:
(a). Fold an A4-sized paper 5 times, and wrap it twice with tape, as shown in Figure A below (to
prevent the fixing tool from caught into the inside of the printer).
(b). Insert the fixing tool between the carriage and the middle flame unit, and securely fix it with
tape, as shown in Figures B and C below.
Note: The tape should be similar to the polyester tape used at shipment, which will not easily be torn or
removed, or leave adhesive on the unit when removed.
Leave a sufficient length of tape to fix the tool so that the tape end is easily seen even when the
access cover is closed, so that the user will remove the tool from the returned printer without fail.
Description of a small piece of paper (example):
Before the machine is powered on, remove this tape and the stuff at the end of the tape (the fixing
tool on the cartridge).
a.
b.
c.
d.
A small piece
of paper
Figure 1-38 How to fix the Carriage
1 - 72
Caution:
(1) If the print head is removed from the printer and left alone by itself, ink (especially the pigment black
ink) is likely to dry. For this reason, keep the print head installed in the printer even during transportation.
(2) Securely lock the carriage in the home position, to prevent the carriage from moving and applying stress
to the carriage flexible cable, or causing ink leakage, during transportation.
1 - 73
Part 2
Technical Reference
1. NEW TECHNOLOGIES
(1) Dye black ink adoption
In addition to the pigment black ink, dye black ink is adopted in this machine, so that special paper can be
printed in black ink. (For printing plain paper, the pigment black ink is used.)
(2) Automatic Print Head Position Alignment
In this machine, the print head position can be aligned automatically by operating the buttons on the
operation panel and operating from the driver utility.
This is the function to detect the reflection density at the print head position alignment sensor (the same
sensor as the CD-R position detection sensor) and appropriately set the print head position alignment by
scanning the print pattern shown below.
The folloings are detected during the automatic print head position alignment. If an error is detected,
<AUTO HEAD ALIGN ERROR> (LCD message) is displayed.
1) Detecting Paper Size
- Detecting Paper Width (an error is detected if the paper width is too short.)
- Detecting Paper Length (an error is detected if the length is shorter than A4/LTR.)
2) Detecting Print Failure due to no ink ejected
- Detecting Ink Ejecting Status (an error is detected if no ink is ejected.)
<Print Pattern for the Automatic Print Head Position Alignment>
Plain Paper A4/LTR
Pattern for detecting the ink ejecting status
Pattern for detecting the
paper width
Feed direction
Figure 2-1 Print Pattern for the Automatic Print Head Position Alignment
2-1
<Phenomena of predictable troubles and the Solutions (how to avoid the troubles)>
1) Although the paper size is correct (A4/LTR) and the print head position alignment
pattern is printed correctly, an error of the automatic print head position alignment
failure occurs.
[Solution] Set “Align heads manually” to valid at the driver utility special settings,
and perform the print head position alignment manually.
(3) Automatic duplex printing
This function can be used only when the paper size is set to <A4> or <LTR>.
<Phenomena of predictable troubles and the Solutions (how to avoid the troubles)>
1) The printing surface of paper is dirty. (Cause: Due to accumulated ink mist.)
The phenomena will be the following two types.
a) A vertical line is printed incorrectly (stain on the platen rib).
[Solution] Clean the interior of the main unit.
b) A holizontal stain is printed around 10 mm from the top edge of paper (back side)
(stain in the interior of the double side unit).
[Solution] Replace the ASF unit.
(4) Making Multiple Copies of an Entire Document (Collation)
When making multiple copies of a documet with more than one page, you have them delivered in sorted
sets.
(Example): To copy three sets of a 3-page document (Page a, b, c in order) with the electronic sort.
The copied paper is delivered in order of (c, b, a), (c, b, a), (c, b, a).
2-2
2. CLEANING MODE AND AMOUNT OF INK PURGED
To prevent printing problems due to bubbles, dust, or ink clogging, print head cleaning is performed
before the start of printing, except in the following cases:
- Cleaning on arrival: Performed when the access cover is closed.
- Cleaning by dot count: Performed after ejection of paper (or after printing on the back side of paper
when auto duplex printing is performed).
- Manual cleaning / deep cleaning: Performed manually.
<Cleaning mode list>
Condition
*Black: Pigment-based black Color: Dye-based black, cyan, magenta, yellow
Details
Amount of ink
used(g)
0.45(BK)
1.50(Color)
Est. required time
(sec)
On arrival of the printer
(All in sequence)
First and second cleaning after shipped from
the plant.
Dot count cleaning*1
(Black/Color)
When the specified number of dots are printed
since the previous Black/Color cleaning. (Cyan
and magenta dots are counted by large and small
nozzles separately.)
0.14(BK)
0.50(Color)
30(BK)
35(Color)
Timer cleaning - 0*2
(Black only)
If 24 to 60 hours have elapsed since the previous
Black cleaning till the start of the next printing.
0.14(BK)
30(BK)
Timer cleaning - 1
(Black only)
If 60 to 96 hours have elapsed since
the previous Black cleaning till the start of
0.14(BK)
30(BK)
the next printing.
If 96 to 120 hours have elapsed since the previous
Black cleaning till the start of the next printing.
0.14(BK)
30(BK)
If 120 to 336 hours have elapsed since the
previous Black/Color cleaning till the start of the
next printing
0.14(BK)
0.50(color)
30(BK)
35(color)
If 336 to 504 hours have elapsed since the
previous Black/Color cleaning till the start of the
next printing
0.45(BK)
1.00(Color)
60
If 504 to 720 hours have elapsed since the
previous Black/Color cleaning till the start of the
next printing
0.45(BK)
1.00(Color)
60
If 720 to 1080 hours have elapsed since the
previous Black/Color cleaning till the start of the
next printing
0.45(BK)
1.00(Color)
60
If 1080 to 2160 hours have elapsed since the
previous Black/Color cleaning till the start of the
next printing
0.78(BK)
1.00(Color)
60
If 2160 to 4320 hours have elapsed since the
previous Black/Color cleaning till the start of the
next printing
1.58(BK)
1.00(Color)
65
If 4320 to 8640 hours have elapsed since the
previous Black/Color cleaning till the start of the
next printing
1.58(BK)
1.00(Color)
65
(All in sequence)
If 8,640 or longer hours have elapsed since the
previous Black/Color cleaning till the start of the
next printing
1.58(BK)
1.00(Color)
65
At print head replacement
When the print head is removed and installed.
0.45(BK)
1.50(Color)
70
0.30(BK)
1.00(Color)
45
(All in sequence)
30(BK)
35(color)
Timer cleaning - 2
(Black only)
Timer cleaning - 3*3
(Black/Color)
Timer cleaning - 4
(All in sequence)
Timer cleaning - 5
(All in sequence)
Timer cleaning - 6
(All in sequence)
Timer cleaning - 7
(All in sequence)
Timer cleaning - 8
(All in sequence)
Timer cleaning - 9
(All in sequence)
Timer cleaning - 10
(All in sequence)
At ink tank replacement
(Black/Color)
2-3
70
Condition
Details
Amount of ink
used(g)
- Via the operation panel (All at the same time
Manual cleaning
only)
(Black/Color/All at the sametime)
- Via the printer driver (Selectable from Black,
45
0.14(BK)
0.50(Color)
Color, or All at the same time)
Via the printer driver (Selectable from Black,
Deep cleaning
(Black/Color/All at the same time)
Color, or All at the same time)
(All at the same time)
30(BK)
40(Color)
65
1.58(BK)
1.00(Color)
If the print head has not been
0.30(BK)
1.00(Color)
capped before power-on
Est. required time
(sec)
(All at the same time)
45(BK)
50(Color)
45
(All in sequence)
(All in sequence)
*1: The dots since the previous cleaning are counted by Black and Color separately. For this reason, the cleaning mode may differ according
to Black or Color.
*2: When 24 to 60 hours have elapsed since the previous Black cleaning, timer cleaning - 0 is performed. However, this cleaning will be
conducted up to 5 times from the printer installation, and no further timer cleaning - 0 will be performed.
*3: The period of time since the previous cleaning is counted by Black and Color separately. For this reason, the cleaning mode may differ
according to Black or Color.
2-4
3. Print Mode
(1) Copy
INK
(Column: Number
of Colors)
Print Quality
PP
PP
Two-sided
printing
PP White/Bk
PP White/Bk
Two-sided
printing
PR
SP
(GP/HR/IJPC/
other photo)
OHP
Mode
Resolution(dpi)
BK
:BCI-3eBK
C
:BCI-6C 5pl
M
:BCI-6M 5pl
Y
:BCI-6Y
k
:BCI-6BK
c
:BCI-6C 2pl
m
:BCI-6M 2pl
(”CMcm” shown in a column means printing in the mixture of CM5pl/cm2pl.)
5
color draft
150x600
CMYBK
1 pass
4
-
3
color standard
2
color fine
1200x1200dpi
CMYBK
1 pass
1200x1200dpi
CMYBKcm
4 passes
No. of passes
Mode
Resolution(dpi)
color draft
color standard
color fine
No. of passes
Mode
Resolution(dpi)
150x600
CMYBK
1 pass
1200x1200dpi
CMYBK
1 pass
1200x1200dpi
CMYBKcm
4 passes
W/B draft
W/B standard
W/B fine
No. of passes
Mode
Resolution(dpi)
150x600
BK
1 pass
600x600dpi
CMYBK
1 pass
600x600dpi
CMYBKcm
4 passes
W/B draft
W/B standard
W/B fine
150x600
CMYBK
1 pass
1200x1200dpi
CMYBK
1 pass
1200x1200dpi
CMYBKcm
4 passes
color and W/B fine
filme copy
1200x1200dpi
CMYcmk
6 passes
filme copy
1200x1200dpi
CMYcmk
6 passes
No. of passes
Mode
Resolution(dpi)
No. of passes
Mode
Resolution(dpi)
No. of passes
Mode
Resolution(dpi)
-
-
-
-
-
1200x1200dpi
CMYcmk
4 passes
color and W/B fine
-
-
1200x1200dpi
CMYcmk
4 passes
1
-
-
-
-
-
-
color and W/B fine
-
-
No. of passes
2-5
1200x1200dpi
CMYBKcm
4 passes
-
-
(2) Standard Color Printing (at PC Printer Driver)
Defult setting
Can be set at Main tab
custom setting
Inktank
5 color : BCI-3eBK / 6BK / 6C / 6M / 6Y
4 color *1 : BCI-3eBK / 6C / 6M / 6Y
4 color *2 : BCI-6BK / 6C / 6M / 6Y
3 color : BCI-6C / 6M / 6Y
1 color : BCI-3eBK
paper type
Drv.UI
Custom
Plain paper (PP)
Print Quality
Resolution(dpi)
Pass
Print control Ink
Photo Pater Pro (PR) Print Quality
PR-101
Resolution(dpi)
Pass
Print control Ink
Sper Photo Paper
Print Quality
SP-101/SG-101
Resolution(dpi)
Pass
Print control Ink
Matte Photo Paper
Print Quality
MP-101
Resolution(dpi)
Pass
Print control Ink
Glossy Photo Paper Print Quality
GP-401
Resolution(dpi)
Pass
Print control Ink
Super Photo Paper
Double Side
Print Quality
SP-101D
Resolution(dpi)
Pass
Print control Ink
High Resoluton Paper Print Quality
HR-101S
Resolution(dpi)
Pass
Print control Ink
Postal Card
Print Quality
Resolution(dpi)
Pass
Print control Ink
Postal Card for Inkjet
printer
Print Quality
Resolution(dpi)
CD-R(Commend)
230V only
Pass
Print control Ink
Print Quality
Resolution(dpi)
Pass
Print control Ink
Print Quality
Resolution(dpi)
Pass
Print control Ink
Print Quality
Resolution(dpi)
CD-R(Other)
230V only
Pass
Print control Ink
Print Quality
Resolution(dpi)
Transparncy
CF-102
T-Shirt Transfers
TR-301
Other Photo Paper
Fast
5
Custom
600x600
1 pass
4 color*1
<―
4
Draft
600x600
1 pass
4 color*1
Draft
1200x1200
3 pass
4 color*2
Draft
1200x1200
2 pass-Bidirectional
4 color*2
Pass
Print control Ink
Print Quality
Resolution(dpi)
Pass
Print control Ink
2-6
3
Standard
1200x1200
1 pass
4 color*1
Standard
1200x1200
4 pass
4 color*2
Standard
1200x1200
4 pass
4 color*2
Standard
1200x1200
4 pass
4 color*2
Standard
1200x1200
4 pass
4 color*2
―>
2
High
1200x1200
4 pass
4 color*1
High
1200x1200
6 pass
4 color*2
High
1200x1200
6 pass
4 color*2
High
1200x1200
6 pass
4 color*2
High
1200x1200
6 pass
4 color*2
Standard
1200x1200
4 pass
4 color*2
Standard
1200x1200
4 pass
4 color*2
Standard
1200x1200
2 pass
5 color
High
1200x1200
6 pass
4 color*2
High
1200x1200
6 pass
4 color*2
High
1200x1200
4 pass
5 color
Standard
1200x1200
High
1200x1200
3 pass
4 color*2
Standard
1200x1200
4 pass
5 color
High
1200x1200
6 pass
3 color
Draft
1200x1200
4 pass-Bidirectional
4 color*2
Draft
1200x1200
4 pass-Bidirectional
4 color*2
High
1200x1200
8 pass
4 color*2
4 pass
4 color*2
High
1200x1200
6 pass
5 color
Standard
1200x1200
6 pass-Bidirectional
4 color*2
Standard
1200x1200
6 pass-Bidirectional
4 color*2
High Quality
1
Custom
4800x1200
16 pass
4 color*2
High
1200x1200
8 pass-Bidirectional
4 color*2
High
1200x1200
8 pass-Bidirectional
4 color*2
(3) Standard Gray Scale Printing (at PC Printer Driver)
Paper Type Drv.UI
Custom
Plain Paper Print Quality
Resolution(dpi)
Pass
Print control Ink
Postal Card Print Quality
Resolution(dpi)
Pass
Print control Ink
Fast
5
Custom
300x300
1 pass
1 color
<―
4
Draft
300x300
1 pass
1 color
3
Standard
600x600
1 pass
1 color
Standard
600x600
2 pass
1 color
―>
2
High
600x600
4 pass
1 color
High
600x600
4 pass
1 color
High Quality
1
(4) Borderless Printing (at PC Printer Driver)
Paper Type
Plain Paper
Photo Paper Pro
PR-101
Super Photo Paper
SP-101/SG-101
Matte Photo Paper
MP-101
Glossy Photo Paper
GP-401
Super Photo Paper
Double Side
SP-101D
Postal Card
Drv.UI
Custom
Print Quality
Resolution(dpi)
Pass
Print control Ink
Print Quality
Resolution(dpi)
Pass
Print control Ink
Print Quality
Resolution(dpi)
Pass
Print control Ink
Print Quality
Resolution(dpi)
Pass
Print control Ink
Print Quality
Resolution(dpi)
Pass
Print control Ink
Fast
5
<―
4
Draft
1200x1200
3 pass
4 color*2
Print Quality
Resolution(dpi)
Pass
Print control Ink
Print Quality
Resolution(dpi)
Pass
Print control Ink
Postal Card for Inkjet
printer
Print Quality
Resolution(dpi)
Pass
Print control Ink
Other Photo Paper
Print Quality
Resolution(dpi)
Pass
Print control Ink
Draft
1200x1200
2 pass
4 color*2
2-7
3
Standard
1200x1200
2 pass-Bidirectional
4 color*2
Standard
1200x1200
4 pass
4 color*2
Standard
1200x1200
4 pass
4 color*2
Standard
1200x1200
4 pass
4 color*2
Standard
1200x1200
4 pass
4 color*2
―>
2
High Quality
1
High
1200x1200
6 pass
4 color*2
High
1200x1200
6 pass
4 color*2
High
1200x1200
6 pass
4 color*2
High
1200x1200
6 pass
4 color*2
Custom
4800x1200
16 pass
4 color*2
Standard
1200x1200
4 pass
4 color*2
Standard
1200x1200
2 pass
4 color*2
High
1200x1200
6 pass
4 color*2
High
1200x1200
4 pass
4 color*2
Standard
1200x1200
3 pass
4 color*2
High
1200x1200
8 pass
4 color*2
High
1200x1200
4 pass
4 color*2
(5) Duplex Printing (at PC Printer Driver)
Paper Type
Plain paper
Super Photo Paper
Double Side
SP-101D
Postal Card
Drv.UI
Custom
Print Quality
Resolution(dpi)
Pass
Print control Ink
Fast
5
Custom
600x600
1 pass
4 color*1
<―
4
Draft
600x600
1 pass
4 color*1
Print Quality
Resolution(dpi)
Pass
Print control Ink
Print Quality
Resolution(dpi)
Pass
Print control Ink
Postal Card for Inkjet
printer
Print Quality
*Supporting Duplex
Resolution(dpi)
Printing only in using
Pass
the Postal Card application Print control Ink
Draft
1200x1200
2 pass
4 color*2
3
Standard
1200x1200
1 pass
4 color*1
―>
2
High
1200x1200
4 pass
4 color*1
Standard
1200x1200
4 pass
4 color*2
Standard
1200x1200
2 pass
5 color
High
1200x1200
6 pass
4 color*2
High
1200x1200
4 pass
5 color
Standard
1200x1200
4 pass
4 color*2
High
1200x1200
6 pass
4 color*2
High Quality
1
(6)Camera Direct Printing (at PC Printer Driver)
Paper type
Photo Paper Pro
PR-101
Super Photo Paper
SP-101/SG-101
Drv.UI
Custom
Print Quality
Resolution(dpi)
Pass
Print control Ink
Print Quality
Resolution(dpi)
Pass
Print control Ink
Fast
5
<―
4
2-8
3
―>
2
High
1200x1200
6 pass
4 color*2
High
1200x1200
6 pass
4 color*2
High Quality
1
4. FAQ(Problems Specific to the MP760 and Corrective Actions)
No
*
Function
Phenomenon
Condition
Cause
Corrective action
Possible call or complaint
1
C
Print results
Margin
(approx. .3mm)
-Paper feeding from the cassette,
Photo Paper Plus Double Sided
(A4), orderless printing, printing
on the back side of paper
-In the low temperature and low
humidity environment
-In the printer driver, increase the
amount of extension.
-Change the paper feeding method
from the cassette to the auto sheet
feeder.
-A margin appears on
printouts.
-Paper feeds at an angle.
2
B
Print results
-Skewed paper
feeding
-Printing on the
platen
-Plain paper
-In the high temperature and
high humidity environment
-If paper is curled, straighten it.
-Try printing on the other side of
paper.
-Paper feeds at an angle.
-Printing is performed on
the platen.
-The back side of paper
gets smeared.
3
B
Print results
Variation in the top
of form accuracy
-A5 or legal size
-In the low temperature and low
humidityenvironment
-Not solved even when the
number of sheets stacked in the
auto sheet feeder or the cassette
is reduced
-Set the top margin to 4mm or
more.
-Print start position
varies.
4
B
Print results
-Skewed paper
feeding
-Margin
-Photo Paper Plus Double Sided
-2L size (Japan only)
-In the printer driver, increase the
amount of extension.
-Change the paper feeding method
from the cassette to the auto sheet
feeder.
-A margin appears on
printouts.
-Paper feeds at an angle.
5
C
Safety during Carriage lock lever
transportation dislocation
-With the print head and tanks
installed
-The phenomenon occurred in
the freight handling test
When returning the repaired
printer to the user, insert the fixing
tool(A4 plain paper folded 5
times) between the main case and
the carriage, and fix it with tape.
[See Part5. Transportation]
During transportaion for
return after repair, Ink
dries, and no ink is
ejected.
Due to decrease of paper
feed capability in the low
temperature and low
humidity environment
2-9
No
*
Function
Phenomenon
Condition
Cause
Corrective action
Possible call or complaint
6
A
Print results
Soiling on the back
side of paper (lines
or streaks parallel
to the paper feed
direction)
-After continuous borderless
printing of small sized paper
(such as 4x6), when a larger
sized paper (such as A4) is
rinted.
-With Photo Paper Plus Double
Sided or postcards, the
phenomenon is likely to be
noticeable and to be complained
of by users, as printing is
performed on both sides of such
paper.
In borderless printing,
printing is performed to
the size slightly larger
than the paper size, and
ink off the paper is
absorbed by the platen's
ink absorber. Absorbed
ink may attach to the
platen rib(s) after several
dozen sheets are printed,
causing soiling at the
leading edge of paper or
on the back side of paper.
1.Perform Bottom plate cleaning
(from the printer driver) up to 3
times*1.
*1: Change the paper in each
Bottom plate cleaning. The
cleaning can end when paper dose
not get any soiling.
2.If soiling on the paper still
remains after 3 times of Bottom
plate cleaning, wipe the platen
rib(s) and their surroundings with
a cotton swab.
-Paper gets smeared.
-The back side of paper
gets smeared.
7
B
Print results
Soiling on paper in
automatic duplex
printing (lines or
streaks
perpendicular to
the paper feed
direction)
-Automatic duplex printing
(Photo Paper Plus Double Sided,
postcards, plain paper)
On the rib(s) inside the
sheet feed unit used for
duplex printing, ink mist
may accumulate,
smearing paper.
Cleaning by user:
1. Perform Bottom plate cleaning
(from the printer driver) up to 3
times*1.
*1: Change the paper in each
Bottom plate cleaning. The
cleaning can end when paper does
not get any soiling.
2. If soiling on the paper still
remains after 3times of Bottom
plate cleaning, wipe the platen
rib(s) and their surroundings with
a cotton swab.If the phenomenon
persists after conducting 1 and 2,
servicing is required.
Service:
Wipe any soiling or dirt off from
the sheet feed unit and the bottom
case unit ribs*2.
cleaning was performed,
and the platen ribs were
cleaned with cotton swab,
paper gets smeared.
2 - 10
No
8
*
C
Function
Print results
Phenomenon
Condition
Cause
Corrective action
Possible call or complaint
Scratches on paper
-PP-101D, PP-101, PR-101,
SG-101, etc.
-Paper feeding from the cassette
-Multiple number of sheets
loaded
-Paper is scratched.
-Marks appear on printed
paper.
-Change the paper feeding method
from the cassette to the auto sheet
feeder.
-If automatic duplex printing is
performed, cancel it, and, by
setting only a single sheet of paper
in the auto sheet feeder, manually
print each side of paper.
Scratches on the PF
return lever due to paper
feeding from the cassette,
and duplex printing path.
*2 Location to clean in servicing when soiling on paper in automatic duplex printing persists:
BOTTOM CASE UNIT
SHEET FEED UNIT
* Occurrence level:
A: The symptom is likely to occur frequently. (Caution required)
B: The symptom may occur under certain conditions, but likeliness is assumed very low in practical usage.
C:The symptom is unlikely to be recognized by the user, and no practical issues are assumed.
2 - 11
Part 3
Appendix
1. PIXMA MP760 Specification
<GENERAL>
Printer
Scanner
Copy
Facsimile
Memory Card
Memory Card Slot
Media
Data Storage
YES
YES
YES
NO
YES
YES
CF(Type I/II)
Micro Drive
Smart Media
SD/miniSD*
Multi Media Card
xD-PictureCard*
Memory Stick/Memory Stick Pro/Memory Stick
Duo*/Memory Stick Pro Duo*/Magicgate
Memory Stick Magicgate Memory Stick
Duo*
*At Adapter
YES
YES
YES
JPEG (DCF/CIFF/Exif2.21under /JFIF)
DPOF
Plain paper
A4/Letter: Borderless, Print index (up to 80
images) Photo Paper Pro, Super White Paper,
High Resolution Paper, Glossy Photo Paper,
Photo Paper Plus Semi-Gloss, Matte Photo Paper:
A4: Borderless, Print index
A4 (up to 80 images)
READ
WRITE
Photo-Direct print
Applicable Image
Supported layouts
Camera Direct (Pictbridge) Paper size
Default (Photo Paper Plus Glossy 10 x 15 cm/4" x
6"), 10 x 15cm/4" x 6" (Photo Paper Plus Glossy,
Photo Paper Pro, Photo Paper Plus Semi-Gloss,
Glossy Photo Paper, Photo Sticker*), 13x 18
cm/5" x 7" (Photo Paper Plus Glossy)**, A4/8.5"
x 11"(Photo Paper Plus Glossy A4/Letter, Photo
Paper Pro A4/Letter,Photo Paper Plus Semi-Gloss
A4/Letter, Glossy Photo Paper A4/Letter), Credit
Card size (Glossy Photo Paper)*
* This setting is available for specified Canon
Cameras only.
** If using a Canon PictBridge-compatible
camera, you can select it.
Layout
Default (Borderless), Borderless, Bordered,
2-up/4-up/9-up/16-up*
* When 4" x 6" is selected from “Paper size”,
these options may be available in “Layout”.
Print Modes
Camera Direct (Bubble Jet Direct)
Compatible Paper
DPOF support
Card #1 (Photo Paper Pro 4" x 6"/101.6 x 152.4
mm),Card #2 (Photo Paper Plus Glossy, Photo
Paper Plus Semi-Gloss,or Glossy Photo Paper 4"
x 6"/101.6 x 152.4 mm),Card #3 (Photo Paper
Plus Glossy 5" x 7"/127.0 x 177.8 mm),LTR
(Photo Paper Pro, Photo Paper Plus Glossy, Photo
PaperPlus Semi-Gloss, or Glossy Photo Paper
3-2
Letter size)A4 (Photo Paper Pro, Photo Paper Plus
Glossy, Photo Paper Plus Semi-Gloss, or Glossy
Photo Paper A4 size)
Layout Print
Standard: Borderless, Bordered, Index Print:
16-80 images (Depending on the size of print
media)
Photo Index Sheet
Power Consumption
YES
Size
MAX
Standby
Standby
Copy(Casette, Copy)
Unit
Scanning Section
Printing Section
Including Tray
Weight
Standard
Noise
Durability
Approx. 40W
Approx. 20W
None
52dB (A) max.
5 years
15,000 pages
18,000 pages (Color/Black&White)
19 1/8 in.(W) x 18 5/8 in.(D) x 12 3/8 in.(H)
(W486mm*D472mm*H314mm)
(With the Paper Support and the Paper
Output Tray closed)
19 1/8 in.(W) x 21 1/8 in.(D) x 12 3/8 in.(H)
(W486mm x D538mm x H314 mm (H))
(With the Paper Support, the Paper Output
Tray, and both extensions opened)
13.7kg (Including Print Head and Ink Tank
+0.2kg
<Scanner Function>
Type
Reading System
ADF
Reading Resolution
Flatbet
2400dpi staggerd CCD
NO
2400 x 4800 dpi max
Sensor Type
Gradation bit
Color (Input)
Color (OutPut)
Gray (Input)
Gray (Output)
Maximum Document Size
Effective Scanning Width (mm)
Local Scan Driver
TWAIN
WIA
48bit
24bit
16bit
8bit
216 mm x 297 mm
216 mm
YES
YES
<Printer Function>
ASF
Size
Paper Materials
Printing resolution
Printing Speed (page/min)
Printing direction
Printable area (none printable area form each edge)
Printing Cartrige
Product Name
Print Yield
YES
A4, A5, B5,
4" x 6", LTR, LGL
Plane paper, other
4800 x 1200 dpi
25 ppm (BK) / 17 ppm (Color)
Bi-direction
3.4mm right/left edge,
3mm top, 2mm bottom
QY6-0049
approx. 900 pages
(Black 1,500 character std pattern, Plain std
mode)
approx. 1,300 pages
(ISO JIS-SCID No.5 pattern, Plain std mode)
approx. 480 pages
Black (BCI3eBK)
Yellow (BCI-6Y)
3-3
(ISO JIS-SCID No.5 pattern, Plain std mode)
approx. 480 pages
(ISO JIS-SCID No.5 pattern, Plain std mode)
approx. 640 pages
(ISO JIS-SCID No.5 pattern, Plain std mode)
approx. 2,000 pages
(ISO JIS-SCID No.5 pattern, Plain std mode)
Magenta (BCI-6M)
Cyan (BCI-6C)
Black (BCI-6BK)
Ink Remaining Detection
Detection Method
Paper Capacity
YES
prism + Dot count
Maximally 50 sheets
(Plain 75g/m2)
YES
YES
YES
Borderless Printing
Silent Mode Printing
CD-R Label Print
<Copy Function>
Copy Print Resolution
Black & White
Color
Copy speed
Ink Jet Black & White (Draft)
Color(Fast)
Scanning Density Adjustment
Manual
Multipule Copies
Preset RE Ratio
Enlarge
Max.
4” x 6” ->TR
5” x 7” ->TR
Reduction
100%
A4 ->TR
Zoom
Zooming Range
Auto Magnification Selection (AMS)
Image Quality
B&W
Color
Energy Saving Mode
Image Combination
2 in 1
4 in 1
Image Repaet ( Auto/Manu )
Mirror Image
Seal Copy
Name Card Copy
Postcard Copy
Borderless Copy
Poster
Fit to Page
Entire Document
600 x 600 dpi (Normal mode)
1200 x 1200 dpi (Normal mode)
25 ppm
17 ppm
YES
9 positions
99
YES
YES
YES
YES
YES
YES
YES
25-400 %
YES
Fast, Normal, Fine (photo)
Fast, Normal, Fine (photo)
YES (15 min/ 1 hour/ 4 hour/ 8 hour)
YES
YES
NO
YES/YES
NO
YES
YES
NO
YES
NO
YES
NO
<Function>
Memory Backup
Image Data Backup
Image Memory
Backup Contents
Backup IC
User Data, Service Data etc.
128 kbit EEPROM (battery unnecessary)
NO
Approx 5MB
3-4
PRINTED IN JAPAN (IMPRIME AU JAPON)
CANON INC.