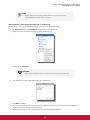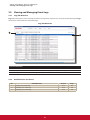
1
SC-T35/SC-T45/SC-T46/SC-T47 ViewSonic Device Manager User Guide Copyright and Trademark Statements © 2014 ViewSonic Computer Corp. All rights reserved. This document contains proprietary information that is protected by copyright. No part of this document may be photocopied, reproduced, or translated to another language without the prior written consent of ViewSonic Computer Corp. Limitation of Liability While reasonable efforts have been made to ensure the accuracy of this manual, the manufacturer and distributor assume no liability resulting from errors or omissions in this manual , or from the use of the information contained herein. Trademark statements Microsoft and Windows are trademarks of the Microsoft group of companies. Citrix, ICA, and XenApp are trademarks of Citrix Systems, Inc. and/or one or more of its subsidiaries, and may be registered in the United States Patent and Trademark Office and in other countries. VMware and VMware View are trademarks or registered trademarks of the VMware, Inc. GraphOn and GO-Global are registered trademarks and the GO logo is a trademark of GraphOn Corporation. The Firefox logo is a registered trademark of Mozilla Foundation or Mozilla Corporation. Adobe and Adobe Reader are either registered trademarks or trademarks of Adobe Systems Incorporated in the United States and/or other countries. Other product names mentioned herein are used for identification purposes only and may be trademarks and/or registered trademarks of their respective companies. i About This User’s Manual This manual provides the basic information on how to manage ViewSonic thin clients with the ViewSonic Device Manager console. Manual Structure and Subjects Chapter Subject 1 Provides an overview of the ViewSonic Device Manager console. 2 Gives detailed instructions on how to install and upgrade ViewSonic Device Manager. 3 Provides instructions on how to manage clients with ViewSonic Device Manager. 4 Provides basic instructions on client configuration. Notes, Tips, and Warnings Throughout this manual, the notes, tips, and warnings in the following formats are used to provide important information, useful advice, and prevent injuries to you, damage to your devices, or loss of data on your system. NOTE • A note provides important information for a specific situation. TIP • A tip gives a piece of useful advice to perform a task more efficiently. WARNING • A warning provides crucial information that must be followed to prevent injuries to you, damage to your devices, or loss of data on your system. Style Conventions The following styles are used throughout this manual while referring to operational items on input devices, hardware panels, or application interfaces. Item Style Example keys on the keyboard bold F11, N, B, S application windows, menus, or entry lists first letter capitalized Add window, Firmware list, Client list, Command menu buttons or tabs on a window, toolbars, taskbar, or menu bold OK, Next, Start, System tab options on a window, screen, list, or menu bold I accept the agreement, Scan by IP Range, Update Firmware, Push Settings selecting a series of options bold Start > All Programs > ViewSonic > ViewSonic Device Manager ii Table of Contents Copyright and Trademark Statements i Limitation of Liability i Trademark statements i About This User’s Manual ii Manual Structure and Subjects Notes, Tips, and Warnings Style Conventions ii ii ii 1 2 3 Overview 1 1.1 Introduction 2 1.2 Features 1.3 Supported Platforms 1.4 Supported Endpoint Devices 3 1.5 Minimum System Requirements 3 2 3 Installing and Upgrading ViewSonic Device Manager 2.1 Installing ViewSonic Device Manager 5 2.2 Installing Java Software 2.3 Initial Setup 10 2.4 Upgrading ViewSonic Device Manager 12 2.5 Uninstalling ViewSonic Device Manager 12 9 Using ViewSonic Device Manager 13 3.1 ViewSonic Device Manager 14 3.1.1 3.1.2 3.2 Establishing a Basic Administration Environment 16 3.2.1 3.2.2 3.2.3 3.2.4 3.2.5 3.2.6 3.2.7 3.2.8 3.2.9 3.2.10 3.2.11 3.2.12 3.2.13 3.2.14 3.2.15 3.2.16 3.3 Interface Overview 14 Available Tasks at a Glance 15 System Tab Overview 16 Available Tasks at a Glance 17 Managing Accounts for Administration 18 Managing Thin Client Firmware Files 19 Managing WES Package Files 22 Managing Client Snapshots 25 Managing Certificates of Remote Computers 27 Configuring Remote Deployment Settings 29 Selecting the Service IP of ViewSonic Device Manager 31 Configuring Auto-Logout for ViewSonic Device Manager 32 Configuring the Database Source of ViewSonic Device Manager 32 Selecting the Interface Language of ViewSonic Device Manager 34 Backing Up the Management Database 34 Managing Database Archive Files 35 Restoring a Database Archive File 36 Scheduling Automatically Performed Tasks 36 Adding Clients into a Managed Group 3.3.1 3.3.2 3.3.3 Scan Tab Overview 40 Available Tasks at a Glance 40 Client Detection and Management 40 40 4 3.3.4 3.3.5 3.3.6 3.3.7 3.4 4 93 Logs Tab Overview 98 Available Tasks at a Glance 98 Viewing Event Logs 99 Exporting Event Logs 100 Emptying Event Logs 100 Viewing Software Information 3.6.1 3.6.2 3.6.3 3.6.4 3.6.5 3.7 Thin Clients Tab Overview 47 Available Tasks at a Glance 48 Creating Client Groups 49 Managing Client Groups 50 Moving Clients to Another Group 51 Deleting Clients from a Group 52 Understanding Client Status Icons 53 Client Settings 54 Creating Setting Profile Groups 56 Managing Setting Profile Groups 57 Creating Client Setting Profiles 58 Managing Client Setting Profiles 61 Using Individualized Client Settings 64 Using Hybrid Client Settings 65 Pushing Settings to Clients through Your Local Network 67 Pulling Client Settings through Your Local Network 71 Pushing Certificates of Remote Computers to Clients 74 Sending Messages to Clients 75 Editing or Viewing the Basic Information about a Client 76 Rebooting Clients through Your Local Network 77 Shutting Down Clients through Your Local Network 80 Waking Clients through Your Local Network 83 Updating Client Firmware 86 Installing Software Packages 87 Taking Client Snapshots 89 Restoring Client Snapshots 90 Assisting a Client User Remotely 91 Exporting Client Data 93 Digging Out Profiles, Clients, or Event Logs with Quick Search Digging Out Clients with Filters 94 Managing Your Filters 96 Viewing and Managing Event Logs 98 3.5.1 3.5.2 3.5.3 3.5.4 3.5.5 3.6 41 Managing All Your Clients 47 3.4.1 3.4.2 3.4.3 3.4.4 3.4.5 3.4.6 3.4.7 3.4.8 3.4.9 3.4.10 3.4.11 3.4.12 3.4.13 3.4.14 3.4.15 3.4.16 3.4.17 3.4.18 3.4.19 3.4.20 3.4.21 3.4.22 3.4.23 3.4.24 3.4.25 3.4.26 3.4.27 3.4.28 3.4.29 3.4.30 3.4.31 3.5 Discovering Clients in the Whole Range of a Local Network Discovering Clients in a Specified Range of IP Addresses 43 Creating and Managing an IP Range List 44 Discovering Clients using a Predefined IP Range List 45 102 About Tab Overview 102 Available Tasks at a Glance 102 Viewing Information on ViewSonic Device Manager Viewing ViewSonic Contact Information 103 Viewing ViewSonic Software License Agreement 103 103 Accessing ViewSonic Device Manager Remotely with a Web Browser Configuring Client Settings 109 4.1 Desktop Virtualization and Client Configuration 110 4.2 Client Settings at a Glance 110 4.3 Editing or Adjusting a Group Configuration 4.4 Editing or Adjusting an Individual Configuration 116 4.5 Configuring Client Settings with ViewSonic Client Setup 118 114 104 1 Overview This chapter provides an overview of the ViewSonic Device Manager console. 1.1 Introduction A brief introduction to ViewSonic Device Manager 2 1.2 Features The key features of ViewSonic Device Manager 2 1.3 Supported Platforms Operating systems supported by ViewSonic Device Manager 3 1.4 Supported Endpoint Devices Client devices supported by ViewSonic Device Manager 3 1.5 Minimum System Requirements The minimum system requirements for the installation and operation of ViewSonic Device Manager 1 3 Overview Introduction 1.1 Introduction Desktop virtualization provides a new perspective to reconsider the design and implementation of an IT infrastructure. In a desktop virtualization infrastructure, a station is no longer a cumbersome desktop, but simply an endpoint device for users to access delivery services from the server(s). With the introduction of the desktop virtualization technologies, you can considerably benefit from: • On-demand application / desktop access • Centralized management of work environments • Drastically reduced endpoint software/hardware issues • Simplified system maintenance • Improved system security • More scalability with low-cost endpoint devices But still you need a powerful software for managing a large number of endpoint devices in a desktop virtualization infrastructure. The ViewSonic Device Manager console is designed to fill the need. It enables you to remotely deploy, manage, update clients, and assist users from a single computer. You can manage and update clients simply and quickly in groups with a flexible and secure mechanism. Additionally, you can remotely assist users in resolving problems or configuring local settings. 1.2 Features The key features of ViewSonic Device Manager are: • Pushing custom settings to a large number of clients • Updating firmware and installing software packages for clients • Taking client snapshots for mass deployment, system backup, and recovery • Rebooting, powering off, and waking clients through the local network • Scheduling automatically performed tasks • Helping users to troubleshoot problems remotely • Identifying clients and managing IT assets with automatically-captured client information 2 Overview Supported Platforms 1.3 Supported Platforms ViewSonic Device Manager supports the following operating systems: • Windows 7 • Windows Server 2003 • Windows Server 2008 R2 • Windows 8 • Windows Server 2008 • Windows Server 2012 / 2012 R2 1.4 Supported Endpoint Devices ViewSonic Device Manager supports the following ViewSonic client family: x86 based ARM based • SC-T45 • SC-T35 • SC-T46 • SC-T47 NOTE • The supported client list above is not exhausted; newly developed models may be included in the future. • For more information on detailed specifications of different models, please visit our website at www.ViewSoniccorp.com. 1.5 Minimum System Requirements The minimum system requirements for the installation and operation of ViewSonic Device Manager are as follows: • Pentium 4, 1.0 GHz processor or the equivalent • 512 MB of free system memory • 2 GB of free disk space for installation / 100 GB or more for firmware and snapshot management • 10/100 Mb Ethernet network adapter / network interface card • Java software or Java Runtime Environment (for the Shadow feature, see page 99) 3 2 Installing and Upgrading ViewSonic Device Manager This chapter gives detailed instructions on how to install and upgrade your ViewSonic Device Manager. 2.1 Installing ViewSonic Device Manager The installation of ViewSonic Device Manager 5 2.2 Installing Java Software The installation of Java Software or Java Runtime Environment 9 2.3 Initial Setup The initial setup of ViewSonic Device Manager 10 2.4 Upgrading ViewSonic Device Manager The upgrade of ViewSonic Device Manager 12 2.5 Uninstalling ViewSonic Device Manager The uninstallation of ViewSonic Device Manager 4 12 Installing and Upgrading ViewSonic Device Manager Installing ViewSonic Device Manager 2.1 Installing ViewSonic Device Manager To install ViewSonic Device Manager on your computer, please follow the steps below: NOTE • Before proceeding, ensure that: Your operating system is supported (see section 1.3 on page 4) Your computer meets system requirements (see section 1.5 on page 4) • To install a newer version of ViewSonic Device Manager, it’s recommended to install it directly without uninstalling the current ViewSonic Device Manager. For more information on how to upgrade your ViewSonic Device Manager, please refer to section “2.4 Upgrading ViewSonic Device Manager” on page 12. 1. Get a copy of the installation program of ViewSonic Device Manager for your computer. 2. Log in to your computer with an administrator account, and then locate and double-click that program. 3. Select the language used during the installation. 4. The Setup Wizard appears. 5. Click Next to continue. NOTE • It may take a few seconds for the wizard to enter the next page/step while preparing for the installation of ViewSonic Device Manager. 5 Installing and Upgrading ViewSonic Device Manager Installing ViewSonic Device Manager 6. A message appears prompting you to restart for the installation of a prerequisite program. Click to check Yes, restart the computer now, and then click Finish. 7. After restart, the Setup Wizard appears again. Click Next to continue. 8. The License Agreement page appears. Read this agreement, click to check I accept the agreement, and then click Next to continue. 6 Installing and Upgrading ViewSonic Device Manager Installing ViewSonic Device Manager 9. Use the default installation directory or click Browse to locate the desired one, and then click Next to continue. 10.Use the default Start menu folder or type to create a new folder for the shortcuts of programs. Or, click Browse to choose an existing folder. 11.Click to check / uncheck Create a desktop icon, and then click Next to continue. 7 Installing and Upgrading ViewSonic Device Manager Installing ViewSonic Device Manager 12.Change the default database password for the superuser or use the default. After completion, click Next to continue. NOTE • A superuser is a user who has full access to the database of ViewSonic Device Manager. 13.Click Install to start installing ViewSonic Device Manager on your computer. 8 Installing and Upgrading ViewSonic Device Manager Installing Java Software 14.After completion, click Finish to exit. 2.2 Installing Java Software To access full functionality of ViewSonic Device Manager, you need to install the Java software, which is free and downloadable from Java’s official website at java.com. The Java software or Java Runtime Environment is required for the Shadow feature of ViewSonic Device Manager, enabling you to remotely assist a client user. NOTE • For more details, please refer to section “3.4.28 Assisting a Client User Remotely” on page 99. It’s recommended to install 32-bit Java for ViewSonic Device Manager. In case that the computer where you install ViewSonic Device Manager also needs 64-bit Java for other purposes, you could install both 32-bit and 64-bit Java. NOTE • For more information, please visit Java’s website at java.com. • For Java Version 7 Update 51 or the later, you may need to add your computer to the (Security) Exception Site list. Go to Control Panel, click Java > Security > Edit Site List > Add, type https://localhost:10443, and then click OK to apply. 9 Installing and Upgrading ViewSonic Device Manager Initial Setup 2.3 Initial Setup When launching ViewSonic Device Manager for the first time, you need to complete the initial setup. Follow the instructions below to complete the required configuration: 1. Launch ViewSonic Device Manager on your computer. 2. A window appears prompting you to choose the service IP address and create an administrator account. Click the drop-down menu to select the desired IP address from the list of available IP addresses, type the desired account name and password, and then click Save to continue. NOTE • Your not connected LAN port may appear in the list of available IP addresses with the address value 0.0.0.0. • It’s strongly recommended to use a fixed IP address as the service IP of ViewSonic Device Manager. The change of the service IP may make all the managed clients become unmanageable. 3. The Login screen appears prompting you to sign in to ViewSonic Device Manager with your credentials (account name and password). 4. The management interface of ViewSonic Device Manager appears. 10 Installing and Upgrading ViewSonic Device Manager Initial Setup ViewSonic Device Manager NOTE • In next chapter, we will describe the functionality and use of ViewSonic Device Manager in details. 11 Installing and Upgrading ViewSonic Device Manager Upgrading ViewSonic Device Manager 2.4 Upgrading ViewSonic Device Manager To upgrade your ViewSonic Device Manager to a newer version, you can just install the new program without uninstalling the old one. For information on how to install ViewSonic Device Manager, please refer to section “2.1 Installing ViewSonic Device Manager” on page 5. NOTE • It’s highly recommended to upgrade your ViewSonic Device Manager without uninstalling the old version. If you uninstall the current ViewSonic Device Manager on a computer, all your settings and client CA (Certificate Authority) files will be removed. With a newly installed ViewSonic Device Manager, this computer will fail to manage clients which are originally under its management, and those clients will become unmanageable. WARNING • Before upgrading your ViewSonic Device Manager, ensure that you’ve logged out and closed the ViewSonic Device Manager console. 2.5 Uninstalling ViewSonic Device Manager To uninstall your ViewSonic Device Manager on a computer, please do the following: NOTE • To upgrade your ViewSonic Device Manager, it’s recommended not to uninstall the current ViewSonic Device Manager. For more information, please refer to section “2.4 Upgrading ViewSonic Device Manager” on page 12. • Ensure that you have backed up important data on ViewSonic Device Manager before proceeding. WARNING • Before uninstalling your ViewSonic Device Manager, ensure that you’ve logged out and closed the ViewSonic Device Manager console. 1. Uninstall your ViewSonic Device Manager through the Control Panel. 2. Follow the on-screen instructions to complete the uninstallation. 12 Using ViewSonic Device Manager 3 This chapter provides instructions on how to manage clients with ViewSonic Device Manager. 3.1 ViewSonic Device Manager Interface overview 14 3.2 Establishing a Basic Administration Environment System tab overview 16 Available tasks at a glance 17 3.3 Adding Clients into a Managed Group Scan tab overview 40 Available tasks at a glance 40 3.4 Managing All Your Clients Thin Clients tab overview 47 Available tasks at a glance 48 3.5 Viewing and Managing Event Logs Logs tab overview 98 Available tasks at a glance 98 3.6 Viewing Software Information About tab overview 102 Available tasks at a glance 102 3.7 Accessing ViewSonic Device Manager Remotely with a Web Browser How to access ViewSonic Device Manager anywhere any device with a Web browser 13 104 Using ViewSonic Device Manager ViewSonic Device Manager 3.1 ViewSonic Device Manager ViewSonic Device Manager enables you to remotely deploy, manage, update clients, and assist users from a single computer. You can manage clients simply and quickly in groups with a flexible and secure mechanism. Additionally, you can remotely assist users in resolving problems or configuring local settings. 3.1.1 Interface Overview To access ViewSonic Device Manager, please do the following: 1. Launch ViewSonic Device Manager on your computer. 2. Type your credentials, and then press Enter or click Login. The ViewSonic Device Manager window appears. Interface Overview 1 3 2 4 5 6 8 7 9 Interface Elements No. Name Description 1 Thin Clients tab Click to access client management. 2 Scan tab Click to look for unmanaged thin clients over your local network. 3 System tab Click to establish and configure the basic administration environment. 4 Logs tab Click to view event logs. 5 About tab Click to view information about ViewSonic Device Manager. 6 Logout button Click to log out from ViewSonic Device Manager. 7 Management / Information Area Select to perform desired tasks, configure desired settings, or view related information available under a selected tab. 8 Navigation Area Click to select a specific item, option, or task under a tab. 9 Message Area Click to view messages about management activities. 14 Using ViewSonic Device Manager ViewSonic Device Manager 3.1.2 Available Tasks at a Glance The following table shows functionality provided in each tab. For more details, please refer to the corresponding section as shown below: Tab Function List Section Page • Creating accounts for administration • Managing thin client firmware files • Managing WES package files • Managing client snapshots • Managing certificates of remote computers System • Configuring remote deployment settings • Configuring settings for ViewSonic Device Manager 3.2 Establishing a Basic Administration Environment 16 • Backing up the management database • Managing database archive files • Restoring management database • Scheduling automatically performed tasks • Looking for clients in the whole range of a local network Scan • Looking for clients in a specified range of IP addresses 3.3 Adding Clients into a Managed Group 40 3.4 Managing All Your Clients 47 3.5 Viewing and Managing Event Logs 98 • Looking for clients with predefined IP range lists • Creating group configuration for clients • Using individualized configuration for clients • Using hybrid configuration for clients • Pushing settings to clients • Pulling settings from clients • Pushing certificates to clients • Sending messages to clients Thin Clients • Rebooting clients remotely • Shutting down clients remotely • Waking clients remotely • Monitoring the use of clients • Controlling clients remotely • Exporting client data • Digging out profiles/clients with Quick Search • Digging out clients with filters • Viewing event logs Logs • Exporting event logs • Emptying event logs About • Viewing information on ViewSonic Device Manager • Viewing ViewSonic contact information • Viewing software license agreement 15 3.6 Viewing Software Information 102 Using ViewSonic Device Manager Establishing a Basic Administration Environment 3.2 Establishing a Basic Administration Environment 3.2.1 System Tab Overview System tab enables you to establish a basic administration environment. To access the functionality of System tab, click the tab on ViewSonic Device Manager. System Tab Overview 1 2 Interface Elements No. Name Description 1 Navigation Area Click to access the desired setting item. 2 Management Area Select to perform desired tasks, configure desired settings, or view related information available under a selected item. 16 Using ViewSonic Device Manager Establishing a Basic Administration Environment 3.2.2 Available Tasks at a Glance No. Available Task Section Page 1 Creating accounts for administration 3.2.3 18 2 Deleting an account 3.2.3 18 3 Editing an account 3.2.3 18 4 Importing thin client firmware files 3.2.4 19 5 Deleting thin client firmware files 3.2.4 19 6 Scanning thin client firmware files 3.2.4 19 7 Importing WES package files 3.2.5 22 8 Deleting WES package files 3.2.5 22 9 10 Scanning WES package files 3.2.5 22 Exporting client snapshots 3.2.6 25 11 Importing client snapshots 3.2.6 25 12 Deleting client snapshots 3.2.6 25 13 Scanning client snapshots 3.2.6 25 14 Importing certificates of remote computers 3.2.7 27 15 Deleting certificates of remote computers 3.2.7 27 16 Configuring remote deployment settings 3.2.8 29 17 Selecting the service IP address of ViewSonic Device Manager 3.2.9 31 18 Configuring auto-logout for ViewSonic Device Manager 3.2.10 32 19 Configuring the database source of ViewSonic Device Manager 3.2.11 32 20 Selecting the interface language of ViewSonic Device Manager 3.2.12 34 21 Backing up the management database 3.2.13 34 22 Downloading a database archive file 3.2.14 35 23 Uploading a database archive file 3.2.14 35 24 Deleting a database archive file 3.2.14 35 25 Restoring a database archive file 3.2.15 36 26 Scheduling automatically performed tasks 3.2.16 36 17 Using ViewSonic Device Manager Establishing a Basic Administration Environment 3.2.3 Managing Accounts for Administration Creating an Account To create an account for administration, please do the following: 1. On System tab, click Admin Account. 2. The Account list appears in Management area. NOTE • When you log in to ViewSonic Device Manager for the first time, you are prompted to create an administrator account for client management. This account will be specified in the Account list. 3. Click Add to open the Add window. 4. Type the desired user/account name and password. NOTE • You can click Authority drop-down menu to choose its type: Admin or User. The former has complete access to ViewSonic Device Manager; the latter is only for viewing Thin Clients and Logs tabs. 5. Click Add to apply. 6. The newly added account appears in the Account list. 18 Using ViewSonic Device Manager Establishing a Basic Administration Environment Deleting an Account To delete an account, please do the following: 1. On System tab, Click Admin Account. 2. The Account list appears in Management area. 3. Click to select the desired account. NOTE • To delete more than one account, Ctrl-click to select multiple accounts. 4. Click Delete on the top of the Account list. 5. The Delete window appears prompting for confirmation. 6. Click Yes to confirm. 7. The selected account is removed from the Account list. Adjusting an Account To adjust an existing account, please do the following: 1. On System tab, Click Admin Account. 2. The Account list appears in Management area. 3. Click to select the desired account. 4. Click Edit to open the Edit window. 5. Adjust the password or the description in the Information field. NOTE • If you only want to add or edit the description in the Information field, you need to type the current password for the selected account. 6. Click Modify to apply. 3.2.4 Managing Thin Client Firmware Files You can update firmware for your clients remotely with ViewSonic Device Manager. Before proceeding, you need to import firmware files of appropriate versions for ViewSonic Device Manager. NOTE • For instructions on how to update firmware for clients remotely, please see section “3.4.23 Updating Client Firmware” on page 86. 19 Using ViewSonic Device Manager Establishing a Basic Administration Environment Importing Thin Client Firmware Files To import a firmware file for thin clients, please do the following: NOTE • For information about availability of a newer or up-to-date version of client firmware file (.zip format), please contact your dealer. 1. On System tab, click Deployment > Firmware. 2. The Firmware list appears. NOTE • If you never imported firmware files into ViewSonic Device Manager, the Firmware list will be empty as shown above. 3. Click Import Firmware on the top of the Firmware list. 4. The Import Firmware window appears. 5. Click Browse to locate the desired firmware file, and then click Open to confirm. NOTE • ViewSonic Device Manager will automatically perform file check to ensure that the file is a valid firmware file for thin clients and there is no duplicate in the Firmware list. 20 Using ViewSonic Device Manager Establishing a Basic Administration Environment 6. Click Import to start importing the selected firmware file. 7. On completion, the imported firmware file appears as an entry in the Firmware list. Deleting Thin Client Firmware Files To delete a thin client firmware file, please do the following: 1. On System tab, click Deployment > Firmware. 2. The Firmware list appears in Management area. 3. Click to select the desired firmware file, and then click Delete Firmware on the top of the Firmware list. NOTE • To delete more than one firmware file, Ctrl-click to select multiple files. 4. The Delete Firmware window appears prompting you for confirmation. 5. Click Delete to confirm. 6. On completion, the selected firmware file is removed from the Firmware list. Scanning Thin Client Firmware Files The Scan Firmware feature helps you to discover the local or remote firmware files. There are two scenarios that you need the help of this feature. The first scenario is that you choose to update clients with remote firmware files rather than local imported ones. In this scenario, the local list of available firmware in ViewSonic Device Manager may be not in sync with the remote list of firmware files on another computer where you choose to get firmware files. The Scan Firmware feature can synchronize your local list with the remote one. NOTE • For instructions on how to configure your ViewSonic Device Manager to use remote firmware files on another computer for client management, please refer to section “3.2.8 Configuring Remote Deployment Settings” on page 29. 21 Using ViewSonic Device Manager Establishing a Basic Administration Environment Another scenario is when you copy the file set of an imported firmware file from the installation directory of another ViewSonic Device Manager into the same installation directory of your ViewSonic Device Manager, this firmware file may not appear as an entry in the Firmware list. NOTE • The default installation directory of ViewSonic Device Manager is C:\Program Files (x86)\ViewSonic. The file set of an imported firmware file is placed in C:\Program Files (x86)\ViewSonic\firmware, under an uppermost dedicated folder. In both scenarios, to synchronize the entries in the Firmware list with your local or remote firmware files, please do the following: 1. On System tab, Click Deployment > Firmware. 2. The Firmware list appears in Management area. 3. Click Scan Firmware on the top of the Firmware list. 4. On completion, the Firmware list is now in sync with your local or remote firmware files. 3.2.5 Managing WES Package Files With WES (Windows Embedded Standard) package files, you can install applications or language packs remotely for your WES-based thin clients. Before proceeding, you need to import package files of appropriate versions for ViewSonic Device Manager. NOTE • The Windows Embedded Standard version of your client may not support multiple user interface packs. In this case, installing a language pack for a client will replace its display (user interface) language with the new one. • For instructions on how to update your WES clients with package files remotely, please refer to “3.4.24 Installing Software Packages” on page 87. Importing WES Package Files To import a WES package file, please do the following: NOTE • For information about availability of a newer or up-to-date version of package file (.zip format), please contact your dealer. 1. On System tab, click Deployment > WES Package. 22 Using ViewSonic Device Manager Establishing a Basic Administration Environment 2. The Package list appears. NOTE • If you never imported WES package files into ViewSonic Device Manager, the Package list will be empty as shown above. 3. Click Import Package on the top of the list. 4. The Import Package window appears. 5. Click Browse to locate the desired package file, and then click Open to confirm. NOTE • ViewSonic Device Manager will automatically perform file check to ensure it’s a valid package file for WES-based clients and there is no duplicate in the Package list. 6. Click Import to start importing the desired package file. 7. On completion, the imported package file appears as an entry in the Package list. 23 Using ViewSonic Device Manager Establishing a Basic Administration Environment Deleting WES Packages To delete a WES package file, please do the following: 1. On System tab, click WES Package. 2. The Package list appears. 3. Click to select the desired package file, and then click Delete Package. 4. The Delete Package window appears prompting you for confirmation. 5. Click Delete to confirm. 6. The selected package file is removed from the Package list. Scanning WES Packages The Scan Package feature helps you to discover the local or remote WES package files. There are two scenarios that you need the help of this feature. The first scenario is that you choose to update clients with remote package files rather than local imported ones. In this scenario, the local list of available packages in ViewSonic Device Manager may be not in sync with the remote list of packages on another computer where you choose to get package files. The Scan Package feature can synchronize your local list with the remote one. NOTE • For instructions on how to configure your ViewSonic Device Manager to use remote package files on another computer for client management, please refer to section “3.2.8 Configuring Remote Deployment Settings” on page 29. Another scenario is when you copy the file set of an imported package file from the installation directory of another ViewSonic Device Manager into the same installation directory of your ViewSonic Device Manager, this package file may not appear as an entry in the Package list. NOTE • The default installation directory of ViewSonic Device Manager is C:\Program Files (x86)\ViewSonic. The file set of an imported package file is placed in C:\Program Files (x86)\ViewSonic\packages, under an uppermost dedicated folder. To synchronize entries in the Package list with the local or remote package files, please do the following: 1. On System tab, click Deployment > WES Package. 2. The Package list appears in Management area. 3. Click Scan Package on the top of the list. 4. On completion, the package file is added as an entry in the Package list. 24 Using ViewSonic Device Manager Establishing a Basic Administration Environment 3.2.6 Managing Client Snapshots A snapshot is the system copy of a client at a specific point of time, which you can use for mass deployment, system backup, and recovery. NOTE • ViewSonic SC-T35 thin clients do not support this feature. • For instructions on how to take a system snapshot for clients, please refer to section “3.4.25 Taking Client Snapshots” on page 89. Exporting Client Snapshots To export a client snapshot, please do the following: 1. On System tab, click Deployment > Snapshot. 2. The Snapshot list appears in Management area. NOTE • The Snapshot list might be empty, if you never took or imported client snapshots. 3. Click to select the desired client snapshot, and then click Export Snapshot on the top of the list. 4. The Export Snapshot window appears prompting for confirmation. 5. Click Export to confirm. 6. A window appears prompting you to choose between opening or saving the exported file. 7. Click to select Save File, and then click OK to confirm. 8. In the opened window, choose the location to save the exported file, and then click Save to confirm. 25 Using ViewSonic Device Manager Establishing a Basic Administration Environment Importing Client Snapshots To import a client snapshot, please do the following: NOTE • Ensure that you have got the desired client snapshot (.zip format) which is taken and exported from ViewSonic Device Manager on this or another computer. 1. On System tab, click Deployment > Snapshot. 2. The Snapshot list appears. 3. Click Import Snapshot on the top of the Snapshot list. 4. The Import Snapshot window appears. 5. Click Browse to locate the desired client snapshot, and then click Open to confirm. NOTE • ViewSonic Device Manager will automatically perform file check to ensure that the file is a valid snapshot and there is no duplicate in the Snapshot list. 6. Click Import to start importing the desired snapshot. 7. On completion, the snapshot appears as an entry in the Snapshot list. Deleting Client Snapshots To delete a client snapshot, please do the following: 1. On System tab, click Deployment > Snapshot. 2. The Snapshot list appears. 3. Click to select the desired snapshot, and then click Delete Snapshot on the top of the list. 4. The Delete Snapshot window appears prompting for confirmation. NOTE • To delete more than one snapshot, Ctrl-click to select multiple files. 5. Click Delete to confirm. 6. The selected snapshot is removed from the Snapshot list. Scanning Client Snapshots The Scan Snapshot feature helps you to discover the local or remote client snapshots. There are two scenarios that you need the help of this feature. The first scenario is that you choose to restore clients with remote snapshots rather than local imported ones. In this scenario, the local list of available snapshots in ViewSonic Device Manager may be not in sync with the remote list of snapshots on another computer where you choose to get snapshots. The Scan Snapshot feature can synchronize your local list with the remote one. 26 Using ViewSonic Device Manager Establishing a Basic Administration Environment NOTE • For instructions on how to configure your ViewSonic Device Manager to use remote snapshots on another computer for client management, please refer to section “3.2.8 Configuring Remote Deployment Settings” on page 29. Another scenario is when you copy a snapshot file set from the installation directory of another ViewSonic Device Manager into the same installation directory of your ViewSonic Device Manager, this snapshot may not appear as an entry in the Snapshot list. NOTE • The default installation directory of ViewSonic Device Manager is C:\Program Files (x86)\ViewSonic. All snapshots taken or imported through ViewSonic Device Manager are placed in C:\Program Files (x86)\ViewSonic\snapshot, under an uppermost dedicated folder. To synchronize entries in the Snapshot list with your local or remote snapshots, please do the following: 1. On System tab, click Deployment > Snapshot. 2. The Snapshot list appears in Management area. 3. Click Scan Snapshot on the top of the list. 4. On completion, the snapshot is added as an entry in the Snapshot list. 3.2.7 Managing Certificates of Remote Computers Thin clients are simple endpoint devices for accessing services from remote computers. To ensure connection security between thin clients and remote computers, certificates of remote computers where desktop virtualization services are delivered may be required in order to verify the identify of remote computers. You could import security certificates of remote computers, and then push certificates remotely to multiple thin clients with the help of ViewSonic Device Manager. Importing Certificates of Remote Computers To import the certificate of a remote computer, please do the following: 1. On System tab, click Deployment > Certificate. 2. The Certificate list appears in Management area. NOTE • If you never imported certificate files into ViewSonic Device Manager, the Certificate list will be empty as shown above. 27 Using ViewSonic Device Manager Establishing a Basic Administration Environment 3. Click Import Certificate on the top of the list. 4. The Import Certificate window appears. NOTE • ViewSonic Device Manager supports both PEM (Privacy Enhanced Mail) and DER (Distinguished Encoding Rules) format certificates. • The upper limit of imported certificates is 16. 5. Click Browse to locate the desired certificate file, and then click Open to confirm. NOTE • ViewSonic Device Manager will automatically perform file check to ensure there is no duplicate in the Certificate list. 6. Click Import to continue. 7. On completion, the imported certificate appears as an entry in the Certificate list. NOTE • While pushing certificates to thin clients, all certificates in the Certificate list will be imported to selected clients. For instructions on how to push certificates to clients, please refer to section “3.4.17 Pushing Certificates of Remote Computers to Clients” on page 74. 28 Using ViewSonic Device Manager Establishing a Basic Administration Environment Deleting Certificates of Remote Computers To delete the certificate of a remote computer, please do the following: 1. On System tab, click Deployment > Certificate. 2. The Certificate list appears in Management area. 3. Click to select the desired certificate. NOTE • To delete more than one certificate, Ctrl-click to select multiple entries. 4. Click Delete Certificate on the top of the Certificate list. 5. The Delete Certificate window appears prompting for confirmation. 6. Click Delete to confirm. 7. The selected certificate is removed from the Certificate list. 3.2.8 Configuring Remote Deployment Settings You can deploy, maintain, and upgrade your thin clients from a remote computer with ViewSonic Device Manager. All required files (firmware, snapshot, or package files) can come from the same computer where your ViewSonic Device Manager is installed, or another computer with the needed files. Remote Deployment Configuration Option Required Actions Using local updates and snapshots Import or create all required files on the same computer where the governing ViewSonic Device Manager is installed Using remote updates and snapshots Configure settings to get all needed files from another computer NOTE • In ViewSonic Device Manager, the local updates and snapshots are used by default. Maintaining or Deploying Clients with Local Updates or Snapshots To maintain or deploy clients with internal updates or snapshots, please do the following: 1. On System tab, click Deployment > Deploy Server. 2. The Deploy Settings pane appears in Management area. 29 Note Default Using ViewSonic Device Manager Establishing a Basic Administration Environment 3. Click the drop-down menu on each section (Firmware, Snapshot, and WES Packages) to select Use Internal Server, and then click Save to apply. Maintaining or Deploying Clients with Remote Updates or Snapshots To maintain or deploy clients with external updates or snapshots, please do the following: 1. On System tab, Click Deployment > Deploy Server. 2. The Deploy Settings pane appears in Management area. 3. Click the drop-down menu on a section (Firmware, Snapshot, or WES Packages) to select Use External Server, new fields appear for configuration. 30 Using ViewSonic Device Manager Establishing a Basic Administration Environment 4. In Firmware/Snapshot/WES Packages URL field, replace YourServerIP in the original URL with the IP address of another computer where you want to get updates and snapshots, type in the default credentials — user as the username and secret as the password, and then click Save to apply. 3.2.9 Selecting the Service IP of ViewSonic Device Manager To select the service IP address of your ViewSonic Device Manager, please do the following: 1. On System tab, click System Settings > General Settings. 2. Click the drop-down list of available service IP addresses to select the desired IP address. 3. Click Save to apply. NOTE • It’s strongly recommended to use a fixed IP address as the service IP of ViewSonic Device Manager. The change of the service IP may make all the managed clients become unmanageable. In case that the IP address of the computer where ViewSonic Device Manager is installed is changed, ensure that you make the Service IP setting here consistent with the new IP address. 31 Using ViewSonic Device Manager Establishing a Basic Administration Environment NOTE • In case that the service IP changes, your ViewSonic Device Manager will prompt you to select a new service IP when you log in to the management console. 3.2.10 Configuring Auto-Logout for ViewSonic Device Manager ViewSonic Device Manager allows you to configure its auto-logout to enhance the security of the management console. When configured, your session will be ended automatically when it’s idle for a specific amount of time. NOTE • By default, your administrative session will not be logged out automatically. To configure auto-logout for ViewSonic Device Manager, please do the following: 1. On System tab, click System Settings > General Settings. 2. Click the drop-down menu to select the desired amount of inactivity time. 3. Click Save to apply. 3.2.11 Configuring the Database Source of ViewSonic Device Manager ViewSonic Device Manager offers two ways to store its management database: one is to store the database on the same computer where ViewSonic Device Manager is installed; the other is on a different computer. By default, the management database is stored on the computer where ViewSonic Device Manager is installed. Using Local Management Database To use the local management database, please do the following: 1. On System tab, click System Settings > External Database. 32 Using ViewSonic Device Manager Establishing a Basic Administration Environment 2. The External Database pane appears in Management area. 3. Click the drop-down menu to select No. Using External Management Database To use the external and centralized management database, please do the following: 1. On System tab, click System Settings > External Database. 2. The External Database pane appears in Management area. 3. In Database section, click the drop-down menu to select Yes. 4. New sections with new fields appears for configuration. NOTE • Four database management systems are supported: PostgreSQL, MySQL, MsSQL (Microsoft SQL Server), and Oracle (Oracle Database). • Ensure that you have set up the desired database management system. 5. In Settings section, click the drop-down menu to select the type of your database management system, type the IP address of the database server, the port number, and the name of the database. 6. In Authorization section, type the user name and password for access of database. 7. Click Check Database to connect to the remote database. 33 Using ViewSonic Device Manager Establishing a Basic Administration Environment 3.2.12 Selecting the Interface Language of ViewSonic Device Manager To select the interface language of your ViewSonic Device Manager, please do the following: 1. On System tab, click System Settings > Language. 2. The System Language pane appears in Management area. 3. Click the drop-down list of available languages to select the desired interface language. 4. Click Save to apply. 3.2.13 Backing Up the Management Database To back up the management database of ViewSonic Device Manager, please do the following: 1. On System tab, click Backup and Restore. 2. In Database Backup section, type the desired file name prefix. TIP • The backup file is stored in the default directory as shown in Directory field. If you want to change the name of a backup file, locate the file and change its name. 3. Click Backup to store a copy of management database and client certificates. 4. On completion, the backup file appears at the top of the Archive File drop-down menu in Database Archive Management section. 34 Using ViewSonic Device Manager Establishing a Basic Administration Environment 3.2.14 Managing Database Archive Files Downloading a Database Archive File To download a database archive file, please do the following: 1. On System tab, click Backup and Restore. 2. In Database Archive Management section, click the Archive File drop-down menu to select the desired database archive file, and then click Download. 3. Click to check Save File, and then click OK to confirm. 4. In the opened window, navigate to the desired location, and then click Save to store the file. Uploading a Database Archive File To upload a database archive file, please do the following: 1. On System tab, click Backup and Restore. 2. In Database Archive Management section, click Upload to open the File Upload window. 3. Locate the desired database archive file, and then click OK to confirm. 4. The file is added to the Archive File drop-down menu. Deleting a Database Archive File To delete a database archive file, please do the following: 1. On System tab, click Backup and Restore. 2. In Database Archive Management section, click the drop-down menu to select the desired archive file. 3. Click Delete to remove the selected file. 35 Using ViewSonic Device Manager Establishing a Basic Administration Environment 3.2.15 Restoring a Database Archive File To restore a database archive file, please do the following: 1. On System tab, click Backup and Restore. 2. In Database Archive Management section, click the Archive File drop-down menu to select the desired archive file. 3. Click Restore to return the management database of ViewSonic Device Manager to the desired state. 3.2.16 Scheduling Automatically Performed Tasks ViewSonic Device Manager enables you to schedule tasks performed automatically at a specific time, allowing scheduled and automatic maintenance tasks for managed endpoint devices. To schedule an automatically performed task, please do the following: 1. On System tab, click Task Schedule. 2. The Task list appears in Management area. NOTE • The Task list might be empty, if you never created automatically performed tasks. 36 Using ViewSonic Device Manager Establishing a Basic Administration Environment 3. Click Add on the top of the Task list. 4. The Add Task Schedule pane appears in Management area. 5. On Schedule tab, type in or click to select the start date, time, the way to repeat, task comment, etc. 37 Using ViewSonic Device Manager Establishing a Basic Administration Environment 6. On Details tab, click Add to specify the action(s). NOTE • One task consists of one or more actions. 7. On Add window, type in or click to select the action order, type, performed action, action comment, etc., and then click OK to confirm. 38 Using ViewSonic Device Manager Establishing a Basic Administration Environment 8. After completion, the action(s) will be added to the Action list. 9. Click Save to confirm. The task entry will be added to the Task list. 39 Using ViewSonic Device Manager Adding Clients into a Managed Group 3.3 Adding Clients into a Managed Group 3.3.1 Scan Tab Overview Scan tab enables you to discover unmanaged clients over your local network, including clients that are not managed by the current ViewSonic Device Manager instance. To access the functionality of Scan tab, click the tab on ViewSonic Device Manager. Scan Tab Overview 2 1 Interface Elements No. Name Description 1 Navigation Area Click to check the desired client detection method. 2 Management Area Manage IP Range lists or discovered clients. 3.3.2 Available Tasks at a Glance No. Available Task Section Page 1 Discovering clients in the whole range of a local network 3.3.4 41 2 Discovering clients in a specified range of IP addresses 3.3.5 43 3 Discovering clients using predefined IP range lists 3.3.6 3.3.7 44 45 3.3.3 Client Detection and Management Your client is not managed by any ViewSonic Device Manager by factory default. To manage your clients with 40 Using ViewSonic Device Manager Adding Clients into a Managed Group ViewSonic Device Manager, you need to first detect unmanaged clients over your local network, and then add them into a managed group under your ViewSonic Device Manager. To look for a thin client over your local network, you can use different client detection options available under the Scan tab. The following table shows prerequisites and methods for detecting clients over your local network: Type Model Thin Client SC-T35 / SC-T45 / SC-T46 / SC-T47 Prerequisites • Clients are connected to the local network • Clients are powered up Method Section Manual Scan 3.3.4 3.3.5 3.3.6 Page 41 43 44 NOTE • If the computer where an ViewSonic Device Manager is installed connects to a local network, then the ViewSonic Device Manager is connected to the local network. • After adding clients into a managed group under your ViewSonic Device Manager, you can start remote management of clients. For details on how to manage your clients remotely, please refer to section “3.4 Managing All Your Clients” on page 47. 3.3.4 Discovering Clients in the Whole Range of a Local Network To discover unmanaged clients in the whole range of a local network and add the desired client(s) into a managed group under your ViewSonic Device Manager, please do the following: 1. On Scan tab, click to check Scan Local Network. 2. Click Start Scan. 3. On completion, the discovered clients are listed in Management area. 41 Using ViewSonic Device Manager Adding Clients into a Managed Group 4. Select the desired client(s), the preferred client group from the drop-down menu on the top of the Client list, and then click Put in group. NOTE • The default client group is Ungrouped. You can change the group of a client at a later time. To create new client groups, please refer to section “3.4.3 Creating Client Groups” on page 49. • To select multiple clients, just click to select each individual client. You can also use Select All and Unselect All on the top of the Client list to select/unselect clients. 5. On completion, the client(s) is managed by your ViewSonic Device Manager. NOTE • Whichever group you add a client to (including Ungrouped), once Put in group is executed successfully, the client will be managed by your ViewSonic Device Manager. 42 Using ViewSonic Device Manager Adding Clients into a Managed Group 3.3.5 Discovering Clients in a Specified Range of IP Addresses To discover unmanaged clients in a specified range of IP addresses and add the desired client(s) into a managed group under your ViewSonic Device Manager, please do the following: 1. On Scan tab, click to check Scan by IP Ranges. 2. The IP range fields appear. 3. Type in the desired IP range, and then click Start Scan. 4. On completion, the discovered clients are listed in Management area. 5. Select the desired client(s), the preferred client group from the drop-down menu on the top of the Client list, and then click Put in group. NOTE • The default client group is Ungrouped. You can change the group of a client at a later time. To create new client groups, please refer to section “3.4.3 Creating Client Groups” on page 49. • To select multiple clients, just click to select each individual client. You can also use Select All and Unselect All on the top of the Client list to select/unselect clients. 6. On completion, the client(s) is managed by your ViewSonic Device Manager. NOTE • Whichever group you add a client to (including Ungrouped), once Put in group is executed successfully, the client will be managed by your ViewSonic Device Manager. 43 Using ViewSonic Device Manager Adding Clients into a Managed Group 3.3.6 Creating and Managing an IP Range List You can define different IP ranges for your local network, and then discover unmanaged clients within a specific range of IP addresses when needed. Creating an IP Range List To create an IP Range list, please do the following: 1. On Scan tab, click to check Scan by List of IP Ranges. 2. Click Add on the top of the IP Range list. 3. The Add window appears. 4. Type in the name for this entry of IP range, and specify the desired IP range using From and To fields. 5. Click Save to add this range entry. 6. Repeat steps 2 through 5 to add other range entries to your IP Range list. Managing the IP Range List To manage your IP Range list, please do the following: 1. On Scan tab, click to check Scan by List of IP Ranges. 2. The IP Range list appears in Management area. 3. Click Add, Edit, or Delete to make changes to your IP Range list. 44 Using ViewSonic Device Manager Adding Clients into a Managed Group 3.3.7 Discovering Clients using a Predefined IP Range List To discover unmanaged clients using a predefined IP Range list and add the desired client(s) into a managed group under ViewSonic Device Manager, please do the following: NOTE • If you haven’t create any IP Range list, please refer to “3.3.6 Creating and Managing an IP Range List” on page 44 for instructions. 1. On Scan tab, click to check Scan by List of IP Ranges. 2. The IP Range list appears. 3. Click to select the desired IP range, and then click Scan to look for unmanaged clients within the range. 4. While searching for thin clients, the selected IP range is shown on the right. 5. On completion, the discovered clients are listed in Management area. 45 Using ViewSonic Device Manager Adding Clients into a Managed Group 6. Select the desired client(s), the preferred client group from the drop-down menu on the top of the client list, and then click Put in group. NOTE • The default client group is Ungrouped. You can change the group of a client at a later time. To create new client groups, please refer to section “3.4.3 Creating Client Groups” on page 49. • To select multiple clients, just click to select each individual client. You can also use Select All and Unselect All above the Client list to select/unselect clients. 7. On completion, the client(s) is managed by your ViewSonic Device Manager. NOTE • Whichever group you add a client to (including Ungrouped), once Put in group is executed successfully, the client will be managed by your ViewSonic Device Manager. 46 Using ViewSonic Device Manager Managing All Your Clients 3.4 Managing All Your Clients 3.4.1 Thin Clients Tab Overview Thin Clients tab helps you to manage all your clients. To access the functionality of Thin Clients tab, click the tab on ViewSonic Device Manager. Thin Clients Tab Overview 2 1 Interface Elements No. Name Description 1 Navigation Area Click to access the desired management item. 2 Management Area Select to perform desired tasks, configure desired settings, or view related information available under a selected item. 47 Using ViewSonic Device Manager Managing All Your Clients 3.4.2 Available Tasks at a Glance No. Available Task Section Page 1 Creating client groups 3.4.3 49 2 Managing client groups 3.4.4 50 3 Managing clients in a group 3.4.5 3.4.6 51 52 4 Creating setting profile groups 3.4.9 56 5 Managing setting profile groups 3.4.10 57 6 Creating client setting profiles 3.4.11 58 7 Managing client setting profiles 3.4.12 61 8 Using individualized client settings 3.4.13 64 9 Using hybrid client settings 3.4.14 65 10 Pushing settings to clients through your local network 3.4.15 67 11 Pulling settings from clients through your local network 3.4.16 71 12 Pushing certificates of remote computers to clients 3.4.17 74 13 Sending messages to clients 3.4.18 75 14 Editing or viewing basic information about a client 3.4.19 76 15 Rebooting clients through your local network 3.4.20 77 16 Shutting down clients through your local network 3.4.21 80 17 Waking clients through your local network 3.4.22 83 18 Updating client firmware 3.4.23 86 19 Installing software packages 3.4.24 87 20 Taking client snapshots 3.4.25 89 21 Restoring client snapshots 3.4.26 90 22 Assisting a client user remotely 3.4.27 91 23 Monitoring a client remotely 3.4.27 91 24 Controlling a client remotely 3.4.27 91 25 Exporting client data 3.4.28 93 26 Digging out profiles or managed clients with Quick Search 3.4.29 93 27 Digging out managed clients with filters 3.4.30 94 28 Managing your client filters 3.4.31 96 48 Using ViewSonic Device Manager Managing All Your Clients 3.4.3 Creating Client Groups You can create a client group for putting a set of clients together for ease of management. NOTE • The default client group is Ungrouped. You can change a client’s group if needed. To create a client group, please do the following: 1. On Thin Clients tab, click Thin Clients in Navigation area. 2. Click Add Group on the top of the Management area. 3. The Add Thin Client Group window appears prompting you for the name of the group. 4. Type in the desired name, and then click OK to confirm. 5. The newly created group then appears in the Client Group list. 49 Using ViewSonic Device Manager Managing All Your Clients 3.4.4 Managing Client Groups Renaming a Client Group To rename a client group, please do the following: 1. On Thin Clients tab, click Thin Clients in Navigation area. 2. In the Client Group list, click to select the desired client group, and then click Rename on the top of the Client Group list. 3. The Rename window appears prompting your for the new name of the selected client group. 4. Type in the new name for the group, and then click OK to confirm. Deleting a Client Group To delete a client group, please do the following: 1. On Thin Clients tab, click Thin Clients in Navigation area. 2. In the Client Group list, click to select the desired client group, and then click Delete on the top of the Client Group list. 3. The Delete window appears prompting for confirmation. • To keep all clients in this group, leave Delete All Subitems unchecked, and then click Yes to confirm. All clients in this group will be moved to Ungrouped (the system default). • To delete all clients in this group as well, click to check Delete All Subitems, and then click Yes to confirm. All clients in this group will be removed from your ViewSonic Device Manger. NOTE • Removing a client from your ViewSonic Device Manager will release the client from the management of ViewSonic Device Manager. 4. The client group is deleted. 50 Using ViewSonic Device Manager Managing All Your Clients 3.4.5 Moving Clients to Another Group To move a client to another group, please do the following: 1. On Thin Clients tab, click Thin Clients to expand the Client Group tree, and then click the client group to which the desired client belongs. 2. Click to select the desired client, and then click Command on the top of the Client list to open the Command menu. NOTE • To select more than one client, Ctrl-click or use Select All to select multiple clients. 3. Click Move to open the Move window. 4. Click to select the desired group, and then click OK to confirm. 51 Using ViewSonic Device Manager Managing All Your Clients 3.4.6 Deleting Clients from a Group To delete a client from a group, please do the following: 1. On Thin Clients tab, click Thin Clients to expand the Client Group tree, and then click the client group to which the desired client belongs. 2. Click to select the desired client, and then click Delete on the top of the Client list. NOTE • To select more than one client, Ctrl-click or use Select All to select multiple clients. 3. A message appears prompting for confirmation. 4. Click OK to confirm. NOTE • Removing a client from your ViewSonic Device Manager will release the client from the management of ViewSonic Device Manager. 52 Using ViewSonic Device Manager Managing All Your Clients 3.4.7 Understanding Client Status Icons In the client list of a client group or a filter, a client status icon is placed in front of each client to indicate the current state of the client. NOTE • With filters, you can access and manage a specific set of clients quickly on ViewSonic Device Manager. For more information on filters, please refer to section “3.4.30 Digging Out Clients with Filters” on page 94. The status icon changes according to different states of a client. Six types of icons are available: Understanding Client Status Icons State Icon Description Online Indicates that the client is turned on at the moment. Offline Indicates that the client is turned off at the moment. Reboot needed Indicates that you need to reboot the client for a configuration change to take effect. Modified Indicates that a client configuration change has been made on ViewSonic Device Manager and you need to push the change to the client. Pushed Indicates that ViewSonic Device Manager has pushed a configuration change to the client. Indicates that the managed client is now added and managed by another instance of ViewSonic Device Manager. Unknown NOTE • The icon made up of a little display with a letter L, W, or Z on its screen indicates that the client is a Linux-based, WES-based (Windows Embedded Standard) thin client. • A tooltip pops up as shown below if you hover your mouse pointer over an icon. 53 Using ViewSonic Device Manager Managing All Your Clients 3.4.8 Client Settings The desktop virtualization solution is available in various forms: user state virtualization, application virtualization, session based virtualization, virtual machine based virtualization, or even a hybrid approach. ViewSonic all-in-one, mobile, t-series zero / thin clients can meet a wide range of forms and needs. However, To get your client device ready for use in your IT infrastructure, you might need to customize client settings to meet the specific needs in your desktop virtualization plan. Additionally, for thin client devices of different divisions, departments, or areas, you might want to offer different computing resources and access privileges. To meet the specific types of policies on computing resources and access privileges, you might need to customize client settings as well. NOTE • The available tabs and setting items may vary, depending on: the client model, firmware version, and the used operating system. For more details, please see chapter 4 “Configuring Client Settings” on page 113. Remote and Local Management of Client Settings You can configure your client settings locally or remotely. With ViewSonic Device Manager, you can configure client settings remotely through your local network. With ViewSonic Client Setup, client settings can be configured locally on a specific client. NOTE • The ViewSonic Client Setup console is a built-in tool for almost all ViewSonic client products. This tool allows you to configure client settings locally on clients. Some client settings are only available locally on clients. You can configure those settings locally through the ViewSonic Client Setup console. For a detailed list of client settings that are only locally available, please refer to section “4.2 Client Settings at a Glance” on page 115. Group Configuration and Individual Configuration ViewSonic Device Manager enables you to apply a group configuration (profile), an individual configuration, or a hybrid of both to a client to set up its operating environment. With ViewSonic Client Setup, you can also make a desired individual configuration for a client. NOTE • A group configuration (profile) is a set of client settings shared by a set of clients. • An individual configuration is a set of client settings applied only to a single client. • A hybrid configuration is a mix of both group and individual configuration. 54 Using ViewSonic Device Manager Managing All Your Clients Client Configuration Individual Configuration applied to a client through VDM or VCS Group Configuration (Profile) applied to a client through VDM Local Configuration applied to a client through VCS VDM: ViewSonic Device Manager VCS: ViewSonic Client Setup Method Configuration Type Console Section Page Local configuration ViewSonic Client Setup (VCS) 4.2 4.5 115 124 Individual configuration ViewSonic Client Setup (VCS) 4.2 4.5 115 124 Group configuration ViewSonic Device Manager (VDM) 3.4.11 58 Individual configuration ViewSonic Device Manager (VDM) 3.4.13 64 Local Remote Please refer to related sections as shown above for detailed instructions on client configuration. Locking the Setting Values ViewSonic Device Manager also allows you to lock a setting value. When a setting value is locked, the gray lock ) or orange ( ) lock icon. You are not allowed to lock icon of the setting value will become the secured blue ( a setting value with ViewSonic Client Setup when you manage client settings locally on a client. icon indicates that the current value of the corresponding setting In ViewSonic Device Manager, a blue lock icon then indicates that the value or data comes from item comes from a group configuration; an orange lock an individual configuration. 55 Using ViewSonic Device Manager Managing All Your Clients 3.4.9 Creating Setting Profile Groups A setting profile (group configuration) is a set of client settings shared by a set of clients. Through a setting profile (group configuration), you can configure client settings in groups. A setting profile group is a set of profiles grouped together for ease of management. NOTE • To create a setting profile, first you need to select or create the profile group to which the new profile belongs. You can use the system default (Ungrouped), and then change the group of the profile at a later time if necessary. To create a setting profile group, please do the following: 1. On Thin Clients tab, click Profiles. 2. The Profile Group list appears. NOTE • Ungrouped is the system default group. 3. Click Add Group on the top of the Profile Group list. 4. The Add Profile Group window appears prompting for the name of the profile group. 5. Type in the desired name for the profile group, and then click OK to confirm. 6. The newly created profile group appears in the Profile Group list now. 56 Using ViewSonic Device Manager Managing All Your Clients 3.4.10 Managing Setting Profile Groups Renaming a Setting Profile Group To rename a setting profile group, please do the following: 1. On Thin Clients tab, click Profiles. 2. In the Profile Group list, click to select the desired profile group, and then click Rename on the top of the list. 3. The Rename window appears prompting for the new name. 4. Type in the new name for the profile group, and then click OK to confirm. Deleting a Setting Profile Group To delete a setting profile group, please do the following: 1. On Thin Clients tab, click Profiles. 2. In the Profile Group list, click to select the desired profile group, and then click Delete on the top of the list. 3. The Delete window appears prompting for confirmation. • To keep all setting profiles in this group, leave Delete All Subitems unchecked, and then click Yes to confirm. All setting profiles in this group will be moved to Ungrouped (the system default). • To delete all setting profiles in this group as well, click to check Delete All Subitems, and then click Yes to confirm. All setting profiles in this group will be removed. NOTE • A setting profile is a set of client settings shared by a set of clients. Deleting a setting profile will change client settings of the corresponding clients. 57 Using ViewSonic Device Manager Managing All Your Clients 3.4.11 Creating Client Setting Profiles A setting profile (group configuration) is a set of client settings shared by a group of clients. Through a setting profile, you can remotely configure client settings in groups. NOTE • To have a basic understanding of client configuration, please refer to section “3.4.8 Client Settings” on page 54. A simple picture of how to create a well-defined setting profile can be given by two steps: Step 1: Create a set of shared client settings (group configuration) Step 2: Specify the applicable scope of the setting profile STEP 1: Create a set of shared client settings To create a client setting profile (group configuration), please do the following: 1. On Thin Clients tab, click Profiles to expand the Profile Group tree, and then click to select the profile group. NOTE • You need to select the profile group to which the new profile belongs first. You can use the system default (Ungrouped), and change the group at a later time if necessary. For detailed instructions on how to create a profile group, please refer to section “3.4.9 Creating Setting Profile Groups” on page 56. 2. Click Add on the top of the Profile list. 3. The Add window appears prompting for the name, description, applicable platform, and models. NOTE • A field marked with an asterisk is the required field. 58 Using ViewSonic Device Manager Managing All Your Clients 4. Type in the desired name, description, choose the applicable platform and models, and then click Save to confirm. 5. The Edit Configuration window for the profile (group configuration) appears. 6. Use this window to edit client settings of this profile. NOTE • The Edit Configuration window for the profile (group configuration) is just like a remote version of ViewSonic Client Setup on a client. You can simply edit client settings for this setting profile through this window. For detailed instructions on how to configure client settings, please refer to “Configuring Client Settings” on page 113. 7. After completion, close the window. 8. The newly created setting profile is added to the Profile list. STEP 2: Specify the applicable scope of the setting profile To specify the applicable scope of the setting profile, please do the following: 1. Click to select the newly created profile, and then click Edit on the top of the Profile list to specify the applicable scope of the profile. 2. Both the Profile Information and Available Clients panes appear in Management area. 3. Click at the right top of the Available Clients pane. 59 Using ViewSonic Device Manager Managing All Your Clients 4. The Select Clients window appears. A tree view of client groups and individual clients is provided in this window for specifying the applicable scope of this setting profile. 5. Click on arrows to expand the tree and click to select the desired client group or individual clients. • To select all clients under a client group, click to select the group. • To select multiple clients under a client group, Ctrl-click to select the desired clients. NOTE • The tree view of client groups and individual clients corresponds exactly to client groups and individual clients established under Thin Clients tab. For information on how to create client groups and add clients to a group, please refer to “3.4.3 Creating Client Groups” on page 49 and “3.3.3 Client Detection and Management” on page 40 separately. • A client can only be associated with a setting profile. If you associate a client with a new setting profile, it will be automatically removed from the old one. • Associating a client with a profile does not actually change the settings of the client. You need to push settings to the client for the change to take effect (a reboot may be required as well). For instructions on how to push settings to a client, please refer to section “3.4.15 Pushing Settings to Clients through Your Local Network” on page 67. 6. After completion, click OK to confirm the selection of applicable clients. 7. Click Save in the Profile Information pane to complete the specification of applicable scope. NOTE • Only a well defined setting profile is actually used for remote configuration of multiple clients. If the applicable scope of a setting profile is not specified, the profile (group configuration) doesn’t affect any client. • From now on, we will call a client configuration set up by applying a shared setting profile a group configuration. 60 Using ViewSonic Device Manager Managing All Your Clients 3.4.12 Managing Client Setting Profiles Adjusting a Setting Profile To edit a setting profile (group configuration), please do the following: 1. On Thin Clients tab, click Profiles to expand the Profile Group tree, and then click the profile group to which the desired setting profile belongs. 2. The Profile list appears in Management area. 3. Click to select the desired setting profile. 4. Select Edit Configuration to adjust client settings for the selected profile or select Edit to adjust the profile information and/or the applicable scope of the selected profile. • To adjust client settings, change desired settings directly in the opened Edit Configuration window. • To adjust profile information, make changes in the Profile Information pane, and then click Save to apply. NOTE • For detailed instructions on the adjustment of client settings or profile information, please refer to section “3.4.11 Creating Client Setting Profiles” on page 58. • To adjust the applicable scope of this profile, use click Save to apply. Button to make desired changes, and then Description Click to select all clients in the client list. Click to unselect all clients in the client list. Click to add new clients. Click to remove the selected clients. Copying a Setting Profile To copy a setting profile (group configuration), please do the following: 1. On Thin Clients tab, click Profiles to expand the Profile Group tree, and then click the profile group to which the desired setting profile belongs. 2. The Profile list appears in Management area. 3. Click to select the desired setting profile, and then click Copy. 4. The Copy window appears prompting for the name, description, and profile group. 61 Using ViewSonic Device Manager Managing All Your Clients NOTE • A field marked with an asterisk is the required field. 5. Provide the required data, and then click Save to confirm. 6. The Edit Configuration window for the profile (group configuration) appears. NOTE • The following steps are similar to those for creating a new setting profile. More information, including both screenshots and notes, can be found in section “3.4.11 Creating Client Setting Profiles” on page 58. 7. Use this window to edit client settings of this profile. 8. After completion, close the window. 9. The newly created setting profile is added to the Profile list. NOTE • If you create a new profile by copying a well-defined setting profile, only the part of client settings is copied. The applicable scope of the original profile is not included. 10.Click to select the newly created profile, and then click Edit on the top of the Profile list. 11.Both the Profile Information and Available Clients panes appear in Management area. 12.Click at the right top of the Available Clients pane. 13.The Select Clients window appears. A tree view of client groups and individual clients is provided in the window for specifying the applicable scope of this setting profile. 14.Click on arrows to expand the tree and click to select the desired client group or clients. • To select all clients under a client group, click to select the client group. • To select multiple clients under a client group, Ctrl-click to select the desired clients. 15.After completion, click OK to confirm the selection of applicable clients. 16.Click Save in Profile Information pane to complete the specification of applicable scope. 62 Using ViewSonic Device Manager Managing All Your Clients Moving a Setting Profile To move a setting profile (group configuration) to another profile group, please do the following: 1. On Thin Clients tab, click Profiles to expand the Profile Group tree, and then click the profile group to which the desired setting profile belongs. 2. The Profile list appears in Management area. 3. Click to select the desired setting profile, and then click Move. 4. The Move window appears. 5. Click to select the desired profile group, and then click OK to confirm. 6. The selected setting profile is moved to the desired profile group. Deleting a Setting Profile To remove a setting profile (group configuration) from a profile group, please do the following: 1. On Thin Clients tab, click Profiles to expand the Profile Group tree, and then click to select the profile group. 2. The Profile list appears in Management area. 3. Click to select the desired setting profile, and then click Delete. 4. The Delete window appears prompting for confirmation. 5. Click Yes to confirm. NOTE • A setting profile (group configuration) is a set of client settings shared by a set of clients. Deleting a well-defined setting profile will change client settings of the corresponding clients. 63 Using ViewSonic Device Manager Managing All Your Clients 3.4.13 Using Individualized Client Settings An individual configuration is a set of client settings applied only to a single client. NOTE • To have a basic understanding of client configuration, please refer to section “3.4.8 Client Settings” on page 54. • To ensure that your ViewSonic Device Manager is in sync with the setting values on managed clients, it’s recommended to pull client settings from all managed clients for ViewSonic Device Manager before editing individualized client settings. For detailed instructions on how to pull client settings from managed clients, please refer to section “3.4.16 Pulling Client Settings through Your Local Network” on page 71. To apply an individual configuration to a client, please do the following: 1. On Thin Clients tab, click Thin Clients to expand the Client Group tree, and then click to select the client group to which the desired client belongs. 2. The Client list appears in Management area. 3. Click to select the desired client, and then click Edit Configuration. 4. The Edit Configuration window for the client appears. 5. Use this window to edit the individual configuration. 64 Using ViewSonic Device Manager Managing All Your Clients NOTE • The Edit Configuration window is just like a remote version of ViewSonic Client Setup. You can simply edit client settings for this client through this window. , this setting value comes from the • If the lock icon of a setting value is blue group configuration (profile). You can only change the value by modifying/ removing the group configuration (profile) or applying a new one. • A client configuration using both group and individual configurations will be called a hybrid configuration (see section “3.4.14 Using Hybrid Client Settings” on page 65 for more details). • For detailed instructions on how to configure specific client settings, please refer to chapter 4 “Configuring Client Settings” on page 113. 6. After completion, close the window. 7. The Apply Thin Client Configuration window appears prompting for confirmation of when to apply. 8. Click Now to apply the configuration immediately or click Later to apply at a later time. NOTE • If you choose to apply at a later time here, you can apply this individual configuration to the client using the Pushing Settings feature. 3.4.14 Using Hybrid Client Settings A hybrid configuration is a combination of a group configuration (profile) and an individual configuration. NOTE • To have a basic understanding of client configuration, please refer to section “3.4.8 Client Settings” on page 54. A simple picture of how to use a hybrid configuration can be given by two steps: Step 1: Apply a group configuration to the selected client. Step 2: Apply an individual configuration to the client. 65 Using ViewSonic Device Manager Managing All Your Clients STEP 1: Apply a group configuration to the selected client To apply a group configuration to a client, please do the following: 1. On Thin Clients tab, click Thin Clients to expand the Client Group tree, and then click the client group to which the desired client belongs. 2. The Client list appears. 3. Click to select the desired client, and then click Edit. 4. The Thin Client Information pane appears in Management area. 5. Click the Profile drop-down menu to select the desired group configuration (profile), associating the selected client with this configuration, and then click Save to apply. NOTE • The other way to associate a client with a group configuration (profile) is to add the client to the applicable scope of the desired profile. For more information, refer to section “3.4.11 Creating Client Setting Profiles” on page 58. STEP 2: Apply an individual configuration to the client To apply an individual configuration to the client next, please do the following: NOTE • To ensure that your ViewSonic Device Manager is in sync with the setting values on managed clients, it’s recommended to pull client settings from all managed clients for ViewSonic Device Manager before editing individualized client settings. For detailed instructions on how to pull client settings from managed clients, please refer to section “3.4.16 Pulling Client Settings through Your Local Network” on page 71. 1. Click to select the desired client again, and then click Edit Configuration this time. 2. Edit the individual configuration for the selected client. NOTE • For more details, please refer to section “3.4.13 Using Individualized Client Settings” on page 64. 66 Using ViewSonic Device Manager Managing All Your Clients 3.4.15 Pushing Settings to Clients through Your Local Network The Push Settings feature enables you to sync up client configuration on a client with the one set up in remote ViewSonic Device Manager. You can then configure client settings remotely through your local network. NOTE • Some settings can only be configured locally on clients. See section “3.4.8 Client Settings” on page 54 and chapter 4 “Configuring Client Settings” on page 113 for more details. Pushing Settings to a Client To push settings to a client, please do the following: NOTE • To ensure that your ViewSonic Device Manager is in sync with the setting values on managed clients, it’s recommended to pull client settings from all managed clients for ViewSonic Device Manager before editing individualized client settings. For detailed instructions on how to pull client settings from managed clients, please refer to section “3.4.16 Pulling Client Settings through Your Local Network” on page 71. 1. On Thin Clients tab, click Thin Clients to expand the Client Group tree, and then click the client group to which the desired client belongs. 2. The Client list appears. 3. Click to select the desired client, and then click Command on the top of the Client list. NOTE • To select more than one client, Ctrl-click to select the desired clients. • Ensure that all selected clients are powered up. Otherwise, you may fail to push settings to some clients. You can remotely know the current status of a client through the Status icon in front of the client. For information on the Status icons, please refer to section “3.4.7 Understanding Client Status Icons” on page 53. 67 Using ViewSonic Device Manager Managing All Your Clients 4. The Command menu appears. 5. Click to select Push Settings. 6. A window appears prompting for confirmation. 7. Click OK to confirm. 8. The Push Settings window appears showing the progress and result of pushing settings. 9. After completion, click Close to exit. 10.Check the status of the client through the Status icon in front of it. If needed, restart the client to complete the configuration changes on the client. 68 Using ViewSonic Device Manager Managing All Your Clients Pushing Settings to a Client Group To push settings to a client group, please do the following: NOTE • To ensure that your ViewSonic Device Manager is in sync with the setting values on managed clients, it’s recommended to pull client settings from all managed clients for ViewSonic Device Manager before editing individualized client settings. For detailed instructions on how to pull client settings from managed clients, please refer to section “3.4.16 Pulling Client Settings through Your Local Network” on page 71. 1. On Thin Clients tab, click Thin Clients to expand the Client Group tree. 2. Right-click on the desired client group to open a popup menu, and then click to select Push Settings. 3. The Pushing Settings window appears showing the progress and result of pushing settings. NOTE • Ensure that all clients in the group are powered up. Otherwise, you may fail to push settings to some clients. You can remotely know the current status of a client through the Status icon in front of the client. For information on the Status icons, please refer to section “3.4.7 Understanding Client Status Icons” on page 53. 4. After completion, click Close to exit. 5. Check the status of clients in the group through the Status icon in front of clients. If needed, restart clients to complete the configuration changes on clients. 69 Using ViewSonic Device Manager Managing All Your Clients Pushing Settings to All Client Groups To push settings to all client groups, please do the following: NOTE • To ensure that your ViewSonic Device Manager is in sync with the setting values on managed clients, it’s recommended to pull client settings from all managed clients for ViewSonic Device Manager before editing individualized client settings. For detailed instructions on how to pull client settings from managed clients, please refer to section “3.4.16 Pulling Client Settings through Your Local Network” on page 71. 1. On Thin Clients tab, right-click on Thin Clients in Navigation area to open a popup menu. 2. Click to select Push Settings. 3. The Push Settings window appears showing the progress and result of pushing settings. NOTE • Ensure that all clients are powered up. Otherwise, you may fail to push settings to some clients. You can remotely know the current status of a client through the Status icon in front of the client. For information on the Status icons, please refer to section “3.4.7 Understanding Client Status Icons” on page 53. 4. After completion, click Close to exit. 5. Check the status of clients through the Status icon in front of clients. If needed, restart clients to complete the configuration changes on clients. 70 Using ViewSonic Device Manager Managing All Your Clients 3.4.16 Pulling Client Settings through Your Local Network The Pull Settings feature enables you to retrieve settings from a client and store in ViewSonic Device Manager, which help you sync up the client configuration in ViewSonic Device Manager with the one set up locally on a client. NOTE • Some settings can only be configured locally on clients. These settings cannot be retrieved from clients and stored in ViewSonic Device Manager. See section “3.4.8 Client Settings” on page 54 and chapter 4 “Configuring Client Settings” on page 113 for more details. Pull Settings from a Client To pull setting from a client, please do the following: 1. On Thin Clients tab, click Thin Clients to expand the Client Group tree, and click to select the client group to which the desired client belongs. 2. The Client list appears. 3. Click to select the desired client, and then click Command on the top of the Client list. NOTE • To select more than one client, Ctrl-click to select the desired clients. • Ensure that all selected clients are powered up. Otherwise, you may fail to pull settings from some clients. You can remotely know the current status of a client through the Status icon in front of the client. For information on the Status icons, please refer to section “3.4.7 Understanding Client Status Icons” on page 53. 4. The Command menu appears. 5. Click to select Pull Settings. 6. A window appears prompting for confirmation. 71 Using ViewSonic Device Manager Managing All Your Clients 7. Click OK to confirm. 8. The Pull Settings window appears showing the progress and result of retrieving settings. 9. After completion, click Close to exit. Pull Settings for a Client Group To pull settings for a client group, please do the following: 1. On Thin Clients tab, click Thin Clients to expand the Client Group list. 2. Right-click on the desired client group to open a popup menu, and then click to select Pull Settings. 3. The Pull Settings window appears showing the progress and result of retrieving settings. NOTE • Ensure that clients in the selected group are all powered up. Otherwise you may fail to pull settings from some clients. You can remotely know the current status of a client through the Status icon in front of the client. For information on the Status icons, please refer to section “3.4.7 Understanding Client Status Icons” on page 53. 4. After completion, click Close to exit. 72 Using ViewSonic Device Manager Managing All Your Clients Pull Settings for all Client Group To pull settings fro all client groups, please do the following: 1. On Thin Clients tab, right-click on Thin Clients in Navigation area to open a popup menu. 2. Click to select Pull Settings. 3. The Pull Settings window appears showing the progress and result of retrieving settings. NOTE • Ensure that all clients are powered up. Otherwise, you may fail to pull settings from some clients. You can remotely know the current status of a client through the Status icon in front of the client. For information on the Status icons, please refer to section “3.4.7 Understanding Client Status Icons” on page 53. 4. After completion, click Close to exit. 73 Using ViewSonic Device Manager Managing All Your Clients 3.4.17 Pushing Certificates of Remote Computers to Clients To push certificates of remote computers to a thin client, please do the following: 1. On Thin Clients tab, click Thin Clients to expand the Client Group tree, and then click the client group to which the desired client belongs. 2. The Client list appears. 3. Click to select the desired client, and then click Command on the top of the Client list. 4. The Command menu appears. 5. Click to select Push Certificate. 6. A window appears prompting for confirmation. 7. Click OK to confirm. 8. The Push Certificates window appears showing the progress and result of pushing certificates. 9. After completion, click Close to exit. 74 Using ViewSonic Device Manager Managing All Your Clients 3.4.18 Sending Messages to Clients To send a message to the managed client(s), please do the following: 1. On Thin Clients tab, click Thin Clients to expand the Client Group tree, and then click the client group to which the desired client belongs. 2. The Client list appears. 3. Click to select the desired client(s), and then click Command on the top of the Client list. 4. The Command menu appears. 5. Click to select Send Message. 6. A window appears prompting you to type in the countdown second(s) and message. 7. Type in the data, and then click OK to confirm. 8. The message will be sent to the desired client(s). 75 Using ViewSonic Device Manager Managing All Your Clients 3.4.19 Editing or Viewing the Basic Information about a Client To edit or view the basic information about a client, please do the following: 1. On Thin Clients tab, click Thin Clients to expand the Client Group tree, and then click the client group to which the desired client belongs. 2. The Client list appears. 3. Click to select the desired client, and then click Edit on the top of the Client list. 4. The Thin Client Information pane appears. 5. Adjust the data of the client or view the basic information about the client. • To adjust the name, comment, profile (group configuration), Asset ID for the client, or type in the new data, and then click Save to apply. NOTE • When selecting a profile (group configuration) from the drop-down menu, you add the client into the applicable scope of the selected profile. • After viewing the basic information, click Back to return to the Client list. 76 Using ViewSonic Device Manager Managing All Your Clients 3.4.20 Rebooting Clients through Your Local Network The Reboot feature enables you to restart multiple clients through your local network without one by one going through the restart procedure. Most of the time, adjusting client settings and updating client firmware require a restart for those changes to take effect. With this feature, you are equipped with a necessary element for remote and centralized management of a large number of endpoint devices. Rebooting a Client through Your Local Network To restart a client through your local network, please do the following: 1. On Thin Clients tab, click Thin Clients to expand the Client Group tree, and then click to select the client group to which the desired client belongs. 2. The Client list appears. 3. Click to select the desired client, and then click Command to open the Command menu. 4. Click to select Reboot. NOTE • To select more than one client, Ctrl-click to select the desired clients. WARNING • Ensure that no important tasks are performed on the selected clients. 5. On the selected client, a warning message appears to notify the user of the planned reboot and allow the user to cancel the action if necessary. 6. After completion, the Status icon will indicate the client is on-line again. 77 Using ViewSonic Device Manager Managing All Your Clients NOTE • For information on the meanings of the Status icons, please refer to “3.4.7 Understanding Client Status Icons” on page 53. Rebooting a Client Group through Your Local Network To restart a client group through your local network, please do the following: 1. On Thin Clients tab, click Thin Clients to expand the Client Group tree. 2. Right-click on the desired client group to open a popup menu. 3. Click to select Reboot. WARNING • Ensure that no important tasks are performed on clients in the selected group. 4. On each client of this group, a warning message appears to notify the user of the planned reboot and allow the user to cancel the action if necessary. 5. After completion, the Status icons will indicate clients of this group are on-line again. NOTE • For information on the meanings of the Status icons, please refer to “3.4.7 Understanding Client Status Icons” on page 53. 78 Using ViewSonic Device Manager Managing All Your Clients Rebooting All Client Groups through Your Local Network To restart all client groups through your local network, please do the following: 1. On Thin Clients tab, right-click to open a popup menu. 2. Click to select Reboot. WARNING • Ensure that no important tasks are performed on clients. 3. On all managed clients, a warning message appears to notify the user of the planned reboot and allow the user to cancel the action if necessary. 4. After completion, the Status icons will indicate all managed clients are on-line again. NOTE • For information on the meanings of the Status icons, please refer to “3.4.7 Understanding Client Status Icons” on page 53. 79 Using ViewSonic Device Manager Managing All Your Clients 3.4.21 Shutting Down Clients through Your Local Network Shutting Down a Client through Your Local Network To shut down a client through your local network, please do the following: 1. On Thin Clients tab, click Thin Clients to expand the Client Group tree, and then click to select the client group to which the desired client belongs. 2. The Client list appears. 3. Click to select the desired client, and then click Command to open the Command menu. 4. Click to select Shutdown. NOTE • To select more than one client, Ctrl-click to select the desired clients. WARNING • Ensure that no important tasks are performed on the selected clients. 5. On the selected client, a warning message appears to notify the user of the planned shutdown and allow the user to cancel the action if necessary. 6. After completion, the Status icon will indicate the client is off-line. 80 Using ViewSonic Device Manager Managing All Your Clients NOTE • For information on the meanings of the Status icons, please refer to “3.4.7 Understanding Client Status Icons” on page 53. Shutting Down a Client Group through Your Local Network To shut down a client group through your local network, please do the following: 1. On Thin Clients tab, click Thin Clients to expand the Client Group tree. 2. Right-click on the desired client group to open a popup menu. 3. Click to select Shutdown. WARNING • Ensure that no important tasks are performed on clients in the selected group. 4. The Shutdown window appears prompting for confirmation. 5. Click Now to confirm. 6. On each client of this group, a warning message appears to notify the user of the planned shutdown and allow the user to cancel the action if necessary. 7. After completion, the Status icons will indicate clients of this group are off-line. 81 Using ViewSonic Device Manager Managing All Your Clients NOTE • For information on the meanings of the Status icons, please refer to “3.4.7 Understanding Client Status Icons” on page 53. Shutting Down All Client Groups through Your Local Network To shut down all client groups through your local network, please do the following: 1. On Thin Clients tab, right-click to open a popup menu. 2. Click to select Shutdown. WARNING • Ensure that no important tasks are performed on clients. 3. The Shutdown window appears prompting for confirmation. 4. On all managed clients, a warning message appears to notify the user of the planned shutdown and allow the user to cancel the action if necessary. 5. After completion, the Status icons will indicate all managed clients are off-line. NOTE • For information on the meanings of the Status icons, please refer to “3.4.7 Understanding Client Status Icons” on page 53. 82 Using ViewSonic Device Manager Managing All Your Clients 3.4.22 Waking Clients through Your Local Network The Wake on LAN feature enables you to wake multiple clients through your local network if clients are connected to power outlets and the local network. Waking a Client through Your Local Network To wake a client through your local network, please do the following: 1. On Thin Clients tab, click Thin Clients to expand the Client Group tree, and then click to select the client group to which the desired client belongs. 2. The Client list appears. 3. Click to select the desired client, and then click Command to open the Command menu. NOTE • To select more than one client, Ctrl-click to select the desired clients. 4. Click to select Wake On LAN. 5. The selected client is powered up. 6. After completion, the Status icon will indicate the client is on-line. 83 Using ViewSonic Device Manager Managing All Your Clients NOTE • For information on the meanings of the Status icons, please refer to “3.4.7 Understanding Client Status Icons” on page 53. Waking a Client Group through Your Local Network To wake a client group through your local network, please do the following: 1. On Thin Clients tab, click Thin Clients to expand the Client Group tree. 2. Right-click on the desired client group to open a popup menu. 3. Click to select Wake On LAN. 4. The Wake On LAN window appears prompting for confirmation. 5. Click Now to confirm. 6. Each client in this group is powered up. 7. After completion, the Status icons will indicate clients of this group are on-line. NOTE • For information on the meanings of the Status icons, please refer to “3.4.7 Understanding Client Status Icons” on page 53. 84 Using ViewSonic Device Manager Managing All Your Clients Waking All Client Groups through Your Local Network To wake all client groups through your local network, please do the following: 1. On Thin Clients tab, right-click to open a popup menu. 2. Click to select Wake On LAN. 3. After completion, the Status icons will indicate all managed clients are on-line. NOTE • For information on the meanings of the Status icons, please refer to “3.4.7 Understanding Client Status Icons” on page 53. 85 Using ViewSonic Device Manager Managing All Your Clients 3.4.23 Updating Client Firmware To update the firmware for your client, please do the following: NOTE • Updating client firmware will NOT erase any client configuration. 1. On Thin Clients tab, click Thin Clients to expand the Client Group tree, and then click the client group to which the desired client belongs. 2. The Client list appears. 3. Click to select the desired client, and then click Command on the top of the Client list. NOTE • To select more than one client, Ctrl-click to select the desired clients. WARNING • Ensure that no important tasks are performed on the selected clients. 4. The Command menu appears. 5. Click to select Update Firmware. 86 Using ViewSonic Device Manager Managing All Your Clients 6. The Update Firmware window appears prompting you to select the firmware version and system language. 7. Click drop-down menus to select the desired firmware version and system language, and then click OK to confirm. 8. On the selected client, a warning message appears to notify the user of the planned reboot and allow the user to cancel the action if necessary. 9. After completion, the client is updated with the desired firmware and system language. 3.4.24 Installing Software Packages To install a software package for your client, please do the following: NOTE • Installing additional software packages is allowed only for WES-based (Windows Embedded Standard) clients. 1. On Thin Clients tab, click Thin Clients to expand the Client Group tree, and then click the client group to which the desired client belongs. 2. The Client list appears. 3. Click to select the desired client, and then click Command on the top of the Client list. NOTE • To select more than one client, Ctrl-click to select the desired clients. WARNING • Ensure that no important tasks are performed on the selected clients. 87 Using ViewSonic Device Manager Managing All Your Clients 4. The Command menu appears. 5. Click to select Partial Update. 6. The Partial Update window appears prompting you to select the software package. 7. Click the drop-down menu to select the desired software package, and then click OK to confirm. 8. On the selected client, a warning message appears to notify the user of the planned reboot and allow the user to cancel the action if necessary. 9. After completion, the desired software package is installed on the selected client. TIP • To check remotely if the installation is completed, select the client, and then click Edit to view the basic information about a client. For more details, refer to section “3.4.19 Editing or Viewing the Basic Information about a Client” on page 76. 88 Using ViewSonic Device Manager Managing All Your Clients 3.4.25 Taking Client Snapshots A snapshot is the system copy of a client at a specific point of time, which you can use for mass deployment, system backup, and recovery. NOTE • ViewSonic SC-T35 thin clients do not support this feature. To take a system snapshot for a client, please do the following: 1. On Thin Clients tab, click Thin Clients to expand the Client Group tree, and then click to select the client group to which the desired client belongs. 2. The Client list appears. 3. Click to select the desired client, and then click Command on the top of the Client list. NOTE • You can take system snapshot for only one client at a time. 4. The Command menu appears. 5. Click to select Take Snapshot. 6. The Take Snapshot window appears prompting you to provide the name of the system snapshot. 7. Type the name for the snapshot or use the default, and then click OK to confirm. 89 Using ViewSonic Device Manager Managing All Your Clients 8. On the selected client, a warning message appears to notify the user of the planned reboot and allow the user to cancel the action if necessary. 9. After completion, the system snapshot is added to the Snapshot list. NOTE • To access the Snapshot list, click System tab, and then click Deployment > Snapshot. • Refer to section “3.2.6 Managing Client Snapshots” on page 25 for instructions on how to manage your snapshots. 3.4.26 Restoring Client Snapshots To restore a system copy of a client, please do the following: 1. On Thin Clients tab, click Thin Clients to expand the Client Group tree, and then click the client group to which the desired client belongs. 2. The Client list appears. 3. Click to select the desired client, and then click Command on the top of the Client list. 4. The Command menu appears. 5. Click to select Install Snapshot. 6. The Install Snapshot window appears prompting you to select a snapshot. 7. Click the drop-down menu to select the desired snapshot, and then click OK to confirm. 8. On the selected client, a warning message appears to notify the user of the planned reboot and allow the user to cancel the action if necessary. 9. After completion, the client is restored to the desired state. 90 Using ViewSonic Device Manager Managing All Your Clients 3.4.27 Assisting a Client User Remotely The Shadow feature enables you to remotely assist client users in resolving problems or configuring local settings. You can remotely monitor and control a client just like a local client user. NOTE • Ensure that you have installed the Java software or Java Runtime Environment. It’s required to execute the Shadow feature. To remotely assist a client user, please do the following: 1. On Thin Clients tab, click Thin Clients to expand the Client Group tree, and then select the client group to which the desired client belongs. 2. The Client list appears. 3. Click to select the desired client, and then click Command on the top of the Client list. NOTE • It’s not allowed to select multiple clients while executing the Shadow feature. However, you could do it one by one for multiple clients. 4. The Command menu appears. 5. Click to select Shadow. 6. The Java software is launched displaying an animated picture on the screen as below. 7. A warning message appears with the certificate information. Click Yes to continue. 8. Another warning message appears with the information about the application digital signature. Click Run to continue. 91 Using ViewSonic Device Manager Managing All Your Clients 9. The VNC Authentication window may appear prompting you for the Shadow password. 10.Type in your Shadow password, and then click OK to confirm. 11.A window pops up with the desktop screen of the selected client. 12.Now you can remotely monitor and control the client to assist the client user. NOTE • The user of the client could also control the system with the local keyboard and mouse. 92 Using ViewSonic Device Manager Managing All Your Clients 3.4.28 Exporting Client Data The Export feature available on the top of the Client Group list or the Client list allows you export an inventory of managed clients. To export an inventory of managed clients, please do the following: 1. On Thin Clients tab, click to select the desired group in the Navigation area. 2. Click Export on the top of the Client Group list or the Client list. 3. A window appears prompting you to select the Export format: CSV or XML. 4. Click the drop-down menu to select the desired format, and then click Export. 5. A window appears prompting you to save or open the generated file. Click to select the desired option, and then click OK to confirm. 3.4.29 Digging Out Profiles, Clients, or Event Logs with Quick Search 93 Using ViewSonic Device Manager Managing All Your Clients At the bottom of each Profile, Client, or Log list, you can access Quick Search to help you dig out the profiles, clients, or event logs. NOTE • Event logs will be introduced on section “3.5.1 Logs Tab Overview” on page 98. • You can also use filters to find out the desired clients within the managed clients. For details, please refer to section “3.4.30 Digging Out Clients with Filters” on page 94. To dig out the desired profile, client, or event log on a Profile, Client, Event Log list, please do the following: 1. Open the Profile, Client, or Log List. • On Thin Clients tab, click Profiles or Thin Clients, and then click the group to which the Profile or Client list belongs to open the Profile or Client list. • On ViewSonic Device Manager, click on Logs tab to open the Log list. 2. The Profile, Client or Log list appears in Management area. 3. At the bottom of the list, click the Quick Search button . 4. The Quick Search bar appears. 5. Click the drop-down menu to select the desired search type and enter the desired search keyword. 6. Click Search to start searching for profiles, clients, or event logs. 7. On completion, the Result list appears above the Quick Search bar. 3.4.30 Digging Out Clients with Filters ViewSonic Device Manager enables you to create filters for digging out clients from all managed clients. With filters, you can access and manage a specific set of clients quickly. NOTE • You can also use Quick Search to dig out clients within managed clients. For details, please refer to “3.4.29 Digging Out Profiles, Clients, or Event Logs with Quick Search” on page 93. 94 Using ViewSonic Device Manager Managing All Your Clients Adding a Filter To add a filter, please do the following: 1. On Thin Clients tab, right click on the Filters in Navigation area. 2. A popup menu appears. 3. Click to select Add Filter. 4. The Add New Filter and Filter Preview panes appear in Management area. 5. Type in the desired name for this filter. 6. Click to select the desired field name, operator, and then type in the value for a filter condition. NOTE • Most information about a client, which can be used as filter conditions, are available in the Thin Client Information pane. To access Thin Client Information pane, please refer to section “3.4.19 Editing or Viewing the Basic Information about a Client” on page 76 for detailed instructions. 7. Click Add to add a condition to a filter. 8. Repeat steps 5 through 7 to add a new condition. 9. Click Preview to view the result of a filter. The result is displayed in the Filter Preview pane. 10.Click Save to create the filter. 95 Using ViewSonic Device Manager Managing All Your Clients Using a Client Filter Once client filters are created, you can access the desired client list quickly just by clicking the corresponding filter. All clients which meets the defined conditions will be specified in the client list. To use a client filter, please do the following: 1. On Thin Clients tab, click Filters to expand the Filter tree. 2. Click to select the desired filter. 3. The desired Client list appears. 3.4.31 Managing Your Filters Deleting a Filter To delete a filter, please do the following: 1. On Thin Clients tab, click Filters in Navigation area. 2. The Filter list appears in Management area. 3. Click to select the desired filter, and then click Delete on the top of the Filter list. NOTE • To delete more than one filter, Ctrl-click to select multiple entries in the Filter list. 4. The Delete window appears prompting for confirmation. 5. Click Yes to confirm. 96 Using ViewSonic Device Manager Managing All Your Clients Adjusting a Filter To adjust a filter, please do the following: 1. On Thin Clients tab, click Filters in Navigation area. 2. The Filter list appears in Management area. 3. Click to select the desired filter, and then click Edit on the top of the Filter list. 4. The Filter Condition List and Filter Preview panes appear in Management area. 5. Adjust conditions for the filter, and then click Save to apply. 97 Using ViewSonic Device Manager Viewing and Managing Event Logs 3.5 Viewing and Managing Event Logs 3.5.1 Logs Tab Overview Logs tab enables you to view event logs about the management of your clients. To access the functionality of Logs tab, click the tab on ViewSonic Device Manager. Logs Tab Overview 1 2 Interface Elements No. Name Description 1 Navigation Bar Click to select the desired type and scope of event logs. 2 Management Area Manage event logs. 3.5.2 Available Tasks at a Glance No. 1 Available Task Viewing your event logs Section Page 3.5.3 99 2 Exporting your event logs 3.5.4 100 3 Emptying your event logs 3.5.5 100 98 Using ViewSonic Device Manager Viewing and Managing Event Logs 3.5.3 Viewing Event Logs To review event logs of ViewSonic, please do the following: 1. On ViewSonic Device Manager, click Logs tab. 2. The Log list appears. • To view log entries on different pages, click to change to the first/previous/next/last page. • To view log entries within a specific scope, click the drop-down menus to limit the scope, and then click Apply to confirm. 99 Using ViewSonic Device Manager Viewing and Managing Event Logs 3.5.4 Exporting Event Logs To export event logs of your system, please do the following: 1. On ViewSonic Device Manager, click Logs tab. 2. The Log list appears. • To export log entries within a specific scope, click the drop-down menus to define the scope, and then click Apply to confirm. • To export all log entries, ensure that, on drop-down menus, the selected options do not limit the scope of the Log list. NOTE • You can click Reset, and then click Apply to get the complete log entries. 3. Click Export. 4. The Export window appears prompting you to select the desired export format. 5. Click the drop-down menu to select the desired format (.CSV or .XML), and then click Export to continue. 6. A window appears prompting you to choose between opening or saving the exported file. 7. Click to select Save File, and then click OK. 8. In the opened window, locate the desired directory to save the file. 3.5.5 Emptying Event Logs To empty event logs of your system, please do the following: NOTE • You cannot partially delete log entries. WARNING • Emptying log will delete all log entries. Ensure that you don’t need the information in the future before proceeding. 100 Using ViewSonic Device Manager Viewing and Managing Event Logs 1. On ViewSonic Device Manager, click Logs tab. 2. The Log list appears. 3. Click Empty Log on the top of the Log list. 4. The Empty Log window appears prompting for confirmation. 5. Click Yes to confirm. 6. All log entries are deleted from ViewSonic Device Manager. NOTE • A new log entry about emptying log will be added to the Log list. 101 Using ViewSonic Device Manager Viewing Software Information 3.6 Viewing Software Information 3.6.1 About Tab Overview About tab provides the information about ViewSonic Device Manager and ViewSonic Computer Corporation. To access the information of About tab, click the tab on ViewSonic Device Manager. About Tab Overview 2 1 Interface Elements No. Name Description 1 Navigation Area Click to access the desired information. 2 Information Area Displays the selected item. 3.6.2 Available Tasks at a Glance No. Available Task Section Page 1 Viewing information on ViewSonic Device Manager 3.6.3 103 2 Viewing ViewSonic contact information 3.6.4 103 3 Viewing ViewSonic Software License Agreement 3.6.5 103 102 Using ViewSonic Device Manager Viewing Software Information 3.6.3 Viewing Information on ViewSonic Device Manager To view information on ViewSonic Device Manager, please do the following: 1. On About tab, click Product in Navigation area. 2. The version of ViewSonic Device Manager, the supported client models, and imported firmware versions are shown in Information area. 3.6.4 Viewing ViewSonic Contact Information To view ViewSonic contract information, please do the following: 1. On About tab, click Contact in Navigation area. 2. Our website address and contact information are shown in Information area. 3.6.5 Viewing ViewSonic Software License Agreement To view ViewSonic Software License Agreement, please do the following: 1. On About tab, click License in Navigation area. 2. ViewSonic Software License Agreement is shown in Information area. 103 Using ViewSonic Device Manager Accessing ViewSonic Device Manager Remotely with a Web Browser 3.7 Accessing ViewSonic Device Manager Remotely with a Web Browser You can access ViewSonic Device Manager installed on a remote computer with a Web browser. ViewSonic Device Manager supports Internet Explorer, Mozilla Firefox, and Google Chrome. With a Web browser-capable computer, you can access ViewSonic Device Manager anywhere to manage all your clients. NOTE • The computer you use to access ViewSonic Device Manager through a Web browser must be in the same network segment as the remote computer where the ViewSonic Device Manager is installed. To access ViewSonic Device Manager through a Web browser, please follow the steps below: 1. Open your Web browser. 2. In the Address bar of the browser, enter the IP address and the number of the communication port for the remote computer where ViewSonic Device Manager is installed, and then press Enter. Please type in the IP address in the following format: https://Your IP address:10443 3. The browser is launched with a page displaying a message about the security certificate of the remote computer. Message about Security Certificate: Google Chrome 104 Using ViewSonic Device Manager Accessing ViewSonic Device Manager Remotely with a Web Browser Message about Security Certificate: Mozilla Firefox Message about Security Certificate: Microsoft Internet Explorer 4. Install a valid security certificate for the remote computer to ensure the communication between your browser and the remote computer. To bypass, follow the instructions available on the browser: • For Google Chrome, click Proceed anyway. • For Mozilla Firefox, click I Understand the Risks > Add Exception > Confirm Security Exception. • For Microsoft Internet Explorer, click Continue to this website > Add, and then add the remote computer to the trusted sites. 5. The Login page appears on the browser prompting for credentials (account name and password). 105 Using ViewSonic Device Manager Accessing ViewSonic Device Manager Remotely with a Web Browser Login Page: Google Chrome Login Page: Mozilla Firefox 106 Using ViewSonic Device Manager Accessing ViewSonic Device Manager Remotely with a Web Browser Login Page: Microsoft Internet Explorer 6. Type in your credentials, and then press Enter to log in to ViewSonic Device Manager. 7. The start page of ViewSonic Device Manager appears in your browser. Start Page of ViewSonic Device Manager: Google Chrome 107 Using ViewSonic Device Manager Accessing ViewSonic Device Manager Remotely with a Web Browser Start Page of ViewSonic Device Manager: Mozilla Firefox Start Page of ViewSonic Device Manager: Microsoft Internet Explorer 8. Now you can start using ViewSonic Device Manager. 108 4 Configuring Client Settings This chapter provides basic instructions on client configuration. 4.1 Desktop Virtualization and Client Configuration Endpoint configuration in a desktop virtualization infrastructure 110 4.2 Client Settings at a Glance Available client setting items on ViewSonic Device Manager and ViewSonic Client Setup 110 4.3 Editing or Adjusting a Group Configuration How to edit or adjust a group configuration (profile) shared by a group of clients 114 4.4 Editing or Adjusting an Individual Configuration How to edit or adjust an individual configuration applied only to a single client 116 4.5 Configuring Client Settings with ViewSonic Client Setup How to configure client settings with ViewSonic Client Setup 109 118 Configuring Client Settings Desktop Virtualization and Client Configuration 4.1 Desktop Virtualization and Client Configuration The desktop virtualization is available in various forms: user state virtualization, application virtualization, session based virtualization, virtual machine based virtualization, or even a hybrid approach. ViewSonic all-in-one, mobile, t-series thin clients can meet a wide range of desktop virtualization forms and needs. To get your client device ready for use in your IT infrastructure, you might need to customize client settings to meet the specific needs in your desktop virtualization plan. 4.2 Client Settings at a Glance The following table provides brief descriptions of client setting items. NOTE • The available tabs and setting items may vary, depending on: the client model, firmware version, and the used operating system. • Some setting items are only available locally on client devices. You can adjust those settings through ViewSonic Client Setup. In the table below, settings that are only available locally on clients are marked with an asterisk (*). 110 Configuring Client Settings Client Settings at a Glance Tab Setting Remote Desktop Citrix ICA Description Click to configure RDP (Remote Desktop Protocol) connection settings and create shortcuts on the local desktop and START menu for Remote Desktop sessions. Click to configure Citrix ICA (Independent Computing Architecture) connection settings and create shortcuts on the local desktop and START menu for ICA sessions. Citrix XenApp Click to configure Citrix XenApp connection settings and create a Start menu folder and/or desktop folder for accessing application delivery services. VMware View Click to configure VMware View connection settings and create shortcuts on the local desktop and START menu for View sessions. GO-Global Click to configure GO-Global Client connection settings and create shortcuts on the local desktop and START menu for accessing application delivery services. Web Browser Click to configure general (for WES-based clients only) or specific browser session settings. A desktop shortcut is created for specific browser sessions launched with the desired initial web page. The used Web browser may vary, depending on the operating system of your client model. SSH Click to configure SSH (Secure Shell) session settings and create shortcuts on the local desktop and START menu for SSH sessions. XDMCP Click to configure XDMCP (X Display Manager Control Protocol) connection settings and create shortcuts on the local desktop and START menu for accessing desktop delivery services. Applications Acrobat Reader User Interface Icon Click to enable/disable Acrobat Reader on your client. Display Click to configure your display settings. Desktop Click to customize your system language and desktop. Keyboard Mouse Screensaver Click to adjust your keyboard settings. Click to adjust your mouse settings. Click to configure your screensaver settings. 111 Configuring Client Settings Client Settings at a Glance Tab Setting USB Storage Devices Audio Printer * Ethernet * PPPoE * Network Icon Description Click to configure settings for USB storage devices. Click to configure settings for audio devices. Click to add local or network printers for your client device. Click to configure your wired network settings. Click to configure PPPoE connection settings and create an Internet connection. VPN * Click to configure VPN (Virtual Private Network) connection settings and create a secure and reliable connection over the Internet. Hosts Click to create the mapping of IP addresses to the names of host servers. You can then use the name of a host server instead of its IP address wherever you need to specify an IP address while configuring client settings. Host Name * Wireless * Proxy Click to change the host name of your client device. Click to configure your wireless network settings and create a wireless connection. Click to configure proxy settings for Web-based access to services. The settings available here are only applicable to services that use Web-based access, such as (Microsoft) Remote Web Access and (Citrix) Web Logon connection types. 112 Configuring Client Settings Client Settings at a Glance Tab Setting Description Time and Date (Time Zone) Click to configure date and time settings. Password Click to configure your password settings. Firmware Update * Click to update firmware through the network. This feature is only applicable when this client is managed by the ViewSonic Device Manager console. Snapshot Click to take a snapshot (system copy at a specific point of time) for your client device, which you can use for mass deployment, system backup, and recovery. Appliance Mode Click to enable/disable the Appliance mode to allow/disallow the automatic Remote Desktop session. In Appliance mode, the client starts up with the desired Remote Desktop session and shuts down when the user logs off the session. Quick Connection System Icon Miscellaneous Terminal Click to enable/disable the Quick Connection mode after system startup. Click to change the host name of your client device. Click to enable/disable the execution of the text-based (command-line) functions. FBWF Click to configure FBWF (File-Based Write Filter) settings. As a file-based write filter, FBWF will intercept all write attempts to a protected volume and redirect those attempts to a RAM cache. After restart, all changes are discarded. UWF Click to configure UWF (Unified Write Filter) settings. As a sector-based write filter, UWF will intercept all write attempts to a protected volume and redirect those attempts to a RAM cache. All system changes only affect the session where the changes are made. After restart, all changes are discarded. Error Report Certificate Manager Click to collect event logs and launch the screen capturing program for error reporting. Click to import or manage certificates for remote computers. 113 Configuring Client Settings Editing or Adjusting a Group Configuration 4.3 Editing or Adjusting a Group Configuration On ViewSonic Device Manager, you can edit client settings for a group of clients through the Edit Configuration window for a profile (group configuration). Through this window, all remotely configurable settings can be edited, then you can push settings to the target group of clients defined in that profile through the Push Settings feature. NOTE • In this section, we will focus on the editing or adjusting of a profile (group configuration) in greater detail. For general instructions on how to create a profile (group configuration) or on how to open the Edit Configuration window for profile, please refer to section “3.4.12 Creating Client Setting Profiles” on page 66. • To have a basic understanding of client configuration, please refer to section “3.4.9 Client Settings” on page 62. • Please note that, although the Edit Configuration window for a profile (group configuration) looks almost the same as the Edit Configuration window for a client (individual configuration), their functions are different. The latter will only affect some specific client when the configuration is applied. For information on the editing or adjusting of an individual configuration for a client, please refer to section “4.4 Editing or Adjusting an Individual Configuration” on page 116. To configure a setting in the Edit Configuration window (for a group configuration), please do the following: 1. In the Edit Configuration window for a profile, click the tab to which the desired setting belongs. Edit Configuration (Profile) Window: SC-T35 114 Configuring Client Settings Editing or Adjusting a Group Configuration Edit Configuration (Thin Client) Window: SC-T45 2. Click on the icon of the desired setting. 3. Click Add to add an entry for that setting if necessary. 4. On the detailed setting page(s), click on the gray globe icon the item. located close to a setting item to activate NOTE • The gray globe icon will become blue when you click to activate the item. • When a globe icon becomes blue, the corresponding setting value is locked on clients and cannot be changed locally through ViewSonic Client Setup. 5. Choose or type in the desired setting values. 6. After the editing of setting values is completed, click Save at the bottom of that setting page to save the changes. 7. Repeat steps 1 through 6 to edit other settings. NOTE • Other values of unactivated setting items will not be applied to clients. • You need to push settings to target group of clients for the changes to take effect. 115 Configuring Client Settings Editing or Adjusting an Individual Configuration 4.4 Editing or Adjusting an Individual Configuration On ViewSonic Device Manager, you can apply an individual configuration to a client through the Edit Configuration window for that client. Through this window, all remotely configurable settings can be edited, then you can push settings to the client through the Push Settings feature. NOTE • In this section, we will focus on the editing/adjusting of an individual configuration in greater detail. For general instructions on how to create an individual configuration or on how to open the Edit Configuration window for a client, please refer to section “3.4.14 Using Individualized Client Settings” on page 72. NOTE • To have a basic understanding of client configuration, please refer to section “3.4.9 Client Settings” on page 62. • Please note that, although the Edit Configuration window for a profile (group configuration) looks almost the same as the Edit Configuration window for a client (individual configuration), their functions are different. The latter will only affect some specific client when the configuration is applied. To configure a setting in the Edit Configuration window (for a client), please do the following: 1. In the Edit Configuration window for a client, click the tab to which the desired setting belongs. Edit Configuration (Thin Client) Window: SC-T35 116 Configuring Client Settings Editing or Adjusting an Individual Configuration Edit Configuration (Thin Client) Window: SC-T45 2. Click on the icon of the desired setting. 3. Click Add to add up an entry for that setting if necessary. 4. On the detailed setting page(s), choose or type in the desired setting values. NOTE • Click on the gray lock icon located close to a setting item to lock its value. The and secured. When a lock icon becomes orange gray lock will become orange and secured, the corresponding setting value is locked on the client and cannot be changed locally through ViewSonic Client Setup. , this setting value comes from the • If the lock icon of a setting value is blue group configuration (profile). You can only change the value by modifying / removing the group configuration (profile) or applying a new one. • If you apply a group configuration to a client, all related settings will also be shown in the Edit Configuration window for that client. 5. After the editing of setting values is completed, click Save at the bottom of that setting page to save the changes. 6. Repeat steps 1 through 5 to edit other settings. NOTE • You need to push settings to that client for the changes to take effect. 117 Configuring Client Settings Configuring Client Settings with ViewSonic Client Setup 4.5 Configuring Client Settings with ViewSonic Client Setup ViewSonic Client Setup allows you to configure client settings locally on clients. Additionally, some settings are only available locally on clients and therefore can only be configured through ViewSonic Client Setup. NOTE • For the list of client settings only locally accessible on clients, please refer to section “4.2 Client Settings at a Glance” on page 110. • To have a basic understanding of client configuration, please refer to section “3.4.9 Client Settings” on page 62. For more information on how to configure client settings locally on clients with ViewSonic Client Setup, please refer to the User’s Manual for a specific thin client model. 118