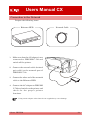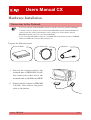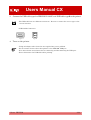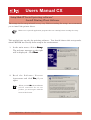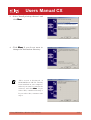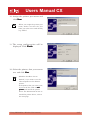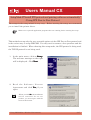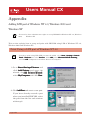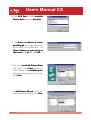
1
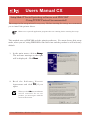
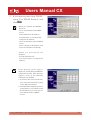
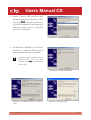
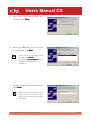
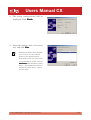
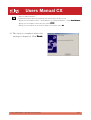
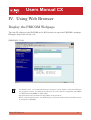
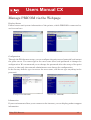
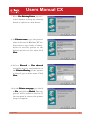
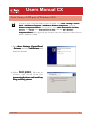
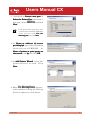
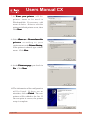
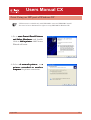
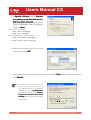
WA00440XX 020422
Users Manual CX
Index
I. Introduction .................................................... 1-1
About this Manual ..................................................................... 1-2
Safety Instructions..................................................................... 1-3
Emission Notice ........................................................................ 1-6
II. About PRICOM .............................................. 2-1
Section 1: PRICOM C-700 ........................................................... 2-1
Operating Requirements ........................................................... 2-1
Parts on PRICOM C-700 .............................................................. 2-2
Parts and Function .................................................................... 2-2
Hardware Installation.................................................................... 2-3
Connect PRICOM C-700 to the Printer ..................................... 2-3
Connection to the Network ........................................................ 2-4
Specification ................................................................................. 2-5
Functional Specification ............................................................ 2-5
Hardware Specification ............................................................. 2-6
Software Specification............................................................... 2-7
Hardware Installation.................................................................. 2-19
i
Section 2: PRICOM C-5100 ......................................................... 2-8
Operation Requirements ........................................................... 2-8
Parts on PRICOM C-5100 ............................................................ 2-9
Parts and Function .................................................................... 2-9
Hardware Installation.................................................................. 2-11
Connect PRICOM C-5100 to the Printer ................................. 2-11
Connection to the Network ...................................................... 2-12
Specification ............................................................................... 2-13
Functional Specification .......................................................... 2-13
Hardware Specification ........................................................... 2-14
Software Specification............................................................. 2-15
Section 3: PRICOM C-6100U ..................................................... 2-16
Operation Requirements ......................................................... 2-16
Parts on PRICOM C-6100U ....................................................... 2-17
Parts and Function .................................................................. 2-17
Connection to the Network ...................................................... 2-19
Specification ............................................................................... 2-21
Functional Specification .......................................................... 2-21
Hardware Specification ........................................................... 2-22
Software Specification............................................................. 2-23
ii
III. Using PRICOM in a Windows Environment 3-1
Starting the PRICOM User Software CX ...................................... 3-1
How to Setup PRICOM ................................................................ 3-2
Setup Mode 1: "Install printing software and PRICOM"
-Using TCP/IP Protocol (recommended) ................................... 3-3
Setup Mode 2: "Install printing software"
-Install Printing Client Software ............................................... 3-11
Setup Mode 3: "Install IPX protocol and printing software
automatically"
-Using IPX Peer to Peer Protocol ............................................ 3-17
IV. Using Web Browser ..................................... 4-1
Display the PRICOM Webpage .................................................... 4-1
Manage PRICOM via the Webpage ............................................. 4-2
V. Questions & Answers ................................... 5-1
CD-ROM is inserted, but does not start automatically .............. 5-1
PRICOM is not found after searching during Setup .................. 5-1
Print job is not printed ............................................................... 5-1
The dial-up starts when print job is executed ............................ 5-3
Error during printing .................................................................. 5-3
LPR printing is not available with PRICOM ............................... 5-3
IPP printing is not available with PRICOM C-5100/C-6100U
.................................................................................................. 5-3
How to check PRICOM configuration status ............................. 5-4
How to initialize / reset PRICOM to factory default ................... 5-4
PRICOM is initialized everytime the power is turned on ........... 5-4
The Status Monitor is not available ........................................... 5-5
iii
Appendix ............................................................... 1
Adding LPR port of Windows NT 4.0, Windows 2000, Windows XP 1
Print Using a LPR port of Windows NT 4.0 ...................................1
Print Using a LPR port of Windows 2000 ......................................4
Print Using a LPR port of Windows XP .........................................7
Print Using an IPP Port of Windows 2000 ...................................10
Print Using an IPP port of Windows XP ......................................12
About TELNET ...............................................................................14
Test Report and Parameters of PRICOM C-5100 and PRICOM C6100U..........................................................................................17
Diagnostic/Configuration Report .................................................17
Parameter Configuration .............................................................19
User Registration ................................................. 1
iv
Users Manual CX
I. Introduction
Thank you for purchasing PRICOM print server.
This manual provides complete information on how to setup and use PRICOM C-700/C5100/C-6100U safely. Please read this manual carefully before using the product.
This manual is edited commonly for the three products and there are some parts not
applied for your PRICOM.
PRICOM print servers provide network connectivity for your printers.
PRICOM is compatible with status monitor of Canon printer driver. You can check the
printer status that is connected to the network at real time on the screen of your computer.
<PRICOM C-700/C-5100/C-6100U>„
Supported Protocol: TCP/IP and IPX Peer to Peer*
Supported OS: Windows 95/98/Me, Windows NT 4.0, Windows 2000, Windows XP.
*IPX Peer to Peer is an original protocol developed by silex technology, Inc.
-PRICOM C-700
10BASE-T compatible print server, which can be connected directly to parallel interface
port.
-PRICOM C-5100
10BASE-T/100BASE-TX compatible auto-detection print server, which can be connected
directly to parallel interface port.
-PRICOM C-6100U
10BASE-T/100BASE-TX compatible auto-detection print server, which can be connected
to USB interface port.
Introduction
1-1
Users Manual CX
About this Manual
This manual uses the following symbols to point out specific information.
The information after the symbols should always be well observed.
TIP
NOTE
This symbol indicates important information that needs to be observed when operating the
product. Make sure to read this information for safe and proper use.
This symbol indicates useful information that is helpful when operating the product. When
you experience difficulties operating the product, please refer to this information first.
-Copying of all or part of this manual without our permission is forbidden.
-The contents of this manual may be changed without advance notice.
-If you have any question about this manual or our products, please contact our
customer support.
-This manual has been edited very carefully. However, silex technology, Inc. is not
responsible for any mistakes included in this manual or any damages, direct or indirect,
arising from the use of this manual.
Copyright © 2002 silex technology, Inc.
-Canon is a registered trademark of Canon Inc., Bubble Jet is a trademark of Canon Inc.
-Microsoft, Windows, Windows NT etc. are registered trademarks of Microsoft Corporation in the U.S. and
other countries.
-Other brand or product names are registered trademarks or trademarks of their respective companies.
Introduction
1-2
Users Manual CX
Safety Instructions
To ensure safe and proper use, please read the following information carefully before
starting to use our product. The safety instructions include important information on
the safe handling of the product and on general safety issues for the user.
IMPORTANT SAFEGUARDS
Make sure to read all safety instructions carefully and to fully understand them before
starting to use PRICOM.
This manual contains safety instructions that must be observed to avoid potential hazards
that could result in personal injuries or material damage. The safety instructions have
been classified according to the potential risk involved as follows:
Danger:
"Danger" indicates the existence of a hazard that could result in death or serious bodily injury if the safety
instruction is not observed.
Warning:
"Warning" indicates the existence of a hazard that could result in bodily injury if the safety instruction is
not observed.
Caution:
"Caution" indicates the existence of a hazard that could result in material damage if the safety instruction
is not observed.
Notice:
"Notice" contains general information that relates to the safe operation of the product.
1. PRICOM
Warning:
To avoid the risk of electric shock or possible damage, never remove the cover of PRICOM and never
disassemble PRICOM. Contact the dealer of silex technology, Inc. products for assistance if repair or
adjustment is necessary.
Introduction
1-3
Users Manual CX
2. AC ADAPTER
Danger:
Never attempt to disassemble or repair an AC Adapter, as exposure to electric shock hazards may result.
Always contact the dealer of silex technology, Inc. product if repair or replacement is required.
Warning:
Always use the AC Adapter provided with PRICOM, to avoid any risk of fire or material damage. Using an
unauthorized and incompatible AC Adapter could result in bodily injury or material damage.
Caution:
Never bend or twist the power cord and never pull on the power cord in an attempt to remove the plug from
the socket. Never place heavy objects on the power cord, as this could damage the cord. Always grasp the
plug when you unplug the power cord. Unplugging the power cord by pulling on the cord itself could
damage the cord.
3. NETWORK CABLES
Danger:
Never use damaged or worn network cables. The use of damaged or worn network cables could result in
electric shock, burns or fire.
4. PROPER TREATMENT OF THE DEVICE
Warning:
To avoid any risk of short-circuit, fire or other internal damage, never allow any metal objects such as
screws or paper clips to fall into the device. If that should happen, immediately turn off the power and
unplug the power cord. Contact the dealer of silex technology, Inc. product for appropriate assistance. To
avoid damage to PRICOM, never allow any liquids to spill into any part of PRICOM, and never expose
PRICOM to rain or water. If any of these events should occur, turn off PRICOM immediately.
Contact the dealer of silex technology, Inc. product for assistance before attempting to use PRICOM again.
To prevent computer malfunction or equipment damage, never place PRICOM on top of (or adjacent to) a
heating device, and never expose it to direct sunlight. Never store PRICOM in a locked and unventilated
vehicle, where excessive internal temperatures may be encountered. Always unplug the power cord during
lightning storms in order to protect the device from possible damage as a result of a power surge. If
PRICOM is ever dropped and damaged, or if you ever detect the emission of an extraordinary odor or
excessive heat, unplug the power cord and turn off the printer and PRICOM immediately. Contact the
dealer of silex technology, Inc. product for appropriate assistance.
Introduction
1-4
Users Manual CX
Notice:
If PRICOM has been exposed to cold temperature, allow it to warm to room temperature before turning it
on. This will prevent the occurrence of harmful condensation within the device (this is a particularly
important concern when the device is being used in cold climates). Avoid using PRICOM in dusty areas
since dust particles can affect the reliability of PRICOM. Contact the dealer of silex technology, Inc. product
if your device has become contaminated with dust or dirt particles.
Introduction
1-5
Users Manual CX
Emission Notice
PRICOM C-700 / PRICOM C-6100U
This equipment has been tested and found to comply with the limits for a Class A digital
device, pursuant to Part 15 of the FCC Rules. These limits are designed to provide
reasonable protection against harmful interference when the equipment is operated in a
commercial environment. This equipment generates, uses, and can radiate radio
frequency energy and, if not installed and used in accordance with the instruction manual,
may cause harmful interference to radio communications. Operation of this equipment
in a residential area is likely to cause harmful interference in which case the user will be
required to correct the interference at his own expense.
This device complies with Part 15 of the FCC Rules. Operation is subject to the following
two conditions: (1) This device may not cause harmful interference, and (2) this device
must accept any interference received, including interference that may cause undesired
operation.
EN55022 Class-A
EN55024
Introduction
1-6
Users Manual CX
PRICOM C-5100
This equipment has been tested and found to comply with the limits for a Class B digital
device, pursuant to Part 15 of the FCC Rules. These limits are designed to provide
reasonable protection against harmful interference in a residential installation. This
equipment generates, uses, and can radiate radio frequency energy and, if not installed
and used in accordance with the instructions, may cause harmful interference to radio
communications. However, there is no guarantee that interference will not occur in a
particular installation. If this equipment does cause harmful interference to radio or
television reception, which can be determined by turning the equipment off and on, the
user is encouraged to try to correct the interference by one or more of the following
measures:
-Reorient or relocate the receiving antenna.
-Increase the separation between the equipment and receiver.
-Connect the equipment into an outlet on a circuit different from that to which the
receiver is connected.
-Consult the dealer or an experienced radio/TV technician for help.
This device complies with Part 15 of the FCC Rules. Operation is subject to the following
two conditions: (1) This device may not cause harmful interference, and (2) this device
must accept any interference received, including interference that may cause undesired
operation.
EN55022 Class-B
EN55024
Introduction
1-7
Users Manual CX
II. About PRICOM
Section 1: PRICOM C-700
PRICOM C-700 is a 10BASE-T print server developed exclusively for Canon Bubble Jet
Printers. PRICOM C-700 is compatible with status monitor of Canon printer driver.
You can check the printer status , which is connected to the network at real time on the
screen of your computer.
Operating Requirements
System requirements for the network connection
-Network cable
-Ethernet HUB
-Printer
Network Environment
Windows 95/98/Me, Windows NT 4.0, Windows 2000, Windows XP
Operating environment
-Temperature
-Humidity
: 10°C to 35°C
: 20% to 80% RH (no condensation allowed)
Storage environment
-Temperature
-Humidity
: -10°C to 50°C
: 20% to 90% RH (no condensation allowed)
EMI
VCCI Class A
FCC Class A
EN55022 Class A
EN55024
About PRICOM
2-1
Users Manual CX
Parts on PRICOM C-700
Parts and Function
Bottom
Back
Printer Port (Parallel Port)
STATUS LED
Power Connector
Network Port
(10BASE-T)
LINK LED
Ethernet Address
(The last 6 digits are the product’s serial number)
(Bottom)
-Printer Port (Parallel Port)
Connect to the parallel interface port of the printer.
For the location of the parallel interface port of the printer, please refer to the printer’s manual.
-Ethernet Address
The Ethernet Address of the device. The last 6 digits are the product’s serial number.
NOTE
Ethernet Address 00:80:92:18:0E: 1A is noted as 008092180E1A.
The product’s number (serial number) is 180E1A.
(Back)
-Network Port (10BASE-T)
Connects to the network cable (twisted pair cable).
-LINK LED (Green)
Lights, when a proper 10BASE-T network connection is established.
-STATUS LED (Orange)
Flashes during data transfer.
-Power Connector
Connects to the AC adapter.
About PRICOM
2-2
Users Manual CX
Hardware Installation
Connect PRICOM C-700 to the Printer
TIP
-Before connecting PRICOM C-700 to the printer, make sure that the power cord of the
printer is unplugged.
-If you have already used PRICOM C-700 in another network, make sure to initialize
PRICOM C-700 to factory default. You can initialize PRICOM C-700 from PRICOM User
Software CX. For further information, refer to chapter “III. Using PRICOM in a Windows
Environment” of this on-line manual.
1.
Make sure that the printer is
switched off and the power cord is
unplugged. Attach the PRICOM to
the paralell interface port of the
printer.
Make sure that the AC adapter is not
connected to PRICOM at this time.
2.
After PRICOM and the printer have
been connected, make sure that the
printer is still switched off. Then
plug the power cord of the printer
into a power socket.
About PRICOM
2-3
Users Manual CX
Connection to the Network
Prepare the following items.
Ethernet HUB
1.
Make sure that the AC adapter is not
connected to PRICOM C-700 and
switch off the printer.
2.
Connect the network cable (twisted
pair cable) to the network port of
PRICOM C-700.
3.
Connect the other end of the network
cable to the Ethernet HUB.
4.
Connect the AC adapter to PRICOM
C-700 and switch on the printer and
check for the proper printer
functions.
Network Cable
Using an AC adapter other than the one supplied may cause damage.
TIP
About PRICOM
2-4
Users Manual CX
Specification
The main points of functionality are as follows.
Functional Specification
Automatic IP address configuration with DHCP, BOOTP, RARP
DHCP/BOOTP
PRICOM C-700 supports the DHCP/BOOTP protocol. The IP address can be set within the network where
the DHCP/BOOTP server is operating.
TIP
-PRICOM C-700 supports DHCP protocols that are in accordance with RFC2131/2132.
Windows NT 4.0, Windows 2000 and DHCP servers of Windows .NET Server are supported.
-To use the DHCP function, please contact your network administrator.
RARP
The PRICOM C-700 supports RARP protocol. The IP address can be set within the network where the
RARP server is operating.
Web Browser
The PRICOM C-700 is equipped with HTTP server that allows you to monitor the printer status or change
the configuration of PRICOM C-700 using a web browser. If the network is connected to the internet,
product support information can be obtained.
TIP
-It is recommended to use the following web browsers to use the HTTP function: Internet
Explorer 3.0 (or higher) or Netscape Navigator 3.0 (or higher). If a different web browser
is used, make sure it is compatible with HTTP 1.0 (RFC1945) and HTML 2.0 (RFC1866).
-Assign IP address to PRICOM C-700 and enable TCP/IP protocol to use HTTP function.
About PRICOM
2-5
Users Manual CX
Hardware Specification
-CPU
32bit RISC CPU
-Memory
RAM
FlashROM
: 512KByte
: 512KByte
-Network Interface
10BASE-T 1 port
-Printer Interface
Centronics (36 pin Amphenole)
IEEE1284 parallel port (bidirectional)
-Others
LED Lamp: 2 LEDs, one for Status (Orange), one for 10BASE-T Link(Green)
About PRICOM
2-6
Users Manual CX
Software Specification
Supported Protocol
TCP/IP, IPX Peer to Peer
TCP/IP
Network Layer
Session Layer
Application Layer
: ARP, RARP, ICMP, IP
: TCP, UDP
: LPR, TELNET, BOOTP, SNMP, HTTP, DHCP, #9100
IP Address can be set with Setup Utility.
Supports silex technology, Inc. original setup protocol .
IPX Peer to Peer
Supports silex technology, Inc. original protocol .
About PRICOM
2-7
Users Manual CX
Section 2: PRICOM C-5100
PRICOM C-5100 is a 10BASE-T/100BASE-TX print server developed exclusively for
Canon Bubble Jet Printers. PRICOM C-5100 is compatible with BJ status monitor of
Canon printer driver. You can check the printer status, which is connected to the network
at real time on the screen of your computer.
Operation Requirements
System requirements for the network connection
-Network cable(Category 5 in 100BASE-TX environment)
-Ethernet HUB(HUB)
-Printer
Network Environment
Windows 95/98/Me, Windows NT 4.0, Windows 2000, Windows XP
Operating environment
-Temperature
-Humidity
: 10°C to 35°C
: 20% to 80% RH (no condensation allowed)
Storage environment
-Temperature
-Humidity
: -10°C to 50°C
: 20% to 90% RH (no condensation allowed)
EMI
VCCI Class B
FCC Class B
EN55022 Class B
EN55024
About PRICOM
2-8
Users Manual CX
Parts on PRICOM C-5100
Parts and Function
Bottom
Parallel Port
Back
LINK LED
ON
OFF
Power Connector
1234
Dip Switches
STATUS LED
(Bottom)
Network Port
-Printer Port (Parallel Port)
(10BASE-T/100BASE-TX)
Connect to parallel port of printer.
-Dip Switches (1-4)
The following list describes the function of each switch.
-Ethernet Address
The Ethernet Address of the device. The last 6 digits are the product’s serial number.
1
2
3
4
OFF
ON
OFF
ON
OFF
OFF
Normal operating setting
Initialization/Reset to factory default upon power up
Normal operating setting
Prints Diagnostic/Configuration report upon power up
Normal operating setting
Normal operating setting
<Initialization/Reset to factory default>
1. Switch off the printer. Make sure that PRICOM C-5100 is not connected to the AC adapter, then
switch on the dip switch No. 2.
2. Connect the AC adapter to PRICOM C-5100 and switch on the printer.
3. Unplug the AC adapter of PRICOM C-5100 and switch off the dip switch No. 2.
<Diagnostic/Configuration report>
1. Swtich off the printer. Make sure that PRICOM C-5100 is not connected to the AC adapter, and
then switch on the dip switch No.3.
2. Connect the AC adapter to PRICOM C-5100. Switch on the printer and the diagnostic report will
start.
About PRICOM
2-9
Users Manual CX
TIP
-Do not turn off the power supply until the LINK LED lights during initialization of PRICOM.
-Do not turn off the power supply until the diagnostic report is completed during diagnostic
report of PRICOM.
-When normal operating setting, make sure that all dip switches are off.
-You can initialize PRICOM C-5100 from PRICOM User Software CX. For further
information, refer to chapter “III. Using PRICOM in a Windows Environment” of this online manual.
-Diagnostic report is not available with Canon Bubble Jet Printers. Do not use any dip
switches.
(Back)
-Network Port (10BASE-T/100BASE-TX)
Connects to the network cable.
-10BASE LINK LED(Green)
Lights when a proper 10BASE-T network connection is established.
-100BASE-TX LINK LED(Green)
Lights when a proper 100BASE-TX network connection is established.
-STATUS LED(Orange)
Lights while the power is supplied. Flashes during data transfer.
-Power Connector
Connects to the AC adapter.
About PRICOM
2-10
Users Manual CX
Hardware Installation
Connect PRICOM C-5100 to the Printer
TIP
-Before connecting PRICOM C-5100 to the printer, make sure that the power cord of the
printer is unplugged.
-If you have already used PRICOM C-5100 in another network, make sure to initialize
PRICOM C-5100 to factory default. You can initialize PRICOM C-5100 from PRICOM
User Software CX. For further information, refer to chapter “III. Using PRICOM in a
Windows Environment” of this on-line manual.
1.
Make sure that the printer is
switched off and unplug the power
cord of the printer. Attach PRICOM
to the parallel interface port of the
printer.
Make sure that the AC adapter is not
connected to PRICOM at this time.
2.
After PRICOM and the printer have
been connected, make sure that the
printer is still switched off. Then
plug the power cord of the printer
into a power socket.
About PRICOM
2-11
Users Manual CX
Connection to the Network
The following items are needed to connect PRICOM C-5100 to the network.
TIP
When using PRICOM in a 100 BASE-TX environment, make sure to use a
100BASE-TX compatible HUB and twisted pair cable (Category 5 or above).
Prepare the following items.
Ethernet HUB
1.
Make sure that the AC adapter is not
connected to PRICOM C-5100, and
switch off the printer.
2.
Connect the network cable to the
network port of PRICOM C-5100.
3.
Connect the other end of the network
cable to the Ethernet HUB.
4.
Connect the AC adapter to PRICOM
C-5100, then switch on the printer
and check for proper printer
functions.
Network Cable
Using an AC adapter other than the one supplied may cause damage.
TIP
About PRICOM
2-12
Users Manual CX
Specification
The main points of functionality are as follows.
Functional Specification
Automatic IP address configuration with DHCP, BOOTP, RARP
DHCP/BOOTP
PRICOM C-5100 supports the DHCP/BOOTP protocol. The IP address can be set within the network
where the DHCP/BOOTP server is operating.
TIP
-PRICOM C-5100 supports RARP protocols that are in accordance with RFC2131/2132.
-To use the DHCP function, please contact your network administrator.
RARP
The PRICOM C-5100 supports RARP protocol. The IP address can be set within the network where the
RARP server is operating.
IPP (TCP/IP)
PRICOM C-5100 supports the Internet Printing Protocol (IPP Version 1.0), that allows you to print
documents directly to any accessible printer via the Internet.
Web Browser
The PRICOM C-5100 is equipped with HTTP server that allows you to monitor the printer status or
change the configuration of PRICOM C-5100 using a web browser. If the network is connected to the
internet, product suport information can be obtained.
TIP
NOTE
-It is recommended to use the following web browsers to use the HTTP function: Internet
Explorer 3.0 (or higher) or Netscape Navigator 3.0 (or higher). If a different web browser
is used, make sure it is compatible with HTTP 1.0 (RFC1945) and HTML 2.0 (RFC1866).
-Assign IP address to PRICOM C-5100 and enable TCP/IP protocol to use HTTP function.
The PRICOM C-5100 supports Hewlett Packard’s print server Jet Direct function.
silex technology, Inc. original status monitor can be used with PJL compatible printers.
About PRICOM
2-13
Users Manual CX
Hardware Specification
-CPU
32bit RISC CPU
-Memory
RAM
FLASHROM
: 2MByte
: 1MByte
-Network Interface
10BASE-T/100BASE-TX 1 port (automatic detection)
-Printer Interface
Centronics (36 pin Amphenole)
IEEE1284 parallel port (bidirectional)
-Others
DIP Switch
LED Lamp
About PRICOM
: 4 bit
: 3 LEDs, one for Status (Orange), one for 10BASE Link
(Green), one for 100BASE Link (Green).
2-14
Users Manual CX
Software Specification
Supported Protocol
TCP/IP, IPX Peer to Peer
TCP/IP
Network Layer
Session Layer
Application Layer
: ARP, RARP, ICMP, IP
: TCP, UDP
: LPR, FTP, TELNET, BOOTP, SNMP, HTTP, DHCP,
IPP, #9100
IP Address can be set with Setup Utility.
silex technology, Inc. original setup protocol compatible.
IPX Peer to Peer
silex technology, Inc. original protocol compatible.
About PRICOM
2-15
Users Manual CX
Section 3: PRICOM C-6100U
PRICOM C-6100U is a USB print server for 10BASE-T/100BASE-TX network
environment developed exclusively for Canon Bubble Jet Printers. PRICOM C-6100U
enables any Canon Bubble Jet Printers with only USB interface to be connected to the
Ethernet. By using the Setup Wizard of the PRICOM User Software CX, the setup of
PRICOM in a Windows 95/98/Me, Windows NT 4.0, Windows 2000 and Winodws XP
environment is very easy.
Operation Requirements
System requirements for the network connection
-Network cable (Category 5 in 100BASE-TX environment)
-USB Cable
-Ethernet HUB
-Printer
Network Environment
Windows 95/98/Me, Windows NT 4.0, Windows 2000, Windows XP
Operating environment
-Temperature
-Humidity
: 10°C to 35°C
: 20% to 80% RH (no condensation allowed)
Storage environment
-Temperature
-Humidity
: -10°C to 50°C
: 20% to 90% RH (no condensation allowed)
EMI
VCCI Class A
FCC Class A
EN55022 Class A
EN55024
About PRICOM
2-16
Users Manual CX
Parts on PRICOM C-6100U
Parts and Function
Top
Bottom
10BASE LINK LED
(Green)
STATUS LED (Orange)
Ethernet Address
(The last 6 digits are the product’s serial number)
100BASE LINK LED
(Green)
Back
Right Side
Power Connector
LAN
USB
DC5V IN
Push Switch
Network Port
(10BASE-T/100BASE-TX)
USB Port
(Top)
You can check the LED on the board.
-10BASE LINK LED(Green)
Lights when a proper 10BASE-T network connection is established.
-100BASE-TX LINK LED(Green)
Lights when a proper 100BASE-TX network connection is established.
-STATUS LED(Orange)
Flashes during data transfer.
About PRICOM
2-17
Users Manual CX
(Bottom)
-Ethernet Address
The Ethernet Address of the device. The last 6 digits are the product’s serial number.
NOTE
-Ethernet Address 00:80:92:18:0E: 1A is noted as 008092180E1A.
-The product’s number (serial number) is 180E1A.
(Back)
-Network Port (10BASE-T/100BASE-TX)
Connect to the network cable. In 100BASE-TX environment, use category 5.
-USB Port
Connect to the USB cable.
-Power Connector
Connect to the AC adapter.
(Right Side)
-Push Switch
By pushing this switch, you can initialize PRICOM to factory default and print Diagnostic/
Configuration report.
<Factory Default>
1. Make sure that the AC adapter is not connected to PRICOM C-6100U.
2. While pushing the push switch, connect the AC adapter to PRICOM C-6100U.The STATUS LED
will blink once when the connection is made.
3. Continue to push the push switch for two seconds. The STATUS LED will blink again when
factory default is successfully completed. Remove your hand from the push switch.
<Diagnostic/Configuration report>
While PRICOM is in use, push on the push switch for more than 5 seconds. The test print will be
executed. This is available only with printers with fonts.
TIP
-Do not turn off the power to PRICOM C-6100U while it is initializing to factory default.
-When PRICOM is turned on again after factory default is completed or the Diagnostic/
Configuration report is executed, do not push on the push switch.
-Factory default can be executed from the PRICOM User Software CX. For further
information, refer to Chapter “III. Using PRICOM in a Windows Environment” of this online manual.
-Diagnostic/Configuration report is not available with Canon Bubble Jet Printer. Do not
use the push switch function.
About PRICOM
2-18
Users Manual CX
Hardware Installation
Connection to the Network
TIP
-If you have already used PRICOM C-6100U on another network, initialize PRICOM
C-6100U to factory default. You can initialize PRICOM C-6100U from PRICOM User
Software CX. For further information, refer to Chapter 3 of this on-line manual.
-PRICOM C-6100U can not be used with USB HUB.
-If you are using PRICOM C-6100U in a 100BASE-TX environment, prepare 100BASE
Ethernet HUB and network cable (Category 5).
Prepare the following items.
Ethernet HUB
Network Cable
1.
Connect the network cable to the
network port of PRICOM C-6100U
and connect the other end of the
network cable to the Ethernet HUB.
2.
Connect the AC adapter to PRICOM
C-6100U, then connect the power
cable to the printer.
About PRICOM
USB Cable
2-19
Users Manual CX
3.
Connect the USB cable typeA to PRICOM C-6100U and USB cable typeB to the printer.
NOTE
-The USB cable has two different connectors. Be sure to connect the correct type to the
correct interface.
<USB Cable Connector>
Type A
4.
TypeB
Turn on the printer.
TIP
-Using AC adapter other than the one supplied may cause problem.
-Do not connect devices other than printer to the PRICOM USB port.
-Give more than 2-second intervals for connecting and disconnecting the USB port.
-Do not disconnect the USB cable while printing.
About PRICOM
2-20
Users Manual CX
Specification
The main points of functionality are as follows:
Functional Specification
Automatic IP address configuration with DHCP, BOOTP, RARP
DHCP/BOOTP
PRICOM C-6100U supports the DHCP/BOOTP protocol. The IP address can be set within the network
where the DHCP/BOOTP server is operating.
TIP
-PRICOM C-6100U supports DHCP protocols that are in accordance with RFC2131/2132.
Windows NT 4.0 and DHCP servers of Windows 2000 are supported.
-To use the DHCP function, please contact your network administrator.
RARP
The PRICOM C-6100U supports RARP protocol. The IP address can be set within the network where the
RARP server is operating.
IPP (TCP/IP)
PRICOM C-6100U supports the Internet Printing Protocol (IPP Version 1.0), that allows you to print
documents directly to any accessible printer via the Internet.
Web Browser
The PRICOM C-6100U is equipped with HTTP server that allows you to monitor the printer status or
change the configuration of PRICOM C-6100U using a web browser. If the network is connected to the
internet, product support information can be obtained.
TIP
-It is recommended to use the following web browsers to use the HTTP function: Internet
Explorer 3.0 (or higher) or Netscape Navigator 3.0 (or higher). If a different web browser
is used, make sure it is compatible with HTTP 1.0 (RFC1945) and HTML 2.0 (RFC1866).
-Assign IP address to PRICOM C-6100U and enable TCP/IP protocol to use HTTP function.
About PRICOM
2-21
Users Manual CX
Hardware Specification
-CPU
32bit RISC CPU
-Memory
RAM
FlashROM
: 2MByte
: 1MByte
-Network Interface
10BASE-T/100BASE-TX 1 port (automatic detection)
-USB Interface
A Port
-Others
Push Switch
LED Lamp
About PRICOM
: 1 button
: 3 LEDs, one for Status (Orange), one for 10BASE Link
(Green), one for 100BASE Link (Green).
2-22
Users Manual CX
Software Specification
Supported Protocol
TCP/IP, IPX Peer to Peer
TCP/IP
Network Layer
Session Layer
Application Layer
: ARP, RARP, ICMP, IP
: TCP, UDP
: LPR, FTP, TELNET, BOOTP, SNMP, HTTP, DHCP,
IPP, #9100
IP Address can be set with Setup Utility.
Supports silex technology, Inc. original setup protocol .
IPX Peer to Peer
Supports silex technology, Inc. original protocol .
About PRICOM
2-23
Users Manual CX
III. Using PRICOM in a Windows Environment
Starting the PRICOM User Software CX
Insert the PRICOM User Software CX CD-ROM into the CD-ROM drive of your computer.
The main menu (as shown below) will automatically be launched.
TIP
If the main menu does not start automatically, open the My Computer, select the CD-ROM
drive and execute “autorun.exe”.
ReadMe
Click on ReadMe for important information on the PRICOM User Software CX. Make sure to read this
information carefully before starting to use PRICOM.
Setup
The installation wizard will be started. This leads you to setup the PRICOM for Printing.
Manual
Click on Manual to access the on-line manual. Adobe Acrobat Reader is used to display the information. If
the Adobe Acrobat Reader is not already installed on your computer, an installation program will be
launched automatically.
Using PRICOM in a Windows Environment
3-1
Users Manual CX
How to Setup PRICOM
TIP
The setup of PRICOM in a Windows NT 4.0, Windows 2000 or Windows XP should be done
through administrator rights.
There are three setup methods available under the PRICOM User Software CX.
Setup Mode 1: "Install printing software and PRICOM"
-Using TCP/IP Protocol(recommended)
This method sets up PRICOM and the printing software. You must choose this setup
mode, when you are using PRICOM for the first time and the product is still in factory
default.
For further information on this setup mode, please refer to pages 3 (3-3) ff.
Install printing software"
Setup Mode 2: "Install
-Install Printing Client Software
This method sets up only the printing software. You should choose this setup mode,
when PRICOM has already been setup in the environment.
For further information on this setup mode, please refer to pages 11(3-11) ff.
Install IPX protocol and printing software automatically"
Setup Mode 3: "Install
-Using IPX Peer to Peer Protocol
This method sets up only the very essential options via the IPX Peer to Peer protocol and
is the easiest way to setup PRICOM. You only need to answer a few questions and the
installation is completed. When choosing this setup mode, the IPX protocol is being
used, the TCP/IP protocol is not being used.
For further information on this setup mode, please refer to pages 17(3-17) ff.
Using PRICOM in a Windows Environment
3-2
Users Manual CX
Setup Mode 1:: "Install printing software and PRICOM"
-Using TCP/IP Protocol (recommended)
The setup via the setup wizard is very easy. Before starting the setup, we recommend
you to install the printer driver.
Make sure to quit all application programs that are running, before starting the setup.
TIP
This method sets up PRICOM and the printing software. You must choose this setup
mode, when you are using PRICOM for the first time and the product is still in factory
default.
1.
In the main menu, click on Setup
Setup.
The welcome message on the right
will be displayed. Click Next
Next.
2.
Read the Software License
Agreement and click Yes, if you
agree.
NOTE
When you click No
No, the installation
will be cancelled. To use our
product, you must agree with the
terms of the license.
Using PRICOM in a Windows Environment
3-3
Users Manual CX
3.
Select "Install printing software and
PRICOM" and click Next
Next.
4.
Select the PRICOM, that you want
to setup, and click Next
Next.
NOTE
-If the product is not displayed on
the list, click Search
Search. Alternatively,
you can type in the Ethernet
Address of the product, that you
want to setup.
-If you want to reset the product to
factory default, click Initialize and
follow the instructions.
Using PRICOM in a Windows Environment
3-4
Users Manual CX
5.
If you want to print using TCP/IP,
select "Use TCP/IP Protocol" and
click Next.
NOTE
-When you selected "Use TCP/IP
Protocol"...
--In an environment with DHCP
server
Select "Obtain an IP address
automatically" to automatically
assign the IP address.
--In an environment without DHCP
server
Select "Assign an IP address" and
input the IP address manually.
-When you deactivated the
checkbox
"Use TCP/IP Protocol"
--It is not necessary to assign an IP
address.
NOTE
If the message on the right is
displayed, the IP address MUST be
assigned manually. This message
appears, if any of the following
conditions are fulfilled.
1. A product, that was not in the list,
was selected by manually typing
in the Ethernet address.
2. No IPX/SPX compatible protocol
is installed on your computer and
the IP address is set to 0.0.0.0 (an
environment without DHCP
server).
Using PRICOM in a Windows Environment
3-5
Users Manual CX
6.
In the next step, the selected
configuration will be displayed for
you to check. If the configuration is
correct, click Execute to implement
it.
7.
Click Next if you do not want to
change the destination directory.
NOTE
-This screen is displayed, if
PRICOM-Print CX has already
been installed on your computer.
Select if you want to overwrite the
software, and click on Next
Next. If you
select "Yes", continue with step 7.
If you select "No", continue with
step 10.
Using PRICOM in a Windows Environment
3-6
Users Manual CX
8.
This screen allows you to select the
group name to appear in the Start
Menu. The default group name is
“PRICOM-Print CX”. After selecting
the group name, click Next
Next.
NOTE
9.
-If you change the name, make sure
that the group name you select is
not used already.
Select, if you want to setup the
printer port.
NOTE
-Click Next, if you selected "Yes".
-Click Finish, if you selected
"No".
10. After the setup preparations are
finished, click Next
Next.
Using PRICOM in a Windows Environment
3-7
Users Manual CX
11. Select the PRICOM, that you want
to setup, and click Next
Next. If the
selected product operates in an
environment that supports both
TCP/IP and IPX Peer to Peer
protocols, continue with step 12. If
the environment only supports one
of the protocols, continue with step
13.
NOTE
-If the product is not displayed on
the list, click Search.
-If you click Search Option
Option, the
TCP/IP broadcast address and the
IPX network number can be
configured.
12. Select the protocol for network
printing and click Next
Next.
Using PRICOM in a Windows Environment
3-8
Users Manual CX
13. Assign the printer port name and
click on Next
Next.
NOTE
When you assign the printer port
name, make sure that the port
name you select is not used already
(e.g. LPT1:).
14. The setup configuration will be
displayed. Click Finish
Finish.
15. Select the printer, that you want to
use, and click Next
Next.
NOTE
-Mark the checkbox “Set as
Default”, if you want to use the
selected printer as the default
printer.
-If the printer, that you want to use,
is not included in the list, click on
Add printer and install the printer
driver. For information on how to
install the printer driver, refer to
the next page.
Using PRICOM in a Windows Environment
3-9
Users Manual CX
NOTE
<How to Add a Printer>
Install the printer driver by following the instructions on the screen.
-When you are asked to select “Local Printer” or “Network Printer”, select Local Printer
Printer.
-When you are asked to select the port, select LPT1:
LPT1:.
-When your are asked, if you want to make a test print, select No
No.
16. The setup is completed when this
message is displayed. Click Finish
Finish.
Using PRICOM in a Windows Environment
3-10
Users Manual CX
Setup Mode 2:: "Install printing software"
-Install Printing Client Software
The setup via the setup wizard is very easy. Before starting the setup, we recommend
you to install the printer driver.
Make sure to quit all application programs that are running before starting the setup.
TIP
This method sets up only the printing software. You should choose this setup mode,
when PRICOM has already been setup in the environment.
1.
In the main menu, click on Setup
Setup.
The welcome message on the right
will be displayed. Click Next
Next.
2.
Read the Software License
Agreement and click Yes, if you
agree.
NOTE
-When you click No
No, the installation
will be cancelled. To use our
product, you must agree with the
terms of the license.
Using PRICOM in a Windows Environment
3-11
Users Manual CX
3.
Select "Install printing software" and
click Next
Next.
4.
Click Next, if you do not want to
change the destination directory.
NOTE
-This screen is displayed, if
PRICOM-Print CX has already
been installed on your computer.
Select if you want to overwrite the
software, and click Next
Next. If you
select "Yes", continue with step 4.
If you select "No", continue with
step 7.
Using PRICOM in a Windows Environment
3-12
Users Manual CX
5.
This screen allows you to select the
group name to appear in the Start
Menu. The default group name is
“PRICOM-Print CX”. After selecting
the group name, click Next
Next.
NOTE
6.
Select, if you want to setup the
printer port.
NOTE
7.
-If you change the name, make sure
that the group name you select is
not used already.
-Click Next, if you selected "Yes".
-Click Finish, if you selected
"No".
After the setup preparations are
finished, click Next
Next.
Using PRICOM in a Windows Environment
3-13
Users Manual CX
8.
Select the PRICOM, that you want
to setup, and click on Next
Next. If the
selected product operates in an
environment that supports both
TCP/IP and IPX Peer to Peer
protocols, continue with step 9. If
the environment only supports one
of the protocols, continue with step
10.
NOTE
9.
-If the product is not displayed on
the list, click Search.
-If you click Search Option
Option, the
TCP/IP broadcast address and the
IPX network number can be
configured.
Select the protocol for network
printing and click Next
Next.
Using PRICOM in a Windows Environment
3-14
Users Manual CX
10. Assign the printer port name and
click Next.
NOTE
-When you assign the printer port
name, make sure that the port
name you select is not used already
(e.g. LPT1:).
11. The setup configuration will be
displayed. Click Finish
Finish.
12. Select the printer, that you want to
use, and click Next
Next.
NOTE
-Mark the checkbox “Set as
Default”, if you want to use the
selected printer as the default
printer.
-If the printer, that you want to use,
is not on the list, click on Add
printer and install the printer
driver. For information on how to
install the printer driver, refer to
the next page.
Using PRICOM in a Windows Environment
3-15
Users Manual CX
NOTE
<How to Add a Printer>
Install the printer driver by following the instructions on the screen.
-When you are asked to select “Local Printer” or “Network Printer”, select Local Printer
Printer.
-When you are asked to select the port, select LPT1:
LPT1:.
-When you are asked, if you want to make a test print, select No
No.
13. The setup is completed when this
message is displayed. Click Finish
Finish.
Using PRICOM in a Windows Environment
3-16
Users Manual CX
Setup Mode 3:: "Install IPX protocol and printing software automatically"
-Using IPX Peer to Peer Protocol
The setup via the setup wizard is very easy. Before starting the setup, we recommend
you to install the printer driver.
Make sure to quit all application programs that are running, before starting the setup.
TIP
This method sets up only the very essential options via the IPX Peer to Peer protocol and
is the easiest way to setup PRICOM. You only need to answer a few questions and the
installation is finished. When choosing this setup mode, the IPX protocol is being used,
the TCP/IP protocol is not being used.
1.
In the main menu, click on Setup
Setup.
The welcome message on the right
will be displayed. Click Next
Next.
2.
Read the Software License
Agreement and click Yes, if you
agree.
NOTE
-When you click No
No, the installation
will be cancelled. To use our
product, you must agree with the
terms of the license.
Using PRICOM in a Windows Environment
3-17
Users Manual CX
3.
Select "Install IPX protocol and
printing software automatically"
and click Next
Next. Continue with step
4, if the IPX protocol is not installed,
continue with step 5, if the IPX
protocol is installed.
4.
In Windows 95/98/Me, you will see
Display 4-1 after the IPX protocol
has automatically been installed.
NOTE
In Windows NT 4.0, Windows 2000,
Windows XP, install the IPX
protocol. Click Help for information
on the setup.
[Display 4-1] Windows 95/98/Me
[Display 4-2] Windows NT 4.0, Windows
2000
Using PRICOM in a Windows Environment
[Display 4-3] Windows XP
3-18
Users Manual CX
5.
After the setup preparations are
finished, click Next
Next.
6.
Select the PRICOM, that you want
to setup, and click Next
Next.
NOTE
-If the product is not displayed on
the list, click Search.
-If you click Search Options
Options, the
IPX network number can be
configured.
7.
Assign the printer port name and
click Next.
NOTE
When you assign the printer port
name, make sure that the port
name you select is not used already
(e.g. LPT1:).
Using PRICOM in a Windows Environment
3-19
Users Manual CX
8.
The setup configuration will be
displayed. Click Finish.
9.
Select the printer, that you want to
use, and click Next
Next.
NOTE
-Mark the checkbox “Set as Default”
if you want to use the selected
printer as the default printer.
-If the printer, that you want to use,
is not included in the list, click on
Add Printer and install the printer
driver. For information on how to
install the printer driver, refer to
the next page.
Using PRICOM in a Windows Environment
3-20
Users Manual CX
NOTE
<How to Add a Printer>
Install the printer driver by following the instructions on the screen.
-When you are asked to select “Local Printer” or “Network Printer”, select Local Printer
Printer.
-When you are asked to select the port, select LPT1:
LPT1:.
-When your are asked, if you want to make a test print, select No
No.
10. The setup is completed when this
message is displayed. Click Finish
Finish.
Using PRICOM in a Windows Environment
3-21
Users Manual CX
IV. Using Web Browser
Display the PRICOM Webpage
Type the IP address of the PRICOM in the Web browser to open the PRICOM’s webpage.
Example: http://192.168.40.112/
(PRICOM C-5100)
NOTE
-For Web browser, we recommend Netscape Navigator 3.0 (or higher) or Internet Explorer
3.0 (or higher) version. If a different web browser is used, it must be compatible with HTTP
1.0 (RFC1945) and HTML 2.0 (RFC1866).
-The information may be different depending on the products.
-When using the Web browser, the TCP/IP protocol must be loaded and an IP address must
be assigned to PRICOM.
Using Web Browser
4-1
Users Manual CX
Manage PRICOM via the Webpage
Display Status
Printer status and system information of the printer, which PRICOM is connected to,
can be seen here.
(Printer status)
(System information)
Configuration
Through the Web browser setup, you can configure the print server (protocols) and restart
the print server. You must type in the user name (root) and password to change the
configuration. We recommend you to change the password after the setup of the print
server, so that only the network administrator can change the configuration.
In the factory default, type in root as the user name, and do not type anything in the
password.
(Configure the PRICOM)
(Restart the PRICOM)
Information
If your environment allows you to connect to the internet, you can display product support
information.
Using Web Browser
4-2
Users Manual CX
V. Questions & Answers
This chapter answers questions and offers solutions to problems that might arise when
using the product.
You can check the latest information about our products at http://www. silex. jp/
CD-ROM is inserted, but does not start automatically
If your computer does not support Autorun, the menu will not start automatically after
inserting the CD-ROM. In this case, execute Autorun.exe in the root directory of the CDROM.
PRICOM is not found after searching during Setup
Make sure that the LINK LED is blinking. If the LINK LED is not blinking, PRICOM
may not be properly connected to the network. Check the following.
-Check if the PRICOM power is turned on.
-Check if the network cable is inserted correctly to PRICOM.
-Check if the network cable is broken.
-Check if the LINK LED of PRICOM and the Ethernet HUB is blinking.
-Check if the Ethernet HUB is working properly.
Initialize PRICOM to factory default and setup from the beginning.
Print job is not printed
Make sure that the LINK LED is blinking. If the LINK LED is not blinking, PRICOM
may not be properly connected to the network. Check the following.
-Check if the PRICOM power is turned on.
-Check if the network cable is inserted correctly to PRICOM.
-Check if the network cable is broken.
-Check if the LINK LED of PRICOM and the Ethernet HUB is blinking.
-Check if the Ethernet HUB is working properly.
-Check if the PRICOM and the printer is connected properly.
-If you are using PRICOM C-6100U, check if the USB cable is connected
properly.
Questions & Answers
5-1
Users Manual CX
If you are using TCP/IP protocol, ping PRICOM with the set IP address to see if there are
any reply. If there is no reply to ping, IP address may not be set properly. Reset
PRICOM to factory default and setup again from the beginning.
Example:
Issue ping in Windows 98 MS-DOS
Go to Start - Programs - MS-DOS Prompt and execute Ping xxx.xxx.xxx.xxx. You will
see the message below. "xxx.xxx.xxx.xxx" is the IP address set to PRICOM.
-When there is a reply to Ping:
Reply
Reply
Reply
Reply
from
from
from
from
xxx.xxx.xxx.xxx:bytes=32
xxx.xxx.xxx.xxx:bytes=32
xxx.xxx.xxx.xxx:bytes=32
xxx.xxx.xxx.xxx:bytes=32
time=58ms
time=58ms
time=58ms
time=58ms
TTL=253
TTL=253
TTL=253
TTL=253
-When there is no reply to Ping:
Request
Request
Request
Request
timed
timed
timed
timed
out.
out.
out.
out.
-Login to PRICOM using Telnet command. If you can not log in, IP address may not be
set to PRICOM properly. Check the IP address and reset IP address to PRICOM.
-If the DHCP/BOOTP server or the RARP server is residing on the network, the IP
address is automatically issued from the server. In this case, the IP address which was
manually set to PRICOM may have been overwritten by the server. To avoid this problem,
create a local environment where the server does not exist and issue the IP address to
PRICOM. At the same time, make sure that the "Obtain an IP address automatically"
in the TCP/IP setting is not marked.
-If the PRICOM and the PC is not in the same segment, a subnet mask and gateway
address must to be set to PRICOM. Use the PRICOM User Software CX to set the
appropriate address.
-Check the printer port name of PRICOM. The port name is indicated "(PRICOM-Print
CX TCP Port)" or "(PRICOM-Print CX IPX Port)" after the assigned port name.
Questions & Answers
5-2
Users Manual CX
If you are using PRICOM in Windows NT 4.0, following is a concern.
-If you are using Canon printer driver version 4.2x or earlier, make sure that the PRICOMPrint CX printing port name is xxx0: to xxx3 (xxx is the three characters of your choice).
Example:
ABC1: or XYZ3:
-If you are using Canon printer driver version 4.3x, do not type in any characters of your
choice. This may cause problem with printing. In this case, do not change the port
name and use the default port name.
The dial-up starts when print job is executed
This problem is caused by the OS you are using and can not be avoided. Click on "Cancel"
to close the dial-up window. The print job should be executed properly.
Error during printing
If you try to print while other users are printing large data (e.g. many pages or color
pages with high resolution), the printer is unable to accept your print job until the ongoing
printing is finished. If the waiting time of your print job exceeds a certain limit, a time
out situation occurs, which causes the error message. In such situation, execute the
print job again afterwards.
LPR printing is not available with PRICOM
With some of the Canon Bubble Jet Printers, the LPR printing is not available. For
more details, check our homepage.
IPP printing is not available with PRICOM C-5100/C-6100U
-With some of the Canon Bubble Jet Printers, the LPR printing is not available. For
more details, check our homepage.
-PRICOM C-700 does not support IPP printing.
Questions & Answers
5-3
Users Manual CX
How to check PRICOM configuration status
Configuration status can be obtained from diagnostic/configuration report with PRICOM
C-5100 and C-6100U. However this is available only with printers that carry their own
fonts. For more information on diagnostic/configuration report, refer to chapter “II. About
PRICOM” of this on-line manual.
Diagnostic/configuration report is not available with PRICOM C-700.
How to initialize / reset PRICOM to factory default
-Both PRICOM C-700, PRICOM C-5100, PRICOM C-6100U can be initialized / reset to
factory default via the PRICOM User Software CX or Telnet. To initialize PRICOM via
the PRICOM User Software CX, select “Set Up” – “Install printing software and PRICOM”
– “Initialize”. To initialize PRICOM via Telnet, refer to "Appendix" of this manual.
-PRICOM C-5100 can be initialized by using the Dip switch. For further information on
how to initialize using the DIP switch, refer to chapter “II. About PRICOM”, “Section 2:
PRICOM C-5100”, “Parts and Functions”.
-PRICOM C-6100U can be initialized by using the Push switch. For further information
on how to initialize using the Push switch, refer to chapter “II. About PRICOM”, “Section
3: PRICOM C-6100U”, “Parts and Functions”
PRICOM is initialized everytime the power is turned on
(In case of PRICOM C-5100)
Make sure that the PRICOM C-5100 DIP switch is not set to "initialize". For further
information on how to operate the DIP switch, refer to chapter “II. About PRICOM”,
“Section 2: PRICOM C-5100”, “Parts and Functions”.
The Status Monitor may not be available depending on the driver version you are using.
Download the latest driver to use the status monitor.
Questions & Answers
5-4
Users Manual CX
The Status Monitor is not available
-The Status Monitor may not be available depending on the driver version you are using.
Download the latest driver to use the status monitor.
-Some of the printer does not support the Status Monitor. Please refer to our homepage
for the supported printers.
-The Status Monitor may not properly function if you execute it manually by going to the
properties of the printer. Set the Status Monitor to execute automatically (pop up at
the time of the start of printing).
If you are using PRICOM in Windows 95/98/Me:
-Be sure that the printer port name is set as "LPTx: (where x is the name of your choice)".
If you use name other than "LPTx:" the Status Monitor will not function properly.
If you are using PRICOM in Windows NT 4.0:
-The Status Monitor may not be available depending on your printer driver version.
Questions & Answers
5-5
Users Manual CX
Appendix
Adding LPR port of Windows NT 4.0, Windows 2000 and
Windows XP
NOTE
-You need to have administrator rights to setup PRICOM in Windows NT 4.0, Windows
2000,
Windows XP.
This section explains how to setup and print with PRICOM using LPR of Windows NT 4.0,
Windows 2000 and Windows XP.
Print Using a LPR port of Windows NT 4.0
NOTE
-In order to print using LPR, LPR port must be added. Go to Start - Settings - Control
Services. Click Add, select Microsoft TCP/IP Printing,
Panel - Network and select Services
OK
and click OK. Component is installed. Restart the computer.
1. Go to Start-Settings-Printers and
click Add Printer and start the
wizard. At Add Printer Wizard
Wizard,
select My Computer and click Next
Next.
2. Click Add Port and create a new port.
If you have already created a port
when you installed PRICOM, select
the port from the list and continue
with step 6.
Appendix
1
Users Manual CX
3. Select LPR Port from the Available
Port.
Printer Ports and click New Port
4. At Name or address of server
lpd type in the IP address
providing lpd,
which was set to PRICOM. At
Name of printer or print queue on
server, add lp and click OK
OK.
that server
5. The list of Available Printer Ports
will appear. Click Close
Close. The name
will be added to the Available ports.
Select the appropriate port, and then
click Next
Next.
6. At Add Printer Wizard,
Wizard select the
printer driver to be used. Click Next
Next.
Appendix
2
Users Manual CX
7. When Use Existing Driver appears,
select whether to keep the existing
driver or replace to a new driver.
8. At Printer name,
name type the printer
name to be used in Windows NT 4.0.
If necessary, type name of choice.
Select to use this printer as the
default printer or not, then click
Next.
Next
9. S e l e c t S h a r e d o r N o t s h a r e d
according to your environment on
the Printer Sharing.
Sharing If the printer
is shared, type a share name. Click
Next.
Next
page put check
10.At the Print a test page,
in Yes
Yes, and click on Finish
Finish. The new
printer will be added to the list. If
the test print is correct, the printer
setup is complete.
Appendix
3
Users Manual CX
Print Using a LPR port of Windows 2000
NOTE
-In order to print using LPR, LPR port must be added. Go to Start - Settings - Control
Panel - Add /Remove Programs - Add/Remove Windows Components and open
Windows Components Wizard.
Wizard In Component, select Other Network File and Print
Services
Services, click Detail
Detail, select Print Services for Unix and click OK
OK. Windows
Component Wizard will be displayed and click Next. After the component is added, click on
Finish. LPR port is added.
1. Go to Start - Settings - Control Panel
- Printers and click Add Printer and
start the wizard.
2. Select Local printer
printer. Be sure to
remove the check from the
Automatically detect and install my
printer.
Plug and Play printer
Appendix
4
Users Manual CX
3. Add check on Create a new port in
Select the Printer Port and create a
new port. Select LPR Port and click
Next.
Next
NOTE
If the destination print port was
created when installing PRICOM,
select the port from Use the
Next.
following port and click Next
4. At Name or address of server
lpd type in the IP address
providing lpd,
which was set to PRICOM. At
Name of printer or print queue on
OK.
server, add lp and click OK
that server
Wizard select the
5. At Add Printer Wizard,
printer driver to be used. Click
Next.
Next
6. When Use Existing Driver appears,
select whether to keep the existing
driver or replace to a new driver.
Appendix
5
Users Manual CX
printer add the
7. At Name your printer,
printer name to be used in
Windows2000. If necessary, add
name of choice. Select to use this
printer as default printer or not, then
click Next
Next.
8. Select Share as or Do not share this
printer according to your
environment on the Printer Sharing
Sharing.
If the printer is shared, type a share
name. Click Next
Next.
9. At the Print test page
page, put check in
Yes. Click Next
Next.
Yes
10.The information of the configuration
will be listed. If there are no
mistakes, click on Finish
Finish. The new
printer will be added to the list. If
the test print is correct, the printer
setup is complete.
Appendix
6
Users Manual CX
Print Using a LPR port of Windows XP
NOTE
-In order to print using a LPR, LPR port must be added. Go to start-Control Panel-Add or
Remove programs-Add/Remove Windows Components and open Windows Components
Wizard. In Components, select Other Network File and Print Services,
Details, select
Wizard
Services click Details
OK. Windows Components Wizard will be displayed, and
Print Services for Unix and click OK
then click Next
Next. After the component is added, click Finish
Finish. LPR port is added.
1. Go to start-Control Panel-Printers
and Other Hardware and click Add
a printer and start the wizard.
2. Select Local printer attached to this
computer. Be sure to remove the
computer
check from the Automatically detect
and install my Plug and Play
printer.
printer
Appendix
7
Users Manual CX
3. Add check on Create a new port in
Select a Printer Port and create a
new port. Select LPR Port and click
Next.
Next
NOTE
If the destination print port was
created when installing PRICOM,
select the port from Use the
Next.
following port and click Next
4. At Name or address of server
lpd type in the IP address
providing lpd,
which was set to PRICOM. At
Name of printer or print queue on
OK.
server, add lp and click OK
that server
Wizard select the
5. At Add Printer Wizard,
printer driver to be used. Click Next
Next.
6. When Use Existing Driver appears,
select whether to keep the existing
driver or replace to a new driver.
Appendix
8
Users Manual CX
7. At Name your printer,
printer add the
printer name to be used in Windows
XP. If necessary, add name of choice.
Select to use this printer as default
printer or not, then click Next
Next.
8. Select Share name or Do not share
this printer according to your
environment on the Printer Sharing
Sharing.
If the printer is shared, type a share
name. Click on Next
Next.
9. At the Print test page
page, put check in
Yes. Click Next
Next.
Yes
10.The information of the configuration
will be listed. If there are no
mistakes, click on Finish
Finish. The new
printer will be added to the list. If
the test print is correct, the printer
setup is complete.
Appendix
9
Users Manual CX
Print Using an IPP Port of Windows 2000
TIP
-IPP function is available only with PRICOM C-5100 and PRICOM C-6100U.
-You need to have administrator rights to setup PRICOM in Windows 2000.
1. Go to Start - Settings - Control Panel
- Printers and double click on Add
Printer. Add Printer Wizard will
Printer
start.
2. Select Network printer for printer
connection.
3. At Locate Your Printer
Printer, select
Connect to a printer on the internet
or on your intranet and assign URL
of PRICOM or the IP address. If
Printer Connection appears, click on
OK.
OK
- If the URL is "abc.com"
http://abc.com/ipp/lp
or http://abc.com/ipp
-If the IP address is "192.168.10.100"
http://192.168.10.100/ipp/lp
or http://192.168.10.100/ipp
Appendix
10
Users Manual CX
4. Select the printer driver for your
printer and click Next
Next.
5.
Select to use this printer as the default printer. Click Next
Next. When set up is complete,
click Finish
Finish.
TIP
Appendix
To print via the proxy server, be sure to setup the proxy server on your Web browser.
LAN Settings. You will see the display
Connections
In Internet Explorer4/5, go to Properties
Properties-Connections
Connections-LAN
below.
11
Users Manual CX
Print Using an IPP port of Windows XP
TIP
-IPP function is available only with PRICOM C-5100 and PRICOM C-6100U.
-You need to have administrator rights to setup PRICOM in Windows XP.
Control Panel
Printers
1. Go to start
start-Control
Panel-Printers
and Other Hardware and double
click on Add a printer
printer. Add Printer
Wizard will start.
2. Select A network printer
printer, or a
printer attached to another
computer for printer connection.
Appendix
12
Users Manual CX
Printer select Connect
3.At Specify a Printer,
to a printer on the Internet or on a
home or office network and assign
URL of PRICOM or the IP address.
Click on Next
Next.
- If the URL is "abc.com"
http://abc.com/ipp/lp
or http://abc.com/ipp
-If the IP address is "192.168.10.100"
http://192.168.10.100/ipp/lp
or http://192.168.10.100/ipp
4. Select the printer driver for your
printer and click OK.
5.
Select to use this printer as the default printer. Click Next
Next. When setup is complete,
click Finish
Finish.
TIP
To print via the proxy server, be
sure to setup the proxy server on
your Web browser. In Internet
Explorer4/5, go to start-Internet
and then right click. Go to Internet
P r o p e r t i e s -Connections -L A N
Settings. You will see the display
Settings
on the right.
Appendix
13
Users Manual CX
About TELNET
After assigning an IP address to the PRICOM, parameters can be configured with
TELNET in your TCP/IP or SNMP software. TELNET allows you to display and set
parameters for PRICOM by using the following commands. Below are some examples.
TIP
Login by root user to change each parameter.
(In the factory default, type in root as the user name and do not type anything in the
password.)
Example of display when logged in using TELNET
PRICOM C-5100 Ver 2.0.0 TELNET server.
Copyright (C) 2001-2002 silex technology, Inc.
login: root
'root' user needs password to login.
password:
User 'root' logged in.
No. Item
Value
(level.1)
---------------------------------------------------------------------1 : Configure General
2 : Configure TCP/IP
3 : Configure SNMP
96 : Display Status
97 : Reset Settings to Defaults
98 : Restart Print Server
99 : Exit
Please select(1 - 99)?
Appendix
14
Users Manual CX
Configure General Menu [1]
*[2. Use HP JetAdmin] is not displayed with PRICOM C-700 and PRICOM C-6100U.
No. Item
Value
(level.2)
---------------------------------------------------------------------1 : Change root Password
: ""
2 : Use HP JetAdmin
: YES
3 : LAN Interface
: AUTO
99 : Back to prior menu
Please select(1 - 99)?
Configure TCP/IP Menu [2]
No. Item
Value
(level.2)
---------------------------------------------------------------------1 : TCP/IP Protocol
: ENABLE
2 : DHCP/BOOTP
: DISABLE
3 : RARP
: DISABLE
4 : IP Address
: 192.168.20.28
5 : Subnet Mask
: 0.0.0.0
6 : Default Gateway
: 0.0.0.0
99 : Back to prior menu
Please select(1 - 99)?
Configure SNMP menu [3]
No. Item
Value
(level.2)
---------------------------------------------------------------------1 : Authentic Community
: "******"
2 : Trap Community
: "public"
3 : Trap Address(IP)
: 0.0.0.0
4 : SysContact
: ""
5 : SysName
: ""
6 : SysLocation
: ""
7 : EnableAuthenTrap
: 2
99 : Back to prior menu
Please select(1 - 99)?
Appendix
15
Users Manual CX
Display Status menu [96]
Display Status
1 : prn1
2 : system
99 : Back to prior menu
Please select(1 - 99)?
prn1 menu [96-1]
prn1:
Ready
system menu [96-2]
C-5100 Version 2.0.0
TCP/IP status
IP address
: 192.168.20.28
Subnet Mask
: 255.255.255.0
Gateway addr
: 192.168.20.254
Reset Settings to Defaults menu [97]
Reset Settings to Defaults
1 : YES
2 : NO
Please select(1 - 2)?
Restart Print Server menu[98]
Restart Print Server
1 : YES
2 : NO
Please select(1 - 2)?
Exit menu [99]
Exit
1 :
2 :
3 :
99 :
Save
Save
Exit
Back
Appendix
and Restart
and Exit
without Saving
to prior menu
16
Users Manual CX
Test Report and Parameters of PRICOM C-5100 and
PRICOM C-6100U
Diagnostic/Configuration Report
TIP
-Diagnostic/Configuration report is not available with Canon Bubble Jet Printers.
-To print a Diagnostic/Configuration report, make sure the printer and the PRICOM is off.
The Diagnostic/Configuration report can be printed when PRICOM is turned on while
connected to the printers that carry their own fonts. During the diagnostic check, the
PRICOM tests the hardware and the network, so this may help you to detect an error.
How to do the Diagnostic/Configuration report, please refer to "II. About PRICOM".
Diagnostic Report (In case of PRICOM C-5100)
You can print hardware function check pages when you turn on PRICOM .
PRICOM C-5100 Version 2.0.0
Copyright (C) 2001-2002 silex technology, Inc.
*** Diagnostic report ***
ROM Check: Ok stat: xxxx FFFF 0000 0000
RAM Check: Ok stat: 0000 0000 0000 0000
NIC Check: Ok addr: 00:80:92:12:34:56 100BASE-TX
EEPROM Check: Ok stat: xxxx xxxx 0000 0000
DIPSW1 : OFF(ON: Test use only)
DIPSW2 : OFF(ON: Initialize configuration)
DIPSW3 : ON (ON: Diagnostic/Configuration print)
DIPSW4 : OFF(ON: Reserved)
Appendix
17
Users Manual CX
Configuration Report
You can print the configuration test page when the PRICOM is turned on while connected to the printers
that carry their own fonts.
Configuration Report (In case of PRICOM C-5100)
PRICOM C-5100 Version 2.0.0
Copyright (C) 2001-2002 silex technology, Inc.
<< Configure General >>
Change root Password
Use HP JetAdmin
LAN Interface
<< Configure TCP/IP >>
TCP/IP Protocol
DHCP/BOOTP
RARP
IP Address
Subnet Mask
Default Gateway
<< Configure SNMP >>
Authentic Community
Trap Community
Trap Address(IP)
SysContact
SysName
SysLocation
EnableAuthenTrap
Appendix
:""
:Yes
:AUTO
:ENABLE
:DISABLE
:DISABLE
:192.168.100.200
:255.255.255.0
:192.168.100.254
:"******"
:"public"
:0.0.0.0
:""
:""
:""
:2
18
Users Manual CX
Parameter Configuration
After you have finished installing the PRICOM, you need to configure the functions.
Below are the explanations on how to configure the PRICOM.
General
Name
CD-ROM Setup Telnet
Change root
Password
Use HP
JetAdmin
LAN Interface
Web page
Change root
Password
Use HP
JetAdmin
LAN Interface
Factory Default
Explanation
none
(no password)
YES
Setup password for administrator. This password will be
used for Telnet, Web page, and setup utility.
Enable or disable using Hewlett Packard's utility
JetAdmin/Web JetAdmin.
Setup network type. Normally use in AUTO. If you see
no blinking on HUB after you turn on PRICOM, change
to appropriate type.
AUTO
TCP/IP
CD-ROM SetUP
TCP/IP Protocol
Name
Web page
TCP/IP Protocol
AdminManager
Use TCP/IP
Protocol
Factory Default
Explanation
ENABLE
Enable or disable TCP/IP protocol. This section influence
LPR, FTP, TELNET, SNMP, HTTP and Setup utility (for
TCP/IP).
DHCP/BOOTP
Use
DHCP/BOOTP
ENABLE
Enable or disable DHCP/BOOTP. This is a protocol which
acquire IP address from DHCP/BOOTP server when booted.
In order to use this function with PRICOM, a DHCP/BOOTP
server must exist in the network and properly set up.
PRICOM will automatically acknow
RARP
Use RARP
ENABLE
Enable or disable RARP. RARP is a protocol which acquire
IP address from RARP server when booted. In order to use
this function with PRICOM, a DHCP/BOOTP server must
exist within the same subnetwork and properly set up.
IP Address
IP Address
IP Address
0.0.0.0
Setup IP address. The value must be configured in the
format of four part series of numbers separated by decimal
points, such as “xxx.xxx.xxx.xxx”.
Subnet Mask
Subnet Mask
Subnet Mask
0.0.0.0
Default Gateway
Default Gateway
Default Gateway
0.0.0.0
Setup subnet mask. The value must be configured in the
format of four part series of numbers separated by decimal
points, such as “xxx.xxx.xxx.xxx”. The gateway must reside
within the same subnetwork as PRICOM. If you set as
0.0.0.0, this section will
Setup gateway IP address. Parameter should be a decimal
that looks like “xxx.xxx.xxx.xxx”. Gateway must reside within
the same subnetwork as PRICOM. If you set as 0.0.0.0, this
section will be invalid.
Receive IP
address
automatically
Appendix
19
Users Manual CX
SNMP
Name
CD-ROM SetUP Telnet
Authentic
Community
Trap Community
Factory Default
Web Page
Authentic
"Public"
Community
Trap Community "Public"
Trap Address
(IP)
SysContact
Trap Address
(IP)
SysContact
0.0.0.0
""
SysName
SysName
""
SysLocation
SysLocation
""
EnableAuthenTr EnableAuthenTr 2
ap
ap
Appendix
Explanation
Setup SNMP authentic community name. This
community name is authenticated when receiving SNMP
Enter TRAP community name. This name will be used
when PRICOM execute trap.
Enter the TRAP address. The TRAP address is disabled
if the IP address is set 0.0.0.0.
Enter SysContact for MIB-II object. Normally enter
administrator’s mail address.
Enter SysName for MIB-II object. Normally enter
PRICOM’s host name or domain name.
Enter SysLocation for MIB-II object. Normally enter
location where PRICOM is located.
Enable or disable authen trap for MIB-II. When
enabled, in occurrence of community error, a SNMP
trap will be sent to the address set at “Trap Address”.
20
Users Manual CX
User Registration
For future technical support, we recommend you to register with us as a user on-line at:
http://www. silex. jp/
User Registration
1