1
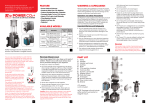
APPLICATION
Rio Plus 1000-3100
Rio® Plus pump is designed to run completely submerged in
water. Do not operate pump outside of water! This pump should
be submerged in water before connecting directly to a GFCI
outlet. Do not operate pump without the main filter strainer.
When using Rio Plus pump in fountains, water features and
waterfalls the use of filter conversion kit is recommended as a
pre-filter.
1. Verify that the pump size fits the application without
dramatically restricting the flow. Consult your local
dealer or manufacturer’s guidelines for the proper size
and model of Rio Plus pump.
2. Attach Rio Filter conversion Optional.
3. Choose discharge adapter option. See figure B.
4. Position the pump so that the tubing used will not kink
and connect it to the discharge adapter. Note do not
reduce the diameter of the recommended output tubing.
5. Secure the tubing with a hose clamp.
NOTE: When installing the pump for any
application there will be extra parts.
APPLICATION I: Fountains, Water
Features & Waterfalls (see figure A)
Follow all warning and safeguards
Rio Plus 50-800
Filter conversion kit 50-180 Item no. 000676002957
Filter conversion kit 200-800 Item no. 0006760001615
Filter conversion kit 1100-1400 Item no. 000676005118
Filter conversion kit 1700-2500 Item no. 000676001585
Filter conversion kit 1100-3100 Item no. 000676004326
APPLICATION II: In-Tank Circulation
1. Verify that the pump size fits the application without
dramatically restricting the flow. Consult your local
dealer or manufacturer’s guidelines for the proper
size and model of Rio Plus pump.
2. Attach Rio Filter conversion Optional.
3. Choose discharge adapter option.
4. Position the pump so that the tubing used will not
kink and connect it to the discharge adapter. Note
do not reduce the diameter of the recommended
output tubing.
5. Secure the tubing with a hose clamp.
(see figure B)
Helpful Hints:
INSTALLATION for 600PT-800PT
4
1. The use of a float valve will help ensure a
consistent water level and ensure the pump will
operate fully submersed at all times.
2. If the pump is making excess noise verify that the
pump is free standing and is not vibrating against
the wall of the sump.
3. Excess noise can be caused using to small of
tubing restricting flow or restricting flow with a valve
by more than 15%.
UNDER GRAVEL FILTER: (see figure D)
1. Remove the main housing strainer.
2. Rio 1000-3100 HP attach either the suction cup
bracket with suction cups or the pump hanger to
the pump.
3. Attach the undergravel filter strainer and
undergravel filter adapter to the intake of the pump.
4. Choose your choice of discharge adapter
5. Verify the uplift tube is cut to the proper length so
that the pump will be operated fully submersed
6. Place the on top of the uplift tube.
7. Plug directly to a GFCI outlet.
Optional venturi attachment: Remove the air stopper
and attach the airline tube and silencer to the venturi
inlet. Note the venturi will not work if the pump is
submersed more than 1in from the surface.
8
PART LIST FOR ALL PUMPS
NOTE: When installing the pump for any
application there will be extra parts.
Do not run on wavemakers or timers!
Rio® Plus pump is designed to run completely submerged in
water. Do not operate pump outside of water! This pump should be
submerged in water before connecting directly to a GFCI outlet. Do
not operate pump without main housing strainer. When using Rio
Plus pump in fountains, water features and waterfalls the use of filter
conversion kit is recommended as a pre-filter.
Follow all warning and safeguards
Rio Plus 50-800
Filter conversion kit 50-180 Item no. 000676002957
Filter conversion kit 200-800 Item no. 0006760001615
5
1. Choose a location for the pump.
2. If using the filter conversion kit remove the main
housing strainer and attach filter conversion kit
3. Choose discharge options.
4. Secure to the aquarium using suction cups. Note verify
that the surface that the pump is attached to is clean.
5. Verify the pump is secure and plug directly to a GFCI
outlet.
Optional venturi attachment: Remove the air stopper and
attach the airline tube and silencer to the venturi inlet. Note
the venturi will not work if the pump is submersed more
than 1 in from the surface.
Rio Plus 1000-3100
Note: Rio Plus 2500 and Rio 3100 are better used as
sump or fountain pumps than water circulation pumps.
Filter conversion kit 1100-1400 Item no. 000676005118
Filter conversion kit 1700-2500HP Item no. 000676001585
Pro filter conversion kit 1100-3100 Item no. 000676004326
1. Choose a location for the pump.
2. Remove the main housing strainer and slide on either
the suction cup bracket with suction cups or hanging
bracket.
3. If using the filter conversion kit remove the main
housing strainer and attach filter conversion kit.
4. Choose discharge options.
5. If securing to the aquarium using suction cups.
Note verify that the surface that the pump is
attached to is clean.
6
TROUBLESHOOTING
(see figure E)
Note: There may be variances when installing this
pump directly to protein skimmer as there are many
different protein skimmer manufactures. Consult with the
manufacture of the protein skimmer for exact installation
instructions for there specific skimmer.
1. The pump comes out of the box and is ready to run.
2. Connect directly to the intake of the protein skimmer.
3. Position the air tubing silencer outside the water.
4. Plug the unit directly to a GFCI outlet.
5. Verify that there is water and air entering the skimmer.
IIMPORTANT: Do to the design of Wet/Dry Filtration and
Sumps, there is a high amount of evaporation and failure
maintain a consistent water level or the daily addition
of top off water will cause the pump to operate without
being fully submersed. If the pump is not operated fully
submersed imminent malfunction to the pump will occur,
thus resulting in loss of live stock and/or injury or loss of
life. If the pump is not operated fully submersed at all times
the warranty is void.
9
APPLICATION I: Fountains, Rio Plus 50-800
Water Features &
Waterfalls
6. Verify the pump is secure and plug directly to a
GFCI outlet.
Optional venturi attachment: Remove the air stopper
and attach the airline tube and silencer to the venturi
inlet. Note the venturi will not work if the pump is
submersed more than 1” from the surface.
APPLICATION III: Wet/Dry Filtration
Systems, Protein Skimmer & Sumps
(see figure C)
Rio® Plus pump is designed to run completely submerged
in water. Do not operate pump outside of water! This pump
should be submerged in water before connecting to a power
source. Use the flow chart to determine the proper water flow
and tubing size. Do not reduce water flow of the pump by more
than 15% using a control valve
Follow all warning and safeguards
Rio Plus 1000-3100
1. Remove main housing strainer.
2. Attach suction cup bracket and suction cups
together, then slide on suction cup bracket set onto
motor housing.
3. Output: Connect either outlet pipe adapter or flow
control directly to the flexible tubing and secure
with a hose clamp.
4. Submerse pump in water and plug directly to a
GFCI outlet.
7
impeller well and intake elbow.
• Impeller and/or ceramic shaft are damaged and
PROBLEM: PUMP IS TOO NOISY
Reason & Solution:
needs to be replaced.
• Wrong size flexible tubing is being used.
• Pump is touching the wall of the filtration.
• Flow has been reduced by more than 15% using a ball
TROUBLESHOOTING FOR
RIO PLUS 600PT-800PT
• Main housing strainer is clogged.
• Impeller and ceramic shaft needs to be cleaned.
• Broken ceramic shaft.
• Impeller was not reinstalled properly. Verify that ceramic
PROBLEM: NO AIR
Reason & Solution:
valve.
•
•
shaft and shaft endcap is in place.
Wrong size pump for the given application.
If rigid PVC is used, connect a 1in piece of flexible
tubing in between the pump and the rigid tubing. This
will take tension off the pump and help reduce noise.
PROBLEM: PUMP WILL NOT START
Reason & Solution:
• Impeller needs to be cleaned.
• When reinstalling the impeller the rubber bushing where
•
•
•
•
not installed on the shaft prior to replacing in the motor
housing.
Impeller will not rotate freely on ceramic shaft.
Main housing strainer is clogged.
GFCI has gone off and needs to be reset.
When using a check valve has air is trapped in
10
APPLICATION II:
In-Tank Circulation
• Verify that the air tubing with silencer is out of
water.
• The venturi needs to be cleaned: Remove the
•
•
•
silencer and place air tubing in a cup of warm water
let the pump suck water through pump.
If regular maintenance has not been preformed
it may be necessary to remove the pump and
disassemble the venturi. When doing so verify that
all holes are clear. It may be necessary to soak
parts in a vinegar water solution (3 parts water to 1
part vinegar.)
Impeller and impeller well cover needs to
be cleaned.
The pump is positioned to deep in the water
column, do not place the pump deeper than 6 in
from the water level.
11
Rio Plus 200-800
Rio Plus 1000-2500
1. Main housing strainer 12. Flow control
2. Impeller endcap
13. Elbow
3. Impeller
14. Duck bill
4. Motor housing
15. intake and output
pipe adapter (optional)
5. Suction cups
6. Suction cup bracket
7. Pump hanger
8. Pipe adapter
9. ¾ in MPT (option)
10. 3/8 in Pipe adapter
11. Discharge adapter
with venturi jet
16. Air tubing and silencer
17. Air tubing
18. Air intake elbow
19. Under-gravel
filter adapter
20. Under-gravel
filter strainer
FLEXIBLE TUBING SIZE:
Rio+ 50-180: ½ in (13mm) or 3/8 in ( 9.5mm) ID
Rio+ 200-800: ½ in (13mm) ID
Rio+ 1000-2500: ¾ in (19mm) ID
or ¾ in (19mm) MPT
Rio+ 3100: 1 in (25.4mm) ID or ¾ in (19mm) MPT
APPLICATION III:
Wet/Dry Filtration
Systems, Protein
Skimmer & Sumps
FIG. B
FIG. A
MPT (Male Pipe Thread)
Rio Plus 1100-2500
Rio Plus 3100
FIG. C
UNDER-GRAVEL FILTER
Rio Plus 200-800
FIG. D
RIO PLUS 600-800PT
FIG. E