1
Owner's Manual
RCR-75CA
Cash Register
User’s Instructions
Please read and retain these instructions.
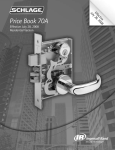
To register your product, please go to www.royalsovereign.com USA.
Click the Customer Support Tab then Registration Tab.
www.royalsovereign.com
Royal Sovereign International, Inc.
Cash Register
Model RCR-75CA
INTRODUCTION
Thank you for choosing Royal Sovereign RCR-75CA cash register. This manual consists of three parts.
(Part A: Overview, Part B: Programming, Part C: Operation instructions) Please take a few moments
and read the operating instructions and programming instructions thoroughly to ensure you expand
your use of our cash register.
NEED HELP? HAVE QUESTIONS?
Please call us Monday - Friday from 8:30am to Friday from 8:30am to 5:30pm (Eastern Standard Time)
at: 1-888-961-6673 (press option 9)
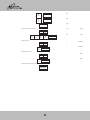
CONTENTS
Table of Contents............................................................................................................................................................ 5
1 Product Features .......................................................................................................................................................... 6
2 Starting Up ................................................................................................................................................................. 9
2.1 Feeding a paper roll................................................................................................................................................... 9
3 Key-Operated Control Switch........................................................................................................................................... 9
3.1 Key switch positions .................................................................................................................................................. 9
3.2 Keys........................................................................................................................................................................ 9
4 Keyboard .................................................................................................................................................................. 10
4.1 Changing the key labels ............................................................................................................................................ 10
4.2 Keyboard ............................................................................................................................................................... 10
4.3 Explanation of the key functions................................................................................................................................. 11
5 Programming ............................................................................................................................................................ 13
5.1 Standard programming ............................................................................................................................................. 13
5.1.1 Programme menu ................................................................................................................................................. 13
5.1.2 Initiate programming ............................................................................................................................................ 13
5.1.3 Conclude programming........................................................................................................................................... 13
5.2 Text input............................................................................................................................................................... 13
5.2.1 Text input areas and maximum number of characters ................................................................................................... 13
5.2.2 Procedure to enter text .......................................................................................................................................... 14
5.2.3 Keys for text input ................................................................................................................................................ 15
5.2.4 Character map ...................................................................................................................................................... 15
5.3 Language Options .................................................................................................................................................... 16
5.4 Programming departments........................................................................................................................................ 16
5.4.1 Programmable contents.......................................................................................................................................... 16
5.4.2 Department programming....................................................................................................................................... 17
5.5 Programming the PLU (price look up).......................................................................................................................... 19
5.5.1 Programmable contents.......................................................................................................................................... 19
5.5.2 Programming PLUs................................................................................................................................................ 19
5.5.3 Deleting a PLU...................................................................................................................................................... 21
5.6 Clerk system............................................................................................................................................................ 22
5.6.1 Programming clerks .............................................................................................................................................. 22
5.6.2 Activating/Deactivating the clerk system ................................................................................................................... 24
5.6.3 Logging on to the cash register as a clerk ................................................................................................................. 24
5.7 Programming tender media identification..................................................................................................................... 25
5.8 Programming a surcharge as an amount....................................................................................................................... 26
5.9 Programming a discount as an amount ........................................................................................................................ 26
5.10 Programming a surcharge as a percentage.................................................................................................................. 27
5.11 Programming a discount as a percentage ................................................................................................................... 27
5.12 Programming the machine number............................................................................................................................. 28
5.13 System options...................................................................................................................................................... 28
5.13.1 Programming system settings................................................................................................................................ 28
5.13.2 Overview of system options .................................................................................................................................. 29
5.13.3 Printing the system options................................................................................................................................... 31
5.14 Programming the date and time ............................................................................................................................... 32
5.15 Programming foreign currencies ............................................................................................................................... 32
5.16 Programming tax rates ........................................................................................................................................... 34
5.17 Programming logo messages.................................................................................................................................... 34
5.18 Programming the end lines ..................................................................................................................................... 35
5.19 Selecting a graphical logo ....................................................................................................................................... 35
5.20 Programming the keyboard...................................................................................................................................... 36
5.20.1 Programmable keys ............................................................................................................................................. 36
5.20.2 Programming the keys ......................................................................................................................................... 37
5.20.3 Resetting the cash register to its default settings ..................................................................................................... 37
3
CONTENTS
6 Operation.................................................................................................................................................................. 38
6.1 Clearing error messages............................................................................................................................................ 38
6.2 Registering departments .......................................................................................................................................... 38
6.2.1 Single DP registration ........................................................................................................................................... 38
6.2.2 Multiple DP registration.......................................................................................................................................... 38
6.3 Registering PLUs...................................................................................................................................................... 39
6.3.1 Registering Programmed PLU .................................................................................................................................. 39
6.3.2 Registering a multiple PLU ..................................................................................................................................... 39
6.4 Concluding receipt / Method of payment....................................................................................................................... 39
6.4.1 Paying with cash and displaying the change................................................................................................................ 39
6.4.2 Payment by cheque /debit....................................................................................................................................... 39
6.4.3 Payment by credit card .......................................................................................................................................... 40
6.4.4 Paying by credit approval........................................................................................................................................ 40
6.4.5 Combining tender media......................................................................................................................................... 40
6.5 Payment in a foreign currency..................................................................................................................................... 41
6.5.1 Paying in a foreign currency with the exact amount ..................................................................................................... 41
6.5.2 Paying in a foreign currency with change................................................................................................................... 41
6.6 Registering surcharges and discounts .......................................................................................................................... 42
6.6.1 Registering amount-related surcharges and discounts ................................................................................................. 42
6.6.2 Registering percentage surcharges and discounts........................................................................................................ 42
6.7 Deleting input errors (corrections............................................................................................................................... 43
6.8 Error correction and void .......................................................................................................................................... 43
6.8.1 EC (error correction) ............................................................................................................................................. 43
6.8.2 Void ................................................................................................................................................................... 43
6.8.3 Complete cancellation............................................................................................................................................ 43
6.8.4 Refunds............................................................................................................................................................... 44
6.9 Received on account operations.................................................................................................................................. 44
6.10 Paid out operations ............................................................................................................................................... 44
6.11 Printing numbers ................................................................................................................................................... 44
6.12 Opening the cash drawer without a sale ..................................................................................................................... 44
6.13 Printing a receipt on/off ......................................................................................................................................... 45
6.14 Printing a copy of the receipt................................................................................................................................... 45
7 Training Mode ........................................................................................................................................................... 45
7.1 Activating Training mode........................................................................................................................................... 45
7.2 Deactivating Training mode........................................................................................................................................ 45
8 Electronic Journal (EJ) ................................................................................................................................................ 46
8.1 Printing the electronic journal (EJ) ............................................................................................................................. 46
8.1.1 Printing the EJ with all details ................................................................................................................................ 46
8.1.2 Printing the EJ with totals only................................................................................................................................ 46
8.1.3 Printing a copy of a receipt from the EJ..................................................................................................................... 47
8.2 Deleting the electronic journal (EJ) ............................................................................................................................ 47
8.2.1 Printing and deleting the EJ.................................................................................................................................... 47
8.2.2 Deleting the EJ without printing .............................................................................................................................. 47
9 Cash Register Reports.................................................................................................................................................. 48
9.1 Types of report ....................................................................................................................................................... 48
9.2 Report overview...................................................................................................................................................... 48
9.3 Report contents ...................................................................................................................................................... 48
9.4 Printing reports ...................................................................................................................................................... 48
9.5 Example of a day's Z-report ...................................................................................................................................... 49
10 Deleting Cash Register Data ........................................................................................................................................ 50
11 In the Case of Problems.............................................................................................................................................. 50
11.1 Display messages .................................................................................................................................................. 50
11.2 Printer malfunction ................................................................................................................................................ 50
12 Options .................................................................................................................................................................. 51
12.1 SD card slot for data backup..................................................................................................................................... 51
4
RCR-75CA
CONTENTS
12.1.1 Saving data on an SD card ..................................................................................................................................... 51
12.1.2 Loading data from an SD card................................................................................................................................. 51
12.2 Rechargeable battery ............................................................................................................................................. 51
12.2.1 Technical data..................................................................................................................................................... 52
12.2.2 Installation of the rechargeable battery................................................................................................................... 52
5
1 Product Features
1.1 PRECAUTIONS FOR USE
Electrical Specifications and Power Cord
Check to ensure that the electrical service being used is adequate for the model you’ve chosen. The electrical rating of your new cash register is defined on the serial plate of the unit. Please
refer to the rating when checking electrical requirements to ensure they meet the electrical codes of your location.
General Use
• Do not attempt to repair it yourself. If repairs should become necessary, please bring the cash register to an authorized service centre.
• Do not insert any objects into the cash register. This could damage the cash register and also exposes you to the risk of an electrical shock.
• Do not use water or solvents, such as paint thinner, spirit to clean the cash register. Use a dry cloth to clean the cash register.
• Make sure you keep all the protective inserts in a safe place for future use. In case of transport damage, the unit must be returned together with the original packaging, operating/programing
instruction manual and accessories.
• Do not print without any paper installed.
• Do not place heavy items or sit on unit.
• To disconnect the power supply fully, disconnect the plug from the power socket.
6
RCR-75CA
1.2 Notes on operation and identification of parts
1.2.1 Notes On Operation
All the data is retained following disconnection from the power supply. The internal memory of this unit ensures the data is retained for approximately 2 months in the event the cash register has
been disconnected from the power supply.
1.2.2 Rechargeable Battery (Sold Separately)
When battery is fully charged, it can operate the cash register for a maximum of 5 hours without the need of the main power supply.
Note:The run time for cash register by the battery depends on the quantity and length of the receipts printed. When the battery capacity is too low, L (Low) appears in the cash
register display. When the cash register is connected to the power outlet, the battery in the cash register automatically recharged.
CAUTION: D o not mix these with any other types of batteries.Recharge batteries under adult supervision.
DO NOT RECHARGE OTHER TYPES OF BATTERIES. These batteries must be kept away from children.
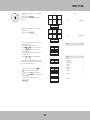
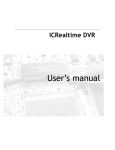
1.2.3 Identification Of Parts
Printer cover opening
LCD Clerk Display
Printer cover
Ink roll cover and opening
Key
SD Card Slot
Mode switch
Drawer
Keyboard
7
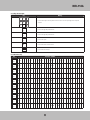
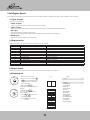
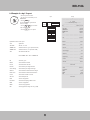
1.3 PRODUCT FEATURES
Feature
Cash drawer
No. of departments
No. of PLUs
No. of clerks
No. of w rates (tax rates)
Type of payment
Cash register reports
Opertator
Customer display
Printer
Programmability
Options
RCR-75CA
Yes
42
1250
8
4
Cash, cheque/debit, credit card
X1/Z1 day's financial report
X2/Z2 monthly financial report
X/Z PLU report
X/Z clerk report
X/Z training report
5 line alpha numeric, LCD Blue Backlit
Numeric 10 Digit LCD
Thermal/ 50 mm per second
Department, PLU, Clerk, Tender Media, Key(+/-), Key (+%/-%), machine number, p register, date, time, foreign currency, tax group,
logo message, ad message, graphic logo, keyboard, memory clear, SD card back up , print program dump
Battery: to operate the cash register without a power cable for approx. 5 hours continuous operation
8
RCR-75CA
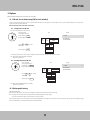
2 Starting Up
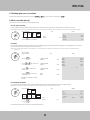
Feeding the Receipt Paper
1. Pull the cover from the back to lift the printer cover
and detach it
2. Remove the paper spool
3. Press shaft into large hole to release side cap. Insert paper roll
on the shaft so that the paper unrolls from the bottom.
4. Lift black receipt roller
5. Feed paper through bottom of receipt roller. Close receipt 6. Place printer cover back on cash register.
roller.
3 Key-Operated Control Switch
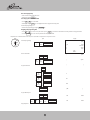
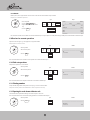
3.1 Key switch positions
The key can be turned to five different positions:
OFF
REG
OFF
REG
X
X
PRG
Z
PRG
OFF
The cash register is off
Z
This is the mode when doing
standard transactions.
Z
X
Print report without memory
deletion
OFF
REG
X
X
PRG
REG
Registration mode
OFF
REG
OFF
REG
PRG
X
Z
PRG
Z
Print report with
memory deletion
Z
PRG
Programming mode
Refer to Section 9 for more details Refer to Section 9 for more details
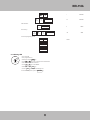
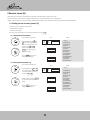
3.2 Keys
Six different keys are available for use with the cash register:
The keys provide different level of security. The key with 'P' provides full security access to all functions of the cash register including programming
Keys identification
S
Z
P
No. of keys
included
2
2
2
OFF
X
X
X
REG
X
X
X
9
Switch position
X
X
X
X
Z
PRG
X
X
X
4 Keyboard
4.1 Changing the key labels
This register has preset key labels. Should you wish to change the name of any label, proceed as per the steps indicated below:
1. Remove the transparent cap from the key.
2. Replace the existing key label with a new label.
3. Replace the transparent cap back on the key.
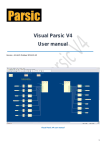
4.2 Keyboard
FEED
EC
RA
RETOUR
PO
VOID
CLR
CLERK
7
8
9
@
ABC
DEF
4
5
6
GHI
JKL
MNO
1
2
3
PQRS
TUV
WXYZ
0
00
„ #
SP
•
DEL
PLU
DP
SHIFT
%-
X
Receipt
ON/OFF
FC
4/18/32
8/22/36
12/26/40
▲
Receipt
ISSUE
#/NS
3/17/31
7/21/35
11/25/39
▼
CHECK
CARD
2/16/30
6/20/34
10/24/38
14/28/42
SUB-TOTAL
1/15/29
5/19/33
9/23/37
13/27/41
CASH
10
RCR-75CA
4.3 Explanation of key functions
Key
Explanation
FEED
The FEED key is used to continue feeding the receipt or journal paper until the key is released.
RA
The RA key is used to record payments made into the cash register.
The total amount received on account is recorded in the financial report.
PO
The PO is used to record amounts removed from the cash drawer.
The total amount registered appears separately in the financial report.
The CLR key is used to delete all the entries made using the numeric keyboard or by the X key before the entries have been finalised by
CLR
pressing a department or function key. The CLR is also used to clear error states.
The EC key is used to cancel an incorrect registration immediately after it has been entered.
The error correct total is recorded in the financial report.
EC
RETOUR
The RETOUR key is used for refund transactions. The refund total is recorded in the financial report.
VOID
The VOID key is used to complete the cancellation of an item within a registration which has not yet been concluded.
The void total is recorded in the financial report.
The CLERK key is used to register a clerk.
CLERK
7
8
9
@
ABC
DEF
4
5
6
GHI
JKL
MNO
1
2
3
PQRS
TUV
WXYZ
0
00
„#
SP
PLU
DP
SHIFT
%-
X
Numeric keys: The numeric keys are used to enter numbers.
The • is used to enter the decimal point.
•
DEL
PLU (Price Look-Up) key. Items and prices are assigned to PLU numbers.
The DP SHIFT key is used to switch between the three department levels.
When Programming mode is active, the key is used to confirm a selection.
The %- key is used to subtract a percentage from a PLU or the total amount of a sale.
The total amount registered by the
key is recorded in the financial report
%-
The X key is used repeat (multiply) entries for departments or refunds.
11
Key
Explanation
4/18/32
8/22/36
12/26/40
3/17/31
7/21/35
11/25/39
2/16/30
6/20/34
10/24/38
14/28/42
1/15/29
5/19/33
9/23/37
13/27/41
T he Department keys serve to register departments.
Note: The RCR-75CA has 42 departments.
▲
The ▲ and ▼ keys are used to scroll up and down in the display.
▼
Receipt
ON/OFF
The Receipt ON/OFF key is used to print /not print a receipt.
Receipt
ISSUE
The Receipt ISSUE key is used to print a copy of the receipt.
CHECK
FC
The CHECK key is used for transactions made with a cheque.
The FC key is used for converting amounts into a foreign currency.
#/NS
The #/NS (NS = No Sale) is used for operations in which entries should not be added. It can be used to print a maximum 7 digit number on
the receipt.
The entry does not affect other sales totals.
The #/NS key is also used to open the cash drawer.
CARD
The CARD key is used for transactions made with a credit card.
SUB-TOTAL
CASH
Press the SUB-TOTAL key to display the total amount of the sale.
The CASH key is used for transactions made with cash.
12
RCR-75CA
5 Programming
5.1 Standard Programming
The key switch must be set to PRG to program or make changes to the system options.
When the key switch is set to PRG, the Programming menu appears in the display. The 2-digit programming number is followed by a brief description of the programming function.
5.1.1 Programme menu
Display content - English
Significance
90.PRINT PROG DUMP
01.DEPARTMENT
03.PLU
06.CLERK
08.TENDER MEDIA
09.KEY + /10.KEY +%/-%
Print programmed data For example, you may want to a print out hard copy which shows all of the PLU and prices that has been programmed
Program departments
Program price look ups (PLU)
Program clerks
Program methods of payment
Program amount-related surcharges/discounts
Program percentage surcharges/discounts
Program machine number (used when you have more than 1 cash register and want to keep track of which cash register was used for a
specific transaction)
Program cash register settings (system options)
Program date and time
Program foreign currencies
Program tax rates
Program top of line (logo) text. For example, you may want to program your business name, address, phone number and GST/HST/PST
numbers to print on every receipt
Program end line. For example, printing Thank you on all receipts
Select a graphical logo
Change keyboard assignment
Delete all data from memory
Produce data backup
12.MACHINE NUMBER
13.P REGISTER
14.DATE & TIME
16.FC
30.TAX GROUP
31.LOGO MESSAGE
32.AD MESSAGE
44.GRAPHIC LOGO
45.KEYBOARD
80.MEMORY CLEAR
81.SD CARD BACKUP
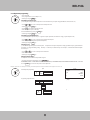
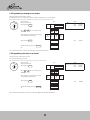
5.1.2 Initiate programming
Proceed as follows to program one of the programme menu options:
OFF
REG
PRG
X
Z
1. Set the key to PRG
2. Select the menu option you want to program:
• Use the ▲ and ▼ keys to scroll through the Programme menu to the required position.
Or:
• Enter the programme number using the digit keys.
3. Confirm your entry by pressing the CASH key.
5.1.3 Conclude programming
Press the SUB-TOTAL key to conclude programming and skip one level back in the menu.
5.2 Text input
This unit allows you to enter text using the cash register keyboard.
5.2.1 Text input Programming and maximum number of characters
Text can be entered in the following programming areas:
Text input for programming
Max. number of characters per text line
Departments
PLU
Clerks
Foreign currencies
Tender media
Logo (top of line) messages
End lines
18
18
18
18
18
32
32
13
5.2.2 Procedure to enter text
Entering digits, letters and special characters
1. All the characters assigned to a key appear when the key is pressed.
2. Digits, letters and special characters are entered in the same way as for a mobile phone. Example:
• To enter an A, press the 8 ABC key once.
• To enter a B, press the 8 ABC key twice.
• To enter a C, press the 8 ABC key three times.
3. Note: Alternatively, you can select the letter by scrolling to it with the ▲ and ▼ keys.
4. Save each letter by pressing the CASH key.
5. The digits in brackets indicate how many characters have been entered (first number) and the maximum number of characters which can be entered (second number). Example: (1/18) one
character has been entered and a maximum total of 18 characters are possible.
6. Save the entire entry by pressing the CASH key.
Example: To enter "AU"
Input
OFF
REG
PRG
Display
<Enter=YES>,<ESC>Exit
X
Z
A
8
ABC
ABC. :
( 1/18)
A B C a b c 8 Ä Á Å
CASH
2
2
TUV
TUV
<Enter=YES>,<ESC>Exit
AU
ABC. :
(2/18)
T U V t u v 2 Ü Ú Ü
CASH
CASH
SUB-TOTAL
14
RCR-75CA
5.2.3 Keys for text input
Key
Meaning
7
8
9
@
ABC
DEF
4
5
6
GHI
JKL
MNO
1
2
3
PQRS
TUV
WXYZ
Press the relevant key the necessary number of times in order to enter the required digits, letters and special
characters.
7
Press to enter digits and special characters.
@
0
Press to enter digits and special characters.
„#
00
Press to enter a space.
SP
•
Press to delete the last character entered.
DEL
Press to delete the entire input.
CLR
5.2.4 Character map
Key
8
ABC
9
DEF
4
GHI
5
JKL
6
MNO
1
PQRS
2
TUV
3
WXYZ
0
„#
7
@
Characters available
A
B
C
a
b
c
8
Ä
Á
Å
Æ
Ą
À
Â
Ć
Ç
ä
D
E
F
d
e
f
9
Ð
Ė
È
Ê
ė
ė
è
é
Ê
ë
G
H
I
g
h
i
4
Ġ
Í
İ
Î
Ï
g
í
ì
J
K
L
j
k
l
5
Ł
ł
M
N
O
m
n
o
6
Ń
Ñ
Ö
Ó
Ø
Ő
Ō
ό
Ô
P
Q
R
S
p
q
r
s
1
ß
Ş
Ś
Ș
р
ș
ś
T
U
V
t
u
v
2
Ü
Ú
Ű
Ů
Ù
Û
ü
ů
W
X
Y
Z
w
x
y
z
3
Ý
Ź
Z
ź
z
O
!
·
#
$
%
’
&
(
)
*
+
,
-
.
7
@
€
[
]
^
_
{
|
}
~
¡
§
15
→ ←
á
å
æ
ą
à
â
c
ć
ñ
ń
ö
ó
ø
ő
ō
ό
ô
ò
ű
û
ù
ú
/
:
;
<
=
>
?
Σ
Ø
¨
¿
Ⅰ
Ⅱ
Ⅲ
┌
┘
Æ OE
↑
·
5.3 Language Options
Four different language options are available with English set as the default setting. Other languages include: French, German and Dutch.
It is recommended that you set the language prior to first use. Changing of the language can be done at any time, however all settings are deleted including cash register reports and history. You
will have therefore have to reprogram the cash register completely
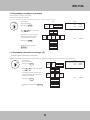
Note: Proceed as follows to set to a language other than English (i.e. French)
Example: You want to set French.
OFF
REG
PRG
X
Z
Input
• Set the key to PRG
• Select programme number 13
• Confirm by pressing CASH .
• Enter the system option number 1
.
1
1
3
PQRS
WXYZ
• Use the ▲ and ▼ keys to move to the
input area [ ] STATUS.
• Enter the status number of the required
language via the numeric keys (In our
example, press 2 for French):
0 for English
1 for German
2 for French or
3 for Dutch.
1
1
PQRS
▲
▼
2
SUB-TOTAL key
CASH
PQRS
• Use the ▲ and ▼ keys to select ALL
AREA.
STATUS
=P REGISTER
11- 1=
SUB-TOTAL
In order for the change of language to take effect, you must now clear the memory:
• Select programme number 80
• Confirm by pressing CASH .
[ 1]
1- 1=
CASH
TUV
• Confirm by pressing CASH
• Conclude programming by pressing the
Display
=P REGISTER
8
0
ABC
„#
▲
▼
• Confirm by pressing CASH .
• Execute deletion by pressing CASH (to
CASH
cancel, press the SUB-TOTAL button.
MEMORY CLEAR
1=
CASH
CASH
PROGRAM AREA
CASHIERS AREA
DEPARTMENT AREA
PLU AREA
E-JOURNAL AREA
ALL REPORT AREA
ALL AREA
5.4 Programming departments
A maximum of 42 departments can be programmed.
Note: On leaving the factory, departments 1 to 4 are already assigned tax rate 1 at 0%, 5 to 8 are assigned a tax rate of 5% and departments 9 to 14 are assigned tax rate 2 at 8%. All the
departments are set up as an itemised department with free pricing. If these settings correspond with those you need, no adjustments to the programme are necessary at this point.FREE
PRICING IS DEFINED AS A PRICE WHICH YOU MAY ENTER IN YOUR CASH REGISTER. FIXED PRICING IS A PRE-DETERMINED PRICE FOR AN ITEM (EG. EGGS AT $2.69)
5.4.1 Programmable contents
The following points can be programmed or defined for each department:
Department name
Used to program a department name. The department name is pre-programmed to Dept01, Dept02, etc.This programming step is optional. On leaving the factory, general, standard names are
pre-programmed.
Department fixed price
Allows user to set a department fixed price. The default setting is set to 'free pricing'. When entering a fixed department price, ensure that the number is set to two decimals.
Setting Tax Rate
Allows you to set a specific tax rate to a specific department.
Department status
The department status is preset to a factory default setting of 0.
16
RCR-75CA
5.4.2 Department programming
OFF
REG
PRG
X
Z
• Set the key to PRG
• Select program number 01 (refer to Chapter 5.1.2).
• Confirm by pressing the CASH key
Programming a department name:
(i.e. You may want to categorize different departments to track sales and inventory of a specific category like Milk, Meat, Fruits, Electronics, etc)
• Use the ▲ and ▼ keys to move to the input area for the department name.
• Confirm by pressing the CASH key.
• Use the CLR key to delete the old department name.
• Enter the required text (max. 18 characters)
Save each individual letter by pressing the CASH key!
• Confirm by pressing the CASH key.
Programming a department fixed price:
(i.e. A specific department may have a set price. All goods in a specific department, like a dollar store category, may for example be $1.00)
• Use the ▲ and ▼ keys to move to the input area for the department fixed price.
• Enter the fixed price (including decimal point and decimal places).
• Confirm by pressing the CASH key
Assigning tax rates:
(i.e. You should assign each department a Tax Group status. The department items may for example be tax exempt, pay federal tax only or pay both federal and
provincial tax). We suggest the following settings Tax Exempt - Set Tax Group to 0, Federal Tax only - Set Tax Group to 1, Federal and Provincial Taxes Payable Set Tax Group to 2
• Use the ▲ and ▼ keys to move to the input area for the TAX rates.
• Enter the tax rate number.
• Confirm by pressing the CASH key.
Defining department Group:
The Department Status should be the factory default setting of 0.
• To exit from the department programming press the SUB-TOTAL key.
PROGRAMMING SHORT-CUT. YOU MAY WANT TO PROGRAM THE SAME SETTING (E.G DEPARTMENT NAME), BEFORE CHANGING TO ANOTHER SETTING. TO DO THIS:
Press the DP SHIFT key to access the same position in the next department.
Example: Department 1 has a fixed price of $3.99, you want the department to be known as 'ABC' and be assigned a tax rate 2 of 5%
Input
OFF
Initiate
department
programming:
REG
PRG
X
Z
0
1
„#
PQRS
▲
▼
CASH
Display
=DEPARTMENT
[ Dept01
0.00
1
0
1 – 1=
]
PRICE
TAX GROUP
STATUS
Programming a department name:
[ Dept01
CASH
CLR
A
8
1x
ABC
CASH
then
17
]
AB
8
ABC
2x
CASH
then
ABC
8
ABC
3x
CASH
then
[ABC
]
[0.00
PRICE]
3.99
PRICE
CASH
Programming a department fixed price:
3
WXYZ
•
DEL
▲
▼
9
9
DEF
DEF
▲
▼
CASH
Assigning a TAX rate:
2
1
TAX GROUP
2
TAX GROUP
5
STATUS
0
STATUS
CASH
TUV
Defining department status:
▲
0
„#
▼
CASH
Save and conclude department programming:
SUB-TOTAL
18
RCR-75CA
5.5 Programming the PLU (price look up)
A maximum of 1250 PLUs can be programmed.
Price Look Up is a convenient way for clerks to quickly and easily enter a price for specific item.This process is similar to a upc bar scan where a product scan has a specific price set to it. The only
difference here is that the clerk must enter the PLU number corresponding to the specific item. For example, if the price of 2% milk is $4.99, you can press a specific button, which is preprogrammed specifically for 2% Milk.
5.5.1 Programmable contents
The following points must or can be programmed or defined for each PLU:
PLU Number
There are 1250 memory locations available.
PLU caption
Each PLU can be programmed individually (by name max. 18 characters).
PLU fixed price
The entry of a PLU fixed price is optional. If you do not enter a fixed price (default setting is 0.00), the cash register only operates using free pricing.
Always enter the fixed price with the set number of decimal places and decimal point.
Link department
The department assignment is required in order to assign the PLU to a tax rate.
PLU status
The factory default setting of 0 should be used.
Inventory
(Optional) - Enter the inventory of the item should you wish to track inventory of this specific PLU sku.
5.5.2 Programming PLUs
Note: an example of Programming Price Look Ups (PLU) follows this explanation.
• Set the key to PRG
OFF
• Select program number 03.
REG
PRG
X
Z
Confirm by pressing the CASH key. The first PLU to be programmed is always displayed.
Select PLU:
• Use the ▲ and ▼ keys to move to the input area for the PLU number.
• Use the digit keys to define which PLUs is to be programmed.
• Confirm by pressing the CASH key
The system automatically switches to the next programming step.
Note: If a PLU number which you want to program already exists, the “Data Exist !!” message appears in the display. The system will still switch to the entered
memory location to complete this transaction.
Programming the PLU name
• Use the ▲ and ▼ keys to move to the input area for the PLU name.
• Enter the required text (max. 18 characters) Save each individual letter by pressing the CASH key!
• When completed entering the characters, press the CASH key.
Program PLU fixed price:
• Use the ▲ and ▼ keys to move to the input area for the PLU fixed price.
• Enter the fixed price (including decimal point and decimal places).
• Confirm by pressing the CASH key.
Assign department:
• Use the ▲ and ▼ keys to move to the input area for the assigning the department.
• Enter the department number. Corresponding to this PLU
• Confirm by pressing the CASH key.
Define PLU status:
• Ensure the PLU Status is 0
19
Enter inventory(Optional):
• Enter the number of the specific PLU in stock.
• Confirm by pressing the CASH key.
Save the program for the individual PLU:
• Use the ▲ and ▼ keys to select SAVE…
• Confirm by pressing the CASH key. The display indicates that the program data is being saved.
Conclude PLU programming:
• Exit from PLU programming by pressing the SUB-TOTAL key.
Navigating when programming PLU
• Use the ▲ and ▼ key to move to the top line and then press the CASH key several times to switch between the memory locations for the programmed PLU.
• Press the DP SHIFT key to access the same position for the next programmed PLU.
Example: PLU no. 22 should be known as 'PIE' with a price of $ 9.99 and set to Department 30. 100 pieces is in stock.
OFF
REG
PRG
Input
Display
Initiate PLU programming:
=PLU
X
Z
0
3
„#
WXYZ
0- 2=
[
[
0.00
1
0
0
CASH
0]No.
]
PRICE
LINK DEPT
STATUS
STOCK
SAVE…
DELETE…
Enter the PLU number
2
2
TUV
TUV
[
0]No.
[
22]No.
[
]
▼
▲
CASH
Programme PLU name:
CLR
1
PQRS
1x
4
GHI
3x
A
CASH
AB
CASH
ABC
then
9
DEF
2x
CASH
then
then
CASH
[ABC
]
0.00
PRICE
9.99
PRICE
Program PLU fixed price:
▲
9
DEF
•
DEL
▼
9
9
DEF
DEF
Assign department:
20
CASH
RCR-75CA
▼
▲
3
0
WXYZ
„#
CASH
1
LINK DEPT
30
LINK DEPT
Define PLU status:
0
CASH
„#
0
STATUS
100
STOCK
Enter inventory:
1
0
0
PQRS
„#
„#
CASH
Save and end programming the PLU:
▼
▲
CASH
SUB-TOTAL
5.5.3 Deleting a PLU
OFF
REG
PRG
X
Z
• Set the key to PRG
• Select program number 03
• Confirm by pressing the CASH key.
• Use the ▲ and ▼ keys to move to the input area for the PLU number.
• Enter the number of the PLU to be deleted.
• Use the ▲ and ▼ keys to select DELETE...
• Confirm by pressing the CASH key
• Press the CASH key to complete the deleting process.
To cancel the deletion process, press the SUB-TOTAL key
21
STATUS
5.6 Clerk system
The clerk system allows the business owner to assign up to 8 different transaction codes to different sales associates. The factory default setting is set to OFF
5.6.1 Programming clerks
• A maximum of 8 clerks can be programmed.
• A name and password can be programmed for each clerk.
• Each clerk can be assigned user rights to limit the clerks usage
Example: "AMY" must be programmed as clerk no. 2. Her password must be set to 222222. She should be assigned all clerk rights
except for printing Z-reports.
OFF
REG
PRG
X
Z
• Set the key to PRG
• Select program number 06
Input
• Confirm by pressing CASH
The first clerk appears in the display.
0
6
„#
MNO
Press the CASH key to access the required clerk
memory location.
Display
CASH
[1
=CLERK
CASH
• U se the ▲ and ▼ keys to move to the input
area for the clerk name.
=CLERK
1- 1=
]
PASS CODE
2- 1=
[2
]
PASS CODE
[2
]
▼
▲
• Confirm by pressing CASH .
CASH
CLR
8
• Delete the existing text.
1x
ABC
6
• Enter the clerk name
1x
MNO
3x
2A
CASH
2AB
CASH
2ABC
then
3
WXYZ
CASH
then
then
[2ABC
CASH
• Conclude text input by pressing the CASH key.
• Use the ▲ and ▼ keys to move to the input
area for the password.
▼
▲
• Enter the current password (default setting:
000000).
Note: Always enter the password as a 6-digit number!
PASS CODE
0
0
0
„#
„#
„#
0
0
0
„#
„#
„#
******
CASH
• Confirm by pressing CASH .
22
]
PASS CODE
RCR-75CA
OFF
REG
PRG
X
Z
• Enter a new 6-digit password in the [ ] NEW CODE
input area.
Input
• Confirm by pressing CASH .
The cash register automatically switches to the next
input area.
Display
2
2
2
TUV
TUV
TUV
2
2
2
TUV
TUV
TUV
******
NEW CODE
******
Confirm CODE
CASH
• Repeat the new password entry in the [ ] Confirm
CODE input area.
• Confirm by pressing CASH .
2
2
2
TUV
TUV
TUV
2
2
2
TUV
TUV
TUV
CASH
The cash register automatically switches to the next
clerk memory location.
To select another clerk memory location:
▲
• Use the ▲ and ▼ keys to move to the top line.
• P ress the CASH key to access the next clerk
memory location.
• Switch
back to the clerk memory location you have
just programmed.
CLERK
3- 1=
CLERK
2- 1=
▼
CASH
• Use the ▲ and ▼ keys to scroll downwards.
The clerk rights are displayed.Rights which have been
assigned to the clerk are identified by a √ at the end
of the line, unassigned rights with a ×.
▲
▼
• In order to change clerk rights, use the ▲ and
▲
▼
▼ keys to select one of the clerk rights.
• Press and press the CASH key to change the
status of the clerk rights: Switch between "assigned"
and "not assigned".
• Conclude clerk programming by pressing the
SUB-TOTAL key.
23
Refund:
Change Price:
Discount:
Service Charge:
Training:
Settings
Registration
X Report:
Z Report:
CASH
Z Report:
√
SUB-TOTAL
Z Report:
√
√
√
√
√
√
√
√
√
×
5.6.2 Activating/Deactivating the clerk system
The clerk system is activated/deactivated via system option 8
OFF
REG
PRG
X
Z
• Set the key to PRG
• Select program number 13
• Confirm by pressing CASH .
Input
1
3
PQRS
WXYZ
• Use the digit keys to enter 8 .
• Use the ▲ and ▼ keys to access the
input area.
Display
CASH
1
1
PQRS
PQRS
▲
▼
• Enter
the status number 1 in order to
activate the clerk system.
Or:
• Enter the status number 0 in order to
deactivate the clerk system.
=P REGISTER
1- 1=
[ 2]
STATUS
=P REGISTER
11- 1=
[ 0]
STATUS
[ 1]
or
[ 0]
STATUS
STATUS
Save…!!
• Confirm by pressing CASH .
Please Continue…
CASH
• Conclude programming by pressing the
SUB-TOTAL key.
Note: Once you return to the REG mode, each clerk will be required to log in before using the cash register
5.6.3 Logging on to the cash register as a clerk
In all key
switch
positions
Input
Display
Log In Failed!!
No Authority
Please Continue...
Clerk/Supervisor ID:
• Enter the clerk number.
CLERK
• Confirm by pressing the CLERK key.
If a password has been programmed, you
are now requested to enter it.
Password:
• Enter the clerk password.
• Confirm by pressing CASH .
CASH
24
RCR-75CA
5.7 Programming "Tender Media" or Mode of Payment
The tender media or mode of payment defines the method of payment for a purchase. There are five different types of Tender Payment.
• CASH
• CARD
• CHEQUE
The following tender media can also be set up on the keyboard:
• Credit 1
• Credit 2
The names of the tender media are used on the receipts and cash register reports and can be reprogrammed, if necessary:
Example: The tender medium "CHEQUE" should be renamed "DEBIT".
OFF
REG
PRG
X
Z
• Set the key to PRG
• Select program number 08
Input
• Confirm by pressing CASH
0
1
„#
PQRS
Display
CASH
• Select
the tender medium required: Switch between the
CASH
various tender media by pressing the CASH key.
• Use
the ▲ and ▼ keys to access the input area.
=TENDER MEDIA
[ CASH
1 – 1=
]
=TENDER MEDIA
2– 1=
[ CARD
]
[ CARD
]
▼
▲
CARD
• C onfirm by pressing CASH .
CASH
• D elete the existing text.
CLR
• Enter the new tender name (ABC is being used in this
example)
9
2x
DEF
then
9
3x
DEF
2x
ABC
GHI
1x
TUV
3x
then
DE
DEF
CASH
then
DEB
8
CASH
then
2x
ABC
CASH
then
DEBI
4
CASH
then
2
DEF
CASH
9
then
4
3x
2x
CASH
8
D
9
CASH
3x
GHI
CASH
then
DEBIT
2
CASH
then
1x
TUV
CASH
then
CASH
• C onclude text input by pressing the CASH key.
• Conclude programming the tender media by pressing
SUB-TOTAL
the SUB-TOTAL key.
25
5.8 Programming a surcharge as an amount
This function programs a fixed amount for the surcharge.
Note: When the cash register is in its default setting, the key for the fixed amount surcharge is not set up on the keyboard.
Example: A fixed surcharge of $ 6.00 must be programmed.(e.g surcharge or service charge for purchasing a ticket)
• Set the key to PRG
Input
OFF
• Select program number 09
REG
PRG
X
Z
• Confirm by pressing CASH
0
9
„#
DEF
• Use
the ▲ and ▼ keys to access the input area[ ]
ADD ON+.
CASH
6
MNO
•
DEL
• Confirm by pressing CASH
0
0
„#
„#
CASH
• Conclude
programming by pressing the SUB-TOTAL
key.
0.00]
0.00]
0 1=
ADD ON+
DISCOUNT-
[
0.00]
ADD ON+
▼
▲
• U se the digit keys to enter the amount of the surcharge
(with decimal point and decimal places).
Display
=KEY +/[
[
SUB-TOTAL
Note: In order for Step 5.8 and 5.9 to function, you will need to Register the Surcharges and discounts.
5.9 Programming a discount as an amount
This function programs a fixed amount for the discount.
Note: The factory default setting is turned OFF
Example: A fixed discount of $1.00 must be programmed(e.g. customer has a $1.00 off coupon).
OFF
REG
PRG
X
Z
• Set the key to PRG
• Select program number 09
Input
• Confirm by pressing CASH
0
9
„#
DEF
• Use
the ▲ and ▼ keys to access the input area[ ]
DISCOUNT-.
▲
• U se the digit keys to enter the amount of the discount
(with decimal point and decimal places).
1
PQRS
• Confirm by pressing CASH
Display
CASH
•
DEL
0
0
„#
„#
SUB-TOTAL
Note: In order for Step 5.8 and 5.9 to function, you will need to Register the Surcharges and discounts
26
0.00]
0.00]
[
1.00]
0 1=
ADD ON+
DISCOUNT-
▼
CASH
• Conclude
programming by pressing the SUB-TOTAL
key.
=KEY +/[
[
DISCOUNT-
RCR-75CA
5.10 Programming a surcharge as a percentage
This function programs a surcharge as a percentage value.
Note:Factory default setting has this feature set to 0
Example: A percentage value of 10% must be programmed for the surcharge(e.g. surcharge of 10% tip at a restaurant).
OFF
REG
PRG
X
Z
• Set the key to PRG
• Select program number 10
Input
1
0
PQRS
„#
• Confirm by pressing CASH
• Use
the ▲ and ▼ keys to access the input
area[ ] ADD ON%.
• U se the digit keys to enter the amount of the
surcharge (with decimal point and decimal
places, value between 0.01 and 99.99).
CASH
1
0
„#
• C onfirm by pressing CASH
0.00]
0.00]
[
2.00]
1=
ADD ON+
DISCOUNT-
▼
▲
PQRS
Display
=KEY +/[
[
•
DEL
0
0
„#
„#
DISCOUNT-
CASH
• Conclude programming by pressing the
SUB-TOTAL
SUB-TOTAL key.
5.11 Programming a discount as a percentage (-%)
This function programs a discount as a percentage value.
Example: A percentage value of 5% must be programmed for the discount(e.g. customer pays by cash and therefore gets a 5% discount).
OFF
REG
PRG
X
Z
• Set the key to PRG
• Select program number 10
Input
• Confirm by pressing CASH
1
0
PQRS
„#
• Use the ▲ and ▼ keys to move to the input area
[ ] DISCOUNT%.
▲
• Use the digit keys to enter the percentage value for
the discount (with decimal point and decimal places,
value between 0.01 and 99.99).
5
JKL
• Confirm by pressing CASH
Display
CASH
•
DEL
0
0
„#
„#
SUB-TOTAL
27
0.00]
0.00]
[
5.00]
1=
ADD ON+
DISCOUNT-
▼
CASH
• Conclude programming by pressing the SUB-TOTAL
key.
=KEY +/[
[
DISCOUNT-
5.12 Programming the machine number
The cash register can be assigned a 4-digit machine number which is then printed on all receipts and reports.
Note: If the machine number is 0000, no number is printed.
Example: 5555 should be programmed as the machine number.
OFF
REG
PRG
X
Z
• Set the key to PRG
• Select program number 12
Input
• Confirm by pressing CASH
1
2
PQRS
TUV
• U se the ▲ and ▼ keys to move to the input area
[ ].
CASH
- 1=
▼
▲
•Enter the machine number using the numeric keys.
Display
==MACHINE NUMBER
[ 0]
5
5
5
5
JKL
JKL
JKL
JKL
[5555]
• C onfirm by pressing CASH
CASH
• Conclude programming by pressing the SUB-TOTAL
key.
SUB-TOTAL
5.13 System options
5.13.1 Programming system settings
The programming system setting options allow you to set the cash register to different setting from the factory default settings. Follow the steps below to change a specific setting.
OFF
REG
PRG
X
Z
• Set the key to PRG
• Select program number 13
Input
• Confirm by pressing CASH
The first system option and its current status appear
in the display
1
3
PQRS
WXYZ
Display
▲
1- 1=
STATUS
=P REGISTER
10- 1=
[ 1]
STATUS
[ 1]
STATUS
[ 0]
STATUS
CASH
• Enter the number of the system option to be
programmed,e.g. 10.
• Use the ▲ and ▼ keys to move to the input
area [ ].
=P REGISTER
[ 2]
▼
• Enter the required status number, e.g. 0.
• Confirm by pressing CASH
CASH
28
RCR-75CA
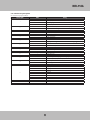
5.13.2 Overview of system options
Note: The default settings appear in bold print.
System option
Status
1
0
1
2
3
Decimal point position: 0 (no point)
Decimal point position: 0.0
Decimal point position: 0.00
Decimal point position: 0.000
2
0
1
Department shift: The department level is retained following a registration
Department shift: The department level is switched back to the basic level
3
0
1
Net price(exclusive of tax)
Gross price(including tax)
4
0
1
Time: 24-hour format
Time: 12-hour format
5
0
1
Display illumination remains on
Display illumination goes out after two minutes of inactivity (energy-save mode)
6
0
1
Print number on bill: no
Print number on bill: yes
7
0
1
Date format: Month-Day-Year
Date format: Day-Month-Year
8
0
1
Clerk system not active
Clerk system active
9
0
1
PLU inventory: not active (no printout on reports)
PLU inventory: active (with printout on reports)
10
0
1
Acoustic signal: off
Acoustic signal: on
11
0
1
2
3
4
5
6
7
8
Language: English
Language: German
Language: French
Language: Dutch
Reserved
Reserved
Reserved
Reserved
Reserved
12
Setting
Reserved
29
Rounding always occurs after pressing the SUB-TOTAL and CASH keys.Rounding may be
required in the future once the penny is discountinued from circulation.
No special rounding
If no special rounding has been selected, rounding is performed according to commercial 5/4
rounding: If the first decimal place to be rounded is a 0, 1, 2, 3 or 4, the number is rounded
down. If the first decimal place to be rounded is a 5, 6, 7, 8 or 9, the number is rounded up.
Rounding per schedule below
0.01 – 0.02 = 0.00
0.03 – 0.07 = 0.05
0.08 – 0.09 = 0.10
Rounding per schedule below
0.00 – 0.24 = 0.00
0.25 – 0.74 = 0.50
0.75 – 0.99 = 1.00
Rounding per schedule below
0.00 – 0.12 = 0.00
0.13 – 0.37 = 0.25
0.38 – 0.62 = 0.50
0.63 – 0.87 = 0.75
0.88 – 0.99 = 1.00
0
1
13
2
3
Tax rounding: rounding up
Tax rounding: standard commercial 5/4 rounding
Tax rounding: rounding down
0
1
2
14
15
Reserved
16
0
1
Zero skip printing for Z-report
No zero skip printing for Z-report
17
0
1
Print total taxable amount: print
Print total taxable amount: no print
18
0
1
Print taxable amount for each tax rate: no print
Print taxable amount for each tax rate: print
19
0
1
Print extra line "Total taxable amount": no print
Print extra line "Total taxable amount": print
20
0
1
Print net total for each tax rate: no print
Print net total for each tax rate: print
0
1
Print extra line "Net total": no print
Print extra line "Net total": print
22
0
1
Print "tax rate" symbol to the right of the total: no print
Print "tax rate" symbol to the right of the total: print
23
0
1
Time: no print
Time: print
24
Reserved
25
0
1
Print total tax: before CASH line
Print total tax: after CASH line
26
0
1
Electronic journal: active
Electronic journal: not active
27
Reserved
28
Reserved
29
Reserved
30
0
1
21
Reserved
Receipt counter is only reset to 0 after deleting the electronic journal.
30
RCR-75CA
31
0
1
Z1 and Z2 counters are not deleted after Z-financial report printout
Z1 and Z2 counters are deleted after Z-financial report printout
32
0
1
Grand Total is not deleted after Z financial report printout
Grand Total is deleted after Z financial report printout
33
0
1
Grand Total is not printed in the Z1 financial report
Grand Total is printed in the Z1 financial report
34
0
1
Basic currency is the local currency (amount ÷ conversion factor)
Basic currency is foreign currency (amount × conversion factor)
35
0
1
Refunds are printed in the financial report
Refunds are not printed in the financial report
36
Reserved
37
0
1
No extra line is printed for GROSS amount in the Z-report
Extra line is printed for GROSS amount in the Z-report
38
0
1
No extra line is printed for Number -(X) in the Z-report
Extra line is printed for Number -(X) in the Z-report
39
0
1
2
3
4
5
Standard font (normal height)
Double font height for DP and PLU
Double font height for tender media (without tax)
Double font height for DP, PLU and tender media
Double font height for logo and end lines
Double font height for entire printout
40
0
1
Receipt mode
Journal mode
5.13.3 Printing the system options
Printing system options provides a hard copy of the different PLU and Departments that have been set up. A hardcopy showing the different items may be useful for
employees/clerks.
OFF
REG
PRG
X
Z
• Set the key to PRG
• Program number 90 is selected automatically
Input
Display
=SETTINGS
• Confirm by pressing CASH
The display shows what can be printed.
- 90
CASH
90. PRINT PROG DUMP
• Use the ▲ and ▼ keys to select P REGISTER.
▲
• Confirm by pressing CASH
▼
CASH
31
=PRINT PROG DUMP
PR 1K
DEPARTMENT
PLU
CLERK
TENDER MEDIA
…
=PRINT PROG DUMP
PR 8K
P REGISTER
5.14 Programming the date and time
Example:17 09 2012 (July 17, 2012) should be programmed as the date. 13:30 should be programmed as the time.
OFF
REG
PRG
X
Z
• Set the key to PRG
• Select program number 14.
Input
• Confirm by pressing CASH .
Display
=Date & Time
Date:
1
4
PQRS
GHI
CASH
The input area for the day is already selected.
• Enter the day's date.
The cash register automatically switches to the input
area for the month.
1
7
PQRS
@
• Enter the month.
The cash register automatically switches to the input
area for the year.
0
9
„#
DEF
• Enter the year.
The cash register automatically switches to the input
area for the hour.
2
0
1
2
TUV
„#
PQRS
TUV
• Enter the hour.
The cash register automatically switches to the input
area for the minute.
1
3
PQRS
WXYZ
• Enter the minute.
The cash register automatically switches to the input
area for the day.
3
0
WXYZ
„#
Note: Use the ▲ and ▼ keys to move to the
individual input areas
• Save the programmed entries by pressing the
CASH
CASH key.
• C onclude programming by pressing the SUB-TOTAL
key.
Time:
1- 1=
DD/MM/YYYY
00/00/2000
HH/MM
00-00
Date:
DD/MM/YYYY
17/00/2000
Date:
DD/MM/YYYY
17/09/2000
Date:
DD/MM/YYYY
17/09/2012
Time:
HH/MM
13-00
Time:
HH/MM
13-30
Save...!!
Please Continue...
SUB-TOTAL
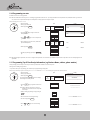
5.15 Programming foreign currencies
A maximum of 2 foreign currencies can be programmed.
Note: If you want to work with a second foreign currency, you must programme FC 2 on the keyboard (refer to Chapters 5.20 and 5.20.2). The default FC key on the keyboard only applies
for foreign currency 1! e.g. US Currency
Example: US Dollar should be programmed as the foreign currency in memory location 2. The exchange rate is $1.00 CDN = $1.02 US
32
RCR-75CA
OFF
REG
PRG
X
Z
• Set the key to PRG
• Select programme number 16
Input
• Confirm by pressing CASH .
The first foreign currency memory location appears in
the display.
1
6
PQRS
MNO
• Press
the CASH key to change the foreign urrency
memory location.
Display
=FC
[FC01
Foreign:
Native:
CASH
=FC
CASH
• U se the ▲ and ▼ keys to move to the text input
area [FC0x ].
▼
▲
• Confirm by pressing CASH .
1- 1=
]
0.01
0.01
[FC02
2- 1=
]
FC02
CASH
• Delete the existing text.
CLR
2
• Enter the new foreign currency text
TUV
2x
1
4x
PQRS
1x
U
CASH
US
CASH
USD
then
9
DEF
CASH
then
then
CASH
• Conclude text input by pressing the CASH key.
• U se the ▲ and ▼ keys to move to the input area
Foreign:.
▼
▲
1
• Enter the foreign currency.
PQRS
•
DEL
0
2
„#
TUV
CASH
• Confirm by pressing CASH .
• U se the ▲ and ▼ keys to move to the input area
Native:
▼
▲
1
• Enter the local currency.
PQRS
CASH
• Confirm by pressing CASH .
SUB-TOTAL
33
[USD
]
Foreign:
0
Foreign:
1.02
Foreign:
1.02
Native:
0
Native:
1
Native:
1
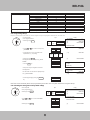
5.16 Programming tax rates
A maximum of 4 tax rates can be programmed.
Note: When the machine leaves the factory, tax rate 1 is already pre-programmed to 0% for tax rate 1 (tax exempt) and 5% for tax rate 2(federal tax rate) and 8% for Tax Rate 3 (provincial tax
rate). If these rates correspond with those you need, no adjustments to the program are necessary at this point.
Example: Changing the tax rate to 2 to 6%
OFF
REG
PRG
X
Z
• Set the key to PRG
• Select program number 30
Input
• Confirm by pressing CASH
3
0
WXYZ
„#
• Press the CASH key to change to another tax
memory location
Display
CASH
CASH
• Use the ▲ and ▼ keys to move to the input area
[ ] RATE%.
6
MNO
•
DEL
• Confirm by pressing CASH
0
0
„#
„#
CASH
• Conclude programming by pressing the SUB-TOTAL
key.
1- 1=
19.00
RATE%
=TAX GROUP
3- 1=
0.00
RATE%
6.00
RATE%
6.00
RATE%
▼
▲
• Use the digit keys to enter the tax rate (with decimal
point and decimal places).
=TAX GROUP
SUB-TOTAL
Note: When programming the departments, the tax rate is assigned to the departments. The tax totals are only calculated and printed on the receipt when the tax rate is actually assigned to the
departments.
5.17 Programming Top Of Line Receipt Information (e.g Business Name, address, phone number)
The logo message, printed at the top of the receipt, can contain up to 4 lines and a maximum of 32 characters per line.
Four logo lines are already pre-programmed.
• If you do not want to print a logo message, you can delete the pre-programmed logo message lines.
Example: A logo should be programmed containing the text "********* WELCOME *********". The remaining preprogrammed lines should be deleted.
OFF
REG
PRG
X
Z
• Set the key to PRG
• Select program number 31
Input
Display
=LOGO MESSAGE
• Confirm by pressing CASH
The programmed logo message appears in the display.
The first logo line is already selected.
• Press the CASH key to programme text for the first
line.
Note: Only 20 characters can appear as a line in the
display at one time but 32 characters are possible
on the receipt.
• Delete
the existing logo message text by pressing the
3
1
WXYZ
PQRS
CASH
CASH
- 1=
********************************
YOUR RECEIPT
********************************
********************
************
CLR
CLR key.
• Enter the new desired text message message.
********* WELCOME *********
• Save the text by pressing CASH .
CASH
• Use the ▲ and ▼ keys to access the next logo
line.
▲
34
▼
********* WELCOME *********
RCR-75CA
• Continue programming the text as described.
CLR
etc.
• Conclude programming by pressing the SUB-TOTAL
key.
SUB-TOTAL
5.18 Programming the end lines(e.g. entering your GST#)
The end lines on the receipt can contain up to 3 lines and a maximum of 32 characters per line.
Three end lines are already pre-programmed.
• If you do not want to print end lines, you can delete the pre-programmed end lines.
• Refer to Chapter 5.2 for information on entering text.
• Text lines which are not programmed are not printed.
OFF
REG
PRG
X
Z
• Set the key to PRG
• Select program number 32
Input
Display
=AD MEASSAGE
• Confirm by pressing CASH
3
2
WXYZ
TUV
CASH
The programmed end lines appear in the display. The end
line is already selected.
For further details, refer to Chapter 5.17.
- 1=
********************************
THANK
********************************
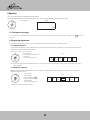
5.19 Selecting a graphical logo
You can print a graphical logo above the logo message on a receipt.
There are 23 motifs available for selection, refer to Figure 1.
OFF
REG
PRG
X
Z
• Set the key to PRG
• Select program number 44 (refer to Chapter 5.1.2).
Input
Display
=GRAPHIC LOGO
• Confirm by pressing CASH
The factory default setting is preset to 0. e.g.no graphical
logo is printed.
• Enter the number of the graphical logo you want to
print in the input area, e.g Figure 17
• Confirm by pressing CASH .
• Conclude programming by pressing the SUB-TOTAL
key.
4
4
GHI
GHI
1
7
PQRS
@
SUB-TOTAL
35
CASH
CASH
[0]
- 1=
STATUS
5.20 Programming the keyboard
5.20.1 Programmable keys
The following keys can be programmed:
• Function keys
• Tender media keys (method of payment)
• Foreign currency keys
Code numbers
Each function has a code number which identifies its uniqueness. The code number is required for programming.
36
RCR-75CA
Category
Function key table
Tender media key
Foreign currency keys
Meaning
DP SHIFT
-%
+%
- Amount discount
+ Amount surcharge
Training
Card
Credit 1
Credit 2
Check
Foreign currency 1
Foreign currency 2
Code Number
143
159
160
157
158
153
161
162
163
164
165
166
Default on Keyboard
x
x
x
5.20.2 Programming the keys
Example: The "Training" function (code number 153) should be assigned to the key currently assigned the "CHECK" function (code number 164).
• Set the key to PRG
Input
OFF
• Select program number 45
REG
PRG
X
Z
• Confirm by pressing CASH
4
5
GHI
JKL
CASH
Display
=KEY-FUNCTION
1=
[ 0]
[ 0]
VALUE CODE
KEY BE ASSIGNED
INIT DEFAULT KEYBD.
• U se the ▲ and ▼ keys to move to the input area [
] VALUE CODE
▼
▲
•Use the digit keys to enter the code number of the
required function, e.g. 153 (Training).
1
5
3
PQRS
JKL
WXYZ
• Confirm by pressing CASH .
The display switches to the next input area [ ] KEY BE
ASSIGNED
• Press the CASH key.
[ 0]
VALUE CODE
[ 153]
VALUE CODE
CASH
[ 0]
CASH
Pls Input
Redefine Key
• Now press the key to be assigned the new function.
The display shows:
KEY BE ASSIGNED
Save...!!
Please Continue...
[ 153]
[ 164]
The code number of the new function is displayed in input
area [ ] KEY BE ASSIGNED
•Conclude programming by pressing the SUB-TOTAL
key.
VALUE CODE
KEY BE ASSIGNED
SUB-TOTAL
Note: Please create a suitable key label for the reprogrammed key so that other clerks clearly know what function is assigned to the key!
5.20.3 Resetting the cash register to factory default settings
OFF
REG
PRG
X
Z
• Set the key to PRG
• Select program number 45
Input
Display
=KEY-FUNCTION
• Confirm by pressing CASH
4
5
GHI
JKL
CASH
[ 0]
[ 0]
1=
VALUE CODE
KEY BE ASSIGNED
INIT DEFAULT KEYBD.
• U se the ▲ and ▼ keys to access the INT DEFAULT
KEYB. field.
▲
• Confirm by pressing CASH
▼
CASH
37
INIT DEFAULT KEYBD.
[ 0]
KEY BE ASSIGNED
6 Operation
Set the cash register to Registration mode REG when in standard operation
Note: The information below applies for the following subchapters: the cash register is always programmed to 2 decimal places (default setting).
• Set the key to REG
OFF
REG
Display
19-01-2011
17:30:30
X
PRG
Z
0.00
6.1 Clearing error messages
In the case of input errors or exceeding limit values, the cash register issues an error status: An acoustic signal is issued and an "E" (Error) appears in the display. Press the CLR key to clear the
error message.
6.2 Registering departments
No decimal point is set when entering prices. The cash register sets the decimal point automatically according to system option 1 (decimal point position).
6.2.1 Single DP registration
e.g. Your business sells an item or a group of items always at the same price (shoes). You therefore want to set a fixed price to a specific department so that the clerk
simply presses a specific department and the price is fixed.
Example: $100.50 should be registered to Department 1.
OFF
REG
X
PRG
• Set the key to REG
• Enter the price (without decimal point, with
decimal places).
• Press the relevant department key.
Input
Z
1
0
0
5
0
PQRS
„#
„#
JKL
„#
1/15/29
Note: If a department is pre-programmed as a department with a fixed price, no price needs to be entered during registration. After pressing the relevant department key, the fixed price is
automatically registered.
6.2.2 Multiple DP registration
Multiple DP Registration may be desired in some instances. One example may be that you typically sell fruits by the kilogram. You may want to enter a weight of 2.2
kilograms at a fixed price of 79 cents.
OFF
REG
X
PRG
Z
• Set the key to REG
• Enter the quantity.
Input
• Press the multiplication key X .
• E nter the price (without decimal point,
with decimal places).
• Press the relevant department key.
2
TUV
• The quantity of goods can a value between 1 and 9999.
38
•
DEL
2
TUV
X
7
9
@
DEF
2/16/30
RCR-75CA
6.3 Registering PLUs
Items (PLUs) are registered by means of PLU numbers. PLUs can only be registered with fixed prices.
6.3.1 Registering (Entering) a programmed PLU
Upon programming a PLU, the price becomes fixed. For example, Milk may have a fixed price of $4.99. If you assign Milk to a specific PLU (in this example PLU #100),
each time you enter PLU#100, the price of $4.99 will be registered.
Example: An item with PLU number 100 should be registered.
OFF
REG
X
PRG
• Set the key to REG
• Enter the PLU number.
Input
1
0
0
PQRS
„#
„#
• Press the PLU key.
Z
PLU
Note: If an attempt is made to register a PLU which has not been programmed, the following message appears: No record !! Please Continue… (no registration, continue)
6.3.2 Registering a multiple PLU
It is often more convenient and accurate to enter the quantity of items being purchased as opposed to entering each transaction separately. Registering a Mutiple PLU is
the process to do this. In this example, it is assumed that Milk costing $4.99 has been programmed for PLU #100. The customer is buying 15 bags of milk.
OFF
REG
X
PRG
Z
• Set the key to REG
• Enter the quantity.
Input
• Press the multiplication key X .
• Enter the PLU number.
1
5
PQRS
JKL
X
1
0
0
PQRS
„#
„#
PLU
• Press the PLU key.
Note: The quantity of goods can a value between 1 and 9999.
6.4 Concluding receipt / Method of payment
6.4.1 Paying with cash and displaying the change
OFF
REG
X
PRG
Z
• Set the key to REG
• Complete all the registrations.
• Produce the subtotal by pressing the SUB-TOTAL key (optional process).
• The amount due for payment appears in the display.
• Enter the amount received from the customer (optional process).
• Press the CASH key.
If the amount paid by the customer is higher than the actual amount due, the cash register automatically calculates the amount of change due after pressing the CASH key and shows it in the
display.
Note: If the customer pays exactly the right amount, you need not enter the sum paid. Simply press the CASH key to conclude the receipt. The amount payable appears in the display.
6.4.2 Payment by check(this key can also be used for Debit payments)
OFF
REG
X
PRG
Z
• Set the key to REG
• Complete all the registrations.
• Produce the subtotal by pressing the SUB-TOTAL key (optional process).
• The amount due for payment appears in the display.
• Enter the amount received from the customer (optional process).
• Press the
CHECK key.
If the amount paid by the customer is higher than the actual amount due, the cash register automatically calculates the
amount of change due after pressing the CASH key and shows it in the display.
Note: If the customer pays exactly the right amount, you need not enter the sum paid. Simply press the CASH key to conclude the receipt. The amount payable appears in the display.
39
6.4.3 Payment by credit card
OFF
REG
X
PRG
Z
• Set the key to REG
• Complete all the registrations.
• Produce the subtotal by pressing the SUB-TOTAL key (optional process).
• The amount due for payment appears in the display.
• Enter the amount received from the customer (optional process).
• Press the CARD key.
If the amount paid by the customer is higher than the actual amount due, the cash register automatically calculates the amount of change due after pressing the CASH key and shows it in the
display.
Note: If the customer pays exactly the right amount, you need not enter the sum paid. Simply press the CASH key to conclude the receipt. The amount payable appears in the display.
6.4.4 Paying by credit approval
Note: The CREDIT key must have been programmed on the keyboard beforehand (refer to Chapter 5.20).
OFF
REG
X
PRG
Z
• Set the key to REG
• Complete all the registrations.
• Produce the subtotal by pressing the SUB-TOTAL key (optional process).
• The amount due for payment appears in the display.
• Enter the amount received from the customer (optional process).
• Press the CREDIT key.
If the amount paid by the customer is higher than the actual amount due, the cash register automatically calculates the amount of change due after pressing the CASH key and shows it in the
display.
Note: If the customer pays exactly the right amount, you need not enter the sum paid. Simply press the CASH key to conclude the receipt. The amount payable appears in the display.
6.4.5 Combining tender media
A bill can be paid by combining the various methods of payment.(eg. The bill costs, 12.00. The customer wants to pay 5.00 cash, the balance on the customers credit card.)
Note: The payment made in cash should always be the last step.
OFF
REG
X
PRG
Z
• Set the key to REG
• Complete all the registrations.
• Produce the subtotal by pressing the SUB-TOTAL key (optional process).
• The amount due for payment appears in the display.
• Enter the amount that the customer wants to pay using tender medium 1 and press the corresponding tender media key(e.g. Cash in this example). The
remaining amount due appears in the display together with the amount paid using tender medium 1.
• Enter the amount that the customer wants to pay using tender medium 2 and press the corresponding tender media key(in this example CREDIT). The
remaining amount due appears in the display and together with the amount paid using tender medium 1+ 2.
40
RCR-75CA
6.5 Payment in a foreign currency
The cash register can operate using two foreign currencies.
The cash register automatically converts the price of the registration in the currency selected and back. if necessary.
Note: Some transactions may occur in US Currency. It is often easier not to use this feature due to the on-going fluctuation of the Canadian dollar.
6.5.1 Paying in a foreign currency with the exact amount
Example: A bill totalling $ 37.04 in department 1 is paid to the exact amount in USD.
OFF
REG
X
PRG
Z
• Set the key to REG
• Produce the subtotal.
• Enter the foreign currency memory
location.
• Press the FC key.
The amount due for payment is converted
to the foreign currency and appears above
the local currency in the display.
In the example: USD (50.00)
• T he customer pays the exact amount due
in the foreign currency.
Input
3
7
0
4
WXYZ
@
„#
GHI
1/15/29
SUB-TOTAL
• P ress the FC key to conclude the
registration process.
1
FC
PQRS
FC
6.5.2 Paying in a foreign currency with change
Example: A bill totalling $ 37.04 in department 1 is paid with $100 US
OFF
REG
X
PRG
Z
• Set the key to REG
• Produce the subtotal.
• Enter the foreign currency memory
location.
• Press the FC key.
The amount due for payment is converted
to the foreign currency and appears above
the local currency in the display.
In the example: USD (50.00)
• Use the digit keys to enter the amount
paid by the customer in the foreign
currency.
Input
3
7
0
4
WXYZ
@
„#
GHI
1/15/29
SUB-TOTAL
• Press the FC key to conclude the
registration process.
1
FC
PQRS
1
0
0
00
PQRS
„#
„#
SP
FC
Explanation to the receipt
Convert Cash 50.00
= The amount due converted to the foreign currency
USD 100.00
= The amount paid in the foreign currency.
Convert Cash 74.07
= The amount paid converted to the local currency
Change 37.03
= The amount of change due in the foreign currency
Note: Please note that rounding differences can occur during the conversions.
Note: In the financial report, the change in the local currency is deducted from the CASH amount in "TOTAL DRAWER". The total of the foreign currency is printed in an extra line.
41
6.6 Registering surcharges and discounts
In order for Step 5.8 and 5.9 to function, you will need to Register the Surcharges and discounts
It is possible to define amount-related or percentage surcharges and discounts. They can be applied to individual PLU's or a subtotal.
• Where necessary, the +% , - Amount Discount and + Amount Surcharge keys must be set up on the keyboard .
• A fixed, pre-programmed value can be entered for amount-based and percentage surcharges and discounts If fixed values are programmed, no other values need be entered when registering
surcharges and discounts. If a value is entered, however, it overwrites the pre-programmed value.
• The number of surcharges and discounts as well as the corresponding total sums appear in the financial report.
6.6.1 Registering amount-related surcharges and discounts
Example: An amount-related discount of $ 2.00 is assigned to an item with PLU number 100. The subtotal is then produced to which an amount-related surcharge of $ 0.50 is added.
OFF
REG
X
PRG
Z
• Set the key to REG
• Register the goods to which an amountrelated urcharge or discount is to be
granted.
• Enter the amount-related surcharge or
discount.
Input
RECEIPT
1
0
0
PQRS
„#
„#
2
00
TUV
SP
• Press the - Amount Discount and
+ Amount Surcharge key.
If the amount-related surcharge or discount
is to be applied to a subtotal, press the
PLU
- Amount Discount
SUB-TOTAL
SUB-TOTAL key beforehand.
5
0
JKL
„#
PLU 100
5.55T1
DISCOUNT-2,00
Subtotal:
3.55
Add ON
+ 0.50
Subtotal:
4.05
------------------------------------------------------------------TAX1
13,00%
0.65
TOTAL TAX
3.40
------------------------------------------------------------------TOTAL
4,05
CASH
4,05
17-09-2012
#6
+ Amount Surcharge
SUB-TOTAL
CASH
6.6.2 Registering percentage surcharges and discounts
Example: A percentage discount of 10% is assigned to an item with PLU number 100. The subtotal is then produced to which a percentage surcharge of 25% is added.
OFF
REG
X
PRG
Z
• Set the key to REG
• Register the goods to which a percentage
surcharge or discount is to be granted.
• Enter the percentage surcharge or
discount.
Input
RECEIPT
1
0
0
PQRS
„#
„#
2
00
TUV
SP
• Press the %- or %+ key.
If the percentage surcharge or discount
is to be applied to a subtotal, press the
PLU
SUB-TOTAL key beforehand.
SUB-TOTAL
2
5
TUV
JKL
SUB-TOTAL
CASH
42
%+
PLU 100
DISCOUNTSubtotal:
Add ON
Subtotal:
5.55T1
-2,00
3.55
+ 0.50
4.05
RCR-75CA
6.7 Deleting input errors (corrections)
If you have entered a wrong character but have not yet pressed the DP SHIFT or PLU key, you can correct the error by pressing the CLR key.
6.8 Error correction and void
Note: The number of corrections and voids are recorded in the financial report.
6.8.1 EC (error correction)
If an item is registered incorrectly and nothing else has been registered in the meantime, this incorrect registration can be cleared by means of an immediate error correction.
Example: While registering several items, the item with PLU number 100 was incorrectly registered. Nothing else has been registered since then. An error correction should be completed.
OFF
REG
X
PRG
Z
• Set the key to REG
Input
1
0
0
PQRS
„#
„#
Receipt
PLU
Cancel
PLU 100
• Press the EC key directly after making the
incorrect registration to cancel the item.
-5.55
PLU 2
PLU 100
Cancels:
PLU 100
2.22T1
5.55T1
-5.55
6.8.2 Void
If an item has been registered by mistake but the receipt has not yet been concluded by pressing a tender media key, the incorrect registration can be cancelled by means of a void. The void
process is used when other items were registered after the item to be cancelled.
Example: Three items have been registered: $ 10.00 for department 1, $ 20.00 for department 2 and $ 30.00 for department 3. The second item needs to be cancelled ($ 20.00 for
department 2).
OFF
REG
• Set the key to REG
• Register the PLUs.
Input
Receipt
X
PRG
Z
• Press the VOID key.
= Billing Mode Detail
3.Dept03 1
30.00
• Use the ▲ and ▼ keys to move to the
item to be cancelled.
= Billing Mode Detail
2.Dept02 1
20.00
• Press
the EC key to delete the item
selected.
= Billing Mode Detail
2.Dept02 0
00,00
• Press
the CASH key to return to the
registration.
Cancel
Dept02
-20.00
Dept01
Dept02
Dept03
Cancels:
Dept02
SubtotaL:
10.00T1
20.00T1
30.00T1
-20.00
40.00
#9
Continue with the registration or conclude
the receipt.
6.8.3 Complete cancellation
If a receipt has not yet been concluded by pressing a tender media key and all the registrations made for it should be cancelled, execute a complete cancellation.
Example: Various items have been registered. The receipt has not yet been concluded. A complete cancellation should be executed.
OFF
REG
• Set the key to REG
2
TUV
X
PRG
Z
Input
PLU
1
0
0
PQRS
„#
„#
• Press the VOID key.
RECEIPT
PLU 2
2.22T1
PLU 100
5.55T1
-------------------------------------------------------------------17-07-2012
#10
Cancel
Cancel
Cancel
PLU
Cancel
PLU 100
• Press the CLR key.
Note: The number and total sum of the corrections are recorded in the financial report.
43
-5.55
6.8.4 Refunds
Refunds (retours) must be registered when a customer returns an item after it has been sold and the receipt concluded.
Example: $ 10 is refunded from department 1.
OFF
REG
X
PRG
Z
Input
• Set the key to REG
• Press the CASH RETOUR key.
• R egister the returned item in the normal
way.
Receipt
1
0
00
PQRS
„#
SP
• Press the CASH key.
PLU
CASH
Dept01
Refund
1
-10.00
-10.00T1
-------------------------------------------------------------------TAX1
13,00%
-1.60
TOTAL TAX
-8.40
-------------------------------------------------------------------TOTAL
-10.00
CASH
-10.00
17-07-2012
#11
Note: The number and total sum of the refunds are recorded in the financial report. Use system option 35 to enable (default setting) or disable printout of this information in the financial report.
6.9 Received on account operations
Payments into the cash register, e.g. credit repayments, are registered as follows:
Example: $ 500 are received on account.
OFF
REG
X
PRG
Input
• Set the key to REG
• Enter the amount paid in.
Z
• Press the
RECEIPT
5
0
0
00
JKL
„#
„#
SP
RA key.
------------------------------------------------------------RA:
17-07-2012
500.00
#12
RA
Note: The number and total sum of received on account operations are recorded in the financial report.
6.10 Paid out operations
Example: $ 60 is paid out for a service technician.
OFF
REG
• Set the key to REG
• Enter the amount paid out.
X
PRG
Input
Z
RECEIPT
6
0
00
MNO
„#
SP
• Press the PO key.
------------------------------------------------------------PO:
17-07-2012
60.00
#13
P0
Note: The number and total sum of the paid out transactions are recorded in the financial report.
6.11 Printing numbers
A freely selectable, 8-digit number can be printed on the receipt, e.g. a customer or voucher number.
Example: The customer purchase order number 87654321 needs to be printed on the receipt.
6.12 Opening the cash drawer without a sale
The cash drawer can be opened without making a sale in order to deposit or remove cash.
Note: The number and total sum of no sale drawer opening operations are recorded in the financial report.
OFF
REG
X
PRG
• Set the key to REG
Input
• Press the #/NS key.
#/NS
Z
44
RECEIPT
------------------------------------------------------------No Sale Act:
17-07-2012
#15
RCR-75CA
6.13 Printing a Receipt ON/OFF
The printing of a receipt can be switched ON or OFF.
OFF
REG
X
PRG
• Set the key to REG
Input
• Press the Receipt ON/OFF key.
RECEIPT
Receipt
ON/OFF
Z
17-07-2012
B
16:30:00
0.00
Note: If receipt printing is switched off, a "B" appears in the display.
Note: If the key is pressed twice in quick succession, the initial status is restored.
6.14 Later printout of receipt (copy of receipt)
If printing of a receipt is switched off via the Receipt ON/OFF key, it can be printed later by pressing the Receipt ISSUE key (receipt/bill). This only relates to the receipt for the last
registration process.
Note: If you need a copy of the receipt for a registration recorded some time ago, it may be possible to print one from the electronic journal as long as the data is still stored there (ring journal).
OFF
REG
X
PRG
Z
• Set the key to REG
• Receipt printing is switched off.
• Register the items and conclude by pressing a tender media key.
Input
Receipt
ON/OFF
• The press the Receipt ISSUE key.
7 Training Mode
Activate Training mode to practice using the cash register.
It is important to activate Training mode when practising to ensure the actual sales figures are not falsified. When Training mode is active, all the operating functions can be
accessed, the difference to Registration mode being that the entries and transactions are not recorded in the cash register reports.
7.1 Activating Training mode
Note: To activate Training mode, press the Training key. This must first be set up on the keyboard (refer to Chapters 5.20 and 5.20.2).
OFF
REG
X
PRG
• Set the key to REG
• Press the Training key.
Z
Display
17-07-2012
T
17:00:00
0.00
Note: If Training mode is switched on, a "T" appears in the display.
Note: Within the scope of programming the clerk system , the clerk rights can be used to define which clerk may use Training mode. In order for the clerk rights to take effect, the clerk system must
be activated.
7.2 Deactivating Training mode
Note: To deactivate Training mode, press the Training key. This must first be set up on the keyboard.
OFF
REG
X
PRG
Z
• Set the key to REG
• Press the Training key.
Display
17-07-2012
T
17:00:00
0.00
45
8 Electronic Journal (EJ)
The electronic journal records every entry made on the cash register in the way the input is recorded on the receipt.
• The electronic journal is active when the cash register leaves the factory. It can be deactivated by means of system option 26.
• Approx. 16,000 (receipt) lines can be stored. When the maximum memory capacity is full, the oldest entries in the electronic journal are automatically overwritten.
8.1 Printing the the electronic journal (EJ)
The electronic journal can be printed out in X and Z modes:
• X-mode: Without memory deletion
• Z-mode: With memory deletion
Note: Printout of the electronic journal can be interrupted and stopped by pressing the CLR key.
8.1.1 Printing the EJ with all details
OFF
REG
X
PRG
Z
OFF
REG
X
PRG
• Set the key switch to position X or Z.
• Select EJ.DETAIL REP.: Use the ▲ and
▼ keys to scroll through the Program
menu to the required position or use the
Input
Display
= X Report
9
6
DEF
MNO
CASH
digit keys to enter 9 and 6 .
• Confirm the input by pressing the
CASH
CASH key; the electronic journal
appears in the display.
Z
• Press the CASH key again to start
printing the electronic journal.
CASH
- 1=
01.FINANCIAL REP.
02.FINA. REP. MON.
03.DEPT. REP.
04.DEPT. REP. MON.
05.PLU REP.
06.PLU REP. MON.
08.CLERK REP.
09.CLERK REP. MON.
86.TRAINING REP.
87.TRAINING REP. MON.
96.EJ.DETAIL REP.
97.EJ.SUM REP.
98.RE-PRINT RECEIPT
8.1.2 Printing the EJ with totals only
OFF
REG
X
PRG
Z
• Set the key switch to position X or Z.
• Select EJ.SUM REP.: Use the ▲ and ▼
keys to scroll through the Program menu
to the required position or use the digit
Input
9
7
DEF
@
CASH
keys to enter 9 and 7 .
OFF
REG
X
PRG
• Confirm the input by pressing the CASH
key; the electronic journal appears in the
display.
CASH
Z
• Press the CASH key again to start
printing the electronic journal.
CASH
46
Display
= X Report
01.FINANCIAL REP.
02.FINA. REP. MON.
03.DEPT. REP.
04.DEPT. REP. MON.
05.PLU REP.
06.PLU REP. MON.
08.CLERK REP.
09.CLERK REP. MON.
86.TRAINING REP.
87.TRAINING REP. MON.
96.EJ.DETAIL REP.
97.EJ.SUM REP.
98.RE-PRINT RECEIPT
- 1=
RCR-75CA
8.1.3 Printing a copy of a receipt from the EJ
A receipt stored in the electronic journal can be printed out, once, at a later date. The receipt is then printed with the title RECEIPT ISSUE.
OFF
REG
X
PRG
Z
• Set the key switch to position X.
Input
Display
• Select RE-PRINT RECEIPT:Use the ▲ and
= X Report
▼ keys to scroll through the Program
menu to the required position or use the
- 1=
01.FINANCIAL REP.
02.FINA. REP. MON.
03.DEPT. REP.
04.DEPT. REP. MON.
05.PLU REP.
06.PLU REP. MON.
08.CLERK REP.
09.CLERK REP. MON.
86.TRAINING REP.
87.TRAINING REP. MON.
96.EJ.DETAIL REP.
97.EJ.SUM REP.
98.RE-PRINT RECEIPT
digit keys to enter 9 and 8 .
• Confirm by pressing CASH .
The input area in which to enter the receipt
number appears in the display together with
the number of receipts stored.
• E nter the number of the receipt to be
printed.
• Confirm by pressing CASH .
Note: The receipts stored are deleted when the electronic journal is deleted.
8.2 Deleting the electronic journal (EJ)
8.2.1 Printing and deleting the EJ
Delete the electronic journal by printing the electronic journal in Z-mode.
8.2.2 Deleting the EJ without printing
OFF
REG
PRG
X
Z
• Set the key to PRG
• Select programme number 80
• Confirm by pressing CASH
The information which can be deleted
appears in the display.
Input
Display
=MEMORY CLEAR
8
0
ABC
„#
• U se the ▲ and ▼ keys to move to
E-JOURNAL AREA.
CASH
▲
• Press the CASH key.
▼
CASH
• C onfirm the prompt by pressing the
- 1=
PROGRAM AREA
CASHIERS AREA
DEPARTMENT AREA
PLU AREA
E-JOURNAL AREA
ALL REPORT AREA
ALL AREA
CASH=DELETE
SUB-TOTAL=CANCEL
Please Wait…
CASH
CASH key.
• Conclude programming by pressing the
SUB-TOTAL
SUB-TOTAL key.
47
9 Cash Register Reports
You are obliged to keep the daily Z reports for submission to the revenue authorities. Otherwise, estimations of sales figures may be used within the scope of tax audits.
9.1 Types of report
Reports can be printed in X or Z mode.
X-mode / X-reports
The key is set to position X. Reports are printed but the memories are not deleted.
Z-mode / Z-reports
The key switch is set to position Z. Reports are printed and, at the same time, the memories are deleted and cannot be restored.
Daily reports
These are reports which are printed at the end of the day.
Note: A daily Z-report must be printed every day in order to accumulate the totals in the memory for a monthly report.
Monthly reports
These are reports which are printed at the end of the month.
9.2 Report overview
All reports can be printed as X or Z reports with the exception of the Receipt Issue (report number 98).
Report number
01
02
03
04
05
06
08
09
86
87
96
97
98
Report (view according to display)
01.FINANCIAL REP.
02.FINA. REP. MON.
03.DEPT. REP.
04.DEPT. REP. MON.
05.PLU REP.
06. PLU REP. MON.
08.CLERK REP.
09.CLERK REP. MON.
86.TRAINING REP.
87.TRAINING REP. MON.
96.EJ.DETAIL REP.
97.EJ.SUM REP.
98.RE-PRINT RECEIPT
Explanation
Daily X or Z financial report
Monthly X or Z financial report
Daily X or Z department report
Monthly X or Z department report
Daily X or Z PLU report
Monthly X or Z PLU report
Daily X or Z clerk report
Monthly X or Z clerk report
Daily X or Z training report
Monthly X or Z training report
Electronic journal, print details (X/Z)
Electronic journal, only print totals (X/Z)
Print copy of receipt/bill (in X-mode only)
9.3 Report contents
The system options enable you to define numerous settings to adapt the content of the receipts and reports to your specific needs.
9.4 Printing reports
OFF
REG
X
PRG
Z
• Set the key switch to position X or Z.
Input
Display
• Select the report to be printed: Use the ▲
and ▼ keys to scroll through the menu to
the required position or use the digit keys to
enter the report number.
• Confirm by pressing CASH
The information which can be deleted appears in
the display.
OFF
REG
X
PRG
Z
• Confirm by pressing CASH .
The report first appears, together with the
totals, in the display.
CASH
• Press the ▲ and ▼ keys to view all the
report totals in the display.
▲
▼
• Press the CASH key to start printout.
CASH
SUB-TOTAL
48
=X Report
- 1=
=Z Report
01.FINANCIAL REP.
02.FINA. REP. MON.
03.DEPT. REP.
04.DEPT. REP. MON.
05.PLU REP.
06.PLU REP. MON.
08.CLERK REP.
09.CLERK REP. MON.
86.TRAINING REP.
87.TRAINING REP. MON.
96.EJ.DETAIL REP.
97.EJ.SUM REP.
98.RE-PRINT RECEIPT
- 1=
RCR-75CA
9.5 Example of a day's Z-report
OFF
REG
X
PRG
Z
• Turn the key switch to Position Z.
• The cash register is automatically set to 01.
FINANCIAL REP.
• Press the CASH key.
The report first appears, together with the
totals, in the display.
• Press the ▲ and ▼ keys to view all the
report totals in the display.
1
0
PQRS
„#
• Press the CASH key to start printout.
Input
Receipt
CASH
1
-----------------------------------Z
Report
-------------Financial Report,Day-----------------------------------------------TO:
17.06.2011 21:00
-----------------------------------TAX1 RATE
19,00%
TAXABLE1 WT
5.964.50
TAXABLE1 WO
5,008.85
TAX1
955.65
----------------------------------------------------------------------Net:
5..64.50
------------------------------------
CASH
▲
▼
CASH
Explanation of terms in the reports
Term:
Significance:
TAX1 RATE
TAX rate 1 is 19%
TAXABLE1 WT
Taxable at TAX rate 1, gross (inclusive of TAX)
TAXABLE1 WO
Taxable at TAX rate 1, net (exclusive of TAX)
TAX1
TAX amount for TAX rate 1
Refund:
-10.00
-----------------------------------Cancels:
-15.01
-----------------------------------Discount:
-0.55
-----------------------------------Service Charge:
1.25
-----------------------------------Add Price:
0.50
-----------------------------------Reduce Price:
-2,00
-----------------------------------In Cash:
500.00
-----------------------------------Out Cash:
-60.00
-----------------------------------Dawer Total
-----------------------------------CASH
6,067.22
No Sale Act:
1
CARD
53.00
CHECK
10.00
USD
394.40
-----------------------------------E.C.R. Reset
Note: TAXABLE1 WO + TAX1 = TAXABLE1 WT
Net
Total sales, gross
Refund
Total amount from refunds
Cancels
Total from all ECs and voids
Discount
Total amount of percentage discounts
Service Charge
Total amount of percentage surcharges
Add Price
Total amount from amount-based surcharges
Reduce Price
Total amount from amount-based discounts
In Cash
Total amount received on account
Out Cash
Total amount paid out
CASH
Total of cash payments
No Sale Act
Total of drawer openings without a sale
CARD
Total of card payments
CHECK
Total of cheque payments
USD
Total of payments in foreign currency 1 (USD)
49
10 Deleting Cash Register Data
This function is used to deleted data stored in the cash register. This includes the report memory, electronic journal or cash register program.
OFF
REG
PRG
X
Z
• Set the key to PRG
• Select program number 80
Input
Display
=MEMORY CLEAR
• Confirm by pressing CASH
The information which can be deleted
appears in the display.
8
0
ABC
„#
• U se the ▲ and ▼ keys to move to the
data to be deleted.
CASH
▲
• Confirm by pressing CASH .
▼
- 1=
PROGRAM AREA
CASHIERS AREA
DEPARTMENT AREA
PLU AREA
E-JOURNAL AREA
ALL REPORT AREA
ALL AREA
CASH
• Confirm the prompt by pressing the
CASH
CASH key.
• Conclude programming by pressing the
SUB-TOTAL
SUB-TOTAL key.
11 In the Case of Problems
11.1 Display messages
Display
Cause
Corrective measures:
Paper
L
End of paper roll.
The battery capacity is too low.
Replace a new paper roll.
Charge the battery.
B
Receipt printing is switched off.
Press the Receipt ON/OFF key to switch receipt printing on
again.
T
The cash register is in Training mode;
Press the Training key to deactivate Training mode.
II
Department level 2 is active
Press the DP SHIFT key to switch between the
department levels.
III
Department level 3 is active
Press the DP SHIFT key to switch between the
department levels.
11.2 Printer malfunction
1. In the event of a printer error, switch off the cash register and disconnect the power plug.
2. Check that the paper roll is inserted correctly or whether there is a foreign object in the printer mechanism.
Attention: Remove the object very carefully. Do not use a knife, screwdriver or anything similar! Never use force!
This could damage the printer mechanismand void the warranty.
3. Switch the cash register on again and complete a registration
4. If the printer error reoccurs, contact Royal Sovereign Customer Service.
50
RCR-75CA
12 Options
Various peripheral equipment can be connected to the cash register.
12.1 SD card slot for data backup(SD Card not included)
Use an SD card to make a backup copy of the current programme data and all reports. If the cash register has a technical defect or data is lost, you can load the backup copies of the reports and
program on the cash register from the SD card.
Note: The electronic journal is not saved on the SD card.
12.1.1 Saving data on an SD card
Note: The SD card should have a capacity of 2 GB.
OFF
REG
PRG
X
Z
• Set the key to PRG
• Select program number 81
Input
Display
=SD CARD
• Confirm by pressing CASH
The options appear in the display.
8
1
ABC
PQRS
• U se the ▲ and ▼ keys to select
BACKUP.
CASH
SD CARD BACKUP
SD CARD RECOVERY
▼
▲
• Confirm by pressing CASH .
- 1=
CASH
The current program and reports (except the electronic journal) are transferred from the cash register and stored on the SD card.
Note: During transfer, Please Wait appears in the display.
Never interrupt this process!
12.1.2 Loading data from an SD card
OFF
REG
PRG
X
Z
• Set the key to PRG
• Select program number 81
Input
Display
=SD CARD
• Confirm by pressing CASH
The options appear in the display.
8
1
ABC
PQRS
• U se the ▲ and ▼ keys to select
RECOVERY.
▲
• Confirm by pressing CASH .
CASH
- 2=
SD CARD BACKUP
SD CARD RECOVERY
▼
CASH
Note: During transfer, PLEASE WAIT appears in the display.
Never interrupt this process!
12.2 Rechargeable battery
Model Number RSYT724261
When the battery is fully charged, it can operate the cash register for a maximum of 5 hours without the need of a power cable.
Note: The runtime of the cash register by the battery depends on the quantity and length of the receipts printed.
5 hours can be achieved when approx. 50 receipts with just 15 text lines are printed.
When the battery capacity is too low, L (Low) appears in the cash register display. When the cash register is connected to the mains power, the battery in the cash register is automatically recharged.
Note: The thermal printing is not as dark in battery operation as when mains powered.
51
12.2.1 Technical data
2100 mAh, 7.4 Volt
12.2.2 Installation of the rechargeable battery
• Disconnect the cash register from the power outlet.
• Open the cash drawer and remove the cash tray.
• Raise the cash drawer a little and pull it out.
• The cash drawer is fixed to the cash register by a screw in the front section. Remove the screw.
• Raise the cash register a little and open the small flap under the keyboard. Insert the battery in this compartment and plug in the cable.
• Close the cash register again in the reverse sequence.
WARRANTY
Royal Sovereign warrants each Cash Register to be free from defects in material and workmanship. Our obligation under this warranty is limited to the repair or replacement, free of
charge, when delivered to an authorized Royal Sovereign service center, of any defective part(s) thereof, other than parts damaged in transit. This warranty is in effect to the
original purchaser, for a period of one year from the date of purchase and is not transferable. This warranty shall apply only if the Cash Register is used in accordance with the
factory provided instructions which accompany it.
EXCLUSIONS
This warranty excludes and does not cover defects, malfunctions or failures of your Royal Sovereign Cash Register, caused by repairs by unauthorized persons or service centers,
mishandling, improper installation, modification or unreasonable use including incorrect voltage, acts of God, or failure to provide reasonable and necessary maintenance. This
warranty is in lieu of any and all expressed warranties. In no event shall Royal Sovereign be liable for consequential or incidental damages.
This limitation would not apply if you live in a location that does not permit the exclusion of limitation of incidental or consequential damages. This warranty gives you specific legal
rights and you may also have other rights which vary from state to state.
ROYAL SOVEREIGN INTERNATIONAL, INC.
RS CANADA INC.
2 Volvo Drive Rockleigh, NJ 07647 USA
1025 Westport Crescent, Mississauga On L5T 1E8 CANADA
TEL : +1) 800-397-1025 FAX : +1) 201-750-1022
TEL : +1) 905-461-1095 TF # : +1) 866-961-6673
FAX : +1) 905-461-1096
www.royalsovereign.com
52