1
OLY MPIA
CM 940-F / 941-F / 942-F
Operating Instructions
Programming Instructions
Since 1903
www.olympia-vertrieb.de
Cash Register CM 940-F / 941-F / 942-F
Declaration of Conformity
CM 940-F / 941-F / 942-F
Olympia
2011
Page 2
Specifications subject to change without notice!
Cash Register CM 940-F / 941-F / 942-F
Dear Customer,
Congratulations!
We are pleased that you decided on purchasing the Olympia CM 940-F / 941-F / 942-F cash register.
The CM 940-F / 941-F / 942-F is a high-quality cash register that implements the latest technologies to satisfy your needs
in the best possible way.
Please read the operating instructions/programming instructions to ensure you learn to use the cash register functions
properly.
We hope you enjoy using your machine!
Kindest regards
Olympia Business Systems Vertriebs GmbH
Olympia Business Systems Vertriebs GmbH
Zum Kraftwerk 1
D-45527 Hattingen
Deutschland
Internet: www.olympia-vertrieb.de
This Operating/Programming Instruction manual is purely for informational purposes. Its content is not part of any contract
for sale. All the data specified relates to nominal values. The equipment and options described may differ from country to
country according to national requirements. We reserve the right to make amendments to the content and technical
modifications without notification.
Olympia
2011
Page 3
Specifications subject to change without notice!
Cash Register CM 940-F / 941-F / 942-F
Intended Use
This cash register is exclusively intended for processing cash register business indoors.
Any other use is considered unintended use.
General Information / Safety Notes
●
●
●
●
●
●
●
●
Ensure that the mains power supply corresponds to that specified on the rating plate located on the rear side of the
cash register.
This cash register is a highly sophisticated piece of equipment. Never attempt to repair it yourself. If repairs should
become necessary, please bring the cash register to an authorised service centre or the sales outlet.
Never insert metallic objects, such as a screwdriver, paper clip etc., in the cash register. This could damage the cash
register and also exposes you to the risk of an electric shock.
Always switch the cash register off when it no longer needs to be used.
Clean any dust from the cash register by wiping it gently with a dry cloth. Never use water or solvents, such as paint
thinner, spirit etc., to clean the cash register.
To disconnect the power supply fully, disconnect the plug from the power socket.
Never expose the cash register to extreme temperatures.
Keep all the transport locks in a safe place for future use. The transport locks must be reinstalled for any future
transportation of the cash register.
Transport Locks
Before the cash register can be put into operation, remove any transport locks installed and store them for future use.
Important transport note: In the case of transport damage, the unit must be returned together with the packaging,
operating/programming instruction manual and accessories.
Connecting to the Power Supply
Before connecting the cash register to the mains power supply, please check that the voltage and frequency
specifications stipulated on the rating plate coincide with the local power supply.
Safety note:
Note:
The power socket must be close to the cash register and easily accessible. This means that the
cash register can be disconnected from the power supply quickly in an emergency.
All the data is retained following disconnection from the power supply. The batteries ensure the data is
retained for approx. 2 months after the cash register has been disconnected from the power supply.
Printer Mechanism
Attention: Observe the following information to ensure long, trouble-free operation:
● Never
● print without any paper installed!
● pull the paper while the printer is operating!
● use poor quality paper!
● insert paper rolls which have already been used!
● tamper with the printer using hard objects or move the drive by hand!
● Pay attention to the markings indicating the end of the paper roll.
Change the paper roll immediately.
● Have the cash register / printer mechanism serviced regularly by an authorised service centre.
Olympia
2011
Page 4
Specifications subject to change without notice!
Cash Register CM 940-F / 941-F / 942-F
Contents
1
Product Features ...................................................................................................................................................... 11
2
Starting Up ................................................................................................................................................................ 13
2.1 Inserting a paper roll......................................................................................................................................... 13
2.2 Paper reel ......................................................................................................................................................... 13
2.2.1
Inserting the paper reel ..................................................................................................................... 13
2.2.2
Removing the journal ........................................................................................................................ 13
2.3 Language.......................................................................................................................................................... 13
3
Key-Operated Control Switch.................................................................................................................................. 14
3.1 Key switch positions ......................................................................................................................................... 14
3.2 Keys.................................................................................................................................................................. 14
4
Keyboard ................................................................................................................................................................... 15
4.1 Raised keyboard .............................................................................................................................................. 15
4.1.1
Raised keyboard labels in English................................................................................................... 15
4.1.2
Raised keyboard labels in German.................................................................................................. 15
4.1.3
Changing the key labels.................................................................................................................... 15
4.2 Flat keyboard.................................................................................................................................................... 16
4.2.1
Flat keyboard labels in English (original) .......................................................................................... 16
4.2.2
Flat keyboard labels in German ........................................................................................................ 16
4.2.3
Changing the flat keyboard label ...................................................................................................... 16
4.3 Explanation of the key functions....................................................................................................................... 17
4.3.1
Standard keys on the keyboard ........................................................................................................ 17
4.3.2
Functions not provided on the standard keyboard............................................................................ 20
5
Programming the Cash Register Via the PC.......................................................................................................... 22
5.1 Installing the PC software................................................................................................................................. 22
5.2 Starting the PC programme.............................................................................................................................. 23
5.3 Connecting the PC to the cash register ........................................................................................................... 25
5.4 Using the PC programme................................................................................................................................. 25
5.4.1
Using a basic programme supplied .................................................................................................. 26
5.4.2
Programming a completely new set of data...................................................................................... 27
5.5 Selection window and programming operation ................................................................................................ 27
5.6 Menu bar .......................................................................................................................................................... 29
5.7 Loading data from the PC to the cash register................................................................................................. 30
5.7.1
Loading all the data from the PC to the cash register ...................................................................... 30
5.7.2
Loading individual data files from the PC to the cash register.......................................................... 31
5.8 Loading data from the cash register to the PC (backup copy)......................................................................... 31
5.9 Data input, in detail........................................................................................................................................... 31
6
Programming on the Cash Register ....................................................................................................................... 32
6.1 Basics for programming ................................................................................................................................... 32
6.1.1
Programming menu .......................................................................................................................... 32
6.1.2
Initiate programming ......................................................................................................................... 33
6.1.3
Conclude programming..................................................................................................................... 33
6.2 Text input.......................................................................................................................................................... 34
6.2.1
Text input areas a maximum number of characters ......................................................................... 34
Olympia
2011
Page 5
Specifications subject to change without notice!
Cash Register CM 940-F / 941-F / 942-F
6.2.2
6.3
6.4
6.5
6.6
6.7
Olympia
Procedure to enter text ..................................................................................................................... 34
6.2.2.1 Entering digits, letters and special characters................................................................... 34
6.2.2.2 Deleting text entered ......................................................................................................... 35
6.2.3
Keys for text input ............................................................................................................................. 36
6.2.4
Character map .................................................................................................................................. 36
Changing the language .................................................................................................................................... 37
6.3.1
Changing the language using the PC ............................................................................................... 38
Programming departments............................................................................................................................... 39
6.4.1
Programmable contents.................................................................................................................... 39
6.4.1.1 Department name.............................................................................................................. 39
6.4.1.2 Department fixed prices..................................................................................................... 39
6.4.1.3 Tax rate assignment .......................................................................................................... 39
6.4.1.4 Department status ............................................................................................................. 39
6.4.2
Department programming ................................................................................................................. 40
6.4.3
Navigating in the departments .......................................................................................................... 42
6.4.4
Programming departments using the PC.......................................................................................... 42
Programming PLUs / items .............................................................................................................................. 43
6.5.1
Programmable contents.................................................................................................................... 43
6.5.1.1 PLU number....................................................................................................................... 43
6.5.1.2 PLU caption ....................................................................................................................... 43
6.5.1.3 PLU fixed prices ................................................................................................................ 43
6.5.1.4 Tax rate assignment .......................................................................................................... 43
6.5.1.5 Department assignment .................................................................................................... 43
6.5.1.6 PLU status ......................................................................................................................... 43
6.5.1.7 LINK PLUs ......................................................................................................................... 43
6.5.1.8 2-digit identity code for order type and printout on the kitchen printer .............................. 43
6.5.1.9 Inventory ............................................................................................................................ 47
6.5.2
Programming PLUs........................................................................................................................... 48
6.5.3
Navigating in the PLUs ..................................................................................................................... 52
6.5.4
Deleting a PLU .................................................................................................................................. 52
6.5.5
Programming PLUs using the PC ..................................................................................................... 53
Programming LINK PLUs ................................................................................................................................. 54
6.6.1
Programmable contents.................................................................................................................... 54
6.6.1.1 LINK PLU number ............................................................................................................. 54
6.6.1.2 LINK PLU name................................................................................................................. 54
6.6.1.3 LINK PLU fixed prices ....................................................................................................... 54
6.6.1.4 Assigning a tax rate ...........................................................................................................54
6.6.1.5 Assigning a department..................................................................................................... 54
6.6.1.6 LINK PLU status ................................................................................................................54
6.6.2
Programming LINK PLUs.................................................................................................................. 55
6.6.3
Navigating in the LINK PLU .............................................................................................................. 57
6.6.4
Deleting a LINK PLU......................................................................................................................... 57
6.6.5
Programming LINK PLUs using the PC............................................................................................ 58
Clerk system..................................................................................................................................................... 59
6.7.1
Programmable contents.................................................................................................................... 59
6.7.1.1 Clerk name ........................................................................................................................ 59
6.7.1.2 Clerk password (pass code) .............................................................................................. 59
6.7.1.3 Commission ....................................................................................................................... 59
6.7.1.4 Clerk attributes / Clerk rights ............................................................................................. 60
6.7.2
Programming clerks .......................................................................................................................... 61
6.7.3
Activating/Deactivating the clerk system .......................................................................................... 63
6.7.4
Logging on to the cash register as a clerk ........................................................................................ 64
6.7.5
Programming clerks using the PC .................................................................................................... 65
2011
Page 6
Specifications subject to change without notice!
Cash Register CM 940-F / 941-F / 942-F
6.8
6.9
6.10
6.11
6.12
6.13
6.14
6.15
6.16
6.17
6.18
6.19
6.20
6.21
6.22
6.23
6.24
6.25
6.26
6.27
6.28
6.29
6.30
Olympia
Programming tender media identification......................................................................................................... 66
6.8.1
Programming tender media identification using the PC ................................................................... 67
Programming an amount-related surcharge (+)............................................................................................... 68
6.9.1
Programming an amount-related surcharge (+) using the PC.......................................................... 68
Programming an amount-related discount (-) .................................................................................................. 69
6.10.1 Programming an amount-related discount (-) using the PC ............................................................. 69
Programming a percentage surcharge (%+) .................................................................................................... 70
6.11.1 Programming a percentage surcharge (+) using the PC .................................................................. 70
Programming a percentage discount (-%) ....................................................................................................... 70
6.12.1 Programming a percentage discount (%-) using the PC .................................................................. 70
Programming the training pass code ............................................................................................................... 71
6.13.1 Programming the training pass code using the PC .......................................................................... 72
Programming the machine number .................................................................................................................. 73
6.14.1 Programming the machine number using the PC............................................................................. 73
System options ................................................................................................................................................. 74
6.15.1 System options in detail .................................................................................................................... 74
6.15.2 Programming system options ........................................................................................................... 78
6.15.3 Printing the system options............................................................................................................... 78
6.15.4 Programming system options using the PC...................................................................................... 79
Programming the date and time ....................................................................................................................... 80
Programming foreign currencies ...................................................................................................................... 81
Programming printing of the X / Z reports ........................................................................................................ 82
6.18.1 Status numbers................................................................................................................................. 82
6.18.2 Programming status numbers........................................................................................................... 83
6.18.3 Programming the content of the report printout using the PC .......................................................... 84
Programming clerk PLUs ................................................................................................................................. 85
Programming the RS 232 port.......................................................................................................................... 86
6.20.1 Programmable contents and their status numbers ........................................................................... 86
6.20.2 Programming the RS 232 port .......................................................................................................... 87
Programming tax rates ..................................................................................................................................... 88
6.21.1 Programming tax rates using the PC................................................................................................ 89
Programming logo messages........................................................................................................................... 90
6.22.1 Programming logo messages using the PC ..................................................................................... 91
Programming AD messages ............................................................................................................................ 92
6.23.1 Programming the AD message using the PC ................................................................................... 92
Programming additional (cooking) messages .................................................................................................. 93
6.24.1 Programming cooking messages using the PC................................................................................ 94
Programming order messages ......................................................................................................................... 95
6.25.1 Programming order messages using the PC.................................................................................... 96
Programming kitchen receipts.......................................................................................................................... 97
Selecting a graphical logo ................................................................................................................................ 98
6.27.1 Programming a graphical logo using the PC .................................................................................... 99
Programming the keyboard ............................................................................................................................100
6.28.1 Key codes .......................................................................................................................................100
6.28.2 Programming the keys ....................................................................................................................101
6.28.3 Resetting the cash register to its default settings ...........................................................................102
6.28.4 Programming the keyboard assignment using the PC ...................................................................103
6.28.4.1 Programming a raised keyboard assignment using the PC ............................................103
6.28.4.2 Programming the flat keyboard assignment using the PC ..............................................104
Programming Dallas keys ..............................................................................................................................105
Defining the ECR type....................................................................................................................................106
6.30.1 Programming the ECR type using the PC ......................................................................................106
2011
Page 7
Specifications subject to change without notice!
Cash Register CM 940-F / 941-F / 942-F
6.31 Programming the decimal point / decimal places...........................................................................................107
6.31.1 Programming the decimal places using the PC..............................................................................108
6.32 Programming rounding...................................................................................................................................109
6.32.1 Programming rounding for received on account/paid out and for calculating tax...........................109
6.32.1.1 Programming rounding for receiving on account / paid out.............................................109
6.32.1.2 Programming rounding for tax calculation.......................................................................110
6.32.2 Defining the rounding method.........................................................................................................111
6.32.3 Programming rounding using the PC..............................................................................................112
6.33 Programming the date format.........................................................................................................................113
6.33.1 Programming the date format using the PC ...................................................................................114
7
Operation.................................................................................................................................................................115
7.1 Clearing error messages ................................................................................................................................115
7.2 Registering departments ................................................................................................................................116
7.2.1
Registering a DP once using fixed price 1......................................................................................116
7.2.1.1 Items were previously registered using price 1 ...............................................................116
7.2.1.2 Items were previously registered using price 2 ...............................................................116
7.2.2
Registering a DP once using fixed price 2......................................................................................117
7.2.2.1 Items were previously registered using price 2 ...............................................................117
7.2.2.2 Items were previously registered using price 1 ...............................................................117
7.2.3
Registering a DP once without a fixed price ...................................................................................117
7.2.4
Multiple DP registration...................................................................................................................117
7.2.5
Registering identical departments ..................................................................................................118
7.2.6
Example receipt for DP registration ................................................................................................119
7.3 Registering PLUs............................................................................................................................................120
7.3.1
Registering a PLU once using fixed price 1....................................................................................120
7.3.1.1 Items were previously registered using price 1 ...............................................................120
7.3.1.2 Items were previously registered using price 2 ...............................................................120
7.3.2
Registering a PLU once using fixed price 2....................................................................................121
7.3.2.1 Items were previously registered using price 2 ...............................................................121
7.3.2.2 Items were previously registered using price 1 ...............................................................121
7.3.3
Registering a PLU once without a fixed price .................................................................................121
7.3.4
Registering a multiple PLU .............................................................................................................121
7.3.5
Example receipt, PLU registration ..................................................................................................122
7.4 Mixed sales.....................................................................................................................................................122
7.5 Concluding receipt / Method of payment.......................................................................................................123
7.5.1
Paying with cash and displaying the change ..................................................................................123
7.5.2
Payment by EC card / cheque ........................................................................................................123
7.5.3
Payment by credit card ...................................................................................................................124
7.5.4
Payment by credit approval ............................................................................................................124
7.5.5
Combining tender media.................................................................................................................124
7.6 Payment in a foreign currency........................................................................................................................125
7.6.1
Paying in a foreign currency with the exact amount .......................................................................125
7.6.2
Paying in a foreign currency with change .......................................................................................125
7.6.2.1 Explanation to the receipt ................................................................................................126
7.7 Registering surcharges and discounts ...........................................................................................................127
7.7.1
Registering amount-related surcharges and discounts ..................................................................127
7.7.2
Registering percentage surcharges and discounts.........................................................................128
7.8 Deleting input errors (corrections) .................................................................................................................128
7.9 Error correction and void ................................................................................................................................129
7.9.1
EC (error correction) .......................................................................................................................129
7.9.2
Void .................................................................................................................................................129
7.9.3
Complete cancellation.....................................................................................................................130
Olympia
2011
Page 8
Specifications subject to change without notice!
Cash Register CM 940-F / 941-F / 942-F
7.10
7.11
7.12
7.13
7.14
7.15
7.16
Refunds ..........................................................................................................................................................130
Received on account operations ....................................................................................................................131
Paid out operations ........................................................................................................................................131
Printing numbers ............................................................................................................................................132
Opening the cash drawer without a sale ........................................................................................................132
Printing a receipt on/off ..................................................................................................................................133
Printing last receipt (duplicate receipt, delayed printout) ...............................................................................133
7.16.1 Printing a copy receipt ....................................................................................................................133
7.16.2 Delayed receipt printout ..................................................................................................................133
8
Restaurant Functions (Table System) ..................................................................................................................134
8.1 Opening a table ..............................................................................................................................................134
8.2 Closing a table................................................................................................................................................134
8.3 Registering items for a table...........................................................................................................................134
8.4 Printing a table view .......................................................................................................................................135
8.5 Preparing the bill for a table ...........................................................................................................................135
8.5.1
Preparing the bill without an additional business receipt................................................................135
8.5.2
Preparing the bill with a business receipt .......................................................................................136
8.6 Transferring a table ........................................................................................................................................137
8.7 Split payments for a table...............................................................................................................................138
8.8 Error corrections/Voids within the table system .............................................................................................139
8.9 Order type system ..........................................................................................................................................139
8.10 Take-away sales ............................................................................................................................................140
9
Training Mode .........................................................................................................................................................141
9.1 Activating Training mode................................................................................................................................141
9.2 Deactivating Training mode............................................................................................................................142
10
Electronic Journal (EJ) ..........................................................................................................................................143
10.1 Printing the electronic journal (EJ) .................................................................................................................143
10.1.1 Printing the EJ with all details .........................................................................................................143
10.1.2 Printing the EJ with totals only ........................................................................................................144
10.2 Deleting the electronic journal (EJ) ................................................................................................................145
10.2.1 Printing and deleting the EJ ............................................................................................................145
10.2.2 Deleting the EJ without printing ......................................................................................................145
11
Cash Register Reports ...........................................................................................................................................146
11.1 Types of report ...............................................................................................................................................146
11.2 Report overview..............................................................................................................................................146
11.3 Report contents ..............................................................................................................................................146
11.4 Printing reports ...............................................................................................................................................147
11.5 Example of a day's Z-report ...........................................................................................................................148
12
Deleting Cash Register Data .................................................................................................................................149
13
Solving Problems ...................................................................................................................................................150
13.1 Display messages ..........................................................................................................................................150
13.2 Printer malfunctions........................................................................................................................................150
14
Options ....................................................................................................................................................................151
14.1 SD card slot for data backup ..........................................................................................................................151
14.1.1 Saving data on the SD card ............................................................................................................151
14.1.2 Loading data from the SD card .......................................................................................................151
Olympia
2011
Page 9
Specifications subject to change without notice!
Cash Register CM 940-F / 941-F / 942-F
14.2 USB flash card slot for data backup...............................................................................................................152
14.2.1 Saving data on a USB flash card ....................................................................................................152
14.2.2 Loading data from the USB flash card............................................................................................152
14.3 Bar code scanners .........................................................................................................................................153
14.3.1 Suitable bar code scanners with a PS/2 plug .................................................................................153
14.3.2 Setting up a bar code scanner ........................................................................................................153
14.3.3 Using the barcode reader to programme PLUs in the cash register ..............................................153
14.4 Battery ............................................................................................................................................................154
14.4.1 Technical data.................................................................................................................................154
14.4.2 Installing the battery........................................................................................................................154
14.5 Bank note verifier (Euro) ................................................................................................................................155
14.6 Dallas lock with 4 keys ...................................................................................................................................155
Olympia
2011
Page 10
Specifications subject to change without notice!
Cash Register CM 940-F / 941-F / 942-F
1
Product Features
Feature
CM 940-F
CM 941-F
CM 942-F
Cash drawer
None
None
Large
Weight
2.1 kg
5.1 kg
8.0 kg
ECR types
Hairdresser's version, baker's version, restaurant version
Keyboard type
Raised keyboard (with 48 keys) or flat keyboard (with 84 keys)
No. of departments
99
No. of PLUs
4,096
No. of LINK PLUs
50 (max. 3 per PLU)
No. of clerk PLUs
60
No. of clerks
16
No. of VAT rates
8
No. of logo messages
8
No. of AD messages
8
No. of graphical logos
23
No. of cooking messages
30
No. of order messages
7
No. of table memories
70
Programming
Programmability
Manual and using PC software
●
●
●
●
●
●
●
●
●
●
●
●
Language (German, English, French,
Dutch)
Usage versions
Keyboard
Dallas keys
RS 232 port (to connect a kitchen
printer)
65 system settings
11 setting options for the report printout
Graphical logo
Logo and AD messages
Cash register number
Passwords (see below)
Clerks
●
●
●
●
●
●
●
●
●
●
●
●
●
Programmable passwords
●
●
Programmable texts
●
●
●
●
●
Types of payment
●
●
●
Olympia
2011
Clerk password
Training password
Department name
PLU name
LINK PLU name
Clerk names
Foreign currency text
CASH
CHEQUE
Card
●
●
●
●
●
●
●
Page 11
Date & Time
Date format
Decimal places (0 to 3)
Rounding methods (also specially for
payments in/out and calculation of
tax)
Tax rates
Departments
PLU
LINK PLUs
Clerk PLUs
Tender media
Foreign currency
Surcharges and discounts (according
to amount and percentage)
Diverse texts (see below)
Tender media name
Header and footer text lines
Additional texts for the kitchen
Order messages
Kitchen printer receipts
Credit 1
Credit 2
Specifications subject to change without notice!
Cash Register CM 940-F / 941-F / 942-F
Feature
CM 940-F
Cash register reports
●
●
●
●
Additional features
●
●
●
●
●
Lock / Keys
CM 941-F
CM 942-F
X1/Z1 financial report, day
● X/Z clerk report, day/month
X2/Z2 financial report, month
● X/Z clerk PLU report, day/month
X/Z department report, day/month
● X/Z training report, day/month
X/Z PLU report, day/month
● X/Z electronic journal, details/totals
Data backup via SD card or USB flash card
Electronic ring journal (16,000 lines)
Training mode
Delayed receipt printout
Duplicate receipt
Dallas lock/keys
Display
Clerk display
Alphanumeric LC display, 5 lines, 128x64
Customer display
Numeric display (10-digit, LCD)
Printer
Fujitsu FTP-628 MLC
Printer type
Thermal printer
Paper width
57.5 ± 0.5 mm
Paper
Thermal paper
Interfaces
●
●
●
●
●
Power supply
1 RJ-45 port for a cash drawer
1 PS/2 port for a barcode scanner
1 USB port for a PC or USB flash card
1 RS 232 serial port
to connect a kitchen printer or scales
1 SD card slot for producing back-up copies of programs
220 V
Power consumption
25 W
Working temperature range
Options
(not contained in scope of
delivery, subject to charge)
0 – 40 °C
●
●
●
●
Olympia
2011
Battery: to operate the cash register without a power cable for approx. 5 hours
continuous operation (OLYMPIA part number 947990002)
Bank note verifier (Euro): Tests bank notes are authentic
(OLYMPIA part number 947990003)
Bar code scanner LS 6000 (OLYMPIA part number 947990001)
Dallas lock with 4 keys (OLYMPIA part number 947990005)
Page 12
Specifications subject to change without notice!
Cash Register CM 940-F / 941-F / 942-F
2
Starting Up
2.1
Inserting a paper roll
Attention: Only use thermal paper!
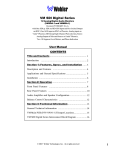
1. Remove the printer lid.
2. Pivot the paper transport unit up.
3. Insert a roll of thermal paper, 57 mm wide and max. 70 mm diameter,
so that the thermal paper unrolls from the bottom and is fed past the
printer mechanism, see Fig. 1.
4. Draw the leading edge of the paper over the tear-off edge and pivot
the paper transport unit down, locking it in place.
5. Depending on the required use (receipt mode or journal mode), either
tear off the paper at the tear-off edge of the printer mechanism or feed
Fig. 1
the paper onto the paper reel (the leading edge of the paper must be
cut straight here, see Fig. 2).
6. Replace the printer lid.
2.2
Paper reel
The paper reel is required when the receipt should be wound onto it. In this
case, the system option 14 (status code 1) for Journal mode must be
activated (see Chapter 6.15).
2.2.1
1.
2.
3.
4.
5.
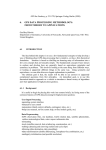
2.2.2
1.
2.
3.
Inserting the paper reel
Open the printer lid.
Fig. 2
Remove the paper reel.
Thread the end of the journal paper in the slit in the paper reel and
fold back in the opposite direction. Then wind on the paper a little by
hand.
Insert the paper reel in the reel guides provided for it.
Important: The part of the reel which cannot be disassembled must be
located to the right, beside the reel drive.
Close the printer lid.
Removing the journal
Remove the paper reel.
Remove the narrow side of the reel, see Fig. 3.
Remove the journal from the reel, see Fig. 3.
2.3
Fig. 3
Language
The texts in the display and on the receipt can be made in four different languages:
● English
● German (default)
● French
● Dutch
Attention: To activate a new language, you must delete all the memories! Observe your obligations in respect of
providing proof and preserving records for the revenue authorities with regard to programming and cash
register reports (see Chapter 11)! Therefore, only change the cash register language before actually putting
it into operation!
To set a language other than German, see Chapter 6.3.
Olympia
2011
Page 13
Specifications subject to change without notice!
Cash Register CM 940-F / 941-F / 942-F
3
Key-Operated Control Switch
3.1
Key switch positions
The key can be turned to five different positions:
OFF
REG
X
Z
PRG
The cash register is
off
Registration mode
Print report without
memory deletion
Print report with
memory deletion
Programming mode
3.2
Keys
Six different keys are available for use with the cash register:
Key
identification
No. of keys
S
Switch position
OFF
REG
X
2
X
X
X
Z
2
X
X
X
X
P
2
X
X
X
X
Olympia
2011
Page 14
Z
PRG
X
Specifications subject to change without notice!
Cash Register CM 940-F / 941-F / 942-F
4
Keyboard
The cash register is available with either a raised or flat keyboard.
4.1
Raised keyboard
In its standard form, the cash register leaves the factory with German labels on the keyboard.
It is possible to apply labels in different languages on the keys. Keyboard sheets in various languages are enclosed with
the cash register for this purpose.
4.1.1
Raised keyboard labels in English
4.1.2
Raised keyboard labels in German
4.1.3
Changing the key labels
Proceed as follows:
1. Remove the transparent cap from the key.
If it is easier for you, carefully remove the entire key beforehand.
2. Replace the existing key label with a new label.
3. Replace the transparent cap back on the key.
If you removed the entire key, replace the key carefully back on the keyboard.
Olympia
2011
Page 15
Specifications subject to change without notice!
Cash Register CM 940-F / 941-F / 942-F
4.2
Flat keyboard
Note:
To use the flat keyboard, the cash register ECR type must be set to 0 (Hairdresser's version) (see
Chapter 6.30).
4.2.1
Flat keyboard labels in English (original)
FEED
▲
Receipt
ON/OFF
RA
-%
PO
+%
DPSHIFT
NS
#
DEPT
6
PLU
6
PLU
12
PLU
18
PLU
24
PLU
30
PLU
36
PLU
42
PrintSize
PLU
Clerk
X
Split
▲
DEPT
5
PLU
5
PLU
11
PLU
17
PLU
23
PLU
29
PLU
35
PLU
41
Retour
7
8
9
Trans
fer
▼
DEPT
4
PLU
4
PLU
10
PLU
16
PLU
22
PLU
28
PLU
34
PLU
40
Void
4
5
6
Change
VAT
Card
DEPT
3
PLU
3
PLU
9
PLU
15
PLU
21
PLU
27
PLU
33
PLU
39
EC
1
2
3
Bill
print
Sub
Total
DEPT
2
PLU
2
PLU
8
PLU
14
PLU
20
PLU
26
PLU
32
PLU
38
CLR
0
00
.
Table
Cash
DEPT
1
PLU
1
PLU
7
PLU
13
PLU
19
PLU
25
PLU
31
PLU
37
4.2.2
Flat keyboard labels in German
BON
▲
BON
EinAus
EinAusZahlung Zahlung
-%
+%
Schrift
Größe
PLU
Bediener
Retour
7
Storno
WGEbene
KV
#
WG
6
PLU
6
PLU
12
PLU
18
PLU
24
PLU
30
PLU
36
PLU
42
X
Split
▲
WG
5
PLU
5
PLU
11
PLU
17
PLU
23
PLU
29
PLU
35
PLU
41
8
9
Umbuchen
▼
WG
4
PLU
4
PLU
10
PLU
16
PLU
22
PLU
28
PLU
34
PLU
40
4
5
6
AußerHaus
Karte
WG
3
PLU
3
PLU
9
PLU
15
PLU
21
PLU
27
PLU
33
PLU
39
SofortStorno
1
2
3
Rechnung
Summe
WG
2
PLU
2
PLU
8
PLU
14
PLU
20
PLU
26
PLU
32
PLU
38
CLR
0
00
.
Table
BAR
WG
1
PLU
1
PLU
7
PLU
13
PLU
19
PLU
25
PLU
31
PLU
37
4.2.3
ZW-
Changing the flat keyboard label
Proceed as follows:
1. Remove the transparent, plastic keyboard protection foil by raising it carefully, using a small tool as an aid if necessary, and pulling it out at the two bottom corners.
2. Remove the old keyboard label sheet in the same way as you removed the transparent key protection, see Point 1.
3. Insert a new keyboard label sheet. The lower corners of the keyboard label sheet must be pushed under the tabs in
the corners of the keyboard housing.
4. Replace the transparent keyboard protection foil in the same way, see Point 3.
Olympia
2011
Page 16
Specifications subject to change without notice!
Cash Register CM 940-F / 941-F / 942-F
4.3
Explanation of the key functions
4.3.1
Standard keys on the keyboard
Note:
The following table indicates whether the respective key is available on the raised keyboard (H) or flat
keyboard (F).
Key
%
$
"
#
H
F
H
F
Explanation
If you press and hold the ┣FEED┫ key, the receipt or journal paper continues to be fed
until the key is released.
Multiple functions Either: ┣%-┫ key for a percentage deduction during a sales transaction
H
or on a subtotal. The total amount registered by the ┣%-┫ key is recorded in the financial
F
report. Or, if the cash register is not completing a transaction: ┣RA┫ key to receive
amounts.
Multiple functions Either: ┣%+┫ key for a percentage surcharge on a sale or on a subtotal.
H
The total amount registered by the ┣%+┫ key is recorded in the financial report. Or, if the
F
cash register is not completing a transaction: ┣PO┫ key to pay out amounts.
The ┣CLR┫ key is used to delete all the entries made using the numeric keyboard or by
H
the ┣ X ┫ key before the entries have been finalised by pressing a department or function
F
H
F
H
F
H
F
key. The ┣CLR┫ is also used to delete input errors.
The ┣EC┫ key is used to cancel an incorrect registration immediately after it has been
entered. The error correct total is recorded in the financial report.
The ┣RETOUR┫ key is used for refund transactions. The refund total is recorded in the
financial report.
The ┣VOID┫ key is used to complete the cancellation of an item within a registration
which has not yet been concluded. The void total is recorded in the financial report.
H
The ┣CLERK┫ key is used to register a clerk.
F
- Continued on next page -
Olympia
2011
Page 17
Specifications subject to change without notice!
Cash Register CM 940-F / 941-F / 942-F
- Continued Key
H
F
H
V
Explanation
Numeric keys:
The numeric keys are used to enter digits.
The ┣. DEL┫ or ┣ . ┫ key is used to enter a decimal point.
F
H
,-.
to
STU
H
The ┣PLU┫ (Price-Look-Up) key.
F
F
The PLU keys from 1 to 42 can be used to select specific PLUs directly.
The ┣DP-SHIFT┫ key is used to switch between the three department levels.
F
When Programming mode is active, press the key to skip to the same field in the next
input position.
F
This key is used separate the items on a table so that they can be calculated separately.
F
This key is used to reassign items to another table number.
F
Key for take-away sales: The key is used to alter the standard tax rate 1 to the reduced
tax rate 2 in a one-off process.
F
This key is used to print a subtotal or a table review.
F
This key is used to open a table and conclude a table registration.
- Continued on next page -
Olympia
2011
Page 18
Specifications subject to change without notice!
Cash Register CM 940-F / 941-F / 942-F
- Continued Key
H
F
H
F
H
F
'+/
&*.
H
%)-
$(,
+*) F
('&
01H
23
H
H
F
H
H
F
! H
F
Explanation
The key is used to change the size of the print on the receipt.
The ┣ X ┫ key is used to repeat (multiply) entries for departments or refunds.
The Department keys serve to register departments.
The cash register is provided with preprogrammed fixed tender keys for frequently
required amounts.
The ┣Receipt ON/OFF┫ key is used to switch printing of receipts on or off.
The ┣↑┫ and ┣↓┫ keys are used to scroll up and down in the display.
The ┣FC┫ (Foreign Currency) key is used for converting amounts into a foreign currency.
The ┣#/NS┫ (NS = No Sale) key is used for operations which do not need to be added. It
can be used to print a maximally 7 digit number on the receipt. The entry does not affect
other sales totals.
The ┣#/NS┫ key is also used to open the cash drawer.
The ┣CARD┫ key is used for card tender transactions.
- Continued on next page -
Olympia
2011
Page 19
Specifications subject to change without notice!
Cash Register CM 940-F / 941-F / 942-F
- Continued -
Key
H
"H
#H
!
4.3.2
F
F
Explanation
Press the ┣SUB-TOTAL┫ key to display the total amount of the sales or produce a copy
of the bill.
The ┣CASH┫ key is used for cash transactions.
F
Functions not provided on the standard keyboard
The following functions can be programmed on the cash register if required:
The following table indicates the keyboard on which the function is not available by default: raised keyboard
(H) or flat keyboard (F).
Note:
Meaning
H
┣ 5.00 ┫, ┣ 10.00 ┫, ┣ 20.00 ┫
and ┣ 50.00 ┫ *
┣ - ┫ and ┣ + ┫ *
H
┣CHANGE VAT┫ *
H
┣ADR┫ *
H
┣FC┫ or ┣FC 1┫ *
F
Explanation
F
The keys serve to enter amounts frequently paid by customers.
F
The keys serve to register amounts surcharged or discounted from totals.
This key is used to change the tax rate following a take-away sale: tax rate 1
(currently 19%) is changed to tax rate 2 (lower, currently 7%) for a one-off process.
F
Additional business receipt - after pressing this key, the preprint for the ADR is
printed when the bill has been printed.
F
This key is used to convert a foreign currency to the local currency.
┣FC 2┫ *
H
F
H
F
Tender media keys for payment via credit approval.
┣NO TAX┫ *
H
F
Calculation of the VAT is omitted once for an item.
┣PRICE 1┫ *
H
F
After pressing this key, fixed price 1 will be registered continually for the DEPT/PLU
registration until stopped.
┣PRICE 2┫ *
H
F
After pressing this key, fixed price 2 will be registered continually for the DEPT/PLU
registration until stopped.
┣PRICE New┫ *
H
F
The key is used to enable free pricing during a PLU registration.
┣BILL PRINT┫ *
H
┣CREDIT 1┫ and
┣CREDIT 2┫ *
Print the subtotal or table review.
- Continued on next page -
Olympia
2011
Page 20
Specifications subject to change without notice!
Cash Register CM 940-F / 941-F / 942-F
- Continued Meaning
H
F
Explanation
┣CHECK┫ *
H
F
Tender media key for payment made by debit card/cheque.
┣TAX 1┫ *
H
F
The VAT for an item is calculated at value added tax rate 1 for the completion of a
receipt.
┣TAX 2┫ *
H
F
The VAT for an item is calculated at value added tax rate 2 for the completion of a
receipt.
┣SPLIT┫ *
H
┣KEYBOARD LEVEL┫ *
H
┣TABLE┫ *
H
┣TRAINING┫ *
H
┣TRANSFER┫ *
H
┣ADDITIONAL TEXT┫ *
H
The key is used to separate items on one table.
F
The key is used to switch between the keyboard levels.
The key is used to open a table (enter a table number then press this key) and to
conclude a table registration.
F
This key is used to switch Training mode on and off.
This key is used to reassign orders to another table number.
F
Only works in combination with the table function:
This key is used in order to add text to a PLU.
* Suggested label for the key to which this function is assigned.
Olympia
2011
Page 21
Specifications subject to change without notice!
Cash Register CM 940-F / 941-F / 942-F
5
Programming the Cash Register Via the PC
It is possible to programme the cash register using a PC as an alternative to programming it manually (see Chapter 6).
The following accessories are enclosed with the cash register to enable this:
● a USB cable to connect the cash register to the PC and
● a data CD with the recommended PC programme Olympia ECR Management System.
Note:
We recommend you only programme the cash register using Olympia ECR Management System. This can
considerably simplify programming various cash register settings and provides a clearer overview of the
programmed data because you can view it quickly, simply and clearly on the monitor screen. You can also
save the programmed settings so that, in the event of a system reset, you have a backup copy available
which you only need to transfer from the PC to the cash register.
Note:
Follow the instructions below in the sequence in which they are described!
5.1
Installing the PC software
Note:
1.
2.
3.
Install the software before connecting the USB cable!
Insert the data CD in the PC.
Wait until the CD content is displayed on the monitor screen.
Open the SetupEcrSystem folder (see Fig. 4).
Fig. 4
4.
5.
Double-click on the SetupEcrSystem programme contained in it to install the PC programme.
Follow the instructions which appear on the screen:
● Click on NEXT,
● Confirm the path by clicking on NEXT,
● Confirm again by clicking on NEXT.
- Continued on next page -
Olympia
2011
Page 22
Specifications subject to change without notice!
Cash Register CM 940-F / 941-F / 942-F
- Continued The installation routine is started. The programming software is automatically installed in C:\Program Files if no modifications have been made.
6. Conclude the process when the installation has finished by clicking on CLOSE.
Note:
5.2
1.
During the installation, a link with the name EcrSystem is established on the desktop. The programme can
then be started simply by double-clicking on the relevant icon.
Starting the PC programme
Open the EcrSystem programme:
● Double-click on the icon created on the PC desktop during installation or
● Select C:\Program Files\EcrSystem and double-click on EcrSystem.exe.
The Login window appears.
Fig. 5
2.
3.
4.
Select the language required (Language Select).
Select the cash register model (ECR Model).
Click the Confirm(0) button.
Note:
When starting for the first time, no password needs to be entered.
The programme mask appears in which you can define all the settings (see Fig. 6):
- Continued on next page -
Olympia
2011
Page 23
Specifications subject to change without notice!
Cash Register CM 940-F / 941-F / 942-F
Fig. 6
Activate the USB interface:
5. Select the System Setting(S) menu in the menu bar.
6. Select the Setup Usb Driver menu option. The following window opens (see Fig. 7):
Fig. 7
- Continued on next page Olympia
2011
Page 24
Specifications subject to change without notice!
Cash Register CM 940-F / 941-F / 942-F
- Continued 7.
8.
9.
10.
Do not alter the values already defined.
Click on INSTALL.
Confirm by clicking on OK.
Close the window by clicking on the X at the top right of the window.
5.3
1.
2.
Connecting the PC to the cash register
Plug one end of the USB cable in the USB port at the rear of the cash register.
Plug the other end of the USB cable in a USB port in your PC.
The hardware wizard appears automatically.
3.
4.
5.
Confirm the driver to be installed, as recommended.
Wait until the wizard has activated the driver and confirmed it.
Click on Finish.
5.4
Using the PC programme
You must now decide:
● whether to open one of the pre-programmed sample files as the basis file or
● whether you want to enter all the data as new.
The data CD supplied contains the following three pre-programmed basic programmes:
● two basic programmes to operate the cash register as a retail model,
● one basic programme to operate the cash register as a gastronomy model.
Tip:
Programming the cash register is normally simplified by loading one of the three basic programmes supplied
and adapting it accordingly to meet your individual needs. When you have finished programming the
programme, load it on the cash register.
We recommend opening an existing file.
- Continued on next page -
Olympia
2011
Page 25
Specifications subject to change without notice!
Cash Register CM 940-F / 941-F / 942-F
5.4.1
Using a basic programme supplied
Open the basic programme supplied
1.
2.
Click on System Setting(S).
Select Select Database.
The sample application programmes contained on the CD in the Applications folder appear for selection.
3.
4.
Select which version you want to load.
Click on the [Open] button. The basic programme selected is opened.
Fig. 8
Saving the basic programme supplied under a new name
Firstly, save the basic programme under a new name:
1. Click on System Setting(S).
2. Select Database Backup…
3. You can edit the data provided according to your needs (accept, modify, supplement and/or delete) (see Chapter 5.5).
Olympia
2011
Page 26
Specifications subject to change without notice!
Cash Register CM 940-F / 941-F / 942-F
5.4.2
Programming a completely new set of data
Save your programmed data under a new name:
1. Click on System Setting(S).
2. Select Database Backup.
3. You can programme the data according to your needs (see Chapter 5.5).
5.5
Selection window and programming operation
After you have opened one of the basic programmes
supplied or a new file, the programmable contents are listed
in a selection window on the left (see Fig. 9).
● Click on the plus sign to display the contents which are
assigned to the general headings (see Fig. 9).
● The numbers in brackets correspond to the programme
numbers in the operating manual regarding operating the
keyboard (see Chapter 6.1.1).
Proceed as follows to programme one of the options:
1. Click once with the left-hand mouse button on the required option. The corresponding input mask appears
on the right-hand side of the window.
2. Complete the input mask using the PC keyboard.
If you complete your input in one of the basic
programmes provided, entries are already filled
at certain positions which you can either accept
or overwrite, as necessary. If you have created
a new file, all the fields are empty.
Work through all the content options and programme
the items as necessary.
Note:
3.
Fig. 9
Olympia
2011
Page 27
Specifications subject to change without notice!
Cash Register CM 940-F / 941-F / 942-F
Example: Programming the logo message (using one of the basic programmes supplied as a basis)
Fig. 10
In order to fill data in the fields:
1. Move the cursor to the relevant field and click the left-hand mouse button.
2. Use the PC keyboard to enter the content required.
3. Double-click in a field to display the setting options and select one directly. Note: This is not available for all fields.
Olympia
2011
Page 28
Specifications subject to change without notice!
Cash Register CM 940-F / 941-F / 942-F
5.6
Menu bar
The menu bar also provides a range of functions for selection:
A
1
2
B
3
4
C
5
6
7
8
9
No.
Significance
10
11
12
13
14
15
Fig. 11
Significance of the menus and buttons
No.
Significance
A
Select the language of the PC software
7
Save data
B
ECR settings
8
Cancel
C
System settings
9
Delete (a data record, all data records)
1
Parameter setting
10
- No function -
2
Keyboard assignment
11
Search
3
Graphical logo
12
Print preview
4
Data management
13
Import from Excel
5
Receive data from ECR
14
Export to Excel
6
Send data to ECR
15
Close the programme
Note:
●
●
The significance of the buttons also appears in bubbles by positioning the mouse arrow over the buttons for
a moment.
Use the [Update To ECR (F3)] button (6) to transfer the current programme content from the PC
programme/computer to the cash register (see Chapter 5.7).
Use the [Upload From ECR (F2)] button (5) to load the current programme content from the cash register to the PC
programme (see Chapter 5.8).
Note:
Olympia
Save the data you enter intermittently but regularly to prevent inadvertent loss of data!
2011
Page 29
Specifications subject to change without notice!
Cash Register CM 940-F / 941-F / 942-F
5.7
5.7.1
Loading data from the PC to the cash register
Loading all the data from the PC to the cash register
When you have completed all the programming input, transfer all the data to the cash register:
1. Click on the ECR Setting(E) menu.
2. Select the Data Management option.
3. Click on the [Update To ECR] button (see Fig. 12).
Data transfer then begins. A corresponding window on the screen indicates the current transfer status.
Fig. 12
Important: *** After data has been transferred to the cash register, the software requires it is switched off briefly! ***
Olympia
2011
Page 30
Specifications subject to change without notice!
Cash Register CM 940-F / 941-F / 942-F
5.7.2
1.
2.
Loading individual data files from the PC to the cash register
Select the content to be transferred in the selection window and display it on the monitor screen (see Chapter 5.5).
Click on the Update To ECR button.
Note:
Please note that when using Update To ECR, only the current screen contents are transferred!
While the data is being transferred to the cash register, the ONLINE STATUS message appears in the cash register display.
If you attempt to transfer a PLU file, a dialogue box appears in which the cash register asks if only new PLUs
should be transferred or all PLUs (including all modifications) should be replaced. Data transfer only starts
after the prompt has been answered by making the required selection.
Wait until the prompt disappears.
When data transfer has been completed, switch the cash register off and then on again.
Note:
3.
4.
Important: *** After data has been transferred to the cash register, the software requires it is switched off briefly! ***
5.8
Loading data from the cash register to the PC (backup copy)
If you have completed programming directly on the cash register, we recommend you transfer the data to the PC to
create a backup copy because programming on the cash register is very time-consuming.
1. Click on the ECR Setting(E) menu.
2. Select the Data Management option.
3. Click on the [Upload From ECR] button (see Fig. 12).
Data transfer then begins. A corresponding window on the screen indicates the current transfer status.
Proceed as follows to save the file:
4. Click on System Setting(S).
5. Select Database Backup….
5.9
Data input, in detail
Chapter 6 of the operating instructions describes how to enter data using the cash register keyboard. Chapter 6 describes
the individual functions and necessary input.
If you want to enter this data using the PC, the relevant PC input mask is illustrated at the end of each subchapter of
Chapter 6. The way to complete the input mask is explained in Chapter 5.5. The basic procedure is identical for each
mask.
In the case of queries regarding the fields, the Help features can often provide assistance. This can be opened by doubleclicking the left-hand mouse button on the relevant field.
Olympia
2011
Page 31
Specifications subject to change without notice!
Cash Register CM 940-F / 941-F / 942-F
6
Programming on the Cash Register
6.1
Basics for programming
●
●
●
6.1.1
To programme the cash register, the key switch must always be set to PRG.
If the key switch is in position PRG, the Programming menu appears in the display: A 2-digit
programme number appears beside which the feature which can be programmed is described briefly.
When a feature is already programmed as required, you can normally skip the programming step.
Programming menu
Displayanzeige - German
Display content
in English
Significance
90.PROGRAMME DRUCKEN
90.PRINT PROG DUMP
Print programmed data
01.WARENGRUPPEN
01.DEPARTMENT
Programme departments
03.PLU
03.PLU
Programme PLUs
04.LINK PLU
04.LINK PLU
Programme LINK PLUs
06.BEDIENER
06.CLERK
Programme clerks
08.FINANZWEG
08.TENDER MEDIA
Programme methods of payment
09.+ /- TASTE
09.KEY + /-
Programme amount-related surcharges/discounts
10.+% / -%
10.KEY +%/-%
Programme percentage surcharges/discounts
11.PASSWORT
11.PASS CODE
Programme pass code (password)
12.MASCHINE NUMMER
12.MACHINE NUMBER
Programme machine number
13.SYSTEM EINSTELLUNG
13.P REGISTER
Programme cash register settings (system options)
14.DATUM- ZEIT
14.DATE & TIME
Programme date and time
16.FREMDWÄHRUNG
16.FC
Programme foreign currencies
18.DRUCKAUSWAHL BER.
18.REPORT PRINTS
Set printing of reports
20.BEDIENER PLU
20.CLERK PLU
Programme clerk PLU
23.COM PORT EINSTELL
23.COM PORTs Setting
Programme connections
30.STEUER
30.TAX GROUP
Programme tax rates
31.KOPFZEILEN
31.LOGO MESSAGE
Programme logo text
32.FUSSZEILEN
32.AD MESSAGE
Programme added message
40.ZUSATZTEXTE
40.COOKING MESSAGE
Programming additional text (cooking) messages
41.ORDERBON-NAME
41.ORDER MESSAGE
Programme order type names
43.NAME KÜCHENDRUCKER
43.KITCHEN Files
Programme data for kitchen printer
44.GRAFISCHES LOGO
44.GRAPHIC LOGO
Select a graphical logo
45.TASTATUR
45.KEYBOARD
Change keyboard assignment
- Continued on next page -
Olympia
2011
Page 32
Specifications subject to change without notice!
Cash Register CM 940-F / 941-F / 942-F
- Continued Displayanzeige - German
Display content
in English
Significance
46.DALLAS SCHLÜSSEL
46.DALLAS KEYS
Programme Dallas keys
47.ECR FUNKTIONS-TYP
47.ECR TYPE
Set cash register type
48.DEZIMAL PUNKT
48.DECIMAL POINT
Set number of decimal places
49.SPRACHE
49.LANGUAGE
Set language
50.RUNDUNG PO-RA%
50.ROUNDING PO-RA%
Programme rounding method
51.RUNDUNG STEUER
51.ROUND TAX
Programme tax rounding method
52.DATUMS FOMAT
52.DATE FORMAT
Programme date format
53.RUNDUNG BETRAG
53.ROUNDING AMOUNT
Programme amount rounding
80.SPEICHER LÖSCHEN
80.MEMORY CLEAR
Delete all data from memory
81.SD CARD
81.SD CARD BACKUP
Produce data backup
82.USB STICK
82.USB STICK BACKUP
Send and receive data via USB flash card
Note:
The sequence of subsequent chapters on programming (from Chapter 6.4) basically corresponds to the
order in the above programming menu.
6.1.2
Initiate programming
Proceed as follows to programme one of the menu options:
1.
2.
Set the key to PRG
Select the menu option you want to program:
●
●
3.
6.1.3
Use the ┣↑┫ and ┣↓┫ keys to scroll to the required item in the menu.
Or:
Enter the programme number using the digit keys.
Press the ┣CASH┫key to confirm selection.
Conclude programming
Press the ┣SUB-TOTAL┫ key to end programming and skip one menu level back.
Olympia
2011
Page 33
Specifications subject to change without notice!
Cash Register CM 940-F / 941-F / 942-F
6.2
Text input
When programming certain options, it is possible to enter text.
Note:
Texts are programmed directly via the cash register keyboard.
6.2.1
Text input areas a maximum number of characters
Text can be entered in the following programming areas:
Text input for programming
6.2.2
Max. number of characters per text line
Departments
18
PLU
18
LINK PLU
18
Clerks
18
Foreign currency
18
Tender
18
Logo message
32
AD message
32
Cooking messages
18
Order messages
18
Kitchen type name
18
Procedure to enter text
6.2.2.1
Entering digits, letters and special characters
1. All the characters assigned to a key appear when the key is pressed.
2. Digits, letters and special characters are entered in the same way as for a mobile phone. Example:
●
To enter an A, press the ┣8 ABC┫ key once.
●
To enter a B, press the ┣8 ABC┫ key twice.
●
To enter a C, press the ┣8 ABC┫ key three times.
●
etc.
Note:
Alternatively, you can select the letter by scrolling to it with the ┣↑┫ and ┣↓┫ keys.
3.
Then confirm the letter selected for entry by pressing the ┣CASH┫ key.
4.
The digits in brackets indicate how many characters have been entered (first number) and the maximum number of
characters which can be entered (second number). Example: (1/18) one character has been entered and a maximum total of 18 characters are possible.
5.
Save the input by pressing the ┣CASH┫ key.
6.
Confirm the input again by pressing the ┣CASH┫ key.
7.
Conclude the programming text input by pressing the ┣SUB-TOTAL┫ key.
- Continued on next page -
Olympia
2011
Page 34
Specifications subject to change without notice!
Cash Register CM 940-F / 941-F / 942-F
Example:
Enter the text "Bar"
Input
Display
<Enter>Yes,<ESC>Exit
#
2x
B
ABC. :
A
Å
B
( 1/18)
C
a
b
c
8
Ä
Á
<Enter>Yes,<ESC>Exit
#
4x
#
7x
Ba
ABC. :
A
Å
B
( 2/18)
C
a
b
c
8
Ä
Á
<Enter>Yes,<ESC>Exit
Bar
ABC. :
( 3/18)
P Q R S p q r s 1 ß
#
"
6.2.2.2
Deleting text entered
Position the cursor in the input area for text and press the ┣CLR┫ key to delete any existing text.
Olympia
2011
Page 35
Specifications subject to change without notice!
Cash Register CM 940-F / 941-F / 942-F
6.2.3
Keys for text input
Key
Significance
Press the relevant key the necessary number of times in order to enter the required digits, letters
and special characters.
Press to enter digits and special characters.
Press to enter digits and special characters.
Press to enter a space.
Press to delete the last character entered.
Press to delete the entire input.
6.2.4
Key
Character map
Characters available
A B C
D E F
G H I
J K L
M N O
P Q R
T U V
W X Y
0 !
7 @ €
Olympia
2011
a
b
c
8
Ä Á Å Æ Ą À Â Ć Ç ä
d
e
f
9
Ð Ė È Ê
ė
e
è
é
g
h
i
4
Ġ Í
Ï
g
í
ì
j
k
l
5
Ł
m n
o
6
Ń Ñ Ö Ó Ø Ő Ō ό
Ô ñ
S p
q
r
s
р
ś
t
u
v
2
Ü Ú Ű Ů Ù Û ü
ů
ű û
ù
ú
Z
w X y
”
#
.
:
;
[
╲
İ
Î
á
å
æ ą
à
â
c
ć
ó
ø
ő
ō ό
ô
<
Ê ë
ł
1
ß
Ş Ś
ń ö
z
3
Ý
Ź Z
ź
z
$
% ’
&
(
)
*
+
,
-
=
>
?
]
^
{
╎
}
~
¡
§
→ ← Σ Ø Æ Œ ¨
¿
Ⅰ
_
Page 36
/
Ⅱ
ò
Ⅲ 「 」 ↑
·
Specifications subject to change without notice!
Cash Register CM 940-F / 941-F / 942-F
6.3
Changing the language
The texts in the display and on the receipt can be made in four different languages:
English, German (default setting), French and Dutch.
Attention: To activate a new language, you must delete all the memories! Observe your obligations in respect of
providing proof and preserving records for the revenue authorities with regard to programming and cash
register reports (see Chapter 11)! Therefore, only change the cash register language before actually putting
it into operation!
Note:
Proceed as follows to set to a language other than German:
Example:
English is to be set as the language.
1.
2.
Set the key to PRG
Select programme number 49
(see Chapter 6.1.2)
3.
Press the ┣CASH┫ key to confirm
the selection.
Enter the status number of the
required language via the
numeric keys:
0 for English
1 for German
2 for French or
3 for Dutch.
Save the selection by pressing
the ┣CASH┫ key.
4.
5.
6.
End programming by pressing
the ┣SUB-TOTAL┫ key.
Input
Display
=LANGUAGE
#[1 ]
#
"
- 1=
[0]
Save...!!
Please Continue...
In order for the change of language to take effect, you must now clear the memory:
7.
Select programme number 80
(refer to Chapter 6.1.2).
Press the ┣CASH┫ key to confirm
the selection.
● The memory areas which can be
deleted appear in the display.
8.
9.
Use the ┣↑┫ and ┣↓┫ keys to
select ALL AREA.
10. Press the ┣CASH┫ key to confirm
the selection.
11. Confirm the confirmation prompt
by pressing the ┣CASH┫ key.
12. End programming by pressing
the ┣SUB-TOTAL┫ key.
Olympia
2011
MEMORY CLEAR
1=
REPORT RESET
#ALL
E-JOURNAL AREA
PROGRAM AREA
CASHIERS AREA
DEPARTMENT AREA
AREA
# PLU
TABLE AREA
ALL AREA
#
"
Page 37
Specifications subject to change without notice!
Cash Register CM 940-F / 941-F / 942-F
6.3.1
Changing the language using the PC
To define the language using the PC programme, OLYMPIA ECR System provides the following input mask. It is used to
programme various parameter settings. They way to use the mask is described in Chapter 5, in detail in Chapter 5.5.
Fig. 13
Important: *** After data has been transferred to the cash register, the software requires it is switched off briefly! ***
Olympia
2011
Page 38
Specifications subject to change without notice!
Cash Register CM 940-F / 941-F / 942-F
6.4
Programming departments
A maximum of 99 departments can be programmed.
Note:
On leaving the factory, departments 1 to 8 are already assigned VAT tax rate 1 at 19% and departments 9 to
24 are assigned VAT tax rate 2 at 7%. All the departments are set-up as an itemised department with free
pricing. If these settings correspond with those you need, no adjustments to the programme are necessary at
this point.
6.4.1
Programmable contents
The following 4 features must or can be programmed or defined for each department:
6.4.1.1
Department name
Programme an individual department name. This programming step is optional. On leaving the factory, general, standard
names are pre-programmed.
6.4.1.2
Department fixed prices
A maximum of two department fixed prices can be programmed. Department fixed price 1 is usually the standard price,
department fixed price 2 relates to a reduced price, e.g. within the scope of a "happy hour" or products which are no
longer fresh.
The entry of department fixed prices is optional. If you do not enter fixed prices (fixed price is 0.00), the cash register only
operates using free pricing.
When programming, always enter the fixed price with the set number of decimal places and decimal point.
6.4.1.3
Tax rate assignment
Assign a tax rate to each department.
6.4.1.4
Department status
The department status defines whether it concerns a positive or negative department and an itemised or single item
department.
Department type
DP status number
Positive itemised department
00
Positive single item department
01
Negative itemised department (e.g. for deposit refunds)
02
Negative single item department
03
Olympia
2011
Page 39
Specifications subject to change without notice!
Cash Register CM 940-F / 941-F / 942-F
6.4.2
Department programming
1.
2.
Set the key to PRG.
Select programme number 01 (see Chapter 6.1.2).
3.
Press the ┣CASH┫ key to confirm the selection.
Programming department name (option):
4.
Use the ┣↑┫ and ┣↓┫ keys to move to the input area for the department name.
5.
Press the ┣CASH┫ key to confirm the selection.
6.
Delete the old department name by pressing the ┣CLR┫ key.
Enter the required text (max. 18 characters) (see Chapter 6.2).
Save each letter after entry by pressing the ┣CASH┫ key!
7.
Press the ┣CASH┫ key to confirm the input.
Programming department fixed price 1 (option):
8.
Use the ┣↑┫ and ┣↓┫ keys to move to the input area for department fixed price 1.
9.
Enter the fixed price 1 (including decimal places and decimal point).
10. Press the ┣CASH┫ key to confirm the input.
The cash register automatically switches to the next programming step.
Programming department fixed price -2 (option):
11. Enter fixed price 2 (including decimal places and decimal point).
12. Press the ┣CASH┫ key to confirm the input.
The cash register automatically switches to the next programming step.
Assigning tax rates:
13. Enter the tax rate group.
14. Press the ┣CASH┫ key to confirm the input.
The cash register automatically switches to the next programming step.
Defining department status:
15. Enter the DP status number.
16. Press the ┣CASH┫ key to confirm the input.
The cash register automatically saves the entire programmed data.
Saving the programmed department :
17. Press the ┣CASH┫ key to confirm the selection.
● Saving the programming in the memory is confirmed in the display. The system is now at the beginning
of the next department. Further data can now be programmed.
Tip:
Programme all the departments directly one after the other!
18. Conclude programming the departments by pressing the ┣SUB-TOTAL┫ key.
Olympia
2011
Page 40
Specifications subject to change without notice!
Cash Register CM 940-F / 941-F / 942-F
Example:
Department 1 should be a positive itemised department with a standard fixed price 1 of € 14.90 and a
reduced fixed price 2 of € 9.90, referred to as "ABC" and operate at the reduced tax rate 2 of 7%.
Input
Display
Initiate department programming:
=DEPARTMENT
[Dept01
#
1 – 1=
]
0.00
PRICE-1
0.00
PRICE-2
1
00
TAX#
STATUS
Programming a department name:
#
1x then #
2x then #
3x then #
#
Dept01
A
AB
ABC
[ABC
]
Programming a department fixed price 1:
#
0.00
PRICE-1
14.90
PRICE-1
0.00
PRICE-2
9.90
PRICE-2
Programming a department fixed price 2:
#
Assigning a tax rate:
#
1
TAX#
2
TAX#
- Continued on next page -
Olympia
2011
Page 41
Specifications subject to change without notice!
Cash Register CM 940-F / 941-F / 942-F
- Continued Defining department status:
#
00
STATUS
01
STATUS
Save and conclude department programming:
Save...!!
#
"
6.4.3
Please Continue...
Navigating in the departments
●
Use the ┣↑┫ and ┣↓┫ keys to move to the top line and then press the ┣CASH┫ key several times to switch between the
DP memory locations.
●
By pressing the ┣DP-SHIFT┫ key, you can access the same position in the next PLU.
6.4.4
Programming departments using the PC
In order to programme departments using the PC programme, OLYMPIA ECR System provides the following input mask.
They way to use the mask is described in Chapter 5, in detail in Chapter 5.5.
Fig. 14
Important: *** After data has been transferred to the cash register, the software requires it is switched off briefly! ***
Olympia
2011
Page 42
Specifications subject to change without notice!
Cash Register CM 940-F / 941-F / 942-F
6.5
Programming PLUs / items
A maximum of 4,096 PLUs (items) can be programmed.
6.5.1
Programmable contents
The following 9 features must or can be programmed or defined for each PLU:
6.5.1.1
PLU number
There are 4,096 memory locations available.
EAN bar codes with up to 13 digits can be read via a bar code scanner.
6.5.1.2
PLU caption
You can programme individual PLU names (max. 18 characters). This programming step is optional. On leaving the
factory, general, standard names are pre-programmed.
6.5.1.3
PLU fixed prices
Two PLU fixed prices can be programmed. PLU fixed price 1 is usually the standard price, PLU fixed price 2 is normally a
reduced price, e.g. within the scope of a "happy hour" or for products which are no longer fresh, such as bread, fruit,
vegetables, etc.
The entry of a PLU fixed price is optional. If you do not enter fixed prices (fixed price is 0.00), the cash register only
operates using free pricing.
When programming, always enter the fixed price with the set number of decimal places and decimal point.
6.5.1.4
Tax rate assignment
Assign each PLU to a tax rate.
6.5.1.5
Department assignment
Assign each PLU to a department.
6.5.1.6
PLU status
Use the PLU status to define whether it is a positive or negative PLU.
PLU type
PLU status number
Positive PLU
00
Negative PLU
01
6.5.1.7
LINK PLUs
LINK PLUs are linked to a "normal" PLU. When the "normal" PLU is then registered, the LINK PLU is automatically
registered too. LINK PLUs are often used in the sale of drinks in deposit bottles, for example. The deposit bottle is then
the LINK PLU. A maximum of 3 LINK PLUs can be programmed for each PLU.
Note:
The LINK PLU must be set-up before it is linked during the course of programming a PLU (see Chapter 6.6).
6.5.1.8
2-digit identity code for order type and printout on the kitchen printer
(a) The first digit in the 2-digit code defines the order type (order #) to which the PLU should belong.
(b) The second digit in the 2-digit code defines the type of output on the kitchen printer (KD#) for the PLU.
(a) Order type / Order number (Order #)
The order types only work when the cash register is operating in its gastronomy version. They ensure that PLUs with the
same order number (order #) are printed on the same receipt. The receipts with different order numbers are printed in
succession. This means that meals, drinks and other items sold can be listed clearly (also see Chapter 6.25).
A maximum of 7 order types can be set-up. The order type numbers are 1, 2, 3, 4, 5, 6 and 7.
Note:
The order messages can be reprogrammed manually (see Chapter 6.25).
Note:
If you operate the cash register in its retail version (see Chapter 6.30), programme a 0 at this point. The
order function is then no longer available.
Olympia
2011
Page 43
Specifications subject to change without notice!
Cash Register CM 940-F / 941-F / 942-F
(b) Printout on the kitchen printer (KD#)
Orders can be sent to the kitchen directly by means of an external kitchen printer (also see Chapter 6.26).
A kitchen printer must be activated via system option 9 (status code 2) so that printing on a kitchen printer
works.
There are eight different types of kitchen receipts which can combine order receipts and single receipts in the
following ways:
Note:
Type of output (receipt type)
Types
Olympia
KD#
Order receipt
Type 1
1
X
Type 2
2
X
Type 3
3
X
Type 4
4
X
Type 5
5
X
Type 6
6
Type 7
7
Type 8
8
2011
Single receipt
According to same item
Each item
X
X
X
X
X
Page 44
Specifications subject to change without notice!
Cash Register CM 940-F / 941-F / 942-F
Types 1 to 4: Consolidated receipt
Type 5
Only one receipt is issued containing the
entire order.
An order receipt is issued initially containing
the entire order. This is followed by the
respective single receipts for identicle items.
TABLE# 100
TABLE # 001
1
1
1
KD#1
1
2
STEAK
PIZZA
SCHNITZEL
02-01-2011 12:30 0433
KD#5
STEAK
PIZZA
02-01-2011 12:30 0433 Clerk 01
Clerk 01
---------------------Section------------------TABLE # 001
1
KD#5
STEAK
02-01-2011 12:30 0434 Clerk 01
---------------------Section------------------TABLE # 001
2
KD#5
PIZZA
02-01-2011 12:30 0435 Clerk 01
- Continued on next page -
Olympia
2011
Page 45
Specifications subject to change without notice!
Cash Register CM 940-F / 941-F / 942-F
- Continued Type 6
Type 7
Only single receipts are issued for identicle
items.
An order receipt is issued initially containing
the entire order. A single receipt is then
printed for each item.
TABLE# 001
TABLE # 001
1
KD#6
STEAK
1
2
KD#7
STEAK
PIZZA
02-01-2011 12:30 0434 Clerk 01
02-01-2011 12:30 0433 Clerk 01
---------------------Section------------------TABLE# 001
2
KD#6
PIZZA
02-01-2011 12:30 0435
Clerk 01
Type 8
Only single receipts are printed for each
item.
TABLE # 001
1
KD#8
STEAK
02-01-2011 12:30 0434
Clerk 01
---------------------Section------------------TABLE # 001
1
KD#8
PIZZA
02-01-2011 12:30 0435 Clerk 01
---------------------Section------------------TABLE # 001
1
KD#8
PIZZA
02-01-2011 12:30 0436 Clerk 01
Olympia
2011
Note:
Page 46
The type number (KD#) of the kitchen
receipts can be reprogrammed in kitchen
receipt names (see Chapter 6.26).
Specifications subject to change without notice!
Cash Register CM 940-F / 941-F / 942-F
6.5.1.9
Inventory
The inventory relates to the number of pieces of an item in stock.
Note:
Olympia
Since the current inventory of a PLU can be printed in the reports, system option 11 (status code 1) for the
PLU inventory counter must be activated (see Chapter 6.15).
2011
Page 47
Specifications subject to change without notice!
Cash Register CM 940-F / 941-F / 942-F
6.5.2
Programming PLUs
1.
2.
Set the key to PRG
Select programme number 03 (refer to Chapter 6.1.2).
3.
Press the ┣CASH┫ key to confirm the selection.
The first PLU programmed is always displayed.
Enter the PLU number
4.
Use the ┣↑┫ and ┣↓┫ keys to move to the input area for the PLU number.
5.
Use the digit keys to define which PLU is to be programmed.
6.
Press the ┣CASH┫ key to confirm the input.
The cash register automatically switches to the next programming step.
Note:
If a PLU number which you want to programme already exists, “DATA EXISTS!!” appears in
the display. Despite this, the cash register switches to the memory location so that you can
complete changes, if required.
Programming the PLU name (option):
7.
Press the ┣CASH┫ key to confirm the selection.
8.
Enter the required text (max. 18 characters) (see Chapter 6.2).
Save each letter after entry by pressing the ┣CASH┫ key!
9.
Press the ┣CASH┫ key to confirm the input.
Programming PLU fixed price 1 (option):
10. Use the ┣↑┫ and ┣↓┫ keys to move to the input area for PLU fixed price 1.
11. Enter the fixed price 1 (including decimal place and decimal point).
12. Press the ┣CASH┫ key to confirm the input.
The cash register automatically switches to the next programming step.
Programming PLU fixed price -2 (option):
13. Enter the fixed price 2 (including decimal place and decimal point).
14. Press the ┣CASH┫ key to confirm the input.
The cash register automatically switches to the next programming step.
Assigning tax rates:
15. Enter the tax rate group.
16. Press the ┣CASH┫ key to confirm the input.
The cash register automatically switches to the next programming step.
Assigning a department:
17. Enter the department number as a 2-digit number.
18. Press the ┣CASH┫ key to confirm the input.
The cash register automatically switches to the next programming step.
Defining PLU status:
19. Enter the PLU status number.
20. Press the ┣CASH┫ key to confirm the input.
The cash register automatically switches to the next programming step.
- Continued on next page -
Olympia
2011
Page 48
Specifications subject to change without notice!
Cash Register CM 940-F / 941-F / 942-F
- Continued Programming LINK-PLU 1 (option):
21. Enter the PLU number.
22. Press the ┣CASH┫ key to confirm the input.
The cash register automatically switches to the next programming step.
Programming LINK-PLU 2 (option):
23. Enter the PLU number.
24. Press the ┣CASH┫ key to confirm the input.
The cash register automatically switches to the next programming step.
Programming LINK-PLU 3 (option):
25. Enter the PLU number.
26. Press the ┣CASH┫ key to confirm the input.
The cash register automatically switches to the next programming step.
Programming the code for order type and printing on kitchen printer (option):
27. Enter the two-digit code for the order type and printing on the kitchen printer.
28. Press the ┣CASH┫ key to confirm the input.
The cash register automatically switches to the next programming step.
Entering the PLU inventory (option):
29. Enter the number of the specific PLU in stock.
30. Press the ┣CASH┫ key to confirm the input.
31. Confirm again by pressing the ┣CASH┫ key.
The display indicates that the programme data is being saved.
Concluding PLU programming:
32. After all the PLUs have been programmed and saved, conclude programming by pressing the
┣Sub-Total┫ key.
Olympia
2011
Page 49
Specifications subject to change without notice!
Cash Register CM 940-F / 941-F / 942-F
Example:
PLU no. 22 is a positive PLU (PLU status = 00) and should be identified by "Pizza". PLU no. 22 should have
a standard fixed price of € 8.90, a reduced fixed price of € 6.- and be assigned to Department 01. Tax rate 1
applies. PLU no. 22 should be linked with LINK PLU no. 33. PLU no. 22 should belong to order type 2 and
kitchen receipts should be printed according to type 5 (code for order type and printing on kitchen printer =
25). 100 pieces were in stock at the time of programming.
Input
Display
Initiate PLU programming:
=PLU
[
1- 1
1]No.
[1
#
]
0.00
PRICE1
0.00
PRICE2
0
TAX GROUP
1
LINK DEPT
00
STATUS
0
LINK PLU 1
0
LINK PLU 2
0
LINK PLU 3
-----------------------------------00
0
ORDER # / KD#
STOCK
Save...!!…
DELETE…
Entering the PLU number
#
[
1]No.
[
22]No.
[22
]
Programming a PLU name:
#
1x
then #
6x then #
8x then #
8x then #
4x then #
#
Olympia
2011
Page 50
22
P
Pi
Piz
Pizz
Pizza
[Pizza
]
Specifications subject to change without notice!
Cash Register CM 940-F / 941-F / 942-F
- Continued Input
Display
Programming PLU price 1:
#
0.00
PRICE1
8.90
PRICE1
0.00
PRICE2
6.00
PRICE2
Programming PLU price -2:
#
Assigning a tax rate
#
0
TAX GROUP
1
TAX GROUP
1
LINK DEPT
1
LINK DEPT
0
STATUS
00
STATUS
00
LINK PLU 1
33
LINK PLU 1
00
LINK PLU 2
00
LINK PLU 2
00
LINK PLU 3
00
LINK PLU 3
Assigning a department :
#
Defining the PLU status:
#
Programming LINK PLU 1:
#
Programming LINK PLU 2:
#
Programming LINK PLU 3:
#
- Continued on next page -
Olympia
2011
Page 51
Specifications subject to change without notice!
Cash Register CM 940-F / 941-F / 942-F
- Continued Programming the code for order type or printing on kitchen
printer:
#
00
ORDER # / KD#
10
ORDER # / KD#
Entering the inventory (stock):
#
0
STOCK
100
STOCK
Saving and ending programming the PLU:
SAVE...
#
"
6.5.3
DELETE
Navigating in the PLUs
●
Use the ┣↑┫ and ┣↓┫ keys to move to the top line and then press the ┣CASH┫ key several times to switch between the
PLU memory locations.
●
By pressing the ┣DP-SHIFT┫ key, you can access the same position in the next PLU.
6.5.4
Deleting a PLU
1.
2.
Set the key to PRG.
Select programme number 03 (refer to Chapter 6.1.2).
3.
Press the ┣CASH┫ key to confirm the selection.
4.
Use the ┣↑┫ and ┣↓┫ keys to move to the input area for the PLU number.
5.
Enter the number of the PLU to be deleted.
6.
Use the ┣↑┫ and ┣↓┫ keys to select DELETE…
7.
Press the ┣CASH┫ key to confirm the selection.
8.
Continue the deleting process by pressing the ┣CASH┫ key or cancel the process by pressing the
┣SUB-TOTAL┫ key.
●
Olympia
2011
Page 52
Specifications subject to change without notice!
Cash Register CM 940-F / 941-F / 942-F
6.5.5
Programming PLUs using the PC
In order to programme PLUs/items using the PC programme, OLYMPIA ECR System provides the following input mask.
They way to use the mask is described in Chapter 5, in detail in Chapter 5.5.
Fig. 15
Important: *** After data has been transferred to the cash register, the software requires it is switched off briefly! ***
Olympia
2011
Page 53
Specifications subject to change without notice!
Cash Register CM 940-F / 941-F / 942-F
6.6
Programming LINK PLUs
LINK PLUs are linked to a "normal" PLU. When the "normal" PLU is registered, the LINK PLU is automatically registered
too. A maximum of 50 LINK PLUs can be programmed.
6.6.1
Programmable contents
The procedure to programme a LINK PLU is basically the same as that to programme a PLU.
The following 9 features must or can be programmed or defined for each LINK PLU:
6.6.1.1
LINK PLU number
There are 50 memory locations available.
6.6.1.2
LINK PLU name
You can programme individual LINK PLU names (max. 18 characters). This programming step is optional. On leaving the
factory, general, standard names are pre-programmed.
6.6.1.3
LINK PLU fixed prices
Two PLU fixed prices can be programmed. PLU fixed price 1 is usually the standard price, PLU fixed price 2 is normally a
reduced price, e.g. within the scope of a "happy hour" or for products which are no longer fresh, such as bread, fruit,
vegetables, etc.
The entry of a PLU fixed price is optional. If you do not enter fixed prices (fixed price is 0.00), the cash register only
operates using free pricing.
When programming, always enter the fixed price with the set number of decimal places and decimal point.
6.6.1.4
Assigning a tax rate
Assign each LINK PLU to a tax rate.
6.6.1.5
Assigning a department
Assign each LINK PLU to a department.
6.6.1.6
LINK PLU status
Use the LINK PLU status to define whether it is a positive or negative PLU.
PLU type
LINK PLU status number
Positive LINK PLU
00
Negative LINK PLU
01
Olympia
2011
Page 54
Specifications subject to change without notice!
Cash Register CM 940-F / 941-F / 942-F
6.6.2
Programming LINK PLUs
1.
2.
Set the key to PRG
Select programme number 04 (see Chapter 6.1.2).
3.
Press the ┣CASH┫ key to confirm the selection.
The first PLU programmed is always displayed.
Entering the LINK PLU number:
4.
Use the ┣↑┫ and ┣↓┫ keys to move to the input area for the LINK PLU number.
5.
Use the digit keys to define which LINK PLU is to be programmed.
6.
Press the ┣CASH┫ key to confirm the input.
The cash register automatically switches to the next programming step.
Programming the LINK PLU name:
7.
Use the ┣↑┫ and ┣↓┫ keys to move to the input area for the LINK PLU name.
8.
Press the ┣CASH┫ key to confirm the selection.
9.
Enter the required text (max. 18 characters) (see Chapter 6.2).
Save each letter after entry by pressing the ┣CASH┫ key!
10. Press the ┣CASH┫ key to confirm the input.
Programming LINK PLU fixed price 1:
11. Use the ┣↑┫ and ┣↓┫ keys to move to the input area for LINK PLU fixed price 1.
12. Enter the fixed price 1 (including decimal place and decimal point).
13. Press the ┣CASH┫ key to confirm the input.
The cash register automatically switches to the next programming step.
Programming LINK PLU fixed price -2:
14. Enter the fixed price 2 (including decimal place and decimal point).
15. Press the ┣CASH┫ key to confirm the input.
The cash register automatically switches to the next programming step.
Assigning a tax rate:
16. Enter the tax rate group.
17. Press the ┣CASH┫ key to confirm the input.
The cash register automatically switches to the next programming step.
Assigning a department:
18. Enter the department number as a 2-digit number.
19. Press the ┣CASH┫ key to confirm the input.
The cash register automatically switches to the next programming step.
Programming the LINK PLU status:
20. Enter the LINK PLU status number.
21. Press the ┣CASH┫ key to confirm the input.
The system is now at the beginning of the programmed LINK PLU.
22. After all the PLUs have been programmed and saved, conclude programming by pressing the ┣CASH┫
and ┣SUB-TOTAL┫ keys in succession.
Olympia
2011
Page 55
Specifications subject to change without notice!
Cash Register CM 940-F / 941-F / 942-F
Example:
LINK PLU no. 5 is a positive PLU (PLU status = 00) and should be identified by "***". LINK PLU no. 5 should
have a fixed price of € 3.30 and be assigned to Department 9. Tax rate 1 applies. There were 150 pieces in
stock at the time of programming.
Input
Initiate programming the LINK PLU:
=linkPLU
[0 ]
[
#
1- 1
FREE CODE
]
0.00
PRICE1
0.00
PRICE2
0
TAX GROUP
0
LINK DEPT
00
STATUS
SAVE...…
DELETE…
Entering the LINK PLU number:
#
[0 ]
FREE CODE
[5 ]
FREE CODE
Programming the LINK PLU name:
#
12x then #
12x then #
12x then #
#
[
]
*
**
***
[***
]
Programming LINK PLU price 1:
#
0.00
PRICE1
3.30
PRICE1
0.00
PRICE2
0.00
PRICE2
Programming LINK PLU price 2:
#
- Continued on next page -
Olympia
2011
Page 56
Specifications subject to change without notice!
Cash Register CM 940-F / 941-F / 942-F
- Continued Input
Display
Assigning a tax rate
#
0
TAX GROUP
1
TAX GROUP
0
LINK DEPT
9
LINK DEPT
Assigning a department :
#
Defining the LINK PLU status:
#
00
STATUS
00
STATUS
Saving and ending programming the LINK PLU:
#
"
6.6.3
SAVE...
Navigating in the LINK PLU
●
Use the ┣↑┫ and ┣↓┫ keys to move to the top line and then press the ┣CASH┫ key several times to switch between the
LINK PLU memory locations.
●
Press the ┣DP-SHIFT┫ key to access the same position in the next programmed LINK PLU.
6.6.4
Deleting a LINK PLU
1.
2.
Set the key to PRG
Select programme number 04 (see Chapter 6.1.2).
3.
Press the ┣CASH┫ key to confirm the selection.
4.
Use the ┣↑┫ and ┣↓┫ keys to move to the input area for the LINK PLU number.
5.
Enter the number of the LINK PLU to be deleted.
6.
Use the ┣↑┫ and ┣↓┫ keys to select DELETE…
7.
Press the ┣CASH┫ key to confirm the selection.
8.
Continue the deleting process by pressing the ┣CASH┫ key or cancel the process by pressing the
┣SUB-TOTAL┫ key.
Olympia
2011
Page 57
Specifications subject to change without notice!
Cash Register CM 940-F / 941-F / 942-F
6.6.5
Programming LINK PLUs using the PC
In order to programme LINK PLUs using the PC programme, OLYMPIA ECR System provides the following input mask.
They way to use the mask is described in Chapter 5, in detail in Chapter 5.5.
Fig. 16
Important: *** After data has been transferred to the cash register, the software requires it is switched off briefly! ***
Olympia
2011
Page 58
Specifications subject to change without notice!
Cash Register CM 940-F / 941-F / 942-F
6.7
Clerk system
The clerk system serves to assign transactions to the individual clerks and is designed for a maximum of 16 clerks. When
the clerk system is active, clerks must log on to the cash register with their clerk number and clerk password (pass code).
When the machine leaves the factory, the clerk system is not active.
6.7.1
Programmable contents
The following features must or can be programmed or defined for each clerk or clerk number:
6.7.1.1
Clerk name
You can programme individual clerk names (max. 18 characters). This programming step is optional. On leaving the
factory, the clerk numbers 01 to 16 are programmed instead of individual clerk names.
6.7.1.2
Clerk password (pass code)
You can programme a 6-digit pass code for each clerk which the clerk must then use to log on to the cash register. The
clerk pass code may only comprise digits and be between 000001 and 999999.
Note:
Programme 000000 if no clerk password is required.
6.7.1.3
Commission
Commission rate
The commission rate defines the percentage rate of the basic amount which a clerk receives as commission.
The commission rate can be maximally a 2-digit number and must be entered without a decimal point.
Note:
Commission factor
The commission factor defines the basis for calculating the commission:
Basis for commission calculation
Commission factor code
Gross sales
0
Net sales
1
Olympia
2011
Page 59
Specifications subject to change without notice!
Cash Register CM 940-F / 941-F / 942-F
6.7.1.4
Clerk attributes / Clerk rights
You can assign each clerk various attributes in three steps via the cash register. These attributes determine which
functions may be executed by a clerk. There are three different status numbers with which to programme clerk attributes.
Each status number is a 2-digit number. Each digit in a status number can be between 0 and 7 according to the tables
below.
The default settings appear in bold print.
Note:
Status number 1
Status code 1
Clerk attributes:
0
Prohibit [RETURN]
1
Status code 2
2
X
Prohibit [VOID]
3
4
X
X
5
6
Clerk attributes:
X
Prohibit print X-reports
X
X
Prohibit print Z-reports
X
X
Prohibit "PAID OUT"
X
X
Prohibit [NO SALE]
7
X
X
0
1
2
X
3
4
X
X
5
6
X
X
7
X
X
X
X
X
X
X
4
5
6
7
Status number 2
Status code 1
Clerk attributes:
0
Prohibit "monthly Z report"
1
Status code 2
2
X
(reserved)
3
4
X
X
5
6
Clerk attributes:
X
Access to all tables
(manager)*
X
X
(reserved)
X
X
(reserved)
X
X
(reserved)
7
X
X
0
1
2
X
3
X
X
X
X
X
X
X
X
X
X
X
* One clerk with this right has access to all operations; he is a manager.
Status number 3
Status code 1
Clerk attributes:
Training permitted
(reserved)
Prohibit print all X-reports
accumul.
0
1
Status code 2
2
X
3
4
X
X
5
6
7
Clerk attributes:
X
Prohibit print other all
clerks at Clerk report
X
X
(reserved)
X
X
(reserved)
X
X
X
X
0
1
2
X
3
4
X
X
5
6
X
X
X
X
7
X
X
X
X
X
Note:
● By default, all rights are enabled for all clerks (status numbers 1 to 3 are set to 00).
● To disable all rights for one clerk, enter 77 for all status numbers.
● Training (status number 3, status code 1)
● When Training mode is active (see Chapter 9), all the cash register operations can be practised without the
entries being assigned to the sales and cash register reports. The operations which have been practised are only
saved in the Training report (see Chapter 11.2). This feature is used to define who may use Training mode.
● To switch the Training text off or on, programme system option 14 accordingly (status code 1) (see Chapter 6.15).
Olympia
2011
Page 60
Specifications subject to change without notice!
Cash Register CM 940-F / 941-F / 942-F
6.7.2
Programming clerks
Example:
The name "Eva" must be programmed for clerk no. 2. Her pass code must be set to 222222. Clerk no. 2
should receive a commission of 3% of the net sales and be assigned all clerk rights except that for printing Zreports.
1.
2.
Set the key to PRG
Select programme number 06
(refer to Chapter 6.1.2).
Press the ┣CASH┫ key to confirm
the selection.
The first clerk appears in the display.
Input
Display
=CLERK
[01
3.
1- 1=
]
PASS CODE
0
#0
COMM.RATE%
COMM.FACTOR
00
STATUS1
00
STATUS2
00
STATUS3
SAVE...
4.
5.
6.
7.
Use the ┣CASH┫ key to switch to
the required clerk memory location.
Use the ┣↑┫ and ┣↓┫ keys to
move to the input area for the
clerk name.
Press the ┣CASH┫ key to confirm
the selection.
Delete the existing text.
8.
Enter the clerk name (text input,
refer to Chapter 6.2).
9.
Conclude text input by pressing
the ┣CASH┫ key.
10. The cash register automatically
switches to the PASS CODE input area.
11. Enter the current password (default setting: 000000).
Note:
Always enter the
password as a 6-digit
number!
12. Press the ┣CASH┫ key to confirm
the input.
#
CLERK
[02
2- 1=
]
#
2x then #E
6x then #Ev
4x then #Eva
# [Eva
#
]
PASS CODE
******
PASS CODE
- Continued on next page -
Olympia
2011
Page 61
Specifications subject to change without notice!
Cash Register CM 940-F / 941-F / 942-F
- Continued 13. Enter a new 6-digit password in
the NEW CODE input area (digits
only).
14. Press the ┣CASH┫ key to confirm
the input.
The cash register automatically
switches to the next input area.
15. Repeat password input in the
Confirm CODE input area.
16. Press the ┣CASH┫ key to confirm
the input.
The cash register indicates the storing
process in the display and then
automatically switches to the COMM.
RATE% input area .
17. Enter the commission rate (without decimal places).
18. Press the ┣CASH┫ key to confirm
the input.
The cash register automatically
switches to the COMM. FACTOR
input area.
19. Enter the code for the commission factor.
20. Press the ┣CASH┫ key to confirm
the input.
The cash register automatically
switches to the STATUS1 input area.
21. Enter the 2-digit status number 1.
22. Press the ┣CASH┫ key to confirm
the input.
The cash register automatically
switches to the STATUS2 input area.
23. Enter the 2-digit status number 2.
24. Press the ┣CASH┫ key to confirm
the input.
The cash register automatically
switches to the STATUS3 input area.
#
#
******
NEW CODE
******
Confirm CODE
0
COMM.RATE%
#
3
COMM.RATE%
0
COMM.FACTOR
1
COMM.FACTOR
#
#
#
00
STATUS1
02
STATUS1
00
STATUS2
10
STATUS2
00
STATUS3
- Continued on next page -
Olympia
2011
Page 62
Specifications subject to change without notice!
Cash Register CM 940-F / 941-F / 942-F
- Continued -
#
25. Enter the 2-digit status number
3.
26. Press the ┣CASH┫ key to confirm
the input.
Note:
00
STATUS3
When a feature is
already programmed as
required, you can skip
the programming step.
Saving and concluding clerk programming:
6.7.3
27. Confirm SAVE… by pressing the
┣CASH┫ key.
#
28. Continue programming for other
clerks or conclude the clerk programming process by pressing
the ┣SUB-TOTAL┫ key.
"
Save...!!
Please Continue...
Activating/Deactivating the clerk system
The clerk system is activated/deactivated using system option 3 (status code 2) (see Chapter 6.15).
1.
2.
Set the key to PRG
Select programme number 13
(see Chapter 6.1.2).
3.
Press the ┣CASH┫ key to confirm
the selection.
4.
Use the digit keys to enter ┣ 3 ┫.
5.
Use the ┣↑┫ and ┣↓┫ keys to
access the input area.
6.
Enter the status code ┣43┫ to activate the clerk system (while retaining the other features in their
default setting).
Or:
7.
Enter the status code ┣47┫ to deactivate the clerk system.
8.
Press the ┣CASH┫ key to confirm
the input.
9.
Note:
Olympia
Conclude programming by pressing the ┣SUB-TOTAL┫ key.
Input
Display
=P REGISTER
#[32]
#
"
1- 1=
STATUS NO.Mx-My
=P REGISTER
3- 1=
[47]
STATUS NO.Mx-My
[43]
STATUS NO.Mx-My
or
[47]
STATUS NO.Mx-My
Save...!!
Please Continue...
When the cash register is switched on the next time, each clerk must log on to the cash register immediately.
2011
Page 63
Specifications subject to change without notice!
Cash Register CM 940-F / 941-F / 942-F
6.7.4
Logging on to the cash register as a clerk
Example:
Clerk no. 2 (clerk name = Eva, clerk number = 2, clerk pass code = 222222) logs on to the cash register.
In all key
switch
positions
Input
1.
Enter the clerk number (1, 2, 3,
… or 16).
Press the ┣CLERK┫ or ┣CASH┫ key
to confirm the entry.
If a pass code has been programmed,
you are now requested to enter it.
2.
3.
Enter the 6-digit clerk pass code.
4.
Press the ┣CASH┫ key to confirm
the input.
Note:
Note:
Olympia
Display
When Registration mode
is active, the
programmed clerk name
appears in the display for
a brief moment.
#
#
Log In Failed!!
No Authority
Please Continue...
CLERK NO.
Password:
Eva
System option 4 (status code 2) can be used to define whether a clerk must log on to the cash register again
each time after concluding a transaction. The default setting of the cash register is such that a clerk remains
logged on to the cash register until the key switch is set to OFF.
2011
Page 64
Specifications subject to change without notice!
Cash Register CM 940-F / 941-F / 942-F
6.7.5
Programming clerks using the PC
In order to programme clerks using the PC programme, OLYMPIA ECR System provides the following input mask. They
way to use the mask is described in Chapter 5, in detail in Chapter 5.5.
Fig. 17
Important: *** After data has been transferred to the cash register, the software requires it is switched off briefly! ***
Olympia
2011
Page 65
Specifications subject to change without notice!
Cash Register CM 940-F / 941-F / 942-F
6.8
Programming tender media identification
The tender media defines the method of payment for a purchase. There are five different tender media.
The two most common tender media are already provided as keys on the keyboard:
●
┣CASH┫
●
┣CARD┫
The following tender media can also be set up on the keyboard:
●
┣CHEQUE┫
●
┣CREDIT 1┫
●
┣CREDIT 2┫
The names of the tender media are used on the receipts and cash register reports and can be reprogrammed, if
necessary:
Example:
Tender medium 4 "CREDIT 2“ should be renamed "XYZ".
1.
2.
Set the key to PRG.
Select programme number 08
(see Chapter 6.1.2).
3.
Press the ┣CASH┫ key to confirm
the selection.
4.
Select the tender medium required: Switch between the various tender media by pressing
the ┣CASH┫ key.
5.
Use the ┣↑┫ and ┣↓┫ keys to
access the input area.
6.
Press the ┣CASH┫ key to confirm
the selection.
Delete the existing text.
7.
8.
Enter the new tender name (text
input, refer to Chapter 6.2).
9.
Conclude text input by pressing
the ┣CASH┫ key.
The STATUS field is
reserved by the software
and cannot/must not be
reprogrammed!
10. Conclude programming by pressing the ┣SUB-TOTAL┫ key.
Input
=TENDER MEDIA
#[CASH
2011
1- 1=
]
[ 00]
=TENDER MEDIA
[CREDIT 2
4x #
[CREDIT 2
# CREDIT 2
2x then #X
3x then #XY
XYZ
4x then #
# [XYZ ]
Note:
Olympia
Display
STATUS
4- 1=
]
]
"
Page 66
Specifications subject to change without notice!
Cash Register CM 940-F / 941-F / 942-F
6.8.1
Programming tender media identification using the PC
In order to programme tender media identification using the PC programme, OLYMPIA ECR System provides the
following input mask. They way to use the mask is described in Chapter 5, in detail in Chapter 5.5.
Fig. 18
Important: *** After data has been transferred to the cash register, the software requires it is switched off briefly! ***
Olympia
2011
Page 67
Specifications subject to change without notice!
Cash Register CM 940-F / 941-F / 942-F
6.9
Programming an amount-related surcharge (+)
This function programs a fixed amount for the surcharge.
Note:
When the cash register is in its default setting, the key for the fixed amount surcharge is not set-up on the
keyboard. The way in which to reprogram the keyboard is described in Chapter 6.28.
Example:
A fixed surcharge of € 6.- must be programmed.
1.
2.
Set the key to PRG.
Select programme number 09
(see Chapter 6.1.2).
3.
Press the ┣CASH┫ key to confirm
the selection.
4.
5.
6.
7.
6.9.1
Use the ┣↑┫ and ┣↓┫ keys to
move to the [ ] ADD ON+ input
area.
Use the digit keys to enter the
amount of the surcharge (with
decimal point and decimal
places).
Press the ┣CASH┫ key to confirm
the selection.
Conclude programming by pressing the ┣SUB-TOTAL┫ key.
Input
Display
=Key +/-
#[
1=
0.00]
ADD ON+
[
0.00]
DISCOUNT-
[
0.00]
ADD ON+
[
6.00]
ADD ON+
#
"
Save...!!
Please Continue...
Programming an amount-related surcharge (+) using the PC
In order to programme amount-related or percentage surcharges and discounts using the PC, OLYMPIA ECR System
provides the following input mask. It is used to programme various parameter settings. They way to use the mask is
described in Chapter 5, in particular Chapter 5.5.
Fig. 19
Important: *** After data has been transferred to the cash register, the software requires it is switched off briefly! ***
Olympia
2011
Page 68
Specifications subject to change without notice!
Cash Register CM 940-F / 941-F / 942-F
6.10
Programming an amount-related discount (-)
This function programs a fixed amount for the discount.
Note:
When the cash register is in its default setting, the key for the fixed amount discount is not set-up on the
keyboard. The way in which to reprogram the keyboard is described in Chapter 6.28.
Example:
A fixed discount of € 1.- must be programmed.
1.
2.
Set the key to PRG
Select programme number 09
(see Chapter 6.1.2).
3.
Press the ┣CASH┫ key to confirm
the selection.
4.
5.
6.
7.
6.10.1
Use the ┣↑┫ and ┣↓┫ keys to
move to the [ ] DISCOUNTinput area.
Use the digit keys to enter the
amount of the discount (with
decimal point and decimal
places).
Press the ┣CASH┫ key to confirm
the input.
Conclude programming by pressing the ┣SUB-TOTAL┫ key.
Input
Display
=Key +/-
#[
1=
0.00]
ADD ON+
[
0.00]
DISCOUNT-
[
0.00]
DISCOUNT-
[
1.00]
DISCOUNT-
#
"
Save...!!
Please Continue...
Programming an amount-related discount (-) using the PC
See Chapter 6.9.1.
Olympia
2011
Page 69
Specifications subject to change without notice!
Cash Register CM 940-F / 941-F / 942-F
6.11
Programming a percentage surcharge (%+)
This function programs a surcharge as a percentage value.
Example:
A percentage value of 10% must be programmed for the surcharge.
1.
2.
Set the key to PRG.
Select programme number 10
(see Chapter 6.1.2).
3.
Press the ┣CASH┫ key to confirm
the selection.
4.
5.
6.
7.
6.11.1
Use the ┣↑┫ and ┣↓┫ keys to
move to the [ ] ADD ON% input
area.
Use the digit keys to enter the
percentage value for the surcharge (with decimal point and
decimal places, value between
0.01 and 99.99).
Input
Display
=Key +/-
1=
#[
0.00]
ADD ON%
[
0.00]
DISCOUNT%
[
0.00]
ADD ON%
[
2.00]
ADD ON%
#
"
Press the ┣CASH┫ key to confirm
the input.
Conclude programming by pressing the ┣SUB-TOTAL┫ key.
Save...!!
Please Continue...
Programming a percentage surcharge (+) using the PC
See Chapter 6.9.1.
6.12
Programming a percentage discount (-%)
This function programs a discount as a percentage value.
Example:
A percentage value of 5% must be programmed for the discount.
1.
2.
Set the key to PRG.
Select programme number 10
(see Chapter 6.1.2).
3.
Press the ┣CASH┫ key to confirm
the selection.
4.
5.
6.
7.
6.12.1
Use the ┣↑┫ and ┣↓┫ keys to
move to the [ ] DISCOUNT%
input area.
Use the digit keys to enter the
percentage value for the discount
(with decimal point and decimal
places, value between 0.01 and
99.99).
Press the ┣CASH┫ key to confirm
the input.
Conclude programming by pressing the ┣SUB-TOTAL┫ key.
Input
Display
=Key +/-
1=
#[
0.00]
ADD ON%
[
0.00]
DISCOUNT%
[
0.00]
DISCOUNT%
[
5.00]
DISCOUNT%
#
"
Save...!!
Please Continue...
Programming a percentage discount (%-) using the PC
See Chapter 6.9.1.
Olympia
2011
Page 70
Specifications subject to change without notice!
Cash Register CM 940-F / 941-F / 942-F
6.13
Programming the training pass code
You can enter a 6-digit password (pass code) for Training mode which must then be entered each time a clerk wants to
operate the cash register in Training mode.
Example:
123456 should be programmed as the training code.
1.
2.
Set the key to PRG.
Select programme number 11
(see Chapter 6.1.2).
3.
Press the ┣CASH┫ key to confirm
the selection.
4.
Enter the existing code (default
setting 000000) in the TRAINING
CODE input area.
Note:
5.
6.
Always enter the pass
code as a 6-digit number!
Press the ┣CASH┫ key to confirm
the input.
Enter a new 6-digit code in the
NEW CODE input area (digits
only).
7.
Press the ┣CASH┫ key to confirm
the input.
8.
Repeat the pass code input in
the CONFIRM CODE input area.
Input
=PASS CODE
Press the ┣CASH┫ key to confirm
the input.
10. Conclude clerk programming by
pressing the ┣SUB-TOTAL┫ key.
Olympia
2011
1=
#
TRAINING CODE
#
******
TRAINING CODE
******
New CODE
******
Confirm CODE
New CODE
#
#
"
9.
Display
Page 71
Save...!!
Please Continue...
Specifications subject to change without notice!
Cash Register CM 940-F / 941-F / 942-F
6.13.1
Programming the training pass code using the PC
In order to programme a Training pass code using the PC programme, OLYMPIA ECR System provides the following
input mask. It is used to programme various parameter settings. They way to use the mask is described in Chapter 5, in
detail in Chapter 5.5.
Fig. 20
Important: *** After data has been transferred to the cash register, the software requires it is switched off briefly! ***
Olympia
2011
Page 72
Specifications subject to change without notice!
Cash Register CM 940-F / 941-F / 942-F
6.14
Programming the machine number
The cash register can be assigned a 4-digit machine number which is then printed on all receipts and reports.
Note:
If the machine number is 0000, no number is printed.
Example:
5555 should be programmed as the machine number.
1.
2.
Set the key to PRG.
Select programme number 12
(see Chapter 6.1.2).
3.
Press the ┣CASH┫ key to confirm
the selection.
Enter the machine number using
the numeric keys.
4.
5.
6.
6.14.1
Input
Display
=MACHINE NUMBER
#[0000 ]
- 1=
[5555]
Press the ┣CASH┫ key to confirm
the input.
#
Conclude programming by pressing the ┣SUB-TOTAL┫ key.
"
Save...!!
Please Continue...
Programming the machine number using the PC
In order to programme the machine number (Machine’s ID) using the PC programme, OLYMPIA ECR System provides
the following input mask. It is used to programme various parameter settings. They way to use the mask is described in
Chapter 5, in detail in Chapter 5.5.
Fig. 21
Important: *** After data has been transferred to the cash register, the software requires it is switched off briefly! ***
Olympia
2011
Page 73
Specifications subject to change without notice!
Cash Register CM 940-F / 941-F / 942-F
6.15
System options
65 different cash register features can be set using the system options. When the cash register leaves the factory, the
system options are set for normal cash register operation (digits below in bold print).
Programming of the individual features has been arranged in 14 system options. Up to 6 different features can be
programmed for each system option . Each system option is unambiguously defined by means of a 2-digit number (status
number): Both the first as well as the second status number can be assigned a value from 0 and 7. The correct 2-digit
status number can be found in Chapter "System Options in Detail".
Note: The arrangement of features in system options means that it is essential that all the features related to a system
option are programmed even if you only want to change one feature!
Note: Certain system options which are not assigned a feature are defined as "reserved" areas by the software.
6.15.1
System options in detail
Note:
The default settings appear in bold print.
Note:
Generally speaking, the system options need not be changed when the cash register is used normally.
System option 1: Defining the content of receipts/bills
Status code 1
Features:
0
Print tax amount, total tax,
net total on receipt
1
Status code 2
2
X
Print net amount on receipt
3
4
X
X
5
7
Features:
X
Print free code (EAN) on
receipt
X
X
Print date on receipt
X
X
Print time on receipt
X
X
Print tax symbol on receipt
6
X
X
0
1
2
X
3
4
X
X
5
6
X
X
7
X
X
X
X
X
X
X
4
5
6
7
System option 2: Defining the content of receipts/bills
Status code 1
Features:
(reserved)
Print receipt number on
receipt
Print [SUB-TOTAL] amount
after push this key
Olympia
2011
0
1
Status code 2
2
X
3
4
X
X
5
7
Features:
X
Print item counter on
receipt
X
X
Print logo message on
receipt
X
X
Print clerk name on receipt
6
X
X
X
X
Page 74
0
1
2
X
3
X
X
X
X
X
X
X
X
X
X
X
Specifications subject to change without notice!
Cash Register CM 940-F / 941-F / 942-F
System option 3
Status code 1
Features:
0
Reset Z1 counter after Z1
report
1
Status code 2
2
X
Reset Z2 counter after Z2
report
3
4
X
X
5
7
Features:
X
Reset Z1 counter after Zreport day
X
X
Sale zero price PLU enable
X
X
Clerk system not active
X
X
Reset GT1 counter after Z1
report
6
X
X
0
1
2
X
3
4
X
X
5
6
X
X
7
X
X
X
X
X
X
X
4
5
6
7
System option 4
Status code 1
Features:
0
Not printing zero skipped at
Z-reports
1
Status code 2
2
X
Print copy receipt is
enabled
3
4
X
X
5
7
Features:
X
12 hr indication on receipt
X
X
Register clerk at each
transaction
X
X
+%/-% calculated for
DPT/PLU items only, SUBTOTAL no
X
X
+% / -% calculated for
DPT/PLU after SUBTOTAL only
6
X
X
0
1
2
X
3
X
X
X
X
X
X
X
X
X
X
X
4
5
6
7
System option 5
Status code 1
Features:
0
Price level will stay after
transaction
1
Status code 2
2
X
Print the departments
3
4
X
X
5
7
Features:
X
Base currency EURO
print too [FC1]
X
X
(reserved)
X
X
(reserved)
X
X
(reserved)
6
X
X
0
1
2
X
3
X
X
X
X
X
X
X
X
X
X
X
4
5
6
7
System option 6
Status code 1
Features:
(reserved)
(reserved)
(reserved)
Olympia
2011
0
1
Status code 2
2
X
3
4
X
X
5
6
7
Features:
X
Print FC sub-total on
receipt
X
X
Print FC change on receipt
X
X
Print FC rate on receipt
X
X
X
X
Page 75
0
1
2
X
3
X
X
X
X
X
X
X
X
X
X
X
Specifications subject to change without notice!
Cash Register CM 940-F / 941-F / 942-F
System option 7
Status code 1
Features:
0
Tax amount is printed after
tender amount
1
Status code 2
2
X
Only print total tax amount
on receipt
3
4
X
X
5
7
Features:
X
Not print net and tax
amount together
X
X
(reserved)
X
X
Print graphical logo on
receipt
X
X
No printout of tax rate on
receipt
6
X
X
0
1
2
X
3
4
X
X
5
6
X
X
7
X
X
X
X
X
X
X
4
5
6
7
System option 8
Status code 1
Features:
0
(reserved)
1
Status code 2
2
4
X
X
Activate "Orders receipt"
"Single tickets" for direct
sales
3
X
5
X
X
(reserved)
6
X
X
7
Features:
X
Electronic ring journal
(otherwise only normal
electronic journal)
X
X
X
X
0
1
2
X
Electronic journal
X
X
Deactivated
3
X
X
"Returns" do not reduce
counter on paid tables
X
X
X
X
X
X
X
4
5
6
7
System option 9
Status code 1
Features:
0
Open track in transaction
1
Status code 2
2
X
Print orders and ticket on
internal printer
3
4
X
X
5
7
Features:
X
Enable kitchen printer
X
X
(reserved)
X
X
Print on internal printer in
case of error on kitchen
printer
X
X
(reserved)
6
X
X
0
1
2
X
3
X
X
X
X
X
X
X
X
X
X
X
4
5
6
7
System option 10
Status code 1
Features:
Check open table Z-report
issued first
(reserved)
Print price on "Orders
receipt"
Olympia
2011
0
1
Status code 2
2
X
3
4
X
X
5
6
7
Features:
X
Identical items not added
on order
X
X
Print PLU no. on order
receipt and kitchen printer
X
X
Print PLU price on order
receipt and kitchen printer
X
X
X
X
Page 76
0
1
2
X
3
X
X
X
X
X
X
X
X
X
X
X
Specifications subject to change without notice!
Cash Register CM 940-F / 941-F / 942-F
System option 11
Status code 1
Features:
0
Print subtotal on order
receipt
1
Status code 2
2
X
Stock PLU counter is
disabled
3
4
X
Tax calculation after
transaction
6
7
Features:
X
Print graphical logo on
order receipt
X
X
Print logo text on order
receipt
X
X
Basic level keyboard reset
after PLU registration
X
X
X
5
X
X
0
1
2
X
3
4
X
X
5
6
X
X
7
X
X
X
X
X
X
X
4
5
6
7
System option 12
Status code 1
Features:
0
Print quantity on X/Z report
1
Status code 2
2
X
(reserved)
3
4
X
X
5
7
Features:
X
Not print zero price PLU at
invoice
X
X
(reserved)
X
X
Display Sleep mode not
active
X
X
Kitchen printer active for
direct sale
6
X
X
0
1
2
X
3
X
X
X
X
X
X
X
X
X
X
X
4
5
6
7
System option 13
Status code 1
Features:
0
Add tax 1 and tax 3
1
Status code 2
2
4
X
X
(reserved)
3
X
5
7
Features:
X
Dallas keys active
X
X
(reserved)
X
X
Reset Z-counters, delete
after all reports
X
X
Beep off
6
X
X
0
1
2
3
X
X
X
X
X
X
X
X
X
X
X
X
4
5
6
7
System option 14
Status code 1
Features:
No "Training" print
(reserved)
Enable WIND motor journal
(journal mode)
Olympia
2011
0
1
Status code 2
2
3
4
X
X
X
5
6
7
Features:
X
(reserved)
X
X
Print item price on order
X
X
Print total sales
with open tables
X
X
X
X
Page 77
0
1
2
X
3
X
X
X
X
X
X
X
X
X
X
X
Specifications subject to change without notice!
Cash Register CM 940-F / 941-F / 942-F
6.15.2
Programming system options
Tip: Before starting with programming, take your time to consider how you want to programme the individual features and
note down the 2-digit status number which needs to be entered.
1.
2.
Set the key to PRG.
Select programme number 13
(see Chapter 6.1.2).
Press the ┣CASH┫ key to confirm
the selection.
The first system option and its current
status appear in the display.
3.
Display
=P REGISTER
#[32]
1- 1=
STATUS NO.Mx-My
4.
Enter the number of the system
option to be programmed, e.g.
13.
=P REGISTER
5.
Use the ┣↑┫ and ┣↓┫ keys to
move to the [ ] input area.
Enter the required 2-digit status
number, e.g. 51 (to switch off the
key tone).
[10]
STATUS NO.Mx-My
[51]
STATUS NO.Mx-My
Press the ┣CASH┫ key to confirm
the input.
Conclude programming by pressing the ┣SUB-TOTAL┫ key.
#
"
6.
7.
8.
6.15.3
Input
Printing the system options
1.
2.
Set the key to PRG.
Programme number 90 is
automatically selected
(see Chapter 6.1.2).
Press the ┣CASH┫ key to confirm
the selection.
The display shows what can be
printed.
3.
Input
Display
=SETTINGS-PRG
#
-90=
90.PRINT PROG DUMP
=PRINT PRG DUMP
– 1=
DEPARTMENT
PLU
LINK PLU
CLERK
TENDER MEDIA
…
4.
5.
Olympia
2011
Use the ┣↑┫ and ┣↓┫ keys to
select P-REGISTER.
Press the ┣CASH┫ key to confirm
the selection.
#
Page 78
=PRINT PRG DUMP
– 10=
P REGISTER
Specifications subject to change without notice!
Cash Register CM 940-F / 941-F / 942-F
6.15.4
Programming system options using the PC
In order to programme system options (P-Register) using the PC programme, OLYMPIA ECR System provides the
following input mask. The way to use the mask is described in Chapter 5, in detail in Chapter 5.5.
Fig. 22
Important: *** After data has been transferred to the cash register, the software requires it is switched off briefly! ***
Olympia
2011
Page 79
Specifications subject to change without notice!
Cash Register CM 940-F / 941-F / 942-F
6.16
Example:
Programming the date and time
17.06.2011 should be programmed as the date. 13:30 should be programmed as the time.
1.
2.
Set the key to PRG.
Select programme number 14
(see Chapter 6.1.2).
3.
Press the ┣CASH┫ key to confirm
the selection.
Input
Display
=Date & Time
Date:
#
- 1=
DD/MM/YYYY
00/00/2000
Time:
HH/MM
00-00
The input area for the day's date is
already marked.
4. Enter the day's date.
The cash register automatically
switches to the input area for the
month.
5. Enter the month.
The cash register automatically
switches to the input area for the year.
DD/MM/YYYY
17/06/2011
7. Enter the hour.
The cash register automatically
switches to the input area for the
minute.
Time:
8. Enter the minute.
The cash register automatically
switches to the input area for the date.
Time:
Date:
DD/MM/YYYY
17/06/2011
HH/MM
13-00
HH/MM
13-30
Use the ┣↑┫ and ┣↓┫ keys to move to the individual input areas manually.
Save the programmed data by
pressing the ┣CASH┫ key.
#
The cash register automatically
switches back to the Programming
menu.
Olympia
Date:
9.
DD/MM/YYYY
17/06/2011
6. Enter the year.
The cash register automatically
switches to the input area for the
hour.
Note:
Note:
Date:
Save...!!
Please Continue...
For programming the date format, see Chapter 6.33.
2011
Page 80
Specifications subject to change without notice!
Cash Register CM 940-F / 941-F / 942-F
6.17
Programming foreign currencies
A maximum of 2 foreign currencies can be programmed.
Note:
If you want to operate with the second foreign currency, you must programme the ┣FC 2┫ key on the
keyboard(see Chapter 6.28). The ┣FC┫ key set-up on the keyboard at the factory only applies to foreign
currency 1!
Clarify the following before starting with the actual programming operation:
● Which foreign currency should be programmed?
● In which storage location should this foreign currency be programmed?
● What text is associated with the foreign currency (e.g. the currency abbreviation in accordance with ISO 4217)?
● What is the exchange rate (foreign currency to local currency)?
Example:
US Dollar should be programmed as the foreign currency in memory location 2. The exchange rate at the
time of programming was 1 EUR = 1.35 USD (native (local) currency = 1 EUR, foreign currency = 1.35
USD).
1.
2.
Set the key to PRG.
Select programme number 16
(see Chapter 6.1.2).
Press the ┣CASH┫ key to confirm
the selection.
The first foreign currency memory
location appears in the display.
3.
4.
Use the ┣CASH┫ key to switch to
the foreign currency memory
location.
Input
Display
FC
#[FC01
Native:
1- 1=
]
0,01
Foreign:
0,01
FC
#
[FC01
2- 1=
]
Native: 0,01
Foreign:
5.
Use the ┣↑┫ and ┣↓┫ keys to
switch to the text input area
[FC-0x
].
6.
Press the ┣CASH┫ key to confirm
the input.
Delete the existing text.
7.
8.
Enter the new foreign currency
text
(see Chapter 6.2).
9.
Conclude text input by pressing
the ┣CASH┫ key.
10. Use the ┣↑┫ and ┣↓┫ keys to
move to the Foreign input area.
11. Enter the foreign currency.
12. Press the ┣CASH┫ key to confirm
the input.
- Continued on next page -
Olympia
2011
[FC02
0,01
]
# FC02
2x then #U
4x
then #US
1x then #USD
# [USD ]
Foreign: 0.01
Foreign: 1.35
Save...!!
# Please Continue...
Page 81
Specifications subject to change without notice!
Cash Register CM 940-F / 941-F / 942-F
- Continued Input
#
"
The cash register automatically
changes to the [ ] Native: input area.
13. Enter the local currency.
14. Press the ┣CASH┫ key to confirm
the input.
15. Conclude programming by pressing the ┣SUB-TOTAL┫ key.
6.18
Display
Native:
0.01
Native:
1
Save...!!
Please Continue...
Programming printing of the X / Z reports
You can define the content of the X and Z report printouts. There are 10 different features available. There are two
different status numbers to programme the report content. Each status number is a 2-digit number. Each digit in a status
number can be between 0 and 7 according to the tables below.
6.18.1
Status numbers
Note:
The default settings appear in bold print.
Status number 1
Status code 1
Features:
0
Print Grand Total in
financial report
1
Status code 2
2
X
Print "Return" on financial
report
3
4
X
X
5
Features:
X
(reserved)
X
X
Print tax rate
X
X
Print "GROSS SALE TL"
on report financial
X
X
Print "Void" on financial
report
7
6
X
X
0
1
2
X
3
4
X
X
5
6
X
X
7
X
X
X
X
X
X
X
4
5
6
7
Note:
● Status number 1 = 77 signifies: None of the data listed is printed.
● Status number 1 = 00 signifies: All the listed data is printed.
Status number 2
Status code 1
Features:
Customer counter On
(CASH counter)
Print "Return" on clerk
report
Print "Void" on clerk report
Olympia
2011
0
1
Status code 2
2
X
3
4
X
X
5
7
Features:
X
(reserved)
X
X
Print PLU free code (EAN)
on reports
X
X
Print "ROUNDING" on
report financial
6
X
X
X
X
Page 82
0
1
2
X
3
X
X
X
X
X
X
X
X
X
X
X
Specifications subject to change without notice!
Cash Register CM 940-F / 941-F / 942-F
6.18.2
Programming status numbers
Example:
All the information should be printed on the X/Z reports:
Status number 1 = 76, status number 2 = 76.
1.
2.
Set the key to PRG.
Select programme number 18
(see Chapter 6.1.2).
Press the ┣CASH┫ key to confirm
the selection.
The current settings of the two status
numbers appear in the display.
3.
4.
5.
6.
7.
8.
9.
Use the ┣↑┫ and ┣↓┫ keys to
move to the [ ] STATUS1 input
area.
Enter the required 2-digit status
number 1, e.g. 76.
Press the ┣CASH┫ key to confirm
the input.
Use the ┣↑┫ and ┣↓┫ keys to
move to the [ ] STATUS2 input
area.
Enter the required status number
2, e.g. 76.
Press the ┣CASH┫ key to confirm
the input.
10. Conclude programming by pressing the ┣SUB-TOTAL┫ key.
Olympia
2011
Input
Display
PRINT DATA X/Z
#[00]
0- 1=1
STATUS1
[00] STATUS2
#
#
"
Page 83
[00] STATUS1
[76] STATUS1
Save...!!
Please Continue...
[00] STATUS2
[76] STATUS2
Save...!!
Please Continue...
Specifications subject to change without notice!
Cash Register CM 940-F / 941-F / 942-F
6.18.3
Programming the content of the report printout using the PC
In order to programme content of the report printout using the PC programme, OLYMPIA ECR System provides the
following input mask. They way to use the mask is described in Chapter 5, in detail in Chapter 5.5.
Fig. 23
Important: *** After data has been transferred to the cash register, the software requires it is switched off briefly! ***
Note:
Olympia
You can alter all the system texts (see Fig. 23) in the PC programme using the options (24), (25) and (26) in
the System Setting.
2011
Page 84
Specifications subject to change without notice!
Cash Register CM 940-F / 941-F / 942-F
6.19
Programming clerk PLUs
A maximum of 60 clerk PLUs can be programmed.
Clerk PLUs are PLUs which have already been programmed (see Chapter 6.5) whose sale/revenue is automatically
saved in the system for all clerks and printed later in a X/Z clerk PLU report when the PLU has been defined as a clerk
PLU beforehand. This provides a quick view as to which clerks have sold more or less of an item compared to other
clerks.
Example:
PLU no. 22 should be defined as a clerk PLU. This programming should be assigned to memory location 3.
1.
2.
Set the key to PRG.
Select programme number 20
(see Chapter 6.1.2).
Press the ┣CASH┫ key to confirm
the selection.
The first clerk appears in the display.
3.
4.
5.
6.
7.
8.
Olympia
2011
If necessary, use the ┣CASH┫ key
to select the required memory
location (1 to 60).
Input
Display
CLERK –PLU 1
# [
#
2x
CLERK –PLU 3
0
]PLU
0
[
]PLU
[
]PLU
Use the numeric keyboard to
enter the PLU number, e.g. 22.
[
22]PLU
Press the ┣CASH┫ key to confirm
the input.
Conclude programming by pressing the ┣SUB-TOTAL┫ key.
#
"
[
22]PLU
Use the ┣↑┫ and ┣↓┫ keys to
move to the [ ] PLU input area.
Page 85
Specifications subject to change without notice!
Cash Register CM 940-F / 941-F / 942-F
6.20
Programming the RS 232 port
The cash register is equipped with 5 ports on the rear side with which to connect periphery devices (see Chapter 1).
The RS 232 serial port on the cash register serves to connect a kitchen printer or a set of scales.
6.20.1
Programmable contents and their status numbers
Status number 1
Device for connection
Status code 1
Kitchen printer, 58 mm (Epson)
1
Kitchen printer Olympia TH 200 80mm (Epson)
2
Scales
3
Status number 2
Baudrate
Status code 1
Data length
Status code 2
4800
0
7 bit
0
9600
1
8 bit
1
19200
2
38400
3
Status number 3
Parity
Status code 1
Stop bits
Status code 2
None
0
1 stop bit
0
Odd
1
2 stop bits
1
Even
2
Olympia
2011
Page 86
Specifications subject to change without notice!
Cash Register CM 940-F / 941-F / 942-F
6.20.2
Programming the RS 232 port
Example:
The RS 232 port is set-up for the connection of the Olympia/SERD TH 200 kitchen printer with a baud rate of
19,200 baud, for a data length of 7 bit, no parity and with 2 stop bits: status number 1 = 2, status number 2 =
20, status number 3 = 01.
1.
2.
Set the key to PRG.
Select programme number 23
(see Chapter 6.1.2).
3.
Press the ┣CASH┫ key to confirm
the selection.
Note:
4.
5.
6.
7.
8.
9.
Display
COM PORT
1- 1=
COM-PORTA
# [0 ]
RS232
CONNECTION
[11]
BAUDR-DATALEN
[00]
PARITY-STOPB
Press the ┣CASH┫ key to switch between 5 different ports.
Only the RS 232 port, assigned to the first slot, can be
programmed.
Use the ┣↑┫ and ┣↓┫ keys to
move to the [ ] CONNECTION
input area.
[0 ]
CONNECTION
Use the numeric keyboard to
enter the 1-digit status number,
e.g. 2.
[2 ]
CONNECTION
Press the ┣CASH┫ key to confirm
the input.
#
Use the ┣↑┫ and ┣↓┫ keys to
move to the [ ] BAUDRDATALEN input area.
[ 11 ]
BAUDR-DATALEN
Use the numeric keyboard to
enter the 2-digit status number 2,
e.g. 20.
[ 20 ]
BAUDR-DATALEN
Press the ┣CASH┫ key to confirm
the input.
#
Save...!!
Please Continue...
Save...!!
Please Continue...
10. Use the ┣↑┫ and ┣↓┫ keys to
move to the [ ] PARITIY-STOPB
input area.
[ 00]
PARITY-STOPB
11. Use the numeric keyboard to
enter the 2-digit status number 3,
e.g. 01.
[ 01 ]
PARITY-STOPB
12. Press the ┣CASH┫ key to confirm
the input.
13. Conclude programming by pressing the ┣SUB-TOTAL┫ key.
Olympia
Input
2011
#
"
Page 87
Save...!!
Please Continue...
Specifications subject to change without notice!
Cash Register CM 940-F / 941-F / 942-F
6.21
Programming tax rates
A maximum of 8 tax rates can be programmed.
Note:
The VAT tax rates 1 and 2 are preprogrammed at the factory to 19% and 7%, respectively.
Tip:
Leave one tax rate without a tax assigned. This serves for neutral sales, e.g for cigarettes when a clerk
purchases a pack from a machine as a service for a guest.
Example:
19.6% should be programmed for tax rate 3.
1.
2.
Set the key to PRG.
Select programme number 30
(see Chapter 6.1.2).
3.
Press the ┣CASH┫ key to confirm the selection.
Change the tax rate memory
location: Press the ┣CASH┫ key
until the required memory location is displayed in the logo
message line.
4.
5.
6.
7.
8.
Use the ┣↑┫ and ┣↓┫ keys to
move to the RATE% input
area.
Use the digit keys to enter the
tax rate (with decimal point and
decimal places).
Press the ┣CASH┫ key to confirm the input.
Conclude programming by
pressing the ┣SUB-TOTAL┫ key.
Input
Display
TAX GROUP
# 19.00
TAX GROUP
#
2x
RATE%
3- 1=
00.00
RATE%
0.00
RATE%
19.60
#
"
1- 1=
RATE%
Save...!!
Please Continue...
Important note: Assigning tax rates to the PLUs
The tax rate is assigned to the PLUs/departments when programming the departments. The tax totals can only be
calculated and printed on the receipt when the tax rate is actually assigned to the departments.
Olympia
2011
Page 88
Specifications subject to change without notice!
Cash Register CM 940-F / 941-F / 942-F
6.21.1
Programming tax rates using the PC
In order to programme the tax rates using the PC programme, OLYMPIA ECR System provides the following input mask.
They way to use the mask is described in Chapter 5, in detail in Chapter 5.5.
Fig. 24
Important: *** After data has been transferred to the cash register, the software requires it is switched off briefly! ***
Olympia
2011
Page 89
Specifications subject to change without notice!
Cash Register CM 940-F / 941-F / 942-F
6.22
Programming logo messages
The logo message, printed at the top of the receipt, can contain up to 8 lines and a maximum of 32 characters per line.
Four logo lines are already pre-programmed.
Note:
● If you do not want to print a logo message, you can delete the pre-programmed logo message lines.
● The way to enter texts is described in Chapter 6.2.
● Text lines which are not programmed are not printed.
● Only 20 characters of a line can be shown in the display. However, a line on the receipt may contain up to 32
characters! The display inserts a line feed in the text after 20 characters and displays the last 12 characters of the logo
message in a second line.
Note:
Only 4 logo message lines can be programmed directly using the cash register. All 8 logo message lines can
be programmed using the PC programme.
Example:
A logo should be programmed containing the text "********* WELCOME *********". The remaining preprogrammed lines should be deleted.
1.
2.
Set the key to PRG.
Select programme number 31
(see Chapter 6.1.2).
Press the ┣CASH┫ key to confirm
the selection.
The programmed logo message
appears in the display. The first logo
line is already selected.
3.
Press the ┣CASH┫ key to open
the first logo message line for
programming the text.
Note: Only 20 characters can appear
as a line in the display at one time but
32 characters are possible on the
receipt.
Input
Display
LOGO MESSAGE
-1=
********************************
CM940
# OLYMPIA
45525 Hattingen
********************************
4.
5.
Delete the existing logo message
by pressing the ┣CLR┫ key.
6.
Enter the new logo message.
7.
Press the ┣CASH┫ key to save the
input.
8.
Use the ┣↑┫ and ┣↓┫ keys to
move to the next logo line.
Continue programming the text
as described.
9.
#
********************
************
Procedure
refer to Chapter 6.2
#
********* WELCOME *********
********* WELCOME *********
etc.
10. Conclude programming by pressing the ┣SUB-TOTAL┫ key.
Olympia
2011
"
Page 90
Specifications subject to change without notice!
Cash Register CM 940-F / 941-F / 942-F
6.22.1
Programming logo messages using the PC
In order to programme logo message lines using the PC programme, OLYMPIA ECR System provides the following input
mask. They way to use the mask is described in Chapter 5, in detail in Chapter 5.5.
Fig. 25
Important: *** After data has been transferred to the cash register, the software requires it is switched off briefly! ***
Olympia
2011
Page 91
Specifications subject to change without notice!
Cash Register CM 940-F / 941-F / 942-F
6.23
Programming AD messages
The added, AD message, printed at the bottom of the receipt, can contain up to 8 lines and a maximum of 32 characters
per line.
Three end lines are already pre-programmed.
Note:
● If you do not want to print an end message, you can delete the pre-programmed message lines.
● The way to enter texts is described in Chapter 6.2.
● Text lines which are not programmed are not printed.
● Only 20 characters of a line can be shown in the display. However, a line on the receipt may contain up to 32
characters! The display inserts a line feed in the text after 20 characters and displays the last 12 characters of the AD
message in a second line.
Note:
Only 4 message lines can be programmed directly using the cash register. All 8 message lines can be
programmed using the PC programme.
Programming AD message lines is completed in the same way as for logo message lines (see Chapter 6.22). The only
difference is that program number 32 must be selected in the program menu.
1.
2.
Set the key to PRG.
Select programme number 32
(see Chapter 6.1.2).
Press the ┣CASH┫ key to confirm
the selection.
The programmed AD message
appears in the display. The first
message line is already selected.
3.
Input
Display
=AD MESSAGE
-0 1
********************************
#
THANK
YOU
********************************
For further procedure, see Chapter 6.22.
6.23.1
Programming the AD message using the PC
The procedure for programming AD messages using the PC, see Chapter 6.22.1.
Olympia
2011
Page 92
Specifications subject to change without notice!
Cash Register CM 940-F / 941-F / 942-F
6.24
Programming additional (cooking) messages
Cooking messages relate to additional information for the kitchen, e.g., how a steak should be prepared: rare, medium,
well-done etc. or whether a meal should be served with or without a side salad.
Up to 30 cooking messages can be programmed, each with a maximum of 18 characters.
Example:
Cooking messages "rare", "medium" and "well done" should be assigned to memory locations 11 to 13.
1.
2.
Set the key to PRG
Select programme number 40
(see Chapter 6.1.2).
3.
Press the ┣CASH┫ key to confirm
the selection.
4.
Use the ┣CASH┫ key to change
memory locations for the cooking
message.
5.
Use the ┣↑┫ and ┣↓┫ keys to
move to the [ ] Name input area.
6.
Press the ┣CASH┫ key to confirm
the input.
Enter the cooking message.
7.
8.
Press the ┣CASH┫ key to confirm
the input.
Use the ┣CASH┫ key to change
memory locations for the next
cooking message.
10. Repeat steps 5 to 9 until you
have programmed all the cooking
messages required.
11. End programming by pressing
the ┣SUB-TOTAL┫ key.
9.
Olympia
2011
Input
Display
cooking msg
#[
10x
#
#
cooking msg
00 10 1
]name
00 10 1
[
]name
[
]name
Procedure
refer to Chapter 6.2
#
#
cooking msg
[
00 20 1
]name
"
Page 93
Specifications subject to change without notice!
Cash Register CM 940-F / 941-F / 942-F
6.24.1
Programming cooking messages using the PC
In order to programme cooking messages using the PC programme,OLYMPIA ECR System provides the following input
mask. They way to use the mask is described in Chapter 5, in detail in Chapter 5.5.
Fig. 26
Important: *** After data has been transferred to the cash register, the software requires it is switched off briefly! ***
Olympia
2011
Page 94
Specifications subject to change without notice!
Cash Register CM 940-F / 941-F / 942-F
6.25
Programming order messages
Order receipts / order types are only available when the cash register is operated in its restaurant version
(see Chapter 6.30).
Order types ensure that PLUs with the same order number are printed on the same order message (also see Chapter
6.5.1.8). This means that all orders from guests can be printed properly sorted and are transferred to the relevant section
within the gastronomy (bar, kitchen, ice-cream parlour, cocktail bar, etc.). This ensures that no order is forgotten.
The order messages with different order numbers are printed in succession. Order message indicate the sections and
appear at the top of the order messages.
Up to 9 order messages can be programmed, each with a maximum of 18 characters.
Note:
Example:
The order message "food" should be programmed for memory location 5.
1.
2.
Set the key to PRG.
Select programme number 41
(see Chapter 6.1.2).
3.
Press the ┣CASH┫ key to confirm
the selection.
4.
Use the ┣CASH┫ key to switch to
the required memory location.
5.
Use the ┣↑┫ and ┣↓┫ keys to
move to the [ ] Name input area.
6.
Press the ┣CASH┫ key to confirm
the selection.
Enter the required order message (max. 18 characters) (see
Chapter 6.2).
7.
8.
9.
Olympia
2011
Press the ┣CASH┫ key to confirm
the input.
Conclude programming by pressing the ┣SUB-TOTAL┫ key.
Input
Display
ORDER MESSAGE
#[
4x
#
#
Procedure
refer to Chapter 6.2
#
"
Page 95
ORDER MESSAGE
1-01
]name
5-01
[
]name
[
]name
Food
[Food
]name
Specifications subject to change without notice!
Cash Register CM 940-F / 941-F / 942-F
6.25.1
Programming order messages using the PC
In order to programme order messages using the PC programme, OLYMPIA ECR System provides the following input
mask. They way to use the mask is described in Chapter 5, in detail in Chapter 5.5.
Fig. 27
Important: *** After data has been transferred to the cash register, the software requires it is switched off briefly! ***
Olympia
2011
Page 96
Specifications subject to change without notice!
Cash Register CM 940-F / 941-F / 942-F
6.26
Programming kitchen receipts
Orders can be transferred directly to the kitchen and printed on an external kitchen printer as kitchen receipts.
There are 8 different printout versions of kitchen receipts (see Chapter 6.5.1.8) which combine the printing of order
receipts and single receipts and which are transferred to a kitchen printer. With regard to these 8 versions, the default
setting is for the respective version number (KD#) to be printed at the top of the kitchen receipt.
A kitchen printer can be programmed instead of the version number, e.g. to specify the section within the kitchen in which
the food was prepared (cold food, hot food, salads, etc.).
Up to 8 kitchen printer receipts can be programmed, each with a maximum of 18 characters.
Example:
"Salads" should be programmed instead of KD#6.
1.
2.
Set the key to PRG.
Select programme number 43
(see Chapter 6.1.2).
3.
Press the ┣CASH┫ key to confirm
the selection.
4.
Use the ┣CASH┫ key to select the
required memory location (1 to
8).
5.
Use the ┣↑┫ and ┣↓┫ keys to
move to the [ ] Name input area.
6.
Press the ┣CASH┫ key to confirm
the selection.
Enter the required kitchen receipt
message (max. 18 characters)
(see Chapter 6.2).
7.
8.
Press the ┣CASH┫ key to confirm
the input.
The [ ] COM-PORT No.
area is reserved and
cannot be programmed
with this cash register
model.
Conclude programming by pressing the ┣SUB-TOTAL┫ key.
Input
Display
KITCHENPRINTER
#[
[ ]
5x
#
#
Procedure,
see Chapter 6.2
#
]name
COM-PORT No.
KITCHENPRINTER
[
[ ]
[
1- 1
6- 1
]name
COM-PORT No.
]name
Salads
[Salads
]name
Note:
9.
Olympia
2011
"
Page 97
Specifications subject to change without notice!
Cash Register CM 940-F / 941-F / 942-F
6.27
Selecting a graphical logo
You can print a graphical logo above the logo message on a receipt.
There are 23 images available for selection, see Fig. 4:
Fig. 28
1.
2.
Set the key to PRG.
Select programme number 44
(see Chapter 6.1.2).
3.
Press the ┣CASH┫ key to confirm the selection.
Enter the number of the
graphical logo you want to print
in the [ ] No. input area, e.g.
17.
4.
5.
6.
Note:
Olympia
Press the ┣CASH┫ key to confirm the input.
Conclude programming by
pressing the ┣SUB-TOTAL┫ key.
Input
Display
GRAPHIC LOGO
# [ 0]
[17]
#
"
Save...!!
- 1=
NO.
NO.
Please Continue...
In its default setting, the input area contains a zero, i.e., no graphical logo is printed.
2011
Page 98
Specifications subject to change without notice!
Cash Register CM 940-F / 941-F / 942-F
6.27.1
Programming a graphical logo using the PC
In order to programme a graphic logo using the PC programme, OLYMPIA ECR System provides the following input
mask. They way to use the mask is described in Chapter 5, in detail in Chapter 5.5.
Fig. 29
Important: *** After data has been transferred to the cash register, the software requires it is switched off briefly! ***
Olympia
2011
Page 99
Specifications subject to change without notice!
Cash Register CM 940-F / 941-F / 942-F
6.28
Programming the keyboard
You can reprogramme the keyboard according to your wants and needs.
The following keys can be programmed:
● Function keys
● Tender media keys (method of payment)
● Foreign currency keys
● DP keys
● PLU keys
● Clerk keys
● Cooking messages
6.28.1
Key codes
Each function has a 3-digit code number which identifies it uniquely. The code number is required for programming.
Code
Meaning
001*
to
999*
10
PLU keys*
1 to 999
0
Code
Function
Code
Meaning
30
DP SHIFT
50
Table
32
Change VAT
51
Keyboard shift
34
Training
53
TRANSFER
54
Separate
55
Additional text
300
to
Cooking messages
1 to 30
11
00 (Space)
12
(Delete)
329
56
Ticket on/off
13
PLU
330
57
Additional business
receipt
14
FC1
to
58
Up
15
FC2
345
59
AB
16
-
45
Clerks
64
Print size
17
+
46
CASH
70
Card
18
VOID
47
SUB-TOTAL
71
Credit 1
19
EC
48
Clear
72
Credit 2
20
RETOUR
401
73
Cheque
83
50.00
84
20.00
to
Clerk
1 to 16
Departments
1 to 99
21
X
22
Price 1 / Open price
23
Price 2
85
10.00
24
RA / -%
86
5.00
25
PO / +%
26
New Price
27
Tax 1
28
Tax 2
29
Non-taxable
499
* The programming process is slightly different from the other keys, see Chapter 6.28.2, Step 4.
Olympia
2011
Page 100
Specifications subject to change without notice!
Cash Register CM 940-F / 941-F / 942-F
6.28.2
Programming the keys
Example:
The "Training" function (code number 34) should be assigned to the key currently assigned the "Print Size"
function (code number 64).
1.
2.
Set the key to PRG.
Select programme number 45
(see Chapter 6.1.2).
3.
Press the ┣CASH┫ key to confirm
the selection.
Input
Display
=KEY-FUNCTION
[ 0]
#
[ 0]
1=
VALUE CODE
KEY BE ASSIGNED
INIT DEFAULT KEYBD.
If you want to programme a PLU key:
4.
Press the ┣CASH┫ key again.
Note:
5.
6.
Press the ┣CASH┫ key to
toggle between the
programming of function
and PLU keys.
Use the ┣↑┫ and ┣↓┫ keys to
move to the [ ] VALUE CODE
input area.
Use the digit keys to enter the
code number of the required
function, e.g. 34 (Training).
Press the ┣CASH┫ key to confirm
the input.
The display switches to the next input
area, [ ] KEY BE ASSIGNED.
7.
8.
9.
Press the ┣CASH┫ key.
=KEY-PLU
#
Olympia
KEY BE ASSIGNED
[ 0]
VALUE CODE
[ 34]
VALUE CODE
#
[ 0]
#
Pls Input
Save...!!
[ 34]
The [ ] KEY BE ASSIGNED field
displays the internal key code to
which the function has been assigned.
Note:
[ 0]
VALUE CODE
INIT DEFAULT KEYBD.
Now press the key to be assigned the new function. The
display shows:
10. Conclude programming by pressing the ┣SUB-TOTAL┫ key.
[ 0]
1=
KEY BE ASSIGNED
Redefine Key
Please Continue...
[391]
VALUE CODE
KEY BE ASSIGNED
"
Please create a suitable key label for the reprogrammed key so that other clerks clearly know what function
is assigned to the key!
2011
Page 101
Specifications subject to change without notice!
Cash Register CM 940-F / 941-F / 942-F
6.28.3
Resetting the cash register to its default settings
1.
2.
Set the key to PRG.
Select programme number 45
(see Chapter 6.1.2).
3.
Press the ┣CASH┫ key to confirm the selection.
Input
Display
=KEY-FUNCTION
#
[ 0]
[ 0]
1=
VALUE CODE
KEY BE ASSIGNED
INIT DEFAULT KEYBD.
4.
5.
6.
Olympia
2011
Use the ┣↑┫ and ┣↓┫ keys to
move to the INIT DEFAULT
KEYBD. field.
Save the programmed data by
pressing the ┣CASH┫ key.
Conclude programming by
pressing the ┣SUB-TOTAL┫ key.
#
"
Page 102
INIT DEFAULT KEYBD.
Save...!!
Please Continue...
Specifications subject to change without notice!
Cash Register CM 940-F / 941-F / 942-F
6.28.4
Programming the keyboard assignment using the PC
6.28.4.1
Programming a raised keyboard assignment using the PC
In order to programme the raised keyboard using the PC programme, OLYMPIA ECR System provides the following
input mask. They way to use the mask is described in Chapter 5, in detail in Chapter 5.5.
Fig. 30
Important: *** After data has been transferred to the cash register, the software requires it is switched off briefly! ***
Olympia
2011
Page 103
Specifications subject to change without notice!
Cash Register CM 940-F / 941-F / 942-F
6.28.4.2
Programming the flat keyboard assignment using the PC
In order to programme the flat keyboard using the PC programme, OLYMPIA ECR System provides the following input
mask. They way to use the mask is described in Chapter 5, in detail in Chapter 5.5.
Fig. 31
Important: *** After data has been transferred to the cash register, the software requires it is switched off briefly! ***
Olympia
2011
Page 104
Specifications subject to change without notice!
Cash Register CM 940-F / 941-F / 942-F
6.29
Programming Dallas keys
Dallas keys are so called unicums which operate using a 12-character code. There is only one copy of each Dallas key. In
this way, Dallas keys simultaneously offer a great deal of security and ease of operation.
Note:
To install the Dallas lock, see Chapter 14.6.
Example:
A Dallas key should be programmed for clerk no. 2.
1.
2.
Set the key to PRG.
Select programme number 46
(see Chapter 6.1.2).
3.
Press the ┣CASH┫ key to confirm the selection.
Input
Display
DALLAS KEY
#
[ 1]
5.
6.
Press the ┣CASH┫ key to move
to the Dallas key memory
location (1 to 16).
Use the ┣↑┫ and ┣↓┫ keys to
move to the [FFFFFFFFFFFF]
input area.
Hold the Dallas key on the
Dallas lock.
Press the ┣CASH┫ key to
confirm the input.
The 12-character code is read in
(e.g.: A1B2C3D4E5F6).
7.
8.
Olympia
2011
Conclude programming by
pressing the ┣SUB-TOTAL┫ key.
DALLAS KEY
#
CLERK NO.
DALLASCODE:
[FFFFFFFFFFFF
4.
1- 1
[ 2]
]
2- 1
CLERK NO.
DALLASCODE:
[FFFFFFFFFFFF
]
[FFFFFFFFFFFF
]
[A1B2C3D4E5F6
]
#
"
Page 105
Specifications subject to change without notice!
Cash Register CM 940-F / 941-F / 942-F
6.30
Defining the ECR type
The cash register can operate in different three modes according to the type of business in which it is operated:
ECR type
Feature / Speciality
Type number
Hairdresser's version
Several clerks (users) can be compiled in one bill
0
Baker's version
Several clerks (users) can operate the cash register simultaneously
1
Restaurant version
Table system can be activated
2
Example:
The cash register should be operated in its restaurant version.
1.
2.
Set the key to PRG.
Select programme number 47
(see Chapter 6.1.2).
3.
Press the ┣CASH┫ key to
confirm the selection.
Enter the type number using
the digit keys.
4.
5.
6.
6.30.1
Save the programmed data by
pressing the ┣CASH┫ key.
Conclude programming by
pressing the ┣SUB-TOTAL┫ key.
Input
Display
#
#
"
=ECR TYPE
- 1=
[0]
[2 ]
Save...!!
Please Continue...
Programming the ECR type using the PC
In order to programme the ECR type using the PC programme, OLYMPIA ECR System provides the following input
mask. It is used to programme various parameter settings. They way to use the mask is described in Chapter 5, in detail
in Chapter 5.5.
Fig. 32
Important: *** After data has been transferred to the cash register, the software requires it is switched off briefly! ***
Olympia
2011
Page 106
Specifications subject to change without notice!
Cash Register CM 940-F / 941-F / 942-F
6.31
Programming the decimal point / decimal places
You can define to how many decimal places the cash register should operate:
Appearance in display and receipt printout
No. of decimal places
1
0
1.0
1
1.00
2
1.000
3
Note:
The default setting is two decimal places.
Example:
The cash register should operate to three decimal places.
1.
2.
Set the key to PRG.
Select programme number 48
(see Chapter 6.1.2).
3.
Press the ┣CASH┫ key to
confirm the selection.
Enter the number of decimal
places required using the digit
keys.
4.
5.
6.
Olympia
2011
Save the programmed data by
pressing the ┣CASH┫ key.
Conclude programming by
pressing the ┣SUB-TOTAL┫ key.
Input
Display
#
#
"
Page 107
=DECIMAL POINT
- 1=
[2 ]
[3 ]
Save...!!
Please Continue...
Specifications subject to change without notice!
Cash Register CM 940-F / 941-F / 942-F
6.31.1
Programming the decimal places using the PC
In order to programme the number of decimal places using the PC programme, OLYMPIA ECR System provides the
following input mask. It is used to programme various parameter settings. They way to use the mask is described in
Chapter 5, in detail in Chapter 5.5.
Fig. 33
Important: *** After data has been transferred to the cash register, the software requires it is switched off briefly! ***
Olympia
2011
Page 108
Specifications subject to change without notice!
Cash Register CM 940-F / 941-F / 942-F
6.32
Programming rounding
The cash register always rounds the totals after pressing the ┣SUB-TOTAL┫ and ┣CASH┫ keys.
6.32.1
Programming rounding for received on account/paid out and for calculating tax
You can define whether calculations for receiving on account / paying out and for tax should be rounded up or down after
selecting the type of rounding required.
If no special European rounding methods are selected, the standard commercial 5/4 rounding is applied:
● If the first decimal place to be rounded is a 0, 1, 2, 3 or 4, the number is rounded down.
● If the first decimal place to be rounded is a 5, 6, 7, 8 or 9, the number is rounded up.
6.32.1.1
Programming rounding for receiving on account / paid out
Significance
Rounding code A
Always round down
0
Rounding (according to rounding method selected)
1
Always round up
2
Example:
An amount received on account or paid out should always be rounded up.
1.
2.
Set the key to PRG.
Select programme number 50
(see Chapter 6.1.2).
3.
Press the ┣CASH┫ key to
confirm the selection.
Enter the rounding code using
the digit keys.
4.
5.
6.
Olympia
2011
Save the programmed data by
pressing the ┣CASH┫ key.
Conclude programming by
pressing the ┣SUB-TOTAL┫ key.
Input
Display
#
#
"
Page 109
=ROUNDING PO-RA%- 1=
[0]
[2 ]
Save...!!
Please Continue...
Specifications subject to change without notice!
Cash Register CM 940-F / 941-F / 942-F
6.32.1.2
Programming rounding for tax calculation
Significance
Rounding code A
Always round down
0
Rounding (according to rounding method selected)
1
Always round up
2
Note:
In its default setting, rounding is always set for calculating the tax.
Example:
Amounts should always be rounded down following tax calculation.
1.
2.
Set the key to PRG.
Select programme number 51
(see Chapter 6.1.2).
3.
Press the ┣CASH┫ key to
confirm the selection.
Enter the rounding code using
the digit keys.
Save the programmed data by
pressing the ┣CASH┫ key.
4.
5.
6.
Olympia
2011
Conclude programming by
pressing the ┣SUB-TOTAL┫ key.
Input
Display
#
#
"
Page 110
=ROUNDING TAX
- 1=
[1 ]
[2 ]
Save...!!
Please Continue...
Specifications subject to change without notice!
Cash Register CM 940-F / 941-F / 942-F
6.32.2
Defining the rounding method
The rounding method defines the method applied to round amounts when the amounts must be rounded to the
programmed number of decimal places and rounding is required for amounts received/paid out and calculating tax
(rounding code A = 1).
Rounding method (special European rounding)
Rounding code B
No special European rounding
(commercial 5/4 rounding applies (see Chapter 6.32.1))
0
European rounding: Switzerland
0.01 – 0.02 = 0.00
1
0.03 – 0.07 = 0.05
0.08 – 0.09 = 0.10
Rounding 0.10
2
Rounding 0.20
3
European rounding: Sweden
0.00 – 0.24 = 0.00
4
0.25 – 0.74 = 0.50
0.75 – 0.99 = 1.00
European rounding: Denmark
0.00 – 0.12 = 0.00
0.13 – 0.37 = 0.25
5
0.38 – 0.62 = 0.50
0.63 – 0.87 = 0.75
0.88 – 0.99 = 1.00
Example:
The Swedish European rounding should be used.
1.
2.
Set the key to PRG
Select programme number 53
(see Chapter 6.1.2).
3.
Press the ┣CASH┫ key to
confirm the selection.
Enter the rounding code B
using the digit keys.
4.
5.
6.
Olympia
2011
Press the ┣CASH┫ key to confirm the input.
Conclude programming by
pressing the ┣SUB-TOTAL┫ key.
Input
Display
#
#
"
Page 111
=ROUNDING AMOUNT- 1=
[1 ]
[4 ]
Specifications subject to change without notice!
Cash Register CM 940-F / 941-F / 942-F
6.32.3
Programming rounding using the PC
In order to programme the rounding using the PC programme, OLYMPIA ECR System provides the following input mask.
It is used to programme various parameter settings. They way to use the mask is described in Chapter 5, in detail in
Chapter 5.5.
Fig. 34
Important: *** After data has been transferred to the cash register, the software requires it is switched off briefly! ***
Olympia
2011
Page 112
Specifications subject to change without notice!
Cash Register CM 940-F / 941-F / 942-F
6.33
Programming the date format
You can define how the date should be printed:
Date format
Code
Month / Day / Year (MM / DD / YYYY)
0
Day / Month / Year (DD /MM / YYYY)
1
Year / Month / Day (YYYY / MM / DD)
2
Note:
The date is set to Month / Day / Year in its default state.
Note:
For programming the date format, see Chapter 6.16.
Example:
The date should be printed in the format Year / Month / Day.
1.
2.
Set the key to PRG.
Select programme number 52
(see Chapter 6.1.2).
3.
Press the ┣CASH┫ key to
confirm the selection.
Enter the code for the date
format using the numeric
keys.
4.
5.
6.
Olympia
2011
Press the ┣CASH┫ key to
confirm the input.
Conclude programming by
pressing the ┣SUB-TOTAL┫ key.
Input
Display
#
#
"
Page 113
=DATE FORMAT
- 1=
[0]
[2 ]
Save...!!
Please Continue...
Specifications subject to change without notice!
Cash Register CM 940-F / 941-F / 942-F
6.33.1
Programming the date format using the PC
In order to programme the date format using the PC programme, OLYMPIA ECR System provides the following input
mask. It is used to programme various parameter settings. They way to use the mask is described in Chapter 5, in detail
in Chapter 5.5.
Fig. 35
Important: *** After data has been transferred to the cash register, the software requires it is switched off briefly! ***
Olympia
2011
Page 114
Specifications subject to change without notice!
Cash Register CM 940-F / 941-F / 942-F
7
Operation
The cash register must be set to Registration mode, REG, in order to operate it.
Set the key to REG
Display
17-06-2011
0.00
Note:
The following applies for the following subsections:
● the cash register is always programmed to 2 decimal places (default setting) and
● the input examples normally depict keys on a raised keyboard (for corresponding keys on the flat keyboard, see
Chapter 4.3).
7.1
Clearing error messages
In the case of input errors or exceeding limit values, the cash register indicates an error status: An acoustic signal is
issued and an "E" (Error) appears in the display. Press the ┣CLR┫ key to clear the error message.
Olympia
2011
Page 115
Specifications subject to change without notice!
Cash Register CM 940-F / 941-F / 942-F
7.2
Registering departments
Note:
Do not enter a decimal point when entering a price; the cash register automatically enters the decimal point
according to the setting defined (refer to Chapter 6.31).
Note:
If you have programmed two fixed prices for departments (see Chapter 6.4) which you also want to register,
you must program the two keys ┣PRICE1┫ and ┣PRICE 2┫ on the keyboard (see Chapter 4.3.2 and 6.28)!
Subsequently, press the ┣PRICE 1┫ or ┣PRICE 2┫ key before registering the item in order to define which fixed
price you want to register.
Important: This assignment remains for the duration of a registration process until you press the ┣PRICE 1┫
and ┣PRICE 2┫ keys to indicate a new assignment!
7.2.1
Registering a DP once using fixed price 1
Important information
● A fixed price must have been programmed for price 1 (refer to Chapter 6.4).
● If two fixed prices have been programmed (refer to Chapter 6.4), the cash register always operates with fixed price 1.
●
If you press the ┣PRICE 2┫ key, the cash register operates using fixed price 2 for the duration of the registration until
you press the ┣PRICE 1┫ key to reactivate fixed price 1.
●
After concluding a registration process, price 1 is automatically reactivated!
7.2.1.1
Items were previously registered using price 1
Example:
Department 1 should be registered with price 1.
1.
2.
Set the key to REG
Press the relevant department key.
Input
$
7.2.1.2
Items were previously registered using price 2
Example:
Department 1 should be registered with price 1.
Olympia
1.
Set the key to REG
2.
Press the ┣PRICE 1┫ key.
3.
Press the relevant department key.
2011
Input
┣PRICE 1┫
Page 116
$"
Specifications subject to change without notice!
Cash Register CM 940-F / 941-F / 942-F
7.2.2
Registering a DP once using fixed price 2
●
A fixed price must have been programmed for price 2 (refer to Chapter 6.4).
If two fixed prices have been programmed (refer to Chapter 6.4), the cash register operates with fixed price 1 by
default.
●
If you press the ┣PRICE 2┫ key, the cash register operates using fixed price 2 for the duration of the registration until
●
you press the ┣PRICE 1┫ key to reactivate fixed price 1.
●
After concluding a registration process, price 1 is automatically reactivated!
7.2.2.1
Items were previously registered using price 2
Example:
Department 1 should be registered with price 2.
1.
2.
Set the key to REG
Press the relevant department key.
Input
$
7.2.2.2
Items were previously registered using price 1
Example:
Department 1 should be registered with price 2.
1.
Set the key to REG
2.
Press the ┣PRICE 2┫ key.
3.
Press the relevant department key.
Input
┣PRICE 2┫
7.2.3
Registering a DP once without a fixed price
Example:
100.50 EUR should be registered to Department 1.
1.
2.
3.
Set the key to REG
Enter the price (without decimal point, with
decimal places).
Press the relevant department key.
$"
Input
$
7.2.4
Multiple DP registration
Example:
15 pieces of an item at a price of EUR 5.75 should be registered for Department 2.
1.
2.
Set the key to REG
Enter the quantity.
3.
Press the multiplication key ┣ X ┫.
4.
Enter the price (without decimal point, with
decimal places).
Press the relevant department key.
5.
Note:
Olympia
Input
%
The quantity of goods can a value between 1 and 9999.
2011
Page 117
Specifications subject to change without notice!
Cash Register CM 940-F / 941-F / 942-F
7.2.5
Registering identical departments
If identical items are registered (same department, same price) during the registration of departments, the registration of
identical items can be speeded up by omitting the price entry for the identical item registration directly following.
Example:
The following are to be sold:
1 x Department 1 at a price of 12.30 €,
another identical item at the identical price,
1 x Department 4 at fixed price 1,
another identical item at the identical price,
1 x Department 4 at fixed price 2 and
another identical item at the identical price.
Set the key to REG
●
Single DP registration (with
price entry):
●
Repeat
DP registration:
●
Single DP registration (with
fixed price 1):
●
Repeat
DP registration:
●
Single DP registration (with
fixed price 2):
●
Repeat
DP registration:
Input
Receipt
$
---------------------------$
Dept01
12.30T1
Dept01
12.30T1
┣PRICE 1┫ '
Dept04
10.00T1
Dept04
10.00T1
Dept04
9.00T1
'
Dept04
9.00T1
---------------------------┣PRICE 2┫ '
TAX1
19%
9.99
---------------------------TOTAL
62.60
CASH
62.60
'
#
Olympia
2011
Page 118
Specifications subject to change without notice!
Cash Register CM 940-F / 941-F / 942-F
7.2.6
Example receipt for DP registration
Example:
The following were sold:
15 pieces each at € 100.50 from Department 2,
2.6 pieces each at € 20.50 from Department 3,
1 piece from Department 4 at fixed price € 1 35.- and
1 piece from Department 4 at fixed price € 2 30.-.
Set the key to REG
Input
Receipt
"
---------------------------Dept02
15
100.50 1,507.50T2
%
Dept03
2.6
20.50
53.30T1
35.00T2
Dept04
Dept04
30.00T2
---------------------------&TAX1
19%
8.51
TAX2
7%
102.87
---------------------------┣PRICE 1┫ '
TOTAL
1,625.80
CASH
1,625.80
┣PRICE 2┫ '
#
Olympia
2011
Page 119
Specifications subject to change without notice!
Cash Register CM 940-F / 941-F / 942-F
7.3
Registering PLUs
Items (PLUs) are registered by means of PLU numbers.
Note:
The cash register can be used to process EAN-8 and EAN-13 bar codes.
Note:
If an attempt is made to register a PLU which has not been programmed, the following message appears:
NO RECORD, CONTINUE.
Note:
If you have programmed two fixed prices for PLUs (refer to Chapter 6.5), which you also want to register, you
must program the two keys ┣PRICE 1┫ and ┣PRICE 2┫ on the keyboard (refer to Chapters 4.3.2 and 6.28)!
Subsequently, press the ┣PRICE 1┫ or ┣PRICE 2┫ key before registering the item in order to define which fixed
price you want to register.
Important: This assignment remains for the duration of a registration process until you press the ┣PRICE 1┫
and ┣PRICE 2┫ key to indicate a new assignment!
7.3.1
Registering a PLU once using fixed price 1
Important information
● A fixed price must have been programmed for price 1 (refer to Chapter 6.5).
● If two fixed prices have been programmed (refer to Chapter 6.5), the cash register operates with fixed price 1 by
default.
●
If you press the ┣PRICE 2┫ key, the cash register operates using fixed price 2 for the duration of the registration until
you press the ┣PRICE 1┫ key to reactivate fixed price 1.
●
After concluding a registration process, price 1 is automatically reactivated!
7.3.1.1
Items were previously registered using price 1
Example:
PLU 3 should be registered with price 1.
1.
2.
Set the key to REG
Enter the PLU number.
3.
Press the ┣PLU┫ key.
Input
7.3.1.2
Items were previously registered using price 2
Example:
PLU 3 should be registered with price 1.
Olympia
1.
Set the key to REG
2.
Press the ┣PRICE 1┫ key.
3.
Enter the PLU number.
4.
Press the ┣PLU┫ key.
2011
Input
┣PRICE 1┫
Page 120
Specifications subject to change without notice!
Cash Register CM 940-F / 941-F / 942-F
7.3.2
Registering a PLU once using fixed price 2
Important information
● A fixed price must have been programmed for price 1 (refer to Chapter 6.5).
● If two fixed prices have been programmed (refer to Chapter 6.5), the cash register always operates with fixed price 1.
●
If you press the ┣PRICE 2┫ key, the cash register operates using fixed price 2 for the duration of the registration until
you press the ┣PRICE 1┫ key to reactivate fixed price 1.
●
After concluding a registration process, price 1 is automatically reactivated!
7.3.2.1
Items were previously registered using price 2
Example:
PLU 3 should be registered with price 2.
1.
2.
Set the key to REG
Enter the PLU number.
3.
Press the ┣PLU┫ key.
Input
7.3.2.2
Items were previously registered using price 1
Example:
PLU 3 should be registered with price 2.
7.3.3
1.
Set the key to REG
2.
Press the ┣PRICE 2┫ key.
3.
Enter the PLU number.
4.
Press the ┣PLU┫ key.
Input
┣PRICE 2┫
Registering a PLU once without a fixed price
Note:
The ┣PRICE NEW┫ key must be programmed on the keyboard (refer to Chapters 4.3.2 and 6.28).
Example:
PLU 3 should be registered at a price of € 19.99.
1.
2.
Set the key to REG
Enter the price.
3.
Press the ┣PRICE NEW┫ key.
4.
Enter the PLU number.
5.
Press the ┣PLU┫ key.
Input
┣PRICE NEW┫ 7.3.4
Registering a multiple PLU
Example:
15 pieces of an item with PLU no. 3 should be registered.
Note:
Olympia
1.
2.
Set the key to REG
Enter the quantity.
3.
Press the multiplication key ┣ X ┫.
4.
Enter the PLU number.
5.
Press the ┣PLU┫ key.
Input
The quantity of goods can a value between 1 and 9999.
2011
Page 121
Specifications subject to change without notice!
Cash Register CM 940-F / 941-F / 942-F
7.3.5
Example receipt, PLU registration
Example:
The following were sold:
1 item with PLU number 1 at fixed price 1,
2.6 items with PLU number 2 at fixed price 1 and
15 items with PLU number 1 at fixed price 2.
Set the key to REG
Input
Receipt
---------------------------
1
10.00T1
2
2.6
100.00
260.00T2
1
15
9.10
136.50T1
----------------------------19%
23.39
TAX1
TAX2
7%
17.01
----------------------------TOTAL
406.50
┣PRICE 2┫ CASH
406.50
#
7.4
Mixed sales
It is possible to register department and PLU sales on a receipt (refer to Chapters 7.2 and 7.3).
Olympia
2011
Page 122
Specifications subject to change without notice!
Cash Register CM 940-F / 941-F / 942-F
7.5
Concluding receipt / Method of payment
Payment can be made in various ways:
● CASH
● CHECK
● CARD
● CREDIT
Note:
The ┣CASH┫ and ┣CARD┫ tender media keys are provided as standard keys on the keyboard when it leaves
the factory (refer to Chapter 4). The ┣CARD┫ and ┣CREDIT┫ tender media keys can be programmed on the
keyboard if necessary (refer to Chapter 6.28).
7.5.1
Paying with cash and displaying the change
1.
2.
Set the key to REG
Complete all the registrations.
3.
Produce the subtotal by pressing the ┣SUB-TOTAL┫ key (optional).
4.
5.
The amount due for payment appears in the display.
Enter the amount received from the customer (optional process).
Note:
The raised keyboard leaves the factory with the four tender media keys ┣5.00┫, ┣10.00┫, ┣15.00┫
and ┣50.00┫ programmed to simplify entering amounts received. If you press one of these
keys, you need not enter the amount using the numeric keys.
Note:
6.
7.5.2
Press the ┣CASH┫ key.
If the amount paid by the customer is higher than the actual amount due, the cash register automatically calculates the amount of change due after pressing the ┣CASH┫ key and shows it in the display.
Payment by EC card / cheque
1.
2.
Set the key to REG
Complete all the registrations.
3.
Produce the subtotal by pressing the ┣SUB-TOTAL┫ key (optional).
4.
5.
The amount due for payment appears in the display.
Enter the amount paid by the customer with the EC card / cheque (optional).
Note:
6.
Olympia
If the customer pays exactly the right amount, you need not enter the sum paid. Continue with
Step 6.
2011
If the customer pays exactly the right amount, you need not enter the sum paid. Continue with
Step 6.
Press the ┣CHEQUE┫ key.
If the amount paid by the customer is higher than the actual amount due, the cash register automatically calculates the amount of change due after pressing the ┣CHEQUE┫ key and shows it in the display.
Page 123
Specifications subject to change without notice!
Cash Register CM 940-F / 941-F / 942-F
7.5.3
Payment by credit card
1.
2.
Set the key to REG
Complete all the registrations.
3.
Produce the subtotal by pressing the ┣SUB-TOTAL┫ key (optional).
4.
5.
The amount due for payment appears in the display.
Enter the amount paid by the customer with the card (optional).
Note:
6.
If the customer pays exactly the right amount, you need not enter the sum paid. Continue with
Step 6.
Press the ┣CARD┫ key.
If the amount paid by the customer is higher than the actual amount due, the cash register automatically calculates the amount of change due after pressing the ┣CARD┫ key and shows it in the display.
7.5.4
Payment by credit approval
Note:
The ┣CREDIT 1┫ and/or ┣CREDIT 2┫ keys first need to be programmed and set-up on the keyboard (see
Chapters 4 and 6.28).
1.
2.
Set the key to REG
Complete all the registrations.
3.
Produce the subtotal by pressing the ┣SUB-TOTAL┫ key (optional).
4.
5.
The amount due for payment appears in the display.
Enter the amount received from the customer (optional process).
Note:
6.
7.5.5
If the customer pays exactly the right amount, you need not enter the sum paid. Continue with
Step 6.
Press the ┣CREDIT 1┫ and/or ┣CREDIT 2┫.
If the amount paid by the customer is higher than the actual amount due, the cash register automatically calculates the amount of change due after pressing the ┣CREDIT 1┫ and/or ┣CREDIT 2┫ key and
shows it in the display.
Combining tender media
A bill can be paid by combining the various methods of payment.
1.
2.
Set the key to REG
Complete all the registrations.
3.
Produce the subtotal by pressing the ┣SUB-TOTAL┫ key (optional).
4.
5.
The amount due for payment appears in the display.
Enter the amount that the customer wants to pay using tender medium 1 and press the corresponding
tender media key. The remaining amount due appears in the display together with the amount paid
using tender medium 1.
Enter the amount that the customer wants to pay using tender medium 2 and press the corresponding
tender media key. The remaining amount due appears in the display and together with the amount
paid using tender medium 1+ 2.
Enter the amount that the customer wants to pay in cash and press the corresponding tender media
key.
6.
7.
Note:
Olympia
The payment made in cash should always be the last step.
2011
Page 124
Specifications subject to change without notice!
Cash Register CM 940-F / 941-F / 942-F
7.6
Payment in a foreign currency
The cash register can operate using two foreign currencies.
The cash register automatically converts the price of the registration in the currency selected and back. if necessary.
7.6.1
Paying in a foreign currency with the exact amount
Example:
A bill totalling € 37.04 in department 1 is paid to the exact amount in USD (foreign currency 1).
1.
2.
Set the key to REG.
Produce the subtotal.
3.
Press the ┣FC┫ or ┣FC 1┫ key.
The amount due for payment is
converted to the foreign currency and
appears above the local currency in
the display.
In the example: USD (50.00)
4. The customer pays the exact
amount due in the foreign currency.
5.
Press the ┣FC┫ key to conclude
the registration process.
Input
"
Dept01
37.04T1
37.04
" Subtotal:
---------------------------19%
5.91
TAX1
---------------------------TOTAL
37.04
50.00
FC CASH
USD
50.00
FC
CASH
37.04
7.6.2
Paying in a foreign currency with change
Example:
A bill totalling € 37.04 in department 1 is paid with 100 USD.
1.
2.
3.
4.
Set the key to REG.
Produce the subtotal.
Enter the foreign currency
memory location.
Press the ┣FC┫ key.
The amount due for payment is
converted to the foreign currency and
appears above the local currency in the
display.
In the example: USD (50.00)
5. Use the digit keys to enter the
amount paid by the customer in
the foreign currency.
6.
Olympia
2011
Press the ┣FC┫ key to conclude the
registration process.
Receipt
Input
Receipt
$ Dept01
37.04T1
Subtotal:
37.04
" --------------------------------------------------TAX1
19%
5.91
--------------------------------------------------TOTAL
37.04
FC CASH
50.00
USD
100.00
FC CASH
74.07
Change
37.03
FC CASH
49.99
Page 125
Specifications subject to change without notice!
Cash Register CM 940-F / 941-F / 942-F
7.6.2.1
Explanation to the receipt
FC CASH 50.00
= The amount due converted to the foreign currency.
USD 100.00
= The amount paid in the foreign currency.
FC CASH 74.07
= The amount paid converted to the local currency.
CHANGE 37.03
= The amount of change due in the foreign currency.
FC CASH 49.99
= The amount of change due in the local currency.
Note:
Please note that rounding differences can occur during the conversions.
Note:
In the financial report, the change in the local currency is deducted from the CASH amount in "TOTAL
DRAWER". The total of the foreign currency is printed in an extra line.
Olympia
2011
Page 126
Specifications subject to change without notice!
Cash Register CM 940-F / 941-F / 942-F
7.7
Registering surcharges and discounts
Surcharges and discounts can be programmed in the following ways:
● as amounts,
● as percentages,
● on individual items,
● on subtotals.
Note:
The number of surcharges and discounts as well as the corresponding total sums appear in the financial
report.
7.7.1
Registering amount-related surcharges and discounts
A fixed, pre-programmed value can be entered for amount-based and percentage surcharges and discounts (see
Chapters 6.9 to 6.12). If fixed values are programmed, no other values need be entered when registering surcharges and
discounts. If a value is entered, however, it overwrites the pre-programmed value.
Note:
The ┣ - ┫ and ┣ + ┫ keys for registering amount-related surcharges and discounts must first be set-up on the
keyboard (see Chapters 4 and 6.28).
Example:
An amount-related discount of € 2 is assigned to an item with PLU number 1. The subtotal is then produced
to which an amount-related surcharge of € 0.50 is added.
1.
2.
3.
4.
Set the key to REG.
Register the goods to which
an amount-related surcharge or discount is to be
granted.
Enter the amount-related
surcharge or discount.
Press the ┣ - ┫ or ┣ + ┫ key.
If you want to apply the amountrelated surcharge or discount to
a subtotal, press the
┣SUB-TOTAL┫ key prior to Step 3.
Input
Receipt
┣ - ┫
"
┣ + ┫
"
----------------------------1
10.00T1
DISCOUNT -2,00
Subtotal
8.00
SURCHARGE
0.50
Subtotal
8.50
----------------------------TAX1
19%
0.65
----------------------------TOTAL
8.50
CASH
8.50
#
Olympia
2011
Page 127
Specifications subject to change without notice!
Cash Register CM 940-F / 941-F / 942-F
7.7.2
Registering percentage surcharges and discounts
Example:
A percentage discount of 10% is assigned to an item with PLU number 1. The subtotal is then produced to
which a percentage surcharge of 25% is added.
1.
2.
3.
4.
Set the key to REG.
Register the goods to which a percentage surcharge or discount is to
be granted.
Enter the percentage surcharge or
discount.
Press the ┣%-RA┫ or ┣%+PO┫ key.
If you want to apply the amount-related
surcharge or discount to a subtotal,
press the ┣SUB-TOTAL┫key beforehand.
Input
Receipt
1
10.00T1
DISCOUNT%
10.0 %
-1.00
Subtotal:
9.00
" ADD ON% 25.00%
2.25
Subtotal:
11.25
----------------------------"
#
7.8
TAX1
19%
1.80
----------------------------TOTAL
11.25
CASH
11.25
Deleting input errors (corrections)
If you have made an incorrect entry but still not pressed the ┣DP SHIFT┫ or ┣PLU┫ keys, you can delete the incorrect entry
using the ┣CLR┫ key.
Olympia
2011
Page 128
Specifications subject to change without notice!
Cash Register CM 940-F / 941-F / 942-F
7.9
Error correction and void
Note:
The number of corrections and voids are recorded in the financial report.
7.9.1
EC (error correction)
If an item is registered incorrectly and nothing else has been registered in the meantime, this incorrect registration can be
cleared by means of an immediate error correction.
Example:
While registering several items, the item with PLU number 1 was incorrectly registered. Nothing else has
been registered since then. An error correction (cancellation) should be completed.
Input
1.
2.
Set the key to REG.
Register the PLUs.
3.
Press the ┣EC┫ key
directly after registering the item to be
cancelled.
4.
7.9.2
Display
Receipt
Delete !!
1
-10.00
1
Cancels:
1
10.00T1
-10.00
-10.00
Void
If an item has been registered by mistake but the receipt has not yet been concluded by pressing a tender media key, the
incorrect registration can be cancelled by means of a void. The void process is used when other items were registered
after the item to be cancelled.
Example:
Three items have been registered: PLU 1 to 3 at fixed price 1. Item 2 (PLU 2) must be cancelled (PLU 2).
Input
Display
1.
Set the key to REG.
2.
Register the PLUs.
3.
Press the ┣VOID┫ key.
4.
Use the ┣↑┫ and ┣↓┫
keys to move to the
item to be cancelled.
2. 2
Press the ┣EC┫ to
clear the item
selected.
2. 2
Press the ┣CASH┫ key
to return to the registration.
Cancel
5.
6.
3. 3
Receipt
03
1
50.00
02
1
100.00
02
1
100.00
2
-100,00
----------------------------1
10.00T1
2
100.00T2
3
50.00T2
Cancels:
2
-100.00
-100,00
----------------------------TAX1
19%
1.60
TAX2
7%
3.27
----------------------------TOTAL
60.00
CASH
640.00
Continue with the registration or conclude the receipt.
Olympia
2011
Page 129
Specifications subject to change without notice!
Cash Register CM 940-F / 941-F / 942-F
7.9.3
Complete cancellation
If a receipt has not yet been concluded by pressing a tender media key and all the registrations made for it should be
cancelled, execute a complete cancellation.
Example:
Three items have been registered: PLU 1 to 3 at fixed price 1. The receipt has not yet been concluded. A
complete cancellation should be executed.
Input
1.
Set the key to REG.
2.
Register the PLUs.
3.
Press the ┣VOID┫ key.
Display
3. 3
Receipt
03
1
50.00
17-06-2011
4.
Note:
7.10
Press the ┣CLR┫ key.
0.00
----------------------------1
10.00T1
2
100.00T2
3
50.00T2
----------------------------Cancel
Cancel
Cancel
The number and total sum of the corrections are recorded in the financial report.
Refunds
Refunds (retours) must be registered when a customer returns an item after it has been sold and the receipt concluded.
Example:
€ 10 is refunded from department 1.
Input
Note:
Olympia
1.
Set the key to REG.
2.
Press the ┣RETOUR┫
key.
3.
Register the returned
item in the normal way.
4.
Press the ┣CASH┫ key.
Receipt
Dept01
$
#
RETOUR
-10.00T1
----------------------------TAX1
19%
-1.60
----------------------------TOTAL
-10.00
CASH
-10.00
The number and total sum of the refunds are recorded in the financial report.
2011
Page 130
Specifications subject to change without notice!
Cash Register CM 940-F / 941-F / 942-F
7.11
Received on account operations
Payments into the cash register, e.g. credit repayments, are registered as follows:
Example:
Note:
7.12
Example:
Note:
Olympia
€ 500 are received on account.
1.
Set the key to REG.
2.
Enter the amount paid
in.
3.
Press the ┣RA┫ key.
Input
Receipt
- - - - - - - - - - - - - - - - - - - - - - - - - - - - RA:
500.00
The number and total sum of received on account operations are recorded in the financial report.
Paid out operations
€ 60 are paid out.
1.
Set the key to REG
2.
Enter the amount paid
out.
3.
Press the ┣PO┫ key.
Input
Receipt
----------------------------PO:
60.00
The number and total sum of the paid out transactions are recorded in the financial report.
2011
Page 131
Specifications subject to change without notice!
Cash Register CM 940-F / 941-F / 942-F
7.13
Printing numbers
A freely selectable, 8-digit number can be printed on the receipt, e.g. a customer or voucher number.
Example:
The customer number 87654321 should be printed on the receipt.
1.
Set the key to REG
2.
Enter the number,
maximally 8 digits.
3.
Press the ┣#/NS┫ key.
Continue registering the
items.
7.14
Input
Receipt
- - - - - - - - - - - - - - - - - - - - - - - - - - - - 87654321 #
Opening the cash drawer without a sale
The cash drawer can be opened without making a sale in order to deposit or remove cash, for example.
Note:
Olympia
The number and total sum of no sale drawer opening operations are recorded in the financial report.
1.
Set the key to REG.
2.
Press the ┣#/NS┫ key.
2011
Input
Page 132
Specifications subject to change without notice!
Cash Register CM 940-F / 941-F / 942-F
7.15
Printing a receipt on/off
The printing of a receipt can be switched on or off.
1.
Set the key to REG.
Input
Display
17-06-2011
2.
Press the
┣Receipt ON/OFF┫ key.
B
0.00
Note:
If receipt printing is switched off, a "B" appears in the display.
Note:
If the key is pressed twice in quick succession, the initial status is restored.
7.16
Printing last receipt (duplicate receipt, delayed printout)
You can print the receipt of the last registration process calculated once again. This receipt has the heading Copy
Receipt.
If no receipt was printed for the last registration process because the receipt printing feature was switched off by means of
the ┣Receipt ON/OFF┫ key, you can print this receipt later (delayed receipt).
Note:
If you need a copy of the receipt for a registration recorded some time ago, it may be possible to print one
from the electronic journal as long as the data is still stored there (ring journal) (see Chapter 10).
7.16.1
Printing a copy receipt
A copy receipt is a duplicate of the receipt just printed.
You want to print a copy of the last receipt printed:
Input
1.
Set the key to REG.
2.
Press the ┣SUB-TOTAL┫ key.
"
Note:
The receipt is printed with the heading "Copy Receipt".
7.16.2
Delayed receipt printout
A delayed printout relates to a receipt which was not printed immediately because receipt printing was switched off via the
┣Receipt ON/OFF┫ key.
You want to print the receipt for the last registration process:
Input
Note:
Olympia
1.
Set the key to REG.
2.
Press the ┣SUB-TOTAL┫ key.
"
The standard receipt is printed out.
2011
Page 133
Specifications subject to change without notice!
Cash Register CM 940-F / 941-F / 942-F
8
Restaurant Functions (Table System)
If the restaurant version of the cash register is operated (see Chapter 6.30), special functions are available, such as the
table function, for example.
The table system serves to record individual registrations for each table. A table can be opened and closed at any time. In
the period between, departments and PLUs can be registered to a table and corrected, if necessary. The final receipt is
printed out after the table has been paid.
Note:
8.1
Note:
All the procedures described in the previous chapters are identical when operating the table system. The
only difference is that the first step is always to open the table and the final transaction to close the table.
Opening a table
A maximum of 70 tables can be opened.
1.
Set the key to REG.
2.
Enter the table number.
3.
Press the ┣TABLE┫ key.
Input
Display
table:
1
Register items in the normal way (refer to Chapter 7).
8.2
Closing a table
1.
Set the key to REG.
Input
Display
17-06-2011
2.
8.3
Press the ┣TABLE┫ key.
0.00
Registering items for a table
1.
2.
3.
4.
Set the key to REG.
Open the table (see Chapter 8.1).
Register the items (see Chapter 7).
Close the table again (see Chapter 8.2).
Receipt
TABLE 1
No.1
1x 1
10.00
----------------------------TABLE 1
No.2
1x 2
100.00
-----------------------------
Olympia
2011
Page 134
Specifications subject to change without notice!
Cash Register CM 940-F / 941-F / 942-F
8.4
Printing a table view
A table view can be printed out on the ECR printer at any time. It does not relate to a bill but to a kind of "table review"
indicating what items have been recorded for the table until now. For this reason, the view does not have the attributes of
a bill.
Example:
PLU number 10 is registered for table 1 at € 100.-. A table view should be printed.
1.
Set the key to REG.
2.
Enter the table number.
3.
Press the ┣TABLE┫ key.
4.
Press the ┣BILL PRINT┫
key.
Input
Receipt
Preparing the bill for a table
8.5.1
Preparing the bill without an additional business receipt
Example:
The bill should be prepared for table 1 without a business receipt.
1.
Set the key to REG.
2.
Enter the table number.
3.
Press the ┣TABLE┫ key.
4.
Press the ┣CASH┫ key.
Input
2011
Receipt
!
Olympia
100.00T1
.
.
.
Subtotal
100.00
-----------------------------
8.5
TABLE 1
10
Page 135
TABLE 1
10
100.00T1
----------------------------TAX1
19%
1.60
----------------------------TOTAL
10.00
CASH
10.00
-----------------------------
Specifications subject to change without notice!
Cash Register CM 940-F / 941-F / 942-F
8.5.2
Preparing the bill with a business receipt
Note:
If you want to operate the business receipt function, you must programme the ┣BUSINESS RECEIPT┫ key on
the keyboard (refer to Chapter 6.28).
The bill should be prepared for table 1 with a business receipt.
Example:
1.
Set the key to REG
2.
Enter the table number.
3.
Press the ┣TABLE┫ key.
4.
Press the
┣ BUSINESS RECEIPT ┫
key.
5.
Press the ┣CASH┫ key.
Input
Receipt
┣ BUSINESS RECEIPT ┫
!
TABLE 1
10
100.00T1
----------------------------TAX1
19%
1.60
----------------------------TOTAL
10.00
CASH
10.00
----------------------------BUSINESS MEETING
RECEIPT
MEETING MEMBER:
--------------------------------------------------------------------------------------------------------------------------------------------MEETING AGENDA:
--------------------------------------------------------IN Restaurant:
--------------------------------------------------------DATE:
----------------------------SIGNATURE:
-----------------------------
Olympia
2011
Page 136
Specifications subject to change without notice!
Cash Register CM 940-F / 941-F / 942-F
8.6
Transferring a table
It is possible to transfer the entire table bill from one table to another. This means that two or more tables can be
combined.
Example:
The bill should be prepared for table 1 without a business receipt.
1.
Set the key to REG.
2.
Enter the table number.
3.
Press the ┣TABLE┫ key.
4.
Press the ┣CASH┫ key.
Input
Receipt
!
Example:
Table 1 should be transferred to table 6.
1.
Set the key to REG.
2.
Press the ┣TRANSFER┫
key.
Enter the number of the
table from which the
items should be transferred.
3.
4.
Press the ┣CASH┫ key.
5.
Enter the number of the
table to which the items
should be transferred.
6.
Press the ┣CASH┫ key.
Input
The cash register prints a
slip for the transfer.
Olympia
Display
Transfer Table
0
0
!
1
0
!
1
0
Note:
TABLE 1
10
100.00T1
----------------------------TAX1
19%
1.60
----------------------------TOTAL
10.00
CASH
10.00
-----------------------------
Receipt
TABLE 1
1
10.00T1
2
100.00T1
----------------------------TABLE 6
Transfer
Following the transfer, the old table is automatically cleared, i.e. the balance is equal to zero.
2011
Page 137
Specifications subject to change without notice!
Cash Register CM 940-F / 941-F / 942-F
8.7
Split payments for a table
The bill for a table need not be drawn up in full, it is possible to prepare a bill for a part of it (split payment).
Example:
PLU number 1 and PLU number 3 are registered to table 1. Only a bill for PLU number 1 should be prepared
(cash payment).
1.
Set the key to REG.
2.
Enter the table number.
3.
Press the ┣TABLE┫ key.
4.
Press the ┣SPLIT┫ key.
The last item registered
appears in the display.
5.
6.
7.
Use the ┣↑┫ and ┣↓┫ to
move to the item to be
billed separately.
Press the ┣SPLIT┫ key.
Press the relevant tender media key to conclude the receipt or bill
for the selected items.
Input
Display
Table:
2. 3
1. 1
1
1
50.00
1
10.00
!
0.00
!
Receipt / Bill
Bill
TABLE 6
CLERK:
The cash register prints a
slip for the transfer.
1
10.00T1
----------------------------TOTAL
100.50
CASH
100.50
Note:
Olympia
Following the transfer, the old table is automatically cleared, i.e. the balance is equal to zero.
2011
Page 138
Specifications subject to change without notice!
Cash Register CM 940-F / 941-F / 942-F
8.8
Error corrections/Voids within the table system
Proceed as described in Chapter 7.9.2 to correct/cancel PLU registrations within the scope of the table system.
Example:
Three items were registered within the scope of the table system: PLUs 1 to 3 at fixed price 1. PLU 2 should
be cancelled (void).
Input
Display
1.
Set the key to REG.
2.
Enter the table number.
3.
Press the ┣TABLE┫ key.
4.
Press the ┣VOID┫ key.
5.
Use the ┣↑┫ and ┣↓┫ keys
to move to the item to be
cancelled.
2. 2
Press the ┣EC┫ to clear the
item selected.
2. 2
Press the ┣CASH┫ key to
return to the registration.
Cancel
6.
7.
3. 3
1
50,00
1
100.00
0
0.00
2
-100,00 TABLE1
Cancel
-1x 2
-100.00
-----------------------------
Press the ┣TABLE┫ key to
exit from the table system.
The cash register prints a slip
for the correction.
8.
8.9
Receipt
Order type system
The order type system organises the printout of orders on the cash register. Order type names ensure that PLUs with the
same order number are printed on the same receipt. These order receipts are then printed out in succession. The order
type system is activated by the fact that the PLU was assigned an order type name during PLU programming (also refer
to Chapter 6.5.1.8).
Olympia
2011
Page 139
Specifications subject to change without notice!
Cash Register CM 940-F / 941-F / 942-F
8.10
Example:
Take-away sales
3 items with PLU number 1 are sold as take-away meals.
Input
1.
Set the key to REG
2.
Press the ┣CHANGE VAT┫
key.
3.
Complete the PLU registration in the normal way.
Conclude the receipt.
4.
Olympia
2011
Display
Receipt
1
3
10.00
30.00T1
----------------------------TAX2
7%
1.96
----------------------------TOTAL
30.00
CASH
30.00
TAX2
Page 140
Specifications subject to change without notice!
Cash Register CM 940-F / 941-F / 942-F
9
Training Mode
Activate Training mode to practise using the cash register.
It is important to activate Training mode when practising to ensure the actual sales figures are not falsified. When Training
mode is active, all the operating functions can be accessed; the difference to Registration mode being that the entries and
transactions are not recorded in the cash register reports.
Important: Please observe the information provided at the beginning of Chapter 11 regarding your obligations in respect
of providing proof and preserving records for the revenue authorities!
Note:
9.1
To switch Training mode on and off, the ┣TRAINING┫ key is required. This must first be set up on the
keyboard (refer to Chapter 6.28).
Activating Training mode
1.
Set the key to REG
Display
Password:
2.
Press the ┣TRAINING┫
key.
3.
Enter the current pass
code (default setting:
000000).
******
17-06-2011
4.
Press the ┣CASH┫ key.
T
0.00
Note:
If Training mode is switched on, a "T" appears in the display.
Note:
Within the scope of programming the clerk system (refer to Chapter 6.7), the clerk rights can be used to
define which clerk may use Training mode. In order for the clerk rights to take effect, the clerk system must
be activated (see Chapter 6.7.3).
Note:
If the clerk system is deactivated by means of system option 3, a pass code must be entered to switch
Training mode on.
Note:
You can reprogramme the 6-digit training pass code (see Chapter 6.13).
Olympia
2011
Page 141
Specifications subject to change without notice!
Cash Register CM 940-F / 941-F / 942-F
9.2
Deactivating Training mode
1.
Set the key to REG.
Display
Password:
2.
Press the ┣TRAINING┫
key.
3.
Enter the current pass
code (default setting:
000000).
******
17-06-2011
4.
Press the ┣CASH┫ key.
0.00
Olympia
2011
Page 142
Specifications subject to change without notice!
Cash Register CM 940-F / 941-F / 942-F
10 Electronic Journal (EJ)
The electronic journal records every entry made on the cash register in the way the input is recorded on the receipt.
● The electronic journal is active when the cash register leaves the factory. It can be deactivated using system option 8
(status code 2) (see Chapter 6.15).
● Approx. 16,000 (receipt) lines can be stored. When the maximum memory capacity is full, the oldest entries in the
electronic journal are automatically overwritten (ring journal).
10.1
Printing the electronic journal (EJ)
The electronic journal can be printed out in X and Z modes:
● X-mode: Without memory deletion
● Z-mode: With memory deletion
Note:
Printout of the electronic journal can be interrupted and stopped by pressing the ┣CLR┫ key.
10.1.1
Printing the EJ with all details
1.
2.
Set the key switch to position
X or Z.
Select EJ.DETAIL REP or the
number 96:
● Use the numeric keys to
enter ┣ 9 ┫ and ┣ 6 ┫.
●
3.
4.
Or: Use the ┣↑┫ and ┣↓┫
keys to scroll to the
required point in the menu.
Press the ┣CASH┫ key to confirm the input. The electronic
journal appears in the display.
Use the ┣↑┫ and ┣↓┫ keys to
scroll through the electronic
journal.
Press the ┣CASH┫ key again to
initiate printout of the electronic journal.
Input
Display
#
#
#
= X Report
-0 1=
01.FINANCIAL REP.
02.FINA. REP. MON.
03.DEPT. REP.
04.DEPT. REP. MON.
05.PLU REP.
06.PLU REP. MON.
08.CLERK REP.
09.CLERK REP. MON.
10.CLERK-PLU-REP.DAY
11.CLERK-PLU-REP.MON
12.HOURLY REPORT
14.OpenTableRepOnlyX
86.TRAINING REP.
87.TRAIN. REP. MON.
96.EJ.DETAIL REP.
97.EJ.SUM REP.
Note:
Olympia
The printout of the electronic journal appears in a smaller font size.
2011
Page 143
Specifications subject to change without notice!
Cash Register CM 940-F / 941-F / 942-F
10.1.2
Printing the EJ with totals only
1.
2.
Set the key switch to position
X or Z.
Select EJ.SUM REP or the
number 97:
● Use the numeric keys to
enter ┣ 9 ┫ and ┣ 7 ┫ .
●
3.
4.
Or: Use the ┣↑┫ and ┣↓┫
keys to scroll to the
required point in the menu.
Press the ┣CASH┫ key to confirm the selection. The electronic journal appears in the
display. Use the ┣↑┫ and ┣↓┫
keys to scroll through the
electronic journal.
Press the ┣CASH┫ key again to
initiate printout of the electronic journal.
Input
Display
#
#
#
= X Report
-0 1=
01.FINANCIAL REP.
02.FINA. REP. MON.
03.DEPT. REP.
04.DEPT. REP. MON.
05.PLU REP.
06.PLU REP. MON.
08.CLERK REP.
09.CLERK REP. MON.
10.CLERK-PLU-REP.DAY
11.CLERK-PLU-REP.MON
12.HOURLY REPORT
14.OpenTableRepOnlyX
86.TRAINING REP.
87.TRAIN. REP. MON.
96.EJ.DETAIL REP.
97.EJ.SUM REP.
Olympia
2011
Page 144
Specifications subject to change without notice!
Cash Register CM 940-F / 941-F / 942-F
10.2
10.2.1
Deleting the electronic journal (EJ)
Printing and deleting the EJ
Delete the electronic journal by printing the electronic journal in Z-mode (see Chapter 10.1).
10.2.2
Deleting the EJ without printing
1.
2.
Set the key to PRG.
Select programme number 80
(see Chapter 6.1.2).
3.
Press the ┣CASH┫ key to
confirm the selection.
The information which can be
deleted appears in the display.
4.
5.
Use the ┣↑┫ and ┣↓┫ keys to
move to MEMORY CLEAR.
Input
Display
#
MEMORY CLEAR
1
ALL REPORT RESET
E-JOURNAL AREA
PROGRAM AREA
CASHIERS AREA
DEPARTMENT AREA
PLU AREA
TABLE AREA
ALL AREA
6.
Press the ┣CASH┫ key.
#
Press <Enter> Delete
Or Press <ESC> Exit
7.
Confirm the prompt by pressing
the ┣CASH┫ key.
#
Delete !!
Please Wait...
8.
Olympia
2011
Conclude programming by
pressing the ┣SUB-TOTAL┫ key.
"
Page 145
Specifications subject to change without notice!
Cash Register CM 940-F / 941-F / 942-F
11 Cash Register Reports
You are obliged to keep the daily Z reports for submission to the revenue authorities. Otherwise, estimations of sales
figures may be used within the scope of tax audits.
Note:
Keep all documents which record how your cash register is programmed for tax audits.
Note which documents are required by the financial authorities.
11.1
Types of report
Reports can be printed in X or Z mode.
X-mode / X-reports
The key is set to position X. Reports are printed but the memories are not deleted.
Z-mode / Z-reports
The key is set to position Z. Reports are printed and, at the same time, the memories are deleted and cannot be restored.
Daily reports
These are reports which are printed at the end of the day.
A daily Z-report must be printed every day in order to accumulate the totals in the memory for a monthly
report.
Note:
Monthly reports
These are reports which are printed at the end of the month.
11.2
Report overview
Most reports can be printed as X or Z-reports.
Report number
Report (view according to display)
Explanation
01
01.FINANCIAL REP.
Daily X or Z financial report
02
02.FINA. REP. MON.
Monthly X or Z financial report
03
03.DEPT. REP.
Daily X or Z department report
04
04.DEPT. REP. MON.
Monthly X or Z department report
05
05.PLU REP.
Daily X or Z PLU report
06
06.PLU REP. MON.
Monthly X or Z PLU report
08
08.CLERK REP.
Daily X or Z clerk report
09
09.CLERK REP. MON.
Monthly X or Z clerk report
10
10.CLERK-PLU-REP.DAY
Daily X or Z PLU clerk report
11
11.CLERK-PLU-REP.MON
Monthly X or Z PLU clerk report
12
12.HOURLY REPORT
X-hourly report
14
14.OpenTableRepOnlyX
X-report regarding open tables
86
86.TRAINING REP.
Daily X or Z training report
87
87.TRAIN. REP. MON.
Monthly X or Z training report
96
96.EJ.DETAIL REP.
Electronic journal, print details (X/Z)
97
97.EJ.SUM REP.
Electronic journal, only print totals (X/Z)
11.3
Report contents
The system options enable you to define numerous settings to adapt the content of the receipts and reports to your
specific needs (refer to Chapter 6.15).
Olympia
2011
Page 146
Specifications subject to change without notice!
Cash Register CM 940-F / 941-F / 942-F
11.4
Printing reports
1.
2.
Set the key switch to position X
or Z.
Select the report you want to
print:
●
●
3.
4.
5.
6.
Use the ┣↑┫ and ┣↓┫ keys to
scroll to the required point in
the menu.
Or, enter the report number
using the digit keys.
Press the ┣CASH┫ key to
confirm the selection.
The report first appears, together with the totals, in the
display.
Use the ┣↑┫ and ┣↓┫ keys to
view all the report totals in the
display.
Press the ┣CASH┫ key to start
printing.
Input
Display
#
#
= X Report
- 1=
= Z Report
- 1=
01.FINANCIAL REP.
02.FINA. REP. MON.
03.DEPT. REP.
04.DEPT. REP. MON.
05.PLU REP.
06.PLU REP. MON.
08.CLERK REP.
09.CLERK REP. MON.
10.CLERK-PLU-REP.DAY
11.CLERK-PLU-REP.MON
12.HOURLY REPORT *
14.OpenTableRepOnlyX *
86.TRAINING REP.
87.TRAIN. REP. MON.
96.EJ.DETAIL REP.
97.EJ.SUM REP.
* Does not appear with key switch at position Z
Olympia
2011
Page 147
Specifications subject to change without notice!
Cash Register CM 940-F / 941-F / 942-F
11.5
Example of a day's Z-report
1.
2.
Turn the key switch to Position
Z.
The cash register is automatically set to 01.FINANCIAL
REP.
3.
Press the ┣CASH┫ key.
4.
The report first appears, together with the totals, in the
display.
5.
Use the ┣↑┫ and ┣↓┫ keys to
view all the report totals in the
display.
6.
Press the ┣CASH┫ key to start
printing.
Input
#
***************************
-----------------------------#
1
-----------------------------
Z
Report
---------------Financial Report,Day---------- -------------------------------
To:
17.06.2011 21:00
-------------# TAXABLE WT 1 19%
89.65
Term:
TAXABLE WT 1
Significance:
Taxable at VAT rate 1, gross
(inclusive of VAT)
TAXABLE WO 1
Taxable at VAT rate 1, net
(exclusive of VAT)
TAX 1
Tax rate 1 is 19%
Note: TAXABLE WT 1 - TAX1 = TAXABLE WO 1
TAXABLE W/T TAX TL Total gross amount which is taxable
TAXABLE W/O TAX TL Total net amount which is taxable (excl. tax)
TOTAL TAX
Total amount of tax
Net
Total net amount which is taxable
Discount
Total amount of percentage discounts
Service Charge
Total amount of percentage surcharges
Add Price
Total amount of amount-related surcharges
Reduce Price
Total amount of amount-related discounts
In Cash
Total amount received on account
Out Cash
Total amount paid out
PaidTable
Total amount of the tables paid
OpenTable
Total amount of the tables not paid
Net
Day's sales (incl. tables not paid)
CASH
Total of sales paid in cash
CREDIT 1
Total of sales paid via credit 1
CREDIT 2
Total of sales paid via credit 2
CARD
Total of sales paid via debit card
CHEQUE
Total of sales paid by cheque
The following could also be listed, for example:
NO SALE
Number of times the drawer was opened without a sale
XXX
Total of sales paid in foreign currency 1 (USD)
2011
------------------------------
Explanation of terms in the reports
Olympia
Receipt
Page 148
TAXABLE WO 1
19%
73.72
TAX 1
19%
15.93
TAXABLE WT 2
7%
338.90
TAXABLE WO 2
7%
316.73
TAX 2
7%
22.17
-----------------------------TAXABLE W/T TAX TL
428.55
TAXABLE W/O TAX TL
390.45
TOTAL TAX
38.10
-----------------------------Net
428.55
-----------------------------Discount:
-2.75
-----------------------------Service Charge:
0.30
-----------------------------Add Price:
1.50
-----------------------------Reduce Price:
-0.50
-----------------------------In Cash:
100.00
-----------------------------Out Cash:
-30.00
-----------------------------PaidTable
160.00
OpenTable
160.00
-----------------------------Net
658.55
-----------------------------Drawer-Total
-----------------------------CASH
468.55
CARD
10.00
CREDIT 1
10.00
CHEQUE
10.00
-----------------------------E.C.R. Reset
Specifications subject to change without notice!
Cash Register CM 940-F / 941-F / 942-F
12 Deleting Cash Register Data
This function is used to deleted data stored in the cash register. This includes the report memory, electronic journal or
cash register programme, for example.
Note:
Pay attention to the obligations in respect of providing proof and preserving records for the revenue
authorities before starting any deleting functions! Deleted data cannot be restored!
1.
2.
Set the key to PRG.
Select programme number
80 (see Chapter 6.1.2).
3.
Press the ┣CASH┫ key to
confirm the selection.
The information which can be
deleted appears in the display.
4.
5.
Use the ┣↑┫ and ┣↓┫ keys to
move to the data area to be
deleted.
Input
Display
MEMORY CLEAR
#
#
1=
ALL REPORT RESET
E-JOURNAL AREA
PROGRAM AREA
CASHIERS AREA
DEPARTMENT AREA
PLU AREA
TABLE AREA
ALL AREA
6.
Press the ┣CASH┫ key.
#
Press <Enter> Delete
Or Press <ESC> Exit
7.
Confirm the prompt by pressing the ┣CASH┫ key.
#
Save...!!
Please Continue...
8.
Olympia
2011
Conclude programming by
pressing the ┣SUB-TOTAL┫
key.
"
Page 149
Specifications subject to change without notice!
Cash Register CM 940-F / 941-F / 942-F
13 Solving Problems
Attention: The power socket must be close to the cash register and easily accessible. This means that the cash register
can be disconnected from the power supply quickly in an emergency.
13.1
Display messages
Display
Cause
Corrective measures:
Paper
End of paper roll.
Replace a new paper roll.
L
The battery capacity is too low.
Charge the battery.
B
Receipt printing is switched off.
Press the ┣RECEIPT ON/OFF┫ key to switch receipt printing
back on.
T
The cash register is in Training
mode;
Press the ┣TRAINING┫ key to deactivate Training mode.
II
Department level 2 is active
Press the ┣DP SHIFT┫ key to switch between the department
levels.
III
Department level 3 is active
Press the ┣DP SHIFT┫ key to switch between the department
levels.
13.2
Printer malfunctions
In the event of a printer error, switch off the cash register immediately and disconnect the power plug!
1. Check that the paper roll is inserted correctly or whether there is a foreign body in the printer mechanism. Remove it,
if present.
Attention: Remove the foreign body very carefully. Do not use a knife, screwdriver or anything similar! Never use force!
This could damage the printer mechanism.
2. Switch the cash register on again and complete a registration.
3. If the printer error reoccurs, contact the service centre.
Note:
Olympia
Never use low quality paper!
2011
Page 150
Specifications subject to change without notice!
Cash Register CM 940-F / 941-F / 942-F
14 Options
Various peripheral equipment can be connected to the cash register.
14.1
SD card slot for data backup
Use an SD card to make a backup copy of the current programme data and all reports. If the cash register has a technical
defect or data is lost, you can load the backup copies of the reports and programme on the cash register from the SD
card.
Note:
The electronic journal is saved on the SD card.
Note:
The SD card slot is located on the right-hand side of the housing underneath the rectangular, light grey,
rubber cover.
14.1.1
Saving data on the SD card
Note:
The SD card should have a capacity of 2 GB.
1.
2.
3.
Insert an appropriate SD card
in the SD card slot on the righthand side of the device.
Set the key to PRG.
Select programme number 81
(see Chapter 6.1.2).
Press the ┣CASH┫ key to
confirm the selection.
The options appear in the display.
4.
5.
6.
Use the ┣↑┫ and ┣↓┫ keys to
select SD CARD BACKUP.
Press the ┣CASH┫ key to confirm the selection.
Input
Display
SD CARD
#
#
SD CARD BACKUP
SD CARD RECOVERY
>>>>>>>>>>>>>>>>>>>>>>>>
Save...!!
Please Continue...
The current programme settings and reports are copied from the cash register onto the SD card and stored there.
Note:
The transfer process is indicated in the display during data transfer.
Never interrupt this process! Then disconnect the cash register briefly from the mains power supply.
14.1.2
Loading data from the SD card
1.
2.
3.
Insert an appropriate SD card
in the SD card slot on the righthand side of the device.
Set the key to PRG.
Select programme number 81
(see Chapter 6.1.2).
Press the ┣CASH┫ key to
confirm the selection.
The options appear in the display.
4.
5.
6.
Use the ┣↑┫ and ┣↓┫ keys to
select SD CARD RECOVERY.
Press the ┣CASH┫ key to
confirm the selection.
Input
Display
SD CARD
#
#
SD CARD BACKUP
SD CARD RECOVERY
>>>>>>>>>>>>>>>>>>>>>>>>
Save...!!
Please Continue...
All the data stored (programme and reports) is transferred from the SD card to the cash register.
Note:
Olympia
The transfer process is indicated in the display during data transfer.
Never interrupt this process! Then disconnect the cash register briefly from the mains power supply.
2011
Page 151
Specifications subject to change without notice!
Cash Register CM 940-F / 941-F / 942-F
14.2
USB flash card slot for data backup
Use an USB flash card to make a backup copy of the current programme data and all reports. If the cash register
develops a technical defect or data is lost, you can load the backup copies of the reports and programme back on the
cash register from the USB flash card.
Note:
The electronic journal (EJ) is saved on the USB flash card.
Note:
The USB flash card must be plugged in at the rear of the device.
14.2.1
Saving data on a USB flash card
1.
2.
3.
Plug a USB flash card in the
slot on the rear of the device.
Set the key to PRG
Select programme number 82
(see Chapter 6.1.2).
Press the ┣CASH┫ key to
confirm the selection.
The options appear in the display.
4.
5.
6.
Input
Display
USB STICK
#
Use the ┣↑┫ and ┣↓┫ keys to
select USB STICK BACKUP.
#
Press the ┣CASH┫ key to
confirm the selection.
- 1=
USB STICK BACKUP
USB STICK RECOVERY
>>>>>>>>>>>>>>>>>>>>>>>>
Save...!!
Please Continue...
The current programme and reports (including the electronic journal) are transferred from the cash register and stored on
the USB flash card.
Note:
The transfer process is indicated in the display during data transfer.
Never interrupt this process! Then disconnect the cash register briefly from the mains power supply.
Note:
The electronic journal (EJ) is saved on the USB flash card.
14.2.2
Loading data from the USB flash card
1.
2.
3.
Plug the USB flash card containing the cash register data in
the slot on the rear of the
device.
Set the key to PRG
Select programme number 82
(see Chapter 6.1.2).
Input
Display
USB STICK
#
Press the ┣CASH┫ key to
confirm the selection.
The options appear in the display.
4.
5.
6.
Use the ┣↑┫ and ┣↓┫ keys to select USB STICK RECOVERY.
Press the ┣CASH┫ key to confirm the selection.
#
- 1=
USB STICK BACKUP
USB STICK RECOVERY
>>>>>>>>>>>>>>>>>>>>>>>>
Save...!!
Please Continue...
All the data stored (programme and reports) is transferred from the USB flash card to the cash register.
Note:
Olympia
The transfer process is indicated in the display during data transfer.
Never interrupt this process! Then disconnect the cash register briefly from the mains power supply.
2011
Page 152
Specifications subject to change without notice!
Cash Register CM 940-F / 941-F / 942-F
14.3
Bar code scanners
A bar code scanner can be used to read 8 and 13-character EAN codes.
14.3.1
Suitable bar code scanners with a PS/2 plug
The following bar code scanners with PS/2 connection have been tested by Olympia and can be implemented without any
problems:
Olympia:
● Model LS-6000 (part number 947990001)
METROLOGIC:
● Model ECLIPSE
● Model ORBIT
● Model VOYAGER
14.3.2
PS/2 plug on the scanners
Fig. 36
Setting up a bar code scanner
The scanner models tested by Olympia can be connected directly to the PS-2 socket on the cash register and used.
14.3.3
Using the barcode reader to programme PLUs in the cash register
1.
2.
Set the key to PRG
Select programme number 03
(see Chapter 6.1.2).
Press the ┣CASH┫ key to
confirm the selection.
The memory location for the first
PLU is automatically activated.
3.
Display
PLU - Item
1=
#
4.
Read the bar code using the bar code scanner.
5.
Complete further PLU assignments (see Chapter 6.5) and confirm each entry by pressing the ┣CASH┫
key.
When the next PLU memory location appears in the cash register display, scan the next PLU and
proceed in the same way for the next PLUs.
6.
7.
Olympia
Input
2011
Conclude the programming process by pressing the ┣SUB-TOTAL┫ key.
Page 153
Specifications subject to change without notice!
Cash Register CM 940-F / 941-F / 942-F
14.4
Battery
Part number 947990002
When the battery is fully charged, it can operate the cash register for a maximum of 5 hours without the need of a power
cable.
The runtime of the cash register by the battery depends on the quantity and length of the receipts printed.
5 hours can be achieved when approx. 50 receipts with just 15 text lines are printed.
When the battery capacity is too low, L (Low) appears in the cash register display. When the cash register is connected to
the mains power, the battery in the cash register is automatically recharged.
Note:
Note:
The thermal printing is not as dark in battery operation as when mains powered.
14.4.1
Technical data
2100 mAh, 7.4 Volt
14.4.2
1.
2.
3.
4.
5.
6.
Installing the battery
Disconnect the cash register from the mains power supply.
Open the cash drawer and remove the cash tray.
Raise the cash drawer a little and pull it out.
The cash drawer is fixed to the cash register by a wing screw in the front section. Remove the wing screw.
Raise the cash register a little and open the small flap under the keyboard. Insert the battery in this compartment and
plug in the cable.
Close the cash register again in the reverse sequence.
Olympia
2011
Page 154
Specifications subject to change without notice!
Cash Register CM 940-F / 941-F / 942-F
14.5
Bank note verifier (Euro)
Part number 947990003
The bank note verifier can be used to check all Euro bank notes are authentic.
Cash register without bank note verifier
Cash register with bank note verifier
Fig. 37
●
Simple plug-and-play installation.
Note:
The installation manual is enclosed with the bank note verifier.
● The bank note verifier is installed on the cash register above the display. This means than no space is necessary
beside the cash register.
● The bank note verifier is covered by a lid section which matches the cash register.
● No additional power supply is required.
● Special feature: After being verified, the bank note is laid in a tray at the rear. The clerk can issue the change and then
put the bank note in the cash drawer. This ensures that the verification process is completed drawing very little
attention and is not annoying for the customer.
14.6
Dallas lock with 4 keys
Part number 947990005
Note:
The opening in which to insert the Dallas lock is located below the round, light grey rubber cover on the righthand side of the cash register housing.
Installation
1. Remove the round rubber cover on the right-hand side of the cash register.
2. Press the Dallas lock in the opening in the housing.
3. Turn the Dallas lock to fix it in place.
4. Programme the Dallas keys (refer to Chapter 6.29).
Olympia
2011
Page 155
Specifications subject to change without notice!
All Rights Reserved
Version 2011-05-02