1
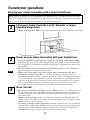
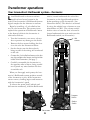
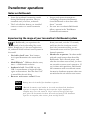
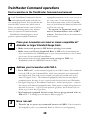
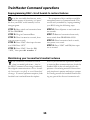
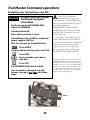
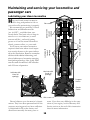
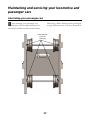
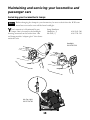
71-3004-250
3/01
Standard Gauge
Hiawatha
Steam Locomotive,
Tender & Passenger Cars
Owner’s Manual
Command Control and RailSounds Equipped
featuring
and
“Standard of the World”
L
ionel returns to Standard Gauge railroading with the first TrainMaster Commandand RailSounds-equipped locomotive, the
world-famous Hiawatha F7 Hudson.
Experience the superiority of today’s Lionel!
• R2LC radio unit for use with the Lionel
TrainMaster® Command™ model railroad
control system
• Opening doors and roofs on passenger
cars
• Smoke generator that produces clean,
safe, and realistic smoke
• Equipped with dual Pittman® motors
• RailSounds™ steam sound system—
digital samples from a real steam
locomotive
• Brilliant headlight
• All die-cast and stamped steel
construction
• Illuminated Fire Box Glow
• CrewTalk™ and TowerCom™
Table of Contents
Transformer operations
Running your steam locomotive with a Lionel transformer
Latch couplers
Adding fluid to your locomotive’s smoke generator
Your locomotive’s RailSounds™ system—the basics/Battery installation
Notes on RailSounds™
Experiencing the range of your locomotive’s RailSounds
Installing the Lionel sound activation button
3
4
5
6-7
8
8
9
TrainMaster® Command operations
The Command™ control environment
Running your locomotive in the TrainMaster® Command environment
CAB-1 commands for your locomotive
RailSounds in the Command environment
CAB-1 numeric keypad commands for your locomotive
Tuning your locomotive’s performance
Reprogramming R2LC circuit boards to restore features
Maintaining your locomotive’s handrail antenna
Assigning your locomotive a new ID#
10
11
11
12
12
13
14
14
15
Maintaining and servicing your locomotive and passenger cars
Lubricating your steam locomotive
Lubricating your passenger cars
Servicing your locomotive’s lamps
Servicing your passenger car lamps
Lionel Service
16
17
18
19
20
2
Transformer operations
Running your steam locomotive with a Lionel transformer
Note: Before running your new Standard Gauge Hiawatha set, it is important that you lubricate all the wheels and axle assemblies of the passenger cars in order to provide the best possible operation. See the illustration on page 18 for more information.
1
2
Note!
3
Place your steam locomotive on 42˝ diameter or larger
Standard Gauge track.
• With track power OFF, connect the drawbar between the locomotive and tender.
Power up your steam locomotive with your transformer.
• Your locomotive is designed to operate on 8-18 volts alternating
current. Due to the dual motor design of this locomotive as well as the overall
size and weight, a transformer capable of delivering a minimum of 6 amps is recommended.
• Do not power your locomotive with direct current (DC). Damage to
sensitive electronic components may occur.
• When you first power up your track, the locomotive will wait
between 3 and 8 seconds as it “listens” for digital language from the
TrainMaster Command-Base (available separately). When it’s determined that it’s
on a conventional (nonCommand) railroad, the locomotive’s headlight will illuminate and RailSounds will start up. At this point, the locomotive is in neutral.
(This occurs when placing the locomotive on your railroad for the first time.
Thereafter, it starts in forward after every three-second power interrupt.)
Move ‘em out!
• Get your locomotive moving. Press the DIR button on your CAB-1 remote or
Lionel transformer. This sequences the Lionel Command reverse unit (R2LC) to
the next operating state. The R2LC alternates between three states: forward, neutral, and reverse.
• Adjust track voltage until your locomotive moves at your desired speed. To
increase speed, increase track voltage. To decrease speed, reduce voltage. To stop
the locomotive, cut track power.
• To select a single operating state (example: forward only) you can deactivate the R2LC’s sequencing function. Get your locomotive moving in the desired
direction, then slide the Program/Run switch on the locomotive’s underside to
PROGRAM. See page 6 for the switch location and positioning.
3
Transformer operations
“Latch” Couplers
our new Lionel Standard Gauge set
utilizes “latch” couplers in order to be
compatible with previously manufactured
Lionel Standard Gauge products.
In order to couple the tender and cars
together with this latch sytstem, it is necessary to lift the coupler arm on BOTH couplers
at the same time and then push cars together.
Y
4
Transformer operations
Adding fluid to your Locomotive’s smoke generator
our locomotive is equipped with a
smoke generator that produces safe,
clean, white smoke during operation.
The smoke generator requires the periodic
addition of Lionel smoke fluid in order to
function. Pierce the fluid tube’s end with a
pin, then add 10 to 15 drops of fluid directly
into the smoke stack. Smoke production will
commence momentarily, faster if you run
your locomotive at speed. When smoke production wanes, add more fluid (4 to 8
drops).
In Command Control only, when the locomotive is first placed on the track and pow-
ered up, the smoke generator will be in a
default “OFF” position. Using any function
key on your CAB-1 remote will turn the
smoke generator on. Turning off the sound
(AUX1-5) or resetting the engine (AUX1-0)
will return the smoke unit to the initial
“OFF” position. Always keep a small
amount of smoke fluid in the locomotive’s
smoke generator; the generator’s element
can become damaged if operated without
fluid. Smoke production is greater at higher
voltages and when the locomotive is pulling
a heavy load or long consist.
Y
Note! Always keep smoke fluid in your locomotive’s smoke generator. If not, turn it off when
smoke is not desired by using the switch shown on page 16 or the AUX1-8 command if
you are running in Command mode. Using Smoke Boost with depleted fluid can
damage the generator’s element.
5
Transformer operations
Your locomotive’s RailSounds system—the basics
ionel RailSounds is the most realistic
model railroad sound system in the
world. Your locomotive’s RailSounds features
digital samples for the ultimate in realism.
Begin by installing a 9-volt alkaline battery in your locomotive. This ensures interruption-free operation of RailSounds. Access
to the battery holder in the locomotive is
achieved as follows:
• Turn the locomotive over onto a soft surface to prevent any damage to the finish.
• Remove the four screws holding the chassis to the cab. See illustration below.
• Set the chassis onto the drive wheels,
being careful of the wiring still connected
to the cab.
• Connect the 9-volt alkaline battery to the battery clip and place the battery into the holder
inside of the locomotive. (See page 7).
• Carefully reassemble the locomotive in
the opposite order of above, being careful
not to pinch any wires between the chassis and the cab.
switch, located underneath the cab of the
locomotive, to the SignalSounds position
before powering up the locomotive. (See
illustration below.) The whistle is activated
by using the whistle lever or button on your
transformer or CAB-1. The volume control
knob to raise or lower the level of sound is
located underneath the rear truck near the
RailSounds switch (see illustration).
L
Cab
screws
RAIL
SIGNAL
6
ON
SMOKE
Cab screws
OFF
SMOKE
PROG
OFF
RUN
ON
SIGNAL
RAIL
When you first apply track power, the locomotive’s RailSounds system produces sounds
of the locomotive at rest. As the locomotive
starts to move, chuffing begins and increases
with the locomotive’s speed.
To silence the steam chuff (whistle and
bell remain unaffected), slide the RailSounds
Program
Switch
Smoke
Switch
Transformer operations
Your locomotive’s RailSounds system—the basics
Notes!
Although RailSounds is powered by track voltage, the battery is required for uninterrupted
operation and shutdown sequences. Use only alkaline batteries.
Discontinue locomotive power for 10 seconds before changing the RailSounds/SignalSounds
ON/OFF switch position.
If RailSounds “drops out” during track power interrupts (direction change), replace the battery.
7
Transformer operations
Notes on RailSounds
• Listen for incidental locomotive sounds
during RailSounds operation. They’re
automatic and, of course, authentic.
• The 9-volt alkaline battery you installed
ensures continuous steam locomotive
sounds.
• Longer track-power interruptions
(including locomotive derailments)
cause RailSounds to shut down after
about 7 seconds.
• For even more authentic RailSounds
effects, operate in the TrainMaster
Command environment.
Experiencing the range of your locomotive’s RailSounds system
down your track, wait for 3-5 seconds,
and listen for the air-release sound—
that’s the locomotive telling you its
Command reverse unit has just reset to
forward operation.
• Shutdown sequence. No other model
railroad sound system shuts down like
RailSounds. Turn off track power, and
after the air-release reset sound, you have
two seconds to restart your locomotive. If
you’re done with operations, RailSounds
will commence with an authentic steam
locomotive shutdown sequence about two
seconds after the air-release reset occurs.
ith RailSounds, you experience the
sounds of real railroading like never
before. Simply put, it’s the most sophisticated, authentic model railroad sound system in
the world.
• Variable chuff rate. Your locomotive’s speed determines the steam chuff
rate.
• MultiWhistle™. Different whistles every
time—a RailSounds exclusive.
• Authentic bell. Press BELL on your
CAB-1 or transformer to begin the effect,
again to discontinue. Even the final “hit”
is muted like the real thing.
• Reverse unit reset sound. Power
W
Note!
Battery must be installed for shutdown sequence.
Note!
Allow the locomotive and tender to sit on the track until the shutdown
sequence is complete. Removing the locomotive before shutdown is
complete may cause the sound to “loop” and not shut off. If this happens, place the locomotive back on the track and wait for the shutdown
sequence to complete, then remove from track if desired.
8
Transformer operations
Installing the Lionel Sound Activation Button
install the Lionel no. 610-5906-001 Sound
Activation Button (available separately).
Connect the button(s) as shown below.
T
o operate the bell and whistle sounds
when operating your locomotive with
conventional transformers, you’ll need to
Existing wire
Black wire
Attach to ground terminal
To your transformer
Attach to power terminal
Red wire
Lionel no. 610-5906-001
Sound Activation Button for
activating the bell
track power must
Note! All
feed through the Sound
Activation Button. Do
not bypass button.
For AC transformers with a horn/whistle button
Existing wire
Red wire
Red wire
Black wire
Lionel no.
610-5906-001
Sound Activation
Button for
whistle
Attach to ground
terminal
To your transformer
Attach to power
terminal
Lionel no. 610-5906-001
Sound Activation Button for bell
For AC transformers lacking a horn/whistle button
Note!
The no. 610-5906-001 button works with any Lionel AC transformer except
no. 6-4690 Type MW. Transformers made by other manufacturers may not be
compatible with RailSounds.
9
TrainMaster Command operations
Your locomotive in the TrainMaster Command environment
ionel TrainMaster Command is the fun
and sophisticated model railroad control system from Lionel. Your locomotive features the R2LC reverse unit, which acts as
both a conventional reverse unit as well as
the key to unlocking many extra features
when you operate in Command mode.
TrainMaster Command gives you the
power to operate multiple Command-
equipped locomotives on the same track, at
the same time. It’s the most fun you can
have with electric trains, and it’s incredibly
easy too! Just follow the directions below and
you’ll be on your way.
To operate in Command mode, you
need a Command Base and a CAB-1
remote. Find them both at your authorized
Lionel retailer.
L
1
Place your locomotive on Lionel or Lionel-compatible 42˝
diameter or larger Standard Gauge track.
• Make sure track power is OFF before placing it on track.
• Make sure your Lionel Command Base is ON and its communications
wire is connected to the COMMON post on your Lionel transformer or the U terminal on any of your installed PowerMasters.
• Once positioned on the track, increase track voltage to FULL (on
PowerMaster, slide the CMD/CONV switch to CMD).
2
3
Address your locomotive with CAB-1.
• Press ENG and 1 on the numeric keypad of your CAB-1 remote. This command
is sent by CAB-1 to the Command Base, which then translates your commands
into digital code. That code is sent around your railroad’s outside rails in the
form of a digital “halo.” All Command-equipped Lionels listen to this digital
communication, but they do not respond until they hear their own ID number.
• The digital language of TrainMaster Command—and not track power—controls
the actions of Command-equipped Lionels. Track power is simply like gasoline in
the tank of your car—it gives you the power to go places, but it doesn’t tell you
where to go or how fast to get there.
• All Command-equipped Lionels come factory-programmed with an
ID# of “1.” To change your locomotive ID#, see page 15.
Move ‘em out!
• Throttle up or press any command button on CAB-1. Your locomotive
will respond to your every command. Read on. The fun is just beginning!
10
TrainMaster Command operations
Running your locomotive in the TrainMaster
Command environment
Example
our Command-equipped locomotive comes factory-programmed with an ID# of “1.” To get
your locomotive into action, set
PowerMasters to CMD or set all power
supplies on full. Press ENG and “1”
on CAB-1. Turn the throttle or press
any command button; RailSounds
starts up. Your locomotive is ready
for Command operations.
Y
Address Locomotive #1
PowerMasters set to CMD or traditional
power supplies ON FULL
Press ENG
Press 1 (the ID#)
Throttle up/press any command button
CAB-1 commands for your locomotive
Locomotive
RailSounds effects
in bold italic.
Press WSTL/HRN to
activate the locomotive’s
whistle, release to
discontinue. MultiWhistle steam
whistle sound.
Coupler
release sounds.
Coupler release
sounds.
Press BELL once to
activate the bell, again
to discontinue.
Traditional bell
sound.
Press AUX2 to turn
your locomotive’s
headlight on and off.
Turn the THROTTLE to
the right to accelerate,
left to decelerate.
Speed-dependent
variable steam
chuffing.
DynaChuff dynamic
chuffing effect.
Press DIR—the locomotive decelerates to a
complete stop; turn the
throttle up, and the locomotive moves in the
opposite direction. There
is no neutral. Steam
air-release sound.
Press HALT to shut down all
PowerMaster electrical output on your railroad. Stops
all Command-equipped
Lionels in operation.
NOTE: Use “HALT” only in
“emergency” situations.
Press and hold BOOST for
extra power. Release
BOOST and return to the
locomotive’s previous
speed. Labored chuff.
Press and hold BRAKE to slow down or stop. Release BRAKE and
return to the previous speed. Squealing brake sounds.
11
TrainMaster Command operations
RailSounds in the Command environment
our locomotive’s RailSounds system
gives you even more in the
TrainMaster Command environment.
• DynaChuff TM. Real steam locomotive
chuffing depends on the locomotive’s load.
DynaChuff simulates both labored and
relaxed chuffing sounds. Highball down the
mainline and hear the labored chuffing of a
locomotive battling inertia. Reduce your
throttle setting, and chuffing relaxes to a
more sedate sound, as though the load placed
on the locomotive has decreased. Experience
DynaChuff on steep grades, at yard crawls,
and at speed. Another RailSounds exclusive.
• Bonus sounds like squealing brakes
with the CAB-1 BRAKE command.
• Incidental sounds you control with
CAB-1 numeric keypad commands, like
steam let-off and steam release effects.
Y
CAB-1 numeric keypad commands for your locomotive
hen you press AUX1 on CAB-1,
you turn the numeric keypad into 10 command buttons.
The keypad “stays open” and gives
you access to extra command features until you press any top-row
button (SW, ACC, RTE, TR, or
W
➠
START-UP
BLOW
OFF
VOLUME
STEAM
RELEASE
SHUT
DOWN
➠
0
1
2
3
4
5
CREW
TALK
TOWER
COM
SMOKE
OFF
ON
ENGINE
RESET
STEAM
Stops and resets the locomotive to FORWARD. Headlight flickers.
Raises the volume of RailSounds.
Sound volume increases.
ENG). The CAB-1 keypad overlay
included with your locomotive is
designed to help you learn the
auxiliary features specific to this
classic locomotive.
Locomotive RailSounds
effects in bold italic.
PRESS
& HOLD
SMOKE
BOOST
6
7
Steam release sound.
8
9
Turns off the smoke generator.
CrewTalk sounds*.
TowerCom™ is an audible announcement that includes that engine’s road
number and/or name. There is a four second delay in this function.
™
CrewTalk is the sound of unintelligible walkie-talkie communication.
Starts-up RailSounds. Start-up
sequence commences. Steam
blowoff sound.
Turns on the smoke generator. Press and
hold 9 (10 seconds maximum) to initiate Smoke Boost™—this superheats the
smoke generator and enhances smoke output
when you start running your locomotive.
CrewTalk sounds*.
Lowers the volume of RailSounds.
Sound volume decreases.
Activates the RailSounds steam shutdown sequence. Just like the real thing,
your locomotive must be idle for shutdown to occur. Steam shutdown commences. Remember, the whistle and bell
will not sound until you restart RailSounds.
CrewTalk sounds.
*Hearing the CrewTalk sounds lets you know that
the locomotive has received these commands.
Note! AUX 1-9 only works if the smoke
unit switch is in the ON position.
12
TrainMaster Command operations
Tuning your locomotive performance
it. To clear stall, press SET twice, holding it
for one second each time.
HIGH VOLTAGE SETTING
Press ENG, the locomotive ID#, then press
SET; the headlight will flash. Get your locomotive moving to the maximum speed you
want it to run, then press BOOST. Use this to
keep your locomotive from accidentally
being derailed at high speed.
MOMENTUM
Simulate the labored performance of a
locomotive pulling a heavy load with
momentum. Press L, M, or H (located under
CAB-1’s removable panel) for light, medium
or heavy momentum. The R2LC remembers
the setting until you change it. For delayed
response, use H. For quick response, choose L.
BOOSTING AND BRAKING
Use the BOOST and BRAKE command buttons for incremental control of speed and a
superior method for handling grades, stopsand-starts, and more. Plus, using BRAKE in
the Command environment gives you a
bonus RailSounds effect—the ultra-realistic
sound of squealing brakes.
STALL
Make your locomotive feel more responsive
by setting a “stall” voltage. Get your locomotive moving, then press SET; the locomotive
will stop. The headlight will flash, indicating
it’s in the SET mode. Turn the throttle clockwise to get the locomotive moving, then
decrease speed until the locomotive just
stops. Then press SET again; the R2LC
remembers the stall setting until you change
To clear this setting, press ENG,
Note! the ID#, then immediately
press BOOST.
SOUND QUALITY
To achieve your preferred RailSounds master volume level, use the volume control dial
located on the bottom of the locomotive (see
page 7). Turn the dial left or right to adjust
the volume to your liking.
For quick remote-control of volume below
the master setting—like muting—use the
CAB-1 numeric keypad’s volume control.
Pressing AUX1 and 4 on the keypad lowers
overall RailSounds output.
These settings will be lost when you
Note! assign a new locomotive ID number.
13
TrainMaster Command operations
Reprogramming R2LC circuit boards to restore features
D
ue to the inevitable derailments, static,
and the nature of electricity, it is possible that your R2LC could someday lose its
setup program.
The symptoms of this condition would be
unresponsiveness in Command mode. This
can be easily remedied by “reprogramming”
your R2LC using the following steps.
STEP 1: Move switch on locomotive from
RUN to PROGRAM.
STEP 2: Plug-in Command Base.
STEP 3: Place locomotive on track, then
turn on power to track.
STEP 4: Press “ENG” then input locomotive’s ID#. Press “SET.”
STEP 5: Press “ENG,” then the ID#,
“AUX1,” then press the number 4.
STEP 6: Turn off power to track and wait
ten seconds.
STEP 7: Remove locomotive from track,
move switch from PROGRAM to RUN.
STEP 8: Place locomotive back on track,
turn power on to track.
STEP 9: Press “ENG” and ID#, then operate as normal.
Maintaining your locomotive’s handrail antenna
our locomotive’s handrails are more
than just model grab irons—they’re
the R2LC’s antenna for receiving Command
Base digital communications. Please handle
the locomotive carefully to avoid handrail
damage. To ensure optimum reception, both
handrails are insulated from the tinplate
shell. If your locomotive experiences difficulty receiving Base communications, check the
handrail ends in the cab and pilot for the
presence of insulating material. Ensure that
each insulator is present and enjoys a proper
fit. Finally, prevent the handrails from touching any part of the die-cast locomotive cab.
Y
14
TrainMaster Command operations
Assigning your locomotive a new ID#
Example
Assign a new ID# to your
Command-equipped
locomotive
Set the locomotive PROGRAM/RUN
Switch to PROGRAM
Command Base ON
Place the locomotive on track
PowerMasters set to CMD or traditional
power supplies ON FULL
Turn track power on (PowerMasters):
Press BOOST
Program the locomotive with a new ID#:
s your fleet of Commandequipped Lionels grows, give
your locomotive its own ID#. Choose
from any number between 1 and 99.
Slide the locomotive’s
PROGRAM/RUN switch to PROGRAM. Plug-in the Command Base
and place the locomotive on track.
Then, power up.
Using CAB-1, press ENG, the locomotive ID#, then press the SET button located under CAB-1’s removable
panel. See the locomotive’s headlight flash; that’s your signal that
the programming has been accepted. Now slide the switch to RUN.
A
Press ENG
Press a number you choose
(the ID#)
Press SET
Set PROGRAM/RUN Switch to RUN
Your locomotive remembers its ID#
forever; change it any time with these
steps.
We recommend that you choose an easy-toremember ID# for your locomotives. Some
possibilities are part of the locomotive road
number, your age, or any two-digit number
that is not used by another locomotive. If
you like, write the number on a small piece
of tape and put this on the bottom of the
frame to aid in remembering.
Front
15
Maintaining and servicing your locomotive and
passenger cars
Lubricating your steam locomotive
Lubricate with
Lionel oil
sparingly
Lubricate with
Lionel oil
sparingly
Cab screws
Lubricate with
Lionel oil
sparingly
Lubricate with Lionel grease
sparingly
elp your Lionel steam locomotive
lead a long and productive life on
your railroad by maintaining it properly.
We recommend you purchase a Lionel
Lubrication and Maintenance Kit
(no. 6-62927), available from your
Lionel dealer. Two basic rules to keep in
mind: never over-lubricate (a small
amount will do), and avoid getting
grease or oil on the steam locomotive’s
wheels, contact rollers, or your track.
You’ll know your steam locomotive
requires lubrication when visual inspection reveals dryness on the parts indicated in the illustration. Remove accumulated dirt and dust before lubricating, and
always lubricate any locomotive emerging
from prolonged storage. Also, lightly lubricate the steam locomotive’s side rods after
each 25 hours of operation.
H
SIGNAL
ON
SMOKE
OFF
SIGNAL
ON
RAIL
PROG
OFF
RUN
SMOKE
RAIL
Lubricate with
Lionel oil
sparingly
Lubricate with
Lionel oil
sparingly
Program
Switch
Smoke
Switch
Cab screws
Do not lubricate your locomotive’s electric
motors. They have been pretested and all the
necessary moving parts have been sufficiently lubricated for life at the factory and
should run smoothly for many years to
come. If you have any difficulty in the operation of your engine, see the Warranty and
Service section at the end of this instruction
sheet for more information.
16
Maintaining and servicing your locomotive and
passenger cars
Lubricating your passenger cars
efore running your passenger cars,
lubricate all axle ends and wheels as
shown below. Remove dirt and dust before
lubricating. Always lubricate after prolonged
storage and after every 25 hours of operation.
B
Lubricate with
Lionel oil
sparingly
17
Maintaining and servicing your locomotive and
passenger cars
Servicing your locomotive’s lamps
Note! Before changing the lamps in your locomotive, be sure to check that the AUX2 command was not used to turn off the front headlight.
our locomotive is illuminated by two
lamps. One is located in the headlight
housing mounted on the boiler front. One
red lamp provides “ashpan glow” that shows
under the cab.
Lamp Numbers:
Headlight (1)
Ash Pan (1)
Y
610-9165-300
610-2724-301
SMOKE
PROG
18
OFF
RUN
Ash Pan Light
610-2724-301
ON
SIGNAL
RAIL
Headlight
610-9165-300
Servicing the passenger car lamps
ach passenger car is illuminated by two
lamps (part number 610-9165-300). To
replace the expired lamps, open the car roof,
locate the expired lamp, press in and turn to
remove. Replace with lamp number 6109165-300.
E
All lamps are available from your Lionel Service Station or direct from the Lionel
Note! Service Department.
19
Limited Warranty/Lionel Service
his Lionel product, including all
mechanical and electrical components,
moving parts, motors and structural
components, except for light bulbs, is warranted to
the original consumer-purchaser, for one year
against original defects in materials or
workmanship when purchased through an
authorized Lionel dealer.
This warranty does NOT cover normal wear
and tear, light bulbs, defects appearing in the
course of commercial use, or damage resulting
from abuse or misuse of the product by the
purchaser. Transfer of this product by the original
consumer-purchaser to another person voids this
warranty. Modification of this product voids this
warranty.
Any warranted product which is defective in
original materials or workmanship and is delivered
by the original consumer-purchaser to Lionel L.L.C.
or an authorized Lionel L.L.C. Service Station,
together with proof of original purchase will, at the
option of Lionel L.L.C., be repaired or replaced,
without charge for parts or labor. In the event the
defective product cannot be repaired, and a
replacement is not available, a refund of the
original purchase price will be granted. Any
products on which warranty service is sought must
be sent freight or postage prepaid, as transportation
and shipping charges are not covered by the
warranty.
T
In no event shall Lionel L.L.C. be
liable for incidental or
consequential damages.
Some states do not allow the exclusion or
limitation of incidental or consequential damages,
so the above exclusion may not apply to you.
This limited warranty gives you specific legal
rights, and you may have other rights which vary
from state to state.
to the nearest Authorized Lionel Service Station.
Your nearest Lionel Service Station can be found by
calling 1-800-4-Lionel, or by accessing our Website
at www.lionel.com.
If you prefer to send your product back to
Lionel L.L.C. for factory repair, you must first call
810-949-4100 or FAX 810-949-5429, or write to
Customer Service, P.O. Box 748, New Baltimore, MI
48047-0748, stating what the item is, when it was
purchased and what seems to be the problem. You
will be sent a return authorization letter and label
to ensure your merchandise will be properly
handled upon receipt.
Once you have received your return
authorization and label, make sure that the item is
packed to prevent damage during shipping and
handling. We suggest that you use the product’s
original packaging. This shipment must be prepaid
and we recommend that it be insured.
Please make sure you have followed all of the
above instructions carefully before returning any
merchandise for service.
Warranty Information
Please complete the information below and
keep it, along with your dated sales receipt. You
must present this and your dated sales receipt when
requesting warranty service.
Name ____________________________
Address ____________________________
Place of Purchase ____________________
Date of Purchase ______________________
Product Number ______________________
Product Description ____________________
Instructions for Obtaining Service
If service for this Lionel L.L.C. product is
required, bring the item, along with your dated
sales receipt and completed warranty information
_ ________________________________
©2001 LIONEL LLC, CHESTERFIELD MI 48051-1956
UNITED STATES OF AMERICA