1
Own r's
Manual
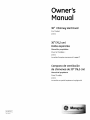
30" Chimneg Vent Hood
For Model:
ZV830
30" (76,2 cm)
Hotte aspirante
Manuel
du propri_taire
Pour la ModUles :
ZV830
La section frangaise commence 6 ta page 17
Campana de ventilaci6n
de chimenea de 30" (76,2 cm)
Manual
del propietario
Para Hodelo:
ZV830
La secci6n en espafiol empieza en la p6gina 29
49-80513
01-08 ]R
]
Consumer
Information
Chimney
Introduction
Hood
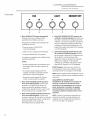
Your new Monogram chimney hood makes an eloquent statement of style and design. Whether gou
chose it for its puritg of design, assiduous attention to detail-or
for both of these reasons-gou'll
find
that your Monogram chimney hood's superior blend of form and function will delight 9ou for gears
to come.
Your Monogram chimney hood was designed to be elegant, get provide the venting
need when cooking. Its sleek design can be beautifull 9 integrated into the kitchen.
performance
9ou
The information on the following pages will help 9ou operate and maintain gour chimney hood
properlg.
Contents
Consumer Information
Important Phone Numbers ....................
Model and Serial Numbers ......................
Problem Solver ...............................
Product Registration .......................
Safetg Instructions ..............................
Warrantg ......................................
Before
using gour
chimneg
hood
15
2
8, 9
11-14
4
16
Read this manual carefullg. It is intended to help
gou operate and maintain gour new chimneg
hood properlg.
Keep it handg for answers to gour questions.
Controls and Features .........................
5
Care and Cleaning
Charcoal Filter ..................................
Filter Panel ......................................
7
6
Light Bulbs ......................................
Metal Grease Filter ..............................
Stainless Steel Hood Surfaces ...................
7
6
7
If gou don't understand something or need more
help, there is a list of toll-free consumer service
numbers included in the back section of this
manual.
OR
Visit our Website at: monogram.corn
Write
down the
model &
serial
numbers
You'll find them on a label on the hood.
These numbers are also on the Consumer Product
Before sending in this card, please write these
numbers here:
Ownership Registration Card packed separatelg
with gour hood.
Hodel Number
Visit monogram.corn and click on "Register Your
Appliance" to register gour chimneg hood.
Serial Number
Use these numbers in ang correspondence or
service calls concerning gour hood.
If gou
received a
damaged
hood
Immediatelg contact the dealer (or builder) that
sold gou the hood.
Consumer
Information
Chimney
Save time
& moneg
If gou
need
service
Hood
Before gou request service, check the Problem
Solver in the back of this manual.
It lists causes of minor operating problems that
9ou can correct goursel£
To obtain service, see the Consumer Services page
in the back of this manual.
NEXT,if gou are still not pleased, write all the
details-including gour phone number-to:
We're proud of our service and want gou to be
pleased. If for some reason gou are not happg with
the service gou receive, here are some steps to
follow for further help.
FIRST,contact the people who serviced gour
appliance. Explain whg gou are not pleased.
In most cases, this will solve the problem.
Manager, Customer Relations
GEAppliances
Appliance Park
Louisville, KY40225
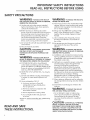
IMPORTANT SAFETY INSTRUCTIONS
READ ALL INSTRUCTIONS BEFORE USING
SAFETY PRECAUTIONS
IllA
Ol_lll_lt
_
VV/_I_I_I
I I_I_--TO
REDUCE THE RISK OF
FIRE, ELECTRIC SHOCK OR INJURY TO PERSONS,
OBSERVE THE FOLLOWING:
A. Use this unit onlg in the manner intended
bg the manufacturen
If gou have questions,
contact the manufacturer.
VV/_I_I_I
I I_Iti.I--TO
REDUCE THE RISK OF A
RANGE TOP GREASE FIRE:
A. Never leave surface units unattended at high
settings. Boilovers cause smoking and greasg
spillovers that mag ignite. Heat oils slowly an
low or medium settings.
B. Before servicing or cleaning unit, switch
power off at service panel and lock the service
disconnecting means to prevent power from
being switched on accidentallg. When the
service disconnecting means cannot be
locked, securelg fasten a prominent warning
device, such as a tag, to the service panel.
B. Alwags turn hood ON when cooking at high
heat or when flamb&ing food {i.e. Crepes
Suzette, Cherries Jubilee, Peppercorn Beef
Flamb6).
C. Do not use this unit with ang solid-state speed
control device.
D. Use proper pan size. Alwags use cookware
appropriate for the size of the surface
element.
D. This unit must be grounded.
C. Clean ventilating fans frequentlg. Grease
should not be allowed to accumulate on
fan or filter.
I 1/AI_I_I
CAUTION-FoRGENERAL
VENTILATING
VV/_I_I_I
USE ONLY. DO NOT USE TO EXHAUST
HAZARDOUS OR EXPLOSIVE MATERIALS AND
VAPORS.
W/_I_I_I
I I_Iti._--TO REDUCE THE RISK OF
INJURY TO PERSONS IN THE EVENT OFA RANGE
TOP GREASE FIRE, OBSERVE THE FOLLOWING*:
A. SMOTHER FLAMES with a close-fitting lid,
cookie sheet or metal tray, then turn off the
burnen BE CAREFUL TO PREVENT BURNS. If the
flames do not go out immediately,
EVACUATE
AND CALL THE FIRE DEPARTMENT.
B. NEVERPICKUPA FLAMING PAN--You mag be
burned.
C. DO NOT USE WATER, including wet dishcloths
or towels-a
violent steam explosion will
result.
D. Use on extinguisher
ONLY if:
1. You know gou have a Class ABC
extinguisher, and you alread 9 know
how to operate it.
2. The fire is small and contained in the
area where it started.
3. The fire department is being called.
4. You can fight the fire with gour back
to an exit.
*Based on "Kitchen Firesafetq Tips" published bg
NFPA.
I I_lt"
I I_I_--TO
REDUCE THE RISK OF
FIRE, ELECTRIC SHOCK OR INJURY TO PERSONS,
OBSERVE THE FOLLOWING:
A. Installation work and electrical wiring must be
done bg qualified person(s} in accordance with
all applicable codes and standards, including
fire-related construction.
B. Sufficient air is needed for proper combustion
and exhausting of gases through the flue
(chimneg) of fuel burning equipment to
prevent back drafting. Follow the heating
equipment manufacturer's
guidelines and
safetg standards such as those published bg
the National Fire Protection Association {NFPA),
and the American Societg for Heating,
Refrigeration and Air Conditioning
Engineers
{ASHRAE}, and the local code authorities.
C. When cutting or drilling into wall or ceiling, do
not damage electrical wiring and other hidden
utilities.
D. Ducted fans must alwags
outdoors.
be vented to the
W/_I_I_I
I I_I_--TO
REDUCE THE RISK OF
FIRE, USE ONLY METAL DUCTWORK.
• DO not attempt to repair or replace ang
part of gour hood unless it is specificallg
recommended
in this manual. All other
servicing should be referred to a qualified
technician.
CAUTION-AuTOMATICALLY
READ AND SAVE
THESE INSTRUCTIONS.
OPERATED
DEVICE. TO REDUCE THE RISK OF INJURY,
DISCONNECT FROM POWER SUPPLY BEFORE
SERVICING. THE UNIT IS EQUIPPED WITH AN
INTEGRAL DISCONNECTING SWITCH LOCATED
INSIDE THE BLOWER HOUSING.
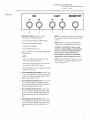
Controls and Features
Chimneg
Controls
FAN
--
LIGHT
,I,
--
oO 00
5
1
4
3
2
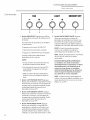
BOOST--Provides
NOTES:
• When ang button is active {turned on), all
outer rings will be illuminated.
• The hood can be turned OFF at ang time bg
pressing the MEMORY/OFF button.
• Alwags deactivate {turn off} the buttons when
the hood is not in use.
Press to turn
on or increase light level. The buttons allow gou
to cgcle to the desired setting. (There are four
light levels/settings and OFF)
LIGHT DECREASE ON/OFF Button. Press to turn
on or decrease light level. The buttons allow
gou to cgcle to the desired setting. {There are
four light levels/settings and OFF.)
FAN INCREASE ON/OFF Button, Press to turn
on or increase fan settings. The buttons allow
gou to cgcle to the desired setting. {Use to set
the fan speed to LOW, MED, HIGH, BOOST or
OFF.)
FAN DECREASE ON/OFF Button.
resets fan
AUTOMATICFAN FEATURE--Thehood fan
The hood will now turn off and the settings will
be memorized.
LIGHT INCREASE ON/OFF Button,
five minutes at the maximum
NOTE: BOOST can stag on longer than five
minutes when activated bg the auto sensor
3. Press MEMORY/OFF to save.
5
()
fan setting and then automaticallg
to HIGH.
fan and light settings.
2. Select desired settings.
4
4"
memorized
1. Press the MEMORY/OFF button.
3
MEMORY/OFF
MEMORY/OFF Button. Press to recall
To memorize desired fan and light settings:
2
Hood
Press to turn
on or decrease fan settings. The buttons allow
gou to cgcle to the desired setting. {Use to set
the fan speed to LOW, MED, HIGH, BOOST or
OFF.}
will turn on automatically or automatically
increase in speed if cooking temperatures
become too hot, The fan will turn off
automoticollg or decrease in speed when
temperatures cool to an appropriate level
NOTE: When the automatic feature is on, gou
can set the fan to a higher setting but not to
a lower setting or off.
Care and Cleaning
Chimney
For gour
safetg
Before servicing or cleaning the unit, switch power
off at the service panel and lock the service panel to
prevent power from being switched on accidentallg.
If the service panel cannot be locked,fasten a tag or
prominent warning label to the panel.
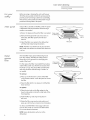
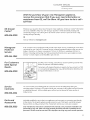
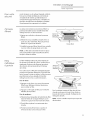
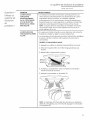
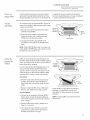
Filter panel
Greasewill accumulate on the filter panel. The panel
is dishwasher-safe and should be cleaned everg 6
months or as needed.
1. Pressin to release and lower the filter cover panel.
L
ooooo
Press corners
to unlock,
2. Remove the hinge barrel nuts and screws on
both sides. Shift filter panel to the left and
remove.
t
Filterpanel
3. Stand the filter cover panel in the dishwasher
with the drain holes facing the bottom.
NOTE:The filter must ALWAYSbe in place and the
filter panel must ALWAYSbe closed when the hood
is in use.
Metal
grease
filter
The metal filter traps grease released bg foods
from the cooktop. The filter also helps prevent
flames (from food, grease} from damaging the
inside of the hood.
For this reason, the filter must ALWAYSbe in place
and the filter panel must ALWAYSbe closed when
the hood is in use. The grease filter is dishwashersafe and should be cleaned everg 6 months, or
as needed.
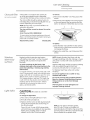
To remove:
1. Press up on the front two corners of the filter
cover panel to unlock. Lower the panel to access
the filter.
2. Pressthe filter latch in to release it. Pull the filter
down and out.
To replace:
1. Place the two tabs on the filter edge into the
lower locating slots in the left or right side of the
hood opening.
2. Push the filter up and snap it into place in
the hood.
3. Rotatethe filter cover panel up into position and
pressup on its front two corners to lock it into place.
To clean, swish the filter in hot soapg water and
rinse in clean water or wash it in the dishwasher.
Do not use abrasive cleansers.
NOTE:Some discoloration will occur in the
dishwasher.
Hood
Presscorners
Barrel
nut (2)
Care and Cleaning
Chimney
Charcoal filter
(on some models)
If the model is not vented to the outside, the
air will be recirculated through a disposable
charcoal filter that helps remove smoke and odors.
The charcoal filter should be replaced when it is
noticeabl 9 dirty or discolored (usually after 6 to 12
months, depending on hood usage).
NOTE:DO NOT rinse, or put charcoal filter in an
automatic dishwasher.
Hood
To remove:
1. Remove the metal filter-see
section.
Metal grease filter
2. Remove the charcoal filter in the same manner
as the metal grease filter bg pressing the filter
latch in to release it. Pull the filter down and out.
The charcoal filter cannot be cleaned. It must be
replaced.
Order Charcoal Filter WBO2X11342.
To inquire about purchasing replacement charcoal
filters or to find the location of a dealer nearest _tou,
please call our toll-free number:
National Parts Center
800.626.2002
To replace:
1. Insert the black charcoal filter into the opening.
Push the latch on both sides toward the center
and engage the flange.
2. Replace the metal filter-see
section.
Stainless
steel hood
surfaces
Regularlg polish the stainless steel exterior
with Stainless Steel Hagid" and the Honogram
polishing cloth, to preserve and protect the
fine finish.
NOTE:Reapply Stainless Steel Hagic with the
Honogram polishing cloth after cleaning or if your
unit comes in contact with water, to protect the
fine finish.
To avoid scratching the fine finish of the
stainless steel, wipe in the same direction as the
grain when polishing or cleaning any stainless
steel surface.
Stainless Steel Hagic and the Honogram polishing
cloth are available through GEParts and
Accessories, 800.626.2002 or monogram.com.
For regular cleaning, use clean water and a soft
cloth, if stains persist, wash with mild dish soap
using a soft cloth or nonabrasive pad. For more
difficult stains, make a solution consisting of
25% vinegar (white or red) and 75% waten Dip
a soft cloth into the solution and rub onto the
stainless steel to remove the stain. If these
methods do not remove the stains, dirt or
debris, call 800.GECARES.
Light bulbs
Metal grease filter
For Stainless Steel Hagic, order part number
WXIOX15.
Do not use appliance wax or polish on ang
stainless steel surface.
Do not use scouring pads, powdered cleaners,
bleach or cleaners containing bleach because
these products can scratch and damage
the finish.
Warrantg does not cover damage due to
improper cleaning methods.
CAUTION: Allow bulbs to cool before
touching.
To change the light bulbs:
1. Press and turn the light bulb face 1/4 turn.
2. The bulb will drop straight out.
& Replace with the same size bulb bg placing bulb
prongs into the keghole slots and turning 1/4
turn to lock in place.
These 120 volt, 50 watt, MR16 halogen bulbs
with GU10 bases are available at most specialtg
lighting stores, building centers and large
retailers. Ask for MR16 GUIO base bulb.
NOTE:Do not replace with bulbs greater
than 120 volts, SOwatts, or the lights will
automatically shut off and the rings around the
operating buttons will flash to indicate the bulbs
have exceeded the acceptable limits.
The Problem Solver
Chimneg
Questions?
Use this
problem
solver!
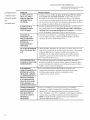
PROBLEM
FAN AUTOMATICALLY
TURNS ON OR INCREASES
IN SPEED AND CAN NOT
BE TURNED OFF OR
LOWERED IN SPEED
Hood
POSSIBLE CAUSE
The hood fan will turn on automatically
or automatically
increase in
speed if cooking temperatures
become too hot. The fan will turn off
automatically
or decrease in speed when temperatures
cool to an
appropriate level. Fan will also turn on automatically
when the hood
electronics are too hot.
NOTE: When the automatic fan feature is on, you can set the fan to
a higher setting but not to a lower setting or off.
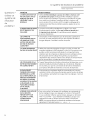
FAN DOES NOT
OPERATE WHEN
TURNED ON
A fuse may be blown
reset circuit breaken
or a circuit breaker tripped.
Replace fuse or
The power disconnect switch inside the hood may be switched of/
Remove the metal grease filter and the charcoal filter (if present} and
flip the switch on.
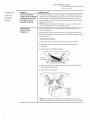
LOCATE ON/OFF SWITCH.
1. Press in to release and lower the filter cover panel at the front.
2. Push the filter latch toward the opening and pull downward
to remove.
3. Remove the charcoal filter, if present.
<.o
Presscorners
4. Reach into the motor compartment
at the front of the opening.
Filtel
latch
and locate the ON/OFF switch
S. Press switch to ON position.
O
Push-bu_on
switch
(horizontal
view from
inside
opening)
NOTE: If the hood blower needs to be removed for service, use the
disconnect switch for your safety. Pressthe switch to the OFFposition.
The Problem Solver
Chimney
Questions?
Use this
PROBLEM
problem
solver!
SLOWER THAN NORMAL
FAN FALLS TO CIRCULATE
AIR OR MOVES AIR
FAN KEEPS GOING
OFF AND ON
Hood
POSSIBLE CAUSE
Check to be sure the metal grease filter and the charcoal filter
(if present) are clean. Clean the metal grease filter (see the Metal
grease filter section) and, if the hood is recirculated {not vented to the
outside), replace the charcoal filter (see the Charcoal filter section).
If cleaning and replacing the filters does not correct the problem,
call for service.
The motor is probablg overheating and turning itself off. This can
be harmful to the motor. Check to be sure the filter is clean and
check ductwork for blockage. If off and on cgcling continues, call
for service.
LIGHTS WILL NOT WORK
AND RINGS AROUND THE
OPERATING BUTTONS
• Light(s/were
replaced with bulbs with greater than the 120 volt, 50
watt limit. Replace with the correct tgpe and size bulb. See the
Light bulbs section.
ARE FLASHING
LIGHT WILL NOT STAY
ON HIGH SETTING
Use 120 volt, 50 watt, MR16 halogen bulbs with a GUIO base and
make sure theg are inserted securelg. It is important to replace with
bulbs that do not exceed the recommended
wattage. Higher wattage
bulbs will cause the outer rings to blink, and the lights will not
function at the highest levels. See the Light bulbs section.
THE HOOD CONTROLS
ARE NOT OPERATING
Disconnect power to the hood bg turning the circuit breaker off or bg
removing the fuse in the home fuse box. Wait 30 seconds to allow the
hood controls to reset and then replace the fuse or move the circuit
breaker back on.
CORRECTLY
SEQUENTIAL PRESSES
OFTHE LIGHT OR FAN
BUTTONS WILL CHANGE
THE SETTING FROM THE
LOWEST SETTING TO OFF
So that gou can easil9 set the controls to the desired setting, the hood
is designed for the light and fan buttons to cgcle through the settings.
This is normal.
TO THE HIGHEST SETTING,
OR FROM THE HIGHEST
SETTING TO OFF TO THE
LOWEST SETTING
WHEN PRESSING THE
MEMORY/OFF BUTTON
TO TURN ON THE LIGHT,
THE FAN COMES ON
INSTEAD
For gour convenience, it is normal for the lights and fan to remember
their last setting when gou press the Memorg/Off button. If gou
want anlg the lights an, press the "FAN +" (or the "FAN -" ) button to
turn the fan off. When gou power the hood up next time, onlg the
lights will function. NOTE: You mag turn the fan and lights off or on
separatelg, using the "+" or "-" buttons.
Notes
Chimneg
10
Hood
fiopo.i.I!O_ _UD_JOdLUl
UO!:lOJ_S!6aEl d!LISJaUMO
:[:)npoJd Jawnsuo3
saouo!lddv
99
IIIII P,oc
1st Class
Letter
Stamp
Here
General Electric Company
Warranty Registration Department
P.O. Box 32150
Louisville, KY 40232-2150
11
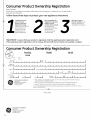
Consumer Product Ownership Registration
Dear Customer:
Thank you for purchasing
have you as a customer!
Follow these
three
our product
and thank you for placing your confidence
steps to protect
2
Complete and mail
gour Consumer
Product Ownership
Registration todeg.
Have the peace of mind
of knowing we can
contact you in the
unlikely event of a
safety modification.
Important:
gour new appliance
in us. We are proud to
investment:
3
After completing this
registration, write gour
model and serial
numbers in this manual,
You will need this
information should you
require service.
Our service number
is 800,4Lt4.1845.
your Owner's
Manual carefullg. It will
help you operate your
new appliance properly.
Read
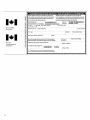
To ensure that gour product is registered, mail the separate product registration
product registration
card is missing, fold and mail the form below. No envelope
If the separate
card.
is needed.
FOLD HERE
Consumer Product Ownership Registration
Hood
Product
_
Mr
MS
Model
Serial
Mrs
[ i
First
I I
Name
Miss [ i
I
I
I
I
I
I
I
I
ILast
Name I
I
I
I
I
I
I
I
I
I
I
I
I
I
Street
I
Address
I
IIIIIIIIIIIIIIIIIIIIIIIIII
I
CRy I
Apt. #
,I
I
I
,,,,,IE-ma,
I
I
IIIIIIIIIIIIIIState
I
I
Address*l,,,,,,,,,,,,,,I
I
I,
IZipI
Code
llll
I
Dote Placed
In Use
Month
I
Dayl, I
GE Consumer
& Industrial
Appliances
General Electric Compong
Louisville, KY/40225
moRogl-arri.com
Yeorl, I
*
NumberPh°ne
I , , I-I , , I-I , , , I
Please provide gout e-moil addless to receivei via e-mail, discountsi special offers and other important
communications flora GEAppliances {GEA}
Check here if 9ou do not want to receive communications
flom GEA's corefu]]g selected partners
FAILURETO COMPLETEAND RETURNTHIS CARD DOES NOT DIMINISH YOURWARRANTY RIGHTS
For more information about GEA's privocg and data usage polic9, go to monogrorn cam end dick on "Pnvocg
Policg" or call 800626222/4
TAPE CLOSED
Appliances
e_
.
J_2
GeneralElectricCompang
GEConsumer
&Industrial
Louisville,
KY/40225
monogramcorn
Please place in envelope and mail to:
Veuillez mettre dans une enveloppe et envoyez & :
OWNERSHIP
REGISTRATION
P.O.BOX1780
MISSISSAUGA,
ONTARIO
L4Y4G1
(FORCANADIAN
CONSUMERS
ONLY)
13
_easeregisteryourproducttoenableusto contactyou
I Veui:ezenregistTer
vot_eproduitafindenouspennetize
de
intheremoteeventasafetynoticeisissuedforthisproduct
I communiqueravecvoussijamaisunavisdes_cu_concemant
andto a'.;owforefficientcommunication
undertheterms Ice produitOtaitOmisetdecommuniquer
faci'.ement
avecvousen
ofyourwarranty,shouldtheneedadse.
LverbJdevo_egarar_e,silebesoins'enfaiLsendr.
:
REGISTEROkLUNE:
W',Nw, geapp;ia nces.ca
MAIL TO:
RO. BOX 1788,M;SS;SSAUGA
0NTAR;0, L4Y4G1
ENREGiSTREMENTSUR iNTERNET A: www_e-'ectromena_Lers_le_ca
POSTERA:
[] MR./M
[] MRS./MME. I FiRSTNAME/PRENOM
dASTNAME/NOM
For Canadian
Customers
Z
_',
',
I
_ :
0,
[] MiSS/MLLE.[] M&
STREETNO/N° RUE
I
_
I
r
:STREETNAME/RUE
:AP_ NO/APR/RR#
i
3_IY/ViLLE
FPROViNCE
I
Z
WI i
m
:
:
Pour ies
Consommateurs
Canadiens
AREA CODE/IND. REG.ITELEPHONE
7
_
i
j_:
DiDYOUPURCHASEASERViCECONTRACTFORTNiSAPPLiANCE?
AVEZ-VOUSACHETEUNCONTRATDESERViCEPOURCETAPPAREiL?
YES/OUi [3
NO/NON []
]
_ MODEL / MODt_LE
I.--I
J
M
_J
I
I
14
E-MAiL
NAME OFSELLINGDEA{ ER/ NOM DUMARCHAND
I
I
I
I
I
Y_A
..............................
i
T: FOSTALCODE/ FOSTAL
I'
CORRESPONDENCE
i CORRESPONDANCE
I
[] ENGLISH
[] FRAN_AIS
i do not wishto neceiveanypromotbnai offersregardingthis product,
Je nedesirepasre_evoir(fot_es promot_onnei_s
corr_rnant ce produ&
,1 .................................................................................
SERiAL/SERiE
iFYES/SiOUi:EXPiRAT_ON
v_,
Consumer
Services
Chimneg
Hood
With the purchase of gour new Monogram
appliance,
receive the assurance that if gou ever need information
or
assistance from GE, we'll be there. All gou have to do is call-toll-free!
GE Answer
Center ®
800.626.2000
Whatever gour question about ang Honogram major appliance, GE Answer Center ®information
service is available to help. Your call-and gour question-will be answered promptlg and
courteouslg. And gou can call ang time. GE Answer Center ®service is open 24 hours a dag,
Hondag through Saturdag.
OR
Visit our Website at: monogram.com
Monogram
Preferred
Service
800.444.1845
For Customers
With Special
Needs...
800.626.2000
Service
Contracts
800.626.2224
AGE consumer service professional will provide expert repair service, scheduled at a time that's
convenient for you. Many GE Consumer Service company-operated locations offer you service
today or tomorrow, or at gour convenience (7:00 a.m. to Z0:00 p.m. weekdays, 8:00 a.m. to
6:00 p.m. Saturday and Sundag). Our factory-trained technicians know your appliance inside
and out-so most repairs can be handled in just one visit.
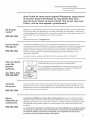
GE offers, free of charge, a brochure to assist in planning a barrier-free
kitchen for persons with limited mobilitg.
..........
!i
Consumers with impaired hearing or speech who have access to a TDD
or a conventional teletgpewriter mag call 800.TDD.GEAC(800.855.4522)
to request information or service.
You can have the secure feeling that GE Consumer Service will still be there after gour
warrantg expires. Purchase a GE contract while gour warrantg is still in effect and gou'll receive
a substantial discount. With a multiple-gear
contract, gou're assured of future service at
todag's prices.
Parts and
Accessories
Individuals qualified to service their own appliances can have parts or accessories sent directlg
to their home. The GE parts sgstem provides access to over 47,000 parts...and all GE Genuine
Renewal Parts are fullg warranted. VISA, HasterCard and Discover cards are accepted.
800.626.2002
User maintenance instructions contained in this manual cover procedures intended to be
performed bg ang user, Other servicing generallg should be referred to qualified service
personnel, Caution must be exercised, since improper servicing mag cause unsafe operation,
15
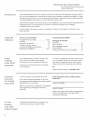
Warranty
Chimney
YOUR MONOGRAM
HOOD WARRANTY
Staple
sales
slip or cancelled
check
here.
purchase
date is needed
to obtain
service
WHAT IS
COVERED
Hood
Proof of original
under
warrantg.
LIMITED ONE-YEAR WARRANTY
For one gear from date of original purchase, we will provide, free of charge, parts and
service labor in gour home to repair or replace ang part of the hood that fails because
of a manufacturing defect.
This warrantg is extended to the original purchaser and ang succeeding owner for products
purchased for ordinarg home use in the 48 mainland states, Hawaii and Washington, D.C.
If the product is located in an area where service bg a GEAuthorized Servicer is not available,
gou mag be responsible for a trip charge or gou mag be required to bring the product to an
Authorized GE Service Location for service. In Alaska the warrantg is the same except that it
is LIMITEDbecause gou must pag to ship the product to the service shop or for the service
technician's travel costs to gour home.
All warrantg service will be provided bg our Factorg Service Centers or bg our authorized
Customer Care®servicers during normal working hours.
Should gour appliance need service, during warrantg period or begond, call 800.444.1845.
Please have gour serial number and model number available when calling for service.
WHAT IS NOT
COVERED
• Service trips to gour home to teach gou
how to use the product.
• Replacement of house fuses or resetting
of circuit breakers.
• Failure of the product if it is used for
other than its intended purpose or used
commerciallg,
• Improper
• Incidental or consequential damage
caused bg possible defects with this
appliance.
Ifgou have an installation problem,
contact gour dealer or installer. You are
responsible for providing adequate
electrical, gas, exhausting and other
connecting facilities as described in the
Installation Instructions provided with
the product.
• Replacement of the replaceable filters.
• Damage to the product caused bg
accident, fire, floods or acts of God.
• Damage caused after deliverg.
I
installation.
• Product not accessible
service,
to provide
required
as provided in this Limited Warrantg. Ang implied warranties, including the implied
warranties of merchantabilitg or fitness for a particular purpose, ore limited to one
gear
EXCLUSIONOF
or the shortest
IMPLIED
period
WARRANTIES--Your
allowed by taw. sole and exclusive remedy is product repair
Some states do not allow the exclusion
or limitation
of incidental
or consequential
damages,
the above limitation or exclusion mag not applg to gou. This warrantg gives gou specific legal
rights, and gou mag also have other rights which varg from state to state.
To know what gour legal rights are in gour state, consult gour local or state consumer affairs
office or gour state's Attorneg General.
15
Warrantor:
General Electric Compang. Louisville, KY 40225
so
Information
de consommateur
Hotte
Introduction
ospironte
Votre nouvelle hotte aspirante Monogram constitue une d&monstration _loquente du style et dessin.
Que vous la choisissiez pour la puret& de son design, pour I'attention soign_e de ses d_tails-ou pour
ces deux raisons b la fois-vous vous apercevrez que la fusion sup&ieure de forme et de fonction de
votre hotte aspirante Honogram vous ravira pour les ann_es 8 venir.
Votre hotte Monogram a 6t_ conque dans un souci d'_l_gance, tout en garantissant les performances
d'aspiration dont vous avez besoin pour cuisiner. Son design aux lignes pures s'int_grera
parfaitement dans votre cuisine.
Les informations des pages suivantes vous aideront b utiliser et b entretenir correctement votre
hotte aspirante.
Table des
mati_res
Service au consommateur
Commandes et param_tres
En registrement du produit ................
Garantie .......................................
Instructions de s6curit_ ........................
Hod_le et num6ro de s&ie ...................
25, 26
28
19
17
Num6ros de t616phone importants ...........
27
Resolution de probl_mes ..................
23, 24
Avont
d'utiliser
votre hotte
ospironte
Lisez attentivement
ce manuel. II a &t_ con_u
pour vous aider b utiliser et b entretenir
correctement
votre nouvelle hotte aspirante.
Conservez-le 6 port_e de main pour r6pondre
vos questions.
..................
20
Nettogage et entretien
Ampoules .....................................
Filtre b charbon ...............................
22
22
Filtre m6tallique b graisse ....................
Panneau filtrant ...............................
21
21
Surfaces de la hotte en acier inoxgdable ...... 22
Si vous ne comprenez pas quelque chose ou que
vous oyez besoin d'aide, vous trouverez la liste
des num6ros d'appel gratuit du service apr_svente au verso de la couverture de ce manuel.
OU
Visitez notre site web sur : monogram.com
Notez les
num&os
de module
et de s&ie
Vous les trouverez
sur I'etiquette
de la hotte.
Ces num&os figurent &galement sur la carte
d'enregistrement
de propri6t& du produit emball6
s_par&ment avec votre hotte.
Allez sur monogram.corn et cliquez sur "Enregistrez
votre appareil" pour enregistrer votre hotte
aspirante.
Avant d'envoger la carte, veuillez noter les
num6ros ici :
Num&o de mod@le
Num&o
de s&rie
Utilisez ces num&os dons toute correspondance
ou pour tout appel au service apr_s-vente,
concernant votre hotte.
Si vous
recevez
une hotte
endommag#e
17
Contactez imm_diatement le revendeur (ou le
constructeur) qui vous a vendu la hotte.
Information
de consommateur
Hotte
ospironte
Economisez
du temps et
de I'argent
Avant de demander I'assistance, reportez-vous
au r&solveur de probl_me figurant au dos de ce
manuel.
II r_pertorie les causes des dgsfonctionnements
mineurs que vous pouvez corriger par vos propres
mogens.
Si vous
Pour utiliser le service, consultez la page du
service au verso de la couverture de ce manuel.
ENSUITE,si vous _tes toujours m_content,
&crivez tousles d_tails-g compris votre num&ro
de t&l&phone-6 :
oyez
besoin
d'une
Nous sommes
intervention
voulons que vous en sogez satisfait. Si, pour une
quelconque raison, vous &tes m_content du
service fourni, voici la proc&dure 6 suivre pour
obtenir une aide suppl_mentaire.
tiers de notre service et nous
PREMIEREMENT,
contactez la personne qui a
r_par& votre appareil. Expliquez-lui les raisons de
votre m6contentement. Dans la plupart des cas,
cela r&soudra le probl_me.
18
Manager, Customer Relations
GE Appliances
Appliance Park
Louisville, KY 40225
J
S
INSTRUCTIONS DE SECURITE IMPORTANTES
LISEZTOUTES LES INSTRUCTIONS
AVANT D'UTILISERVOTREAPPAREIL
PRf CAUTIONS EN MATIn'RE DE SECURITf
AVERTISSEMENT :
AVERTISSEMENT: RI_DUISEZ LE
POUR REDUIRE LE RISQUE D'INCENDIE,
DE SECOUSSEELECTRIQUE OU DE BLESSURE
CORPORELLE, OBSERVEZ LES pRISCAUTIONS
SUIVANTES :
RISQUE D'UN FEU DE GRAISSE SUR LA SURFACE
DE CUISSON DU FOUR :
A. N'utilisezcet appareil que de la mani_re pr_vue
par le fabricant, Si vous avez des questions, appelez
lefabricant.
B.Avantde r@parer
ou de nettoyervotreappareil,
d6branchezle courantau niveaudu ponneau
de serviceet verrouillezlesm_canismesde
d_branchementdeservicepour_vitertout
braochementaccidentelau courant.Sivousne pouvez
pasverrouillerlesm_canismesde d_branchementde
service,attachezsoigneusementun avertissementbien
visible,commeune@iquette,au panneaude service.
C.N'utilisezjamais cet appareilavecun m_canisme
de r_glagede la vitesse@semi-conducteurs,
D.Cetappareildolt @rebien mis6 la terre.
ATTENTION : UNIQUEMENT
_, USAGE
DE VENTILATION GI_NI_RALE.N'UTILISEZ JANAIS
POUR L'I_CHAPPENENT DE MATII_RESET DE
VAPEURS EXPLOSIVES.
AVERTISSEMENT : POUR
RI_DUIRE
LE RISQUE DE BLESSURECORPORELLE SI DE LA
GRAISSE PREND FEU SUR LA SURFACE DE CUISSON
DU FOUR, SUIVEZ LES INSTRUCTIONS SUIVANTES* :
A. ETOUFFEZ
LESFLAMHESavec un couvercle qui
convient, une t61e6 biscuits ou un plateau en m_tal,
puis _teignez le br01eu_FAITESBIENATTENTIONDE NE
RASVOUSBROLER.
Si leeflammes ne s'@eignent pas
imm@diatement,SORTEZETAPPELEZLESPOMPIERS.
B. NE DEPLACEZJAMAISUNECASSEROLLE
OUI FLAMBE-Vous pouvez vous brQleE
C. N'UTILISEZJAMAISD'EAU,en particulier de serviette ou
de chiffon mouill@-il se produira une explosion violente
de vapeur brQlante,
D. N'UTILISEZ UN EXTINCTEUR que si:
1. Vous avez un extincteur
comment
de classe ABC et vous savez
I'utiliser;
2, Lefeuest r_duitet confin__ I'endroitoOil a
commence;
3. Vous avez d_j6 appel_ leepompiers;
4, Vous combattez leeflammes en tournant le dos 6
une sortie.
* Bas6sur I'ouvrage intitul6 <<KitchenFire Safetg Tips>>
publi6 par la NFPA,
LISEZ ET CONSERVEZ
CES INSTRUCTIONS.
A. Nelaissez
jamais sanssurveillancelesunit@s
de cuisson
de surface6 unetemp@ature@lev@e.
Lebouillonnement
oocasionnedesd_bordements
fumantset graisseuxqui
peuventprendrefeu.Chauffez6 feudouxlessubstances
huileuses,
avecun r@glage
basou mogen.
B.Nepr@arezpasdesmetsflamb@s
sur la cuisini@re.
Sivouspr@arezdes metsflamb@s
sousla hotte,mettez
le ventilateuren marche,
C. Nettogez lesm6canismes de ventilation fr@quemment.
II ne faut pas permettre une accumulation de graisse sur
le ventilateur ou sur lefiltre.
D, Utilisezune casserole de bonne taille. Utilisez toujours
un ustensile de cuisine qui convienne au diam@re de
1'616mentde cuisson.
AVERTISSEMENT: POUR
RI_DUIRE
LE RISQUE D'INCENDIE, DE SECOUSSEI_LECTRIQUE
OU DE BLESSURE CORPORELLE, OBSERVEZ LES
pRI_CAUTIONS SUlVANTES :
A. Vous devez faire ex6cuter tousles travaux d'installation
et de c6blage 61ectriquepar une personne qualifi6e,
conform6ment 6 tous leecodes et les normes en
vigueur, en particulier ceux de construction relatifs
aux incendies.
B.Vousdevezassezd'airpouravoirunebonnecombustion
et permettreF@vacuation
desgazpar le conduitde
chemin_edu materielde combustiondu carburant,afin
d'_vitertout retourd'ai_Suivezlesdirectivesdu fabricant
de materielde combustionet lesnormesde s@curit@
commecellespubli@es
par la NationalFireProtection
Association
(NFPAI
et I'AmericanSocietgfor Heating,
Refrigeration
and AirConditioningEngineers
(ASH
RAE},
ainsiquelesmodalit@s
descodesIocau>¢
C.Sivousfaitesun trouou uneouverturedans un murou
un pbfond, n'endommagezpaslesills @lectriques
et les
autresinstallationscach@es
de servicepublic.
D.Vousdeveztoujoursaiimenterlesventilateursdonsles
conduitsen air en provenancede I'ext_rieu_
AVERTISSEMENT: POUR
RI_DUIRE
LE RISQUE D'INCENDIE, N'UTILISEZ QUE DES
CONDUITS EN MI_TAL.
• N'essagezjamais de remplacer ou de r6parer un
616mentde votre hotte si le pr6sent manuel ne le
recommande pas express6ment, Tout autre entretien
dolt _tre effectu6 par un technicien qualifi&
ATTENTION : APPAREIL
COMMANDI_
AUTOMATIQUEMENT. AFIN DE RI_DUlRE LES
RISQUES DE BLESSURE, DI_BRANCHEZ
L'APPAREIL DE L'ALIMENTATION I_LECTRIQUE
AVANT DE PROCI_DER _, UNE RI_PARATION.
L'APPAREIL EST 1_gUIpI_ D'UN SECTIONNEUR
INTI_GRAL SITUE A L'INTERIEUR DU
LOGEMENT DU VENTILATEUR.
19
Commandes et param@tres
Hotte
Commandes
FAN
-
LIGHT
,I,
--
o9 ¢¢
5
4
Bouton MEMORV/OFR Appugez pour afficher
les param&tres m&moris_s de ventilateur et de
luminosit&
Pour m@moriser les param@tres de ventilateur
et de luminosit@ :
1. Appuyez sur le bouton MEMORY/OFF.
2. S_lectionnez les param@tressouhait@s.
3. Appuyez sur HEHORY/OFFpour enregistren
La hotte va d_sormais
param_tres
s'_teindre et les
seront conserves.
NOTES :
• Lorsqu'un bouton est actif (enclench_}, tous
les anneaux externes seront allum&s.
• La hotte peut &tre mise sous tension (OFF)
6 tout instant en appugant sur le bouton
HEHORY/OFR
• Veillez _ toujours d_sactiver (_teindre) les
boutons si vous ne comptez pas utiliser la
hotte.
Bouton LIGHTINCREASEON/OFR Appugez
dessus pour enclencher ou augmenter le niveau
de luminosit& Les boutons vous permettent de
naviguer jusqu'au param_tre souhait& (Ouatre
niveaux/param&tres de luminosit_ sont
disponibles ainsi que OFF.}
Bouton LIGHTDECREASEON/OFR Appugez
dessus pour enclencher ou baisser le niveau de
luminosit& Lesboutons vous permettent de
naviguer jusqu'au param_tre souhait& (Ouatre
niveau×/param_tres de luminosit_ sont
disponibles ainsi que OFF.}
Bouton FAN INCREASEON/OFE Appugez
dessus pour enclencher ou augmenter les
param_tres du ventilateur. Les boutons vous
permettent de naviguer jusqu'au param_tre
souhait& (Utilisez-les pour r_gler la vitesse du
ventilateur sur LOW, HED,HIGH, BOOSTou OFR)
20
3
ospironte
MEMORY/OFF
4"
()
2
Bouton FAN DECREASEON/OFE Appugez
dessus pour enclencher ou baisser les
parametres du ventilateur. Les boutons vous
permettent de naviguer jusqu'au param_tre
souhait& (Utilisez-lespour r_gler la vitesse du
ventilateur sur LOW,PIED,HIGH,BOOSTou OFF.)
BOOST--Fournit cinq minutes au niveau
maximum du ventilateur et red_marre
automatiquement
le ventilateur
sur HIGH.
NOTE: BOOSTpeut rester plus de cinq minutes
d&s Iors qu'il est activ_ par le capteur
automatique.
FONCTION VENTILATEUR AUTOMATIQUE-Le ventilateur de la hotte s'enclenchera
automatiquement
automatiquement
ou augmentera sa vitesse
si les temperatures
de
cuisson sont trop _lev_es, Le ventilateur
s'_teJndra Automatiquement
ou baJssera sa
vitesse Iorsque tes temperatures
baissent
pour atteindre
un niveeu acceptable.
NOTE : Lorsque la fonction automatique est
activ_e, vous pouvez r_gler le ventilateur surun
niveau plus &lev_ mais non pas surun niveau
inf_rieur ou sur OFR
Entretien et nettogage
Hotte ospironte
Pour votre
sdcurit
Avant de r@arer ou de nettoger I'appareil,mettez-le
hors service _ I'aidedu tableau de commande et
verrouillezde din d'6viter que I'alimentation ne
s'enclenchement par inadvertance. Si le tableau ne
peut @treverrouill6,fixez une @tiquetteou _tiquette
d'avertissement bien apparente sur le tableau.
Panneou
filtrant
La graisse s'accumulera sur le panneau filtrant. Le
panneau est lavable au lave-vaisselleet doit @tre
nettog_ tousles 6 ou selon les besoins.
1. Appuez pour rel(_cherou abaisser le panneau
filtrant.
les coins pour
ECFOU
baillet
2. Retirez les _crous _ barillets articul_s et les vis
(2)
T
situ6s aux deux extr6mit6s. Placez le panneau
filtrant sur la gauche et retirezde.
Panneau filtlant
3. Installez le panneau filtrant dans le lave-vaisselle
avec les orifices de purge situ_s vers le bas.
NOTE : Le filtre doit TOUJOURS@trebien en place
et le panneau filtrant doit TOUJOURS@treferm6
Iorsque la hotte est utilis@e.
Filtre
m4tollique
8 graisse
Le filtre m@talliqueattrape la graisse lags@ par
les aliments de la table de cuisson. Le filtre perme
&galement d'6viter que les flammes (provenant
des aliments, de la graisse} abiment I'int_rieur
de la hotte.
3
Jescoins pour
d@loquer,
Pour cette raison, le filtre doit TOUJOURS &tre bien
en place et le panneau filtrant doit TOUJOURS 6tre
ferm_ Iorsque la hotte est utilis@. Le filtre _ graisse
peut @trelav_ au lave-vaisselle et il doit @tre
netto96 tousles 6 mois ou selon les besoins.
Pour le retirer
:
1. Appugez sur les deux coins avant du panneau
filtrant pour d_bloquen Abaissez le panneau
pour acceder au filtre.
du filtre
2. Appugez sur le Ioquet du filtre pour le rel_chen
Rabattez et tirez le filtre.
Pour le nettoger, trempez le filtre dans de I'eau
chaude savonneuse et rincez _ I'eau froide ou
Pour le remplacer :
lavez-le dans le lave-vaisselle. N'utilisez pas de
nettogants abrasifs.
1. Placez lesdeux languettes de I'extr&mit& du filtre
dans les fentes de montage inf_rieures sur le
c6t_ droit ou gauche de I'ouverture de la hotte.
NOTE : Le lave-vaisselle risque de provoquer des
d6colorations.
2. Tirez le filtre et placez-le correctement dans
la hotte.
3. Pivotezle panneau filtrant dans so position et
enfoncezses deuxcoins avant pour le fixen
21
Entretien et nettogage
Hotte aspirante
Filtre 8
charbon
(sur certains
modSles)
Surfaces
de la hotte
en acier
inoxgdable
Si le mad&le n'est pas ventil_ vers I'ext6rieur, I'air
sara renvog_ _ travers un filtre 6 eharbon actif
jetable qui permet d'_vacuer la fum_e et les
odeurs.
Le filtre 6 charbon doit _tre remplac_ Iorsqu'il est
particuli_rement sale ou d_color& (an g_n&ral
apr_s 6 6 12 mois, en fonction de I'utilisation qui
est faite du filtre}.
NOTE : NErincez PAS,ou NE mettez PASle filtre 6
charbon actif dans un lave-vaisselle automatique.
Le flltre 6 charbon actif ne peut _tre nettog& II
doit _tre remplac@.
Commander un filtre 6 charbon actif
WBO2Xl1342.
Pour savoir oOcommander des filtres 8 chorbon de
rechange ou pour connaTtreI'adressedu revendeur
le plus proche, veuillez appeler gratuitement le :
Centre national de pi_ces
800.561.3344
Cirez r_guli_rement I'ext_rieur en acier inoxgdable
6 I'aide du produit Stainless Steel Magic et du
chiffon de cirage Honogram afin de preserver
et de prot6ger la la finition.
Afin d'_viter de rager la finition en acier
inoxgdable, essugez dans le m6me sens que le
grain Iorsque vous cirez ou nettogez une surface
en acier inoxgdable.
TM
Pour un nettogage r_gulier,utilisez de I'eau propre
et un tissu doux. Si la t_che persiste, lavez avec du
liquide de vaisselle non corrosif _ I'aided'un chiffon
doux ou d'une lingette non abrasive. Pour les t(_ches
les plus difficiles,_laborez une solution compos_e de
25 % de vinaigre (blanc ou rouge} etde 75 % d'eau.
Plongezun tissu doux dans la solution et grattez sur
I'acier inoxgdable pour retirer la t(_che.Si vous ne
parvenez pas 6 retirer lest_ches, salet6s ou les
r_sidus,appelez 800.561.3344.
Ampoules
Pour le retirer
:
1, Retirez le filtre m_tallique--voir le section Filtre
m#tallique 6 graisse.
2. Retirezle filtre 6 charbon de la m&me maniere
que le filtre 6 graisse en appugant sur le Ioquet du
filtre pour le reDche, Rabattez ou tirez sur le filtre.
Pour le remplacer :
1. Ins&rezle filtre 6 charbon noir dans I'ouverture.
Poussezle verrou des deux c6t6s vers le centre
et engagez le bride.
2. Replacez le filtre m6tallique--voir le section Filtre
m_tallique 6 graisse.
NOTE : Appliquez _ nouveau le produit pour acier
inoxgdable Stainless Steel Hagie 5 I'aide du chiffon
de cirage Honogram apr_s nettogage ou si votre
appareil entre en contact avec I'eau afin de
prot6ger la finition.
Le produit Stainless Steel [Vlagic et le chiffon de
cirage Honogram sont disponibles parmi les
composants et accessoires GE,en appelant le
800.561.3344 ou sur monogram.com.
TM
Pour le praduit Stainless Steel Hagic, commandez
en indiquant le num_ro de piece WX10X15.
N'utilisez pas de cire ou de lustrant pour appareil
sur une surface en acier inoxgdable.
N'utilisez pas de lingettes de d_capage, de poussi_re
nettogante, d'eau de Javel ou de nettogants
contenant de I'eaude Javel, ces produits 6tant
susceptiblesde rager ou d'ab_merla finitian.
La garantie ne couvre pas les dommages dus
des m6thodes de nettagage inappropri_es.
ATTENTION
: Laissez'es ampoules
refroidir avant de les toucher.
Pour remplacer les ampoules :
1. Appugez et pivotez I'ampoule d'un 1/4 de tour.
2. L'ampoule tombera d'elle-m_me.
3. Remplacezda par une ampoule de la re@metaille
en plaqant les broches de I'ampoule dans les
orifices et en pivotant d'un 1/4 de tour pour la fixer.
Ces ampoules halog_nes 120 volts, 50 watts,
MR16 _ culots GUIO sont disponibles aupr@sde
boutiques sp6cialis@es,centres de construction
et de d_taillants. Demandez I'ampoule 6 culot
MR16 GUIO.
22
NOTE: Ne les remplacez pas par des ampoules
sup_rieures 6 120 volts, 50 watts, ou les lampes
s'6teindront automatiquement et les anneaux
autour des boutons de mise en marche
clignoteront afin d'indiquer qua les ampaules
ant d6pass@les limites acceptables.
Ce sgst me
de r6solution
Hotte
Questions ?
Utilisez ce
PROBLI_ME
sgstame de
rdsolution
de
AUTONATIQUENENT
OU SA VITESSE BAISSE
ET IL NE PEUT I_TRE
problame
!
LE VENTILATEUR
S'ENCLENCHE
I_TEINT OU SA VITESSE
I_TRE REDUITE
ospironte
CAUSES POSSIBLES
Le ventilateur de la hotte s'enclenchera automatiquement ou sa
vitesse baissera automatiquement si les temperatures de cuisson
augmentent de faqon excessive. Le ventilateur s'_teindra
automatiquement ou la vitesse baissera Iorsque les temp6ratures
baisseront jusqu'_ un niveau appropri& Le ventilateur s'enclenchera
_galement automatiquement Iorsque la hotte est trop chaude.
NOTE : Lorsque la fonction automatique du ventilateur est activ6e,
vous pouvez le r_gler sur un niveau sup_rieur et non pas sur un
niveau inf_rieur
LE VENTILATEUR NE
FONCTIONNE PAS MI_ME
ALLUMI_
de probl6me
ou sur off.
II se peut qu'un fusible soit grill_ ou qu'un disjoncteur soit enclench&
Remplacez le fusible ou r6glez 6 nouveau le disjoncteur.
Le commutateur
de la hotte peut _tre &teint. Retirez le filtre m_tallique
graisse et le filtre _ charbon actif (si present} et enclenchez le
commutateun
REpI_REZ LE COMMUTATEUR ON/OFF.
1. Appugez pour rel_]cher ou abaisser le panneau filtrant sur I'avant.
2. Enfoncez le Ioquet du filtre vers I'orifice et appuyez dessus pour
le retirer.
3, Retirez le filtre _ charbon actif, si present.
Appuyezsur
lescoinspour
d6bloquer,
Loquet
du filtre
4. Acc_dez au compartiment _]moteur et rep&rez le commutateur
ON/OFF_ I'avant de I'ouverture.
5. Appugez le commutateur sur la position ON.
Interlupteur
bouttonpoussoir(vue
horizontalede
rlnterieurde
rouverture)
NOTE : Si I'aspirateur de la hotte doit _tre retir6 pour une r6paration,
utilisez le commutateur pour votre s&curit& Appugez le commutateur
sur la position OFF.
23
Ce sgst@me de r6solution
Hotte
Questions ?
Utilisez ce
syst8me de
r solution
de
probl me
PROBLI_ME
de probl me
ospirante
CAUSES POSSIBLES
LE VENTILATEUR NE FAIT
PAS CIRCULER L'AIR OU
D!_PLACE L'AIR PLUS
LENTEMENT QUE LA
NORMALE
!
LE VENTILATEUR NE CESSE
DE S'I_TEINDRE ET DE
S'ALLUMER
LES LAMPES NE
FONCTIONNENT PAS ET
LES ANNEAU× SITUI_S
V_rifiez le filtre m_tallique
_ graisse et le filtre 6 charbon actif
(si present) sont propre. Nettogez le filtre m_tallique 6 graisse
(voir le section Filtre m_tollique 6 groisse) et si la hotte est recgcl&e
(non ventil& vers I'e×t&rieur), remplacez le filtre (_ charbon aetif
(voir le section Filtre _ chorbon octif). Si malgr6 le nettogage et le
remplacement
des filtres le probl_me persiste, appelez le service
d'assistance.
Le moteur surchauffe probablement
et s'_teint. Ceci risqu&
d'endommager
le moteur. V@ifiez que le filtre est propre et si
la tugauterie
est abstruse. Si le probl_me persiste, appelez
le service d'assistance.
Les lampe(s) ant @t_remplac@espar des ampoules sup6rieures
120 volts, 50 watts. Remplacezdes par des ampoules de taille et
de tgpe ad6quats. Consultez la section Ampoules.
AUTOUR DES BOUTONS
DE MISE EN MARCHE
CLIGNOTENT
LA LAMPE NE RESTERA
PAS SUR LE NIVEAU I_LEVI_
Utilisez des ampoules halog@nesde tgpe 120 volts, S0 watts, des
ampoules halog@nes P1R16halog@nes_]culot GU10 et assurez-vous
qu'elles ant @t_correctement introduites. II est important de les
remplacer par des ampoules ne d_passant pas le wattage autoris&
Des ampoules dont le wattage est sup&rieur provoqueront le
clignotement des anneaux externes et les lampes ne fenctionneront
pas au niveau &lev& Consultez la section Ampoules.
LES COMMANDES DE LA
HOTTE NE FONCTIONNENT
PAS CORRECTEMENT
Coupez I'alimentation de la hotte en d@sactivant le disjoncteur ou en
retirant le fusible de la bake 6 fusibles de votre domicile. Patientez
Sl VOUS APPUYEZ
PLUSIEURS FOIS SUR LES
BOUTONS DE LA LAMPE
Vous pouvez par cons&quent r6gler les commandes sur le niveau
souhait_, la hotte a _t6 con¢ue de mani_re que les boutons de lampe
et de ventilateur permettent de naviguer dans les r6glages. C'est tout
fait normal.
OU DU VENTILATEUR, LES
RI_GLAGESCHANGERONT
DU NIVEAU LE PLUS BAS
30 secondes pour que les commandes de la hotte se r&initialisent,
puis replacez le fusible et enclenchez 6 nouveau le disjoncteur.
AU NIVEAU OFFAU NIVEAU
LE PLUS I_LEVI_OU DU
PLUS I_LEVI_AU NIVEAU
OFF AU NIVEAU
LE PLUS BAS
LORSQUE VOUS APPUYEZ
SUR LE BOUTON
MEMORY/OFF
POUR
ALLUMER LA LAMPE,
LE VENTILATEUR
S'ENCLENCHE
24
Pour votre confort, les lampes et le ventilateur se souviennent du
dernier r&glage Iorsque vous appugez sur le bouton Memorg/Offi
Si vous souhaitez n'allumer que les lampes, appugez sur le bouton
"FAN +" (ou le "FAN-" ) pour &teindre le ventilateur. Lorsque vous
rallumerez la hotte, les lampes seront les seules _ fonctionner.
NOTE : Vous pouvez allumer ou 6teindre le ventilateur et les lampes
s_par_ment, _ I'aide des boutons <<+ >>ou <<- >>.
Please place in envelope and mail to:
Veuillez mettre dans une enveloppe et envoyez & :
OWNERSHIP
REGISTRATION
P.O.BOX1780
MISSISSAUGA,
ONTARIO
L4Y4G1
(FORCANADIAN
CONSUMERS
ONLY)
25
Feaseregisteryourproductto enableusto contactyou
inthe remoteeventa safetyn_ce isissuedforthisproduct
andtoallowforefficientcommunicalion
undertheterms
ofyourwarranty,shouldtheneedadse,
Veui]',ez
enregistrer
votreproduct
olindenouspermett_de
communiquer
avecvoussijamaisueavisdes_cudt_eoocema_
ceprodu__a__r_isrodecommuniquer
fecilement
aveevousen
vertodevo_egarar_e,si',ebesoinsenfairse_r.
REGISTER
ONqJNE:
www.geapp_"ances.ca
MAiLTO: P,O,BOX1780,MISS,'SSAUGA
L4Y4G1
ENREGISTREME
NTSURINTER
NET,&,www_ele_omenagersse_ca
POSTER
A: OI'_rAR,'O,
For Canadian
Customers
[3 MK/M
[3 MRS./MME. IFIRSTNAME/PRENOM
[] MiSS/MLLE.[] MS.
i
T
[
STREETNO/N° RUE
iSTREETNAME/RDE
CiTY/ViLCE
1
i AF, NO/APP,/RR#
I
_PROViNCE _POSTAL
CO'DE
/POSTAL
I
]E-MAIL
I
L
1
DIDYOUPURCHASE
ASERVIDE
CONTRACT
FOR
THIS
APPLANCE?
,
AVEZ-VOUS
ACHEIE
UNCONTRAT
DESERVICE
POUR
CETAPPAREiL
?
YES/OUi[3
NO/NON[3
NAME
OFSELLING
DEALER
/ NOMDUMARCHAND
T
]
iNSTALLATiONDATE/DATED'iNSTALLATiON
F
CORRESPONDENCE
Y,_A
M
D_J
i
[] ENGbSH
[] i do notwish to rece_va
any_'amotionaloffersregardingthis product.
[] Je ne d6si_e_s _,cavoird'offrespromotionneiiesconcernantca prcdui[,
26
,J, .................................................................................
iFYAYES
/ SiOUi:
EXPiRAT_N
M
O_J
MODEL/MODELE
I
iI CORRESPONDANDE
[3 FRAN?_S
..............................
r
I
AREA
CODE/iND,
RE'G,
I_TELEPHONE
Pour ',es
Consommateurs
Canadiens
_LASTNAME/NOM
i
±
SERIAL/S_RIE
Service au consommateur
Hotte
aspironte
Avec I'achat de votre nouvel appareil Monogram,
sogez assurg
de recevoir toute I'information
ou I'assistance dont vous
pourriez avoir besoin, de la part de GE. Tout ce que vous avez
6 faire, c'est de nous appeler--gratuitement
!
GE Answer
Center ®
Ouelle que soit votre question concernant n'importe quel appareil Monogram, le service d'information
du GE Answer Center ° est disponible pour vous aider. Votre appel-et
votre question -seront pris en
compte rapidement et courtoisement
Et vous pouvez nous contacter n'importe quand. Le service GE
Answer Center ® est ouvert 24 heures sur 24, du lundi au samedi.
800.561.3344
OU
Visitez notre site web sur : monogram.cam
Service favori
Monogram
800.561.3344
Un professionnel qualifi6 du service GE s'occupera de la r6paration, 6 un moment qui vous
convienne. La plupart des entreprises du service GE vaus proposent une intervention lejour meme
ou le lendemain, ou 6 votre convenance (de 07h00 6 22h00 lesjours de semaine, de 08h00 6
18h00 les samedis et dimanches). Nos techniciens form6s en usine connaissent I'interieur et
I'e×t6rieur de votre appareil-la plupart des reparations peuvent etre effectu&es en une
intervention seulement
Au Canada : lundi au vendredi,
Pourles cfients
avec des
besoins
sp6ciau_..
de 07h00 6 20h00 et samedi, de 08h00 8 17h00 EDST.
GE afire gratuitement une brochure pour aider 6 la planification d'une
cuisine sans entrave pour les personnes 6 mobilit_ r@duite.
I_
_
2ZN
Les consommateurs malentendants ou muets qui ont acc_s 6 un TDD
ou 6 un telescripteur conventionnel peuvent appeler le 800.TDD.GEAC
1800.833.4322) pour solliciter information ou service.
Aux Etats-Unis
800.626.2000
Contrats
de service
800.561.3344
Pi_ces
d6tach6es
accessoires
et
800.561.3344
Vous pouvez etre rassur_ de savoir que le service GE sera toujours 16 apr_s I'expiration de votre
garantie. Souscrivez 6 un contrat GE pendant que votre garantie est toujours en vigueur et vous
b6neficierez d'une ristourne substantielle. Avec un contrat sur plusieurs ann&es, vous etes assur6
d'un futur service au prix d'aujourd'hui.
Les personnes qualifi_es pour r_parer leurs propres appareils peuvent commander des pieces
d&tach_es et des accessoires et se les faire envoger directement 6 domicile. Le sgst_me de pi&ces
d_tach_es GE propose un acc_s 6 plus de 47 000 pi_ces.., et toutes les pi&ces de rechange d'origine
GE b_n_ficient d'une garantie compl&te. Les cartes bancaires VISA, HasterCard et Discover sont
accept_es.
Les instructions de maintenance contenues dans ce manuel d_taillent les procedures 8 utiliser
par n'importe quel utilisateur. Toute autre r_paration ou intervention doit etre effectu_e par
un technicien qualifi_. La prudence est n_cessaire, car une r_paration incorrecte peut
provoquer un fonctionnement dangereux de I'appareiL
27
Garantie
Hotte
GARANTIE
Agrafez
ici
La preuve
du service
CE QUI EST
COUVERT
ospironte
DE VOTRE HOTTE
le ch#que annul# ou le re_u de votre achat.
d'achat
originale
sera n#cessaire
pour b#n#ficier
apr#s-vente
pendant
la p#riode
de garantie.
GARANTIE LIHITEE D'UN AN
Pendant une annie 5 compter de la date d'achat originale, nous fournirons gratuitement les
_i_ces et la main-d'oeuvre _ votre domicile, pour r_parer ou remplacer n'importe quelle partie
e la hotte qui serait d_fectueuse a cause d'un d_faut de fabrication.
Cette garantie est _tendue 6 I'acheteur original et 6 tout propri_taire successif pour les appareils
achet_s pour un usage domestique ordinuire dons les 48 Etats continentoux, 8 Hawaii, 6
Washington D.C. ou au Canada. Sicet appareil est install_ dons un endroit oO il n'existe pus de
service ogre@ GE, vous pouvez avoir 6 prendre en charge les frais de transport, ou il peut vous _tre
demand_ d'apporter I'appareil ,dans un service GE agr_ pour r_paration. En Alaska, la garantie est
la m_me, sauf qu'elle est LIHITEE parce que vous devez prendre en charge les frais de transport
au magasin ou les frais de d_placement du technicien du service 8 votre domicile.
Tousles services de garantie sont fournis par nos centres de service d'usine, ou par un technicien
Customer Care® agree, pendant les heures de travail normales.
Dons le COSOOvotre appareil n_cessiteroit une intervention, pendant la p_riode de gorantie ou UUdela, appelez le 800.448.1845 aux Etats-Unis. Au Canada, appelez le 800.561.3344. Munissez-vous
du num@ro de mod@le et du num@ro de s@rie Iors de votre appel au service apr@s-vente.
CE QUI N'EST
PAS COUVERT
• Les d6placements 6 domicile pour vous
apprendre 6 utiliser I'appareil.
• Le remplacement
des fusibles du domicile
ou la r_initialisation
des disjoncteurs.
• Un dommage annexe ou cons6cutif provoqu6
par d'6ventuels d6fauts de cet appareil.
• Remplacement
des filtres jetables.
• Un dommage de I'appareil provoqu_ par un
accident, un incendie, une inondation ou un
cas de force majeure.
• Un dommage
provoqu6 apr_s la livraison.
• Une panne de I'appareil dans le cas d'une
utilisation autre que celle pr6vue, ou d'une
utilisation commerciale.
• Une installation
incorrecte,
Si vous rencontrez un probl_me
d'installation,
contactez votre revendeur ou
votre installateur. Vous 6tes responsable de
la fourniture appropri6e d'61ectricit6, de gaz,
d'6vacuation
et d'autres raccordements,
comme indiqu6 dens les instructions
d'installation
fournies avec votre produit.
• Un appareil non accessible
la r6paration n6cessaire.
pour ex6cuter
EXCLUSION DES GARANTIES IMPLICITES - Votre seul et unique recours r#side
dons la r#paration de I'appareil telle qu'elle est d_finie dans carte garantie
limit#e. Toutes autres garanties implicites, g compris les garanties implicites de
valeur commerciale ou d'ad#quation 6 un usage particufier, sont limit_es 6 une
annie ou 6 la plus petite p_riode autoris_e par la Ioi.
Certains
indirects,
garantie
d'autres
_tats/provinces n'autorisent pas I'exclusion ou la limitation des dommages fortuits ou
par consequent la limitation ou I'exclusion ci-dessus peut ne pas s'appliquer _]vous. Cette
vous donne des droits I_gaux particuliers et il est possible que vous puissiez b_n_ficier
droits, qui varient d'un _tat!province 6 I'autre.
Pour conna_tre quels sont vos droits I_gaux dons votre _tat/province,
aux consommateurs local ou national ou le minist_re de la Justice.
consultez le bureau de service
Garant aux I_tats-Unis : General Electric Compang. Louisville, KY40225
28
Garant au Canada : Habe Canada Inc.
Informaci6n
para el consumidor
Campana
Introducci6n
de chimenea
Su nuevo campana de chimenea Monogram hace una elocuente declaraci6n de estilo g diseBo. Si Io
ha elegido por su pureza de diseBo o su aplicada atenci6n a los detalles-o por ambas razonesusted descubrir6 que la combinaci6n superior de formas g funciones de su campana de chimenea
Monogram Io deleitar6 durante muchos ahos.
Su campana de chimenea Monogram cuenta con un diseBo elegante g al mismo tiempo ofrece la
ventilaci6n necesaria durante la cocci6n de alimentos.
La informaci6n de las p6ginas siguientes Io agudar6n a operar g mantener su campana de chimenea
de una manera adecuada.
Contenidos
Controles g caracteristicas
Servicios para el consumidor
Garantia ......................................
...................
32
40
Instrucciones de seguridad ..................
31
NOmero de modelo g de serie ...............
29
NOmeros telef6nicos importantes ............
39
Solucionador de problemas ...............
35, 36
Cuidado g limpieza
Bombillas de luz ..............................
Filtro de carb6n ................................
34
34
Filtro de grasa de metal .......................
Panel del filtro .................................
33
33
Superficiesde acero inoxidablede bacampana .... 34
Antes
de
usorsu
campana
de
Lea este manual con detenimiento. Su objetivo
es agudarlo a operar g mantener su nuevo
campana de chimenea de una manera
adecuada.
Si no entiende algo o necesita m6s aguda, hag
una lista de nOmeros gratuitos de atenci6n al
cliente en la secci6n trasera de este manual.
O
chimenea
Mant_ngalo a mano para responder sus
preguntas.
Visite nuestro sitio Web: monogram.com
Escriba los
nOmeros
de modelo
B!de serie
Usted puede encontrarlos en una etiqueta sobre
la campana.
Antes de enviar la tarjeta, tenga a bien escribir
los nemeros aqui:
si usted
recibi6 un
campana
dat_ado
29
Estos nOmeros tambi&n
se encuentran
en la
Tarjeta de Registro de Propiedad de Producto
embalada en forma separada con su campana.
NOmero de modelo
Viste monogram.com
g haga clic en "Registre
su artefacto" para registrar su campana de
chimenea.
NOmero de serie
Comuniquese de inmediato con el vendedor
(o constructor} que le vendi6 el campana.
Utilice estos nOmeros en cualquier
correspondencia o Ilamadas de servicio t6cnico
relacionadas con su campana.
Informaci6n
para el consumidor
Campana
de chimeneo
Ahorre
tiempo g
dinero
Antes de solicitar servicio t_cnico, verifique el
Solucionador de problemas ubicado en la parte
trasera de este manual.
Incluge una lista de problemas operativos menores
que usted puede corregir solo.
si necesito
servicio
t6cnico
Para obtener servicio t_cnico, dirijase a la pagina
de Servicios para el consumidor en la parte
trasera de este manual.
DESPUES,si aOn asi no est6 satisfecho, escriba
todos los detalles-inclugendo nOmero
telef6nico-a:
Estamos orgullosos de nuestro servicio g
deseamos que usted quede satisfecho. Si por
alguna raz6n no esta satisfecho con el servicio
que recibe, aqui incluimos algunos pasos a
seguir para obtener m6s aguda.
PRIMERO,contacte alas personas que realizaron
el servicio en su artefacto. Explique por qu_ no
est6 satisfecho. En la magoria de los casos, esto
solucionar6 el problema.
3O
Manager, Customer Relations
GE Appliances
Appliance Park
Louisville, KY/40225
INSTRUCCIONESIMPORTANTE DE SEGURIDAD
LEA TODAS LAS INSTRUCCIONESANTES DE USAR
PRECAUCIONES DE SEGURIDAD
ADVERTENCIA: PARA REDUCIR EL
ADVERTENCIA: PARA REDUCIR EL
RIESGO DE INCENDIOS, DESCARGAS ELI_CTRICASO
LESIONES PERSONALES, OBSERVE LO SIGUIENTE:
RIESGO DE UN FUEGO DE GRASA DE ESTUFA:
A. Useeste unidad solamente de la manera que el
fabricante Io indique. Si usted tiene preguntas, p6ngase
en contacto con el fabricante.
B.Antesde proporcionarservicioo de limpiarla unidad.
desconecteel suministroel@ctrico
en el panelde
serviciog cierreel mecanismode seguridadpara evitar
quealguienIoconecteaccidentalmente.Cuandono
existaun dispositivodecierrede seguridad,amarreun
avisovisible,como unaetiquetaal panelde servicio
haciendola advertencia
C.No useesta unidadcon ning0ndispositivode control
de velocidadde estados61ido.
A.Nuncadejeunidadesde superficiessinla atenci6n
debidaenseleccionesaltas.Cuandoseestahirviendo
algo g ocurrenderramamientos,
estospoddancausar
humog que losderramamientosgrasososseincendien.
CalientelosaceReslentamentea seleccionesmedias
g bajas.
B.Siempreenciendalacampanacuandococinea fuego
altoo cuandoflambeealimentos(CrepesSuzette.
CherriesJubilee.FlambeadodeCamecon Pimienta).
C.Limpieel ventiladorconfrecuencia.Lagrasano debe
acumularseen el ventiladoro enel filtro.
D. Estaunidaddebe estarconectadaa tierra.
D, Useuna sart_n de tamaho apropiado, Siempre use
piezas de cocina apropiadas para el tamaho del
elemento de la supefficie.
PRECAUCION:
ADVERTENCIA: PARAREDUCIREL
PARAUSODE
VENTILACIONGENERALSOLAMENTE.NO USE
PARAEXPULSARMATERIALESPELIGROSOS
O
EXPLOSIVOSY VAPORES,
ADVERTENCIA: PARA REDUCIR EL
RIESGO DE LESIONES PERSONALES EN EL CASO
DE UN INCENDIO DEBIDO A GRASA DE ESTUFA
OUEMADA, HAGA LO SIGUlENTE *:
A. CONTENGALASLLAMAScon una tapa que ajuste bien
sobre la sart_n, con una 16minapara hacer dulces o
con una bandeja met61ica,y luego apague el
quemado_ TENGACUIDADODE NO QUEP1ARSE
Si los
llamas no se apagan inmediatamente, EVACUEEL
LUGARY LLAP1E
AL DEPARTAMENTO
DE BOMBEROS,
B, NUNCAAGARREUNA SARTENO UNA OLLAOUESE
ENCUENTREEN LLAMAS--Sepodria queman
C. NO USEAGUA,incluyendo patios de cocina o toallas
humedecidas-esto hat6 que ocurra una explosi6n de
vapor violenta.
D. Useun extintor SOLAHENTEsi:
1, Usted sabe que tiene un e×tintor CloseABC,g si
usted go sabe c6mo operorlo,
2. Elfuego es pequeho g est6 contenido al 6rea donde
comenz6.
3, Eldepartamentode bomberosha sidoIlamado.
4.Ustedest6 luchandocontra losllamascon sus
espaldashaciaunasalida.
* Basadoen "Ideaspara la seguridaden la cocina".
publicadopot NFPA.
RIESGODE INCENDIOS,DESCARGAS
ELI_CTRICAS
O
LESIONESPERSONALES,
OBSERVELOSIGUIENTE:
A. Eltrabajode instalaci6ng el alambradoel_ctricodebe
hacerlouna persona(s)
calificadaconformea todos los
c6digosg est6ndaresaplicables,inclugendouna
construcci6naprobadapor el inspectorde incendios.
B.Suficienteairees necesarioparaunacombusti6n
apropiadag paradeshacerse
de losgasesa tray,s de
unasalidade humo(chimenea(
de equiposquequeman
combustiblesparaprevenirretroalimentaci6n.
Sigalos
recomendaciones
del fabricantedel equipode
calentamientog losest6ndares
de seguridadtalescomo
lospublicadospor la Asociaci6nnacionalde protecci6n
de incendios(NFPAI.
g la Sociedadamericanade
ingenierosdecalefacci6n,acondicionadores
de aireg
refrigeraci6n(ASHRAE).
g losc6digosde losautoridades
locales.
C.Cuandoseencuentrecortandoo taladrandoen la
paredo en el techo,no dane losalambradosel@ctricos
u otrasutilidadesescondidas.
D.Los ventiladores con conductos deben estar siempre
ventilados hacia el exterio_
ADVERTENCIA: PARA REDUCIR EL
RIESGO DE INCENDIOS, SOLAMENTE USE
CONDUCTOS MET/_LICOS.
•No intenterepararo reemplazarningunapartede su
campanaa no serque Iorecomiendeespedficamente
estemanual.Cualquierotto serviciodebeserreferidoa
un t@nicocalificado.
PRECAUCI6N:DISPOSITIVO
LEA Y SIGA
ESTASINSTRUCCIONES.
OPERADO AUTOM/_TICAMENTE.PARAREDUCIR
EL RIESGODE LESIONES,DESCONECTEDE LA
FUENTE DE ENERGJAANTES DE EFECTUAR
REPARACIONES.LA UNIDAD SE ENCUENTRA
EQUIPADA CON UN INTERRUPTORDE
DESCONEXI6N INTEGRALUBICADO DENTRO
DEL CUERPO DELVENTILADOR.
31
Controles
g caracteristicas
Campana
Controles
FAN
--
LIGHT
,I,
--
o9 99
5
4
Bot6n MEMORY/OFF(memoria/apagado).
Presione para buscar configuraciones
guardadas del ventilador g las luces.
Para guardar configuraciones deseadas del
ventilador g las luces:
1.Presione el bot6n MEMORY/OFF
(memoria/apagado).
2. Seleccione las configuraciones deseadas.
3. Presione MEMORY/OFFpara guardar.
La campana se apagar6 g las configuraciones
quedar6n guardadas.
NOTAS:
• Cuando cualquier bot6n se encuentre activo
(encendido), todos los anillos exteriores se
iluminar6n.
• La campana puede apagarse (OFF)en
cualquier momento presionando el bot6n
MEMORY/OFF(memoria/apagado).
• Siempre desactive (apague) los botones
cuando no est@ usando la campana.
Bot6n LIGHT INCREASE ON/OFF (aumento
de luz encendido/apagado).
Presione poro
encender o aumentar el nivel de luz. Los
botones le permiten desplazarse hasta la
configuraci6n deseada. (Existen cuatro niveles
de luz/configuraciones
g apagado (OFFI.
Bot6n LIGHT DECREASE ON/OFF (disminuci6n
de luz encendido/apagado).
Presione para
encender o disminuir el nivel de luz. Los botones
le permiten desplazarse hasta la eonfiguraei6n
deseada. (Existen cuatro niveles de
luz/configuraciones
32
g apagado {OFF).
3
4
de chimenea
MEMORY/OFF
4"
(
2
Bot6n FAN INCREASEON/OFF (aumento de
ventilador encendido/apagado). Presione para
encender o aumentar las configuraciones del
ventilador. Los botones le permiten desplazarse
hasta la configuraci6n deseada. (Utilice para
conflgurar la velocidad del ventilador en LOW
(baja), MED(media), HIGH (alta), BOOST(impulso)
o en OFF(apagado).
Bot6n FAN DECREASEON/OFF (disminuci6n
de ventilador encendido/apagado). Presione
para encender o disminuir las configuraciones
del ventilador. Los botones le permiten
desplazarse hasta la configuraci6n deseada.
(Utilice para configurar la velocidad del
ventilador en LOW(baja),MED (media), HIGH
(alta), BOOST(impulso) o en OFF(apagado).
BOOST(impulso)--Funciona cinco minutos en
la configuraci6n m6xima del ventilador g luego
autom6tieamente se reconfigura en HIGH {alta).
NOTA:BOOST{impulso} puede mantenerse m6s de
cinco minutos cuando se aetiva mediante el sensor
autom6tico.
CARACTERISTICADEVENTILADOR
AUTOM/_TICO--EIventilador de la campana se
enciende o aumenta la velocidad en forma
autom_tica si las temperaturas de cocci6n se
elevan demasiado. El ventilador se apagar6
autom_ticamente o disminuir6 la velocidad
cuando las temperaturas bajen hasta un nivel
apropiado.
NOTA:Cuando la caracteristica autom6tica se
encuentra encendida, se puede programar el
ventilador en una configuraci6n m6s alta pero
no en una m6s baja o en apagado.
Cuidado y limpieza
Campana
Para su
seguridad
Antes de realizar reparaciones o limpiar la unidad,
desconecte la energia desde el panel de servicio g
bloquee _ste ultimo para evitar el accionamiento de
Panel
del filtro
Se acumular6 grasa en el panel del filtro. Elpanel es
apto para lavavajillas g debe limpiarse cada 6 meses
o segQnsea necesario.
1. Presionehacia adentro para liberarlo g baje el
panel de la tapa del filtro.
de chimenea
la energia de manera accidental. Si el panel de
servicio no puede bloquearse, coloque una etiqueta
o cartel de advertencia sobre el panel.
esquinaspara
2. Quite las tuercas cilindricas g tornillos de la
bisagra de ambos lados. Desplace el panel
del filtro hacia la izquierda g quitelo.
Tuercas
cllindricas
(2)
t
Paneldelfiltro
3. Coloque el panel de la tapa del filtro en el
lavavajillas con los orificios de desagLiehacia
abajo.
NOTA:El filtro SIEHPREdebe estar en su lugar g el
panel del filtro SIEMPREdebe estar cerrado cuando
la campana se encuentre en uso.
Filtro de
grasa de
metal
El filtro de metal atrapa la grasa liberada por los
alimentos desde la estufa. El filtro tambi6n aguda a
evitar que las llamas (de alimentos, grasa) daBen la
parte interna de la campana.
esquinas pala
Por esta raz6n, el filtro SIEHPREdebe estar en su
lugar g el panel del filtro SIEHPREdebe estar
cerrado cuando la campana se encuentre en uso.
El filtro de grasa es apto para lavavajillas g debe
limpiarse cada 6 meses, o segOnsea necesario.
Para retirar:
1. Presione hacia arriba sobre las dos esquinas
frontales del panel de la tapa del filtro para
destrabarlo. Baje el panel para poder acceder
al filtro.
2. Presione la traba del filtro hacia adentro para
liberarlo. Jale del filtro hacia abajo g quitelo.
Para reemplazar:
1. Coloque las dos lengOetas del borde del filtro
dentra de las ranuras de ubicaci6n inferiores
sobre el lado izquierdo o derecho de la abertura
de la campana.
del filtro
Limpie el filtro en agua jabonosa caliente g
enjuague con agua limpia o 16veloen el
lavavajillas. No utilice productos de limpieza
abrasivos.
NOTA: En el lavavajillas se producir6
decoloraci6n.
una leve
2. Presione el filtro hacia arriba g tr6belo en su
lugar en la campana.
3. Gireel panel de la tapa del filtro en su posici6n
g presionehacia arriba sobrelas dos esquinas
frontales para trabarlo en su lugan
33
Cuidado y limpieza
Campana
Filtro de
carb6n
(en algunos
modelos)
Si el modelo no tiene ventilaci6n al exterior, el aire
se recirculara a trav@sde un filtro de carb6n
desechable que ayuda a remover humo 9 olores.
El filtro de carb6n debe cambiarse cuando est6
evidentemente sucio o decolorado (usualmente
despu_s de 6 a 12 meses, dependiendo del uso
de la campana).
de chimenea
Para retirar
1..Quite el filtro de metal-ver la secci6n Filtro de
grasa de metal.
2. Quite el filtro de carb6n de la misma manera que
el filtro de grasa de metal presionando la traba
del filtro hacia adentro para liberarlo.Jale del filtro
hacia abajo g quitelo.
NOTA: NOenjuague, o lave el filtro de carb6n en
un lavaplatos autom6tico.
El filtro de carb6n no se pueden limpiar. Debe
cambiarse.
Solicffe el filtro de carb6n WBO2X11342.
Para consultar soL>rela adquisici6n de filtros de
car66n de recam6io o para averiguar la direcci6n
del distri6uidor mds cercano,por favor Ilame al
siguiente n_mero telef6nico gratuito:
Centro nacional de piezas
800.626.2002
Superficies
de acero
inoxidable
de la
campana
Bombillas
de luz
Para reemplazar:
1. Inserte el filtro negro de carb6n en la abertura.
Presione la traba sobre ambos lados hacia el
centro y enganche el reborde.
2. Cambie el filtro de metal-ver la secci6n Filtro
de grasa de metal.
Regularmente pula la parte externa de acero
inoxidable con Stainless Steel Magic y el patio
de pulido Monogram, para preservar g proteger
el acabado flno.
NOTA:Vuelva a aplicar Stainless Steel Magic con el
patio de pulido Monogram despu6s de limpiar o si
su unidad entra en contacto con agua, a fin de
proteger el acabado fino.
Para no ragar el acabado fino del acero
inoxidable, pase el paso en la misma direcci6n
de la veta cuando pula o limpie cualquJer
superficie de acero inoxidable.
Stainless Steel Magic g el patio de pulido
Monogram se encuentra disponibles a tray,s
de Piezas g accesorios de GE,800.626.2002
o monogram.com.
Para una limpieza regular,utilice agua lirnpia yun
patio suave. Si las manchas persisten, limpie con un
detergente suave para vajilla utilizando un patio
suave o esponjilla no abrasiva. Para manchas m6s
rebeldes, prepare una soluci6n de 25% de vinagre
(blanco o rojo) y 75% de agua. Introduzca un patio
suave en la soluci6n g frote sobre el acero
inoxidable para quitar la mancha. Si estos m@todos
no quitan las manchas, suciedad o residuos,Ilame
a1800.GE.CARES.
Para solicitar Stainless Steel Magic, solicite el
nGmero de pieza WMOX15.
No utilice cera o pomada para artefactos sobre
ninguna superficie de acero inoxidable.
TM
No utilice esponjillas abrasivas, IJmpJadoresen
polvo, lejia o IJmpiadoresque contengan lejia porque
estos procluctos pueden ragar g dafiar el acabado.
La garantia no cubre dafios provocados par
m_todos de limpieza inapropiados.
PRECAUCI6N: Antes detocarlas,
espere a que las bombillas se enfrien.
Para cambJar las bombillas de la luz:
1. Presione g gire la bombilla en un 1/4 de giro.
2. La bombilla caera hacia abajo.
3. Vuelvaa colocar una bombilladel mismo tama_o
colocando las pOasde la bombilla dentro de las
ranuras g dando 1/4 de giro para trabar en su lugan
Estas bombillas hal6genas de 120 voltios, SO
ratios, MR16 con bases GUIO se encuentran
disponibles en la mayoria de las tiendas de
iluminaci6n, centros de construcci6n g
minoristas grandes. Solicite la bombilla de base
MR16 GUIO.
34
NOTA:No utilice bombillas magores a 120
voltios g SOvatios, o las luces se apagar6n
autom6ticamente y los anillos que rodean los
botones de funcionamiento se iluminar6n para
indicar que las bombillas han superado los
limites aceptables.
Solucionador de problemas
Campana
Preguntas?
iUtilice este
solucionodor
de
problemos!
PROBLEMA
EL VENTILADOR SE
ENCIENDE O AUMENTA
LA VELOCIDAD
AUTOM/_TICAM ENTE Y
NO PUEDE APAGARSE
O REDUCIRSE
SU VELOClDAD
de chimenea
CAUSASPOSIBLES
El ventilador de la campana se enciende o aumenta la velocidad
en forma autom6tica si las temperaturas de cocci6n se elevan
demasiado. El ventilador se apagar6 automaticamente o disminuir6
la velocidad cuando las temperaturas bajen hasta un nivel
apropiado. El ventilador tambi_n se encendera automaticamente
cuando los elementos electr6nicos se calienten demasiado.
NOTA: Cuando la caracteristica de ventilador autom6tico se
encuentra encendida, se puede programar el ventilador en
una configuraci6n m6s alta pero no en una m6s baja o en apagado.
EL VENTILADOR NO
FUNCIONA CUANDO SE
LO ENCIENDE
El fusible puede haberse quemado o el disguntor puede haber
saltada. Cambie el fusible o vuelva a configurar el disguntor.
El interruptor de desconexi6n de energia ubicado dentro de la
campana puede estar apagado. Quite el filtro de grasa de metal
g de carb6n (si se cuenta con uno) g accione el interruptor.
UBIQUE EL INTERRUPTOR ON/OFF (encendido/apagado).
1. Presione hacia adentro para liberarlo g baje el panel de la tapa del
filtro en el frente.
2. Presione la traba del filtro hacia la abertura g jale hacia abajo para
quitarlo.
3. Quite el filtro de carb6n, si se cuenta con uno.
esquhlas para
destrabar
Traba
delfiltro
4. Busque dentro del compartimento del motor g ubique el interruptor
ON/OFF(encendido/apagado) en el frente de la abertura.
Interruptorde
bot6nde presJOn
(visi6n horizontal
desdeelinterior
delaabertura)
5. Presione el interruptor en la posici6n ON (encendido).
NOTA: Si el ventilador de la campana debe quitarse para recibir
servicio t_cnico, utilice el interruptor de desconexi6n para su
seguridad. Presione el interruptor en la posici6n OFF (apagado).
35
Solucionador de problemas
Campana
LPreguntas?
iUtilice este
solucionodor
de
PROBLEMA
EL VENTILADOR NO
ClRCULA EL AIRE O
MUEVE EL AIRE M/_S
LENTAMENTE QUE
LO NORMAL
pro61emas!
de chimenea
CAUSASPOSIBLES
Aseg@ese de que el filtro de grasa de metal y el filtro de carb6n
(si se cuenta con uno) est_n presentes. Limpie el filtro de grasa
de metal (ver la secci6n Filtro de grasa de metal) y, si la campana
se recircula (no se ventila hacia el exterior), cambie el filtro de carb6n
(ver la secci6n Filtra de car66n). Si la limpieza y el recambio de filtros
no corrigen el problema, Ilame al servicio t6cnico.
EL VENTILADOR SE
ENCIENDE Y APAGA
TODO SIN PARAR
El motor probablemente se est6 sobrecalentando y se apaga solo.
Esto puede daBar el moton Aseg6rese de que el filtro est_ limpio g
verifique que no haya taponamientos en el conducto. Si continua
el ciclo de apagado y encendido, Ilame al servicio t_cnico.
LAS LUCES NO
FUNCIONAN Y LOS
ANILLOS UBICADOS
Las luces se reemplazaron con bombillas de limites mayores a
los 120 voltios y 50 ratios. Utilice la bombilla del tipo y tamafio
correctos. Ver la secci6n Bom6illas de luz.
ALREDEDOR DE LOS
BOTONES DE
FUNCIONAMIENTO
PARPADEAN
LA LUZ NO SE MANTIENE
EN LA CONFIGURACI6N
ALTA
Utilice bombillas hal6genas de 120 voltios, 50 vatios, MR16 con una
base GUIO y aseg6rese de que est&n bien colocadas. Es importante
utilizar bombillas que no superen el vataje recomendado. Las
bombillas con un vataje superior haran que los anillos externos
parpadean, y las luces no funcionaran en los niveles mas altos.
Ver la secci6n Bombillas de luz.
LOS CONTROLES DE LA
Desconecte la energia de la campana apagando el disyuntor o
quitando el fusible de la caja de fusibles. Espere 30 segundos para
que los controles de la campana se reconfiguren g luego cambie el
fusible o vuelva a activar el disyunton
CAMPANA NO FUNCIONAN
CORRECTAMENTE
SI SE PRESIONAN
CONSECUTIVAMENTE LOS
BOTONES DE LUZ O DEL
VENTILADOR, CAMBIAR/_,
LA CONFIGUACION DE LA
M,AS BAJA A APAGADO
A LA CONFIGURACI6N
Para que pueda programar f6cilmente los controles en la
configuraci6n deseada, la campana est6 dise6ada para que
los botones de luzy del ventilador se desplacen entre
configuraciones. Esto es normal.
MAS ALTA, O DE LA M/_S
ALTA A APAGADO, A LA
CONFIGURACION M/_S BAJA
CUANDO SE PRESlONA
EL BOTON MEMORY/OFF
(MEMORIA/APAGADO)
PARA ENCENDER LA
LUZ, EN SU LUGAR SE
ENCIENDE EL
VENTILADOR
36
Para su comodidad, es normal que las luces y el ventilador
"recuerden" su ultima configuraci6n cuando presiona el bot6n
Memory/Off. Si s61odesea encender las luces, presione el bot6n
"FAN+" (ventilador +/(o el "FAN-'1 (ventilador -) para apagar el ventiladon
Cuando vuelva a encender la campana, s61ofuncionar6n las luces.
NOTA:Se pueden encender y apagar las luces y el ventilador por
separado, utilizando los botones "+" o "-".
Notas
Campana
de chimenea
37
Notas
Campana
38
de chimenea
Servicios ul consumidor
Compona
de chimenea
Con la compra
de su nuevo
artefacto
Monogram,
tenga
la
tranquilidad
de que si alguna
vez necesita
informaci6n
o
asistencia
de GEo estarernos
listos para hacerlo,
iTodo Io que
tiene que hacer es Ilamar
en forma
gratuita!
GE Answer
Center*
800.626.2000
Cuando tenga una consulta sobre cualquier artefacto importante Honogram, el servicio de
infarmaci6n GE Answer Center ® estar6 listo para agudarlo. Su Ilamada-g su pregunta-ser6n
respondidas r6pida g cort6smente. Y usted puede Ilamar en cualquier momento. El servicio GE
Answer Center ®est6 abierto 24 horas al dia, de lunes a s6bado.
O
Visite nuestro
Servicio
preferido
Monogram
800.444.1845
sitio web: monogram.com
Un profesional de servicio t&cnico de GE le brindar6 un servicio de reparaci6n experto,
programado en un momento que resulte conveniente para usted. Muchas Iocaciones operadas
por la compafiia de servicio t&cnico de GE le ofrecen un servicio en el dia o al dia siguiente, a
cuando sea conveniente para usted (7:00 a.m. a 10:00 p.m. dias de semana, 8:00 a.m. a 6:00 p.m.
sabados g domingos). Nuestros t_cnicos capacitados en la fabrica conocen el artefacto por
completo, asi que la magor parte de las reparaciones puede efectuarse en s61ouna visita.
Para clientes
con necesidades
especiales...
GE le ofrece, en forma gratuita, un folleto para agudar a planificar una
cocina libre de barreras para personas con movilidad limitada.
t_4
800.626.2000
Contratos
de
servicio t6cnico
800.626.2224
Piezas y
accesorios
800.626.2002
I_
_
2ZN
Los consumidores con problemas auditivos o de habla que tienen acceso a
un TDD (tel6fono para sordomudos) o un teletipo convencional pueden
Ilamar a1800.TDD.GEAC(800.833.4322) para solicitar informaci6n o servicio
t_cnico.
Usted puede estar tranquilo de que el Servicio T@cnicode GE estar6 alli para agudarlo cuando
finalice su garantia. Adquiera un contrato GE mientras su garantia sigue vigente g recibir6 un
descuento sustancial. Con un contrato de varios aBos, usted se asegura servicio t&cnico futuro
con los precios de hog.
Las personas calificadas para arreglar sus propios artefactos pueden recibir las piezas o
accesorios directamente en sus hogares. El sistema de piezas de GE ofrece acceso a m6s de/47.000
repuestos_.g todas las Piezas de Repuesto Genuinas de GE tienen garantia total. Se aceptan tarjetas
VISA, HasterCard g Discover.
Las instrucciones de mantenimiento del usuario incluidas en este manual cubren los
procedimientos a realizar por cualquier usuario. Cualquier otra clase de arreglos deben ser
efectuados pot personal de servicio t_cnico calificado. Debe tenerse mucho cuidado, porque
los arreglos inadecuados pueden provocar un funcionamiento poco seguro.
39
Garantia
Compona
de chimenea
GARANT[A
DE SU CAMPANA
MONOGRAM
Abroche
el comprobante
de venta
o cheque
compensado
aquL Se necesita
una prueba
de la fecha de compra
original
para obtener
servicio
t_cnico
cubierto
por la garantia.
ELEMENTOS
CUBIERTOS
GARANTIE LIMITI_ED'UN AN
Durante un aho a partir de la fecha original de compra, otorgaremos, en forma gratuita, piezas
g servicio t_cnico en su hogar para reparar o reemplazar cualquier parte de su campana que
falle debido a defectos en la fabricaci6n.
Esta garantia se extiende al comprador original g cualquier dueF_oposterior para productos
adquiridos para uso dom_stico dentro de los/48 estados continentales, Hawai, Washington, D.C. o
Canad& Si el producto se encuentra en una regi6n donde no hag Servicio T6cnico de GE, usted ser6
responsable del cargo del viaje ousted puede tener que Ilevar el producto a un Servicio T6cnico
Autorizado de GE para efectuar la reparaci6n. En Alaska la garantia es la misma salvo que es
LINITADA porque usted debe pagar el envio del producto a la tienda de servicio t_cnico o los gastos
de viaje del t6cnico hasta su hogar.
Todo el servicio de garantia debe suministrarse por parte de nuestros Centros de Servicio de Fhbrica
o por t_cnicos autorizadas de Customer Care ® durante un horario normal de trabajo.
Si su artefacto requiere servicio t_cnico, durante el periodo de garantia o despu6s del mismo, en los
EE.UU. Ilame a1800.444.1845. En Canad6: 800.561.3344. Tenga el n0mero de sede g de modelo a
mano cuando Ilame para solicitar un servicio t6cnico.
ELEMENTOS
NO CUBIERTOS
• Visitas a su hogar para ense6arle
producto.
a usar el
• Reemplazo de fusibles dom_sticos
reconfiguraci6n
de disguntores.
o la
• Instalaci6n
• Dafios incidentales o resultantes provocados
por posibles defectos en este artefacto.
• Recambio
de los filtros
reemplazables.
• Da_os al producto provocados
por
accidentes,
incendios,
inundaciones
magor.
• Da_os
provocados
despu_s
• Fallas del producto si se utiliza para un
objetivo diferente del previsto o se usa de
forma comercial
o fuerza
de la entrega.
inadecuados
Si tiene un problema con la instalaci6n
comunlquese con su vendedor o instalador
Usted es responsable de suministrar
adecuadas instalaciones el_ctricas, de gas,
de salida g otras conexiones como se
describe en las Instrucciones de Instalaci6n
incluidas con el producto.
• Producto no accesible para prestar el
servicio t_cnico solicitado.
EXCLUSION DE GARANT[AS IMPL[CITAS--Su 6nico g exclusivo recurso es la
reparaci6n del producto coma se establece en la presente Garantla Limitada.
Los garantl'as imph'citas, inclugendo garantias de comerciabilidad
g aptitud
para un objetivo particular, se encuentran limitadas a un aria o el periodo m6s
corto permitido par la leg.
Algunos estados/provincias no permiten la exclusi6n o limitaci6n de dahos incidentales o
resultantes, por Io tanto esta exclusi6n o limitaci6n puede no aplicarse en su caso. Este garantia le
otorga derechos legales especificos gusted puede contar con otros derechos, que pueden variar de
estado a estado/provincia a provincia.
Para conocer sus derechos legales en su estado/provincia, consulte a su oficina
del consumidor local o estatal/provincial
o al Fiscal General de su estado.
Garante
General
ElectricCompong
i_
AppliancesGEC°nsumer&lndustrial
Louisville,
KY80225
Garante
'_--_l_l_l_l_l_l_l_r_
monogramcorn
40
en los EEUU.: General Electric Compang,
en Canad6: Mabe Canada Inc,
Louisville, KY 40225
[
q
[ 49-80513
01-08 JR
j
Printed in Mexico