1
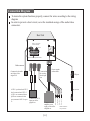
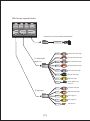
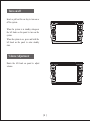
Subaru Forester
NV7SFT1
Introduction
Thank you for purchasing the Myron and Davis Subaru Forester In Dash Multi Media
Entertainment System. Please read this manual carefully for safe and proper operation. Retain
the manual for future reference. This system is a multi-functional Audio / Video
entertainment system with a user friendly GUI, which is designed for ease of operation by the
end user. It combines a 7” Digital Touch Screen, slot load DVD player with
VCD/CD/MP3/MPEG-4/CD-R/WMA/JPEG playback capabilities, AM/FM radio, Navigation
with Text to Speech, Bluetooth communication, TV Tuner (optional), XM/Sirius Satellite
ready, a USB multi-media port and is Back Up camera and Sensor ready.
With it’s OSD menu, various functions can be accessed through either the function keys on
the panel or touch screen.. If your cell phone is a Bluetooth capable, you can answer your call
through the system without picking up your phone. The system also has an independent rear
video out capable of suppling video to a Rear Seat Entertainment System.
3
Built-in Radio, DVD player, navigation,
Bluetooth hands-free, LCD display and high
power amplifier.
Supports virtual CDC function, capable of
storing songs from the CD in the Mp3 format.
Storage space capable of 5 Cd’s or up to 60
songs.
Supports Bluetooth hands-free communication
and Bluetooth Music Streaming.
Touch Screen Input With Navigation
While in Navigation Mode characters can be
entered by touching the screen thus allowing
the user to quickly enter a route
Back Up Camera (Optional)
Allows the user to have a visual from behind
the vehicle
Back Up Sensor (Optional)
Allows the user to determine the distance to
objects behind the vehicle
5
Connection Diagram
To insure the system functions properly, connect the wires according to the wiring
diagram
In order to prevent a short circuit, cover the insulated casings of the audio/video
connectors.
Host Unit
Built-in navigation
antenna interface
GPS-ANT
Multi-function compound interface
Connected to
the steering
wheel input
port
Power speaker
cabinet cable
USB port
6
BACK
BRAKE
Blue BACK
Blue/white
TV GND
TV BATT
Connected to the
amplifier power
supply socket of the
oringinal car
Yellow BATT
Connected to AUX
input port of the
priginal car
Black GND
USB
AUX-1 is preferred to AUX-2,
don't connected to AUX-2 if
AUX-1 was connected;when
IpOD was connected to this
port,connected AUX-2 to port
A.
AUX-1
Connected to the radio
aerial plug of the
original car
AUX-2
Radio antenna
Hold connectors
for special use
USB patch cord
AV input wire A (optional)
L-IN
Left channel audio input
White
Left channel audio input
R-IN
Right channel audio input
Red
Right channel audio input
V-IN
1 out of 2
Video input
Yellow
Video input
TV connecting wire (accessory of TV box)
Connected to TV box
Camera/radar wire (Accessory of camera/radar)
(Male radar)
Connected to radar
(Female lens)
V-IN
Video input
AUX-2
AUX-1
4
A
B
C
Connected to camera
Yellow
(Optional)
Connected to camera
Connected to
AUX input port
of the priginal
car
AUX-1 is preferred to AUX-2,don't connected to AUX-2 if AUX-1
was connected;when iPod was connected to this port,connected AUX-2
to port A.
D
iPod adapter (optional)
Multi-function compound interface
Connected to iPod
7
Multi-function compound interface
Connected to tire pressure monitoring module(optional)
TPMS tire pressure
monitoring system
5.1 channel audio
output wire
White
FR-OUT
Red
RL-OUT
White
Rear left channel audio output
RR-OUT
Red
Rear right channel audio output
White
Center channel audio output
SW-OUT
Black
Subwoofer audio output
SPDIF
Yellow
Digital audio output
External amplifier power
control wire
L-OUT
White
Left channel audio output
R-OUT
Red
Right channel audio output
V1-OUT
Yellow
Video output port 1
V2-OUT
Yellow
Video output port 2
KEY-CON
8
Front right channel audio output
C-OUT
AMP - C
AV output wire
Front left channel audio output
FL-OUT
Data control wire
Turn on/off
Insert or pull out the car key to turn on or
off the system.
NAV
When the system is in standby state,press
the left knob on the panel to turn on the
system.
When the system is on, press and hold the
left knob on the panel to enter standby
state.
MAIN
Volume Adjustment
Rotate the left knob on panel to adjust
volume.
NAV
MAIN
9
Descriptions of Buttons
8
1
2
9
NAV
3
10
4
11
12
5
6
MAIN
13
7
6
Press this button to switch to radio mode
from other modes. While in the radio state
press this button repeatedly to switch
between FM1/FM2/FM3/AM1/AM2.
7
Insert a paper clip in this hole and press the
button inside the hole. The system will be
reset to the factory settings.
8
GPS SD Card Port
9
When on, press the button once to enter
night mode, and press the button again to
enter black screen mode; press and hold the
button to enter standby state; when it is in
standby state, press it to turn on the system.
Turn the knob to adjust the volume.
10 12
USB.
10
11
13
11
t