1
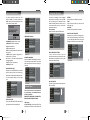
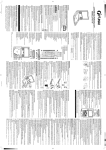
3D Blu-ray Disc Player
B500-AU
-1-
B500说明书.indd
1
2011-10-15
9:54:29
Contents
Safety Information....................................................................................................... 2-4
Warning........................................................................................................................
Disc handling.................................................................................................................
Copyrights.....................................................................................................................
Feature hinghlights........................................................................................................
5-7
5
5-7
7
Functions & Controls..................................................................................................
Blu-ray control panel.....................................................................................................
Blu-ray rear panel..........................................................................................................
Remote control..............................................................................................................
Remote battery installation............................................................................................
8-9
8
8
9
9
Installation...................................................................................................................
Audio connections.........................................................................................................
Video connections.........................................................................................................
Other connections.........................................................................................................
Connecting to a LAN (to use BD-Live)..........................................................................
Electrical connection.....................................................................................................
10-14
10
10
11
12-13
13-14
User Instructions.........................................................................................................
Getting started...............................................................................................................
Basic operation.............................................................................................................
Sub menu options.........................................................................................................
Popup menu options.....................................................................................................
Connecting USB SD/Device..........................................................................................
Playing a CD disc..........................................................................................................
Data playback...............................................................................................................
Erasing Data from a USB device or SD Card ..............................................................
14-20
14-15
15-17
17
17-18
18
18-19
19-20
20
Advanced Operation...................................................................................................
Setup menu...................................................................................................................
General menu...............................................................................................................
Video menu...................................................................................................................
Audio menu...................................................................................................................
Language menu............................................................................................................
Parental menu...............................................................................................................
Network menu...............................................................................................................
21-25
21
21
21-22
22-23
23
23-24
24-25
Care and Maintenance................................................................................................
Troubleshooting..........................................................................................................
Technical Specifications............................................................................................
Disposal Information..................................................................................................
26
26
27
27
-1-
B500说明书.indd
2-1
2011-10-15
9:54:29
Safety Information
Safety Information
Important – Please read these instructions fully before installation
Before Use
• Dispose of all packaging carefully and responsibly.
• The appliance is designed for indoor use only and must be protected from rain, moisture and
extreme temperature variations.
• This appliance is designed for household use. Do not use the appliance for industrial and
commercial use, or any other purpose.
• The appliance MUST be positioned on a firm level base.
• Do not place the appliance near a heat source such as radiators, heat registers, stoves or
other products that produce heat.
• Slots and openings in the cabinet are provided for ventilation and to ensure operation of the
product.
These openings must not be blocked or covered by placing the product on bed, sofa, rug or
others.
• The appliance shall not be exposed to dripping or splashing and that no objects filled with
liquids, such as vases, shall be placed on the appliance.
• Do not use attachments not recommended by the manufacturer as they may cause hazards.
• Do not place this product on an unstable cart, stand, tripod, bracket or table. The product
may fall, causing serious injury to users and damage to the product. Use the accessories that
recommended by the manufacturer.
• A product and cart combination should be moved with care. Quick stops, excessive force and
uneven surfaces may cause the product and cart combination to overturn.
• Keep your fingers well clear of the disc tray as it is closing. Neglecting may cause serious
personal injury and damage to the product.
• Do not place heavy object or step on the product.
• This appliance must be positioned so that the plug is accessible.
• For added protection for this product during storm, or when it is left unattended and unused for
long periods of time, unplug it from the wall outlet. This will prevent damage to the product due
to lightning and power line surges.
• The top and rear panels of the product may become warm after a long period if use. This is not
a malfunction.
• When the unit is not in use, remove the disc and turn off the power.
• If you do not use the unit for a long period, the unit may not function properly in the future. Turn
on and use the unit occasionally.
• Do not place foreign objects on the tray.
• Do not attempt to repair the appliance yourself. Contact the Customer Helpline:
Safety Precautions
The lightning flash with arrowhead symbol, within an equilateral triangle, is intended to
alert the user to the presence of uninsulated “dangerous voltage” within the product’s
enclosure that may be of sufficient magnitude to constitute a risk of electric shock to
persons.
The exclamation point within an equilateral triangle is intended to alert the user to
the presence of important operating and maintenance (servicing) instructions in the
literature accompanying the appliance.
The symbol for CLASS II (Double Insulation).
WARNING: To reduce the risk of fire or electric shock, do not expose this appliance to rain or
moisture, dangerous high voltages are present inside the enclosure. Do not open the cabinet,
refer servicing to qualified personnel only.
CAUTION: When replacing the direct plug in power supply or a separable, cord-connected
power supply, the replacement must be exact duplicate, or one recommended by the
manufacturer.
This is a CLASS-1 laser product. Use of controls or adjustments
or procedures other than those specified herein, may result in
hazardous laser light beam exposure.Do not open the cover and
do not repair yourself. Refer servicing to qualified personnel.
During Use
• This appliance is not intended for use by persons (including children) with reduced physical,
sensory or mental capabilities, or lack of experience and knowledge, unless they have been
given supervision or instruction concerning use of the appliance by a person responsible for
their safety. Children should be supervised to ensure that they do not play with the appliance.
• This appliance is not intended for use by young children or infirm persons unless they have
been adequately supervised by a responsible person to ensure that they can use the appliance
safely. Young children should be supervised to ensure that they do not play with the appliance.
• Do not push objects of any kind into this product through openings as they may touch
dangerous voltage points or short out parts that could result in a fire or electric shock. Never
spill liquid of any kind on the product.
• Do not locate the unit in places near heating devices, high temperature (40C or higher), high
humidity (90% or higher), dirty places and avoid direct exposure to sunshine.
-2-
-3-
B500说明书.indd
2-3
DANGER: Visible and invisible laser radiation when open and interlock failed or
defeated. Avoid direct exposure to laser beam.
Locations
2011-10-15
9:54:29
Safety Information
Warning
• The unit should not be placed near a TV, radio or VCR, the playback picture may become
poor and the sound may be distorted.
• The pick up may be condensed with water under the following situation.
• From a cold place to warm place
• Operates in a room where the heater is just turned on, or a place where the cold air from the
air conditioner directly hits the unit.
• During summer, the unit moves from an air conditioned room to a hot and humid place.
• A room is vaporous or damp.
• If condensation exists, the unit will not operate properly. Remove the disc, power up the unit
and leave it for two to three hours. The unit will warm up and evaporate any moisture.
Important – Please read these instructions fully before using
Disc handling
• Do not touch the playback side of the disc.
• Do not attach paper or tape to disc.
How to remove the disc
How to hold the disc
• Fingerprints and dust on the disc cause picture and sound deterioration. Wipe the disc from
the centre outwards with a soft cloth. Always keep the disc clean.
How to clear the disc
• If you cannot wipe off the dust with a soft cloth, wipe the disc lightly with a slightly moistened
soft cloth and finish with a dry cloth.
• Do not use any type of solvent such as thinner, benzene, commercially available cleaners or
antistatic spray for vinyl. It may damage the disc.
• Do not store discs in a place subject to direct sunlight or near heat source.
• Do not store discs in a place subject to moisture and dust such as a bathroom or near a
humidifier.
• Store discs vertically in a case, stacking or placing object on discs outside or their case may
cause warping.
• Normally, Blu-ray / DVD discs are divided into titles, and the titles are sub-divided into
chapters. Audio CD discs are divided into
tracks.
DVD DISC
TITLE1
TITLE2
CHAPTER1
CHAPTER2
CHAPTER3
CHAPTER4
TRAK1
TRAK2
AUDIO CD
TRAK3
TRAK4
CHAPTER5
TRAK5
• Each title, chapter, or track is assigned a number, which is called title number, chapter number
or track number respectively. There may be discs that do not have these numbers.
Copyrights
This product incorporates copyright protection technology that is protected by U.S. patents and
-4-
B500说明书.indd
4-5
-5-
2011-10-15
9:54:30
Warning
Warning
other intellectual property rights.
Use of this copyright protection technology must be authorized by Macrovision, and is intended
for home and other limited viewing uses only unless otherwise authorized by Macrovision.
Reverse engineering or disassembly is prohibited.
Java and all other Java trademarks and logos are trademarks or registered trademarks of Sun
Microsystems, Inc. in the United States and/or other countries.
BONUSVIEW™
'BD LIVE' and 'BONUSVIEW are trademarks of Blu-ray Disc Association.
Manufactured under license from Dolby Laboratories. Dolby and the Double-D symbol are
trademarks of Dolby Laboratories.
Manufactured under license under U.S. Patent #’s: 5,451,942; 5,956,674; 5,974,380;
5,978,762; 6,487,535 & other U.S. and worldwide patents issued & pending. DTS and the
Symbol are registered trademarks, & DTS 2.0+ Digital Out and the DTS logos are trademarks of
DTS, Inc. Product includes software. © DTS, Inc. All Rights Reserved.
Disc types
The blu-ray disc association announced Blu ray-3 D standard identification
BDA announced the final Blu ray-3 D official logo
Feature highlights
- Audio and Video
Disc size 12cm
Single side, single layer / single side, double layer
PAL and NTSC DVD disc
Playback time 135min / 240min max
-Audio and Video
Note
• The product does not guarantee 100% interoperability with all HDMI CEC devices.
High-Definition entertainment
Watch high-definition content disc with HDTV (High Definition Television). Connect it through a
high speed HDMI cable (1.4 or category 2). You can enjoy excellent picture quality up to 1080p
resolution with the frame rate of 24 frames per second with progressive scan output.
BONUSVIEW/PIP (Picture-in-Picture)
This is a new function of BD-Video that plays the primary video and secondary video
simultaneously.Blu-ray players with Final Standard Profile or Profile 1.1 specs can play Bonus
View features.
Disc size 12cm
Single layer 25GB, Double layer 50GB
Over 9 hours on a double layer 50GB disc.
- Audio
Disc size 12cm / 8cm CD disc Playback time 74min/20min max
- JPEG - Picture
JPG format disc
* This player is BD-ROM, BD-RE, BD-R, DVD-Video, DVD+/-R, DVD+/-RW, CD-DA, CD-R, CDRW compatible.
Region Management Information
This Blu-ray Player is designed and manufactured to respond to the Region Management
Information that is recorded on a Blu-ray disc. If the Region number described on the Blu-ray
disc does not correspond to the Region number of this Blu-ray Player, this Blu-ray player cannot
play that disc.
The region codes for this player are:
-6-
B500说明书.indd
6-7
BD-Live
Connect this product to the movie studios website via the LAN port to access a variety of up-todate content (e.g. refreshed previews and exclusive special features). You can also enjoy next
generation possibilities, such as ringtone/wallpaper downloads, peer-to-peer interactions, live
events and gaming activities.
Upscale DVD for enhanced picture quality
Watch the discs in the highest picture quality available for the HDTV. Video upscaling increases
the resolution of standard definition disc to high definition up to 1080p over an HDMI connection.
A highly detailed picture and increased sharpness delivers a more true-to-life picture.
-7-
2011-10-15
9:54:30
Functions & Controls
Functions & Controls
Blu-ray control panel
Remote control
1
2
3
4
5
6
1
2
3
7 8 9
FRONT PANEL
10
4
5
6
7
8
9
10
DISPLAY
1
2
3
A-B
4
5
6
ZOON
7
8
9
PIP
0
SEARCH
CLEAR
AUDIO
SUB MENU
6. USB input
7. PREV Button
8. STOP Button
9. NEXT Button
10. CARD input
12
13
POPUP
MENU
DISC
MENU
11
1. STANDBY button
2. Disc tray
3. OPEN/CLOSE button
4. LED Display
5. PLAY buttons
HDMI O/P
RESET
ENTER
SETUP
RETURN
21. SUB MENU button
22. STOP button
23. ►►I button
24. I◄◄ button
25. BLUE button
26. YELLOW buttons
27. POPUP MENU button
28. NAVIGATION button
29. RETURN button
14
15
16
17
18
19
20
21
22
23
24
25
26
27
28
29
Remote battery installation
BD/SD/USB
QT146
Before use, the remote control will need
batteries fitting. These are supplied with
the package and need removing from their
packaging before fitting.
Blu-ray rear panel
11
14
15
1. Remove the battery compartment lid as
shown.
13
12
16
17
REAR PANEL
15. OPTICAL digital audio output
16. STEREO Audio output
17. COMPOSITE video output
11. HDMI video output
12. COAXIAL digital audio output
13. COMPONENT video output
14. ETHERNET input
-8-
B500说明书.indd
8-9
REMOTE CONTROL
1. DISPLAY button
2. STANDBY button
3. 0-9 NUMBER buttons
4. SEARCH button
5. PLAY button
6. PAUSE button
7. ◄◄ button
8. ►► button
9. RED button
10. GREEN button
11. ENTER button
12. SETUP buttons
13. BD/SD/USB button
14. HDMI O/P RESET button
15. EJECT button
16. A-B button
17. ZOOM button
18. PIP button
19. AUDIO button
20. CLEAR button
+
-
-+
2. Fit 2 x AAA batteries as shown. Take
care to match the polarities of the remote to
the batteries. EG: the + sign on the battery
matches the + sign on the remote control
battery compartment.
3. Replace the battery compartment lid and
proceed to use.
-9-
2011-10-15
9:54:30
Installation
Installation
Audio connections
Other connections
NOTE: before you make any connections, ensure the Blu-ray player, Sub woofer and any TV /
Monitor you wish to connect to is switched OFF.
● Connecting the Blu-ray player to an external amplifier
There are two digital audio output options,COAXIAL or OPTICAL. See the diagram across.
Connecting to an external amplifier and TV using HDMI cables.
If you have an external Amplifier that supports HDMI audio, then you can connect the Blu-ray
player to the Amplifier HDMI input and then the HDMI output to your TV or monitor.
Amplifier with decoder
HDMI IN
(optional) Digital Inputs
HDMI line
Video connections
There are a number of ways to connect the Blu ray player to your TV or monitor. See the
diagram across for examples.
1. HDMI: This is the standard connection for High Definition TV and can carry video and audio
signals.
Will this machine and compatible with 3 D TV connection, can be 3 D Play video.
2. COMPONENT: This connection only carries video. Connect one end to the Blu-ray player the
other end to your TV/Monitor.
3. COMPOSITE: This connection only carries video and the cable is usually yellow. Connect
one end to the Blu-ray player the other end to your TV/Monitor.
Many track speakers
Amplifier
HDMI IN
HDMI line
NOTE: YUV and VIDEO will have no signal output under the below two conditions.
1.There is only HDMI output when playing 3D blu-ray video.
2.There is only HDMI output when the resolution from the SETUP menu is set to 1080P
24Hz.
COMPONENT CABLE
Blu-ray player
COMPOSITE CABLE
TELEVISION
HDMI CABLE
-10-
B500说明书.indd
10-11
-11-
2011-10-15
9:54:31
Installation
Installation
disc.
Connecting to a LAN (to use BD-Live)
By connecting this unit to a broadband connection, you can view BD-Live features found on
some movie titles.
BROADBAND Router
WAN
ADSL/CABLE Modem
ADSL
REAR of Blu-Ray Player
NETWORK cable
Internet
NETWORK cable
POWER
RESET
Computer
NETWORK cable
1. Connect the ETHERNET input (14) to your broadband router, (refer to your user manual for
your router).
2. Once connected see the NETWORK SETTINGS instructions on pages 25.
Some Blu-ray discs (labelled as BD-Live), have bonus material and other data that can be
downloaded to an SD/USB device inserted into the SD/USB slot on the front of the player (6
or 10).
1. Turn the player OFF.
2. Connect the player to a network as shown above.
3. Insert an usb Drive (min 2GB). usb device must be formatted as FAT32.
Insert an SD Card (min 2GB). SD Card must be formatted SD as FAT 16 or SDHC 4-16G
FAT32.
4. Switch the player ON.
5. Insert a BD disc that supports BD-Live.
6. This step will differ from disc to disc, but usually the title menu will have a BD-Live option.
Simply select this option using the navigation buttons and then press the ENTER button to
select.
Q: Do all Blu-ray Discs have this feature?
A: BD-Live is still relatively new, so make sure that the disc has the BD-Live marking on the disc
packaging.
Q: How do I access BD-Live?
A: With a BD-Live enabled disc inserted and this unit connected to the internet, simply select
the BD-Live option at the Main Title screen of the disc.
Q: Will all discs have the same BD-Live contents?
A: No, they will differ from disc to disc.
Q: How do I navigate throughout the BD-Live screen?
A: Using the Navigation buttons on the remote.
Q: Do I need to have an external USB/SD card inserted to use this content?
A: Yes, the USB/SD card must be inserted as the BD-Live content will be downloaded onto this
inserted media.
Q: How do I delete something I downloaded?
A: See page 20 to delete an item from the USB/SD Card.
Q: Where can I find a list of all of the downloads on my player?
A: The BD-Live homepage (shown when you activate Blu-ray) provides the list of downloads
which can be played with the currently-inserted disc. The list on display may be different from
disc to disc. Also, the Blu-ray Disc player may have a function to show the list of files on local
storage, but those downloads can only be played with the specific disc which enabled the
content download.
Electrical connection
Any electrical work that is required to install this appliance MUST be carried out by a
qualified electrician.
BD-Live FAQs:
Q: What is BD-Live?
A: BD-Live is a new Blu-ray feature that utilizes the internet to extend your movie viewing
experience through downloaded content and advanced inter activity. When using this player
with BD-Live enabled Blu-ray discs, you can download a variety of up-to-date content, such as
previews, trivia games, exclusive special features and more. The content will vary from disc to
Before making any electrical connections, ensure the following:
• Do not bend, stretch or pull the supply cable in order to avoid electric shock.
• The supply voltage should be the same as that indicated in the technical specifications and the
appliance rating plate.
• When installed, the power socket must be within easy reach.
• If the socket outlets in your home are not suitable for the plug supplied with this unit check with
a qualified electrician for replacement.
• The use of multiple connectors or extension cables are not recommended.
• The appliance must be connected to a 110-240 volt 50Hz AC supply by means of a three pin
socket.
-12-
-13-
NOTE: In the settings menu Lansettings items, you can view the network
connection is being recognized Tips.
B500说明书.indd
12-13
2011-10-15
9:54:32
User Instructions
User Instructions
• The main plug is used as the disconnect device, the disconnect device shall remain readily
operable.
• In order to disconnect the apparatus from the mains completely, the mains plug should be
disconnected from the mains socket outlet completely.
• If power supply cord is damaged, it must replaced by the manufacturer or its service agent or a
similar qualified person in order to avoid a hazard.
Getting started
Note: Leave or enter each mode, must wait for 10 seconds before entering the next
operation.
Follow the below steps to get the system up and running.
1. Ensure you have correctly connected all the wiring and cables.
2. Turn on your TV/Monitor and set it to the correct input. This will depend on how you
connected the Blu-ray player to your TV.
3. Press the STANDBY button on the BD player.
4. Press the OPEN/CLOSE button on either the remote or BD player. Insert a disc ( label sideup ),
press the OPEN/CLOSE button once again to shut the drawer and wait for the BD player to
read the disc.
5. Use the navigation buttons on the remote to navigate to the play option on the BD menu.
6. Press the ENTER button to begin playback.
Below are a couple of notes you need to keep in mind when using the Blu-ray player.
1. HDMI O/P RESET
When connected via a HDMI cable, press the HDMI O/P RESET button to reset the resolution
to the default Auto This can be useful if you set the player to a resolution your television
cannot display and need to reset to a default resolution that is supported.
Press the HDMI O/P RESET button, then restart the player. The player will start at the default
Auto, and you will then be able to operate the player again.
2. COLOUR BUTTONS
Color button (red/green/yellow/blue)to choose some BD menu items quickly.
The key also can be used in the Java conversational BD Operation.
3. BD/SD/USB
Press BD/SD/USB to choose BD or SD card or USB device.
-14-
B500说明书.indd
14-15
IMPORTANT NOTE:
After plugging in, the unit will be in standby mode and the POWER/STANDBY light will
be red. Press the STANDBY button to power on the player. Usual boot times are around 30
seconds.
Basic operation
PLAYBACK OF A Blu-ray / DVD DISC
1. Press the STANDBY button to power on the unit. When powered on the STANDBY/POWER
light will be blue.
2. Press the OPEN/CLOSE button to open the disc tray, “OPEN” will appear on-screen. Insert a
disc with the label facing upwards into the tray.
3. Press the OPEN/CLOSE button to close the tray, “CLOSE” will appear on-screen, then
“READING” will briefly display. After loading, the menu screen of the disc should appear. Use
the navigation buttons to select your required option and press the ENTER button to select.
4. To stop playback, press the STOP button. Press the PLAY button again to resume playback
from where you left off. If the STOP button is pressed a second time the resume option is
cancelled.
NOTE:
If feel unwell or visual fatigue, please don't watch 3 D images.
If feel dizzy, nausea or have other related symptons, please do not continue to watch, and have
a rest.
If you have used the BD/SD/USB inputs, you may need to select the BD input again in order to
play discs. Press the BD/USB/SD button until the BD option is selected.
PAUSE
Press the PAUSE ll button to pause playback.While in pause mode, pressing the NAVIGATION
button will advance the picture one frame at a time. To resume playback press either the PAUSE
ll or PLAY ► button.
SKIP ►►l / l◄◄ SKIP
Press the SKIP ►►lbutton to advance the disc to the beginning of the next chapter.
Press the SKIP l◄◄ button to advance the disc to the beginning of the playing chapter. SKIP
l◄◄ button to advance the disc to the beginning of the previous chapter, one more press makes
it move to the beginning of the previous chapter.
SLOW MOTION
Press the PAUSE ll button to pause playback. Press the FAST/FWD ►► button to advance the
playback at X2,X4,X8,X16,X32 speed.
-15-
2011-10-15
9:54:32
User Instructions
User Instructions
To resume normal play, press the PLAY button.
DISC MENU
Pressing the DISC MENU button will display the title menu screen. Some discs may not have a
menu and this button will do nothing.
AUDIO
Press the AUDIO button repeatedly or use the navigation
available audio tracks.
buttons to cycle through the
(1) Press the button to set the start point (“A”) of the loop.The video will continue playing.
(2) Press the button to set the end point (“B”). The segment “A-B” will be played on repeat.
Press A-B button to resume normal playback.
SUB Menu Options
When the SUB MENU button is pressed, a sub menu will appear on-screen. The content of
this menu depends on the disc being played at the time. These will include DISC, PLAYBACK,
VIDEO & AUDIO categories
SEARCH
Jump to a user specified time during playback.
Select a category using the navigation buttons, press the ENTER button to select the option.
Most options have sub menus attached to expand further options.
RETURN
Return a picture or menu Press the RETURN button
Some categories are disc dependant, but a description of most can be found below.
CLEAR
Press this button to cancel a mistaken entry when using the numeric keypad.
DISPLAY
Press the DISPLAY button to view details about the currently playing disc. For example: Title,
Chapter, Elapsed time, Remaining time, Disc type and Play status. Press the DISPLAY button
once more to hide the information.
PIP (PICTURE IN PICTURE)
Some BD discs have picture in picture capabilities. If your disc supports this function, while
viewing a disc (some BD discs only) press the PIP button to view. Press the PIP button again to
cancel.
When playing BD with Bonus View support, press this button to disable/enable the video portion
of a Picture-in-Picture (PiP) track (e.g., the director'scommentary). This feature is not available
for all discs.
Note: PiP/Director's commentary must have been turned on in the BD's mainmenu in
order for this feature to work..
ZOOM:
Select this option to return to the discs Complex modulation ZOOM for complex modulation
ZOOM (state x1.2) / complex modulation ZOOM (x1.5) / complex modulation ZOOM (x2) /
complex modulation ZOOM (x4) .
NOTE: Zoom button is only available when zooming in or zooming out the picture, and it
does not work when comes to the blu-ray video and DVD video.
A-B:
Use this button to set a segment of the disc to be repeated as a loop.While a disc is playing:
-16-
B500说明书.indd
16-17
DISC
Signal type: Select the primary and secondary video / audio.
Subtitle info: Turn subtitles ON/OFF and select language.
Subtitle style: When available select the subtitle style and formatting.
Angle: When a disc has more than one angle available, select the desired angle.
PLAYBACK
Repeat: Select to repeat the current Title,
Chapter or turn repeat OFF.
3 D DEPTH: Select the 0-4 the current.
VIDEO
Picture: Select the required picture setting from Normal, Soft, Fine, Cinema or User. The
USER setting allows custom settings to be entered.
Progressive: Choose the required progressive setting. 50HZ , 60HZ or Video. Select one of
the auto settings automatically detect between Film and Video material and apply the correct
setting. On occasions you may notice a distorted picture using both of these settings, in this
case choose the “Video” option.
AUDIO
Sound Effect : Use this option to turn disks voice off, Surround Strong or Sturround Normal.
Cinema Voice: Use this option to turn cinema voice ON or OFF
PopUp Menu Options
Press the POPUP MENU button to display the pop up menu while playing a disc.
Various functions are available from this pop up menu. Use the navigation buttons to choose an
option and ENTER to select.
-17-
2011-10-15
9:54:32
User Instructions
User Instructions
TOP MENU: Select this option to return to the discs main title screen.
POPUP MENU: Select this option and depending on how the disc is authored a pop up menu
will appear adding extra functionality.
For example, a chapter selection menu may appear on screen.
Connecting USB/SD Device
Connecting USB /SD Device Supported Audio, Video, Picture files types
Video: MPEG-4 files. Music: mp3 files .wma files. Picture: jpeg files.
USB storage devices with supported files stored on a FAT32partition will be recognized.
SD storage devices with supported SD MAX2GB (FAT16) and 4 GB SDHC ~ 32 GB FAT32
NOTE:
The USB device must be formatted as a FAT32 drive, NTFS and other filesystem types
are not supported.
USB interface output voltage of DC5V (± 0.1V) Maximum output current 0.5 A
If USB drives the work more than 0.5 please increase A current USB driver external power
supply, to see the appended drawings:
Native USB
Interface
External USB
Interface
5. Press the PAUSE ll button to pause playback. To resume playback press either the PAUSE ll
or PLAY ► button.
SELECTING TRACKS USING THE NUMBER BUTTONS
Press the number button(s) corresponding to the track number you would like to play, then press
the ENTER button and the player will start to play your specified track.
SELECTING TRACKS USING THE NUMBER BUTTONS
During playback, pressing the SKIP ►►l buttons will select the playing tracks and begin
playback.
Again Press the SKIP l◄◄ buttons will select the previous tracks and begin playback, one more
press makes it move to the beginning of the previous tracks.
FORWARD >> / REVERSE << SEARCH
During playback, press either the FAST/FWD ►► or FAST/REV ◄◄ buttons to advance the
disc forward or backwards at double speed X2. To increase the advance rate, press the button
again repeatedly to cycle between: X2, X4, X8, X16 and X32.
To resume normal playback press the PLAY button.
When the SUB MENU button is pressed, a sub menu will appear on-screen.
The content of this menu depends on the disc being played at the time.
USB Drive
Select a category using the navigation buttons, press the ENTER button to select the option.
Most options have sub menus attached to expand further options.
Some categories are disc dependant, but a description of most can be found below.
NOTE: USB/SD Device do not support 3D video files.
Playing a CD Disc
1. Press the STANDBY button to power on the unit. When powered on the STANDBY/POWER
light will be blue.
2. Press the OPEN/CLOSE button to open the disc tray, “OPEN” will appear on-screen. Insert a
disc with the label facing upwards into the tray.
3. Press the OPEN/CLOSE button to close the tray “CLOSE” will appear on-screen, then
“READING” will briefly display. After loading, the menu screen of the disc should appear. Use
the navigation buttons to select your required option and press the ENTER button to select.
4. To stop playback, press the STOP button. Press the PLAY button again to resume playback
from where you left off. If the STOP button is pressed a second time the resume option is
cancelled.
-18-
B500说明书.indd
18-19
PLAYBACK
Repeat: Select to repeat ALL, TRACK, RANDOM ( like shuffle ) or OFF.
Data Playback
PLAYBACK OF DATA (PICTURE AUDIO) DISC/ SD/USB
Press the BD/SD/USB button to select the input you wish to view files from.
After a short period a list of available folders and files will appear on-screen.Use the navigation
buttons to select an image or a folder and press the ENTER button to start playback or to open
the folder. To return to the previous folder navigate up to the “..” icon at the top of the list and
press ENTER.
To return to the selection menu during playback press the RETURN button.
NOTE: These below options are limited to the folder list screen and won't be available
during a slide show.
-19-
2011-10-15
9:54:32
User Instructions
Advanced Operation
Press the POPUP MENU button to view the available options.
1. CONTENTS INFORMATION
Select the Contents information option to view details about the highlighted file. Such as image
resolution, filename, and any other detail stored within the file.
2. SLIDESHOW SETUP
This option allows you to set the viewing duration of each image, and whether they repeat or
not.
Setup Menu
Screen Saver
Choose this option you want to set Screen
saver ON or OFF
When the SETUP button is pressed you will
be faced with a menu, select the SETTING
option to enter the main settings menu.
The options here are split into categories
for easier navigation : GENERAL, VIDEO,
2. Select BD-VIDEO DATA ERASE using the
navigation buttons, and press ENTER to activate.
3. Select START using the navigation buttons, then press the ENTER button to erase all the
data from the device. Select CANCEL to cancel the procedure.
Net w o r k
Video Menu
TV ASPECT
Use this option to set the required TV Aspect
ratio. The options are as follows:
A U D I O , L A N G U A G E , PA R E N TA L &
NETWORK.
Use the navigation buttons to navigate the
menu and the ENTER button to select an
option.
4:3 PAN-SCAN: This is for 4:3 TV’s and will
stretch the wide image top to bottom and cut
off the sides.
4:3 LETTERBOX: Again this is for 4:3 TV’s
but this will add black bars top & bottom for
widescreen material.
16:9: This is the standard widescreen format,
4:3 material will be displayed with black bars
on either side.
16:9 FULL: This setting will stretch all
material to fill the screen on a widescreen
TV.
General Menu
Below is a list of available options and a
description of each setting.
RESTORE SETTINGS
Select this option of you want to reset all the
settings to the factory defaults. (On-Screen
Language, Parental, Network settings remain
unchanged).
Vi d eo
Restore Settings
Yes
Screen Saveru
Audio
L an g u ag e
TV Aspect
Vi d eo
HDMI
4:3Pan&Scan
4:3 Letter box
Audio
16:9
L an g u ag e
16:9Full
Net w o r k
Net w o r k
20-21
Gen er al
Par en t al
Par en t al
B500说明书.indd
On
Off
Par en t al
Gen er al
-20-
Screen Saveru
L an g u ag e
SKIP: FAST/FWD ►► or FAST/REV ◄◄ buttons will advance to the next or previous image.
ROTATE: During playback of a slide show press the POPUP MENU button to access the rotate
options.
Should you wish to remove BD-Live data you have stored on a USB device or SD Card . Follow
this procedure.
1. With the USB drive or SD Card inserted in the slot, press the SETUP button.
Restore Settings
Vi d eo
Audio
3. SLIDESHOW START/CONTINUE
Use these options when choosing to start a slide show or to resume a slide show.
Erasing Data from a USB device or SD Card
Gen er al
-21-
2011-10-15
9:54:33
Advanced Operation
Advanced Operation
HDMI Menu
This option has a sub menu of its own
specifically for the connection to a TV via
a HDMI cable. The options are described
below.
RESOLUTION
Choose the resolution best suited to your TV
/ Monitor. The options are: Auto, 480i/576i,
480p/576p, 720p, 1080i, 1080p & 1080p/24p.
speakers.
NOTE: If an incompatible resolution is set,
you can use the HDMI O/P reset function as
outlined on page 14, to restore the default
resolution of Auto.
RGB OUTPUT RANGE
Select STANDARD to display colours as the
director intended. Choose ENHANCED and
the player will enhance the contrast.
COLOUR SPACE
Only change this setting if you have problems
when viewing in AUTO mode. The options
are: Auto, YCbCr: 4:4:4, YCbCr 4:2:2 or
RGB.
PCM DOWN CONVERSION
Use this option to turn PCM down sampling
ON or OFF. Some amplifiers cannot support
high sample rates. If this is the case turn
this function ON and the audio will be down
sampled to 48kHz.
TV Aspect
Resolution
Vi d eo
HDMI
RGB Output Range
Gen er al
Night Mode
Auto
Vi d eo
PCM Down Conversion
On
Audio
Digital Audio Output
Off
L an g u ag e BD Click Sound
Night Mode
On
Vi d eo
PCM Down Conversion
Off
Audio
Digital Audio Output
L an g u ag e BD Click Sound
Par en t al
Net w o r k
DIGITAL AUDIO OUTPUT
Choose between PCM & BITSTREAM.
Select PCM when the connected equipment
will not decode Dolby Digital or DTS.
Night Mode
PCM
Vi d eo
PCM Down Conversion
Bitstream
Digital Audio Output
Gen er al
On
Vi d eo
PCM Down Conversion
Off
Audio
Digital Audio Output
L an g u ag e BD Click Sound
Net w o r k
Net w o r k
Gen er al
Night Mode
Par en t al
Par en t al
HIGH BITRATE AUDIO
Select AUTO for the player to determine the
correct setting. Select ON when AUTO does
not output correctly, for instance the bitrate is
too high. OFF disables the function.
Gen er al
Spanish or Other.
Gen er al
Gen er al
Audio Language
Oringinal
Vi d eo
Subtitle Language
English
Audio
Menu Language
French
Par en t al
Spanish
Net w o r k
Other***
L an g u ag e
High Bitrate Audio
L an g u ag e BD Click Sound
Vi d eo
Subtitle Language
English
Par en t al
Audio
Menu Language
German
Net w o r k
L an g u ag e On-Screen Language
French
Par en t al
Spanish
Net w o r k
Other***
Audio Menu
NIGHT MODE
This function allows enhancement of Dolby
digital audio played at low volumes or small
-22-
B500说明书.indd
22-23
Menu Language
French
L an g u ag e On-Screen Language
Spanish
Par en t al
Other***
Audio Language
Gen er al
Audio Language
Vi d eo
Subtitle Language
Audio
Menu Language
English
German
French
Spanish
Par en t al
Net w o r k
NOTE: Choose OTHER when your
language is not listed or you wish
to use the default option of the playing
disc.
SUBTITLE LANGUAGE
Select the default subtitle language to be
selected automatically.
Choose between: Auto, English, German,
French, Spanish or Other.
Color Space
BD CLICK SOUND
Use this option to enable or disable the click
sound in the pop up menu.
German
Audio
English
L an g u ag e On-Screen Language
German
L an g u ag e On-Screen Language
Audio
Net w o r k
Subtitle Language
ON SCREEN LANGUAGE
Select the default on-screen language to be
selected automatically.
Choose between: English, German, French
or Spanish.
AUDIO LANGUAGE
Select the default audio language to be
selected automatically.
Choose between: Original, English, German,
French, Spanish or Other.
Audio
Par en t al
Audio Language
Vi d eo
Net w o r k
Language Menu
Gen er al
Gen er al
Parental Menu
DVD-VIDEO RATINGS Use this function to
restrict viewing of material based on age
rating.
Auto
Gen er al
DVD-Video Ratings
Vi d eo
BD-Video Age Limit
8 All discs can
be played
7
Audio
Unlock player
6
L an g u ag e Temporary Unlock
Par en t al
Net w o r k
MENU LANGUAGE
Select the default menu language to be
selected automatically.
Choose between: English, German, French,
Change Password
5
4
3
2
1
When you try to change the restriction level
-23-
2011-10-15
9:54:33
Advanced Operation
Advanced Operation
you will be asked for a pass code. The
default is “0000”, The Super password is
“8888”. but this can be changed the next time
you access the ratings options.
Gen er al
DVD-Video Ratings
DVD-Video Unloc
Vi d eo
BD-Video Age Limit
BD-Video Unloc
Audio
Unlock player
L an g u ag e Temporary Unlock
Par en t al
Change Password
Net w o r k
PASS WORAD:
Gen er al
TEMPORARY UNLOCK
0 PROHIBITS playback of ALL movies.
1 KIDSAFE Suitable for all children
2 G general audiences
3 PG Parental guidance
4 PG 13 Parental guidance for children under
the age of 13.
5 PGR Parental guidance suggested for
children under 17 years old.
6 R Under 17 years old, Parental guidance
strongly suggested.
7 NC17 17 years old and above
8 ADULT Adult only.
DVD-Video Ratings
Vi d eo
BD-Video Age Limit
Audio
Unlock player
Audio
Unlock player
IP/DNS Setting
Vi d eo
Proxy Server Settings
Access Setting
Audio
BD-Live Access
BD-LIVE LOCAL STORAGE
According to the user's local storage type,
when using the local memory is the SD card,
you can select SD CARD. When using local
storage is a USB drive, you can select USB.
L an g u ag e BD-Live Local Storage
Par en t al
Net w o r k
Change Password
CHANGE PASSWORD
Choose CHANGE PASSWORD to enter a
new pass code number. NOTE: The default
pass code will work should you forget your
new code.
Gen er al
DVD-Video Ratings
Yes
PROXY SERVER SETTINGS
If your internet connection requires
connection through a proxy server then enter
the address & port details in this menu, then
initialise the entered settings.
Gen er al
LAN Settings
Vi d eo
Proxy Server Settings
Proxy Address
Audio
BD-Live Access
Proxy Port Number
Vi d eo
BD-Video Age Limit
L an g u ag e BD-Live Local Storage
Audio
Unlock player
Par en t al
L an g u ag e Temporary Unlock
Par en t al
Gen er al
LAN Settings
Vi d eo
Proxy Server Settings
Audio
BD-Live Access
L an g u ag e
BD-Live Local Storage
Par en t al
SD Card
USB
Net w o r k
lnitialixze
Net w o r k
Change Password
Net w o r k
No Limit
Network Menu
This section covers the setup functions
for connecting to a broadband network
for BD-Live features.
ENSURE THE NETWORK IS CONNECTED
BEFORE USING THESE SETTINGS.
Change Password
UNLOCK PLAYER
If you select UNLOCK PLAYER after entering
the pass code all discs can be played.
BD-LIVE ACCESS
This menu gives you three access options for
BD-Live material.
Gen er al
LAN Settings
Vi d eo
Proxy Server Settings
Limit
Audio
BD-Live Access
Prohibit
Permit
L an g u ag e BD-Live Local Storage
Par en t al
Net w o r k
LAN Setting
IP /DNS Setting will automatically assign
the player an IP address on the network and
-24-
24-25
BD-Video Unloc
LAN Settings
Net w o r k
Net w o r k
B500说明书.indd
DVD-Video Unloc
BD-Video Age Limit
Par en t al
L an g u ag e Temporary Unlock
Par en t al
DVD-Video Ratings
Vi d eo
L an g u ag e Temporary Unlock
BD-VIDEO AGE LIMIT
Playback of some BD-ROMs can be limited
based on the age of the user. Scenes may
be blocked or replaced with different scenes.
Use the navigation buttons to set an age
limit.
Gen er al
Gen er al
PERMIT
Allows all access to all BD-Live material.
LIMIT
Restricts access to BD-Live material with
certificates only.
PROHIBIT
Restricts all access to BD-Live material.
the rest of the settings will be completed
automatically. Choosing to switch this OFF
will mean entering the IP Address, Subnet
Mask & Gateway Address manually and is
not recommended unless you are familiar
with network settings.
Access Setting
Set the connection speed AUTO/manuall
-25-
2011-10-15
9:54:33
Care & Maintenance
Technical Specifications
Important: Always unplug the appliance from the power socket during cleaning and
maintenance.
• Never use any sharp instruments or abrasive substances, soap, household cleaner, detergent
or wax polish for cleaning.
• Clean the external surfaces with a damp soft cloth only. Never use abrasive products or
solvents as it may damage the appliance.
Troubleshooting
Blu-ray player
Power
Power Consumption
Disc Support
Video Format
Audio Format
Supported image format
Supported Audio format
Composite
In the unlikely event of difficulties with your appliance please follow the trouble shooting guide
below. If the problem persists, contact the retailer if the machine is still under guarantee.
Customer helpline:
Component
Problem
Reason(s) Solution(s)
Solution(s)
No Power
● Power cable not connected to wall socket
● TV not set to the correct input
● Make sure the plug is connected
● Set to the correct input channel
HDMI
● Video cables improperly connected
● Audio/speaker cables improperly
● Re-connect the cables
● Re-connect the cables
● Sub woofer not turned on
● Switch on the unit
● Sub woofer volume too low
● Increase the volume
● Audio output setting not correct
● Set to the correct mode
● Clean the disc or try another disc
No Picture
No Sound
● Disc is dirty
Distorted Picture
● In fast forward or rewind mode
● Wrong TV system
Unable to Play
Remote not working
● Picture distortion can occur during this
function. It is normal.
● No disc in the tray
● Set to the correct TV System
● Insert a compatible disc
● Disc not loaded properly
● Check the disc loaded
● Disc is dirty
● Clean the disc
● Setup menu obscures the picture
● Batteries low
● Press the SETUP button to close the menu
● Replace the batteries
● Object obstructing the sensor
● Move the object
● Remote too far away from the Player/Sub
Some Functions not Working
● Some discs do not support all functions
TV Displays “No Signal” or blank ● Some TV’s cant display the 1080i output
● Move closer
● Try another disc
● Try another resolution
BD-LIVE Troubleshooting
If you receive an error stating you do not have enough storage space for a download, connect
the usb drive to your computer and remove / backup some of the files, erase the media or use
another usb drive.
If you receive an error while downloading. The BD-Live server may be busy. Try again another
time.
-26-
B500说明书.indd
26-27
Digital Audio Output
Frequency Response
S/N Ratio
Dynamic Range
Total Harmonic Distortion
Dimensions
110-240V ~ 50/60Hz
1W (standby), <25W (maximum)
BD (405nm), DVD (650nm), CD (780nm)
AVC (H.264), VC-1, MPEG-2, MPEG-4
DTS-2.0 Digital Out, DTS-HD, Dolby Digital, Dolby Digital PLus,
Dolby True HD, Linear PCM
JPG, JPEG
MP3, WMA
(75Ω load) 1 channel 1.0 Vp-p
Blu-ray: 480i
DVD: 480i
(75Ω load) Y: 1.0Vp-p, Pr: 0.7Vp-p, Pb: 0.7Vp-p
Blu-ray: 480i
DVD: 480i
1080p, 1080p 24, 1080i, 720p, 480p/576p, 480i/576i
PCM Multichannel Audio, Bitstream Audio, PCM Audio
Optical / Coaxial
48kHz Sampling: 4Hz to 22kHz / 96kHz Sampling: 4Hz to 22kHz
85 dB
85 dB
0.01%
360x 250 x 53mm
We apologise for any inconvenience caused by any minor inconsistencies in these instructions,
which may occur as a result of product improvements and development.
This appliance complies with the following EEC directives: 2006/95/EEC Low voltage
directive /2004/108/EEC EMC directive
Disposal Information
The symbol on the product or its packaging indicates that this product may not be
treated as household waste. Instead it should be handed over to the applicable
collection point for the recycling of electrical and electronic equipment. By ensuring
this product is disposed of correctly, you will help prevent potential negative
consequences for the environment and human health, which could otherwise
be caused by inappropriate waste handling of this product. For more detailed
information about recycling this product, please contact your local council office, your household
waste disposal service or the shop where the product was purchased.
-27-
2011-10-15
9:54:33
B500说明书.indd
28-29
2011-10-15
9:54:33
HOTLINE
• AUSTRALIA
: 1300 765 663
• NEW ZEALAND : 0800 100 236
MD110922-01
-30-
B500说明书.indd
30
2011-10-15
9:54:33