1
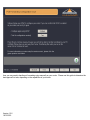
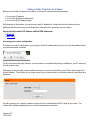
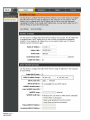
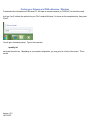
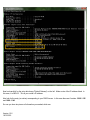
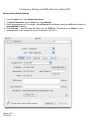
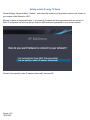
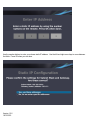
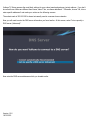
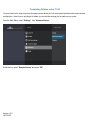
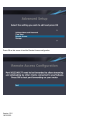
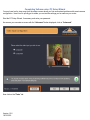
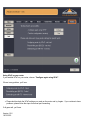
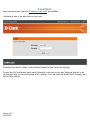
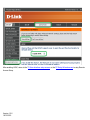
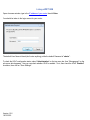
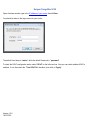
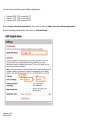
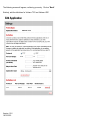
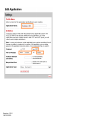
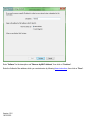
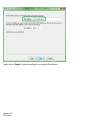
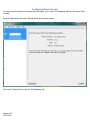
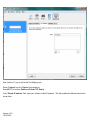
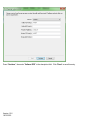
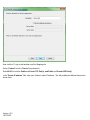
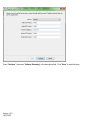
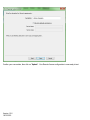
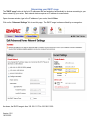
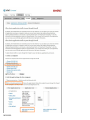
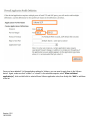
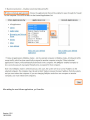
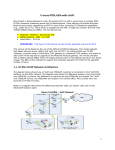
Vulkano Remote Access Configuration
User guide
Table of Contents
Vulkano Remote Access Configuration.......................................................................................................... 3
Do I really need to configure my router?..................................................................................................... 5
Do I really need to set a static IP address for Vulkano?............................................................................. 7
DHCP Reservation - Getting Vulkano's MAC address.............................................................................. 8
Setting a Static IP address for Vulkano.....................................................................................................9
Finding your Gateway and DNS addresses - Windows........................................................................ 13
Finding your Gateway and DNS addresses - Apple OS/X....................................................................16
Choosing a static IP address for Vulkano............................................................................................. 18
Setting a static IP using TV Setup........................................................................................................ 19
Setting a static IP using PC Setup Wizard............................................................................................23
Completing Vulkano setup: TV UI..............................................................................................................26
Completing Vulkano setup: PC Setup Wizard........................................................................................... 29
Routers which support UPnP..................................................................................................................... 32
Belkin Connect N150............................................................................................................................... 33
D-Link DIR-601.........................................................................................................................................35
Linksys WRT120N.................................................................................................................................... 37
Netgear RangeMax N150........................................................................................................................ 40
Routers which do not support UPnP......................................................................................................... 43
2Wire 2700 HGV...................................................................................................................................... 44
Choosing a static IP address for Vulkano............................................................................................. 45
Determining your DHCP range............................................................................................................46
Configuring Remote Access.................................................................................................................. 48
Apple Airport Extreme.............................................................................................................................. 57
Making a DHCP Reservation.................................................................................................................58
Choosing a static IP address for Vulkano............................................................................................. 61
Determining your DHCP range............................................................................................................62
Configuring Remote Access.................................................................................................................. 64
AT&T uVerse (2Wire)............................................................................................................................... 71
Choosing a static IP address for Vulkano............................................................................................. 72
Determining your DHCP range............................................................................................................73
Configuring Remote Access.................................................................................................................. 75
Additional resources................................................................................................................................... 84
Monsoon Multimedia Support Information............................................................................................... 85
Web links.................................................................................................................................................. 86
Version 1.0.2
10/15/2010
Vulkano Remote Access Configuration
In order to communicate with your Vulkano from outside your home network to add or edit scheduled recordings, and
transfer them to your PC or mobile phone once they're completed, you may need to manually configure your network
router to allow remote access.
Remote access is also commonly called "port forwarding" and we will use those terms interchangeably in this guide.
Different router manufacturers use different terminology to describe remote access. It can be called:
•
•
•
•
•
Port Forwarding
Port Mapping
Remote Access
Gaming and Applications
Special Servers
Note: Special router setup steps for port forwarding are typically not needed if all you are doing is streaming
live video from Vulkano.
If your home router supports UPnP (Universal Plug n Play), then chances are good that Vulkano can perform this
setup on your router automatically.
However, if you get this screen during TV Out Setup,
or this screen when running the PC Setup Wizard,
Version 1.0.2
10/15/2010
then you may need to handle port forwarding setup manually on your router. Please use this guide to determine the
best approach to take, depending on the capabilities of your router.
Version 1.0.2
10/15/2010
Do I really need to configure my router?
Choosing a strategy for configuring your router for remote access should be done in the following order, as the steps
are listed in increasing level of difficulty.
#1 Your router supports UPnP, UPnP is enabled, remote access configuration already works, and you are
reading this document just to learn more about port forwarding.
If your router is relatively new, chances are good that it supports UPnP (Universal Plug n Play) and UPnP is turned
on by default. In this case, Vulkano itself can make the settings changes to your router using UPnP and you won't
have to do anything extra.
#2 Your router supports UPnP, but UPnP is disabled. You need some guidance to enable UPnP on your
router.
There's a possibility that your router supports UPnP, but for some reason it's turned off. If this is true, then the
simplest thing you can do is to turn UPnP on and then let the Vulkano setup make the settings changes using UPnP.
If you cannot find information about your specific router (or a similar model) in this guide, then you should locate
the documentation for your router, which you can usually find in the "Downloads" or "Support" section of the router
manufacturer's web site. Search the documentation for UPnP to find out whether it is supported and how to make
sure that it is enabled.
Turn UPnP on, then return to the setup screen to "try again".
If you're using TV Setup, go to this page.
If you're using PC Setup Wizard, go to this page.
#3 Your router does not support UPnP, but does support DHCP reservation to make sure that the Vulkano
can always get assigned the same IP address without needing to configure Vulkano to use a static IP. In
addition, you will need to set the port forwarding rules on your router manually.
Depending on your router manufacturer, DHCP reservation may be called:
• Static DHCP
• Static DHCP Assignment
• fixed-address
• Address Reservation
• IP reservation
• MAC/IP binding
Start by reading this page regarding DHCP reservation, then check the sections of this document for your router (or
a similar model) which describe how to make a DHCP reservation.
Version 1.0.2
10/15/2010
#4 Your router does not support UPnP, and does not support DHCP reservation. In this case you will need
to configure Vulkano to use a static IP. In addition, you will need to set the port forwarding rules on your
router manually.
If your router supports neither UPnP nor DHCP reservation, then you will have to configure your Vulkano with a static
IP address and you will need to set your router manually to forward a couple ports to this address.
Version 1.0.2
10/15/2010
Do I really need to set a static IP address for Vulkano?
The reason for setting a static IP address is so that your Vulkano ALWAYS comes up on the same IP address, even
if it reboots, or your router reboots, or the power in your house goes off for a while, then comes back on, etc.
Setting a static IP address is a reliable way of making sure that your Vulkano is always at the same address. But
some router manufacturers have devised clever ways of allowing your device to repeatedly get assigned the same IP
address without requiring the further complications of setting up a static IP address.
Depending on your router manufacturer, this feature may be called:
• DHCP reservation
• Static DHCP
• Static DHCP Assignment
• fixed-address
• Address Reservation
• IP reservation
• MAC/IP binding
Check your router's documentation to see if it offers this feature. If so, go ahead and use it. If not, continue on to
first set a static IP for Vulkano.
Version 1.0.2
10/15/2010
DHCP Reservation - Getting Vulkano's MAC address
Knowing the MAC address of your Vulkano will simplify your set up if your router supports DHCP reservation.
Vulkano's MAC address can be found on the Help...About screen of the TV User Interface, or the
Advanced...Info..LAN screen (for Vulkano connected via Ethernet)
or the Advanced...Info..WiFi screen (for Vulkano connected via Wi-Fi).
Version 1.0.2
10/15/2010
Setting a Static IP address for Vulkano
Before you set a static IP address for Vulkano, you'll need to know the following information:
• Your router's IP address.
• Your router's DNS server address(es).
• Your router's DHCP address range.
With these bits of information, you can choose a static IP address for Vulkano that will not interfere with any
addresses that the router gives out automatically to other devices or computers on your network.
How to find the router's IP address and the DNS addresses:
• Windows
• Mac OS/X
Accessing your router's configuration
To access your router's configuration, you copy the router's IP address which you just found into the address field of
your favorite browser, as shown:
Or, as in the case of the Apple Routers, you may need to run a special utility that you installed on your PC when you
first set up your router.
Assuming you are using the browser method to access your router's configuration, press "Enter" after typing in the
router's address. This will take you to a login screen for your router where you will need to enter the user name and
password.
We will now show you a specific example to show you how to determine the DHCP range of your router. The
method will be different depending on your router's manufacturer and model.
Version 1.0.2
10/15/2010
On the D-Link DIR-601, the DHCP Server settings are found under "Setup" (top bar) and "Network Settings" (side
bar). You can see here that the DHCP IP Address Range is 192.168.11.90 to 192.168.11.115.
Version 1.0.2
10/15/2010
Version 1.0.2
10/15/2010
Version 1.0.2
10/15/2010
Finding your Gateway and DNS addresses - Windows
To determine this information on a Windows PC, first open a command prompt (or "DOS Box" for the older crowd).
Just type "cmd" (without the quotes) into your "Run" window (Windows 7 is shown as the example below), then press
"Enter".
You will get a command prompt. Type in the command
ipconfig /all
and press the enter key. Depending on your system configuration, you may get a lot of text on the screen. This is
normal.
Version 1.0.2
10/15/2010
Now look carefully for the entry which says "Default Gateway" on the left. Make a note of the IP address listed. In
this case, it is 10.0.1.1. This is your router's IP address.
Also look for the entry (or entries) corresponding to your DNS Servers. In this case there are 2 entries: 198.6.1.195
and 198.6.1.146.
So now you have two pieces of information you needed, which are:
Version 1.0.2
10/15/2010
Router address: 10.0.1.1
DNS server address(es): 198.6.1.195 and 198.6.1.146.
Write these down to save them for later.
Version 1.0.2
10/15/2010
Finding your Gateway and DNS addresses - Apple OS/X
Router address (Default Gateway)
1. From the Apple menu, select System Preferences... .
2. In System Preferences, from the View menu, select Network.
3. Select the appropriate port. For example, choose Ethernet for broadband connections, AirPort for wireless, or
Internal Modem for dial-up.
4. Click Advanced... , and in the sheet that opens, click the TCP/IP tab. The number next to "Router:" is your
default gateway. In this example, the router's IP address is 192.168.1.1.
Version 1.0.2
10/15/2010
DNS addresses
If you're using an Apple system running OS/X, you can determine your DNS server addresses by opening a terminal
window by launching Applications --> Utilities --> Terminal, and typing in the following command:
$ cat /etc/resolv.conf
The output will look something like this:
nameserver 203.54.1.20
nameserver 203.54.1.21
So now you have two pieces of information you needed, which are:
Router address: 192.168.1.1
DNS server address(es): 203.54.1.20 and 203.54.1.21
Write these down to save them for later.
Version 1.0.2
10/15/2010
Choosing a static IP address for Vulkano
From the previous steps, you should now know:
• Your router's IP address (example: 192.168.1.1)
• Your router's DHCP address range: (example: 192.168.1.32 to 192.168.1.64)
• Your router's DNS addresses: (example: 203.45.16.30 and 203.45.16.31)
The static IP that you choose for Vulkano needs to be between your router's IP address and the lower end of the
DHCP address range, namely from:
192.168.1.2
to:
192.168.1.31
Or, it can be between the upper end of the DHCP address range, and 253 on the same subnet (first three numbers
with dots between them). So, on the upper end, that gives you from:
192.168.1.65
to:
192.168.1.253.
You'll also need to make sure that you don't choose an address already in use by another network device configured
for static IP, if any.
For this example, we will choose:
192.168.1.30. Write this down along with the DNS addresses you determined in the earlier steps.
Version 1.0.2
10/15/2010
Setting a static IP using TV Setup
Choose Settings...Advanced Setup...Network... and choose the interface you have used to connect your Vulkano to
your network, either Ethernet or Wi-Fi.
Ethernet is chosen in the example below. If you chose Wi-Fi instead, the following screens which are relevant to
Static IP configuration will show up after you enter the SSID and security password for your wireless network.
Choose "Let me specify a static IP address (Advanced)" and press OK.
Version 1.0.2
10/15/2010
Use the number buttons to enter your chosen static IP address. Use the left and right arrow keys to move between
the fields. Press OK when you are done.
Version 1.0.2
10/15/2010
Vulkano TV Setup guesses the most likely settings for your subnet mask and gateway (router) address. If you don't
know that these values are different then shown, select "Yes, use these addresses". Otherwise, choose "No, let me
enter specific addresses" and make your entries on the following screens.
The subnet mask of 255.255.255 is almost universally used in consumer home networks.
Now you will need to enter the DNS server information you found earlier. At this screen, select "Let me specify a
DNS server (Advanced)".
Now enter the DNS server addresses which you located earlier:
Version 1.0.2
10/15/2010
You are done configuring your Vulkano's static IP address.
You may now continue to making your port forwarding settings on your router, followed by the port forwarding test
here.
Version 1.0.2
10/15/2010
Setting a static IP using PC Setup Wizard
Run the PC Setup wizard and enter your Vulkano's password.
On the Video Input Configuration screen, click on the "Advanced" button.
Choose "Network" on the left, and "WiFi" at the upper right if you are connected to your network wirelessly, or "LAN"
if you are using the Ethernet port. Click on the tab labeled "Client IP Settings".
Version 1.0.2
10/15/2010
Enter your chosen static IP address, the Gateway (router address), and the DNS addresses. The subnet mask of
255.255.255 is almost universally used in consumer home networks and should be entered here unless you know
that it should be something else - meaning you're an advanced networker! Press "Apply" when you are done.
You are done configuring your Vulkano's static IP address.
You may now continue to making your port forwarding settings on your router, followed by the port forwarding test
here.
Version 1.0.2
10/15/2010
Version 1.0.2
10/15/2010
Completing Vulkano setup: TV UI
You may have had to stray away from the setup screens where you first encountered problems with remote access
configuration. Here's how to quickly get to where you can test the settings you've made on your router.
From the Main Menu, select "Settings", then "Advanced Setup":
Scroll down to select "Remote Access" and press "OK".
Version 1.0.2
10/15/2010
Press OK on this screen to test the Remote Access configuration:
Version 1.0.2
10/15/2010
Assuming all works well, you'll see:
Congratulations! Your Vulkano and network are now set up to allow you to set up, edit, and download recorded
shows no matter where you are.
Version 1.0.2
10/15/2010
Completing Vulkano setup: PC Setup Wizard
You may have had to stray away from the setup screens where you first encountered problems with remote access
configuration. Here's how to quickly get to where you can test the settings you've made on your router.
Start the PC Setup Wizard, if necessary, and enter your password.
As soon as you encounter a screen with the "Advanced" button displayed, click on "Advanced".
Now click on the "Ports" tab:
Version 1.0.2
10/15/2010
Using UPnP on your router
If you enabled UPnP on your router, choose: "Configure again using UPnP".
If there is any problem, you'll see:
• Please double check the UPnP settings you made on the router and try it again. If you continue to have
problems, please follow the steps for manual port forwarding.
If all goes well, you'll see:
Version 1.0.2
10/15/2010
Congratulations! Your Vulkano and network are now set up to allow you to set up, edit, and download recorded
shows no matter where you are.
Manual Port Forwarding Setup
If you made the changes yourself manually, then click "Test".
If there is any problem, you'll see:
• Please double check the settings you made on the router and try it again.
If all goes well, you'll see:
Congratulations! Your Vulkano and network are now set up to allow you to set up, edit, and download recorded
shows no matter where you are.
Version 1.0.2
10/15/2010
Routers which support UPnP
If your router supports UPnP, you should confirm that UPnP is enabled so that Vulkano can make the port forwarding
settings automatically.
Please check the list below for your router manufacturer. Even if your specific model is not listed, it is likely that the
steps will be similar.
Version 1.0.2
10/15/2010
Belkin Connect N150
Open a browser window, type in the IP address of your router, then hit Enter.
On the left hand side, select "System Settings":
You should be taken to the login screen:
To check the UPnP configuration status, look for the section called "UPnP Enabling". If not, then check the "Enable"
button, then click on "Apply Changes" at the bottom of this screen.
Version 1.0.2
10/15/2010
After enabling UPnP, return to the TV User Interface setup screen, or the PC Setup Wizard screen to retry Remote
Access Setup.
Version 1.0.2
10/15/2010
D-Link DIR-601
Open a browser window, type in the IP address of your router, then hit Enter.
You should be taken to the login screen for your router:
The default User Name is "Admin", while the default Password is blank (don't enter anything).
To check the UPnP configuration status, select "Advanced" on the top menu bar, then "Advanced Network" on the
left hand side. Now you can check whether UPnP is enabled. If not, then check the "Enable UPnP" checkbox, then
click on "Save Settings".
Version 1.0.2
10/15/2010
After enabling UPnP, return to the TV User Interface setup screen, or the PC Setup Wizard screen to retry Remote
Access Setup.
Version 1.0.2
10/15/2010
Linksys WRT120N
Open a browser window, type in the IP address of your router, then hit Enter.
You should be taken to the login screen for your router:
The default User Name is blank (don't enter anything), while the default Password is "admin" .
To check the UPnP configuration status, select "Administration" on the top menu bar, then "Management" on the
sub-menu which appears. Now you can check whether UPnP is enabled. If not, then check the UPnP "Enabled"
checkbox, then click on "Save Settings".
Version 1.0.2
10/15/2010
After enabling UPnP, return to the TV User Interface setup screen, or the PC Setup Wizard screen to retry Remote
Access Setup.
Version 1.0.2
10/15/2010
Version 1.0.2
10/15/2010
Netgear RangeMax N150
Open a browser window, type in the IP address of your router, then hit Enter.
You should be taken to the login screen for your router:
The default User Name is "admin", while the default Password is "password".
To check the UPnP configuration status, select "UPnP" on the left menu bar. Now you can check whether UPnP is
enabled. If not, then check the "Turn UPnP On" checkbox, then click on "Apply".
Version 1.0.2
10/15/2010
Version 1.0.2
10/15/2010
After enabling UPnP, return to the TV User Interface setup screen, or the PC Setup Wizard screen to retry Remote
Access Setup.
Version 1.0.2
10/15/2010
Routers which do not support UPnP
Some routers do not support Universal Plug n Play at all and have to be configured manually.
The information presented here was current at the time this document was written. It is possible that an update to
your router's firmware may be available that makes UPnP work, which would save you a lot of trouble setting things
up.
Version 1.0.2
10/15/2010
2Wire 2700 HGV
The 2Wire 2700 HGV manual can be accessed here.
Version 1.0.2
10/15/2010
Choosing a static IP address for Vulkano
As the 2Wire router does not support DHCP reservation, you will need to explicitly set Vulkano to use a static IP
address that will not conflict with the DHCP range that your router will use to give out addresses automatically to
other devices on the network.
First, determine your DHCP range on the next page, then use this information to set the static IP address on
Vulkano.
Version 1.0.2
10/15/2010
Determining your DHCP range
The "DHCP range" refers to the list of IP addresses that are handed out automatically to devices connecting to your
home network by your router. Each network device requires an IP address to communicate.
Open a browser window, type in the IP address of your router, then hit Enter.
Click on the "Advanced Settings" link to see this page. The DHCP range is shown outlined by an orange box.
As shown, the DHCP range is from 192.168.11.173 to 192.168.11.200.
Version 1.0.2
10/15/2010
The first three numbers of an IP address, separated by dots, in this case 192.168.11, are collectively known as the
subnet.
You want to choose a static IP for Vulkano that is outside of this range.
The entire subnet consists of the range of IP addresses between 192.168.11.1 and 192.168.11.253. The router
usually reserves the lowest address for itself.
So the IP address ranges in this example are:
•
•
•
•
192.168.11.1 - used by the 2Wire router
192.168.11.2 to 192.168.11.172 - available
192.168.11.173 to 192.168.11.200 - used by DHCP
192.168.11.201 to 192.168.11.253 - available
Now proceed to configure Vulkano for an available static IP address using the instructions on this page.
Version 1.0.2
10/15/2010
Configuring Remote Access
Log into the 2Wire 2700 HGV's setup page using the router's IP address in your browser.
By default, there is no login required. Here's the initial screen:
Click on "View the home network".
Version 1.0.2
10/15/2010
Identify the "volcano" or "vulkano" device, then click on "Edit firewall settings".
Version 1.0.2
10/15/2010
Version 1.0.2
10/15/2010
You will need to add three user-defined applications:
1. Vulkano EPG: TCP on port 49177
2. Vulkano TCP: TCP on port 56123
3. Vulkano UDP: UDP on port 56123
Select "Allow individual applications", then click on the link "Add a new user-defined application".
Enter the settings shown below, then click on "Add definition".
Version 1.0.2
10/15/2010
The following screen will appear, confirming your entry. Click on "Back".
Similarly, add the definitions for Vulkano TCP and Vulkano UDP:
Version 1.0.2
10/15/2010
Version 1.0.2
10/15/2010
Once you have added all 3 of the application settings for Vulkano, you now need to apply them to the Vulkano
device. Make sure that "vulkano" or "volcano" is the selected computer, select "Allow individual application(s)",
click and shift-click to select all three Vulkano application rules, then finally click "Add" to add them to the list.
Version 1.0.2
10/15/2010
After adding the new Vulkano applications, you'll see this:
Version 1.0.2
10/15/2010
You can now close the browser window showing your router setup and proceed to test the port forwarding setup with
TV Setup or PC Setup Wizard.
Version 1.0.2
10/15/2010
Apple Airport Extreme
Use the Apple AirPort Utility software to configure your Apple AirPort router.
Version 1.0.2
10/15/2010
Making a DHCP Reservation
The AirPort Extreme router allows you to make a "DHCP Reservation" which makes sure that your Vulkano always
gets assigned the same IP address, without requiring you to actually set Vulkano to use a static IP.
In the AirPort utility, choose the Internet-DHCP tab.
Click on the "+" sign to add a DHCP reservation.
Version 1.0.2
10/15/2010
Enter "Vulkano" for the description and "Reserve by MAC Address", then click on "Continue".
Enter the Vulkano's Mac address, which you can determine by following these instructions, then click on "Done".
Version 1.0.2
10/15/2010
Finally, click on "Update" to enter the settings to your Apple AirPort Extreme.
Version 1.0.2
10/15/2010
Choosing a static IP address for Vulkano
If you choose not to use DHCP reservation, you will need to explicitly set Vulkano to use a static IP address that will
not conflict with the DHCP range that your router will use to give out addresses automatically to other devices on the
network.
First, determine your DHCP range on the next page, then use this information to set the static IP address on
Vulkano.
Version 1.0.2
10/15/2010
Determining your DHCP range
The "DHCP range" refers to the list of IP addresses that are handed out automatically to devices connecting to your
home network by your router. Each network device requires an IP address to communicate.
To find the Apple Airport Extreme's DHCP range, run the AirPort Utility and access the Internet-DHCP tab as shown.
As shown, the DHCP range is from 10.0.1.10 (the DHCP Beginning Address) to 10.0.1.34 (the DHCP Ending
Address). The first three numbers separated by dots, in this case 10.0.1, are collectively known as the subnet.
You want to choose a static IP for Vulkano that is outside of this range.
Version 1.0.2
10/15/2010
The entire subnet consists of the range of IP addresses between 10.0.1.1 and 10.0.1.253. The router usually
reserves the lowest address for itself.
So the IP address ranges in this example are:
•
•
•
•
10.0.1.1 - used by the Apple router
10.0.1.2 to 10.0.1.9 - available
10.0.1.10 to 10.0.1.34 - used by DHCP
10.0.1.35 to 10.0.1.253 - available
Now proceed to configure Vulkano for an available static IP address using the instructions on this page.
Version 1.0.2
10/15/2010
Configuring Remote Access
To configure remote access on the Apple Airport Extreme, you'll use the "Port Mapping" feature in the Airport Utility
software.
Open the Airport utility and select "Manual Setup" from the main screen.
Click on the "Advanced" icon, then the "Port Mapping" tab.
Version 1.0.2
10/15/2010
Now click the "+" sign to add a new Port Mapping rule.
Select "Custom" from the "Service" drop-down list.
Enter 49177 for both the Public and Private TCP Port(s).
In the "Private IP address" field, enter your Vulkano's static IP address. This will probably be different than what is
shown here.
Version 1.0.2
10/15/2010
Press "Continue", then enter "Vulkano EPG" in the description field. Click "Done" to save this entry.
Version 1.0.2
10/15/2010
Now click the "+" sign to add another new Port Mapping rule.
Select "Custom" from the "Service" drop-down list.
Enter 56123 for both the Public and Private TCP Port(s), and Public and Private UDP Port(s).
In the "Private IP address" field, enter your Vulkano's static IP address. This will probably be different than what is
shown here.
Version 1.0.2
10/15/2010
Press "Continue", then enter "Vulkano Streaming" in the description field. Click "Done" to save this entry.
Version 1.0.2
10/15/2010
Confirm your new entries, then click on "Update". Your Remote Access configuration is now ready to test.
Version 1.0.2
10/15/2010
You can now close the AirPort Utility and proceed to test the port forwarding setup with TV Setup or PC Setup
Wizard.
Version 1.0.2
10/15/2010
AT&T uVerse (2Wire)
Version 1.0.2
10/15/2010
Choosing a static IP address for Vulkano
As the AT&T 2Wire router does not support DHCP reservation, you will need to explicitly set Vulkano to use a static
IP address that will not conflict with the DHCP range that your router will use to give out addresses automatically to
other devices on the network.
First, determine your DHCP range on the next page, then use this information to set the static IP address on
Vulkano.
Version 1.0.2
10/15/2010
Determining your DHCP range
The "DHCP range" refers to the list of IP addresses that are handed out automatically to devices connecting to your
home network by your router. Each network device requires an IP address to communicate.
Open a browser window, type in the IP address of your router, then hit Enter.
Click on the "Advanced Settings" link to see this page. The DHCP range is shown outlined by an orange box.
As shown, the DHCP range is from 192.168.11.173 to 192.168.11.200.
Version 1.0.2
10/15/2010
The first three numbers of an IP address, separated by dots, in this case 192.168.11, are collectively known as the
subnet.
You want to choose a static IP for Vulkano that is outside of this range.
The entire subnet consists of the range of IP addresses between 192.168.11.1 and 192.168.11.253. The router
usually reserves the lowest address for itself.
So the IP address ranges in this example are:
•
•
•
•
192.168.11.1 - used by the 2Wire router
192.168.11.2 to 192.168.11.172 - available
192.168.11.173 to 192.168.11.200 - used by DHCP
192.168.11.201 to 192.168.11.253 - available
Now proceed to configure Vulkano for an available static IP address using the instructions on this page.
Version 1.0.2
10/15/2010
Configuring Remote Access
Log into the AT&T 2Wire router's setup page using the router's IP address in your browser.
By default, there is no login required.
Click on "Settings", then "Firewall".
Under "1) Select a computer" select "vulkano" or "volcano". The display will change to "You have chosen
vulkano".
Version 1.0.2
10/15/2010
Version 1.0.2
10/15/2010
In the section "2) Edit firewall settings for this computer", choose "Allow individual application(s)".
You will need to add three user-defined applications:
1. Vulkano EPG: TCP on port 49177
2. Vulkano TCP: TCP on port 56123
3. Vulkano UDP: UDP on port 56123
Select "Allow individual applications", then click on the link "Add a new user-defined application".
Enter the settings shown below, then click on "Add to List".
Version 1.0.2
10/15/2010
The following screen will appear, confirming your entry.
Version 1.0.2
10/15/2010
Similarly, add the definitions for Vulkano TCP and Vulkano UDP:
Version 1.0.2
10/15/2010
Version 1.0.2
10/15/2010
Once you have added all 3 of the application settings for Vulkano, you now need to apply them to the Vulkano
device. Again, make sure that "vulkano" or "volcano" is the selected computer, select "Allow individual
application(s)", click and shift-click to select all three Vulkano application rules, then finally click "Add" to add them
to the list.
Version 1.0.2
10/15/2010
After adding the new Vulkano applications, you'll see this:
Version 1.0.2
10/15/2010
Now click "Save" to apply the settings to your router.
You can now close the browser window showing your router setup and proceed to test the port forwarding setup with
TV Setup or PC Setup Wizard.
Version 1.0.2
10/15/2010
Additional resources
Version 1.0.2
10/15/2010
Monsoon Multimedia Support Information
Live Support Hours:
9:00 AM to 9:00 PM PST Monday - Saturday
Call 1(866)-937-4282
Support by e-mail
E-mail [email protected] and you will hear a reply within 24 hrs Monday to Friday.
For Mobile Queries kindly write to [email protected].
Online Vulkano Community Forum: http://placeshiftingenthusiasts.com/mm/forum/
Version 1.0.2
10/15/2010
Web links
Here are links to several technical articles which you may find useful if you wish to learn more about the technology
behind port forwarding. This information is optional and only offered in case you are interested.
General information about Port Forwarding: http://en.wikipedia.org/wiki/Port_forwarding
Vulkano port forwarding instructions for many routers: http://portforward.com/english/applications/port_forwarding/
Monsoon_Vulkano/Monsoon_Vulkanoindex.htm
Note: The software that this web site wants to sell you uses UPnP to attempt port forwarding setup, just like the
Vulkano Setup itself. This is a third-party web site with no affiliation with Monsoon Multimedia.
DHCP: http://en.wikipedia.org/wiki/Dynamic_Host_Configuration_Protocol
Finding your DNS server address: http://www.cyberciti.biz/faq/how-to-find-out-what-my-dns-servers-address-is/
Version 1.0.2
10/15/2010