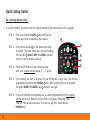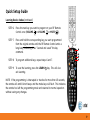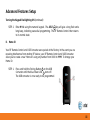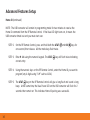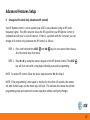
1
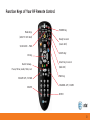
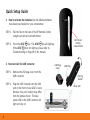
Congratulations on your purchase of the AT&T U-verse TV Point Anywhere RF Remote Control.
This product has been designed to provide many unique and convenient features to enhance
your AT&T U-verse experience.
Your new remote control, along with the USB converter, provides you with the flexibility of
no longer having to "point" your remote control at the U-verse Receiver in order to change
channels or access any of the receiver features. Since this is a Universal Remote Control,
you have the ability to program up to three additional devices, such as a TV or DVD player.
Another key benefit of your new Remote is its ability to "learn" commands from the remote
controls for your other devices. You no longer have to worry about finding the right codes
or that your TV will not be able to work with your new Remote Control. As long as you
have the original remote that came with your TV or other devices, you can now program
those keys into your new AT&T U-verse RF Remote Control. Additional features for this
Remote Control are described in the remainder of this manual.
Note:
The RF Remote Control only controls the AT&T U-verse Receiver with the USB Converter
using RF (radio frequency) signals. All other devices are controlled with IR (Infrared)
signals.
Table of Contents
Function Keys of Your RF Remote Control ......................................................................3
Quick Setup Guide .........................................................................................................................4
1 . How to activate the batteries .............................................................................................4
2 . How to install the USB Converter .....................................................................................4
3 . Setting up your Remote to control other devices (TV/DVD/etc) ......................5
3A. Search for Device Codes ............................................................................................6
3B. Learning Device Codes ...............................................................................................8
Advanced Features Setup .......................................................................................................10
A . Volume or Channel Control Options .............................................................................10
B . Power Control Options ........................................................................................................12
C . Backlight Cancellation Feature .......................................................................................14
D . Home ID ......................................................................................................................................15
E . Change to IR Control Only (deactivate RF Control) ..............................................17
F . Restoring Factory Defaults .................................................................................................18
Troubleshooting .........................................................................................................................19
Care and Maintenance ..............................................................................................................21
FCC Requirements .......................................................................................................................22
Customer Service Information .............................................................................................24
Specifications & Notice ............................................................................................................25
Function Keys of Your RF Remote Control
Mode Keys
(AT&T TV DVD AUX)
SCAN BACK - FWD
OK Key
Backlit Group Pause, Menu, Guide, Mute, Last
VOLUME UP / DOWN
DELETE
POWER Key
Ready to Learn
(Green LED)
LEARN Key
Select Key to Learn
(Red LED)
FWD Key
CHANNEL UP / DOWN
ENTER
Quick Setup Guide
1. How to activate the batteries (two AA Alkaline batteries
have been pre-installed for your convenience)
STEP 1. Pull the Tab on the back of the RF Remote Control
straight out with one smooth motion.
Pull Tab on
Battery
Compartment
STEP 2. Press the AT&T
key. The AT&T
key will light up.
If the AT&T
does not light up, please refer to
Troubleshooting on Page 19 of this manual.
2. How to install the USB Converter
STEP 1. Remove the USB plug cover from the
USB Converter.
STEP 2. Plug the USB Converter into the USB
port on the front of your AT&T U-verse
Receiver. Your port location may differ
from the picture shown. The blue
power LED on the USB Converter will
light and stay on.
USB Plug
Cover
USB Plug
Pairing
Button
Power LED
Quick Setup Guide
NOTE: The USB Converter must be installed in the front USB port of the U-verse Receiver only.
It will not operate if installed in the USB ports on the back of the receiver.
NOTE: After installing the USB Converter, test the POWER, CHANNEL and VOLUME keys for proper
operation. If there is any problem, the USB Converter can be swiveled up or down for optimum
performance.
3. Setting up your Remote to control other devices (TV/DVD/etc)
To control other devices, your RF Remote Control needs to be programmed. For older devices,
the RF Remote Control contains the IR codes to control them. For newer models of devices
(less than 6 months old) it is likely that the RF Remote Control will have to “learn” the IR codes.
•
If your device is older, start with Section 3A (Search for Device Codes).
If Method 1 doesn’t work, use Section 3B (Learning Device Codes).
•
If your device is newer (less than 6 months), then start with Section 3B (Learning Device
Codes).
Quick Setup Guide
3A. Search for Device Codes
The Search method will scan through all the IR codes to find one that works with your TV
or other device.
STEP 1. Power on the device to be programmed.
MODE KEYS
STEP 2. Point the RF Remote Control at the selected device.
STEP 3. Press and hold a mode key
or
or
along
with the ENTER
key. Hold both keys for
one second, then release. The four mode keys on
the RF Remote Control flash twice to indicate you
are in search mode.
SCAN FORWARD
STEP 4. Search by pressing the SCAN \FF
key
repeatedly until the device turns OFF. (The selected mode key will flash once
for each press of the SCAN \FF
key.) Pause briefly between each key
press to allow your device enough time to respond.
STEP 5. Press the POWER
button on the RF Remote to power the device back on.
Quick Setup Guide
Search for Device Codes (continued)
NOTE: If the device does not turn off and you have searched all available codes, you will
hear 8 beeps and the mode key will flash 8 times. If this happens, please start over at
Step 2 or proceed to 3B, Learning Device Codes.
NOTE: If the device does not turn on, you may have pressed the SCAN \FF
key too many
times. Press the REW\ SCAN
key to scan backwards and test the POWER button again.
STEP 6. Check VOLUME
and
and MUTE
. Do not test using REW\ SCAN
SCAN \FF
EXIT
CHANNEL
and
FWD
or number keys. If
there is any problem with any of the keys, press the SCAN \FF
button and
search until you find a code which will operate all the functions properly.
STEP 7. Press the ENTER
key to save the programming. The appropriate mode key
will give a long flash with a long beep, indicating successful programming.
NOTE: If the programming is interrupted or inactive for more than 15 seconds, the remote will
emit 8 short beeps and the mode keys will flash. This indicates the remote has left the
programming mode and returned to normal operation without saving any changes.
Quick Setup Guide
3B: Learning Device Codes
To use this method, you must have the original remote for the device you wish to program.
STEP 1. Press and hold the LEARN 1 key until the four
mode keys flash in sequence, then release.
5
STEP 2. Press the mode key 2 for the device you want
to control. The other mode keys will stop flashing.
The red LED 3 SELECT KEY TO LEARN indicator
on your U-verse remote will flash.
2
STEP 3. Place the RF Remote Control head-to-head
with your original remote (about 1” – 2” apart).
3
STEP 4. Press the key you want to program on your RF Remote Control once. (The first key
programmed should be the POWER 5 key.) After pressing the key to program,
the green READY TO LEARN LED 4 indicator will light.
STEP 5. Press and hold the corresponding key you want programmed from the original
remote until the RF Remote Control emits a long beep, indicating it has
“learned” the desired command. (For the first key, this should be the
POWER key.)
4
1
Quick Setup Guide
Learning Device Codes (continued)
STEP 6. Press the next key you want to program on your RF Remote
Control once (VOLUME
or VOLUME
or MUTE
).
STEP 7. Press and hold the corresponding key you want programmed
from the original remote until the RF Remote Control emits a
long beep, indicating it has “learned and saved” the key
command.
5
1”-2”
2
4
1
STEP 8. To program additional keys, repeat steps 6 and 7.
STEP 9. To save the learning, press the LEARN 1 key. This will also
exit Learning.
NOTE: If the programming is interrupted or inactive for more than 15 seconds,
the remote will emit 8 short beeps and the mode keys will flash. This indicates
the remote has left the programming mode and returned to normal operation
without saving any changes.
3
Advanced Features Setup
A. Volume or Channel Control Options
By factory default the Volume and Channel commands are sent to the AT&T U-verse Receiver. Once
the TV has been programmed, the POWER key will control both the U-verse Receiver and the TV; the
Volume controls (VOL+ or -, MUTE) will go to the TV, and the Channel controls (CH+ or -, LAST) will
be sent to the U-verse Receiver. Once you have programmed a device to a mode key, you can send
the volume commands to that device rather than the TV or U-verse Receiver (e.g. a home theatre
receiver). Follow the instructions in Section A1 to have the Volume commands always go to one
device. If you want the Volume (or Channel) commands to go to a programmed device when it has
been selected using the mode key, follow the instructions in Section A2.
A1. Always Send Volume or Channel Commands to One Device
STEP 1.
Press and hold both the AT&T
All the mode keys flash twice.
and OK
STEP 2.
Enter 9 5 5 for volume, or 9 6 6 for channel using the numeric keypad. The
AT&T
key will flash twice to confirm the correct entry.
STEP 3.
Press the mode key (
or
or
) for the device you want to always
control the volume or channel (e.g. AUX
for your Home Theater).
STEP 4.
The selected mode key (e.g. AUX
) will give a long flash with a
long beep to confirm successful programming.
keys for one second, then release.
Advanced Features Setup
A2. Send Volume or Channel Commands only to the Device Mode Selected (e.g. in
DVD mode, the DVD player controls the audio, but in TV mode the TV controls the audio)
STEP 1. Press and hold both the AT&T
All the mode keys flash twice.
and OK
keys for one second, then release.
STEP 2. Enter 9 5 5 for Volume or 9 6 6 for Channel using the numeric keypad. The AT&T
key will flash twice to confirm the correct entry
STEP 3. Press the ENTER
key. The AT&T
to confirm successful programming.
key will give a long flash with a long beep
NOTE: If the programming is interrupted or inactive for more than 15 seconds, the remote will emit 8
short beeps and the mode keys will flash. This indicates the remote has left the programming mode
and returned to normal operation without saving any changes.
NOTE: The mode key must first have been programmed for your device.
Advanced Features Setup
B. Power Control Options
By factory default, the POWER key only operates the AT&T U-verse Receiver. Once you have
programmed the TV mode key, both the TV and the AT&T U-verse Receiver will be powered
ON and OFF at the same time. In normal operation, you can turn programmed devices ON or OFF
individually by pressing the appropriate mode key, and then the POWER key.
B1. To Power Multiple Devices On and Off Simultaneously
STEP 1. Press and hold both the AT&T
All the mode keys flash twice.
and OK
keys for one second, then release.
STEP 2. Enter 9 7 7 using the numeric keypad. The AT&T
STEP 3. Press the AT&T
key. The AT&T
key flashes twice.
key will flash twice indicating correct entry.
STEP 4. Press the appropriate mode key or keys (
or
or
control. The appropriate mode key will flash twice.
) that you wish to also
NOTE: The mode key must first have been programmed for your device.
STEP 5. Press the ENTER
key to complete the programming. The last mode key
programmed will give a long flash with a long beep indicating successful
programming.
Advanced Features Setup
B2. To Power Devices On and Off Independently
STEP 1. Press and hold both the AT&T
All the mode keys flash twice.
and OK
keys for one second, then release.
STEP 2. Enter 9 7 7 using the numeric keypad. The AT&T
key flashes twice.
STEP 3. Press the ENTER
key to complete the programming. The AT&T
key
will give a long flash with a long beep indicating successful programming.
NOTE: If the programming is interrupted or inactive for more than 15 seconds, the remote
will emit 8 short beeps and the mode keys will flash. This indicates the remote has left the
programming mode and returned to normal operation without saving any changes.
Advanced Features Setup
C. Backlight Cancellation Feature
Your RF Remote Control has the ability to turn the keypad backlighting ON or OFF. If you
wish to use this feature to extend battery life, follow these instructions.
C1.
Turning the Keypad Backlighting OFF
STEP 1. Press and hold the AT&T
mode key together with the OK
then release. All the mode keys flash twice.
key for one second,
STEP 2. Enter 9 9 1 using the numeric keypad. The AT&T
key will give a long flash with a
long beep to indicate successful programming. The RF Remote Control then returns
to its normal state.
NOTE: If the programming is interrupted or inactive for more than 15 seconds, the remote will emit
8 short beeps and the mode keys will flash. This indicates the remote has left the programming
mode and returned to normal operation without saving any changes.
C2.
Turning the Keypad Backlighting ON
STEP 1. Press and hold the AT&T
mode key together with the OK
then release. All the mode keys flash twice.
key for one second,
Advanced Features Setup
Turning the Keypad Backlighting ON (continued)
STEP 2. Enter 9 9 1 using the numeric keypad. The AT&T
key will give a long flash and a
long beep, indicating successful programming. The RF Remote Control then returns
to its normal state.
D. Home ID
Your RF Remote Control and USB Converter were paired at the Factory. In the event you are
receiving interference from another RF device, your RF Remote Control and USB Converter
allow you to create a new ‘Home ID’ using any number from 0000 to 9999. To change your
Home ID:
STEP 1. Press and hold the Pairing Button 1 on the USB
Converter until the blue Power LED 2 turns off.
The USB converter is now ready to be programmed.
Advanced Features Setup
Home ID (continued)
NOTE: The USB converter will remain in programming mode for two minutes to receive the
Home ID command from the RF Remote Control. If the blue LED light turns on, it means the
USB converter timed out and you must start over.
STEP 2. On the RF Remote Control, press and hold both the AT&T
one second, then release. All the mode keys flash twice.
STEP 3. Enter 9 1 4 using the numeric keypad. The AT&T
correct entry.
and OK
keys for
key will flash twice indicating
STEP 4. Using the numeric keys on the RF Remote Control, enter the Home ID you want to
program (any 4 digits using “0-9” such as 1234).
STEP 5. The AT&T
key on the RF Remote Control will give a long flash and sound a long
beep. At the same time, the blue Power LED on the USB converter will flash for 2
seconds then remain on. This indicates Home ID pairing was successful.
Advanced Features Setup
E. Change to IR Control Only (deactivate RF Control)
Your RF Remote Control is set to operate your AT&T U-verse Receiver using an RF (radio
frequency) signal. The USB Converter allows the RF signal from your RF Remote Control to
communicate with your U-verse IR receiver. If there is a problem with the Converter, you can
change to IR control only (deactivate the RF control) as follows:
STEP 1. Press and hold both the AT&T
and OK
All of the mode keys flash twice.
keys for one second, then release.
STEP 2. Enter 9 1 6 by using the numeric keypad on the RF Remote Control. The AT&T
key will flash once with a long beep indicating successful programming.
NOTE: To restore RF control, follow the above steps but enter 9 1 5 in Step 2.
NOTE: If the programming is interrupted or inactive for more than 15 seconds, the remote
will emit 8 short beeps and the mode keys will flash. This indicates the remote has left the
programming mode and returned to normal operation without saving any changes.
Advanced Features Setup
F. Restoring Factory Defaults
F1. Return all programmed codes to Factory Default (including “Learned” codes)
STEP 1. Press and hold both the AT&T
key and OK
key for one second, then release.
STEP 2. All the mode keys flash twice.
STEP 3. Enter 9 0 0 using the numeric keypad. The AT&T
key gives a long flash with a long
beep to confirm successful programming. The RF Remote Control returns to its
normal state.
F2. Return “Learned” codes to Factory Default (does not reset codes programmed through the
Search process)
STEP 1. Press and hold both the AT&T
key and OK
key for one second, then release.
STEP 2. All the mode keys flash twice.
STEP 3. Enter 9 8 8 using the numeric keypad. The AT&T
key gives a long flash with
a long beep to confirm successful programming. The RF Remote Control then
returns to its normal state.
Troubleshooting
Issue: I pulled the tab from the battery compartment and pressed the AT&T key, but it did not
light up.
Remove the battery door (push the battery door tab up – towards the top of the remote).
Check to be sure the batteries are seated and properly installed according to the ( + or - )
markings inside the battery compartment.
Issue: The remote does not work or the backlighting is dim.
Check to be sure the batteries are installed properly (see above). Use only Alkaline
batteries. Batteries may be weak and need to be replaced.
Issue: My remote control does not control my U-verse receiver; I can’t change channels.
Make sure the converter is properly installed and the blue LED is lit.
Issue: I tried to program using “Search for Device Codes”, but it failed.
You must press the ENTER
key to "save" the programmed code.
Search doesn’t work for all devices, try Learning Device Codes (Page 8).
Issue: What should I do when I replace a device after I programmed the mode key?
Simply override the code by reprogramming the mode key for the new device (see Quick
Start Guide, Section 3A Page 6, or Section 3B, Page 8).
Troubleshooting
Issue: I have programmed the codes for a device, but some function keys do not work.
Try using Search again and make sure that the functions work before saving. If the desired
device functions still do not work, refer to the Quick Setup Guide, Section 3B: Learning (Page 8).
Issue: I have programmed the TV mode key. After pressing the TV key, the CHANNEL keys
still control the AT&T U-verse Receiver and not the TV.
By default, the CHANNEL keys (
,
,
) on the remote operate the U-verse Receiver.
Issue: The volume (or Channel) on my U-verse service changes by itself.
To avoid interference from other RF remotes, See Section D: Home ID (Page 15).
Issue: I programmed my TV and Home Theater system to come on with my U-Verse Receiver,
but the Home Theater system turns off when I turn the others on.
If any of the devices get out of sync so that some turn ON while others turn OFF, you will
need to turn all devices OFF. (For the device that is out of sync, use the actual device’s
power button). When all devices are OFF, use the POWER
key on the RF Remote Control
to turn all devices back ON. It is important to point the Remote Control directly toward the
devices for this to work properly.
Care and Maintenance
1. Keep the remote dry. If it gets wet, wipe it dry immediately.
2. Use and store the remote only in normal temperature environments.
3. Handle the remote gently and carefully. Don’t drop it.
4. Wipe the remote with a clean cloth occasionally to keep it looking new.
5. Except for the battery door, do not attempt to open, modify or tamper with the internal
components of the RF Remote Control and/or USB Converter. This can cause malfunction
and void the warranty.
6. Use only Alkaline AA batteries. Do not mix old and new batteries. Replace batteries
every 9 months for optimum performance.
FCC Requirements
FCC ID Numbers:
RF Remote Control – CAC302
USB Converter – CAC300
This device complies with part 15 of the FCC Rules. Operation is subject to the following two
conditions:
(1) This device may not cause harmful interference, and
(2) This device must accept any interference received, including interference that may cause
undesired operation.
Privacy of communications may not be ensured when using the AT&T U-verse TV Point Anywhere
RF Remote Control.
Note:
This equipment has been tested and found to comply designed with the limits for a Class B digital
device, pursuant to Part 15 of the FCC Rules. These limits are designed to provide reasonable
protection against harmful interference in a residential installation. This equipment generates,
uses, and can radiate radio frequency energy and, if not installed and used in accordance with the
instructions, may cause harmful interference to radio communications. However, there is no
guarantee that interference will not occur in a particular installation. If this equipment does
cause harmful interference to radio or television reception, which can be determined by turning
the equipment off and on, the user is encouraged to try to correct the interference by
one or more of the following measures:
FCC Requirements (continued)
1. Reorient or relocate the receiving antenna.
2. Increase the separation between the equipment and receiver.
3. Connect the equipment into an outlet on a circuit different from that to which the receiver
is connected.
4. Consult the dealer or an experienced radio / TV technician for help.
Warning: Changes or modifications to this unit not expressly approved by the party responsible
for compliance could void the user’s authority to operate the equipment.
Customer Service Information
For help with your AT&T U-verse service or this remote control, please visit http://uverse.att.com/
support, or call AT&T Customer Care at 1-800-ATT-2020. When prompted, say you need “U-verse
Technical Support.”
For a Spanish version of this manual visit: www.helpme.att.net/controlremoto
One (1) Year Warranty
AT&T guarantees from one (1) year of purchase this AT&T U-verse TV Point Anywhere RF Remote
Control will properly perform its intended functions. This is a Limited Warranty that does not
cover defects resulting from misuse, abuse, accident or negligence, including any failure to follow
the instructions provided with the RF Remote Control. Consequential and incidental damages are also
not recoverable under this limited warranty, but some states do not allow the exclusion or limitation
of incidental or consequential damages, so this limitation may not apply to you.
If during the first year after the purchase date and under normal working conditions the RF Remote
Control does not perform its intended functions, please call 1-800-ATT-2020. If the RF Remote Control
is replaced by AT&T during the first year, the replacement remote is warranted to properly perform its
intended functions for either ninety (90) days or the remainder of the remote control’s one year
warranty from the original date of purchase whichever is longer. To receive a replacement RF Remote
Control, you must provide proof of purchase.
Specifications and Notice
Model: AT&T U-verse TV Point Anywhere RF Remote Control
IR Range: up to 30' *
RF Range: up to 150' *
* The range quoted is calculated based on an unobstructed line of sight test
under optimum conditions. Actual range will vary depending on conditions,
and can be less than the maximum possible. Your actual range will be limited
by several factors including, but not limited to: battery strength,
electromagnetic interference, infrared interference, and obstructions.
The AT&T U-verse TV Point Anywhere RF Remote Control is intended and sold
for use only with AT&T's U-verse TV receivers. May not be compatible with
all entertainment systems or capable of accepting every programming code for
other devices. Limited one year replacement only warranty. See inside this User
Guide for further information.