1
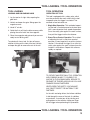
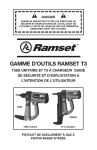
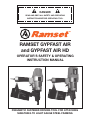
DANGER
READ AND OBEY ALL SAFETY AND OPERATING
INSTRUCTIONS BEFORE OPERATING TOOL.
RAMSET GYPFAST AIR
and GYPFAST AIR HD
OPERATOR’S SAFETY & OPERATING
INSTRUCTION MANUAL
PNEUMATIC FASTENER DRIVING TOOL FOR ATTACHING
SHEATHING TO LIGHT GAUGE STEEL FRAMING
TABLE OF CONTENTS / INTRODUCTION
Introduction . . . . . . . . . . . . . . . . . . . . . . . . . . . . . . . . . . . . . . . . . . . . . . . . . . . . . . . . . . . . . . . . . . . . . . . . . . . . . . 2
Safety Precautions. . . . . . . . . . . . . . . . . . . . . . . . . . . . . . . . . . . . . . . . . . . . . . . . . . . . . . . . . . . . . . . . . . . . . . . . . 3
Specifications. . . . . . . . . . . . . . . . . . . . . . . . . . . . . . . . . . . . . . . . . . . . . . . . . . . . . . . . . . . . . . . . . . . . . . . . . . . . . 4
Air Systems. . . . . . . . . . . . . . . . . . . . . . . . . . . . . . . . . . . . . . . . . . . . . . . . . . . . . . . . . . . . . . . . . . . . . . . . . . . . . . . 4
Tool Loading. . . . . . . . . . . . . . . . . . . . . . . . . . . . . . . . . . . . . . . . . . . . . . . . . . . . . . . . . . . . . . . . . . . . . . . . . . . . . . 5
Tool Operation . . . . . . . . . . . . . . . . . . . . . . . . . . . . . . . . . . . . . . . . . . . . . . . . . . . . . . . . . . . . . . . . . . . . . . . . . . . . 5
Maintenance. . . . . . . . . . . . . . . . . . . . . . . . . . . . . . . . . . . . . . . . . . . . . . . . . . . . . . . . . . . . . . . . . . . . . . . . . . . . . . 6
Warranty. . . . . . . . . . . . . . . . . . . . . . . . . . . . . . . . . . . . . . . . . . . . . . . . . . . . . . . . . . . . . . . . . . . . . . . . . . . . . . . . . 7
Introduction
Congratulations on purchasing a Ramset pneumatic tool.
A Ramset tool is a professional quality tool that combines power and speed in a lightweight design for
versatile operation in a variety of industrial and construction applications.
Please take the time to review this entire manual and all other documentation that came with the tool.
They will help you to become familiar with operating a power fastening tool. Be sure to read the safety
instructions carefully before using your new tool. Also read Ramset’s warranty statement in the back of
this manual.
Even though Ramset is a leader in the power fastening business, we continually strive to find new and
better ways of improving our products. That is a commitment we’re made to our most important asset:
you the customer.
The information in this manual is considered accurate at time of publication.
TABLE OF CONTENTS / INTRODUCTION
2
SAFETY PRECAUTIONS
WARNING: When using pneumatic tools, basic
precautions should always be followed to reduce
the risk of personal injury.
WEAR EYE AND HEARING PROTECTION.
Always wear hearing and eye protection devices
when you are operating the GypFast Air, Air HD
tool or working in the vicinity of this tool. Also,
your eye protection must meet the requirement of
ANSI Standard Z87, and should have side shields
for increased protection.
CONNECTION TO THE SUPPLY OF ENERGY
Never, under any circumstances, connect the
tool to an Oxygen, Air or Gas cylinder or bottle of
any description. FAILURE TO OBSERVE THIS
IS EXTREMELY DANGEROUS AND COULD
RESULT IN A SERIOUS EXPLOSION.
Use only clean dry regulated compressed AIR
from a COMPRESSOR.
CHECK that the air pressure of the compressor
does not exceed the maximum working pressure
indicated on the tool.
FASTENERS
Only fasteners made or approved by Ramset
are to be used in this tool. Use of fasteners
not approved by Ramset may cause jamming,
serious damage to the tool, and could be
hazardous. Fasteners are steel, bugle head
collated nails in a plastic coil. The range of
nails driven are lengths of 1” (25mm), 1-1/2”
(38mm), 2” (50mm) and 2-1/2” (63mm).
SAFETY WHEN USING THE TOOL
Check before commencing to use the tool that
the safety and triggering mechanism is functioning
properly, and that all nuts and bolts are tight.
• DO NOT use or handle the tool other than in
the manner specified.
• DO NOT disassemble or make inoperative
any part of the tool, such as the safety yoke.
• DO NOT operate a tool if the safety system
sticks, binds or is disconnected, or defective
in any way.
• DO NOT modify this tool, or use any modified
tool other than a factory approved model.
• DO NOT use a malfunctioning tool. If a tool
is not operating properly have it repaired by
qualified service personnel.
• DO NOT point the tool at yourself or anyone
else, whether it contains fasteners or not.
TO PREVENT UNINTENTIONAL TOOL
OPERATION
ALWAYS DISCONNECT THE TOOL FROM THE AIR
LINE WHENEVER:
• The tool is left unattended.
• Maintenance or repairs are to be preformed
on the tool.
• Clearing a jam.
• Moving the tool to another location.
To avoid personal injury to yourself, or others,
obtain training in safe tool operation, and read this
instruction manual before using the tool.
Repairs to the tool must be performed by qualified
service personnel only. Use only Ramset authorized
parts for repair or replacement. If you have any
questions about safe tool operation, contact your
local Ramset sales person.
NEVER CARRY THE TOOL WITH THE TRIGGER
PULLED BECAUSE YOU MAY UNINTENTIONALLY
ACTUATE THE SAFETY SYSTEM WITH THE
RESULT THAT A FASTENER MAY BE DRIVEN
INTO YOU OR A CO-WORKER.
SAFETY PRECAUTIONS
3
SPECIFICATIONS / AIR SYSTEMS
SPECIFICATIONS
Tool Type: Dimensions (H x L x W):
Weight w/out Nails (GYPFASTAIR):
Weight w/out Nails (GYPFASTAIRHD):
Activation Mode:
Energy Source:
Maximum Permissible Pressure:
Recommended Operation Range:
Magazine Capacity:
Air Consumption (GYPFASTAIR):
Air Consumption (GYPFASTAIRHD)
Coil Nailer
12” (303mm) x 13” (329mm) x 5.5” (137mm)
5.8 lbs (2.6 kg)
6.2 lbs (2.8 kg)
Contact / Sequential
Compressed Air
120 PSI (8.27 bar)
71 to 113 PSI (4.9 to 7.8 bar)
150 nails
2.6 Liter per stroke at 100 PSI (6.9 bar)
2.8 Liter per stroke at 100 PSI (6.9 bar)
AIR SYSTEMS
OPERATING AIR PRESSURE
The correct operating air pressure is the lowest
compressed air setting that will do the job.
Using the tool at a higher pressure than required
wastes air, and over stresses the tool. Start at
90 p.s.i. and adjust the air pressure up or down
as required. OPERATING AIR PRESSURE
MUST NOT EXCEED 120 P.S.I. WHICH IS THE
MAXIMUM PRESSURE RATING FOR THE TOOL.
AIR LINE LUBRICANTS
The following lubricants are recommended for
use in the air line lubricator. Above 0C (32°F)
use a non-detergent S.A.E. No. 20 commercially
available air tool oil. Below 0°C use a mixture of
non-detergent S.A.E. No. 10, 1 part to three parts
ethylene glycol automotive anti-freeze, certified as
being compatible for use with aluminum. It should
NOT contain any anti-leak additives.
TOOL HOSE CONNECTIONS & AIR HOSE
REQUIREMENTS
Air supply hoses must have a minimum working
pressure rating of 150 p.s.i. Use a good quality
hose, with a minimum i/d bore of 8mm (5/16”).
The air inlet fitting at the rear of the handle is
threaded to accept a male 1/4-18 NPT nipple.
Ensure a quick release air coupling and nipple
are used. The air shut-off coupling (female) must
be connected to the AIR SUPPLY. The NIPPLE
must be connected to the TOOL, so that air
cannot be trapped in the tool when released
from the air supply.
AIR FILTER/REGULATOR/LUBRICATOR
An air filter, pressure regulator, and lubricator
must be included in the air system for proper
tool operation.
The Filter: will prevent excessive tool wear by
trapping scale, dirt and water.
Placing a few drops of non-detergent oil in the
tool air inlet before each use is beneficial. This is
intended to supplement an air line lubricator, not
to replace its use.
The Regulator: is very important as it sets
the correct air pressure for the tool. A regulator
positioned close to the tool assures proper and
economical operation.
NEVER use a detergent type oil, ie. motor engine
oil, sewing machine oil, etc. Use of these types of
oils may cause deterioration to the O-rings and
cause them to swell. This in turn may cause the
tool to malfunction and create a safety hazard.
The Lubricator: replaces the heavy duty
lubrications used in routine maintenance, and
injects an oil mist into the tool’s air supply.
This greatly assists tool life.
SPECIFICATIONS / AIR SYSTEMS
4
TOOL LOADING / TOOL OPERATION
TOOL LOADING
TOOL OPERATION
LOADING AND UNLOADING NAILS
OPERATION OF TOOL
This tool is equipped with a safety yoke, which
must be pushed to the work surface for the tool
to operate when the trigger is actuated. Two
methods of tool actuation are:
1. Lay the tool on its right side, exposing the
gate latch.
2. Unlatch and open the gate. Swing open the
magazine cover.
3. Uncoil 3” of nails.
4. Guide the first nail into the drive raceway while
placing the coil of nails into the magazine.
5. Close the magazine and gate and you are now
ready to start driving nails.
To unload nails from a tool, first tear off excess
collation sticking out the front of the tool. Unlatch
and open the gate to remove the rest of the coil.
1. Single Shot Operation. This method of operating the tool is used when precise fastener location is more important than speed of operation.
Press the safety yoke against the work surface,
then pull the trigger to drive the fastener.
2. Bump Fire or Contact Operation. This method
of operating the tool is used when speed of
operation is more important than precise fastener
location. Pull and hold the trigger, then strike the
safety yoke against the work surface where the
fastener is to be driven. Repeat this action as
rapidly as required.
TO PREVENT UNINTENTIONAL TOOL OPERATION
AND POSSIBLE INJURY TO YOURSELF OR
ANYONE IN THE WORKING AREA, BE SURE TO
RELEASE THE TRIGGER AS SOON AS YOU HAVE
FINISHED DRIVING FASTENERS.
NEVER PRESS THE SAFETY YOKE AGAINST
ANY OBJECT EXCEPT THE MATERIAL TO BE
FASTENED.
As the nails are being driven, the leftover collation
is fed through the nose of the tool. As collation
accumulates, it can be torn off by twisting and
pulling down on the collation. Keep your finger
off the trigger when performing this procedure.
TOOL LOADING / TOOL OPERATION
5
MAINTENANCE
COLD WEATHER OPERATING PRECAUTIONS
Keep the tool in a warm area until you are ready
to use it. If the tool is already cold, bring it into a
warm area, and allow it to warm up before using it.
If you must use the tool in cold conditions, drive
several fasteners into a scrap piece of wood at the
lowest air pressure at which the tool will operate.
Gradually increase the air pressure while continuing
to drive fasteners until the desired operating pressure
is reached.
DO NOT OPERATE THE TOOL WHEN IT IS COLD
UNLESS FASTENERS ARE BEING DRIVEN INTO
A WORK SURFACE.
JAMMING
Damage to parts and/or excessive accumulation
of dirt are principle causes of jams. If a jam should
occur, proceed as follows:
Solvent may cause O-rings to deteriorate, and
possible swell, causing a tool malfunction, and
creating a possible safety hazard.
5. Important: It is extremely important for safety
reasons that all dirt and foreign materials be
removed from around the safety yoke, and the
safety yoke compression spring. The safety
yoke must be free to move in and out without
sticking or binding. The spring must positively
return the safety yoke to its starting position
whenever the safety yoke is released from
being held in its position.
EXTERNAL LUBRICATION
Lubricate the area where the safety yoke slides
with General Electric Company “VERSILUBE”
silicone lubricating grease G-322L or an equivalent.
2. Open the magazine, and remove all fasteners.
Jammed fasteners should be clearly visible;
check inside the nose for wedged fasteners
and remove.
MALFUNCTIONS
Be alert for tool problems. A malfunctioning tool
must be immediately removed from use and not
used again until it has been repaired by a qualified
service person. Operating a tool with the following
malfunctions is unsafe. The following list is not all
inclusive.
3. Clean the magazine, nose and all associated
parts.
1 Safety yoke sticks or binds along its vertical
path of travel.
4. If the tool continues to jam, or you cannot clear
a particularly difficult jam, have it serviced by
an Authorized Ramset distributor.
2. Trigger sticks or binds.
1. Disconnect the tool from the air hose.
EXTERNAL CLEANING
The external parts may be cleaned as follows:
1. Disconnect the tool from the air hose.
2. Open the magazine and remove all fasteners.
3. Remove all dirt and grit from the magazine and
nose of the tool.
4. Clean the outside of the tool using a soft cloth
and a mild degreasant like paraffin.
CAUTION: Never use highly volatile solvents
such as gasoline to clean the tool. Do not allow
any solvent to enter the interior of the tool.
MAINTENANCE
6
3. Air leaks from the tool. Some air leaks affect
safety, other do not – be safe and assume that
any air leaks affects safety. Stop using the tool,
and have it repaired.
SERVICE AND REPAIR
Except as specifically described in other sections
of this manual, this tool must not be disassembled,
serviced, repaired, or reassembled by anyone
except qualified service personnel. Incorrect
servicing, repairs and assembly of this tool may
result in serious injury to the user and/or damage
to the tool. Please contact your local Ramset sales
person, or authorized Distributor for assistance
and repair.
WARRANTY
RAMSET AIR TOOL SYSTEMS WARRANTY AND LIMITATIONS
Ramset warrants that new GypFast Air and
Air HD systems power fastening tools, parts and
accessories will be free from defects in material
and workmanship for the period shown below.
TWO-YEAR WARRANTY
A two-year warranty will apply to all parts, except
those listed below as normal wearing parts, or parts
which are specifically covered by an extended
warranty.
SIX-MONTH WARRANTY
A six-month warranty applies to the following
parts, which are considered normal wearing parts:
• Bumper
• Piston Assembly
• O-Rings
• Piston Rings
The warranty period is based off of tool build date,
determined from the tool serial number. Ramset
may extend the warranty time frame from the date
of purchase with a qualifying document proving
date of purchase.
WARRANTY STATEMENT
Ramset’s sole liability hereunder will be to
replace any part or accessory which proves
to be defective within the specific time period.
Any replacement part or accessory provided
in accordance with this warranty will carry a
warranty for the balance of the period of warranty
applicable to the part it replaces. This warranty
does not apply to part replacement required due
to normal wear.
This warranty is void as to any tool which has
been subjected to misuse, abuse, accidental
or intentional damage, use with fasteners not
meeting Ramset specification, size, or quality,
improperly maintained, repaired with other than
genuine GypFast Air and Air HD replacement
parts, damaged in transit or handling, or which,
in Ramset’s opinion, has been altered or
repaired in a way that affects or detracts from
the performance of the tool.
Ramset MAKES NO WARRANTY, EXPRESSED
OR IMPLIED, RELATING TO MERCHANTABILITY,
FITNESS, OR OTHERWISE, EXCEPT AS STATED
ABOVE and the liability AS STATED ABOVE
AND AS ASSUMED ABOVE is in lieu of all other
warranties arising out of, or in connection with,
the use and performance of the tool, except to
the extent otherwise provided by applicable law.
Ramset SHALL IN NO EVENT BE LIABLE FOR
ANY DIRECT, INDIRECT, OR CONSEQUENTIAL
DAMAGES, INCLUDING, BUT NOT LIMITED TO
DAMAGES WHICH MAY ARISE FROM LOSS
OF ANTICIPATED PROFITS OR PRODUCTION,
SPOILAGE OF MATERIALS, INCREASED COST
OF OPERATION OR OTHERWISE.
Ramset reserves the right to change specifications,
equipment, or designs at any time without notice
and without incurring obligation.
WARRANTY
7
FOR TOOL REPAIR SERVICE CONTACT YOUR LOCAL
AUTHORIZED RAMSET DISTRIBUTOR OR TO FIND
YOUR NEAREST RAMSET TOOL REPAIR CENTER
VISIT OUR WEB SITE AT WWW.RAMSET.COM
OR CALL 800-241-5640
Concrete Fastening Systems
Glendale Heights, IL 60139
800-RAMSET6 (1-800-726-7386)
www.ramset.com
Buy with Confidence...
Buy From Your Authorized Distributor
AN ILLINOIS TOOL WORKS COMPANY
© ILLINOIS TOOL WORKS 2009
PRINTED IN THE U.S.A.
Form No. GF AIR MANUAL-1/09