1
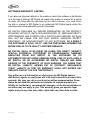
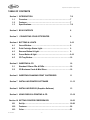
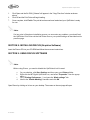
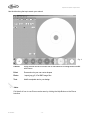
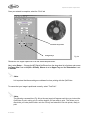
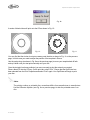
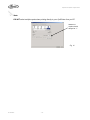
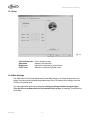
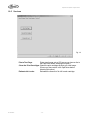
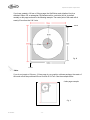
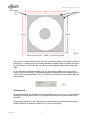
COMPLETE SOLUTIONS FOR ON-DEMAND CD & DVD PRODUCTION
OptiPRINTER
Photo-Quality CD/DVD Inkjet Printer
OPERATING & MAINTENANCE
MANUAL
OptiPrinter CD/DVD Inkjet Printer
Thank you for purchasing a MF Digital
OptiPrinter
OPERATING & MAINTENANCE MANUAL
Document Reference No. TP 000 022 (Rev 1.03)
Production Standard
ZZ 004 805
MF Digital
121 Carolyn Blvd.
E. Farmingdale
NY 11735
U.S.A.
Tel: (631) 249-9393
Fax: (631) 249-9273
Email: [email protected]
www.mfdigital.com
ZZ 004 805
-2-
OptiPrinter CD/DVD Inkjet Printer
WARNING
To avoid electrical shock hazards, unit covers should only be removed by authorized
personnel.
©
COPYRIGHT
This document is the property of MF Digital and it may not be reproduced, copied
exhibited to a third party without the written permission of MF Digital.
or
MF Digital reserves the right to amend or modify the specifications and design criteria
applying to these products.
ZZ 004 805
-3-
OptiPrinter CD/DVD Inkjet Printer
SOFTWARE WARRANTY (LIMITED)
If you discover physical defects in the media on which the software is distributed
or in the User’s Manual, MF Digital will replace the media or manual for a period
of ninety (90) days after the purchase by the retail customer. You must return
the disk or manual to MF Digital or an authorized MF Digital dealer within the
warranty period accompanied by proof of purchase.
MF DIGITAL DISCLAIMS ALL IMPLIED WARRANTIES ON THE PRODUCT,
INCLUDING WITHOUT LIMITATION WARRANTIES OF MERCHANTABILITY,
PERFORMANCE AND FITNESS FOR A PARTICULAR PURPOSE. MF Digital
WILL NOT BE LIABLE FOR ANY BUG, ERROR, OMISSION, DEFECT,
DEFICIENCY, OR NONCONFORMITY IN ANY SOFTWARE. AS A RESULT,
THE SOFTWARE IS SOLD “AS IS”, AND THE PURCHASER ASSUMES THE
ENTIRE RISK AS TO ITS QUALITY AND PERFORMANCE.
MF DIGITAL SHALL IN NO EVENT BE LIABLE FOR DIRECT, INDIRECT,
SPECIAL, INCIDENTAL, CONTINGENT OR CONSEQUENTIAL DAMAGES
RESULTING FROM ANY DEFECT IN THE SOFTWARE OR ITS
DOCUMENTATION INCLUDING DAMAGES FROM LOSS OF DATA, EVEN IF
MF DIGITAL OR AN AUTHORIZED MF DIGITAL DEALER HAS BEEN
ADVISED OF THE POSSIBILITY OF SUCH DAMAGES. YOU AGREE THAT
MF DIGITAL’ LIABILITY, ARISING OUT OF CONTRACT, NEGLIGENCE,
STRICT LIABILITY IN TORT OR WARRANTY SHALL NOT EXCEED ANY
AMOUNTS PAID BY YOU FOR THIS PRODUCT.
Any written or oral information or advice given by MF Digital dealers,
distributors, agents or employees will in no way increase the scope of this
warranty. Nor may you rely on such oral or written communication. Some
states do not allow the exclusion or limitation of implied warranties or
liability for incidental or consequential damages, so the above limitation or
exclusion may not apply to you. This warranty gives you specific legal
rights, and you may also have other rights that vary from state to state.
ZZ 004 805
-4-
OptiPrinter CD/DVD Inkjet Printer
TABLE OF CONTENTS
Section 1 INTRODUCTION
1.1
1.2
1.3
7-8
Overview………………………………………………………………. 7
Features……………………………………………………………….. 7
Specifications………………………………………………………… 7-8
Section 2 BOX CONTENTS
8
Section 3
9
CONNECTING YOUR OPTIPRINTER
Section 4 BUTTONS & LIGHTS
9-10
4.1
Cancel Button………………………………………………………… 9
4.2
Print Cartridge Status Light……………………………………… 9
4.3
Resume Button & Light……………………………………………
4.4
Power Button & light………………………………………………… 9-10
4.5
CD Tray Button……………………………………………………….. 10
Section 5 INSERTING A CD
9
10
5.1
Standard 120mm CDs & DVDs…………………………………….. 10
5.2
CD Business Cards & Mini Discs…………………………………. 10
Section 6 INSERTING/CHANGING PRINT CARTRIDGES
11
Section 7 INSTALLING PRINTER SOFTWARE
11-13
Section 8 INSTALLING DISCUS (Graphics Software)
13
Section 9 USING DISCUS & PRINTING A CD
13-18
Section 10 SETTING PRINTER PREFERENCES
19-23
10.1
Set Up…………………………………………………………………. 19-20
10.2
Features……………………………………………………………….. 20
10.3
Color……………………………………………………………………. 21
ZZ 004 805
-5-
OptiPrinter CD/DVD Inkjet Printer
10.4
Mask Settings………………………………………………………… 21-22
10.5
Services……………………………………………………………….. 23
Section 11 ERRORS
24
Section 12 TECHNICAL SUPPORT
25
Appendix A OTHER GRAPHICS SOFTWARE PACKAGES
26-32
CorelDRAW & Photoshop………………………………………….. 26
Create a Page………………………………………………………… 26
Introducing the Mask……………………………………………….. 26-28
Understanding the Mask Interface……………………………….. 28-32
Mask Type…………………………………………………………….. 29
Enable Mask…………………………………………………….…….. 29
Standard Area Settings……………………………………………... 29-30
Hub Area Settings……………………………………………………. 30
Mask Origin…………………………………………………………… 30-31
Parameter Unit………………………………………………….……. 31-32
Templates……………………………………………………………... 32
Appendix B Recommendations
ZZ 004 805
33
-6-
OptiPrinter CD/DVD Inkjet Printer
SECTION 1: INTRODUCTION
1.1 Overview
MF Digital, world leading developers & manufacturers of optical disc duplication & printing systems,
has launched a brand new, drawer mechanism CD/DVD printer: the OptiPrinter™.
Working in partnership with Hewlett-Packard, the OptiPrinter™ brings professional print quality to the
in-house production of CDs and DVDs, delivering outstanding photo quality images directly onto the
surface of discs, enabling customers to choose colorful backgrounds and images that reflect their
company.
What’s more, the OptiPrinter™ has been specifically designed to provide maximum versatility and
high-speed printing and can be used in a variety of settings. The PC-based OptiPrinter™ offers
professional desktop printing for the low volume/small business user, while the OptiPrinter™ can also
be used in conjunction with an autoloader or automated disc duplicator for fast, unattended printing of
greater quantities.
1.2 Features
•
•
•
•
•
•
•
•
•
•
•
Professional, photo quality CD & DVD inkjet printer
Desk-top printer
Combine with autoloader
Direct to surface color inkjet printing
Laser-sharp printing
Perfect clean crisp graphics
High speed printing
4800 dpi resolution with 16.7 million colors
Uses standard, off-the-shelf HP high capacity & standard print cartridges
Hewlett-Packard inkjet Technology
Smallest ink droplet (5 pl) technology
1.3 Specifications
Minimum System
Requirements:
Windows 2000: Pentium 133MHz, 64Mb RAM;
Windows XP: Pentium 233 MHz, 128 Mb RAM
Power Requirement:
100 to 240 VAC, 50/60Hz
Environment:
Recommended operating temperature: 15 to 365 °C
Recommended operating humidity: 20 to 80% RH no condensing
Dimensions:
Width: 17.8” (453mm) Depth: 18.11” (460mm) Height: 7.16”
(182mm) Net Weight: 6.2kg/13.5lbs (approx. without cartridges)
Prints directly onto the surface of inkjet printable 120mm CDs &
DVDs, 86x61mm rectangular and 80mm x 61mm & 80mm x
x63mm saddle CD business cards & 80mm mini discs
Bi Universal Serial Bus. 2.0 Full Speed (USB), centronics parallel
IEEE-1284 compliant.
Media Support:
Connectivity:
ZZ 004 805
-7-
OptiPrinter CD/DVD Inkjet Printer
Maximum Resolution:
Black: 600 x 600 dpi
Color: 4800 x 1200 optimized dpi color printing on premium photo
papers with 1200 x 1200 dpi input dpi resolution.
Full color spectrum of 16.7 million colors.
HP PhotoREt III Color Management System
Print Speed:
25% mono coverage @ normal, text quality approx.* 16-19
seconds per disc
100% full color coverage @ normal. inkjet quality approx.* 60
seconds per disc
100% full color coverage @ best, inkjet quality approx.* 106
seconds per disc
100% full color coverage @ best, HP PhotoREt III true photo
quality approx. * 120 seconds per disc
(*Speeds given are approximations and are dependant on file size and
disc coverage)
Cartridges:
Dual Ink Cartridges: Standard HP Black Print Cartridge 51645A
Standard HP Color Print Cartridge C6578D; Large capacity color
cartridge: C6578AN
SECTION 2: BOX CONTENTS
Carefully remove your MF Digital OptiPrinter from its shipping carton and verify that all parts are
present. If there are missing or damaged parts contact MF Digital or an authorized distributor
immediately.
You should find the following:
Ø
Ø
Ø
Ø
Ø
Ø
Ø
Ø
MF Digital OptiPrinter
Power Cable
USB Cable
Quick Start Guide
CD, including Printer Driver, User Manual, Test Image, Templates
2 Blank Printable CDs
One Black & One Color Cartridge
Discus Graphics Software CD
Note:
Be sure to remove all pieces of protective tape. Remove the tape holding down the printer lid.
Open the lid and remove the 2 pieces of tape holding the CD Tray in place.
Note:
If your MF Digital OptiPrinter is damaged during shipment, please contact the freight carrier
first, then, contact your distributor or MF Digital. You should save your shipping materials so
that if the need arises, you can return your OptiPrinter for service. This packaging was
designed specifically for shipping your OptiPrinter. Other packaging may not be suitable.
ZZ 004 805
-8-
OptiPrinter CD/DVD Inkjet Printer
SECTION 3: CONNECTING YOUR OPTIPRINTER
1.
2.
3.
4.
Connect the USB cable port on the computer and on the printer.
Connect the power cable to the printer and plug into the power supply.
Power up the OptiPrinter by pressing the Power Button (see Fig. 1)
The Power Button light and the Resume Button light will be illuminated (see Fig .1)
Note:
When you power up your OptiPrinter, the CD tray will either eject automatically or remain
inside the printer.
SECTION 4: BUTTONS & LIGHTS
The Printer Buttons let you turn the printer on & off, cancel a print job, or resume printing. The lights
give you visual clues about the status of the printer.
4.1 Cancel Button
Cancel Button
Print Cartridge Status Light
Resume Button & Light
CD Tray Button
Power Button & Light
Fig. 1
Pressing the Cancel Button cancels the current print job.
4.2 Print Cartridge Status Light
This light flashes when a print cartridge is low in ink or incorrectly installed, or the printer’s top
cover is open.
4.3 Resume Button & Light
This light is illuminated when you first power up your OptiPrinter, and indicates that there is no
CD in the printer.
This light will also flash when an action is required such as loading a CD or clearing a CD jam.
When the action is completed, press the Resume Button to continue printing.
4.4 Power Button & Light
The Power Button turns the printer on & off. It may take a few seconds for the printer to turn on
after you press the Power button. The green light flashes when the printer is processing.
ZZ 004 805
-9-
OptiPrinter CD/DVD Inkjet Printer
Caution!
Always use the Power button to turn the printer on & off. Using a power strip, surge
protector, or a wall-mounted switch to turn the printer on & off may cause printer failure.
4.5 CD Tray Button
Pressing this button will slide the CD tray back and forth into the printer.
SECTION 5: INSERTING A CD INTO THE PRINTER
5.1 Standard 120mm CDs & DVDs
With your OptiPrinter switched on, press the CD Tray Button on the front, left of the printer (see
Fig.1) and the CD tray will slide out. Place a CD onto the tray ensuring that the disc sits against the
two pins at the front of the tray as shown in Fig. 2a
Position the CD so that the
edge of the CD sits against
the edge of the two pins.
Fig. 2a
Press the CD Tray Button once again and the tray slides back into the printer.
The Resume button light will go out at this point.
5.2 CD Business Cards & Mini Discs
The OptiPrinter will also print directly onto inkjet printable CD Business Cards (rectangular and
saddle/hockey rink) and Mini Discs, via the special adaptors, which can be purchased
separately (Fig.2b). Place the adaptors onto the CD tray making sure that the 2 pins on the
tray fit snugly into the corresponding holes on the adaptor (Fig. 2c).
Fit the adaptor into
the CD tray pins
Fig. 2b
Fig. 2c
Place the inkjet printable CD Business Card or Mini Disc into the adaptor, ensuring that it sits
completely flat. Press the CD Tray Button and the tray slides back into the printer. The
Resume button light will go out at this point.
ZZ 004 805
- 10 -
OptiPrinter CD/DVD Inkjet Printer
SECTION 6: INSERTING/CHANGING THE PRINT CARTRIDGES
1.
2.
3.
4.
5.
6.
7.
8.
9.
10.
Press the Power Button to turn on the printer
Before installing or changing a print cartridge, you MUST insert a CD into the OptiPrinter. Press
the CD Tray Button, place a CD onto the tray and press the CD Tray Button again. The tray will
slide back into the printer. The Print Cartridge Status Light will flash
Open the top cover
The print cartridge cradle moves to the center of the printer (Fig. 3 on the next page)
Raise the cradle latch
Remove existing cartridge (if any) from the cradle
Remove the plastic tape from the print cartridge (Fig. 4 on the next page)
Hold the cartridge so that the copper strip is on the bottom and rear
Push the cartridge firmly into the cradle (color on the left, black on the right)
Secure the cradle latch, then, close the top cover.
Remove plastic tape
Fig. 3
Fig. 4
SECTION 7: INSTALLING THE PRINTER SOFTWARE
Note:
The screen images that follow are from Windows 2000. Windows XP screens appear slightly
different.
1.
2.
Connect the OptiPrinter to your PC (see Section 3)
Switch on your PC and the OptiPrinter. Your PC should automatically recognize that new
hardware has been added in the form of the OptiPrinter and the “Digital Signature Not Found ”
message box (see Fig. 5 on the next page) will appear. You will be asked if you wish to continue
installation, select Yes. In Windows XP, select Continue Anyway.
ZZ 004 805
- 11 -
OptiPrinter CD/DVD Inkjet Printer
Fig. 5
Note:
The message, which appears above, is merely precautionary from Windows and it is not
necessary to stop the installation.
Note:
If your PC does not recognize the new OptiPrinter hardware when you first connect it to your
PC, you should load the print driver via the Add Printer icon on your Printer settings:
a. Place the Print Drive CD into your PC’s CD-ROM drive
b. On you PC’s desktop, select Start, Settings and Printers
c. Double click the Add Printer icon and follow the on screen instructions
d. When the Wizard asks for the name of the printer, click the Have Disk button and
navigate to the ENU_Release folder in the CD-ROM and select OK
e. The driver will install on your PC
f. When complete, select Finish and the MF Digital OptiPrinter print driver icon will
appear in your printer settings
3.
4.
Place the Printer Driver CD into the CD-ROM drive of your PC.
You will now be asked to locate the Printer Driver. Click on the Browse button (as shown in Fig.
6) and navigate to file on the Printer Driver CD, which you have just placed in your CD-ROM
drive.
Fig. 6
ZZ 004 805
- 12 -
OptiPrinter CD/DVD Inkjet Printer
5.
6.
7.
Click Open and the file “ENU_Release” will appear in the “Copy Files from” window as shown
above.
Click OK and the Print Driver will begin loading.
Once complete, click Finish. The print driver has now been loaded and your OptiPrinter is ready
for use.
Note:
If at any point of the above installation process you encounter any problems, you should load
the OptiPrinter Print Driver via the Add Printer icon on your printer settings as described on the
previous page.
SECTION 8: INSTALLING DISCUS (Graphics Software)
Insert the Discus CD into your CD-ROM and follow the on-screen instructions.
SECTION 9: USING DISCUS SOFTWARE
Note:
Before using Discus, you need to disable the OptiPrinter's built in mask.
a.
b.
c.
d.
On your desktop, click Start, Settings and then open your Printers folder.
Right click the MF Digital OptiPrinter icon, and select “Properties” from the popup
menu.
Click “Printing Preferences…“ and open the “Mask settings” tab
Unclick the “Enable Masking” checkbox and click OK
Open Discus by clicking on its icon on your desktop. The screen on the next page will open.
ZZ 004 805
- 13 -
OptiPrinter CD/DVD Inkjet Printer
Select a label type
Fig.7
ZZ 004 805
- 14 -
OptiPrinter CD/DVD Inkjet Printer
Use the tabs along the top to create your artwork
Fig. 8
Canvas:
Select a blank canvas or choose from a wide selection of backgrounds included
with Discus.
Paint:
Draw and color your own vector shapes
Photo:
Import jpeg, gif, tiff or BMP image files
Text:
Add & manipulate text to your design
Note:
Full details of how to use Discus can be seen by clicking the Help Button on the Discus
interface.
ZZ 004 805
- 15 -
OptiPrinter CD/DVD Inkjet Printer
Once your artwork is complete, select the “Print” tab
Diameter Adjusters
Nudge Keys
Fig. 9a
Choose the “MF Digital OptiPrinter” from the Select template menu
Next, select Setup…. Choose the MF Digital OptiPrinter from the drop-down list of printers and ensure
the Paper Size is set to A4 (210 x 297mm), Source is set at Upper Tray and that Orientation is set
at Portrait.
Note:
It is important that these settings are adhered to when printing with the OptiPrinter.
To ensure that your image is positioned correctly, select “Test Print”.
Note:
The following command box (Fig. 9b on the next page) will appear each time you instruct the
OptiPrinter to print, asking you to confirm whether you are ready to print. This allows you to
check that you have placed a disc onto the CD tray and retracted it into the printer, ready to
print.
ZZ 004 805
- 16 -
OptiPrinter CD/DVD Inkjet Printer
Fig. 9b
A series of black circles will print onto the CD as shown in Fig. 10.
Fig. 10
Fig. 11
You may find that the circles do not print centrally onto the disc as shown in Fig. 11 on the previous
page, in which case you need to adjust the position of the template in Discus.
Use the nudge keys (as shown in Fig. 9a on the previous page) to move your template back & forth
and up & down until your test prints centrally onto your disc.
Once the test print has been perfected, you are now ready to print the artwork you created.
Place a blank CD into the CD tray. On the print tab, select “Print”. Ensure that the OptiPrinter has
been selected from the Print Properties and select “Print” again. Your OptiPrinter will begin to print
your disc.
Note:
The printing surface on printable discs sometimes differs from manufacturer to manufacturer.
Use the Diameter Adjuster (see Fig. 9a on previous page) to alter the printable area of our
disc.
ZZ 004 805
- 17 -
OptiPrinter CD/DVD Inkjet Printer
Note:
DO NOT select multiple copies when printing directly to your OptiPrinter from you PC.
Number of
copies should
always be “1”
Fig. 12
ZZ 004 805
- 18 -
OptiPrinter CD/DVD Inkjet Printer
SECTION 10: SETTING PRINTER PREFERENCES
You can choose a number of printing options on your OptiPrinter from the Printer Preferences menu.
10.1 Set-Up
Fig. 13
Print Quality
There are 4 options to choose from: Best, Normal, Fast Normal and Draft. Best provides the
best quality printing at the slowest speed. The print speed increases and the print quality
lessens with Normal, Fast Normal and Draft. Draft provides draft quality at the fastest printing
speed.
Disc Surface Type
The choice you make here will depend on the image you wish to print. If you are simply
printing text onto a CD, then select Text Quality. If you are printing graphics, you would
probably select Inkjet Quality. For images where only the very best quality will do, such as
high-resolution photos, select Photo Quality.
If you select Photo Quality, you will be given a choice of PhotoREt or 4800x1200 Optimized
dpi.
PhotoREt will ensure that tiny droplets of ink are placed accurately and at the highest
firing frequency with no compromise in speed. Instead of simply increasing the dpi,
which results in longer printing times, PhotoREt uses more color levels to deliver quality
printing (see Fig. 14 on the next page)
4800x1200 Optimized dpi will ensure that the image is printed to the very highest dpi
resolution and may result in longer print times.
ZZ 004 805
- 19 -
OptiPrinter CD/DVD Inkjet Printer
Conventional
Printing
PhotoREt
Printing
Fig. 14
10.2 Features
Fig. 15
Click the “Enable HP” preview and when you select print, a print preview will be displayed
automatically each time you print.
If you select the “Advanced Features” button, you are given the following options:
Ink Volume: Select this feature to lessen or increase the amount of ink used to
print a document.
Dry time: Select this feature to increase the time the printer holds a document
After printing if ink on your printed document smears.
Low Memory Mode: Select this option to allow the draft to be printed if your
computer does not have enough memory or disk space to print a document.
ZZ 004 805
- 20 -
OptiPrinter CD/DVD Inkjet Printer
10.3 Color
Fig. 16
Print in Grayscale:
Saturation:
Brightness:
Color Tone:
Print in shades of gray
Intensity of printed color
Lightness or darkness or printed colors
Warmth or coolness of printed colors
10.4 Mask Settings
The OptiPrinter’s built in mask determines the printable area for your image and prevents your
image from being printed outside the printable area of the CD media you are using or onto the
CD tray of the printer itself.
This mask should be used when printing discs using any design software program other
Than the Discus software which is included with your printer; for example, CorelDRAW or
Photoshop.
ZZ 004 805
- 21 -
OptiPrinter CD/DVD Inkjet Printer
Fig. 17
Mask Type:
Enable Mask:
Standard Area
Setting:
Hub Area Setting:
Mask Origin:
Parameter Unit:
Select the mask that matches the media to which you wish to
print on. Choose from the following:
Standard CD/DVD (120mm)
Business Card Rectangle (86x 61mm)
Business Card Rectangle (80 x 61mm)
Mini CD (80mm)
Click this checkbox to switch the OptiPrinter’s mask on or off.
IMPORTANT. If you are using Discus software, you
MUST switch off the mask.
Adjust the printable area of your design.
To print on the central hub of a CD, check this box and adjust
dimensions accordingly.
To alter the origin of the mask when printing through a graphics
package other than Discus.
Select the size of unit you wish to make changes with,
I.e., either 1mm or 0.1mm increments.
For more information on using the OptiPrinter Mask and using graphics
software other than Discus, see Appendix A
ZZ 004 805
- 22 -
OptiPrinter CD/DVD Inkjet Printer
10.5
Services
Fig. 18
Print a Test Page:
Prints a test image onto a CD (ensure you have a disc in
the OptiPrinter before selecting this option).
Clean the Print Cartridges: Cleans the print cartridges & prints out a test image
(Ensure you have a disc in the OptiPrinter before
selecting this option).
Estimate Ink Levels:
Estimates the amount of ink left in each cartridge.
ZZ 004 805
- 23 -
OptiPrinter CD/DVD Inkjet Printer
SECTION 11: ERRORS
You can identify many common problems using the lights on the printer’s control panel. The
Following list highlights common errors and the recommended corrective measures:
Cancel Button
Print Cartridge Status Light
Resume Button & Light
Power Button light
1. Printer Cartridge light is On or Flashing
The top cover is open
Close the cover
Problem with print cartridge
Verify correct cartridge is installed and that installation is
correct
Cartridges may be low in ink
If this is the case, the printer cartridge light will stop
flashing once the top cover is opened or the printer is
printing. The problem is not related to the ink volume if
the light continues to flash when the top cover is opened.
2. Power Light is Flashing
The printer is preparing to print.
The light stops flashing when the printer has received all
data.
3. All Lights are flashing
The printer may need to be restarted.
Press the Power Button to turn off the printer, then press the Power Button again to restart the
printer.
If the lights continue to flash, press the Power Button to turn off the printer. Disconnect the
printer from the power source. Reconnect the printer to the power source. Press the Power
Button to turn on the printer.
4. Resume Button Light Flashes
When printing directly to the Optiprinter from your PC, if you send a subsequent copy to print
too soon after you have sent your initial copy to print, the OptiPrinter may malfunction resulting
in the Resume Button light to flash.
To prevent this from occurring, you should ensure that sufficient time has elapsed (approx. 10
seconds) before sending subsequent copies to your OptiPrinter.
To correct this problem:
a. Ensure that a CD is placed on the CD tray and that the tray has been pulled back into the
printer.
b. Cancel any outstanding print job (Settings/Printers/Verity Systems OptiPrinter).
c. Switch off the OptiPrinter by pressing the Power Button. All lights should now be eliminated.
d. Disconnect the power cable from the back of the printer.
e. Leave the OptiPrinter to rest for a minimum of 1 minute, before reconnecting the power cable
and switching the printer back on using the Power button.
f. The Power Button should be the only button light to become illuminated, indicating that the
printer is now ready to print again.
ZZ 004 805
- 24 -
OptiPrinter CD/DVD Inkjet Printer
SECTION 12: TECHNICAL SUPPORT
You should first attempt to get technical assistance from your dealer or distributor.
MF Digital support personnel can be reached at:
MF Digital
121 Carolyn Blvd.
E. Farmingdale
NY 11735
U.S.A.
Tel: (631) 249-9393 Ext. 310
E-mail: [email protected]
ZZ 004 805
- 25 -
OptiPrinter CD/DVD Inkjet Printer
APPENDIX A: Using other Graphics Software Packages
CorelDRAW & Photoshop
While Discus offers a quick and easy method for designing CDs, if greater control & more
flexibility is what you need, you may wish to use a package such as Photoshop or CorelDRAW
to design your discs.
Create A Page
Like conventional inkjet printers, the OptiPrinter has been programmed with a standard
paper size (see Fig. B on next page). For most desktop printers this paper size is A4
(210 x 297 mm) or Letter (8.5 x 11“), for the OptiPrinter, the paper size is set at 124 mm
x 124 mm so that it accommodates a standard 120 mm CD or DVD plus smaller CD
business cards & mini discs
If you wish to use CorelDRAW or Photoshop graphics software to create an image to
print on the OptiPrinter, we recommend you start by creating a page 124 mm x 124 mm
in your design software. This will ensure that any images you subsequently create on
this page will fit onto the pre-set printer page.
Introducing the Mask
Unlike other CD & DVD printers on the market, the OptiPrinter boasts a unique and
easy to use mask, which makes the accurate printing of CDs from graphics software
packages such as CorelDRAW & Photoshop easier than ever before.
The OptiPrinter mask looks something like Fig.A and is 122mm x 122mm in size. The
shaded area represents the mask itself and through the use of the mask, the printer is
prevented from printing an image onto this area.
Mask
Fig. A
ZZ 004 805
- 26 -
OptiPrinter CD/DVD Inkjet Printer
If you have created a 124 mm x 124 mm page, the OptiPrinter mask (whether it be for a
standard 120mm CD, a rectangular CD business card or a mini disc) will sit, by default,
centrally on this page as shown in the following example. The center point of the mask will sit
exactly 62 mm from the X & Y axis.
X-axis
Fig. B
Y-axis
Note:
If you do not create a 124 mm x 124 mm page in your graphics software package, the center of
the mask will still be positioned 62 mm from the X & Y axis. See the example below:
Letter page example
Fig. C
ZZ 004 805
- 27 -
OptiPrinter CD/DVD Inkjet Printer
As you can see from Fig. A, the OptiPrinter mask covers a maximum area of 122mm x122mm.
It is therefore important to note that any image you produce to print on the OptiPrinter should
be no greater than 122mm x 122mm or your image will print outside the mask and onto the
CD tray itself. See examples below in Fig. D.
Example A:
Balloon image is
126x126mm and
would therefore
print outside of
the 122x122mm
mask
Example B:
Balloon Image is
121x121mm and
would therefore
print within the
boundaries of the
122x122mm mask
Fig. D
Understanding the Mask Interface
The OptiPrinter mask interface, located in the Printer Preferences, looks like this:
Selected
mask will be
displayed
here.
Fig. E
Using the mask, adjustments can be made to match exactly the size of media you wish to print.
Each of the features included on the mask interface is described on the following pages:
ZZ 004 805
- 28 -
OptiPrinter CD/DVD Inkjet Printer
Mask Type:
The OptiPrinter has pre-determined masks for the following types of media:
120mm CDs & DVDs
86 x 61mm Rectangular CD Business Cards
86 x 61mm Rectangular CD Business Cards
80mm Mini CDs
Select the media you wish to print from the drop down list and a picture of that mask
will appear on the interface (see Fig. E on the previous page).
Enable Mask:
Ensure this box is checked.
Standard Area Settings:
This feature allows you to adjust the print area of the mask. You can amend the
following dimensions:
Outer Diameter – Can be used when printing standard 120mm CDs & DVDs and Mini
CDs
Note:
The maximum print area for a CD is 120mm in diameter. The mask will not accommodate and
the printer will not print beyond this diameter.
Fig. F
However, this outer diameter can be reduced to accommodate the slightest variation in
printable media.
Inner Diameter:
Height:
Width:
ZZ 004 805
This can be increased or decreased in size
To adjust the height of the mask for CD business cards
To adjust the width of the mask for CD business cards
- 29 -
OptiPrinter CD/DVD Inkjet Printer
Corner Height:
Corner Width:
To adjust the corner height of the mask for CD business
cards
To adjust the corner width of the mask for CD business
cards
Hub Area Settings:
To print on the hub of your chosen media, first check the “Printing on Hub” checkbox as
shown in Fig. G.
Hub
Fig. G
Fig. H
The mask interface displays the hub.
Once again the Outer & Inner diameters of the hub can be adjusted to fit your media’s
requirements exactly. See Fig. E, pg 24.
Mask Origin:
The mask origin refers to the position of the mask in relation to the actual printer page itself
and is used to centralize the mask on the page.
As explained previously, the OptiPrinter has a set page size of 124 mm x124 mm, and by
default, the mask sits in the center of this page. The center of the mask sits on the 62mm point
of the X & Y axis, while the origin of the mask (the top left hand corner) sits on the on the 1 mm
x 1 mm point of the X & Y axis (see Fig. I and Fig. J on the next page)
Fig. I
ZZ 004 805
- 30 -
OptiPrinter CD/DVD Inkjet Printer
Mask Origin
X=1
Y=1
1mm
Fig. K
There may be circumstances in which you need to adjust the position of the mask in relation to
the printer (i.e., different print area tolerances between different makes of media may require
tiny adjustments). If this is the case, you can do so by changing the dimensions of the mask
origin.
As you will see from the above diagram (Fig. K), the maximum distance you can move the
mask is 1mm in any direction. It is therefore advisable to change the unit of parameter from x
1mm to x0.1mm as shown below in Fig. L. This way, tiny movements can be made to align the
mask perfectly.
Fig. L
Parameter Unit:
As mentioned above, the parameter unit can be changed from x1 mm to x 0.1 mm movements
allowing you to adjust your mask by tiny increments at a time so that a perfect mask can be
achieved.
Changing this setting to x 0.1mm will result in all measurements on the Mask interface being
shown as tenths of a millimeter as shown in Fig. M on the next page.
ZZ 004 805
- 31 -
OptiPrinter CD/DVD Inkjet Printer
Parameter Unit = x1mm
Fig.M
Parameter Unit = x0.1mm
Templates:
To help you position your images correctly in either CorelDRAW 11 or Photoshop7, templates
are included on the CD enclosed.
These templates should be used as guides as to where to position your graphics in relation to
the media you wish to print.
ZZ 004 805
- 32 -
OptiPrinter CD/DVD Inkjet Printer
APPENDIX B: RECOMMENDATIONS
Positioning your OptiPrinter
♦
Ensure your OptiPrinter is placed on a flat surface.
♦
Ensure there is sufficient ventilation around your printer.
♦
Avoid places subject to dust, moisture & vibrations.
Maintaining your Printer
♦
DO NOT force the print cartridge cradle – always follow the correct procedures for changing
ink cartridge (see section 5).
♦
DO NOT manually force the CD tray into the printer
♦
From time to time the CD tray of the OptiPrinter may collect deposits of ink where an image
has printed directly onto the CD tray. To clean the tray simply wipe with a moist cloth.
♦
DO NOT put your hand or any other object inside the printer while it is printing.
♦
DO NOT spill liquid onto the printer
Getting the Most out of Your OptiPrinter
♦
If you wish to print photo-quality graphics onto your CDs & DVDs, the higher the input the
higher the output.
♦
Use jpegs, tiff files that are 300dpi resolution
ZZ 004 805
- 33 -
OptiPrinter CD/DVD Inkjet Printer
Supplied by:
MF Digital
121 Carolyn Blvd.
E. Farmingdale
NY 11735
U.S.A.
Tel: (631) 249-9393
Fax: (631) 249-9273
E-mail: [email protected]
Website: http://www. mfdigital.com
ZZ 004 805
- 34 -