1
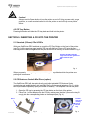
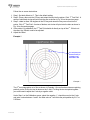
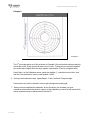
OptiPrinter PRO CD/DVD Inkjet Printer
COMPLETE SOLUTIONS FOR ON-DEMAND CD & DVD PRODUCTION
Photo-Quality CD/DVD Inkjet Printer
OPERATING & MAINTENANCE
MANUAL
ZZ 004 821
-1-
OptiPrinter PRO CD/DVD Inkjet Printer
Thank you for purchasing a Verity Systems
OptiPrinter PRO
OPERATING & MAINTENANCE MANUAL
Document Reference No. TP 000 120 (Rev 1.01)
Production Standard
ZZ 004 821
VERITY SYSTEMS LTD
VERITY SYSTEMS, INC.
2 Eastern Road
5441 Merchant Circle, Unit A
Aldershot
Placerville
Hampshire
California
GU12 4TD
95667
United Kingdom
United States
Tel: +44 (0) 1252 317000
Tel: (530) 626-9363
Fax: +44 (0) 1252 316555
Fax: (530) 626-9395
Email: [email protected]
Email: [email protected]
www.veritysystems.com
ZZ 004 821
-2-
OptiPrinter PRO CD/DVD Inkjet Printer
WARNING
To avoid electrical shock hazards, unit covers should only be removed by authorized
personnel.
©
COPYRIGHT
This document is the property of Verity Systems and it may not be reproduced, copied
or exhibited to a third party without the written permission of Verity Systems.
Verity Systems reserves the right to amend or modify the specifications and design
criteria applying to these products.
ZZ 004 821
-3-
OptiPrinter PRO CD/DVD Inkjet Printer
SOFTWARE WARRANTY (LIMITED)
If you discover physical defects in the media on which the software is distributed
or in the User’s Manual, Verity Systems will replace the media or manual for a
period of ninety (90) days after the purchase by the retail customer. You must
return the disk or manual to Verity Systems or an authorized Verity Systems
dealer within the warranty period accompanied by proof of purchase.
VERITY SYSTEMS DISCLAIMS ALL IMPLIED WARRANTIES ON THE
PRODUCT, INCLUDING WITHOUT LIMITATION WARRANTIES OF
MERCHANTABILITY, PERFORMANCE AND FITNESS FOR A PARTICULAR
PURPOSE. Verity Systems WILL NOT BE LIABLE FOR ANY BUG, ERROR,
OMISSION, DEFECT, DEFICIENCY, OR NONCONFORMITY IN ANY
SOFTWARE. AS A RESULT, THE SOFTWARE IS SOLD “AS IS”, AND THE
PURCHASER ASSUMES THE ENTIRE RISK AS TO ITS QUALITY AND
PERFORMANCE.
VERITY SYSTEMS SHALL IN NO EVENT BE LIABLE FOR DIRECT,
INDIRECT, SPECIAL, INCIDENTAL, CONTINGENT OR CONSEQUENTIAL
DAMAGES RESULTING FROM ANY DEFECT IN THE SOFTWARE OR ITS
DOCUMENT ATION INCLUDING DAMAGES FROM LOSS OF DATA, EVEN IF
VERITY SYSTEMS OR AN AUTHORIZED VERITY SYSTEMS DEALER HAS
BEEN ADVISED OF THE POSSIBILITY OF SUCH DAMAGES. YOU AGREE
THAT VERITY SYSTEMS’ LIABILITY, ARISING OUT OF CONTRACT,
NEGLIGENCE, STRICT LIABILITY IN TORT OR WARRANTY SHALL NOT
EXCEED ANY AMOUNTS PAID BY YOU FOR THIS PRODUCT.
Any written or oral information or advice given by Verity Systems dealers,
distributors, agents or employees will in no way increase the scope of this
warranty. Nor may you rely on such oral or written communication. Some
states do not allow the exclusion or limitation of implied warranties or
liability for incidental or consequential damages, so the above limitation or
exclusion may not apply to you. This warranty gives you specific legal
rights, and you may also have other rights that vary from state to state.
ZZ 004 821
-4-
OptiPrinter PRO CD/DVD Inkjet Printer
TABLE OF CONTENTS
Section 1 INTRODUCTION
1.1
1.2
1.3
7-8
Overview………………………………………………………………. 7
Features……………………………………………………………….. 7
Specifications………………………………………………………… 7-8
Section 2 BOX CONTENTS
8
Section 3
9
POWER ON
Section 4 BUTTONS & LIGHTS
9-10
4.1
Cancel Button…………………………………………………………. 9
4.2
Print Cartridge Status Light………………………………………… 9
4.3
Resume Button & Light………………………………………………9
4.4
Power Button & light………………………………………………… 9
4.5
CD Tray Button……………………………………………………….. 10
Section 5 INSERTING A CD INTO THE OPTIPRINTER PRO
10-11
5.1
Inserting a Standard CD/DVD………………………………………. 10
5.2
Inserting a CD Business Card & Mini Disc………………………. 10-11
Section 6 INSERTING/CHANGING PRINT CARTRIDGES
11
Section 7 INSTALLING PRINTER SOFTWARE
12-13
Section 8 INSTALLING DISCUS (Graphics Software)
13
Section 9 USING DISCUS & PRINTING A CD
13-16
Section 10 SETTING PRINTER PREFERENCES
17-25
10.1
Paper/Quality……………………………………………………….…. 17-18
10.2
Basics.……………………………………………………………….…. 18-19
10.3
Color…………………………………………………………………... 20
10.4
Services…………………………………………………………………21
10.5
Mask Settings………………………………………………………… 21-22
ZZ 004 821
-5-
OptiPrinter PRO CD/DVD Inkjet Printer
10.6
Calibration……………………………………………………………... 23-26
Section 11 ERRORS
27
Section 12 TECHNICAL SUPPORT
28
Appendix A OTHER GRAPHICS SOFTWARE PACKAGES
29-32
CorelDRAW & Photoshop………………………………………….. 29
Create a Page………………………………………………………… 29
Introducing the Mask……………………………………………….. 29
Understanding the Mask Interface……………………………….. 30
Mask Type………………………………………………………. 30
Enable Mask……………………………………………………. 30
Standard Area Settings………………………………………. 30-31
Hub Area Settings…………………………………………….. 31-32
Mask Origin…………………………………………………….. 32
Parameter Unit…………………………………………………. 32
Templates……………………………………………………………... 32
Appendix B Recommendations
ZZ 004 821
33
-6-
OptiPrinter PRO CD/DVD Inkjet Printer
SECTION 1: INTRODUCTION
1.1 Overview
Verity Systems, world leading developers & manufacturers of optical disc duplication & printing
systems, has launched a brand new, drawer mechanism CD/DVD printer: the OptiPrinter PRO.
Working in partnership with Hewlett-Packard, the OptiPrinter PRO brings professional print quality to
the in-house production of CDs, DVDs, CD Business Cards and Mini CDs, delivering outstanding
photo quality images directly onto the surface of discs, enabling customers to choose colorful
backgrounds and images that reflect their company.
What’s more, the OptiPrinter PRO has been specifically designed to provide maximum versatility and
high-speed printing and can be used in a variety of settings. The PC-based OptiPrinter PRO offers
professional desktop printing for the low volume/small business user, while the OptiPrinter PRO can
also be used in conjunction with an autoloader or automated disc duplicator for fast, unattended
printing of greater quantities.
1.2 Features
•
•
•
•
•
•
•
•
•
•
•
Professional, photo quality CD & DVD inkjet printer
Desk-top printer
Combine with autoloader
Direct to surface color inkjet printing
Laser-sharp printing
Perfect clean crisp graphics
High speed printing
4800 dpi resolution with 16.7 million colors
Uses standard, off-the-shelf standard HP print cartridges
Hewlett-Packard inkjet Technology
Ultra small ink drops (about 32 per dot)
1.3 Specifications
Minimum System
Requirements:
Windows 2000: Pentium 133MHz, 64Mb RAM;
Windows XP: Pentium 233 MHz, 128 Mb RAM
Power Requirement:
100 to 240 VAC, 50/60Hz
Environment:
Recommended operating temperature: 15 to 365 °C
Recommended operating humidity: 20 to 80% RH noncondensing
Width: 17.6” (447mm) Depth: 14” (356mm) Height: 6” (152.4mm)
Net Weight: 5.5kg/12.12lbs (approx. without cartridges)
Prints directly onto the surface of inkjet printable 120mm CDs &
DVDs, 86x61mm rectangular and 80mm x 61mm & 80mm x
x63mm saddle CD business cards & 80mm mini discs
Bi Universal Serial Bus. 2.0 Full Speed (USB), centronics parallel
IEEE-1284 compliant.
Black: Up to 1200 dpi
Dimensions:
Media Support:
Connectivity:
Maximum Resolution:
ZZ 004 821
-7-
OptiPrinter PRO CD/DVD Inkjet Printer
Color: 4800 x 1200 optimized dpi color printing on premium photo
papers with 1200 x 1200 dpi input dpi resolution.
Full color spectrum of 16.7 million colors.
HP PhotoREt III Color Management System
Print Speed:
Cartridges:
25% mono coverage @ normal, text quality approx.* 16
seconds per disc
25% mono coverage @ normal, inkjet quality approx.* 19
seconds per disc
100% full color coverage @ normal, inkjet quality approx.*
24 seconds per disc
100% full color coverage @ best Inkjet (PhotoRet) approx.* 52
seconds per disc
100% full color coverage @ photo quality (PhotoRet), approx.*
134 seconds per disc
(*Speeds given are approximations and are dependant on file size,
disc coverage and processing speed)
Dual Ink Cartridges: Standard HP Black Print Cartridge C6656;
Standard HP Tri-Color Print Cartridge C6657 or Standard HP
Photo Print Cartridges C6658
SECTION 2: BOX CONTENTS
Carefully remove your Verity Systems OptiPrinter PRO from its shipping carton and verify that all parts
are present. If there are missing or damaged parts contact Verity Systems or an authorized distributor
immediately.
You should find the following:
Ø
Ø
Ø
Ø
Ø
Ø
Ø
Ø
Verity Systems OptiPrinter PRO
Power Cable
USB Cable
Quick Start Guide
CD, including Printer Driver, User Manual, Test Image, Templates
2 Blank Printable CDs
One Black & One Color Cartridge
Discus Graphics Software CD
Note:
Be sure to remove all pieces of protective tape. Remove the tape holding down the printer lid.
Open the lid and remove the piece of foam holding the CD Tray in place.
Note:
If your Verity Systems OptiPrinter PRO is damaged during shipment, please contact the freight
carrier first, then, contact your distributor or Verity Systems. You should save your shipping
materials so that if the need arises, you can return your OptiPrinter PRO for service. This
packaging was designed specifically for shipping your OptiPrinter PRO. Other packaging may
not be suitable.
ZZ 004 821
-8-
OptiPrinter PRO CD/DVD Inkjet Printer
SECTION 3: POWER ON
1.
2.
3.
Connect the power cable to the printer and plug into the power supply.
Power up the OptiPrinter PRO by pressing the Power Button. (See Fig. 1)
The Power Button light will flash for a short period then remain illuminated.
SECTION 4: BUTTONS & LIGHTS
The Printer Buttons let you turn the printer on & off, cancel a print job, open & close tray or resume
printing. The lights give you visual clues about the status of the printer.
Print Cancel Button
CD Tray Button
Print Cartridge Status Light
Power Button & Light
Fig. 1
Resume Button & Light
4.1 Print Cancel Button
Pressing the Print Cancel Button cancels the current print job.
3.2 Print Cartridge Status Light
This light flashes when a print cartridge is low in ink or incorrectly installed, or the printer’s
top cover is open.
4.3 Resume Button & Light
This light will flash when an action is required such as loading a CD or clearing a CD jam.
When the action is completed, press the Resume Button to continue printing.
The OptiPrinter Pro also has a multiple print capability. If a multiple print command is sent
from a PC, the first CD is printed as normal. Then when the CD tray is ejected, the resume
light will flash. Place a new CD into the tray and press the Resume button. The CD tray will
retract and the CD will be printed and so on for the number of copies requested.
4.4 Power Button & Light
The Power Button turns the printer on and off. It may take a few seconds for the printer to turn
on after you press the Power button. The green light flashes when the printer is processing.
ZZ 004 821
-9-
OptiPrinter PRO CD/DVD Inkjet Printer
Caution!
Always use the Power button to turn the printer on and off. Using a power strip, surge
protector, or a wall-mounted switch to turn the printer on and off may cause printer
failure.
4.5 CD Tray Button
Pressing this button will slide the CD tray back and forth into the printer.
SECTION 5: INSERTING A CD INTO THE PRINTER
5.1 Standard (120mm) CDs & DVDs
With your OptiPrinter PRO switched on, push the CD Tray Button on the front of the printer
(see Fig.1 on the previous page) and the CD tray will slide out. Place a CD onto the tray
ensuring that the disc sits against the two pins at the front of the tray as shown below in Fig. 2
Position the CD so that the
edge of the CD sits against the
edge of the two pins.
Fig. 2
When you send your image to printer, the CD Tray will tray slide back into the printer and
printing will commence.
5.2 CD Business Cards & Mini Discs (option)
The OptiPrinter PRO will also print directly onto inkjet printable CD Business Cards
(rectangular and saddle/hockey rink) and Mini Discs, via the special adaptors (Fig. 3), which
can be purchased separately (see your dealer for details). The adaptors come in two parts.
1. Open the CD tray by pressing the CD tray button on the front of the printer.
2. Place Part 1 of the adaptor onto the CD tray making sure that the 2 pins on the tray fit
snugly into the corresponding holes on the adaptor part (Fig. 4).
Part 1
ZZ 004 821
Part 2
Fig. 3
Fit Part 1
onto the 2
locating
pins on
the CD
tray
- 10 -
Fig. 4
OptiPrinter PRO CD/DVD Inkjet Printer
3. Open the printer cover
4. Using your hand, slowly slide the CD tray back into the printer until approximately 1
inch of the CD tray remains protruding from the front of the printer.
5. Fit Part 2 of the adaptor matching the pin on the adaptor to the hole on the CD tray (Fig
5 & Fig. 6).
Locator
hole on
CD tray
Fit
adaptor
part into
locator
hole
Fig. 5
Fig. 6
6. Close the printer cover and press the CD tray button so that the CD tray slides out.
7. Place the inkjet printable CD Business Card or Mini Disc into the adaptor, ensuring that
it sits completely flat (Fig. 6).
8. As the tray slides back into the printer, Part 2 of the adaptor closes against the discs
and holds it securely in place for printing.
SECTION 6: INSERTING/CHANGING THE PRINT CARTRIDGES
1.
2.
3.
4.
5.
6.
7.
8.
Press the Power Button to turn on the printer
Open the top cover
Lift the print cartridge latch to the open position (Fig. 7)
Slide the print cartridge out of the cradle (Fig. 8)
Remove the plastic tape from the print cartridge (Fig. 9)
Hold the cartridge so that the copper strip is on the bottom and rear
Slide the cartridge firmly into the cradle, color on the left, black on the right. (Fig. 10)
Push down the print cartridge latch until it snaps closed. Close the top cover.
Fig. 7
ZZ 004 821
Fig. 8
- 11 -
Fig. 9
Fig. 10
OptiPrinter PRO CD/DVD Inkjet Printer
SECTION 7: INSTALLING THE PRINTER SOFTWARE
Note:
Your OptiPrinter PRO should not be connected to your PC during the initial software
installation. If connected, remove the USB and power cables from the printer. There may
be variations in the following instructions depending on operating system (2000 or XP) and
configuration.
1.
2.
3.
4.
5.
6.
7.
8.
9.
10.
11.
Place the Printer Driver CD into the CD-ROM drive of your PC. The Verity_OptiPrinter Pro
installation wizard should automatically start.
Follow the on-screen instructions, clicking Next when prompted. When prompted, click Install
to begin installation.
The Digital Signature Not Found message box will appear (see Fig.11). You will be asked if
you wish to continue installation, select Yes. In Windows XP, select Continue Anyway.
On the final screen click Finish.
Connect the OptiPrinter Pro to your PC via the USB cable.
Connect the power cable to the back of the OptiPrinter Pro and plug into the power supply.
Switch on the printer.
If the Digital Signature Not Found message box appears again, select Yes to continue
installation. In Windows XP, select Continue Anyway.
The Found New Hardware box will appear on screen, which will search for the driver. In
Windows XP select No, not at this time and click Next.
At the next box, select Install the software automatically (Recommended) and click Next.
If the Digital Signature Not Found message box appears again, select Yes to continue
installation. In Windows XP, select Continue Anyway.
When prompted, click Finish.
Fig. 11
Note:
The message, which appears above, is merely precautionary from Windows and it is not
necessary to stop the installation.
ZZ 004 821
- 12 -
OptiPrinter PRO CD/DVD Inkjet Printer
Note:
If your PC does not recognize the new OptiPrinter PRO hardware when you first connect it to
your PC, you should load the print driver via the Add Printer icon on your Printer settings:
a. Place the Print Drive CD into your PC’s CD-ROM drive
b. On you PC’s desktop, select Start, Settings and Printers
c. Double click the Add Printer icon and follow the on screen instructions
d. When prompted, select Local Port
e. When the Wizard asks for the name of the printer, click the Have Disk button and
navigate to the enu/drivers/win2k_xp/OptiPrinter_Pro.inf file on the CD-ROM and
select Open and then OK.
f. The driver will begin to install on your PC.
g. Whenever prompted click Next.
h. When complete, select Finish and the Verity Systems OptiPrinter PRO print driver
icon will appear in your printer settings
i. The Digital Signature Not Found message box (see Fig. 11) will appear. You will be
asked if you wish to continue installation, select Yes. In Windows XP, select Continue
Anyway.
SECTION 8: INSTALLING DISCUS (Graphics Software)
Insert the Discus CD into your CD-ROM and follow the on-screen instructions.
SECTION 9: USING DISCUS SOFTWARE
Note:
Before using Discus, you need to disable the OptiPrinter Pro's built in mask.
a. On your desktop, click Start, Settings and then open your Printers folder.
b. Right click the Verity Systems OptiPrinter PRO icon, and select “Properties” from the
popup menu.
c. Click “Printing Preferences…“ and open the “Mask settings” tab
d. Unclick the “Enable Masking” checkbox and click OK
Open Discus by clicking on its icon on your desktop. The screen on the next page will open.
ZZ 004 821
- 13 -
OptiPrinter PRO CD/DVD Inkjet Printer
Select a label type
Use the tabs along the top to create your artwork
Fig.12
Fig. 13
ZZ 004 821
- 14 -
OptiPrinter PRO CD/DVD Inkjet Printer
Canvas:
Select a blank canvas or choose from a wide selection of backgrounds included
with Discus.
Paint:
Draw and color your own vector shapes
Photo:
Import jpeg, gif, tiff or BMP image files
Text:
Add & manipulate text to your design
Note:
Full details of how to use Discus can be seen by clicking the Help Button on the Discus
interface.
Once your artwork is complete, select the “Print” tab
Diameter Adjusters
Nudge Keys
Fig. 14
Choose the OptiPrinter Pro from the Select template menu
Next, select Setup…. Choose the Verity Systems OptiPrinter PRO from the drop-down list of printers
and ensure the Paper Size is set to A4 (210 x 297mm), Source is set at Upper Tray and that
Orientation is set at Portrait.
Note:
It is important that these settings are adhered to when printing with the OptiPrinter PRO.
ZZ 004 821
- 15 -
OptiPrinter PRO CD/DVD Inkjet Printer
To ensure that your image is positioned correctly, select “Test Print”.
A series of black circles will print onto the CD as shown in Fig. 15
Fig. 15
Fig. 16
You may find that the circles do not print centrally onto the disc as shown in Fig. 16, in which case you
need to adjust the position of the template in Discus.
Use the nudge keys (as shown in Fig. 14 on the previous page) to move your template back & forth
and up & down until your test prints centrally onto your disc.
Once the test print has been perfected, you are now ready to print the artwork you created.
Place a blank CD into the CD tray. On the print tab, select “Print”. Ensure that the OptiPrinter PRO has
been selected from the Print Properties and select “Print” again. Your OptiPrinter PRO will begin to
print your disc.
Note:
The printing surface on printable discs sometimes differs from manufacturer to manufacturer.
Use the Diameter Adjuster (see Fig.14 on previous page) to alter the printable area of our disc.
ZZ 004 821
- 16 -
OptiPrinter PRO CD/DVD Inkjet Printer
SECTION 10: SETTING PRINTER PREFERENCES
You can choose a number of printing options on your OptiPrinter PRO from the Printer Preferences
menu.
10.1
Paper/Quality
Fig. 17
This screen allows you to select the appropriate output quality for your disc.
Disc Surface Type
Select the type of surface you want to print on from this drop down list. Choose from:
White Inkjet; Premium Inkjet; Other Inkjet; Premium Glossy; Premium Plus Glossy; Premium
Matt; Colorfast Glossy; Glossy; 4800x1200dpi; Other Photo Quality; Text Quality
The choice you make here will depend on the image you wish to print. If you are printing basic
text, select Text Quality. If printing basic graphics, select White Inkjet. For images where only
the very best will do, such as high-resolution photos, select Premium Inkjet or Premium Matt or
Glossy.
Print Quality
There are 6 options to choose from:
• FastDraft: Prints at the fastest speed while using the least amount of ink.
• Fast Normal: Prints faster then Normal mode and at a higher quality than
FastDraft.
ZZ 004 821
- 17 -
OptiPrinter PRO CD/DVD Inkjet Printer
•
•
•
Normal: Prints faster than Best and at a higher quality than Fast Normal.
Best: Provides high quality printing
Maximum dpi: Provides the highest quality printing but requires longer to print
than Best and requires a large amount of disk space.
Print Task Quick Sets
In addition to using the Disc Surface Type and Print Quality options to set your output quality,
the OptiPrinter PRO is pre-programmed with nine print settings:
•
•
•
•
•
•
•
•
•
Default
Premium Photo Quality Matt (4800x1200 dpi)
Premium Photo Quality Glossy (4800x1200 dpi)
Photo Quality Matt (PhotoREt)
Photo Quality Glossy (PhotoREt)
Best Inkjet (PhotoREt)
Normal Inkjet (600x600 dpi)
Normal Text (300x300 dpi)
Fast Text (300x300 dpi)
Selecting a setting will automatically select the most suitable disc surface and print quality for
the job in hand.
Example
If you select Premium Photo Quality Matt (4800x1200 dpi), the Disc Surface Type is
automatically set to Premium Matt whilst the Print Quality Type is automatically set to Maximum
dpi.
You can delete these pre-programmed settings and even create your own using the Save and
Delete buttons.
ZZ 004 821
- 18 -
OptiPrinter PRO CD/DVD Inkjet Printer
10.2
Basics
Fig. 18
This tab allows to you:
a.
Select multiple copies to print in the Copies field.
b.
Click the Print Preview checkbox and a preview of your print image will
automatically appear on screen each time you print.
c.
Select Advanced Features and you are presented with the following
options (Fig.19):
Ink Volume: Select this feature to lessen or increase the amount of ink used to
print a document.
Dry time: Select this feature to increase the time the printer holds a document
After printing if ink on your printed document smears.
Low Memory Mode: Select this option to allow the draft to be printed if your
computer does not have enough memory or disk space to print a document.
ZZ 004 821
- 19 -
OptiPrinter PRO CD/DVD Inkjet Printer
Fig. 19
ZZ 004 821
- 20 -
OptiPrinter PRO CD/DVD Inkjet Printer
10.3
Color
Fig. 20
Saturation:
Intensity of printed color
Brightness:
Lightness or darkness or printed colors
Color Tone:
Warmth or coolness of printed colors
Color Space: Defines the range of colors that can be printed.
sRGB/sYCC is an appropriate color space for most print jobs.
Adobe RGB is an emerging color space that offers more colors
than sRGB/sYCC, but which only works for images.
ZZ 004 821
- 21 -
OptiPrinter PRO CD/DVD Inkjet Printer
10.4
Services
Fig. 21
Print a Test Page:
Prints a test image onto a CD (ensure you have a disc in
the OptiPrinter PRO before selecting this option).
Clean the Print Cartridges: Cleans the print cartridges & prints out a test image
(Ensure you have a disc in the OptiPrinter PRO before
selecting this option).
Display Ink Levels:
Estimates the amount of ink left in each cartridge.
(Displays only when printing)
10.5
Mask Settings
The OptiPrinter PRO’s built in mask determines the printable area for your image and prevents
your image from being printed outside the printable area of the CD media you are using or onto
the CD tray of the printer itself.
This mask should be used when printing discs using any design software program other
Than the Discus software which is included with your printer; for example, CorelDRAW or
Photoshop.
ZZ 004 821
- 22 -
OptiPrinter PRO CD/DVD Inkjet Printer
Mask Type:
Enable Mask:
Standard Area
Setting:
Hub Area Setting:
Mask Origin:
Parameter Unit:
Select the mask that matches the media to which you wish to
print on. Choose from the following:
Standard CD/DVD (120mm)
Business Card Rectangle (86x 61mm)
Business Card Rectangle (80 x 61mm)
Mini CD (80mm)
Click this checkbox to switch the OptiPrinter PRO’s mask on or
off.
IMPORTANT. If you are using Discus software, you MUST
switch off the mask.
Adjust the printable area of your design.
To print on the central hub of a CD, check this box and adjust
dimensions accordingly.
To alter the origin of the mask when printing through a graphics
package other than Discus.
Select the size of unit you wish to make changes with,
I.e., either 1mm or 0.1mm increments.
For more information on using the OptiPrinter PRO mask and using
graphics software other than Discus, see Appendix A
ZZ 004 821
- 23 -
OptiPrinter PRO CD/DVD Inkjet Printer
10.6
Calibration
Your OptiPrinter PRO comes from the factory pre-calibrated to print the image in the center of
the CD. However, during the life of the printer it may be necessary to recalibrate it to ensure a
perfect image position on the CD. This tab allows you to fine-tune the position of the printed
image with the CD.
Fig. 23
Note:
In order to set the calibration, the OptiPrinter Pro must be attached to your PC via the USB
cable. Calibration will not work if the printer is connected via the parallel port.
Click the Set Print Position button, the Calibration Screen appears (See Fig. 24).
ZZ 004 821
- 24 -
Fig. 24
OptiPrinter PRO CD/DVD Inkjet Printer
Follow the on screen instructions.
1. Step 1: Set both offsets to ‘0’. This is the default setting.
2. Step 2: Place a disc onto the CD tray and retract the tray into the printer. Click ‘1st Test Print’. A
series of solid black circles will print onto the disc as shown in Fig. 24 on the previous page.
3. Step 3: rotate to discs 180 degrees in the CD tray and retract the tray once more into the
printer. Click ‘2nd Test Print’. A series of broken, red circles will print onto the disc as shown in
Fig. 24 on the previous page.
4. If the printer is in calibration, the 2nd Test Print should sit directly on top of the 1st . If this is not
the case, the ‘Offsets’ need to be adjusted.
5. Adjust the Offset
Example 1
2nd Test print (red
broken circles) is
printing too far
down the Y-axis
Example 1
The 2nd test image prints out of line as shown in Example 1 (the red broken circles are printing
perfectly on the X-Axis, but too far down on the Y-Axis). To bring the two test prints together
you would need to adjust the Y-axis by a negative value.
Under Step 1 on the Calibration screen, select the negative (‘-‘) check box next to the Y-axis
and enter a value between 1 and 5. An offset value of 1 will move the print position by 0.01” or
0.254mm.
ZZ 004 821
- 25 -
OptiPrinter PRO CD/DVD Inkjet Printer
Example 2
Example 2
The 2nd test image prints out of line as shown in Example 2 (the red broken circles are printing
too far right on the X-axis and too far down on the Y-axis). To bring the two test prints together
you would need to adjust the X-axis by a negative value and the Y-axis by a negative value.
Under Step 1 on the Calibration screen, select the negative (‘-‘) check box next to the X- axis
and the Y-axis and enter a value in each between 1 and 5.
6. Once you have entered a value, repeat Steps 2, 3 and 4 until both Test prints align.
Some trial an error will be required in order to get the alignment exactly right.
7. When you have completed the calibration, hit the Exit button, the numbers you have
entered are stored inside the printer’s memory so the calibration you have set will remain if the
printer is powered down or disconnected from the PC.
ZZ 004 821
- 26 -
OptiPrinter PRO CD/DVD Inkjet Printer
SECTION 11: ERRORS
You can identify many common problems using the lights on the printer’s control panel. The
Following list highlights common errors and the recommended corrective measures:
Print Cancel Button
Print Cartridge Status Light
Resume Button & Light
Power Button light
1. Printer Cartridge light is On or Flashing
The top cover is open
Close the cover
Problem with print cartridge
Verify correct cartridge is installed and that installation is
correct
Cartridges may be low in ink
If this is the case, the printer cartridge light will stop
flashing once the top cover is opened or the printer is
printing. The problem is not related to the ink volume if
the light continues to flash when the top cover is opened.
2. Power Light is Flashing
The printer is preparing to print.
The light stops flashing when the printer has received all
data.
3. All Lights are flashing
The printer may need to be restarted.
Press the Power Button to turn off the printer, then press the Power Button again to restart the
printer.
If the lights continue to flash, press the Power Button to turn off the printer. Disconnect the
printer from the power source. Reconnect the printer to the power source. Press the Power
Button to turn on the printer.
ZZ 004 821
- 27 -
OptiPrinter PRO CD/DVD Inkjet Printer
SECTION 12: TECHNICAL SUPPORT
You should first attempt to get technical assistance from your dealer or distributor.
Verity Systems support personnel can be reached at:
VERITY SYSTEMS LTD
VERITY SYSTEMS, INC.
2 Eastern Road
5441 Merchant Circle, Unit A
Aldershot
Placerville
Hampshire
California
GU12 4TD
95667
United Kingdom
United States
Tel: +44 (0) 1252 796901
Tel: (530) 626-9363
Fax: +44 (0) 1252 316555
Fax: (530) 626-9395
Email: [email protected]
Email: [email protected]
Open GMT Time
ZZ 004 821
Open PST Time
- 28 -
OptiPrinter PRO CD/DVD Inkjet Printer
APPENDIX A: Using other Graphics Software Packages
CorelDRAW & Photoshop
While Discus offers a quick and easy method for designing CDs, if greater control & more
flexibility is what you need, you may wish to use a package such as Photoshop or CorelDRAW
to design your discs.
Create A Page
If you wish to use CorelDRAW or Photoshop graphics software to create an image to
print on the OptiPrinter PRO, we recommend you start by creating a page 120 mm x
120 mm in your design software.
Introducing the Mask
Unlike other CD & DVD printers on the market, the OptiPrinter PRO boasts a unique
and easy to use mask, which makes the accurate printing of CDs from graphics
software packages such as CorelDRAW & Photoshop easier than ever before.
The OptiPrinter PRO mask looks something like Fig. A. The shaded area represents
the mask itself and through the use of the mask, the printer is prevented from printing
an image onto this area.
Mask
Fig. A
ZZ 004 821
- 29 -
OptiPrinter PRO CD/DVD Inkjet Printer
Understanding the Mask Interface
The OptiPrinter PRO mask interface, located in the Printer Preferences, looks like this:
Selected mask
will be
displayed here
Fig. B
Using the mask, adjustments can be made to match exactly the size of media you wish to print.
Each of the features included on the mask interface is described on the following pages:
Mask Type:
The OptiPrinter PRO has pre-determined masks for the following types of media:
Standard CDs & DVDs (120mm)
Business Card Round (63mm) (i.e. Saddle/Hockey)
Business Card Round (61mm) (i.e. Saddle/Hockey)
Business Card Round (58mm) (i.e. Saddle/Hockey)
Business Card Rectangular (58mm)
Business Card Rectangular (63mm)
Mini CDs (80mm)
Select the media you wish to print from the drop down list and a picture of that mask
will appear on the interface (see Fig. B).
Enable Mask:
Ensure this box is checked.
Standard Area Settings:
This feature allows you to adjust the print area of the mask. You can amend the
following dimensions:
ZZ 004 821
- 30 -
OptiPrinter PRO CD/DVD Inkjet Printer
Outer Diameter – Can be used when printing standard 120mm CDs & DVDs and
Mini Ds
Note:
The maximum print area for a CD is 120mm in diameter. The mask will not accommodate and
the printer will not print beyond this diameter.
Fig.C
However, this outer diameter can be reduced to accommodate the slightest variation in
printable media.
Inner Diameter:
Height:
Width:
Corner Height:
Corner Width:
This can be increased or decreased in size
To adjust the height of the mask for CD business cards
To adjust the width of the mask for CD business cards
To adjust the corner height of the mask for CD business
cards
To adjust the corner width of the mask for CD
business cards
Hub Area Settings:
To print on the hub of your chosen media, first check the “Printing on Hub” checkbox as
shown in Fig. D.
Hub
Fig. D
ZZ 004 821
- 31 -
Fig. E
OptiPrinter PRO CD/DVD Inkjet Printer
The mask interface displays the hub.
Once again the Outer & Inner diameters of the hub can be adjusted to fit your media’s
requirements exactly. See Fig. B.
Mask Origin:
The Calibration tab should be used to align your print image with the CD, however, the masks
origin can also be used to more the position of the image by entering values in the X & Y axis.
Fig. F
As you will see from the above diagram (Fig. F), the maximum distance you can move the
mask is 1mm in any direction. It is therefore advisable to change the unit of parameter from x
1mm to x0.1mm as shown below in Fig. G This way, tiny movements can be made to align the
mask perfectly.
Fig. G
Parameter Unit:
As mentioned above, the parameter unit can be changed from x1 mm to x 0.1 mm movements
allowing you to adjust your mask by tiny increments at a time so that a perfect mask can be
achieved.
Changing this setting to x 0.1mm will result in all measurements on the Mask interface being
shown as tenths of a millimeter as shown in Fig. H
Parameter Unit = x1mm
Fig. H
Parameter Unit = x0.1mm
Templates:
To help you position your images correctly in either CorelDRAW 11 or Photoshop7,
templates are included on the CD enclosed.
These templates should be used as guides as to where to position your graphics in relation to
the media you wish to print.
ZZ 004 821
- 32 -
OptiPrinter PRO CD/DVD Inkjet Printer
APPENDIX B: RECOMMENDATIONS
Positioning your OptiPrinter PRO
♦
Ensure your OptiPrinter PRO is placed on a flat surface.
♦
Ensure there is sufficient ventilation around your printer.
♦
Avoid places subject to dust, moisture & vibrations.
Maintaining your Printer
♦
DO NOT force the print cartridge cradle – always follow the correct procedures for changing
ink cartridge (see section 5).
♦
DO NOT manually force the CD tray into the printer
♦
From time to time the CD tray of the OptiPrinter PRO may collect deposits of ink where an
image has printed directly onto the CD tray. To clean the tray simply wipe with a moist
cloth.
♦
DO NOT put your hand or any other object inside the printer while it is printing.
♦
DO NOT spill liquid onto the printer
Getting the Most out of Your OptiPrinter PRO
♦
If you wish to print photo-quality graphics onto your CDs & DVDs, the higher the input the
higher the output.
♦
Use jpegs, tiff files that are 300dpi resolution
ZZ 004 821
- 33 -
OptiPrinter PRO CD/DVD Inkjet Printer
Supplied by:
VERITY SYSTEMS LTD
2 Eastern Road
Aldershot
Hampshire
GU12 4TD
United Kingdom
VERITY SYSTEMS, INC.
5441 Merchant Circle, Unit A
Placerville
California
95667
United States
Tel: +44 (0) 1252 317000
Fax: +44 (0) 1252 316555
Email: [email protected]
Tel: (530) 626-9363
Fax: (530) 626-9395
Email: [email protected]
Website: http://www.veritysystems.com
ZZ 004 821
- 34 -