1
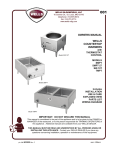
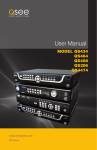
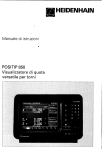
GPS
301
GLOBAL POSITIONING SYSTEM
WARNINGS & NOTIFICATIONS
THE GPS301 IS A GPS
RECEIVER ONLY & HAS
NO RADAR DETECTION
CAPABILITIES
IT IS LEGAL TO USE THIS
UNIT IN ANY AUSTRALIAN
STATE OR NZ
OPERATION NOTICE OF GPS
GPS signal reception can be affected by the location of satellites, tall
buildings, tunnels, bridges, etc. If the GPS301 is not receiving a signal, you
will need to change your location until a signal is received.
The latitude, longitude, and altitude indications on the display are based on
WGS-84 Datum, and the altitude indication may not appear depending on
the signal conditions from GPS satellites.
GPS Warnings
• For safety reasons it is not recommended that the driver change any
settings while in motion. Please come to a complete stop or have a
passenger make changes if necessary.
• The Global Positioning System is operated and maintained by the US
Government. The US Government is completely responsible for the
accuracy of the Global Positioning System.
• The US Government reserves the right to make changes to the Global
Positioning System in accordance with the Department of Defence civil GPS
user policy and the Federal Radio navigation plan. These changes along
with poor satellite geometry could cause inaccurate readings.
i
Quick Start
Guide
INSTALLATION
a.
! Avoid any position which may obstruct the deployment of any air bags
or obstruct the drivers view.
! Place your GPS301 in a position where it has a good view of the sky
above.
! Generally, the best location is in the centre bottom of the windscreen,
which allows easy access to controls & view of the display.
ii
INSTALLATION
b.
i) Find the main unit and mounting bracket (with suction
cups) in the main box/package.
ii) The metal portion of the bracket locks into the top plastic
portion of main unit. Press the release button and slide the
bracket into place
iii) Bend the angled portion of the windshield mounting
bracket so that the GPS301 is parallel to the road surface.
c.
i) Find the 12VDC cigarette lighter adapter and insert the
small plug into the 12VDC power input on the side of the
main unit.
ii) Insert the other end
into the cigarette
lighter socket
of your vehicle.
TURNING THE GPS301 ON
Use the Volume / On /Off switch to turn your GPS301 on.
Increase
Volume
iii
Off
INITIAL POWER ON DISPLAY
when the power is turned on for the first time only, the unit may
take up to 5 minutes to establish a satellite lock.
During this period the unit must remain on.
RED
Welcome
RED
GPS301
The GPS LED will turn (from RED to GREEN) once satellite
information has been retrieved.
Future Power On should only take a few moments.
4 START DISPLAY
The start display shows the compass heading on the left of
the LED window and the current Speed (km)on the right.
The headings are;
N (North)
NE (North East)
NW (North West)
E (East)
SE (South East)
S (South)
SW (South West)
W (West)
GREEN
NE
56
The start display shows
the current speed.
5 GPS SPEED ACCURACY
Generally the GPS Speed Display is more accurate than a car
speedometer although reacts slower. The Car Speedometer
often reads faster due to some of the following factors:
Conservatively calibrated speedometer by manufacturer, worn
tyres, low profile tyres, different sized wheels and the number of
available satellites.
iv
CONTENTS
Warnings & Notifications...........................................................................i
Quick Start Guide.....................................................................................ii
Contents..................................................................................................1
Feature Highlights....................................................................................2
Included with your GPS301......................................................................2
Controls and Functions ............................................................................3
3 Stage Safety Alerts..................................................................................4
Operation
Main Menu...............................................................................................5
Mark Location..........................................................................................6
Quick Access Location........................................................................6
User Locations with Name Tag ............................................................7
Alert Point..........................................................................................9
Edit Name........................................................................................10
Delete: User Points...........................................................................10
Delete: Alert Points...........................................................................11
Navigation..............................................................................................12
Navigate to a Quick Access Location..................................................12
Navigate to City or Suburb.................................................................13
Navigate to Point of Interest (POI).....................................................14
Speeds...................................................................................................15
Position .................................................................................................15
Options..................................................................................................16
Alert Volumes...................................................................................17
Speed Alert.......................................................................................17
Dimmer...........................................................................................18
Baud Rate........................................................................................18
Units................................................................................................19
Downloads.......................................................................................20
Download Procedure.......................................................................20
PC Download...................................................................................21
GPS Reset.........................................................................................23
NMEA ..............................................................................................23
Troubleshooting.....................................................................................24
One Year Limited Warranty......................................................................25
1
FEATURE HIGHLIGHTS
GLOBAL POSITIONING
SYSTEM (GPS) TECHNOLOGY
EARLY WARNING SAFETY
SYSTEM - NATIONWIDE
COVERAGE
! GPS direction, time and
distance to more than 5000
pre-programmed Australian
and New Zealand cities and
suburbs
! 3 Stage visual and audible
warning system to maximise
safety
! Speed Camera warning
! Red Light Camera warning
! Black Spot warning
! Over speed alert
! Audible warning
! Distance to warning location
! Direction to warning location
! User up datable warning
locations
! Individual Alert Volumes /
Tones
! Mark and delete up to 500 of
your own locations and speed
camera, red-light camera or
black spot locations
! Flash memory for city,
warning, points of interest and
updates via the internet
TRIP COMPUTER
! Current Speed
! Average Speed
! Maximum Speed
! Electronic Compass and GPS
co-ordinates
INCLUDED WITH YOUR GPS301
Owner’s Guide
Windshield
Mounting Clip
AC Adapter
01 1
S 3 30
PPS
GG
EM
SYST
ING
SYSTEM
TION
NING
AL POSI
L POSITIO
GLOBGLOBA
Hard Wire Lead
Coiled Cigarette Lighter
Serial Cable
If any of these items are missing or damaged, contact your dealer
immediately.
2
CONTROLS AND FUNCTIONS
2
1
3
LEFT SIDE VIEW
5
4
NE
6
56
FRONT VIEW
(Example Display Shown)
7
8
9
TOP VIEW
10
11
13
14
12
1 Serial Port
2 12 volt Power Socket
3 ON / OFF Volume
Control
4 Speaker
5 Satellite Status LED
6 Alert Status LED
7 8 Character LED
Display
8 Windshield Clip Socket
9 Windshield Clip release
10
11
DISPLAY button
(Name tag - Right)
SELECT button
12
SCROLL button
13
NAVIGATE button
(Name tag - Left)
MENU / Cancel
14
3
3 STAGE SAFETY ALERTS
Your GPS301 has a pre-programmed memory that will alert you to any
speed camera, red light camera or black spot you are approaching.
Example
400m
800m
160m
Camera
Level 2
Level 3
Level 1
Level 1 Alert @ approx 800m
GREEN
GREEN
Green Alert LED
Speed Camera, Red Light
Camera or Black Spot
Red Ligh
scrolls on display
No audible alert.
Level 2 Alert @ approx 400m
GREEN
YELLOW
Yellow Alert LED
Scrolling text
Distance to Camera
Direction to Camera
Audible Alert
400m
Level 3 Alert @ approx 160m
GREEN
RED
Red Alert LED
Distance to Camera
Direction to Camera
Audible Alert
160m
During Level 2 & 3 Alerts the display alternates
your current speed and the distance &
direction to the alert point.
Distance to camera is distinguished by the
full first character
4
OPERATION - MAIN MENU
Key Layout For General Operation
L
R
NAVI
DISPLAY
MENU
/CANCEL
Example:
SELECT
SCROLL
NE
PRESS
0
MENU
Mark Loc
Speed Display;
(Compass heading,
speed)
PRESS
SELECT
Mark Location
(Page 6)
PRESS
Navigate
PRESS
SELECT
Navigation
(Page 12)
PRESS
PRESS
Speeds
PRESS
SELECT
Speeds
(Page 15)
PRESS
Position
PRESS
SELECT
Position
(Page 15)
PRESS
Options
PRESS
SELECT
Options
(Page 16)
Display Key - From any Menu you may return to the start display by
R
pressing
or press MENU to return to the previous menu.
DISPLAY
/CANCEL
5
MARK LOCATION
QUICK ACCESS LOCATION
Mark location is used to store in memory your current location, which
may be used in future as a point to navigate to.
The Quick Access Locations are to mark your HOME, WORK,
AIRPORT or HOTEL locations.
OPERATION FLOW
PRESS
Mark Loc
MENU
Example
Home
SELECT
Save?
1. Drive to a location you wish to mark and stop the vehicle.
2. Press
MENU.
3. Scroll
to Mark Loc and press
SELECT.
4. Scroll
to the desired Quick Access Location name you
wish to store to.
5. Press
SELECT. You will be prompted with Save?
6. Press
SELECT to save. Saved will appear as
confirmation.
6
SELECT
SELECT
MARK LOCATION
USER LOCATIONS WITH NAME TAG
User locations are used to store into memory your current location,
which may be used in future to navigate back to. You may name each
individual location.
OPERATION FLOW
PRESS
Mark Loc
MENU
New Loc
User PT
SELECT
Example
B
SELECT
L
NAVI
or
DISPLAY
SELECT
1. Drive to a location you wish to mark as a user point and
stop the vehicle.
2. Press
MENU.
3. Scroll
to Mark Loc and press
4. Scroll
to New Loc. Press
7
SELECT
R
SELECT.
SELECT.
SELECT
MARK LOCATION
to User PT and press
5. Scroll
SELECT.
6. You are now at the naming stage.
Use Scroll
Press
R
to find desired letter.
DISPLAY button to move one character space
L
to the right or press
NAVI button to move one
character space to the left. When satisfied with the name
move to the next step.
7. Press
SELECT and you will be prompted with Save?.
8. Press
SELECT again to save. Saved will appear.
To edit user point name see page 10.
8
MARK LOCATION
ALERT POINT
An alert point is a location you wish to store where a new Speed Camera,
Red Light Camera or Black Spot has appeared which is currently not in
the GPS301's memory.
OPERATION FLOW
PRESS
Mark Loc
MENU
New Loc
SELECT
Alert PT
SELECT
SELECT
Example
Black Sp
1.
SELECT
Stop as close as safely practical to the alert
location.
2. Press
MENU.
3. Scroll
to Mark Loc. Press
4. Scroll
to New Loc. Press
5. Scroll
to Alert PT and press
SELECT.
SELECT.
SELECT.
6. You can now Scroll to the appropriate type of alert,
Speed Camera, Red Light Camera
oS Black Spot.
7. Press
SELECT and you will be prompted with Save?.
8. Press
SELECT again to save. Saved will appear.
9
EDIT NAME
MARK LOCATION
OPERATION FLOW
PRESS
Mark Loc
MENU
EditName
SELECT
SELECT
You may edit the names of previously stored user points.
1. Press
MENU.
2. Scroll
to Mark Loc and press
3. Scroll
to EditName and press
SELECT.
4. Scroll
to the desired name and press
SELECT.
SELECT.
You can now edit the name of your user point using
buttons and scroll.
5. Press
SELECT and press
L
and
SELECT again to confirm.
DELETE: USER POINTS
OPERATION FLOW
PRESS
Mark Loc
MENU
Delete
SELECT
Example
Johns
SELECT
SELECT
You may delete previously stored user points individually or delete all
user points.
1. Press
MENU.
2. Scroll
to Mark Loc, Press
10
SELECT.
R
MARK LOCATION
3. Scroll
to Delete, press
SELECT.
4. Scroll to the name or Del All. Press
5. Press
SELECT.
SELECT to confirm delete.
DELETE: ALERT POINTS
OPERATION FLOW
PRESS
Mark Loc
MENU
Delete
SELECT
Example
Johns
SELECT
SELECT SELECT
This feature allows you to delete an alert point currently stored in your
GPS301's memory.
This includes alert points you have stored or pre-installed alert points.
To delete an alert point you must be within the
RED ZONE (Red LED or less than 160m from alert
point) for the DELETE options show on the display.
1. Stop safely within 160m of the alert location (LED will show red).
2. Press
MENU.
3. Scroll
to Mark Loc. Press
4. Scroll
to Delete, Press
5. Scroll
to Speed Camera. Press
6. Press
SELECT again to confirm deleted.
11
SELECT.
SELECT.
SELECT.
NAVIGATION
The navigation feature allows you to select a desired point to navigate to.
The point (location) can be a pre-installed city or suburb, quick access
location, user point or pre-installed Point of interest.
P.O.I. (Point of Interest)locations are currently
unavailable but may be available in future updates.
When navigating to a location point, your display alternates as follows:
104km
58 :30
ALT
Press
* You can press
anytime
to show current direction
and speed.
NE 56
Press
Home
NAVIGATE TO A QUICK ACCESS LOCATION.
OPERATION FLOW
1. Press
2. Scroll
Press
Example
L
PRESS
L
Home
NAVI
SELECT
NAVI
to Home,Work,Airport or Hotel.
SELECT.
3. Selected appears and navigate mode begins as per example
above.
EXIT NAVIGATE
1. To exit from navigate mode press
2. Scroll
to Off and press
NAVI
SELECT.
12
NAVIGATION
NAVIGATE TO CITY OR SUBURB
You may select a city or suburb to navigate to.
Your GPS301 contains an extensive list of cities and suburbs in Australia
and NZ for you to choose from.
OPERATION FLOW
PRESS
Example
L
City
city
NAVIGATE
NAVI
SELECT
Example
NSW
manly
Manly
SELECT
SELECT
1. Press
NAVI to navigation menu.
2. Scroll
to City, Press
3. Scroll
to desired state.
SELECT.
Press
SELECT, Scroll to desired City and press
(Press and
hold for fast scrolling).
4. Selected appears and navigation mode begins.
EXIT NAVIGATE
1. To exit from navigate mode press
2. Scroll
to Off and press
SELECT
NAVI
SELECT.
13
SELECT
NAVIGATION
NAVIGATE TO POINT OF INTEREST (POI)
You may select a point of interest group which will then allow you to
navigate to the nearest location for that point of interest group.
OPERATION FLOW
PRESS
L
city
POI
NAVIGATE
NAVI
Example
Wendys
manly
1. Press
Example
NAVI. Scroll
SELECT
SELECT
to POI, press
SELECT.
2. Scroll to desired POI, Press
SELECT. Selected
appears and navigation mode begins.
EXIT NAVIGATE
1. To exit from navigate mode press
2. Scroll
to Off and press
NAVI
SELECT.
14
SPEEDS
The speed feature allows you to view your average, maximum speeds for
a journey. You may reset the speed (trip computer) records to start a
new journey.
OPERATION FLOW
PRESS
Speeds
MENU
1. Press
SELECT
MENU.
2. Scroll
to Speeds and press
SELECT.
3. The displays for Speeds are as follows:
Example:
avg
75k
Average Speed
75km
PRESS
PRESS
max
Max Speed
124km
124k
PRESS
Reset?
PRESS
Reset
SELECT
POSITION
You can view your longitude, latitude and altitude position.
OPERATION FLOW
PRESS
Position
MENU
1. Press
2. Scroll
MENU.
to Position and press
SELECT.
3. The display will alternate between latitude, longitude and
altitude displays.
15
SELECT
OPTIONS
OPERATION FLOW
PRESS
Options
MENU
SELECT
The options feature gives you access to the following sections.
POI Volu
Speed Ca
Red Ligh
Black Sp
Speed Al
Speed Al
Dimmer
Baud Rat
Units
Download
GPS Rese
PRESS
POI Volume
SELECT
PRESS
Speed Camera Volume
SELECT
PRESS
SELECT
PRESS
Red Light Camera
Volume
Black Spot Volume
SELECT
PRESS
Speed Alert Volume
SELECT
PRESS
Speed Alert Km
SELECT
PRESS
SELECT
PRESS
SELECT
PRESS
SELECT
PRESS
SELECT
PRESS
SELECT
16
Dimmer
Baud Rate
Units
Download
GPS Reset
OPTIONS
ALERT VOLUMES
The alert volumes can be turned On,Quiet or Off.
OPERATION FLOW
PRESS
Options
MENU
Black Sp
SELECT
SELECT
1. Press
MENU.
2. Scroll
to Options and press
3. Scroll
to desired Alert. Press
3. Scroll
to desired volume and press
SELECT.
SELECT.
SELECT,
4. Selected appears to confirm.
SPEED ALERT
The is feature allows you to set a speed limit where if you exceed this
limit the unit will give an audible alert.
OPERATION FLOW
PRESS
Speed Al
1. Press
Options
MENU
MENU.
SELECT
SELECT
2. Scroll
to OPTIONS and press
3. Scroll
to Speed Alert km and press
SELECT.
4. Scroll
to adjust Alert Speed. Press
SELECT.
SELECT.
5. Selected appears to confirm.
17
OPTIONS
DIMMER
You can select the brightness of the LED display (MID, HIGH or LOW)
for you enter the Options-Dimmer menu.
As a SHORTCUT, do the following:
Press
NAVI and
DISPLAY buttons at the same time to rotate
through the 3 dimmer states.
Release the buttons when at the desired state.
BAUD RATE
The Baud rate selection allows you to choose a setting for when
communicating (via serial cable) to a PC or Laptop for downloading
updates.
OPERATION FLOW
PRESS
Options
MENU
Baud Rat
SELECT
9600bps
SELECT
The GPS301 uses the NMEA format for downloading data.
1. Press
MENU.
2. Scroll
to Options and press
3. Scroll
to Baud Rate and press
4. Scroll
to desired Baud rate setting (9600bps or 4800bps).
5. Press
SELECT to confirm.
18
SELECT.
SELECT.
SELECT
OPTIONS
UNITS
The Unit Selection allows you to set either metric or imperial for speed
and distance displays.
OPERATION FLOW
PRESS
Units
1. Press
Options
MENU
SELECT
Metric
SELECT
MENU.
2. Scroll
to Options and press
3. Scroll
to Units and press
4. Scroll
to the desired unit selection.
5. Press
SELECT to confirm.
19
SELECT
SELECT.
SELECT
DOWNLOADS
OPTIONS
You must select this mode when the unit is connected via the serial
cable to a PC or Laptop for downloading updates.
The AC adaptor is used to power the GPS301 in a
house when connected to a PC for downloading
updates.
PC REQUIREMENTS FOR DOWNLOADING
- Pentium II equivalent or higher
- Serial Port
- Internet Capable
- Operating System: Win98
second edition, Win2000
or XP
DOWNLOAD PROCEDURE:
PC: Preparation.
1. Go to www.uniden.com.au and download the file Uniden GPS
Uploader.zip.
2. Decompress the downloaded file into an appropriate directory in your
PC. It will decompress out to the files; Uniden GPS Uploader.exe and
Uploader.ini.
OPERATION FLOW
PRESS
Options
MENU
Download
SELECT
SELECT
1. Connect the AC adaptor of your GPS301 and a power point and turn
that AC adaptor on.
2. Connect serial cable.
i. Plug stereo connector of the serial cable into the serial
port of your GPS301.
ii. Plug the other end of the Serial Cable to the serial port of
your computer.
20
OPTIONS
3. Turn on your GPS301.
4. Press
MENU.
5.. Scroll
to Options and press
6. Scroll
to Download and press
SELECT.
SELECT.
PC: Download
1. Double click on the file Uniden GPS Uploader.exe.
If an error message is displayed when you double click on Uniden GPS
Uploader.exe then please check the serial cable connection and PC
internet connection.
2. Check the next screen of Uniden GPS Uploader.
The Camera Data, City Data and POI Data at the bottom of the Uniden
GPS Uploader screen shows the data version currently stored in the
GPS301.
The top part of the Uniden GPS Uploader screen shows the new data file
stored in Uniden Web Site Server.
3. Check the software version between the Web Site Server data and
GPS301 data.
If the Web Site Server data is newer, click on Execute in the Uniden GPS
Uploader screen to update the GPS301 data. During downloading, a
progress bar will be shown.
Download data is stored into the GPS301 automatically.
4. After update files have been downloaded into the GPS301 turn off the
power to your GPS301. When next powered up the unit will operate
with the new data.
21
OPTIONS
22
GPS RESET
OPTIONS
You may reset the GPS Receiver if you have moved countries or traveled
a long distance without the GPS 301 switched on.
OPERATION FLOW
PRESS
Options
MENU
GPS Rese
Reset?
SELECT
1. Press
MENU.
2. Scroll
to options and press
SELECT.
3. Scroll
to GPS Reset and Press
SELECT.
4. Press
SELECT
SELECT
SELECT again to confirm.
The GPS Receiver will be reset and may take several minutes to
obtain a satellite lock
NMEA
GPS - NMEA Ver 3.01Data is output from the serial Port continuously.
This is for connecting to other Devices that require GPS Data.
23
TROUBLESHOOTING
If your GPS301 does not perform to your expectations, try
the suggestions listed below.
Unit does not operate:
! Check the power cord. Be sure the
connectors are properly installed.
! Be sure ignition key is ON or in the
accessory position.
! Fuse out. Check and replace.
! Check power to lighter socket. Vehicle
electrical problem exists.
! Make sure that the volume control is in the
ON position.
! Clean cigarette lighter socket.
Weak detection.
! Check angle of unit. Point to the horizon.
! Relocate the unit clear of any obstruction
outside the windshield, such as a wiper
blade.
! Relocate the unit clear of the window tint.
Beeps over bumps or
rough road.
! Check that the power cord is connected at
The unit bounces
against the windshield.
! The unit bounces against the windshield.
! Reposition so that the bumpers are firmly
Searching for Satellite.
! Move the unit to a different location on the
both ends.
! Clean cigarette lighter socket.
against the windshield.
windscreen.
! Drive to a location with clear sky view.
! Reset the GPS receiver (page 23).
! Check operation in another car.
24
ONE YEAR LIMITED WARRANTY
IMPORTANT: Evidence of the original purchase is required for warranty service.
WARRANTOR: Uniden New Zealand Limited. Uniden Australia Pty Limited.
ABN 58 001 865 498
ELEMENTS OF WARRANTY: Uniden warrants to the original retail owner for the duration of this warranty its GPS301 hereinafter referred to as the Product, to be free
from defects in materials and craftsmanship with only the limitations or exclusions set
out below.
WARRANTY DURATION: This warranty to the original retail owner only is only valid in
the original country of purchase and shall be no further effect 12 months after the date
of original retail sale. This warranty will be deemed invalid if the Product is (A)
Damaged or not maintained as reasonable and necessary, (B) Modified, altered or
used as part of any conversion kits, subassemblies, or any configurations not sold by
Uniden, (C) Improperly installed, (D) repaired by someone other than an authorised
Uniden Repair Agent for a defect or malfunction covered by this warranty, (E) Used in
conjunction with any equipment or parts or as part of a system not manufactured by
Uniden. (F) Where the Serial No. label of the product has been removed or damaged
beyond recognition.
PARTS COVERED: This warranty covers for one (1) year, the GPS301 only. All
accessories (Mounting bracket etc) are covered for 90 days only.
STATEMENT OF REMEDY: In the event that the Product does not conform to this
warranty at any time while this warranty is in effect, the warrantor, as its discretion,
will repair the defect or replace the Product and return it to you without charge for
parts and service. THIS WARRANTY DOES NOT COVER OR PROVIDE FOR THE
REIMBURSEMENT OR PAYMENT OF INCIDENTAL OR CONSEQUENTIAL DAMAGES.
THIS GUARANTEE IS IN ADDITION TO AND DOES NOT IN ANY WAY AFFECT YOUR
RIGHTS UNDER THE CONSUMER ACT.
PROCEDURE FOR OBTAINING PERFORMANCE OF WARRANTY: In the event that the
Product does not conform to this warranty, the Product should be shipped or
delivered, freight prepaid, with evidence of original purchase (e.g a copy of the sales
docket) to the warrantor at:
UNIDEN AUSTRALIA PTY LIMITED
SERVICE DIVISION
345 Princes Highway,
Rockdale, NSW 2216
AUSTRALIA
Fax: (02) 9599-3278
www.uniden.com.au
UNIDEN NEW ZEALAND LIMITED
SERVICE DIVISION
150 Harris Road,
East Tamaki,
Auckland,
NEW ZEALAND
Fax: (09) 274 4253
www.uniden.co.nz
25
Printed in China
USZZ01077ZA