1
r
OWNER'S
MANUAL
MODEL NO.
315.111720
CAUTION:
Read and follow
ALL safety rules
and instructions
before operating
this equipment.
Thank You for Buying
Craftsman Tools
3/8 _nch Cordless Dri_g
Two-Speed / Revers e
RuRes for Safe Operation
Warranty
Operation
Maintenance
Repair Parts
Sord by SEARS, ROEBUCK AND CO. Hoffman Estates, tL 60179 USA
972000-234
4-95
ULES FOR SAFE OPERATION
covering to contain long hair and keep it from being
drawn into nearby air vents.
WARNING:
J
Do not attempt to operate this tool until you have
read thoroughly and understand completely all
instructions, safety rules, etc. contained in this
manual° Failure to comply can result in accidents
involving fire, electric shock, or serious personal
injury° Save owner's manual and review frequently
for continuing safe operation, and instructing others
who may use this tool.
10. ALWAYS WEAR SAFETY GLASSES. Everyday
eyeglasses have only impact-resistant lenses; they
are NOT safety glasses.
11_ PROTECT YOUR LUNGS, Wear a face mask or
dust mask if operation is dusty'.
12_ PROTECT
YOUR HEARING.
Wear hearing
protection during extended perbds of operation.
t3.
SECURE WORK. Use clamps or a vise to hold
work. It's safer than using your hand and it frees
both hands to operate tool.
14.
DON'T OVERREACH.
Keep proper footing and
balance at all times Do not use on a ladder or
READ ALL INSTRUCTIONS
t.
KNOW
YOUR
POWER
TOOL.
Read
owner's
manual carefully.
Learn its applications
and
limitations as well as the specific potential hazards
related to this toot.,
2.
GUARD AGAINST ELECTRICAL
SHOCK
by
preventing body contact with grounded surfaces.
For example: Pipes, radiators, ranges, refrigerator
enclosures_
3.
KEEP WORK AREA CLEAN.Cluttered
benches invite accidents.
4.
AVOIDDANGEROUSENVIRONMENT.Don't
power tool in damp or wet locations
rain° Keep work area well lit.
5.
KEEP CHILDREN
areasand
use
STORE
AND VISITORS
IDLE TOOLS.
When
AWAY.
All
not in use tools
should be stored in a dry and high or locked-up
place - out of the reach of children.
7_ DON'T FORCE TOOL. It wilt do the job better and
safer at the rate for which it was designed.
8.
USE RIGHT
TOOL.
Don't
15. MAINTAIN TOOLS WITH CARE.Keep tools sharp
at all times, and clean for best and safest
performance.
and changing
force small
17, NEVER USE IN AN EXPLOSIVE
for lubricating
ATMOSPHERE.
Normal sparking of the motor' could ignite flammable
liquids, gases, or fumes_
18, KEEP HANDLES
DRY, CLEAN,
FROM OIL AND GREASE° Always
cloth when cleaning_ Never use
gasoline, petroleum-based products
solvents to clean your tool,,
AND FREE
use a clean
brake fluids,
or any strong
19o STAY ALERT. Watch what you are doing and use
common sense_ Do not operate tool when you are
tired. Do not rush.
20.
tool or
attachment to do the job of a heavy duty tool. Don't
use tool for purpose not intended - for example - A
circular saw should never be used for cutting tree
limbs or logs_
9.
Follow instructions
accessories°
16. REMOVE CHUCK KEY. Form habit of checking to
see that chuck key is removed from chuck before
turning tool on_
or expose to
visitors should wear safety glasses and be kept a
safe distance from work area. Do not let visitors
contact tool or extension cord.
6.
unstable support.
WEAR PROPER APPAREL. Do not wear loose
clothing or jewelry that can get caught in tool's
moving parts and cause personal injury. Rubber
gloves and non-skid footwear are recommended
when working outdoors. Wear protective hair
CHECK DAMAGED
PARTS, Before further use of
the too!, a guard or other part that is damaged
should be carefully checked to determine that it will
operate properly and perform its intended function.
Check for alignment of moving parts, binding of
moving parts, breakage of parts, mounting, and
any other conditions that may affect its operation.
A guard or' other' part that is damaged should be
properly repaired or replaced by an authorized
service center unless indicated elsewhere in this
instruction manual
Look for this symbol to point out important safety precauti
it means attention!!! Your safety is involved.
.....
.....
Hrl,,l=
ii
,, i i,l,,, ,I:L
ill:,l
..................
'HHllll
.......
Page 2
:::"::"
'
.....
........
]
RULES FOR SAFE OPERATION (Continued)
21_ DO NOT USE TOOL IF SWITCH DOES NOT
TURN IT ON AND OFF. Have defective switches
and water, then neutralize with lemon juice or
vinegar. If liquid gets in your eyes, flush them with
clean water for at least 10 minutes, then seek
replaced by an authorized service center.
22_ DRUGS,
ALCOHOL,
MEDICATION.
Do not
operate toot while under the influence of drugs,
alcohol, or any medication.
23° DRILLING
OR
DRIVING
SCREWS
not touch metal parts when drilling into a wall;
grasp onlythe insulated handle(s) or plastic housing
when using this tool. Make sure hidden electrical
wiring, water pipes, and mechanical hazards are
not in the path of the bit when drilling into a wail
24_ INSPECT FOR and remove all nails from lumber
before drilling.
25.
RULES
26° USE ONLY THE CHARGER
tf carrying your battery tool at your side, make sure
it is not running and your finger is not on the switch,
Avoid accidental starting°
32.
SECURE WORK before applying power. NEVER
hold workpiece in your hand or across your legs.
USE ONLY IDENTICAL
33° WHEN SERVICING
CRAFTSMAN REPLACEMENT
PARTS.
IMPORTANT SAFETY
FOR CHARGER
34.
35.
PROVIDED
BATTERIES
explode°
28,
BATTERY
36.
NEAR
FIRE OR HEAT,
DO NOT CHARGE BA'I-rERY
OR WET LOCATION.
They may
This manual
Before using battery charger, read all instructions
WAIRNBNG:
type_, of batteries may burst causing personal
injury and damage,
37°
Do not expose charger to rain or snow°
38°
Use of an attachment
not recommended
or sold
by the battery charger manufacturer may result in
a risk of fire, electric shock, or injury to persons°
TOOL IN A DAMP
39°
29° Your battery tool should be charged in a location
where the temperature is more than 50°F but tess
than 100°F.
INSTRUCTIONS.
To reduce risk of injury, charge only nickelcadmium type rechargeable
batteries. Other
WITH
TOOLS OR THEIR
THESE
and cautionary markings in this manual, on battery
charger, and product using battery, charger.
YOUR BATTERY TOOL. Do not substitute any
other charger. Use of another charger could cause
batteries to explode causing possible serious injury.
27° DO NOT PLACE
SAVE
iNSTRUCTIONS
contains
important
safety
and operating
instructions for battery charger part number
999555-007.
FOR
Battery tools do not have to be plugged into an
electrical outlet; therefore, they are always in
operating condition. Be aware of possible hazards
when not using your battery tool or when changing
accessories.
m,edical attention,
31,
INTO
ELECTRICAL
WIRING IN WALLS, CEILINGS,
OR OTHER AREAS CAN CAUSE THE BIT OR
CHUCK TO BECOME ELECTRICALLY
LIVE. Do
IMPORTANT
SAFETY
BATTERY TOOLS
immediate
40_
30° Under extreme usage or temperature conditions,
battery leakage may occur. If liquid comes in
contact with your skin, wash immediately with soap
To reduce risk of damage to charger body and
cord, pull by charger body rather than cord when
disconnecting charger_
Make sure cord is located so that it will not be
stepped on, tripped over, or otherwise
to damage or stress,.
subjected
WARNnNG'.
The operation of any power tool can result in foreign objects being thrown into your eyes,
which can result in severe eye damage. Before beginning power tool operation, always wear
safety goggles or safety glasses with side shields and a full face shield when needed. We
recommend Wide Vision Safety Mask for use over eyeglasses or standard safety glasses with
side shields, available at Sears Retail Stores.
Page 3
RULES FOR SAFE OPERATION (Continued)
41_
An extension cord should not be used unless
43.
Do not operate charger if it has received a sharp
blow, been dropped, or otherwise damaged in any
way; take it to a qualified serviceman.
44.
Do not disassemble charger; take it to a qualified
service_nan when service or repair' is required_
Incorrect reassembly may result in a risk of electric
shock or fire.
45.
To reduce risk of electric shock, unplug charger
from outlet before attempting any maintenance or
cleaning. Turning off controls will not reduce this
risk.
46.
Do not use charger outdoors.
47.
Disconnect
in use.
absolutely necessary° Use of improper extension
cord could result in a risk of fire and electric shock.
If extension
cord must be used, make sure:
a.
That _ins on plug of extension cord are the
same number, size and shape as those of plug
on charger°
b.
That extension cord is properly wired and in
good electrical condition; and
c.
That wire size is large enough for' AC ampere
rating of charger as specified below:
! .... AwGSize
of Cord/Length
0f Cord'
Feet
48.
AWG
Feet
I
42_
DO
NOT
16
25
OPERATE
16
50
16
100
CHARGER
16
150
WITH
A
charger from power supply when not
SAVE THESE
INSTRUCTIONS.
Refer to them
frequently and use them to instruct others who may
use this toot. if you loan someone this tool, loan
them these instructions also.
DAMAGED CORD OR PLUG. If damaged, have
replaced immediately by a qualified serviceman°
L J _LI
iiii
iiiiiiiiiii
WARNING:
WARNING:
Do not allow familiarity with your drill to make you
careless° Remember that a careless fraction of a second
is sufficient to inflict severe injury,,
If any parts are missing, do not operate your drill until the
missing parts are replaced. Failure to do so could result
in possible serious personal injury.
IMPORTANT INFORMATION FOR
RECHARGING BATTERIES
When using your drill continuously, the batteries in your
battery pack will become hoL You should let a hot battery
pack cool down for approximately 30 minutes before attempting to recharge_
NOTE: This situation only occurs when continuous use of
your drill causes the batteries to become hoL It does not
occur under normal circumstances. Refer to "CHARGING
YOUR DRILL" for normal recharging of batteries. If the
charger does not charge your battery pack under normal
circumstances, return both the battery pack and charger to
your nearest Sears repair center for electrical check.
Page 4
MNTROOUCTBON
L
CONGRATULATIONS AND THANK YOU FOR BUYING
THIS CRAFTSMAN CORDLESS DRILL. It has been
designed, engineered and manufactured to provide you with
Sears high standard of dependability, ease of operation, and
operator safety, Properly cared for, it will give you years of
rugged, trouble-free performance,.
i ii
,,ill ii
,i
,,l,
,, i
, ,i ,i ,,,i
SPECIFICATIONS:
Chuck Capacity
iu_il
3/8 Inch
LI "
Motor
CAUTRON:
6..0 Volt DC
Charger Rating
120 Volts, 60 Hz, AC Only
No Load Speed
,lu,,
using your new drill. Pay close attention to the Rules For
Safe Operation, Warnings and Cautions. If you use your
drill
properly
only this
for entire
what it
is intended,
will
! Carefully
readand
through
owner's
manualyou
before
enjoy years of safe, reliable
service.
......
,i
ll,nnl,
llu,nl
300 - 500 RPM
i i
Switch
Two Speed - Reversible
,_lll
Charge Rate
3-5 Hours
Maximum Torque
Your drill has many features for making drilling operations
more pleasant and enjoyable. Safety, performance and
dependability has been given top priority in the design of
this drill making it easy to maintain and operate.
45 InoLb&
* No. Of 3/8-in. Holes Driven Per Charge
i i i,,_r_,_t
i,
60
,i.................
* Nor Of #8 x 1-1/4-ino Screws Driven Per Charge 180
,i
* These specifications represent the average number
of holes and screws drilled or driven into white pine
using fully charged battery packs.. Battery packs will
not reach full charge the first time they are charged°
Allow several cycles (drilling followed by recharging)
for them to become fuUy charged.
.....................
,,, i ii1_
FULL
ONE
",'EAR
WARRAN
ONCRAESMAN
3/84N.
DR"L
If this Craftsman 3/8-1n. Drill fails to give compTete satisfaction within one year from the date of purchase, RETURN
IT TO THE NEAREST SEARS STORE IN THE UNITED STATES, and Sears will replace it, free of charge.
If this Craftsman 3/8-1n. Drill is used for commercial or rental purposes, this warranty applies for only 90 days from
the date of purchase°
This warranty gives you specific legal rights, and you may also have other rights which vary from state to state,
Sears, Roebuck and Co., DEPT, 817 WA, Hoffman Estates, IL 60179
.....
__
_
.......
H,,_lm
i
/
i,/,u
,,_,_,
TABLE OF CONTENTS
Rules for Safe Operation
......................................................................................................
Ao Important Safety Rules For Batteq/Tools
......................................................................
B. Important Safety Instructions for Charger .......................................................................
2-4
3
3
,
C. important Information For Recharging Batteries .......................................................................
4
Introduction and Product Specifications ..............................................................................
5
3,
Warranty and Table Of Contents .................................................................................................. 5
4.
6-10
11
Operation ...........................................................................................................................
5o Accessories ..........................................................................................................................
6,
Maintenance
7.
Exploded View and Repair Parts List ...................................................................................
13
&
Parts Ordering / Service ........................................................................................................
14
............................................................................................................................
Page 5
11
OPERATIO
WARNmNG:
Always wear safety goggles or safety glasses with side
shie!dswhen operatingtools. Failure to do so couldresult
inobjectsbeing throwninto youreyes, resultingin possible
serious injury.
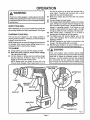
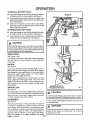
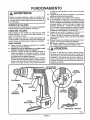
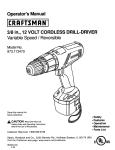
KNOW YOUR DRILL
Before attempting to use your drill, familiarize yourself with
all operating features and safety requirements. See Figure
1.
CHARGING
YOUR DRILL
This tool has been shipped in a low charge condition to
prevent possible problems. Therefore, you shouldcharge it
at least 5 hours prior to use.
NOTE: Batteries willnot reach full charge the first time they
are charged. Allow several cycles (drilling followed by recharging) for them to become fully charged.
the drill, be careful not to touch both terminals with a
metal object. Touching both terminals with a metal
object will short out the battery pack.
m Make sure charger"plug and input jack are properly
connected.
6 Connect charger to power supply.
[] The charge indicator light (LED), located on the battery
pack, will light up and glow when the charger is properly connected to power supply. This light indicates the
charger is operating properly. It will remain on until
charger is disconnected from power supply_ The light
only glows while your tool is charging, not during use.
i= After' normal usage, a minimum of 3 to 5 hours of
charging time is required to be fully charged.
B The battery pack will become slightly warm to the
touch while charging. This is normal and does not
indicate a problem.
[] DO NOT operate the tool while it is connected to the
charger. The driving ability' will not increase.,
[] DO NOT place charger in an area of extreme heat or
cold. It will work best at normal room temperature.
TO CHARGE
[]
[]
[]
Charge battery pack only with the charger provided.
Make sure power supply is normal house voltage,
120 volts, 60 Hz, AC only.
Connect charger to battery pack by inserting charger
plug into input jack. As shown in figure 1, inputjack is
located on the back side of battery pack.
NOTE; Battery pack can remain on your drill or be
removed while charging. When battery pack is out of
B!
CAUTION:
Your drill's battery pack contains special high
temperature batteries to help prevent battery damago
when left on charge for extended periods of time.
However, once the batteries become fully charged,
we recommend that you unplug the charger from
power supply and disconnect it from the battery pack.
CHARGEINDICATOR
LIGHT(LED)
BATTERYPACK
CHUCK
BATTERY
CHARGER
CHUCK
STORAGE
SELECTOR
INPUTJACK
SWITCHTRIGGER
CHUCKKEY
WRISTSTRAP
CHARGERPLUG
Fig1
Page 6
OPERATION
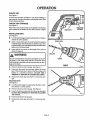
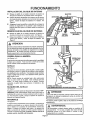
TO INSTALL
BATTERY PACK
Lock switch trigger on your drill by placing the direction
of rotation selector in center position. See Figure 2.
Orient batter,] pack so that terminals on battery pack
align with terminals in drill housing, insert battery pack
in driIlo See Figure 3,
lli
m
REVERSE
Make sure the latches on each side of your battery
pack snap in place and battery pack is secured in drill
before beginning operation_
TO REMOVE BATTERY
[]
SELECTOR
PACK
Lock switch trigger on your drill by placing the direction
of rotation selector in center position. See Figure 2.
FORWARD
Locate latches on end of battery pack and depress to
release and remove battery pack, See Figure 3.
CAUTION:
CENTER
POSITION
(LOCK-OFF)
Fig. 2
When placing battery pack in your drill, be sure battery
p_ck terminals align with drillterminals and latches snap
in place properly. Improper assembly of battery packcan
cause damage to internal components.
WRIST STRAP
See Figures 1 and 3o
A wrist strap is provided to reduce the chances of dropping
your drillo Place one hand through the wrist strap when
carrying tool.
SWITCH
WRISTSTRAP
BATTERY 1
PACK
l_
See Figure 2,
To turn your drill ON, depress the switch trigger_ To turn it
OFF, release the switch trigger. The switch of this drill has
been designed for two speed drilling. For low speed drilling,
depress the switch trigger halfway_ For normal ddlling,
depress the switch trigger all the way,
NOTE: When changing from low to high speed, you may
notice a dead spot in the trigger switch. This is part of the
design of the switch and there is nothing wrong with your
drill. Continue to pull the switch trigger until high speed
drilling begins.
SWITCH LOCK
LATCHES
DEPRESSLATCHESTO
RELEASEBATTERYPACK
Fig. 3
See Figure 2.
The switch trigger can be locked in OFF position ,This feature
can be used to prevent the possibility of accidental starting
when nQt in use, To lock switch trigger, place the direction
of rotation selector in the center position,
See Figure 2
CAUTION:
To prevent gear damage, always allow chuck to come to
a complete stop before changing the direction of rotation°
To stop, release switch trigger and allow the chuck to come
to a complete stop.
This tool has the feature of being reversibleo The direction
of rotation is controlled by a selector located above the
WARNING:
switch trigger. With the drill held in normal operation position, the direction of rotation selector should be positioned
Battery tools are aIways in operating condition..Therefore,
to the left of the switch for drilling. The driiting direction is
switch should always be locked when not in use or
reversed when the selector is to the right of the switch.
carrying at your side°
When the selector is in center position, the switch
Page 7
trigger is locked.
OPERATION
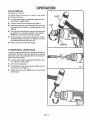
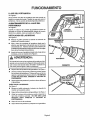
CHUCK KEY
See Figure4.
A, chuck key has been provided for use when installingor
removing bits. it is also used when removingthe chuck. (See
chuck removal section.)
CHUCK KEY STORAGE
See Figure 4.
When not in use, the chuck key can be placed in the storage
area located on the bottom of your drill as shown in figure
4,
INSTALLING
BITS
See Figure 5.
lU
Lock the switchtrigger by placingthe directionof rotation
selector_in center position.
Open or close chuck jaws to a point where the opening
is slightly larger than the bit size you intend to use. Also,
raise the front of your ddlt slightly to keep the drill bit from
falling out of the chuck jaws.
CHUCKJAWS
• 1 insert ddll bit into chuck the full length of the jaws as
shown in Figure 5.
'1' ii
,
iiiillllll,,ll
i
I
I II
.....
":"::::::_tl
DRILLBIT
WARNING'.
Do not insertdrillbit into chuckjaws and tighten as shown
in figure 6o This could cause drill bit to be thrown from
drill resultingin possible serious personal injuryor damage to the chuck.
W
Remove chuck key frorn storage. See Figure 4.
[]
Using only the chuck key provided, tighten the chuck
jaws. Place chuck key in each of the three holes, and
tighten in a clockwise direction DO NOT USE A
WRENCH TO TIGHTEN OR LOOSEN THE CHUCK.
[]
Remove the chuck key and return it to chuck key storage,
REMOVING BITS
See Figure 5_
1_1 Lock the switch trigger by placing the direction of rotation selector in center position.
_!
Remove chuck key from storage, See Figure 4.
[]
Loosen chuck jaws using only the chuck key provided.
DO NOT USE A WRENCH TO TIGHTEN OR LOOSEN
THE CHUCK.
[]
Remove drill bit from chuck jaws.
[]
Remove the chuck key and return it to chuck key storage.
Page 8
CHUCK
RIGHT
Fig, 5
OPERATmON
WARNUNG:
Always wear safety goggles or safety glasses with side
shields when operating tools,. Failure to do so could result in objects being thrown into your eyes, causing possible serious injury.
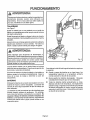
DRILLING
See Figure 7.
The material to be drilled should be secured in a vise or
with clamps to keep it from turning as the drill bit rotates,
Hoid tool firmly and place the bit at the point to be driIEed.
Depress the switch trigger to start tool.
vlove the drill bit into the workpiece applying only enough
5ressure to keep the bit cutting_ Do not force or appfy side
)ressure to elongate a hole,
i
_u
i ,
,,
, ,,
...........
i1_,,_
..........................
WARNING:
Be prepared for blnding or breakthrough, When these
situations occur, drill has a tendency to grab and kick in
the opposite direction and could cause loss of control
when breaking through material, tf not prepared, this
loss of control can result in possible serious injury.
Nhen drilling metals, use a light oil on the drill bit to keep it
from overheating. The oil will prolong the life of the bit and
increase the drilling action_
tf the bit jams in workpiece or if the drill stalls, release switch
trigger immediately. Remove the bit from the workpiece and
determine the reason for jamming°
To obtain the longest possible battery life, we suggest the
following:
BATTERIES
Your drill's battery pack is equipped with 5 nickel-cadmium
rechargeable batteries, Length of service from each charging will depend on the type of work you are doing,
The batteries in this toot have been designed to provide
maximum trouble free fife,, However, like all batteries, they
will eventually wear out, Do not disassemble battery pack
and attempt to replace the batteries. Handling of these
batteries, especiatiy when wearing rings and jewelry, could
result in a serious burn,,
Store and charge you r batteries in a cool area, Temperatures above normal room temperature wit_shorten battery lifeo
_!
Never store batteries in a discharged condition. Recharge them immediately after they are discharged
[]
All batteries gradually lose their charge. The higher the
temperature, the quicker they lose their charge, if you
store your tool for long periods of time without using it,
recharge the batteries every month or two. This practice
will prolong battery life_
Page 9
OP
CHUCK REMOVAL
See Figures 8, 9, and 10.
The chuck must be removed
accessories 1"oremove:
in order to use some
Lock the switch trigger by placing the direction of rotation selector in center position,
[]
Remove chuck key from storage, See Figure 4,
[]
Close the chuck jaws° Insert chuck key into chuck and
tap sharply with a mallet in a clockwise direction° See
Figure 8.
tl
Open the chuck jaws fully and remove the chuck screw
by turning it in a clockwise direction, See Figure 9,
NOTE: The chuck screw has left hand threads_
t_
Insert chuck key in chuck and tap sharply in a counterclockwise direction to loosen it on spindle. It can now
be unscrewed by hand. See Figure 10.
Return chuck key to chuck key storage.
TO RETIGHTEN
A LOOSE CHUCK
The chuck may become loose on spindle and develop a
wobble° Also, the chuck screw may become loose causing
chuck jaws to bind and preventing them from closing. To
tighten, follow these steps:
m
Lock the switch trigger by placing the direction of rotation selector in center position°
[]
Open the chuck jaws fully.
[]
Insert chuck key in chuck and tap with a mallet in a clockwise direction. See Figure 8.
[]
Tighten the chuck screw.. NOTE: Chuck screw has left
hand threads.
Page 10
Fig. 9
....
,.........
ACCESSO
The following
recommended
accessories
...............................
are currently available at Sears Retail Stores.
•
6-Pco Extra Length Magnite Power Bit Set
•
•
30-Pc. Power ScrewdriveriNutdriver Set,and
Case
High Speed Bits (For Wood or Metal) ...... 3/8 Inch
Max.
°
Keyless Chuck (Item No. 8 20988)
17-PCoPower Screwdriver/Nutdriver Set and
Case
,_WARNiNG:
The use of attachments or accessories not listed might be hazardous.
,I
MAmNTENANCE
DO NOT ABUSE POWER TOOLS. Abusive practices can
damage tool as well as workpiece_
WARNING:
,ill...................... :
When servicing use only identical Craftsman replacement
parts. Use of any other parts may create a hazard or
cause product damage.,
Avoid using solvents when cleaning plastic parts. Most
plastics are susceptible to various types of commercial
solvents and may be damaged by their use. Use clean cloths
to remove dirt, dust, oil, grease, etc.
r,_ll,,,,i
ll_,iiii, ill
......
iiiiiiiiiJlillillll,i
WARNING:
Do not attempt to modify this tool or create accessories
not recommended for use with this tool. Any such alteration
or modification is misuse and could i:esult in a hazardous
condition leading to possible serious personal injury..
i
WARNING:
Do not at any time tet brake fluids, gasoline, petroleumbased products, penetrating oils, etco come in contact
with plastic parts° They contain chemicals that can
damage, weaken, or destroy plastics_
To preserve naturat resources, please re_
cycle or dispose of expired battery pack
properly,
BATTERY PACK REMOVAL
TION FOR RECYCLING
.............
This product contains nickel-cadmium
battery. Must be disposed of properly.
Local, state, or federal laws may prohibit disposal of nickelcadmium batteries in ordinary trash. Consult your local waste
authority for information regarding available recycling and/or
disposal options_
AND PREPARA-
_,lL, I IIl'_ '"'_ ...............
II
I
I
WARNING-.
Upon removal, cover the battery pack's terminals with
heavy duty adhesive tape,. Do not attempt to destroy or
disassemble battery pack or remove any of its components.
Nickel-cadmium batteries must be recycled or disposed
of properly Also, never touch both terminals with metal
objects and/or body parts as short circuit may result.
Keep away from children., Failure to comply with these
warnings could resuJt in fire and/or serious injury.
Page 11
iiiii
jiii i,i
,i,i, _,,
mlr,','l
Page 12
,,==-==-'--- CRAFTSMAN
3/8 INCH CORDLESS
ii llll_ i_l
DRILL--
MODEL NUMBER
,_11
SEE BACK PAGE FOR PARTS ORDERING
INSTRUCTIONS
2
5
PARTS LiST
Key
No.
Pad
Number
I
616478-003
2
973101-001
3
614984-001
4
973572-003
5
967215-001
6
999555-007
315.111720
972000-234
Page 13
0
inch Cordless
OWNER'S
MANUAL
Two=Speed / Reversi
MODEL NO.
The model number of this toot will be found on a plate
attached to the motor housing,
315.111720
HOW TO ORDER
REPLACEMENT
PARTS
WHEN
ORDERING
REPLACEMENT
PARTS,
ALWAYS GIVE THE FOLLOWING INFORMATION:
• PART NUMBER
o PART DESCRIPTION
= MODEL NUMBER
315.111720
• NAME OF ITEM
3/8 Inch
Cordless Drill
All parts listed may be ordered from any Sears Service
Center and most Sears stores.
IF YOU NEED
REPAIR SERVICE
OR PARTS:
FOR REPAIR SERVICE, CALL
THIS TOLL FREE NUMBER:
1-800-4-REPAIR
(1-800-473-7247)
FOR REPLACEMENT PARTS
INFORMATION AND
ORDERING, CALL THIS
TOLL FREE NUMBER:
1-800-FON-PART
(1-800-366-7278)
SEARS, ROEBUCK AND CO. Hoffman Estates, IL 60179
_
'L_±JJ
J J l'J
MANUAL
DEL USUARIO
MODELO N°
315.111720
ATENCION:
Lea
cuidadosamente
TODAS las reglas
de seguridad y
las instrucciones
antes de usar
esta herramienta.
Le agradecemos
que haya
comprado herramientas
Craftsman
TaBadro a Bateria de 3/8 Pul
Dos VeRocidades/Reversible
Reg_as para Funcionamiento
Garantfa
Funcionarniento
Mantenimiento
Repuestos
Seguro
Vendido porSEARS, ROEBUCK AND CO., Hoffman Estates, IL 60179 U,&A.
972000-234
4-95
D
REGLAS
ATENCION:
No tntente hacer funcionar esta herramienta sin antes
haber let'do y comprendido bien todas las instrucctones,
las reglas de seguridad, etc. indicadas en este manual.
El incumplimiento de estas instrucciones puede ocastOnar
accidentes,
incendio, cheque el_ctrico o lesiones
personales graves. Conserve et manual del usuario y
est_dtelo frecuentemente
para poder utilizar el equipo
con seguridad y poder comunicar las instrucciones
aproptadas a otras personas que utiltcen esta herramienta.
LEA TODAS LAS INSTRUCCIONES
1. CONOZCA SU HERRAMIENTA MECANICA, Lea
cuidadosamente el manual de) usuario, Aprenda sus
aplicaciones y limitaciones asf come tambidnlos riesgos
potenciales especfficos relacionados
con esta
herramienta.
2. PROTEJASE
CONTRA CHOQUE ELECTRlCO
EVITANDO CONTACTO DEL CUERPO CON LAS
SUPERFICIES PUESTAS A TIERRA, Per ejemplo: las
cajas de lastuberfas, radiadores, estufas, refrigeradores.
3, MANTENGA EL AREA DE TRABAJO LIMPIA, Los
lugares y bancos de trabajo desordenados invitana los
accidentes,
4. EVITE TODOS LOS AMRIENTES PELIGROSOS, No
use su herramienta mecdnica donde haya humedad,
en lugares mojados o donde estd expuesta a la lluvia..
Mantenga et tugar de trabajo bien iluminade.
5., MANTENGA
A
LOS
NI_IOS
Y
A LOS
ESPECTADORES
ALEJADOS.
Todos
los
espectadores deben usar lentes de seguridad y ser
mantenidos a una distancia prudente del _.reade trabajo.,
No deje que los espectadores toquen la herramienta o
el cord6n de extensi6no
6o ALMACENAMIENTO DE LAS HERRAMIENTAS QUE
NO SE USAN,
Cuando no est_.n en use las
herramientas deben set guardadas en un lugar seco,
atto o bajo llave - fuera del alcance de los niSos_
7. NO FUERCE LA HERRAMIENTA. El trabajo quedar,_
hecho mejor y de manera m#,ssegura si la her_ramienta
trabaja a la vefocidad para la cual fu_ diseSada.
8. USE LA HERRAMIENTA CORRECTA. No fuerce a una
herramienta o a un accesorio pequeSo que haga el
trabajo de una herramienta de servicio pesado. No use
fa herramienta para prop6sitos que no ha side diseSada.,
Per ejemplo, no use una sierra circular para cortar
troncos o ramas de _rboles
9. USE VESTIMENTA ADECUADA. No use ropa o joyas
sueltas, pues pueden quedar atrapadas en las piezas
m6viles de la herramienta y causar lesi6n personal,, Se
recomienda usar guantes y calzado antirresbaladizo
cuando se trabaja al aire libre. Tambi_n, prot_jase el
cabello largo y suj_telo a fin de evitar que quede
atrapado en los respiraderos cercanos.
10.. USE SIEMPRE LENTES PROTECTORES,
Los
anteojos regularestfenen solamente lentes resistentes
al impacto;ellos NO son lentes de seguridad.
1t, PROTEJA SUS PULMONES. Utilice una mdscara
contra el polvo si el trabajo va a despedir mucho polvo.
t2o PROTEJA SU AUDIClON, Utilice protecci6n para los
oldos durante perlodos pro[ongadosde funcionamiento.
13_ SUJETE ELTRABAJO, Use mordazas o un tornillode
banco para sujetar el tmbajo. Se necesitan ambas
manes para hacer funcionar esta herramienta.
t4. NO USE LA HERRAMIENTA A UNA DISTANCIA
DEMASIADO ALEJADA, Mantenga siempre un buen
equilibrio y una posici6n firmeo NO la utilice en una
escalera o en un apoyo inestable.
15. MANTENGA BIEN CUIDADAS LAS HERRAMIENTAS,
Mantenga las herramientas afiladas en todo memento
y limpias para un rendimiento mejor y rods seguro, Siga
tas inshucciones de lubricaci6n y de cambio de
accesorios.
16o SAQUE
LA LLAVE
DEL
PORTABROCA,
Acost_mbrese a verificar si la llave del portabroca ha
side sacada del portabreca antes de poner en marcha
la herramienta,
17. NUNCA USE EN UNA ATMOSFERA EXPLOSIMA. Las
chispas norrnaies del motor pueden hacer explotar los
vapores.
18o MANTENGA LAS MANIJAS SECAS, LIMPIAS Y SIN
ACEITE NI GRASA. Siempre use un patio timpiopara
efectuar la limpieza. Nunca use I[quido de frenos,
gasolina, productos a base de petr61eoo solventes para
limpiar su herramienta.
19. MANTENGASE ALERTA. Ponga atenci6n a 1oque est&
haciendo y use sentido comt_n° No haga funcionar la
herramienta cuando est_ cansado.. No se apresure
20,. INSPECCION DE PIEZAS DAi_IADAS. Antes de seguir
utitizandola herramienta, inspeccione para determinar
si algun protector o cualquier pieza que est_ daSada
funcionar,_ debidamente. Verifique el atineamiento de
las piezas m6viles, si est_n atascadas o si hay rotura
de piezas, revise adem&s el montaje y cualquier otto
estado que pueda afectar su funcionamiento_ Si se daP,a
un protector o cualquier otra pieza debe ser reparada o
reemplazada per un centre de servicio autorizado a
menos que se indique en otro lugar en este manual del
usuario,
Este sfmbolo
le indica importantes
reglas de seguridad.
iSignifica
atenci6n!
Existe riesgo para su seguridad.
P_gina 2
ADVERTENCIAS
SOBRE EL CARGADOR
21.. NO USE LA HERRAMIENTA SI ELINTERRUPTOR NO
FUNCIONA DEBIDAMENTE.
Haga reemplazar el
interrupter defectuoso per un distribuidorautorizado,
22, DROGAS, ALCOHOL, MEDICAMENTOS.
No haga
funcionar esta herramtenta cuandoeste bajo Ia _nfluenc_a
de dregas, alcohol o haya tomado medicinao
23. SI TALADRA
O INSTALA TORNILLOS
EN EL
CABLEADO ELECTRtCO EN PAREDES, TECHOS U
OTRAS AREAS PUEDE QUE CAUSE QUE LA BROCA
O EL PORTABROCA QUEDEN CON CORRIENTEo No
toque Gaspiezas met_ficas cuando taladre en una pared;
sujete solamente el (los) mango(s) aisiado(s) o la caja
de p!_sticocuando use esta herramienta.Asegt]rese de
que no haya cableado el_ctrico escondldo, tuberfas del
agua ni riesgos mec,_nicos en el trayecto de la broca
cuando est_ taladrando en una pared.
24. INSPECCIONE y saque todos los clavos de la madera
antes de taladrar.
REGLAS DE SEGURIDAD IMPORTANTES
PARA HERRAMIENTAS A BATERIA
25. Las herramientas a baterfa no deben set enchufadas
en un tomacorriente el_ctrico, per lo tanto siempre est_.n
listas para ser usadas. Est_ atento a los posibles
peligros cuando no est_ utilizando su herramienta a
baterfa o cuando cambie accesorios,
(Continuaci6n)
31. Si transporia su herramienta a baten'a en un costado,
asegt]rese de que no est_ funcionando y que su dedo
no est_ en el gatillo. Evite la puesta en marcha
accidental.
32. ASEGURE EL TRABAJO antes de poner en marcha.
NUNCA sujete el trabajo en su mane o a tray,s de sus
piernas.
33° CUANDO EFECTUE LABORES DE MANTENIMIENTO
USE SOLAMENTE REPUESTOS
CRAFTSMAN
AUTENTICOS.
iNSTRUCCIONES JMPORTANTES DE
SEGURIDAD PARA EL CARGADOR
34° CONSERVE ESTAS INSTRUCCIONES. Este manual
contiene instruccicnes de seguridad y funcionamiento
lmportantes sobre el cargador de la baterfa n5mero de
pieza 999555-007,,
35° Antes de usar el cargador de la baterfa, lea todas ias
instruccionesy advertencias tndicadas en este manual,
en el cargador de la bateri'a yen la herramienta que es
alimentada per el cargadoro
'H'","H I I n _
36
'"1ill'I:__!LI
ADVERTENCnA:
Para reducir el riesgo de lesiSn, cargue solamente
baterfas recargables de nfquel y cadmio,. Otros tipos
de baterfas puedenexplotarcausando lesi6n personal
y daSo,.
2& USE SOLAMENTE
EL CARGADOR
QUE SE
SUMINISTRA CON LA HERRAMIENTA A BATERIA.
No utilice ningun otro cargador. Si usa otro puede hacer
exp!otar la baterfa causando alguna lesiSn seriao
27,. NO COLOQUE LAS HERRAMIENTAS A BATERIA O
SUS BATERIAS CERCA DEL FUEGO O DE UNA
FUENTE DE CALOR. Se puede producir una expfosiSn.
287 NO CARGUE LA HERRAMIENTA A BATERIA EN UN
LUGAR HUMEDO.
37. No exponga el cargador a la Iluvia. o a la nieve.
29, Su herramienta a baterfa debe ser cargada en un lugar
donde la temperatura sea superior a 50 ° F (10 ° C) pero
inferior a 100 ° F (37 ° C).
39. Para reducir et riesgo de dare al cuerpo del cargador y
al cord6n, cuando desconecte el cargador tire et cuerpo
del cargador en vez del cord6n.
30. Bajo condiciones de use o temperatura extrema, puede
ocurrir escape de I[quido en la baterfa.. Si el lfquido
entra en contacto con la pief, I_.vese inmediatamente
con agua y jabSn, _uego neutratice con ]ugo de limSn o
vinagre. Si entra lfquido a sus ojos, I_velos con agua
limpia durante I0 minutes, luego busque atenciSn
m_dica inmediata_
40. Aseg5rese de que el cord6n quede situado de manera
que no vaya a pisarlo o a tropezar en 61o que de otra
manera vaya a ser daSadoo
38. El uso de un accesorio no recomendado o vendido por
el fabricante del cargador de la bater[a, puede resultar
en un riesgo de incendio, choque el_ctrico o lesi6n a
otras personas..
ADVERTENCnA:
HI,I,HI 'l ..................
La utitizaci6n de cualquier herramienta mecdnica puede causar la proyecci6n de objetos extrafios
a sus ojos, Io cual puede ocasionar daSos oculares severoso Antes de comenzar a usar la
herramienta mec_inica,siempre use sus ientes protectores o gafas de seguridad con protecci6n
lateral y una mz_scaracompleta cuando sea necesario. Recomendamos una Mdscara de Visi6n
Amplia para usar sobre sus lentes protectores o lentes de seguridad est_ndar, con protecci6n
lateral, disponible en los Almacenes Sears.
P,_gina 3
ADVERTENCIAS
SOBRE EL CARGADOR (Continuaci6n)
41.. No debe usarse un cord6n de extensi6n a menos que
sea absolutamente necesarto. Et uso de cordones de
extensl6n tnadecuados puede resultar en riesgo de
incendio y de choque el_ctrico. Si se debe usar un
cordSn de extensi6n, asegerese de que:
ao Las clavijas del enchufe del cord6n de extensi6n son
iguales en n_irnero,tama5o y forma a tas del cargador.
bo El cordSn de extensi6n est& debidamente cableado y
en buen estado; y
co El calibre del cable es suficiente para el amperaje
nominal CA del cargador, segen se especifica a
continuaci6n_
Pies
25
50
100
150
Calibre AWG del Cord6n, en Pies
AWG
16
16
16
16
i
.................
1
i iii ii,,i,
42_ NO HAGA FUNClONAR EL CARGADOR SI EL
CORDON O EL ENCHUFE ESTAN DAI_ADOS. Si est_
daSado, hdga!o memplazar inmediatamente pot un
electricista calificado.
43° No haga funcionar el cargador si ha recibido un gotpe
fuerte, si se ha cafdo o si se ha daSado de alguna
manera. Ll_velo a un reparador calificado.
44° No desarme el cargador; li_velo a un t_cnico calificado
cuando necesite servtcio o reparaci6n. Et rearmado
incorrecto puede resultar en un riesgo de choque
el_ctrico o incendio.
45. Para reducir el riesgo de choque el_ctrico, desenchufe
el cargador del tomacorriente antes de efectuar cualquier
mantenimiento o limp[ezaoAI apagar los controles no se
reducir& este rtesgo.
46. No use el cargador a la intemperie.
47° Desconecte el cargador de la fuente de energi_acuando
no est_ en uso.
48. CONSERVE ESTAS 1NSTRUCCiONES. Consulte estas
instrucciones frecuentemente y t_selas para instruir a
otros sobre el uso de esta herramienta.. Si usted presta
esta herramienta aotra persona entregue tambi_n las
instrucciones.
i / iJ/illJJI_LIJ
ADVERTENCIA:
ADVERTENCIA:
No permita que su familiaridad con su taladro interfiera
con su atenci(_n y prudencia. Recuerde que un descuido
de una fracci6n de segundo puede causar una lesi6n
grave,_
Si falta cuaJquiera de las p{ezas, no haga fuc{onar su
taladro hasta que las piezas no hayan sido reemplazadas.
De lo contrario puede resultar en una posible lesiSn
personal grave.
INFORNIACUON _MPORTANTE PARA
CARGAR LAS BATERIAS
Cuando use su taladro en forma continua, las baterfas en
el bl0que de baterfas puede calentarse. Usted debe dejar
enfdar el bloque de bater{as durante aproximadamente
30 minutos antes de intentar recargarlo.
NOTA: Esta situaciSn ocurre solamente cuando el uso
continuo de su taladro causa que las batedas se catienten.
No ocurre bajo circunstancias normales.. Consulte "CARGA
DEL TAL-ADRO" para carga normal de las bater{as. Si el
cargador no carga su btoque de bater[as bajo circunstancias
normales, devuelva ambos, el bloque de baterfas y el
cargador a su centro de reparaciSn Sears mAs cercano
para revision el_ctrica_
P&gina 4
JNTRODUCCaON
FELICITACIONES Y NUESTRO AGRADECIMIENTO POR
HABER COMPRADO ESTE TALADRO A BATERIA
CRAFTSMAN. Ha sido diseSado y fabdcado de acuerdo
con las altas normas de Sears de fiabilidad, facilidad de
funcionamiento
y seguridad para el usuario. Si esta
herramienta
es mantenida
en la forma debida, te
proporcionar_ muchos aSos de rendimiento sin problemas,.
i
i i i, ,i,
ESPECIFICACIONES:
Capacidad del Portabroca
Motor
6 Voltios CC
Potencia Nominal del Cargador
i,.i
ATENCION:
3/8 pulg,
'H.l.ll
120 Voltios, 60 Hz,
CA solamente
Velocidad sin Carga
Lea cuidadosamente todo este manual antes de usar su
nuevo taJadro, Preste mucha atenci6n alas Reglas de
Seguridad asfcomo a lasAdvertencias yAvisoso Si usted
utiliza el taladro debidamente y solamente para el
prop6sito que ha side diseSado, usted disfrutarA de
muchos aSos de servicio seguro.
Su taladro tiene muchas caracteristicas que contribuyen a
facilitar y hacer m_s agradable su trabajoo Se ha dado
prioridad
m_.xima a fa seguridad,
rendtmiento
y
dependabitidad en el diseSo de esta taladro por lo cual es
f_cil de mantener y operar..
Gatilfo
300 - 500 RPM
Dos Velocidades - Reversible
............................
. ............
Velocidad de Carga
ll,i, ii i,ll/
,i
3-5 Horas
,_l,i
iii
TorsiSn M&xima
45 ibf, pulg
* N-_de agujeros de 3/8 pulg,.
taladrados por carga
60
* N_ de tomillos de #8 x 1/4 pulg.
instalados por carga
180
/ /
H,lu,l,,,
H
* Estas especificaciones
representan
el nt]mero
promedio de agujeros taladrados y tornillos instalados
en pino blanco usando bloques de bateda totalmente
cargados_ Los bloques de batefla no alcanzan su carga
total la primera vez que son cargadoso Deber&n pasar
varios ciclos (taladrado seguido de carga) antes de
que los bloques puedan cargarse en sl_ totalidad.
...........................
r
::
GARANTIA
:
:......................................................
COMPLETA
illl
DE UN A_IO DEL TALADRO
CRAFTSMAN
,ll,,,,i
illlllu
•
DE 3/8 PULG.
Si este Taladro Craftsman de 3/8 pulg. no le proporciona completa satisfacci6n a partir de un a5o desde la fecha de
compra, DEVUELVALO AL ALMACEN SEARS MAS CERCANO EN LOS ESTADOS UNIDOS y Sears Io
reemplazar& gratuitamente.
Si este Taladro Craftsman de 3/8 pulg,, se usa para propSsitos comerciales o de alquiler, esta garantia es vb,lida
solamente durante 90 d{as desde la fecha de compra.
Esta garant[a {e otorga derechos legales especfficos y usted puede adem_s tenet otros derechos que varian de
un estado a otro.
Sears, Roebuck and Co., Dept. 817 WA, Hoffman Estates, IL 60179
TABLA
t,,
Reglas para Funcionamiento
A.
Reglas de Seguridad
Bo tnstrucciones
C.
2,
Informaci6n
Introducci6n
Seguro ..........................................................................................................2-4
Importantes
Importantes
DE ']ATERIAS
para Herramientas
a Bateria ..........................................................
3
de Seguddad para el Cargador
....................................................................
3
Importante para Cargar las Bater[as .....................................................................................
4
y Especificaciones
del Producto ........................................................................................................
5
3, Garant{a y Tabla de Materias ........................................................................................................................................
5
4,, Funcionamiento
...................................................................................................................................................................................
6-10
5o Accesorios
6.
.........................................................................................................................................................................
11
Mantenimiento
...........................................................................................................................................................................
t1
7,, Vista Esquem#,tica y Lista de Repuestos ..........................................................................................................................
13'
8.
Pedidos
de Repuestos/Servicio
......................................................................................................................14
PAgina 5
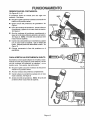
FUNCIONA
ADVERTENCIA:
,Siempre use Ientes protectores o galas de seguddad con
protectores laterales cuando est_ utilizando su herramienta...Si
no Io hare puede que salter] ebjetos a sus ojos, resultando en
una lesi6n grave..
CONOZCA
SU TALADRO
Antes de usar su taladro, familiarfcese con todas las caracterfsticas
de funcIonamlento y reglas de seguridad. Ver Figura io
CARGA DEL TALADRO
Esta hertamtenta ha side enviada con ca_ga baja para evitar
posibtes problemas_ Per Io tanto, usted debe cargarla per Io
menos 5 horas antes de usada_
NOTA: Las baterfas no atcanzan su carga total la prirnera vez
que son cargadas_ Deje que pasen varies ctclos (taladrado m_s
carga) hasta que las bater[as puedan cargarse en su totalidad..
PARA CARGAR
lm
B
_I
Cargue el bloque de baterfas solamente con el cargador
sumintstrado con la herramienta.
Asegdrese de que la alimentacldn es el voltaje normal
del hogar: 120 voitlos, 60 Hz, CA solamente.
Conecte el cargador al bloque de baterfas insertando el
enchufe del cargador en la conexi6n de entrada. Come se
muestra en la Figura 1, la conexl6n de entrada se encuentra
en la parte trasera det bIoque de baterfas.
NOTA: El bloque de baterfas puede permanecer en el taladro
o sacarlo de _1cuando se est_ cargando. Cuando se sara el
bloque de baterfas del taladro, tenga cuidado de no tocar los
bornes con un objeto de metal.. St toca ambos homes con
lENTO
un objeto de metal, productr& un corto circuito en el bloque
de baterfaso
BI AsegSrese de que e! enchufe del cargador y la conexiSn de
entrada est6n debidamente conectados.
U
Conecte el cargador a fa fuente de energ[a el_ctricao
R
La luz indtcadora de carga (LED), que se encuentra en el
bloque de baterfas, se encender& y pe_'manecer_ iluminada
cuando el cargador est_ debldamente conectado a la fuente
de energfa el_ctrlca. Esta luz indica que et cargador est_
trabajando debidamenteo
Permanecer& encendida hasta
que el cargador sea desconectado de la fuente de energfa
el_ctrica. La {uz solamente permanece lluminada cuando su
herramienta se est_ cargando, no durante el use.
1_ Despu_s del use normal, se requiere un mi'nimo de 3 a 5
betas de carga para que quede totalmente cargadoo
Itl El bloque de baterfas permanecer& ligeramente caliente
cuando se est,. cargando, Esto es normal y no es Indlcacl6n
de problema.
wli NO haga funcionar la herramienta cuando est_ conectada al
cargador. No aumentar_, la eficacta del taladrado.
NO coloque el cargador en un ambtente de touche taler o
fri'o. Trabajar& meier a temperatura ambiente normal
,Hll lll,i
ATENCION:
El bloque de baterfas de su baterfa contiene baterfas
especiales de alla temperatura para ayudar a evitar daSo
de las bater[as cuando se deja cargando durante pert'odes
prolongados.. Sin embargo, una vez que las baterfas se
cargan completamente, recomendamos que desenchufe
el cargador de ta fuente de energ(a el_ctrica y Io desconecte
del bloque de batert'as.
LUZ INDICADORA
DE CARGA (LED)
BLOQUE
DE BATERIAS
PORTABROCA
CARGADOR
DE LA BATERIA
GUARDALLAVE
SELECTOR
CONEXION
DEENTRADA
GATILLO
LLAVEDEL
PORTABROCA
CORREA
PARALA MUI_ECA
ENCHUFE DEL CARGADOR
Fig 1
Pdglna 6
FUNC!ONA
INSTALACION
DEL BLOQUE
DE BATERIAS
I_
Bloquee el gatillo de su taladro eolocando el selector de
direcci6n de rotaci6n en la posici6n central. VerFigura 2.
[]
Col0que et bloque de baterfas de ta! manera que los homes
de la bateda queden alineados con los bornes de la caja del
taladro.. Inserte el bloque de batedas en el taladroo Ver
Figura 3.
AsegSrese de qua los pestillos a cada lade de su bloque de
batedas se enganchen en su posict6n y qua el bloque de
batedas est_ bten sujeto en el taladro antes de comenzar a
funcionar.
m
DESMONTAJE
DEL BLOQUE
SELECTOR
RETROCESO,
DE BATERIAS
[]
Bloquee el gatillo de su taladro colecando el selector de
direcci6n de rotaci6n en la posici6n central Ver Figura 2_
m
Ubique los pestillos en el extreme del bloque de bater[as y
oprima para abrirlos y sacar el bloque de baterfas.. Ver
Figura 3.
MARCHA
ADELANTE
POSICIONCENTRAL
(BLOQUEO)
ATENCION:
Fig. 2
Cuando coleque e_b!eque de baterfas en el taladro, aseg_rese
de los homes del bloque de batedas est_n alineados con !os
bornes del taladro y los pestillos se enganchen en su lugar
debidamente. El montaje incorrecto del bloque de bater[as
puede causar daSo a los componentes lnternos.
CORREA
PARA LA MUi_ECA
CORREAPARA
L,AMU_ECA
Vet Figures 1 y 3o
Se proves de una correa pare ta muSeca pare reducir la posibilidad
de dejar caer su taladro. Pase una mane a trav_s de la correa
para la muSeca cuando transporte la herramienta,
BLOQUE
'DEBATERIAS
GATILLO
Vet Figure 2o
Pare poner en marcha el taladro, apdete el gatillo. Suelte et gatitlo
pare apagar el tafadro.. El gatitlo de este taladro ha side disefado
para ta!adrado _e dos ve!ocidades Para tatadrado a baja velocidad,
eprima el gattlto haste la mitad. Pare taladrado normat, oprima el
gatillo haste el fondo
PESTILLOS
NOTA: Cuando cambie de vetecidad baja a alta, usted puede
notar un punto muerto en el gatillor Esto constituye parte del
diseSo y no existe ningr_n problema con su tatadro. Continue
apretando el gatlllo haste qua comience el tafadrado a atta
velocidad.
BLOQUEO
OPRIMA LOS PESTILLOS
PARA DESENGANCHAR EL BLOQUE DE BATERIAS
DEL GATILLO
Fig. 3
=.
Ver Figure 2.
El gatillo de su taladro puede ser bloqueado en la poslci6n "OFF"
(APAGADO). Esta caracteflsticas puede usarse para svitar la
posibitidad de la puesta en marcha accidental cuando no est_ en
use.. Para broquear el gatlllo, coloque el setector de rotaci6n de
direcci6n en la posici6n central,.
REVERSIBLE
Ver Figure 2
Su tatadro tlene la caractedstica de ser reversible, La dtrecci6n de
rotaci6n es controtade per un selector sttuado arriba del gatilio_
Con el tafadro en la posfcl6n de funcionamiento normal pare
taladrar, el selector de rotaci6n debe estar a Ja izquierda dei
gatillo La direcci6n de rotaci6n se invierte cuando el selector es
colocado ala derecha dei gatillo. Cuando el selector est_ en la
posici6n central, el gatillo estQ bloqueado_
ATENCION:
Para evitar dafio at engranaje, siempre espere hasta qua el
portabroca se detenga compretamente antes de cambiar ta
direcci6n de rotaci6n., .......................
____
Para detener, sueite el gatillo y deje que el portabroca se derange
cempletamente_
ADVIFRTENCgA:
Las herramienlas a baterfa stempre est_n en condic_6n de
funcionamiento
Per Io tanto, el gatillo debe estar siempre
bloqueado cuando no to est_ usando o cuando Io est_
transp0rtand0 en su Costed0.:
.........
P_.gina 7
FUNCIONAIVllENTO
LLAVE DEL PORTABROCA
Vet Figura 4.
Se ha pr6visto una Uave de portabroca para usar cuando se
instata o se sacan las brocas. Tarnbi_n se usa para sacar el
portabroca, (Ver la secci6n del desmontaje del portabroca_)
ALMACENAMIENTO
PORTABROCA
DE LA LLAVE DEL
Vet Figura 4o
Cuando no est_ en uso, la Ilave dell portabroca puede ser
colocada en el _rea de almacenamiente situada en la parte
inferiorde su taladro, como se muestra en la Figura4,
INSTALACiON
DE LAS BROCAS
Vet Figuta 5,
El
Btoquee el gatiflo colocando el selector de direcci6n de
rotaci6n en la posici6ncentral
_1 Abra o cierre las mordazas del portabroca basra que la
abertura sea tigeramente m&s grande que la broca que
usted intentausar. Adem_ts, levante la parte delantera de
su taladro ligeramente para evitar que las brocas sesalgan
fuera de las mordazas del portabroca.,
l
Inserte la broca en el portabrocahasta todo el largo de las
mordazas, como se muestra en la Figura &
MORDAZASDEL
PORTABROCA
BROCA
ADVERTENCIA:
PORTABROCA
No inserte las brocasen lasmordazas del portabrocant las
apriete como se muestra en la Figura& Esto puedecausar
que la broca sea lanzada fuera del taladro resultandoen
una lesi6n personalgrave o da5o al portabroca..
ilu]
...................
i i
m] Saque la !lave del portabrocadel guardaUave.Vet'FTgura4_
m
Usando solamente la Ilavedel portabrocaprovista,apriete
las mordazas det portabroca..Coloque la ilave en los tres
agujemsy apdete girandohacia ia derech& NO USE UNA
LLAVE INGLESA PARA APRETAR O AFLOJAR EL
PORTABROCA.
[]
Saque la llave del portabrocay vuelva a colocarla Itaveen
el guardallave.
PARA SACAR LAS BROCAS
Vet Figura 5_
m Bloquee et gatillocelocando el setector de direcci6nde
rotaci6n en la posici6ncentral..
1_ Saque la llavedel portabrocade! guardallav& VerFigura 4_
I_ Afloje las mordazas del portabreca usando solamente la
flave del portabroca provist& NO USE UNA LLAVE
INGLESA
PARA APRETAR
O AFLOJAR
EL
PORTRABROCA.
Saque la broca de las mordaza&
i_
Saque ta Ilavedet portabroca y col6quela en el guardallave.
P&gina 8
CORRECTO
.....................................
,i
Fig. 5
t
FUNCIONAMIENTO
ADVEIRTENCIA:
Siempre,use lentes protectores o gafas de seguddad con
protectores
laterales cuando est_ utilizando su
herramienta. Si no !o hace puede que salten objetos a
sus ojos, resultando en una lesiSn grave.
TALADRADO
Ver Figura 7.
Sujete el material que va ser taladrado en un tornilto de
banco o con mordazas para evitar que gire cuando la broca
del taladro ester girandoo
Sujete firmemente el taladro y coloque la broca en el punto
que va ser taladrado. Oprima el gatillo para poner en marcha
el taladro.
Mueva la broca en el trabajo aplicando solamente suficiente
presiSn para mantener ta broca cortandoo No fuerce su
taladro o aplique presiSn lateral para alargar un agujero.
i
ii ii ill i,
lll l lllll lll,,l,,,l,l,
ll,,,
ADVERTENCIA:
Est_ preparado para situactones de atascamiento o
perforaciSn. Cuando estas situaciones ocurren, el taladro
tiende a atascarse y retroceder en la direcciSn opuesta io
cual podr[a causar p_rdida de control cuando est_
perforando a trav_s del material. Esta p_rdida de control
puede resultar en una posible lesi6n seria.
Cuando taladre metales, use un aceite liviano en la broca
para evitar que se sobrecalienteo El aceite prolongar,_ la vida
de la broca y aumentar_ el taladradoo
Si la broca se atasca en la pieza de trabajo o si su taladro ee
detiene, apague la herramienta inmediatamente, Saque la
broca de la pieza de trabajo y determine la raz6n del
atascamiento.
Para obtenerlavida t]til m_s larga de las baterfas, sugerimos
Io siguiente:
m Guarde y cargue tas batedas en un lugar fresco. Las
temperaturas superiores a la temperatura ambiente
normal acortar_n la vida t_til de las baterlas.
Nunca guarde las baterfas descargadas. C#.rguelas
inmediatamente despu_s que se han descargadoo
BATERIAS
El bloque de baterlas de su taladro est#,equipado con cinco
baterfas de ntquel y cadmio recargabies., La duraci6n del
servicio de cada carga depender_ del tipo de trabajo que
est6 realizandoo
[]
Las bater.fas en esta herramienta han side diseSadas para
proveer duraci6n m_xima sin problemas. Sin embargo,
come todas las baterias, eventualmente se acabar#,n.. No
desarme el bloque de baterfas ni intente reemplazar las
bateHasoLa manipulaci6n de estas baterfas, especialmente
cuando est_ usando anillos y jeyas, puede resultar en una
quemadura grave
P&gina 9
Todas las baterfas pierden gradualmente su cargao
Mientras m_s alta es la temperatura, m&s r_pidamente
pierden la carga. Si guarda su herramienta per perlodos
de tiempo prolongados sin usarla, cargue las baterfas
cada rues o cada dos meses. Esta pr,_ctlca prolongar_
la vida Litil de las baterfas.
FUNCIONAM
DESMONTAJE
DEL PORTABROCA
Ver Figuras 8, 9 y I0.
El portabroca puede ser sacado para usar algen otro
accesodo. Para _acar:
Ill
Bloquee el gatillo colocando et selector de direcciSn de
rotaciSn en la posici6n central.
[]
Saque la Ilave del portabroca
Figura 4.
[]
Cierre las mordazas del portabroca, lnserle la Ilave en
el portabroca y golpee con un mazo hacia la derecha.
Vet Figura 8o
[]
Abra las rnordazas del portabroca completamente y
saque el tornillo del portabroca gir_.ndolo a la derechao
Ver Figura 9o NOTA: Et tornitlo del portabroca tiene
roscas hacia la izquierdao
M
lnserte la Ilave del portabroca en el portabroca y golpee
con un mazo hacia la izquierda. Esto Io aflojar& det
husillo. Despu_s puede ser destornillado a mano. Vet
Figura 10.
H
Coloque nuevamente ta Ilave del portabroca en el
guardatlave.
PARA APRETAR
det guardatlave.
UN PORTABROCA
Ver
SUELTO
El portabroca a veces puede aflojarse en el husillo y oscilar_
Adem,_s e! torntllo det portabroca puede af!ojarse y causar
que las mordazas del portabroca se atasquen y no se
puedan cerrar. Para apretar, siga estos pasos:
_1 Btoquee el gatillo colocando el selector de direcciSn de
rotaci6n en ta posici6n central
[]
Abra las mordazas del portabroca completamente.
Im Inserte la ilave en el portabroca y golpee con un mazo
hacia ta derecha. Ver Figura 8.
[]
Apriete el tornillo del portabroca,. NOTA: El tornillo del
portabroca tiene roscas hacia la izquierda.
P&g=na10
Fig. 9
, IN,
ACCESORmO$
"l'
los siguientes
accesorios
son recomendados
y est_in disponibles
° Juego de 6 Brocas de Magnita de Gran Longitud
° Ca]a y Juego de 30 Piezas de Destornilladod
Llave de Tuercas
•
en la actualidad
en los Almacenes Sears.
• Broca de Alta Velocidad
(Para Madera o Metal) .............................
3/8 pulgo M,_x.
• Portabroca sin Llave (Ref N_9 20988)
• Caja y Juego de 17 Piezas de Destornilladod
Llave de Tuercas
ADVERTENClA:
Puede ser peligrosousar dlspostttvoso accesorios que no aparezcanen la Itsta anterior.
MANTENt
NO HAGA USO ABUSIVO DE LAS HERRAMIENTAS
MECANICAS. Et uso abusivo puede daSar la herramienta y
tambi_n la pieza de trabajo,,
i illll
ADVERTENCmA:
Cuando repare la herramienta use solamente repuestos
aut_,nticos Craftsman° El uso de cualquier otro repuesto
puede crear un riesgo o daSar el producto.
..........................
ADVERTENCIA:
, , ,,,,,,,,
Evite usar solventes cuando limpie las piezas de pl_.stico.
La mayor[a de los pl&sticos son susceptibles a diversos tipos
de solventes comerciales y pueden dafiarse con su usooUse
_aSos limpios para sacar la suciedad, polvo de carb6n, etc,
No trate de modificar esta herramienta ni de crear
accesorios no recomendados para su uso con esta
herramienta,. Cualquiera alteraciSn o modificaci6n se
considera mal uso y puede resultar en una condici6n
peligrosa que cause una posible lesi6n personal grave,.
ADVERTENCiA:
Evite en todo momento que los tiquidos de frenos,
gasolina, productos a base de petr61eo, aceites
penetrantes, etc,. entren en contacto con las piezas de
pl#.stico.EI]os contienen productos qufmicos que puedan
daSar, debilitar o destruir el pl_stico_
Para conservar los recursos naturales le
rogamos reciclar o eliminar el bioque de
batefla de manera apropriada..
Este producto contiene una baterfa de
nfquel y cadmioo Debe ser eliminada de
manera adecuada.
Las leyes locates, estatales y federales pueden prohibirque
las bateflas usadas sean descartadas en ta basura comt_no
Consulte con las autoridades locales para obtener
informaciSn sobre el reciclaje y/o la manera correcta de
descartar estos productos.,
DESMONTAJE DEL BLOQUE DE BATERIAS Y
PREPARACION
PARA EL RECICLAJF.
,ll
,i
i i illl,i,11,1,,,
i ,llll
ADVERTENCIA:
Despu_s de sacar el bloqtJe de baterfas, cubra los bornes
del b!oque de bater{a con cinta adhesiva resistenteo No
intente destruir, desarmar la baterfa o sacar cualquiera
de sus componentes. Las bater{as de nfquel y cadmio
deben ser recicladas o descartadas de manera adecuadao
Igualmente, nunca toque arnbos bornes con objetos
met__llcos y/o una parte del cuerpo pues se pueden
producir corto circuitos. Mant_ngase fuera del alcance
de los niSos,. SI no se cumpten estas advertencias, se
puede producir un incendio y/o lesiSn grave.
P&gina 11
NO'FAS
i,i
....................................
,,,,,
,,
i
i
, Hlu
........
lllll
,, ,,, ,,, ,, JlJl
.........
i i J iliJJJJ
.....................
!
i i
i iiJJ:l:llllll
i i
it:::::¸
i_ll,,
i, ,,,,i,i
......................
P,_gina 12
i
,,-----
TALADRO
A BATERIA CRAFTSMAN
DE 3/8 PULGADA -- MODELO N° 315.111720
-===_
[
El n_mero de modelo se encuentra en una placa situada en la caja del motor. Stempre mencione el nt_mero de
!
|
modelo de su TALADRO A BATERIA DE 3/8 PUL,GADA cua,ndo solicite servicio o haga pedidos de repuestos,
J
VER LA ULTIMA PAGINA PARA LAS INSTRUCClONES
COMO PEDIR REPUESTOS
2
5
LaSTA DE REPUESTOS
Ref
N_
Ndmero de
Repuesto
Descripci6n
1
616478-003
Tornilto (Especial) .................................................................................................................................................
1
2
973t0t_001
3
614984-001
Portabroca (Article No. 9-2975) ....................................................................................................................
1
Llave del Portabroca ....................................................................................................................................
1
4
973572-003
Bloque de Bater[a .................................................................................................................................
1
5
967215-001
Correa para ta MuSeca ..........................................................................................................................
1
6
999555-007
972000-234
Cant,
•Cargador de la Bateda ................................................................................
*......................................................
1
Manual del Usuario
,ll
P&gina 13
r-
®
MANUAL
DEL USUARIO
Taladro a Baterfa de 318 Puig.
Dos Velocidades/Reversible
MODELO N°
315.111720
El nt_mero de modelo de esta herramienta
est,. en una
placa situada en la caja dei motor.
COMO HACER
PEDIDOS DE
REPUESTOS
S! NECES|TA SiSRViCiO
DE REPARACION O
REPUESTOS:
CUANDO HAGA PEDIDOS DIE REPUESTOS, SIEMPRE
PROPORCIONE LA SIGUIENTE INFORMACION:
• NUMERO DEL
REPUESTO
• DESCRIPCION
REPUESTO
DEL
° NUMERO DEL
MODELO
315.111720
° NOMBRE DEL
ARTICULO
Taladro a Bateria
de 3/8 pulgada
Todos los repuestos indicados pueden ser solicitados a
un Centro de Servicio Sears y a la mayorfa de los
Almacenes Sears.
PARA SERVICIO DE
REPARAClON, LLAME GRATIS A
ESTE NUMERO:
1-800-4-REPAIR
(1-800-473,7247)
PARA 1NFORMACION SOBRE
REPUESTOS Y COMO HACER
PEDIDOS, LLAME GRATIS A ESTE
NUMERO:
1-800-FON-PART
(1-800-366-7278)
SEARS, ROEBUCK AND CO,, Hoffrnan Estates, IL 60179