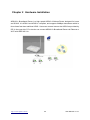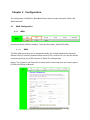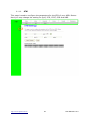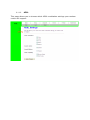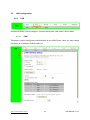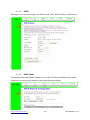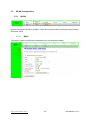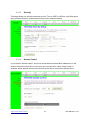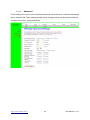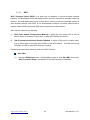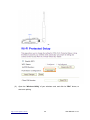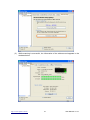
1
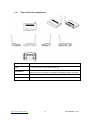
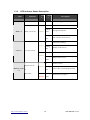
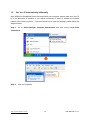
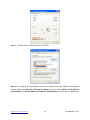
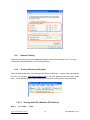
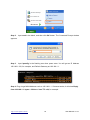
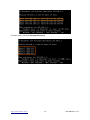
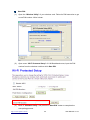
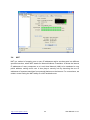
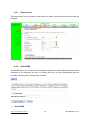
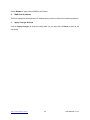
+ ADSL 2 Modem Router + Wireless N ADSL 2 Modem Router RM-1802 Networking User Manual Table of Contents Safe Seating Gestures ..............................................................................................................6 CE Statement of Conformity ..................................................................................................6 Chapter 1 Introduction......................................................................................................7 1.1 Overview ...........................................................................................................7 1.2 Features.............................................................................................................7 1.3 Specifications ....................................................................................................9 1.3.1 Views of Product Appearance ............................................................... 11 1.3.2 LED Indicator Status Description ........................................................12 1.4 System Requirements ....................................................................................13 1.5 WAN Network Plug and Play........................................................................13 1.6 Get Your IP Automatically & Manually.......................................................14 1.6.1 Network Testing .....................................................................................17 1.6.2 Testing with Internet Browser ..............................................................17 1.6.2.1 Testing with DOS (Windows XP Platform) .................................17 Chapter 2 Hardware Installation ...................................................................................20 Chapter 3 Configuration .................................................................................................21 3.1 WAN Configuration .......................................................................................21 3.1.1 WAN ........................................................................................................21 3.1.1.1 WAN ................................................................................................21 3.1.1.2 ATM ................................................................................................22 3.1.1.3 ADSL...............................................................................................23 3.2 LAN configuration .........................................................................................24 3.2.1 LAN .........................................................................................................24 3.2.1.1 LAN .................................................................................................24 3.2.1.2 DHCP ..............................................................................................25 3.2.1.3 DHCP Static....................................................................................25 3.3 WLAN Configuration....................................................................................26 3.3.1 WLAN .....................................................................................................26 3.3.1.1 Basic ................................................................................................26 3.3.1.2 Security ...........................................................................................27 3.3.1.3 Access Control ................................................................................27 3.3.1.4 Advanced ........................................................................................28 3.3.1.5 WPS.................................................................................................29 3.4 NAT .................................................................................................................33 3.4.1 Visual Server ..........................................................................................34 3.4.2 Visual DMZ ............................................................................................34 Chapter 4 DDNS Service Application ............................................................................36 http://www.sapido.com.tw/ 2 User Manual v1.0.0 Chapter 5 5.1 5.2 5.3 5.4 5.5 5.6 5.7 5.8 Chapter 6 6.1 6.2 6.3 Q & A ..............................................................................................................41 Installation ......................................................................................................41 LED .................................................................................................................41 IP Address .......................................................................................................41 OS Setting .......................................................................................................42 ADSL2/2+ Broadband Router Setup ...........................................................43 Wireless LAN..................................................................................................45 Support............................................................................................................47 Others..............................................................................................................48 Appendices......................................................................................................49 Operating Systems .........................................................................................49 Browsers..........................................................................................................49 Communications Regulation Information...................................................49 http://www.sapido.com.tw/ 3 User Manual v1.0.0 FCC Statement Federal Communication Commission Interference Statement This equipment has been tested and found to comply with the limits for a Class B digital device, pursuant to Part 15 of the FCC Rules. These limits are designed to provide reasonable protection against harmful interference in a residential installation. This equipment generates, uses and can radiate radio frequency energy and, if not installed and used in accordance with the instructions, may cause harmful interference to radio communications. However, there is no guarantee that interference will not occur in a particular installation. If this equipment does cause harmful interference to radio or television reception, which can be determined by turning the equipment off and on, the user is encouraged to try to correct the interference by one of the following measures: Reorient or relocate the receiving antenna. Increase the separation between the equipment and receiver. Connect the equipment into an outlet on a circuit different from that to which the receiver is connected. Consult the dealer or an experienced radio/TV technician for help. FCC Caution 1. The device complies with Part 15 of the FCC rules. Operation is subject to the following conditions: 2. This device may not cause harmful interference, and this device must accept any interference received, including interference that may cause undesired operation. 3. FCC RF Radiation Exposure Statement: The equipment complies with FCC RF radiation exposure limits set forth for an uncontrolled environment. This equipment should be installed and operated with a minimum distance of 20 centimeters between the radiator and your body. 4. This Transmitter must not be co-located or operating in conjunction with any other antenna or transmitter. 5. Changes or modifications to this unit not expressly approved by the party responsible for compliance could void the user authority to operate the equipment. IMPORTANT NOTE FCC Radiation Exposure Statement: This equipment complies with FCC radiation exposure limits set forth for an uncontrolled environment. This equipment should be installed and operated with minimum distance20cm between the radiator & your body. http://www.sapido.com.tw/ 4 User Manual v1.0.0 CE Mark Warning This is a class B product. In a domestic environment, this product may cause radio interference, in which case the user may be required to take adequate measures. National Restrictions Frequency range - 2400.0 - 2483.5 MHz Country Bulgaria France Italy Luxembourg Norway Russian Federation Country Reason/remark General authorization required for outdoor use none and public service. Military Radiolocation use. Refarming of the 2.4 Outdoor use limited to 10 GHz band has been ongoing in recent years to mW e.i.r.p. within the allow current relaxed regulation. Full band 2454-2483.5 MHz implementation planned 2012. If used outside of own premises, general none authorization is required. General authorization required for network and none service supply (not for spectrum). This subsection does not apply for the Implemented geographical area within a radius of 20 km from the centre of Ny-Ålesund. none Only for indoor applications. Note: Please don’t use the product outdoors in France CE Statement of Conformity Our product has been tested in typical configuration by Ecom Sertech Corp and was found to comply with the essential requirement of "Council Directive on the Approximation of the Laws of the Member Sates relating to Electromagnetic Compatibility" (89/336/EEC; 92/31/EEC; 93/68/EEC). The Declaration of Conformity can be found at the Sapido regional website. www.sapidotech.de CE Information of Disposal The electric and electronic equipment or unit which is labeled with crossed-out wheeled bin may not be disposed of with household waste. This mark is based on European Directive 2002/96/EC (for Waste Electric and Electronic Equipment=WEEE). Please take it to the designated collection facilities. We will ensure the proper recycling, reuse and other forms of recovery of WEEE. WEEE has the potential effects on the environment and human health as a result of the presence of hazardous substances. You can contribute to eliminate these effects by your cooperation. http://www.sapido.com.tw/ 5 User Manual v1.0.0 Safe Seating Gestures You should follow the manufacturer’s instructions for adjusting the backrest to fit your body properly. An adjustable chair that provides firm, comfortable support is best. Adjust the height of the chair so your thighs are horizontal and your feet flat on the floor. The back of the chair should support your lower back (lumbar region). CE Statement of Conformity Our product has been tested in typical configuration by Ecom Sertech Corp and was found to comply with the essential requirement of “Council Directive on the Approximation of the Laws of the Member States relating to Electromagnetic Compatibility” (89/336/EEC; 92/31/EEC; 93/68/EEC) http://www.sapido.com.tw/ 6 User Manual v1.0.0 Chapter 1 Introduction 1.1 Overview RM-1802 is a high speed ADSL2+ Wireless Router designed for home and SOHO. It is ADSL2 and ADSL2+ compliant, and supports 24Mbps downstream which is three times fast than traditional ADSL. Users can connect Internet via ADSL line provided by ISP. In the near side, PC or device can connect RM-1802 via Ethernet or Wi-Fi with IEEE 802.11n. RM-1802 is easy-to-use, high efficiency and secure. RM-1802 provides not only high speed ADSL2+ but also wired and wireless for users to choose. RM-1802 has entity WPS button for user to connect easily and securely. In security, RM-1802 has NAT, Firewall, and ACL…etc to protect users in LAN. Moreover, RM-1802 has encryptions way, WEP, WPA, WPA2, to prevent any unauthorized access to wireless network. 1.2 Features High speed Internet connection ADSL2/2+ Broadband Router is ITU-T ADSL2 and ADSL2+ compliant and provides high speed Internet connection. Furthermore, ADSL2/2+ Broadband Router can auto detect connect parameter to meet each ISP. Wired/Wireless All-in-one Not only Ethernet (wired), ADSL2/2+ Broadband Router also has 802.11n Wi-Fi (wireless) for user to choose. Rigorous Security mechanism ADSL2/2+ Broadband Router provides Wireless Security, NAT, ACL Firewall…etc security mechanism to make sure that the data of user in network are protected securely. High Quality connection With QoS, the data in network is reordered to make sure the fluency of network application or service, like VoIP, Skype, IPTV or online game. One Touch Encrypted Wireless connection ADSL2/2+ Broadband Router has entity WPS button to make wireless connecting more easy. All user should do is just One Touch. Easy to configure and manage With convenient Web-based UI, user can configure easily and browse system http://www.sapido.com.tw/ 7 User Manual v1.0.0 information and status. ADSL2/2+ Broadband Router also provide remote management like SNMP, Telnet, TFTP, TR-069. http://www.sapido.com.tw/ 8 User Manual v1.0.0 1.3 Specifications Item Specification Key Components Main Processor Realtek RTL8672-vK ADSL2/2+ with RTL8271B AFE Flash 2Mbytes Serial Flash RAM 8Mbytes SDRAM Wireless Chip Realtek RTL8188RE 802.11b/g/n 1T1R Ethernet Controller Realtek RTL8305N 5-Port 10/100Mbps Switch Controller Interfaces ADSL Port 1 x RJ-11 for ADSL line connection LAN Port 4 x 10/100Mbps RJ-45 with auto MDI/MDIX Wireless Wireless Standards IEEE 802.11b/g/n Antenna External 3dBi x1 Peak Gain Antenna of the 2.27dBi @ 2.45GHz Other Physical Power x1 ADSL x1 LED Indicators LAN x4 Wireless / WPS x1 Reboot button / Reset button – one sec for reboot / ten seconds for restore to factory default setting。 Buttons WPS button – When WPS button pushed,system will enter WPS mode。Power button: power on/off http://www.sapido.com.tw/ 9 User Manual v1.0.0 Operating Temp. 0°C~40°C (32°F~104°F) Storage Temp. -20°C~70°C (-4°F~158°F) Operation Requirement Operating Humidity 10% to 85% Non-Condensing Storage Humidity 5% to 90% Non-Condensing Power Supply Power Adapter DC12V/1A Note: 1. Firmware Upgrade available through download. http://www.sapido.com.tw/ 10 User Manual v1.0.0 1.3.1 Views of Product Appearance Power Plug Power Adapter DC12V/1A RJ-11 RJ-11 ADSL port for connecting to ADSL line Reset Button Press “Reset” button over 10 seconds. When status indicator turns from flashing to solid, the process is completed. All settings are back to default. Ethernet Port 4 RJ-45 Ethernet 10/100 Ports Power button Power on/off device http://www.sapido.com.tw/ 11 User Manual v1.0.0 1.3.2 LED Indicator Status Description LED Power x 1 Function Power indication Colo Statu r s Green On On Blinking ADSL x 1 ADSL port activity Green 120ms Blinking 30ms On Green Blinking 30ms LAN x 4 Power is being applied to this product Connected to DSLAM successfully Training with DSLAM ADSL interface Tx/Rx activity Connected at 100Mbps 100Mbps Tx/Rx activity LAN port activity On Green Blinking 120ms On Wireless activity Wireless / WPS Description & x1 WPS status Green Blinking 30ms Reddish Blinking Orange 120ms http://www.sapido.com.tw/ 12 Connected at 10Mbps 10Mbps Tx/Rx activity Wireless is active Wireless data is transmitting/receiving WPS function in progress User Manual v1.0.0 1.4 System Requirements To begin with ADSL2/2+ Broadband Router, you must have the following minimum system requirements. If your system can’t correspond to the following requirements, you might get some unknown troubles on your system. One Ethernet (10 BASE-T or 10/100 BASE-TX) network interface card. PC and at least one web browser software installed (E.g.: Internet Explorer 5.0, Netscape Navigator 7.x, Apple Safari 2.03 or higher version). At lease one 802.11b, 802.11g, or 802.11n wireless adapter for wireless clients. Recommended OS: Windows 2000, Windows XP, Windows Vista, Windows 7 / Linux. 1.5 WAN Network Plug and Play WAN Type auto-detection: When using Ethernet auto-connection: Auto-detection mode only applies on PPPoE, DHCP, PPTP and L2TP. Router will detect WAN type and load the settings from last time or display corresponding page for user to input information. If there is no setting from user, the router will load the default settings. If there is no setting from user, it will detect ISP and load corresponding settings. http://www.sapido.com.tw/ 13 User Manual v1.0.0 1.6 Get Your IP Automatically & Manually After ADSL2/2+ Broadband Router connected with your computer, please make sure your IP is in the automatic IP position or you adjust it manually in order to activate the Internet network from home to Internet. If you don’t know how to enter the settings, please follow the steps as below. Step 1. Go to Start>Settings> Network Connections and then select Local Area Connection. Step 2. Click on Properties http://www.sapido.com.tw/ 14 User Manual v1.0.0 Step 3. Double click on Internet Protocol (TCP/IP). Step 4-1. For getting IP automatically if you are one of the users under ADSL2/2+ Broadband Router, please skip Use the following IP address and then select Obtain an IP address automatically and Obtain DNS server address automatically and then click on OK button. http://www.sapido.com.tw/ 15 User Manual v1.0.0 Step 4-2. For getting IP manually in order to specify a Virtual Server, such as Print Server, FTP Server and so on, please skip Obtain an IP address automatically and then select Use the following IP address. And the following default setting of ADSL2/2+ Broadband Router should be noted: IP Address: 192.168.1.10 (as your Print Server for example) Subnet Mask: 255.255.255.0 Default Gateway: 192.168.1.1 Note: If you configure your computer’s IP Address manually, it needs to be on the same network segment. For example: IP Address: 192.168.1.xxx (xxx can be any number between 2 and 253, but it can’t be repeated, we use 100 to be the example.) Subnet Mask: 255.255.255.0 Gateway: 192.168.1.1 (this is the IP address of ADSL2/2+ Broadband Router in Router Mode) DNS: 192.168.1.1 (use ADSL2/2+ Broadband Router’s IP address or on your own choice) Note: IP address and Default gateway cannot be the same. http://www.sapido.com.tw/ 16 User Manual v1.0.0 1.6.1 Network Testing There are two ways to test your Network whether it can work on Internet or not. They are “Testing with Internet Browser” and “Testing with Dos”. 1.6.2 Testing with Internet Browser Open an Internet Browser, such as Internet Explore or Netscape. Input a valid web address you like, for example, http://www.yahoo.com in the web address blank and then press enter. If the website appears, that means your Internet is working under normal situation. 1.6.2.1 Step 1. Testing with DOS (Windows XP Platform) Go to start http://www.sapido.com.tw/ -> Run. 17 User Manual v1.0.0 Step 2. Input cmd in the blank, and then click OK button. The Command Prompt window appears. Step 3. Input ipconfig in the flashing area then press enter. You will get an IP Address 192.168.1.100, for example, and Default Gateway as 192.168.1.1. Step 4. Ping a legal WAN Address such as 192.168.1.1. If Internet works, it will show Reply from 192.168.1.1: bytes = 32 time = 3ms TTL =64, for example. http://www.sapido.com.tw/ 18 User Manual v1.0.0 If it can’t work, it will show Request timed out. http://www.sapido.com.tw/ 19 User Manual v1.0.0 Chapter 2 Hardware Installation ADSL2/2+ Broadband Router is a high speed ADSL2+ Wireless Router designed for home and SOHO. It is ADSL2 and ADSL2+ compliant, and supports 24Mbps downstream which is three times fast than traditional ADSL. Users can connect Internet via ADSL line provided by ISP. In the near side, PC or device can connect ADSL2/2+ Broadband Router via Ethernet or Wi-Fi with IEEE 802.11n. http://www.sapido.com.tw/ 20 User Manual v1.0.0 Chapter 3 Configuration The configuration of ADSL2/2+ Broadband Router mainly contain three part, WAN, LAN, WLAN and NAT. 3.1 WAN Configuration 3.1.1 WAN Please click Setup, WAN to configure. There are there parts, WAN, ATM, ADSL. 3.1.1.1 WAN The DSL WAN connection can be separated virtually into multiple channels by assigning different VPI/VCI in each Permanent Virtual Circuit (PVC). In each PVC you can also set the connection protocol to be PPP, Dynamic IP, Static IP or Bridge mode. Notice: The "Connect" and "Disconnect" button will be enable only when the connect type of PPPoE and PPPoA is "Manual" 3.1.1.2 ATM This page is used to configure the parameters for the ATM of your ADSL Router. Here you may change the setting for QoS, PCR, CDVT, SCR and MBS. http://www.sapido.com.tw/ 22 User Manual v1.0.0 3.1.1.3 ADSL This page allows you to choose which ADSL modulation settings your modem router will support. 3.2 LAN configuration 3.2.1 LAN Please click Setup, LAN to configure. There are there parts, LAN, DHCP, DHCP Static. 3.2.1.1 LAN This page is used to configure the LAN interface of you ADSL Router. Herer you may change the setting for IP address, subnet mask, etc. http://www.sapido.com.tw/ 24 User Manual v1.0.0 3.2.1.2 DHCP This page can be used to configure the DHCP mode. None, DHCP, Relay or DHCP server. 3.2.1.3 DHCP Static This page lists the fixed IP/MAC address on your LAN. The device distributes the number configured to hosts on your network as they request Internet access. http://www.sapido.com.tw/ 25 User Manual v1.0.0 3.3 WLAN Configuration 3.3.1 WLAN Please click Setup, WLAN to configure. There are five parts, Basic, Security, Access Control, Advanced, WPS. 3.3.1.1 Basic This page is used to configure the parameters for your wireless network. http://www.sapido.com.tw/ 26 User Manual v1.0.0 3.3.1.2 Security This page allows you setup the wireless security. Turn on WEP or WPA by using Encryption Keys could prevent any unauthorized access to your wireless network. 3.3.1.3 Access Control If you choose “Allowed Listed”, only those clients whose wireless MAC address are in the access control list will be able to connect to your Access Point. When “Deny Listed” is selected, these wireless clients on the list will not be able to connect the Access Point. http://www.sapido.com.tw/ 27 User Manual v1.0.0 3.3.1.4 Advanced These settings are only for more technically advanced users who have a sufficient knowledge about wireless LAN. These settings should not be changed unless you know what effect the changes will have on your Access Point. http://www.sapido.com.tw/ 28 User Manual v1.0.0 3.3.1.5 WPS Wi-Fi Protected Setup (WPS) is an easy way to establish a secured wireless network between 11N Broadband router and wireless card. Users do not need to manually entering a creative, yet predictable security key on both Wi-Fi devices to prevent unwanted access to their wireless network. With WPS, it can automatically configure a wireless network with a network name (SSID) and strong WPA data encryption and authentication. WPS can be enabled by 2 methods: 1. PBC (Push button configuration) Method, in which the user simply has to push a button, either an actual or a virtual one, on both WPS devices to connect. 2. PIN (Personal Identification Number) Method, in which a PIN has to be taken either from a sticker label or from the web interface of the WPS device. This PIN will then be entered in the AP or client WPS device to connect. Please follow instructions below to enable the WPS function. Start PBC: (1.) Press the WPS button from 11N Broadband router or click Start PBC from menu “Wi-Fi Protected Setup”, and waiting for the WPS wireless card setting. http://www.sapido.com.tw/ 29 User Manual v1.0.0 or (2.) Open the “Wireless Utility” of your wireless card, and click its “PBC” button, to start auto pairing. http://www.sapido.com.tw/ 30 User Manual v1.0.0 (3.) While scanning is successful, the information of the wireless card appears in the windows below. http://www.sapido.com.tw/ 31 User Manual v1.0.0 Start PIN: (1.) Open the “Wireless Utility” of your wireless card. Follow its PIN instruction to get a new PIN number. Write it down. (2.) Open menu “Wi-Fi Protected Setup” of 11N Broadband router, input the PIN number from the wireless card then click Start PIN. (3.) Back to “Wireless Utility” and press the “Start PIN” button to complete the auto-paring process. http://www.sapido.com.tw/ 32 User Manual v1.0.0 3.4 NAT NAT is a method of mapping one or more IP addresses and/or services ports into different specified services, where NAT stands for Network Address Translation. It allows the internal IP addresses of many computers on a Local Area Network (LAN) to be translated to one public address, saving users’ cost. It also plays a security role by obscuring the true IP addresses of important machines from potential hackers on the Internet. For convenience, we called a router having the NAT facility as a NAT-enabled router. http://www.sapido.com.tw/ 33 User Manual v1.0.0 3.4.1 Visual Server This page allows you to configure virtual server so others can access the server through the Gateway. 3.4.2 Visual DMZ Virtual DMZ allows you to expose one computer to Internet, so that all inbound packets will be redirected to the computer you set. It is useful while you run some applications that use uncertain incoming ports. Please use it carefully. 1. Enable DMZ http://www.sapido.com.tw/ 34 User Manual v1.0.0 Check Enable to apply Virtual DMZ for the Router. 2. DMZ Host IP Address This field stands for the destination IP address that you like to redirect the matched packet to. 3. Apply Changes & Reset Click on Apply Changes to save the setting data. Or you may click on Reset to clear all the input data. http://www.sapido.com.tw/ 35 User Manual v1.0.0 Chapter 4 DDNS Service Application DDNS is a service changes the dynamic IP to the static IP. The settings of DDNS can solve the problem of being given the different IP by router every time. After setting the Router, your host name would correspond to your dynamic IP. Moreover, via the host name application, it could be easier for you to use FTP, Webcam and Printer remotely. Dynamic DNS allows you to make an assumed name as a dynamic IP address to a static host name. Please configure the dynamic DNS below. Please select Dynamic DNS under the IP Config folder, and follow the instructions below to enter the Dynamic DNS page to configure the settings you want. If you don’t have a DDNS account, please follow the steps to complete your DDNS with Dynamic IP settings. Step 1. First access the Internet and fill http://www.dyndns.com/ into the address field of your web browser, then click Create Account. http://www.sapido.com.tw/ 36 User Manual v1.0.0 Step 2. Fill in the form as required, and then click on Create Account button. http://www.sapido.com.tw/ 37 User Manual v1.0.0 Step 3. When you got this account created message, close it, and check your mailbox. You would get a mail from DynDNS website. Step 4. Click on the indicated address within your mail to confirm. http://www.sapido.com.tw/ 38 User Manual v1.0.0 Step 5. Click on login. Step 6. Click My Services after logging in. Step 7. Click Add New Hostname. Step 8. Put in your favorite hostname and service type, and then click Create Host after finished. http://www.sapido.com.tw/ 39 User Manual v1.0.0 Step 9. Your hostname has been created when you see the following page. http://www.sapido.com.tw/ 40 User Manual v1.0.0 Chapter 5 Q & A 5.1 1. Installation Q: Why does the throughput seem slow? A: To achieve maximum throughput, verify that your cable doesn’t exceed 100 meter. If you have to do so, we advise you to purchase a bridge to place it in the middle of the route in order to keep the quality of transmitting signal. Out of this condition you would better test something else. Verify network traffic does not exceed 37% of bandwidth. Check to see that the network does not exceed 10 broadcast messages per second. 5.2 1. Verify network topology and configuration. LED Why doesn’t ADSL2/2+ Broadband Router power up? A: Check if the output voltage is suitable, or check if the power supply is out of order. 2. The Internet browser still cannot find or connect to ADSL2/2+ Broadband Router after verifying the IP address and LAN cable, the changes cannot be made, or password is lost. A: In case ADSL2/2+ Broadband Router is inaccessible; you can try to restore its factory default settings. Please press the “Reset” button and keep it pressed for over 10 seconds and the light of STATUS will vanish. The LEDs will flash again when reset is successful. 3. Why does ADSL2/2+ Broadband Router shut down unexpectedly? A: Re-plug your power adapter. Then, check the STATUS indicator; if it is off, the internal flash memory is damaged. For more help, please contact with your provider. 5.3 1. IP Address Q: What is the default IP address of the router for LAN port? A: The default IP address is 192.168.1.1 with subnet mask 255.255.255.0 http://www.sapido.com.tw/ 41 User Manual v1.0.0 5.4 1. OS Setting Why can’t my computer work online after connecting to ADSL2/2+ Broadband Router? A: It’s possible that your Internet protocol (TCP/IP) was set to use the following IP address. Please do as the following steps. (Windows 2000 & XP) Start>Settings> Network and Dial-up Connections>double click on Internet Protocol(TCP/IP)> select obtain IP address automatically> Click on OK button. Then, open Internet browser for testing. If you still can’t go online, please test something else below. Verify network configuration by ensuring that there are no duplicate IP addresses. Power down the device in question and ping the assigned IP address of the device. Ensure no other device responds to that address. 2. Check that the cables and connectors or use another LAN cable. Q: Why can't I connect to the router's configuration utility? A: Possible Solution 1: Make sure that your Ethernet connect properly and securely. Make sure that you've plugged in the power cord. Possible Solution 2: Make sure that your PC is using an IP address within the range of 192.168.1.2 to 192.168.1.254. Make sure that the address of the subnet mask is 255.255.255.0. If necessary, the Default Gateway data should be at 192.168.1.1. To verify these settings, perform the following steps: Windows 95, 98, or My Users: 1. Click on Windows Start > click on Run > input winipcfg > click on OK button. 2. Check the IP Address, Subnet Mask, Default Gateway data. Is this data correct? If the data isn't correct, click on Release All. Then click on Renew All. Windows NT, 2000, or XP Users: 1. Click on Windows Start > click on Run > input cmd > click on OK button. 2. At the DOS prompt, type ipconfig/all. 3. Check the IP Address, Subnet Mask, Default Gateway data. Is this data correct? If the data isn't correct. Please input ipconfig/release > press Enter > input ipconfig/renew > press Enter. Possible Solution 3: Verify the connection setting of your Web browser and verify that the HTTP Proxy feature of your Web browser is disabled. Make these http://www.sapido.com.tw/ 42 User Manual v1.0.0 verifications so that your Web browser can read configuration pages inside your router. Launch your Web browser. Internet Explorer Users: 1. Click on Tools > Internet Options > Connections tab. 2. Select never dial a connection, click on Apply button, and then click on OK button. 3. Click on Tools and then click on Internet Options. 4. Click on Connections and then click on LAN Settings. 5. Make sure none of the check boxes are selected and click on OK button. 6. Click on OK button. Netscape Navigator Users: 1. Click on Edit > Preferences > double-click Advanced in the Category window. 2. Click on Proxies > select Direct connection to the Internet > click on OK button. 3. Click on Edit again and then click on Preferences. 4. Under category, double-click on Advanced and then click on Proxies. 5. Select Direct connection to the Internet and click on OK button. 6. Click on OK button. 3. Q: Web page hangs, corrupt downloads, or nothing but junk characters is being displayed on the screen. What do I need to do? A: Force your NIC to 10Mbps or half duplex mode, and turn off the "Auto-negotiate" feature of your NIC as a temporary measure. (Please look at the Network Control Panel, in your Ethernet Adapter's Advanced Properties tab.) 4. Q: Why can't I connect to the Web Configuration? A: you can remove the proxy server settings in your web browser. 5.5 1. ADSL2/2+ Broadband Router Setup Q: Why does ADSL2/2+ Broadband Router’s setup page shut down unexpectedly? A: If one of the pages appears incompletely in ADSL2/2+ Broadband Router’s setup pages, please click on Logout item on the Main Menu before shutting it down. Don’t keep it working. Then, close Internet browser and open it again for going back to the previous page. 2. Q: I don’t know how to configure DHCP. http://www.sapido.com.tw/ 43 User Manual v1.0.0 A: DHCP is commonly used in the large local network. It allows you to manage and distribute IP addresses from 2 to 254 throughout your local network via ADSL2/2+ Broadband Router. Without DHCP, you would have to configure each computer separately. It’s very troublesome. Please Open Internet browser > Input 192.168.1.1 in the website blank field > Select DHCP Server under the IP Config Menu. 3. Q: How do I upgrade the firmware of ADSL2/2+ Broadband Router? A: Periodically, a new Flash Code is available for ADSL2/2+ Broadband Router on your product supplier’s website. Ideally, you should update ADSL2/2+ Broadband Router’s Flash Code using Firmware Upgrade on the System Management menu of ADSL2/2+ Broadband Router Settings. 4. Q: Why is that I can ping to outside hosts, but cannot access Internet websites? A: Check the DNS server settings on your PC. You should get the DNS servers settings from your ISP. If your PC is running a DHCP client, remove any DNS IP address setting. As the router assign the DNS settings to the DHCP-client-enabled PC. 5. Q: ADSL2/2+ Broadband Router couldn’t save the setting after click on Apply button? A: ADSL2/2+ Broadband Router will start to run after the setting finished applying, but the setting isn’t written into memory. Here we suggest if you want to make sure the setting would be written into memory, please reboot the device via Reboot under System Management directory. http://www.sapido.com.tw/ 44 User Manual v1.0.0 5.6 1. Wireless LAN Q: Why couldn’t my wireless notebook work on-line after checking? A: Generally, Wireless networks can sometimes be very complicated to set up, particularly if you're dealing with encryption and products from different vendors. Any number of variables can keep your workstations from talking to each other. Let's go over some of more common ones. For starters, verify that your router and your workstation are using the same SSID descriptions. SSID acts as a password when a mobile device tries to connect to the wireless network. The SSID also differentiates one WLAN from another, so all access points and all devices attempting to connect to a specific WLAN must use the same SSID. A workstation will not be permitted to connect to the network unless it can provide this unique identifier. This is similar to the function of your network's Workgroup or Domain name. When you're experiencing conductivity problems, it is always best to keep things simple. So next you are going to do is that, please disable any WEP encryption you might have configured. Successful implementation of encryption also includes the use of a shared key. A HEX key is the most common, but other formats are also used. This key identifies the workstation to the router as a trusted member of this network. Different manufacturers can implement this key technology in ways that might prevent them from working correctly with another vendor's products. So pay attention to detail is going to be the key to a successful installation. Next make sure the router and the NIC are configured to use the same communications channel. There are normally 11 of them, and the default channel can also vary from vendor to vendor. You might also want to confirm that the router has DHCP services enabled and an address pool configured. If not, the NIC won't be able to pick up an IP address. I have run across a few access points that offer DHCP services but do not assign all of the needed IP information to the NIC. As a result, I was able to connect to the network, but could not browse the web. The point is, don't assume anything. Verify for yourself that all of the required settings are being received by the workstation. Finally, you might want to keep the system you're trying to configure in the same room as the router, at least during the initial configuration, in order to minimize potential interference from concrete walls or steel beams. http://www.sapido.com.tw/ 45 User Manual v1.0.0 2. Q: My PC can’t locate the Wireless Access Point. A: Check the following: Your PC is set to Infrastructure Mode. (Access Points are always in Infrastructure Mode.) The SSID on your PC and the Wireless Access Point are the same. Remember that the SSID is case-sensitive. So, for example “Workgroup” does NOT match “workgroup”. Both your PC and the Wireless Access Point must have the same setting for WEP. The default setting for the Wireless Router is disabled, so your wireless station should also have WEP disabled. If WEP is enabled on the Wireless Router, your PC must have WEP enabled, and the key must match. If the Wireless Router’s Wireless screen is set to Allow LAN access to selected Wireless Stations only, then each of your Wireless stations must have been selected, or access will be blocked. To see if radio interference is causing a problem, see if connection is possible when close to the Wireless Access Point. Remember that the connection range can be as little as 100 feet in poor environments. 3. Q: Wireless connection speed is very slow. A: The wireless system will connect at highest possible speed, depending on the distance and the environment. To obtain the highest possible connection speed, you can experiment with following: Access Point location: Try adjusting the location and orientation of the Access Point. Wireless Channel: If interference is the problem, changing to another channel may show a marked improvement. Radio Interference: Other devices may be causing interference. You can experiment by switching other devices off, and see if this helps. Any “noisy” devices should be shielded or relocated. RF Shielding: Your environment may tend to block transmission between the wireless stations. This will mean high access speed is only possible when close to the Access Point. 4. Q: Some applications do not run properly when using the Wireless Router. http://www.sapido.com.tw/ 46 User Manual v1.0.0 A: The Wireless Router processes the data passing through it, so it is not transparent. Use the Special Application feature to allow the use of Internet applications which do not function correctly. If this does solve the problem, you can use the DMZ function. This should work with almost every application, but: 5. It is a security risk, since the firewall is disabled. Only one (1) PC can use this feature. Q: I can’t connect to the Wireless Router to configure it. A: Check the following: The Wireless Router is properly installed, LAN connections are OK, and it is powered ON. Make sure that your PC and the Wireless Router are on the same network segment. If your PC is set to “Obtain an IP Address automatically” (DHCP client), restart it. If your PC uses a Fixed (Static) IP address, make sure that it is using an IP Address within the range 192.168.1.129 to 192.168.1.253 and thus compatible with the Wireless Router’s default IP Address of 192.168.1.254. Also, the Network Mask should be set to 255.255.255.0 to match the Wireless Router. In Windows, you can check these settings by using Control Panel ~ Network to check the Properties for the TCP/IP protocol. 6. Q: The WinXP wireless interface couldn’t communicate the WEP with ADSL2/2+ Broadband Router’s wireless interface. A: The default WEP of WinXP is Authentication Open System - WEP, but the WEP of ADSL2/2+ Broadband Router is only for Shared Key - WEP, it caused both sides couldn’t communicate. Please select the WEP of WinXP from Authentication Open System to Pre-shared Key - WEP, and then the WEP wireless interface between WinXP and ADSL2/2+ Broadband Router would be communicated. 5.7 1. Support Q: What is the maximum number of IP addresses that the XDSL Router will support? A: The Router will support to 253 IP addresses with NAT mode. 2. Q: Is the Router cross-platform compatible? http://www.sapido.com.tw/ 47 User Manual v1.0.0 A: Any platform that supports Ethernet and TCP/IP is compatible with the Router. 5.8 1. Others Q: Why can’t I receive corrupted FTP downloads? A: If you are experiencing corrupted files when you download a file with your FTP client, try using another FTP program. 2. Q: What can I do if there is already a DHCP server in LAN? A: If there are two DHCP servers existing on the same network, it may cause conflict and generate trouble. In this situation, we suggest to disable DHCP server in router and configure your PC manually. http://www.sapido.com.tw/ 48 User Manual v1.0.0 Chapter 6 Appendices 6.1 Operating Systems 1. Microsoft:Windows 2000, XP, Vista 32bit and the following related versions. 2. Apple:Mac OS X 10.4.7, Leopard and the following related versions. 3. Linux:Redhat 9, Fedora 6 & 7, Ubuntu 7.04 and the following related versions. 6.2 Browsers 1. Internet Explorer ver. 6 and 7 and the following related versions. 2. FireFox ver. 2.0.0.11 and the following related versions.3. 3. Safari ver. 3.04 and the following related versions. 6.3 Communications Regulation Information Should any consumers need to learn more information, services and supports, please contact the supplier of your product directly. http://www.sapido.com.tw/ 49 User Manual v1.0.0