1
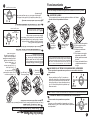
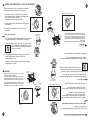
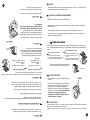
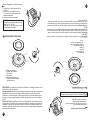
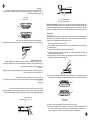
Funcionamiento 5 Knob on the mark of ignition. MED NOTA: No obstruya la salida de los gases de combustión de horno y asador. AJUSTE DE FLAMAS Si el quemador del horno presenta puntas amarillas en las flamas: Ajuste del aire del quemador del horno: 1.- Light a match and place it close the burner while you push and turn the knob 1/4 of the way,the burner will light immediatly. . MAXIMUM FLAME MINIMUM FLAME HI To turn on the surface burners manually: LO OFF HOW TO TURN ON THE BURNERS MANUALLY NOTE: In the case on power cut, your range can be ignited manually. 1 Retire la parrilla del horno (Ver Pág. 7) 2 Retire la charola del horno. (Ver Pág. 10) NOTA: Las diferentes altitudes sobre el nivel del mar y las variaciones en el suministro de gas, hacen necesario regular la entrada de aire primario a los quemadores para obtener una adecuada mezcla de aire-gas y así tener un buen funcionamiento de la estufa. 3 A - Afloje el tornillo del regulador. B - Gire el regulador un poco. C - Encienda el horno. D - Verifique que las flamas sean azules. E - Si las flamas no son azules repita desde el paso B. Al finalizar apriete nuevamente el tornillo. F - Coloque la charola del horno y la parrilla nuevamente en su lugar. ENCENDIDO ELECTRÓNICO DE QUEMADORES SUPERIORES Para encender los quemadores superiores con encendido electrónico independiente : APAGADO OFF Knob in ignition position. ELECTRONIC IGNITION BUTTON Some models (see page 2) have electronic ignition, to operate it push the button located on the left side of the manifold panel while you push and turn the desired knob. Release the ignition button when the burner lights. MED MINIMUM FLAME MAXIMUM FLAME HI LO OFF To turn on the surface burners with electronic ignition: TOP BURNERS WITH ELECTRONIC IGNITION NOTE: Because of different altitudes above sea level and variations in the supply of gas, you may need to adjust the main air intake to the burners. This will result in a better air-gas mixture and thus a better operation. 1 Remove the oven rack. (See page 7). 2 Remove the oven tray. (See page 10). 3 A - Locate the screw on the air shutter and loosen it. B - Turn around the air shutter. C - Turn on the oven. D - Verify that the flames are blue. E - If the flames are not blue, repeat since step B, when the flames are adjusted, tighten the screw again. F - Replace the oven tray and the oven rack. Algunos modelos (ver Pag. 2) cuentan con encendido electrónico, para operarlo oprima el botón que se localiza en el lado izquierdo del frente de perillas y al mismo tiempo presione y gire 1/4 de vuelta la perilla del quemador que desea encender. FLAMA HI MÁXIMA BOTÓN DE ENC. ELECTRÓNICO LO FLAMA MÍNIMA MED Perilla en posición de encendido. NOTA: En caso de no contar con electricidad, su estufa puede ser encendida manualmente. ENCENDIDO MANUAL DE QUEMADORES SUPERIORES Para encender los quemadores superiores: Acerque un cerillo encendido al quemador y al mismo tiempo presione y gire 1/4 de vuelta la perilla del quemador correspondiente. FLAMA HI MÁXIMA LO FLAMA MÍNIMA If the oven burner has yellow flames, it may require adjustment to the air shutters: How to adjust the oven burner air shutter: HOW TO ADJUST THE FLAMES NOTE: Do not obstruct the gas exhaust of the oven or broiler. MED Perilla en posición de encendido. 5 How to Use Your Range