1
USER’S MANUAL
English
C Pen
The symbol on our products signifies that they have been
certified according to the EMC directive 89/336/EEC and the
Low Voltage directive 73/23/EEC when applicable. The products
fulfill the requirements according to the following standards:
EN 50 081-1:1992 Electromagnetic compatibility, Generic
Emission Standard.
EN 50 082-1:1992 Electromagnetic compatibility, Generic
Immunity Standard.
Second edition (April 1999).
This manual is published by C Technologies AB, without any warranty.
Improvements and changes to this manual necessitated by typographical errors,
inaccuracies of current information, or improvements to programs and/or
equipment, may be made by C Technologies AB at any time and without notice.
Such changes will, however, be incorporated into new editions of this manual.
All rights reserved
© C Technologies AB, 1999
Part No. AM 251 022 R1A
Printed in Sweden
Contents
C PEN ............................................................... 5
The Battery .................................................................................. 6
How C Pen Works ....................................................................... 7
The Buttons ................................................................................. 9
Turning On and Off ................................................................. 10
The Main Menu ........................................................................ 11
Reading text .............................................................................. 14
Reading another line ............................................................... 16
Stop reading ............................................................................. 16
NOTES ............................................................ 17
The Command menu ............................................................... 17
Creating a new file or folder ................................................... 18
The Text menu .......................................................................... 18
The Edit menu .......................................................................... 19
C Write ....................................................................................... 22
Closing a text ............................................................................ 29
Leaving Notes ........................................................................... 29
SETTINGS ....................................................... 30
Text Language .......................................................................... 31
Read Mode ................................................................................ 31
Text Quality ............................................................................... 31
C Write Feedback ..................................................................... 33
System Settings ......................................................................... 34
STORAGE ....................................................... 35
INFO ............................................................... 35
C ADDRESS ................................................... 36
Enter a new contact ................................................................. 37
View a contact .......................................................................... 39
Edit a contact ............................................................................ 40
Find a contact ........................................................................... 40
Delete a contact ........................................................................ 41
Exit C Address ........................................................................... 42
C Pen
C DICTIONARY ............................................... 43
Dictionary license key .............................................................. 43
Introduction .............................................................................. 44
Translation screen ..................................................................... 45
Word selection list .................................................................... 46
Word selection screen .............................................................. 47
Word edit box .......................................................................... 48
Word references ....................................................................... 48
Text Language .......................................................................... 49
DICTIONARIES button .............................................................. 49
INFO button .............................................................................. 50
Removing dictionaries ............................................................. 50
Exiting C Dictionary ................................................................. 50
CONNECTING TO A PC ................................... 51
Installing software .................................................................... 51
Getting help .............................................................................. 53
C Pen viewer .............................................................................. 53
Transferring files ....................................................................... 53
C Address ................................................................................... 54
C Dictionary ............................................................................... 54
C Direct ...................................................................................... 55
C Pen Edit .................................................................................. 55
Storage ...................................................................................... 56
Closing the connection ........................................................... 56
TROUBLESHOOTING ....................................... 57
CARE & SAFETY ............................................. 59
TECHNICAL SPECIFICATIONS ......................... 60
Warranty .................................................................................... 61
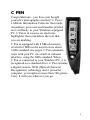
C PEN
Congratulations - you have just bought
yourself a photographic memory! C Pen is
a Mobile Information Collector that reads,
remembers, processes and transfers printed
text cordlessly to your Windows-equipped
PC. C Pen is in essence an electronic
highlighter that remembers the text that
you are marking.
C Pen is equipped with 8 MB of memory,
of which 6 MB can be used to store about
3,000 standard size pages. C Pen communicates with your PC via a built-in infrared
interface, using the IrDA standard. When
C Pen is connected to your Windows PC, it is
recognized as a standard drive. C Pen contains
a digital camera, OCR (Optical Character
Recognition) technology and a powerful
computer, yet weighs no more than 100 grams.
Carry it with you wherever you go.
5
C Pen
The Battery
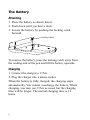
Attaching
1. Place the battery as shown below.
2. Push down until you hear a click.
3. Secure the battery by pushing the locking catch
forward.
Locking catch
To remove the battery, press the locking catch away from
the reading end of the pen and lift the battery upwards.
Charging
1. Connect the charger to C Pen.
2. Plug the charger into a mains socket.
When the battery is fully charged, the charging stops
automatically. You cannot overcharge the battery. While
charging, you may use C Pen as usual, but the charging
time will be longer. The normal charging time is 12
hours.
6
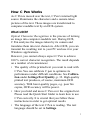
How C Pen Works
As C Pen is moved over the text, C Pen’s internal light
source illuminates the characters and a camera takes
pictures of the text. These images are transformed to
computer-readable text by an OCR-system.
What is OCR?
Optical Character Recognition is the process of turning
an image into computer-readable text. During OCR,
C Pen analyzes the images taken by its camera and
translates them into text characters. After OCR, you can
transmit the resulting text to your PC and use it in your
Windows applications.
However, you cannot always expect C Pen to achieve
100 % correct character recognition. The result depends
on a number of circumstances:
• The quality of the printed text you want to read with
C Pen. You can calibrate C pen to optimize its
performance under difficult conditions. See Calibration under Settings/Text Quality, p. 32. High-quality
printed text produces, of course, maximum OCR
accuracy. With lower-quality pages, e.g. poor fax
copies, OCR accuracy will be poorer.
• How you hold and move C Pen over the original text.
Please read the Quick Start folder to learn how to use
C Pen correctly. It is crucial that you follow these
instructions in order to get optimal results.
• The language of the text C Pen is reading. The text
language should be set in Settings.
7
C Pen
• Anything that is not a printed character, and any
character distorted by a mark or smudge on the paper
could be unrecognizable.
• Characters in the text should not overlap.
• Underlined text is difficult for C Pen to read because
the underline changes the shape of descenders of the
letters q, g, y, p, and j.
• C Pen can’t read red or yellow text on a white or red
background, or white text on a red background.
• The size of the characters should be 7–20 points.
Read more about settings in the Settings chapter on
p. 30.
!
8
NOTE: C Pen only recognizes machine-printed characters such as laser-printed or typewritten text. C Pen does
not recognise handwritten text.
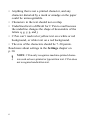
The Buttons
Navigation
control (Nav)
Trigger button
(Trigg)
On/Off and
Escape (ESC)
button
Press to select
an item
Turn to navigate
the menus
Nav
Turn the navigation control left or right to
move in menus and text. Press it to select an
item or option.
Trigg
Press and hold down to read text.
On/Off
ESC
This button is used to turn C Pen on and off.
It also closes menus and cancels text.
9
C Pen
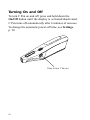
Turning On and Off
To turn C Pen on and off, press and hold down the
On/Off button until the display is activated/deactivated.
C Pen turns off automatically after 4 minutes of non-use.
To change the automatic power-off time, see Settings,
p. 30.
Press to turn C Pen on.
10
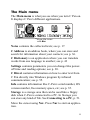
The Main menu
The Main menu is what you see when you turn C Pen on.
It displays C Pen’s different applications.
Move the cursor
with Nav
Notes contains the collected texts; see p. 17.
C Address is an address book, where you can store and
search for information about your contacts; see p. 36.
C Dictionary is an application where you can translate
words from one language to another; see p. 43
Settings contains parameters you can change like poweroff time and reading options; see p. 30.
C Direct contains information on how to enter text from
C Pen directly into Windows program by infrared
communication; see p. 55.
Info contains information like C-Pen’s serial number, OS
version number, free memory space, etc; see p. 35.
Storage is a storage area that can be used like a floppy
disk when C-Pen is connected to a PC. In Storage you
can store any kind of file. See Connecting to a PC, p. 51.
Move the cursor using Nav. Press Nav to start an application.
11
C Pen
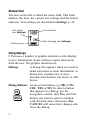
Status field
The area on the left is called the status field. This field
displays the time, the current text settings and the battery
indicator. Text settings are described in Settings, p. 30.
Text quality
(see Settings)
Battery power
Current time
Text language (see Settings)
Using dialogs
C Pen uses a number of graphic elements on the display
to give information. Some of these require interaction
from the user. The graphic elements are:
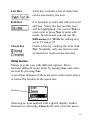
Dialogs
A dialog box appears when you need to
make selections or enter information. A
dialog box contains one or more
elements like buttons, list boxes or edit
boxes.
Dialog Buttons An on-screen button, e.g. OK, CANCEL, YES or NO. To select a button
that appears in a dialog, use the
navigation control; turn Nav until the
button you want to select is marked
with inverted colors, then press Nav.
CANCEL will cancel any changes and
close the dialog.
12
List Box
A list box contains a list of items that
can be selected by the user.
Edit Box
It is possible to enter and edit text in an
edit box. Select the box and the text
will be highlighted. Use your C Pen to
read a text or press Nav to enter edit
mode. In edit mode you can use the
Edit menu or C Write for editing text,
see p. 19 and p. 22.
Check box
Check a box by clicking the item with
Nav. Normally, only one item in a list
of check box items can be selected.
Using menus
Menus provide you with different options. Move
between different menu items by turning Nav and select
an item by pressing Nav.
A scroll bar indicates if there are more menu items above
or below the borders of the menu box.
Scroll bar
Selecting an item marked with a will display further
alternatives. Selecting Cancel will only close the menu.
13
C Pen
Reading text
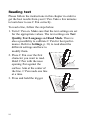
Please follow the instructions in this chapter in order to
get the best results from your C Pen. Take a few minutes
to learn how to use C Pen correctly.
To read a line, follow the steps below.
1. Turn C Pen on. Make sure that the text settings are set
for the appropriate values. The text settings are Text
Quality, Text Language and Read Mode. There is
also a possibility to calibrate C Pen for best performance. Refer to Settings, p. 30, to read about the
different settings and how to
modify them.
2. Place C Pen over the first
character you want to read.
Hold C Pen with the nose
opening flat against the
surface. Aim at the center of
the line. C Pen reads one line
at a time.
3. Press and hold the trigger.
14
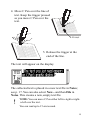
4. Move C Pen over the line of
text. Keep the trigger pressed
as you move C Pen over the
text.
0-15 cm/s
5. Release the trigger at the
end of the line.
The text will appear on the display.
The collected text is placed in a new text file in Notes;
see p. 17. You can also select New... and then File in
Notes. This creates a new, empty text file.
!
NOTE: You can move C Pen either left-to-right or rightto-left over the text.
You can read up to 15 cm/second.
15
C Pen
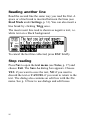
Reading another line
Read the second line the same way you read the first. A
space or a line break is inserted between the lines (see
Read Mode under Settings, p. 31). You can also insert a
line break by clicking Trigg once.
The most recent line read is shown as negative text, i.e.
white text on a black background.
To cancel the last line collected, press ESC briefly.
Stop reading
Press Nav to open the text menu (see Notes, p. 17) and
choose Exit. The Save As dialog box appears. Choose
YES if you want to save the text, NO if you want to
discard the text or CANCEL if you want to return to the
text. The dialog also contains an edit box with the file
name. See p. 12 how to use dialogs and edit boxes.
16
NOTES
Notes contains the text files you have read. Enter Notes
by moving the cursor to the Notes icon in the main
menu and by pressing Nav. Inside Notes, move between
items using Nav.
The Command menu
The Command menu contains commands for handling
texts. Open the menu by selecting a text file and pressing
Nav.
Press Nav to open the command menu
The options in the Command menu are:
Open
Rename
Opens a file.
Renames a file. A dialog with an edit box
appears; see Using Dialogs, p. 12.
Delete
Removes a selected file.
Properties Displays the creation date, the date of last
modification and the file size.
Cancel
Cancels the Command menu.
17
C Pen
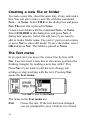
Creating a new file or folder
To create a new file, close the open text, if any, and read a
line. You can also create a new file with the command
New… in Notes. Select FILE in the dialog box and press
Nav. The new file is placed in Notes.
Create a new folder with the command New... in Notes.
Select FOLDER in the dialog box and press Nav. A
dialog box appears. Select the edit box if you want to
edit or read a folder name. Use your C pen to read a name
or press Nav to enter edit mode. To save the folder, select
OK and press Nav. The folder is placed in Notes.
The Text menu
In an open text you move the cursor line by line with
Nav. You can insert a new line at the cursor position (the
flashing triangle) by reading a new line with C Pen.
Press Nav if you want to edit the text, change text
settings or stop working with the text. Pressing Nav
opens the Text menu.
Press Nav to open the text menu
The items in the Text menu are:
Exit
18
Closes the text. If the text has been changed
you are prompted to save it before it is closed.
Edit
Enters edit mode. You can edit text either by
using the Edit menu (see below) or by using
C Write (see p. 22).
Settings Sets the text settings of the text you are
reading; see Settings, p. 30.
Select
Selects a read line/word. After selecting a
reading, you automatically enter edit mode.
Cancel
Closes the text menu.
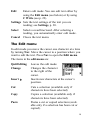
The Edit menu
In edit mode you move the cursor one character at a time
by turning Nav. Move the cursor to a position where you
want to edit the text. Press Nav to open the Edit menu.
The items in the edit menu are:
Quit Editing
Leaves the edit mode.
Change
Changes the character
to the right of the
cursor.
Insert
Inserts new characters at the cursor’s
position.
Cut
Cuts a selection (available only if
characters have been selected)
Copy
Copies a selection (available only if
characters have been selected).
Paste
Pastes a cut or copied selection (available only if a selection has been cut or
copied).
19
C Pen
Delete
Deletes a character or a selection.
Select
Selects characters or a whole text.
Settings
Sets the text settings of the text you are
reading.
Cancel
Closes the edit menu.
Change
Place the cursor to the left of the character you want to
change and choose Change from the menu.
Turn Nav to select the new character from the character
frame and then press Nav.
The character frame
Insert
Move the cursor to the place where you want the
insertion and select Insert from the menu. When pressing
Nav you can choose between inserting a space, a line
break, one character or multiple characters.
To insert one character, select Character and press Nav.
Then turn Nav to select a character from the character
frame and press Nav. The character frame closes automatically after the insertion.
To insert more than one character, select Multiple
Character and press Nav. Turn Nav to select a character
from the character frame and press Nav. The character
frame remains and you can continue inserting characters.
20
When you are finished, press ESC to return to the text
you are editing.
Select
Use the Select command to edit more than one character
at a time. Choose Select > Characters and turn Nav to
select multiple characters. Press Nav and choose Cut,
Copy or Delete from the menu.
If you select All, the whole text will be selected.
Delete
Place the cursor to the left of the character you want to
delete and choose Delete from the menu.
If text is selected, the whole selection will be deleted.
Settings
You can change text settings here. The text settings are
• Text Language: Select the language of the text you
are reading
• C Write Feedback: Check the box if you want
C Write feedback on
• Read mode: Select Continuous or Separate lines
• Text Quality: Select Normal or Inverted
• Calibration: Select Default Setting if your C Pen is
calibrated and you want to revert to the factory setting.
Quit Editing
Quit Edit mode by pressing Nav to open the Edit menu
and selecting Quit Editing.
21
C Pen
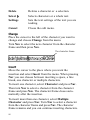
C Write
C Write is a feature that allows you to draw characters by
using C Pen as an ordinary pen. C pen can track its own
movement over a surface and recognize the movement as
a letter, digit or a symbol. Using C Write is an alternative
to using the character frame when inserting characters in
a text.
To be able to use C Write, the surface you “write” on
must have a distinct pattern. A printed text is the best
choice.
Use C Write in the following way:
1. Enter edit mode
2. Place C Pen against a text surface
3. Press and hold Trigg
4. Form a letter (see the prototypes, p. 25)
5. Release Trigg
When you release Trigg an image will shortly turn up,
showing the letter shape as perceived by your C Pen. You
do not have to wait for this image to disappear to write
your next letter.
Visual feedback
22
This visual feedback can be switched on/off in Settings.
Select C Write Settings (called C Write if you enter
Settings from Notes) and press Nav. A dialog box appears
where you can check or uncheck the Feedback utility.
Basic rules when using C Write
• In order to obtain maximum accuracy when writing
with C Pen, your characters should resemble the prototypes on the following pages as much as possible.
Start here
• A character must be drawn in one single stroke.
• The dot indicates the starting point of the stroke.
• The height of the character should be 1 - 4 cm.
• Trigg must be pressed before you start writing.
• It is important that the pen tip is in contact with the
surface while you are writing.
• The writing surface must have a distinct pattern, such
as a printed text. Solid colors or simple repetitive
patterns (lines, squares, grids) should be avoided.
Capital letters
When you enter edit mode the status field will look like
this:
C Write Lower case icon
The ab icon indicates that C Write will generate lowercase letters.
23
C Pen
In order to write a capital letter, you have to write the shift
sign first (see C Write Prototypes). Only the first letter
will be a capital. The status field will reflect this choice.
C Write Capital letter icon
If you write two shift signs, C Write will enter Caps Lock
mode. All letters will be capitals until you write a shift
sign again.
C Write Caps Lock mode icon
Symbols
Press Trigg shortly to enter symbol mode. The status
field displays a symbol icon.
C Write Symbol mode icon
Write one of the symbols in the symbol table. You are
automatically brought back to normal mode. If you want
to quit symbol mode without writing a symbol, you have
to write a backspace sign.
24
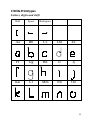
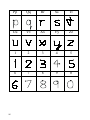
C Write Prototypes
Letters, digits and shift
Shift
Space
Backspace
Aa
Bb
Cc
Dd
Ee
Ff
Gg
Hh
Ii
Jj
Kk
Ll
Mm
Nn
Oo
25
C Pen
26
Pp
Qq
Rr
Ss
Tt
Uu
Vv
Xx
Yy
Zz
1
2
3
4
5
6
7
8
9
0
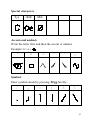
Special characters
Çç
Ææ
Øø
Accents and umlauts
Write the letter first and then the accent or umlaut.
Example: ä = a +
¨
º
^
´
`
~
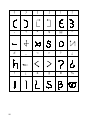
Symbols
Enter symbol mode by pressing Trigg briefly.
.
,
:
;
/
\
27
C Pen
28
(
)
[
]
{
}
-
+
*
$
@
“
#
_
<
>
?
¿
!
¡
£
§
ß
%
Closing a text
Press Nav to open the text menu, then select Exit. C Pen
prompts you to save before closing if changes have been
made.
Leaving Notes
To leave Notes, close the open text and select Exit in the
Notes application.
29
C Pen
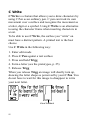
SETTINGS
Settings contains the parameters controlling C Pen. Enter
Settings from the main menu by moving the cursor to
the Settings icon and pressing Nav. A list of the available
settings appears.
To modify a setting:
1. Select the setting from the settings list with Nav. A
dialog box appears.
2. Turn Nav to highlight the setting value. Press Nav to
modify.
3. Turn Nav to change the value and press Nav to
confirm.
4. Select the OK button to close the dialog and save the
changed setting.
5. Exit Settings by selecting Exit at the top of the
Settings list.
The following settings are available:
•
•
•
•
•
30
Text Language
Read Mode
Text Quality
C Write Feedback
System Settings
Text Language
Select the language of the text you are reading from the
list of check boxes. If you read text containing numbers
only, select Numbers Only as language.
Read Mode
This setting indicates how C Pen should format the
readings. The read modes are:
Continuous text: A space is inserted between two
separate readings with C Pen. Suitable
when you read a complete paragraph
which will be used in a document on
your PC.
Separate lines: Each reading starts on a new line. Text
Quality
Text Quality
Select text quality from the list of check boxes.
Normal:
Black text on white background.
Inverted:
White text on black background.
31
C Pen
Calibration
C Pen’s reading ability can be adjusted to the present
contrast between the text and its background in the
following way:
1.
2.
3.
4.
Hold C Pen with the pen tip flat against the surface.
Press Trigg for two seconds without moving C Pen.
A progress indicator appears on C Pen’s screen.
Move C Pen over the text, in circles or back and forth.
Continue to move C Pen until the progress bar has
reached the end.
5. A message shows up to indicate that the calibration is
ready:
During the calibration process, C Pen will find the
appropriate balance of black and white for the particular
surface.
The calibration overrides factory setting. The calibration
is not saved when C Pen is turned off. If you want to
revert to the factory setting without turning C Pen off,
choose Calibration under Text menu/Settings or Edit
menu/Settings:
32
Select Calibration and press Nav and a dialog box
appears:
In the calibration dialog box, select CANCEL to go back
or DEFAULT SETTING to revert to the factory setting.
If you press the scan button (Trigg), calibration will start.
You can do a calibration whenever you use C Pen. This
method increases C Pen’s reading ability if the text is not
black and/or the background is not white. Inverted text
must still be set in Text Quality. Remember that red text
is not possible to read.
Text Quality, Text Language and Read mode are
referred to as text settings. You must use these text
settings in order to achieve the optimal OCR.
C Write Feedback
Check the box if you want enable the feedback facility
in C Write.
33
C Pen
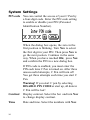
System Settings
PIN code You can control the access of your C Pen by
a four-digit code. Enter the PIN code setting
to enable or disable your PIN (Personal
Identification Number).
When the dialog box opens, the zero in the
first position is blinking. Turn Nav to select
the first digit in your PIN. Then press Nav to
go the next postion. Continue in the same
way. When you have reached OK, press Nav
and confirm the PIN in a new dialog box.
If PIN-code is enabled, you must enter the
PIN each time C Pen is turned on. After three
unsuccessful attempts, C Pen will turn off.
You get three attempts each time you start C
Pen.
Warning! If you start C pen by selecting
DISABLE PIN CODE at start up, all data in
C Pen will be lost!
Contrast
Display contrast. Select the bar and turn Nav
to change display contrast.
Time
Date and time. Select the numbers with Nav.
34
Menu
The language that C Pen uses in its
Language menus and dialog boxes. Select the desired
menu language in the list of check boxes.
Power-off The time of inactivity in minutes before
time
C Pen turns off automatically.
STORAGE
Storage is a storage area that can be used as a floppy
disk when C Pen is connected to a PC. See Connecting to
a PC for how to use Storage, p. 56.
This application has the following menu items:
Delete
Removes a file.
Properties Displays the file size, creation date and date
of last modification.
Cancel
Cancels the command menu
INFO
Info contains a list of help and information topics. Select
one of the topics from the list to read the topic text.
35
C Pen
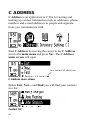
C ADDRESS
C Address is an application in C Pen for storing and
looking up contact information such as addresses, phone
numbers and e-mail addresses to people and organizations you communicate with.
Start C Address by moving the cursor to the C Address
icon in the main menu and press Nav. The C Address
main screen will open:
Your contact list starts here
C Address main screen
Below Exit, New... and Find you will find your contacts
in a list.
Contact list
36
Enter a new contact
To enter a new contact, select New... and press Nav. The
Contact edit screen will open.
Contact edit screen
You can change the choice of contact details (addresses,
phone numbers, e-mail addresses etc.) in OPTIONS.
Select OPTIONS, press Nav and scroll through the
options. Check or uncheck the boxes according to your
personal preferences. When you are finished, select OK
and press Nav or just press ESC.
Check boxes
In the Contact edit screen, turn Nav to go to the first
box, called First name. Read the first name of your
contact with your C Pen, for instance from a business
card or a telephone list. When you stop reading you will
automatically be moved to the next box, Last Name.
Read the last name to this box and you will be moved to
37
C Pen
a box called Full name. The name in this box will later
be suggested as your contact file name. Continue reading
text into the following boxes in the same way.
You can always move to any box you want by turning
Nav. If you want to redo a reading with C Pen, just select
the box and read again.
You can edit the content of a box by selecting it and
pressing Nav. A cursor indicates that you are in edit
mode:
Blinking cursor
Press Nav again to open the edit menu or use C Write to
edit the text. When you have finished editing, select
Done in the edit menu and press Nav.
If you want to discard the information you have entered,
press ESC or select Cancel and press Nav. A dialog box
appears, asking if you want to discard all changes. Select
Yes and press Nav.
Select Save and Close when you are finished (or select
Top at the end of the box list and press Nav). By pressing
Nav the Save As dialog box appears. The suggested file
name is the name you entered in the Full name box. If
this box is empty or unchecked the suggested file name
will be “Last name, First Name”. You can edit the file
name or you can read a file name with your C Pen.
38
A file name must not be longer than 64 characters.
Invalid characters like ‘\’ or ‘.’ will be replaced with a
blank space. If the file name already exists, a number
suffix will be added to the file name, for instance ‘John
Mill (1)’ if ‘John Mill’ already exists.
To save the contact file, select Yes and press Nav. A new
contact is added to your contact list.
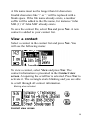
View a contact
Select a contact in the contact list and press Nav. You
will see the following menu:
To view a contact, select View and press Nav. The
contact information is presented in the Contact view
screen. At opening the scroll bar is selected. Press Nav to
activate it. The rectangle starts blinking and you are able
to scroll through all contact information.
Blinking when activated
Contact view screen
39
C Pen
To select OK or EDIT, first press Nav to deactivate the
scroll bar - the rectangle stops blinking - then turn Nav
to go to the buttons. If the buttons are not visible, just
turn Nav to the right to scroll the text sideways.
Edit a contact
There are two ways to edit a contact:
1. Select a contact in the contact list, press Nav, select
EDIT and press Nav again.
2. Select EDIT in the Contact view screen and press Nav.
In both cases the Contact edit screen will open, displaying the previously entered information in the boxes.
Editing and saving the text in a box can be performed in
the same way as described in Enter a new contact.
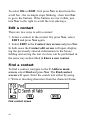
Find a contact
To find a contact, navigate to the C Address main
screen, select Find and press Nav. The Find contact
screen will open. Enter the search text either by using
C Write or inserting characters from the character frame.
Find contact screen
40
If the Search all fields check box is checked, all information stored in C Address will be searched in order to find
matching text.
If the check box is not checked only names will be
searched, (First name, Last name and Full name).
To start the search, select Find and press Nav. The Find
contact screen closes and a contact list containing only
the contacts with matching information will be displayed. You can select these files, just as you do in the
contact list.
Search result
Select EXIT and press Nav to close the screen and return
to the C Address main screen.
If no matching text is found, a dialog box appears telling
you “No matches found”. Select OK and press Nav to go
back to the Find Contact screen.
Delete a contact
Select a contact in the contact list, press Nav and select
Delete. A dialog box asks you to confirm that you are
sure. Select Yes and press Nav. The contact is now
deleted.
41
C Pen
Exit C Address
You can exit C Address from the C Address main screen
by selecting EXIT and pressing Nav or by pressing ESC.
42
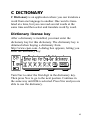
C DICTIONARY
C Dictionary is an application where you can translate a
word from one language to another. One word is translated at a time, but you can read several words at the
same time and then select and translate word by word.
Dictionary license key
After a dictionary is installed, you must enter the
dictionary key for this dictionary. The dictionary key is
obtained when buying a dictionary from
http://www.cpen.com. A dialog box appears, letting you
enter the dictionary key:
Turn Nav to enter the first digit in the dictionary key.
Then press Nav to go to the next postion. Continue in
the same way until OK is selected. Press Nav and you are
able to use the dictionary.
43
C Pen
Introduction
Start C Dictionary by moving the cursor to the C
Dictionary icon in the main menu and press Nav. C Pen
is now ready to read words to be translated. If you want
to change dictionary before you start reading, see
DICTIONARIES button p. 49.
The language from which you translate
Word edit box
Button for selecting dictionaries
C Dictionary main screen
To translate a word, just read the word with C Pen as
usual. One of the following situations occur:
1. The word is found in the dictionary and the translation is presented on the screen (see Translation
screen p. 45).
2. No exact match of the word is found in the dictionary
and a list of alternatives is displayed (see Word
selection list p. 46).
44
3. Several words are read and the words are shown in a
new screen (see Word selection screen p. 47).
4. A dialog box appears, telling that the word cannot be
found in the dictionary.
When you are reading a word it may happen that the
word (or part of the word) in front of and/or behind your
look up word is also included. If this is the case
C Dictionary acts according to the following rules:
• If two words are read, the longest word is looked up
• If three words are read, the middle word is looked up
• If more than three words are read, the Word selection
screen (see p. 47) is displayed
Translation screen
The Translation screen displays the translation of the
selected word. A scroll bar appears if only part of the text
is shown. Turn Nav to scroll the text.
Scroll bar
Translation screen
The meaning of bold and italic characters is explained in
Info (see INFO button p. 50).
Close the Translation screen by pressing Nav or ESC.
45
C Pen
Pressing Trigg briefly will delete the current reading and
bring you back to the C Dictionary main screen.
You can start reading a new word without closing the
screen.
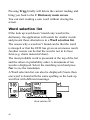
Word selection list
If the look up word doesn’t match any word in the
dictionary, the application will search for similar words
and present these alternatives in a Word selection list.
The reason why a word isn’t found can be that the word
is misspelt or that the OCR has given an erroneous result.
Another reason can be that the word is not in its base
form (e.g. chairs instead of chair).
The most probable word is presented at the top of the list
and the others in probability order. A maximum of ten
words is displayed. Select the matching word and press
Nav to see the translation.
A Word selection list can also be displayed if more than
one word is found with the same spelling as the look up
word but with different meanings.
Word selection list
46
Close the Word selection list by selecting Cancel and
press Nav or by pressing the ESC-button.
Pressing Trigg briefly will delete the current reading and
bring you back to the C Dictionary main screen.
You can start reading a new word without closing the list.
Word selection screen
If more than three words are read the Word selection
screen appears. Turn Nav to select a word and then press
Nav. The selected word is looked up and either the
Translation screen, a Word selection list or the Can’t
find dialog box is presented.
Word selection screen
Close the Word selection screen by pressing ESC or by
selecting the CANCEL button and then pressing Nav.
Pressing Trigg briefly will delete the current reading and
bring you back to the C Dictionary main screen.
You can start reading a new word without closing the
screen.
47
C Pen
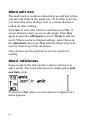
Word edit box
The read word or words are directed to an edit box where
you can edit them in the usual way. To be able to do this
you must first close dialogs, lists or screens that have
turned up after reading.
Turn Nav to select the edit box and then press Nav. A
cursor indicates that you are in edit mode. Press Nav
again to open the edit menu or use C Write to edit the
word. When you have finished editing, select Done in
the edit menu, then press Nav and the edited word will
now be looked up in the dictionary.
You can also use the edit box to see the result of a
reading.
Word references
Some words in the dictionaries contain references to
other words. The word references are displayed in bold
and italic style.
If you press Nav when a word reference is displayed, a
menu appears:
48
In this menu you can select to look up the reference,
canceling the menu or closing the translation containing
the reference (wrote in our example).
If you choose to look up the reference (write in our
example), this word will be translated.
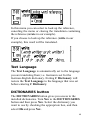
Text Language
The Text Language is automatically set to the language
you are translating from; i.e. German is set for the
German-English dictionary. Exiting C Dictionary will
restore the Text Language to the language that was set
before entering C Dictionary.
DICTIONARIES button
The DICTIONARIES button gives you access to the
installed dictionaries. Turn Nav to the DICTIONARIES
button and then press Nav. Select the dictionary you
want to use by checking the appropriate box, and then
select OK and press Nav.
49
C Pen
If you want to use the same dictionary the next time you
use your C Pen you do not have to repeat this procedure,
since the dictionary setting is stored when C Pen is
turned off.
INFO button
The INFO button displays information about the
currently selected dictionary; number of words, manufacturer of database, explanatory chart and abbreviations.
Removing dictionaries
Dictionaries are removed from the Host Computer.
Exiting C Dictionary
You can exit C Dictionary from the C Dictionary main
screen by selecting EXIT and pressing Nav or by
pressing ESC.
50
CONNECTING TO A PC
C Pen can be connected to a PC by Infrared (IR) Communication. To enable this communication certain hardware
and software must be installed on your PC and configured properly. The following are required:
1. IR port. Portable computers often have a built-in IR
port. Refer to your computer’s manual to find out
whether your notebook is equipped with an IR port
and if so, where it is located. Most desktop computers
do not have a built-in IR port. In this case you must
use an external IR adapter. Refer to your retailer if you
don’t have an IR adapter.
2. Infrared drivers for Windows 95 (included on the C Pen
Software CD). If you use Windows 98 or Windows NT,
please read the ReadMe file on the C Pen Software CD.
3. C Pen Windows Software. This software is installed
using the C Pen Software CD.
Installing software
Both the Infrared drivers and the C Pen Windows
Software are installed when you run the installation
program on the CD-ROM. Infrared drivers are possibly
already installed on your computer. The installation
program automatically detects if infrared drivers are
installed or not.
Infrared hardware on notebooks can be configured in
many different ways. Please refer to the ReadMe file on
the C Pen Software CD before installing infrared software
on a notebook. If you have questions and the ReadMe
51
C Pen
file does not help, please refer to C Pen Windows
Software Help or your notebook’s retailer or manufacturer.
To install C Pen Windows Software:
1. Put the C Pen Software CD into your computer’s CDROM drive and the installation program will start
automatically.
2. If the installation does not start, open the Start menu in
the Windows taskbar, select Run and type
d:\setup.exe, where d: is the drive letter for your CDROM drive.
3. To install C Pen Windows Software, click on Install C
Pen.
To install Infrared drivers, click on Install Infrared
(Windows 95 only).
The installation program also enables you to view the C
Pen Demo, which demonstrates how you should use C
Pen for best results. To play the demo, click on Demo.
To open the ReadMe file, click on ReadMe.
To connect C Pen to your PC, position C Pen so that it is
aligned with the PC’s IR port as shown in the figure (if
52
C Pen is within range of the computer’s IR port, the On/
Off button flashes with a green and red light). The
installation program will place the C Pen icon (My C
Pen) on your computer’s desktop. Double-click on the
icon to connect to C Pen.
Getting help
To get help using C Pen Windows Software, first open C
Pen Viewer (by double-clicking on My C Pen) and from
the Help menu select C Pen Help Topics. You can also
press F1 on your keyboard to enter C Pen Windows
Software Help.
C Pen Viewer
C Pen Viewer enables you to
browse the contents of your C
Pen. The user interface looks
like Windows Explorer and
you will recognize the
applications from the Main
Menu in C Pen. Use C Pen
Viewer to open and browse
files, to create new folders and
to install or remove applications in your C Pen.
Transferring files
Transfer files between C Pen and the PC the same way as
when working with a floppy disk or a hard drive. In C
53
C Pen
Pen Viewer, find the file you want to transfer (e.g. a text
file in Notes) and drag the file to a folder on your PC.
When transferring files from the PC to C Pen, remember
that each application, except Storage, accepts only its
own kind of files. Notes, for example, may only contain
text files. Storage accepts any kind of file.
C Address
C Address, the C Pen address book, is available in C Pen
Viewer on your PC. Double-clicking on C Address in C
Pen Viewer presents the address files stored in C Pen,
listed by their contact name. An address file can be
opened by Netscape Communicator or Microsoft
Outlook on your PC by double-clicking on it and
clicking Yes in the dialog. Please note that this will open
a copy of the file and that your changes will be saved on
your hard drive, not in C Pen. To put an edited address
file back into C Pen, simply drag it from a folder on your
PC and drop it into the C Address application in C Pen
Viewer.
C Dictionary
The C Dictionary application is also available in C Pen
Viewer. While translation of words is done in C Pen,
installation and removal of dictionaries is done on your
PC. The number of dictionaries that can be installed in C
Pen depends on the amount of free memory in your C
Pen. For information on how to install and remove
dictionaries, please refer to the C Pen Windows Software
Help.
54
C Direct
C Direct gives you the opportunity to enter text from
your C Pen at the cursor position in all Windows programs.
To activate C Direct place C Pen in front of the IR-port
on your PC, click the right mouse button on the C Pen
icon (My C Pen) and select C Direct from the menu. The
C Direct icon will appear in the system tray
in the lower right corner of your screen.
The display on your C Pen will show “C Direct”. When
you read text now with C Pen, it will appear as usual on
the display. To transfer the text to the active application
in Windows, direct C Pen’s IR-eye towards the IR-port of
the PC. The text will disappear from C Pen’s display and
be transferred to the cursor position in Windows.
The easiest way to control C Direct is from the C Direct
icon in the system tray in Windows. By clicking the icon
with the right mouse button, you can choose Connect,
Disconnect or Exit C Direct. For more information on
how to use C Direct, please refer to the C Pen Windows
Software Help.
C Pen Edit
C Pen Edit is a simple text editor that lets you edit files
stored in C Pen directly without having to first move
them to your PC. C Pen Edit provides basic text editing,
such as cut, copy, paste, find and replace. C Pen Edit can
open and save files that reside either on your PC or in
your C Pen. If you double-click on a text file in Notes it
55
C Pen
is automatically opened in C Pen Edit and it can be
saved directly back into C Pen.
Storage
To start using Storage, double-click its icon in C Pen
Viewer. Files in Storage are opened if you double-click
on them. Text files (files with the extension .txt) are
opened by C Pen Edit. Other file types are first copied to
a temporary folder on your hard drive (as defined in
Settings) and then opened by their default Windows
application. In this case, if you edit the file and save,
your changes will be saved on your hard disk and not in
C Pen.
Copying files is done according to Windows standard,
i.e. either by using drag-and-drop or Copy/Paste in the
Edit menu. You can delete files in Storage by selecting
the file(s) you wish to delete and then pressing Delete on
your keyboard. The Delete command is also available in
the File menu. Please note that this operation CANNOT
BE UNDONE.
Closing the connection
Close the connection between your C Pen and your PC
by selecting Disconnect C Pen from the File menu in C
Pen Viewer.
56
TROUBLESHOOTING
Problem: C Pen won’t turn on.
Solution:
Battery is not charged. Charge battery or use
AC/DC adapter.
You must press the On/Off button for two
seconds.
Problem: The text on the display does not match the
text you are reading.
Solutions: Make sure you have chosen the correct
language under Settings.
Make sure that you have chosen inverted
text if the text is white on black background,
or normal text if you have black text on
white background. These are also under
settings.
Make sure that you hold C Pen so that the
nose is flat against the surface of the text you
are reading. If you have an angle between
the nose and the surface, C Pen will take
incorrect pictures of the text.
Problem: A dialog box with the message “Nothing
read” appears.
Solution:
You must keep the trigger pressed as you
move C Pen over the text.
You must hold the nose opening flat against
the surface before you press the trigger.
57
C Pen
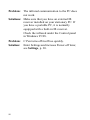
Problem: The infrared communication to the PC does
not work.
Solutions: Make sure that you have an external IR
receiver installed on your stationary PC. If
you have a portable PC, it is normally
equipped with a built-in IR receiver.
Check the infrared under the Control panel
in Windows 95/98.
Problem: C Pen turns off itself too quickly.
Solution:
58
Enter Settings and increase Power-off time;
see Settings, p. 30.
CARE & SAFETY
• Keep C Pen away from direct sunlight, heat, moisture
and dust.
• Do not expose C Pen to extreme variations in temperature.
• Make sure that the camera opening is free from dust or
any other objects.
• Clean C Pen with a dry cloth. Do not use detergents or
other chemicals when cleaning C Pen.
• Do not use other batteries than the one supplied with C
Pen. Should you need a new battery, contact your local
dealer.
• When charging, use the charger supplied with C Pen.
The charger is specially designed for C Pen and should
not be used for other equipment.
• Make backup copies of the files in your C Pen regularly and keep the copies in a safe place.
59
C Pen
TECHNICAL SPECIFICATIONS
Size:
150x38x23 mm
Weight:
100 g
(with battery installed)
Display:
202x32 pixels,
40 characters per row,
4 rows
Processor:
Intel© StrongARM™ 100 MHz processor
Memory:
1 MB RAM
8 MB flash memory, of which 6 MB can
be used for text files
Reading speed: max 15 cm/s (up to 75 characters/s)
Character sizes: 7-18 points
60
INDEX
B
M
Battery 6
Battery indicator 12
Buttons 9
Main Menu 11
Menus 13
C
Navigation control, Nav 9
Notes 17
C Address 36, 54
C Dictionary 43, 54
C Direct 55
C Pen Edit 55
C Pen Viewer 53
C Write 22
C Write Prototypes 25
Calibration 32
Command menu 17
Connecting to a PC 51
Contrast 34
N
O
OCR 7
P
PIN code 34
R
Read Mode 31
Reading text 14
S
Date 34
Dialog box 12
Settings 30
Status field 12
Storage 35, 56
System Settings 34
E
T
Edit box 13
Edit menu 19
Technical specifications 60
Text, inverted 31
Text Language 31
Text menu 18
Text Quality 31
Text settings 33
Time 34
Transferring files 53
Trigg 9
Troubleshooting 57
Turning on/off 10
D
F
File properties 17, 35
I
Info 35
Infrared communication 51
Installing software 51
Inverted text 31
L
Language, setting 30
61
C Pen
Warranty
C Technologies AB warrants that this product is free from defects in materials and function at the time
of original purchase and for a period of one year from that date. When the name C Technologies is
mentioned in the following text, it means, unless otherwise stated, C Technologies AB (reg. number
556532-3929), its subsidiaries and retailers.
If, during the warranty period, any defect in the product arises due to a deficiency in materials or
function, C Technologies pledges to, at C Technologies' option, either repair or replace the defective
product with the same or an equivalent model.
C Technologies, however, takes no responsibility for:
1. Damage caused during shipping, by accidents, malicious damage, modification, incorrect usage,
force majeure or any cause beyond the control of C Technologies, including but not limited to
lightning, water, fire, public disturbances, riots, strike, war or other similar conflicts.
2. C Technologies is not responsible for damage (including but not limited to direct or indirect
personal injury, lost profits, fall in production, losses of or alterations to processed information or
any other incidental or consequential damages) caused by the product or the usage of the product
or because the product cannot be used.
3. Deficient maintenance or a repair performed by unauthorized persons.
4. Incompatibility due to technological developments.
5. Defects caused by external equipment or abnormal wear.
6. Defects caused by normal wear and tear.
7. Damage caused by the usage of inappropriate battery.
8. Damage arising in connection with or as a consequence of upgrading with additions to or
alterations of the product, using software or hardware not produced by or approved in writing by C
Technologies.
If your C Pen product requires warranty service you should return the product to the dealer/retailer from
whom it was purchased. The product must be packed in original packaging or with sufficient care so
as to avoid shipping damage. The original purchaser must be able to show proof and date of
purchase with receipt/invoice from point of purchase in order for this warranty to be valid.
Repair or exchange does not extend or renew the warranty period. Exchanged defective parts become the
property of C Technologies. When the warranty period has expired, the warranty of exchanged/replaced
parts also ceases.
This product is not to be regarded as having defects in materials or function if it must be rebuilt in
order to be modified in accordance with national or local technical safety regulations in a country
other than one that the product was meant to be used in.
C Technologies reserves all rights to the product, its hardware, software and trademark. Whoever buys
or uses the product has no right to alter, disassemble, reverse engineer or in any other way use any part
of the hardware or software in the product, except in the way and for the purposes permitted by law.
This warranty does not affect the purchaser's rights against the dealer arising from the sales/purchase
contract, nor the purchaser's legal rights according to existing, mandatory rules in applicable laws.
If there are no such applicable laws or mandatory rules, the purchaser's rights are limited to those
which are stated in this warranty. C Technologies shall not be liable for any incidental or
consequential damages for breach of any expressed or implied warranty of this product.
62