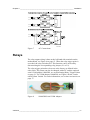
1
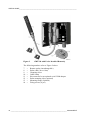
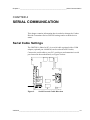
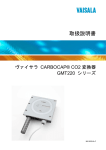
USER'S GUIDE Vaisala CARBOCAP® Carbon Dioxide Transmitter Series GMT220 M010022EN-F PUBLISHED BY Vaisala Oyj P.O. Box 26 FI-00421 Helsinki Finland Phone (int.): +358 9 8949 1 Fax: +358 9 8949 2227 Visit our Internet pages at www.vaisala.com. © Vaisala 2012 No part of this manual may be reproduced, published or publicly displayed in any form or by any means, electronic or mechanical (including photocopying), nor may its contents be modified, translated, adapted, sold or disclosed to a third party without prior written permission of the copyright holder. Translated manuals and translated portions of multilingual documents are based on the original English versions. In ambiguous cases, the English versions are applicable, not the translations. The contents of this manual are subject to change without prior notice. This manual does not create any legally binding obligations for Vaisala towards customers or end users. All legally binding obligations and agreements are included exclusively in the applicable supply contract or the General Conditions of Sale and General Conditions of Service of Vaisala. ________________________________________________________________________________ Table of Contents CHAPTER 1 GENERAL INFORMATION............................................................................ 5 About This Manual ................................................................... 5 Contents of This Manual ....................................................... 5 Version Information ............................................................... 5 Related Manuals ................................................................... 6 Documentation Conventions ................................................. 6 Safety......................................................................................... 6 ESD Protection...................................................................... 7 Recycling .................................................................................. 7 Warranty.................................................................................... 7 CHAPTER 2 PRODUCT OVERVIEW.................................................................................. 9 GMT220 Transmitter Parts ...................................................... 9 LED Indicators and Optional Display ................................... 11 CHAPTER 3 INSTALLATION............................................................................................ 13 Wall Mounting......................................................................... 13 Duct or Channel Mounting .................................................... 14 Connections............................................................................ 15 Power Supply Requirements ................................................ 16 Connection to a 24 VAC Supply ........................................... 16 Relays ...................................................................................... 17 CHAPTER 4 SERIAL COMMUNICATION ........................................................................ 19 Serial Cable Settings.............................................................. 19 Serial Commands ................................................................... 20 Setting Relay Trigger Points ............................................... 21 Pressure Compensation...................................................... 22 Temperature Setting ........................................................... 23 Display Setting .................................................................... 23 Error States............................................................................. 24 Non-critical and Fatal Errors ............................................... 24 Error Indication in Transmitters without Display.................. 25 Error Messages ...................................................................... 25 VAISALA ________________________________________________________________________ 3 USER'S GUIDE____________________________________________________________________ CHAPTER 5 MAINTENANCE............................................................................................27 Replacing the Probe...............................................................27 Transmitter with Integrated Probe (Wall Model)..................27 Transmitter with Remote Probe...........................................27 Check and Calibration............................................................28 Comparison with Calibrated Probe......................................28 Calibrator GMK220..............................................................28 On-site Checking and Adjusting with Reference Gas and GM70 Hand-Held Meter ......................................................29 Two-Point Adjustment Procedure........................................30 One-Point Adjustment Procedure........................................32 Technical Support ..................................................................33 Product Returns......................................................................33 CHAPTER 6 TECHNICAL DATA ......................................................................................35 Technical specifications ........................................................35 Inputs and outputs ...............................................................36 Operating conditions............................................................36 Mechanics ...........................................................................36 Electromagnetic compatibility..............................................37 Accessories .........................................................................37 Dimensions in mm (inches)...................................................38 List of Figures Figure 1 Figure 2 Figure 3 Figure 4 Figure 5 Figure 6 Figure 7 Figure 8 Figure 9 Figure 10 Figure 11 Figure 12 Figure 13 Figure 14 Figure 15 Figure 16 GMT220 with Integrated Probe ..................................................9 GMT220 with Probe Installed Remotely...................................10 LED Indicators and Optional Display........................................11 Mounting the Transmitter..........................................................13 Gasket Ring ..............................................................................14 Electrical Connections and Jumpers ........................................15 AC Connections........................................................................17 19040GM Serial COM Adapter.................................................17 Serial Port and Cable Direction ................................................19 Field Check Adapter .................................................................30 Location of the GM70 Adjustment Button.................................31 Transmitter................................................................................38 Mounting Plate..........................................................................39 Probe GMP221 .........................................................................39 Probe GMP222 .........................................................................40 Mounting Flange GM45156SP .................................................40 List of Tables Table 1 Table 2 Table 3 Table 4 Table 5 Table 6 Manual Revisions .......................................................................5 Related Manuals.........................................................................6 Serial Settings...........................................................................20 Serial Commands .....................................................................20 Altitude and Atmospheric Pressure ..........................................22 Error Messages ........................................................................25 4 ___________________________________________________________________ M010022EN-F Chapter 1 ________________________________________________________ General Information CHAPTER 1 GENERAL INFORMATION This chapter provides general notes for the manual and the Carbon Dioxide Transmitter Series GMT220. About This Manual This manual provides information for installing, operating, and maintaining Carbon Dioxide Transmitter Series GMT220. Contents of This Manual This manual consists of the following chapters: - Chapter 1, General Information, provides general notes for the manual and the Carbon Dioxide Transmitter Series GMT220. - Chapter 2, Product Overview, introduces the Carbon Dioxide Transmitter Series GMT220. - Chapter 3, Installation, provides you with information that is intended to help you install this product. - Chapter 4, Serial Communication, contains information that is needed to change the Carbon Dioxide Transmitter Series GMT220 settings and to read the device status. - Chapter 5, Maintenance, provides information that is needed in basic maintenance of the Carbon Dioxide Transmitter Series GMT220. - Chapter 6, Technical Data, provides the technical data of the Product. Version Information Table 1 Manual Revisions Manual Code M010022EN-D M010022EN-E M010022EN-F Description August 2008 October 2008 - Updated technical specification March 2012 - Updated error messages VAISALA ________________________________________________________________________ 5 USER'S GUIDE____________________________________________________________________ Related Manuals Table 2 Related Manuals Manual Code M010139EN Manual Name Vaisala CARBOCAP® Hand-Held Carbon Dioxide Meter GM70 User's Guide Documentation Conventions Throughout the manual, important safety considerations are highlighted as follows: WARNING Warning alerts you to a serious hazard. If you do not read and follow instructions very carefully at this point, there is a risk of injury or even death. CAUTION Caution warns you of a potential hazard. If you do not read and follow instructions carefully at this point, the product could be damaged or important data could be lost. NOTE Note highlights important information on using the product. Safety The Carbon Dioxide Transmitter Series GMT220 delivered to you has been tested for safety and approved as shipped from the factory. Note the following precautions: WARNING Ground the product and verify outdoor installation grounding periodically to minimize shock hazard. CAUTION Do not modify the unit. Improper modification can damage the product or lead to malfunction. 6 ___________________________________________________________________ M010022EN-F Chapter 1 ________________________________________________________ General Information ESD Protection Electrostatic Discharge (ESD) can cause immediate or latent damage to electronic circuits. Vaisala products are adequately protected against ESD for their intended use. It is possible to damage the product, however, by delivering electrostatic discharges when touching, removing, or inserting any objects inside the equipment housing. To make sure you are not delivering high static voltages yourself: - Handle ESD sensitive components on a properly grounded and protected ESD workbench. - When an ESD workbench is not available, ground yourself to the equipment chassis with a wrist strap and a resistive connection cord. - If you are unable to take either of the above precautions, touch a conductive part of the equipment chassis with your other hand before touching ESD sensitive components. - Always hold component boards by the edges and avoid touching the component contacts. Recycling Recycle all applicable material. Dispose of batteries and the unit according to statutory regulations. Do not dispose of with regular household refuse. Warranty Visit our Internet pages for standard warranty terms and conditions: http://www.vaisala.com/warranty. Please observe that any such warranty may not be valid in case of damage due to normal wear and tear, exceptional operating conditions, negligent handling or installation, or unauthorized modifications. Please see the applicable supply contract or Conditions of Sale for details of the warranty for each product. VAISALA ________________________________________________________________________ 7 USER'S GUIDE____________________________________________________________________ This page intentionally left blank. 8 ___________________________________________________________________ M010022EN-F Chapter 2 __________________________________________________________ Product Overview CHAPTER 2 PRODUCT OVERVIEW This chapter introduces the Carbon Dioxide Transmitter Series GMT220. GMT220 Transmitter Parts Vaisala’s GMT220 transmitters are versatile instruments for measuring CO2 in industrial applications. The CARBOCAP® sensor is silicon based and its operation is based on the NDIR Single-Beam Dual-Wavelength principle. 0807-032 Figure 1 GMT220 with Integrated Probe The following numbers refer to Figure 1 above: 1 2 3 4 5 6 = = = = = = Transmitter cover Transmitter housing Integrated probe (interchangeable) Printed protective film Tightening screw Cable gland (I.D. 6 mm) VAISALA ________________________________________________________________________ 9 USER'S GUIDE____________________________________________________________________ 0807-033 Figure 2 GMT220 with Probe Installed Remotely The following numbers refer to Figure 2 above: 7 8 9 10 11 12 13 14 = = = = = = = = Remote probe (interchangeable) Probe cable (2m or 10m) Clamping sleeve Cable clamp Pin connector for an optional serial COM adapter Probe mounting clips (optional) Mounting flange (optional) Fixing screws (4 pcs) 10 __________________________________________________________________ M010022EN-F Chapter 2 __________________________________________________________ Product Overview LED Indicators and Optional Display The GMT220 series transmitter has, as a standard, three LED light indicators on the cover plate: OPERATION, LEVEL 1 and LEVEL 2 (see Figure 3). - The green OPERATION LED is lit when the power is connected. - The red LEVEL LEDS are lit if the relay setting is reached, for example when CO2 concentration is over the predefined limit. If the relays are not in use, the LEVEL LEDs indicating CO2 concentration are dark. The transmitter is also available with an optional back lit LCD display, which outputs the CO2 volume concentration in unit of percentage or ppm depending on the measurement range of the probe. Blinking led lights and Er-codes in the display indicate operation errors, see Error Messages on page 25. 0807-034 Figure 3 LED Indicators and Optional Display For GMP221 probe, the display shows percentage values with two decimal accuracy, for example 0.31 %. For GMP222 probe, the display shows ppm values rounded up to the nearest 10 ppm. VAISALA _______________________________________________________________________ 11 USER'S GUIDE____________________________________________________________________ This page intentionally left blank. 12 __________________________________________________________________ M010022EN-F Chapter 3 _______________________________________________________________ Installation CHAPTER 3 INSTALLATION This chapter provides you with information that is intended to help you install this product. Wall Mounting Mount the wall model transmitter or the remote probe into a place representing the environment to be measured. 0807-035 Figure 4 Mounting the Transmitter The following numbers refer to Figure 4 above: 1 2 = = Attach the mounting plate to the wall with screws. Press down the transmitter so that it slides along the rails of the mounting plate. VAISALA _______________________________________________________________________ 13 USER'S GUIDE____________________________________________________________________ Duct or Channel Mounting When the probe is installed in a duct or channel, it is recommended to use the optional mounting flange (GM45156SP). 1. Drill a hole with minimum diameter of 22 mm in the wall. 2. Attach the flange onto the duct with four screws so that the gasket ring seals the attachment. 3. Place the probe through the flange so deep that the perforated head is completely in the duct (see Figure 5 below). 0807-036 Figure 5 NOTE Gasket Ring If the air pressure in the duct is clearly lower than the surrounding air pressure, an additional sealing may be necessary. This is to avoid possible measurement errors due to leakages through the joint. 14 __________________________________________________________________ M010022EN-F Chapter 3 _______________________________________________________________ Installation Connections To connect the GMT220: 1. Connect the nominal 24 V supply terminals (+) and (-) on the motherboard (right-hand side, see Figure 6 below). 2. Connect the analog output (see Figure 6 below) as follows: Terminal 0: the common wire (-) Terminal V: voltage output signal (+) Terminal mA: current output signal (+) If the current output is chosen, select the output range by using the current output jumper 4mA (see Figure 6 below). If the range of 4...20mA is chosen, connect the jumper (default). If the range of 0...20 mA is chosen, disconnect the jumper. CAUTION Connecting the power leads to the output terminals can seriously damage the product. 1 2 3 7 4 8 5 6 0807-037 Figure 6 Electrical Connections and Jumpers VAISALA _______________________________________________________________________ 15 USER'S GUIDE____________________________________________________________________ The following numbers refer to Figure 6 on page 15: 1 2 3 4 5 6 7 8 = = = = = = = = Current output jumper (4 mA) Relay jumpers L1 and L2 A, B, C and D: Not intended for customer use Relay 2 terminals Relay 1 terminals Serial port Power supply terminals Output terminals Power Supply Requirements The GMT220 series transmitters are designed to operate with a nominal 24 VAC/DC supply. The power supply should maintain the voltage for all load conditions and all mains voltages. The power input includes a halfwave rectifier. To avoid current peaks, it is recommended to use a DC supply. Connection to a 24 VAC Supply The GMT220 series transmitters can be connected to a 24 VAC supply without an external rectifier. However, when more than one transmitter is connected to one 24 VAC transformer, a common loop is formed and risk of a short-circuit increases. To avoid this, always use separate floating supply for each transmitter, see Figure 7 A on page 17. CAUTION If several transmitters have to share one transformer, the phase () must always be connected to (+) connector (24 V) in each transmitter, see Figure 7 B on page 17. 16 __________________________________________________________________ M010022EN-F Chapter 3 _______________________________________________________________ Installation 0807-038 Figure 7 AC Connections Relays The relay output wiring is done at the left-hand side terminals on the motherboard, see Figure 6 on page 15. When the relay trigger point is exceeded, the relay switches ON. This function can be inversed by disconnecting the corresponding relay jumper (L1 or L2). The relay trigger points have been set at the factory as defined in the order form. The points can also be changed with a PC and the optional serial COM adapter 19040GM, see section Setting Relay Trigger Points on page 21. The COM adapter 19040GM, see Figure 8 below, can be ordered from Vaisala. For order information, see section Accessories on page 37. 0808-001 Figure 8 19040GM Serial COM Adapter VAISALA _______________________________________________________________________ 17 USER'S GUIDE____________________________________________________________________ This page intentionally left blank. 18 __________________________________________________________________ M010022EN-F Chapter 4 _______________________________________________________Serial Communication CHAPTER 4 SERIAL COMMUNICATION This chapter contains information that is needed to change the Carbon Dioxide Transmitter Series GMT220 settings and to read the device status. Serial Cable Settings The GMT220 is linked to PC via a serial cable equipped with a COM adapter (optional part 19040GM, can be ordered from Vaisala). Connect the serial cable to your PC's serial port and transmitter's serial port located in the motherboard, see Figure 9 below. 0807-039 Figure 9 Serial Port and Cable Direction VAISALA _______________________________________________________________________ 19 USER'S GUIDE____________________________________________________________________ Set the serial settings according to Table 3 below. Table 3 Serial Settings Baud rate Parity Data bits Stop bits Flow control NOTE 9600 None 8 1 Xon/Xoff (none) Remember to save the settings after each command. Serial Commands Table 4 Serial Commands Command MF_Rx_HIGH MF_Rx_LOW MAIN_SAVE F MF_PRESSURE MF_TEMP MF_DMODE MF_OUT_I_MODE NOTE Description Sets high relay trigger limit Sets low relay trigger limit Saves changes Sets ambient pressure value Sets ambient temperature value Sets display operation mode Sets current output range To view all set values for the transmitter, use MF command alone, without any parameters. 20 __________________________________________________________________ M010022EN-F Chapter 4 _______________________________________________________Serial Communication Setting Relay Trigger Points The relays of the transmitter turn ON/OFF when the CO2 content reaches the predefined trigger point. For the ON/OFF selection, see section Relays on page 17. There are two trigger points for both relays. The higher limit activates the relay and the lower deactivates it. The two limits are used to prevent the relay switching back and forth when the measured value is very close to set point. Both commands can also be entered without entering a trigger point value. The command without parameters gives the current set value. MF_Rx_HIGH yyy<cr> where: x = 1 or 2 (number of the relay) yyy = trigger point (CO2 content in ppm) Example of setting the higher trigger limit of the relay 1: >MF_R1_HIGH 1200 MF_R1_HIGH=1200.0000 > Save the settings: MAIN_SAVE F<cr> Give the lower trigger limit: MF_Rx_LOW yyy<cr> where: x= 1 or 2 (number of the relay) yyy = trigger point (CO2 content in ppm) Example of setting the lower trigger limit of the relay 1: >MF_R1_Low 900 MF_R1_LOW=900.000000 > Save the settings: MAIN_SAVE F<cr> VAISALA _______________________________________________________________________ 21 USER'S GUIDE____________________________________________________________________ Pressure Compensation For achieving the most accurate measurements in high altitudes where the barometric pressure is lower than in the sea level, the actual pressure value can be set to the GMT220's software. The factory setting is 1013 hPa. Pressure values in different altitudes are shown in Table 5 below. The ambient pressure value can be set by using the following command: MF_PRESSURE xxxx<cr> where: xxxx = pressure in hPa Example of setting desired pressure: >MF_PRESSURE 900 MF_PRESSURE=900 > Save the settings: MAIN_SAVE F<cr> Table 5 Altitude m (ft) 0 (sea level) 500 (1640) 1000 (3281) 1500 (4921) 2000 (6562) 2500 (8202) 3000 (9843) Altitude and Atmospheric Pressure Atmospheric Pressure (hPa) 1013 954 899 845 795 757 701 Atmospheric Pressure (psi) 14.69 13.84 13.04 12.26 11.53 10.83 10.17 22 __________________________________________________________________ M010022EN-F Chapter 4 _______________________________________________________Serial Communication Temperature Setting The ambient temperature value can be set by using the following command: MF_TEMP xxx<cr> where: xxx = ambient temperature (C) x 10. Example of setting desired temperature (25 C): >MF_TEMP 250 MF_TEMP=250 > Save the settings: MAIN_SAVE F<cr> Display Setting The display operation mode, display accuracy and probe temperature can be set by using the following command: MF_DMODE x<cr> where: x = 0 (zero)/1/2/3/7/8/9 0= no display 1= ppm-reading with one decimal 2= %-reading with two decimals 3=reading with no decimals 7=ppm-reading with no decimal 8= ppm-reading with 10 ppm accuracy >mf_dmode 7 MF_DMODE=07 00 00 00 00 Save the settings: MAIN_SAVE F<cr> VAISALA _______________________________________________________________________ 23 USER'S GUIDE____________________________________________________________________ Error States The GMT220 series transmitter goes through a continuous selfdiagnostic procedure. If any problems occur, it displays a corresponding error message. A transmitter without a display indicates errors by blinking the three LED lights on the cover. Transmitter with a display indicates error by showing an error code in the display. In all error cases, check first that the probe is connected properly, then reset the transmitter by disconnecting it. In case of a constant error, please contact Vaisala Service Center or a local Vaisala representative (see sections Technical Support on page 33 and Product Returns on page 33). Non-critical and Fatal Errors There are two types of errors. In case of a non-critical instantaneous error, the measurement continues and the error code is displayed. If there is a fatal error, the measurement is interrupted and the corresponding error code is displayed. NOTE In a fatal error state, the analog output goes to 100 % (20 mA or 10 V). Non-critical errors are indicated by the blinking of the green operation LED light and fatal errors by the red relay LED lights. If the actual CO2 concentration is out of the measurement range, the display and all outputs stop at the highest measured value until the carbon dioxide concentration in the environment falls back to a measurable level. 24 __________________________________________________________________ M010022EN-F Chapter 4 _______________________________________________________Serial Communication Error Indication in Transmitters without Display Error codes are cabled by blinking a message with short flashes of the LED lights. LEDs are situated on the cover of the transmitter. The green OPERATION LED is blinking when a non-critical error occurs (no effect on relays). The red LEVEL 1 and LEVEL 2 LEDs are blinking when a fatal error occurs (switches the relays OFF). NOTE The red level LED is continuously lit when the predefined CO2 concentration is exceeded. Error Messages Table 6 Error Messages Error Message Er 01 Probable Cause Er 02 Er 03 Er 04 Er 05 Er 06 Er 08 Er 10 Er 11 Er 12 Er 13 Er 14 Action Main board memory problem Main board memory problem Main board memory problem Probe contact failure Contact Vaisala Service Center Contact Vaisala Service Center Contact Vaisala Service Center Contact Vaisala Service Center Probe contact failure Contact Vaisala Service Center Probe contact failure Contact Vaisala Service Center Incompatible probe Contact Vaisala Service Center IR-source failure Contact Vaisala Service Center IR-source failure Contact Vaisala Service Center Sensor failure Contact Vaisala Service Center Signal error None Measurement out of range Check environment and recalibrate if necessary Severity Fatal Fatal Fatal Fatal Fatal Fatal Fatal Fatal Fatal Fatal Noncritical Noncritical VAISALA _______________________________________________________________________ 25 USER'S GUIDE____________________________________________________________________ This page intentionally left blank. 26 __________________________________________________________________ M010022EN-F Chapter 5 ______________________________________________________________ Maintenance CHAPTER 5 MAINTENANCE This chapter provides information that is needed in basic maintenance of the Carbon Dioxide Transmitter Series GMT220. Replacing the Probe The probe on the transmitter can be changed and replaced if necessary. Transmitter with Integrated Probe (Wall Model) To replace the integrated probe, do the following: 1. 2. 3. Open the cover Loosen the tightening screw on the transmitter body (see Figure 1 on page 9). Pull out the probe and install a new probe. Tighten the screw and close the cover. Transmitter with Remote Probe To replace the remote probe, do the following: 1. 2. Loosen the clamping sleeve and pull the probe out, see Figure 2 on page 10. Install a spare probe and tighten the clamping sleeve. All the calibration electronics are in the probe. The new probe is automatically identified by the control electronics of the transmitter. NOTE Disconnection of the probe causes an error and switches the relays OFF. VAISALA _______________________________________________________________________ 27 USER'S GUIDE____________________________________________________________________ Check and Calibration There are three ways to check the transmitter and calibrate it. These are presented in this section. Comparison with Calibrated Probe It is recommended to check the calibration of the GMT220 every second year. A simple field calibration checking can be performed by using a calibrated reference probe. During the checking procedure, please avoid exhaling towards the probe as this alters the CO2 concentration. 1. 2. 3. 4. Check the current transmitter reading. Replace the probe with a reference probe. Let the transmitter stabilize for a few minutes. The measured CO2 concentration near by the transmitter may have increased due to breathing. Compare the readings measured with the original and the reference probe. The difference between the readings should be less than 5 % of the full scale reading of the GMT220. If there is need for an adjustment of the probe, please contact Vaisala Service Center or Vaisala's representative (see sections Technical Support on page 33 and Product Returns on page 33). Calibrator GMK220 The Vaisala GMK220 calibrator is intended for spot checking and twopoint calibration of the GMT220 series probes. The calibration parameters are stored to the nonvolatile memory of the probes. Contact Vaisala's representative to get more information about the GMK220. 28 __________________________________________________________________ M010022EN-F Chapter 5 ______________________________________________________________ Maintenance On-site Checking and Adjusting with Reference Gas and GM70 Hand-Held Meter A probe to be checked can be flushed in a reference gas by using a field check adapter (optional part, 26150GM). The procedure requires pressurized gas bottle giving a flow rate of 0.4...1.0 l/min through the adapter chamber. If an adjustment is needed, it can be carried out by a user with a Vaisala's hand-held carbon dioxide meter GM70. Probes can also be sent to Vaisala Service Centers (see sections Technical Support on page 33 and Product Returns on page 33) to be calibrated. Follow the instructions below to check the operation of a GMP220 series probe. 1. 2. 3. 4. 5. 6. 7. 8. 9. Check the display reading of the GM70. Turn off the GM70. Detach the GM70's probe as follows: - Loosen the plastic probe fastener by unscrewing it about 5 turns. - Take a firm hold from the base of the probe and pull strongly until the probe comes loose. Detach the GMP220 probe from the transmitter base (open the cover, loosen the tightening screw and pull the probe out). Insert the GMP220 probe to the GM70 handle as deep as possible. Turn the probe inside the handle until you feel that a step in the probe connector snaps into the groove of the probe handle connector and locks the probe. Tighten the probe fastener. Turn on the GM70. Compare the readings of the GM70 and the transmitter probe to be checked. If there is need for an adjustment, please contact Vaisala Service Center or adjust the probe according to the instructions in sections Two-Point Adjustment Procedure on page 30 and One-Point Adjustment Procedure on page 32. To perform the adjustment, you need the following: - GM70 diffusion handle - One or two accurate reference gases according to which adjustment you do - Pressure regulator VAISALA _______________________________________________________________________ 29 USER'S GUIDE____________________________________________________________________ - Flow meter - Field check adapter (Vaisala order code: 26150GM) - Flexible tubing with 3 mm (1/8 inch) inner diameter Two-Point Adjustment Procedure CAUTION Please take special care regarding the following when carrying out the adjustment: - Check that you give the correct reference concentrations in the correct units. - Check that the reading has really stabilized before accepting the reading. You cannot revert back to the factory settings after the adjustment! 1. Insert the probe into the field check adapter until the perforated filter is covered. 0505-237 Figure 10 2. 3. 4. 5. Field Check Adapter Connect the tubing to the bottom port of the adapter. Connect the adapter with the tubing to the flow meter, the pressure regulator and further to the low-end reference gas bottle. The side port of the adapter is left open for gas outflow. Let the low end reference gas flow and stabilize with a flow rate of about 0.6 l/min. Follow the reading of GM70, and after it has stabilized, wait for 6 more minutes. Take out the screw from the GM70 probe handle to expose the adjustment button (see Figure 11 below). Press the button with a small screwdriver. When pressing the button, the indicator turns to adjusting mode. 30 __________________________________________________________________ M010022EN-F Chapter 5 ______________________________________________________________ Maintenance 0505-236 Figure 11 Location of the GM70 Adjustment Button 6. Press OK to confirm the adjusting. 7. Select CO2, press 8. Press YES to give the ambient pressure and temperature values. To continue adjusting press EXIT. 9. Now the adjustment mode is on. Press GRAPH to confirm that the readings have stabilized. Go back and press ADJUST to select the adjustment method. 10. Select 2-point adjustment, press SELECT. Press READY with the stabilized reading in the lower reference concentration. Give the lower reference concentration value by using the arrow buttons (for example, if you are using pure nitrogen, enter value 0 ppm). Take care that you give the correct value in correct units, as you cannot revert the earlier values after accepting the new values. Press OK. Next move on to the adjustment at the second (high-end) reference point. 11. 12. 13. 14. 15. SELECT. Take out the tubing from the low-end gas bottle and connect it to the high-end gas bottle. Let the high end reference gas flow and stabilize with a flow rate of 0.6 l/min. Follow the reading of GM70, and after it has stabilized, wait for 6 more minutes. Press READY with the stabilized reading in the higher reference concentration. Give the high-end reference concentration value by using the arrow buttons. The analyzed CO2 concentration of the reference gas is typically printed on the bottle. Take care that you give the correct value in correct units, as you cannot revert to the earlier values after accepting the new values. Press OK. VAISALA _______________________________________________________________________ 31 USER'S GUIDE____________________________________________________________________ 16. Confirm the adjustment, press YES. By pressing NO you return to adjustment mode display. (If the difference between the two references is less than 20% of the measuring range of the probe, adjustment cannot be done). 17. Adjustment is complete. Press BACK-EXIT to return to the basic display. Shut off the gas flow. Replace the screw onto the adjusting button. 18. 19. One-Point Adjustment Procedure CAUTION Please take special care regarding the following when carrying out the adjustment: - Check that you give the correct reference concentrations in the correct units. - Check that the reading has really stabilized before accepting the reading. You cannot revert to the factory settings after the adjustment! 1. 2. 3. 4. 5. Insert the probe into the field check adapter (as deep as possible, the perforated filter cover should be completely inside the adapter). Connect the tubing to the bottom port of the adapter. Connect the adapter with the tubing to the flow meter, the pressure regulator and further to the reference gas bottle. The side port of the adapter is left open for gas outflow. Let the reference gas flow and stabilize with a flow rate of 0.6 l/min. Follow the reading of GM70, and after it has stabilized, wait for 6 more minutes. Take out the screw from the GM70 probe handle to expose the adjustment button (see Figure 11 on page 31). Press the button with a small screwdriver. When pressing the button, the indicator turns to adjusting mode. OK to confirm the adjusting. 6. Press 7. Select CO2, press 8. Press YES to give the ambient pressure and temperature values. To continue adjusting press EXIT. 9. Now the adjustment mode is on. Press GRAPH to see when the readings have stabilized. Go back and press ADJUST to select the adjustment method. SELECT. 32 __________________________________________________________________ M010022EN-F Chapter 5 ______________________________________________________________ Maintenance 10. 11. Select 1-point adjustment, press SELECT. Press READY if the value has stabilized. Give the reference concentration value by using the arrow buttons. Examples: For a zero-point adjustment using pure nitrogen (N2) enter value 0 ppm. For other reference gases, the analyzed CO2 concentration is typically printed on the bottle. Use that value. Take care that you give the correct value in correct unit, you cannot revert the earlier values after accepting the new values. Press OK. YES. By pressing NO you return 12. Confirm the adjustment, press to adjustment mode display. 13. Adjustment is complete. Press BACK-EXIT to return to the basic display. Shut off the gas flow. Replace the screw onto the adjusting button. 14. 15. Technical Support For technical questions, contact the Vaisala technical support by e-mail at [email protected]. Provide at least the following supporting information: - Name and model of the product in question Serial number of the product Name and location of the installation site Name and contact information of a technically competent person who can provide further information on the problem. Product Returns If the product must be returned for service, see www.vaisala.com/returns. For contact information of Vaisala Service Centers, see www.vaisala.com/servicecenters. VAISALA _______________________________________________________________________ 33 USER'S GUIDE____________________________________________________________________ This page intentionally left blank. 34 __________________________________________________________________ M010022EN-F Chapter 6 ____________________________________________________________ Technical Data CHAPTER 6 TECHNICAL DATA This chapter provides the technical data of the Product. Technical specifications Measuring range GMT221 GMT222 0 ... 2% CO2 0 ... 3% CO2 0 ... 5% CO2 0 ... 10% CO2 0 ... 20% CO2 0 ... 2000 ppm 0 ... 3000 ppm 0 ... 5000 ppm 0 ... 7000 ppm 0 ... 10 000 ppm Accuracy (including repeatability, non-linearity and calibration uncertainty) at 25 °C and 1013 hPa GMT221 ± (1.5% of range + 2% of reading) (applies for concentrations above 2% of full scale) GMT222 ± (1.5% of range + 2% of reading) Temperature dependence, typical - 0.3 % of reading / °C (output decreases when temperature rises, default 25 C (77 F)) Pressure dependence, typical + 0.15 % of reading / hPa (output increases when pressure rises, default 1013 hPa (1 atm)) Long-term stability < ± 5 %FS / 2 years Response time (63%) GMT221 GMT222 20 seconds 30 seconds Warm-up time 30 seconds 15 minutes full specification VAISALA _______________________________________________________________________ 35 USER'S GUIDE____________________________________________________________________ Inputs and outputs Outputs 0 ... 20 mA or 4 ... 20 mA and 0 ... 10 V Resolution of analog outputs 12 bits Recommended external load current output max. 400 voltage output min. 1 k Two pre-or user-defined relay outputs Relay contacts max. 30 VAC / 60 VDC, 0.5 A Operating voltage nominal 24 VAC/DC Power consumption <4W Connections screw terminals, wire size 0.5 ... 1.5 mm2 Operating conditions Operating temperature range without display -20 … +60 °C (-4 ... +140 °F) with display 0 … +50 °C (+32 ... +122 °F) Storage temperature range -30 ... +70°C (-22 ... +158 °F) Operating pressure (compensated range) 700 ... 1300 hPa Humidity range 0 ... 100 %RH, non-condensing Mechanics Housing material transmitter body probe Housing classification Weight GMT221 GMT222 Probe cable length ABS plastic PC plastic IP65 max. 280 g max. 300 g 2 m and 10 m (optional) 36 __________________________________________________________________ M010022EN-F Chapter 6 ____________________________________________________________ Technical Data Electromagnetic compatibility The GMT221 and GMT222 transmitters comply with the following standards: EN 61326-1, Electrical equipment for measurement, control and laboratory use - EMC requirements - Generic environment. [CISPR16/22 Class B, EN/IEC 61000-4-2, EN/IEC 61000-4-3, EN/IEC 61000-4-4, EN/IEC 61000-4-5, EN/IEC 61000-4-6] Accessories Description Spare probe (use the order form to define measurement range etc.) Spare filter for GMP221 Spare filter for GMP222 Clips (2 pcs) for attaching the probe Field check adapter Protective sleeve for the GMP221 Protective sleeve for the GMP222 Mounting flange for the probe 2 meters probe cable (includes a cable clamp) 10 meters probe cable (includes a cable clamp) Serial COM adapter Hand-held carbon dioxide meter Calibrator for the probes In-soil adapter Wall mounting plate Probe cap for GMP221 Probe cap for GMP222 Connection cable for MI70 Order Code GMP221, GMP222 25378GMSP 25879GMSP 25245GMSP 26150GM GM45168SP GM45237SP GM45156SP 25665GMSP 210848GMSP 19040GM GM70 GMK220 211921GM GM45160 GM45129 GM45172 GMA70 VAISALA _______________________________________________________________________ 37 USER'S GUIDE____________________________________________________________________ Dimensions in mm (inches) 0807-040 Figure 12 Transmitter 38 __________________________________________________________________ M010022EN-F Chapter 6 ____________________________________________________________ Technical Data 0807-041 Figure 13 Mounting Plate 0807-042 Figure 14 Probe GMP221 VAISALA _______________________________________________________________________ 39 USER'S GUIDE____________________________________________________________________ 0807-043 Figure 15 Probe GMP222 0807-044 Figure 16 Mounting Flange GM45156SP 40 __________________________________________________________________ M010022EN-F Chapter 6 ____________________________________________________________ Technical Data VAISALA _______________________________________________________________________ 41 www.vaisala.com *M010022EN*