1
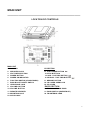
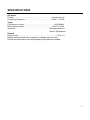
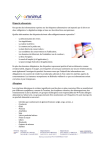
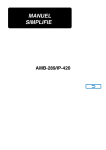
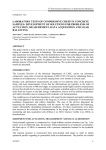
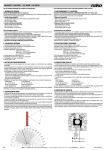
MODEL: E399
COMPACT CD SYSTEM
AM /FM STEREO & AUX INPUT
INSTRUCTION MANUAL
1
CAUTION
Read all of these instructions.
Save these Instructions for later use.
Follow all Warnings and Instructions marked on the audio equipment.
Where the main plug is used as the disconnect device, the disconnect device should be
easily accessible.
1) Cleaning - Unplug this product from the wall outlet before cleaning. Do not use liquid
cleaners or aerosol cleaners. Use a damp cloth for cleaning.
2) Attachments - Do not use attachments not recommended by the product manufacturer as
they may cause hazards.
3) Water and Moisture - Do not immerse into water. Do not use this product near water:
for example, near a bathtub, washbowl, kitchen sink, or laundry tub; in a wet basement; or
near a swimming pool; and the like.
4) Accessories - Do not place this product on an unstable cart, stand, tripod, bracket, or
table. The product may fall, causing serious injury to a child or adult and serious damage
to the product. Use only with a cart, stand, tripod, bracket, or table recommended by the
manufacturer, or sold with the product. Any mounting the product should follow the
manufacturer s instructions, and should use a mounting accessory recommended by the
manufacturer.
5) Product and cart combination should be moved with care. Quick stops, excessive force,
and an uneven surface may cause the product and cart combination to overturn.
6) Ventilation - Slots and openings in the cabinet are provided for ventilation and to ensure
reliable operation of the product and to protect it from overheating, and these openings
must not be blocked or covered. The openings should be never blocked by placing the
product on a bed, sofa, rug, or other similar surface. This product should not be placed in a
built-in installation such as a bookcase or rack unless proper ventilation is provided or the
manufacturer instructions have been followed.
7) Power source - This product should be operated using only from the type of power source
2
indicated on the marking label. For products intended to operate from battery power, or
other sources, refer to the operating instructions.
8) Grounding or Polarization - This product may be equipped with a polarized
alternating-current line plug (a plug having one blade wider than the other does).This plug
will fit into the power outlet only one-way. This is a safety feature. If you are unable to
insert the plug fully into the outlet, try reversing the plug. If the plug should still fail to fit,
contact your electrician to replace your obsolete outlet. Do not defeat the safety purpose of
the polarize plug.
9) Power Cord & Protection - Power-supply cords should be routed so that they are not
likely to be walked on or pinched by items placed upon or against them, paying particular
attention to cords at plugs, convenience receptacles, and the point where they exit from
the product.
10) Lightning - For added protection for this product during a lighting storm, or when it is left
unattended and unused for long periods, unplug it from the wall outlet and disconnect the
antenna or cable system. This will prevent damage to the product due to lightning and
power-line surges.
11) Overloading - Do not overload wall outlets, extension cords, or integral convenience
receptacles as this can result in risk of fire or electric shock.
12) Object and Liquids - Never push objects of any kind into this product through openings
as they may touch dangerous voltage points or short out parts that could result in a fire or
electric shock. Never spill liquid of any kind on the product.
13) Servicing – This unit contains no user serviceable parts. Do not attempt to service this
product yourself as opening or removing covers may expose you to dangerous voltage or
other hazards. Refer all servicing to qualified service personnel.
14) Damage Requiring Service - Unplug this product from the wall outlet and refer servicing
to qualified service personnel under the following conditions:
a) When the power-supply cord or plug is damaged.
b) If the liquid has been spilled, or objects have fallen into the product.
c) If the product has been exposed to rain or water.
d) If the product does not operate normally by following the operating instructions. Adjust
only those controls that are covered by the operating instructions as an improper
adjustment of other controls may result in damage and will often require extensive
work by a qualified technician to restore the product to its normal operation.
e) If the product has been dropped or damaged in any way.
f) When the product exhibits a distinct change in performance, this indicates a need for
service.
15) Replacement Parts – This unit contains no serviceable parts. Only a licensed service
technician should perform service of any kind. Unauthorized service or parts replacement
can result in fire, electric shock, or other hazards.
16) Heat - the product should be situated away from heat sources such as radiators, heat
registers, stoves, or other products (including amplifiers) that produce heat.
3
Follow the advice below for safe and appropriate operations.
ON PROTECTION AGAINST LASER ENERGY EXPOSURE
The laser beam used in this compact disc player is harmful to the eyes; do not attempt
to disassemble the casing.
STOP operation immediately if any liquid or solid object should fall into the cabinet.
Do not put anything in the safety slot, if you do, the laser diode will be ON when the CD
door is still open.
PLACEMENT
Do not use the unit in places that are extremely hot, cold, dusty or humid.
Place the unit on a flat and even surface.
Do not restrict the air-flow of the unit by placing it in a place with poor ventilation, by
covering it with a cloth or by placing it on a carpet
CONDENSATION
When left in a heated room where it is warm and damp, water droplets or condensation
may form inside the unit.
When there is condensation inside the unit; the unit may not function normally.
Let the unit stand for 1 to 2 hours before turning the power on, or gradually heat the
room up and dry the unit before use.
Should any trouble occur, remove the power source and refer servicing to qualified personnel
STORAGE
If the unit is not to be used for a long period, make sure that all power sources are
disconnected from the unit, remove all batteries from the battery compartment, and unplug
the AC-DC adaptor from the wall outlet. Make it a practice to remove the AC-DC adaptor by
grasping the main body and not by pulling the cord.
.
4
MAIN UNIT
________________________________________________
LOCATION OF CONTROLS
MAIN UNIT
1. AC CORD
2. SPEAKER JACKS
3. VOLTAGE SELECTION
4. POWER BUTTON
5. POWER ON INDICATOR
6. FUNCTION SWITCH (CD/AUX/RADIO)
7. BASS BOOST ON/OFF SWITCH
8. HEADPHONE JACK
9. VOLUME+ BUTTON
10. VOLUME- BUTTON
11. REMOTE RECEIVER
12. MOUNTING HOLE
23. AUX-IN JACK
CD SECTION
13. PLAY/PAUSE BUTTON
14. STOP BUTTON ■
15. SKIP - FAST REV BUTTON
16. SEARCH - FAST FWD BUTTON
17. MEMORY BUTTON
18. CD COVER OPEN/LOCK
19. CD COVER
RADIO SECTION
20. TUNING UP/DOWN KNOB
21. BAND SWITCH (AM/FM/FM ST.)
22. FM ANTENNA LEAD
5
REMOTE CONTROL
Function key description
LCD DISPLAY
1. POWER - Turn on and off the unit.
2. MUTE - Activate/Deactivate the audio mute.
3. PLAY/PAUSE - In CD mode, press once to start playing, press again to pause
playback temporarily.
4. STOP ■ - STOP the playing status in play mode.
5. REPEAT/RANDOM - Play desired tracks repeatedly and randomly.
6. PROGRAM - To program the desired tracks.
7. SKIP - FAST REV.
- Press and release to SKIP backward to the desired track.
8. SEARCH - FAST FWD
- Press and release to SEARCH forward to the desired
track.
9. VOLUME-, - Decrease the VOLUME level.
10. VOLUME+, - Increase the VOLUME level.
PLACING BATTERIES INTO THE REMOTE CONTROL
1. Press down on the compartment cover and slide the cover off to open the compartment.
2. Place two (“AA”) batteries (not included) in the remote control according to the polarity
makings (“+” and “-“) inside the compartment and on the batteries.
3. Place the cover over the compartment, press down lightly, and push it upward until it snaps
on.
6
MOUNTING AND BASE OPTIONS
2
1 . H o ld e r
2 . F a ste n e r
(to h itc h o n th e w a ll) 1
SPEAKERS
1 1 . M o u n tin g H o le 7
RADIO OPERATION
1. Set the function switch to Radio
FM
Select FM on the band selector switch. Turn the TUNING knob to select the station. The FM
stereo indicator light will show a stereo broadcast is being received.
FM STEREO RECEPTION
For reception of a FM stereo broadcast station, set the AM/FM/FM ST. switch to FM ST.
position. The FM ST. indicator on the LCD display will light up when a FM STEREO broadcast
is being received.
AM
Select AM on band selector switch. Turn the TUNING knob to select the station. This set has
a built-in AM antenna. It may be necessary to change the position of the unit for the best AM
signal strength.
DISPLAY AND CLOCK ADJUSTMENT
When the clock function is outlined, the display will show the clock.
Adjusting the clock
1. Press the PROGRAM button to adjust clock when clock display.
2. Press SKIP or SEARCH button to choose 12H or 24H.
3. Press PROGRAM button to keep the selection of 12H or /24H and then go to the next clock
adjustment mode.
4. Press SKIP or SEARCH button to select the hour data.
5. Repeat steps 3 and 4 to select the minute data.
6. Press PROGRAM to set the clock.
8
CD OPERATION
1. Plug in the AC power plug.
2. Set the function switch to CD position.
3. Press POWER button to turn on the unit.
4. Open the CD cover by pressing the CD cover button.
5. Insert a CD disc in the CD compartment with the label side up.
6. Close the CD cover by gently pressing CD cover securely until it clicks.
7. ADJUSTING THE SOUND
Press the VOLUME +/- button to set the sound level.
For increased bass at all volume levels, switch the BASS BOOST on to boost the low
frequency sound.
8. Press PLAY/PAUSE button to pause temporarily.
Press PLAY/PAUSE button during playback to pause temporarily.
Press PLAY/PAUSE button to resume playback from the point playback is interrupted.
9. Press and release the SKIP button or SEARCH button to search backward or forward to
the desired track.
10. Press and hold the SKIP button or SEARCH button to search backward or forward to
the desired point of the playback or track.
11. Press the STOP button to stop playing.
12. In the STOP mode, press the PROG button to start the memory function and “P01” will
display. After a few seconds the “P01” will turn to “00” and then you can start to select the
desired track number using the SKIP or SEARCH buttons After selecting each track, press
the PROG button to store the track into memory. Repeat this operation to memorize up to
20 tracks. Press SKIP button to start playing the tracks in order programmed. To cancel
memorized tracks, press STOP button and open the CD cover by pressing the CD cover
button.
13. Press REPEAT/RANDOM button to repeat function. Press REPEAT/RANDOM button
once to repeat the same track only, and the “REPEAT” display will light up and flash.
Press the REPEAT/RANDOM button twice to repeat all, and the “REPEAT” display will
light up and not flash. To cancel repeat play, press the REPEAT/RANDOM button twice
until the repeat indicator disappears.
14. Press REPEAT/RANDOM button to select random mode until RANDOM appear. All the
tracks on the loaded CD will be played in random order. Playback will STOP
automatically when all tracks have been played. To cancel random play, press the
REPEAT/RANDOM button until RANDOM disappears.
9
AUX FUNCTION
_________________________________________________
Auxiliary mode allows you to play any audio device (e.g.MP3, Cassette player etc) through
this unit using a 3.5mm to 3.5mm stereo audio cable
1. Use a 3.5mm male-to-male cable to connect the lineout or headphone out jack of an audio
device to the AUX input jack.
2. Set the function button to the “AUX” mode.
3. Start playback on the external audio device.
To avoid distortion, do not set the VOLUME on the external audio device to a very high level.
CARE AND MAINTENANCE
_________________________________________________
1.
2.
3.
4.
Clean your unit with a damp (never wet) cloth. Solvent or detergent should never be used.
Avoid leaving your unit in direct sunlight or in hot, humid or dusty places.
Keep your unit away from heating appliances and sources of electrical noise.
Such as fluorescent lamps or motors. If dropouts or interruptions occur in the music during
play, or if the disc fails to play at all. Its bottom surface may require cleaning. Before
playing, wipe the disc from the center outwards with a good soft cleaning cloth.
10
TROUBLESHOOTING
In case of trouble with the unit, please take the time to look through this chart and see if you
can solve the problem yourself before you call your dealer
GENERAL Problems
No power
Check the connection to the AC power supply.
No sound from speakers.
Check the connection to the speakers.
Adjust the VOLUME.
Select proper source.
Pull out the headphones plug from PHONES jack.
If muting is on, press the MUTING button.
The sound is noisy.
The unit is too close to a TV set or similar appliances. Install the unit apart from them, or turn
them off.
REMOTE CONTROL Problems
Remote control does not work.
If the batteries are exhausted, change the batteries.
Use remote control unit within the range and point at the front panel.
Clear obstacles between the remote control unit and the Player.
If a fluorescent light is near the unit, turn it off.
TUNER Problems
Cannot listen to any station, or signal is too weak.
Tune in the station properly.
If a TV is near the unit, turn it off.
Re-orient the antenna until reception improves.
The broadcast is stereo and the sound is monaural.
Press the FM MODE button.
CD PLAYER Problems
Cannot play.
Load a disc with label side facing you.
If the disc is dirty, clean the Surface of the disc.
One track is played repeatedly.
Press the REPEAT button to cancel the repeat mode.
Disc skips.
Place the unit on a stable place to avoid vibration and shock.
If the disc is dirty, clean the Surface of the disc.
Do not use scratched, damaged or warped discs.
11
SPECIFICATIONS
CD player
Pickup………………………………..…………………….. 3-beam pick-up
Frequency Response…………..…………………………100Hz ~ 16 KHz
Tuner
FM frequency range..……………………………………........ 88-108MHz
AM frequency range…………….…………………….........530-1710 KHz
Antennas . . . . . . . . . . . . . . . . . . . . . . .. . . . . . . . . . . FM pigtail antenna
Built-in AM antenna
General
Output power………………………….…………………………...2.2 W x 2
Design and specifications are subject to change without notice.
Photos and illustrations may differ slightly from production models.
12
LIMITED 90-DAY WARRANTY
We warrant this product to be free from defects in material and workmanship under normal use for a ninety-day
period from the original date of purchase from an authorized ETEC dealer. We will repair or replace the unit free
of charge should it become defective under this warranty, providing you, the original purchaser, submit proof of
purchase (sales slip) along with the unit and all accessories.
During the ninety-day period from the original purchase date, we will service or exchange the unit at no charge.
To obtain warranty service or replacement within the ninety-day warranty period, please return the product and
all accessories to the original place of purchase.
For technical support, the ETEC Technical Support Center is available 24-hours a day, 7-days a week for
technical assistance or troubleshooting. To contact us by phone, please call 1-800-936-1168.
This warranty does not cover any product which has been subject to damage due to an act of nature, misuse,
neglect, accident, abuse, commercial use, or modification of, or to, any part of the product, including the antenna.
Damage to any external media such as DVD, CD, and/or USB or other memory devices are not covered nor is
the cost incurred in shipping the unit for warranty repair. Under no circumstances shall ETEC USA be liable for
any loss (direct, indirect, incidental, foreseen, unforeseen, special or consequential) or for any damage arising
out of, or in connection with, the use of this product.
UNDER
NO
CIRCUMSTANCES
WILL
ETEC
USA
BE
LIABLE
FOR
ANY
INCIDENTAL
OR
CONSEQUENTIAL DAMAGES.
This warranty does not cover re-manufactured units, or product sold 'As Is'
This warranty is valid only to the original purchaser of the Product in the United States, Canada, and Mexico and
grants specific legal rights.
13
14