1
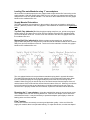
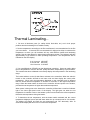
DO NOT DISCARD BOX!
(If for any reason you need to ship your machine back and you discard your box you will be
responsible for purchasing another one plus any freight charges to ship the box to you)
MIGHTYLAM 2700HC
Roll Laminator
READ BEFORE OPERATING MACHINE
ABC Office • 1142 West Flint Meadow Drive, Kaysville, UT 84037 • (800) 658-8788 • www.abcoffice.com
CAUTION...READ BEFORE OPERATING
DO NOT RUN THE MACHINE IN REVERSE
WHEN THERE IS FILM ON THE FRONT
ROLLERS, ESPECIALLY HOT FILM. THIS
WILL CAUSE THE FILM TO DISPLACE THE
TEMPERATURE SENSOR AWAY FROM THE
ROLLER. THE HEAT CONTROLLER WILL
RECEIVE AN INCORRECT LOWER READING
OF THE TEMPERATURE AND THE ROLLERS
WILL BE OVERHEATED AND POSSIBLY
DAMAGED.
BEFORE REVERSING THE MACHINE TO
REMOVE A WRAP-AROUND, CUT THE FILM
FROM THE SUPPLY ROLL AND PULL THE FILM
AWAY FROM THE FRONT ROLLERS.
TO AVOID ANY DAMAGE, PLEASE DO NOT
USE RAZORS OR SHARP OBJECTS NEAR
THE ROLLERS.
DO NOT LEAVE MACHINE ON WHEN NOT IN
USE OR YOU WILL DAMAGE YOUR ROLLERS
2
Table of Contents
For Your Safety..................................... 4
Electrical Safeguards ............................ 4-5
Specifications........................................ 5
Set-up ...................................................
Inspection .............................................
Appropriate Location.............................
Loading Film onto Mandrels..................
Film Tension .........................................
Threading the Film ................................
5-8
5
5
6
6-7
7-8
Thermal Laminating .............................. 9-10
Coating Mount Board ............................ 10
Mounting & Laminating ......................... 11
Maintenance/Service ............................ 11-13
Cleaning Rubber Rollers ....................... 11-12
Removing Wrap-arounds ...................... 12-13
Trouble-shooting................................... 13
Do’s & Don’ts ........................................ 14
Warranty & Return Policy...................... 15
3
OPERATING INSTRUCTIONS
MIGHTYLAM 2700HC
For your safety...
Do not connect the laminator to electrical power or attempt to operate it until
you have read these instructions completely. Keep these instructions in a
convenient location for future reference.
Read all safety messages located in this instruction manual and on the
laminator very carefully.
Always lower the safety shield before operating your laminator.
Removing feed table exposes hot and moving parts. This means that you can
be harmed if you remove the feed table. When the table is in the proper
position the risk of injury to the operator is reduced.
Do not operate this laminator without all detachable units installed correctly.
This means that there is risk of injury if this product is operated without all of its
parts in their proper positions.
Keep hands and clothing away from rollers. The rollers are pinch points that
can trap body parts or clothing and cause serious injury.
Do not touch the rollers while the laminator heater power is on. Turn
rollers off and allow to cool.
Do not use the laminator for other than its intended purpose.
Electrical Safeguards...
Never override or attempt to defeat electrical or mechanical safety interlock
devices.
The machine has been manufactured with a plug on the machine designed to
operate on a 110volt, 15 Ampere circuit.
Disconnect power supply before servicing your laminator.
The laminator should only be operated from the type of power source indicated
in these OPERATING INSTRUCTIONS and on the serial label located on the
rear panel of the unit.
4
Do not leave the laminator power on for extended periods while not in use.
Unplug the machine at the end of the day as a precaution against a possible
fire hazard.
Do not operate the laminator with a damaged power supply cord or plug.
Replace fuses only with same type rated 15 amp, 250V and 3/4 amp, 250V
fuses. Contact your dealer for replacement fuses.
Specifications...
Operating Speed:
0-10’ per/minute, (3m/min)
Power Requirements
Voltage:
15 amps, 100-130 VAC, 60Hz
Warm Up Time:
Power Fuse:
Motor fuse:
10-15 minutes
15 A
.75 A
Maximum Laminating Dimensions
Thickness:
Width Capacity:
Net Weight:
Machine Dimensions
Shipping Weight:
Shipping Dimensions
1/4”
27”
83 lbs.
37”L x 18”H x 21”D, (94 x 46 x 53cm)
123 lbs.
40”L x 20”H x 24”D, (102 x 51 x 61cm)
Set-up...
Inspection:
Upon receipt of your MightyLam 2700HC, inspect the box, the machine and all other contents
of the box for shipping damage. Damage should be brought to the immediate attention of the
delivering carrier and your dealer.
Power Requirements:
The MightyLam 2700HC is designed to operate on a 110 Volt, 15 Ampere circuit. It will plug
into a standard 110 volt wall receptacle. You must ensure that the circuit is protected by a 15
ampere circuit breaker. Failure to use a dedicated circuit will result in blown fuses and tripped
breakers.
Appropriate Location:
The laminator must be placed on a sturdy table or stand in a clean, well lit area with ample
space on all four sides of the laminator.
5
Loading Film onto Mandrels using 3” core adapters:
When the film is loaded properly the core gripper blade will prevent the film from turning on the
supply mandrel. With the gripper spring away from you, pull the core gripper blade toward you
and place the roll of film onto the mandrel. Turn the roll on the mandrel to lock the core gripper
blade into the cardboard film core.
Supply Mandrel Orientation:
The supply mandrels must be placed on the machine in the proper orientation to achieve film
tension. (Note the position of the core grippers in the illustration as viewed from the right hand
end).
Top Roll, Poly (adhesive) In: With the gripper spring away from you, pull the core gripper
blade toward you and place the roll of film onto the mandrel so that the film unwinds towards
you from the bottom of the roll. Turn the roll on the mandrel to lock the core gripper blade into
the cardboard film core.
Bottom Roll, Poly (adhesive) In: With the gripper spring towards you, push the core
gripper blade away from you and place the roll of film onto the mandrel so that the film unwinds
away from you from the bottom of the roll. Turn the roll on the mandrel to lock the core gripper
blade into the cardboard film core.
The core gripper blades on the top and bottom mandrels spring back in opposite directions.
The blade should spring back in the direction that the core will rotate when laminating. When
the film is loaded properly the core gripper blade will prevent the film from turning on the
mandrel. When using poly-in rolls the top roll of film should unwind from the bottom of the roll
and the bottom of the roll should also unwind from the bottom of the roll. With Poly-out rolls the
top roll will unwind from the top and the bottom roll will also unwind from the top of the roll.
Once the film is properly loaded onto the mandrels, replace the mandrels onto the laminator.
Removing the 3” core adapters: Using the supplied Allen wrench, remove the set screw
on the adapter then slide the mounting bracket out. Now the core adapter can be slid off the
end without the brake. It may be necessary to spread the adaptor open slightly to clear the
bearing at the end of the mandrel.
Film Tension:
Film tension must be set correctly to ensure good lamination quality. At the end of the film
supply roll mandrels there is a split brake bushing. To adjust film tension, turn the star shaped
6
nut on the brake clockwise to increase tension, and counterclockwise to decrease. This action
clamps the brake on the mandrel axle creating tension necessary to achieve good results.
Threading thermal Film:
When changing film rolls, thread the film according to the instructions.
1. Remove the feed table and raise the safety shield.
2. Feed the film from the top roll under the upper idler roller, over the top roller and
behind the safety shield, and pull it down below both rollers. Be sure that the adhesive
side of the film is facing out and the non-adhesive side is against the roller
3. Pull about 3 feet of film from the bottom roll. Feed the film from the bottom roll under
and behind the lower idler roller. Align the edges of top and bottoms rolls so there is no
side to side overlap. This will prevent transferring adhesive to the roller.
4. Lay the film from the lower roll over the film from the top roll and both rollers, again
ensuring the adhesive side is away from the rollers. If you are cold loading, it will be
necessary to tape the bottom film to the top film. If you are hot loading, the bottom film
will adhere to the top film where they overlap at the rollers.
5. Have a large piece of poster board or cardboard ready to use as a feed card to thread
the film between the rollers. A piece 6-8 inches long and the full width of the film will
help prevent wrinkles when loading hot.
6. Replace the feed table and lower the safety shield. Place the board on the feed table
and push it forward to the roller.
7. Turn the SPEED CONTROL knob far enough to allow the rollers to sufficiently pull the
poster board or cardboard into the laminator. Keep in mind that varying media and
temperatures will require different speeds.
8. Feed the poster board or cardboard between the rollers.
9. If you are hot loading, stop the motor after the poster board or cardboard has traveled
one or two inches through the rollers. After the board has passed through the rollers
and there are no wrinkles, reduce the film tension to the minimum amount needed.
7
Pressure Sensitive (PS) Film Loading
1. Place the roll of single sided PS film on the top supply mandrel. Orient it the same way you
would poly in thermal film (see figure below).
2. Thread film under top idler bar.
3. Peel back release liner and tape it to an empty cardboard core on rewind shaft.
4. Attach a sheet of scrap paper to the film. Ensure that your paper is wider than your film. Also
be sure to never run the machine without paper. This will prevent film from sticking to the
bottom roller. See diagram below…
Rewind Mandrel and Clutch Adjustment
The rewind mandrel is designed to pull off and collect the release liner from pressure sensitive
film. A clutch allows for changes in roll diameters, and constantly keeps tension on the liner to
pull it away from the film. The clutch should be adjusted so that the liner is properly removed
and collected on the mandrel without causing the liner to break, or put undue strain on the
motor. Excessive tension could cause the motor to overheat and fail.
To adjust the clutch:
1. Remove plastic plug from cover.
2. Run motor slowly until the socket head screw is aligned with plug opening.
3. Turn the screw clockwise to increase the tension and counterclockwise to lessen the
tension.
4. Replace plug.
Optional: When testing we run butcher paper from the bottom supply mandrel to run prints
without overlap. Butcher paper should be wider or equal to the film width.
Note: Cold laminate can be made more pliable by using a heat assist from the top roller.
Turn on only the top heater and set to 100°F.
8
Thermal Laminating...
1. Be sure all laminator parts (i.e. safety shield, feed table, etc.) are in their proper
positions and the laminating film is loaded correctly.
2. Set the temperatures according to the film manufacturer’s recommendations for the film
you have chosen. A low-melt film is recommended for inkjet prints. Keep in mind that the
temperature at which you will laminate will vary with different medias and laminating
speeds. See the chart below for approximate temperature ranges. The laminator will take
approximately 25-30 minutes to reach operating temperature. The temperatures will be
indicated on the LED display.
3 mil low melt 190°-210°F
5 mil low melt 200°-210°F
10 mil low melt 210°-220°F
3. Your new MightyLam 2700HC has dual digital heat controllers. Users can easily adjust
the set temperature to achieve the best quality lamination independently top and bottom.
The controller has been calibrated to accurately display roller temperature in the laminating
range.
The heater switches on the left side frame activates in the controllers. When the switch is
turned on the controller will flash a two letter code and then display the current roller
temperature. When cold, the temperature displayed on the controllers may be different
than the actual ambient temperature to account for correction in the higher temperature
range. When the heater switch is turned on the controller will send power to the heaters,
provided the set temperature is higher than ambient temperature.
When power is being sent to the heaters the controller will illuminate a small red indicator
light in the lower right hand corner of the display. The light goes out when the set
temperature is reached. Power to the heaters cycles on and off when the roller temperature
falls below set temperature during lamination.
4. To determine the set temperature, with the heater switch activated and the current
temperature displayed, press and hold down either the up or down arrow for 3-4 seconds.
The display will change and flash the set temperature and “SU” alternately. After 10
seconds the display will return to the current roller temperature.
9
To change the set temperature, depress and hold either arrow down for 3-4 seconds until
the display flashes “SU and the current set temperature. Depress and hold the appropriate
arrow to raise or lower the setting. The digits will change slowly initially but will increase
speed when held down longer for large changes. When the desired setting has been
reached, release the button. The display will continue to flash for a few seconds and then
display the current roller temperature.
Each time the machine is turned on it will heat up to the last set temperature.
5. Turn the MOTOR switch ON and perform a test lamination to ensure proper settings for
successful lamination. Watch film as it exits the rollers so it doesn’t wrap around the
rollers. It might be helpful to hold the film at first when starting a lamination run. If any
adjustments are necessary make them now and run another test. Repeat this step until
you obtain desired results.
6. Allow the MightyLam 2700HC to run a small amount of film before feeding the print into
the laminator to avoid a dwell line across your print. Feed the print slowly and evenly,
smoothing it as the rollers pull it through.
7. You may laminate subsequent prints now, leaving ample space between each print for
trimming.
8. Once your last print has completely exited the laminator, turn the MOTOR switch OFF.
9. When you have finished laminating, turn heat switch off.
10. With heavier gauges of film it is recommended that the fans be turned on. Be sure to turn
the fans off when the machine is sitting idle.
Coating Mount Board...
The MightyLam 2700HC is capable of applying an adhesive coating to mount board that has
not previous been coated.
1. Load a roll of adhesive, with the liner wound to the outside, onto the top mandrel in the
same manner as with laminating film.
2. Load a roll of paper on the bottom mandrel or use adhesive the same width as the mount
board to keep the adhesive from accumulating on the rollers.
3. Set the temperature to approximately 125°F. The MightyLam 2700HC will take
approximately 10-15 minutes to reach this temperature. The roller temperatures are
indicated on the LED displays.
4. Feed the uncoated mount board into the laminator behind a small leader board. The
leader board will prevent the compression of the leading edge of your mount board.
5. You may coat subsequent boards now, one directly behind the other, so that the board in
front becomes the leader board. We recommend that you coat a sufficient supply of mount
board in one session so you’ll have it ready for future use.
10
Mounting & Laminating...
1. Be sure all laminator parts (i.e. safety shield, feed table, etc.) are in their proper positions
and the laminating film is loaded correctly.
2. Turn the TEMPERATURE CONTROL switch to the ON position.
3. Set the temperatures according to the film manufacturer’s recommendations for the film
you have chosen. The MightyLam 2700HC will take approximately 20-30 minutes to reach
operating temperature. The temperatures of the heated rollers are indicated on the LED
display.
4. Position the print to be mounted on a section of mount board up to 1/4” thick behind a
leader board. The leader board will prevent compression of the leading edge of your mount
board.
5. Peel the release liner from the board back about an inch behind a leader board if
necessary unless your mount board is larger than your print and you will be trimming your
board afterwards. A leader board will prevent compression on the leading edge of your
mount board.
6. Feed the print and mount board into the laminator behind the leader board slowly and
evenly. Be sure to pull back the release liner before it enters the rollers. Allow the
machine to remove the release liner as you hold it. If you pull too much liner back the print
will become wrinkled onto the board.
7. You may mount subsequent prints now, one directly behind the other so that the board in
front becomes the leader board.
8. Once your last print has completely exited the laminator, turn the MOTOR switch OFF
and use a razor to remove the mounted and laminated prints.
9. If using thermal mount boards set the machines temperature to the manufacturers’
specification and decrease speed to allow heat to penetrate your print and activate the
adhesive. There will be no liner.
Maintenance/Service...
Always use caution when servicing your laminator.
Precautions:
Disconnect the power supply and open the panel breaker
before attempting to service or repair the laminator.
Any maintenance or service should be preformed only by those
having appropriate technical training and experience.
Adjust only those controls that are specified in these operating instructions.
11
Cleaning Rubber Rollers:
Excessive build-up of adhesive on the rollers may cause poor lamination quality and erratic film
movement. Use the following procedure to remove any adhesive from the laminating rollers.
1. Turn the HEATED ROLLERS off and allow the laminator to cool.
2. Cut the film where it comes off the top and bottom supply rolls. Pull any film out of the
laminator and away from the rollers using reverse.
3. Carefully remove the feed table to access the rollers. The feed table exposes hot and
moving parts.
4. Disconnect the power supply.
5. Clean the exposed section of the rollers with a soft lint free cloth dampened with an
appropriate cleaning solution such as denatured alcohol.
6. Reconnect the power supply and turn the FORWARD/REVERSE switch to the
FORWARD position. Turn the MOTOR switch to the ON position momentarily to expose
a new section of the rollers.
7. Repeat steps 5-6 until the rollers are thoroughly clean.
8. Allow the rollers to dry completely before rethreading the laminating film.
Removing Wrap-A-Rounds:
Build-up on the rollers may cause a film wrap-around, especially when using thin film gauges.
Follow the procedure below to remove wrap-a-rounds.
1. Turn the HEATED ROLLERS OFF. Allow the laminator to cool.
2. Cut the film where it comes off the top and bottom supply rolls.
3. Pull the film out of the unit that has become wrapped around the rollers.
4. If you have a severe wrap-around, it may be necessary to use the REVERSE feature
to back the film out. Be sure to pull the film away from the laminator.
NOTE: If there is a wrap-around on the front rollers, of if there is a run-away heat
condition; please check the sensor on the bottom roller to ensure it is touching the
roller. Incorrect positioning of the sensor can result in a false roller temperature reading
and subsequent roller damage. Be careful with sharp objects, cutting a rubber roller will
ruin it and result in void of warranty.
Checking Sensor Position:
If the machine appears to be overheating or if you’ve just experienced a wrap-around it is
important to check the positioning of your sensors. It is important that the tip of the sensor is in
contact with the silicon roller. There are two sensors on this machine. Please be sure to check
both sensors. See diagram below…
12
INCORRECT
(GAP)
CORRECT
(TOUCHING)
SENSOR
SENSOR
HEATED
ROLLERS
HEATED
ROLLERS
Trouble-shooting...
PROBLEM:
LED does not show display when heat switches are on.
ACTION:
Close panel breaker, disconnect power and replace fuse.
PROBLEM:
Film is not bonding to the print.
ACTION:
Slightly adjust temperature upward. Allow ink to dry thoroughly. Check to see if
paper is too slick, may need to use a more matte paper.
PROBLEM:
Laminated item curls
ACTION:
Loosen tension on side (top or bottom) film is curling toward.
PROBLEM:
Laminated item is wrinkled
ACTION:
Increase mandrel tension on the side (top or bottom) that has the wrinkles. You
may need to reduce temperature. Make sure your paper is stored in a dry
place.
PROBLEM:
Laminated item is blistered
ACTION:
Reduce temperature
PROBLEM:
Mandrel tension does not remain constant.
ACTION:
Tighten brake screw, it might be improperly adjusted. Rotate film core while
holding mandrel film. Core gripper blade may not be preventing the core from
spinning on the mandrel. Ensure mandrels are installed correctly (see page 6).
PROBLEM:
Laminator heats but motor does not turn on
ACTION:
Ensure motor is on and in forward position with speed turned on. Replace
motor fuse.
PROBLEM:
Laminator blows fuses often.
ACTION:
Ensure machine is running on a dedicated circuit. Do not exceed maximum
material thickness. Reduce supply mandrel tension.
13
Do’s and Don’ts...
•
Read the instruction manual before operating your laminator.
•
Always run test samples before laminating valuable items.
•
•
Feed the print through slowly and evenly, smoothing it as it is pulled into the
laminator.
•
Operate the laminator with two rolls of the same width laminating film to avoid
excessive adhesive transfer to the rollers.
•
If laminator is not in current use turn unit off.
•
Never feed abrasive materials or metal objects such as staples, paper clips, or
glitter through the laminator. Keep sharp objects like scissors and rulers away from
the rollers at all times.
•
Once an item has been fed between the rollers do not attempt to alter its position
as this can damage the print.
•
Do not stop the laminator before the item has completely exited from the rear to
avoid a “dwell line” across the print.
•
Do not clean or service the laminator before disconnecting the power supply.
14