1
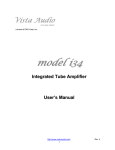
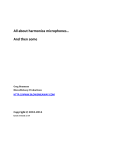
DIY Tube Stereo 35 Board - TubeZone Assembled -Instructions - Page 1
TubeZone Assembled Version
Board and portions of manual, (c) 2006 Shannon Parks & DIYtube.com.
Version specific instructions (c) 2006 Ned Carlson and Tubezone.net Inc.
Reproduction in whole or part without express written permission prohibited.
DIY Tube Stereo 35 Board - TubeZone Assembled -Instructions - Page 2
READ ME FIRST!
This is a modified version of the usual disclaimer/warning that comes with most transmitting
equipment and parts.
Since similar conditions exist in all tube audio amplifiers we believe it be appropriate here.
Please note prior to beginning construction that there are high(over 400 volts) DC and AC
voltages present in the equipment you are about to work on, and in the right situation these
voltages could injure or kill you if you contact them. Normally the worst you can encounter is a
nasty shock, however you must remember at all times this possibility of a injurious situation.
Follow the same precautions you would with any electrical appliance,including not working
with plugged in equipment (including soldering irons) with bare feet on a wet floor, use only
insulated probes & tools when working on live high voltage, and if you are working with one
hand taking measurements or working in live equipment, keep the other hand off the chassis
or other grounded conductive item. Always use the proper size fuse or circuit breaker in the
equipment installed when operating amplifiers or any other electronic gear.
In a work situation you would be required to use eye protection when working with tools,
soldering, or testing equipment and we strongly recommend you do so also, and remind you that
when you fail to use safety glasses or follow recommendations regarding safety or simply do not
practice common sense about safe procedures, you do so completely at your own risk.
Failing or defective components in high voltage tube equipment, particularly elderly equipment,
when failing may arc, spark,smoke, spit, sputter, get hot enough to burn flesh, catch on fire,
rupture or shatter sending shards of possibly hot glass, metal, or plastic at your face or body
and may spew possibly hot and injurious goo or fluid, or cause normally harmless pieces of
metal to become electrically charged at dangerous voltages.
If you have no previous experience repairing high voltage equipment, you must have a
professional repair person to install this modification for you , or obtain competent
third party help and and obtain basic knowledge of electronic components, soldering, safety and construction
techniques prior to proceeding.
Disclaimer
Under no circumstances does diytube or Tubezone.net Inc assume liability or responsibility for injury or
damages sustained in the assembly, test or operation of this kit or for damages to any other equipment
connected to it. As this is a partial kit, proper assembly is buyer's responsibility. diytube reserves the right to
make design changes or improvements without the obligation to revise prior
versions. All specifications are subject to change without notice.
. WARNING: Lethal voltages (greater than 400VDC and mains voltage) are present in this project.
. Use a Variac or isolation transformer while working on and testing the unit.
. Use a rubber mat to stand on while working on and testing the unit.
. Keep one hand in your back pocket if probing voltages with a DMM.
. Wrap a small piece of electrical tape around the test lead probe shaft to expose
just the tip.
. Do not connect or disconnect wires to the terminals when unit is powered or plugged in.
. Lethal voltages exist in the capacitors even after unit is powered down, so wait
at least one hour to after unplugging to allow charge to dissipate.
Warranty and returns
UNINSTALLED and unmodified boards (meaning in identical condition as received from Tubezone.net Inc) may
be returned within 30 days for refund or credit, so you have that amount of time to consider your options and
decide whether installing this kit is within your capability.
Once installed, at my option, within 6 months of purchase, I will either supply repair parts to you to replace any
defective components, or repair the board to replace defective components. Repairs due to mis-wiring or other
user errors will be billed @ $50/hour. Defective tubes must be returned to be replaced. Any return postage
or shipping to send items back to me is on customer's account. I do not issue call tags or accept CODS.
DIY Tube Stereo 35 Board - TubeZone Assembled -Instructions - Page 3
I strongly suggest you completely read this manual before you turn on your iron or get out the cutting
oil.
Preparation
Before assembly, some preparation needs to done. Parts must be purchased, a work area needs set up and
chassis decisions should be made. The axiom haste makes waste has never been more true. Make sure
your chosen transformers and the board will fit comfortably using the chassis of your choice. The PCB itself
makes a perfect template, as shown on the website, for socket and mounting holes.
Be sure to plan where RCA connectors, binding posts, standby & ON/OFF switches and the AC
cord will be oriented on the chassis. Physically lay out the parts in a space equal to your chassis to assure
everything fits. Also, note that the vacuum tube sockets can only be mounted on one side, which is designated in
the silkscreen printing.
Overview of the Schematic and Design
The design closely resembles the Dynaco Stereo 35. The use of one 12DW7 per channel has been replaced by
½ a 12AX7A and ½ a 12AU7.
The 12AX7A is a voltage amplifier that directly drives the 12AU7, a split load phase inverter. The only other
meaningful change is the replacement of a single cathode resistor and capacitor for the EL84's with four
individual resistors and capacitors. A larger value resistor in series with a variable resistor parallels the main
cathode resistor, providing a range of 320-450 ohms per cathode. This circuit is then in series with a 10 ohm
resistor to calculate the current very easily via a test point, set conservatively for 350mV, thus 35mA.
The assembly drawing is a quick reference to what component is where and the numbering scheme for the
connectors. It is also a good place to make any notes.
This PCB is a double sided, plated through hole design on .094'' FR4 material with LPI (liquid photo-imageable)
solder mask and 2 ounce copper per side. Plated staked terminals have replaced the through-hole connections.
Installation Of Assembled Boards
I would suggest you build your chassis and install all outside connectors and transformers prior to installing the
board.
Avoid running the input signal wires close to audio or power transformer wiring. This will help prevent feedback
and hum pickup.
A template for drilling the chassis holes can be found on the last page of this manual.
Six 6-32 standoffs with nuts and screws are supplied to mount the board. Always use all 6 mounting points
for proper support.
While it might appear that the labeling on the board is self explanatory, please use this list to check
connections one by one before making connections or powering the amplifier up. There are several important
notes you may need to read.
I refer to the lead colors on the Dynaco PA774 and Z565 transformers, if you are using different models, please
compare the lead colors on your transformer to the diagrams in this manual for the Dynaco units.
Clockwise from J-1 (longest row of connectors)
J1
PRIMARY: Primary lead of power transformer (either of the black wires on PA774)
AC IN: White wire from three prong power (mains) cord, or "hot" lead from chassis power cord connector.
6.3VAC (#1): Filament supply, brown and green wires on the PA774.
6.3VAC (#2): Filament supply, Brown-white and green-white wires from PA774.
IMPORTANT NOTE: If you are using a filament supply with a center tap and
choose to ground the center tap, remove R40 and 41.
GND (#1): Power transformer secondary center tap (red-yellow wire from PA774)
GND (#2): Spare ground connection.
B+ 1 & 2: Primary power to output transformers (Red wires from the Z565's)
2NDARY 1 & 2: The two secondary B+ (HT) wires from power transformer (Red wires from PA774)
IMPORTANT NOTE: If you are using an outboard tube rectifier, simply connect the cathode or filament of the
rectifier tube(s) to either of the 2NDARY terminals. Usually, the cathode or filament on a 5 volt rectifier (5AR4,
5AR4, 5U4), is connected from pin 8 on the tube socket. Check tube pin-out diagrams. (Cont next page)
DIY Tube Stereo 35 Board - TubeZone Assembled -Instructions - Page 4
Installation Of Assembled Boards, Continued
J2
PRIMARY: One plate lead from left channel output transformer (Blue-white lead from Z565)
UL TAP: One screen lead from left channel output transformer (Green-white lead from Z565)
GND: Ground secondary lead from left channel output transformer (Black lead from Z565)
IMPORTANT NOTES:
1. If the output transformer you are using is not ultralinear (does not have screen taps), simply connect the
screen power supply to all the connectors labeled "UL TAP".
2. For triode-wired operation, a 100 ohm 1W resistor can be soldered on the underside of the board between
pins 1 & 2 on J2, J3, J4 and J5 Remove C20 and C21. Do not attach any UL taps to pin 2 on these connector
blocks if you do this, tape up the UL leads so they do not contact the chassis.
3. The color codes on the Z565 transformers are different than most other transformers. Check your transformer
diagram and compare the lead colors. Usually, the equivalent of the blue-white lead on the Z565, will be brown
on other makes of transformers.
J3
PRIMARY: One plate lead from left channel output transformer (Blue lead from Z565)
UL TAP: One screen lead from left channel output transformer (Green lead from Z565)
NEG FEED: 16 or 8 ohm (16 if you have a 16 ohm tap, 8 if not) secondary lead from left channel output
transformer (Yellow/16 ohm or orange/8 ohm lead from Z565)
IMPORTANT NOTE: Do not connect NEG FEED until after you have set in initial bias and feedback, see "Initial
Settings", next chapter.
J7
1: Left channel audio input from jack or volume control.
2. Left channel audio ground (case on RCA input jack)
J6
1: Right channel audio input from jack or volume control.
2. Right channel audio ground (case on RCA input jack)
J4
PRIMARY: One plate lead from right channel output transformer (Blue lead from Z565)
UL TAP: One screen lead from right channel output transformer (Green lead from Z565)
NEG FEED: 16 or 8 ohm (16 if you have a 16 ohm tap, 8 if not) secondary lead from left channel output
transformer (Yellow/16 ohm or orange/8 ohm lead from Z565)
IMPORTANT NOTE: Do not connect NEG FEED until after you have set in initial bias and feedback, see "Initial
Settings", next chapter.
J5
PRIMARY: One plate lead from left channel output transformer (Blue-white lead from Z565)
UL TAP: One screen lead from left channel output transformer (Green-white lead from Z565)
GND: Ground secondary lead from left channel output transformer (Black lead from Z565)
Before going onto the biasing and setup step, get a large dummy load or a pair of cheap speakers (meaning
ones that you won't miss if they are damaged) and hook them up to the proper impedance outputs. Avoid
running the amplifier with no output load (even shorted is preferable to open) Note that even if all the voltages
check out properly, oscillation (audible, subsonic or ultrasonic) and or intermittent connections can damage
speakers. Always check out repaired amplifiers on dummy loads or expendable speakers first. Dummy loads
can get hot, watch out!
DIY Tube Stereo 35 Board - TubeZone Assembled -Instructions - Page 5
Initial Settings: Feedback and Bias
WARNING: Do these adjustments with the unit off and unplugged, as well as having had one hour to bleed
voltage from the filter caps. Note: Most amps will just use a fixed resistor here, but the diytube circuit uses a pot
for experimentations sake thus this extra step.
➔ 1) Don't have your negative feedback connected yet, that is your output secondary or else it will be a
real low impedance.
➔ 2) Probe your DMM from J4 pin 3 (right channel) to ground and adjust R30 until the resistance is 20.3K
(set to 28.3K if using the 16 ohm tap as feedback, as in the original Z565).
➔ 3) Probe your DMM from J3 pin 3 (left channel) to ground and adjust R31 until the resistance is 20.3K
(set to 28.3K if using the 16 ohm tap as feedback, as in the original Z565).
➔ 4) Your feedback is set.
Adjusting Bias
➔ 1) With the unit off, probe your DMM from V3 pin 3 (the cathode) to ground. Adjust R22 until you
measure 400 ohms to ground.
➔ 2) Then probe your DMM from V4 pin 3 (the cathode) to ground. Adjust R19 until you measure 400
ohms to ground.
➔ 3) Then probe your DMM from V5 pin 3 (the cathode) to ground. Adjust R28 until you measure 400
ohms to ground.
➔ 4) Then probe your DMM from V6 pin 3 (the cathode) to ground. Adjust R25 until you measure 400
ohms to ground.
WARNING: The following is done while the unit is ON and IDLE.
Take care and follow proper high voltage safety rules.
➔ 5) With all your connections in place, power up. Your initial bias has been set - this makes sure that you
don't accidentally have a tube aggressively biased, and they should all end up near the same range on
power up.
➔ 6) Probe your DMM (set to DC volts) from the test point which is sandwiched between the R19 & R22 to
ground. V3 is adjusted with the 'inside' test point. Adjust R22 until the voltage is .350V or 350mV.
➔ 7) Probe your DMM (set to DC volts) from the test point which is sandwiched between the R19 & R22 to
ground. V4 is adjusted with the 'outside' test point. Adjust R19 until the voltage is .350V or 350mV.
➔ 8 ) Probe your DMM (set to DC volts) from the test point which is sandwiched between the R25 & R28 to
ground. V5 is adjusted with the 'inside' test point. Adjust R28 until the voltage is .350V or 350mV.
➔ 9) Probe your DMM (set to DC volts) from the test point which is sandwiched between the R25 & R28 to
ground. V6 is adjusted with the 'outside' test point. Adjust R25 until the voltage is .350V or 350mV.
Voltages
These are no-signal, nominal measurements in VDC, unless otherwise noted. They are all referenced to ground.
DIY Tube Stereo 35 Board - TubeZone Assembled -Instructions - Page 6
DIY Tube Stereo 35 Board - TubeZone Assembled -Instructions - Page 7
Modifications And Notes
Adding a volume control
If volume controls are desired, use a 100k or better audio taper pot. A linear pot will not work correctly. You can
salvage the 250k pot off of a Dynaco SCA35. Radio Shack has a 100k Alps stereo pot that many people use.
Each channel must have its own control, so either a stereo pot or two single pots must be used.
The pot connections will be:
•
Terminal 1 to RCA input jack center terminal
•
Terminal 2 (the wiper) to J6 pin 1 or J7 pin 1 (depending on channel)
•
Terminal 3 to J6 pin 2 (GND) or J7 pin 2 (GND) and outside case of RCA input jack.
To determine which pin is which, use a DMM and crank the volume pot fully counter-clockwise (Anti-clockwise)
(lowest volume setting).
Resistance between pins 1 & 2 will be nearly the full range of the pot. Pins 2 & 3 will be very low resistance.
Rotating the pot fully clockwise (highest volume setting) will yield opposite
results, i.e. pins 1 & 2 will be very low resistance and pins 2 & 3 will be nearly the full range of the pot. If using a
stereo pot, follow the same process with pins 4, 5 & 6.
Other notes
•
•
•
•
•
•
•
If the output transformer you are using is not ultralinear (does not have screen taps), simply connect
the screen power supply to all the connectors labeled "UL TAP".
A 100 ohm 1W resistor (Mouser# 281100) can be soldered on the underside of the board between pins
1 & 2 on J2,J3,J4 and J5 for triode operation. Do not attach any UL taps to pin 2 on these connector
blocks if you do this. Remove C20 & C21
If you are using a filament supply with a center tap and choose to use the center tap, remove R40 and
41. These are for filament supplies with no center tap , such as the Dynaco PA774.
SW2 can be omitted and the secondary CT wired straight to ground if a standby switch is not desired. If
you are using the slow warm up thermistor (RF42), there's little reason to use a standby switch unless
you like to make lots of on the fly tube changes.
R42, the inrush limiter, is very important for proper operation of this unit. It is possible to wire a switch or
time-delay relay in parallel with it in order take it out of the circuit once the unit has warmed up, but this
is not recommended, especially for Hammond transformers, as they are rated at 115VAC. Note: This will
increase the B+ by around 12V and will slightly increase heater voltage. Switch or relay would need to
be reset as well.
A .05uF, 1kV cap (or a capacitor rated by UL, CSA, NOM or CE for AC mains voltage use at or above
your local voltage, in USA & North America, normally 120VAC, Europe 240VAC) may strap the ON/OFF
switch (pins 1 and 2). This can prevent `pops' on turnoff.
The inrush limiter R42 (NTC or negative thermal coefficient thermistor) is meant for North American
line (mains) voltage of 120VAC. It will work on Japanese (100VAC) voltage as well. However for 220
and 240 volt systems, this should be replaced with a 1 amp rated part, unless you are using a
240/120 step-down adapter transformer and the North American 120V mains transformer.
For further help, you can contact TubeZone by phone at 773-782-6145, by
email at http://www.tubezone.net/contact/index.html ,
or research answers or post a message on the DIYtube ST35 discussion
board at: http://www.diytube.com
DIY Tube Stereo 35 Board - TubeZone Assembled -Instructions - Page 8
Parts List- diytube/Tubezone Stereo 35 Rev D Revised: Sept 28, 2006
Board Parts
QTY Reference
Part
_________________________________________________________________________
2
R1,R2
47K, 1/4W
2
R3,R4
470K, 1/4W
4
R13,R14,R15,R16
220K 1/4W
2
R5,R6
1.3K, 1/4W
2
R7,R8
300K, 1/2W
2
R9,R10
27K, 1W
2
R11,R12
33K, 1W
4
R17,R20,R23,R26
470 ohm, 3W
4
R18,R21,R24,R27
1K, 1/2W
4
R19,R22,R25,R28
10K trim control
1
R29
300K, 1W
2
R30,R31
100K trim control
2
R32,R33
3.3K, 3W
4
R34,R35,R40,R41
100 ohm, 3W
2
R36,R37
.05, 1W
2
R38,R39
150K, 1/4W
1
R42
Inrush Limiter 2 amp
4
R43,R44,R45,R46
10 Ohm, 1/4W
4
C1,C2,C3,C4
0.22uF,400VDC
4
C5,C6,C7,C8
470uF 35VDC
1
C9
120 uF 450VDC
3
C10,C11,C12
120 uF 400VDC
2
C16,C17
27pF 500VDC
2
C18,C19
33pF 500VDC
2
C20,C21
15pF 500VDC
2
C22,C23
0.22uF 250VDC
2
D1,D2
1 amp 1000V Diode
6
PC Mount 9 pin (B9A) Tube Sockets
4
V3,V4,V5,V6
EL84, 6BQ5 or 7189 Tubes
1
V1
5751, 12AX7, ECC83 or ECC803 Tube
1
V2
12BH7, ECC99, ECC82 or 12AU7 Tube or equivalent
DIY Tube Stereo 35 Board - TubeZone Assembled -Instructions - Page 9
Parts List- diytube/Tubezone Stereo 35 Rev D Revised: Sept 28, 2006
Off Board Parts: Suitable equivalents or better parts may be used.
The Mouser part numbers are just for easy reference, in case that's where you like to get your parts from. Due to
the small quantities of nuts & bolts, you might want to buy these at your local hardware store rather than mail
order. Appropriate hardware for mounting transformers is usually #8 screws & nuts. The Mouser nuts & screws
are nickel plated and in boxes of 100.
Don't forget solder, etc.
QTY Reference
Part
Mouser Part Number
_________________________________________________________________________
Note: Change the last letter of the part number, `G', to a `Y' or `R' for a yellow or red neon
indicator on the power switch. Default is green.
1
SW1
Power Switch
10-R13-112B02G
1
SW2
Standby Switch
103-R13-112A02
1
F1
Fuse Holder
504HTB-26M
1
F1
2A Midget Fuse
504-GMA2
1
3 Prong AC cord
173-53101
1
Strain Relief
561-P5N4
1
Stereo Volume Pot
313-2420-100K
Note: These aren't $30, gold-plated interconnects, you can use better parts if you like.
1
1
4
2
2
2
RCA Red Jack
RCA Black Jack
Binding Posts
Binding Posts
Red Test Points
White Test Points
161-0251
161-0252
164-4205
164-4201
151-307
151-301
DIY Tube Stereo 35 Board - TubeZone Assembled -Instructions - Page 10
DIY Tube Stereo 35 Board - TubeZone Assembled -Instructions - Page 11
DIY Tube Stereo 35 Board - TubeZone Assembled -Instructions - Page 12
DIY Tube Stereo 35 Board - TubeZone Assembled -Instructions - Page 13
DIY Tube Stereo 35 Board - TubeZone Assembled -Instructions - Page 14
DIY Tube Stereo 35 Board - TubeZone Assembled -Instructions - Page 15
Original ST35 Dynaco schematic
DIY Tube Stereo 35 Board - TubeZone Assembled -Instructions - Page 16