1
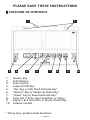
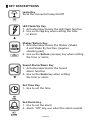
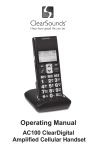
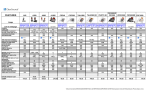
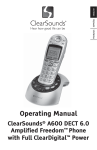
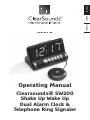
ENGLISH
ESpAñoL
FRANÇAIS
CSC48
Operating Manual
Clearsounds® SW200
Shake Up Wake Up
Dual Alarm Clock &
TelephoneV508
Ring Signaler
1 – ENGLISH
TABLE OF CONTENTS
PRIOR TO USE
Pg.3................... Congratulations
Pg.3-4................ Important Safety Instructions
Pg.5-6................ Location of Controls
Pg.7................... Key Descriptions
INSTALLATION
SETTINGS
Pg.9................... LCD Contrast
Pg.9................... Connecting a Lamp
Pg.9-11............. Alarm Notification Modes and Activation
OPERATION
Pg.12................. Set Time
Pg.13-14........... Set Alarm and Notifications
Pg.14................. Snooze
Pg.14................. Alarm Off
Pg.15................. Telephone Ring Signaler
TECHNICAL SPECIFICATIONS
Pg.16
REGULATORY COMPLIANCE
Important FCC Information for Customers
Pg.16-17
INDUSTRY CANADA
Pg.18
WARRANTY POLICY
Pg.19-20
2 – ENGLISH
PRIOR TO USE
Congratulations on your purchase of the SW200 Shake Up Wake
Up Alarm Clock from ClearSounds Communications®. Please
read this User Manual carefully in order to get the best use out
of your new product. Keep this manual near the telephone for
easy reference.
Please visit our website at www.clearsounds.com to register
your product, download additional manuals and review
trouble-shooting tips.
Be sure to save your sales receipt as your proof of purchase
should you need warranty service.
Warranty Service – This product is designed to provide years of
quality service. However, if there is a malfunction, follow the
warranty procedure on pages 19-20.
█ IMPORTANT SAFETY INSTRUCTIONS
When using your alarm clock, basic safety precautions should
always be followed to reduce the risk of fire, electric shock and
injury to person, including the following:
WARNING: The SW200 Alarm Clock is capable of amplifying
sounds to a loud volume. It is important to instruct all potential
users of its proper operation.
WARNING: To avoid the possibility of electrical shock, do not
use this product near water (For example, near a bathtub,
wash basin, kitchen sink or laundry tub, in a wet basement
or near a swimming pool) while in the bathtub or shower or
when you are wet. If the clock becomes submerged in water,
do not attempt to retrieve it until after you have unplugged the
power cord and telephone line cord from the modular wall jack.
Do not plug the product back in until it has dried completely.
3 – ENGLISH
WARNING: There may be a remote risk of electric shock from
lightning. If the electrical storm is present in your immediate
area, possibility of electrical shock exists.
WARNING: When cleaning, unplug the clock, and then use
a damp cloth to wipe. Do not use liquid cleaners or aerosol
cleaners.
WARNING: No product should ever be placed near an open
radiator or heating register.
WARNING: Occasionally a power surge can occur on electrical
lines without warning. With any electrical device that you plug
into an outlet, it is suggested you use a surge protector. A
surge protector will prevent power surges from damaging your
phone. Surge protectors are simple devices available at your
local hardware store.
WARNING: Do not overload wall outlets or extension cords as
this can increase the risk of fire or electrical shock.
WARNING: Never push any object through the slots in the
clock. They can touch dangerous voltage points or short out
parts that could results in risk of fire or electrical shock.
WARNING: Do not cover slots and opening on the units, they
are needed for ventilation and protection against overheating.
WARNING: Alarm volume is very loud and can damage your
hearing. Never put your ear close to the speaker.
IMPORTANT: YOUR RECEIPT IS PART OF YOUR WARRANTY
AND MUST BE RETAINED AND PRODUCED IN THE EVENT OF A
WARRANTY CLAIM.
4 – ENGLISH
PLEASE SAVE THESE INSTRUCTIONS
█ LOCATION OF CONTROLS
1
3
1. 2. 3. 4. 5. 6. 7. 8. 9. 10.
4
5
2
6
7
8
Snooze Key
LED Flashers
Tone Control
Lamp On/Off Key
“Up” Key or LED Flash Activate Key*
“Return” Key or Shaker Activate Key*
“Down” Key or Sound Activate Key*
Time Set (12/24 Hour Selection or Time)
Alarm 1 & 2 Selection or Alarm On/Off Key
Volume Control
* These Keys perform dual functions
5 – ENGLISH
9
10
16
11
11.
12.
13.
14.
15.
16.
12
13
14
Lamp Outlet
Telphone Line IN/OUT jacks
Vibrating Pad Jacks
Telephone Ring Signaling Tone Selection
LCD Contrast Selection (HI-LO)
Speaker (Sound Ring Tone)
6 – ENGLISH
15
█ KEY DESCRIPTIONS
Lamp Key
Turns the connected lamp On/Off
LED Flash/Up Key
1. Activates/deactivates the LED Flash function
2. Use as the Up key when setting the time
or alarm
Shaker/Return Key
1. Activates/deactivates the Shaker (Shake
A and Shake B) function (requires
vibrating pad)
2. Use as the Return (escape) key when setting
the time or alarm
Sound Alarm/Down Key
1. Activates/deactivates the Sound
Alarm function
2. Use as the Down key when setting
the time or alarm
Set Time Key
1. Use to set the time
Set Alarm Key
1. Use to set the alarm
2. Alarm “Off” key, use when the alarm sounds
7 – ENGLISH
INSTALLATION
Installation of your ClearSounds® SW200
Shake Up Wake Up Dual Alarm Clock is easy.
If at any time you have questions about your clock after
reading this manual, please contact the ClearSounds®
Customer Service Department at 1-800-965-9043.
█ PARTS CHECKLIST
Check the contents of the box - The SW200 should contain:
1. Alarm Clock
2. (1) Vibrating Pad
3. Telephone line cord
4. User’s Manual
█ TO INSTALL:
1. Connect the AC power plug into a standard AC wall outlet or
surge protector.
2. Optional: Connect the bed shaker(s) into the shaker jack(s)
and place the shaker(s) under your pillow or mattress.
3. Optional: Connect a lamp to the lamp outlet.
The Shake Up Wake Up can be used as both an alarm clock
and a telephone ring signaler (see page 15 for instructions on
telephone ring signaling).
8 – ENGLISH
SETTINGS
█ LCD CONTRAST SETTING
To adjust the brightness of the display, simply move the
Dimmer Control located on the back of your clock to HI or LO.
█ CONNECTING A LAMP
You are able to connect a lamp to the clock and use the lamp
for room lighting and/or alarm clock notification.
1. Connect the lamp to the lamp outlet on the back
of the clock.
2. Make sure the lamp is turned to the ON position.
3. Press
to turn the lamp On/Off.
Note: You will only use
to turn the lamp On/Off. Do
not turn the lamp to the OFF position.
█ ALARM NOTIFICATION MODES AND ACTIVATION
You can adjust the type of notification that is desired. The
available notifications for each alarm include: LED/optional
Lamp Flashing, Sound (with 3 pattern options), and Vibrating
Shaker (1 vibrating pad is included with the SW200). For each
alarm, you can select a combination of the 3 notifications.
To activate each of the alarm functions and have them in
“ready mode”, simply press and hold the desired notification
key until the blue backlight appears. To deactivate, press and
hold until the blue backlight disappears. After having each
function in “ready mode”, you will be able to select the specific
notification you desire for each alarm (see Set the Alarm and
Audible, Visual & Shaker Notification on page 13-14).
9 – ENGLISH
LED/optional Lamp Flashing
Press and hold the LED Flash
key to activate the LED
flasher function. If you have plugged a lamp into the clock, it
will also flash when the alarm goes off.
Vibrating Pad Jacks
You can connect a vibrating pad to each of the vibrating pad
jacks on the back of the clock. Jack A is used for Alarm 1 and
Jack B is used for Alarm 2. Each shaker operates independently.
Simply plugging the shaker in to the jack and activating
the shaker function will allow the shaker to vibrate during the
scheduled alarm time.
Press and hold the Shaker
shaker function.
key to activate the
SOUND ALARM
Adjustable Volume Control
The Volume control increases or decreases the loudness of the
alarm, which can go as high as 87 dB. The volume control
is adjustable for all 3 sound alarm patterns (see pg. 11 for
more information about sound alarm patterns). To adjust the
volume, roll the slide wheel up to make it louder and down to
make it softer.
Adjustable Tone Control
The Tone control shapes the sound by changing the frequencies
of the alarm. The tone control only works for sound alarm
Pattern 1 (see page 11 for more information about sound
alarm patterns).
10 – ENGLISH
Sound Alarm Patterns
There are 3 alarm patterns you can select from if using the
Sound Alarm. See Set the Alarm and Sound, Visual & Shaker
Notification on page 13 for instructions on selecting the
pattern for each alarm.
Pattern 1 (displayed as P1)
Traditional beep, fast speed, volume and
tone control capable
Pattern 2 (displayed as P2)
Slow speed start that switches to fast speed, lower
volume start that gets increasingly louder, volume
control capable
Pattern 3 (displayed as P3)
Various patterns that change, lower volume start that
gets increasingly louder, volume control capable
Press and hold the Sound Alarm
sound alarm function.
11 – ENGLISH
key to activate the
OPERATION
█ SET THE TIME
If your clock is connected to the phone line and you subscribe
to Caller ID service, the time will be automatically set when
you receive a call.
You can also select a 12 or 24 hour mode. Please make sure
to set the correct AM/PM time. A round light in the upper right
of the clock display will appear for PM time. For AM time, the
light does not appear.
To select 12 or 24 hour time
1. Press Set Time
and the display will show the
current time mode (12 or 24).
2. Press Up
or Down
3. Press Return
to change the mode.
to save and exit.
To set the time
1. Press Set Time
setting will blink.
twice
and
the
current
hour
2. Press Up
or Down
to change the hour.
Keep pressing the key until you reach the desired hour.
3. Press Set Time
will blink.
and the current minute setting
4. Press Up
or Down
to change the minute.
Keep pressing the key until you reach the desired minute.
5. Press Return

to save and exit.
12 – ENGLISH
█ SET THE ALARM AND SOUND, VISUAL AND
SHAKER NOTIFICATION
This clock offers 2 separate alarms that can be set for
different times. Alarm 1 is displayed as 1 and Alarm 2 is
displayed as 2. When either alarm is switched On, the blue
backlighting will appear on the Set Alarm
key. The snooze
bar will also light red when either alarm is switched On.
If neither alarm is turned On, the snooze bar will not be lit.
Note: You must activate the alarm notification modes that you
wish to use. See Alarm Notification Modes and Activation
on pages 9-11.
To set your alarm
1. Press Set Alarm
and “1” will be blinking on the
left side of the display.
2. Press Up
or Down
to select the alarm (alarm 1
or alarm 2) you want to set and then press Set Alarm
.
3. The current On/Off status for that alarm will blink. Press
Up
or Down
press Set Alarm
to select On or Off and then
.
4. The current alarm hour will blink. Press Up
or Down
to change the hour and then Press Set Alarm  .
5. The current alarm minute will blink. Press Up
Down
Set Alarm
to
change
the
.
13 – ENGLISH
minute
and
then
or
Press
6. The current On/Off selection for the Sound Alarm
(r1=On/Off) will blink. Press Up
or Down
to
select On or Off and then Press Set Alarm  .
7. If you select On, the current pattern for the sound alarm
(P1-P3) will blink (if selecting Off, skip to step 8).
Press Up
or Down
to select the desired sound
pattern and then Press Set Alarm
.
8. The current On/Off selection for the LED/Lamp Flashing
(F1=On/Off) will blink. Press Up
or Down
select On or Off and then Press Set Alarm
to
.
The alarm setting is now complete and will show the
current time.
Please Note: At any point, you can press Return
save and exit.
to
█ SNOOZE KEY
When your clock alarm activates, you can temporarily turn it
off using the Snooze key. The Snooze key will stop the alarm
for 5 minutes. After 5 minutes, the alarm will activate again.
You can continue to press the Snooze key for a total of 1 hour
after which the alarm mode will be automatically switched off.
The Snooze key is located on the top of the clock.
█ ALARM OFF KEY
When your clock alarm activates, it will continue for 5
minutes if no key is pressed. If you press Set Alarm  ,
the alarm will turn off and it will reset to activate at the
same time the next day.
14 – ENGLISH
█ TELEPHONE RING SIGNALER
If you choose to connect the Shake Up Wake Up to your
telephone line, it will notify you when there is an incoming
phone call.
The sound ring selection is controlled by a separate switch
located on the back of the clock. You must activate the Sound
Alarm
key to activate the telephone sound ringer.
Additionally, any notifications that you have activated (LED
flasher/lamp and shaker) for alarm clock notification will also
alert you to the telephone ringing.

2
1
3
1. Connect one end of the included telephone cord to the LINE
IN jack on the clock and connect the other end of the cord
to the phone jack in the wall.
2. Make sure the AC power plug is connected to a standard AC
wall outlet or surge protector.
3. Select Ring Tone 1-3 located on the back of the clock.
4. Be sure the notifications that you desire for telephone
ring signaling (sound alarm, LED flasher/lamp, shaker)
are activated.
5. Optional: Connect your telephone to the LINE OUT
jack. This will allow you to use that telephone from the
clock location.
When the clock alerts you to an incoming call, simply answer
any phone and the alarm will stop. After you hang up, your
clock is ready to alert the next call.
15 – ENGLISH
TECHNICAL SPECIFICATIONS
General Number:
Amplification:
SW200
Up to 87 dB
Features and Specifications subject to change without notice.
To learn more, call ClearSounds at 1-800-965-9043
or visit www.clearsounds.com
FCC WANTS YOU TO KNOW
1. This equipment complies with Part 68 of the FCC rules and
the requirements adopted by the ACTA. On the bottom of this
equipment is a label that contains, among other information, a
product identifier. If requested, this number must be provided to
the telephone company.
2. If the ClearSounds® SW200 Shake Up Wake Up Dual Alarm Clock
& Telephone Ring Signaler causes harm to the telephone network,
the telephone company will notify you in advance that temporary
discontinuance of service may be required. But if advance notice
isn’t practical, the telephone company will notify the customer
as soon as possible. Also, you will be advised of your right to file
a complaint with the FCC if you believe it is necessary.
3. The telephone company may make changes in its facilities,
equipment, operations or procedures that could affect the
operation of the equipment. If this happens, the telephone
company will provide advance notice in order for you to make
necessary modification to maintain uninterrupted service.
4. If you experience trouble with this equipment, you should
disconnect it from the network until the problem has been
corrected or until you are sure that the equipment is not
malfunctioning.
5. Please follow instructions for repairing if any (e.g. battery
replacement section); otherwise do not alternate or repair any
parts of device except as specified.
16 – ENGLISH
6. Connection to party line service is subject to state tariffs. Contact
the state public utility commission, public service commission or
corporation commission for information.
7. If the telephone company requests information on what
equipment is connected to their lines, inform them of:
a) The telephone number that this unit
is connected to,
b) The ringer equivalence number
c) The USOC jack required [RJ11C], and
d) The FCC Registration Number
Items (b) and (d) are indicated on the label. The ringer equivalence
number (REN) is used to determine how many devices can be
connected to your telephone line. In most areas, the sum of the
RENs of all devices on any one line should not exceed five (5.0). If
too many devices are attached, they may not ring properly.
Service Requirements
In the event of equipment malfunction, all repairs should be
performed by our Company or an authorized agent. It is the
responsibility of users requiring service to report the need for
service to our Company or to one of our authorized agents. Service
can be facilitated through our office at:
ClearSounds Communications, Inc.
1743 Quincy Avenue, Suite 155 Naperville, IL 60540 U.S.A
17 – ENGLISH
INDUSTRY CANADA CS03 STATEMENT
This product meets the applicable Industry Canada technical
specification. This is confirmed by the registration number. The
abbreviation, IC before the registration number signifies that
registration was performed based on a Declaration of Conformity
indicating that Industry Canada technical specifications were met. It
does not imply that Industry Canada approved the equipment.
Before installing this equipment, users should ensure that
it is permissible to be connected to the facilities of the local
telecommunications company. The equipment must also be installed
using an acceptable method of connections. The customer should be
aware that compliance with the above conditions may not prevent
degradation of service in some situations.
Repairs to certified equipment should be made by an authorized
Canadian maintenance facility designated by the supplier. Any repairs
or alterations made by the user of this equipment, or equipment
malfunctions, may give the telecommunication company cause to
request the user to disconnect the equipment.
WARNING! Users should not attempt to make such connections
themselves, but should contact the appropriate electric inspection
authority, or an electrician, as appropriate.
CAUTION: The Ringer Equivalence Number (REN) assigned to each
terminal device provides an indication of the maximum number of
terminals allowed to be connected to a telephone interface.
The termination on an interface may consist of any combination
of devices subject only to the requirement that the sum of the
Ringer Equivalence Numbers of all the devices does not exceed 5.
An alternative indication of the REN is the Load Number (LN); this
number should be divided by 20 to approximate the equivalent REN.
The REN Number of this unit is indicated on the bottom of
your phone.
If your home has specially wired alarm equipment connected to
the telephone line, ensure the installation of the SW200 does
not disable alarm equipment. If you have questions about what
will disable alarm equipment, consult your telephone provider or
a qualified installer.
This Class B digital apparatus complies with Canadian ICES-003.
18 – ENGLISH
LIMITED ONE-YEAR WARRANTY
The product is warranted by ClearSounds against manufacturing
defect in material and workmanship under normal use for one
(1) year from the date of purchase. Should you experience a
problem, contact our customer service department or visit our
website at www.clearsounds.com.
Be sure to save your sale receipt as the proof of purchase date
should you need warranty service.
Your SW200 Alarm Clock comes with a (1) year limited
warranty from the date of purchase. This product is warranted
by ClearSounds against manufacturing defect in material and
workmanship under normal use. In the event that this product
fails to function properly within one year of the original purchase
due to defects in materials or workmanship, return the unit
(freight prepaid) with proof of purchase (sales receipt or
packing slip, no exceptions) to ClearSounds Communications.
ClearSounds Communications will either repair or replace the
unit (with a refurbished unit or unit of equal condition) and
return it you (using UPS/USPS ground shipping) at no cost to
you. The warranty replacement or repair will be warranted for
a period of 90 days or the remainder of the original warranty
period (from original purchase date); whichever is longer.
The warranty does not cover accidents, negligence or breakage
to any parts. This includes shipping damage, failure to
follow instructions, misuse, fire, floods, use of incompatible
accessories, Acts of God or failure in your phone service
carrier’s line service. The product must not be tampered with
or taken apart by anyone who is not an authorized ClearSounds
Communications® representative. Tampering with the phone
will void any written or implied warranties.
If a defect covered by this warranty should occur, promptly
contact a Customer Service Representative by phone or log
onto www.clearsounds.com to obtain a Return Merchandise
Authorization number and shipping instructions before
19 – ENGLISH
shipping the product to us. Any shipment without a (RMA)
Return Merchandise Authorization number will not be accepted
and will be returned to you at your expense. All authorized
returned products must be accompanied with proof of purchase
and a brief explanation of the problem.
For out of warranty repairs and service, please contact our
Customer Service Department for instructions. The repair shall
be warranted for 90 days.
IMPORTANT: YOU RECEIPT IS PART OF YOUR
WARRANTY AND MUST BE RETAINED AND
PRODUCED IN THE EVENT OF A
WARRANTY CLAIM.
Service in United States and Canada, contact:
ClearSounds Communications
Attention: Repair Center
1743 Quincy Avenue, Suite 155
Naperville, IL 60540
USA
800-965-9043
Check our website www.clearsounds.com for additional information
and to download additional manuals and information.
20 – ENGLISH