1
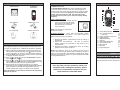
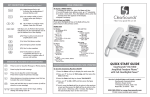
KEY DESCRIPTIONS
Handset
MENU MAP (p. #) denotes page in Operator Manual
Main Menu
Dial Key
Make/Answer a call. Activates the speakerphone
if pressed during a call.
CID (Caller ID) Book
(p. 36)
Add to PB(Phonebook)(p.39)
Delete (p.39)
Delete All (p.39)
Phonebook (p. 49)
New (p.50)
Edit (p.52)
Delete (p.52)
Delete All (p.52)
PB Status (p.53)
BS (Base) Settings
(p. 23)
Terminate HS
(Headset)(p.25)
Dial Mode (p.23)
Flash Time (p.23)
Modify PIN (Personal
Identification
Number)(p.24)
BS Reset (p.25)
HS (Handset) Settings
(p. 26)
Alarm (p.55)
End Key
End a call. Long press to activate power on/off.
Navigation Key:
Up scroll for lists and menu options
Increase the earpiece/speakerphone
volume during a call.
Enter the Caller ID (CID) book.
Down scroll for lists and menu options
Decrease the earpiece/speakerphone
volume during a call.
Enter the Phonebook.
Set up an internal call to another handset
Transfer an incoming call to another
handset.
Set up a conference call with an external
line and an internal handse.
Star Key - Press and hold to turn on/off keypad
lock function.
Set up a conference call.
One-touch memories – Store up to 4 numbers for
one-touch memory dialing.
0 Key – In standby mode, press and hold this key
until the icon appears to activate the shaker and
visual ringer function. Press and hold this key
again until the icon disappears to deactivate it.
Speaker V.(volume)(p.29)
Earpiece V.(volume)(p.29)
Ring Setup (p.19)
INT (Internal) Ring (p.19)
EXT (External) Ring (p.19)
Tone Setup (p.28,30)
Key Tone (p.30)
Range Alarm (p.28)
Date & Time (p.34-35)
Registration (p. 17)
Submenu II
Audio Setup (p.29)
Language (p.33)
HS Name (p.26)
Auto Answer (p.28)
LCD Contrast (p.34)
Enter the redial list.
Insert a pause when pre-dialing a number
or storing a phonebook entry.
Soft Keys – Two soft keys are used to select
functions displayed directly above each of the
soft keys (on the bottom line of the display).
Functions displayed above the soft key will
change as you move through the menu.
Submenu I
Select Base (p.27)
HS Reset (p.27)
Date Format (p.34)
Time Format (p.34)
Set Date (p.35)
Set Time (p.35)
QUICK START GUIDE
ClearSounds® A300E*
DECT 6.0 Expandable Handset
* Requires use of the A300 Cordless Phone
with Sound Boost
Service in United States and Canada, contact:
ClearSounds Communications
Attention: Repair Center
1743 Quincy Avenue, Suite 155
Naperville, IL 60540 USA
800-965-9043 or www.clearsounds.com
Printed manual available upon request
PARTS CHECKLIST
PHONE BASE
BATTERIES
AC ADAPTER
CORDLESS
HANDSET
CARRYING CLIP
USER’S MANUAL
CONNECTING YOUR PHONE
1. CHECK PARTS LIST
2. PHONE INSTALLATION: The phone should be located
in an area where it is easy to see the visual display and
lighted ringer. The phone may be placed on a shelf or table
or may be fixed to the wall. Begin by removing the clear
plastic Caller ID protective tab. This film tab is only
for display and to protect your Caller ID display during
shipping.
Desk / Table Mounting
1. Plug the AC power adapter into the
jack on the bottom of the base,
then plug the AC adapter into a
standard electrical outlet or
surge protector.
The supplied handset is already registered to the base unit,
and you can register up to 4 additional handsets to the base.
1. Before registering an additional handset to the base, you
, which is located
should press and hold the page key
on the main base, for about 5 seconds and then release it.
2. Press the Menu soft key on the handset you are registering
to display the main menu list.
or down
to scroll to Registration and then
3. Press up
press the Select soft key.
or down
to scroll through the base list and
4. Press up
select one of the bases and then press the Select soft key.
The handset will search for the requested base.
5. If the handset is successfully registered, you will be
prompted to enter the PIN code (the default PIN is 0000).
Upon validation of the PIN, the Registration tone will
sound and the base assigns a number to the handset.
More information on this feature located in the Operating
Manual on page 17.
1
2
16
17
15
18
3
14
19
13
4
20
12
5
21
6
Bottom of base
NOTE: The adapter is required for
the phone to work.
Installing Batteries
Three AAA re-chargeable Ni-MH
batteries come with your phone. You must install the
batteries before using your phone.
REGISTERING ADDITIONAL HANDSETS
LOCATION OF CONTROLS
1. Remove the battery compartment cover by sliding it
downwards.
2. Insert the new batteries.
Be sure to observe
battery polarity as imprinted on the inside of the
compartment.
3. Replace the battery compartment cover by sliding
upward until it clicks into place.
NOTE: The batteries need to be replaced if they do not
recover their full storage capacity after recharging. Check the
battery icon on the LCD to see the battery charge level. When
replacing the batteries, always use good quality Ni-MH AAA
re-chargeable batteries.
If at any time you have questions about your
telephone after reading this manual, please
contact our ClearSounds® Customer Service
Department at 1-800-965-9043.
11
7
10
8
22
9
Figure 1
1 Visual Phone Ringer
2 (4) 1-Touch Memory
Dial Keys
3 Large LCD/Caller ID Screen
4 Right Soft Key
5 Right/Redial Key
6 End Key
7 Down/Phonebook Key
8 Hash (Pound) Key
9 Microphone
10 Star Key
11 Lighted Keypad
12 Dial/Speakerphone Key
13 Left/Intercom Key
14 Left Soft Key
15 Up/Caller ID Key
16 Earpiece
17 Carrying Clip
18 Speaker
19 SOS Key
20 Screw Eye
21 Battery Compartment
Cover
22 Charging Contacts
MEMORY KEYS
Dialing from the Memory M1 – M4 and SOS keys
Press one of the M1 – M4 or SOS memory dial keys and the
phone will automatically begin to dial (Page 30 of the Operating
Manual describes how to program the memory dial keys).