1
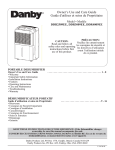
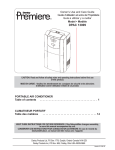
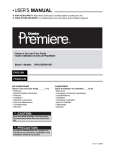
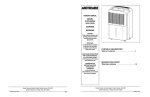
Owner’s Use and Care Guide
Guide d'utiliser et soins de Propriètaire
Model • Modèle
DDR4509EE, 6509EE
CAUTION:
Read and follow all
safety rules and operating
instructions before first
use of this product.
PRÉCAUTION:
Veuillez lire attentivement
les consignes de sécurité et
les directives d’utilisation
avant l’utilisation initiale
de ce produit.
PORTABLE DEHUMIDIFIER
Owner’s Use and Care Guide
• Welcome
• Important Safety Information
• Installation Instructions
• Features
• Operating Instructions
• Care and Maintenance
• Troubleshooting
• Warranty
...........................................1-8
DÉSHUMIDIFICATEUR PORTATIF
Guide d’utilisation et soins de Propriètaire
• Bienvenue
• Consignes de Sècurité Importante
• Consignes d’installation
• Caractéristiques
• Consignes de Fonctionnement
• Soins et Entretien
• Dépannage
• Garantie
. . . . . . . . . . . . . . . . . . . . . . . . . . . . . . . . 9 - 16
KEEP THESE INSTRUCTIONS FOR FUTURE REFERENCE: If the Dehumidifier changes
ownership, be sure this manual accompanies the unit.
CONSERVER CES INSTRUCTIONS POUR CONSULTATION ULTÉRIEURE: En cas de revente du
déshumidificateur, ce manuel doit être inclus avec l’appareil.
Danby Products Ltd, PO Box 1778, Guelph, Ontario Canada N1H 6Z9
Danby Products Inc, PO Box 669, Findlay, Ohio USA 45839-0669
V. 2.07.09 JF
WELCOME
Thank you for choosing a Danby appliance to provide you and your family with all of the “Home Comfort”
requirements of your home, cottage, or office. This Owner’s Use and Care Guide will provide you with
valuable information necessary for the proper care and maintenance of your new appliance. If properly
maintained, your Danby appliance will give you many years of trouble free operation. Please take a few
moments to read the instructions thoroughly and familiarize yourself with all of the operational aspects of this
appliance.
This unit can be conveniently moved from room to room within your home and set up in just minutes.
For easy reference, may we suggest you attach a copy of your sales slip/receipt to this page, along with the
following information, located on the rear wall of the water tank compartment.
Model Number:
Serial Number:
Date of Purchase:
This information will be necessary if your unit requires servicing and/or for general inquiries.
To contact a Customer Service Representative, call Danby TOLL FREE:
1-800-26(1-800-263-2629)
KEEP THESE INSTRUCTIONS FOR FUTURE REFERENCE.
CAUTION: Do not leave this unit unattended or operate in an area where people or animals may
not be able to react quickly. A failed unit may cause over-heating, resulting in personal injury or
property damage.
1
IMPORTANT SAFETY INFORMATION
NOTE
The WARNING instructions issued in this manual are not meant to cover all possible conditions and situations
that may occur. It must be understood that common sense, caution, and carefulness are factors that cannot be
built into all appliances. These factors must be supplied by the person(s) installing, maintaining, or operating
the appliance. Failure to install, maintain, and/or operate the equipment according to the manufacturer’s
instructions may result in conditions which can produce bodily injury and/or property damage. Contact your
dealer, service agent, or the manufacturer about any problems or conditions you do not fully understand.
For Danby Customer Service call 1-800-26-
(1-800-263-2629)
ELECTRICAL
To reduce the risk of fire, electric shock, or personal injury, all wiring and grounding
REQUIREMENTS must conform with the latest edition of Local and National Electrical codes.
• It is the customer’s responsibility to have the wiring and fuses checked by a qualified electrician to make
sure adequate electrical power is available.
• This appliance is designed to operate on a separate branch, polarized, three-wire, effectively grounded 120
Volt 60 Hertz (alternating current) circuit protected by a 15 ampere fuse, equivalent fuse or circuit breaker.
The three-prong grounding plug on the power cord should be plugged directly into a polarized, three slot,
effectively grounded receptacle rated 110/120 V.A.C.
FOR YOUR SAFETY: To reduce the risk of fire or explosion, do not store or use gasoline or other
flammable vapors or liquids in the vicinity of this or any other appliance.
GROUNDING Improper connection of the equipment-grounding conductor can result in a risk of
shock. Check with a qualified electrician or serviceman if you are in doubt as
INSTRUCTIONS electrical
to whether your appliance outlets are properly grounded.
• This appliance must be grounded. In the event of malfunction or breakdown, grounding will reduce the risk
of electrical shock by providing a path of least resistance for electrical current. This appliance is equipped with
a cord having an equipment-grounding conductor and 3 prong grounding plug. The plug must be connected
into an outlet that is properly installed and grounded in accordance with all local codes and ordinances.
• Do not modify the plug provided with this appliance. If it will not fit the outlet, have a proper outlet installed
by a qualified electrician.
• If the household electrical supply does not meet the above specifications, or it you are not sure your home
has an effective ground, have a qualified electrician or your local electrical utility company check it and
correct any problems.
SAVE THESE INSTRUCTIONS!
2
INSTALLATION INSTRUCTIONS
LOCATION
• Select a suitable location, making sure you have easy access to an electrical outlet (avoid the use of
extension cords). If it is absolutely necessary to use an extension cord, use an approved “air conditioner”
heavy duty extension cord ONLY (available at most local hardware stores).
• Make sure there are no obstructions restricting airflow through the front air intake grill. Maintain a minimum
clearance of at least 20 cm (8”) between adjacent walls and the back of the unit, to allow for proper air
circulation and maximum efficiency. To obtain maximum operating efficiency from your dehumidifier, the
recommended (room ambient) operating temperatures should be between 6°C (42.8°F)- 35°C (95°F).
• It is important to remember the efficiency of a dehumidifier will be effected/influenced by the rate at which
new humid air (moisture) is allowed to infiltrate the same space/area. To maintain efficiency, the dehumidifier
must be operated in an enclosed area. Keep all doors and windows closed.
FEATURES
• Soft touch (Electronic)Control Key Pads
• Full Bucket Indicator Light
• Auto-Sensing Humidity Control
• Easy Roll Castors (4)
• Adjustable Humidity Settings (35% - 80%)
• Front Mounted Water Tank(Removable)
• 2 Fan Speed Settings (High / Low)
• Direct Drain Option (Hosenot Included)
• Delay Start Protection (Compressor)
• Quiet Operation
• Auto-Defrost (De-Icer)
• Removable Air Filter
Handle
Control Panel
Front Panel
Air Inlet
Air Filter
(Side Panel)
Water Tank
Water level
Indicator
Easy-roll Castors
3
OPERATING INSTRUCTIONS
1
8
4
5
2
7
6
4) HUMIDITY UP: This button allows you to increase
the relative humidity setting. Each time this button is
pressed, the RH value setting is increased incrementally
by 5% (ranging from 35% - 80%)
3
1) LED Readout (ROOM HUMIDITY): The LED
window displays the following information
independently:
A) Internal (Room/Environment) Relative Humidity
Conditions
5) HUMIDITY DOWN: This button allows you to
decrease the relative humidity setting. Each time this
button is pressed the RH value setting is decreased
incrementally by 5% (ranging from 80% - 35%).
B) Set Operating Relative Humidity Value.
NOTE: The LED readout is programmed to default to
display the ambient relative humidity conditions.
To view the Set Operating Relative Humidity Value,
press the “up” or “down” button (once) and the set RH
operating value will flash for approximately 5 seconds in
the LED window, then revert back to display the internal
RH value.
6) HIGH FAN: The adjacent (green) indicator light
illuminates when HIGH FAN is selected.
2) ON/OFF Button: Each time this button is pressed the
unit turns ON (adjacent indicator light illuminates) or Off
(adjacent indicator light is not illuminated)
8) WATER FULL INDICATOR: This (red) light
illuminates under the following conditions:
3) CONTINUOUS: Used for Continuous Dehumidifier
Operation (unit will run non-stop).
NOTE: Humidity values (settings) cannot be
programmed in this mode. The adjacent (green) indicator
light illuminates to signify the “continous” mode is
currently in operation.
B) When the internal water tank is full. The water tank
must be emptied and replaced back in the cabinet before
normal operating conditions can resume.
7) LOW FAN: The adjacent (green) indicator light
illuminates when LOW FAN is selected.
A) When the internal water tank is not properly installed
inside the cabinet.
INDICATOR
LIGHT FUNCTION
This is a safety feature. When the water tank is emptied
and/or correctly re-positioned, the dehumidifier will
resume operation automatically. NOTE: It may take
several minutes before operating conditions resume.
Power Light (Green):
When the unit is first connected to an electrical outlet,
the (green) power light will not light until the “on/off”
button is pressed. When the “on/off” button is activated,
the power light turns to a state “on” condition. The
dehumidifier will automatically default to the memory
setting (see Memory Setting below for details).
Factory Default Setting: Each time the unit is
disconnected /re-connected and/or in the event of a
power failure, the electronic circuit board automatically
defaults to the following factory setting:
Humidity Setting: 60%
Fan Speed: High
IMPORTANT NOTE: Depending on the humidity
conditions of the surrounding environment, the
dehumidifier may not start automatically when the
“on/off” button is pressed (see dehumidifier operating
instructions for details). In the event of a power failure,
the unit will default to the last program setting that was
used when power is restored.
NOTE: In the event of a power failure, all previous
settings are automatically erased/cancelled. If your
program setting was different than above (default setting)
it will be necessary to re-program your settings. When
the unit is switched “off” manually (using the on/off
keypad) the unit will always default to the last program
setting that was used.
Water Full Indicator Light (Red):
When the water tank is full and/or incorrectly positioned
inside the cabinet, the (water full) red light turns on and
remains on until such time the tank is emptied and/or
correctly re-positioned. This condition will result in the
immediate shut down of the dehumidifying system (both
compressor and fan motor operation are terminated).
4