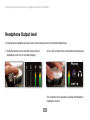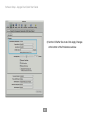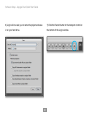
1
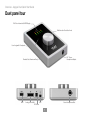
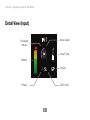
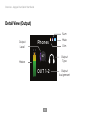
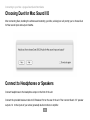
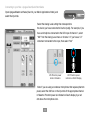
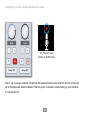
Apogee Duet
QuickStart Guide
V1, April, 2013
Contents
Overview!...........................................................................................................................4
Introduction!4
Package contents!5
Duet panel tour! 7
OLED Screen Tour!8
Connecting to your Mac!................................................................................................11
System Requirements!11
Install Duet Software !11
Connect to Headphones or Speakers!12
Configuring the Input!13
Connecting to your iPad!...............................................................................................15
System Requirements!15
Install Maestro from App Store !15
Connect to Headphones or Speakers!17
Configuring the Input!18
Adjusting Input & Output Levels!..................................................................................21
Software Setup!...............................................................................................................25
Using Duet with iOS Apps!33
Additional Support!........................................................................................................34
Warranty & Notifications!
Registration and Warranty Information!35
Warnings!37
Copyright Notice!38
Software Notice !38
Declarations of Conformity!39
35
Overview - Apogee Duet Quick Start Guide
Overview
Introduction
Thank you for purchasing Duet. This QuickStart guide describes how to set up Duet with your Mac and iPad,
connect speakers or headphones to play back music and connect mics and instruments to record your
own creations.
Duet
The Industry Standard for Personal Recording
Apogee Duet is an award-winning audio interface, headphone amp and MIDI interface making it easy to create
professional recordings anywhere on your iPod touch, iPhone, iPad or Mac. With Apogee’s legendary digital audio
conversion and world-class mic preamps, Duet is the best way to capture your music with incredible dimension
and detail.
4
Overview - Apogee Duet Quick Start Guide
Package contents
The following items are included in the Duet box:
• Duet
• Breakout cable with:
• 2 combination line/mic/instrument inputs
• 2 balanced line outputs
• 2 meter USB cable
• 30-pin iOS cable
• Universal power supply with NA, EU, UK, AU, JP
• QuickStart Guide
Software, firmware and the Duet User’s Guide are available online only.
Please register your product and download the latest installer here:
http://www.apogeedigital.com/downloads
5
Overview - Apogee Duet Quick Start Guide
6
Overview - Apogee Duet Quick Start Guide
Duet panel tour
Full Color Interactive OLED Display
Multi-function Controller Knob
User Assignable Touchpads
1/4” Stereo
Headphone Output
Durable Cast Aluminum Body
MIDI
Analog In and Out
USB
DC Power
Stereo Headphones Out
7
Overview - Apogee Duet Quick Start Guide
OLED Screen Tour
Home View
8
Overview - Apogee Duet Quick Start Guide
Detail View (Input)
Input Level
Grouped
Inputs
Input Type
Meters
Group
Phase
Soft Limit
9
Overview - Apogee Duet Quick Start Guide
Detail View (Output)
Sum
Output
Level
Phones
Mute
-47
Output
Type
Meters
OUT 1-2
10
Dim
Output
Assignment
Connecting to your Mac - Apogee Duet Quick Start Guide
Connecting to your Mac
System Requirements
•
•
•
•
•
Computer: Intel Mac 1.5GHz or faster
Memory: 2 GB RAM minimum, 4 GB recommended
OS: 10.6.8, 10.7.5 or greater
Connection and power: Any available USB port on a Mac
USB bus powered; DC power optional (DC power supply included)
Install Duet Software
1.
2.
3.
4.
5.
6.
Connect Duet’s USB port to a USB port on your Mac using the supplied USB 2 cable.
Go to http://www.apogeedigital.com/downloads.php
Download the latest Duet software installer.
Once you have downloaded the package, double-click the Apogee icon to run the firmware updater.
After the firmware update has completed, double-click the open-box icon to run the software installer
You will be required to restart your computer after the install is complete.
11
Connecting to your Mac - Apogee Duet Quick Start Guide
Choosing Duet for Mac Sound I/O
After connecting Duet, installing the software and restarting your Mac, a dialog box will prompt you to choose Duet
for Mac sound input and output. Click Yes.
Connect to Headphones or Speakers
Connect headphones to the headphone output on the front of the unit.
Connect the provided breakout cable to I/O Breakout Port on the rear of the unit. Then connect Duet’s 1/4” speaker
outputs 1-2 to the inputs of your active (powered) studio monitors or amplifier.
12
Connecting to your Mac - Apogee Duet Quick Start Guide
Configuring the Input
Connect a microphone or instrument to the breakout cable’s combo jack.
13
Connecting to your Mac - Apogee Duet Quick Start Guide
Open Apogee Maestro software (found in your Mac’s Applications folder), and
select the Input tab.
Select the Analog Level setting that corresponds to
the device you have connected to Duet’s input(s). For example, if you
have a microphone connected to the XLR input of channel 1, select
“Mic” from the Analog Level menu on channel 1. If you have a 1/4”
instrument connected to the input, then select “Inst”
48V Phantom power
button in Maestro
48V Phantom power
indicator on OLED Display
Note: If you are using a condenser microphone that requires phantom
power, select the 48V box on the Input tab of the appropriate channel
in Maestro. Phantom power is indicated on Duet’s display by a red
dot above the microphone icon.
14
Connecting to your iPad - Apogee Duet Quick Start Guide
Connecting to your iPad
System Requirements
• iPhone 4, iPhone 4S, iPad, iPad 2, iPad (3rd gen.)
• Connection: 30-pin dock connector
• iPod Touch (5th gen.), iPhone 5, iPad (4th gen.), iPad Mini
• Connection: Apple’s Lighting to 30-pin adapter (sold separately)
• iOS version: 5.1.1 or greater
• DC power required: DC power supply included
Install Maestro from App Store
1. Connect the provided external power supply to Duet. When connecting to iPad/iPhone, the external power
supply is required.
2. Connect Duet to your iPad/iPhone using the provided 30-pin iOS cable.
15
Connecting to your iPad - Apogee Duet Quick Start Guide
3. On the iPad/iPhone, open Settings and choose General > About > Duet, then choose "Find App for Accessory".
16
Connecting to your iPad - Apogee Duet Quick Start Guide
The App Store will open and navigate automatically to the Apogee Maestro app.
5. Once you've signed in to the App Store, download Apogee Maestro.
Note: it's possible to record through the mic inputs and play back audio without installing Maestro
Connect to Headphones or Speakers
Connect headphones to the headphone output on the front of the unit.
Connect the provided breakout cable to I/O Breakout Port on the rear of the unit. Then connect Duet’s 1/4” speaker
outputs 1-2 to the inputs of your active (powered) studio monitors or amplifier.
17
Connecting to your iPad - Apogee Duet Quick Start Guide
Configuring the Input
Connect a microphone or instrument to the breakout cable’s combo jack.
18
Connecting to your iPad - Apogee Duet Quick Start Guide
Open Apogee Maestro app, choose Duet from the main menu and select the Input tab.
Select the Analog Level setting that corresponds to the
device you have connected to Duet’s input(s). For
example, if you have a microphone connected to the XLR
input of channel 1, select “Mic” from the Analog Level
menu on channel 1. If you have a 1/4” instrument
connected to the input, then select “Inst”
19
Connecting to your iPad - Apogee Duet Quick Start Guide
48V Phantom power
button in Maestro
48V Phantom power
indicator on OLED Display
Note: If you are using a condenser microphone that requires phantom power, select the 48V box on the Input
tab of the appropriate channel in Maestro. Phantom power is indicated on Duet’s display by a red dot above
the microphone icon.
20
Adjusting Input & Output Levels - Apogee Duet Quick Start Guide
Adjusting Input & Output Levels Input level
To change Duet’s input level (i.e the preamp gain of microphones and instruments):
1) Push the Multi-function Controller Knob until the
microphone or instrument icon is lit on the
Duet’s display
2) Turn the Controller Knob until the desired recording
level is obtained.
IN 2
The controller knob operates in parallel with Maestro’s
input controls.
21
Adjusting Input & Output Levels - Apogee Duet Quick Start Guide
Speaker Output level
To change Duet’s speaker output level (i.e the listening level of connected speakers):
1) Push the Multi-function Controller Knob until the
speaker icon is lit on the Duet’s display
2) Turn the controller knob to the desired listening level.
Speaker
The controller knob operates in parallel with any
software output controls.
22
Adjusting Input & Output Levels - Apogee Duet Quick Start Guide
Headphone Output level
To change Duet’s headphone output level (i.e the listening level of connected headphones):
1) Push the Multi-function Controller Knob until the
headphone icon is lit on the Duet’s display
2) Turn the controller knob to the desired listening level.
Phones
The controller knob operates in parallel with Maestro’s
headphone control.
23
Software Setup - Apogee Duet Quick Start Guide
24
Software Setup - Apogee Duet Quick Start Guide
Software Setup
Mac OS: Using Duet with Logic
1) Go to the Logic Pro or Logic Express menu and
choose Preferences > Audio.
2) In the Core Audio pane of the Device tab, select
Duet for Output Device and Input Device.
25
Software Setup - Apogee Duet Quick Start Guide
3) Set the I/O Buffer Size to 64. Click Apply Changes
at the bottom of the Preferences window.
26
Software Setup - Apogee Duet Quick Start Guide
Mac OS: Using Duet with Logic (continued)
4) Now close the Logic Pro Preferences window and
select New > Empty Project > from the File Menu.
5) If you are recording a single microphone or
instrument, make the following selections in the New
Tracks dialog box:
27
Software Setup - Apogee Duet Quick Start Guide
6) Logic will now ask you to name the project and save
in on your hard drive.
7) Click the Record button in the transport control at
the bottom of the Logic window.
28
Software Setup - Apogee Duet Quick Start Guide
Mac OS: Using Duet with Avid Pro Tools (9 or greater)
1) Choose Setup menu > Playback Engine.
2) Choose Duet for Current Engine.
29
Software Setup - Apogee Duet Quick Start Guide
3) Set the Buffer Size to 64. Click OK.
4) The following dialog box will appear. Click Yes.
30
Software Setup - Apogee Duet Quick Start Guide
Mac OS: Using Duet with Ableton Live
1) Choose Live > Preferences. Click on the Audio tab.
2) Select CoreAudio in the Driver Type menu.
3) Select Duet in both the Audio Input Device and Audio Output Device menus.
4) Set Buffer Size to 128
5) Close the Preferences window after making settings.
31
Software Setup - Apogee Duet Quick Start Guide
32
Software Setup - Apogee Duet Quick Start Guide
Using Duet with iOS Apps
Duet works with any iOS Core Audio compatible app on iPod Touch, iPhone or iPad. Simply download your favorite
app, connect Duet and you’re ready to go!
Recommended apps:
GarageBand - https://itunes.apple.com/us/app/garageband/id408709785?mt=8
Auria - https://itunes.apple.com/us/app/auria/id524122834?mt=8
Cubasis - https://itunes.apple.com/us/app/cubasis/id583976519?mt=8
Visit www.apogeedigital.com/knowledgebase
for the most up to date list of compatible apps
33
Additional Support
For more information:
• Complete Apogee Duet User's Guide
• Apogee KnowledgeBase and FAQs
• Apogee Product Registration
• How to contact Apogee Technical Support
Visit: http://www.apogeedigital.com/support/
34
Warranty & Notifications
Registration and Warranty Information
To receive free tech support, important information and product updates first...
Register your new Apogee product here:
www.apogeedigital.com/register/
If you do so, Apogee can contact you with any update information. As enhancements and upgrades are
developed, you will be contacted at the registration address. Firmware updates are free for the first year of
ownership unless otherwise stated.
APOGEE ELECTRONICS CORPORATION warrants this product to be free of defects in material and manufacture
under normal use for a period of 12 months. The term of this warranty begins on the date of sale to the purchaser
(proof of purchase in the form of a receipt may be required). Units returned for warranty repair to Apogee or an
authorized Apogee warranty repair facility will be repaired or replaced at the manufacturer’s option, free of charge.
35
ALL UNITS RETURNED TO APOGEE OR AN AUTHORIZED APOGEE REPAIR FACILITY MUST BE PREPAID,
INSURED AND PROPERLY PACKAGED, PREFERABLY IN THEIR ORIGINAL BOX.
Apogee reserves the right to change or improve design at any time without prior notification. Design changes are not
implemented retroactively, and the incorporation of design changes into future units does not imply the availability of
an upgrade to existing units. This warranty is void if Apogee determines, in its sole business judgment, the defect to
be the result of abuse, neglect, alteration or attempted repair by unauthorized personnel. The warranties set forth
above are in lieu of all other warranties, expressed or implied, and Apogee specifically disclaims any and all implied
warranty of merchantability or of fitness for a particular purpose. The buyer acknowledges and agrees that in no
event shall the company be held liable for any special, indirect, incidental or consequential damages, or for injury,
loss or damage sustained by any person or property, that may result from this product failing to operate correctly at
any time.
Warranty Exclusions
• Used products purchased through a third party or online.
• Products with missing or defaced serial numbers.
• Products damaged by environmental factors, such as oxidation and/or damages caused by natural disaster.
• Units that have NOT been opened by user within the one year warranty period.
• Physical Damages which include, but not limited to the following:
• Unauthorized modifications
• Misuse, neglect or improper assembly
• Transport damages due to improper packaging or carrier
• Burns resulting from faulty or failed electric power
36
• Missing/bent parts
• Cracked components
• Liquid/water damage
USA: Some states do not allow for the exclusion or limitation of implied warranties or liability for incidental or
consequential damage, so the above exclusion may not apply to you. This warranty gives you specific legal rights,
and you may have other rights which vary from state to state.
Service Information
Your Apogee product contains no user-serviceable components; refer to qualified service personnel for repair or
upgrade. Your warranty will be voided if you tamper with the internal components. If you have any questions with
regard to the above, please contact Apogee.
In the event your Apogee product needs to be upgraded or repaired, it is necessary to contact Apogee prior to
shipping, and a Return Merchandise Authorization (RMA) number will be assigned.
Warnings
FCC warning
This equipment has been tested and found to comply with the limits for a Class A digital device, pursuant to Part
15 of the FCC rules. These limits are designed to provide reasonable protection against harmful interference when
operated in a commercial environment. This equipment generates, uses, and can radiate radio frequency energy
and, if not installed and used in accordance with the instruction manual, may cause harmful interference to radio
37
communications. Operation of this equipment in a residential area is likely to cause harmful interference, in which
case the user will be required to take whatever measures necessary to correct the interference at his own expense.
Copyright Notice
Duet is a computer-based device, and as such contains and uses software in ROMs. This software, and all related
documentation, including this User’s Guide contain proprietary information which is protected by copyright laws.
All rights are reserved. No part of the software and its related documentation may be copied, transferred, or
modified. You may not modify, adapt, translate, lease, distribute, resell for profit or create derivative works based
on the software and its related documentation or any part thereof without prior written consent from Apogee
Electronics Corporation, U.S.A.
Software Notice
Redistribution and use in source and binary forms, with or without modification, are permitted provided that the
following conditions are met:
1. Redistributions of source code must retain the above copyright notice, this list of conditions and the following
disclaimer.
2. Redistributions in binary form must reproduce the above copyright notice, this list of conditions and the
following disclaimer in the documentation and/or other materials provided with the distribution.
THIS SOFTWARE IS PROVIDED BY THE COPYRIGHT HOLDERS AND CONTRIBUTORS “AS IS” AND ANY EXPRESS OR
IMPLIED WARRANTIES, INCLUDING, BUT NOT LIMITED TO, THE IMPLIED WARRANTIES OF MERCHANTABILITY AND
38
FITNESS FOR A PARTICULAR PURPOSE ARE DISCLAIMED. IN NO EVENT SHALL THE COPYRIGHT OWNER OR
CONTRIBUTORS BE LIABLE FOR ANY DIRECT, INDIRECT, INCIDENTAL, SPECIAL, EXEMPLARY, OR CONSEQUENTIAL
DAMAGES (INCLUDING, BUT NOT LIMITED TO, PROCUREMENT OF SUBSTITUTE GOODS OR SERVICES; LOSS OF USE,
DATA, OR PROFITS; OR BUSINESS INTERRUPTION) HOWEVER CAUSED AND ON ANY THEORY OF LIABILITY,
WHETHER IN CONTRACT, STRICT LIABILITY, OR TORT (INCLUDING NEGLIGENCE OR OTHERWISE) ARISING IN ANY
WAY OUT OF THE USE OF THIS SOFTWARE, EVEN IF ADVISED OF THE POSSIBILITY OF SUCH DAMAGE.
Declarations of Conformity
This device complies with Part 15 of the FCC Rules. Operation is subject to the following two conditions:
1. This device may not cause harmful interference
2. This device must accept any interference received, including interference that may cause undesired operation.
This equipment has been tested and found to comply with the limits of a Class B digital device, pursuant to Part 15
of the FCC Rules. These limits are designed to provide reasonable protection against harmful interference in a
residential installation. This equipment generates, uses and can radiate radio frequency energy and, if not installed
and used in accordance with the instructions, may cause harmful interference to radio communications. If this
equipment does cause harmful interference to radio or television reception, which can be determined by turning
the equipment off and on, the user is encouraged to try to correct the interference by one or more of the
following measures:
1. Re-orient or relocate the receiving antenna.
2. Increase the separation between the equipment and receiver.
39
3. Connect the equipment into an outlet on a different circuit from that to which the receiver is connected.
4. Consult the dealer or an experienced radio/TV technician for help.
NOTE: The use of non-shielded cable with this equipment is prohibited.
CAUTION: Changes or modifications not expressly approved by the manufacturer responsible for compliance
could void the user’s authority to operate the equipment.
Apogee Electronics Corp.
1715 Berkeley Street
Santa Monica,CA 90404, USA
Industry Canada Notice
This Class B digital apparatus meets all requirements of the Canadian Interference-Causing Equipment
Regulations. Cet appareil numérique de la classe B respecte toutes les exigences du Règlement sur le matérial
brouilleur du Canada.
40
Declaration of Conformity – CE
Apogee Electronics Corporation hereby declares that the product, the Duet, to which this declaration relates, is in
material conformity with the following standards or other normative documents:
• EN50081-1/EN55022; 1995
• EN50082-1/IEC 801-2, 3, 4; 1992
following the provisions of:
• 73/23/EEC – Low Voltage Directive
89/336/EEC – EMC Directive
Declaration of Conformity – Japan
Apogee Electronics Corporation hereby declares that Duet, to which this declaration relates, is in material
conformity with the VCCI Class A standard.
Declaration of Conformity – Australia
Apogee Electronics Corporation hereby declares that the Duet is in material conformity with AN/NZS standard
requirements.
41
42
Apogee Electronics Corp. Santa Monica, CA
www.apogeedigital.com
Part #: 7010-0063-0160
Revision 4.0