1
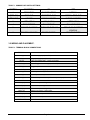
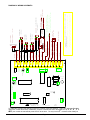
MODEL 1241 TWO WAY AUDIO MODULE INSTALLATION INSTRUCTIONS “LEADERS IN TWO WAY AUDIO TECHNOLOGY” Manual P/N 119503 Rev. 6.0 01/95 TABLE OF CONTENTS 1.0 GENERAL.......................................................................................................................................................... 3 1.1 FEATURES. ....................................................................................................................................................... 3 1.2 DEFINITIONS. ................................................................................................................................................... 3 2.0 REQUIREMENTS. ............................................................................................................................................. 3 2.1 POWER. ............................................................................................................................................................ 3 2.2 SYSTEM. ........................................................................................................................................................... 3 2.3 CENTRAL STATION. ......................................................................................................................................... 3 3.0 CONFIGURING THE MODULE.......................................................................................................................... 4 3.1 OPTION SWITCH DESCRIPTION. .................................................................................................................... 4 3.2 WIRING AND PLACEMENT............................................................................................................................... 6 3.3 JUMPERS. ......................................................................................................................................................... 8 3.4 ADJUSTMENTS/INSTALLATION. ...................................................................................................................... 8 3.5 MICROPHONE AND SPEAKER INSTALLATION............................................................................................... 8 3.6 COMMUNICATOR PROGRAMMING. ................................................................................................................ 9 4.0 ACTIVATION. .................................................................................................................................................... 9 4.1 IMMEDIATE TURN ON. ..................................................................................................................................... 9 4.2 USING RING DETECTOR.................................................................................................................................. 9 4.3 MANUAL ACTIVATION (HANDS FREE SPEAKERPHONE). ........................................................................... 10 5.0 CONTROLLING THE MODULE....................................................................................................................... 10 5.1 INTERNAL CONTROLS. .................................................................................................................................. 12 6.0 OPTIONAL CONNECTIONS............................................................................................................................ 12 7.0 ADDITIONAL INFORMATION. ........................................................................................................................ 15 7.1 INSTALLATION TIPS. ...................................................................................................................................... 15 7.2 NOTES............................................................................................................................................................. 15 8.0 FCC REQUIREMENTS .................................................................................................................................... 16 TABLE OF DIAGRAMS AND TABLES TABLE 1..............SUMMARY OF SWITCH SETTINGS. .......................................................................................... 6 TABLE 2..............TERMINAL BLOCK CONNECTIONS. .......................................................................................... 6 DIAGRAM 1 ........MULTIPLE SPEAKER CONNECTION. ........................................................................................ 8 DIAGRAM 2 ........WIRING SCHEMATIC................................................................................................................ 11 TABLE 3..............TOUCH TONE COMMAND SUMMARY. ................................................................................. 12 DIAGRAM 3 ........RELAY CONNECTIONS. ........................................................................................................... 13 DIAGRAM 4 ........SIREN DRIVER CONNECTIONS............................................................................................... 13 Page 2 1.0 GENERAL. 1.1 FEATURES. The Model 1241 is the most sophisticated Two Way audio device on the market today. Features include: ♦ Central station detection and automatic disconnect upon central station disconnect. ♦ Compatibility with all digital communicators. ♦ Microprocessor technology which provides a wide range of operating modes. ♦ Activation by a trigger input immediately after the communicator hangs-up and/or by its built-in ring detector by calling the system back after the alarm report. ♦ When used in the call back mode, the system has the ability to bypass any other devices such as an answering machine and/or downloadable communicator, which may intercept the call. ♦ Multiple microphone inputs and the ability to drive multiple speakers. ♦ Remote volume control of the microphone and speaker from the central station. 1.2 DEFINITIONS. LINE HOLD - The immediate turn on of the audio module which allows the module to use the phone call generated by the digital communicator when communicating with the central station. CALL BACK - A procedure when the central station calls the premises after an alarm activation to initiate Two Way communications. This can be used with or without the LINE HOLD mode. VOX - Two Way communication which automatically switches the ability to talk to the talking party. Works like a speakerphone. MANUAL CONTROL - The opposite of VOX. The central station controls who talks and who listens with commands generated from a Touch-Tone phone. LISTEN ONLY / TALK ONLY - Both terms relative to the central station. LISTEN ONLY allows the central station to listen without talking. TALK ONLY allows the central station to talk without listening. 2.0 REQUIREMENTS. 2.1 POWER. Operating voltage: 9 to 14 VDC. Current draw (standby): 80 mA max. Current draw (active): 300 mA max. 2.2 SYSTEM. The Eagle Model 1241 requires the following hardware: 1. A communicator/control panel which has a Two Way trip connection or a control panel with an Eagle Model 1405 or Model 1406 Activation Module (when used in the line hold mode.) 2. Connections to power (+12VDC & Ground) and telephone (Tip & Ring). The 1241-S requires 6 VDC. 3. A minimum of one speaker (Eagle Model 2150 or equivalent) and one electret microphone (Eagle Model 2101 or equivalent). 2.3 CENTRAL STATION. 1. A receiver with listen-in or Two Way capability (stays on line after kiss off). Page 3 2. A Touch-Tone phone in parallel with the receiver line if used in the line hold mode. 3.0 CONFIGURING THE MODULE. 3.1 OPTION SWITCH DESCRIPTION. The Eagle Model 1241 has many modes of operation. It can be custom configured for each installation. The following is a description of each of the option setting switches. Recommended settings are italicized. NOTE: When changing the Option Switches, always remove power, set switches, then reconnect power. This insures that the new options will be read by the microprocessor! SW1: ON = Factory test / Demo Mode. OFF = Normal operating mode. This switch is only used to facilitate demonstration of the system to prospecting users. If using the full time call back mode, moving this switch to the ON position (DEMO Mode) changes the number of rings before activation from six or ten (selected by SW2) to just one (1) ring. The duration of the demo mode is set with SW2. For normal operation, place SW1 is OFF . NOTE: When using the central station controlled relay connected to P8, SW1 must be in the OFF position. ________________________________________________________________ SW2 is dependent upon SW1 for its operation. If SW1 is in the NORMAL MODE (OFF) and SW4 is ON then: SW2: ON = 6 rings before answering. OFF = 10 rings before answering. If SW1 is in the NORMAL MODE (OFF) and ring detect is OFF (SW4 is OFF) then the operation of the Model 1241 is independent of SW2's setting. If SW1 is in the DEMO MODE (ON) then: SW2: ON = Fast time-out of the shut down timer. Shuts down in one minute instead of five minutes. OFF = Normal time-out of the shut down timer. Shuts down in five minutes. There is no recommended setting for SW2. _________________________________________________________________ SW3: ON = Activate in the "Two Way VOX mode" (automatic operation). OFF = Activate in "Listen Only" mode (manual operation). When the system is triggered by the trigger input or the ring detector, this switch controls how the Two Way audio will activate. In some commercial applications where the possibility of a "hold up in progress" may occur, it is desirable to have the system activate first in the "Listen Only" mode which will prevent the speaker from emitting any sound when the system activates. If desired, the operator can then switch the audio to Two Way VOX after activation. NOTE: It is recommended to have the module activate in the “listen-only” mode. Confirm with local law enforcement if this is permitted. Page 4 The module may be switched into either mode and back again (as many times as desired) independent of which mode it was initiated. Recommended setting for SW3 is OFF. ______________________________________________________________________ SW4: ON = Activate the system from ring detector. (Note: system will also activate with trigger input when in this position, dependent on SW5.) OFF = Activate the system with the trigger input ONLY (disable ring detector). This switch controls the full-time ring detector. It DOES NOT control the "5-minute window after alarm activation" ring detector. These are two separate modes and controlled separately. If it is desired to have the system activate the ring detector, place this switch in the ON position. If it is desired to have the system activate ONLY with the trigger input, then place the switch in the OFF position. Recommended setting for SW4 is OFF. _________________________________________________________________ SW5: ON = Activate immediately with the trigger input (Line-hold mode). OFF = Set up the ring detector to answer after one ring. When SW5 is in the ON position, the system will activate immediately with the trigger input. (This occurs when the digital communicator is shut down with a kiss-off from the Central Station.) A trip from the communicator/control panel or an Eagle Model 1405 or 1406 activation module is required. When SW5 is in the OFF position a trigger input will activate a five (5) minute window. The 1241 will answer the phone line as soon as it sees one ring within this window. The system will ignore any invalid phone calls (see section 4.2). When the five minute window expires, the system will ignore any additional phone calls (unless programmed for "call-back" mode with SW4). NOTE: This mode is independent of the full-time call back mode. If it is desired that the only time the module is to answer is when the ring detector has been set up with the trigger input, set SW4 OFF (trigger only). Recommended setting for SW5 is ON. ________________________________________________________________ SW6: ON = Positive edge trigger on trigger input. OFF = Negative edge trigger on trigger input. NOTE: Before selecting this option, determine which type of trip will be used by measuring the DC voltage at the trigger input when connected to the communicator. (Positive lead of the voltmeter on Terminal TRIP of the 1241, negative lead of the voltmeter on Terminal GND on the 1241.) When SW6 is in the OFF position, the system will interface with digital communicators that provide a trigger input that is at 1.5 VDC or less when NOT reporting and switch to 2.5 VDC or greater when reporting. When SW6 is in the ON position, the system will interface with digital communicators that provide a trigger input that is at 2.5 VDC or greater when NOT reporting and switch to 1.5 VDC or less when reporting. SW6 is installation dependent. There is no recommended setting. Page 5 TABLE 1: SUMMARY OF SWITCH SETTINGS. SWITCH FUNCTION ON OFF 1 OPERATION FACTORY TEST NORMAL 2 (SW1 ON) TIME OUT FAST TIME OUT NORMAL TIME OUT 2 (SW1 OFF) # RINGS 6 RING ANSWER 10 RING ANSWER 3 ACTIVATE IN VOX (2-WAY) LISTEN ONLY 4 RING DETECT FULL TIME ON FULL TIME OFF 5 TRIGGER FUNCTION IMMEDIATE TURN ON 6 TRIGGER VOLTAGE POSITIVE EDGE SET UP RING DETECT WINDOW NEGATIVE EDGE 3.2 WIRING AND PLACEMENT. TABLE 2: TERMINAL BLOCK CONNECTIONS. TERMINAL CONNECTION +12 (1) Positive supply input (+12 VDC) GND (2) Negative supply input (Ground) TIP (3) Telco Tip (premise side - brown on RJ-31X). RING (4) Telco Ring (premise side - gray on RJ-31X). TRIP (5) Trigger input. ANS HGUP (6) Manual Answer/Hang-up input. N.C. (7) Normally closed relay contact. N.C. (8) Normally closed relay contact. MIC1 (9) Electret microphone 4 or amplified microphone input (selectable). MIC POWR (10) Electret microphone supply voltage output (5 VDC). MIC2 (11) Electret microphone 1 signal input. SHLD (12) Electret microphone ground. MIC3 (13) Electret microphone 2 signal input. MIC4 (14) Electret microphone 3 signal input. SPK (15) Speaker driver output. SPK (16) Speaker driver output. GREEN WIRE Earth Ground. Page 6 TABLE 2 DESCRIPTION. +12 and GND: +12 VDC and GROUND input, respectively. WARNING!: DO NOT CONNECT AC VOLTAGE TO +12 AND GND - DAMAGE WILL OCCUR! TIP and RNG: Telephone T1 and R1, respectively (usually brown and gray on RJ-31X, respectively.) NOTE: It is recommended to connect the 1241 to the premise side of the RJ-31X. If using the ring detect mode and the communicator/alarm panel has a download feature (which is being used), the 1241 must be connected across the street side of the RJ-31X and the communicator must be programmed to answer the phone a minimum of one ring before the 1241 is programmed to answer the phone. TRIP: Trip input into the module. Positive or negative edge. Set edge with SW6. Maximum input voltage should not exceed 14VDC. Consult factory for assistance with your equipment. ANS HGUP: This input is only used when it is desired to operate the 1241 as a Hands Free "Speaker Phone" in addition to its normal function. Connect GND and ANS HGUP to a Normally Open switch (if desired). Also used when using Model 1405 Activation Module. See paragraph 4.3. N.C. and N.C.: Normally Closed relay contacts for local alarm silencing. These contacts duplicate pins 4 and 5 (yellow & green wires) of P1. During Two Way, this connection is opened. This relay is used to disconnect a local alarm for Two Way. If the additional contacts are required to release an additional annunciator, the contacts on P1 must be used via accompanied relay cable assembly, P/N 117000. MIC1: The function of this terminal is dependent on P3. If P3 is set on pins 1 and 2, this is the signal input for an electret microphone. If P3 is set on pins 2 and 3, then this is the signal input for a power microphone (low impedance microphone). See Paragraph 3.3 for details. MIC POWR: This is power output for all electret microphones, or any microphone which use +5 VDC for power. MIC2, MIC3 and MIC4: These are the inputs for electret microphones (Eagle Model 2101). These inputs are amplified on the module. Any combination of inputs may be used (including terminal MIC1). NOTE: Shielded wire must be used for all remotely mounted electret microphones! SHLD: This is the ground for all electret microphones. This may also be used for a ground connection for a power microphone. SPK and SPK: These are the talk-back speaker outputs. Speakers with a minimum of one watt power rating are recommended (Eagle Model 2150). The total impedance of the speakers connected to these terminals must be 8 ohms or more. See DIAGRAM 1 for multiple speaker connections. GREEN GROUNDING WIRE: The 1241 requires EARTH GROUND for lightening protection. Connect EARTH GROUND to this wire. EARTH GROUND must be connected to maintain warranty! Failure to connect will void warranty! WARNING: Earth Ground must be connected for proper lightening protection! Failure to connect voids warranty! Page 7 DIAGRAM 1: MULTIPLE SPEAKER CONNECTION. 8 Ohms 8 Ohms 8 Ohms 2 Speakers 16 Ohms Total Resistance 8 Ohms 8 Ohms Resistance 8 Ohms 3.3 JUMPERS. P3 - This sets the type of microphone used on MIC1 (only). Set the shunt block across pins 1 and 2 (default) when using an electret microphone (Eagle Model 2101). When using an amplified microphone, set the shunt block across pins 2 and 3. If your unit was shipped with a jumper wire in place of the header, MIC1 is set for use with an electret microphone (Eagle Model 2101). If it is desired to use an amplified microphone, cut the jumper. 3.4 ADJUSTMENTS/INSTALLATION. SPK - Used to adjust the gain of the speaker during "Two Way VOX" mode only; CCW - increases gain; CW decreases gain. Use an amply rated speaker, 1 watt or more (Eagle Model 2150 or equivalent). MIC - Used to adjust the gain of the microphones during "Two Way VOX" mode only; CCW - increases gain, CW decreases gain. 3.5 MICROPHONE AND SPEAKER INSTALLATION. 3.5.1 LOCATION. A microphone and speaker can cover a range of up to 2500 square feet. This is dependent on the environment in which they are installed. Installation is recommended at or near system keypads with a minimum of one per floor, excluding basement. 3.5.2 SEPARATION. It is required to install the microphone and speaker no less than three (3) feet from one another. This will prevent any feedback in the Two Way VOX mode. CAUTION! - Microphone(s) and speaker(s) must be mounted a minimum of three feet from each other or feedback may occur. 3.5.3 QUANTITY OF MICROPHONES AND SPEAKERS. Microphones. The Model 1241 is designed to handle up to four microphones (one per input). If additional microphones are required they may be installed in a parallel configuration. If this is utilized, it is recommended to configure ALL used inputs the same (all single or all double). This will prevent unbalanced inputs. Inputs not used should have no connection. Page 8 Speakers. The Model 1241 is designed to drive up to four speakers. Total speaker impedance must be eight (8) ohms or greater. (See section 3.2 for wiring diagram.) If additional speakers are required, or if additional volume is desired, the Eagle Model 1402 SPEAKER EXPANSION MODULE must be used. 3.6 COMMUNICATOR PROGRAMMING. When programming the digital communicator, it is advised to begin the "TELEPHONE NUMBER" with "∗ ∗ 70" (tone dialing) or "1170" (pulse dialing). This will allow uninterrupted communication when the subscriber has call waiting. 4.0 ACTIVATION. 4.1 IMMEDIATE TURN ON. When SW5 is set in the ON position, the module will activate when a trigger is received at the TRIP terminal. This trigger must correspond with the completion of the communicator's alarm report (kiss off from the Central Station). When the Two Way audio module is activated in this mode, the operator, if listening at that time, will hear a two tone "beep-bop" acknowledgment generated by the module. This is the operator’s notification that the module is on and active. The red LED will illuminate while active. NOTE: The central station receiver must be capable of a “listen-in” function, i.e., the receiver must hold the phone line open until an operator can pick up the line. The operator can control the operation of the module using a Touch-Tone phone per Paragraph 5.0. 4.2 USING RING DETECTOR. 4.2.1 DESCRIPTION. FULL TIME CALL BACK. When the ring detector option is selected for the module (SW4 is ON), the module will answer in the programmed number of rings (SW2). When this feature is programmed ON, it is valid at all times, i.e., anytime the phone rings the programmed 6 or 10 times, the Model 1241 will pick up the line and the red LED will illuminate while active. FIVE MINUTE WINDOW. The Model 1241 has a call back mode which activates upon a trip. The window is initiated from the trip input. This sets up the system to answer an alarm which has just been reported by the digital communicator (SW5 is OFF). The operator will have 5 minutes in which to call back the system and have it answer within one ring. This feature allows call back only within five minutes of an alarm activation. While active, the red LED will illuminate. If the five minute call back timer has elapsed, SW4 has been set to activate the system only on the trigger input (OFF) and SW5 has been set to activate the five minute call back window (OFF), then the system will no longer pick up the call; no matter how many rings occur. If SW4 has been set to activate the system both with the trigger input and the ring detector (ON), SW5 has been set to answer within five minutes of an alarm activation (OFF) and the five minute call back timer has elapsed, the module will revert to the number of rings programmed using SW2 after the five minute time-out has expired. These two features are independent of each other. That is, the module can be configured to answer the phone in the programmable 6/10 rings (valid anytime) and/or answer the phone within one ring after an alarm activation (five minute window). 4.2.2 CALL ANSWERING. Page 9 When the system detects the programmed number of rings, it will pick up the phone line and send a series of 3 "beeps" as an answer acknowledgment. The system now has the line, but Two Way is NOT active. The operator has 15 seconds to press (and release) the * (asterisk) key to activate the module. If the * is not sent in 15 seconds, the system will hang-up. When the * is received, the system will generate a two tone "beep-bop" acknowledgment and the red LED will illuminate. The operator can control the operation of the module using a Touch-Tone phone per Paragraph 5.0. 4.3 MANUAL ACTIVATION (HANDS FREE SPEAKERPHONE). When a momentary, normally open "answer/hang-up" switch is connected between GND and ANS HGUP, the 1241 can operate as a speaker phone. Pressing the switch will cause the system to come on-line in the "Two Way VOX mode”. The red LED will illuminate while active. Pressing the switch again will cause it to hang-up. The timers, "beep" tones and Touch-Tone digits will be disabled in this mode. The switch must be pressed to hang-up the system as it will NOT time out automatically. 5.0 CONTROLLING THE MODULE. After the module has been successfully activated by one of the methods described above (other than the manual speakerphone mode), the operator can control the operation of the system using a Touch-Tone phone in the following manner: To switch to high gain "listen only", press and release 3 . To switch to "Two Way VOX", press and release 2 . To switch to high volume "talk only", press and release 1 . The operator can switch back and forth between these modes as often as one wishes independent of the mode in which the module was in when activated. CAUTION!: If there is a loud, continuous background noise, such as a radio, the central station operator should not attempt to increase the gain of the Model 1241, as this may cause the system to lose the ability to recognize the tones from the central station. If the module “locks-up” into the high gain “listen-only” mode, press and hold 2 for a minimum of 5 seconds. This should unlock the module. Repeat if necessary. The Model 1241 provides five (5) minutes of Two Way. During Two Way, the module will generate a "beep" once every minute. Upon the fourth and final minute of Two Way the module will generate a two tone "beep bop" warning the central station that there is only one more minute of Two Way before the module automatically disconnects. These beeps will be heard at the premise when module is in the "Two Way VOX" mode or in the high volume "talk only" mode. These beeps will always be heard by the central station. The one minute progress beeps may be disabled by cutting the resistor at the top edge of the module (see DIAGRAM 2). The activation and the final minute warning beeps will still operate even if the resistor is removed. Page 10 1 MIN ALERT TONES CUT TO DISABLE EAGLE SECURITY MODEL 1241 P5 1 2 3 4 5 6 P7 INCREASE 2 1 AUDIO ACTIVE INCREASE P4 IN USA ON OFF 3 4 P3 3 2 1 SPEAKER VOLUME 1 4 3 2 6 5 2 1 1 4 3 2 6 5 P6 P2 P1 SPK SPK MIC4 MIC3 SHLD MIC2 MIC POWR N.C. RELAY YELLOW BLUE BARE YELLOW BLUE BARE 1 4 3 2 (brown) TELCO TIP YELLOW BLUE BARE YELLOW BLUE BARE -12 VDC (NEG) SWITCHED +12 VDC FROM CONTROL PANEL FROM CONTROL PANEL RJ31X OR RJ11 TELCO JACK ONE OF THE EAGLE TRIP MODULES (1405 or 1406). IF A TRIP OUTPUT IS NOT AVAILABLE USE TRIP OUTPUT ON THE DIALER (IF AVAILABLE). THE TRIGGER INPUT IS CONNECTED TO A - + MICROPHONE 1 or AMPLIFIED MIC (see NOTE: 1) SIREN DRIVER MODULE MIICROPHONE 2 (optional) MICROPHONE 3 (optional) MICROPHONE 4 (optional) (if any) Cut the shorting bar across pins 1 & 2 for an amplified mic. P3 is used to select which type of mic input is being used. Leave the shorting bar across Pins 1 & 2 for the electret mic. sound discriminators. electret mic or an amplified microphone such as found on some NOTE: 1 - Terminal 9 can be used in conjuntion with either a 3 pin +12 VDC (GROUND) (NEG) (gray) -12 VDC AUDIO SPEAKER OBSERVE POLARITY SIREN SPEAKER TELCO RING TRIGGER INPUT ANSWER/HANGUP INPUT N.C. SIGNAL 1 POWER (+) SIGNAL 2 SHIELD (-) SIGNAL 3 SIGNAL 4 SPEAKER (-) SPEAKER (+) RELAY MIC1 1 2 P8 GND N.C. MICROPHONE VOLUME ERTH N.C. ANS HGUP TRIP RING TIP GND Page 11 +12 SW1 DIAGRAM 2: WIRING SCHEMATIC. To extend the Two Way shut down time (reset to 5 minutes), press and release 7 at any time during the Two Way (before the module disconnects). Additionally, anytime a command is sent to the Model 1241 (a 1 , 2 , 3 , 7 or #0 ) the module will automatically reset the five minute timer. The only time the 7 command need actually be MADE 1 2 sent is when the module is used in the "listen-in only" mode for the duration of the call. To shut down the module, press and release 9 at any time. To shut down the module and initiate the five minute call back window, press and release 8 at any time. This will allow the central station or any other party to call back and have an active Two Way session. (This is beneficial when a home or business owner wishes to listen-in after the central station has finished.) The Model 1241 features a relay which can be controlled by the central station. When an Eagle Model 1400 Auxiliary Relay Module is connected to P8, then the central station can activate the relay with a #0 command. The activation is a 350 mS (350 milli-Second) pulse which energizes the relay. The Model 1400 provides DPDT (2 Form C) contacts. TABLE 3: TOUCH TONE COMMAND SUMMARY. TOUCH -TONE COMMAND 1 2 3 7 8 9 #0 * (ASTERISK) FUNCTION HIGH GAIN TALK ONLY TWO WAY VOX HIGH GAIN LISTEN ONLY RESET SHUT DOWN TIMER SHUT DOWN MODULE & INITIATE 5 MINUTE CALLBACK WINDOW SHUT DOWN MODULE TRIGGER C.S. CONTROLLED RELAY (P8) ACTIVATE 1241 FROM CALL BACK MODE 5.1 INTERNAL CONTROLS. 5.1.1 CENTRAL STATION DETECTION. The model 1241 features Eagle's exclusive central station detection. This feature allows the audio module to detect a central station receiver dropping off line before an operator picks up on the Two Way line. When detected (about 15 to 20 seconds post receiver hang up) the module will shut itself down and initiate the five minute call back window. This feature also is useful if the central station operator does not send the shut-down command. In this case the module will shut down (after 15 to 20 seconds post operator hang up). It will not activate the call back mode. 6.0 OPTIONAL CONNECTIONS. Several accessories can be connected to the Eagle Model 1241 providing additional features. The following describes those accessories. P1 - DPDT relay connection. If the system to which the Model 1241 is connected is using an internal sounder (siren, bell or buzzer), it should be interrupted during Two Way. This will allow the central station maximum listen-in ability without interference. These connections may be made at either of two places. Series one lead of the sounder through terminals N.C. and N.C. This is a normally closed relay connection which will open during Two Way. Optionally, use the 6 wire harness (P/N 117000, connected to P1) to make the connection. DIAGRAM 3: RELAY CONNECTIONS. Page 12 [RED] N.C. PIN 1 [BRN] COMM. PIN 3 [ORN] N.O. PIN 5 [GRN] N.C. PIN 4 [YEL] COMM. PIN 6 [BLU] N.O. RELAY 1 RELAY 2 Note: Yellow and Green wires are DUPLICATED on terminals N.C. and N.C.. The DPDT relay is handy when using a common speaker for both siren output and Two Way talk back. The following diagram shows the connections for using a common speaker for this function. Orange Blue 14 15 16 DIAGRAM 4: SIREN DRIVER CONNECTIONS. 13 1 2 3 YELP-1&2 SWEP-2&3 10 11 MODEL 12 1401 P1 EAGLE Q1 9 SECURITY Blk 6 PIN HEADER 4 3 2 1 P1 Relay 2 (N.C.) +12 VDC FROM CONTROL PANEL Red Relay 2 (N.O.) Relay 1 (COM) Relay 1 (N.C.) 6 5 GND (-) FROM CONTROL PANEL Red/Wht Relay 2 (COM) Green Relay 1 (N.O.) Brown 8 Ohm SPEAKER (s) Yellow CAUTION!: DO NOT use both the 6 wire harness and terminals N.C. and N.C. These terminals are duplicated on the GREEN and YELLOW wires on the harness. Page 13 P2 - MODEL 1400 AUXILIARY RELAY MODULE This module provides an additional DPDT relay which is activated when the audio module is activated. It is automatically de-activated when the module shuts down. The color code on the Model 1400 wire harness is the same as the cable supplied with the audio module. P4 - MODEL 1402 SPEAKER EXPANSION MODULE. The Model 1402 provides three additional speaker outputs. If it is desired to connect more than four speakers to the Model 1241 or additional power is desired on each of the first four speakers, then the Model 1402 must be used. P5 - INHIBIT INPUTS. This provides access to the four inhibit inputs. The talk inhibits are ideal for silent alarms when talk back is not desirable. The Two Way inhibits are useful for system trouble, test, opening and closing reports when Two Way is not desirable. Two inhibits (the Yellow and Orange wires on optional cable assembly P/N 117006) are used to prohibit any talk back during a Two Way session. If either of these two inputs are at 5VDC (or above) when the module is activated, all talk back will be inhibited. If the central station tries to place the module in any talk mode (by sending a 2 or 3 ), the module will generate a 'bop' tone signaling an invalid command. Note: If the module is in the high gain listen mode and a 2 is sent, the module will generate the 'bop' tone and will place the module in a regular gain listen-only mode. The Brown and Red wires (on optional cable assembly P/N 117006) provide two inputs which completely inhibit Two Way. If either of these inhibits are at 5VDC (or above) when the module is activated, the module will not activate. P6 - SYSTEM CONNECTIONS. Used to connect Model 1405 or 1406 activation modules. Note: These trip modules are not required on systems which have a Two Way or listen-in trigger or when call back (exclusively) is used. P7 - TELCO INTERFACE. This connection is for the Eagle Model 1403 REMOTE CONTROL RELAY MODULE. This may be used to provide the central station control of peripherals at the premise such as a thermostat or the zoning of microphones and speakers. The Model 1403 will provide up to eight (8) individual zones or 16 dual zones (using multiple Model 1403's). P8 - CENTRAL STATION CONTROLLED RELAY. This provides the connection for a Model 1400 AUXILIARY RELAY MODULE which the central station controls activation. A Model 1400 AUXILIARY RELAY MODULE is used to provide a DPDT relay which is MOMENTARILY activated for 350 mS. This can drive a latching relay or any peripheral equipment if desired. The command to activate this relay is # followed by 0 . MICROPHONES. Additional microphones may be connected to the remaining open microphone terminals as needed (Terminals MIC1, MIC2, MIC3, and MIC4). Page 14 7.0 ADDITIONAL INFORMATION. 7.1 INSTALLATION TIPS. ♦ Microphones and Speakers must be a minimum of 3 feet apart. ♦ Do not place microphones at or near devices that generate loud ambient sounds. ♦ Do not place microphones in heating ducts. ♦ Do not place microphone at or next to keypads that contain an internal piezo unless it is disabled. ♦ Always, always use shielded cable for all microphone runs. ♦ Full time call back mode is not recommended for most installations. ♦ It is recommended to use the “listen-only” mode at activation. ♦ Although the module can drive 4 speakers, the volume is low. Use a 1402 on larger installations. ♦ Use a four wire shielded wire for speaker/mic runs, it’s lower cost than 2 separate wires. ♦ Use a minimum of one speaker and mic per floor on residential installations. ♦ Basements don’t usually need a mic or a speaker unless the customer request’s it. ♦ Dirty power supplies (and grounds) will cause interference on Two Way. ♦ Always, always Earth ground a Two Way module. It eliminates interference! ♦ Avoid programming restorals into the control panel. ♦ Program a “call waiting defeat” command into the control panel (*70 or 1170) 7.2 NOTES. ♦ The operation of the system will be greatly enhanced if amplified phone is used at the Central Station. ♦ When using multiple microphones at the subscriber end, be aware that loud background noise picked up by one microphone will "drown out" the other microphone(s). ♦ It is unwise to switch to the high gain "Listen only" mode in the presence of loud background noise as that will only make it worse. ♦ It is recommended that shielded wire be used for microphones located farther than 6 inches from the circuit board. ♦ As with all electronic devices, electrostatic discharges can damage the components. Handle the circuit board with care! ♦ Radionics, Napco Detection Systems, Linear, C&K and ITI operate differently than most industry communicators and the system must be programmed in such a way as to facilitate there use. This may include the use of an Eagle Model 1405 Activation Module. Please consult Eagle Security Products, Inc. for assistance. ♦ Features and specifications subject to change without notification. ♦ Use of this equipment may be in violation of local laws. Please verify and obey all local laws. Eagle Security Products, Inc. does not assume any liability for the illegal use of this equipment. ♦ Trademarks and Registered Trademarks are the property of their respective owners/companies. Page 15 8.0 FCC REQUIREMENTS. 1. The Federal Communications Commission (FCC) has established Rules which permit this device to be directly connected to the telephone network. Standardized jacks are used for these connections. This equipment should not be used on party lines or coin lines. 2. If this device is malfunctioning, it may also be causing harm to the telephone network; this device should be disconnected until the source of the problem can be determined and until repair has been made. If this is not done, the telephone company may temporarily disconnect service. 3. The telephone company may make changes in its technical operations and procedures; if such changes affect the compatibility or use of this device, the telephone company is required to give adequate notice of the changes. You will be advised of your right to file a complaint with the FCC. 4. If the telephone company requests information on what equipment is connected to their lines, inform them of: a. The telephone number this unit is connected to b. The ringer equivalence number c. The USOC jack required. d. The FCC Registration number Items 'b' and 'd' are indicated on the label. The ringer equivalence (REN) is used to determine how many devices can be connected to your telephone line. In most areas, the sum of the RENs of all devices on any one line should not exceed five (5.0). If too many devices are attached, they may not ring properly. 5. In the event of equipment malfunction, all repairs should be performed by our Company or an authorized agent. It is the responsibility of users requiring service to report the need for service to our Company or to one of our authorized agents. Service can be obtained at: Eagle Security Products, Inc. 20 North America Drive West Seneca, New York 14224 (716) 674-9192 TECHNICAL SUPPORT HOTLINE: (800) 926-TECH (8324) HOURS: M-F, 8 AM - 6 PM (PAGE/CALL BACK 6 PM - 8 PM) or at your local installation company. EAGLE SECURITY PRODUCTS MODEL 1241 Complies with Part 68, FCC Rules FCC Registration #: 1SYUSA-18688-KX-N Ringer Equivalence : 0.0B LIMITED WARRANTY Eagle Security Products, Inc. Warrants that the products of its manufacture shall be free from defects in materials or workmanship to one year from the date of invoice if such goods have been properly installed, are subject to normal proper use, and have not been modified in any manner whatsoever. Upon return of the defective product to the nearest Eagle Security Products dealer, Eagle Security Products will, at its sole discretion, either repair or replace, at no cost to the customer, such goods as may be of defective material or workmanship. Customers outside the United States are to return products to their distributor for repair. In addition, any out of the box failure will be replaced at no charge providing the unit has not been altered physically. Alterations include, but not limited to, soldering, the addition of tape / foam tape or any form of physical damage. EAGLE SECURITY PRODUCTS, INC. SHALL NOT UNDER ANY CIRCUMSTANCES BE LIABLE FOR ANY INCIDENTAL OR CONSEQUENTIAL DAMAGES ARISING FROM LOSS OF PROPERTY OR OTHER DAMAGE OR LOSSES OWING TO THE FAILURE OF EAGLE SECURITY PRODUCTS’ PRODUCTS BEYOND THE COST OF REPAIR OR REPLACEMENT OF ANY DEFECTIVE PRODUCTS. EAGLE SECURITY PRODUCTS, INC. MAKES NO WARRANTY OF FITNESS OR MERCHANTABILITY AND NO OTHER WARRANTY, ORAL OR WRITTEN, EXPRESS OR IMPLIED, BEYOND THE ONE YEAR WARRANTY EXPRESSLY SPECIFIED HEREIN. Page 16