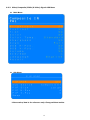
1
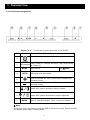
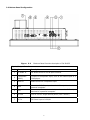
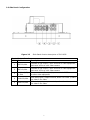
DIAMOND DIGITAL DX-D193P Colour TFT LCD Monitor 19” (43 cm) LCD Panel Size Copyright 2008, Mitsubishi Electric Australia Pty. Ltd. All rights reserved. No part of this publication may be reproduced, transmitted, transcribed, stored in a retrieval system or translated into any language or computer language, in any form or by any means, electronic, mechanical, magnetic, optical, chemical, manual or otherwise, without the prior written permission. CONTENTS 1 1.1 1.2 Safety Disclaimer Important Safety Instructions 3 3 3 4 2.2 2.3 Introduction Before Installing Your Monitor Unpacking Precautions 4 4 4 3 3.1 3.2 3.3 3.4 3.5 Exploded View Front Panel Configuration Bottom Panel Configuration Side Panel Configuration Tilt / Swivel Angle Dimension 5 5 6 7 8 8 4 4.1 Production Description Supported Timing Table 9 9 5 5.1 5.2 5.3 5.4 5.5 5.6 Installing the Monitor Ventilation Desktop Installation Connecting the Composite Video to the Monitor Connecting the Y/C(S-Video) Signal to the Monitor Connecting the YPbPr Signal to the Monitor Connecting Audio to the Monitor 10 10 10 10 11 11 11 6 6.1 6.2 6.2.1 6.2.2 6.2.3 6.2.4 Navigating the Monitor Navigating the Monitor On-Screen Display(OSD) On-Screen Display Menus VGA/DVI Signal OSD Menu VGA/DVI Signal OSD Function Table Video(Composite/YPbPr/S-Video) Signal OSD Menu Video(Composite/YPbPr/S-Video) Signal OSD Function Table Input Signal Icon Hot Key Icon 12 12 12 13 14 15 16 Troubleshooting Guide Technical Specifications WARRANTY Service Contacts 18 19 20 21 2 2.1 6.2.5 6.2.6 7 8 2 17 17 1 Safety 1.1 Disclaimer This company makes no representations or warranties, either expressed or implied, with respect to the contents hereof and specifically disclaims any warranties, merchantability or fitness for any particular purpose. Further, this company reserves the right to revise this publication and to make changes from time to time in the contents hereof without obligation of this company to notify an person of such revision or changes. All brand or product names are trademarks or registered trademarks of their respective companies. 1.2 Important Safety Instructions 1. Read & keep these instructions these instructions. 2. 3. 4. 5. 6. 7. Heed all warnings. Follow all instructions. Do not use this apparatus near water. Clean only with dry cloth. Do not block any ventilation openings. Install in accordance with the manufacturer’s instructions. Do not install near any heat sources such as radiators, heat registers, stoves, or other apparatus (including amplifiers) that produce heat. 8. Protect the power cord from being walked on or pinched particularly at plugs, convenience receptacles, and the point where they exit from the apparatus. 9. Only use attachments/accessories specified by the manufacturer. 10. Use only with the cart, stand, tripod, bracket, or table specified by the manufacturer, or sold with the apparatus. When a cart is used, use caution when moving the cart/apparatus combination to avoid injury from tip-over. 12. Unplug this apparatus during lightning storms or when unused for a long period of time. 13. Refer all servicing to qualified service personnel. Servicing is required when the apparatus has been damaged in any way, such as power-supply cord or plug is damaged, liquid has been spilled or objects have fallen into the apparatus, the apparatus has been exposed to rain or moisture, does not operate normally, or has been dropped. 14. WARNING : To reduce the risk of fire or electric shock, do not expose this apparatus to rain or moisture. 15. Apparatus shall not be exposed to dripping or splashing and no objects filled with liquids, such as vases, shall be placed on the apparatus. 3 2 Introduction 2.1 Before Installing Your Monitor Thank you for choosing our new generation DX-D193P monitor. This lightweight, slim design LCD monitor includes many outstanding features and combines the benefit of a high resolution display. Please follow ALL instructions and cautions carefully before using this product. Keep this user manual safely stored for future reference. Read this manual cover to cover. Pay attention to all warnings and cautions. Do not attempt to service the monitor by yourself. If a problem occurs, contact the manufacturer’s authorised service center. 2.2 Unpacking The original packing carton is the safest container in which to transport the unit and must be used if returning the unit for service. Save it for possible future use. Open the shipping carton and check the contents. If any items are missing or damaged, contact your dealer immediately. The package should include the following items: Quantity 2.3 Part List 1 DX-D193P TFT LCD Security Monitor with Protective Glass 1 User manual 1 VGA to VGA (D-SUB) cable, 1.36M 1 Power Adapter :12VDC, 4A, 100 – 240VAC, 50/60 Hz 1 AC Power Cord, 1.2M, plug type optional Precautions HANDLING The monitor must be treated with caution and not be exposed to impact and shock. The monitor has a fragile glass screen. Never rub it with a hard, stiff object or tool as the panel is easily scratched. Your monitor is protected by one glass filter. Every effort has been made to protect the screen, however the monitor is a fragile product. Cleaning & Maintenance The display area is highly prone to scratching. Do not use ketone type material (ex. Acetone), ethyl alcohol, toluene, ethyl acid or methyl chloride to clean the screen, as it may permanently damage the screen. Usable cleaning agents are water, IPA (Iso Prophyl Alcohol) or Hexane. Keep food particles and fingerprints away from the display area.. Do not spray any liquid directly on the screen. Wet a clean, soft, lint-free cloth with water only (Paper towels or dirty cloths may scratch the surface of the display). Wipe the display softly from top to bottom in a downward motion with another clean, dry, lint-free cloth. Do not to press too hard to avoid damaging the screen. Storage Do not store the monitor in temperatures higher than 60℃ (140℉) or humidity higher than 85%. Store in a dark place, keep away from sunlight and ultra violet (UV) radiation. Air bubbles may develop within the glass screen if this is not observed. 4 3 Exploded View 3.1 Front Panel Configuration Figure 3.1 Ref # Button Front Panel function description of DX-D193P Function Description Press to switch monitor on / off. 1 POWER 2 LED Indicator 3 MODE 4 AUTO Green: Power on ; Orange: No signal ; Red: Power saving ; NA: Power off see ※ Note Input source VGA signal auto adjustment. 5 Press to increase the value of OSD option selected and increase volume. 6 Press to decrease the value of OSD option selected and decrease volume 7 Select OSD options upwards or adjust contrast 8 Select OSD options downwards or adjust brightness. 9 MENU Menu or close OSD display, enter or return to selection. ※ Note: On the first press, the monitor shows the OSD of the current source. Before the OSD disappears, press again to change Mode. 5 3.2 Bottom Panel Configuration Figure 3.2 Bottom Panel function description of DX-D193P Input /Output Interface Ref # Connector 1 PC Audio In 2 Component (YPbPr) Description For audio source of R.G.B input terminal. Connect to component input, such as the video output of a DVD player. 3 Audio In Audio source for Component input 4 VGA Connect to R.G.B input, such as the VGA output terminal of a personal computer. 5 DVI Connect to DVI input terminal, such as the DVI output terminal of a personal computer. 6 DC Out 12V DC out for single camera power (max. 500mA) 7 DC In DC Power input of 12V/4A. 6 3.3 Side Panel Configuration Figure 3.3 Side Panel function description of DX-D193P Input /Output Interface Ref # Connector Description 1 BNC2 In/Out Connect to the output / input terminal of video equipment, such as a VCR or a color video camera 2 BNC1 In/Out Connect to the output / input terminal of video equipment, such as a VCR or a color video camera 3 S-Video (Y/C) In /Out Connect to the Y/C output / input terminal of VCR or other video equipment 4 Audio2 In/Out RCA Audio input / output terminal, audio 1 for video 1, audio for video 2 & s-video. 5 Audio1 In/Out RCA Audio input / output terminal, audio 1 for video 1, audio for video 2 & s-video. 7 3.4 Tilt / Swivel Angle The viewing angle of the monitor can be adjusted to the most comfortable monitoring status. Min Degree Max Degree 5 degree 40 degree 3.5 Dimension 8 4 Product Description The DX-D193P TFT-LCD Security Monitor with Protective Glass displays PAL colour pictures in CCTV systems. There are 2 sets of Composite Video BNC connector inputs/outputs, 2 sets of RCA audio input/outputs, 1 set of L/R RCA Audio inputs for Component (YPbPr) and 1 S-Video (Y/C) input and output using a 4-pin mini-DIN. Each model includes an Analog VGA input using 15-pin D-sub to accommodate the increasing use of PCs and digital video devices in security applications. DVI and Component Video (YPbPr) connectors are also available. Monitor control functions are accessed via the front panel push buttons and On-screen Display (OSD). Refer to Section 3 Exploded View, page 6, for front panel descriptions. 4.1 Supported Timing Table Timing Mode Standard Type Pixel Format Refresh Pixel Freq. FH KHz FV Hz Interlace H Pol. V Pol. Rate Mode 1 VESA 640x350 85 31.5 37.861 85.08 NO + - Mode 2 Us Text 720x400 70 28.322 31.469 70.087 NO - + Mode 3 VESA 640x400 85 31.5 37.861 85.08 NO - + Mode 4 VESA 720x400 85 35.5 37.927 85.039 NO - + Mode 5 VESA 640x480 60 25.175 31.469 59.94 NO - - Mode 6 VESA 640x480 72 31.5 37.861 72.809 NO - - Mode 7 VESA 640x480 75 31.5 NO - - Mode 8 VESA 640x480 85 36 43.269 85.008 NO - - Mode 9 VESA 800x600 56 36 35.156 56.25 NO + + Mode 10 VESA 800x600 60 40 37.879 60.317 NO + + Mode 11 VESA 800x600 72 50 48.077 72.188 NO + + Mode 12 VESA 800x600 75 49.5 46.875 NO + + Mode 13 VESA 800x600 85 56.25 53.674 85.061 NO + + Mode 14 VESA 1024x768 60 65 48.363 60.004 NO - - Mode 15 COMPAQ 1024×768 66 71.664 53.964 66.132 NO + + Mode 16 VESA 1024x768 70 75 56.476 70.069 NO - - Mode 17 VESA 1024x768 75 78.75 60.023 75.029 NO + + Mode 18 VESA 1024x768 85 94.5 68.677 84.997 NO + + Mode 19 NEC 1280x1024 60 108 63.981 60.02 NO + + Mode 20 HITA 1280x1024 72 135 78.125 72.005 NO + + Mode 21 VESA 1280x1024 75 135 79.976 75.025 NO + + Mode 22 VESA 1280x1024 85 157.5 91.146 85.024 NO + + 9 37.5 75 75 5 Monitor Installation This chapter outlines the procedures to install the DX-D193P TFT-LCD Security Monitor with Protective Glass. A qualified service person should install the monitor and adhere to all local codes. 5.1 Ventilation To prevent overheating, ensure that the ventilation openings on the rear of the monitor are not covered. 5.2 Desktop Installation The DX-D193P TFT-LCD Security Monitor comes with a 12V/4A power adapter. Before connecting the power cord cable to the adapter, put the adapter in the holder fixed on the rear of the monitor (see Figure) .The monitor automatically adjusts to either power input voltage. The viewing angle of the LCD can be adjusted for the most comfortable monitoring status. 5.3 Connecting the Composite Video Signal to the Monitor The DX-D193P TFT-LCD Security Monitor with has 2 sets of BNC connectors located on the rear side of the monitor for composite video input/outputs. All video inputs are passive loop-through when operating in a single connection mode. If a cable is also connected to the output connector, the video signal can be passed on to another monitor connected to it via the passive loop-through function. Note: Press the SOURCE button (see Figure 3.1) to select the video source (Composite1/2) 10 5.4 Connecting the Y/C (S-Video) Signal to the Monitor There is 1 set of mini-DIN type connectors for the S-Video (Y/C) input/output on the rear side panel (see Figure 3.3). 5.5 Connecting the YPbPr Signal to the Monitor There is 1 set of YPbPr connectors for the S-Video (Y/C) input/output on the rear side panel Connect the signal cable to the connectors with same colors (green/blue/red) 5.6 Connecting Audio to the Monitor There are 3 sets of stereo audio connectors and 1 stereo mini-jack for audio input located on the rear side panel (see Figure 3.2 or 3.3). – Audio 1 & Audio 2 are RCA input/output sets with looping through function. Audio 3 is RCA inputs with L/R channel. – Audio 1 is associated with Video 1; Audio 2 is associated with Video 2 (Y/C); Audio 3 is associated with YPbPr; PC audio is associated with VGA,DVI. Ref Audio 1 Video 1 V Video 2 S-video Audio 2 Audio 3 PC Audio V V YPbPr V VGA V DVI V 11 6 Navigating the Monitor 6.1 Navigating the Monitor On-screen Display(OSD) The DX-D193P TFT-LCD Security Monitor has several modes: Composite1/2, YPbPr, VGA, DVI and S-Video. The LCD monitor is programmed through the on-screen display (OSD) menus and submenus where an operator can select operating parameters. To access the OSD menus, press the Menu button on the front panel. Use the front panel of the monitor to make any necessary adjustments to the OSD. NOTE: When you are navigating through the OSD menus, use the MENU button to select a menu or exit a menu. To navigate the set up menus, follow the steps below: 1. Connect the CVBS or VGA cable. 2. Press the POWER button to turn on the unit (see Figure 3.1). 3. If required, press the SOURCE button until a signal is displayed. NOTE: Main menus are not available without a signal applied. 4. Press the MENU button to activate the main menu selections (see Figure 3.1). and buttons to select a menu. 5. Press the 6. Press the + and - buttons to toggle the OSD values directly. 7. Press the MENU button to exit the OSD menu bar. 6.2 On-screen Display Menus There are on-screen menus that allow you to customize your settings. Press the MENU button to access the OSD menu. 12 6.2.1 VGA/DVI Signal OSD Menu Main Menu Sub Menu _ PIP/POP * Above Value/data is for reference only. Change without notice. 13 6.2.2 VGA/DVI Signal OSD Function Table Main Menu REF.# Menu Definition 1 Brightness Adjusts the brightness level (range 0-100) 2 Contrast Adjusts the contrast level (range 0-100) 3 H-Position * Adjust the left or right position of the screen image (range 0-100) 4 V-Position * Adjust the up or down position of the screen image (range 0-100) 5 Clock * Adjust the horizontal sync width of the screen image (range 0-100) 6 Phase * Adjust the clarity of the screen image(range 0-100) 7 Color Temp. Press (+) or (-) to choose three types of colour temperature 9300°K , 6500°K or User Color. 8 User Color R Adjust the red colour’s intensity of the screen image (range 0-100) 9 User Color G Adjust the green colour’s intensity of the screen image (range 0-100) 10 User Color B Adjust the blue colour’s intensity of the screen image (range 0-100) 11 OSD H-Pos. Adjust the left or right position of the OSD.(range 0-100) 12 OSD V-Pos. Adjust the up or down position of the OSD.(range 0-100) 13 Volume Adjust the volume control. 14 PIP/POP Enter PIP/POP submenu. 15 Language Select languages: English, Traditional Chinese, Simplified Chinese, French, German, Spanish, Italian, Portuguese, Russian and Japanese. 16 Power Saving Power saving mode selection 17 Recall Press (+) or (-) recall the default value Sub Manu REF.# Sub Menu Definition 14.1 PIP/POP View the video input screen image on the left-top/right side screen. 14.2 Sub Source Choose the source of the sub picture: Composite1/2 or S-Video 14.3 PIP Size Choose the size of the sub picture 14.4 PIP H-Position Adjust the left or right position of the sub picture 14.5 PIP V-Position Adjust the up or down position of the sub picture 14.6 Swap Switch between main source and sub source * Item 3,4,5,6 have different value after auto tuning, but DVI can’t adjust. 14 6.2.3 Video(Composite/YPbPr/S-Video) Signal OSD Menu Main Menu Sub Menu *Above value/data is for reference only. Change without notice. 15 6.2.4 Video(Composite/YPbPr/S-Video) Signal OSD Function Table Main Menu REF.# Submenu Definition 1 Brightness Adjusts the brightness level (range 0-100) 2 Contrast Adjusts the contrast level (range 0-100) 3 Tint Adjust the colour tint. (NTSC only) (range 0-100) 4 Color Adjust the colour density (range 0-100) 5 Color Temp. Press (+) or (-) to choose three types of colour temperature 9300°K , 6500°K or User Colour. 6 Sharpness. Adjust the clarity and focus of the screen image 7 Scan Press (+) or (-) to choose 4 type of over/ under/ full/ 1 : 1 scan 8 Adjust the left or right position of the OSD.(range 0-100) 10 OSD H-Pos. OSD V-Pos. Volume 11 PIP/POP Entering PIP/POP submenu. 12 Language 13 Recall Select languages: English, Traditional Chinese, Simplified Chinese, French, German, Spanish, Italian, Portuguese, Russian and Japanese. Press (+) or (-) recall the default value 9 (range 0 - 100) Adjust the up or down position of the OSD.(range 0-100) Adjust the volume control. Sub Manu REF.# Submenu Definition 11.1 PIP/POP 11.2 Sub Source View the video input screen image on the left-top/right side screen Choose the source of the sub picture: VGA,DVI or YPbPr. 11.3 Size Choose the size of the sub picture 11.4 PIP H-Position Adjust the up or down position of the sub picture 11.5 PIP V-Position Adjust the left or right position of the sub picture 11.6 Swap Switch between main source and sub source 16 6.2.5 Input Signal Icon VGA Signal Composite Signal S- Video Signal DVI Signal YPbPr Signal 6.2.6 Hot Key Icon Contrast Adjustment Brightness Adjustment Volume Adjustment 17 7 Troubleshooting Guide Problem Solution No image is displayed on – screen “No Signal” message is displayed Display image is not centered, is too small, or – – – – – Check that the power cord of the monitor is securely connected to the wall outlet or grounded extension cable or strip. Power switch should be in the ON position and the LED illuminated. The signal cable should be completely connected to the video card/computer. The video card should be completely seated in its slot and the computer switched ON. Press the Mode button on the front panel to choose an available source. Push the Auto key on the front panel to activate the Auto Adjust function. -or- too large in the PC mode – Vertical or horizontal – Push the down key to activate the AUTO function (for VGA inputs only). -or- noise is present in the Adjust the Clock and Phase in the PC OSD submenu. picture – Adjust the Clock and Phase in the PC OSD menu. Incorrect colours – Press the MENU button on the front panel of the monitor, then press the down arrow to select the Color Temp in OSD. Press the down arrow on the front panel and select 9300°K , 6500°K or User Color - or Press the MENU button on the front panel of the monitor, then press the right arrow to select the Recall menu. Press the down arrow on the front panel and select Recall to reset to the default settings. – The error message “Out of – PC is operating outside of the specified timing table recommendation. Range” is displayed When it is not supported by the monitor, change the PC timing mode to one of the valid timing modes (See Table 4.1). 18 8 Technical Specification Model DX-D193P Monitor Size 19 inch with protective screen Pixel pitch (H x V mm) Max. VGA / DVI Resolution Dimension (W x H x D mm) 0.294 x 0.294 1280 x 1024 pixels /85 Hz 421.2 x 408.8 x 240 VGA、DVI、Composite、S-VIDEO、Component. Display Mode Signal Connector DC In/Out, VGA In, DVI In, BNC1 In/Out, BNC2 In/Out, Y/C In/Out, YPbPr In, Audio1 In, Audio2 In, Audio3 In, PC Audio In Power Input DC Input : 12V / 4A. Rated Voltage 100/240 VAC, 50/60 Hz Power Output DC 12V / 500mA. Operating Condition Temp. : 0°C ~ 40°C, Humidity : 20% ~ 80%. Storage Condition Temp. : -20°C ~ 60°C, Humidity : 15% ~ 85%. Power Consumption (On/Off) Weight <45W/5W N.W. 6.98kgs. G.W. 8.8kgs. LCD Panel Optical Characteristics 250 cd/m2 Luminance Contrast Ratio (CR) 1000 : 1 Response Time(Tr +Tf) 5 ms 160。/160。 Viewing Angel (H/V) Video Input Composite Video (CVBS) 1.0 Vp-p (0.5–1.5 Vp-p), automatic switching from 75Ω unbalanced termination to Hi-Z with passive loop-through operation Y/C (S-video) 0.7 Vp-p (Y-signal), 0.3 Vp-p (C-signal) 75Ω termination 19 WARRANTY WARRANTY After Sales Service After this product is unpacked, keep the carton and packing materials to ensure safe transportation in case of any after sales service. The warranty is covered by a 3-year limited warranty, subject to normal conditions of use. If you experience any problems with this product please contact your local dealer or supplier for repair and maintenance instructions. Warranty Do NOT Include: Any damage resulting from incorrect use or careless operation or handling of the equipment. Any damage caused by not operating the equipment in accordance with the manufacturer’s instructions detailed in the “User Manual “. Any tampering or removal of the Monitor housing will invalidate the warranty. Damages resulting from natural disasters e.g. flood, fire and earthquake. Any damages caused by inappropriate transportation or storage of the equipment. 20 Service Contacts Australian Service Contacts Visit the Customer Support page of Mitsubishi Electric Australia’s web site at; www.mitsubishielectric.com.au Further details of your nearest Mitsubishi Electric Authorized Service Center or to contact a Mitsubishi Electric Service Representative in your state or territory: New South Wales and Australian Capital Territory 348 Victoria Road Rydalmere, NSW, 2116 Telephone: (02) 1300 651-808 Fax: (02) 9684-7684 Queensland 12 / 468 Nudgee Road Hendra, QLD, 4011 (Airlink Business Park) Telephone: (07) 3623-2000 Fax: (07) 3630-1888 South Australia and Northern Territory 77 Port Road Hindmarsh, SA, 5007 Telephone: (08) 8340-0444 Fax: (08) 8340-0555 Victoria and Tasmania Building 28 Omnico Business Park 270 Ferntree Gully Rd Notting Hill, VIC, 3168 Telephone: (03) 9535-7800 Fax: (03) 9535 7801 Western Australia 5 / 329 Collier Road Bassendean, WA, 6054 Telephone: (08) 9377-3411 Fax: (08) 9377-3499 21