1
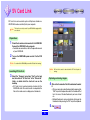
On-line Manual
LITE VERSION
Video Capture Software
IMPORTANT INFORMATION
CONTENTS
SV Photo Capture
SV Card Link
Troubleshooting
Please read this operation manual
carefully before using your software.
IMPORTANT INFORMATION &
CONTENTS
IMPORTANT INFORMATION
CONTENTS
PREVIOUS PAGE
NEXT PAGE
CONTENTS
● The “readmeen.txt” file, located in the “Readme” folder of the “PixLab Lite Installation CD-ROM”, includes important new information that could not be included in
this on-line manual.
The “readmeen.txt” file can be read using the “Notepad” program provided with
Windows. For instructions on using “Notepad”, refer to the Windows operating
instructions.
● This on-line manual is written for users who already understand how to use
Microsoft Windows and the mouse.
Should you have any questions on operating Windows or the mouse, refer to the
Windows on-line manual, instruction manual, etc.
● The descriptions in this on-line manual may not correspond exactly to your
computer’s environment.
SV Photo Capture .......................................................................... 3
Preparations ............................................................................................. 3
Launching SV Photo Capture ................................................................... 3
Capturing images ..................................................................................... 4
Saving images .......................................................................................... 5
Exitting ...................................................................................................... 5
VIEWCAM operation while SV Photo Capture is running ................... 5
SV Card Link .................................................................................. 6
Copyright
Preparations ............................................................................................. 6
Launching SV Card Link ........................................................................... 6
Capturing and saving images ................................................................... 6
Exitting ...................................................................................................... 7
● Microsoft and Windows are registered trademarks or trademarks of Microsoft
Corporation in the United States and other countries.
● Other names of corporations and products are trademarks or registered trademarks
of the respective corporations.
● The contents of the on-line manual have been prepared with care. If, however,
you should have any doubts or notice any errors, please contact Sharp Corporation.
● PixLab (hereafter referred to as “this software”) is copyrighted by Sharp
Corporation. Copyrights and other rights concerning PixLab belong to Sharp
Corporation.
● The contents of the on-line manual may not be reproduced in part or in whole.
They are for personal use only, and as per copyright laws may not be used without
the permission of Sharp Corporation.
● Please note that Sharp Corporation will accept no responsibility for damages,
loss of income or claims by third parties resulting from the use of this software.
● Please note that the specifications of this software and the contents of the on-line
manual are subject to change without prior notice.
● Operation may be slow depending on the computer’s operating environment and
processing capabilities.
● Images or recordings you make on your camcorder may be used for your personal
enjoyment only. They may not be used without the permission of the copyright
holder per copyright laws. Also note that the use of certain performances, shows,
exhibitions, etc., though intended for personal enjoyment, may be restricted.
Troubleshooting ............................................................................ 8
If there are communications errors or communicationsare unstable... ..... 8
It the image cannot be captured... ............................................................ 8
2
SV Photo Capture
CONTENTS
Use this to capture images
with correction.
Edge Smoothing
OFF button
Use this to capture
images without
correction.
Preparations
2
Capture button
Use this button to start
capturing images from
the VIEWCAM.
Connect the VIEWCAM to the computer.
• For details on connections, refer to the operation manual
of your VIEWCAM.
Display window
The image is
displayed here as it is
being captured.
Turn on the VIEWCAM’s power and set it to the Camera
or VCR mode.
Cancel button
Launching SV Photo Capture
3
NEXT PAGE
Edge smoothing AUTO button
SV Photo Capture can be used to control the VIEWCAM
connected to the computer from the computer and capture images
being displayed on the LCD screen in the Camera mode, or
images recorded on tapes in the Tape Playback mode into the
computer as still pictures.
1
PREVIOUS PAGE
Click this to cancel
the image capture.
Select the “Program” menu from “Start” on the task
bar, then click on “SV Photo Capture” in the “PixLab
Lite” folder, or double click the short-cut icon on the
desktop.
• SV Photo Capture is launched.
Connection
settings button
Use this to set the
serial port and transfer
speed.
Exit button
Use this to close the
SV Photo Capture
dialog.
Mode select
buttons
Camera mode:
Mode for capturing
images currently
being displayed on
the VIEWCAM’s LCD
screen.
Video mode:
Mode for capturing
images from the tape
currently playing on
the VIEWCAM.
Zoom buttons
(Camera mode)
Control buttons (VCR mode)
Use this to play in the reverse direction.
Use these to zoom in
and out.
Use this to play in the forward direction.
COM Port Settings
● This software automatically searches for and selects the COM port assigned
for serial connection and there is no need to specify the port.
icon, change
● If the connection cannot be set automatically, click the
the assigned serial port and transfer speed in the connection settings dialog
box and then try again. For details on the serial port and transfer speed
settings, refer to the operation manual of your computer.
Use this to stop.
Use this to pause playback and display a still image.
Use these for slow playback.
Use these during still image playback for frame-by-frame
playback.
Use these to fast-forward and rewind the tape. During
playback, use them for forward and reverse search.
Note
3
● If your VIEWCAM is not equipped for the operations described
above, these operations cannot be performed with SV Photo
Capture.
● SV Photo Capture cannot be launched while SV Card Link is running.
CONTENTS
7
Capturing images
4
5
Use the mode select buttons to choose the mode.
to capture images being displayed on the LCD
• Click
screen of the VIEWCAM.
• Click
to capture images recorded on a tape as the
tape is playing.
NEXT PAGE
Click
when the image you want to capture
is displayed.
• The image stops moving (a still image is displayed) and
transfer from the VIEWCAM begins.
• The save folder selection dialog box shown below is
displayed when transfer is completed.
Use the edge smoothing AUTO or OFF button to select
whether or not to correct the image to be captured.
• When edge smoothing AUTO is selected, images are
automatically corrected when they are captured from
the VIEWCAM. We recommend normally selecting this.
• When edge smoothing OFF is selected, images are not
corrected when they are captured from the VIEWCAM.
Note
6
PREVIOUS PAGE
On VIEWCAMS which automatically perform edge smoothing on
images, the images are captured with the edge smoothened without
having to set this button.
• When the image capture has been completed, the
VIEWCAM returns to the status prior to the image
capture.
(Example: When the
is clicked during
playback, the playback will stop until the image receiving
has been completed, and then continue after.)
Start to view, record or playback the tape on the
VIEWCAM to display images on its LCD screen.
• When capturing images being displayed on the LCD
screen, the zoom buttons (Camera mode) can be used
to enlarge or reduce the image you want to capture.
• When capturing images being played, use the control
buttons (VCR mode) to display the image you want to
capture.
4
CONTENTS
Saving images
8
9
10
Select the folder in which the image is to be saved.
• All files are saved in JPEG format.
• If the “Details ...” button is clicked before pressing “Save”
button, the screen shown below is displayed and the
compression rate can be changed.
• If still picture or slow playback is performed continuously for
a specific amount of time, the VIEWCAM automatically
switches back to playback to protect the video tape and
heads.
The power turns off after a specific amount of time if no
operation is performed while a tape is loaded when the
VIEWCAM is in the Tape Recording mode.
• The power does not turn off even after a specific amount of
time if no operation is performed during communications
between the VIEWCAM and SV Photo Capture in the Tape
Recording mode.
In the Tape Playback mode, the VIEWCAM goes into the
stop mode after still picture playback continues for a specific
amount of time.
Click the “Save” button.
Repeat steps 6 to 8 to capture other images.
To quit SV Photo Capture, click
.
With SV Photo Capture, the connection settings are set
automatically. These settings can also be set manually.
.
1) Click
2) Set the serial port and transfer speed.
3) Click “OK”.
Note
NEXT PAGE
VIEWCAM operation while SV Photo Capture
is running
Exitting
11
PREVIOUS PAGE
● Do not disconnect connection cables or turn off the power of the
VIEWCAM, computer or other connected equipment while image
data is being transferred with SV Photo Capture. Doing so could
result in loss of important data stored on the computer’s hard
disc.
5
SV Card Link
CONTENTS
PREVIOUS PAGE
NEXT PAGE
SV Card Link can be used to capture still pictures stored on a
VIEWCAM’s media card directly into your computer.
Note
This function can only be used if your VIEWCAM is equipped with
a media card.
Preparations
1
2
Check that a media card is mounted in the VIEWCAM.
Connect the VIEWCAM to the computer.
• For details on connections, refer to the operation manual
of your VIEWCAM.
Turn on the VIEWCAM’s power and set it to the VCR
mode.
Note
Do not turn off the VIEWCAM’s power while SV Card Link is running.
Note
Launching SV Card Link
3
Select the “Program” menu from “Start” on the task
bar, then click on “SV Card Link” in the “PixLab Lite”
folder, or double click the short-cut icon on the
desktop.
• SV Card Link is launched and data transfer with the
VIEWCAM starts. Once data transfer is completed, the
files on the media card are displayed as thumbnails.
SV Card Link cannot be launched while SV Photo Capture is
running.
Capturing and saving images
4
5
6
Click on the thumbnail of the file to be loaded to select
it.
• Click successively on two thumbnails while pressing the
“Shift” key on the keyboard to select the thumbnails that
lie in the area of the two thumbnails you have clicked
on.
• Multiple thumbnails can be selected by clicking on the
thumbnails while pressing the “Ctrl” key on the keyboard.
Click
.
CONTENTS
6
Select the folder in which the still images are to be
saved.
PREVIOUS PAGE
NEXT PAGE
Exitting
9
To quit SV Card Link, click
.
With SV Card Link, the connection settings are set automatically.
These settings can also be set manually.
1) Click
.
2) Set the serial port and transfer speed.
3) Click “OK”.
Note ● Do not disconnect connection cables or turn off the power of the
VIEWCAM, computer or other connected equipment while image
data is being transferred with SV Card Link. Doing so could result
in loss of important data stored on the computer’s hard disc.
7
8
Click the “OK” button.
• The still images on the media card are stored in the
selected folder on the computer.
Repeat steps 4 to 7 to capture other images.
7
Troubleshooting
CONTENTS
PREVIOUS PAGE
● Are the VIEWCAM and computer connected properly?
Check that the cable is securely connected and that the
power is on.
● Is the power saving function turned on?
For some computers, turning on the power saving (power
management) function may interfere with communications.
Refer to your computer’s operating instructions and turn the
power saving function off before starting up SV Photo
Capture or SV Card Link.
● When using SV Card Link, is a media card inserted? Is
the card insertion slot open?
Communications are not possible if the card insertion slot is
open.
● Is a battery monitor program running?
If a battery monitor or other such program is running
permanently, cancel it before starting up SV Photo Capture
or SV Card Link.
● Are the communications port settings correct?
Check that the communications port assigned to the serial
terminal (RS-232C) is active.
● Try lowering the transfer speed.
Click the connection settings button and set “Transfer speed”
to “9600” bps. If transfer is successful, gradually increase
the speed and find a speed at which communications are
stable.
If there are communications errors or
communications are unstable...
In the connection settings, change the “Serial port” COM
port setting to that port.
When using an infrared communications function or internal
fax/modem function, the communications ports may already
assigned to those functions, in which case they cannot be
used with SV Photo Capture or SV Card Link.
The way in which communications ports are freed differs
from computer to computer. Contact the manufacturer of your
computer.
If the image cannot be captured...
Check the followings if the image is not captured and an error
message appears. Depending on the VIEWCAM model, the
image capture will not occur if the VIEWCAM is:
● In the Camera Mode:
• While recording
• During edit search
• During digital quick zoom
• During zoom is in the digital zoom mode
• When the effects function has been activated
● Is another program that interrupts often running?
If an Internet browser, e-mail program or other such
applications are also running, quit them before starting up
SV Photo Capture or SV Card Link.
In addition, if the computer is connected to a LAN or a special
local network, strong interruptions may hamper
communications.
● In the VCR Mode:
• During stop, fast forward, or rewind
• During playback zoom
• During the audio dubbing mode
• When the effects function has been activated
8