1
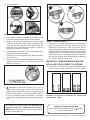
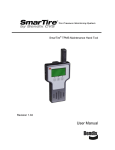
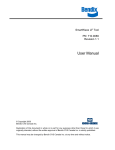
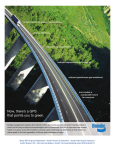
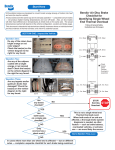
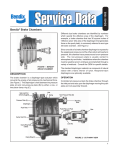
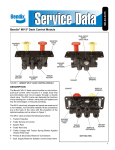
TRAILER TIRE SENSOR INSTALLATION
IMPORTANT NOTICE: PLEASE READ these instructions carefully and follow each step precisely
to ensure that you DO NOT DAMAGE A SENSOR and that the SENSORS ARE INSTALLED IN THE
CORRECT, PRE-PROGRAMMED LOCATIONS.
S m a r Ti r e s y s t e m t i r e
sensors can be broken
when mounting or
dismounting a tire unless
specific instructions are
followed. If tire work is done
by an unauthorized facility,
please let them know that
a tire pressure monitoring
system is installed on the
vehicle before they remove
a tire from a wheel.
Exercise caution and take precautions when cutting the
steel strap. Beware of potential sharp edges.
1. Remove the wheel from the vehicle and the tire from the rim.
2. Wrap — and CENTER — the
strap in the lowest point of
the drop center well of the
rim and mark it 1" (25 mm)
past the worm gear. Cut the
strap at the mark. Any excess
strap must be removed or it
will potentially break-off and
damage the tire.
Bands not installed straight
may become loose and fail.
GENERAL SAFETY GUIDELINES
WARNING! PLEASE READ AND FOLLOW THESE INSTRUCTIONS
TO AVOID PERSONAL INJURY OR DEATH:
When working on or around a vehicle, the following guidelines should be observed AT ALL TIMES:
▲ Park the vehicle on a level surface, apply the
parking brakes and always block the wheels.
Always wear personal protection equipment.
▲ Stop the engine and remove the ignition key
when working under or around the vehicle.
When working in the engine compartment,
the engine should be shut off and the ignition
key should be removed. Where circumstances
require that the engine be in operation, EXTREME
CAUTION should be used to prevent personal
injury resulting from contact with moving,
rotating, leaking, heated or electrically-charged
components.
▲ Do not attempt to install, remove, disassemble
or assemble a component until you have read,
and thoroughly understand, the recommended
procedures. Use only the proper tools and
observe all precautions pertaining to use of those
tools.
▲ If the work is being performed on the vehicle’s
air brake system, or any auxiliary pressurized air
systems, make certain to drain the air pressure
from all reservoirs before beginning ANY work
on the vehicle. If the vehicle is equipped with a
Bendix® AD-IS® air dryer system, a Bendix® DRM™
dryer reservoir module, or a Bendix® AD-9si™ air
dryer, be sure to drain the purge reservoir.
▲ F o l l o w i n g t h e v e h i c l e m a n u f a c t u r e r ’s
recommended procedures, deactivate the
electrical system in a manner that safely removes
all electrical power from the vehicle.
▲ Never exceed manufacturer’s recommended
pressures.
▲ Never connect or disconnect a hose or line
containing pressure; it may whip. Never remove
a component or plug unless you are certain all
system pressure has been depleted.
▲ Use only genuine Bendix ® brand replacement
parts, components and kits. Replacement
hardware, tubing, hose, fittings, etc. must be of
equivalent size, type and strength as original
equipment and be designed specifically for such
applications and systems.
▲ Components with stripped threads or damaged
parts should be replaced rather than repaired.
Do not attempt repairs requiring machining or
welding unless specifically stated and approved
by the vehicle and component manufacturer.
▲ Prior to returning the vehicle to service, make
certain all components and systems are restored
to their proper operating condition.
▲ For vehicles with Automatic Traction Control
(ATC), the ATC function must be disabled (ATC
indicator lamp should be ON) prior to performing
any vehicle maintenance where one or more
wheels on a drive axle are lifted off the ground
and moving.
▲ The power MUST be temporarily disconnected
from the radar sensor whenever any tests USING
A DYNAMOMETER are conducted on a Bendix®
Wingman® Advanced™-equipped vehicle.
▲ You should consult the vehicle manufacturer's operating and service manuals, and any related literature,
in conjunction with the Guidelines above.
1
3. Slide on the sensor.
1
2
1"
(25 mm)
3
FIGURE 1 - SENSOR INSTALLATION
4. The sensor must always be installed at the valve in order
to know its location after the tire has been mounted.
5. With the strap and sensor positioned in the lowest point
of the drop center well, feed the end of the strap into the
worm gear and pull it tight. Orient the sensor so that it is
positioned at the valve with the worm gear 4" (100 mm)
away from the edge of the sensor.
6. Hand-tighten the strap using a 5/16" (8 mm) hexagon driver
until the sensor cannot be moved.
CAUTION: Do not over tighten the strap. Reference torque:
35 in-lbs (4 Nm).
7. Indicate that a sensor has been installed by applying the
supplied rim label to the rim. Clean and dry the rim as
needed. See Figure 2.
FIGURE 3 - USING A TIRE IRON
9. See Figure 3. To avoid damaging the sensor, simply mount
the tire so that the last part of the bead to slip over the
flange will be at the sensor. Start at one end of the tire
and work towards the opposite end with the tire oriented so
that the beads are first pushed under the rim flange directly
opposite the sensor (1) and then worked over the flange
toward the sensor (2). Using this technique, the bead will
slip over the rim flange at the sensor without contacting it
(3). Repeat for the remaining bead.
IMPORTANT - SENSORS/WHEELS MUST BE
INSTALLED IN THE CORRECT LOCATIONS
10.Use Figure 4 to verify that the wheels are installed in the
correct location for each (numbered P1, P2, etc.) sensor.
FIGURE 2 - "REMOVE TIRE WITH CARE" STICKERS
8.
IMPORTANT: The sensor number (P1, P2, etc.) is
shown on the sensor body. In Step 10, the tires will be
installed on the vehicle with the sensors in a pre-allocated
position. Use a method — such as marking the number on
the rim, or moving the tires to a set location — for keeping
track of which tire has which sensor, before installing the
tires.
For complete installation instructions, download the
SmarTire Trailer-Link ™ TPMS Operator's Manual
(BW2920) from the Document Library, or the Literature
Center, at www.bendix.com.
2
1
2
4
3
21 34
21 78
43 56
FIGURE 4 - TRAILER DIAGRAMS SHOWING THE PRE‑SET
S E N S O R L O C AT I O N S E X P E C T E D B Y S M A R T I R E
TRAILER‑LINK™ TMPS
Log-on and Learn from the Best
On-line training that's available when you are
Visit www.brake-school.com.
24/7/365.
S-1619 © 2013 Bendix Commercial Vehicle Systems LLC, a member of the Knorr-Bremse Group. 12/13 All Rights Reserved.