1
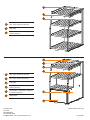
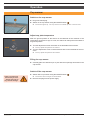
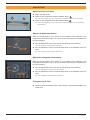
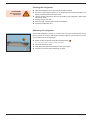
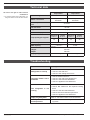
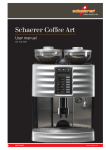
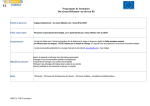
Schaerer Coffee Art / Coffee Art Plus
Schaerer Coffee Vito
Cup warmer / Cup & Cool
Operating instructions
V05 / 12.2011
1
2
3
1
ON- / OFF switch cup warmer
2
Cup plate
3
Temperature adjustment cup plate
(refer to page 7)
1
2
3
4
1
ON- / OFF switch cup warmer
2
ON- / OFF switch refrigerator
3
Cup plate
4
Temperature adjustment cup plate
(refer to page 8)
5
Temperature adjustment refrigerator (refer to page 8)
6
Refrigerator
5
6
Schaerer Ltd.
P.O. Box Allmendweg 8
CH-4528 Zuchwil
[email protected] / www.schaerer.com
BATW SCA & SCV_EN
N° 021661
Schaerer Coffee Art / Coffee Art Plus
Schaerer Coffee Vito
Cup warmer / Cup & Cool
Operating instructions
V05 / 12.2011
Published by:
Schaerer Ltd., P.O. Box, Alllmendweg 8, CH-4528 Zuchwil
Edition:
Version 05 / 12.2011
Concept and editorial department:
Schaerer Ltd., P.O. Box, Alllmendweg 8, CH-4528 Zuchwil
© Copyright:
Schaerer Ltd., P.O. Box, Alllmendweg 8, CH-4528 Zuchwil
All rights reserved, including translations into foreign languages. It is prohibited to copy, reproduce and distribute this document or any excerpts thereof in any manner – including electronic means – without first obtaining the publisher’s written
consent. All of the information, technical data, pictures and illustrations in this manual are based on the most current data
available at the time of printing. Schaerer Ltd. reserves the right to make changes at any time without issuing a separate
notification. All pictures, illustrations and display messages in this manual serve only as examples. Due to a variety of possible options, your machine may differ from the devices shown in this manual. In the event, for any reason, of disaccord, the
German (DE) document shall be authoritative for Schaerer Ltd..
Operating instructions / V05 / 12.2011
3 / 16
Table of contents
Safety notes.. . . . . . . . . . . . . . . . . . . . . . . . . . . . . . . . . . . . . . . . . . . . . . . . . . . . . . . . . . . . . . . . . . . . . . . . . . . . . . . . . . . . . . . . . . . . . . 5
User safety. . . . . . . . . . . . . . . . . . . . . . . . . . . . . . . . . . . . . . . . . . . . . . . . . . . . . . . . . . . . . . . . . . . . . . . . . . . . . . . . . . . . . . . . . . . . . . . . 5
Risk of damage to the machine. . . . . . . . . . . . . . . . . . . . . . . . . . . . . . . . . . . . . . . . . . . . . . . . . . . . . . . . . . . . . 6
Intended use. . . . . . . . . . . . . . . . . . . . . . . . . . . . . . . . . . . . . . . . . . . . . . . . . . . . . . . . . . . . . . . . . . . . . . . . . . . . . . . . . . . . . . . . . . . . . 7
Cup warmer. . . . . . . . . . . . . . . . . . . . . . . . . . . . . . . . . . . . . . . . . . . . . . . . . . . . . . . . . . . . . . . . . . . . . . . . . . . . . . . . . . . . . . . . . . . . . . . 7
Cup & Cool. . . . . . . . . . . . . . . . . . . . . . . . . . . . . . . . . . . . . . . . . . . . . . . . . . . . . . . . . . . . . . . . . . . . . . . . . . . . . . . . . . . . . . . . . . . . . . . . 7
Operation. . . . . . . . . . . . . . . . . . . . . . . . . . . . . . . . . . . . . . . . . . . . . . . . . . . . . . . . . . . . . . . . . . . . . . . . . . . . . . . . . . . . . . . . . . . . . . . . . . . . 8
Cup warmer. . . . . . . . . . . . . . . . . . . . . . . . . . . . . . . . . . . . . . . . . . . . . . . . . . . . . . . . . . . . . . . . . . . . . . . . . . . . . . . . . . . . . . . . . . . . . . . 8
Switch on the cup warmer. . . . . . . . . . . . . . . . . . . . . . . . . . . . . . . . . . . . . . . . . . . . . . . . . . . . . . . . . . . . . . . . . . 8
Adjust cup plate temperature. . . . . . . . . . . . . . . . . . . . . . . . . . . . . . . . . . . . . . . . . . . . . . . . . . . . . . . . . . . . . 8
Filling the cup warmer. . . . . . . . . . . . . . . . . . . . . . . . . . . . . . . . . . . . . . . . . . . . . . . . . . . . . . . . . . . . . . . . . . . . . . . . 8
Switch off the cup warmer. . . . . . . . . . . . . . . . . . . . . . . . . . . . . . . . . . . . . . . . . . . . . . . . . . . . . . . . . . . . . . . . . . 8
Cup & Cool. . . . . . . . . . . . . . . . . . . . . . . . . . . . . . . . . . . . . . . . . . . . . . . . . . . . . . . . . . . . . . . . . . . . . . . . . . . . . . . . . . . . . . . . . . . . . . . . 9
Switch on the Cup & Cool. . . . . . . . . . . . . . . . . . . . . . . . . . . . . . . . . . . . . . . . . . . . . . . . . . . . . . . . . . . . . . . . . . 9
Adjust cup plate temperature. . . . . . . . . . . . . . . . . . . . . . . . . . . . . . . . . . . . . . . . . . . . . . . . . . . . . . . . . . . . . 9
Adjust the refrigerator temperature. . . . . . . . . . . . . . . . . . . . . . . . . . . . . . . . . . . . . . . . . . . . . . . . . . . . 9
Filling the Cup & Cool. . . . . . . . . . . . . . . . . . . . . . . . . . . . . . . . . . . . . . . . . . . . . . . . . . . . . . . . . . . . . . . . . . . . . . . . 9
Fill the milk container.. . . . . . . . . . . . . . . . . . . . . . . . . . . . . . . . . . . . . . . . . . . . . . . . . . . . . . . . . . . . . . . . . . . . . . . 10
Switch off the Cup & Cool. . . . . . . . . . . . . . . . . . . . . . . . . . . . . . . . . . . . . . . . . . . . . . . . . . . . . . . . . . . . . . . . 10
Change appliance fuse. . . . . . . . . . . . . . . . . . . . . . . . . . . . . . . . . . . . . . . . . . . . . . . . . . . . . . . . . . . . . . . . . . . . . . . . . . 11
Cleaning.. . . . . . . . . . . . . . . . . . . . . . . . . . . . . . . . . . . . . . . . . . . . . . . . . . . . . . . . . . . . . . . . . . . . . . . . . . . . . . . . . . . . . . . . . . . . . . . . . . . . 12
Cup warmer. . . . . . . . . . . . . . . . . . . . . . . . . . . . . . . . . . . . . . . . . . . . . . . . . . . . . . . . . . . . . . . . . . . . . . . . . . . . . . . . . . . . . . . . . . . . . 12
Cleaning the cup plates. . . . . . . . . . . . . . . . . . . . . . . . . . . . . . . . . . . . . . . . . . . . . . . . . . . . . . . . . . . . . . . . . . . . 12
Cup & Cool. . . . . . . . . . . . . . . . . . . . . . . . . . . . . . . . . . . . . . . . . . . . . . . . . . . . . . . . . . . . . . . . . . . . . . . . . . . . . . . . . . . . . . . . . . . . . . 12
Cleaning the cup plates. . . . . . . . . . . . . . . . . . . . . . . . . . . . . . . . . . . . . . . . . . . . . . . . . . . . . . . . . . . . . . . . . . . . 12
Cleaning the milk container. . . . . . . . . . . . . . . . . . . . . . . . . . . . . . . . . . . . . . . . . . . . . . . . . . . . . . . . . . . . . . 12
Cleaning the refrigerator. . . . . . . . . . . . . . . . . . . . . . . . . . . . . . . . . . . . . . . . . . . . . . . . . . . . . . . . . . . . . . . . . . . 13
Defrosting the refrigerator.. . . . . . . . . . . . . . . . . . . . . . . . . . . . . . . . . . . . . . . . . . . . . . . . . . . . . . . . . . . . . . . . 13
Technical data. . . . . . . . . . . . . . . . . . . . . . . . . . . . . . . . . . . . . . . . . . . . . . . . . . . . . . . . . . . . . . . . . . . . . . . . . . . . . . . . . . . . . . . . 14
Troubleshooting.. . . . . . . . . . . . . . . . . . . . . . . . . . . . . . . . . . . . . . . . . . . . . . . . . . . . . . . . . . . . . . . . . . . . . . . . . . . . . . . . . . . 14
Declaration of conformity. . . . . . . . . . . . . . . . . . . . . . . . . . . . . . . . . . . . . . . . . . . . . . . . . . . . . . . . . . . . . . . 15
Manufacturer’s address.. . . . . . . . . . . . . . . . . . . . . . . . . . . . . . . . . . . . . . . . . . . . . . . . . . . . . . . . . . . . . . . . . . . . . . . . 15
Applied standards. . . . . . . . . . . . . . . . . . . . . . . . . . . . . . . . . . . . . . . . . . . . . . . . . . . . . . . . . . . . . . . . . . . . . . . . . . . . . . . . . . 15
Notes. . . . . . . . . . . . . . . . . . . . . . . . . . . . . . . . . . . . . . . . . . . . . . . . . . . . . . . . . . . . . . . . . . . . . . . . . . . . . . . . . . . . . . . . . . . . . . . . . . . . . . . . . . . 16
4 / 16
Operating instructions / V05 / 12.2011
Safety notes
Observe the safety instructions and the chapter liability in the user manual
Schaerer Coffee Art, Schaerer Coffee Art Plus & Schaerer Coffee Vito!
User safety
Danger!
Electrocution!
Attention!
Health hazard!
Attention!
Risk of burns!
Operating instructions / V05 / 12.2011
●● Only skilled electricians may carry out work on electrical systems!
●● The device must be connected to a secured circuit. (We recommend using an earth leakage circuit breaker in the connection).
●● All relevant guidelines on low voltage and/or country-specific or local
safety regulations and laws must be observed.
●● The connection must be grounded according to regulations and safeguarded against electrocution.
●● The voltage must correspond to the data on the device’s serial plate●●
●● Never insert the power plug into the socket while it is wet or touch it
with wet hands!
●● Never touch energized parts!
●● Before carrying out service work, always switch off the main switch
and/or disconnect the device from the power supply system.
●● The power cord may only be replaced by a qualified service technician.
●● Built-in safety devices must never be altered!
●● Children and persons under the influence of alcohol, drugs or medication or those with physical, sensory or mental impairments may not use
the device except under supervision..
●● The coffee machine must be installed by the operator so that there are
no impediments to care and maintenance. In both self service and full
service applications, trained personnel must supervise the machine in
order to ensure that the care instructions are observed and personnel
are available for questions regarding use.
●● Do not touch hot device components! The stainless steel shelves become hot! The cup warmer has to cool down before cleaning!
5 / 16
Risk of damage to the machine
Attention!
Risk of damage to
the machine
6 / 16
●● The device must be set on a flat, level and secure surface!
●● Do not expose the device to frost! This machine is not for outdoor use!
●● Do not spray the machine with water. The maximum relative humidity
should not exceed 80%; do not allow dewing.
●● For insurance reasons always ensure that, at the end of operation, the
mains power switch is switched off or the machine is unplugged!
●● Never spray the device with water or any other fluid (e.g. steam cleaner)!
●● Never immerse the device in water or in any other fluid!
●● Maintenance work and repairs must only be performed by Schaerer Ltd.
service personnel using original spare parts!
●● We recommend damage prevention measures: – e.g. installing smoke
detectors.
●● If the coffee machine and/or auxiliary devices are transported at temperatures below 10°C, the coffee machine and/or auxiliary devices must
remain for 3 hours at room temperature before being connected to a
power supply and switched on. If this recommendation is not observed,
there is a risk of short circuits or damage to the electrical components
as a result of condensation.
Operating instructions / V05 / 12.2011
Intended use
Cup warmer
Caution!
Risk of machine
damage!
●● The Schaerer cup warmer is used to pre-warm empty, dry cups.
This unit is designed for industrial and commercial use.
●● It can be used in businesses, offices, restaurants and cafes, hotels and
similar facilities. It can also be used in the home. The device should be
cleaned and cared for by trained personnel. It may be used in self-service
areas if attended to by trained personnel.
●● The Schaerer cup warmer is not permitted to be used for warming other
objects or food items.
●● Use of this equipment is subject to the “General Terms and Conditions”
of Schaerer AG and these operating instructions. In legal terms, any other
use is not an intended use. The manufacturer accepts no liability for damage resulting from unintended use.
Cup & Cool
Caution!
Risk of machine
damage!
Caution!
User at risk!
Operating instructions / V05 / 12.2011
●● The Schaerer cup&cool is used to pre-warm empty, dry cups. It is also
used to keep the milk cool.
●● This unit is designed for industrial and commercial use.
●● It can be used in businesses, offices, restaurants and cafes, hotels and
similar facilities. It can also be used in the home. The device should be
cleaned and cared for by trained personnel. It may be used in self-service
areas if attended to by trained personnel.
●● The Schaerer cup&cool is not permitted to be used for warming or cooling
other objects or food items.
●● Use of this equipment is subject to the “General Terms and Conditions”
of Schaerer AG and these operating instructions. In legal terms, any other
use is not an intended use. The manufacturer accepts no liability for damage resulting from unintended use.
●● It is not permitted to store explosive substances such as aerosol containers with combustible propellant gas in the Schaerer cup&cool..
7 / 16
Operation
Cup warmer
Switch on the cup warmer
1
►► Plug in the mains plug.
►► Switch on the cup warmer using the ON/OFF switch 1 .
;; The switch lights up. The cup warmer is heated up after ± 60 minutes.
Adjust cup plate temperature
Mark the ground position of the switch on the backside of the machine! If the
temperature should be to high or to low, the switch can always be turned back to
its ground position.
OFF
MAX.
FACTORY
SETTING
►► Turn the adjustment screw clock wise on the backside of the machine.
;; The cup plate temperature increases.
►► Turn the adjustment screw counterclockwise wise on the backside of the machine.
;; The cup plate temperature decreases.
Filling the cup warmer
►► Carefully place the desired cups or pots with their openings downward in the
cup warmer.
Switch off the cup warmer
If this is not observed,
the warranty is invalidated in the event of
any resultant damage.
8 / 16
►► Switch off the cup warmer using the ON/OFF switch 1 .
;; The switch will no longer be illuminated.
►► Remove the plug from the power supply.
Operating instructions / V05 / 12.2011
Cup & Cool
Switch on the Cup & Cool
1
2
►► Plug in the mains plug.
►► Switch on the cup warmer using the ON/OFF switch 1 .
;; The switch lights up. The cup warmer is heated up after ± 60 minutes.
►► Switch on the refrigerator using the ON/OFF switch 2 .
;; The switch lights up. After ± 60 minutes the refrigerator is on operating
temperature.
Adjust cup plate temperature
Mark the ground position of the switch on the backside of the machine! If the
temperature should be to high or to low, the switch can always be turned back to
its ground position.
OFF
MAX.
FACTORY
SETTING
►► Turn the adjustment screw clock wise on the backside of the machine.
;; The cup plate temperature increases.
►► Turn the adjustment screw counterclockwise wise on the backside of the machine.
;; The cup plate temperature decreases.
Adjust the refrigerator temperature
Mark the ground position of the switch on the backside of the machine! If the
temperature should be to high or to low, the switch can always be turned back to
its ground position.
OFF
MAX.
FACTORY
SETTING
►► Turn the adjustment screw clock wise on the backside of the machine.
;; The refrigerator temperature decreases.
►► Turn the adjustment screw counterclockwise wise on the backside of the machine.
;; The refrigerator temperature increases.
Filling the Cup & Cool
►► Carefully place the desired cups or pots with their openings downward in the
Cup & Cool.
Operating instructions / V05 / 12.2011
9 / 16
Fill the milk container
Never top up milk
and always clean the
container thoroughly
before refilling!
►►
►►
►►
►►
►►
►►
►►
►►
Open the refrigerator door.
Pull out the milk container.
Push the cover of the milk container back.
Pour precooled milk (3 – 5°C) into the milk container.
Place the cover back on the container.
Push the milk container back in carefully.
Insert the adapter on the milk hose into the connection on the milk cover.
Close the refrigerator door.
Switch off the Cup & Cool
If this is not observed,
the warranty is invalidated in the event of
any resultant damage.
10 / 16
►► Switch off the cup warmer using the ON/OFF switch 1 .
;; The switch will no longer be illuminated.
►► Switch off the refrigerator using the ON/OFF switch 2 .
;; The switch will no longer be illuminated.
►► Remove the plug from the power supply.
Operating instructions / V05 / 12.2011
Change appliance fuse
►► Switch off the cup warmer / Cup & Cool using the ON/OFF switch(es).
;; The switch(es) will no longer be illuminated.
►► Remove the plug from the power supply.
Cup warmer:
►► Carefully lay the cup warmer on the side 1 .
Attention!
Risk of damage to
the machine!
1
Cup & Cool:
►► Carefully tilt the Cup & Cool until the fuse tray is accessible.
►►
►►
►►
►►
►►
Remove the fuse tray 2 using a screw driver.
Remove and replace the fuses 3 (refer to technical data, page 13).
Place the fuse tray back in.
Carefully move the cup warmer / Cup & Cool back to its origin position.
Plug in the mains plug.
2
3
Operating instructions / V05 / 12.2011
11 / 16
Cleaning
Cup warmer
Cleaning the cup plates
Attention!
Do not use any
abrasives!
►► Switch off the cup warmer using the ON/OFF switch 1 .
;; The switch will no longer be illuminated.
►► Clean the cold device using a damp cloth. After wipe dry using a fine cloth or
chamois leather.
Attention!
The cup plates
become hot!
Cup & Cool
Cleaning the cup plates
Attention!
Do not use any
abrasives!
Attention!
The cup plates
become hot!
►► Switch off the cup warmer using the ON/OFF switch 1 .
;; The switch will no longer be illuminated.
►► Switch off the refrigerator using the ON/OFF switch 2 .
;; The switch will no longer be illuminated.
►► Clean the cold device using a damp cloth. After wipe dry using a fine cloth or
chamois leather.
Cleaning the milk container
The milk container
and milk hose must
be cleaned every
day!
Attention!
Do not kink the
milk hose!
12 / 16
►► Open the refrigerator door.
►► Unplug the milk hose with the milk nozzle and adapter from the milk container
cover.
►► Pull out the milk container and empty completely.
►► Stir 5 ml of the Daypure (order no. 071300) from the measuring bottle into a
bucket containing 500 ml of warm water.
►► Use the cleaner solution to wipe out the milk container.
►► Wipe again using clean water.
►► Rub dry using a soft cloth.
►► Re-plug the milk hose with the milk container and place the container back into
the refrigerator.
►► Close the refrigerator door.
Operating instructions / V05 / 12.2011
Cleaning the refrigerator
►► Open the refrigerator door and pull out the milk container.
►► Stir 5 ml of the Daypure (order no. 071300) from the measuring bottle into a
bucket containing 500 ml of warm water.
►► Use the cleaner solution to wipe out the inside of the refrigerator. Wipe again
using clean water.
►► Rub dry using a soft cloth.
►► Place the milk container back into the refrigerator.
►► Close the refrigerator door.
Attention!
Do not use any
abrasives!
Defrosting the refrigerator
1
Operating instructions / V05 / 12.2011
Defrost the refrigerator weekly, or as soon as the ice layer is thicker than 3 mm.
Never remove the ice layer with sharp or pointed objects. The surface of the cooling compartment can be damaged.
►► Switch off the refrigerator using the ON/OFF switch 1 .
;; The switch will no longer be illuminated.
►► Leave the front door open.
►► Wipe away the water from melting ice with a soft cloth.
►► Close the front door before switching on again.
13 / 16
Technical data
We reserve the right to make technical
modification!
* For special models see model label, values given above are for the basic model.
Cup warmer
Cup & Cool
210 W
220 W
1/N/PE | 50–60 Hz |
220-240V
1/N/PE | 50 Hz |
220-240V
Power rating *
Mains connection
On-site power connection
3x 1mm²
On-site fuses
10-16A
Appliance fuses
2 x 2A (surge-proof)
Number of cup plates
4
Cup capacity per cup plate
3
Ø 60mm
Coffee
Ø 90mm
Espresso
Ø 60mm
Ø 90mm
72
36
44
22
Espresso
Shelf temperature
max. 95°C
Coffee
max. 80°C
Milk capacity
4 Liter
Width:
Height:
Depth:
272 mm
524 mm
385 mm
Empty weight
± 18.5 kg.
± 27 kg.
Troubleshooting
Error
Remedy
Refrigerator is iced up
●● Check: Is the door always closed?
●● Check: Is the seal OK?
●● Check: Is the cooling set too low?
The mains switch is not illuminated
●●
●●
●●
●●
Check: Switch on device?
Check: Is the mains plug plugged in?
Check: Is the local fuse defective?
Check: Is appliance fuse defective?
Refer to "The mains switch is not illuminated"!
The refrigerator is not
cooling
14 / 16
●● Check: Not waited for the required cooling
time?
●● Check: Is the door seal defective?
●● Check: Has warm milk been poured in?
●● Check: Is appliance fuse defective?
Cup(s) not getting warm
Refer to “The mains switch is not illuminated”!
The cups are at a different temperature
●● The various containers require different heating times.
Operating instructions / V05 / 12.2011
Declaration of conformity
Manufacturer’s address
Manufacturer
Documentation responsible
Schaerer Ltd.
P.O. Box
Allmendweg 8
CH-4528 Zuchwil
T +41 (0)32 681 62 00
F +41 (0)32 681 64 04
[email protected]
www.schaerer.com
Schaerer Ltd.
Hans-Ulrich Hostettler
P.O. Box
Allmendweg 8
CH-4528 Zuchwil
Applied standards
The stated manufacturer declares herewith that this machine complies with all
relevant stipulations of the specified EU directives. In case of any modifications of
the units that have not been approved by Schaerer, this declaration is rendered
invalid. A quality management system certified by Bureau Veritas, in accordance
with SN EN ISO 9001: 2008, has been used to ensure the proper adherence to
the requirements.
For CE conformity
Machine directive 2006 / 42 / EG
EMC Directive 2004 / 108 / EG
●● EN 60335-1:2002 +A1 +A11 +A12
+A13 +A14 +A2
●● EN 60335-2-49:2003 +A1
●● EN 60335-2-89:2002 +A1 +A11
+A2
●● EN 62233:2008
●●
●●
●●
●●
EN 55014-2:1997 +A1 +A2
EN 55014-1:2006 +A1
EN 61000-3-2:2006 +A1 +A2
EN 61000-3-3:2008
●● EN 61000-6-2:2
●● EN 61000-6-4:2007 +A1
International (CB) :
Safety
EMC
●● IEC 60335-1 Ed4.2:2006
●● IEC 60335-2-24 Ed6:2002/2006
+A1 +A2
●● IEC 60335-2-49:2005 +A1
●● IEC 60335-2-89:2002 +A1
●● IEC 62233 Ed1:2005
●● CISPR 14-1 Ed 5.1: 2009
●● CISPR 14-2 Ed 1.2: 2008
●● IEC 61000-3-2:2005 +AMD1
+AMD2
●● IEC 61000-3-2:2000 +AMD1
+AMD2
●● IEC 61000-3-3:2008
●● IEC 61000-6-2:2005
●● IEC 61000-6-4:2006 +AMD1
China (CCC) :
Operating instructions / V05 / 12.2011
Safety
EMC
●● GB4706.1-2005
●● GB4706.13-2008
●● GB4343.1-2009
●● GB17625.1-2003
15 / 16
Notes
16 / 16
Operating instructions / V05 / 12.2011